- Step by step replacement instructions
- Switching off the light on the dashboard
- Disconnecting wires
- Removing one plinth
- What will you need
- How to disassemble a lamp with a socket?
- How to change a light bulb in a spotlight on a stretch ceiling
- G4, G9
- E14, E27
- Light bulb design
- Lamps with G5 and G13 base
- Light bulb design
- Applying Exploded Elements
- Applying Exploded Elements
- The principle of operation of an energy-saving lamp
- How to disassemble the LED lamp?
- Is it possible to check the functionality of the components?
- Work order
Step by step replacement instructions
In order to replace the cartridge, you will need the following:
- terminal blocks for connecting wiring;
- insulating tape;
- screwdriver;
- construction knife with several different blades;
- indicator mini-tester;
- new base to replace.
The replacement process is carried out in several stages. Below is a step-by-step instruction using the model for the e14 base as an example.
Switching off the light on the dashboard
This needs to be done first. Since a power outage is necessary, replacement should be done during the daytime. If the breakdown occurred in the evening or at night, you can try to turn off only the ceiling line. As a rule, the wiring has such a distinction. If the introductory machine is turned off, the room is completely de-energized.In this case, you will either need to reschedule the repair in the morning, or arrange a backlight with a flashlight. In the presence of an internal shield, shutdown is performed by pressing one button.
Important! Turning off the power must be carried out only on the panel, and not on the switch that controls the lamp
Disconnecting wires
According to the wiring requirements, the circuit breaker must be installed on the phase line, in front of the chandelier. Then it is necessary to check the voltage at the terminal block of the lamp with an indicator.
Removing one plinth
If a burned-out light bulb is carelessly unscrewed from the cartridge, its bulb can separate from the base and remain in the person’s hand. Before you disassemble the light bulb with the base remaining in the cartridge, you will need to do the following:
- After turning off the electricity, you need to put on gloves on your hands, and goggles on your face, which will ensure their protection from glass fragments (it is recommended to wear a hat when the light bulb is high);
- If the remains of broken glass are visible on the base, it will be necessary to lay a newspaper or a large sheet of thick paper on the floor under the lamp;
- Then you should grab the edge of the exposed base with platypuses and start rotating it counterclockwise;
Note! If it is difficult to rotate, it must first be loosened with sharp movements in both directions. You can also try to rotate it in the opposite direction (of course, if it lends itself). You can also try to rotate it in the opposite direction (of course, if it lends itself)
You can also try to rotate it in the opposite direction (of course, if it lends itself).
After you manage to turn the base at least one thread, its further turning out will not require too much effort.
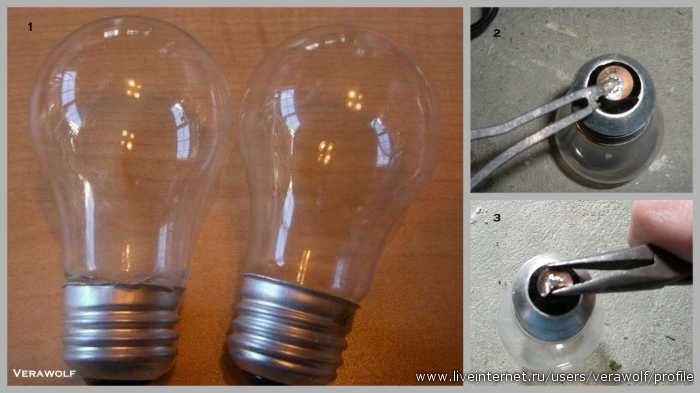
Another option is possible when it is not possible to grab the base of a broken lamp by the edges. In this case, it is necessary to insert the pliers inside the plinth glass and push their lips with force, resting against its walls from the inside. Then, turning the tool with force in a given direction, you should try to completely unscrew the base from the lamp socket (see photo below).
Removing the base of a broken lamp
If you have to remove a broken base of a pendant light or sconce, first remove the fixture from the wall and place it on a workbench or workbench so that there is a stop. If it is present, it will be much easier to remove a broken element.
For ease of disassembly, in all the situations described, it is recommended that the edges of the base be first slightly bent inwards using a flat screwdriver. After that, it will be much easier to grab the broken part by the edges.
What will you need
- incandescent lamp
- Long nose pliers
- Simple scissors or scissors for cutting metal
- long tongs
- Flat head screwdriver
- Gloves (rubber, plastic or garden cloth)
- Protective glasses
- Soap and/or baking soda
- Paper towels
- Newspaper or boxes
- Hydrochloric acid (optional)
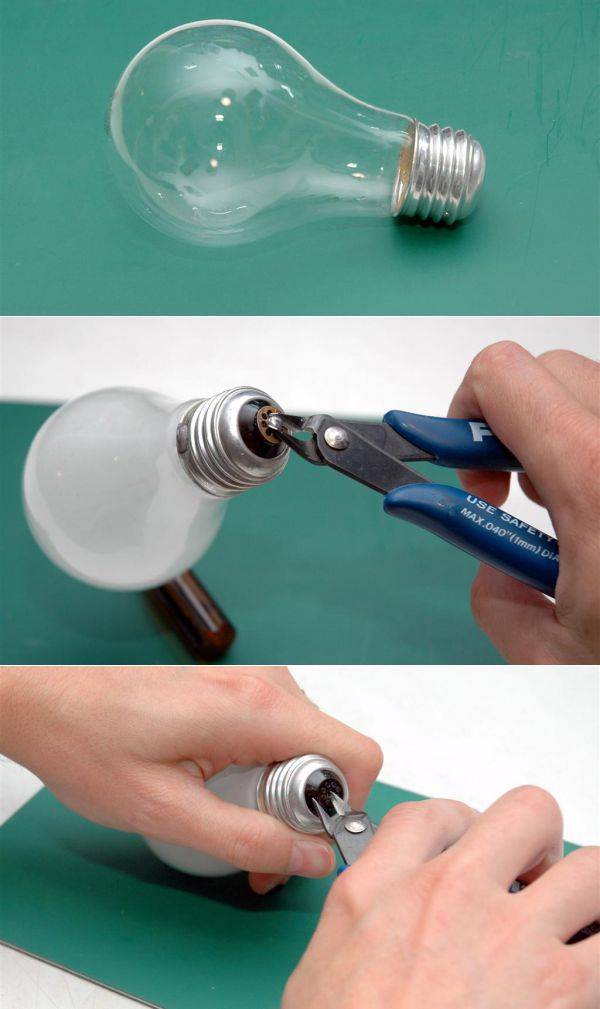
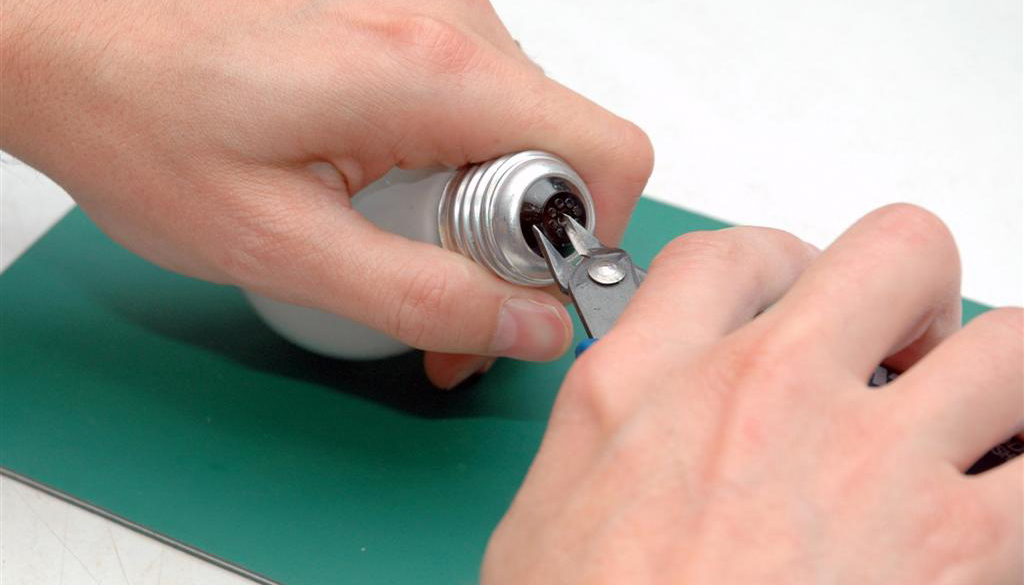
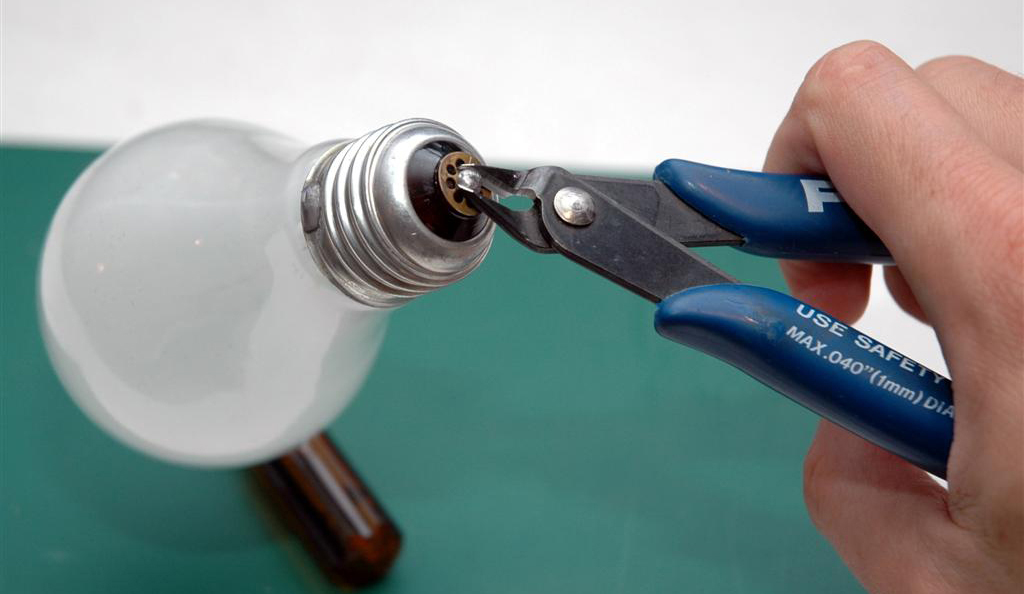
Grab the solder joint with pliers. Look at the bottom of the bulb and look for a small metal joint. Grab this joint firmly with needle-shaped nippers.
You will be breaking glass during this step and during other processes, so it's best to work on the box or lay down some sheets of paper. You should also wear gloves and goggles.
Twist and pry out the metal. Turn the joint with pliers until you feel the copper part break one or two wires leading to the filament inside. When the metal base is free, remove it.


- Grab the light bulb firmly with your other hand as you remove the metal bottom.
- You may need to wiggle the sides of the plinth back and forth slightly if twisting doesn't work.
- The sides of the metal part should be sufficiently embossed so that you can grab a good grip with pliers while lifting the plinth.
Break the glass insulator. Hold one side of the black glass insulator at the bottom of the bulb with pliers. Twist it to break the glass.
- The glass in this place is thick, so you will have to make an effort to break it. Make sure you hold the bulb firmly with your other hand.
- The insulator will break into many pieces during this step, so don't forget about safety.
- You may need to break the insulator at different angles around the perimeter if it doesn't break completely the first time.
Remove all fragments of the broken insulator. Using tweezers, clean the light bulb base from fragments of black glass insulator.
- These shards will be very sharp, so you should not pick them up with your bare hands.
- After removing the glass of the insulator, you will see the internal components of the light bulb from below.
Remove the inner filling tube. Insert a flathead screwdriver into the bottom of the bulb, next to one side of the outer fill tube. Press down on the side of the tube with a screwdriver to pull it out.
The lamp will be filled with argon or a similar inert safe gas.When you pull out the tube, you will hear a sound indicating the release of argon gas.
Pull out the tube. Insert a screwdriver between the tube and the lamp to release the tube completely, then pull it out with pliers or tongs.
- If you can successfully free the tube without breaking it, you can use it for something else.
- If you are unable to pull the tube out by prying it around with a screwdriver, you may need to apply more force and break the tube. Remove the fragments with tweezers when finished.
- You will have to put in a lot of effort, so make sure you have a firm grip on the bulb with your other hand.
An incandescent light bulb is an excellent material for crafts by home craftsmen. It can serve as an element of decor or a convenient vessel for various purposes. There are several ways to dismantle its insides. To understand how to disassemble a light bulb, you need to decide on its purpose in the "second life". Separating the bulb from the base and extracting the insides from the whole lamp are different procedures.
How to disassemble a lamp with a socket?
In the process of unscrewing the lamp from the socket, it may break or separate from the base. In this case, you will need to disassemble the cartridge, for which you need:
Wear protective gloves. If the light source is high, head protection is also useful. Turn off the electricity, check through the absence of voltage indicator. Sweep the floor, clearing it of splinters (you can pre-lay it). Unscrew the base using pointed pliers.Unscrew counterclockwise. If the bulb holder does not unscrew, then try to loosen it in different directions. Another way? push the pliers, focusing on the inner walls of the base and unscrew it.
The first way is the easiest and most reliable. In order to make it easier to grab the base with pliers, the edges can be slightly bent with a screwdriver.
How to change a light bulb in a spotlight on a stretch ceiling
Depending on the type of cartridge, light bulbs are removed in different ways. Let us consider in detail the replacement process for each type of base. Before starting work, it is better to de-energize the network on the shield, otherwise it is possible an electric shock.
It is not very convenient to remove light bulbs of this type from the spots, since the outer part is recessed into the luminaire body and is located above the plane of the stretch ceiling. In the plafonds, they are held with a special retaining ring or a wire clip with antennae at the ends. These luminaires are compatible with LED and halogen pin type elements.
To change a light bulb with a G5.3 base, you need to squeeze the two antennae and pull out the fixing bracket. If a retaining ring is used as a retaining part, it is simply unscrewed. The lamp falls out. Then it must be disconnected from the contacts by pulling it towards you. After that, a new lamp is connected, inserted into the lamp body and the fixing ring is installed in place.
Note! Insert halogen bulbs carefully, it is advisable to use a napkin or gloves for this. Touching the flask with your fingers shortens the life of the instrument
Sometimes the retaining ring does not sit back after replacing the light bulb
This happens for several reasons:
Sometimes the retaining ring does not sit back after replacing the light bulb. This happens for several reasons:
- the case is deformed - it will have to be replaced;
- the ceiling is fixed too high and the base rests on the concrete base - you need to purchase a lamp of exactly the same size, a difference of 1 mm can cause a problem;
- clamps of the wrong size - this happens if it was necessary to unscrew several light bulbs and the rings were mixed up.
In fixtures under the GX53 base, the lamps protrude from the ceiling by 3-4 mm. On their back side there are two pin-contacts that are inserted into the corresponding grooves on the body of the lighting fixture. Dismantling is carried out by turning the lamp counterclockwise until it clicks, then it is simply pulled out.
Replacement is very easy, no fixing parts need to be installed or wires need to be disconnected. It is enough to insert a new lamp and turn it clockwise.
G4, G9
The design feature of such lamps is that the body protrudes beyond the plane of the ceiling. With G4 and G9 base, LED and halogen pin-type models are available. To dismantle the lamp, just pull it down. Then just insert a new one into the groove. You do not need to rotate the lamp. In some models, you first need to disassemble the spotlight, namely, unscrew the decorative diffuser.
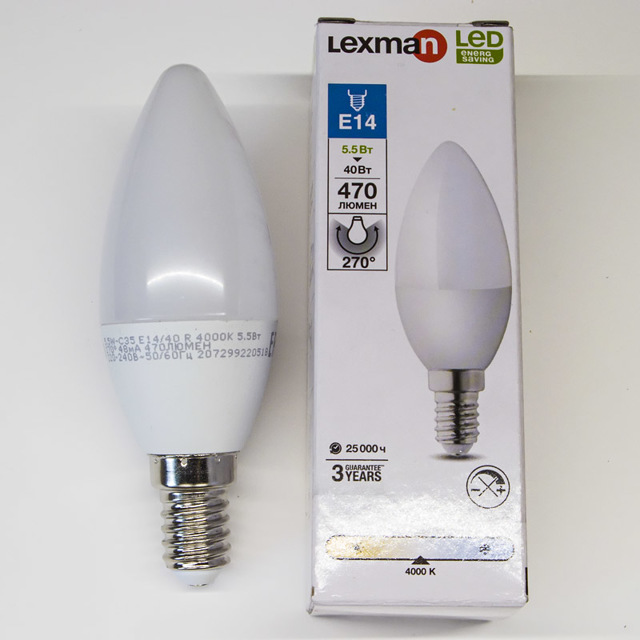
E14, E27
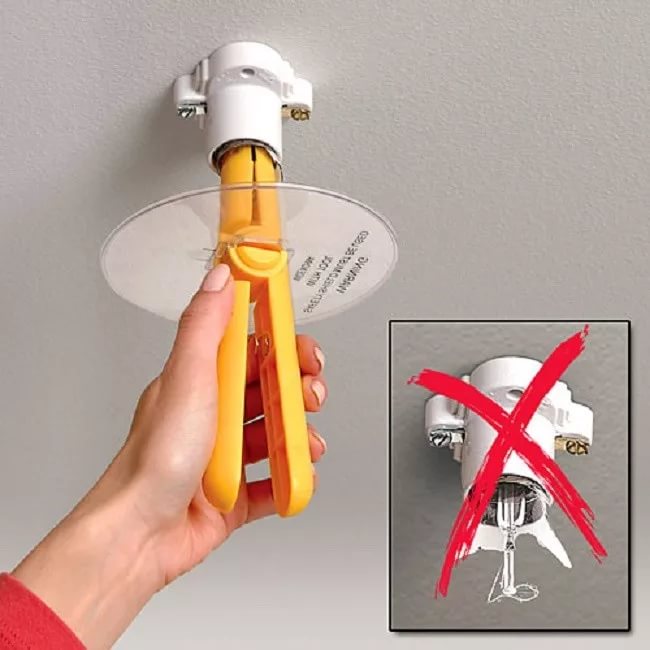
Such lamps are changed in the same way as in a conventional chandelier or sconce.
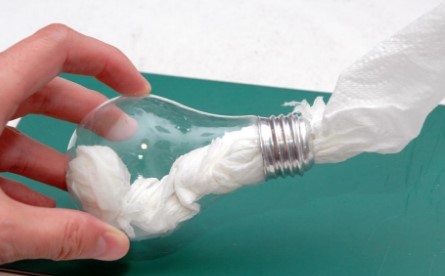
Holding on to the flask, carefully unscrew it counterclockwise. Then they screw in a new one until it stops, but without effort. Sometimes the light bulb is difficult to grab with your fingers, in this case you can use masking tape
Sometimes the light bulb is difficult to grab with your fingers, in this case you can use masking tape.
It is worth noting that fixtures under the E14 and E27 base are rarely installed in tension structures, since they take up a lot of space. In order not to lower the ceiling level, more compact models are used.


Light bulb design
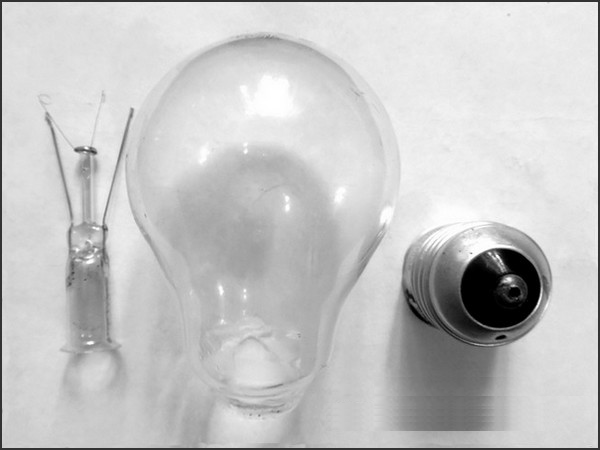
Before disassembling a light bulb for spare parts, you should familiarize yourself with its device, in the simplest case, represented by such three mandatory components as:
- Glow electrodes with a spiral placed between them;
- Protective flask (cylinder) made of glass;
- The base part, after the removal of which it is possible to “open” the flask, thereby providing access to the insides of the product.
To understand what incandescent bulbs consist of, the figure below will help, in which the parts listed above are arranged from left to right.

Incandescent light bulb composition
The spiral built into the inner space is attached to two electrodes, one of which is soldered to the sleeve, and the second to its centrally located patch contact. Between them is a glassy mass with good insulating properties.
In the manufacture of a new light bulb, its insides are filled with a special gas that protects the electrodes and the working coil itself from oxidation and rapid burnout.
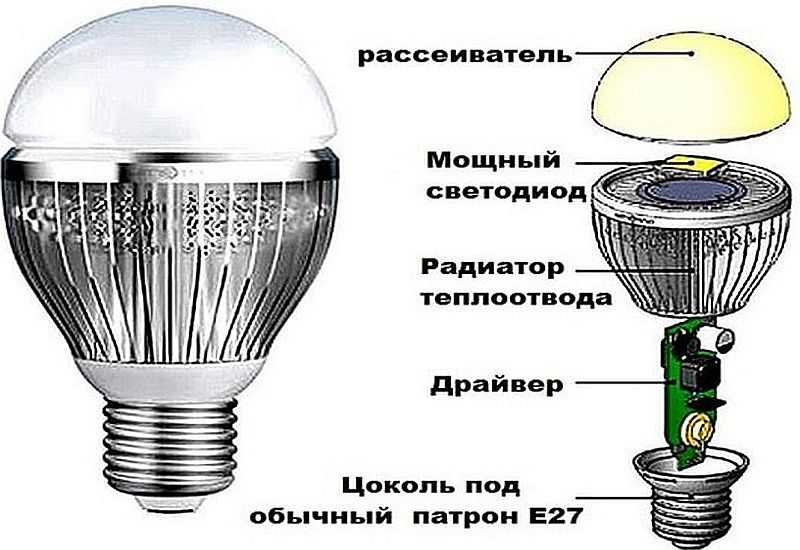
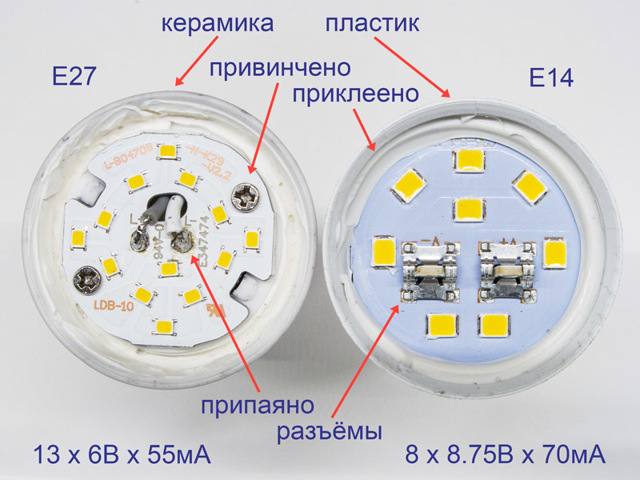
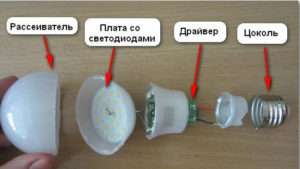
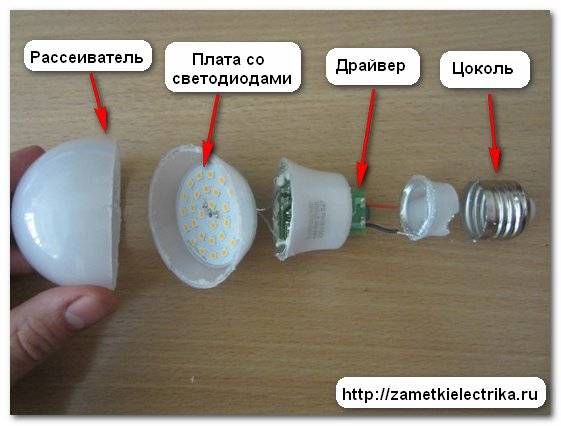
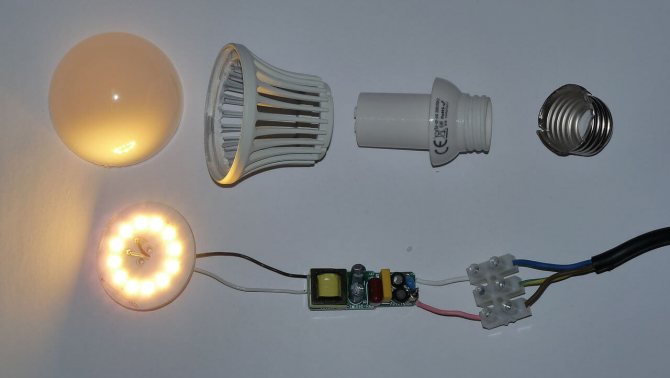
Additional Information. Energy-saving and LED lamps have a more complex design, therefore, when disassembling, not only lighting elements are removed from them, but also electronic boards (see photo below).
LED lamp device
After getting acquainted with what the LED lamp consists of, it will be much easier to disassemble it.
Lamps with G5 and G13 base
The most popular light bulbs in ceiling fixtures are equipped with G5 and G13 sockets.These bases are especially often used for kitchen and bathroom lamps, local lighting (for example, mirrors).
Replacement instructions:
We purchase a lamp of the right size and power. If you have any difficulties with determining the characteristics of the lamp, we take it with us to the store. This will help the seller to choose the right light bulb.
We turn off the electrical appliance. To ensure safety, it is recommended to completely de-energize the room by turning off the electricity in the shield.
We dismantle the ceiling (lighting grille). The plafond on the ceiling is attached to the luminaire body with latches or screws. Sometimes the ceiling rests on the lamp itself. To dismantle the cover, just pull on any of its edges.
Unscrew the light bulb. We cover the lamp with both hands (closer to the edges of the bulb) and turn it 90 degrees along the axis
We pull out the light bulb carefully, but with a little effort, so that the contact pins come out of the cartridge guides.
We mount the lamp in the lamp. We put it into the cartridge until it stops, and then turn it around the axis by 90 degrees. The direction of screwing does not matter.
We check the operation of the lamp. If everything is done correctly, we return the ceiling to its place. If the light does not appear, turn off the lights and gently move the light bulb (turn it slightly)
If these attempts are unsuccessful, we pay attention to the throttle or starter - most likely the problem is in them. Replacing the throttle and starter is a rather complicated operation, and it is better to entrust it to a specialist.
In this case, it is recommended to install a new lamp, since the cost of repair work will cover the cost of buying a new lighting device.
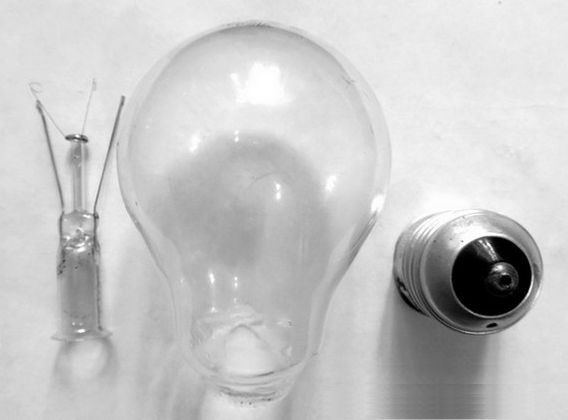
Light bulb design
Before disassembling a light bulb for spare parts, you should familiarize yourself with its device, in the simplest case, represented by such three mandatory components as:
- Glow electrodes with a spiral placed between them;
- Protective flask (cylinder) made of glass;
- The base part, after the removal of which it is possible to “open” the flask, thereby providing access to the insides of the product.
To understand what incandescent bulbs consist of, the figure below will help, in which the parts listed above are arranged from left to right.
The spiral built into the inner space is attached to two electrodes, one of which is soldered to the sleeve, and the second to its centrally located patch contact. Between them is a glassy mass with good insulating properties.
In the manufacture of a new light bulb, its insides are filled with a special gas that protects the electrodes and the working coil itself from oxidation and rapid burnout.
Additional Information.
Energy-saving and LED lamps have a more complex design, therefore, when disassembling, not only lighting elements are removed from them, but also electronic boards (see photo below).


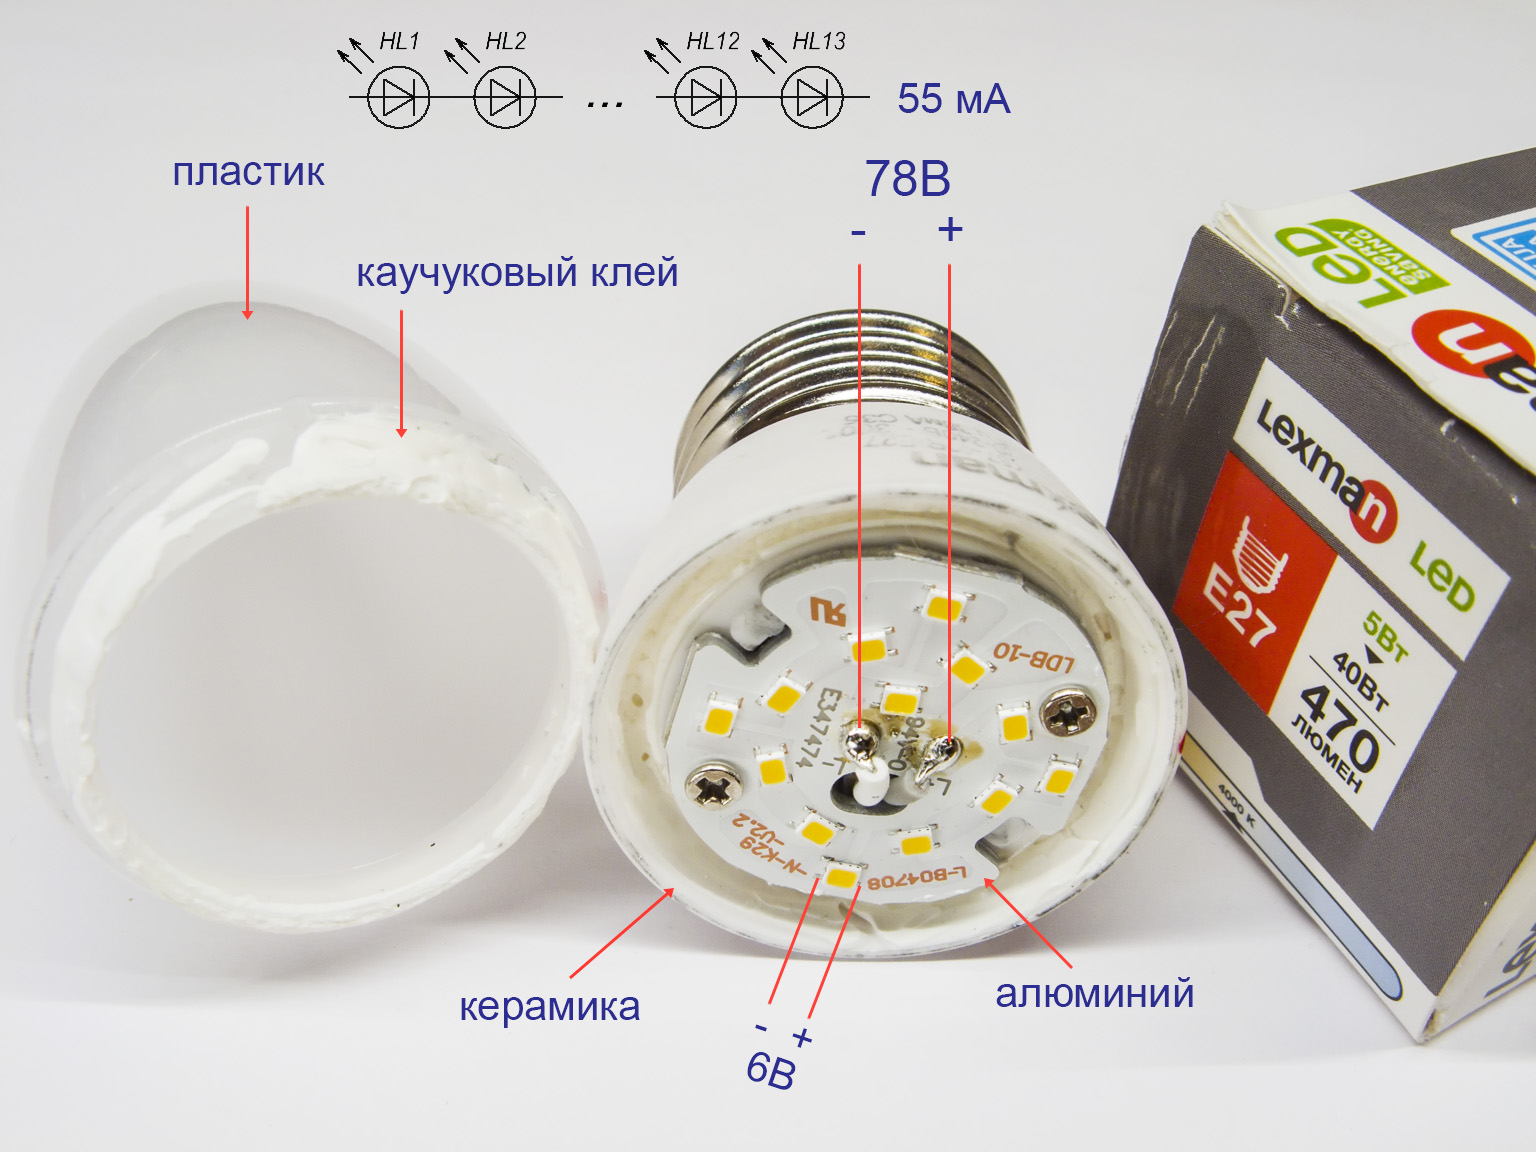


After getting acquainted with what the LED lamp consists of, it will be much easier to disassemble it.
Applying Exploded Elements
All about incandescent lamps
Disassemble such products most often for purely applied or decorative purposes, suggesting to have an original container based on heat-resistant glass.An empty glass flask can be used in the following cases:
- In order to fill it with water and contain flower stems in it, for example;
- Some craftsmen pour fuel into the flask and, dropping a homemade wick into it, use the structure as a lamp;
- To place an attractive craft (sailboat, for example) inside the glass shell;
- If you pour earth on its bottom, then it will be possible to plant a very small plant in it.
And finally, the lamp bulb can be used as an aquarium or as a container for long-term storage of spices.
The metal base of the light bulb should simply be carefully broken off, after first scratching the place of its junction with the bulb with a glass cutter. In addition, you can lower it into a very strong chemical solution, and after dissolving the metal component, separate one glass part from the mixture. As a result of this operation, it will be possible to obtain a high-quality heat-resistant insulator.
If a complete disassembly of the lamp is required, then it is most convenient to simply bend the base at the junction with the glass, after which the adhesive composition should be crumbled and the bulb released. Most often, this can be done without much difficulty, since the joint loses its strength in this place for a long-running or old lamp.
Applying Exploded Elements
Disassemble such products most often for purely applied or decorative purposes, suggesting to have an original container based on heat-resistant glass. An empty glass flask can be used in the following cases:
- In order to fill it with water and contain flower stems in it, for example;
- Some craftsmen pour fuel into the flask and, dropping a homemade wick into it, use the structure as a lamp;
- To place an attractive craft (sailboat, for example) inside the glass shell;
- If you pour earth on its bottom, then it will be possible to plant a very small plant in it.
And finally, the lamp bulb can be used as an aquarium or as a container for long-term storage of spices.
The metal base of the light bulb should simply be carefully broken off, after first scratching the place of its junction with the bulb with a glass cutter. In addition, you can lower it into a very strong chemical solution, and after dissolving the metal component, separate one glass part from the mixture. As a result of this operation, it will be possible to obtain a high-quality heat-resistant insulator.
If a complete disassembly of the lamp is required, then it is most convenient to simply bend the base at the junction with the glass, after which the adhesive composition should be crumbled and the bulb released. Most often, this can be done without much difficulty, since the joint loses its strength in this place for a long-running or old lamp.
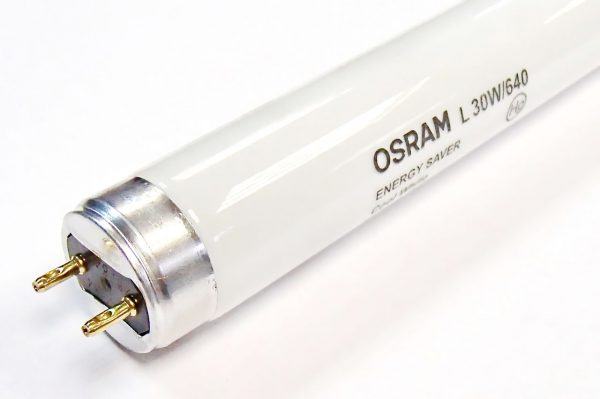
The principle of operation of an energy-saving lamp
The design and principle of operation of a CFL is no different from a conventional fluorescent one, except that a semiconductor control circuit is used to start and maintain its mode.
The CFL flask is folded in space several times to reduce the dimensions of the product. At its edges, filament electrodes are made of glass, two on each side. At start-up, the control circuit passes a current through the filaments, which heats the filaments. Charge carriers - electrons - are released from them, preparing the ground for the occurrence of a discharge.
At the second stage, the control circuit breaks the filament circuits and generates a high voltage pulse at the ends of the lamp.The gas in the lamp is ionized, a discharge occurs in it, emitting radiation in the ultraviolet spectrum. Getting on the walls of the tube covered with phosphor, ultraviolet causes the phosphor to glow in the visible radiation spectrum.
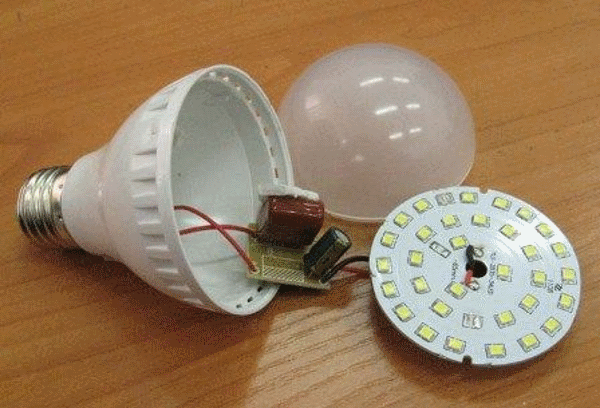
How to disassemble the LED lamp?
A diode light bulb is usually disassembled for repair, which is quite simple. The diode lamp consists of:
- corps;
- plinth;
- light diffuser;
- drivers;
- block of LEDs.
If the lamp cannot be repaired, but the diodes themselves are working, they can be used to create a new LED light bulb. In the form of a housing, you can use an ordinary incandescent lamp. This allows you to save a lot, because a new ice light bulb is expensive.
Aquaforum - a forum for aquarists and terrariumists > Aquarium and equipment > "Samodelkin" > Technologies > How to unscrew the base of a burnt out light bulb
View Full Version : How to unscrew the base of a burnt out light bulb from the socket
12.09.2010, 23:35
It happens that when replacing a burned-out light bulb, the base from the old one remains in the cartridge, and the light bulb itself comes off. In principle, you can turn off the electricity in the house and unscrew the base with pliers. And you can do it differently.
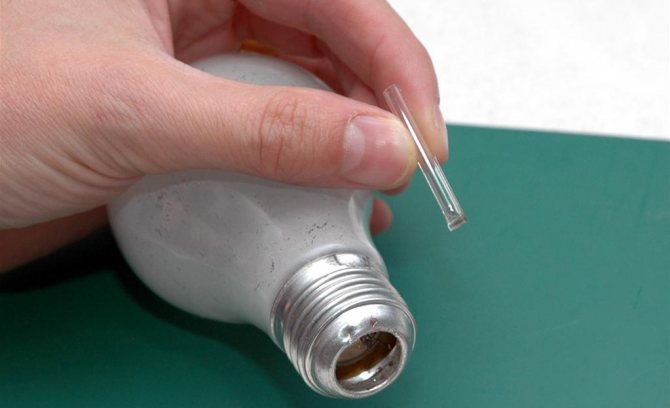
We take a plastic bottle, unscrew the cork and melt the edges of the neck with a lighter so that the neck becomes soft. Of course, you don't have to try it by hand. Just see with your eyes.
We insert the melted neck of the plastic bottle into the base of the light bulb, hold it for 10-15 seconds and calmly unscrew it without turning off the electricity.
12.09.2010, 23:40


cool. 5+
KARENINA
12.09.2010, 23:45
Super. Now I’ll try it, since the lamp has been lying for a long time, just with such a case)
Hooray!!! It turned out) Thanks for the idea) And then I thought that the lamp of the khan)
Yes, an interesting concept….. It should be noted….
13.09.2010, 01:25
however) I once uncovered with tweezers)
It happens that the base is filled from the inside with something like cement or ceramics. Then you can't really add anything, alas.
Repeatedly twisted over the edge of the base with small pliers.
KARENINA
13.09.2010, 10:15
Repeatedly twisted over the edge of the base with small pliers.
I tried that too. But the base sat dead in the ceiling code27
I tried that too. But the base sat dead in the ceiling code27
Well then one of two. Or, if the base is empty, we bend the edge on one side, and it is a little easier to unscrew the base for the resulting petal. Or, if it is filled with cement, we gouge / drill a sufficiently deep recess in this cement, and we twist for it. You can make something like a slot for a screwdriver.
13.09.2010, 10:21
As a rule, collapsible cartridges, i.e. the part into which the base is screwed is unscrewed from the cartridge itself. Unscrewed, and there anything.
The Chinese, alas, do not always guess about this “as a rule”. I met a cartridge in which the base contact was made not only from thin tin, but rather from thick foil, and riveted to the back of the cartridge. The device turned out to be disposable: it withstood literally a couple of cycles of screwing in and out of the lamp.
13.09.2010, 18:25
I hope, not to the detriment of the method proposed by the author, I will add one more. We take a piece of dry coarse laundry soap. With a knife we make a bar out of it to insert it into the cartridge. We insert it into the cartridge, turn and unscrew the remains of the base. I hope everything is clear, but the voltage is yellow. turn it off before operation
a piece of dry coarse laundry soap somehow did not understand, on what principle is this? I just can't figure it out, it shouldn't work.
I didn’t even know what problems the replacement of a burned-out light bulb with a fallen bulb is associated with: 024:: 024: Thank you for having fun. :024:
13.09.2010, 18:42


Opsis! works great. HOZ-VE. The bar, entering the cartridge, clings to the notches of the glass and, when turning, transmits the rotation of the rest of the base. Maybe you decided that the bulb of the lamp is intact? Then everyone knows how. Another way is to insert the pliers into the base and, opening their spouts, also unscrew the base.
Ah, well, I understand that. Although usually the strength of soap is not enough. Usually the bulb falls off when you try to unscrew the rusted-melted-burnt lamp.
Is it possible to check the functionality of the components?
If you are going to connect the lamp, then you must be sure that it is working. To do this, you need to get a tester and measure the resistance of the filaments on the cathodes. Resistance should be no more than 10 ohms.
Is your tester showing infinite resistance? Take your time to get rid of the light bulb, because it can be used a little more, thanks to the cold start mode.
Normally, the contacts on the starter are open when at rest, and the capacitor plates do not conduct DC. This means that when measuring resistance, the device must output up to a hundred MΩ.When you touch the tester probes to the inductor leads, the resistance values should gradually decrease to a constant within a few tens of ohms.
Also, a malfunction of the throttle is indicated by the instantaneous burnout of a newly installed lamp. Unfortunately, here with the help of a multimeter, well, you can’t do it.
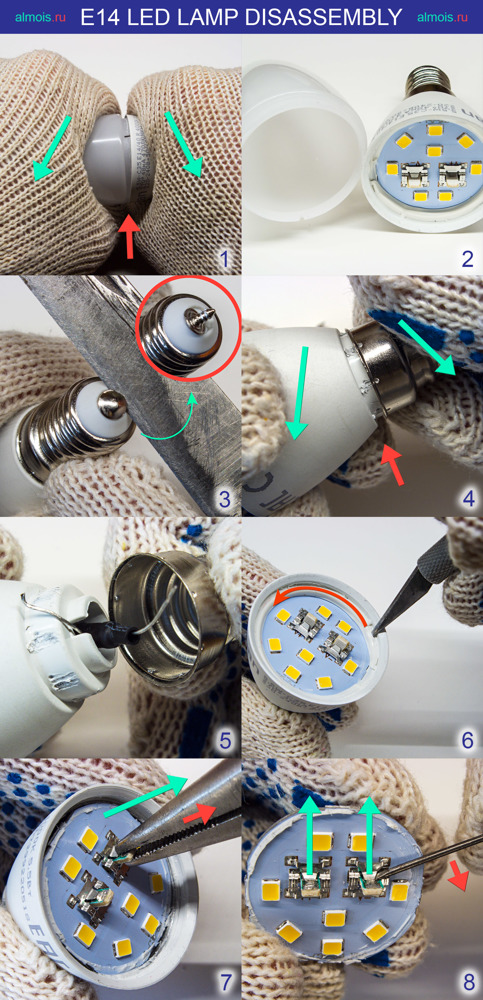
Work order
Remember that the LED lamp is an electronic device that is sensitive to shocks and falls.
Disassemble it carefully, take your time and strictly follow this sequence:
- Insert the tip of a knife or metal plate into the gap between the diffuser bulb and the lamp body. Pry up the flask, move a few millimeters around the circumference and repeat the action. This will remove the adhesive layer and loosen the clips holding the diffuser.
- Holding the lamp by the body (not by the base), gently tilt the bulb from side to side, allowing it to release from the latches. Then remove by pulling up.
- Remove the screws that secure the LED board to the heatsink. Cut or unsolder the wires from the board, marking their attachment points. Pry the board with a knife to peel off the thermal paste, then remove it.
- Remove the LED cooler. If it is secured with screws, unscrew them first. The power board is usually located under the heatsink.
- Cut or unsolder the wires at the base of the power board that attach it to the base, mark the contact points. Take out the board.
- If necessary, remove the plinth from the base of the body using the same procedure as for the flask.
Now the lamp is completely disassembled. The assembly is carried out in the reverse order, soldering the dismantled wires and updating the layers of thermal paste.Mounting the LED board on old thermal paste significantly reduces the life of the lamps.
We hope our article was interesting and informative. If you have not yet changed your mind about disassembling the LED lamp - get down to business!


