- How to cook pasta on the stove?
- Workplace preparation
- What is electric welding, and why is it needed at home?
- 1) Manual arc welding
- 2) Semi-automatic in gas environment
- 3) Automatic submerged arc welding
- About the techniques for forming a seam
- Overlap seam
- Ceiling seam
- Tee seam (with one-sided cutting)
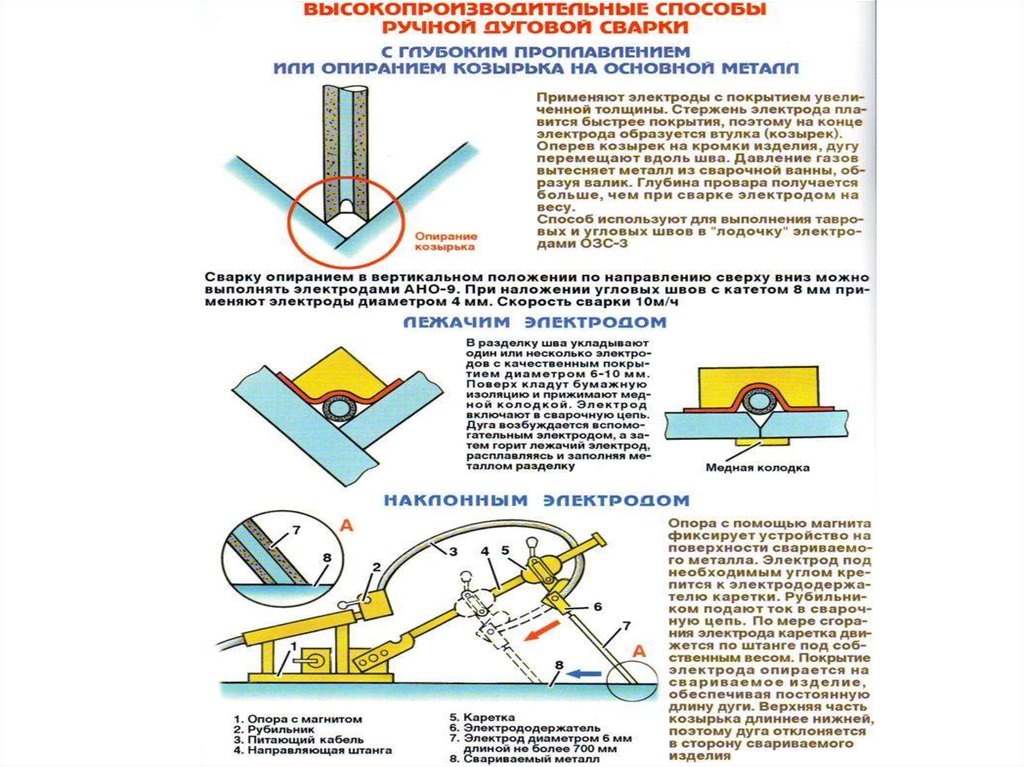
- Welding seam with electrode support
- What is electric welding?
- The design of the inverter for welding
- How to choose the right pasta?
- Influence of electrode feed rate
- Connecting pipes using electric welding
- Metal electrofusion fittings
- Electric Fitting Polyethylene
- Coupling and electropollination
- How to prepare electric pipe welding
- Technical equipment of a home welder
- Electric Welding Technology
How to cook pasta on the stove?
The Italians say that preparing this product is easy, but doing it right is much more difficult. Connoisseurs of well-cooked pasta love it to be cooked “al dente”, which translates from Italian as “to the teeth”.
Consider how to cook delicious pasta on the stove using the example of small products - shells, spirals, horns, bows.
This will require the following ingredients:
- Water - 1 l;
- The main component is 100 g;
- Salt - 10-11 g.
It is very important to take into account the proportions, otherwise the main component will lack space, and therefore it will become too sticky, and the cooking time will increase.Another point to consider when it comes to how to cook pasta properly is the choice of pot.
It is desirable that it has thick and high walls. This will prevent the water from reaching the edges.
How to cook pasta on the stove?
The cooking process goes like this:
- Put a container of water on the stove, making the fire maximum, salt the water poured into it when the latter boils;
- Put the main ingredient in it;
- After some time, the liquid will begin to boil again, after which you need to reduce the gas. Before this happens, stir the product constantly so that it does not stick together due to the starch released from it. If this is not done, the pasta, which this article tells how to cook, will turn into a lump. In addition, they will stick to the bottom and walls of the pan;
- If you are interested in how to cook bow pasta, for example, or another type of medium-sized product (spirals, horns, shells), then you need to know how long it will take. The duration of cooking is about 5 minutes. If you cook small products - for example, thin, small noodles, the cooking time after the water has boiled is 3-4 minutes;
- You can check them for readiness by squeezing them, and if they become elastic, you can turn off the stove;
- Immediately place the dish in a colander to allow the liquid to drain completely;
- Turn on the cold water at full power to rinse the food, making it even more crumbly.
When pasta of the bow type (or medium-sized small-shaped products) is ready, they can be served as a side dish with any additives - meat, fish, vegetables, etc.Some housewives also prefer to fry them before serving using butter to enhance the taste. You can add a piece of this ingredient to a hot dish without frying, but do not stir, but shake the closed pan so that it is evenly distributed over the dish.
Separate skill deserves the process of how to cook nest pasta so that they do not fall apart. For this you will need the following ingredients:
- The main component - 6-8 pieces;
- Water - 2 l;
- Olive oil - 1-2 tsp.
The product is prepared as follows:
- Boil the right amount of water in a saucepan;
- In a separate container (you can use a pan with a wide bottom), lay the main ingredient so that the nest-shaped pasta is freely located in it;
- Fill them with boiling water, salt;
- Bring the dish to a boil, cook for 4-5 minutes;
- Using a slotted spoon, remove it by transferring it to a plate;
- If desired, you can add spices to the finished dish to taste;
- It is served as a regular side dish - with the addition of meat, fish, vegetables, cheese, sausages, etc.
The procedure for how to cook nest pasta implies that they must retain their shape. Firstly, this is facilitated by the fact that initially they are poured with boiling water, which allows you to fix the shape. Secondly, the main component is removed by means of a skimmer, thanks to which they can be transferred to a plate in the form in which they are cooked.
Watch this video on YouTube
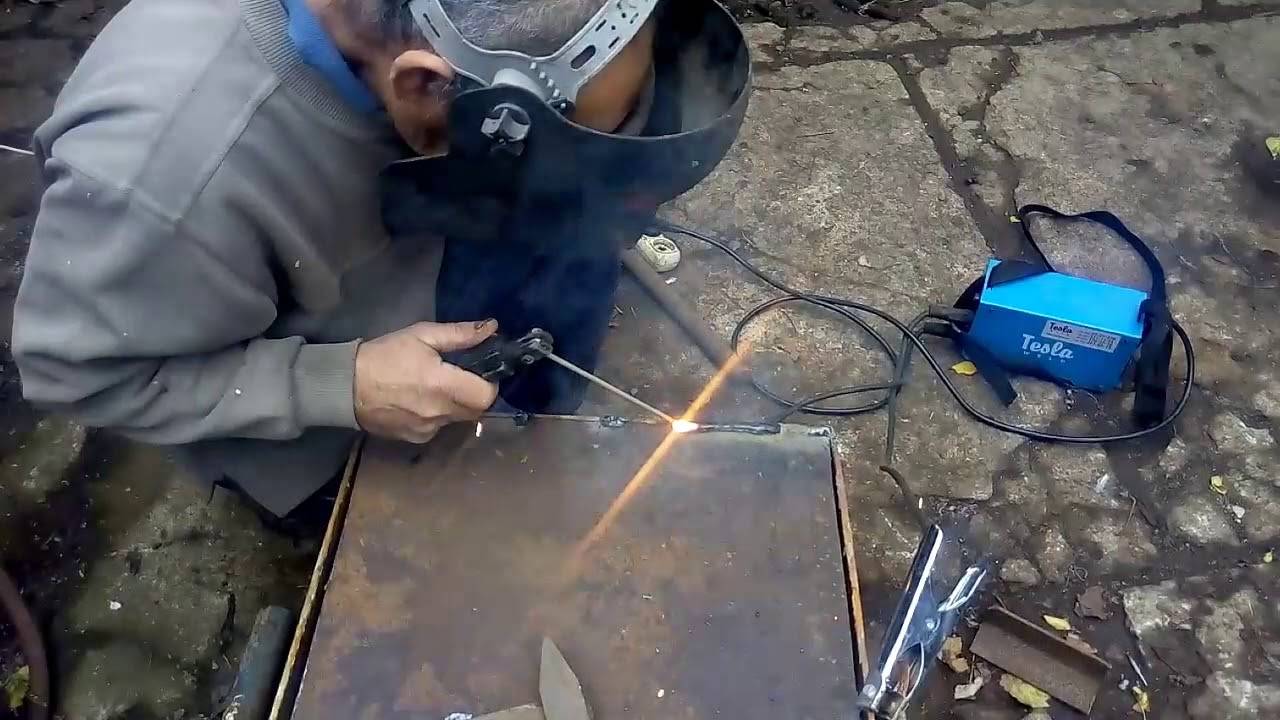
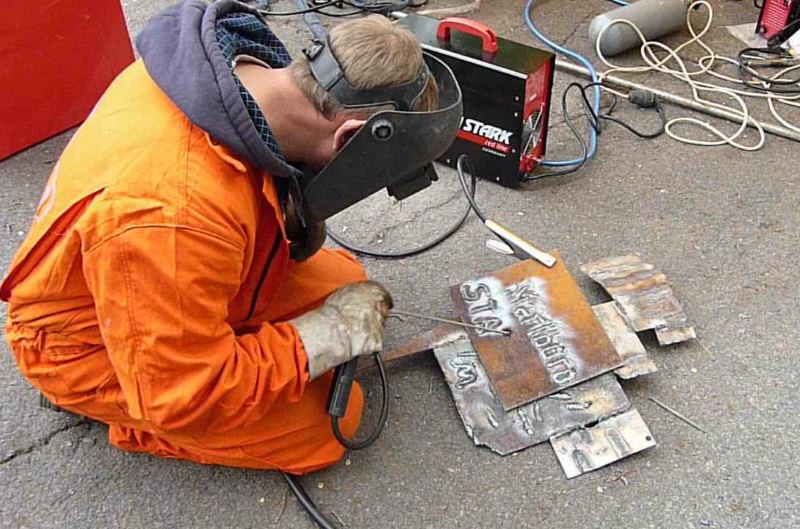
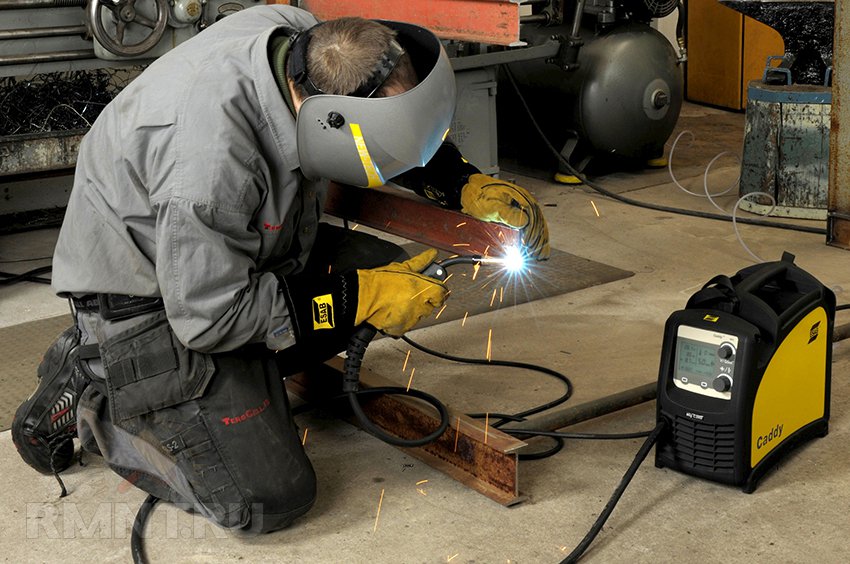
Workplace preparation
How learn how to cook with electricity in a short time? You won’t be able to do this in one day, but by applying the tips from a variety of videos and preparing everything you need at the workplace, you can quickly start practicing.
To learn how to cook with a welding inverter, you need a plate to ignite the electrode. It is not always possible to attach the mass to the product, so a small metal table or base is required
The welder should have a hammer on hand to correct the fixing of metal parts, a slag separator, and a means to extinguish the fire (sand or a fire extinguisher).
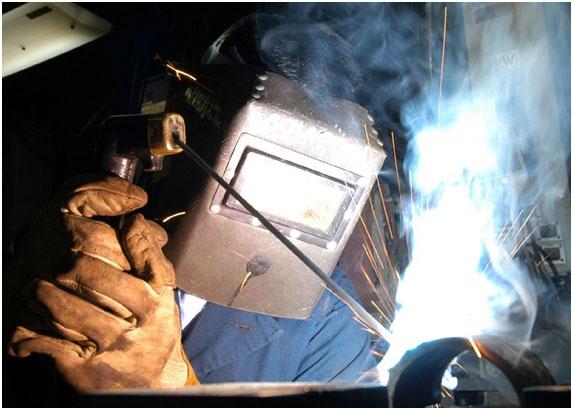
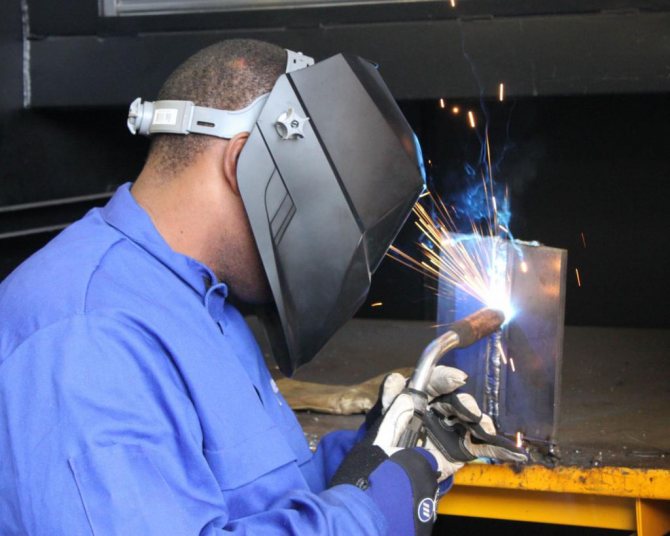
Welding metal with an inverter is important, being well protected from harmful influences. Regardless of the place of work (home or production conditions), each welder must have:
- a protective mask with a light filter corresponding to the lighting at the workplace (in filter No. 5 it will be hard to see indoors, in No. 3 it will be very blinding to the eyes on the street);
- canvas mittens to protect against heat and splashes;
- thick, non-flammable clothing not tucked into the belt;
- boots;
- headgear to protect against flying slag drops.
What is electric welding, and why is it needed at home?
To understand the term, you will need to touch the school physics course and understand the accompanying processes when welding parts. The knowledge gained will help the welder to make better seams, because understanding the basics of electric welding makes it possible to work consciously, and not relying on the patterned actions of other specialists.
Electric welding (arc welding) - obtaining joints of an inextricable type due to the crystallization of filler and base materials.
During the seam formation process, a temporary melting of the base and the electrode occurs, due to which a weld pool is formed.After the surface has cooled, the materials are connected at the molecular level (melted), crystallizing into a seam, which is not inferior in strength to other areas of the main surface.
| Advantages of electric welding | Disadvantages of electric welding |
|---|---|
| Structural simplicity. | Harm of electromagnetic radiation and light. |
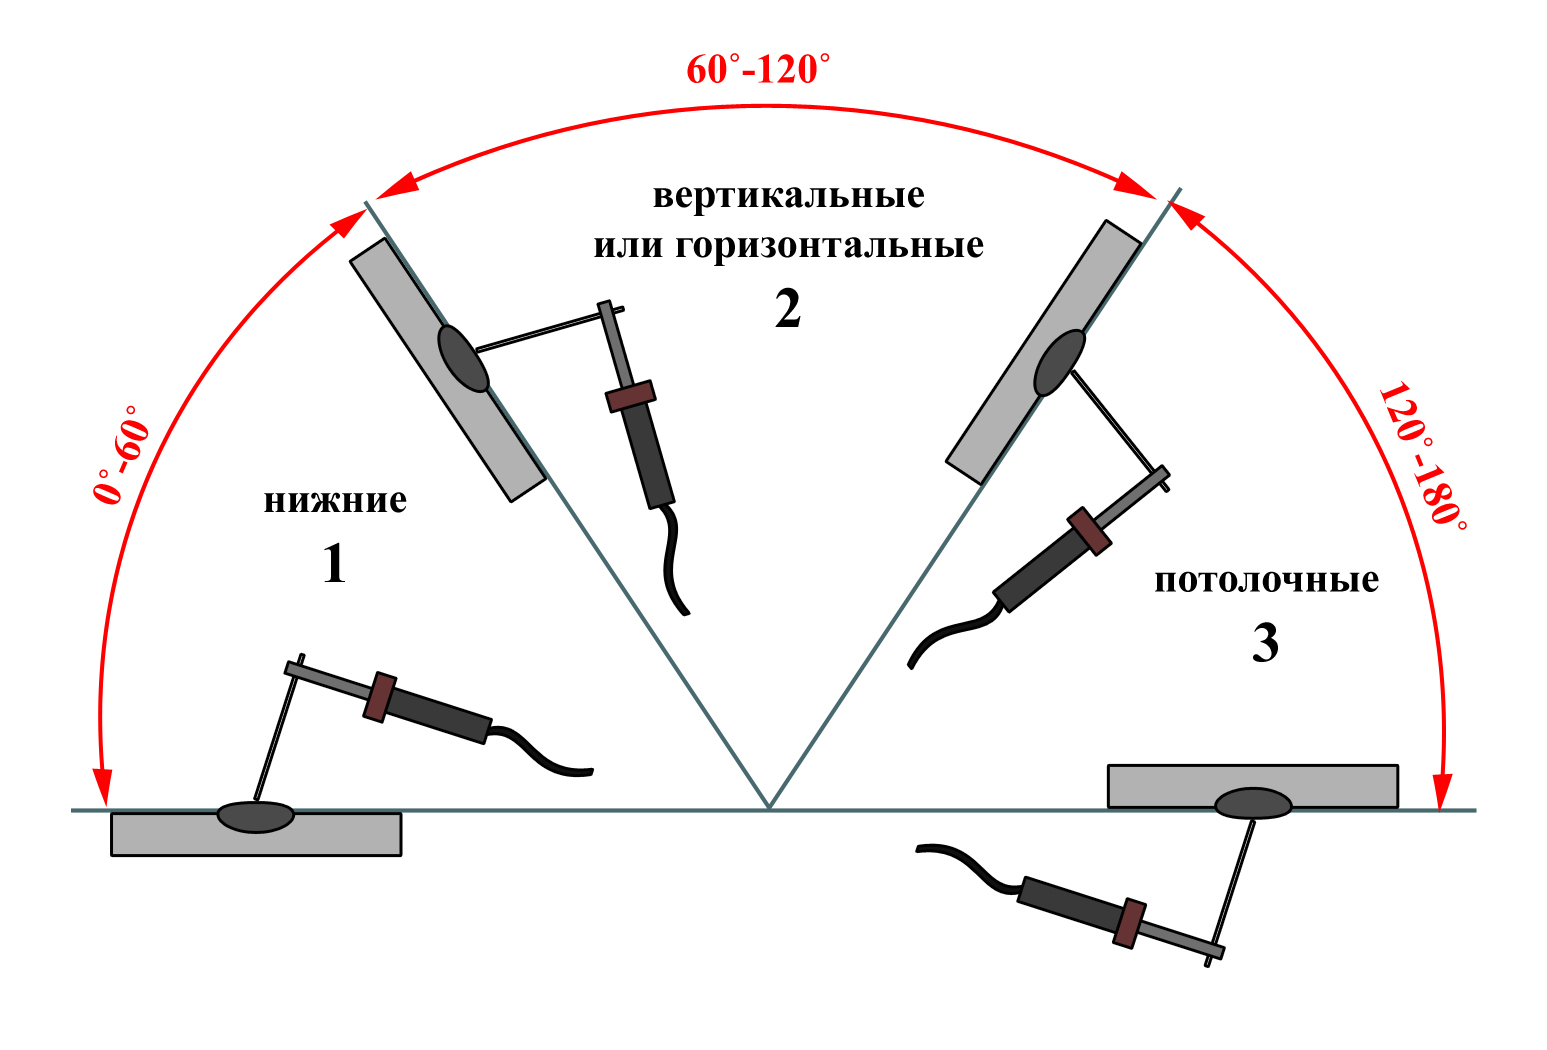
| Versatility of application regardless of the spatial position - vertical, horizontal, at an angle of 45 degrees and so on. | The efficiency is based on the skill of the welder. In the absence of such, the end result will be deplorable. |
| A large number of metals that can be joined using electric arc welding. | From the master you need basic skills in using the unit + from 30 hours of practical experience in simple conditions. |
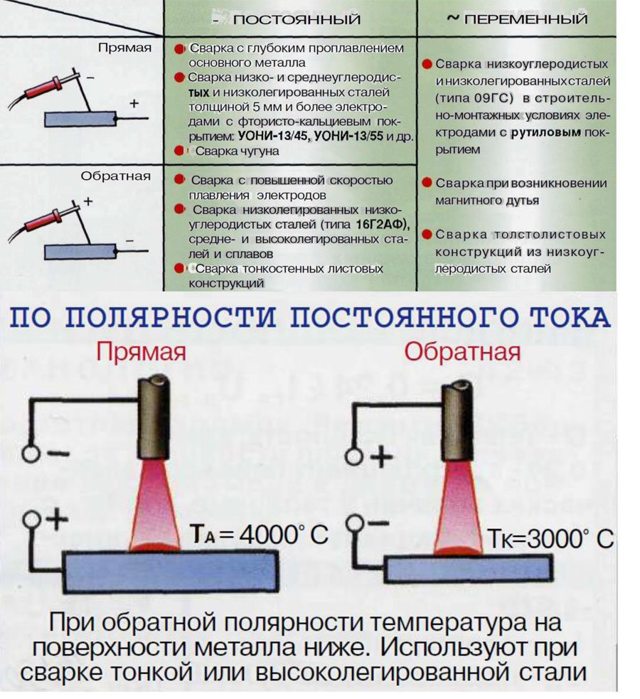
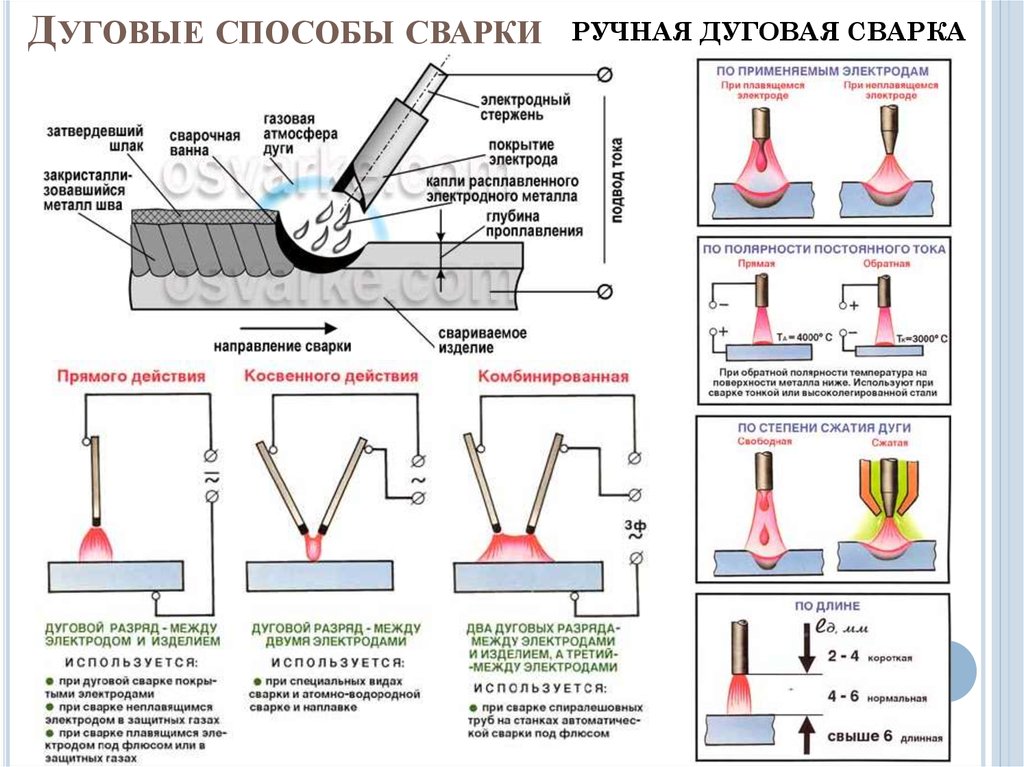
The classification of electric welding is made on the basis of many criteria - the level of mechanization of the welding process, the type of current + its polarity, the arc, the characteristics of the electrode, the method of protecting the zone, and so on. Let's look at the classic distribution - manual arc, semi-automatic arc and automatic arc types of welding.
1) Manual arc welding
The most difficult option to use for an inexperienced welder, because most of the work has to be done by one's own hands. Regulation of technology with other points is carried out by means of GOST 5264-80. The type of connection, the shape of the edges, the nature of the seam, the cross section and the thickness of the elements to be welded are taken into account.
The disadvantages of manual welding are the negative impact on the human body of decay / light products and the relatively low efficiency of work on a large scale. A low-skilled specialist will not be able to wield an arc with high quality when working with manual arc welding, therefore, the suturing method is definitely not for beginners.
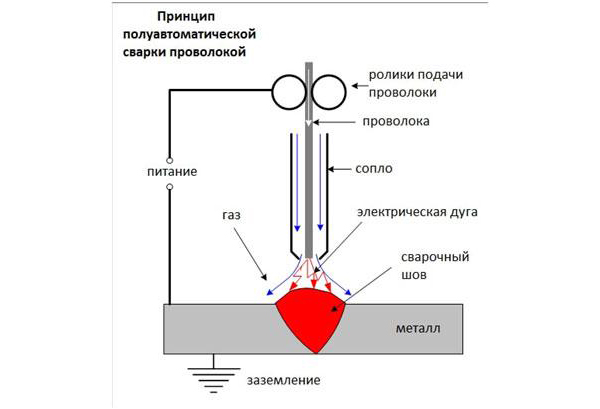
2) Semi-automatic in gas environment
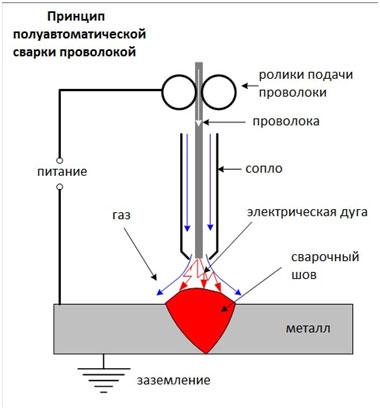
Distinctive features of connection method 2 are the use of a movable consumable electrode + the presence of a protective gas. The second acts as a barrier between the external environment and the electric arc.
The protective gas is argon, carbon dioxide, helium, or their combinations in certain proportions. Semi-automatic welding technology occurs by passing the wire through a gas nozzle, due to which it melts. The length of the arc is controlled automatically, while the direction of movement + speed remains under the control of the welder. The method of work can be carried out without a gas shell - a special self-shielding wire is used interspersed with silicon, manganese and other metal elements with deoxidizing properties.
3) Automatic submerged arc welding
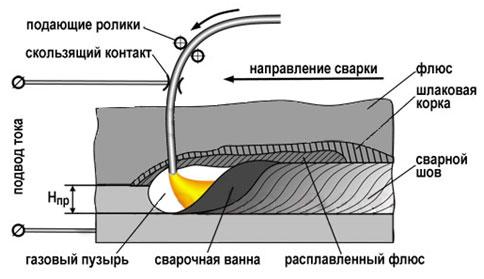
A method with increased productivity and minimal electrode losses. The welder can not be afraid of splashes, and the welding area is as safe as possible in terms of the formation of oxides and other harmful impurities for the seam.
Welding process algorithm:
- Wire feed by special rollers.
- By means of a sliding type contact, an electric current is applied to the wire.
- The movement of the electrode along the marking for the seam begins.
- A flux is poured out of the bunker of the unit, due to the evaporation of which a gas cloud is formed that protects the electric arc from the influence of the external environment.
- Seam formation.
- Slag removal.
- Collect excess flux for reuse.
Equipment for work does not require the operator to use special eye protection. Due to the automation of the process, the subjective influence of the welder is minimized, and therefore, the risk of messing up sharply tends to go down.
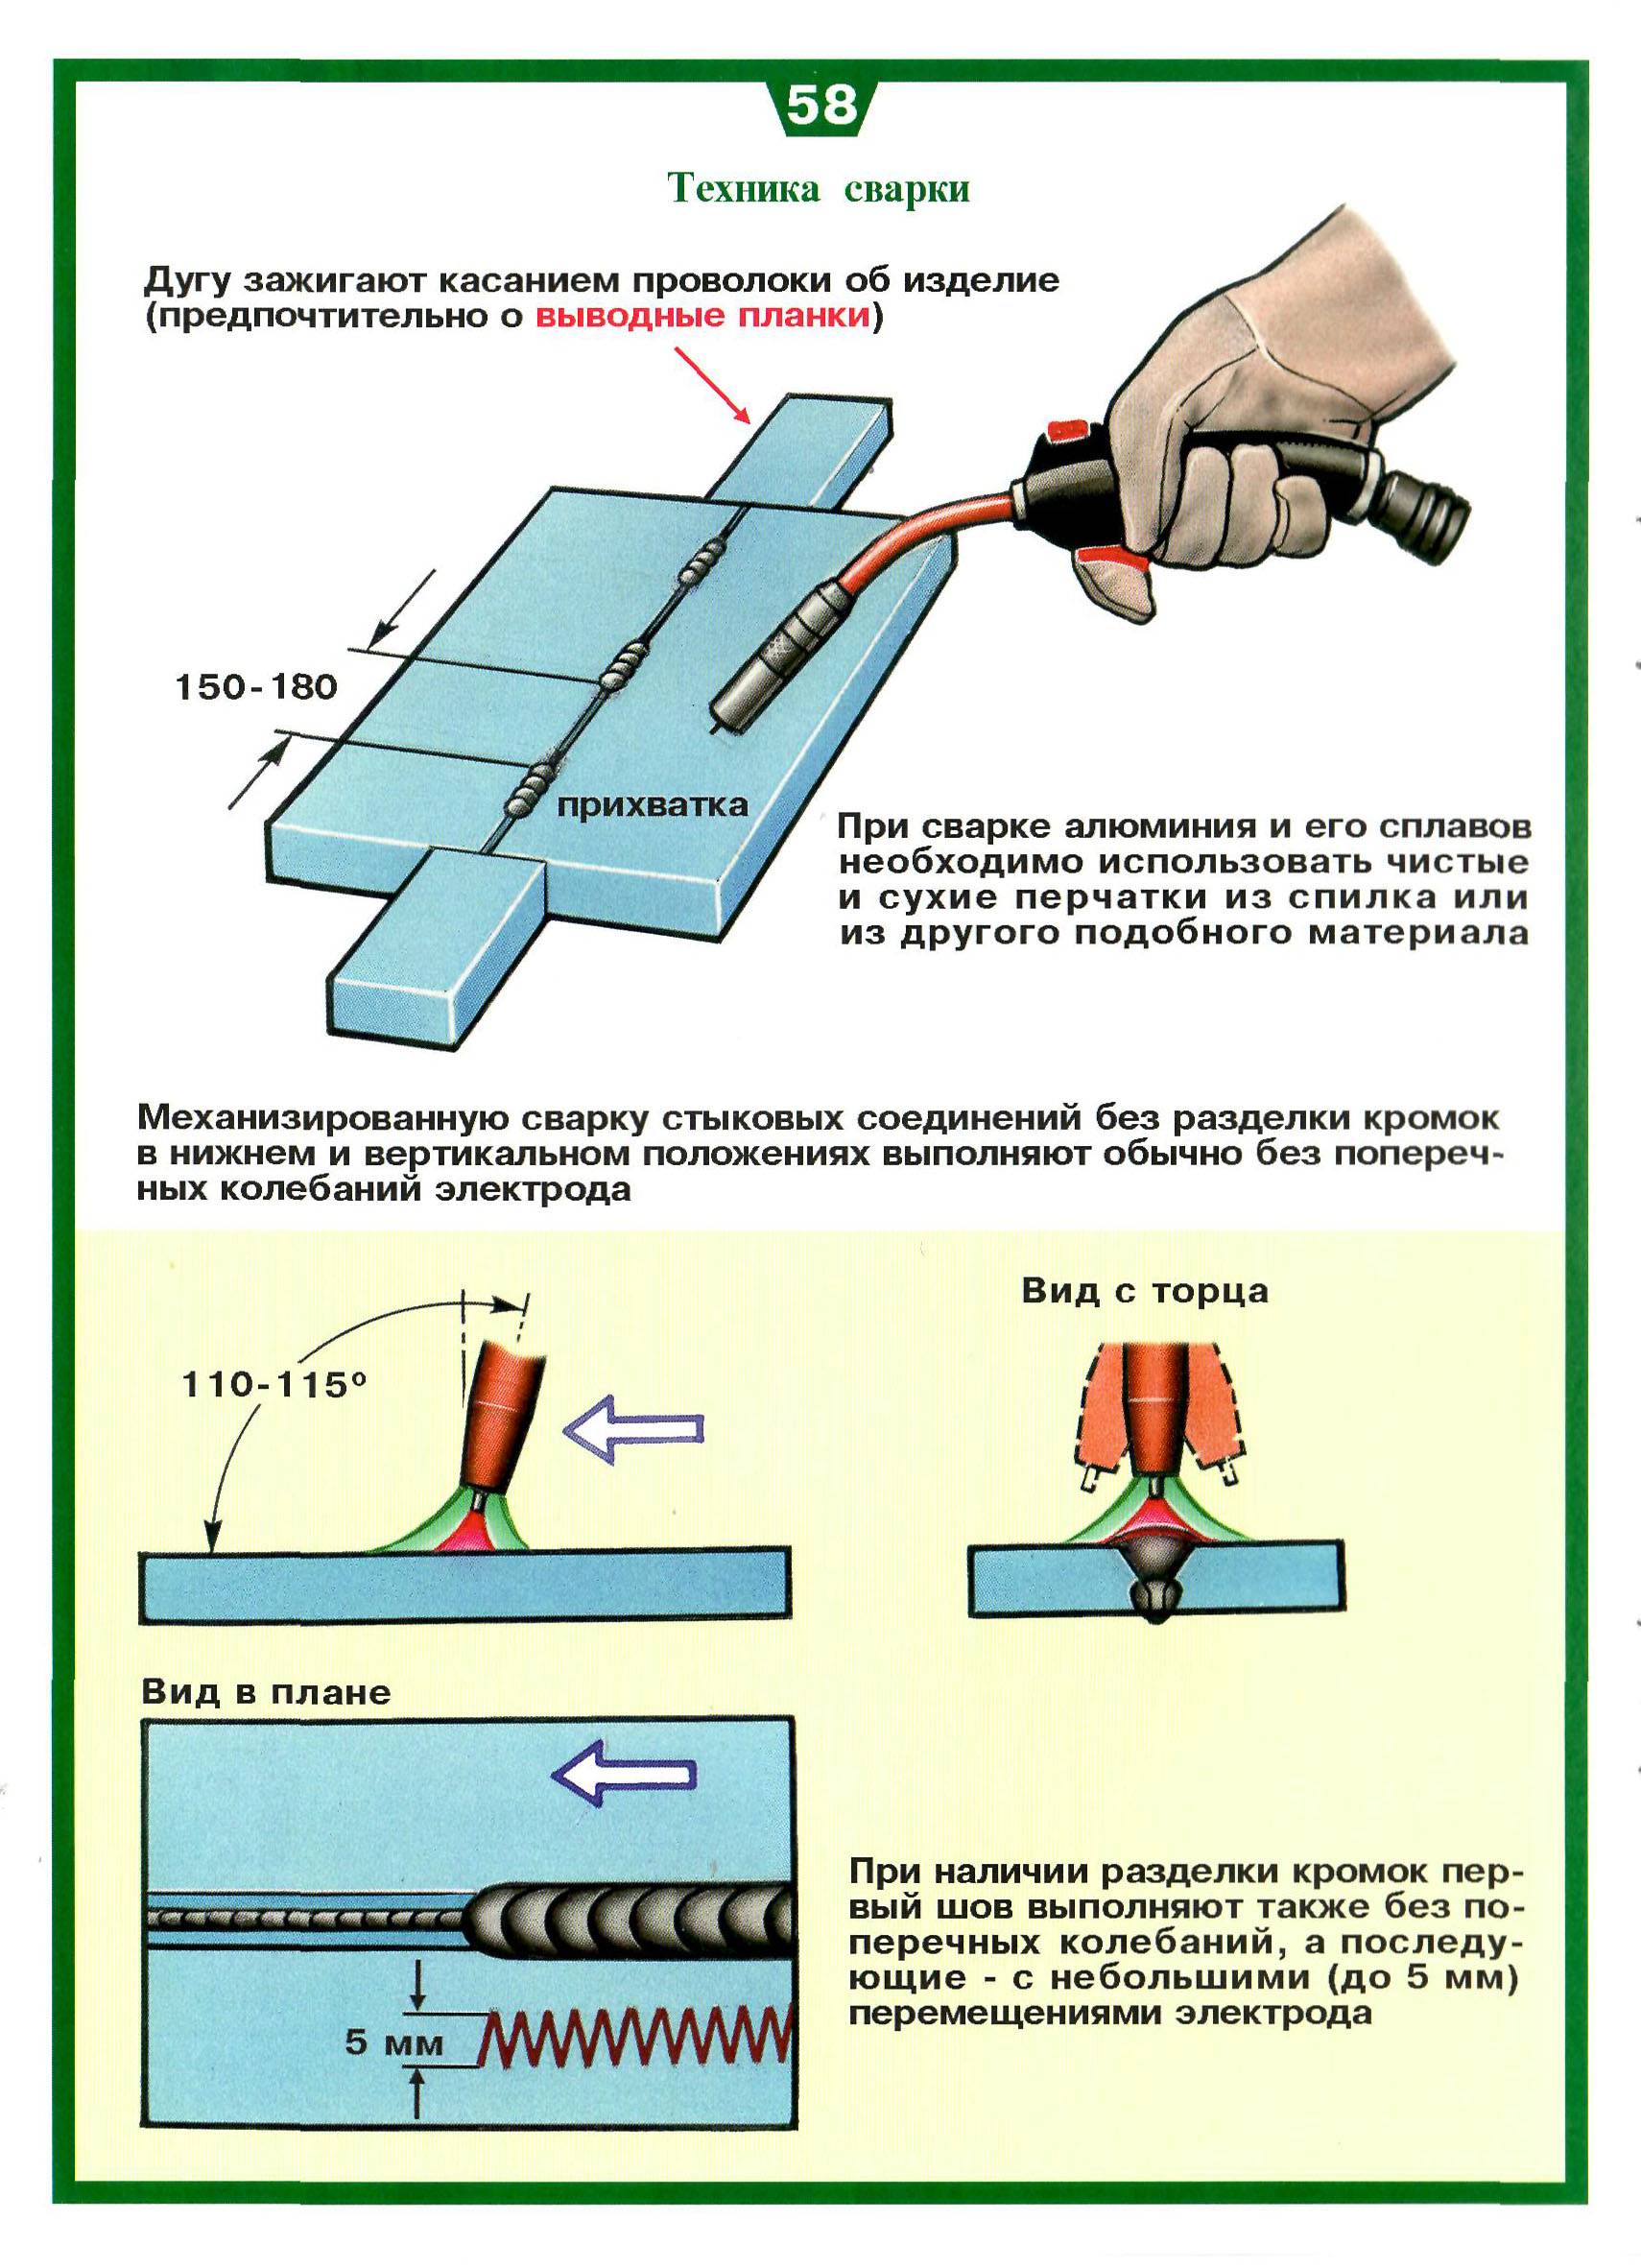
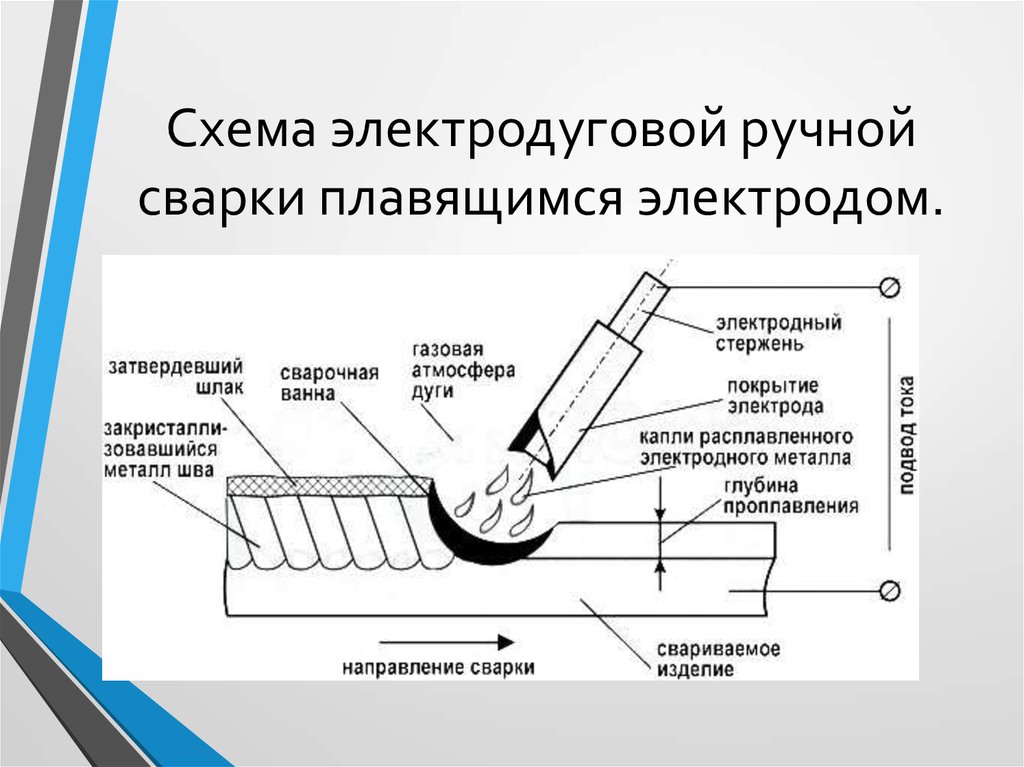
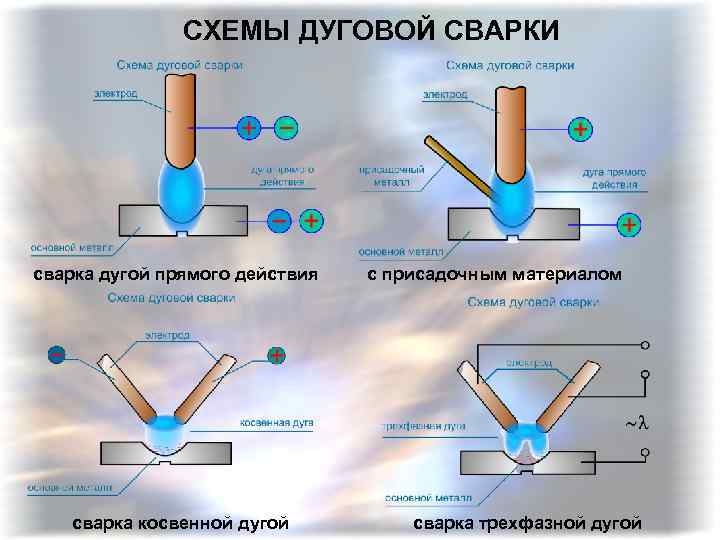
About the techniques for forming a seam
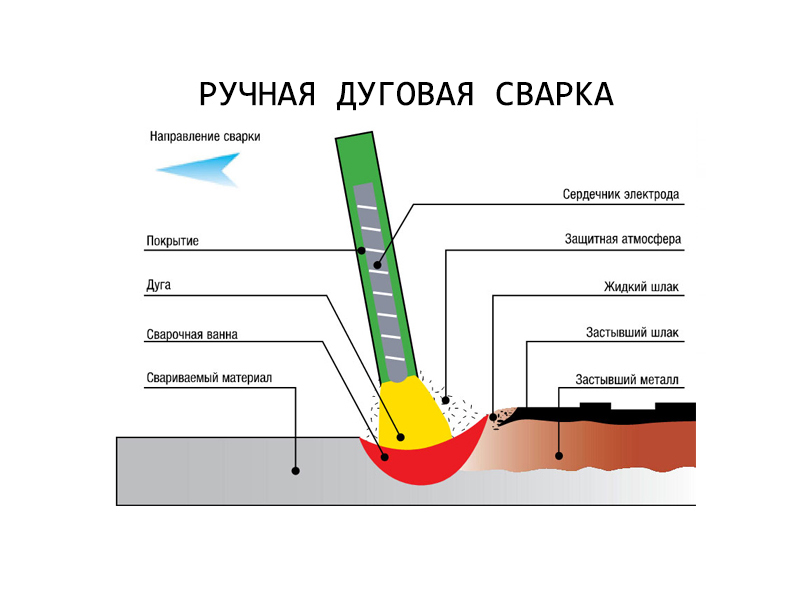
Before you learn how to cook by electric welding yourself, you should master various welding techniques for connecting metal parts. Proper maintenance and movement of the electric arc is the key to a quality seam. If the arc is too long, then the metal will oxidize and become saturated with nitrogen, spray with drops, and form a porous structure.
Overlap seam
The welding arc moves forward along the electrode axis. Thus, the desired arc length is maintained, which is affected by the melting rate of the electrode. The length of the electrode decreases gradually, just as the distance between it and the weld pool increases. To prevent this, the electrode is supposed to be moved along the axis, observing the synchronism of its shortening and movement in the direction of the weld pool.
Ceiling seam
The electrode diameter depends on the thickness of the welded setal
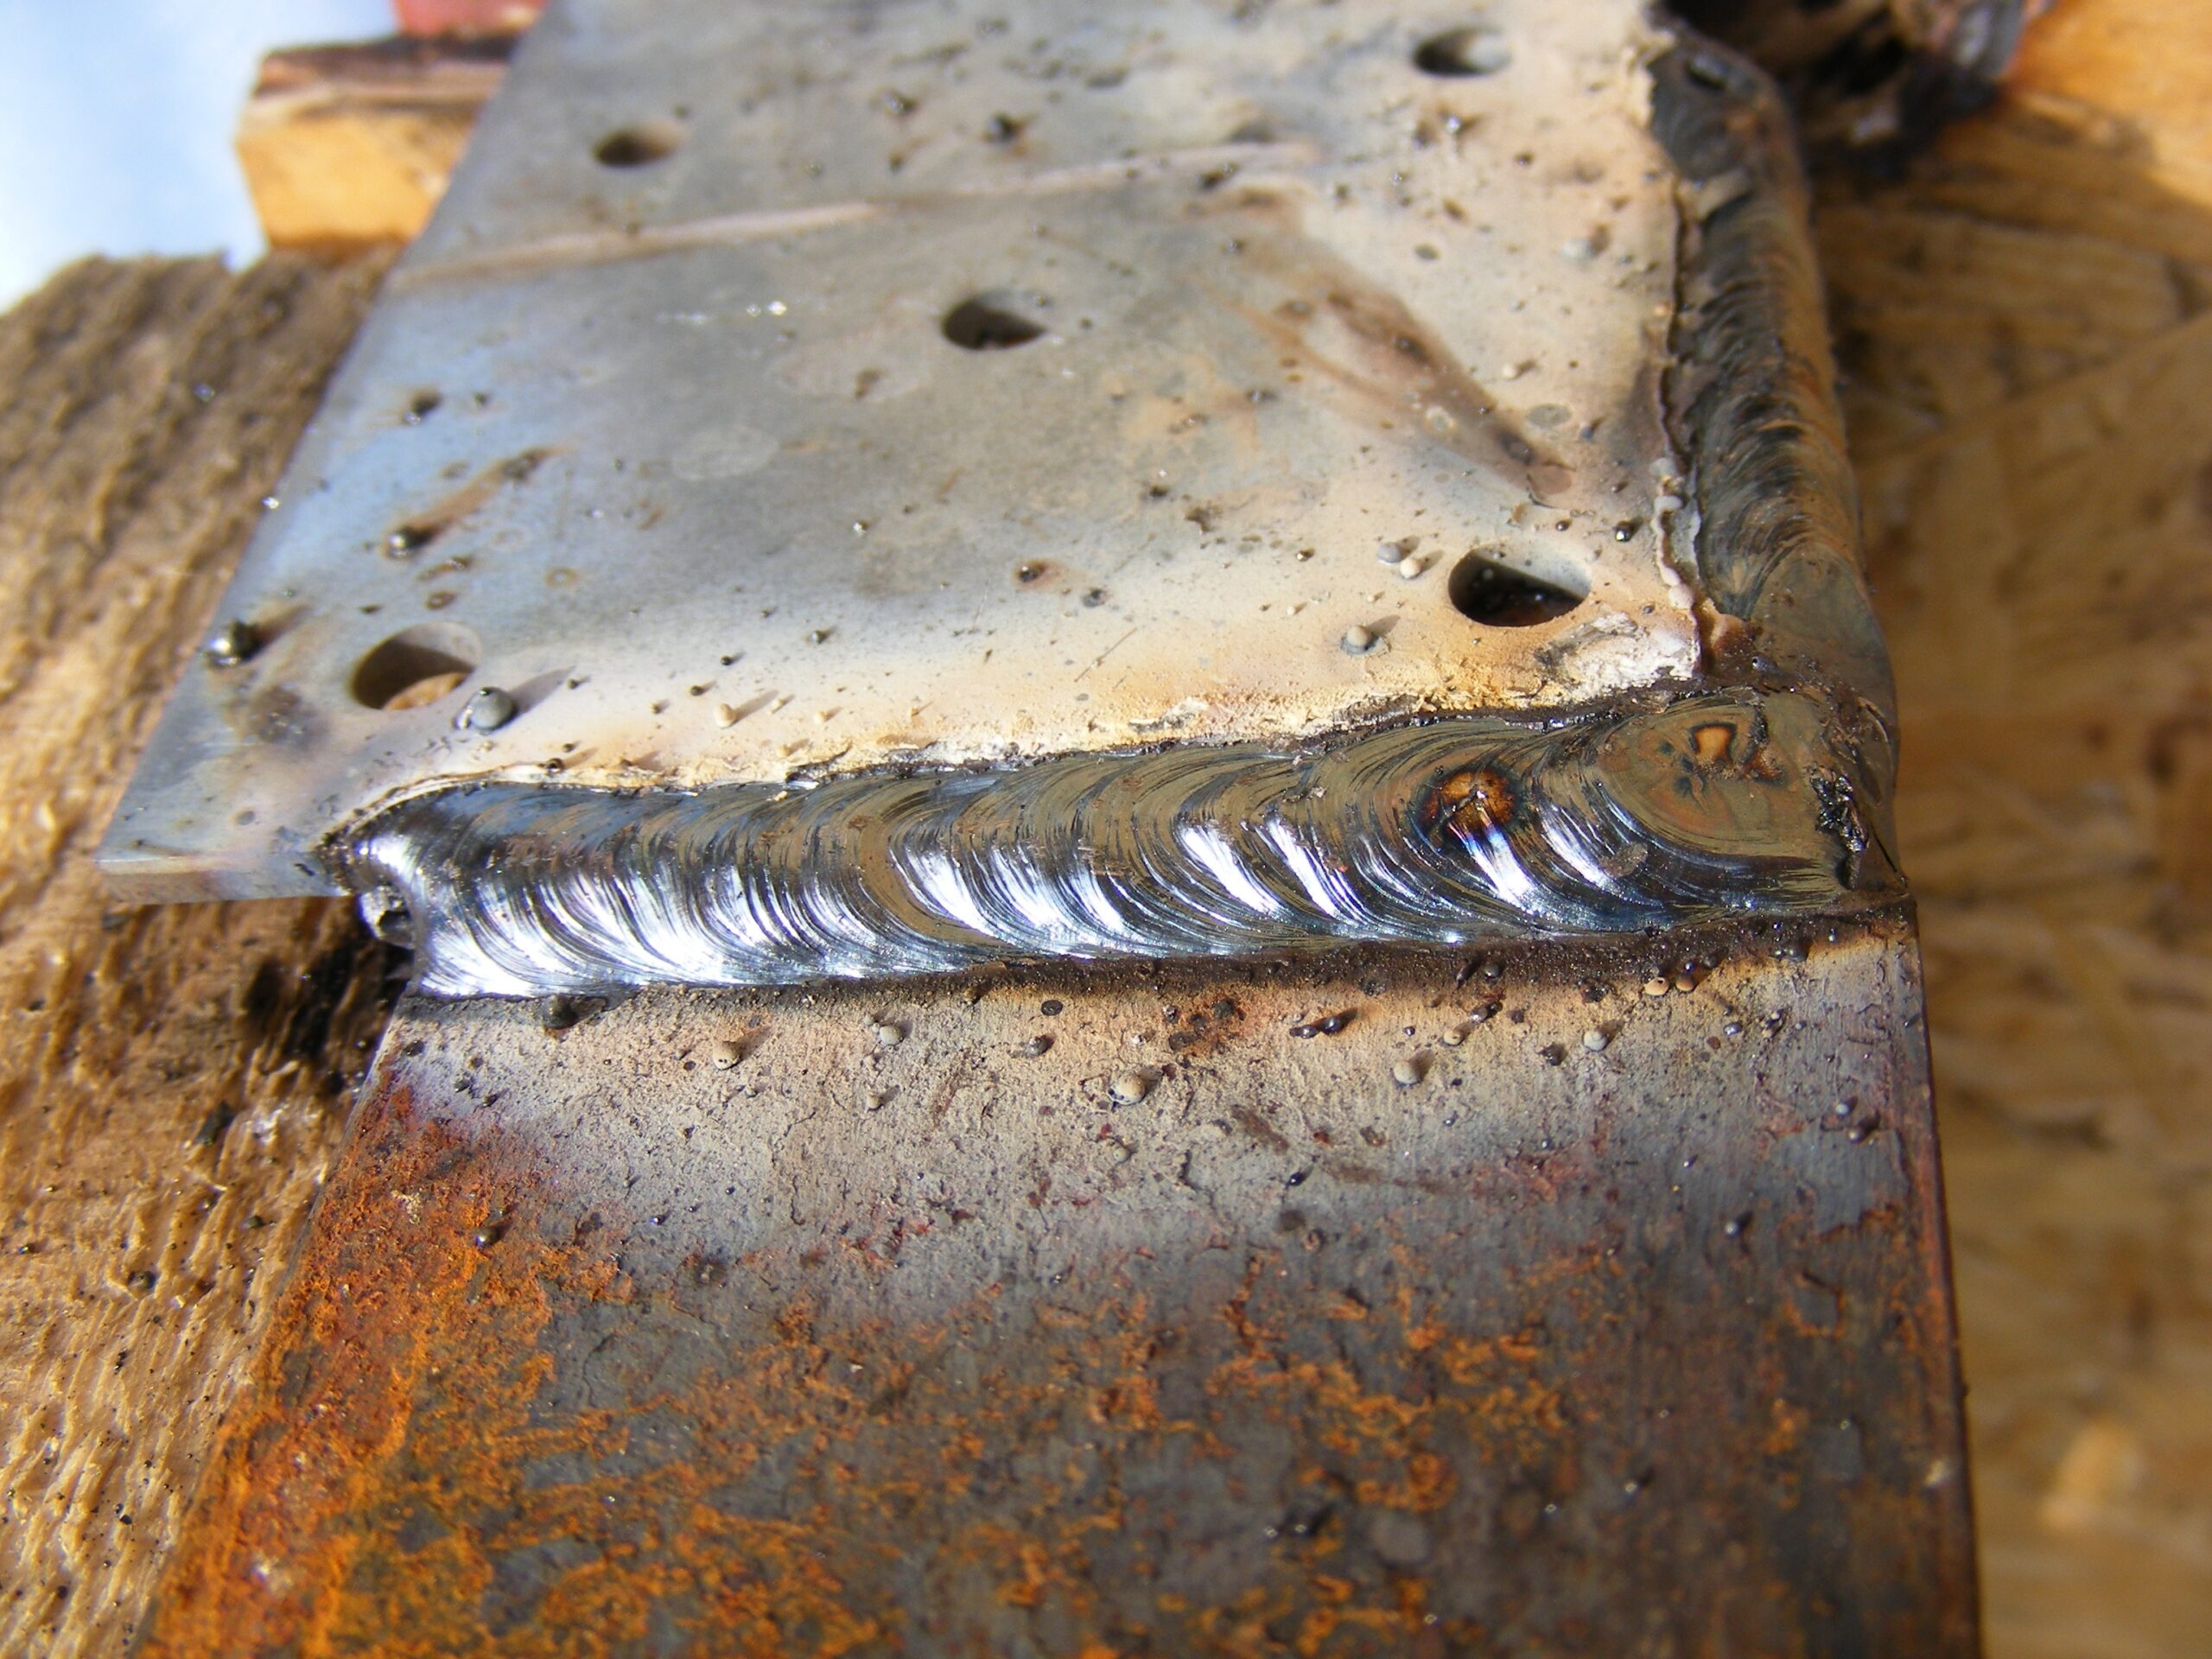
Another type of roller is called thread. Such a bead is formed in the process of moving the electrode along the axis of the weld being welded. As for the thickness of the roller, it depends on the diameter of the electrode and the speed with which it moves.

About the width of the roller, we can say that it is usually 2-3 mm exceeds the electrode diameter. This results in a fairly narrow weld seam. Its strength is not high enough to create a strong structure. How to fix it? It is enough when the electrode moves along the axis of the weld to make an additional movement of it - across the axis.
Tee seam (with one-sided cutting)
The transverse displacement of the electrode during operation makes it possible to obtain a sufficient width of the seam. This is done by reciprocating oscillations of the electrode, the width of which is determined individually for each specific case. Here it is necessary to take into account the position of the seam, its size, the shape of the groove, the characteristics of the materials, as well as the list of requirements put forward to the design. It is customary to consider the normal width of the seam from 1.5 to 5.0 electrode diameters.
Welding seam with electrode support
It is formed with rather complex, triple movements of the electrode. Exists in several variations. The trajectory of movement in classical arc welding must be such that the edges of the parts to be joined are melted, and at the same time sufficient molten metal must be formed to form a weld of a given shape.
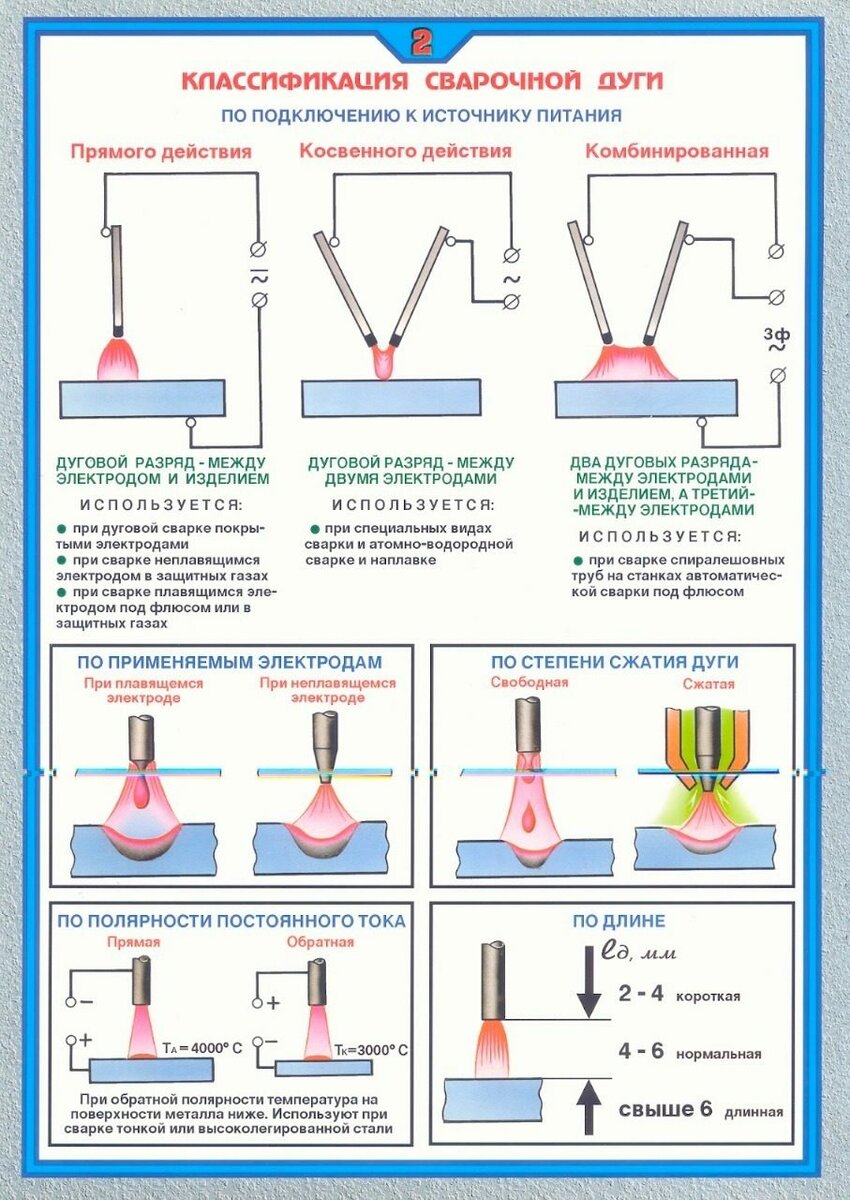
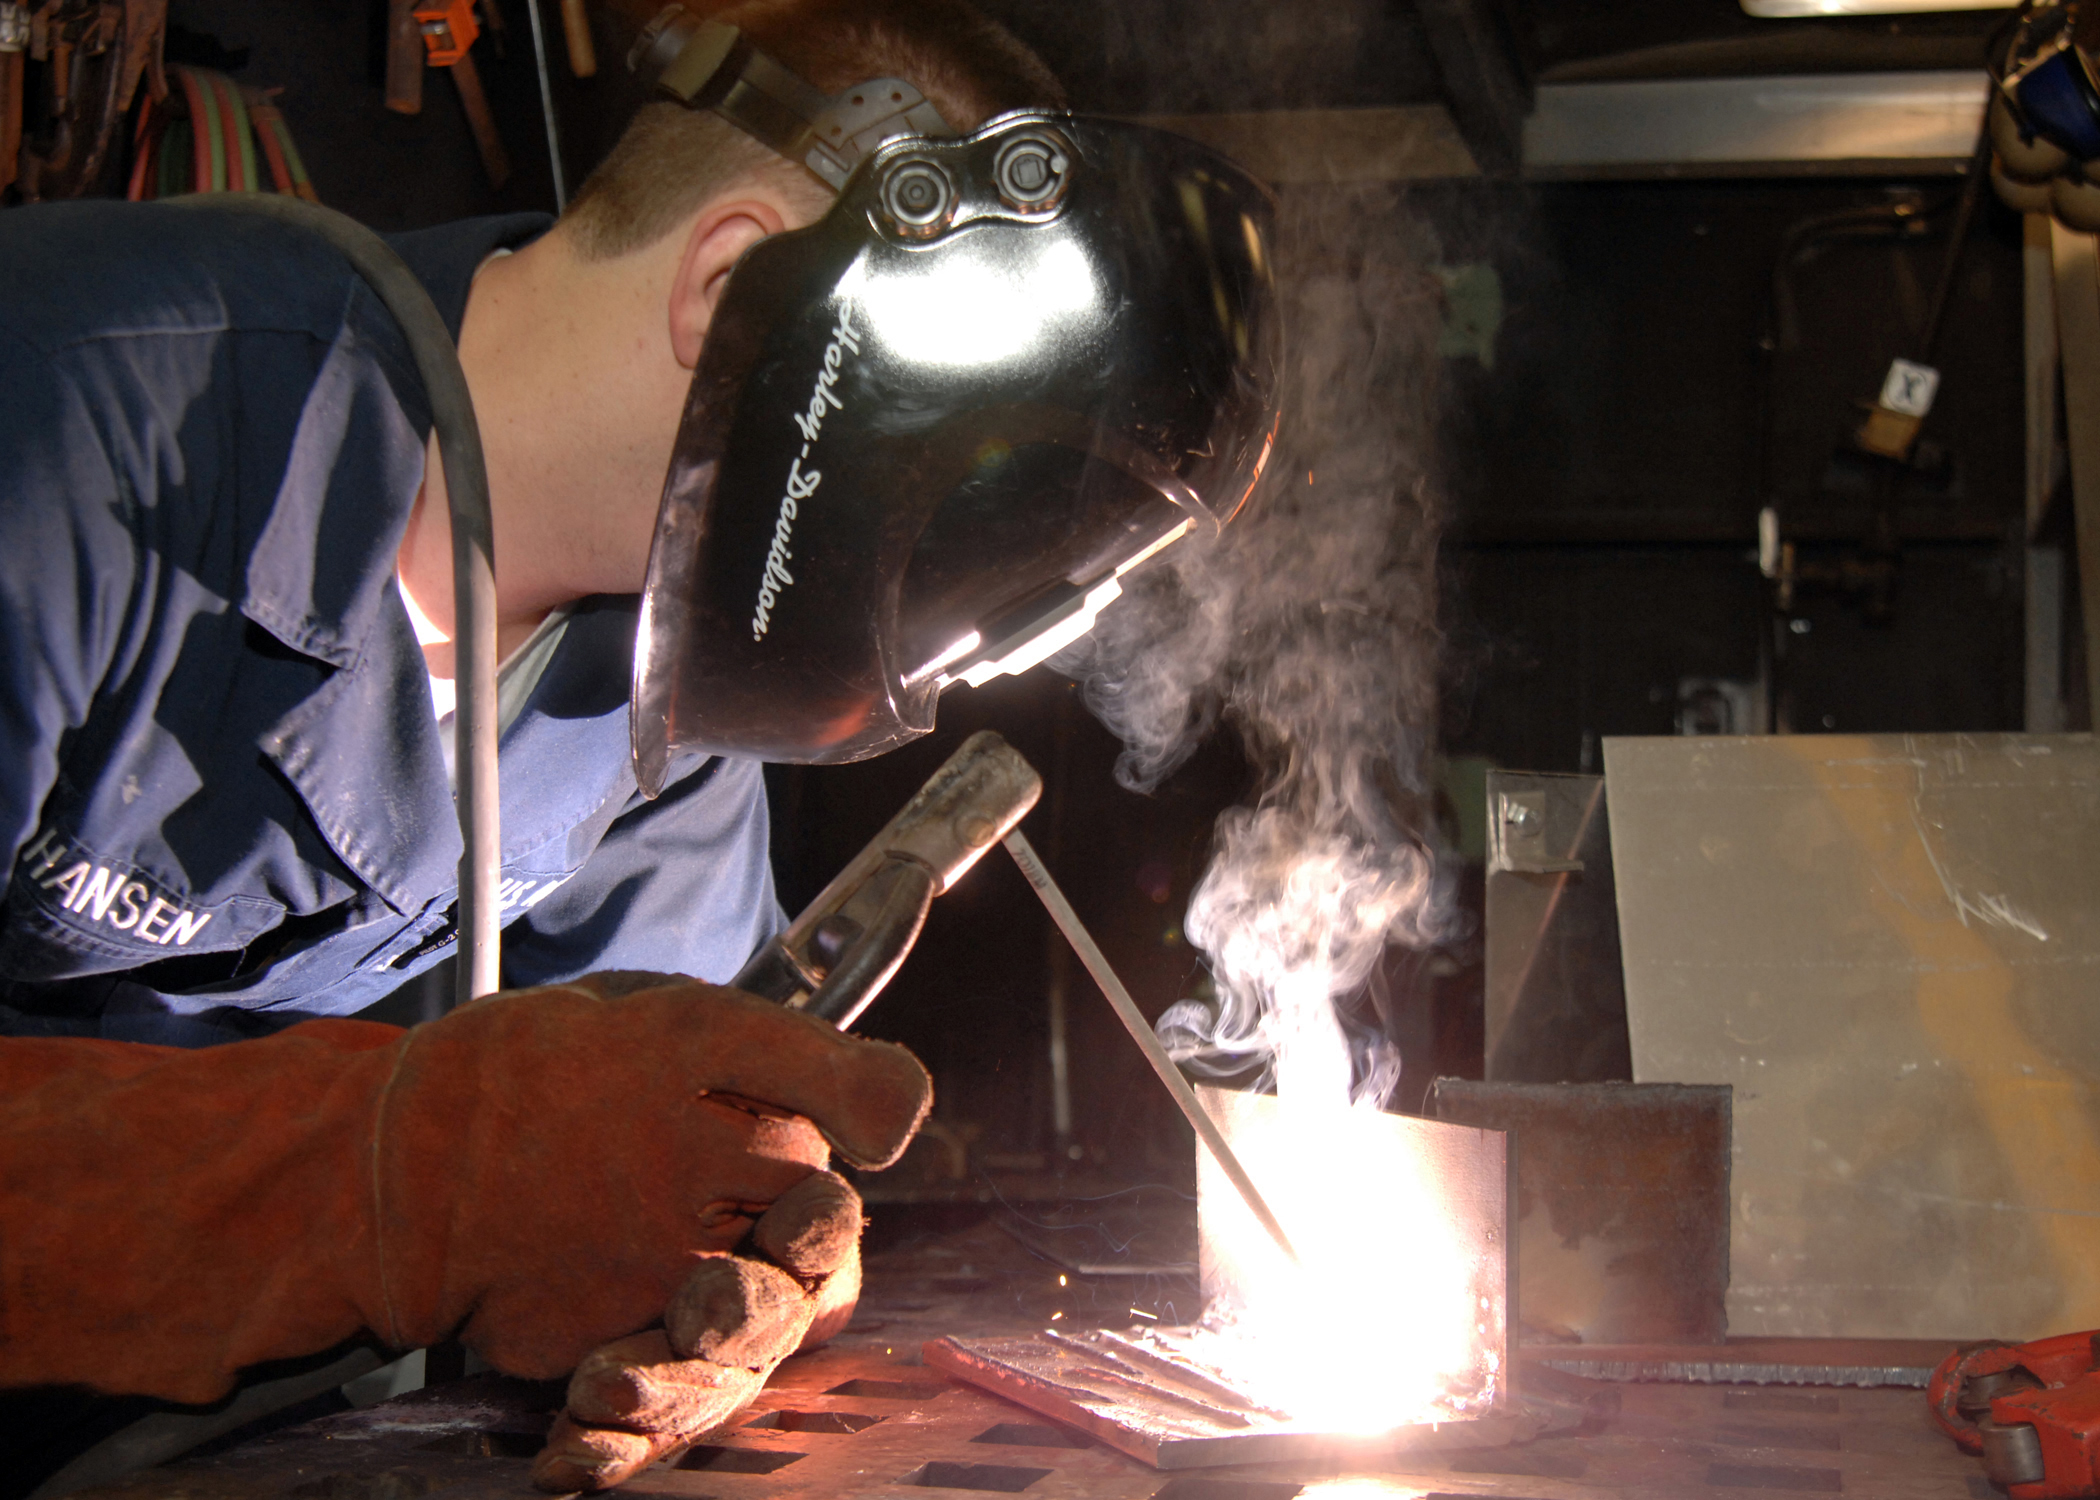
What is electric welding?
Electric is one of the welding methods, when an electric arc is used to heat and then melt metals. The temperature of the latter reaches 7000°C, which is much higher than the melting point of most metals.
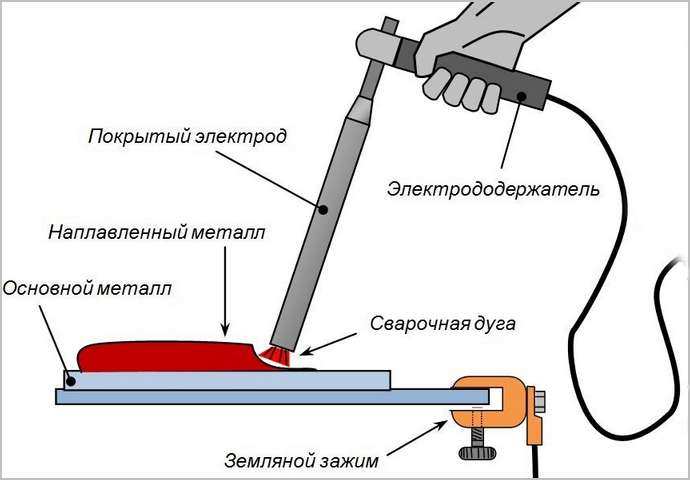
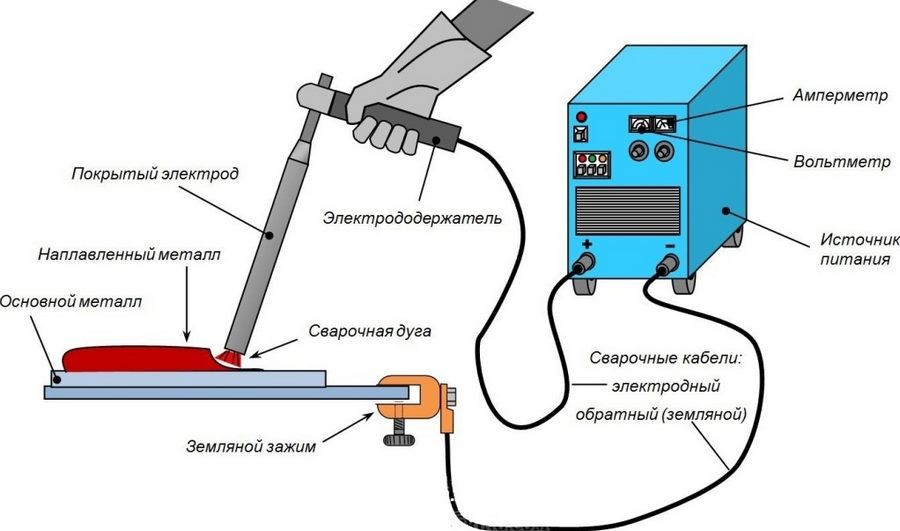
The process of electric welding proceeds as follows. To form and maintain an electric arc, current is supplied from the welding tool to the electrode.
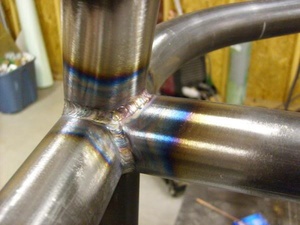
During the welding process, the base metal and the metal core of the electrode are melted and mixed, forming a strong and inseparable seam (+)
When the electrode rod touches the surface to be welded, the welding current flows. Under its influence and the influence of an electric arc, the electrode and the metal edges of the elements to be welded begin to melt. From the melt, as welders say, a weld pool is formed, in which the molten electrode is mixed with the base metal.
Molten slag floats to the surface of the bath and forms a protective film. After turning off the arc, the metal gradually cools down, forming a seam covered with scale. After the material has completely cooled, it is cleaned off.
Non-consumable and consumable electrodes can be used for welding. In the first case, a filler wire is introduced into the melt to form a weld, in the second it is not required. For the formation and subsequent maintenance of an electric arc, special equipment is used.
Skills in the field of a welder in a domestic environment are required to perform an extensive range of work:
The design of the inverter for welding
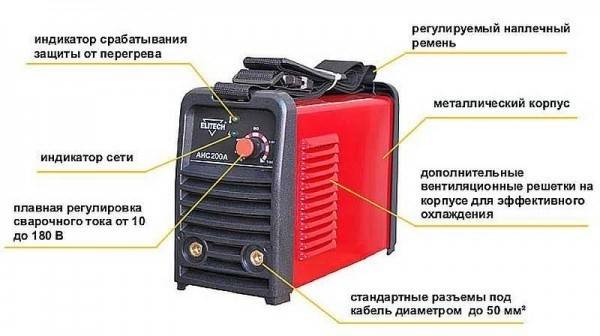
In order to understand how to properly use the welding machine, the novice master should familiarize himself with the design of the inverter.
The welding inverter is a metal box with an internal component, with a total weight of about 7 kg, which is equipped with a handle and a shoulder strap for easy carrying. The housing of the welding inverter may contain ventilation holes that contribute to a better outflow of air when the unit is cooled.The front panel has buttons for switching the working state, knobs for selecting the required voltage and current, outputs for connecting working cables, as well as indicators that signal the presence of power and overheating of the inverter during welding. The cable for connecting the machine to the mains is usually connected to the connector located on the back of the inverter.
The design of the welding inverter
When the electrode contacts the metal plates being welded during welding, a high-temperature arc is formed, as a result of which both the elements of the welded rod and the metal of the welded joint are melted. The pool formed in the area of the arc by the molten metals of the plates and the electrode is protected from oxidation by a liquefied coating of the electrode. After the metal is completely cooled, the upper surface of the weld, protected by the electrode coating during welding, will turn into a hardened slag, which can be easily removed by light mechanical action (for example, by tapping)
It is important to observe the same distance-gap between the metal of the welded joint and the electrode (arc length), which will prevent its extinction. To do this, the electrode should be fed into the fusion area at a constant speed, and the weld rod should be guided along the weld joint evenly.
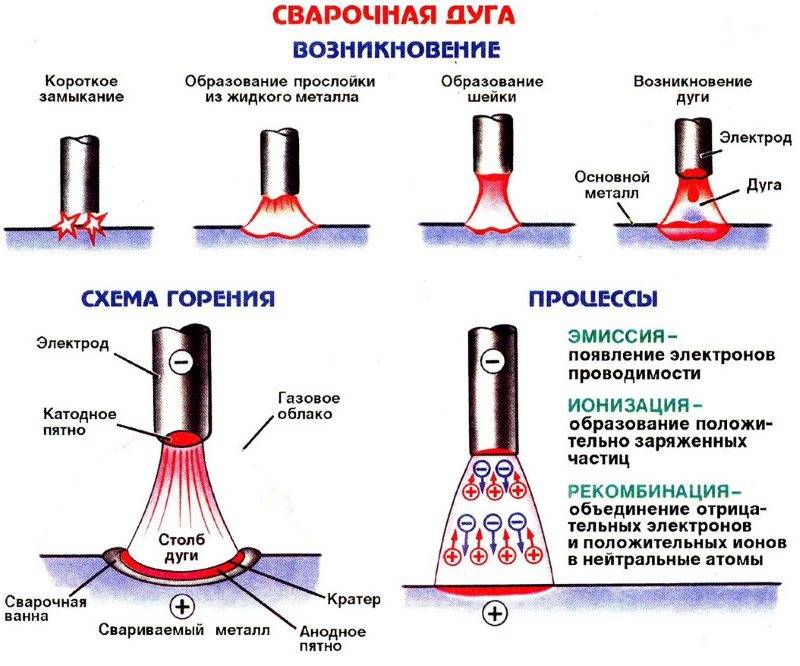
welding arc
How to choose the right pasta?
How to choose the right pasta?
Most adherents of proper nutrition refuse this food, considering it unhealthy and unhealthy. But the right product can benefit the body, and therefore, when buying it, you should consider the following recommendations:
The composition of quality products includes two components - flour and water.Taste, benefits and harms, their nutritional and energy value largely depend on the quality of the main ingredients. They may also contain natural dyes - spinach juice, carrot juice, cuttlefish ink, spices, the presence of which should be indicated on the package;
The type of flour the product is made of deserves special attention. It should belong to durum wheat varieties, since it is this option that does not contain fats in its composition, it is perfectly absorbed by the body.
If the main ingredient of soft varieties is used to make pasta, they will contain a lot of starch, which is why they become very high-calorie, and this is the reason for gaining excess weight;
To ensure that a quality durum base stock is being used, pay attention to the appearance of the product. Its surface should be smooth, the color should be amber, yellow with a golden hue.
It has smooth edges, and there are small blotches on the products. There should be no debris in the package. If they are made from soft flour, their color will be light or they will have a pale, unnatural color, uneven edges, a rough surface, light small spots, it is possible that there are fragments, crumbs in the package;
Protein is an important component of flour products. If they are of high quality, made from durum wheat, they contain about 12-15 g / 100 g. An indicator of the low quality of the product is a protein content of a maximum of 10 g / 100 g;
Pay attention to the cost - good pasta is more expensive, referring to the premium class;
Pasta like spaghetti is tested in another way - analyze how they break, but you can do this right before the cooking process itself. If they are of high quality, then they bend well, but they are strong, so it is not so easy to break them, which cannot be said about products made from soft grades of raw materials;
A quality product after cooking retains its shape, yellowish-golden color, even if left in water for a long time;
Good pasta is characterized by the fact that it boils minimally, and therefore does not stick together.
Watch this video on YouTube
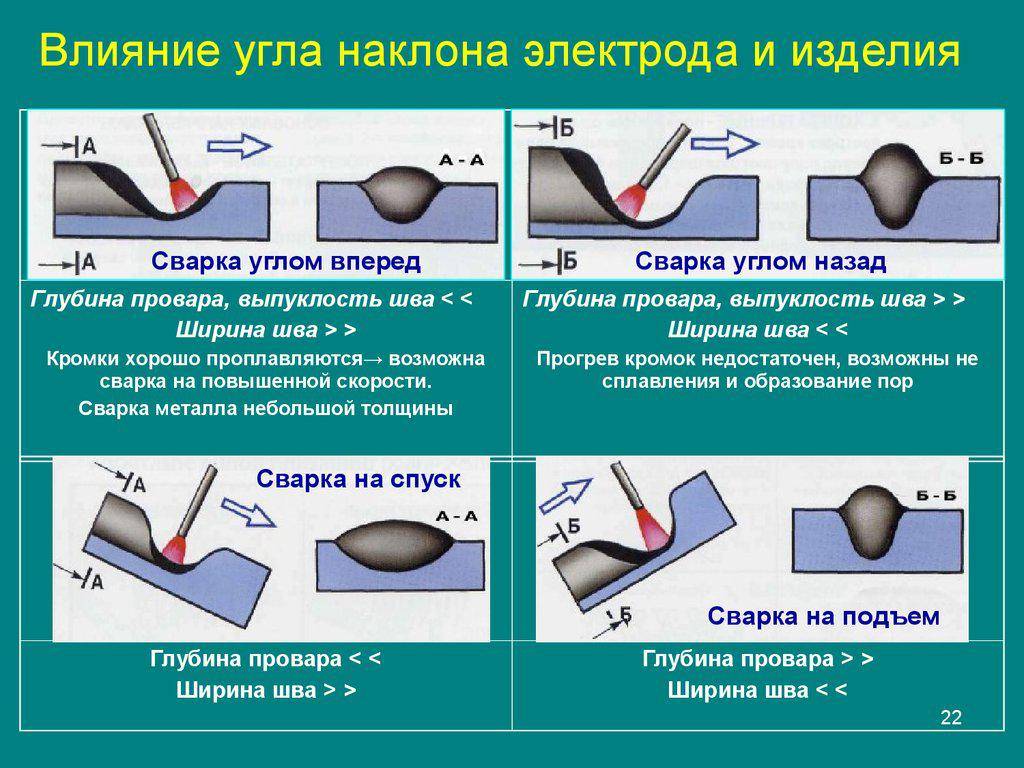
Influence of electrode feed rate
Feed rate electrodes for welding should provide the required amount of supplied molten material. Its insufficient amount can lead to undercutting. This factor is very important in both direct and reverse polarity welding.
During arc welding, due to the rapid movement of the rod along the joint, the arc power may not be enough to heat the metal. As a result, a shallow seam is formed, lying on top of the metal. The edges remain unfinished.
Slow advance of the electrode leads to overheating. In this case, it is possible to burn the surface and deform the thin metal.
Modern welding machines have a wide range of various functions and capabilities. Nevertheless, at the moment, so far, most of the quality work done is determined precisely by the skill of a person.
Connecting pipes using electric welding
Metal electrofusion fittings
Electrofusion fittings are devices that help connect two parts of workpieces. There are two formats: threaded and welded.Threaded Fitting Ends - Threaded on the inside and outside of the fitting. And also the fitting has a chamfer, which facilitates the implementation of the electric weld.
Many of these devices are attached to the part using two elements: a knee and a butt. In the first variant, the diameter is larger than in the second, and the second, as a rule, coincides with the part to be welded.
Electric Fitting Polyethylene
These parts allow you to increase the electrofusion of the connected parts. Typically, polyethylene auxiliary fittings are used for polyethylene water pipes, which are designed for low pressure systems.
 HDPE fittings are installed on pipes with a butt or overlap. The elements are held by a special holder. The connection and tube are installed, then heated by inserting into the fitting.
It is noteworthy that both options for electric welding are based on chemical action - the destruction of molecular chains of polymers at a temperature of 170 degrees Celsius and the formation of new ones in the process of hardening plastic.
Coupling and electropollination
Modern electrical technology has reached a level where it is easy to do without bulky, difficult to use and obsolete equipment.
The outer sheath and its fitting are melted, and after the temperature drops, a new polymer chain is created. As a result, high-quality electric welding of polyethylene pipes is guaranteed, which can be safely used both for domestic systems and for industrial pipelines.
These fittings are characterized by the following advantages:
- they connect pipes with a diameter of 20 to 400 mm;
- the connection is installed inside and is able to withstand high pressure operation;
- they are inert to all chemicals and thus safe even for water;
- withstand any pressure surges.
Fittings have a wide range - from small to large diameter. They can even be used in large chemical plants.
You can use a transformer to install fittings.
How to prepare electric pipe welding
Preparation: welder, workpiece, connector, transformer in full readiness and integrity.
Pipe at a right angle.
With a chamfer of the edge of the part, for precise cutting.
The pipe passes into the fitting and fixes the place where it was previously noted.
Degrease parts.
After connecting the welding transformer to the power source, form a welding joint.
The welding machine is turned off and the warm-up mode is turned on for 30 minutes.
It is important not to move any connection or holder! After turning off, wait for complete cooling.
The device is ready for use and further connection!
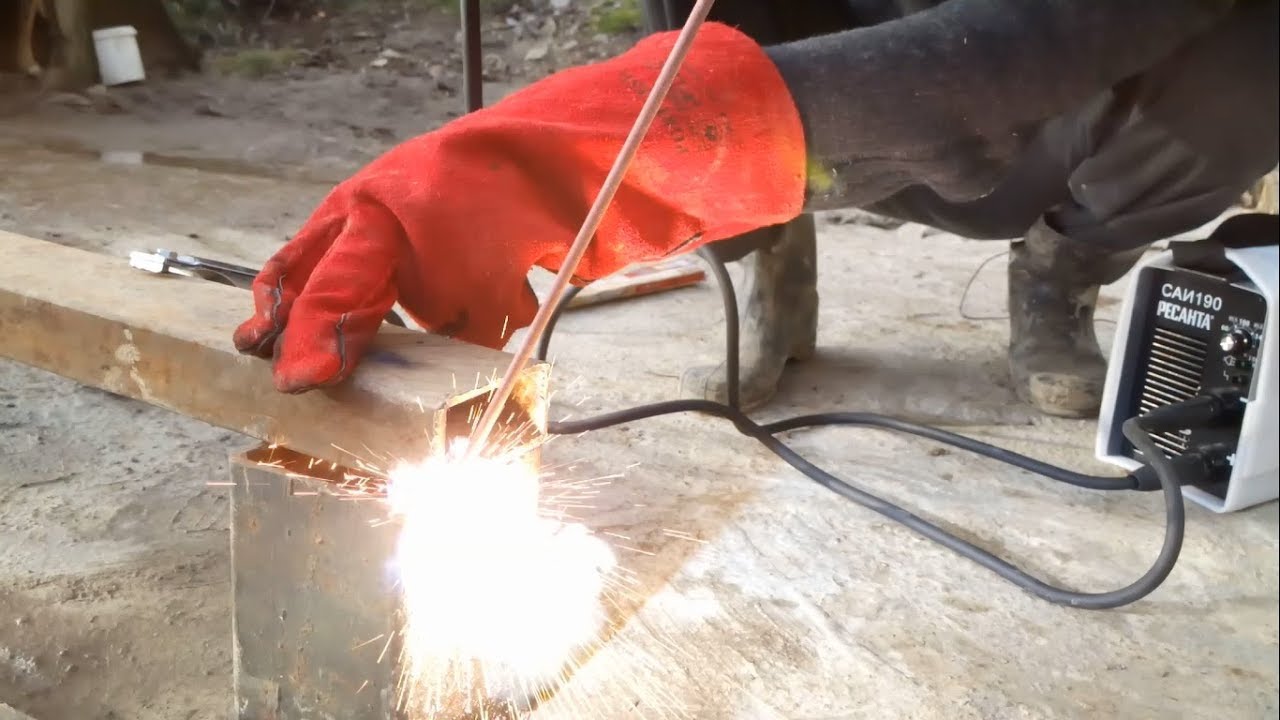
Technical equipment of a home welder
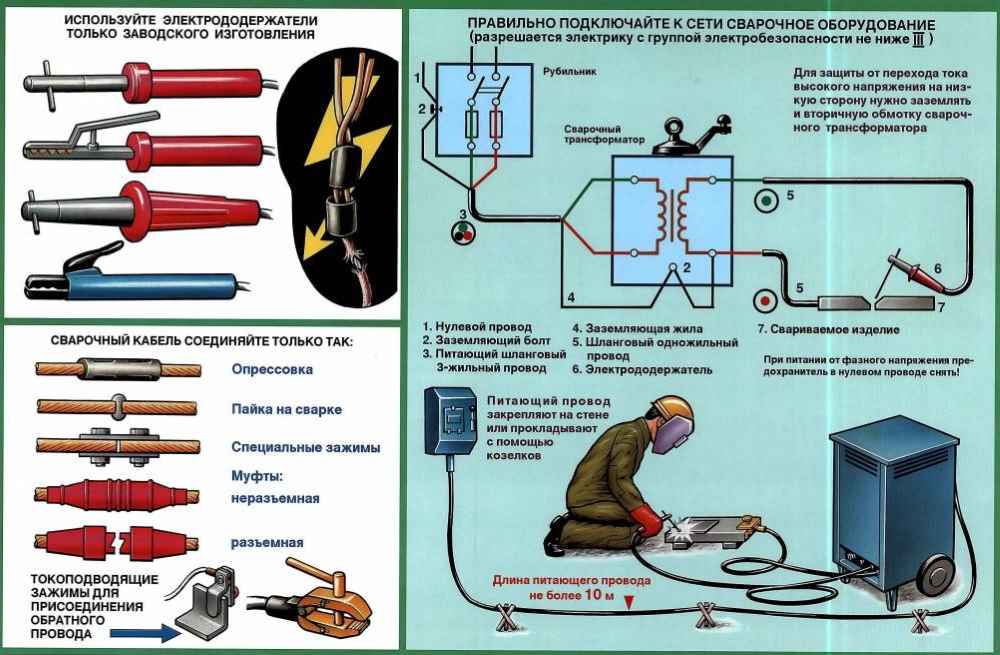
To form an arc of a manual ES, an electric current source is required that provides a stable supply of electric energy to power the ED. For manual ES equally applicable as alternating current sources, and devices operating on direct current. In the conditions of home use of welding equipment, the condition of the electrical wiring to which the purchased welding unit will be connected plays an important role. The type of equipment that a beginner “welded” can use will depend on this.

Important! The welding machine is able to operate from a household electrical network within the parameters of its protective and regulating devices - plugs and fuses, automatic machines, etc. If the performance characteristics of the “welder” do not meet the requirements of the protective system of the electrical network, flashing lights, turning off machines, failure of household appliances throughout the house due to sudden voltage fluctuations are possible
The home welder must be equipped with the following:
- Current source.
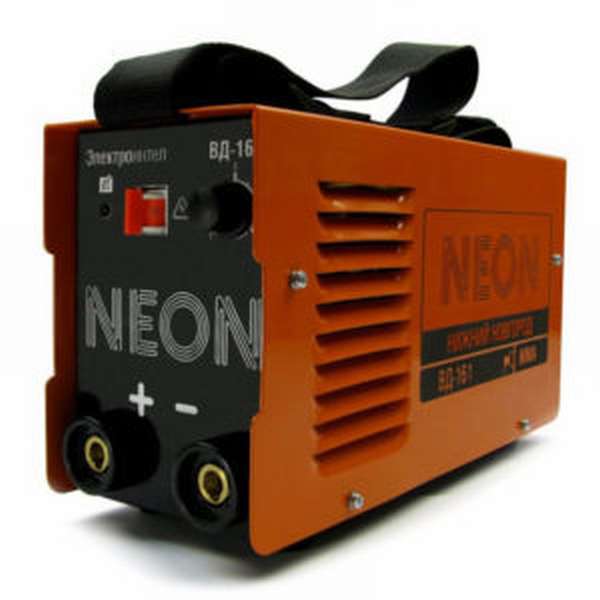
Currently, welding equipment for domestic use is often referred to as equipment for MMA (from the English. Metal Manual Arc - manual ES with piece coated electrodes). The electrical equipment market offers three types of current sources for home use:
- welding transformers operating on alternating current,
- welding rectifiers that convert alternating mains voltage into direct current,
- inverters that can work from a home outlet.
- A set of power cables and lead wires with carrying.
- Electrode holders (spring or lever), commonly called "holders".
- Welder's personal protective equipment:
- heat-resistant clothing, shoes, gloves or mittens,
- protective mask.
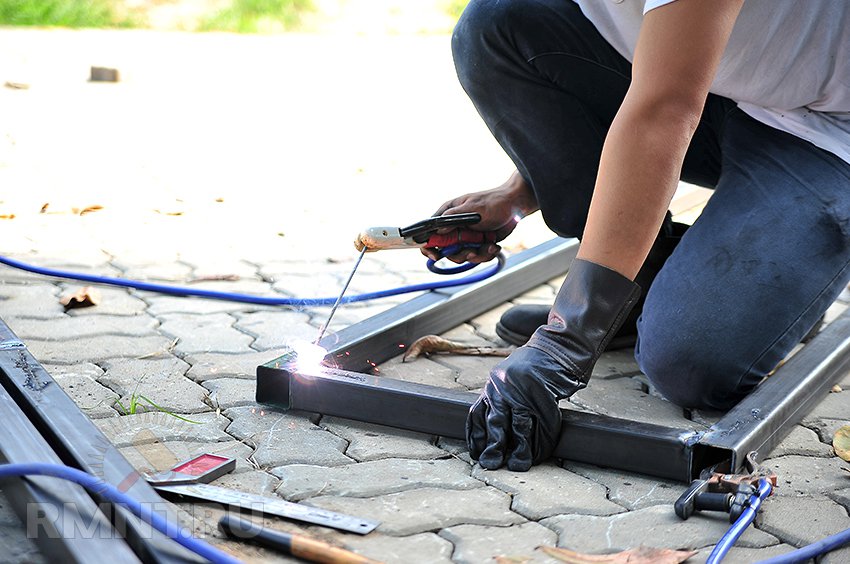
Electric Welding Technology
It is better to learn how to properly weld parts by electric welding under the guidance of experienced welders. If for some reason this does not work, you can try it yourself. First you need to properly organize the workplace
This is very important, since welding is a high-temperature, and therefore a fire hazardous process.
To work, you need to choose a workbench or any other base made of non-combustible material.Wooden tables and similar products are strictly prohibited. It is desirable that there are no flammable objects near the place where welding will be carried out.
Be sure to put a bucket of water near you to eliminate possible sources of ignition. In addition, you need to determine a safe place where the remains of the used electrodes will be stored. Even the smallest of them can start a fire.
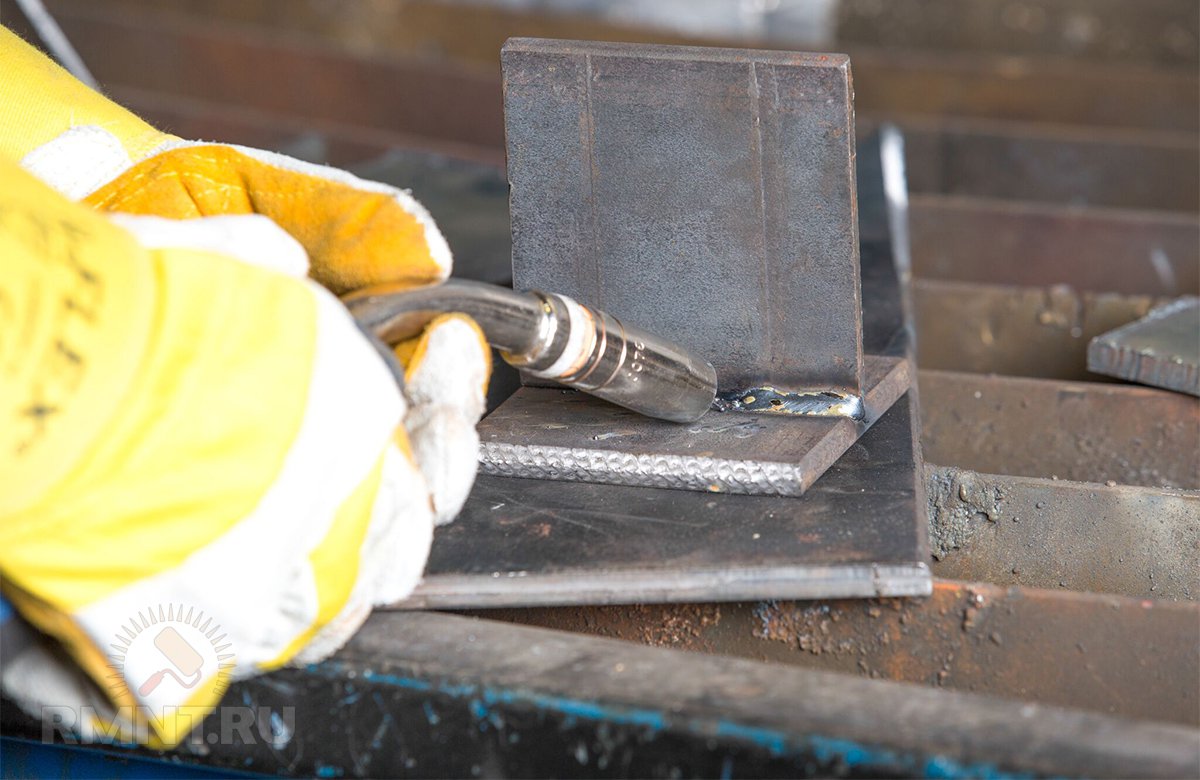
On sale you can find welding electrodes of different diameters. The required rod size is selected based on the thickness of the metal to be welded.
For the first independent seams, you need to prepare an unnecessary piece of metal and select electrodes for it. Experts recommend using 3 mm rods in such cases. The smaller diameter is used for welding thin sheets, which are inconvenient to learn from. Larger diameter electrodes require high equipment power.
We start by cleaning the area of \u200b\u200bmetal on which the seam will be located. There should be no rust or any contamination.
After the part is prepared, take the electrode and insert it into the clamp of the welding machine. Then we take the “grounding” clamp and firmly fasten it to the parts. Check the cable again. It must be tucked into the holder and well insulated.
Now you need to select the operating current power for the welding machine. It is selected according to the diameter of the electrode. We set the selected power on the panel of the welding equipment.
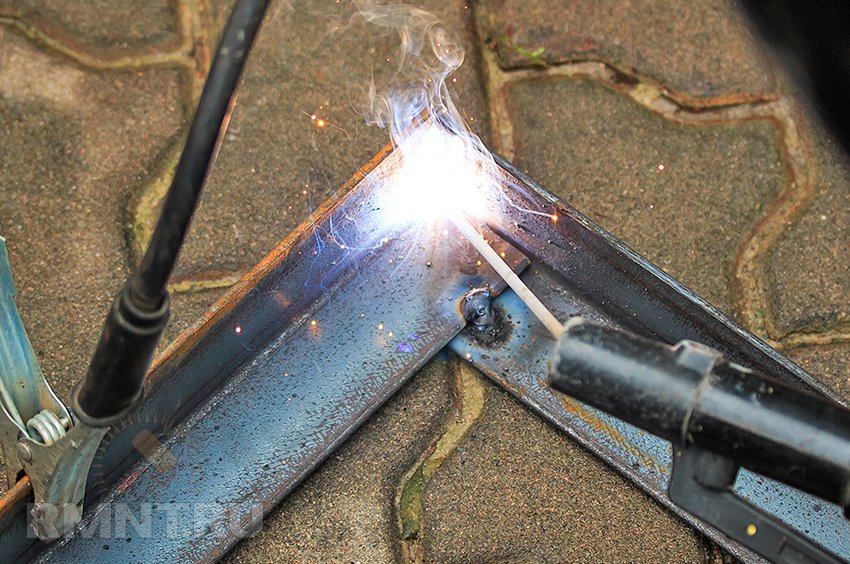
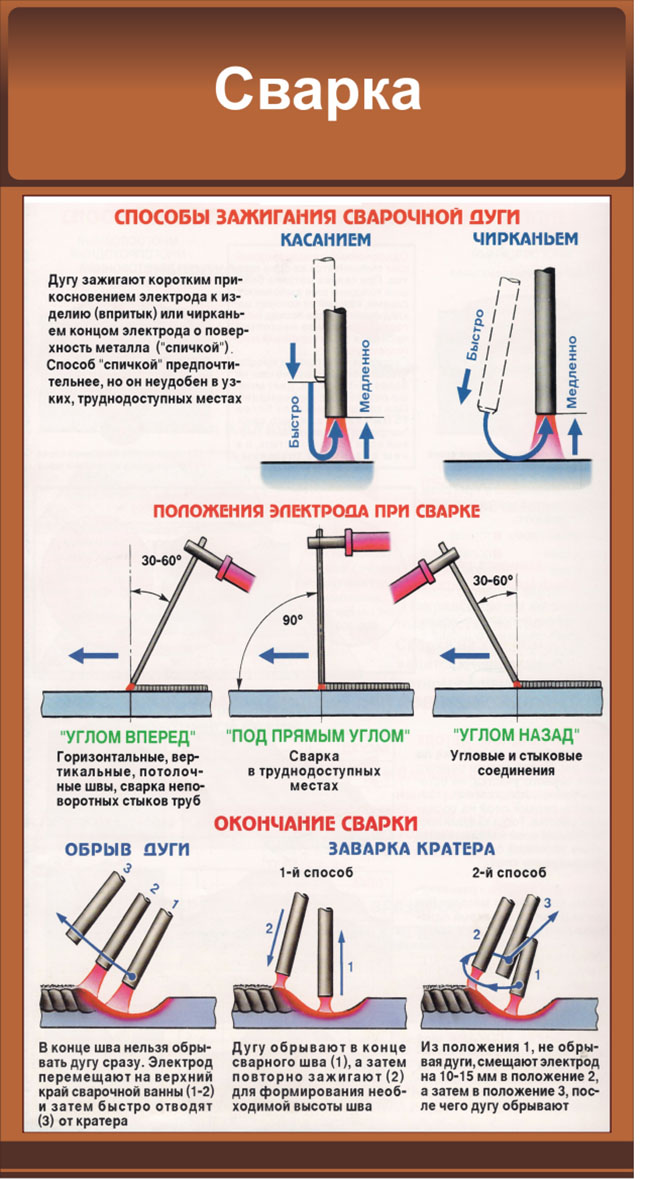
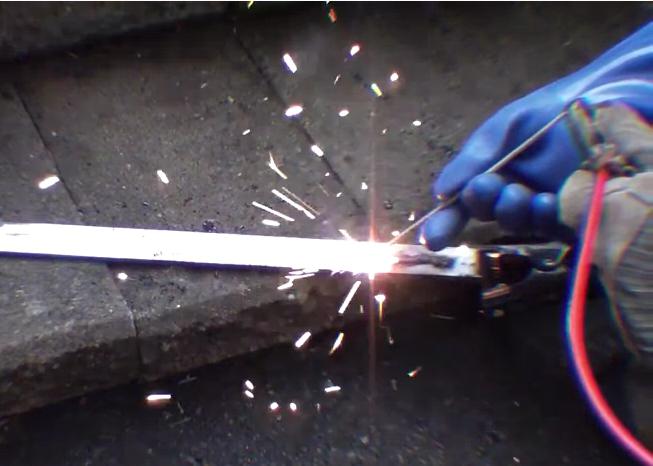
The next step is to ignite the arc. To do this, the electrode must be brought to the workpiece at an angle of about 60 ° and very slowly passed over the base. There should be sparks.As soon as this happens, lightly touch the electrode to the part and immediately raise it to a height of no more than 5 mm.
The welding inverter is ready for operation. Two cables are connected to it: one with a clamp for the electrode, the second with a grounding mount
At this moment, the arc flashes, which must be maintained throughout the entire operation time. Its length should be 3-5 mm. This is the distance between the tip of the electrode and the workpiece.

While maintaining the arc in working condition, it must be remembered that during operation the electrode burns out and becomes shorter. If the electrode is too close to the workpiece, sticking may occur. In this case, you need to slightly swing them to the side. The arc may not ignite the first time. Perhaps there is not enough current, then it needs to be increased.
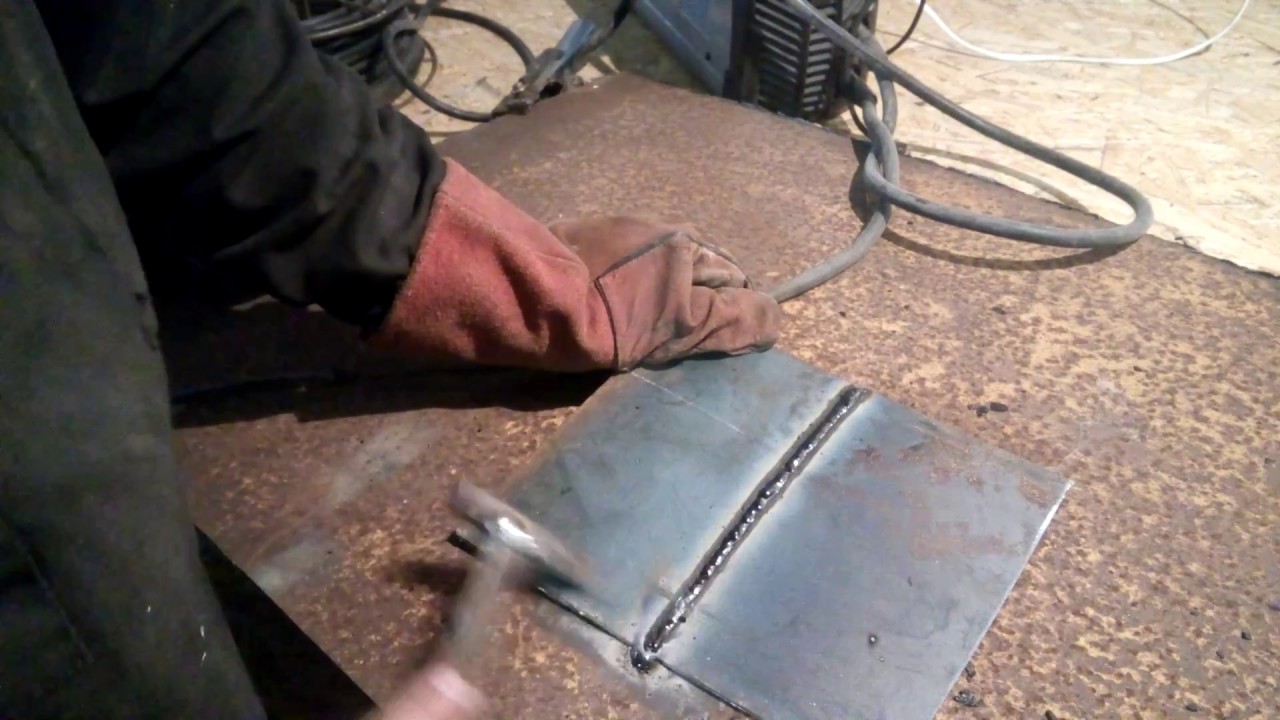
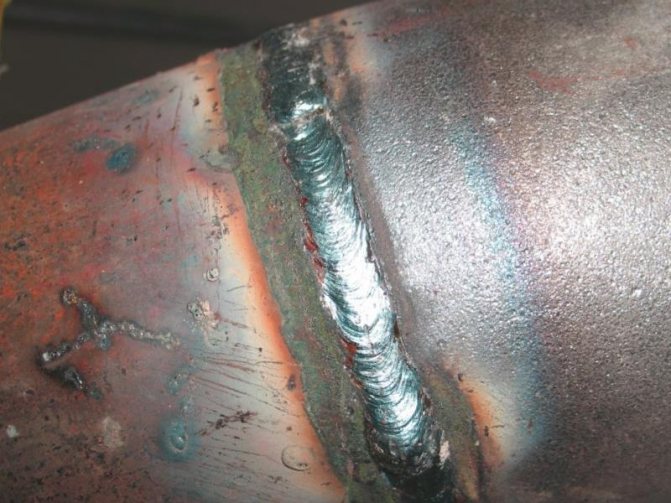
After the novice welder has learned to ignite the arc and keep it in working condition, you can start welding the bead. This is the simplest of all operations. We set fire to the arc and begin to very smoothly and carefully move the electrode along the future seam.
At the same time, we perform oscillatory movements resembling a crescent moon with a small amplitude. We kind of “rake” the molten metal to the center of the arc. Thus, you should get an even seam, similar to a roller. It will contain small wave-like influxes of metal. After the seam has cooled down, scale must be knocked into it.