- Where to install an electrical panel?
- Power supply scheme
- We think over the power supply
- We draw a diagram
- Installation of wiring in the apartment - what you need to remember?
- Where to start replacing wiring
- Power calculation
- Apartment power scheme
- The choice of electrical cables according to the rules
- Do-it-yourself wiring installation
- Open mounting option
- Flush wiring
- Electrical wiring in a private house
- DIY wiring
- Wire connection methods
- Selection of electrical installation equipment
- Drawing up a wiring diagram
- Action plan
- Why define a cross section?
- Making a plan and receiving a project
- Conclusions and useful video on the topic
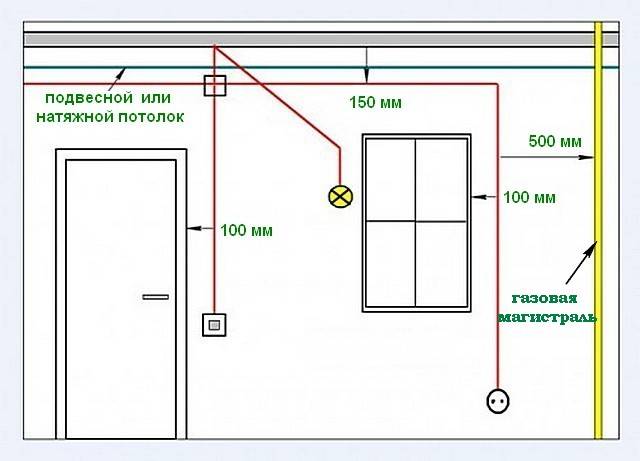
Where to install an electrical panel?

electrical panel
A specific place for mounting the shield is not indicated in any regulations. Only you can’t install it closer than 1 meter from any pipeline - a gas line, downpipes, sewerage, heating system, water conduit, you can’t even place gas meters nearby.
There are no prohibitions on the purpose of the premises, they often have shields in boiler rooms - it is convenient to collect all communications here, the selection committee will not express complaints. If the shield has a high protection class, then you can place the switchboard near the front door.

How to make a patio in the country with your own hands: a variety of design options, decoration and arrangement (85+ Photo Ideas & Video)
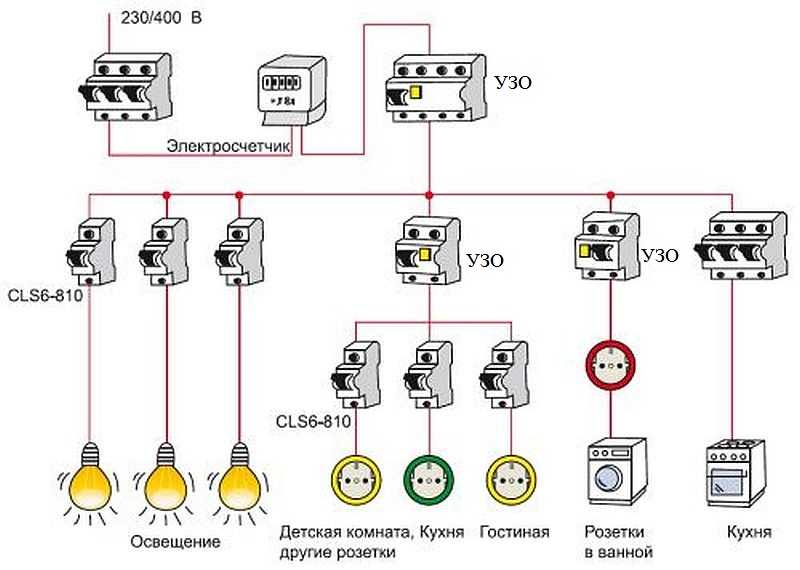
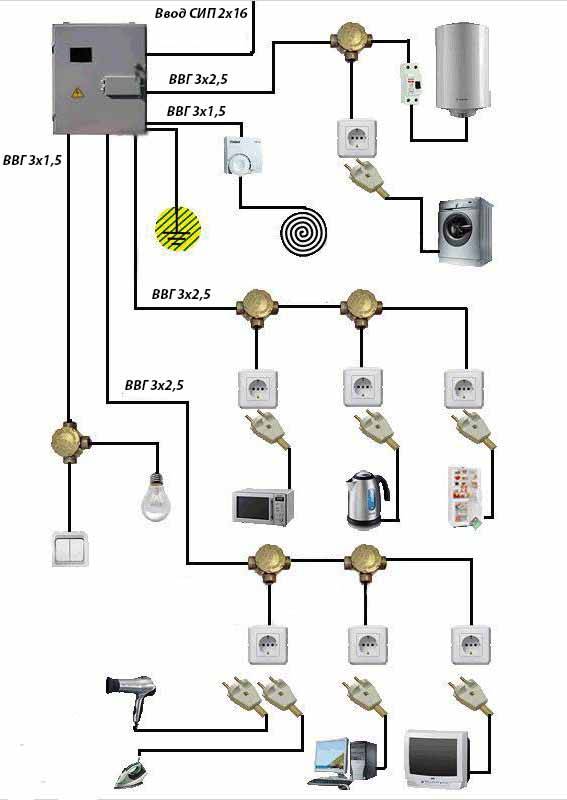
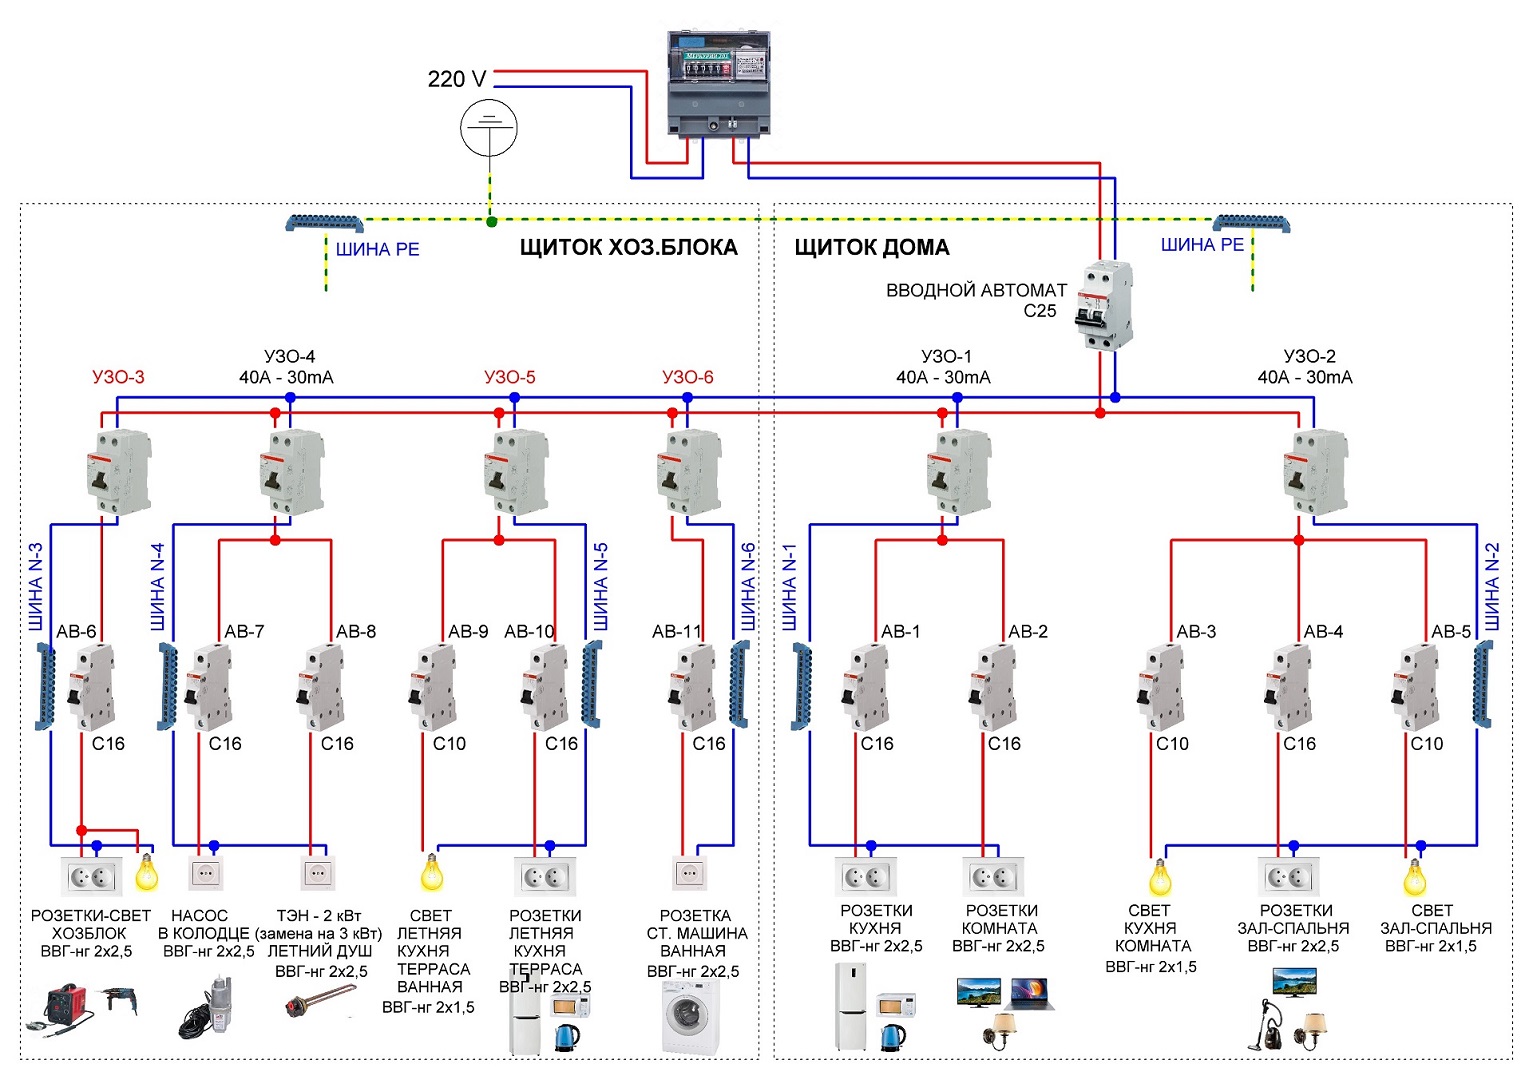
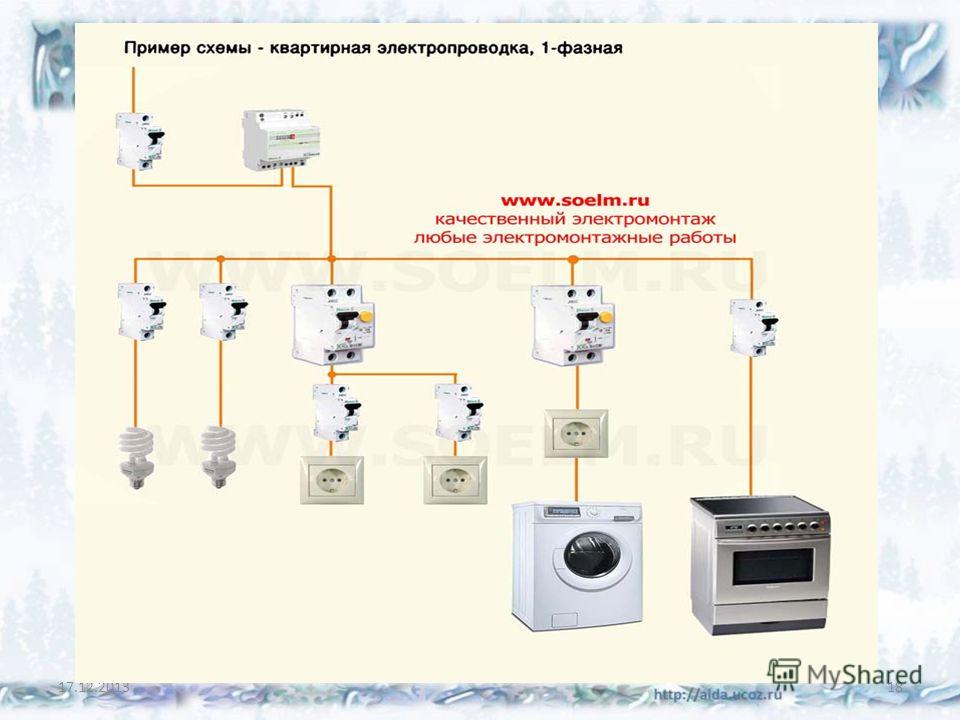
Power supply scheme
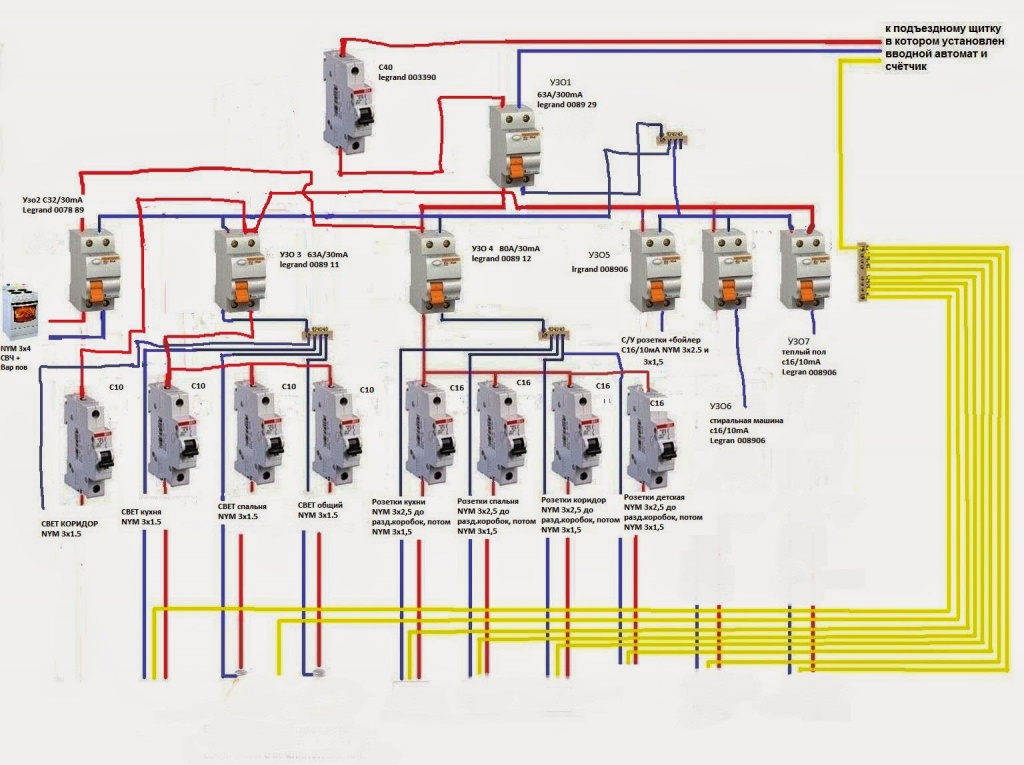
Take a look at the picture in the section. For now, just take a look. Let's give some explanations. First: kWA - electricity meter; RCD is a residual current device. Secondly, the power supply circuit is single-line.
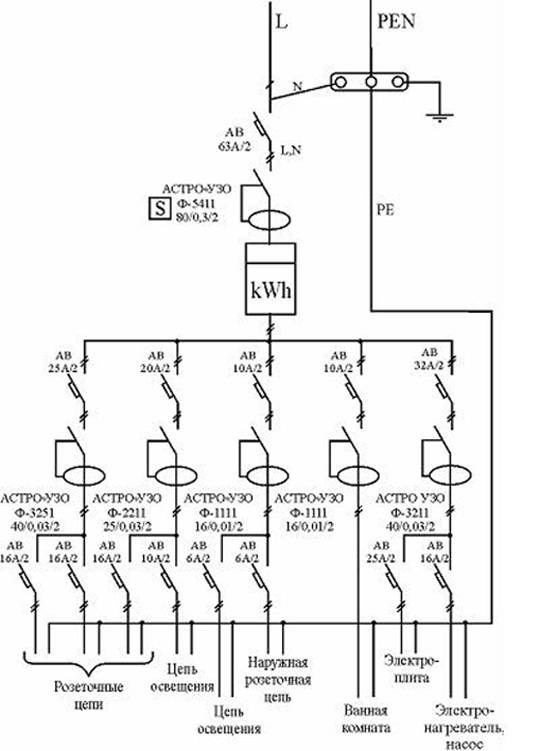
Single-line diagram of the power supply of the apartment
Pay attention to the two slashes that cross out the wire designation. This means that in real life there are two wires - phase L and zero N (neutral), laid together
The PE protective wire is not crossed out, which means it comes separately. If the input is three-phase, then there will be three dashes on the designations of its wires. Systems with an isolated neutral, which are not used in everyday life, do not touch.
Now look at the drawing carefully. This is a single-line power supply scheme for an elite apartment of 200 sq. m. If you understand everything in it in general, you can draw your own power supply scheme, even if you do not have an electrical engineering education and you do not know how to draw.
In the worst case, you will end up with a clumsy sketch. But according to him, a senior student looking for a part-time job or a retired electrician will be able to draw the correct scheme in half an evening and inexpensively. And if you entrust the scheme to a practicing specialist with a decent salary already, then it will cost a pretty penny. The trouble will not decrease for you: after all, he needs the initial data.
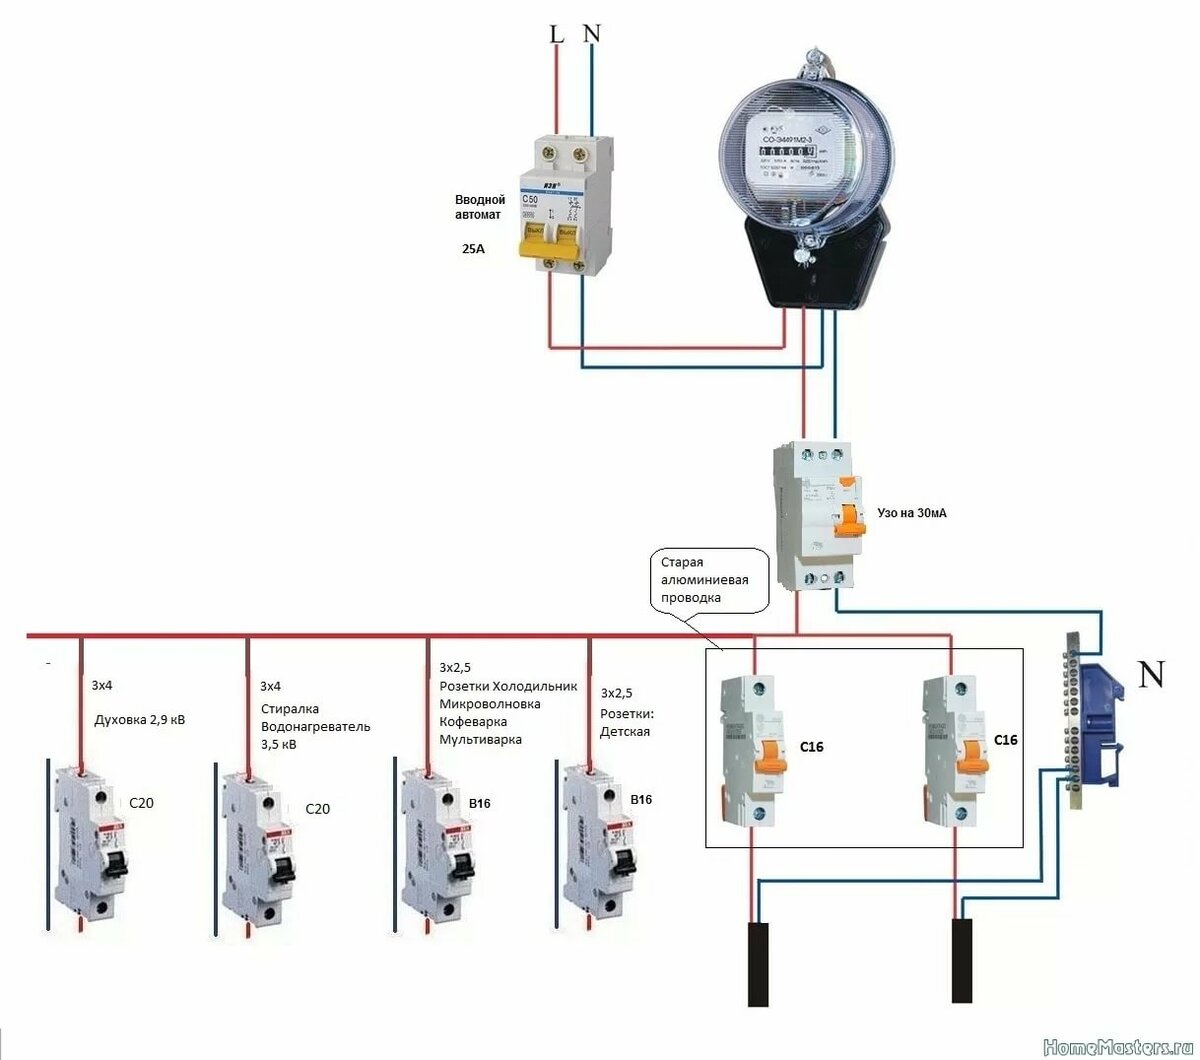
We think over the power supply
Proper wiring in the house depends primarily on the power consumption.In cottage settlements they give a consumption limit of 10-20 kW for housing, but in a city apartment this is unrealistic: either the machine in the entrance will always knock out, or, even worse, the house wiring will burn. And in old houses, where most often the replacement of wiring is required, the "Khrushchev" limit of 1.3 kW is laid down; at the limit - 2 kW.
However, no one turns everything on at once. Even in summer, when the air conditioners are on, they turn on out of time. Here, chance works for the consumer: with an average power consumption of 4.3 kW, house wiring is holding up. This limit is the basis for the calculation. True, if in the summer you start washing or ironing, you will have to turn off the air conditioner with the boiler, otherwise the main machine will cut down the entire apartment. But you will have to come to terms with this.
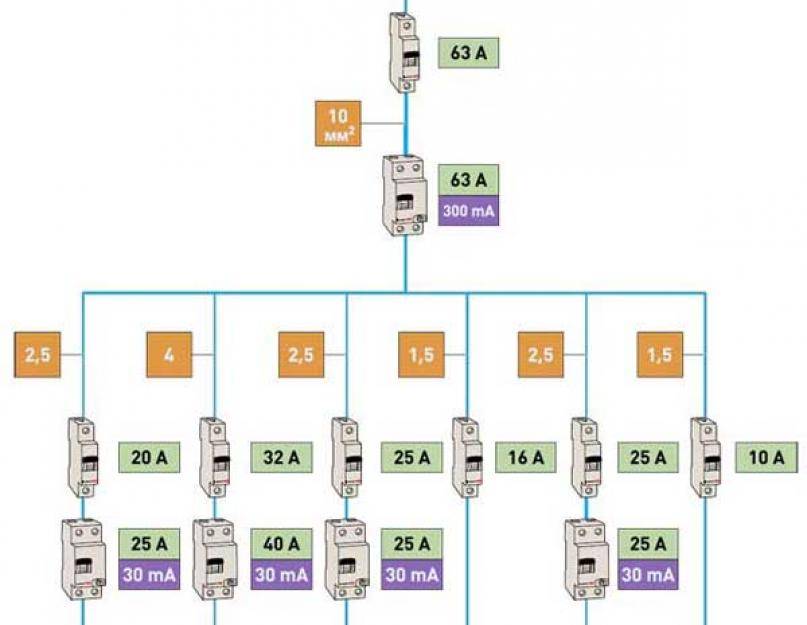
Without going into the details of the calculation, we will immediately give data for an average city apartment of 40-100 square meters. m of total area:
- The main machine - from 25 to 32 A, depending on the area. For the meticulous: the current safety factor is 1.3-1.5. It is impossible to give 2 in apartment buildings: the general wiring is “stunted”.
- Apartment RCD - 50 A 30 μA unbalance.
- Kitchen - two wiring branches of 4 square meters. mm; on each - an automatic machine for 25 A and an RCD of 30 A 30 μA. Washing the bathroom - from the kitchen; not indicated on the diagram, see below.
- Air conditioning - a branch of 2.5 sq. mm; automatic - 16 A, RCD - 20 A 30 μA.
- Socket circuits and lighting circuits - one and the other in each room, except for the bathroom and the bathroom; in them - only lighting; the bathroom is yet to be discussed. The cross section of the prodods is 2.5 sq. mm; automatic shutdown is not needed, the general apartment is enough.
That's all the source code for a single-line power supply circuit for an apartment. You can draw.
Figure: graphic diagrams for “visibility”:
We draw a diagram
As a basis, you can take the diagram given. Its top, from the exit from the counter, remains unchanged, you only need to change the numerical data. The brand of RCD does not matter: if you end up putting others instead of ASTRO-RCD, this does not violate anything.


In case of doubt regarding the designations, see the Appendix to the PUE (Rules for the installation of electrical installations of consumers) or GOST 2.755-87 (CT SEV 5720-86). Just keep an eye on the GOST number: for some reason, a lot of links to GOST 2.721-74 and even GOST 7624-55 pop up in the search, which are no more useful now than the Moral Code of the Builder of Communism, which was personally edited by a dear comrade and unforgettable General Secretary at one time Leonid Ilyich.
When drawing a diagram, observe the dimensions of the symbols of the elements: their scaling is not allowed. If, for example, an electric capacitor is indicated by two parallel lines 0.5 mm thick and 10 mm long at a distance of 2 mm from one another, then so be it, even if it is alone on a sheet of drawing paper A0.
Installation of wiring in the apartment - what you need to remember?
Before connecting the electrical wiring in the apartment, you need to take several important preparatory steps. So, we have already talked about the design and drawing of the circuit - a very important step on which the quality of installation depends. The next step is the implementation of the markup in the wiring diagram, along which the wires will be laid and a temporary shield installed.
It is desirable to start work by laying the main bundle of cables, their branches and indicating their turns. Do not forget that the cable arrangement must be vertical or horizontal. After finishing, draw a diagram that you will need when carrying out the main work.After that, we need to purchase tools and other construction devices (we choose them based on the material of the walls and other surfaces):
- grinder for working with concrete and brick surfaces;
- mounting chisel - suitable for working with foam blocks and plaster.

This tool will be needed to create recesses in walls and other surfaces when laying wires. Next, we proceed to the preparation of electrical wiring - cutting cables. When cutting them to the required length, do not forget to leave about 15 cm of cable in reserve for connecting the cables to each other. Next, you need to prepare a mixture for embedding, which in its characteristics will be similar to that applied to the walls for decoration. It is needed to secure the wires in the strobe and level the surface. Having prepared the solution, we apply it on the walls and wait until the mixture dries a little, after which we level the irregularities using a foam grater.
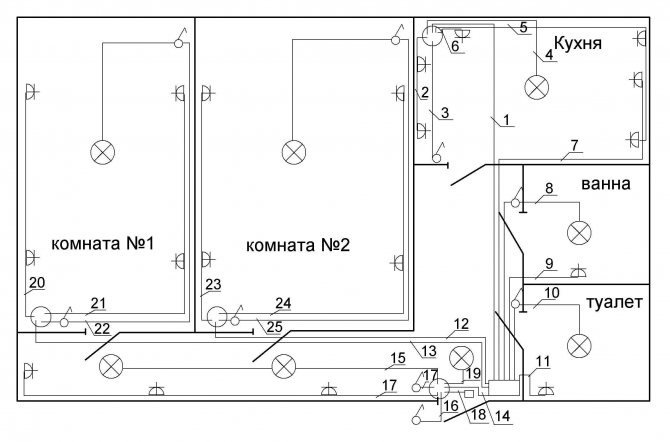
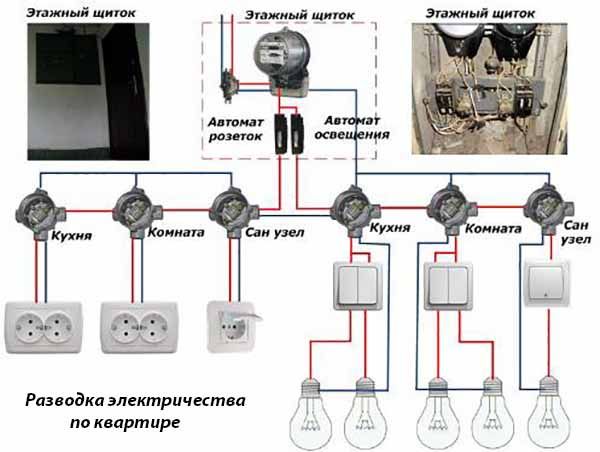
Where to start replacing wiring
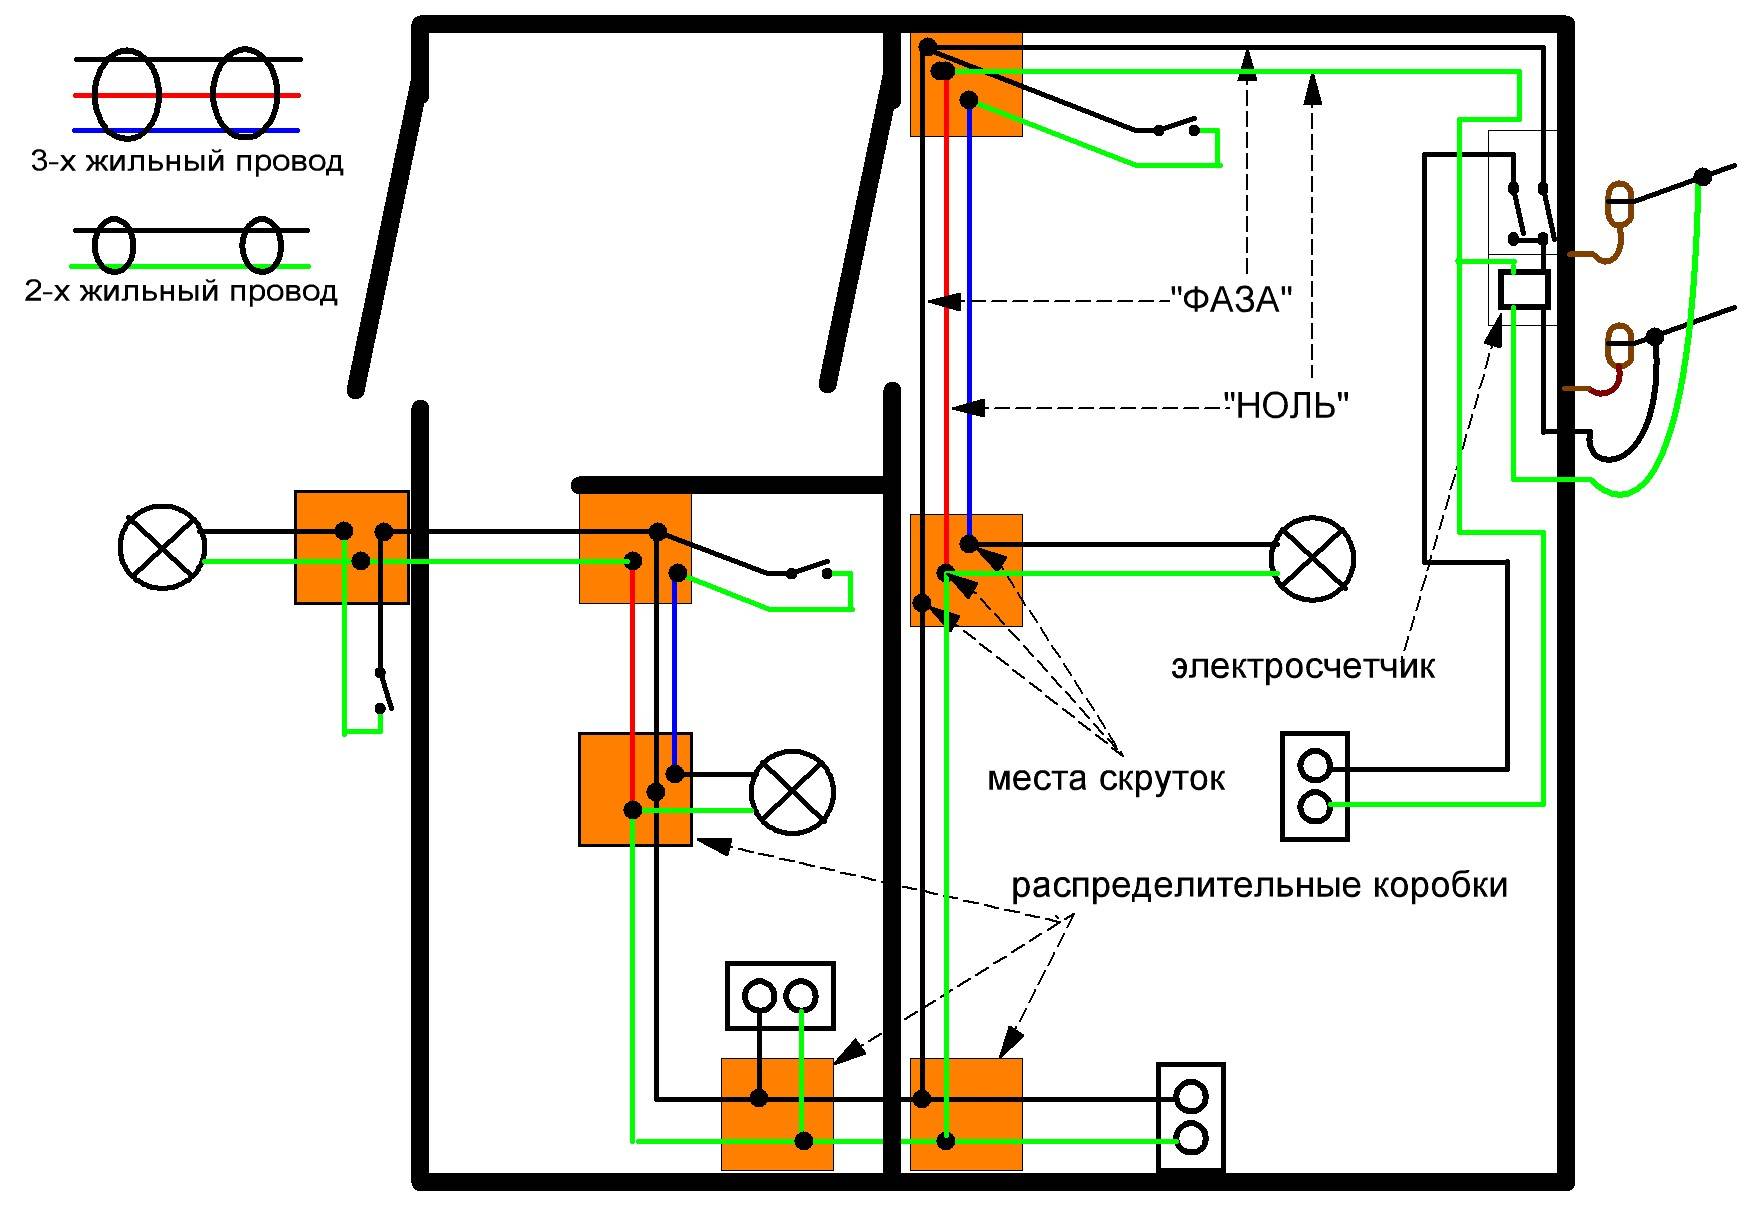
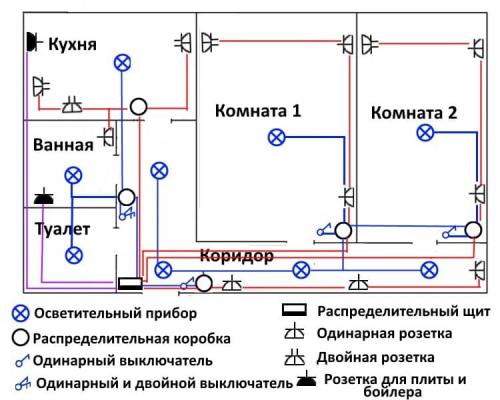
Structural diagram of the electrical wiring of the apartment
At the preparatory stage, a plan is drawn up for a new wiring in a two-room apartment. It is coordinated in the BTI and Energosbyt. Preparation also includes:
- Visual inspection of the line for visible damage.
- Drawing up a drawing with the electrical systems of the whole house.
- Purchase of consumables - sockets, cables, switches, boxes.
- Search for the right tools - puncher, grinder, indicator, side cutters, level, lantern, mounting knife, pliers, soldering iron, fabric electrical tape.
Buy a wire with allowances after measuring the length of the route.
Power calculation
 Approximate power of various electrical appliances
It is necessary to replace the electrician so that in the future there will be no failures and overvoltage of the network. The power of the line is selected taking into account all electrical equipment and depends on the cable section. You will need to do several calculations:
- Sum up the capacities of all equipment connected to the power grid.
- Add +100W per fixture.
- Divide the total by 220.
If the result is 12-15, it is allowed to use a cable with a cross section of 1.5 mm2. For an apartment of a standard layout, this is enough.
When there is a large load on the line, it is allowed to increase the cable cross-section, equip communications in a two-wire or three-wire scheme.
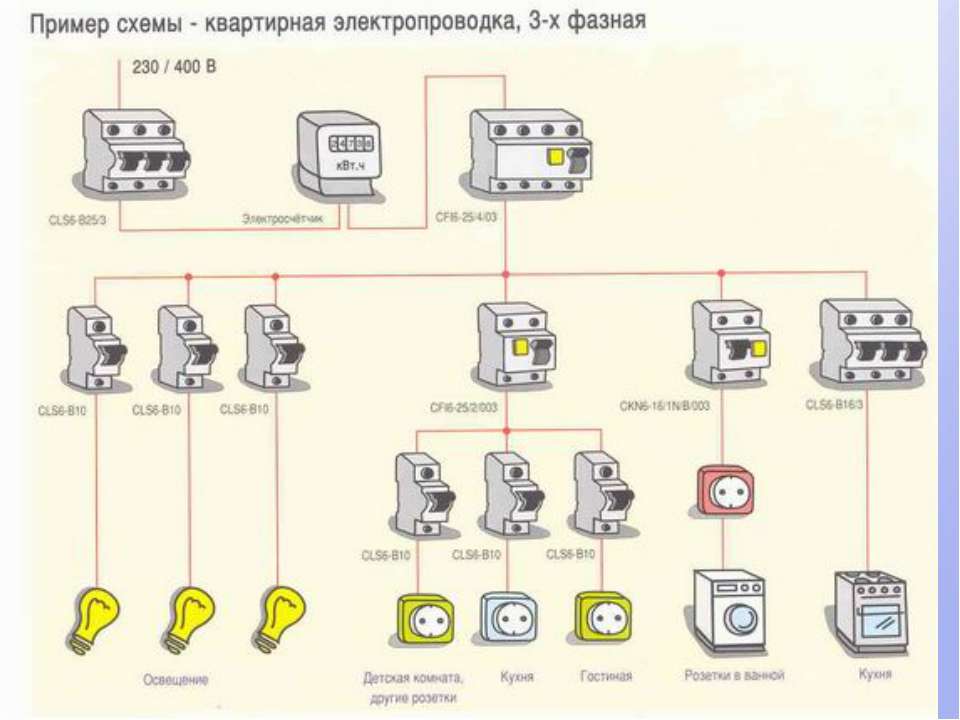
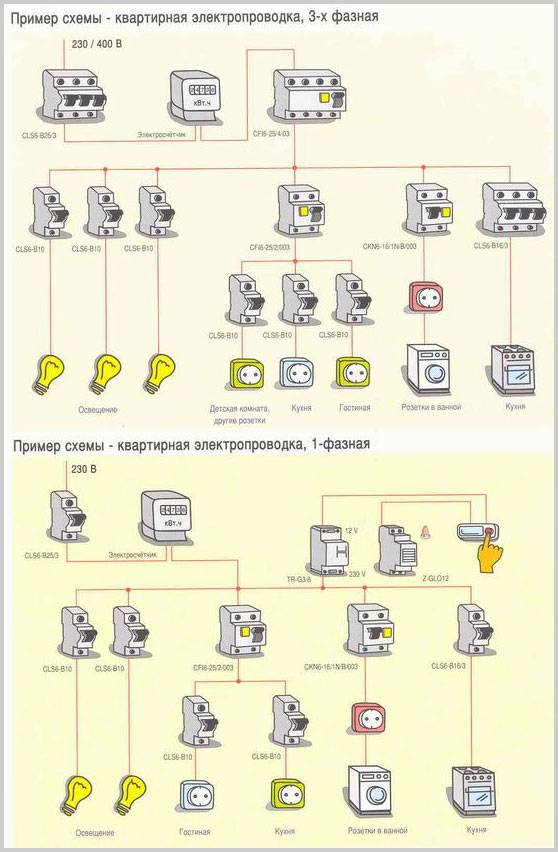
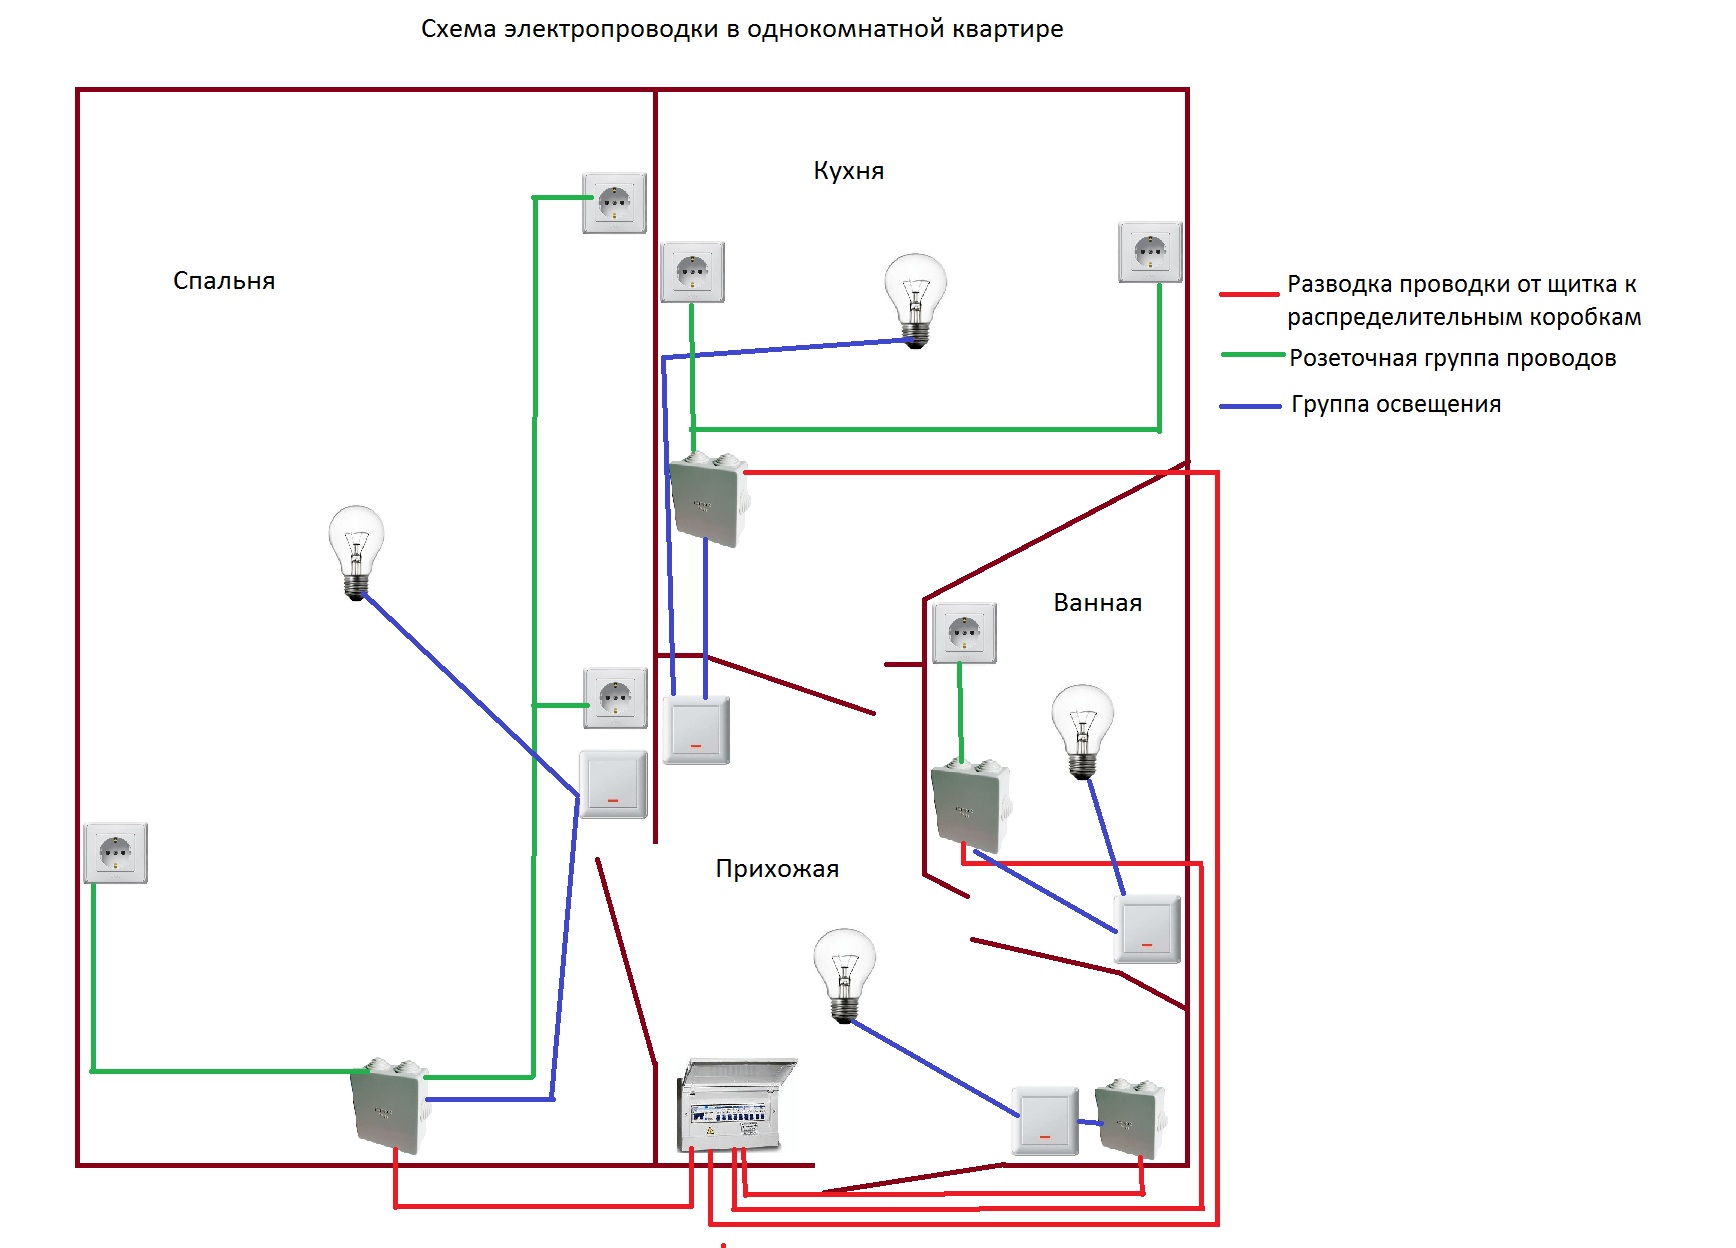
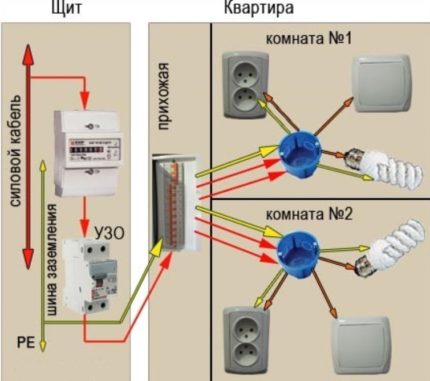
Apartment power scheme
 The power supply scheme of the apartment through the RCD
In old houses, there is an electrical panel on each floor, where there is a meter, a batch switch, and circuit breakers. Therefore, when a wiring diagram is designed in a two-room apartment, it is worth making an independent power and lighting circuit, planning the main and additional branches. In Khrushchev, the following connection options are allowed:
- Parallel - energy is supplied to the consumer from the power source through its own line. A three-core cable is connected to a single-phase device, a five-core cable with wires of phases A, B, C, zero and earth to a three-phase device. Such a scheme provides for the organization for each consumer of its own line and the installation of an individual RCD.
- Serial - a cable is pulled from one power source, and the consumer is connected to it at a certain distance. To implement the scheme, you will need a wire with a large cross section and strobes in the walls. The source of energy will be a generator that delivers a nominal value of 220 V.To save money, you can stretch the electrical cable from the shield to a specific consumer.
- Series-parallel - the scheme is used in most apartments. The junction box is designed for consumers grouped by type (boiler, sockets, light) or location (kitchen, bedroom, bathroom).
The choice of electrical cables according to the rules
Modern safety requirements, not an ultimatum, recommend wiring in residential premises NOT with wires, but with electric cables.
A wire is an electrically conductive conductor made of copper or aluminum, covered with a layer of insulation.
A cable is several wires, twisted into a bundle at the factory and covered with one or two soybeans of a common insulating sheath.
For wiring apartments are recommended:
- VVGng or NYUM cables for hidden or open wiring;
- PVA cables, only for connecting mobile household appliances to electrical sockets or power supply.
Other wires of the PUNP type are prohibited due to the lack of a single GOST for their production and, as a result, low quality.
- The cross section of the cable cores for an apartment (house) is very easy to choose:
- For lighting, we select cables with a cross section of 2 × 1.5 mm;
- For sockets, cables with a cross section of 3 × 2.5 mm (cables with grounding);
- For an electric stove, cables are 3 × 4 mm, less often 3 × 6 m. It all depends on the power of the stove.
Important! If you are repairing electrical wiring made with aluminum cables (wires), then you need to use aluminum wires (cables) for repairs. New electrical wiring, as well as additional sockets and lighting, must be laid using copper electrical cables.
The connection of copper and aluminum conductors should be carried out only through connecting terminals, which do not allow copper and aluminum to touch
New electrical wiring, as well as additional sockets and lighting, should be laid using copper electrical cables. The connection of copper and aluminum conductors should be carried out only through connecting terminals, which do not allow copper and aluminum to touch.
Do-it-yourself wiring installation
If the preliminary calculations were performed correctly, and the future wiring diagram was drawn up correctly, there will be no installation problems. The main thing is to observe safety precautions.
The first stage of work is markup. The cable laying line is drawn with a bright marker directly on the walls / ceiling and strictly according to the scheme. All necessary notes are made - the location of sockets, switches, lamps, appliances, a shutdown switchboard (SchO).
Stage two - wall strobe (strobe depth is approximately 20 mm, the width is equal to the width of the cable being laid), if the wiring is hidden. Or the wires are installed in an open way.
For equipment, all holes are made with a perforator (“crown” nozzle). In the corners of the premises, through holes are necessarily made for the cable transition.
On the ceiling, the cable can be attached directly to the ceilings or hidden in their voids (with the design of input / output holes), and then close everything with a decorative ceiling.
The step-by-step installation of electrical wiring after all the preparatory measures is as follows:
- First, the SCW is installed, and the RCD is connected to it (ground terminals are located in the standard shield at the bottom, zero terminals are at the top, and automata are installed between them).
- Further inside the cable starts, but does not connect. Please be aware that only an electrician with the appropriate professional qualifications and permitting certificate can connect this cable.
- The input cable to the SC is connected as follows:
- the blue wire is attached to zero;
- white wire - to the upper contact of the RCD (that is, to the phase);
- yellow with a green stripe, the wire is attached to ground.
As for the machines, they are connected in series from above with a white jumper wire or a special factory bus.
Important: you should look very carefully at the markings and accompanying marks of the cable manufacturer - the colors may differ from those given above. And now, when everything that is needed and can be connected, you can proceed directly to the wiring
And now, when everything that is needed and can be connected, you can proceed directly to the wiring.
Open mounting option
Open wiring is mounted in series:
- according to the markings, boxes or cable channels are fixed (on self-tapping screws, 5-10 cm from the edge, step 50 cm);
- junction boxes, switches, sockets are installed;
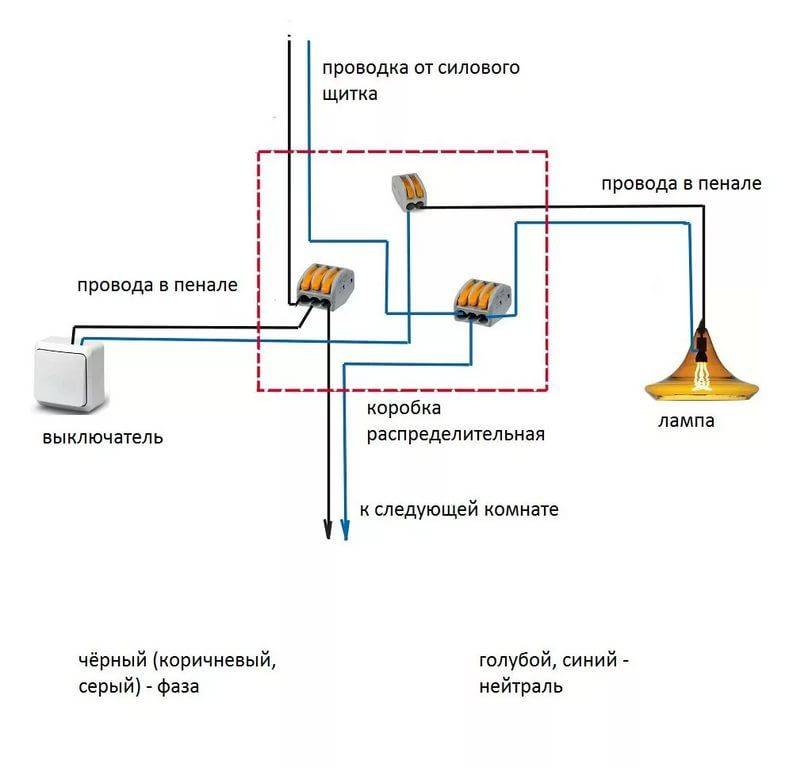
- a cable is laid from the sockets to the switchgear (from the connection points of the VVG - 3 * 2.5 wires);
- VVG (3 * 1.5 cable) is led from light bulbs and switches to the distribution box.
- in junction boxes, the wire cores are connected with clamps or WAGO terminals according to color.
Flush wiring
The difference between hidden and open wiring is that the wire in the first version is placed along special corrugations in pre-designed strobes. This method allows the replacement/repair of wiring without seriously disturbing the finish. In this case, junction boxes and socket boxes are placed in specially made niches.
To seal the wiring, you can use gypsum putty, and after installation, the strobes of hidden electrical wiring are plastered.
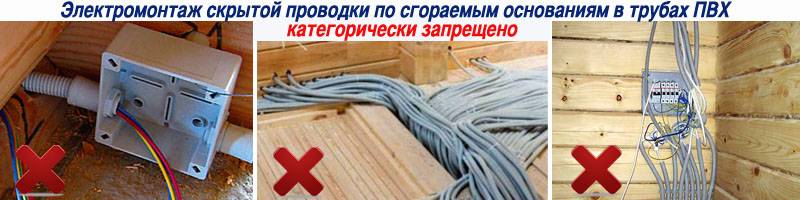
Electrical wiring in a private house
In a private house or country house, the design of an electric cable will require special security measures. After all, such structures can be made of wood. And the wiring in them must be mounted taking into account the following requirements:
- the use of cables with perfect insulation and self-extinguishing wires;
- the use of exclusively metal distribution and installation boxes;
- mandatory sealing of any connections;
- preventing contact of open wiring with walls and ceilings (it is imperative to use porcelain insulators);
- maintaining hidden wiring only through copper pipes and steel wires, always with the provision of grounding;
- installation of plastic corrugations and boxes in plaster.
And in order to increase the safety of wooden housing, experts recommend installing an RCD in such houses - a differential relay that promptly reacts to a possible current leakage or short circuit by “knocking out” the machine.
DIY wiring
Modern construction trends include hidden wiring. It can be laid in grooves specially made in the walls - strobes. After laying and fixing the cables, they are covered with putty, comparing with the surface of the rest of the wall. If the erected walls will then be lined with sheet materials - drywall, GVL, etc., then strobes are not needed. Cables are laid in the gap between the wall and the finish, but in this case - only in corrugated sleeves. The sheath with laid cables is fastened with clamps to the structural elements.
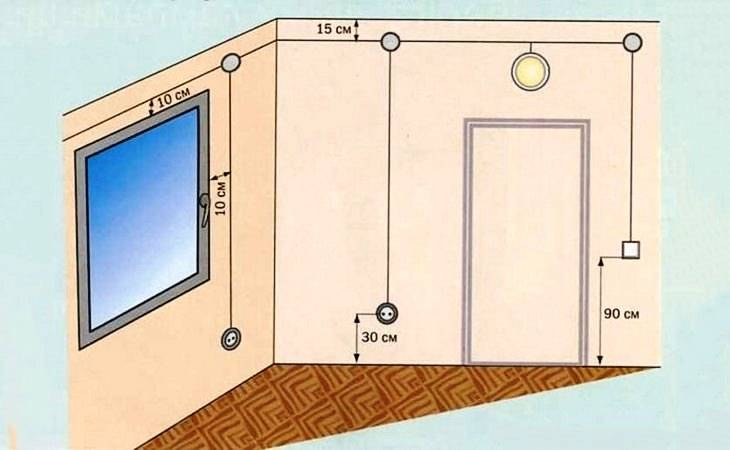
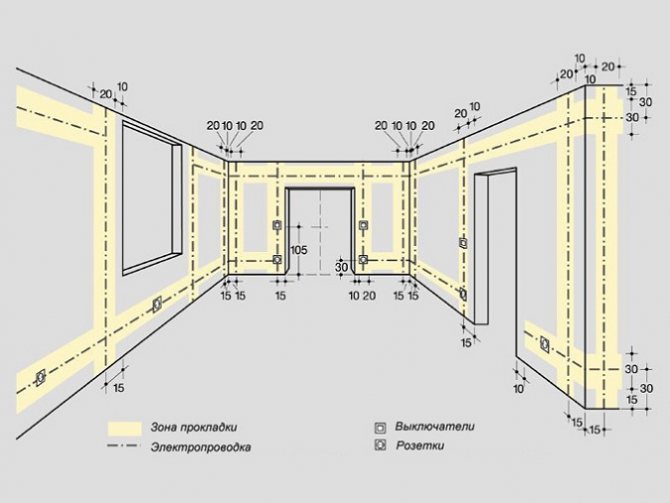
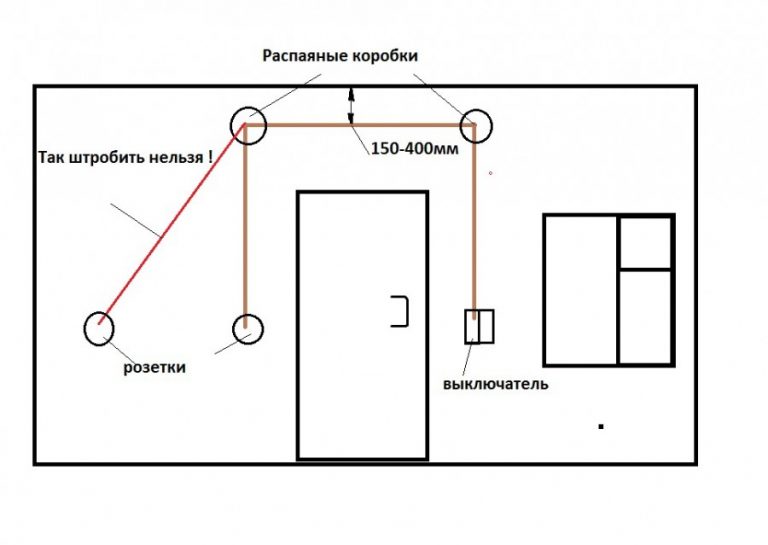
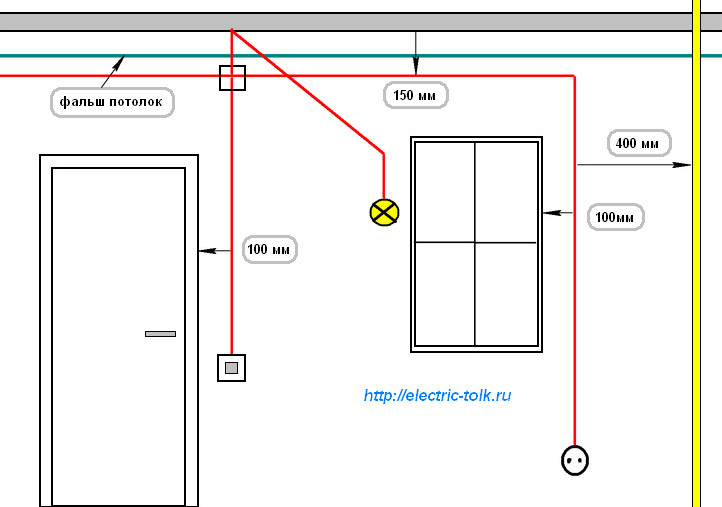
How should internal wiring be laid?In a private house, when arranging with your own hands, you must follow all the rules
When laying, you need to remember that the internal wiring of a private house is done in accordance with all the rules and recommendations. This is the only way to guarantee safety. The basic rules are:
- wiring only vertically and horizontally, no rounded corners or beveled routes;
- all connections must be made in mounting junction boxes;
- horizontal transitions must be at a height of at least 2.5 meters, from them the cable goes down to the outlet or to the switch.
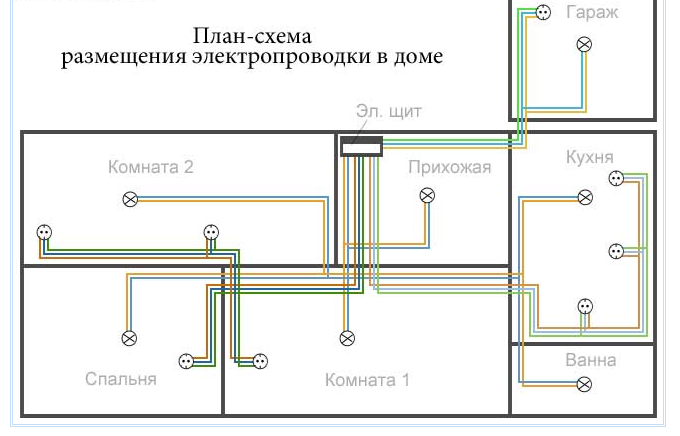
A detailed route plan, similar to the one in the photo above, must be saved. It will come in handy during the repair or modernization of wiring. You will need to check with him if somewhere nearby you need to ditch or make a hole, hammer in a nail. The main task is not to get into the cable.
Wire connection methods
A large percentage of wiring problems stem from poor wire connections. They can be done in several ways:
- Twisting. Only homogeneous metals, or those that do not enter into a chemical reaction, can combine in this way. It is impossible to twist copper and aluminum categorically. In other cases, the length of the bare conductors must be at least 40 mm. Two wires are connected to each other as tightly as possible, the turns are stacked one next to the other. From above, the connection is wrapped with electrical tape and / or packed with a heat shrink tube. If you want the contact to be 100%, and the losses to be minimal, do not be too lazy to solder the twist. In general, according to modern standards, this type of wire connection is considered unreliable.
The rules for installing electrical wiring in a private ohm prohibit making twists in the walls (bricking them up) - Connection via terminal box with screw terminals. Metal terminals are soldered in the case made of heat-resistant plastic, which are tightened with screws. The conductor, stripped of insulation, is inserted into the socket, fixed with a screw, using a screwdriver. This type of connection is the most reliable.
Connecting electrical wiring using terminal boxes is fast, convenient, reliable, safe - Connecting blocks with springs. In these devices, contact is provided by a spring. A bare conductor is inserted into the socket, which is clamped by a spring.
And still, the most reliable connection methods are welding and soldering. If it is possible to make the connection like this, we can assume that you will not have problems. At least with connections.
Do-it-yourself installation of electrical wiring in a house requires careful fulfillment of all requirements. This is a guarantee of your privacy and the safety of your private property.
After the wires from the machine to the point of connection of the socket or switch are laid, they are checked for integrity with a tester - the wires ring among themselves, checking the integrity of the conductors, and each individually to the ground - checking that the insulation is not damaged somewhere. If the cable is not damaged, proceed with the installation of the socket or switch. Having connected, they check it again with a tester. Then they can be started on the appropriate machine. Moreover, it is advisable to immediately sign the machine: it will be easier to navigate.
Having finished the electrical wiring throughout the house, having checked everything on their own, they call the specialists of the electrical laboratory. They check the condition of conductors and insulation, measure grounding and zero, based on the results they give you a test report (protocol).Without it, you will not be given a commissioning permit.
Selection of electrical installation equipment
Before starting installation, you need to buy the electrical panel itself and all electrical installations and devices that will make up its content. It should be taken into account that each item occupies a certain number of mounting places on a DIN rail - a metal bar 3.5 cm wide. One or several DIN rails can be located in one box.
Under one "mounting place" a segment on a profile with a length of 1.75 cm is taken into account - a module. The passport of the electrical panel must indicate how many modules it is designed for.
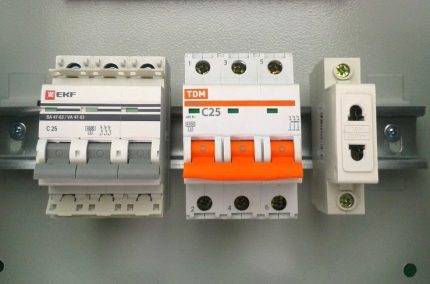 Three devices are fixed on one DIN rail: the first two occupy 3 modules each, the third one - one module. Leaving space between nearby devices to save space is not recommended.
Before choosing a shield, add up the number of all modules, and then add a few places to the resulting amount that may come in handy in the future. For example, let's calculate which box is needed for a 1-room apartment.
 According to the scheme, we determine how many modules each of their devices occupies: a 4-pole machine at the input - 4 places, a counter - 6, RCBO - 2 x 2, machines - 4. The result is 18 modules
For 18-20 seats, an electrical panel for 24 modules is suitable. But if the apartment is large, and in the future it is planned to purchase new equipment, install underfloor heating or repair with the replacement of wiring, then it is better to purchase a box for 36 seats.
If you want to simplify further work, make the network protection maximum, and the location of the modules convenient, try to choose a shield with a complete set, and these are:
- removable frame with DIN rails;
- input holes and holders for fastening cables;
- two tires, working and protective zero - with stands and installation sites;
- a set of fasteners for mounting;
- wire organizers.
Shields are metal and plastic, built-in and hinged.
Let's see how they differ fundamentally.
Experienced electricians recommend working with one store. The advantages of buying from a large supplier are a large assortment of goods and the guarantee of receiving original products, not fakes. Therefore, it is better to purchase both the shield and the rest of the electrical installation products in one place.
In addition to the meter and protective devices, you will need:
- combs for several poles with end caps - for connecting modules to each other, simplifying installation and saving space;
- 2-3 meters of wire PV1 with a cross section, like that of the input cable, and color coding of the insulation;
- zero tires or cross-modules for group RCDs;
- clamps and ties for organizing conductors;
- limiters for DIN rails;
- stubs for masking empty seats.
If financial possibilities allow, then it is better to select equipment from one trusted manufacturer - Hager, ABB, Legrand, Schneider Electric. Devices of the same brand are easier to mount, and the shield will look much more aesthetic.
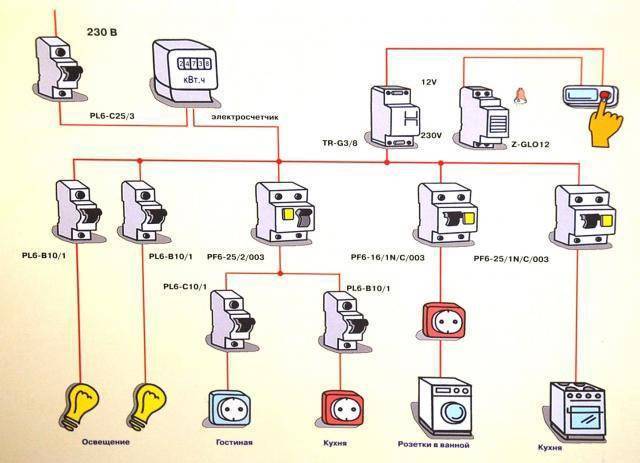
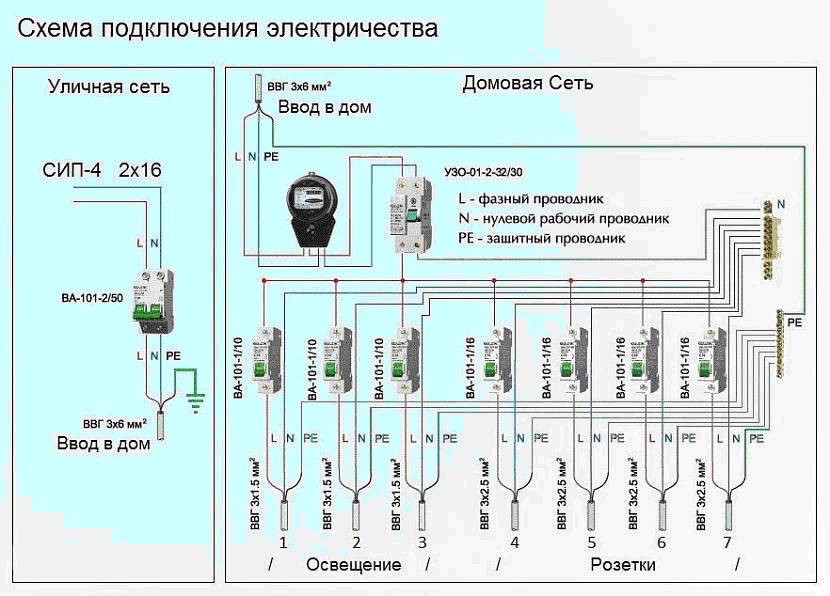
Drawing up a wiring diagram
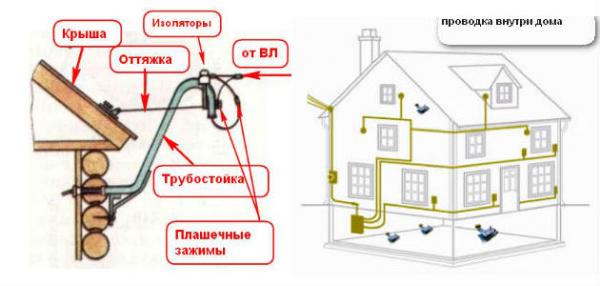
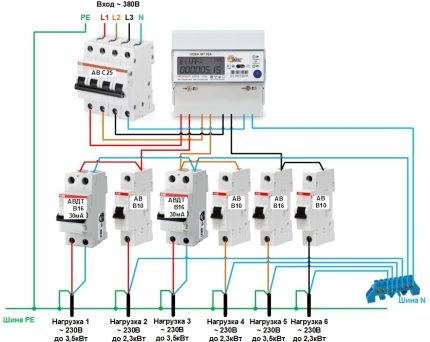
Let's make a reservation right away: we are talking about a single-phase network with a voltage of 220 volts, which is already connected to a private house with an area of 100-150 m² or an apartment. Specialized organizations are engaged in the design and installation of three-phase 380 V electrical networks for large country cottages.In this case, it does not make sense to take on the electrical wiring on your own, because without a power supply project and agreed executive documentation, the management company will not allow connection to its communications.
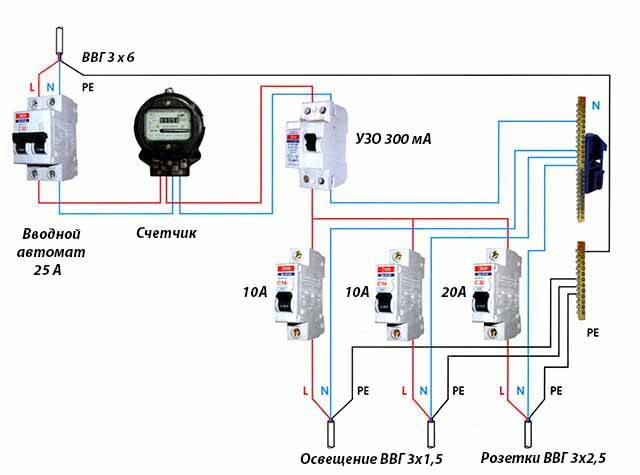
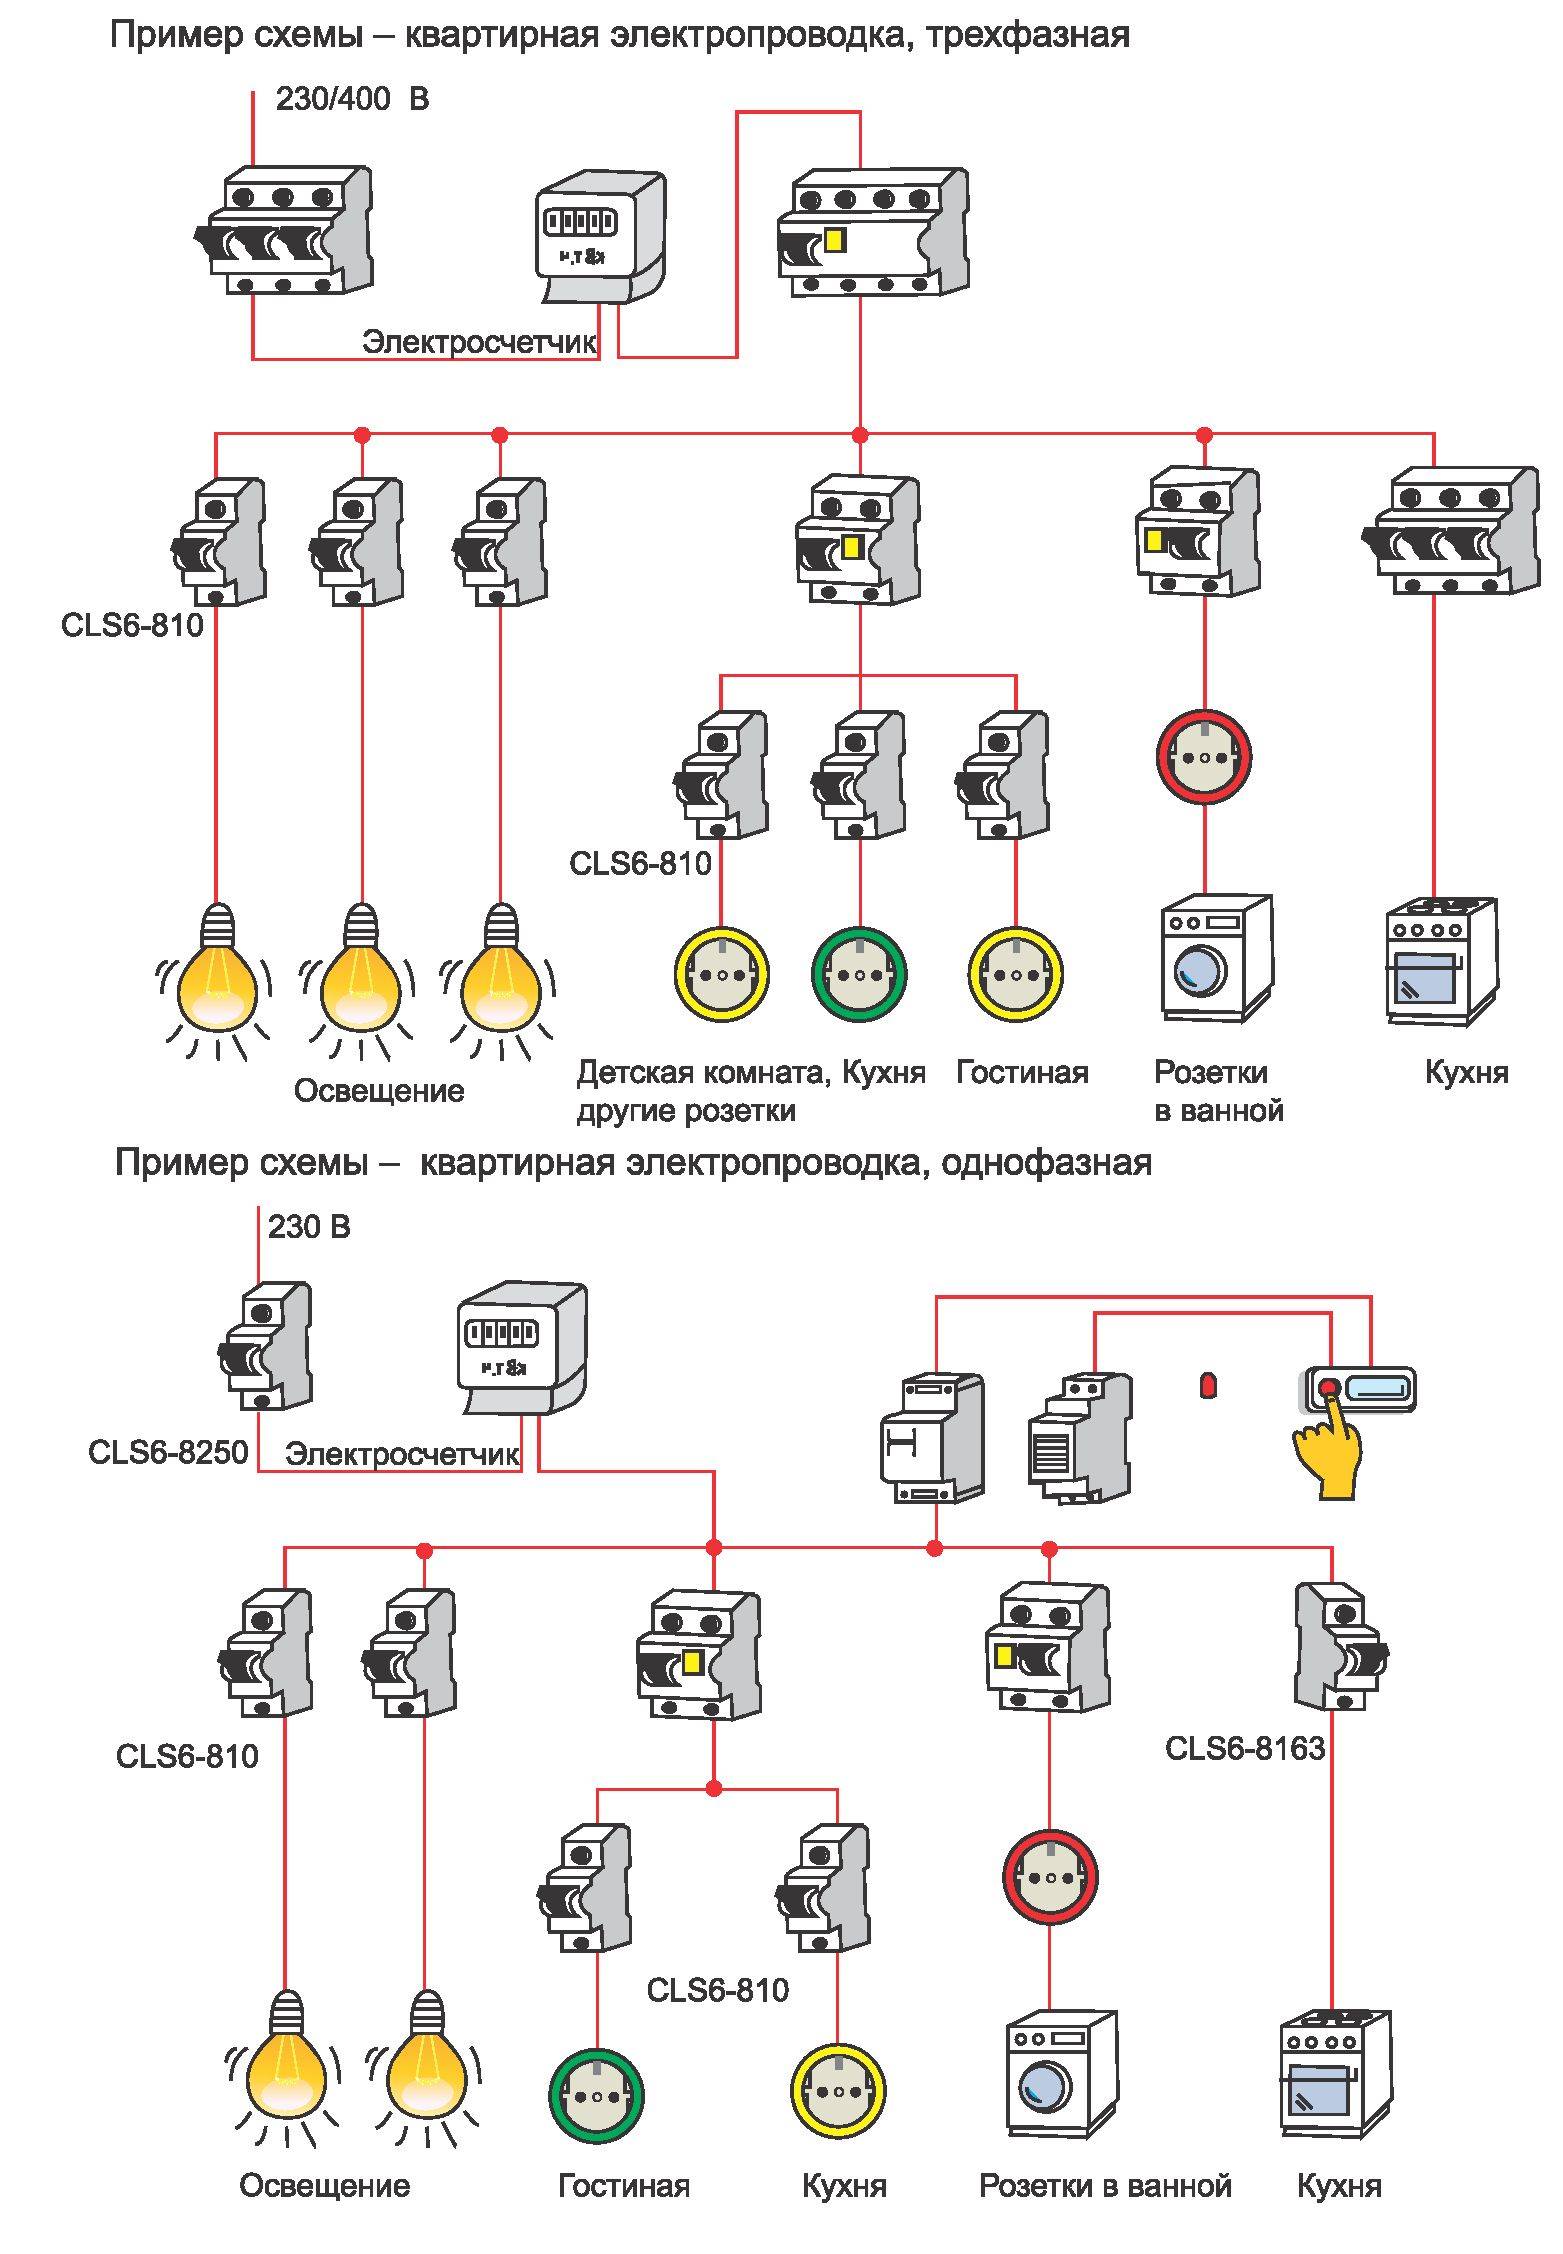
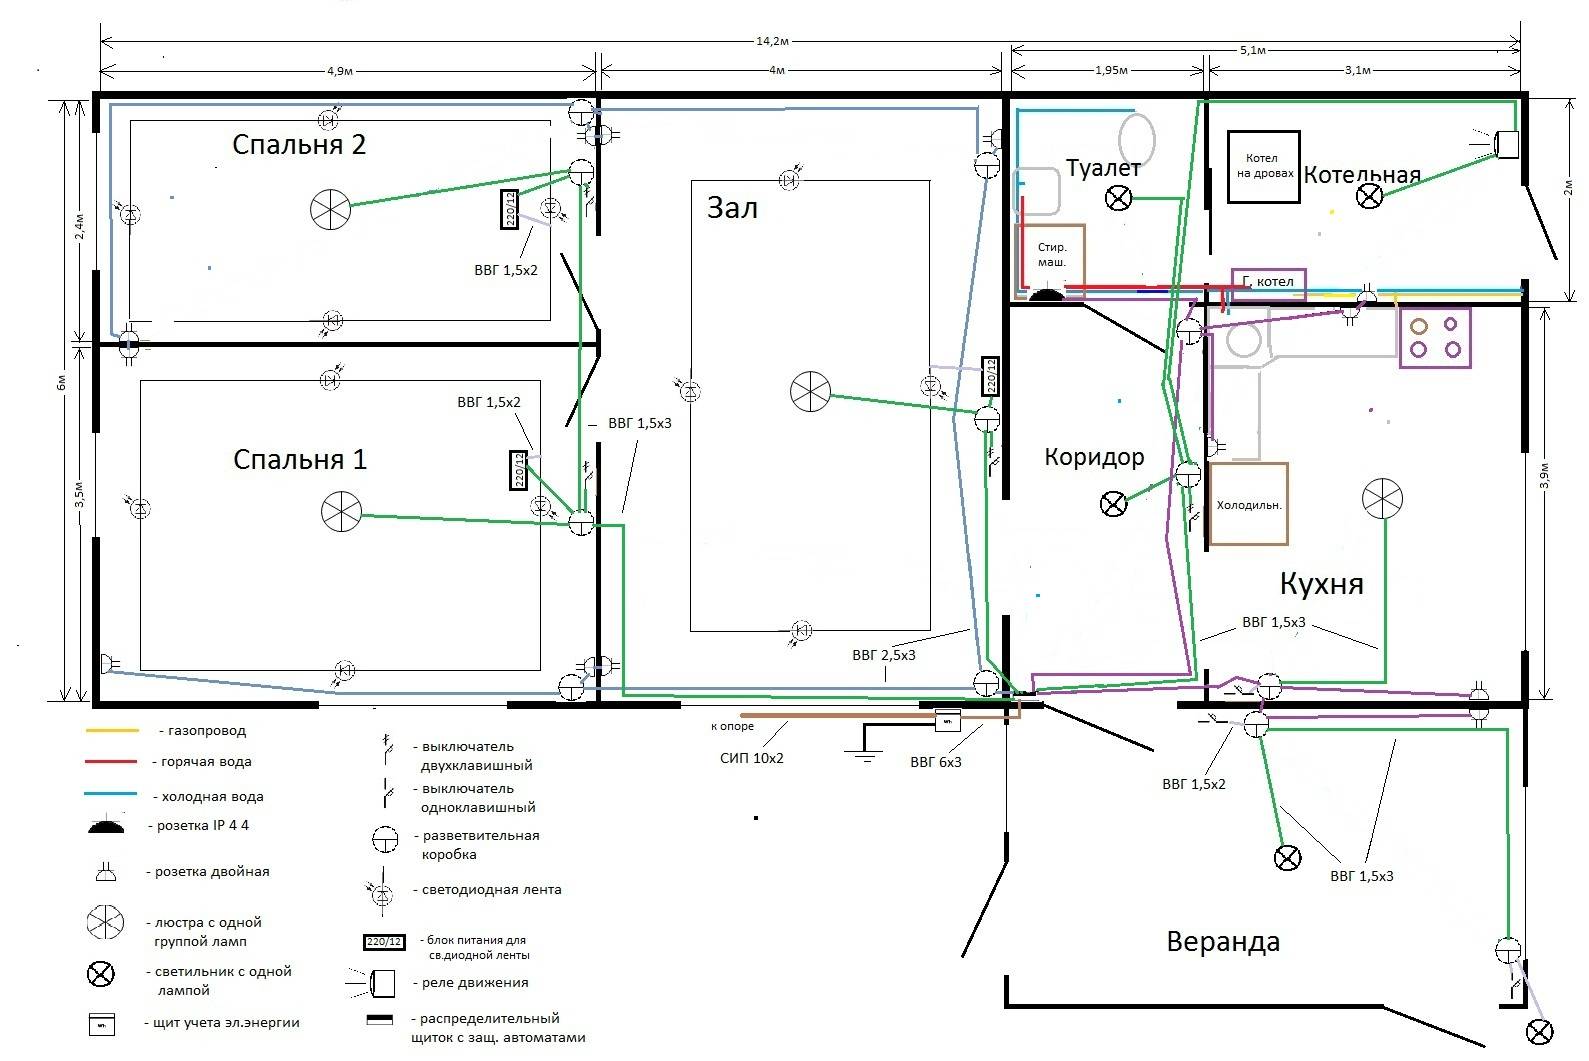
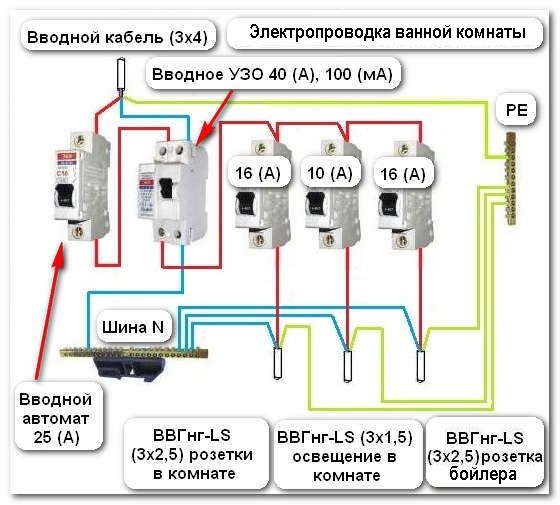
So, the typical wiring diagram for a residential building shown above includes the following elements (starting from cable entry):
- introductory circuit breaker with a nominal value of 25 amperes;
- electric meter (preferably multi-tariff);
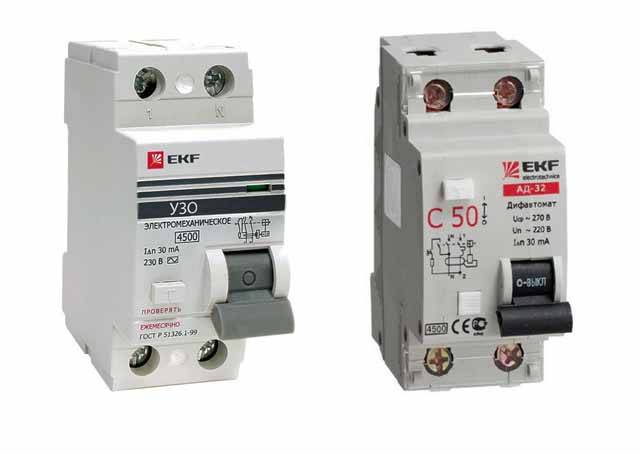
- residual current device - RCD, designed for a trip current of 300 mA;
- 20 A differential machine, triggered at a leakage current of 30 mA, - to protect the socket network;
- automatic switches with a nominal value of 10 A for lighting (the number depends on the number of lines to the lamps);
- an electrical cabinet equipped with a zero and ground bus, as well as DIN rails for mounting automatic machines and RCDs:
- cable lines with junction boxes leading to sockets for connecting household appliances and lighting fixtures.
The functional purpose of the listed elements is as follows. Circuit breakers protect branches or the system as a whole from a short circuit, RCD protects you from electric shock, and a differential machine combines these 2 functions. The latter must be installed on each power line. To protect household electrical appliances from voltage surges, you can supplement the circuit with a protective relay installed after the main RCD, as the master tells about it in the video:
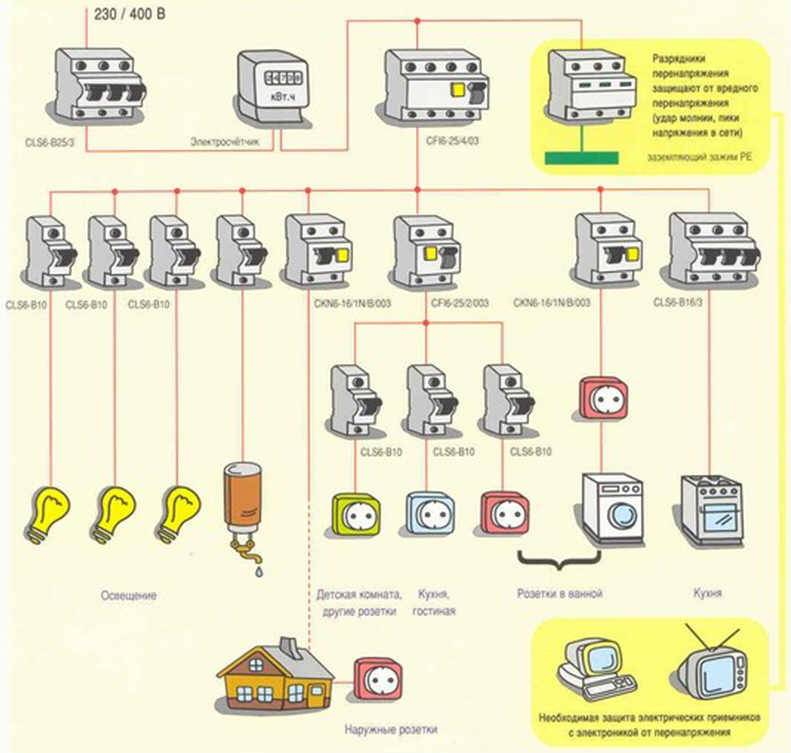
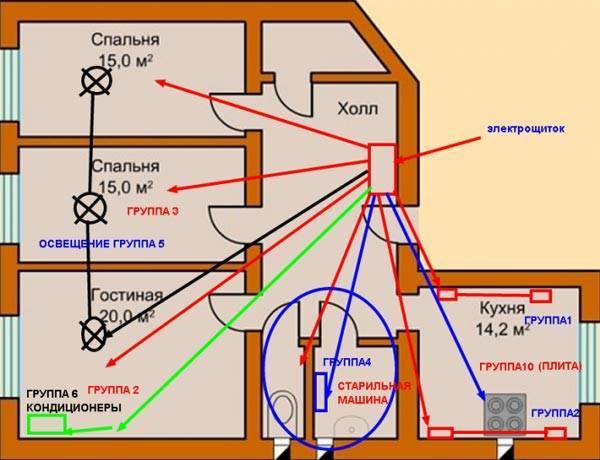
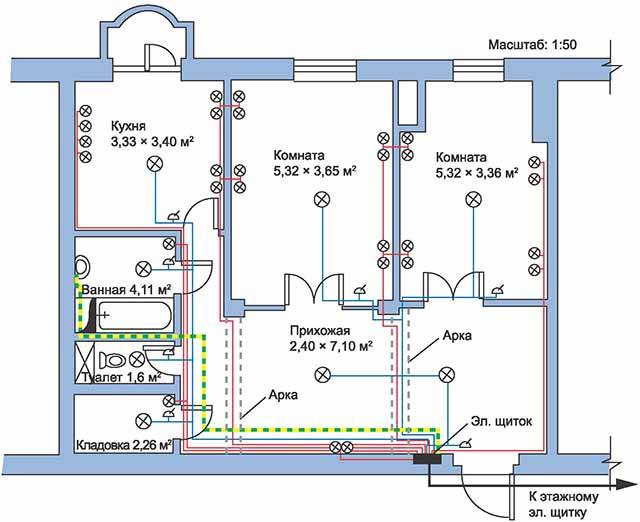
To make a complete electrification scheme, you need to draw a house plan by hand and place lighting fixtures with sockets on it.Indicate the location of the electrical panel and spread the wiring from it along the walls, marking each pair (phase and zero) with one line, as electricians do (called a single-line diagram). An example of such a sketch is shown in the picture.
Action plan
Wiring in a private house is done before the start of finishing work. The box of the house is expelled, the walls and roof are ready - it's time to start work. The sequence of actions is as follows:
- Determination of the type of input - single-phase (220 V) or three-phase (380 V).
- Development of the scheme, calculation of the capacity of the planned equipment, submission of documents and receipt of the project. Here it must be said that not always in the technical conditions they will determine the power you declared, most likely they will allocate no more than 5 kW.
- Selection of components and accessories, purchase of a meter, automatic machines, cables, etc.
- Entering electricians from the pole into the house. It is carried out by a specialized organization, you need to decide on the type - air or underground, install an input machine and a counter in the right place.
- Install a shield, bring electricity to the house.
- Laying cables inside the house, connecting sockets, switches.
- Ground loop device and its connection.
- Testing the system and obtaining an act.
- Electrical connection and operation.
This is only a general plan, each case has its own nuances and features, but you need to start with obtaining the technical conditions for connecting to the power grid and the project. To do this, you need to decide on the type of input and the planned power consumption. It must be remembered that the preparation of documents can take up to six months, so it is better to submit them even before the start of construction: two years are given to fulfill the technical conditions.During this time, for sure, you will be able to drive out the wall on which you can put the machine and the counter.
Why define a cross section?
First of all, if the wire is too small, it will not be able to withstand a large load of consumption.
It will heat up frequently, resulting in:
- Deterioration of insulation.
- Damage to the contacts on the terminals.
This increases the risk of a short circuit at times.
Also, not many people know that wires that differ in their cross section also differ in prices. Therefore, the calculation should be done in order not to overpay for material with excessive parameters.
It is important not to forget that the wires also differ in purpose, but this is easy to figure out if you know the correct color layout. It is shown in the table below.
It is provided in the table below.
| Wire color | Purpose |
| Striped, yellow-green | Zero protective conductor (grounding) |
| Blue | Zero working conductor |
| Black, red, brown, and all other colors different from the previous ones. | Phase conductors |
Making a plan and receiving a project
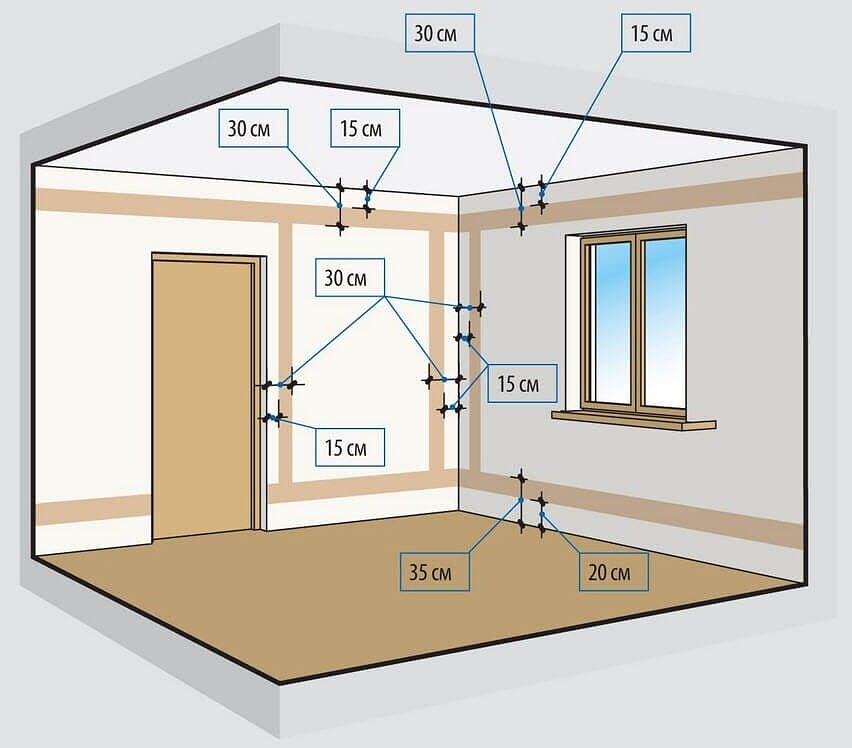
Now you can create a plan for wiring and installing electrical outlets in the house. To do this, use the building plan on a scale, mark on it where the equipment should be located, think over the places where switches and sockets will be installed. It is necessary not to forget about the installation sites of massive furniture so that it does not cover switches and sockets.


Wiring diagram in the house
On the plan it is necessary to note all the necessary lighting fixtures. Some will require switches to be installed, others will require their own outlets. After that, you need to think about what else you may have to include in each room.
For example: in the kitchen there are many different appliances that are constantly connected, they need their own sockets. But you may need to occasionally use other electrical devices. All these data are indicated on the plan, and the most convenient placement of the inclusion points is calculated.

Primula: description, varieties for home growing from seeds, compliance with the rules of cultivation and care (50+ Photos & Videos) + Reviews
Conclusions and useful video on the topic
For more complete information regarding the installation of electrical wiring in the area of the apartment, it is recommended to view the video description of the processes.
Familiarization with the video will enrich the existing experience, which will only positively affect the quality of the work.
Do-it-yourself electrical wiring in a city apartment is a perfectly acceptable option. However, there are "buts" in solving the issue in this way.
Firstly, you should not take on this matter if there is not the slightest experience in electrical installation. Secondly, when contemplating the independent execution of work, you first need to think about your own safety and only secondarily about your own benefit.
Share with readers your experience of independently wiring an apartment, connecting sockets and switches. Please leave comments, ask questions on the topic of the article and participate in discussions - the feedback form is located below.


