- Plumbing schemes
- Scheme #1. Serial (tee) connection
- Scheme #2. Parallel (collector) connection
- Blitz Tips
- Cesspool - a simple and economical solution
- Installation of sewer pipes
- What are the consequences of installation errors?
- Choosing parts for the pipeline
- Option #1 - cast iron pipes
- Option # 2 - polypropylene products
- Option #3 - PVC parts
- Main stages of work
- The main stages of laying
- sewerage scheme
- We plan future work
- We select the method of installation of the pipeline
- Wiring diagram device
- Arrangement tips
- Do-it-yourself arrangement of autonomous sewage in a private house: videos and recommendations
- How much will it cost to build a sewer in a private house: turnkey price
- Tips for installing an autonomous sewer at their summer cottage
- Step-by-step instructions for wiring a water supply system
- Installation of ball valves
- Installation of meters for hot and cold water
- Mounting of gearboxes
- Manifold installation
- Installation of water pipes
- Installation rules
- Do-it-yourself plumbing in a private house
Plumbing schemes
Plumbing can be carried out in two ways - with serial and parallel connection.The choice of water supply scheme depends on the number of residents, periodic or permanent stay in the house or on the intensity of use of tap water.
There is also a mixed type of wiring, in which the faucets are connected to the plumbing system through a manifold, and the rest of the plumbing points and household appliances are connected using the serial connection method.
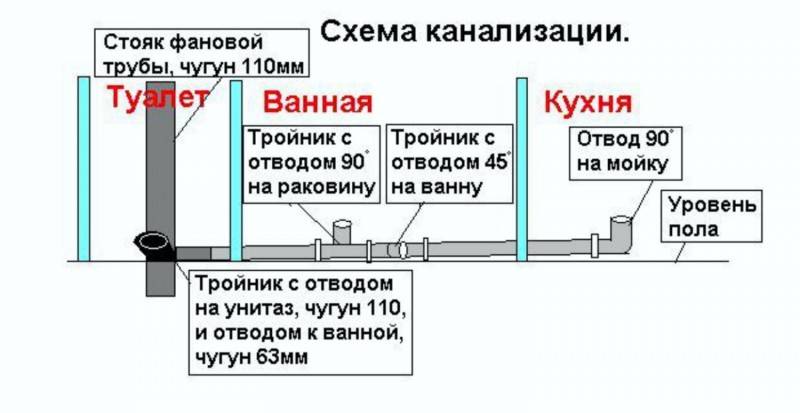
Scheme #1. Serial (tee) connection
It is an alternate supply of pipes from a riser or water heater to plumbing fixtures. First, common pipes are diverted, and then, with the help of tees, branches are led to places of consumption.
This method of connection is more economical, it requires fewer pipes, fittings, it is easy to install. Pipe routing with a tee system is more compact, it is easier to hide it under finishing materials.
With a sequential scheme for connecting a pipeline with hot water, discomfort is especially noticeable - the water temperature changes dramatically if several people use the water supply at once
But a series connection is more suitable for municipal apartments, for houses with periodic residence or with a small number of residents. It cannot provide uniform pressure in the system when it is used by several users at the same time - at the most remote point, the water pressure will change dramatically.
In addition, if it is necessary to carry out repairs or connect a plumbing fixture, you will have to disconnect the entire house from the water supply. Therefore, for private houses with high water consumption and permanent residence, it is better to choose a scheme with parallel plumbing.
Scheme #2. Parallel (collector) connection
Parallel connection is based on the supply of individual pipes from the main collector to the water intake points. For cold and hot mains, their collector nodes are installed.
This method requires laying a large number of pipes and, accordingly, creates difficulties in masking them. But on the other hand, each draw-off point will have a stable water pressure, and with the simultaneous use of several plumbing fixtures, changes in water pressure will be insignificant.
A collector is a device with one water inlet and several outlets, the number of which depends on the number of plumbing units, household appliances that use tap water for operation.
The collector for cold water is mounted closer to the pipe entering the house, and for hot water - at the outlet of the water heater. A cleaning filter and a pressure regulating reducer are installed in front of the collector.
Each output from the collector is equipped with a shut-off valve, which allows you to turn off a specific water intake point, while other outputs will work in normal mode. In addition, each of them can be equipped with a regulator to maintain a certain pressure for individual devices.
Blitz Tips
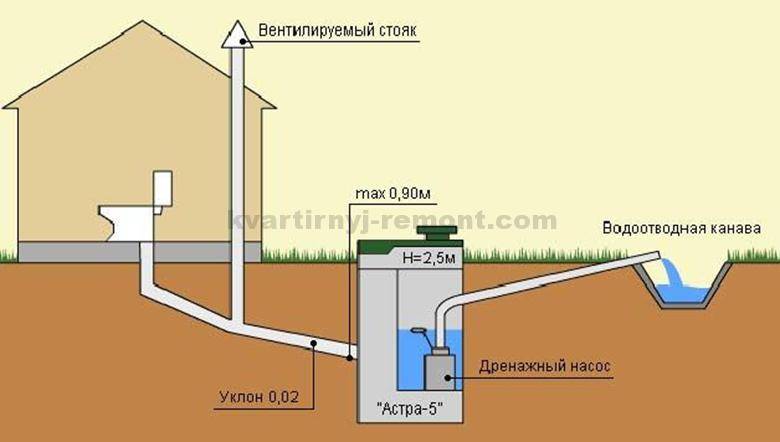
- Before the system is carried out, work is carried out inside a private house - installation of a vertical riser for alternately connecting pipes to it from the bathroom equipment, observing a slope of 5 mm per 1 m. When installing the pump, the slope is optional.
- During the planning process, the kitchen and lavatory should be located near the exit of the sewer system to the street. In multi-storey construction, the location of bathrooms under each other to reduce the number of risers and simplify the installation and maintenance of the entire network.For a large number of bathrooms or in the absence of a slope on the site, it is rational to use a pump.
Cesspool - a simple and economical solution
If the central sewerage system is not diluted near the site, then a drain pit is equipped or a septic tank is installed. All work is carried out according to SNiP, in which the following standards are prescribed:
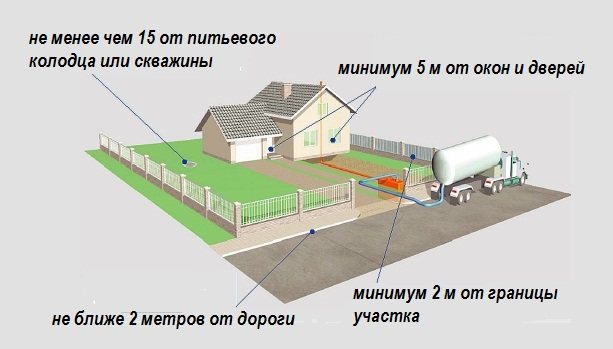
- there should be a distance of more than 5 m from the wall of the house to the drain pit, while the minimum distance from the fence should be 2 m;
- from a drinking well to a cesspool, the distance should be from 30 m;
- from the drain pit to the main building, a distance of 35 - 50 m must be observed;
- sewerage is not laid close to the water supply, since there must be a distance of 3 m between them;
- in order to properly lay the pipes, you need to make a slope - for every meter 3 cm, while from the point of discharge of polluted waters coming out of the house and to the point that connects the sewer pipes to the drain pit, the slope will be 15 cm, since this the distance is 50 m.
Such a project has either a large depth of the pit, or plumbing fixtures are installed at a certain height. To calculate the size of the cesspool, the number of permanent residents in the house is taken into account, and the fact that 0.5 m³ is needed for the needs of 1 person. And the services of sewers are used once a quarter, when they are used once every six months when installing a septic tank.
The installation depth of the septic tank is 150 cm, and from the building to it it should be up to 5 m. A pit is dug for the tank, and in order for it not to get deformed, the walls of the pit are equipped with bricks or concrete rings. Pipes passing from the septic tank to the house should not have a turn.
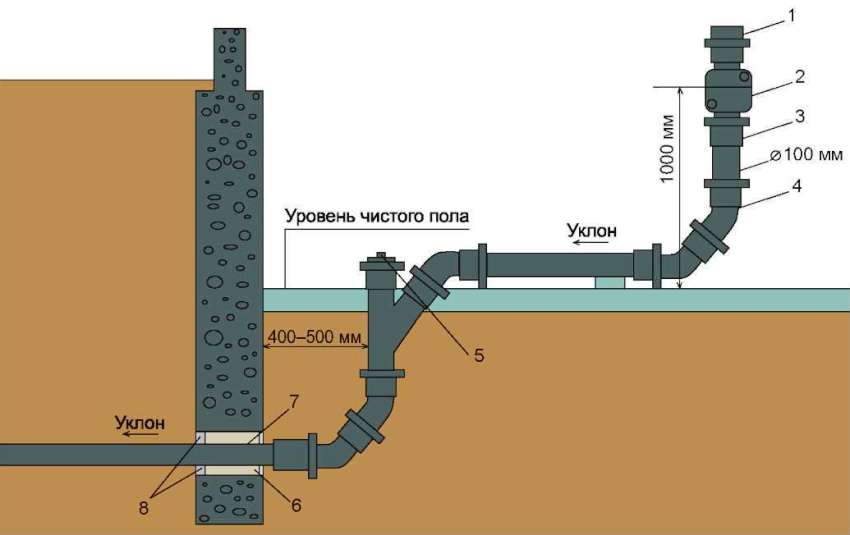
Installation of sewer pipes
After the internal wiring is installed, the socket is removed from the house, the installation of the external highway begins.
To know how to properly lay a sewer line, you need to remember 2 rules for laying sewer pipes:
- Installation is carried out from the house to the septic tank or collector.
- Pipes are mounted with a lock (bell) to the septic tank.
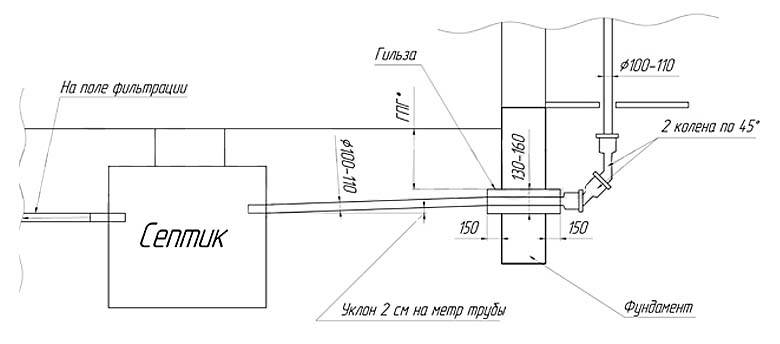
To avoid freezing, it is necessary to have a pipe under the foundation. A bandage (sleeve) is placed at the injection site. This is a piece of pipe with a larger diameter. The free space is filled with insulation or sealed with mounting foam.
Properly selected and installed sewerage will provide comfort and convenience in the house.
What are the consequences of installation errors?
The lack of an internal sewerage project, savings on building materials, neglect of installation rules and just minor flaws made during the assembly of the pipeline can lead to the most unpleasant consequences:
Mistake made / Possible consequences
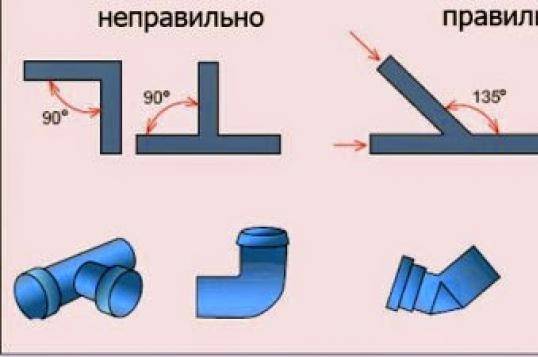
| insufficient slope of the pipeline from plumbing and household appliances to a common riser | stagnation |
| use of pipes with a damaged inner surface, burrs remaining during cutting | layering of waste on the walls of pipes, reducing the throughput of the pipeline |
| making right angle turns or U-turns | blockage formation, at high sewage pressure - depressurization and damage to the unit |
| connection of socket elements against the flow | clogging of the joint |
| no siphons under plumbing fixtures | the appearance of an unpleasant odor, return suction of sewage into a plumbing fixture |
| leaky connections: lack of an insulating layer, loose or overtightened threaded connection | the appearance of leaks |
| lack of inspection hatches in difficult areas of the system | the impossibility of cleaning the node. |
Choosing parts for the pipeline
First of all, we determine the material from which the elements are made.
Option #1 - cast iron pipes
Some time ago, there was simply no alternative to such details. Their advantages include durability, such pipes serve more than half a century, high strength and fire resistance. At the same time, cast iron is not sufficiently resistant to impact point loads, from which it must be protected as far as possible. The disadvantages of the material include a very large weight, high cost and difficult installation. In addition, the inner surface of such pipes is rough, which contributes to the deposition of layers, which, after time, can completely block the path of sewage.


Option # 2 - polypropylene products
The advantages of such elements are resistance to all types of corrosion and solutions of salts, alkalis and acids, durability, high heat resistance. The latter quality allows the parts to easily endure both low and high temperatures, which makes it possible to lay them in almost any conditions.
Another advantage is increased fire resistance. Polypropylene is able to withstand the effects of fire for quite a long time and does not emit toxic substances. Attractive and affordable price. Some difficulty is the installation of parts, which requires special equipment.
The most popular are plastic pipes for sewerage. They are lightweight, easy to install and have a smooth inner surface that prevents build-up on the inner walls of parts.
Option #3 - PVC parts
They can be made from non-plasticized or plasticized PVC. The characteristics of products made from these materials are similar. The advantages of PVC pipes include a low coefficient of thermal expansion, which allows products not to increase or sag when heated, as well as resistance to UV radiation. In addition, a very large range of shaped elements is produced, which makes it possible to assemble a pipeline of any configuration.
The disadvantages of products include fragility at low temperatures, low resistance to fire and the release of toxic substances during combustion, as well as sensitivity to certain chemicals.
Main stages of work
Installation work is carried out in stages. Sometimes the sequence of events changes - a lot depends on the readiness of the premises and the features of the layout.
But still, you need to strive for a generally accepted order:
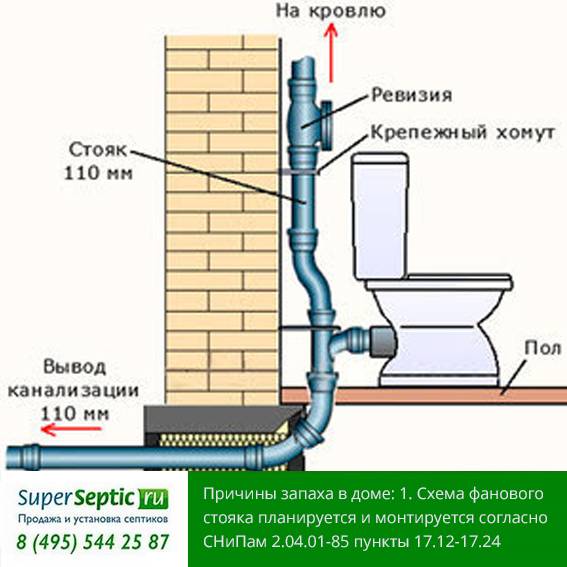
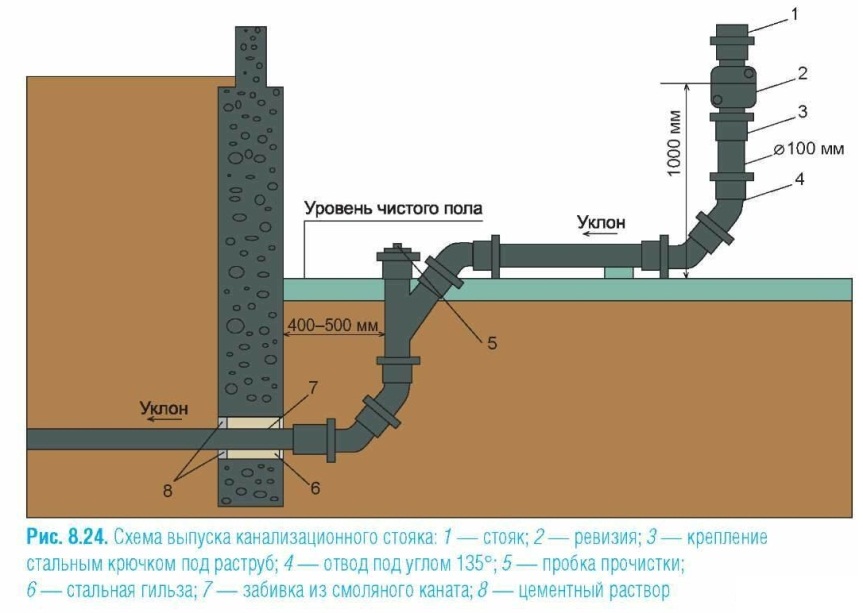
- Laying the outlet - a pipe connecting the internal and external systems. It passes through the wall, so it must be placed in a sleeve - a heat-insulated safety casing. There should be no joints and joints in the section of the transition through the wall.
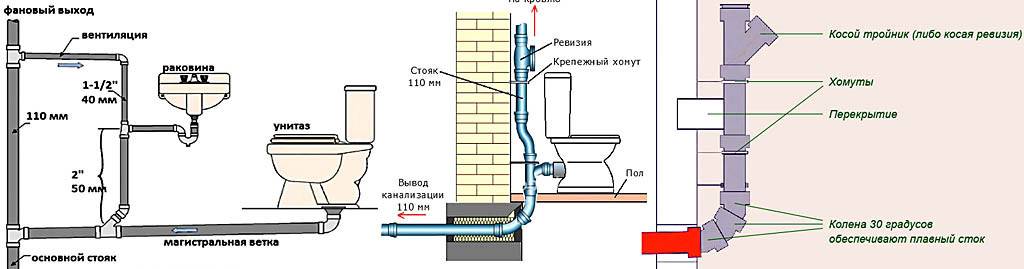
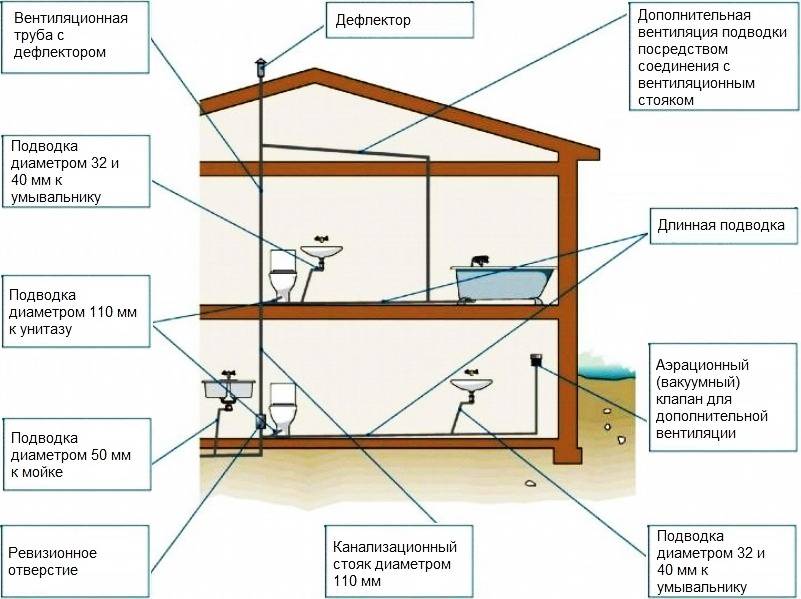
- Installation of a riser - a vertical pipe running through all floors and ceilings. Usually 1 riser is installed, but if the length of the internal line exceeds 10 m, then it is better to install the 2nd one.
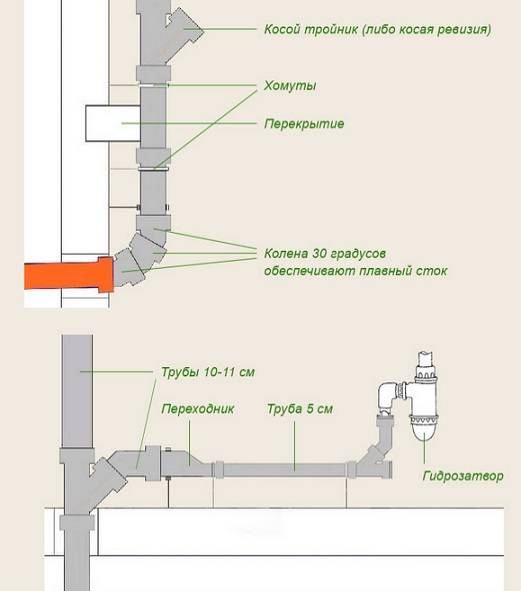
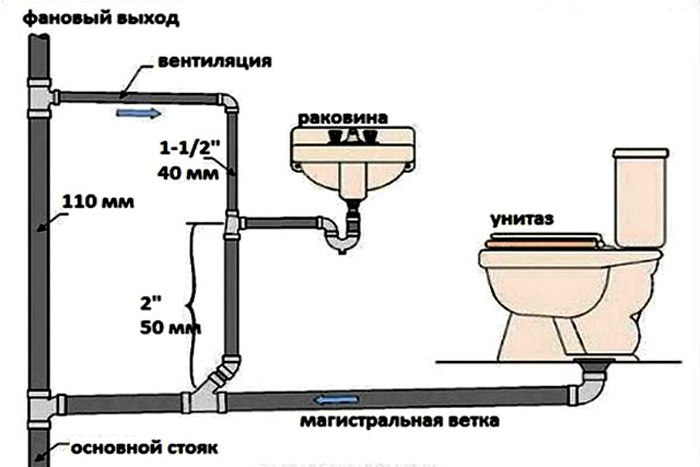
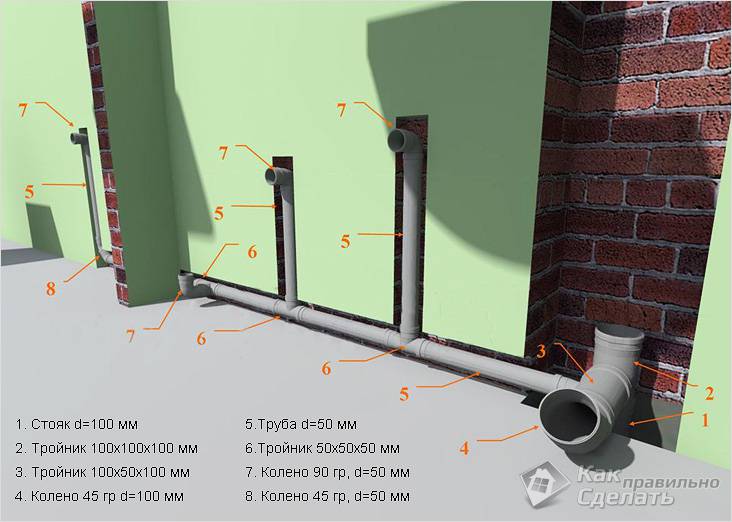
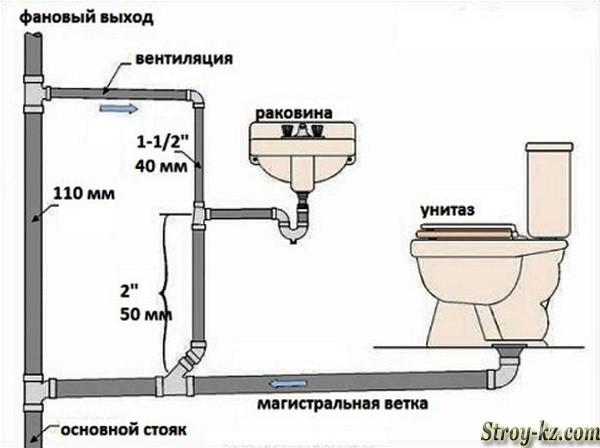
- Pipe routing - bends leading to plumbing equipment.The diameter of the pipe leading from the toilet bowl is the largest - 100-110 mm, the rest are 50 mm each.
And only after the installation of sewer pipes, the devices are connected, followed by testing the system.
Installation recommendations:
Metal pipes and fittings have not been used for a long time. Cast iron was replaced with light and practical polymers: PVC (gray), PP (light gray or white).
Plastic pipes have a perfectly smooth inner surface, excellent resistance to heat and aggressive substances. They are easy to handle and install due to their low weight.
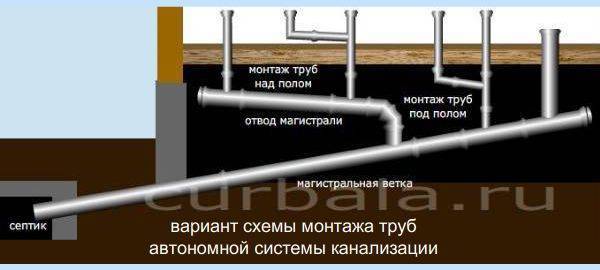
The main stages of laying
Work on the creation of a waste system is carried out according to the following scheme:
- In accordance with the project, a trench is dug using construction equipment or manually with a shovel. The trench starts from the foundation of the house or the outlet of the pipeline, on which it is put on a socket.
- The bottom of the trench is leveled, rammed and a sand cushion is made. Why a layer of sand of 15 cm is moistened with water and compacted tightly.
- The pipeline is being laid, with the sockets pointing down to facilitate the connection.
- The pipeline is assembled by lubricating the pipe edges with a special agent (sealant, etc.) for better sliding of the parts. On the product, you can make marks that will control the correct connection. Before installation, rubber sealing cuffs are inserted into the socket.
- When laying the pipeline, you should try to use less bends and turns, for which bends with angles of 15-45 degrees are used. Inspection hatches are installed at the joints and areas of potential clogging.
- After the assembly is completed, the correct slope is checked.If the depth of laying the pipe passes above the level of soil freezing, then work is carried out to insulate the object. For this purpose, mineral wool, cylindrical basalt insulation or a heating cable is used, which is laid simultaneously with the pipe.
Measurement of the angle of inclination of the drain system
Start filling up the trench. The pipes are gradually covered with sand, carefully compacted, and then covered with a layer of soil extracted earlier. Each layer of earth of 10-15 cm is compacted, soil can be compacted only on the sides of the pipeline. This should not be done over pipes in order to avoid damage or deformation of the product.
For proper laying of sewerage with their own hands, experts recommend:
- It is unacceptable to use a lubricant that is not intended for the sewer system. Internal surfaces should not be lubricated.
- When installing an internal sewage system in a room without heating, pipe insulation is used.
- The throughput of a pipe depends on its diameter.
- It is not recommended to shorten sockets and fittings.
- To ensure the correct slope, the pipes must be fixed.
- The lifetime of the system is determined by its tightness.
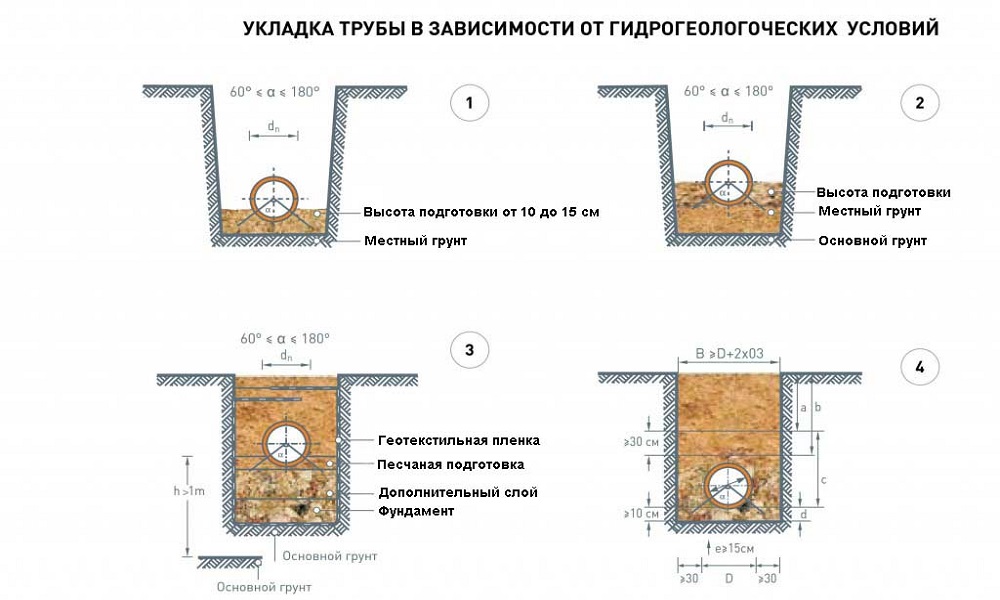
Thus, the choice of installation method for the sewer system depends on the place and region of residence, landscape design features, the presence of groundwater and the material from which the pipes are made.
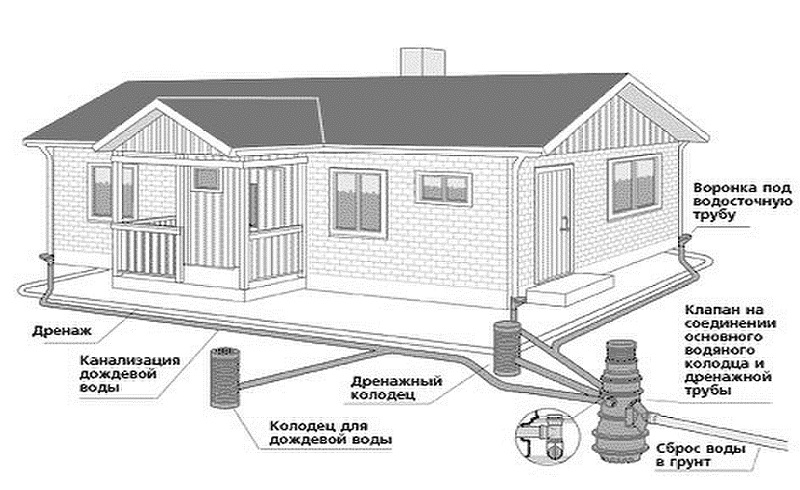
sewerage scheme

A sewerage scheme should be drawn up taking into account factors such as:
- the expected volume of wastewater;
- soil characteristics;
- climatic features of the area (seasonal temperature changes, rainfall).
The system should consist of three main elements:
- internal sewer network;
- external highway;
- septic tank (cesspool).
Several rules apply to the calculation of sewer systems.
- When distributing sewer pipes, it is necessary to minimize the number of interchanges, joints and connections.
- If the house has several floors, then rooms with plumbing fixtures should be placed one above the other. This will allow the use of common risers.
- The kitchen and bathroom are optimally located in adjacent rooms, as close as possible to the sewer.

The diagram must reflect the exact location and characteristics of the following elements:
- sewer pipes with indication of material, length and diameter;
- places for the device of turns, branches and inspection hatches;
- plumbing fixtures;
- risers and collectors;
- outlet line;
- septic tank.
As a result, the scheme of the sewer system should include the full amount of information necessary for its installation.
We plan future work
Repairs should begin with careful planning of upcoming events. Pipe routing is one of the most important elements that form the sewerage and water supply system. The functionality of the structure largely depends on how well it is planned and executed. During the planning phase, several important factors need to be identified.


We select the method of installation of the pipeline
Pipe laying can be carried out in a closed or open way. Both of these schemes are, in principle, equally reliable. They differ in terms of operation and maintenance. Open installation involves the installation of pipes over walls or floors. If desired, they can be hidden with various decorative designs. The main advantage is the ease of access to communications.If you need to connect new elements, maintenance or repair, you will not need to destroy the decorative coating that hides the pipes. In addition, the slightest leak or other problem will immediately become apparent and eliminated in a timely manner.
With hidden installation, pipes are mounted directly into the wall, which is certainly more aesthetically pleasing. However, the maintenance and repair of communications is very difficult. As well as inspecting parts for leaks or other problems. With hidden installation, it is advisable to install sensors that will report a water leak. In any case, in order to gain access to the pipeline, you will have to open the wall, which is the biggest disadvantage of this type of installation.
The open version of piping is the easiest to perform, maintain and repair. A non-aesthetic appearance can, if desired, be covered with decorative accessories
The importance of pipe material
Experience shows that it is easiest to do plumbing wiring with your own hands using polypropylene or metal-plastic pipes. These are lightweight parts that are reliable in operation, which lend themselves well to processing and are quite easy to install. To make connections of metal-plastic structures, different types of fittings or compression couplings are used, which are installed with the help of special tongs. Due to the fact that special equipment is not required for installation, metal-plastic can be mounted even in the most inaccessible places.
Metal-plastic pipes can be connected using fittings or compression couplings. In the second case, special pliers will be needed for installation.
The connection of polypropylene pipes is carried out in the form of a welding seam. To work, you will need a special apparatus, which is best rented or borrowed from friends. This point must be taken into account when choosing pipes, since it will be almost impossible to connect polypropylene elements in hard-to-reach places. An additional argument for choosing polypropylene will be the ability to easily fix an unsuccessful joint, which is very valuable for a novice plumber.
Wiring diagram device
You can choose a scheme for diluting water pipes from two options: tee or manifold. The second is considered the most practical and convenient. It assumes that when installing plumbing in a bathroom or toilet room, each device will be connected separately, which significantly reduces pressure drops in the system and allows repairs to be made without disconnecting the pipeline. The option is characterized by extreme ease of installation and a minimum of connections, but it is more expensive than a tee scheme. It is somewhat more difficult to implement. When assembling it, experts recommend installing a shut-off valve on each of the branches from the main system so as not to block the entire structure in the event of a breakdown.
The result of planning will be a scheme for arranging plumbing equipment and piping. It is carried out after accurate measurements of the room and the devices that will be installed in it. With the help of such a plan, it will be much easier to determine all the necessary parts and their quantity, as well as to prevent possible misunderstandings with the output of installation angles during the installation of equipment.It's a good idea to number each part of the wiring in the order in which the assembly will be made. You can also make a list of all elements, indicating the type of connections and the length of the fragments.
An example of a piping layout. Performing a similar drawing on your own for ease of installation, it is best to number all the elements and indicate their dimensions
Arrangement tips
After joining all segments of the sewer structure, they begin to insulate the pipeline. Thermal insulation is necessary in cases where the depth of pipe laying is at the level of soil freezing during winter frosts.
After the installation of the external sewer line is completed, it is necessary to fill the trench with a mandatory check of the slope of the pipeline, since this parameter could change during the connection process.
If it is planned to use the soil collected during the digging of the ditch when backfilling, it must be crushed to get rid of large clods.
In the absence of knowledge on how to properly lay a sewer in a private house, some home craftsmen pay insufficient attention to this issue. But the arrangement of the sewer system must be carried out in compliance with a number of requirements.
The main one is as follows: the trench must be filled with earth in layers having a thickness of about 5 centimeters. Compact the soil only on the sides of the pipe so as not to deform or damage it.
Approaches to laying pipes for sewerage in a private house and in an apartment are the same, since drains and sewage are formed in residential and utility rooms and only after that they are brought out.
Therefore, when distributing the sewer system in a modern high-rise building and in a country cottage, it is advisable to adhere to a number of requirements:
- be sure to observe the slope of the pipeline;
- minimize the number of bends and turns throughout the entire highway.
Since domestic sewage is created according to a non-pressure type, the simplest socket connection can be used when assembling pipelines. Rubber cuffs are used to seal it. This element is placed in the inner groove of the socket before the start of the connection process.
The main difference in the arrangement of the design for the disposal of wastewater and sewage in the house and in the apartment is that in the first case there is an outer part of the system laid in the ground, which leads to a septic tank or to a centralized sewer line.
You can do the above work yourself. Subject to the recommendations given by professionals, the reliability of the sewage system will be high, and the service life will be long.


Do-it-yourself arrangement of autonomous sewage in a private house: videos and recommendations
As a material for the manufacture of autonomous sewers, polypropylene is used, which is characterized by low weight, environmental friendliness, strength and high thermal conductivity. Wastewater treatment is carried out by certain types of bacteria that feed on organic waste. Access to oxygen is a prerequisite for the life of these microorganisms. The price of an autonomous sewage system in a private house is much higher than the cost of arranging a conventional septic tank.
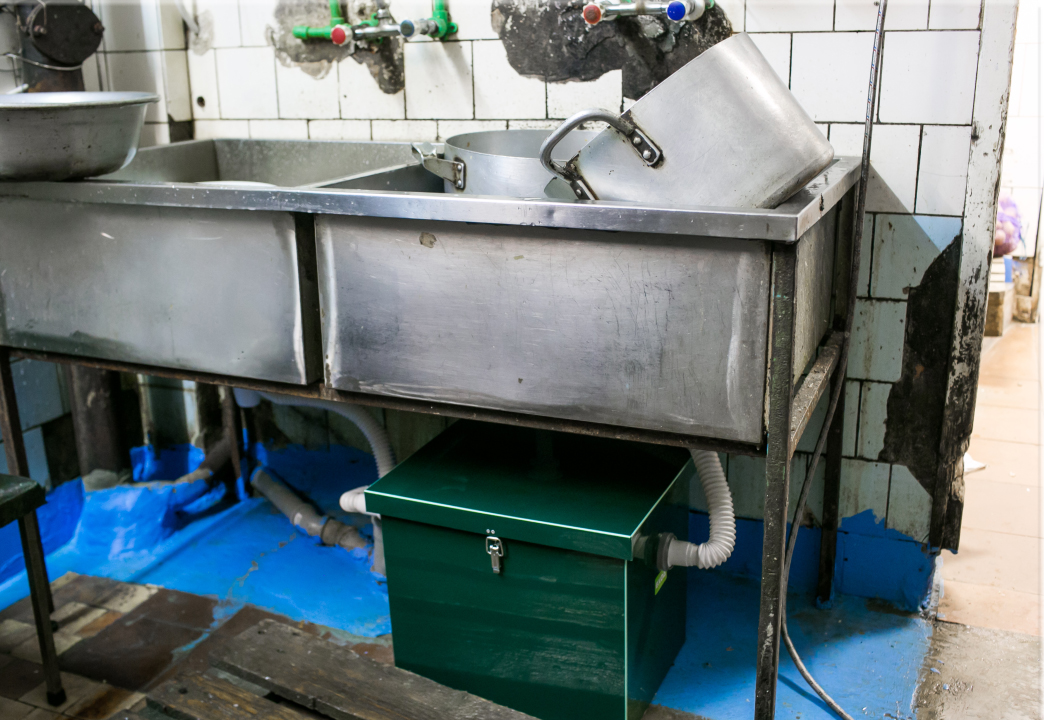
The constituent elements of the autonomous sewage system
This is due to the numerous advantages of autonomous type systems:
- high level of wastewater treatment;
- unique aeration cleaning system;
- no maintenance costs;
- no need for additional acquisition of microorganisms;
- compact dimensions;
- no need to call a sewage truck;
- the possibility of installation at a high level of groundwater;
- lack of odors;
- long service life (up to 50 cm).
How much will it cost to build a sewer in a private house: turnkey price
The possibilities of autonomous sewers Unilos Astra 5 and Topas 5 are considered the most optimal for summer cottages. These designs are reliable, they are able to provide comfortable living and the necessary amenities for residents of a country house. These manufacturers offer other equally effective models.
The average price of autonomous sewers Topas:
| Name | price, rub. |
| Topas 4 | 77310 |
| Topas-S 5 | 80730 |
| Topas 5 | 89010 |
| Topas-S 8 | 98730 |
| Topas-S 9 | 103050 |
| Topas 8 | 107750 |
| Topas 15 | 165510 |
| Topaero 3 | 212300 |
| Topaero 6 | 341700 |
| Topaero 7 | 410300 |
The average price of autonomous sewers Unilos:
| Name | price, rub. |
| Astra 3 | 66300 |
| Astra 4 | 69700 |
| Astra 5 | 76670 |
| Astra 8 | 94350 |
| Astra 10 | 115950 |
| Scarab 3 | 190000 |
| Scarab 5 | 253000 |
| Scarab 8 | 308800 |
| Scarab 10 | 573000 |
| Scarab 30 | 771100 |
The tables show the standard cost of the system. The final price for the installation of an autonomous sewage system on a turnkey basis is formed taking into account the prices for laying an external pipeline and other points affecting earthworks and installation work in general.
The average price of autonomous tank type sewers:
| Name | price, rub. |
| Biotank 3 | 40000 |
| Biotank 4 | 48500 |
| Biotank 5 | 56000 |
| Biotank 6 | 62800 |
| Biotank 8 | 70150 |
Tips for installing an autonomous sewer at their summer cottage
As in any other system, it is recommended to install the pipeline at an angle from the house towards the purification tank. The optimal angle is between 2 and 5° per meter. If you do not adhere to this requirement, the full discharge of wastewater by an autonomous sewer for a summer residence will become impossible.
During the laying of the highway, care should be taken to securely fix its elements. To eliminate the risk of pipe deformation and displacement during soil subsidence, the soil at the bottom of the trenches must be carefully compacted. If you fill the bottom with concrete, you get a more reliable fixed base. During the installation of pipes, it is desirable to adhere to a straight path.
Be sure to check the joints for tightness. Liquid clay is usually used for docking. It is allowed to use specialized products recommended by the pipe manufacturer. If a line is being installed on the basis of elements with a diameter of 50 mm, the maximum allowable length of the straight sections of the system is 5 m. When using products with a diameter of 100 mm, this figure is 8 m maximum.
When choosing a place for a septic tank on the site, it must be taken into account that at least five meters must remain before the fence
Step-by-step instructions for wiring a water supply system
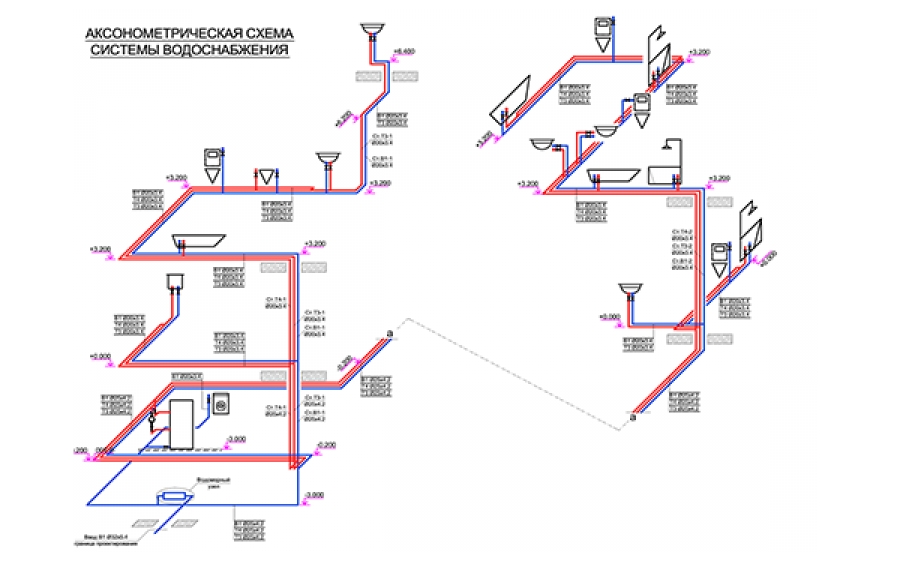
Do-it-yourself water supply wiring in an apartment always begins with drawing up a detailed water supply scheme on paper. It should provide for the smallest nuances, since it will be the basis not only for the work, but also for the acquisition of the required amount of materials.
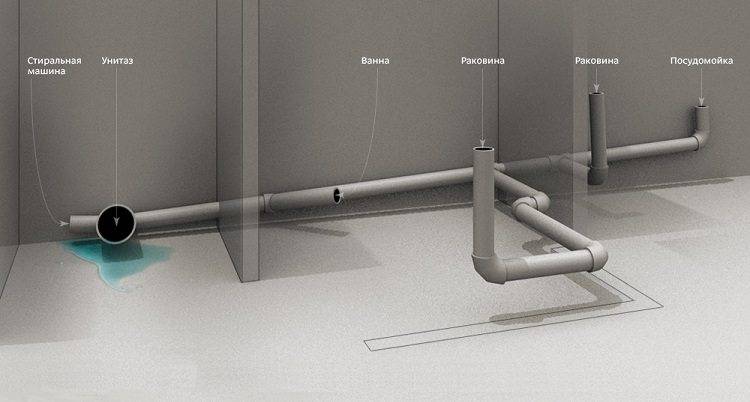
Attention! The scheme should be drawn up with a minimum number of joints, connections and bends - this will significantly increase its operational reliability. If the space of the room allows, then the best option is the collector wiring of water supply pipes, an example of which is shown in the figure below.
If the space of the room allows, then the best option is the collector wiring of water supply pipes, an example of which is shown in the figure below.
The referenced positions refer to the following elements:
- 1,2,3 - ball valves at the inlet of the washing machine, sink and bath mixer;
- 4.5 - collectors for cold and hot water;
- 6 - check valves;
- 7.8 - hot and cold water meters;
- 9 - reducers for pressure normalization;
- 10 - filters providing rough cleaning.
- 11 - emergency cranes.
- 12 - cold and hot water risers.
The most acceptable option for organizing a do-it-yourself plumbing system is to use plastic pipes. They are easy to install and can be used for a long time. The optimal pipe diameter is selected according to the total length of the pipeline in order to provide the required pressure. To do this, you can use special tables that can be found on the Internet or consult with experts.
Attention! If the distribution of water pipes is carried out in an old house, then you should pay attention to the condition of the main riser. It may first need to be replaced, and this event should only be carried out by specialists.
Installation of ball valves
Installation of emergency ball valves at the inlet from the main risers and installation of filters. The taps at the inlet to the water supply system have been reassigned to quickly turn off the water supply when a leak is detected.


Be sure to turn off the water before starting installation. It is recommended to use ball valves that operate at pressures up to 60 atmospheres and temperatures up to +150˚С. Coarse filters are connected to the installed ball valves.
Installation of meters for hot and cold water
As a rule, union nuts are included with the meter, which allow, if necessary, to disconnect the meter without violating the integrity of the system.
Important! When installing the meter yourself, you need to pay attention to the directional arrows that are placed by the manufacturer on the device. They indicate the direction of water movement.
Remember! After starting the system, the installed devices must be registered with the water supply organization.
Mounting of gearboxes
Installation in the water supply system of reducers that will prevent damage to pipelines in the event of pressure drops. It is imperative to install these devices if the water pressure in the riser significantly exceeds the throughput of plumbing devices. It is good if, under excess pressure, excess water will be drained into the sewer, so if possible, a special drain should be provided.
Basic rules for installing the gearbox:
- The pressure regulator gauge must be mounted vertically;
- During installation, shut-off valves must be provided;
- Be sure to take into account the direction of the water in accordance with the indicated arrow on the device.
Manifold installation
As a rule, these devices are equipped with a maximum of four outputs. Therefore, to connect a larger number of consumers, it is necessary to install several collectors.
Important! Ball valves should be installed at the inlets of all consumers to be able to turn off specific devices in case of an accident.
Installation of water pipes
Direct installation of water pipes. To do this, purchased plastic pipes must be cut to size in accordance with the wiring diagram. The joints are welded using a special apparatus, which is quite easy to handle. This technology is described in detail in the article Polypropylene pipes - do-it-yourself installation.
You can start operating a self-installed water supply system only after checking, which is best done with an assistant. This will quickly shut off the water supply if a leak is detected due to poor assembly.
Installation rules
Installation of a drainage system in an apartment is not complicated and obeys simple rules:
- Joints and turns are performed only where necessary, their number should be minimized.
- Be sure to observe the slope - the connection to the riser must be lower than the rest of the pipeline elements.
- To prevent the pipes from sagging, they must be fixed with clamps. Mounting step - 1 m.
- For installation, use only smooth pipes without violating the integrity of the inner surface and unevenness at the joints.
- Regardless of the method of connecting pipes, the joints must be degreased.
- Gaskets and rings used to seal joints must be soft and elastic.
- The connection of pipeline elements is carried out along the flow.
- The location of joints inside walls and ceilings is not allowed.
- The toilet is connected to the riser first so that the fecal matter does not enter the apartment sewer.
Do-it-yourself plumbing in a private house
Start with plumbing since the presence of water is necessary already at the stage of building a private house. In this case, you need to think first of all about ensuring the supply of cold water. You can also install a heating boiler, the installation of which is a simple procedure.
To equip the water supply of a private house, plumbing, materials and tools are needed:
-
shut-off plumbing;
-
PVC pipes;
-
pump equipment;
-
a set of keys;
-
pliers;
-
shovel;
-
Bulgarian.
Before you make plumbing in a private house, you need to determine what types of plumbing equipment will be installed. Consider the general rules and sequence of installation.


As mentioned above, at the initial stage, a plan should be developed for the placement of plumbing and plumbing elements. The scheme should include information about all the nodes of the external and internal wiring of the water supply system of a private house. Based on the parameters of the water supply, you need to select the optimal equipment for arranging a pumping station. Manufacturers of such equipment attach a wiring diagram to it, indicating the main features of connecting a private house to the water supply system. It is necessary to place the pump plumbing unit in such a way as to minimize the noise from its operation. To do this, select the most convenient place in the house (in the basement or basement). In the documentation for the pumping station, you can find information about the noise level that is created during its operation.
After the location of the pumping equipment has been chosen, it is possible to start arranging trenches for laying external pipes through which water from the source will be supplied to the house. Their depth should exceed the level of soil freezing. If there is no technical possibility of laying a pipeline at such a distance, it is necessary to insulate the line using special fiberglass materials.
After arranging the outer part of the water supply of a private house and installing pump plumbing, the installation of internal pipes is carried out. This is a very important stage that must be carried out with strict adherence to the technology of work. When the distribution of water pipes is completed, the specialists proceed to the installation of plumbing and installation of the sewer system.
Let's consider installation of the sewerage for the private house. Here, even before the installation work, an engineering diagram of the system is drawn up, indicating the points of placement of plumbing. A professionally drawn up sewerage plan will eliminate the difficulties during installation and problems during operation.
Sewerage of a private house includes external and internal systems. The elements of outdoor installation include sewer pipes and cleaning systems. The internal part also consists of piping and plumbing of a private house.
Rules for installing sewerage in a private house:
-
when choosing the location of the cesspool, it is necessary to provide for the possibility of unhindered access to it by sewage vehicles;
-
the lowest line of the cesspool is placed one meter deeper than the freezing level of the soil. The sewage collector is equipped with a slope and must have a depth of more than 70 cm.
In situations where it is not possible to lay sewer pipes below the freezing level, the collector is insulated.
For the installation of the sewer system of a private house, plastic pipes are currently used. Unlike metal products, such a pipe will not experience corrosion problems. The installation of these elements of a private house is carried out by inserting one pipe into another, followed by sealing the seams. Laying of sewer pipes is carried out in strict accordance with the preliminary calculations of the depth. This will allow the line to be laid on undisturbed solid ground, which will prevent the elements from bending. Pipes for risers and collectors must be of a larger diameter than sewer pipes coming from private home plumbing.
To carry out work on the arrangement of sewage systems in a private house, experienced and highly qualified specialists should be involved. The works on the installation and connection of plumbing are carried out in strict accordance with the requirements of building codes according to the drawn up scheme. Only experienced specialists who perform work under engineering supervision can satisfy such parameters.
Read the material on the topic: How to choose accessories for pipes