- Water swing
- Related video: We got to the water
- Types of water intake workings and soils
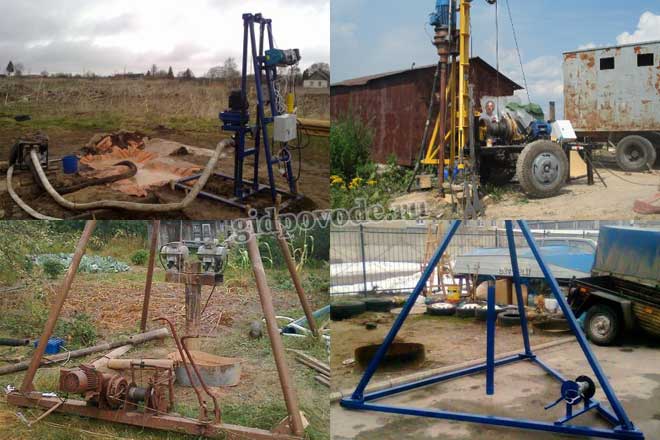
- Methods for self-drilling
- Shock rope
- Auger
- Rotary
- Puncture
- Do-it-yourself well drilling methods in the country
- Well construction and buildup
- How is a typical well arranged?
- Casing Functions
- Inner tube with filter
- Borehole device
- Caisson, adapter, packer
- Horizons and types of wells: accessible and not very
- Horizons have boundaries
- The whole range of wells
- Abyssinian well
- Well on the sand
- Artesian well
- What are the features of well operation
- Advantages of hydrodrilling wells
- DIY Drill Rig Assembly Guide
- First step
- Second step
- Third step
- Fourth step
- Drilling a well by hand
- buildup
- Video: cleaning (buildup) of the well with a homemade bailer
- 5 Impact technology - Abyssinian well installation
Water swing
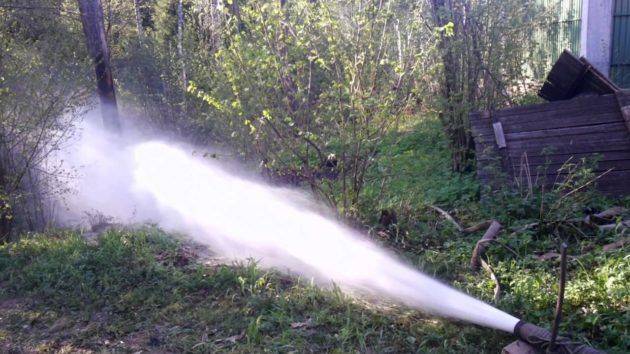
To obtain the required amount of water, you must either open the aquifer, or swing it. When opening a reservoir, drinking water flows during the first day, but such a process requires small-sized drilling equipment.
Opening can be direct and reverse. In the direct method, water is pumped into the casing and drilling fluid is pumped out of the annulus.When reversed, the water flows by gravity, and the solution is pumped out of the barrel.
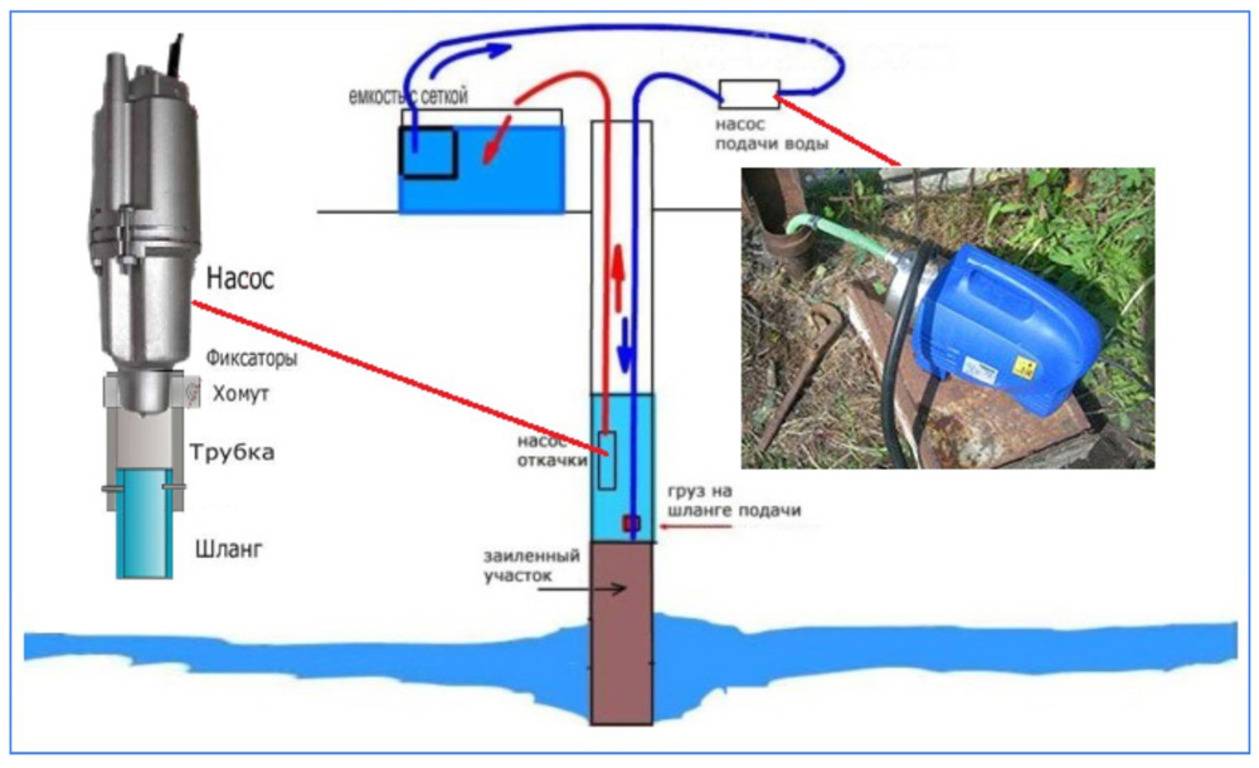
The buildup takes two to three days with a submersible centrifugal pump, as the vibrating one quickly becomes clogged with silt.
Water is pumped out each time the pump is covered. Before switching on, the pump is raised and lowered on a cable to raise the sludge. Swinging, add gravel backfill, as it will settle.
When the transparency of the water rises to half a meter, the buildup is considered over. Dip an enameled plate or a white lid into the water - its edges should be visible with a strictly vertical observation.
This completes the well. Further, it is equipped with a filter, an automatic pump and other devices for supplying and purifying water.
Related video: We got to the water
A selection of questions
- Mikhail, Lipetsk — What discs for metal cutting should be used?
- Ivan, Moscow — What is the GOST of metal-rolled sheet steel?
- Maksim, Tver — What are the best racks for storing rolled metal products?
- Vladimir, Novosibirsk — What does ultrasonic processing of metals mean without the use of abrasive substances?
- Valery, Moscow — How to forge a knife from a bearing with your own hands?
- Stanislav, Voronezh — What equipment is used for the production of galvanized steel air ducts?
Types of water intake workings and soils
Before starting drilling, you should study the composition of the soil at the site in order to at least roughly imagine your future well.
Depending on the characteristics of the aquifer, there are three types of wells:
- Abyssinian well;
- filter well;
- artesian well.
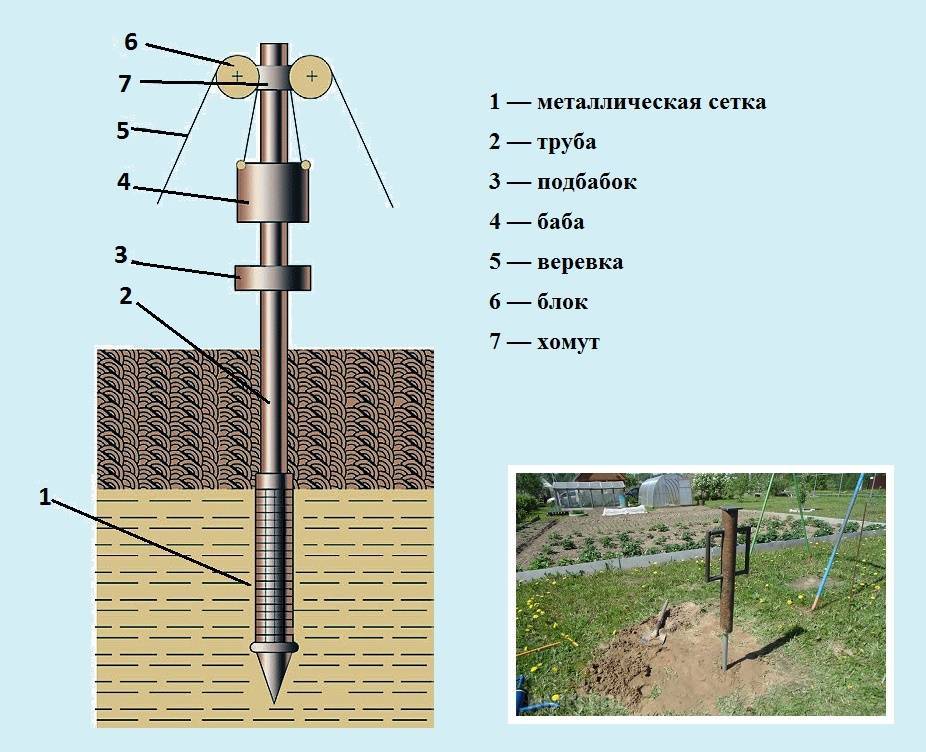
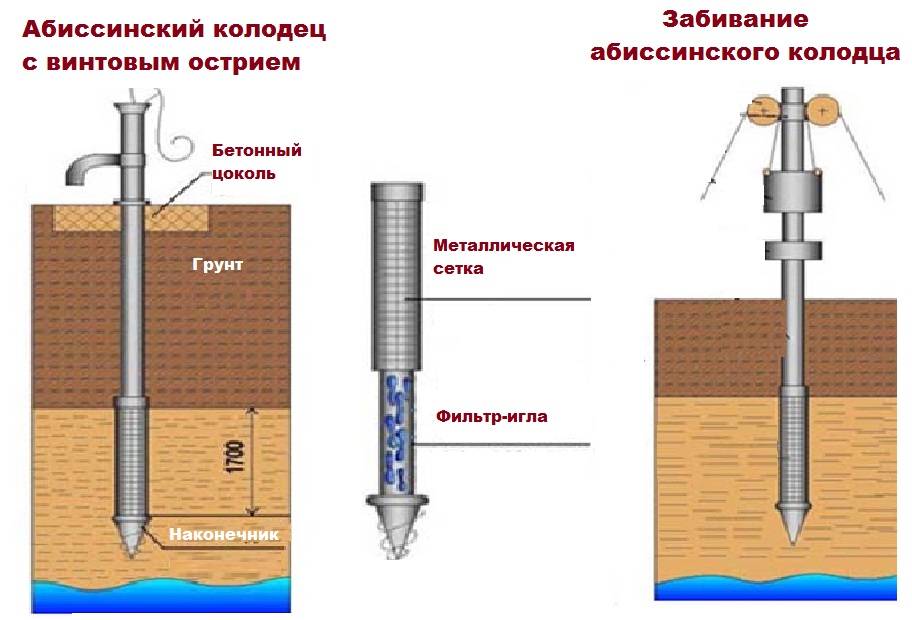
The Abyssinian well (or well-needle) can be arranged almost everywhere.They punch it where the aquifer lies relatively close to the surface and is confined to the sands.
For its drilling, driving technology is used, which is not suitable for the construction of other types of wells. All work can usually be completed within one business day.
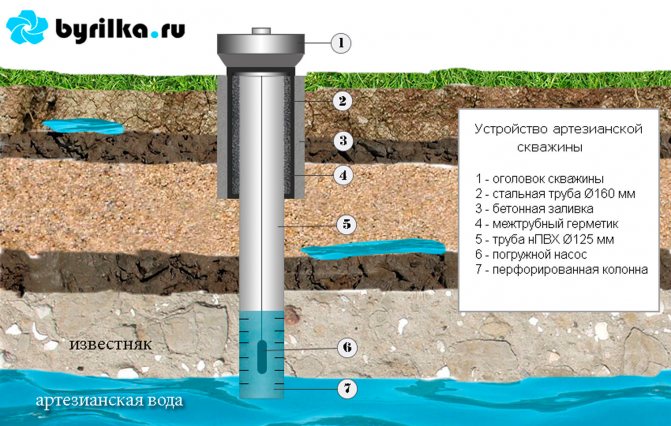
This scheme allows you to study the features of the device of various wells in order to better understand the technology of their drilling and choose the appropriate method (click to enlarge)
But the flow rate of such wells is small. To provide a house and a plot with enough water, it sometimes makes sense to make two such wells on site. The compact dimensions of the equipment make it possible to arrange such a well right in the basement without any problems.
Filter wells, which are also called "sand" wells, are created on soils where the aquifer lies relatively shallow - up to 35 meters.
Usually these are sandy soils that lend themselves well to drilling. The depth of the filter well usually varies between 20-30 meters.
This diagram clearly shows the device of the filter well. A filter must be installed at the bottom of it to prevent sand and silt from entering the water.
Work in a good scenario will take two to three days. The filter well needs good maintenance, since the constant presence of sand and silt particles in the water can cause silting or sanding.
The typical life of such a well can be 10-20 years. The period may be longer or shorter, depending on the quality of the well drilling and its further maintenance.
Artesian wells, they are wells “for limestone”, are the most reliable, since the water carrier is confined to bedrock deposits.Water contains numerous cracks in the rock.
Silting of such a well usually does not threaten, and the flow rate can reach about 100 cubic meters per hour. But the depth to which drilling is to be carried out usually turns out to be more than solid - from 20 to 120 meters.
Of course, drilling such wells is more difficult, and it will take much more time and materials to complete the work. A professional team can cope with the work in 5-10 days. But if we drill a well on the site with our own hands, it may take several weeks, and even a month or two.
But the effort is worth it, because artesian wells can last half a century, or even more, without problems. Yes, and the flow rate of such a well allows you to supply water not only to one house, but also to a small village. Only manual drilling methods are not suitable for a device of such development.
The physical and mechanical properties of soils are also of great importance when choosing a drilling method.
In the course of work, it may be necessary to go through a variety of layers, for example:
- wet sand, which can be drilled in almost any way relatively easily;
- water-saturated sand, which can only be removed from the trunk with the help of a bailer;
- coarse-clastic rocks (gravel and pebble deposits with sandy and clay aggregates), which are drilled with a bailer or a glass, depending on the aggregate;
- quicksand, which is fine sand, supersaturated with water, it can only be scooped out with a bailer;
- loam, i.e. sand with abundant inclusions of clay, plastic, well amenable to drilling with an auger or core barrel;
- clay, a plastic rock that can be drilled with an auger or a glass.
How to find out what soils lie under the surface, and at what depth is the aquifer? Of course, you can order geological studies of the soil, but this procedure is not free.
Almost everyone chooses a simpler and cheaper option - a survey of neighbors who have already drilled a well or built a well. The water level in your future water source will be at about the same depth.


Drilling a new well a short distance from an existing facility may not follow exactly the same scenario, but it will most likely be very similar.
Methods for self-drilling
To drill a well for water in a country house, a personal plot, a rural courtyard, it must be taken into account that there are three ranges of depths at which aquifers occur:
- Abyssinian well. Before the water will have to drill from one and a half to 10 meters.
- On the sand. To make a well of this type, you need to pierce the soil to a mark in the range from 12 to 50 m.
- Artesian source. 100-350 meters. The deepest well, but with the purest drinking water.
In this case, each time a separate type of drilling rig is used. The determining factor is the chosen method of drilling operations.
Shock rope
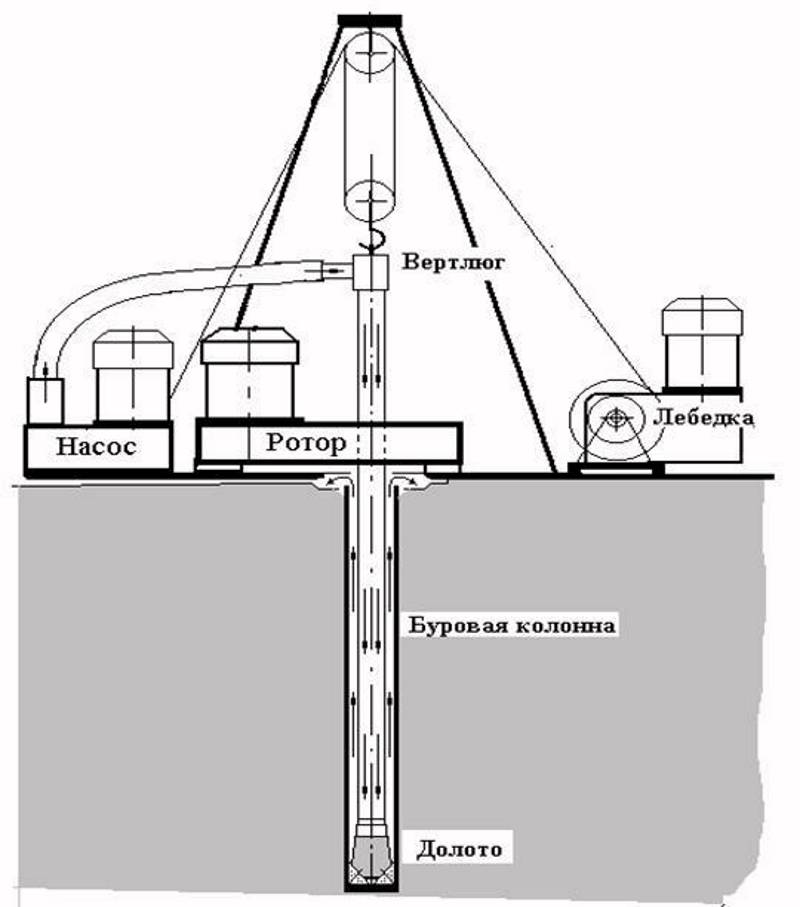
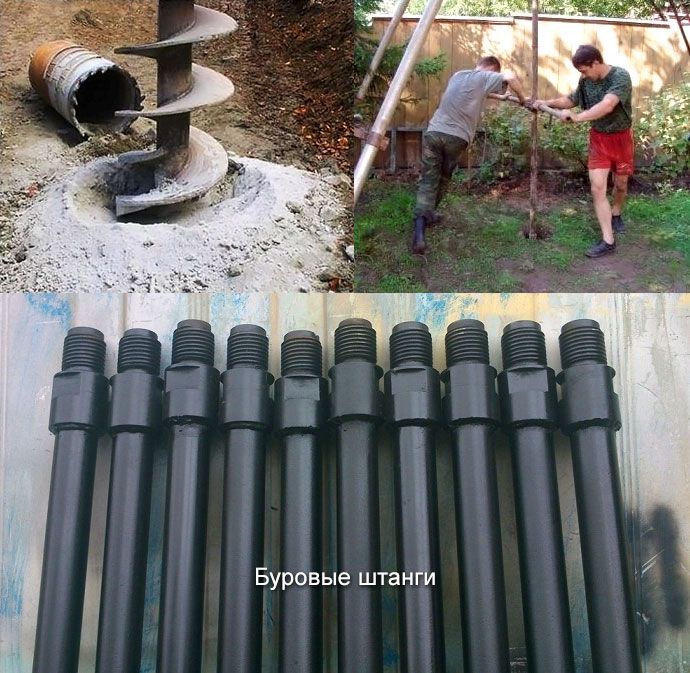
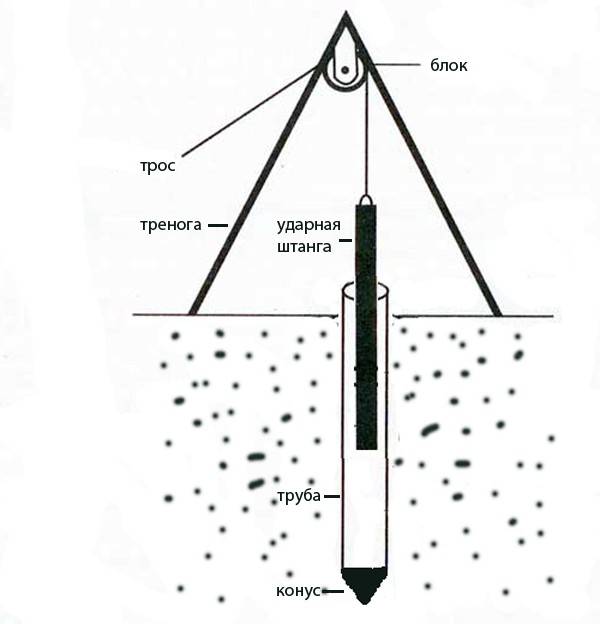
With such drilling of wells for water, the technology of the process involves raising the pipe with three cutters to a height. After that, being weighted with a load, it descends, and crushes the rock under its own weight. Another device necessary for extracting crushed soil is a bailer. All of the above can be bought or made with your own hands.
But before you drill a well with your own hands, you will have to use a garden or fishing drill to make the primary recess. You will also need a metal profile tripod, a cable and a system of blocks. The drummer can be lifted with a manual or automated winch. The use of an electric motor will speed up the process.
Auger
This technology of drilling wells under water involves the use of a drill, which is a rod with a helical blade. A pipe with a diameter of 10 cm is used as the first element. A blade is welded onto it, the outer edges of which form a diameter of 20 cm. To make one turn, a sheet metal circle is used.
A cut is made from the center along the radius, and a hole equal to the diameter of the pipe is cut along the axis. The design is “divorced” so that a screw is formed that needs to be welded. To drill a well in the country with your own hands using an auger, you need a device that will serve as a drive.
It could be a metal handle. The main thing is that it can be disconnected. As the drill deepens into the ground, it is increased by adding another section. The fastening is welded, reliable, so that the elements do not come apart during the work. After the procedure is completed, the entire structure is removed, and casing pipes are lowered into the shaft.
Rotary
Such drilling of a well in the country is not the cheapest option, but the most effective. The essence of the method is the combination of two technologies (shock and screw). The main element that receives the load is the crown, which is fixed on the pipe. As it sinks into the ground, sections are added.
Before you make a well, you need to take care of the water supply inside the drill. This will soften the ground, which will extend the life of the crown. This method will speed up the drilling process. You will also need a special installation that will rotate, raise and lower the drill with a crown.
Puncture
This is a separate technology that allows you to penetrate the ground horizontally. This is necessary for laying pipelines, cables and other communication systems under roads, buildings, in places where it is impossible to dig a trench. At its core, this is an auger method, but it is used for drilling horizontally.
The pit is dug, the installation is installed, the drilling process begins with periodic sampling of rock from the pit. If water in the country can be obtained from a well separated by an obstacle, a puncture is made, a horizontal casing pipe is laid, and a pipeline is pulled. Everything can be done with your own hands.
Do-it-yourself well drilling methods in the country
Drilling technique may vary. It all depends on the type of drilling rig. In total, there are 3 drilling methods.
Well drilling methods:
- Shock-rope;
- screw;
- Rotary.
We drill a well using a percussion rope method through a special load, which is suspended by a cable from the frame. The load is welded with triangular teeth. With the help of raising and lowering the system, the well is drilled.
The auger installation resembles an ordinary garden drill, but is more powerful. Several turns of the screw are welded onto the pipe and the tool is ready. The rotation is done by hand thanks to the long handle. Every half a meter of immersion, the drill has to be removed and cleaned.
The rotary system is considered the most efficient and suitable for any well. A drill column is attached to a drill rod or column. Rotary drilling combines the rotation of the drill and impact on the ground. At the same time, the design of the system allows pumping liquid into the well, flushing it.
Well construction and buildup
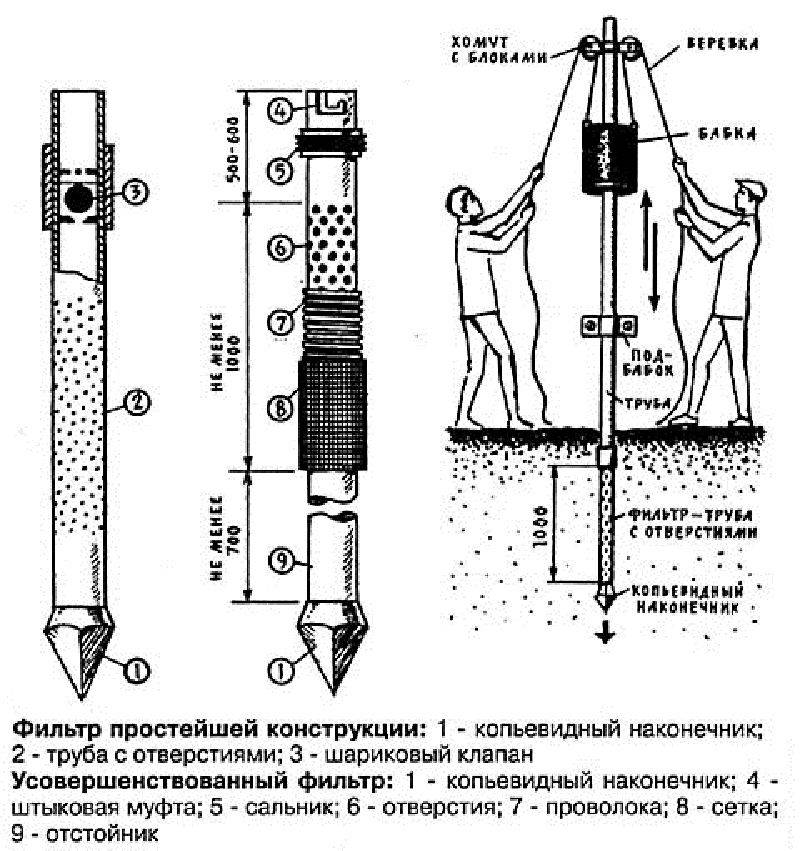
After the desired depth is reached, the next stage begins - arrangement. A filter column is lowered into the finished well, consisting of a pipe, a sump and a filter. You can make it yourself from a filtration mesh, perforation and casing, or use a ready-made, store-bought sand filter for a submersible pump.
Well construction process
To strengthen the pipe, the space behind it is covered with crushed stone of a 5 mm fraction or coarse sand. The backfill must be above the level of the filter. The filter is the most important element of any well. The main function of the filter is to protect against sand and large impurities. In parallel with backfilling, water is pumped into a pipe with a sealed upper end. This manipulation helps to flush the annulus and the filter. After washing, a natural barrier for large impurities is formed. Gelling a well with a bailer or screw pump means that water is pumped out of a fresh well until the water is clean and clear. This stage is called buildup. For her most often use an electric centrifugal pump. The advantage of this mechanism is that it can pump high-density liquid media. An ordinary household pump is also acceptable, but it will require more effort and time. In case of problems with the power supply, it is possible to use a hand pump.
Well pipe
After pumping on a safety cable, the pump is lowered to a depth (see the picture above). A water pipe or hose with a diameter of 25 or 50 mm is connected to it. The choice of diameter depends on the capabilities of the well - the amount of water that can be pumped out of the well in a certain period of time.
If a metal pipe is used, the pump is not fixed. Instead, a waterproof cable is attached to the pipe from the pump.


Well Pump Sample
How is a typical well arranged?
If you do not focus on the nuances, the essence of arranging a water well for a country house is the same: it is a long narrow vertical shaft that reaches the depth of water. The walls of the excavation are reinforced with casing pipes
Wells differ from each other in width, depth and additional devices that increase their productivity and reliability.
In addition to the casing pipe, the wells are equipped with equipment for the forced lifting of fluid and its distribution. To choose the right pumping equipment and storage capacity, you need to know the characteristics of the well, the most important of which is its depth and flow rate.
The flow rate of a well is an indicator of its productivity: the maximum volume of fluid obtained per unit of time. It is calculated in cubic meters or liters per hour or day.
Casing Functions
Casing pipes are the main element of the well. Casing is carried out using separate segments, soldered, welded or screwed together
Particular attention should be paid to their equal diameter: the whole structure should create a straight, even column
If the casing pipes have an external thread, the links are connected by couplings, due to which the penetration diameter increases.
Casing pipes are needed to:
- while drilling the well, there was no shedding of the mine;
- the barrel is not clogged during its operation;
- the upper aquifers did not penetrate the structure.
Casing pipes made of steel alloys and polymers (PVC, PVC-U, HDPE) are widely used. Cast iron and obsolete asbestos-cement products are used less frequently. The space between the pipe and the ground around the mouth is poured with concrete if the working was drilled in loose soils or the aquifer lies at a considerable depth.
Only after this work is completed, all other equipment is installed. Sometimes during the operation of the well, a slight "squeezing" of the pipe to the surface may occur. This is a natural process that does not require any additional measures.
Threaded metal and plastic casing pipes are considered the most popular. The photo shows the installation of a blue plastic casing
Inner tube with filter
A pipe with a filter is lowered into the wellbore, made according to the double casing scheme. Through its perforated first link, the filtered water will flow into the backing, and then be pumped to the surface.
After the pipe is installed at the desired depth, it is desirable to fix its mouth. For this purpose, a clamp is used to prevent spontaneous subsidence of the pipe.
Borehole device
The upper part of the casing pipe is equipped with a head. The basic design of this device is the same for heads of any kind. It consists of a flange, a cover and a rubber ring.
Different types of heads differ from each other in the type of material from which they are made, and additional options.
Heads are made of cast iron and plastic. This is a sealed device. It is used to fasten the pump cable and the outlet of the water pipe.
Due to the low pressure created by the head in the pipes, the inflow of water and, as a result, the flow rate of the well increases.
Caisson, adapter, packer
So that high humidity does not affect the operation of devices associated with the well, a special reservoir is provided for them - a caisson. It is made either from metal or plastic.
Metal caissons, unlike plastic ones, can be repaired, they are better adapted to the climate with significant temperature differences. In addition, a metal product can be independently assembled from parts that are sold separately. But plastic models are cheaper and they don't rust.
Those who wish to arrange a caisson for a well with their own hands will find detailed instructions for its construction on our website.
To hermetically connect the ground water supply and the well, you will need a downhole adapter. This device is usually placed in the place where all the equipment that needs to be protected from water is assembled. Most often this is a technical room. One part of the adapter is attached to the casing, and the hose from the pump is screwed to the other part.
A metal caisson is an expensive thing: its price reaches 40 thousand rubles, so you can buy it in parts and assemble it yourself, which will make the purchase cheaper
Sometimes there is a need to allocate a local section of a deep artesian well, where, for example, repair work will be carried out.For this purpose, packers are used - compactors for wells.
The listed elements are part of the well device, exerting a great influence on its functionality.
Horizons and types of wells: accessible and not very
Before you start preparing for such a large-scale work, you need to find out where to drill, but without conducting geological exploration, you will not be able to find the exact answer.
Horizons have boundaries
Water is located on different horizons, these sources do not communicate with each other. This is provided by layers of impermeable rocks - clay, limestone, dense loam.


- The shallowest source is perched water, which is provided by precipitation and reservoirs. It can start at a depth of 0.4 m and end at 20 m from the surface. This is the dirtiest type of water, it always has a lot of harmful impurities.
- Having drilled a well up to 30 m deep, you can “stumble” on cleaner groundwater, which is also fed by precipitation. The upper boundary of this horizon can be located at a distance of 5 to 8 m from the surface. This liquid is also recommended to be filtered.
- The underground water source, located in the sandy layer, is already filtered with high quality, therefore it is optimal for water supply. It is this horizon that must be reached by those who want to drill their own well.
- Depth from 80 to 100 m is an unattainable ideal with crystal clear water. Artisanal drilling methods do not allow you to get so deep.
Since the occurrence of horizons is influenced by relief and other factors, the boundaries of perched water and groundwater are conditional.
The whole range of wells
Drilling water wells manually depends on the type of future well.The types of structures cannot be called numerous, because there are only three of them:
- Abyssinian;
- on the sand;
- artesian.
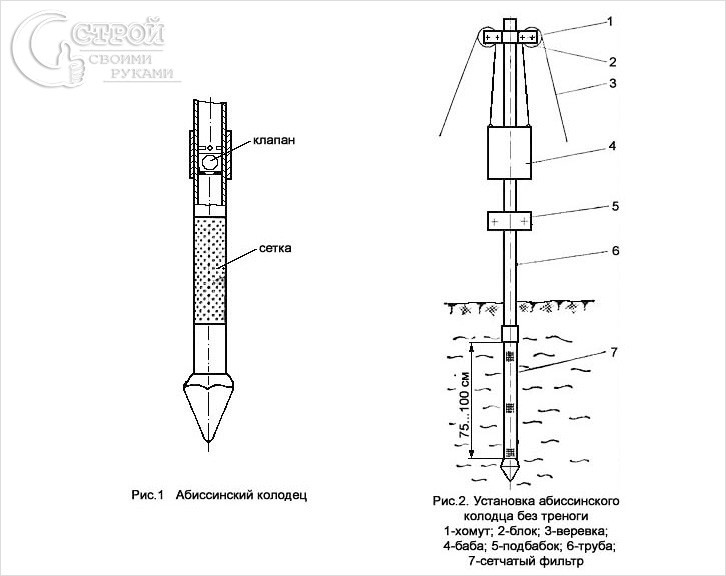
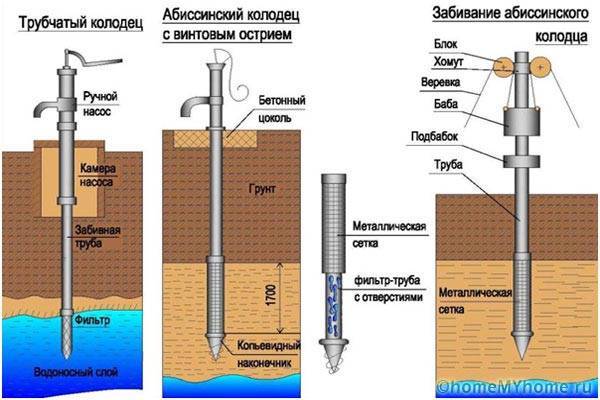
Abyssinian well
This option is optimal when the water in the area is 10-15 m away from the surface. It does not require a lot of free space. Another advantage is the relative simplicity of work, which allows even a beginner who is just learning the science of drilling to cope with the task. This is a well-needle, which is a column constructed from thick-walled pipes. A special filter is arranged at the bottom of it, drilling holes at the end of the pipe. The Abyssinian well does not require drilling as such, since the chisel is simply hammered into the ground. But the most common way to make such a well is still called impact drilling.
Well on the sand
If the aquifer lies at a depth of 30 to 40 m, then it is possible to build a sand well, with the help of which water is extracted from sands saturated with water. Even a 50-meter distance from the surface does not guarantee the purity of drinking water, so it must be given for laboratory analysis. Since in this case there will be no insurmountable obstacles on the way - hard rocks (semi-rocky, rocky), manual drilling of water wells does not imply any special difficulties.
Artesian well
This aquifer can be located at a depth of 40 to 200 m, and water has to be extracted from cracks in rocks and semi-rocks, so it is inaccessible to mere mortals. Without knowledge and serious equipment for drilling, the task of building a well for limestone is an impossible mission.However, it can serve several sites at once, so drilling services ordered together promise significant savings.
What are the features of well operation
There are several rules for using wells, following which the price of its operation is reduced:
- Regardless of the type of construction, cleaning should be carried out regularly.
- Signs of contamination of the system are: the presence of air pockets when opening the water; the presence of other impurities in the water.
- If cleaning is not carried out in time, such contamination can cause breakdowns that cannot be repaired, which means that a complete replacement will be needed.
- To restore the functionality of the system, it is enough to perform a purge.
- A radical cleaning method is the use of acid or electricity. But this should be carried out only by highly qualified specialists.
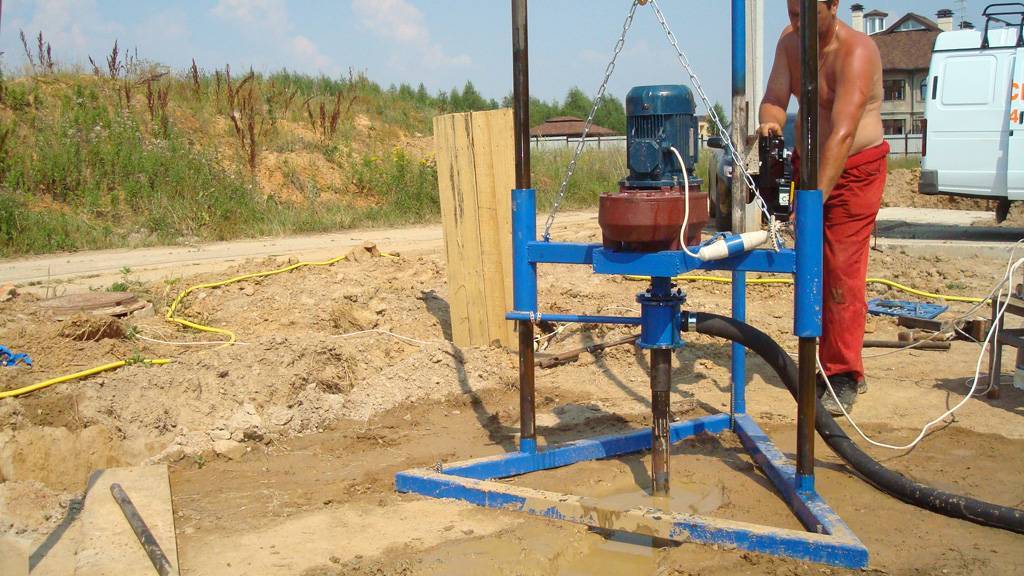
Advantages of hydrodrilling wells
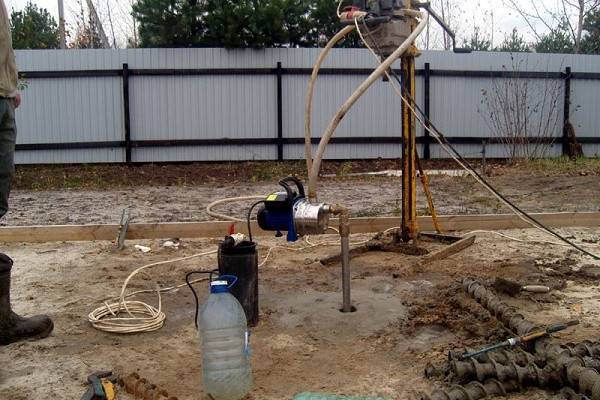
The technology of hydro-drilling for water among the people has gained popularity relatively recently, therefore it has many misinterpretations. First, it is a misconception that the method is only suitable for small wells. This is not true.
If desired, and with appropriate technical support, it is possible to hit wells with more than 250 meters by hydraulic drilling. But the most common depth of domestic wells is 15-35 meters.
The opinion about the high cost of the method is also not supported by calculations. Good speed of work reduces financial costs.
The obvious advantages of the method also include:
- compactness of the equipment;
- the possibility of drilling in an extremely limited area;
- minimum technological operations;
- high speed of work, up to 10 m per day;
- safety for landscape and ecological balance;
- the possibility of self-drilling;
- minimum cost.
Perhaps the most significant advantage of hydrodrilling is still the ability to drill in landscaped areas without significant aesthetic troubles.
The technology of hydraulic drilling on the MBU machine allows you to carry out a cycle of work on a small site and does not violate the landscaping of the site
The advantages of hydrodrilling are also very clear when compared with dry drilling technology, where it is necessary to constantly remove the working tool from the hole for cleaning and load it again.
Most of all, this technology is adapted to work with fine-clastic sedimentary soils, which are most easily removed from the well using a bailer. And the drilling fluid allows you to do without gelling.
Of course, for a good result of the enterprise, it is necessary to purchase the appropriate means of mechanization, because one home-made drill, even at shallow depths, is not enough.
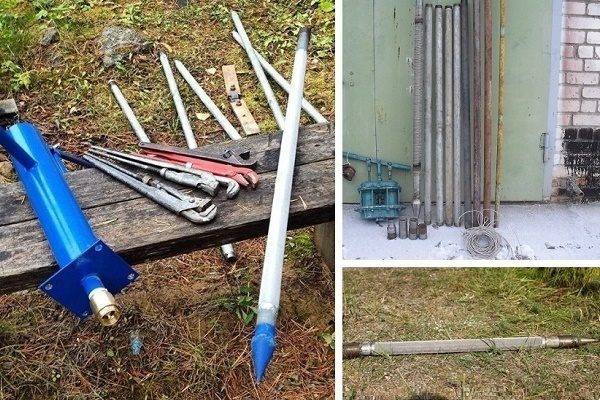
DIY Drill Rig Assembly Guide
For self-assembly of a drilling rig, it is enough to have minimal experience with a welding unit, an electric drill and a grinder.
Prepare the required equipment in advance. You will need:
- tool for creating an external inch thread;
- Bulgarian;
- wrench;
- half an inch galvanized pipe, as well as a squeegee of a similar size;
- plumbing cross.
Prepare everything you need and proceed to do the job in accordance with the step-by-step guide.
First step
Drilling rig by own hands
Prepare pipe sections for the manufacture of the main part of the drilling fixture. Pipes will need to be fixed in a spur and a cross.To do this, prepare a two-centimeter thread on the ends of the segments.
Weld pointed metal plates to the ends of several segments. They will act as tips.
Such an installation involves drilling with a constant supply of water, thanks to which the direct arrangement of the recess and the removal of the soil will be easier.
Do-it-yourself drilling rig
To supply water, connect a water or pump hose to any opening of the cross blank. Connect using a suitable adapter.


Second step
Proceed to connect the structural parts to the threaded connections. Connect a piece of workpiece with an equipped tip to the lower end of your working pipe. Make the connection using a squeegee.
Direct drilling will be carried out by deepening the pointed tip with the rotation of the working installation. Tip blanks should have different lengths. First you use the shortest fixture. After about a meter deep is ready, replace the short tip with a slightly longer one.
Do-it-yourself drilling rig
Third step
Assemble the base of the drilling structure from a square section profile. In this case, the base will be a rack with supporting components of the structure. The supports are connected to the main rack by means of a transition platform by welding.
Attach the platform and motor to the square profile. Fix the profile itself to the rack so that it can move along the rack.The dimensions of the profile used should slightly exceed the dimensions of the rack.
Do-it-yourself drilling rig
When choosing an electric motor, be sure to pay attention to its power rating. A 0.5 horsepower motor will suffice to ensure optimal drilling conditions
Do-it-yourself drilling rig
Do-it-yourself drilling rig
Do-it-yourself drilling rig
Do-it-yourself drilling rig
Power regulation is carried out using a gearbox. A flange must be attached to the gearbox shaft. Attach another flange to the flange with bolts. There should be a rubber washer between these two flanges. Thanks to the rubber gasket, shock loads that appear when passing through different types of soil will be smoothed out.
Fourth step
Connect water. Fluid must be continuously supplied to the main working tool by means of a drill. Without a properly organized water supply, the quality of the equipment will decrease.
The problem mentioned above can be solved by installing a special device made of steel pipe below the flanges. Prepare 2 holes in the pipe section with some shift in relation to each other.
Next, you need to make a groove on both end sides of the pipe for arranging ball bearings. You must also prepare an inch thread. At one end, the pipe is connected to the flange, and working elements will be installed at its other end.
In order to create additional moisture insulation of the created device, place it in a special polypropylene tee. Connect an adapter to the middle of this tee to connect the water supply hose.
Drilling a well by hand
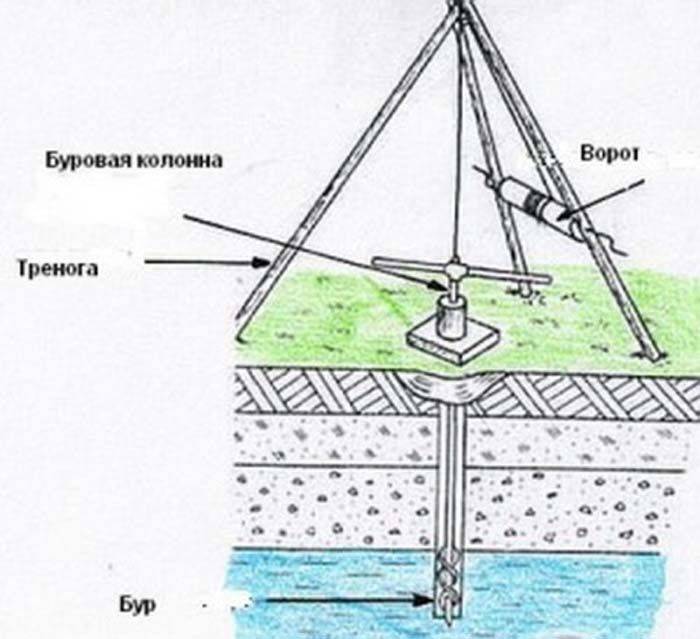
To perform the work, the drill itself, the drilling derrick, the winch, rods and casing pipes are required. The drilling tower is necessary when digging a deep well, with the help of this design, the drill with rods is immersed and lifted.
The easiest way to drill a well for water is rotary, which is carried out by rotating the drill
When drilling shallow wells, the drill string can be removed manually, without the use of a derrick at all. Drill rods can be made of pipes, products are connected with dowels or threads. The lowest bar is additionally equipped with a drill.
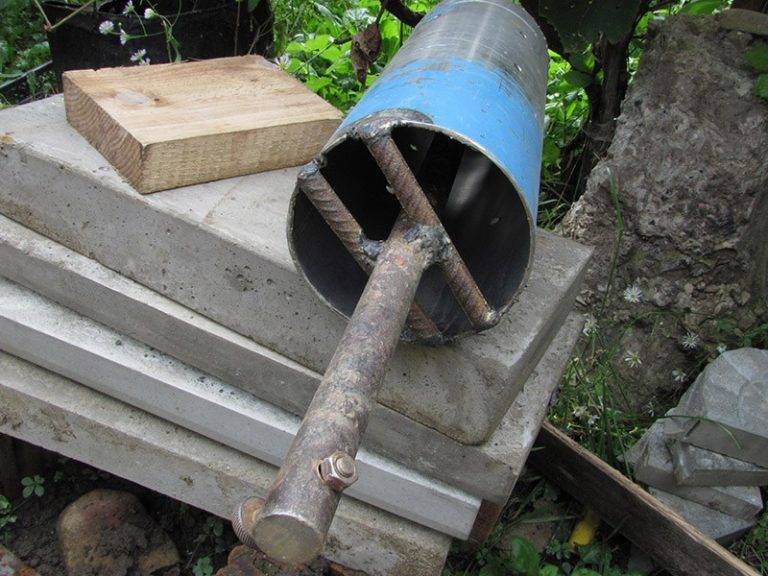
The cutting attachments are made from 3 mm sheet steel. When sharpening the edges of the nozzles, it should be noted that when the drill mechanism is rotated, they must cut into the soil clockwise.
The drilling technology, familiar to most owners of household plots, is also applicable for arranging a well under water
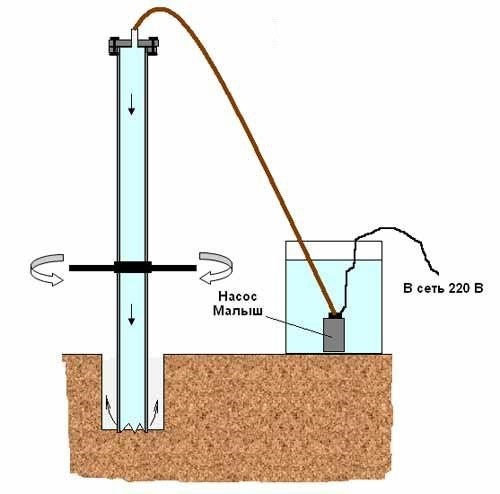
The tower is installed above the drilling site, its height must exceed the height of the drill rod in order to facilitate the extraction of the rod when lifting. Then, a guide recess for the drill is dug on two bayonets of the shovel. The first turns of rotation of the drill can be performed by one person, but as the pipe sinks, additional help will be required. If the drill does not come out the first time, turn it counterclockwise and try again.


As the drill goes deeper, the rotation of the pipe becomes more difficult. Softening the soil with water will help facilitate the work. In the course of moving the drill down every half meter, the drilling structure should be brought to the surface and freed from the soil. The drilling cycle is repeated again.At the stage when the tool handle is level with the ground, the structure is extended with an additional knee.
Since it takes a significant part of the time to lift and clean the drill, you should make the most of the design, capturing and extracting the maximum possible portion of the soil layer to the surface.
When working on loose soils, casing pipes should be additionally installed in the well, which prevent soil from shedding from the walls of the hole and blocking the well
Drilling continues until it enters the aquifer, which is easily determined by the state of the excavated land. Passing the aquifer, the drill plunges even deeper until it reaches the next aquifer - the water-resistant layer. Immersion to the level of the water-resistant layer will ensure maximum water inflow into the well
It is important to note that manual drilling is applicable only for diving to the first aquifer, the depth of which does not exceed 10-20 meters.
To pump out dirty water, you can use a hand pump or a submersible pump. After two or three buckets of dirty water, the aquifer is washed and clean water usually appears. If this does not happen, the well should be deepened by another 1-2 meters.
You can also use a manual drilling method based on the use of a conventional drill and a hydraulic pump:
new entries
How birch leaves can be useful for the garden 6 non-obvious reasons to plant hydrangea in the garden Why soda is considered a versatile and effective tool for the garden and vegetable garden
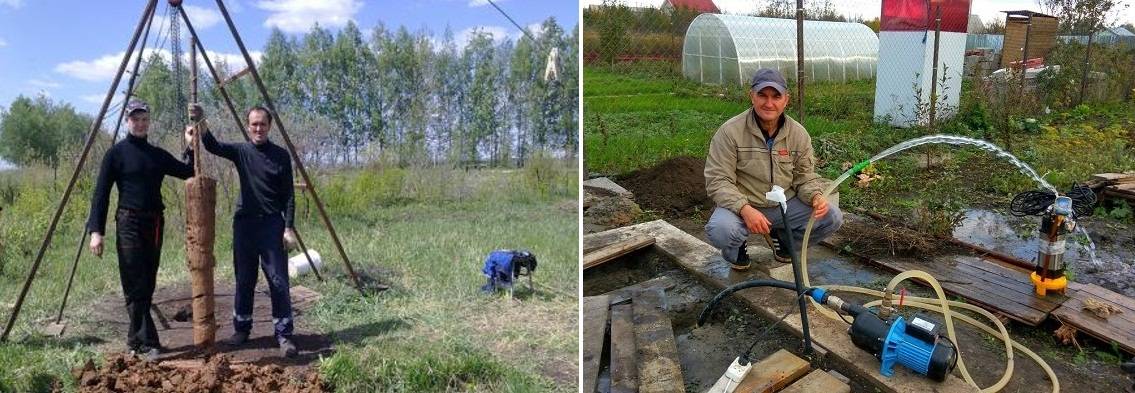
buildup
A drilled well will not yet give water in the required quantity and quality. To do this, it is necessary either to open the aquifer, or to shake the well.Opening the reservoir allows you to get drinking water during the day. It requires a large amount of clean water, complex and expensive equipment. For your information: opening is carried out by direct and reverse methods. In the direct case, water is pumped under pressure into the casing and the drilling fluid is pumped out of the annulus. In the reverse, water is fed by gravity "by the pipe" and the solution is pumped out of the barrel. Direct opening is faster, but it disrupts the reservoir structure more and the well serves less. The opposite is the opposite. Keep in mind when negotiating with drillers if you order a well.
The buildup of the well takes several days, but can be done with a conventional household submersible centrifugal pump; vibrating is not suitable for the reasons indicated above. For buildup, first, the silt is removed from the well with a bailer; how to work with a bailer, you can see in the video below:
Video: cleaning (buildup) of the well with a homemade bailer
The rest is easy: the water is completely pumped out each time it is enough to cover the pump. It is useful to raise and lower it several times on the cable before turning it on in order to stir up the residual sludge. The buildup can be done with a manner, but you can scoop up, and it will take about two weeks.
The buildup of the well is considered complete when the transparency of the water rises to 70 cm. clean barrel. When the edges of the disk begin to blur during immersion - stop, already opacity. You need to look at the disk strictly vertically.Upon reaching transparency, the water sample is handed over for analysis and, if everything is OK, the annular space is concreted or closed with clay, and a filter is installed.
5 Impact technology - Abyssinian well installation
We make the base from high-quality metal pipes 1.0 or 1.5 inches. We cut them into two-meter pieces. We weld the spurs with a thread or cut it. We carry out the extension of pipes when immersed in the ground, connecting them with couplings. We seal the joints with tow, sanitary flax with oil paint. To drive the structure into the ground, a driving woman weighing 30 kilograms is used.
At first glance, everything looks very simple, but there are some nuances to consider. We carry out the installation, starting with the choice of a place where we dig a hole 1 × 1 × 1 meter. Using a garden drill, we pass the upper part of the rock to form a hole. We begin to clog the pipe, using any round object with a hole in the middle as a woman. We raise the woman on a rope thrown over the blocks. Falling, she hits the podbka, fixed with clamps on the pipe. As we deepen, we build up the pipes and rearrange the subs.

Periodically check: perhaps water has appeared. To do this, we lower a small tube, which, in contact with water, makes a gurgling sound. We deepen the well until the water rises 0.5–1 m above the filter. We supply water under pressure to wash the filter from clay. Pump out the muddy water until clean water flows. We cover the area around the well with greasy clay, ramming. We concrete from above so that the water in the well does not become contaminated.


