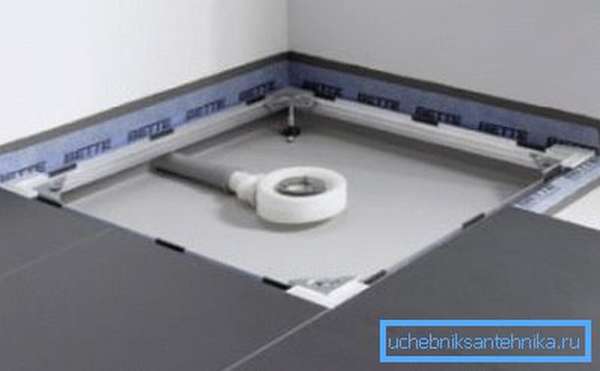
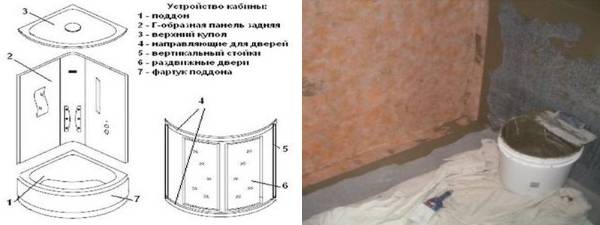
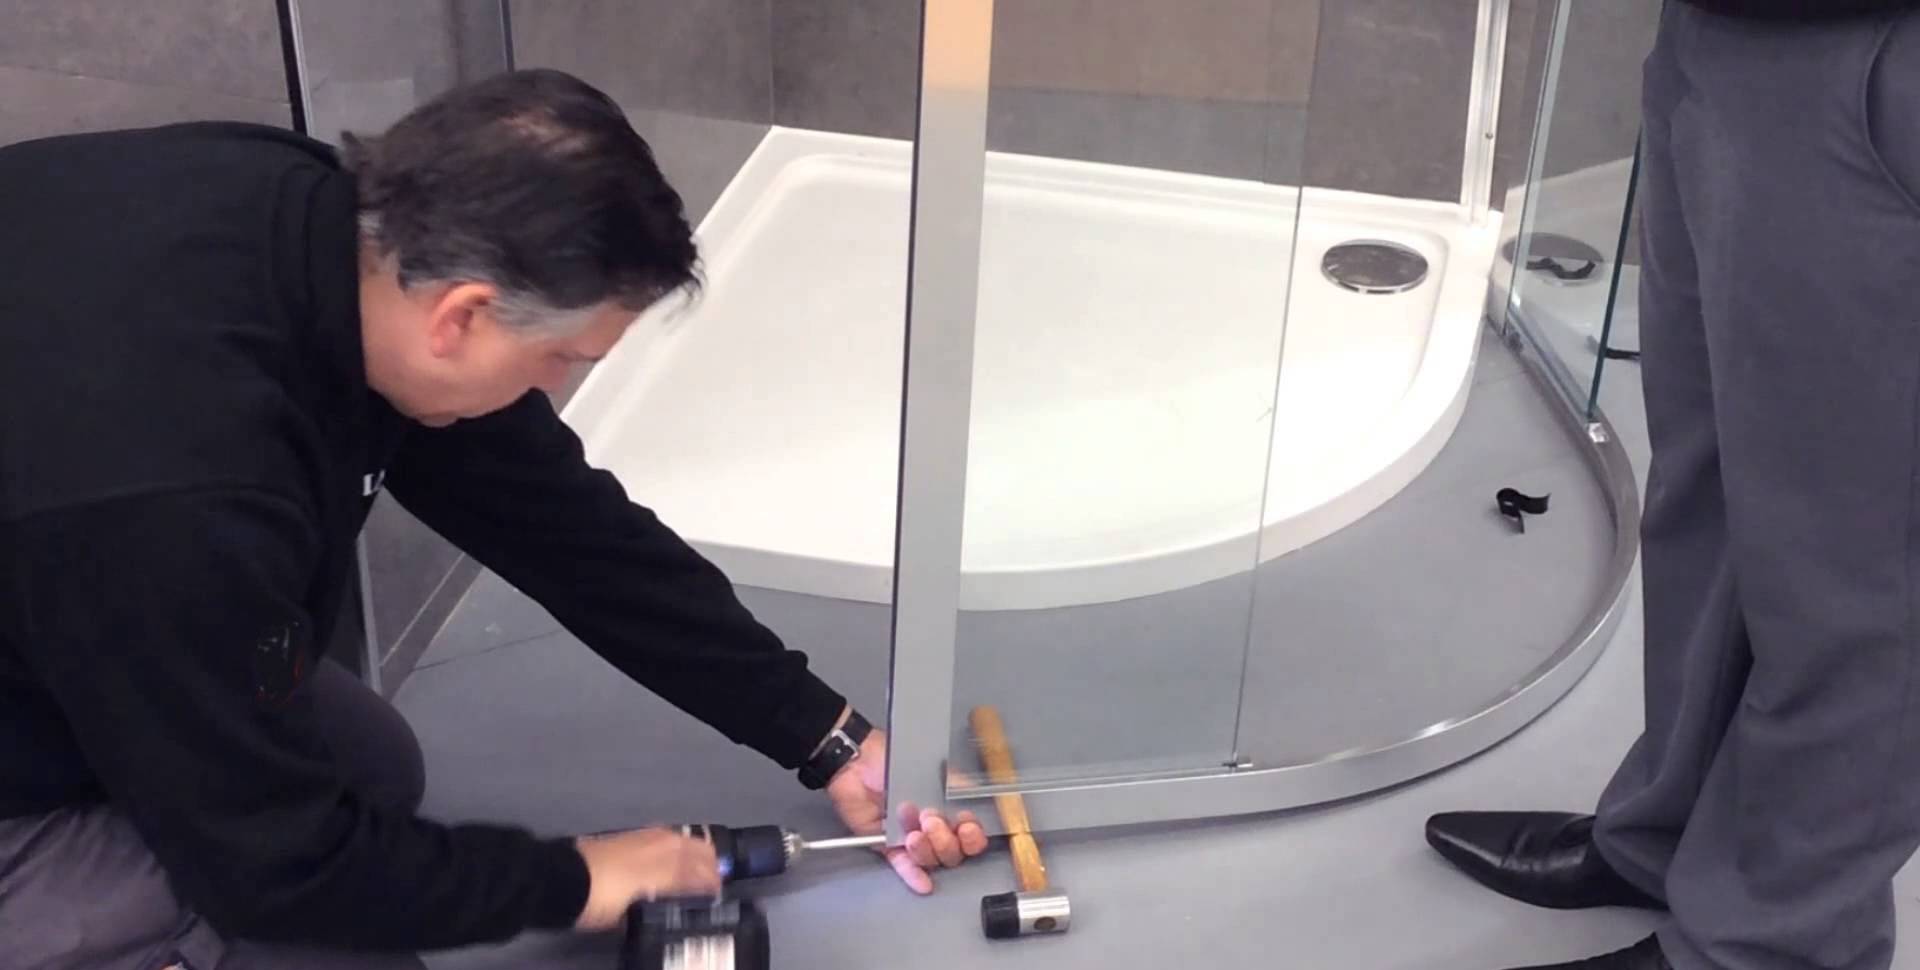
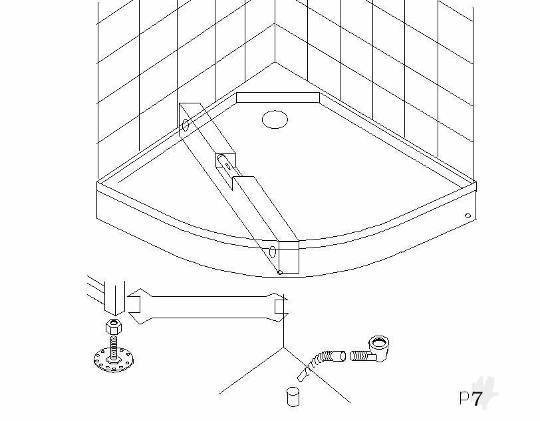
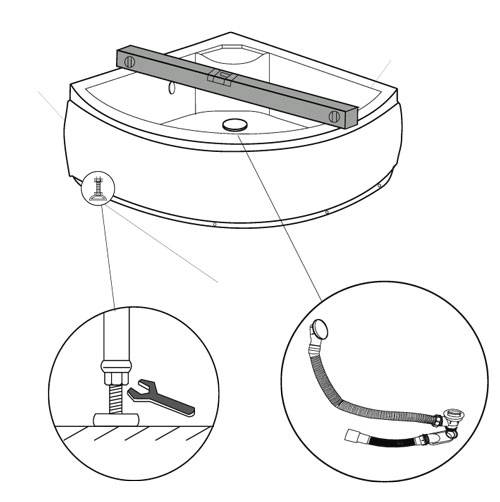
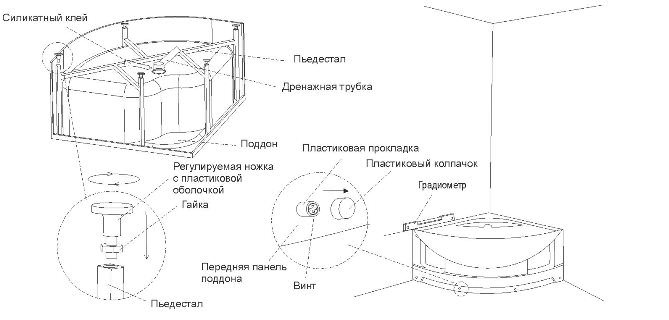
- Screen installation
- Choice
- Geometric parameters
- Technical specifications
- Material quality
- Performance
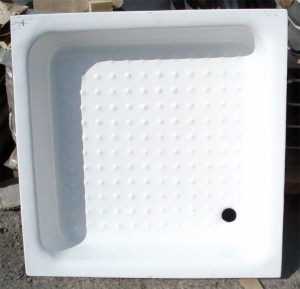
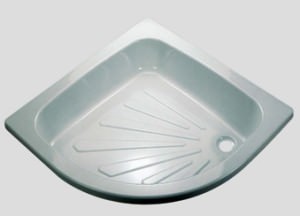
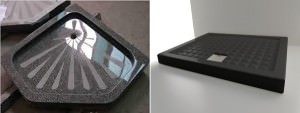
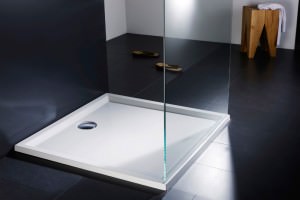
- Types of shower trays
- Materials for manufacturing
- Cast iron
- Steel
- Ceramic
- Acrylic
- Quarry
- Stone, wood, glass
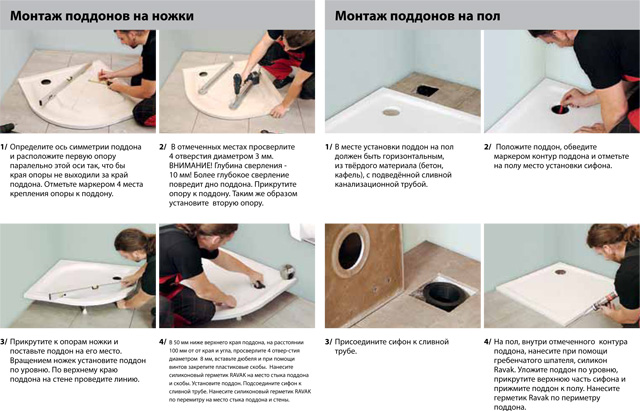
- Other ways to install pallets
- What is the best base for the pallet
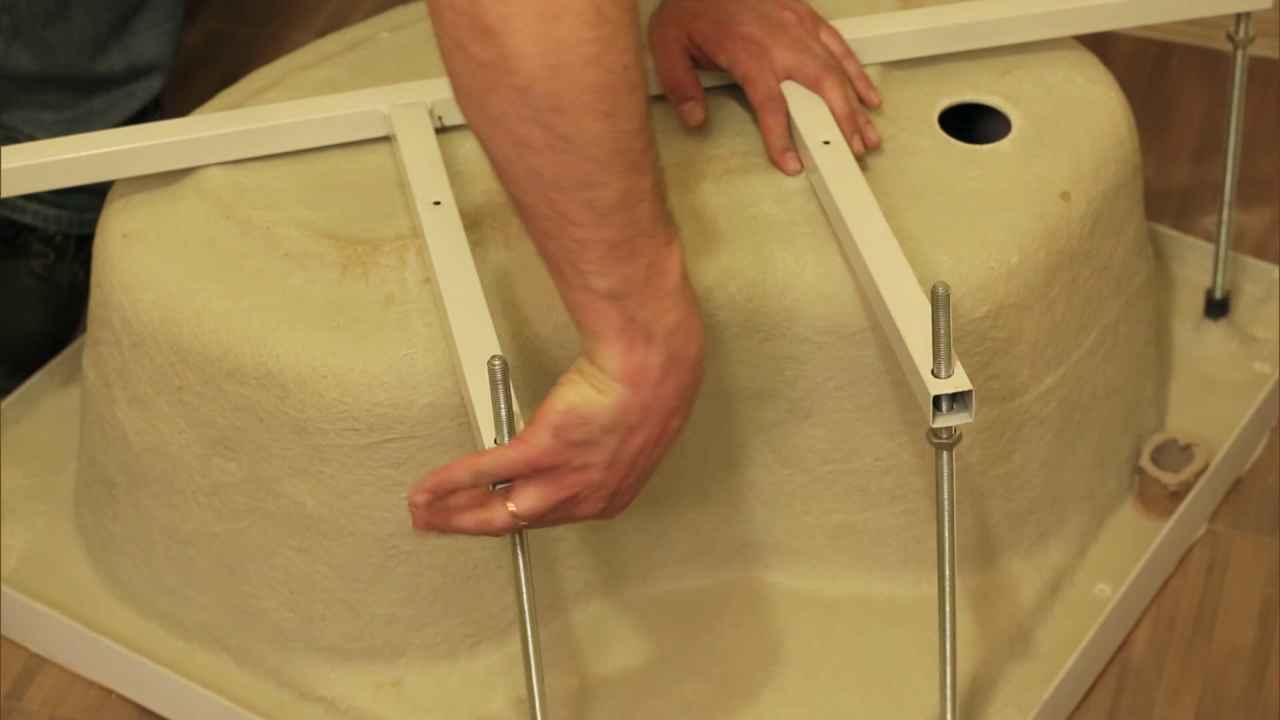
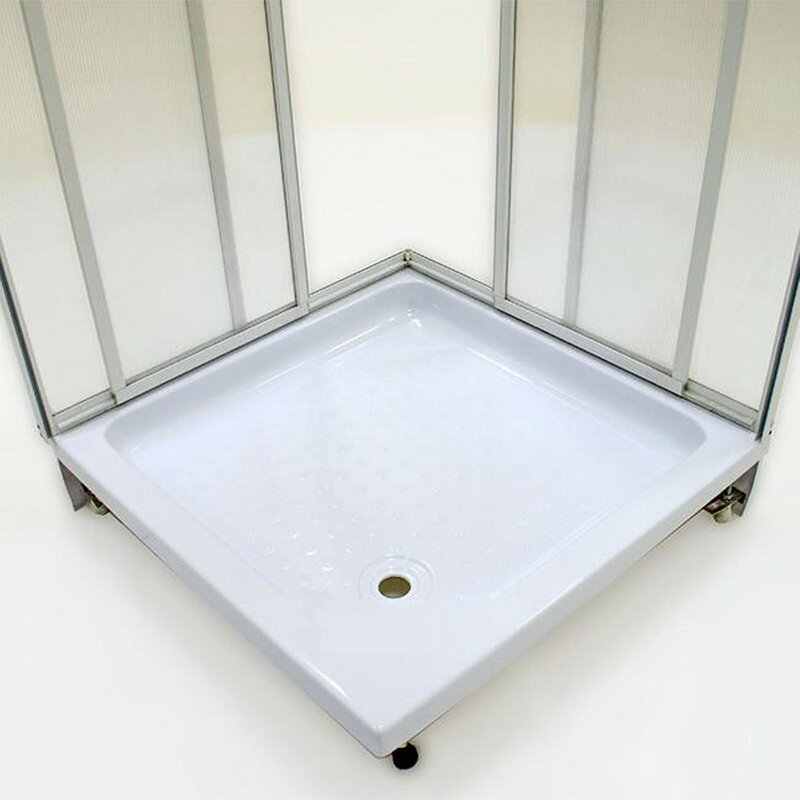
- Metal or plastic frame
- Installing a shower tray on a brick foundation
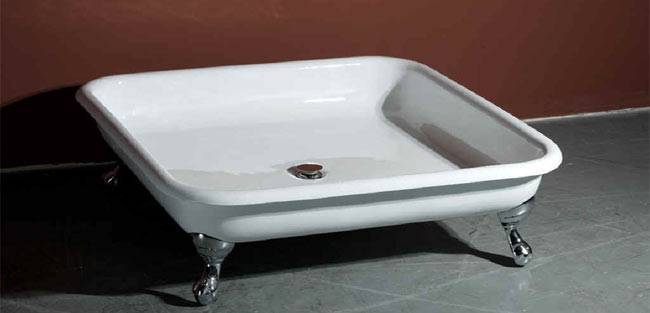
- Types of structures according to the height of the sides
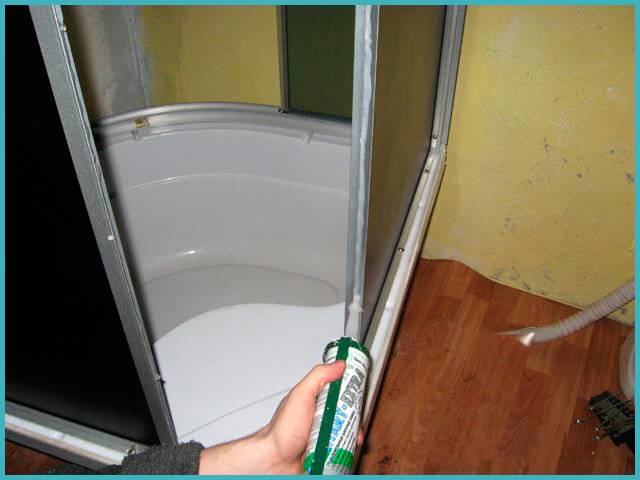
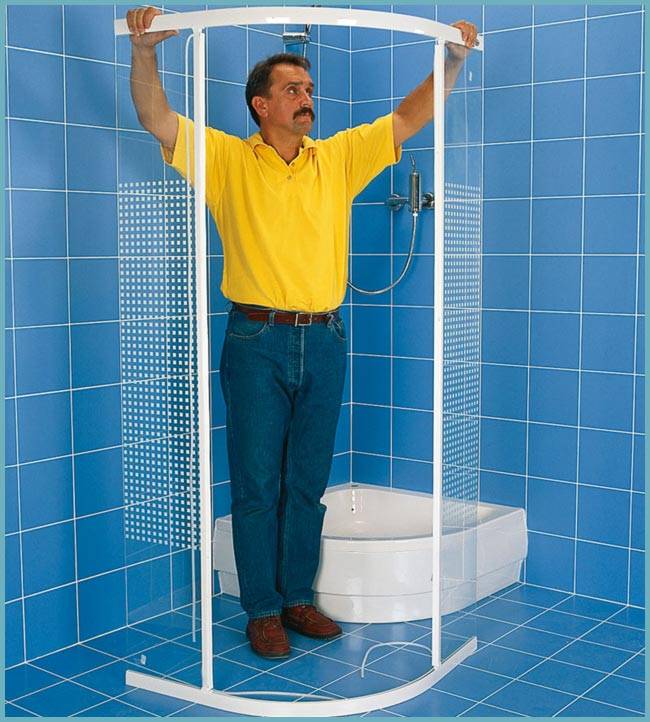
- Installation of cabin walls
- Installation of the roof and cabin doors
- Connecting the cabin to the power supply
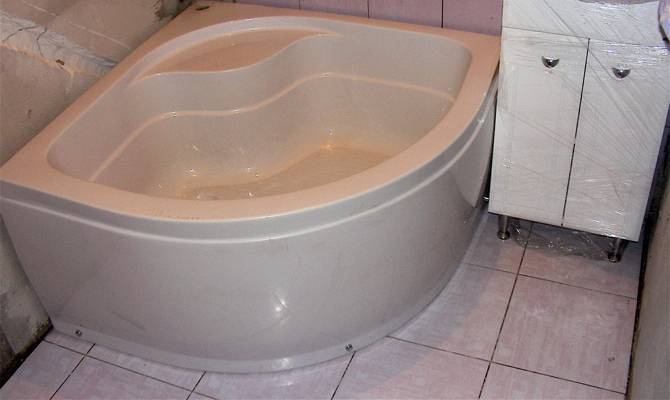
- Which is better to choose a shower tray in the bathroom
- Safety requirements for the operation of shower trays and corners
- The main requirements for the safety of a shower enclosure are:
- Do-it-yourself brick shower tray manufacturing technology
- 3 Pallet sides
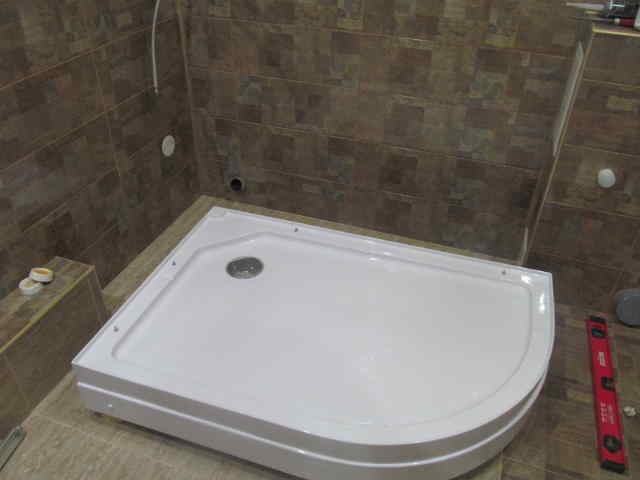
- Shapes and sizes
- The nuances of self-installation of an acrylic pallet
- Preparatory stage before installation
- Installation work
- Cab bottom installation strength
- What can be used to trim the cabin
- How to make a do-it-yourself tile shower tray
- Filling the screed
- Ladder installation
- The erection of the side
- Filling the screed inside the pallet
- Waterproofing
- Facing
- A device that has a siphon for low pallets
- Security and accessories
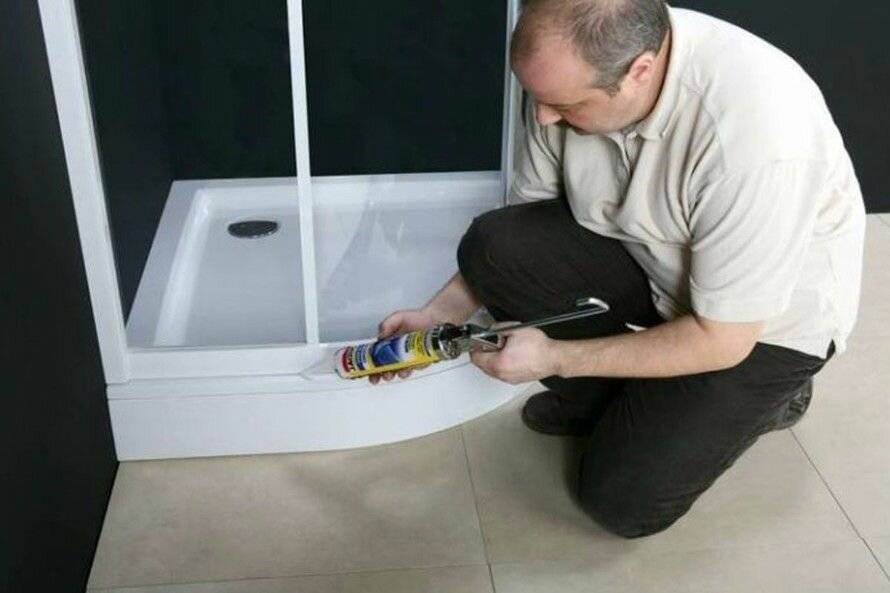
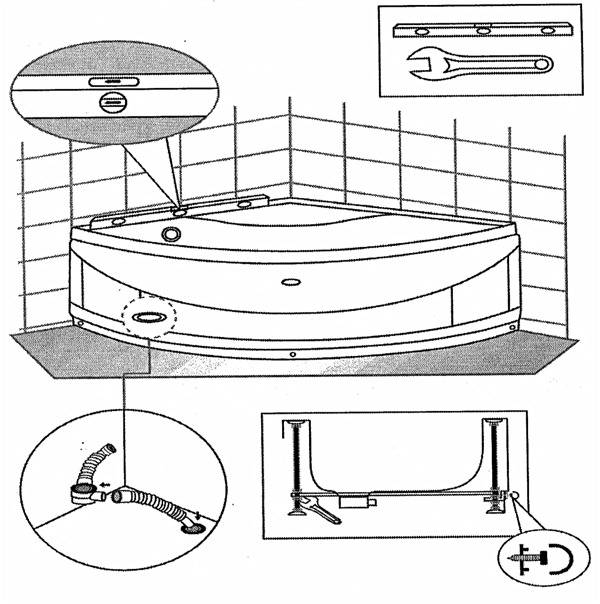
Screen installation
Try on the decorative screen by tucking the top of the screen under the edge of the tray. Adjust the plastic corners for the screen and tighten them with nuts.
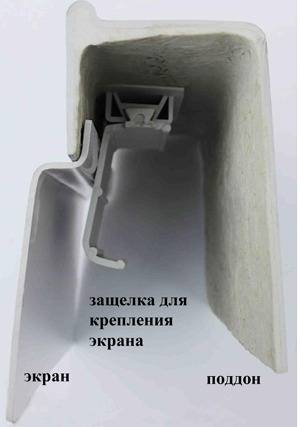
The screen is fastened with a self-tapping screw, which is threaded through the guide for a decorative chrome or white plug, then passes through the screen and is fixed in a plastic L-shaped stop for attaching the screen.
Close the screws with decorative chrome or white plugs. (depending on which ones are included in the delivery)
Following these instructions, you will be able to assemble shower tray cabins of any size. Be it angular, asymmetrical or rectangular. The difference is only in the shape of the pallet, the assembly process does not change
Choice
Parameters and characteristics that determine the choice:
- Geometric - the dimensions of the shutter, the height of the space under the shower cabin, the diameter of the drain hole;
- Technical - performance and throughput;
- The quality of the material;
- The complexity of the installation;
- operational features.
Shower cabins are often sold with siphons. If this modification of the cabin suits you, you can purchase it. But no less often you have to choose a siphon yourself
Therefore, you should pay attention to the following points
Geometric parameters
pallet structure, how it is installed determines the choice valve mounting height. Modifications are made to devices with a height of 8 to 20 cm. However, for a low-mounted shower cabin, only those whose height does not exceed 10 cm are suitable. The lower the height of the device, the easier it will be to install. The most difficult thing is to choose the shutters for the cabin, installed directly on the floor.
The market is increasingly selling shower cabins with drain holes with euro sizes - 52, 62 and 90 millimeters. The structural details of the shutter must comply with them.
Technical specifications
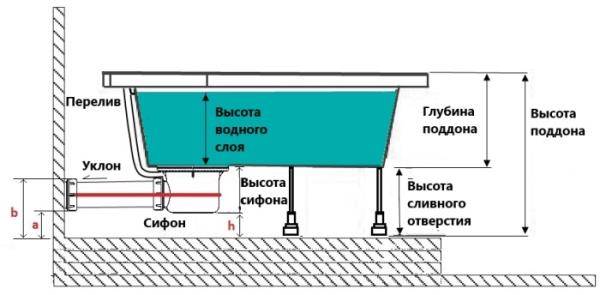
The depth of the shower cabin sink is usually small, the water flow is large, therefore, the water must have time to exit without delay. The throughput (PS) of a water seal determines the speed at which water will flow, as well as how quickly the gate structure will become clogged, how often it will need to be cleaned. PS showers average 30 liters per minute. In the presence of hydromassage and other additional functions, the water consumption increases. The indicator characterizing the PS is the height of the water layer above the level of the top of the drain. With a height of h=12 cm - diameters are 5.2/6.2 cm, with h=15 cm - a diameter of 9 cm. Therefore, for low pallets there are siphons of small diameters - 50 mm, for high ones - large ones. The instructions for the shower cabin indicate the PS, which must be taken into account when choosing a shutter device.
GOST recommends a minimum throughput of at least 15 liters per minute for showers with outlet, at least 21 for siphons with overflow and for deep sinks.
Material quality
The parts located under the shower cabin are not subjected to external physical stress, so they can fail due to the aging of the plastic. Poor-quality plastics begin to crack in the second year of service. Quality ones last a long time.
The grate covering the drain requires attention. The best option when it is stainless steel. This is the most durable material that is used for gratings. There are gratings made of alloys
In this case, pay attention to the decorative coating.Two layers of chrome are a guarantee that the coating will not peel off, and the grille will last a long time.
Chrome is resistant to detergents, which is an additional advantage. Plastic nickel-plated gratings quickly remain without a coating, which cannot be restored on its own.
To facilitate the periodic maintenance of the shutter device, as well as to protect against sewer odors, the shutter devices are supplied with additional parts - dry or hydraulic shutters, removable sump cups. The reliability of the shutter is the lower, the more additional parts. The probability of breakdowns increases with the increase in the number of parts.
When buying cheap hydraulic seals, they throw away large sums of money down the drain, since only raising the pallet will allow them to be replaced. In some cases, you will have to dismantle the entire shower cabin, then you cannot do without breaking its parts. Whether it is worth saving on a shutter device is up to the buyer to decide.
Performance
Drain fittings, according to the regulations, should be easy to disassemble and assemble by hand
This is an important condition, especially when the drain is clogged, or in other emergency cases. Therefore, the installation of the shutter device is carried out with a minimum set of tools.
During operation, the main difficulty is cleaning the locking device. When choosing, you should consider this issue. Some modifications are made self-cleaning. Some are cleanable through the drain hole. Such modifications of the shutter product have an outlet diameter of 90 mm, which allows you to disassemble the device, remove everything you need in sequence, and then assemble the seized in the reverse order.
When buying a siphon, it is better to choose products with click-clacks that are removed with a cleaning basket

Types of shower trays
First of all, let's pay attention to the types of structures. First, they can be of different shapes.
Secondly, products differ in materials:
- cast iron;
- marble;
- steel;
- acrylic;
- ceramics.
It should be noted in advance that ceramic and marble pallets are the most brittle, so you need to be as careful as possible when working with them. In addition to the material and shape, products may vary in depth:
- flat (up to 10 cm);
- medium (up to 18 cm);
- high (20-30 cm).
Features of each material
To find out which material is right for you, we will talk about their main characteristics. Cast iron pans take a long time to heat up, so you can sometimes experience discomfort with your feet. Acrylic models don't have this problem, but they can be brittle, making them difficult to work with. There is also a quartz look: it is similar to the previous one, only in this case quartz dust is added to the material, which makes the product much stronger, more resistant to mechanical stress.


Marble designs give the bathroom interior a high cost due to its appearance. In addition, they heat up quickly, which cannot be said about the ceramic variety. But, despite this, it has a great advantage - it is strength and durability. As for the cost, ceramics and stone products are the most expensive.
Materials for manufacturing
Cast iron
They have been an indispensable inhabitant of the bathroom for more than a dozen years. This type can be described as very durable, will last almost a lifetime. At this time, cast iron is displacing other materialswhich are much lighter.Working with a cast-iron pallet requires a lot of effort and does not work without outside help. They have low sound insulation.
Steel
They belong to the most inexpensive type. The steel pallet is quite reliable and durable. Enamel coating very quickly loses its attractive appearance and needs to be renewed. Also, mention should be made of low sound insulation. But all the disadvantages are covered by the low price and fast heating of the surface.
Ceramic
Such pallets are made from sanitary ware and sanitary ware. The positive qualities of this type include a beautiful design and is resistant to external conditions. The disadvantages include the fragility of the structure itself, it takes a long time to heat up. Not uncommon, the surface is covered with patterns that resist slipping.
Acrylic
The advantages of this type include high thermal conductivity, easy installation, radiant whiteness, but periodic surface reinforcement is necessary. Maintenance does not require additional care. To reinforce the pallet, the bottom is often reinforced with plastic or metal.
Quarry
Obtained by combining quartz and acrylic. From this follow all the advantages of an acrylic pallet, but devoid of its disadvantages. The downside is the price. Not everyone can afford it. The youngest type of all presented.
Stone, wood, glass
Stone pallets will delight you with their design and variety of shapes. They have high sound insulation. Pallets made of wood will please the eye, but upset by the high price.
In addition to the listed types, there are combined models on the market.
What you should pay attention to:
- High wear resistance.
- High sound insulation.
- Long-term heat retention.
- The surface must be non-slip (rough or corrugated).
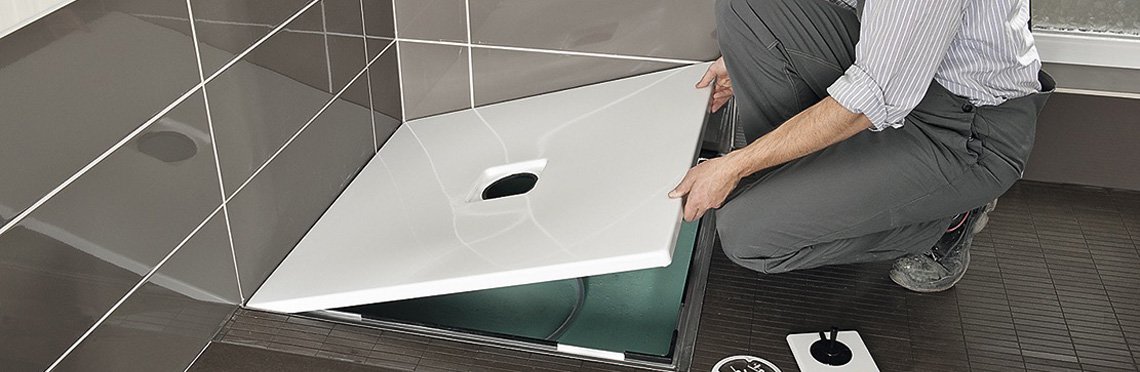
Other ways to install pallets
Installing a shallow sump is a simpler procedure. A feature of this installation is the correct installation of the siphon, which should be located below the floor level.
In this case, you should carefully select the drain hole, which must have sufficient throughput. So, for a pallet with a layer of water of 12 cm, siphons are used, the dimensions of the through hole of which are 0.52-0.62 cm. If the maximum layer of water exceeds the mark of 15 cm, then the diameter of the hole must be at least 0.9 cm.
The installation of flat and shallow pallets after the drain hole is carried out by gluing to the base, the joints are treated with mounting foam and the structure is loaded for a day. After that, all joints are treated with sealant.
In addition to the above method of installing a shower tray using a metal frame, there are other ways. So, brickwork or foam blocks can be used as a rigid base for enamelled pallets. This makes it possible to eliminate the presence of space between the floor and the pallet and ensures maximum structural strength.
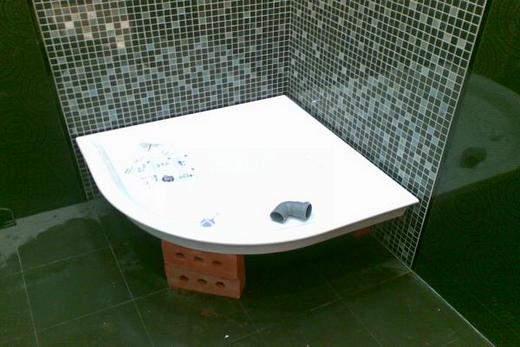 Installing a shower tray on bricks
What is the best base for the pallet
The installation of a shower tray can be done in various ways:
- on a brick foundation;
- on plastic support parts;
- on a metal frame.
The base is chosen depending on the configuration of the model and its technological characteristics. The need for a foundation is due to the fact that the drain hole must be located above the level of the sewer line so that the water leaves well.Masters believe that the angle of inclination from the bottom to the entrance to the sewer line should be at least 3 degrees. If it is not possible to make a pedestal or lower the sewer inlet, a special pump will be required to pump out the water.
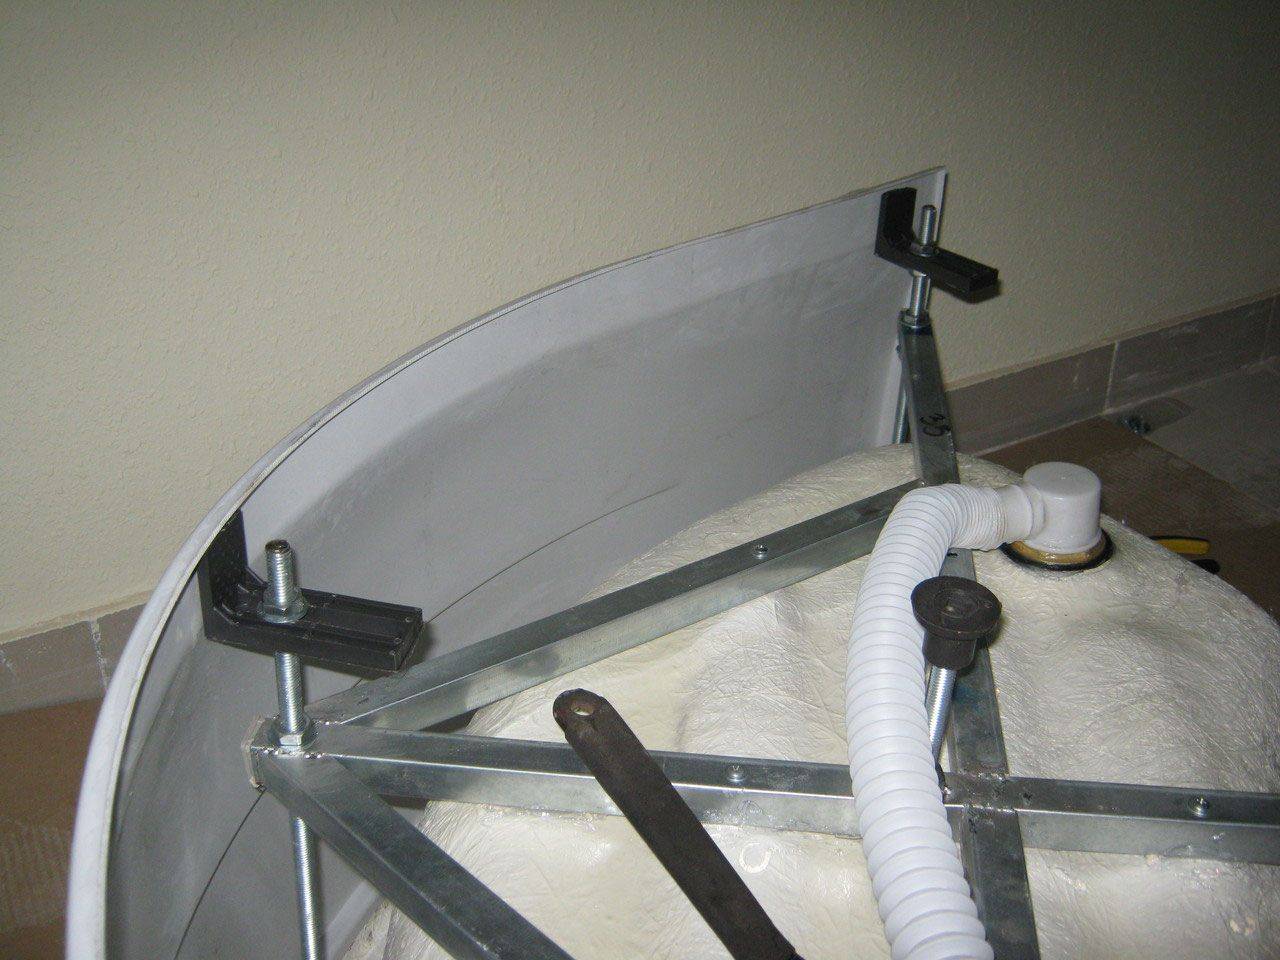
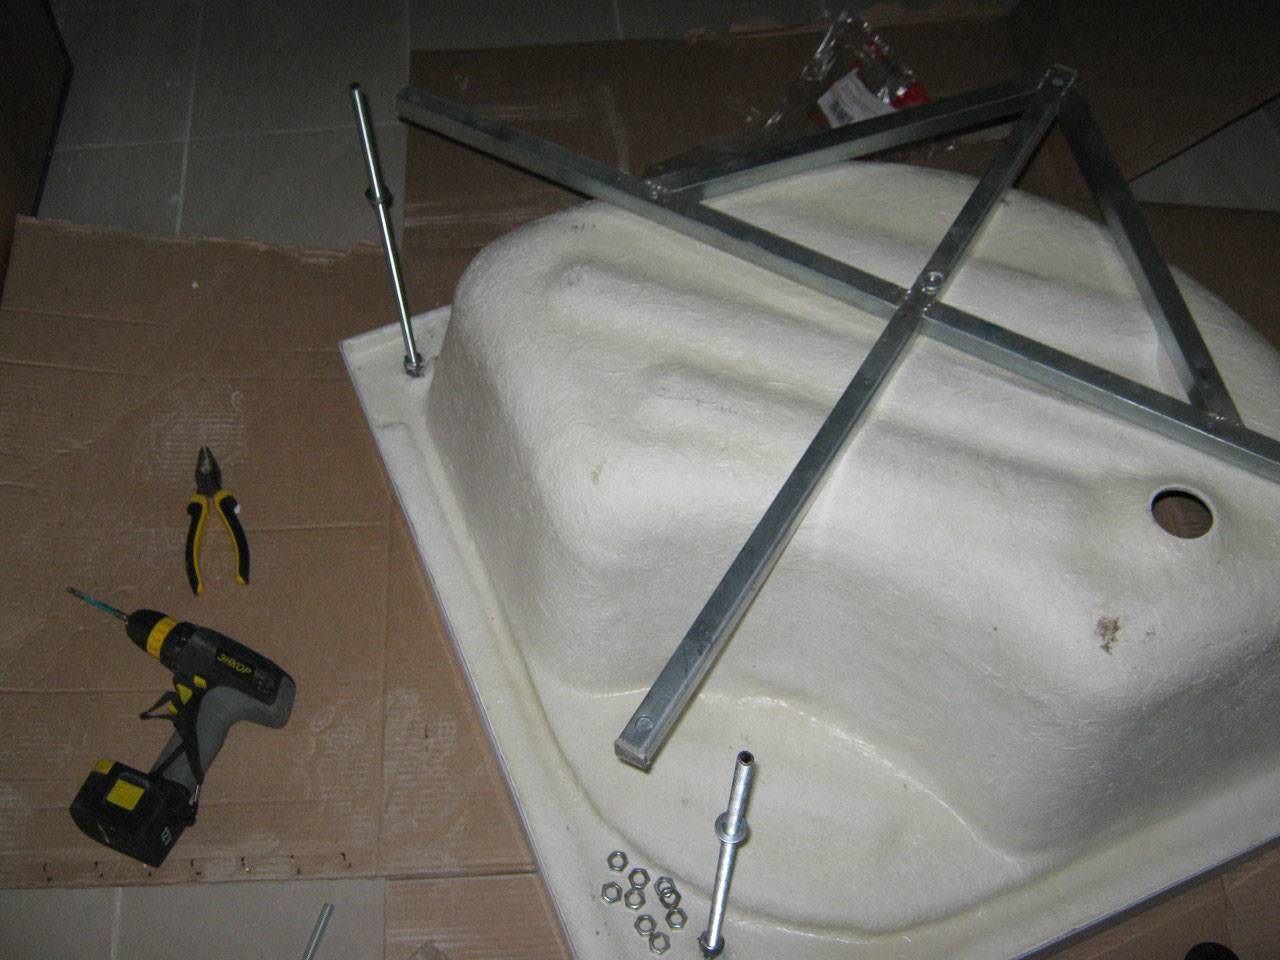
Most deep models are equipped with a special metal profile frame. But if the tray is thin-walled, the feet of the swimmers will quickly push through the bottom between the guides, especially if the owners of the bathroom do not have a fragile constitution. In these places, the acrylic options may even form through cracks. Therefore, deep, thin-walled pallets also require a stable foundation.
Here it is necessary to monitor the quality of laying sewer lines so that the drain hole is higher than the outlet, and the water quickly leaves the container. The element itself is attached to the floor with glue or a cement tile mixture.
Cast iron elements are usually simply placed on the floor. Their height is sufficient for reliable discharge into the sewer. The same goes for stone products. But there may be a problem with the siphon. It will have to be equipped directly on the floor surface, or a flexible unit must be connected and hidden in a specially equipped niche in the wall.
Consider how to mount different types of foundations when installing shower trays.
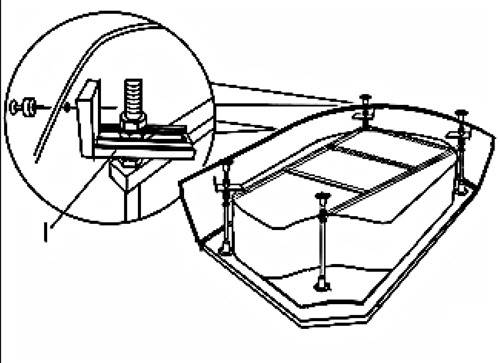
Metal or plastic frame
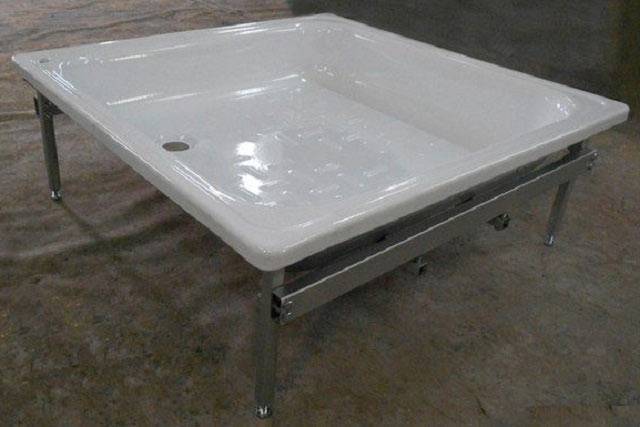
If you still choose this type of base, a lot of time for installation will not be required. The main steps here will be:
- Leveling the legs with a building level.
- Shower tray installation.
- Connection to the sewer and fixing the drain hole.
Under the bottom, you can place a plate of extruded polystyrene for thermal insulation of the area. Mounting foam is used in the same way.
This is especially important when installing steel pallets. It will also help reduce the sound of falling water. To protect the thin bottom and give the structure stability, you can make a removable formwork and pour concrete
The installation of the shower tray will be carried out on the resulting pedestal. This method has disadvantages: it is impossible to check and fix the leak. Replacing the sewer unit, and bringing the siphon down is also quite difficult. Alternatively, you will have to use flexible connections and hide the siphon in a niche in the wall


To protect the thin bottom and give the structure stability, you can make a removable formwork and pour concrete. The installation of the shower tray will be carried out on the resulting pedestal. This method has disadvantages: it is impossible to check and fix the leak. Replacing the sewer unit, and bringing the siphon down is also quite difficult. Alternatively, you will have to use flexible connections and hide the siphon in a niche in the wall.
Installing a shower tray on a brick foundation
This is an excellent solution for most pallets, eliminating any deformation and extending the life of plumbing. The main thing is to choose the place where the siphon will be installed.

Bricks in this case are laid not only around the perimeter of the product. Otherwise, the bottom will bend over time. In designs with legs, to eliminate this drawback, an additional support is provided in the center. Since there is a bulge there, you cannot install a similar model on a flat brick foundation. It is necessary to provide a recess for this tubercle.
The correct technique for creating a brick base is as follows:
- Outline the lines of the foundation according to the desired dimensions.
- Knead the cement mortar for masonry.
- Apply several strokes of the composition to the floor with a spatula.
- Lay the first row of bricks, starting from the corner, and tap them with a mallet for a better fit to the floor. The thickness of the seam should be 5–7 mm.
The installation of the shower tray is carried out after 3 days, when the masonry fully rises.
A welded frame made of metal corners 20 by 20 mm can act as a support in the center of the bottom. It is installed between rows of bricks and is fixed to the floor with dowel-nails. Acrylic should be protected from friction against metal surfaces with a layer of insulating rubber glued to the metal.
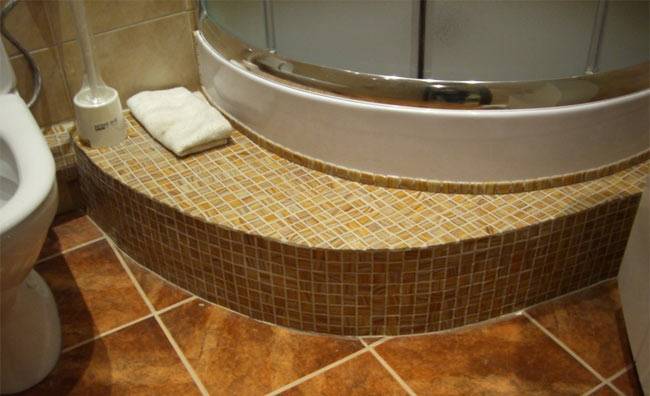
A deep pallet on a high foundation will require the creation of a ladder to the entrance to the shower stall. Steps can be created from concrete or bricks and overlaid with tiles. The walls behind the pallet are finished with tiles or other waterproof material. The tile adhesive must also have excellent moisture resistance.
Types of structures according to the height of the sides
The bottom is in the form of a square, rectangle, semicircle. The complexity of the work depends on the depth of the pallet.
- The height of the walls from 20 cm gives the design the appearance of a small bath. For a shower cabin with a high tray, installation without a frame is not carried out. The framework is established on six legs.
- For the average depth of the structure (10-20 cm height of the sides), installation is carried out both on the frame and on the principle of small pallets.
- A small structure is sometimes mounted on supports. But if they are absent, then a special foundation is being prepared.
There are showers, where the bottom is a floor with waterproofing and a drain drain.
Installation of the shower tray is carried out in two ways: on the frame and on the foundation.
Installation of cabin walls
Installation of the walls of the shower cabin must also be carried out, observing the following order:
- the guide structures, into which the glass will subsequently be inserted, are carefully smeared with a transparent sealant;
- glasses are installed and pressed with special paws, a sealant is attached to them;
- silicone is applied along the edge of the pallet;
- side panels are attached to the pallet.
If the sealant gets on the glass, it must be removed immediately, after drying, removal without traces will be quite difficult.
Installation of the walls of the shower cabin
The assembled structure must be left for a while, until the sealant and silicone are completely dry. This usually takes up to two days.
Installation of the roof and cabin doors
Before fixing the roof of the shower cabin, a watering can, a fan and lighting are mounted in it. Also, the design may provide for the presence of a speaker, it is also mounted in advance. All parts are fastened with self-tapping screws and sealant, which will prevent leakage.
Installation do-it-yourself shower doors
After the roof is assembled, it is fixed with screws and sealant.
Shower cubicle doors can be installed before or after the roof is fixed, depending on its design. Sliding doors are mounted on special rollers on the frame. Usually these are 8 rollers (4 each at the top and 4 at the bottom). After, How are the doors installed?, you can proceed to the installation of handles and installation of accessories. All shelves and holders are installed.
Connecting the cabin to the power supply
Installing a shower cabin with your own hands does not always involve connecting the power supply.This may be required by models equipped with a hydromassage or a steam generator.
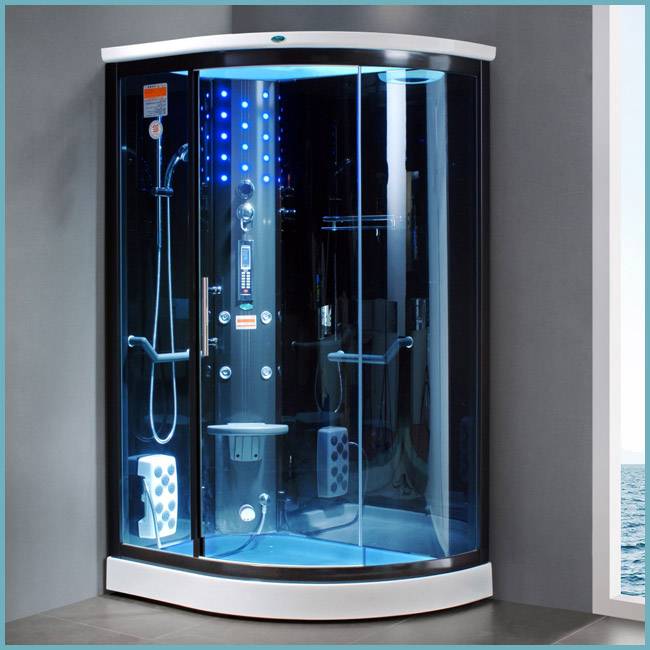
Shower cabin connected to the mains
The connection must be carried out using a copper cable with a cross section of 2 sq. mm. If the cab consumes more than 5 kW per hour, then additional installation of a separate machine will be required.


Important! For connection, it is better to invite a professional electrician who will ensure the safe operation of the device.
Which is better to choose a shower tray in the bathroom
When choosing a product for a shower, it is recommended to pay attention to:

- To match the size of the box to the size of the room in which it is installed.
- Physical features of users. Age, weight, physical limitations.
- Individual wishes.
- Noise isolation.
- Heatability.
- Strength.
- Slip.
- Care.
- Design.
| № | Material | Acrylic | Stone | Ceramics | Steel | Cast iron |
| Characteristic name | ||||||
| 1. | Slip | + | + | + | — | — |
| 2. | Noise isolation | — | — | + | + | + |
| 3. | Heatability | + | — | — | + | — |
| 4. | Easy Care | + | + | + | + | — |
| 5. | Strength | + | + | — | — | — |
Based on the table, people prefer to dwell on acrylic products due to the presence of a large number of advantages.
Safety requirements for the operation of shower trays and corners
The main requirements for the safety of a shower enclosure are:
- Non-slip tray cover
- Manufactured from high quality waterproof materials
- Reliable waterproofing of the shower tray
- Unhindered flow of water into the sewer
- When connecting electrical systems to a shower enclosure, mandatory insulation of wires in a special moisture-resistant braid and grounding is required
A huge variety of shower trays presented in hardware stores makes it possible to choose a design that is suitable for design and color.Corner models are ideal for small spaces, taking up minimal space.
It is possible to make a shower enclosure and a pallet with your own hands if you have at least a little construction experience. This approach, in addition to significant cost savings, results in obtaining equipment of the ideal size, shape, color, and embodying a personal creative idea.
Save on your wall so you don't lose:
Do-it-yourself winter shower for giving with heating - In the summer, a heated shower is sure to come in handy at the summer cottage. He provides to
Do-it-yourself do-it-yourself toptun shower in the country: we make a heated shower tank - Many owners of suburban areas are probably thinking about how to build a shower in their country house.
Warm shower in the country: do-it-yourself shower cabin for giving One of the important buildings on a suburban area that you can build yourself is a shower cabin.
Shower cabin assembly diagram: shower cabin assembly procedure and how to properly assemble a shower cabin - Installing a shower cabin in the house is a win-win option that is justified in every respect. Cons.
How to make a shower cabin with your own hands without a pallet - Having gathered to improve the bathroom, everyone may have a question - how to make a shower room.
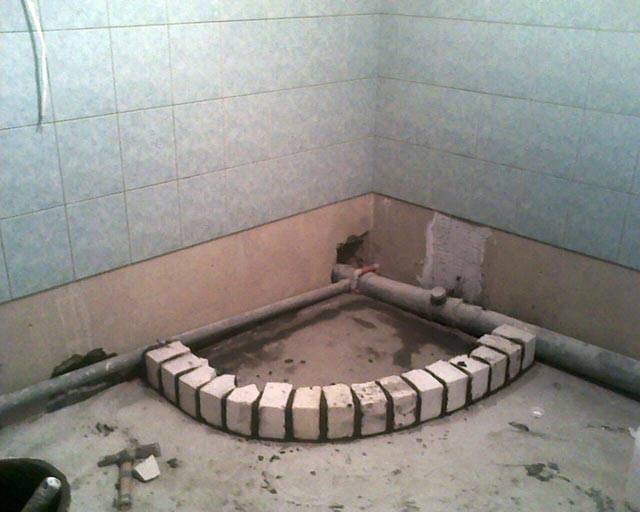
Do-it-yourself brick shower tray manufacturing technology
In any bathroom, it is possible to install a shower enclosure without a tray from a plumbing store. You can independently build a shower tray by adhering to a simple manufacturing technology. A hand-made base can be of any shape and size, and the use of beautiful facing materials will allow you to create a unique design.
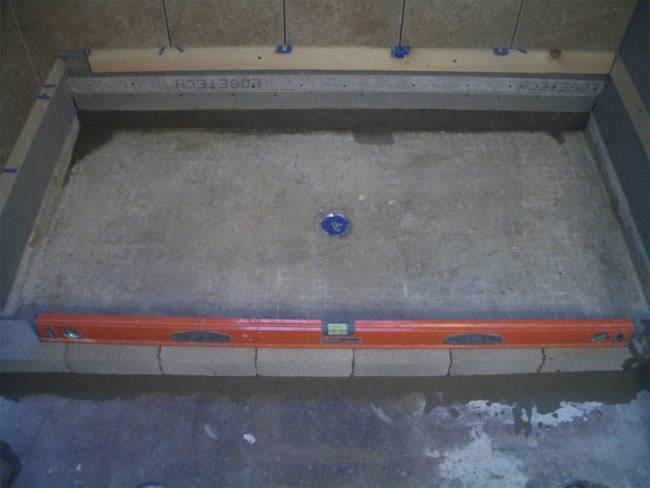
Work should begin with determining the location of the drain and installing the drain structure. The entire floor surface for the installation of a shower enclosure must be treated with a layer of waterproofing, the walls are covered with a composition to a height of 30 cm.
A brick barrier is laid out along the perimeter of the future pallet, the height of which should be at least 5 cm higher than the level of the drain hole. Then the screed is poured. The level of the screed should be approximately 6 cm below the drain.
After the screed has dried, both the floor and the brick barrier must be covered with a waterproofing mortar. By pouring tile adhesive or cement-sand mortar, a slight slope towards the drain is made. The surface is covered with a mixture from the edge, gradually shifting the radius to the center. It is necessary to try to maintain the same angle of curvature so that there are no rough transitions.
Finishing the surface with mosaics or ceramic tiles allows you to maintain the impeccable appearance of a homemade pallet for a long time.
3 Pallet sides
There are several types of pallets that differ in the height of the sides:
- small pallets, with a side height of up to 45 mm;
- medium pallets, with a wall height of up to 100 mm;
- deep trays that can replace a bath, because their height exceeds 180 mm.
Very often, the installation of deep pallets is a necessity in houses with old communications. Since the drain pipes in such houses do not pass water in large volumes, the water can leave slowly, and therefore in deep pans it is not as critical as in the case of low ones.
 Installation of a deep tray
In terms of dimensions, the shower tray can still occupy a different area. The most compact of them have a side length of 700x700 mm, and the largest - 1400 mm on each side.However, the most popular are medium-sized pallets, whose dimensions are 900x900 mm or 1000x1000 mm, while the height of the walls of such pallets can be either 50 mm or 140 mm. In this case, the buyer decides which option to choose, since the range of options from different manufacturers allows you to choose any combination of parameters.
When choosing a tray for a shower cabin, it must be borne in mind that it is installed on a siphon, the height of which can vary from 100 to 200 mm.
Shapes and sizes
With the individual production of the pallet, the manufacturer will take into account all the preferences of the client. Pallets of the following shapes and sizes are common on the market:
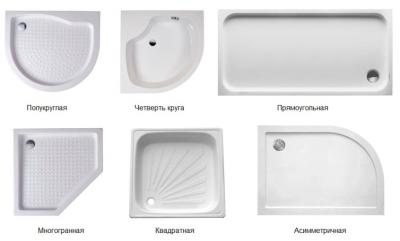
- Rectangular. They are used when two people take a shower at the same time. And also installed as a bath. Dimensions: 90x70 cm, 150x80 cm, 170x90 cm.
- Square. Common form. They are installed in different parts of the room: in the corner or adjacent to one wall. Sizes from 70x70 cm to 150x150 cm.
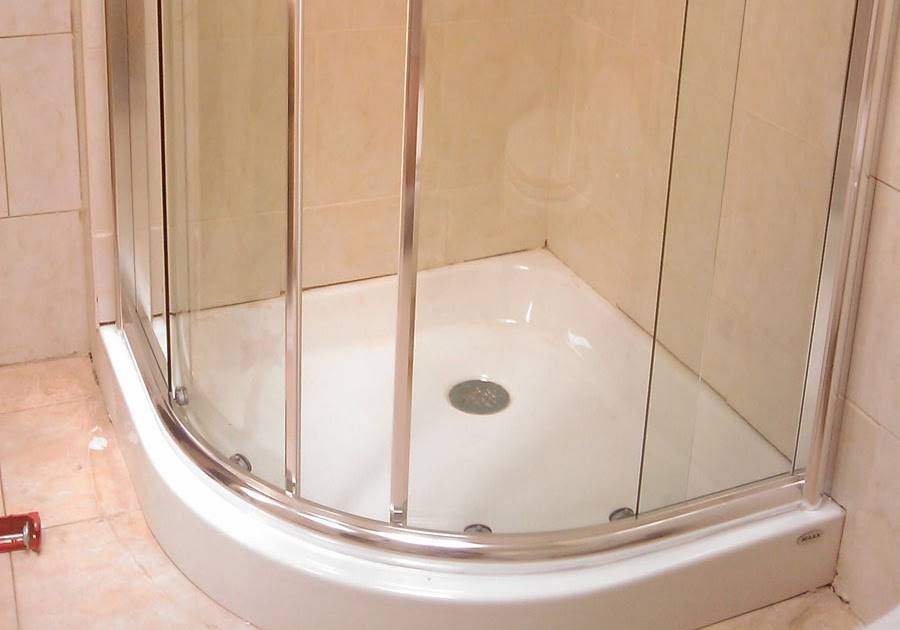
- Corner. Allocate pentagonal and radial designs. The first view is a square with cut corners, the radial model is a quarter of a circle. Allocate dimensions: 80x80x15 cm; 90x90x15 cm; 90x90x23.4 cm; 100x100x14 cm.
- Asymmetrical. Represented by semicircular, trapezoid and other shapes. Are applied at the deep pallets which are used as a bathtub. Made to order for exclusive models. This shape saves space in small bathrooms.
The nuances of self-installation of an acrylic pallet
The weak point of the acrylic bottom is its central part. There is no support underneath. Under the weight of a large person, it can burst.


To strengthen the acrylic model and its installation was considered correct, the work is carried out in strict sequence.
Preparatory stage before installation
- The entire wiring of the sewer and plumbing system is checked for the condition of the pipes.
- To connect the cab to electricity, wiring is installed that is resistant to moisture and water.
- To connect the pallet to the sewerage and water supply system, high quality pipes are purchased in order to avoid leaks in the future.
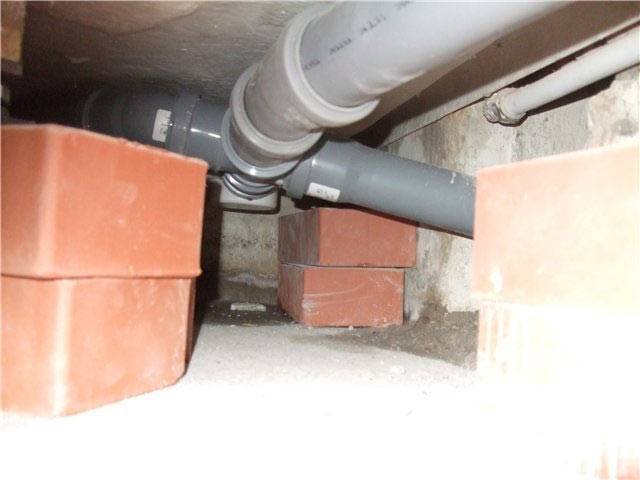
- The sewer pipe is brought to the center of the pallet, instead of the approximate location of the drain hole.
- All plumbing and water supply pipes are checked for tightness of connections.
- Close the holes with a rag where there will be connections with the pallet. This is done so that debris does not get there during the installation of the bottom.
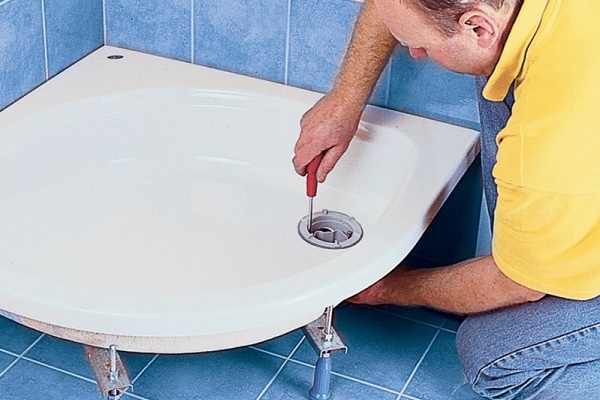
Installation work
It is possible to say that the installation of the shower tray is correctly performed only if the structure is strictly aligned vertically and, most importantly, horizontally. Then only the flow of waste water into the sewer will be properly organized. Puddles will not form on the bottom of the cabin. Without an even base of tiles, it is not possible to install the pallet evenly.
If the middle of the bottom is strengthened, then the horizontality of the structure is not violated. Next is the connection to the water supply and sewerage. The distance from the floor to the back of the pallet is measured. A place is left for installing the drain so that it is possible to clean the siphon and replace the sewer pipe.
Cab bottom installation strength
If a pallet with high sides is purchased, then a brick wall or steel pipes can be used as an additional support. The choice depends on the size of the structure.
A rubber gasket is placed between the supports and the pallet. An inspection hatch is mounted in the brick support to provide access to communications.
What can be used to trim the cabin
There are many variations for a quality shower design. The main rule is that the design and the finishing material itself should be selected depending on the size of the bathroom, lighting, cabin configuration and some other details.
What is used for decoration:
- ceramics (tile) is a very reliable and durable material with good resistance to moisture. Has a wide range of colors;
- mosaic (tile) - used to create a variety of patterns. A huge variety of palettes, sizes and shapes allows you to realize the most daring artistic ideas;
- marble is a durable and very beautiful finishing material. Natural stone will make any interior more refined. Although it also has disadvantages - it is expensive and difficult to process;
- PVC panels are the lightest and most economical material option. Such panels cover the ceiling and walls as standard. But plastic is not suitable for the floor.
How to make a do-it-yourself tile shower tray
For those people who do not know how to make a shower tray with their own hands, we suggest that you familiarize yourself with the technology of this process, as well as the features of each operation.
The main steps in the manufacture and installation of a tile shower tray:
- Screed filling.
- Ladder installation.
- The erection of the side of the pallet.
- Filling the screed inside the pallet.
- Waterproofing.
- Facing.
Filling the screed
The manufacture of the pallet should begin with preparatory operations, during which the existing base must be brought into the appropriate state. First of all, it is necessary to dismantle the old plumbing and tiles, and then check the quality of the rough screed. If an empty sound comes out when tapping the floor, then it is better to remove the old coating, and instead fill in a layer of a new screed, on which the shower tray will be installed.
After that, two coats of primer should be applied to the floor. Now you can start waterproofing. If a liquid mastic was chosen for these purposes, then this material must be applied to the floor, as well as to the walls (up to 400 mm in height). All corners, as well as the joints of the floor and walls, should be especially carefully processed.
After the mastic has hardened, you can start pouring the rough screed onto the floor, this operation should be performed only if the old rough screed is completely dismantled. If you want your bathroom to be warm and comfortable, you can install an underfloor heating system.
Ladder installation
After the screed poured onto the floor hardens, you can proceed with the installation of the trap. A sewer pipe must be connected to the installation site of the shower tray. So that water does not stagnate in the pan during water procedures, the pipe must be supplied with a certain slope, you can check the slope using a level. Then, under the prepared ladder, you can lay a brick, giving the structure the required height, and fix it with plaster or alabaster.
Ladder installation
When the applied mixtures harden well, it is recommended to test the pan for tightness.To do this, you need to pour some water inside and check how quickly it drains into the sewer pipe, as well as how dry all the joints remain. If you find the slightest leak, do not delay fixing this problem.
The erection of the side
For the manufacture of the side, you can use an ordinary brick. The pallet can have the shape of a square or a rectangle, if desired, you can give it a bend. It is necessary to lay the brick taking into account the chosen configuration, so that the side repeats the shape of the future pallet.
Building a brick wall
Before proceeding with the laying of bricks, it is recommended to make markings on the floor, which will help to make a side of the desired shape. Now you can start preparing the cement-sand mortar and laying the bricks. The side should be higher than the ladder, but it should not be made too high, just a few centimeters is enough.
Filling the screed inside the pallet
Now is the time to start pouring the final screed inside the shower tray. To improve the quality of the solution, it is necessary to add a little liquid glass or other water-repellent components to it.
Be sure to place beacons before pouring. Do not forget that the screed should have a slight slope, this can also be controlled using beacons.
Waterproofing
After the screed has dried, you can proceed to the final waterproofing. Coat the dried screed and brick sides with mastic, this will prevent moisture from getting inside. The waterproofing mastic must be applied very carefully, and its layer should not be too thick, since after that it will be possible to proceed to the final stage of work.
Final waterproofing
Facing
When all the preparatory work has already been completed, you can do the facing work. Choose the tile and the way it is placed so that there are as few swatches as possible, then the work will be easier, and the cladding will look much more beautiful.
Facing work must begin from the floor, and then move on to the sides of the structure. Tiles should be laid on the walls in a vertical direction, clearly level, making sure that the rows are even. Lastly, lay the top of the side.
Final tiling
Now you know how to install a tile shower tray. As you can see, there is nothing supernatural in this.


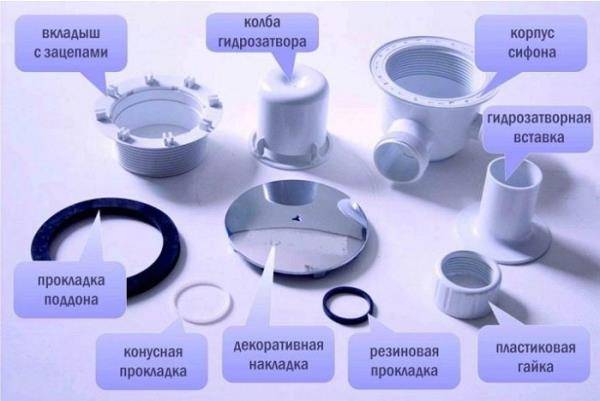
A device that has a siphon for low pallets
There is no fundamental difference between the numerous modifications of various locking devices. There are differences in the shape, size and material of the parts.
What parts are assembled from shower siphon with a low deck?
- The body of the product in which all other parts are installed. It is attached to the pallet with studs made of alloys that are not subject to corrosion - there can be from 2 to 4 of them. Most often it is made of plastic.
- Two rubber seals. There is a nuance here. Foreign sealing gums have a ribbed surface, thereby increasing tightness and reducing the effort to tighten the connection. Russian rubber bands are made flat. When tightening plastic parts when connecting, more force is required. As a result, plastic lasts less.
- Branch pipe for connection to the sewerage network opening. Can be angular or straight. In order for them to reach the sewer pipe without building up, the length of the pipe is made with a margin.If necessary, the pipe is shortened.
- Washer, nut and self-sealing gasket to be put on the nozzle. To connect to the body, the nut is screwed onto the body outlet thread.
- Hydrolock glass (some modifications of the product are supplied with a dry seal). The glass is installed in the body. Captures solid dirt and prevents odors. It is screwed to the body with metal bolts.
- A protective valve / cap is needed only during the installation of the shower tray itself, so that construction debris does not get into the siphon.
- A water seal inserted into a water seal. Has rubber seals.
- Drain grate (stainless steel, silumin or stainless alloys). The grille is equipped with special hooks for engagement with the top of the water sealing cup. Due to them, the grate is held and cannot come off spontaneously.
Security and accessories
For the shower cabin, there are a variety of accessories on the market that are designed for the safe use of the shower.
They create additional convenience and give a unique interior design:
- Shower seat. Standard square type, but you can also find round ones. Shown in vibrant colors. Taking a shower will turn into additional relaxation.
- Shelf: wall, corner. Designed for convenient use of shampoos, gels, washcloths, soaps and more. Located at eye level.
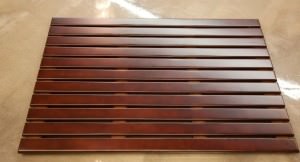
- Flooring or PVC mat. When the shower tray is not provided with an additional relief or rough coating, this type of accessory is indispensable. The flooring is usually made from wood. PVC mats are available in various colors.


