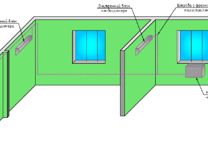
- Device location rules: choose a location for installation
- In the bedroom
- For kitchen
- In the children's room
- In the living room
- Installation order
- Internal equipment
- outdoor module
- Corner installation of the air conditioner
- System start
- freon inlet
- Vacuum pump
- Conclusion
- How to install an air conditioner: installation of outdoor and indoor units
- The second stage of installing an air conditioner with your own hands: connecting blocks
- How to connect an air conditioner: connecting copper pipes
- How to do your own cleaning: air conditioning maintenance at home
- Air conditioner efficiency
- 1 The principle of operation of the unit
- How long to vacuum?
- Connecting blocks
- Drainage
- Freon circulation system
- rolling
- Port connection
- Overview of the design of the outdoor unit before connecting the air conditioner: diagram and structure
- Connecting the air conditioner to the mains
- Location of several air conditioners in the main rooms
- Procedure for installing the air conditioner
- Installation of SPLIT systems
Device location rules: choose a location for installation
Before you install a split system in an apartment, you need to familiarize yourself with the features of its location. This will help not to spoil the facade of an apartment building and place the air conditioner in a suitable place.
In the bedroom
People who live in a one-room apartment often install systems in the bedroom. When choosing a suitable place, several rules are taken into account:
- It is impossible for cold air to get into a sleeping place or workspace, as this can cause a cold.
- It is not recommended to install a split system above the TV and other electronics.
- The air conditioner should be located at a distance of 10-15 centimeters from the ceiling.
- It is contraindicated to place devices above batteries and behind curtains that impair the outflow of cold air.
For kitchen
Some people don't know where to install the air conditioner in the kitchen. It is recommended to place it in such a way that it is not above the gas stove and the dining table. Some experts advise placing it above the window. In this case, it is better to use compact models that do not take up much free space.

In the children's room
It is not recommended to install such a device in a nursery, as children are sensitive to cold and catch cold quickly. However, many parents, due to the intense summer heat, still install air cooling systems in the nursery. Experts recommend buying mobile models that can be installed anywhere in the room. They need to be placed so that cold air does not get on the crib.
In the living room
The living room is considered the largest room in the apartment, and therefore it is easiest to place an air conditioner here. It is installed in the corner that is farthest from the sofa, armchairs and other places where people often sit.
Installation order
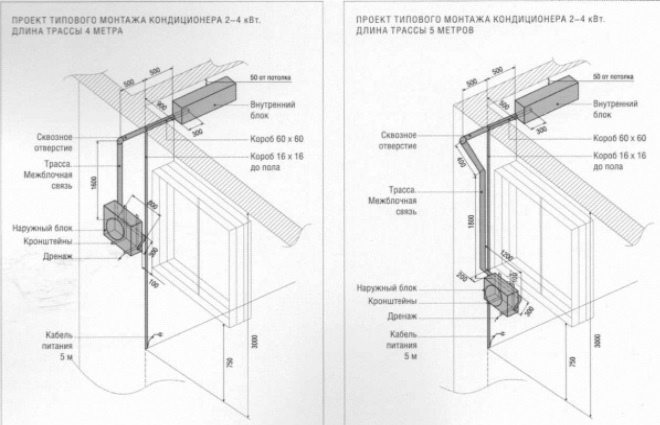
In order to correctly and efficiently install a split system with your own hands, you need to do it in this order:
- first you need to install the internal equipment;
- then prepare communication channels;
- lay connecting lines in the channels;
- install an outdoor unit;
- connect blocks with electric and gas mains;
- evacuate the system and check its tightness;
- fill the system with refrigerant (freon).
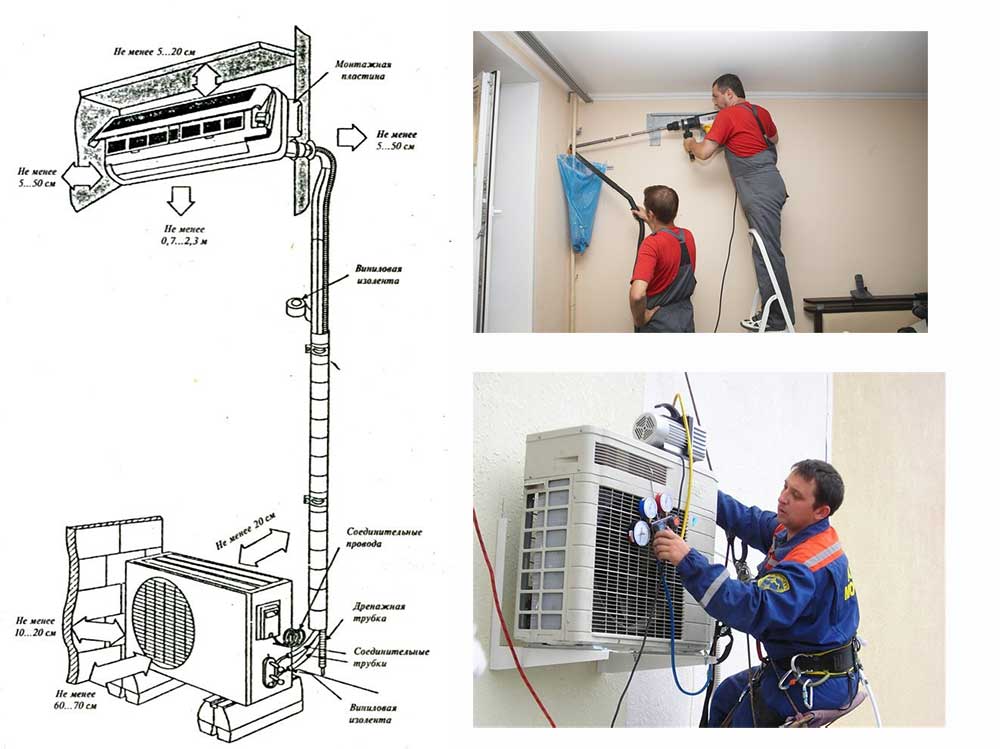
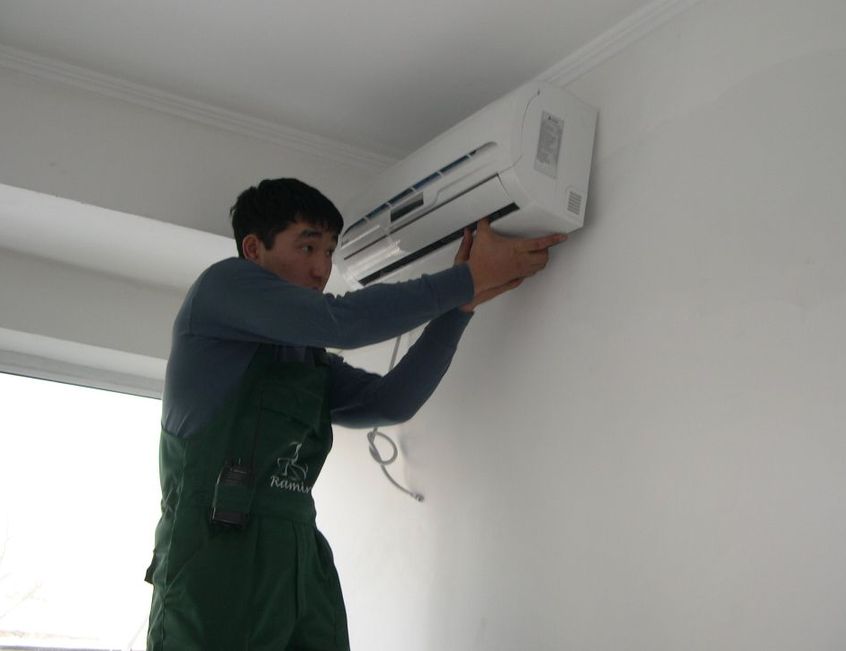
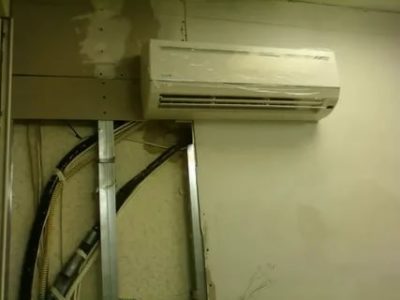
Internal equipment
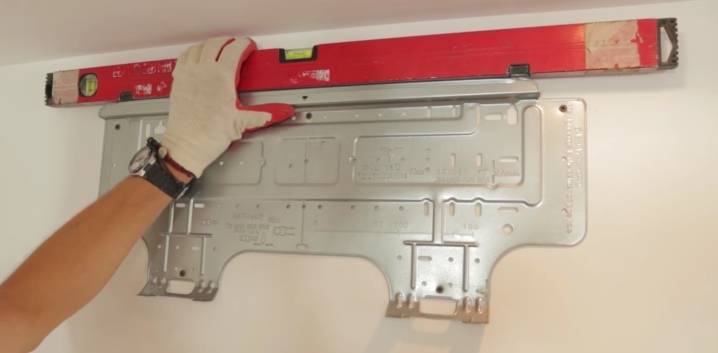
The indoor unit is attached to the wall using the supplied steel frame. Usually there is a drawing in the instructions, which indicates the location of the holes on the bearing surface of the wall. But it’s easier to take the frame itself and mark the attachment points to the wall right along it.
Take the mounting frame and place it on the wall where you plan to mount the indoor unit. Use a spirit level to make sure the frame is level. If the frame is tilted to the left or right, moisture inside the air conditioner may accumulate at one end and not reach the condensate drain pipe.
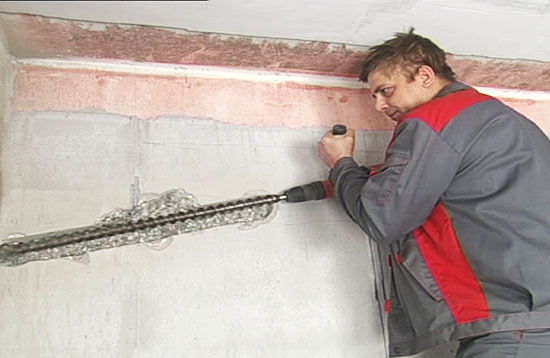
After making sure the frame is horizontal, use it as a template to mark the wall. Using a perforator, make holes in the wall of the required diameter using the marks. Fasten the support frame to the wall with dowels, screws or screws.
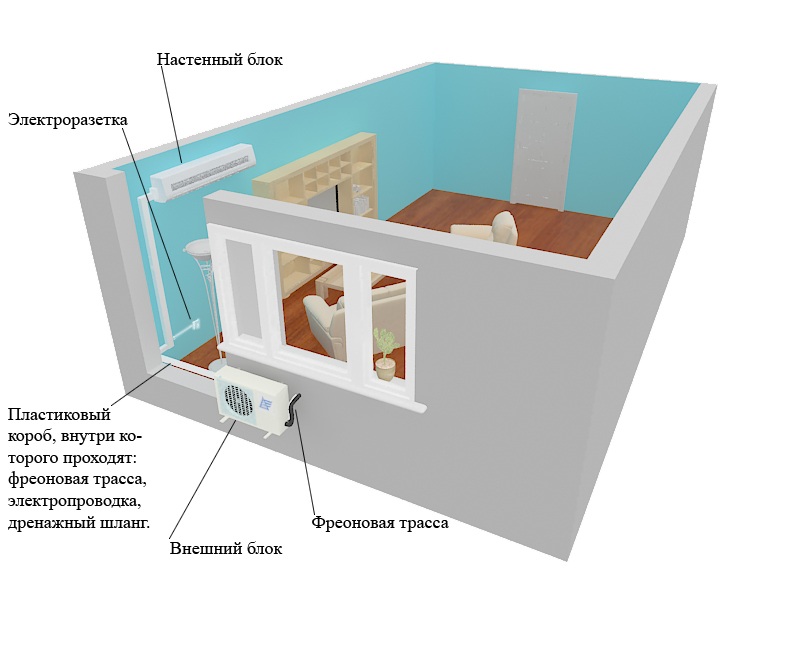
After the carrier frame is fixed, it is necessary to prepare the channels through which the connecting lines will pass. First, mark a line on the wall along which communications should pass. Among other things, there will be a drainage tube. In order for water to flow freely into the street, the line of highways must have a slight slope, which is checked by the building level.
You can deepen the lines into the wall. To do this, using a wall chaser, you will have to make channels 35-40 mm deep and 50-75 mm wide.This is bad because if you need to repair the air conditioner, you will have to ruin the wall.
It is easier to lay lines in a plastic box. A standard cable channel with a cross section of 60x80 mm is well suited. Plastic boxes are attached to the wall with screws or dowels. Sometimes cable channels are attached to concrete with construction adhesive, but this is not suitable for installing air conditioning systems. The fact is that copper lines and electrical wires are quite heavy.
outdoor module
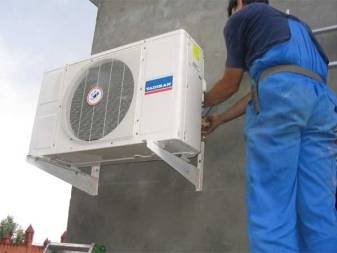
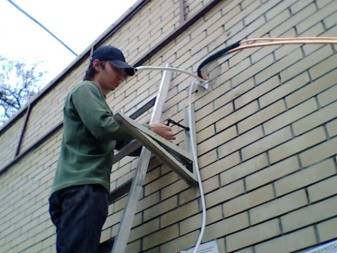
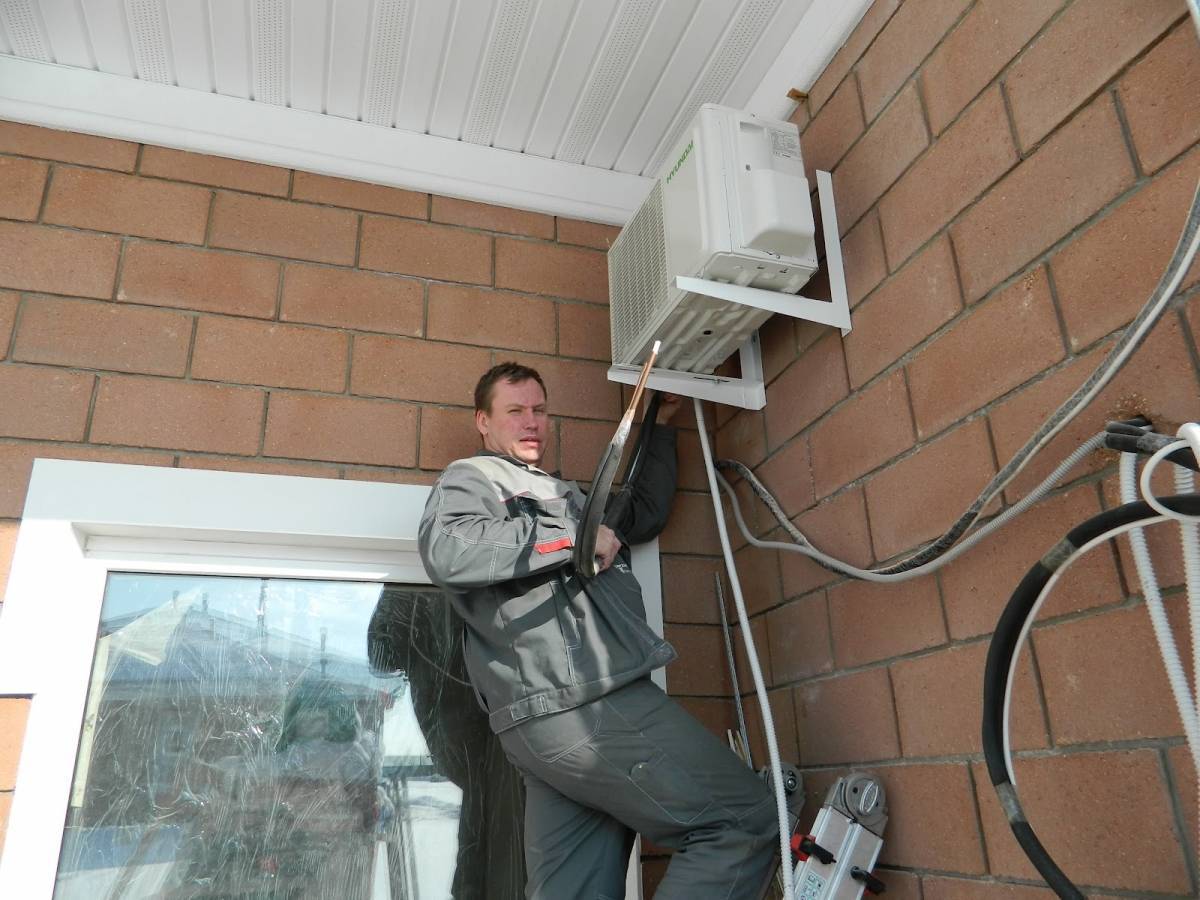
It is quite difficult to install the external part of the split system on your own. The outdoor module has a large weight and significant dimensions. The matter is complicated by the fact that the work will have to be carried out outside the premises, moreover, at a considerable height.
First, prepare one hole for the top mount of one of the brackets. Fix the top of the bracket and, having installed it strictly vertically, mark the place of the lower attachment. After one bracket is fixed, you can mark the place for the second.
Using the building level, make a mark on the wall so that the second bracket is at the right distance from the first, strictly at the same level. Attach it the same way you attached the first one.
The most difficult thing is to install the outdoor module on the brackets. Due to the fact that there is a compressor inside it, the outdoor module can weigh up to 20 kg. Just in case, tie the module with strong tape or rope and do not remove this insurance until you have completely secured the module to the brackets.

Corner installation of the air conditioner
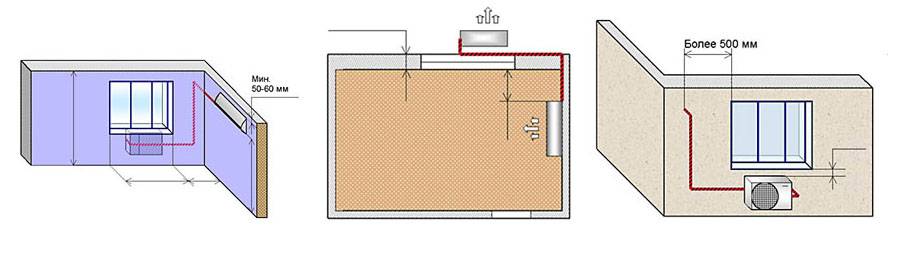
You can install the air conditioner in the corner of the room where another way is simply impossible due to the architectural features or the size of the room.Some manufacturers have corner models of split systems with a very attractive design and compact dimensions. But this is the least desirable location of the air conditioner in the kitchen or room, since in any case, the distribution uniformity will suffer and the formation of different temperature zones cannot be avoided.
At the same time, sometimes the question arises of where to place the air conditioner in the room, if there is an opening 70 cm wide between the window frame and the wall, and there is no other place to choose. In this case, corner mounting is justified. When the landlord chooses this option, then the location of the doorway should be taken into account - you can not hang the device in front of him, as the air will go to another room.
System start
Having finished all the work on switching, proceed to the launch. The system must be prepared by removing all air, nitrogen and moisture from it. They get into the pipes during their installation. If the system is not cleaned of foreign gases, then the load on the compressor will increase, and its useful life will decrease.
Moisture also has a negative effect on the performance of the system. The composition of freon pumped into the air conditioner contains oils. It is designed to lubricate the internal elements of the system. Since the oil has a hygroscopic structure, it will lose its effectiveness when mixed with water. In turn, this will lead to premature wear of the system elements.
It becomes clear that this operation is necessary. The system will start, of course, but for a short time. Removal of air and other foreign matter is carried out in two ways:
- the inlet of freon into the system;
- vacuum pump.
The first method can be carried out due to a small additional supply of freon pumped into the indoor unit.It is only suitable for trails no longer than 6 meters. That is why a vacuum pump is required for longer communications. If you blow a long system out of the indoor unit, then there will be no freon left for its operation.
Control valve at the bottom of the block


freon inlet
Before starting the operation on the outdoor unit, the plugs and covers on the valves are unscrewed. Next, the valve of the indoor unit on the larger diameter pipe opens for 1 second. This is done based on the design of the valve. Typically a hex wrench is used.
Having supplied freon to the system and creating excess pressure, it is necessary to relieve it. This is done with the help of a spool on the same pipe, by pinching with a finger. At the same time, you need to leave a small amount of freon in the system so that fresh air does not enter there. This procedure is repeated a couple of times.
After its completion, a plug is screwed onto the spool, and the valves on both pipelines are fully opened. To check the quality of the joints, you can smear them with soap suds.
Vacuum pump
This procedure requires not only a vacuum pump, but also a high pressure hose. You will also need two pressure gauges - for low pressure and high pressure.
The hose is connected to the spool of the thick pipeline. In this case, both valves must be closed. After switching the vacuum pump to the system, it is turned on and left to work for 15-30 minutes. This time is quite enough to pump out air and other impurities from the pipelines.
Vacuum pump with pressure gauge
After turning off the pump, it must be left connected to the pipeline with the valve closed.In this position, the system should stand for about 30 minutes. During this period of time, pressure indicators are monitored. If all connections are tight, the instrument arrows should remain in place.
If the readings begin to change - somewhere poor-quality sealing. As a rule, these are the places where pipes are connected to the blocks. Their additional broach eliminates the problem. If it does not help, then the leak is detected with soap suds.
System pressure control
If the complete tightness of the system is confirmed, then leaving the pump connected, the valve on the thick pipeline opens. After the characteristic sounds fading, indicating that the pipes are filled with freon, the pump hose is unscrewed. It is better to do this with gloves so as not to get frostbite from freon residues. Now you can open the valve on the thin pipeline. Everything is ready - the system can be turned on.
In the video, see how the evacuation of the nose is carried out:
Conclusion
In conclusion, I would like to note that the installation and launch of both air conditioners and split systems is a rather complicated undertaking. It is necessary to have the skills of construction and installation works, to understand the technical documentation and materials. That is why, in most cases, specialists are involved in such work.
Moreover, some large split systems are installed only by representatives of the manufacturer's plant. Otherwise, the service warranty will be void.
We also note that the launch of air conditioning systems using vacuum pumps is carried out in Russia and neighboring countries. In world practice they are not used. For example, the same Israel where air conditioners are not turned off all year round. Why this is done is a question for foreign experts.
Source
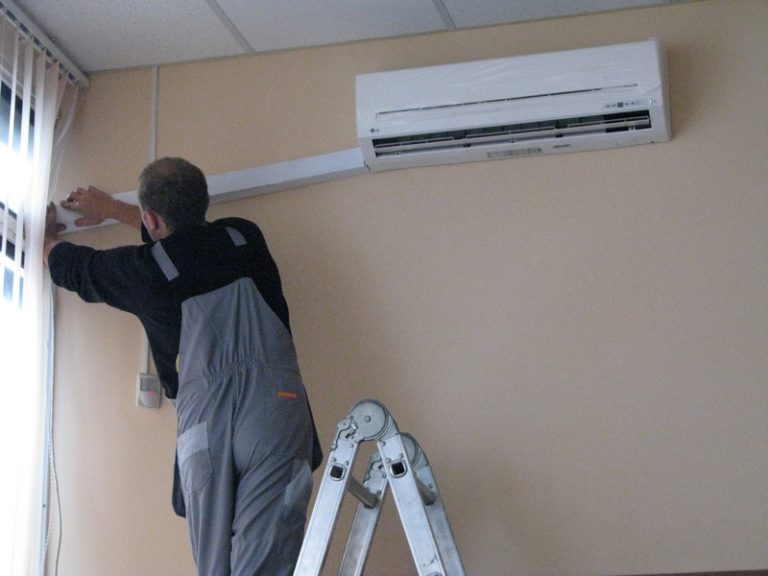
How to install an air conditioner: installation of outdoor and indoor units
First you need to determine the places where the blocks, the track and other elements of climatic equipment will be placed. To do this, you need to walk along the entire route with a device designed to detect wiring and apply preliminary markings.
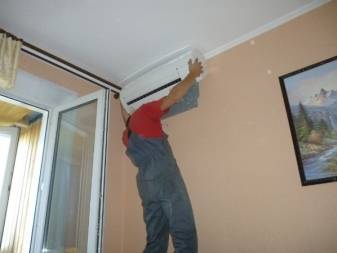
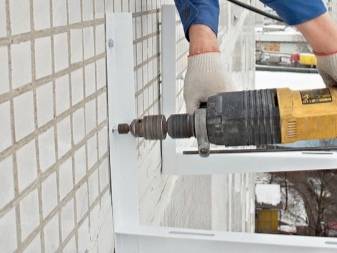
After that, a plate is attached to the wall to fix the indoor unit. This element is placed strictly in a horizontal position, therefore, in the process of work, it is imperative to use the building level.
The choice of brackets for mounting outdoor units must be approached very responsibly.
How to install the indoor unit:
The plate is applied to the wall, leveled and the places where the fasteners will be placed are marked.
The plate is removed and holes are made at the marked points with a drill.
Fasteners are installed. In wooden houses, you can use self-tapping screws; for concrete and brick buildings, it is better to take dowels.
The plate is put in place and securely fixed
Particular attention should be paid to the latches that hold the unit to the bottom.
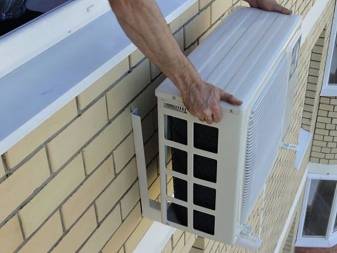
It remains only to check the horizontalness of the plate and fix the evaporator on it.
Then you should install the air conditioner with your own hands from the outside. To do this, taking into account the standards, markings are applied, in accordance with it, metal corners or brackets are installed. Stainless steel anchor bolts 10x1 cm in size can be used as fasteners. The choice of brackets must be approached very responsibly. These elements must not only withstand the weight of the outdoor unit, but also cope with wind and snow loads.
After making sure that the brackets are installed evenly, the outdoor unit is fixed to them with the help of bolts. The compressor to the installation area must be lowered very carefully, having previously tied it with ropes. In the place where communications will pass through the wall, a through hole of the required size is made with a puncher.
Do not install the air conditioner close to the ceiling or side walls
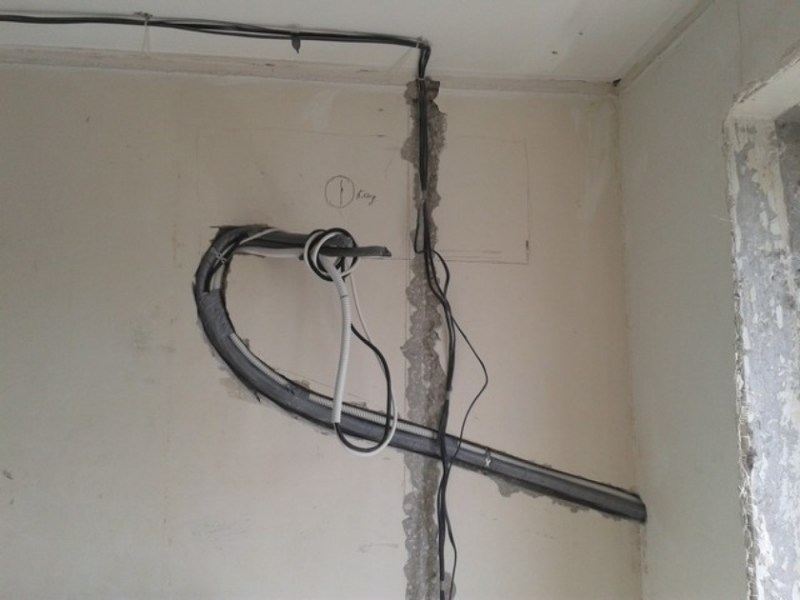
The second stage of installing an air conditioner with your own hands: connecting blocks
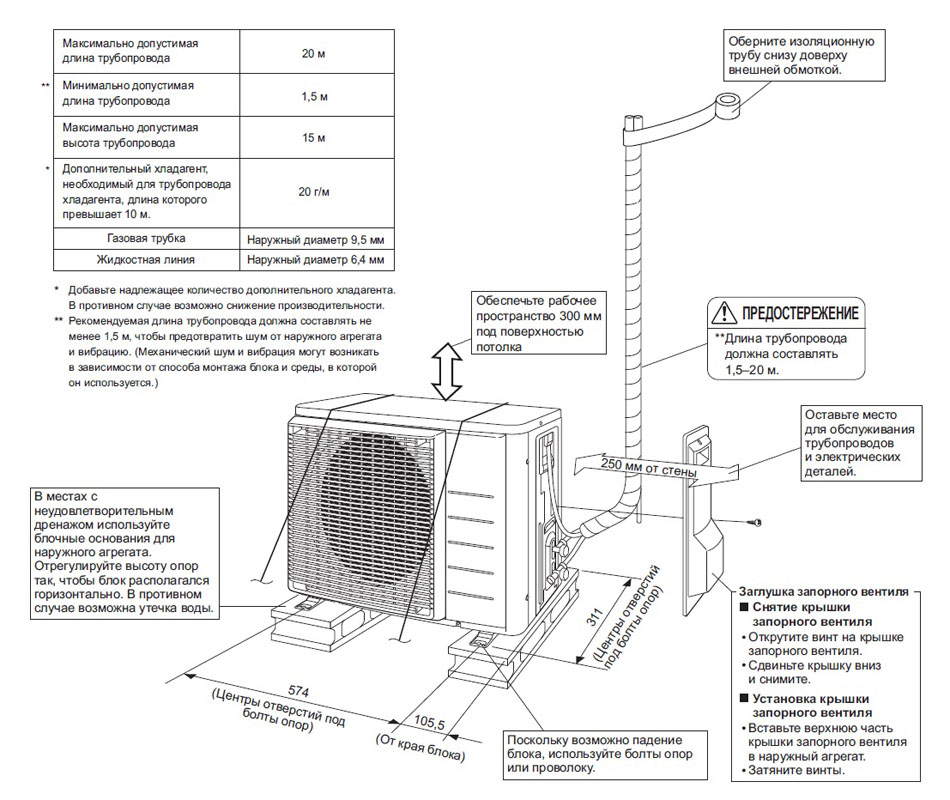
To connect the outdoor and indoor units, a cable and copper pipes of two diameters are used. The dimensions of the connecting elements are usually indicated in the instructions that come with the split system. The length is calculated taking into account the placement of blocks. Add 30 cm to the value obtained.


Copper tube processing:
- a cut of the required length is made from the bay;
- the edges are straightened, and all burrs are eliminated;
- plugs and plugs are installed at the ends;
- thermal insulation is put on.
After that, the pipes must be brought out through the hole in the wall and bent in the right places using a pipe bender. Crimp lugs are installed on the cable on both sides, after which it is inserted into the hole and connected in accordance with the instructions.
When installing a split system, the drainage tube is connected to the indoor unit with your own hands (a special outlet is provided for this) and brought out at a distance of about 80 cm from the wall. To prevent sagging, it should be fixed at every meter. Before laying communications in a plastic box, they should be tied into a bundle using metallized tape or ties.
The outdoor unit is installed first, and then the system is installed indoors
How to connect an air conditioner: connecting copper pipes
First, the pipes are connected to the indoor unit. On its side wall there are two ports with fittings of different diameters. From them you need to twist the nuts. As a result of this, a hiss will appear, indicating that nitrogen, which was pumped in by the manufacturer, is coming out of the block. It is necessary to protect internal parts from oxidative processes.
Next, remove the plugs from the tubes and once again check their edges for defects. The surface must be even. After that, union nuts can be put on the pipes.
Then the edges of the tubes should be flared. When performing this procedure, you need to hold the product with the hole down so that dust and small chips do not get inside. The tube is clamped in the holder so that 2 mm remains outside. Then the roller is installed, the screw is tightened. This is done until the cylinder stops lowering. As a result, a "skirt" is formed on the product.
The tube is connected to the outlet of the indoor unit with a flared edge. A union nut is used as a connecting element, which is tightened with a wrench. There is no need to use sealing materials. The tubes are connected to the outdoor unit in the same way.
Copper pipes are connected to the indoor unit of the air conditioner
How to do your own cleaning: air conditioning maintenance at home
To achieve savings, many apartment owners resort to self-maintenance of climate equipment after installing the air conditioner with their own hands. Videos from the network contain a lot of useful information on this issue, so there are no particular problems.
The simplest cleaning method is foam rinsing.For this, a special detergent is used, which is sold in the form of an aerosol can.
The procedure for cleaning the split system with foam:
- Disconnect the air conditioner from the mains, open its cover and remove the filters.
- Rinse the filters under running water and leave to dry.
- Treat the fins of the evaporator with foam from a can and wait for the time indicated in the manufacturer's instructions (10-30 minutes).
- Install the filters back and turn on the air conditioner, setting it to ventilation or heating mode (the choice of mode depends on the recommendations of the foam manufacturer).
- After 30 min. the air conditioner can be turned off and the room ventilated.

The most common way to clean the air conditioner is foam flushing.
On the video "How to clean a split system at home" this process can be found in more detail. This method is suitable for removing impurities from the heat exchanger. To clean the drain pan, fan and hidden areas of the air conditioner, you will have to disassemble it.
Air conditioner efficiency
How efficiently the equipment will work, and how much electricity will be spent, depends on the specific operating conditions.
Condition one. Suppose a heating device is installed next to the air conditioner. Then the compressor:
- will work almost continuously;
- will consume a lot of energy;
- will soon be out of order.
Condition two. Ordinary dust that has penetrated the system can reduce the performance of the air conditioner and even disable it. So you should regularly and thoroughly carry out wet cleaning.
Condition three.It is not allowed to put any objects on the surface of the block.
Condition four. Do not cover the air conditioner.
Condition five. Evaporation of the refrigerant can be eliminated if, when installing the system, carefully seal any joints and joints.
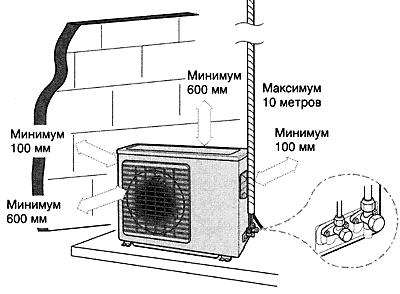
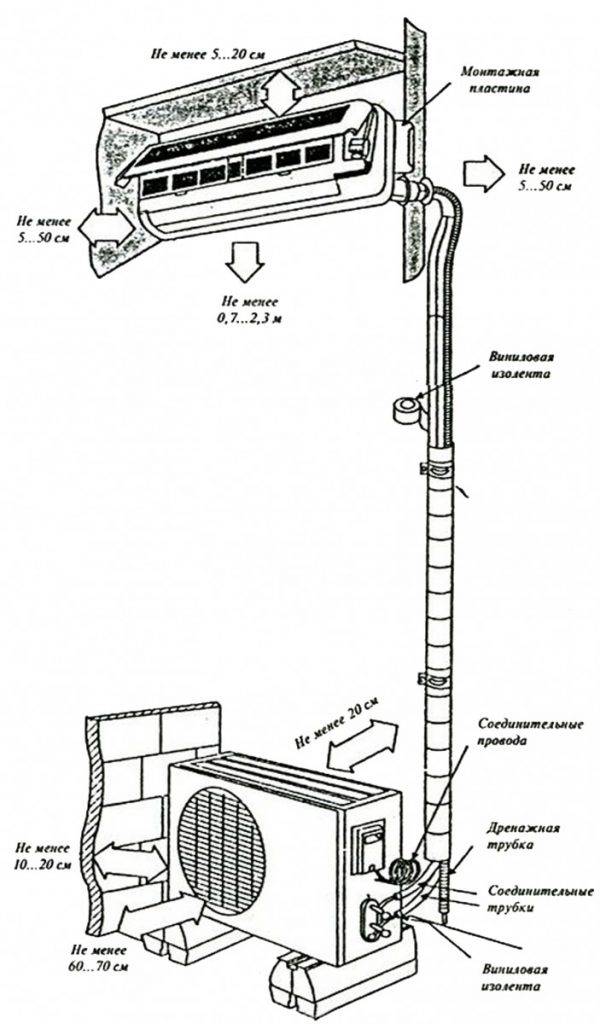
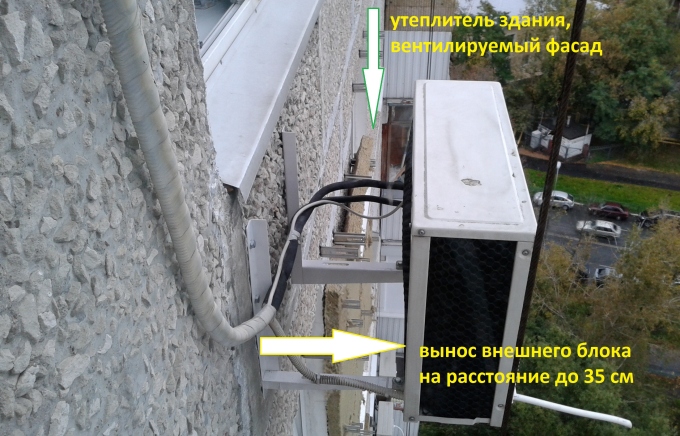
Condition six. The outdoor unit must be lower than the indoor unit. For its installation, it is necessary to choose the coolest zone on the outer side of the wall. For example, a roof overhang can form an eternal shadow.
If all the above conditions for installing the air conditioner are observed, then the system will work smoothly, creating the desired comfort in the premises.
1 The principle of operation of the unit
All models of split systems on sale are built and operate according to the same principle. They consist of a compressor and an evaporator unit. To connect them, special pipes are used. The outdoor unit is mounted outside the wall.
Unit device
An evaporator is installed inside the room. More productive and expensive models are equipped with several indoor units with a common compressor.


The principle of operation of the air conditioner at home:
- 1. High-pressure refrigerant (freon) is supplied through a nozzle, the diameter of which corresponds to the outlet pipes.
- 2. It goes to the inside of the evaporator, where it gradually expands, and after some time it completely boils. The generated steam actively absorbs heat.
- 3. In the process of absorption, condensate is certainly released in the form of water, which settles on the surface of the radiator.
- 4. Moisture is transferred to the reservoir, and then discharged outside the walls of the house.
If the installation of the air conditioner is done professionally and correctly, the compressor will constantly pump out freon vapors from the internal chamber, while the internal pressure increases in parallel. As a result, the refrigerant heats up, which contributes to its transformation into a dense fog.
The refrigerant is redirected to the condensation chamber, where it is cooled by an integrated fan, transforming into a liquid. In this state, it is sent to the evaporator (through the nozzle) and everything closes in a circle.
Even ordinary dust can lead to breakage of the climate unit. Wet cleaning is not only necessary, but also prescribed, and thorough, regular and thorough. Indoors, it is strictly forbidden to put any products or objects on the unit itself. It is also impossible to cover it with a tablecloth.
Scheme of work
Do-it-yourself installation of an air conditioner necessarily involves sealing all connecting elements and joints, which will eliminate the likelihood of refrigerant evaporation. Experts recommend placing the outdoor unit in such a way that it is lower in level than the indoor unit. The standard installation of the air conditioner involves the location of the outdoor unit in a cool place, in the shade.
We recommend watching a visual video on the operation of the air conditioner.
How long to vacuum?
The duration of the process depends on the capabilities of the vacuum equipment. An indicator of the degree of vacuuming is the power of the equipment, single-stage vacuum cleaners are less powerful, suitable for the corresponding split systems. The act of sealing can last about 30 minutes.
The two-stage pump is more powerful equipment, it can achieve vacuum even in a minute.The next 15-20 minutes are necessary to check the tightness of the system.
You can monitor the pressure level using a monometric manifold or a vacuum unit. More accurate indicators of the tightness of the circuit are achieved by high pressure crimping (40 bar).
Connecting blocks
Here, in general, there are no special secrets. The communications stretched through the hole in the wall are connected to the appropriate connectors. There are no problems with connecting the cable - connect wires of the same color to the terminals that are already connected to them. In this case, you can't really go wrong.
If the height difference in the installation of blocks exceeds 5 meters, it is necessary to make a loop to catch the oil (we lay copper pipes in this way) dissolved in freon. If the drop is lower, we do not make any loops.
Laying the route between the indoor and outdoor unit of the split system
Drainage
There are two ways to divert drainage from the split system - into the sewer or just outside, outside the window. The second method is more common with us, although it is not very correct.
This is the drain outlet of the indoor unit (handy)
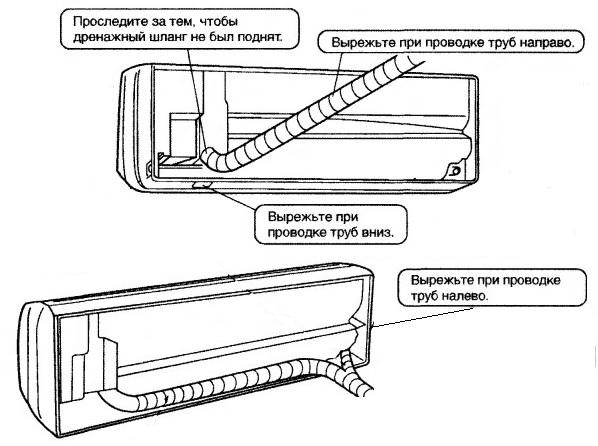
Connecting the drain tube is also easy. A corrugated hose is easily pulled onto the outlet of the drainage system of the indoor unit (a tube with a plastic tip at the bottom of the unit). To keep it secure, you can tighten the connection with a clamp.
The same is the case with the drainage from the outdoor unit. Exit it at the bottom. Often they leave everything as it is, and the water just drips down, but it's probably better to also put on a drainage hose and take moisture away from the walls.
Outdoor Unit Drainage
If not a hose is used, but a polymer pipe, it will be necessary to select an adapter that will allow you to connect the outlet of the air conditioner and the tube.You will have to watch on the spot, because situations are different.
When laying a drain pipe, it is better to avoid sharp turns and certainly not to allow sagging - condensation will accumulate in these places, which is not good at all. As has been said more than once, the tube is laid out with a slope. Optimal - 3 mm per 1 meter, minimum - 1 mm per meter. Throughout it is fixed to the wall, at least every meter.
Freon circulation system
It is somewhat more difficult with connecting copper pipes. They are carefully laid out along the walls, avoiding kinks and creases. For bending, it is better to use a pipe bender, but you can get by with a spring one. In this case, sharp turns should also be avoided, but in order not to bend the tubes.
The ports on the outdoor unit look like this. Same on the inside.
From the beginning, we connect the tubes in the indoor unit. On it, we twist the nuts from the ports. As the nuts loosen, a hiss is heard. It's nitrogen coming out. This is normal - nitrogen is pumped in at the factory so that the insides do not oxidize. When the hissing stops, take out the plugs, remove the nut, put it on the tube, and then start rolling.


rolling
First, remove the plugs from the pipes and check the edge. It should be smooth, round, without burrs. If the section is not round during cutting, use a calibrator. This is a small device that can be found in the forehead shop. It is inserted into the pipe, scrolled, aligning the section.
The edges of the tubes are carefully aligned for 5 cm, after which the edges are flared so that they can be connected to the inlet / outlet of the blocks, creating a closed system. The correct execution of this part of the installation is very important, since the freon circulation system must be airtight.Then refueling the air conditioner will not be needed soon.
Expanding copper pipes for air conditioning installation
When flaring, hold the pipe with the hole down. Again, so that copper particles do not get inside, but spill out onto the floor. In the holder, it is clamped so that it sticks out 2 mm outward. That's right, no more, no less. We clamp the tube, put the flaring cone, twist it, applying solid efforts (the tube is thick-walled). The flaring is finished when the cone goes no further. We repeat the operation on the other side, then with the other tube.
This is what the result should be
If you have not rolled pipes before, it is better to practice on unnecessary pieces. The edge should be smooth, with a clear continuous border.
Port connection
We connect the flared edge of the pipe to the corresponding outlet, tighten the nut. No additional gaskets, sealants and the like should be used (forbidden). For this, they take special tubes made of high-quality copper so that they provide sealing without additional funds.
Connection principle of copper tube with air conditioner port
You need to make a serious effort - about 60-70 kg. Only in this case, the copper will flatten out, compress the fitting, the connection will become almost monolithic and accurately sealed.
The same operation is repeated with all four outputs.
Overview of the design of the outdoor unit before connecting the air conditioner: diagram and structure
When installing an air conditioner with your own hands, it will be useful to familiarize yourself with its structure. This will avoid mistakes in the process of work and better master the technology.
The design of the outdoor unit consists of the following components:
- fan
- compressor;
- condenser;
- four-way valve;
- filter;
- control boards;

To install an air conditioner with your own hands, you need to familiarize yourself with its structure
- union type connections;
- protective cover with quick release design.
The fan generates air currents that blow around the condenser. In it, freon is subjected to cooling, and its condensation occurs. The air that is blown through this radiator, on the contrary, heats up. The main function of the compressor is to compress freon and keep it moving inside the refrigeration circuit.
There are two types of compressors:
- spiral;
- piston.
Piston compressors are cheaper, but less reliable. Unlike spiral ones, they react worse to the effects of low temperatures in the cold season. When connecting an inverter air conditioner, the control board is usually located in the outdoor unit. If the model is not inverter, all electronic components are placed in that part of the split system that is installed indoors. This is done in order to protect the control board from humidity and temperature extremes.

The design of the outdoor unit includes the following units: compressor, valve, fan
Four-way valves are commonly found in reversible types of air conditioners. Such split systems operate in two modes: "heat" and "cold". When the air conditioner is set to heat, this valve changes the direction of the refrigerant flow. As a result of this, the functionality of the blocks changes: the internal one starts to heat the room, and the external one works for cooling.Union fittings are used to connect copper pipes that connect the indoor and outdoor units.
The freon system filter prevents copper chips and other particles from entering the compressor. In the process of installing the air conditioner with your own hands, small debris is formed. The filter traps particles before entering the compressor.
The quick-release cover is designed to protect the terminal block intended for connecting wires and fitting connections. In some models, it provides partial protection by covering only the terminal block.

Regardless of which structural type the split system belongs to, its outdoor module always has the same working units
Connecting the air conditioner to the mains
To finish with the indoor unit, we proceed to connect the power wires.
After opening the front cover of the indoor unit, unscrew the plastic plug for connecting the cable.
After inserting the cable, connect it according to the electrical diagram. To do this, look for the designations on the terminal block:
L-phase
N - zero
earth icon
Check on the power cable where you have phase and zero and connect the corresponding ends to your terminals.
When connecting an air conditioner of low power (up to 2.5 kW) directly from a control room without a socket, a three-core cable VVGng-Ls 3 * 2.5 mm2 should be laid in your strobe.
A 16A machine is installed in the shield.
With a low-power conduit up to 1 kW, you can of course use a cross section and 1.5mm2 + automatic 10A, but 2.5mm2 is a more versatile option and will allow you to change the split system for more power without problems in the future.
If the air conditioner will be connected through an existing outlet, then use a wire with a PVA plug 3 * 2.5mm2.
In connecting the indoor and outdoor units to each other, there is also nothing complicated. Here, as a rule, a 4*2.5mm2 or 5*2.5mm2 cable is used. The terminal markings on these blocks are the same.


Accordingly, you throw a cable between them (not a PVS wire, but a VVGng cable!) And connect the wires of the same color to the terminals L1 on the indoor unit and L1 on the external, N - on the internal and N - on the external, etc. Just follow the connection diagram and labels.
Sometimes the air conditioner itself in the room is powered not from the outlet, but from the outdoor unit (most often for inverter models). In this case, the outdoor will have a few more terminals.
This is phase-zero-earth. Then the power cable from the outlet or diffuser in the switchboard, lay it outside, and not to the indoor unit.
The connection of the freon route tubes from the outside is similar to the room connection.
Location of several air conditioners in the main rooms
This option of placing a "split" has 3 important advantages:
- In the desired room (with closed doors) the temperature that is comfortable for you will be most accurately maintained. Precisely adjusting the temperature during sleep is VERY IMPORTANT for health, and not just for comfort.
- If “conders” (with properly selected power) are installed in the main rooms, then the whole apartment (including the corridor) will be provided with coolness when it is needed.
- During the day, only those rooms in which you spend most of your time will be cooled. It makes no sense to "study" the whole apartment when you spend the whole day in one room. For example, when meeting guests, you can provide the whole apartment with coolness, and at night maintain the temperature only in the bedrooms.
Procedure for installing the air conditioner
Installation work is carried out according to the developed algorithm. All requirements and rules are taken into account. How to install the air conditioner:
- Electrical wiring is being laid to connect the system to the network.
- Installation of the unit outside the room.
- selection of the optimal place for installation, which will be located above 2 m from ground level;
- fixing the brackets to the selected anchor bolts;
- installation of the block on the prepared place (brackets);
- creation of main holes in the wall, the diameter of which is from 50 to 60 mm for all communications;
- installation of a waterproofing cylinder in the holes and connecting communications.
- Installation of the unit indoors:
- selection of the optimal location, according to the requirements described above;
- installation of brackets for air conditioning;
- installation of the indoor unit in its place.
- Wiring connection:
- installation of an internal or external box;
- joining copper pipes through which freon will circulate, connecting electrical wires;
- evacuation - air and all moisture is removed from the system. Special equipment will allow you to perform the operation in about 45 minutes, no less.
- Test operation of the installed air conditioner. For this purpose, special hardware and software equipment is used.
The air conditioner is installed and ready to go.
Installation of SPLIT systems

In the air conditioning industry, one of the most commonly used types are split air conditioners. These systems consist of two separate parts, an outdoor unit and an indoor unit, which are connected to each other with copper piping to form a closed circuit.Currently, most manufacturers offer split air conditioners that can operate in cooling or heating mode. The heating process is carried out by the heat pump by changing the cycle. To ensure the design mode of operation, it is necessary to follow the rules for installing the outdoor unit of the air conditioner and choose the right power.
Assembly of split air conditioners.
Choose the right place to install the indoor and outdoor units. When choosing a location, you need to ensure an even distribution of air in the room and ease of use of the system. Excessive drafts should not be allowed in the area of \u200b\u200bthe permanent presence of people. When installing the indoor unit, consider access to the unit to clean the filters and disinfect the evaporator. After selecting the correct installation location, the indoor unit is assembled first. It is mounted on the frame, marking the center of the position, aligning and securing the structure. Then a hole with a diameter of 65 mm is made in the wall so that it is closed by the indoor unit, through which the installation of pipes, electrical and condensate drainage will be carried out. The hole is made with a slight slope from the outside. It is recommended to install a protective sleeve in the hole, and on the side of the outer wall - a socket that closes it and increases the aesthetics of installation. Drainage of condensate from the indoor unit should always be done naturally, if possible, with a pipe slope of approximately 3%. A solution with a condensate pump should only be considered as a last resort. The pump is a mechanical part that serves to discharge condensate and increase the reliability of the air conditioning system.After installing the condensate drain system, it is necessary to check its permeability by pumping about 2 liters of water through the drain into the drip tray. If the air conditioner operates year-round, a heating cable must be installed in the drain pipe. Before hanging the indoor unit on the rack installed on the wall, it is necessary to connect a cooling unit to it
The connection must be made in the form of a screw connection, so special care must be taken to ensure that the refrigeration system is strong and tight. On the outer surface of the socket, when tightening the screw connections, use a paste that prevents the nuts from self-twisting. It is necessary to insulate the piping connections on the indoor unit to prevent moisture condensation on the outer surface of the pipes and streaks on the wall below the indoor unit
The outdoor unit is installed on an L-type support structure. The device must be installed at a safe distance from the wall to allow free air flow through the condenser, its subsequent maintenance and cleaning.
It is necessary to insulate the piping connections on the indoor unit to prevent moisture condensation on the outer surface of the pipes and streaks on the wall below the indoor unit. The outdoor unit is installed on an L-type support structure. The device must be installed at a safe distance from the wall to allow free air flow through the condenser, its subsequent maintenance and cleaning.


