- What is the floor drain made of?
- Sewer drain installation technology
- Automatic system: pros and cons
- How to connect a bathtub to the plumbing
- Features of a semi-automatic siphon
- Do-it-yourself shower ladder installation: types and features of ladders
- Types of mechanism and materials for its manufacture
- What ladder material to choose
- Classification of siphons according to the design of the drain
- Water seal system
- Some useful installation tips
- How to assemble and install?
- Mounting Features
- What is the drain in the floor
- Device
- Tile shower drain: installation features
- Drain design - simple and reliable
- Why do you need an emergency drain?
- Types of emergency drain devices: DIY
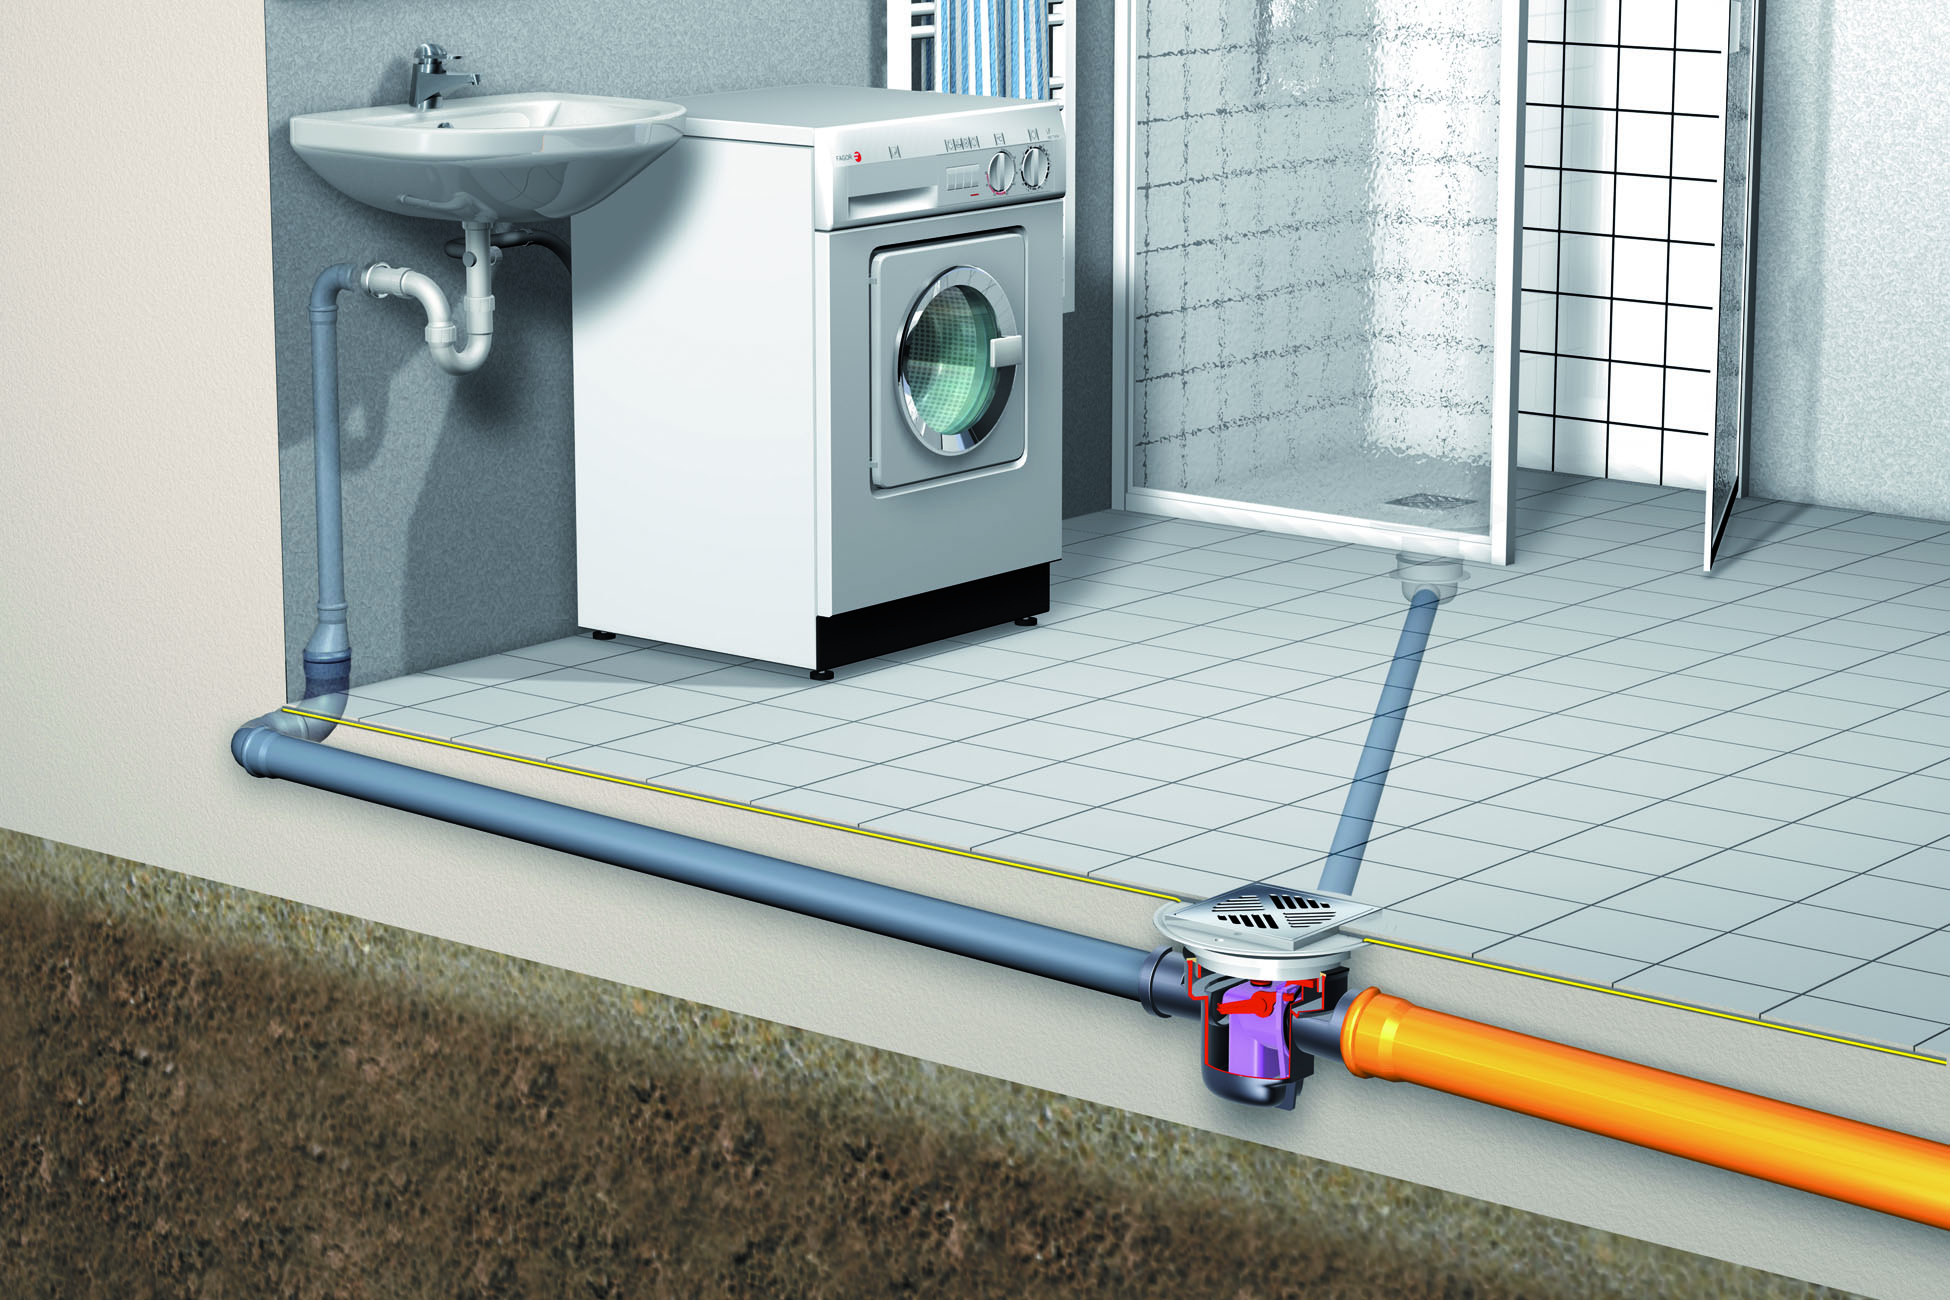
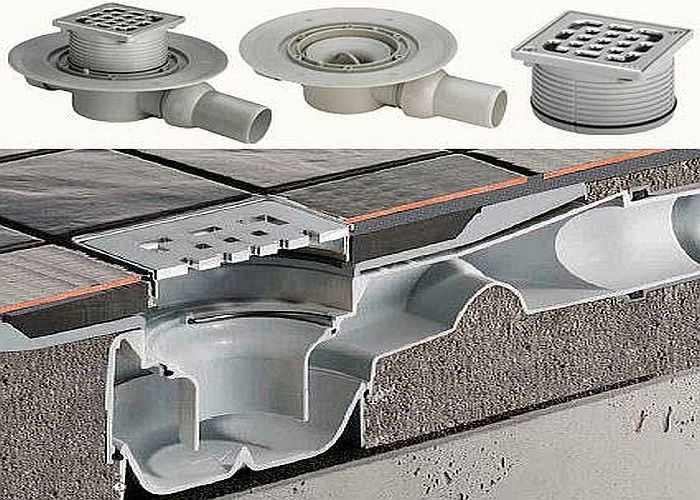
What is the floor drain made of?
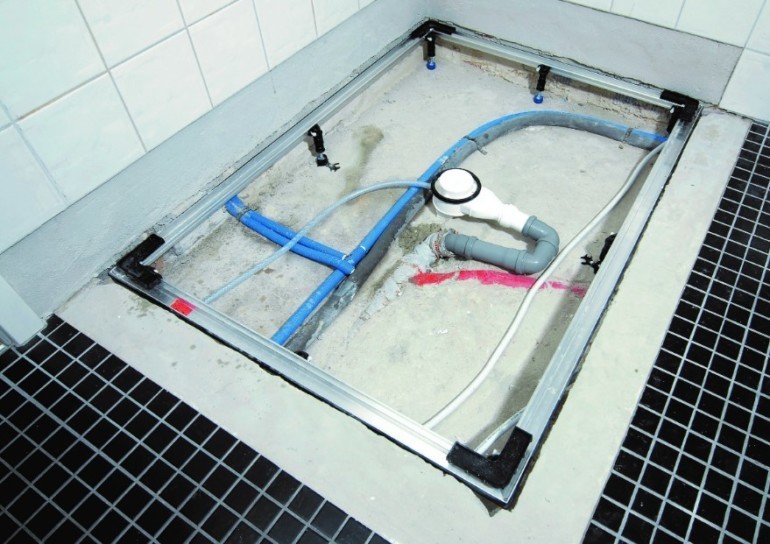
To divert water in an emergency, the following components are needed:
- Ladder - a special siphon, flat, designed for arranging construction pallets and drains.
- Emergency outlet - a piece of pipe connecting the ladder to the sewer.
- Waterproofing substrate - a layer of special mastic that prevents moisture from entering the interfloor overlap.
- Floor screed - a layer of concrete, which is filled with both the ladder and the pipe outlet. In addition, tiles can be directly laid on the screed itself.
Of course, it is worth noting that the ladder is the most important element of the emergency drain, so the reliability of the entire structure depends on its choice. Drain siphon grate most often made of brass, stainless steel or plastic. Therefore, it will not be difficult to choose it for your bathroom design. But the internal structure can have significant differences.
Sewer drain installation technology
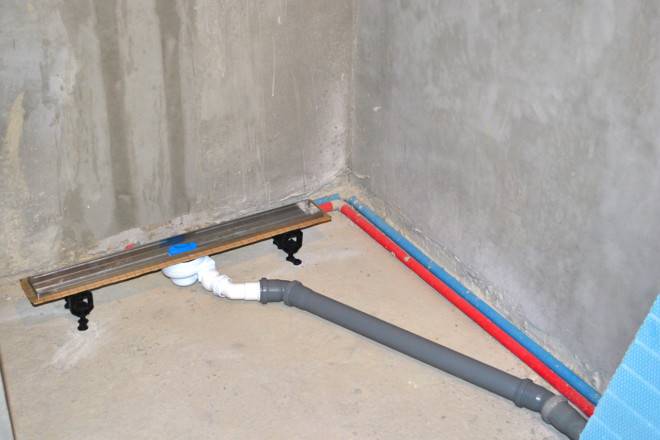
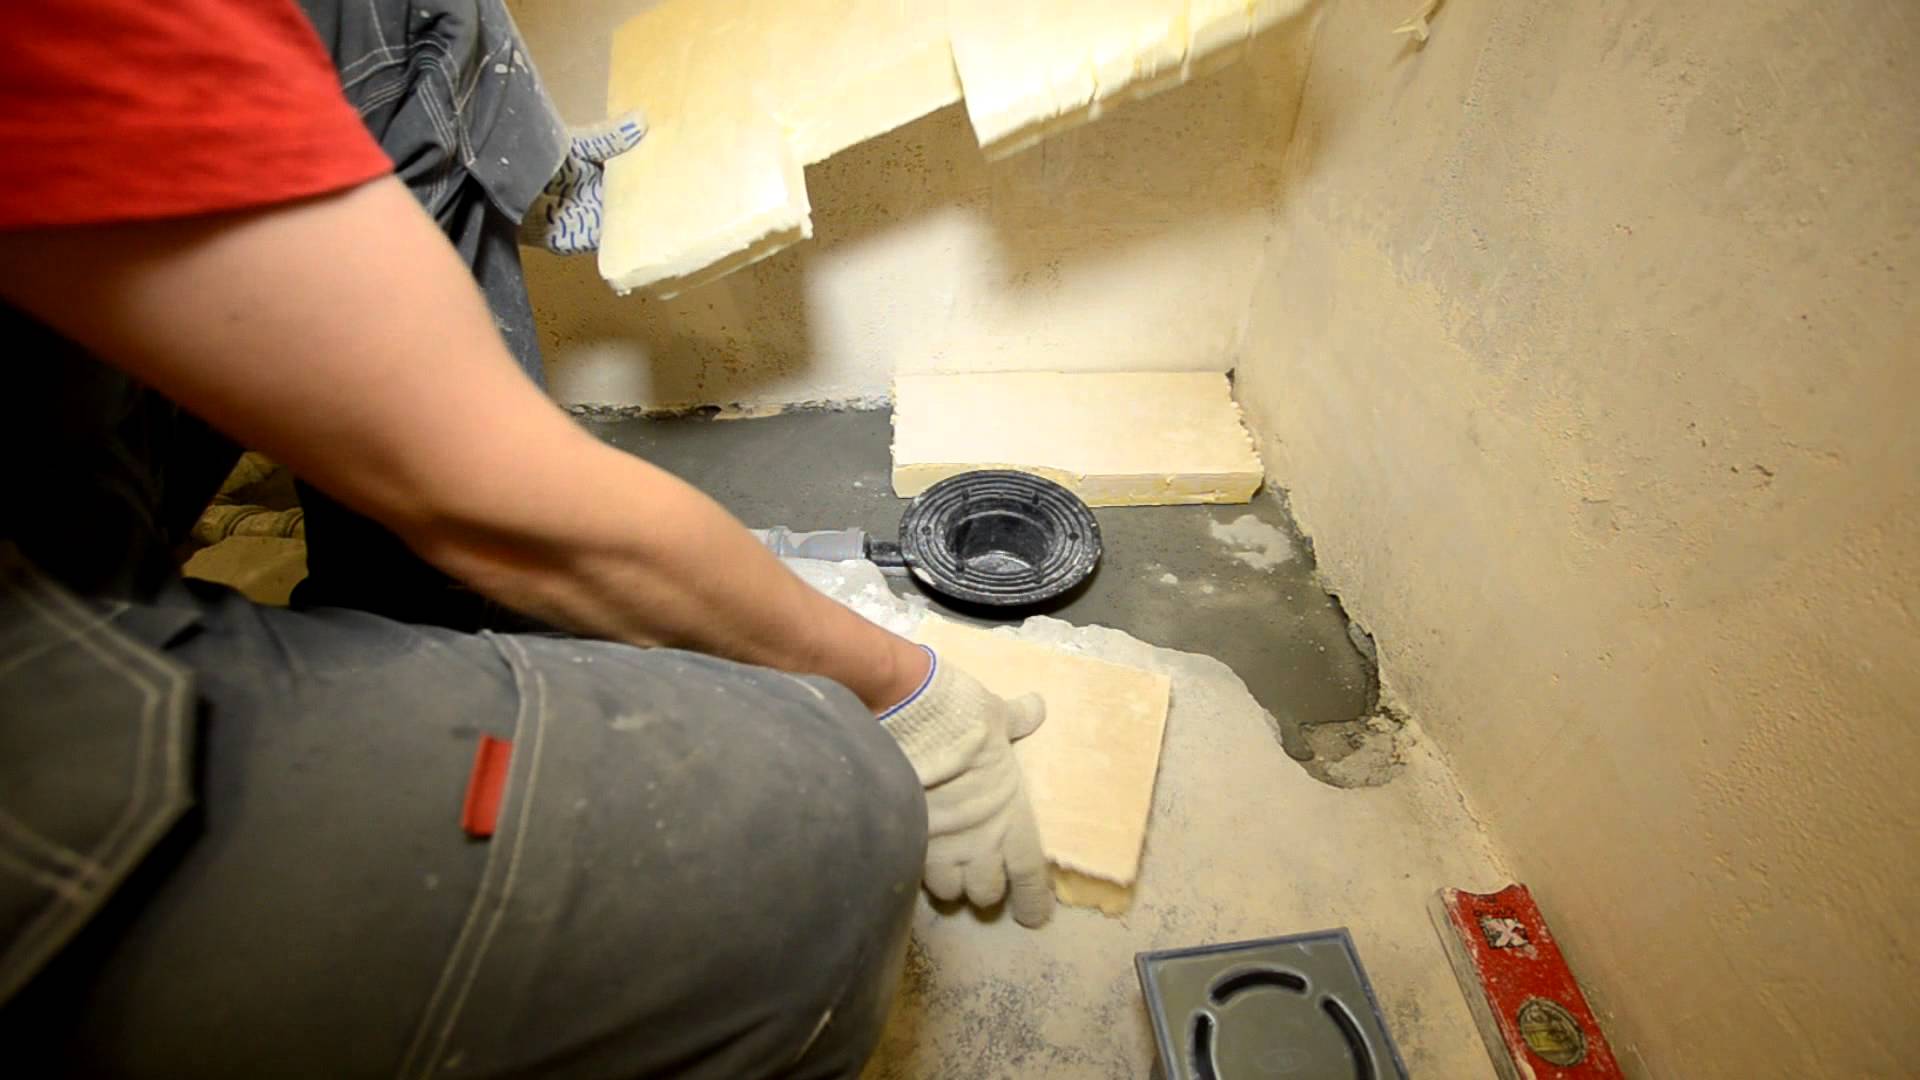
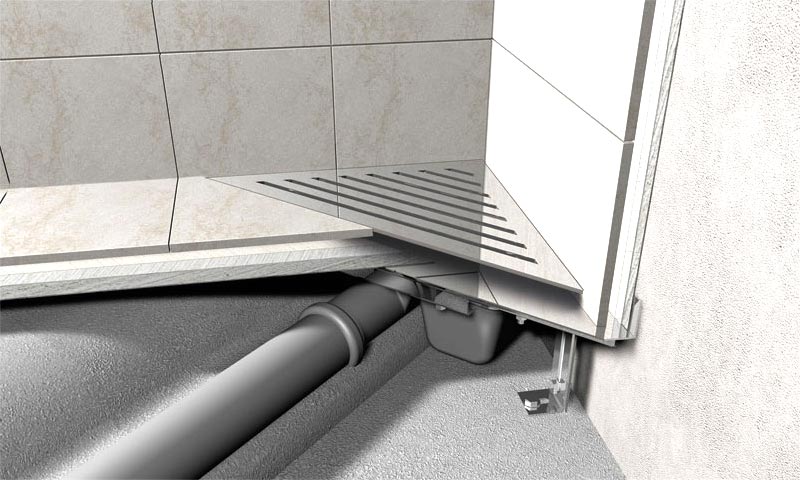
The very first and important condition for the installation of any ladder is the slope of the flooring. It must be made in such a way that wastewater can gradually and easily enter the drain. The ladder is usually installed in place of the shower
, so many floor finishes are done with tiles. Rules for installing a sewer ladder, which must be observed:
- The ladder grate must be on the same level
with top flooring. - Finishing the floor starts directly from the ladder, the tiles must be laid from it to the walls.
- All seams between tiles must be no more than 2 mm.
- Their grout is made only moisture resistant.
The installation of the ladder has its own subsequence
:
This version of the installation of the ladder allows you to keep the height of the floor in the bathroom on a par with other rooms, so the work is quite laborious. You can go another, simpler way, you need to build a flooring from a wooden
or iron frame
, the main thing is that it be durable
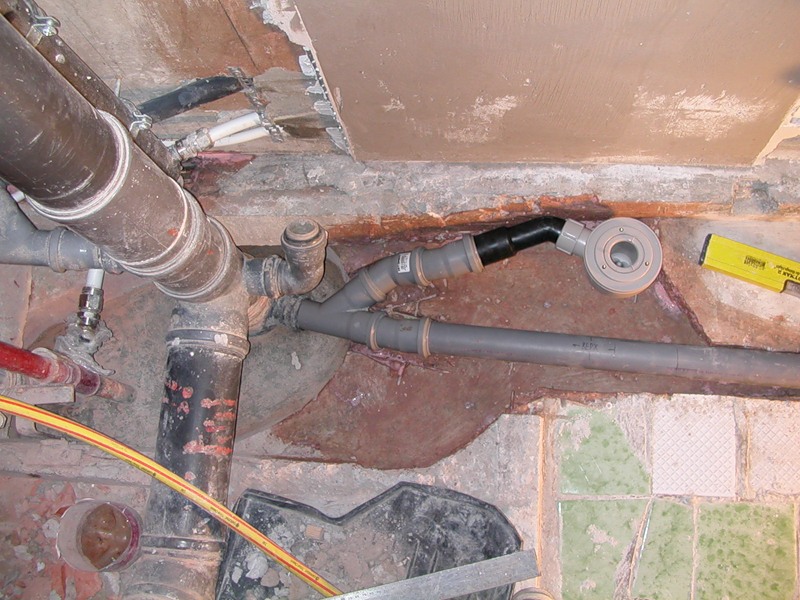
Next, the installation of the outlet from the ladder to the sewer pipe is carried out, it is also important to withstand the slope
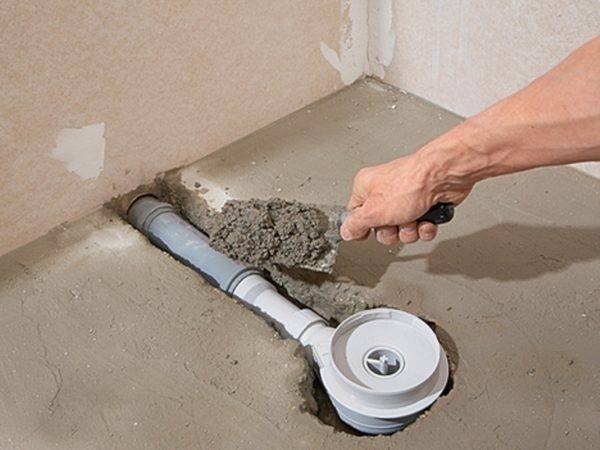
The elevation is done through the construction of a screed, it is necessary to perform formwork installation,
put waterproofing material and reinforcing mesh.The ladder is installed so that its level is slightly higher than the formwork, that is, on a par with the facing material. Next, concrete is poured, you always need to control the slope of the pipe. After it hardens, the formwork is disassembled, performed Finishing work.
Installing a ladder yourself is not an easy task, but anyone can handle it.
It is important to strictly follow the rules for installing the sewer drain and the sequence of work
Automatic system: pros and cons
A characteristic difference between the automatic drain is a complex device with a click-clack valve button equipped with a lock and a spring. These keys are made in various design variations and styles. The material used is copper or brass coated with nickel or chromium. Among the advantages of the system are:
- convenience of descent of water;
- compact design;
- practicality and efficiency in various cases;
- presentable appearance.
Automatic drain-overflow also has disadvantages, such as: difficulties in repairing the button, complexity of installation with the need to involve a specialist, low service life of the spring to hold the valve, high cost.
How to connect a bathtub to the plumbing
After installing the sewer connection, the mixer is mounted. With it, the bath will be connected to the water supply. Water outlets are holes in the wall to which outlets from the central riser are connected.
Mixer design
-
FUM tape is wound on eccentrics. After they are screwed into the socket with neat, smooth movements. From the inside, the “boots” are not sealed - there will be a gasket that will do an excellent job of protecting against leaks.Only after that, glasses or reflectors are installed on the open parts of the eccentrics;
-
Special gaskets must be included with the mixer. They are mounted on the protrusions of the eccentrics and the crane itself is mounted on top of them;
- A shower hose is connected to the faucet. Its fasteners are also sealed with rubber gaskets, and the thread is FUM tape. If desired, you can immediately install a holder for a shower "rain";
- Then his work is checked. Be sure to inspect the eccentrics - nothing should drip from them. If water flows out of the joints, it is necessary to press the parts of the structure more tightly.
The best way to check is to turn on the water and take half a bath. With this pressure, all fragile connections will immediately show themselves. Detected leaky fasteners are tightened and treated with sealants.
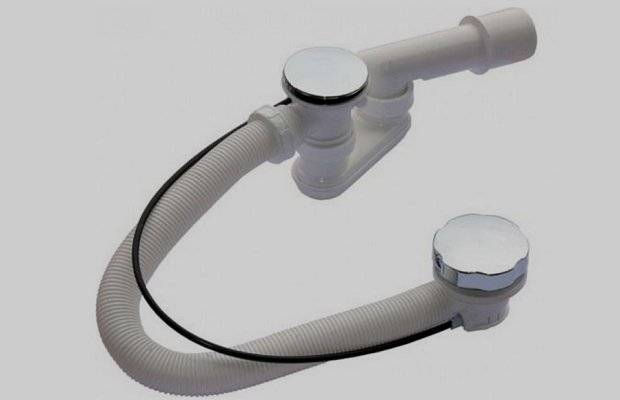
Features of a semi-automatic siphon
 Semi-automatic design
Semi-automatic systems are considered the most practical. Their constructive solution is distinguished by the presence of a control unit on the outside of the overflow grille. The device is designed to adjust the tension of a special cable. One end is connected to the block, and the other is connected to the drain plug using a rod on the cuff, while the plug is firmly connected to the system as a single mechanism.
The control unit is always placed on the reverse side of the hole and is presented in a different design form:
- padded handle;
- button;
- swivel ring.
To open the drain at the bottom of the bowl, you do not need to immerse your hand in water, you should turn the ring or handle from the end side of the tub. She will tighten (to close the drain) or loosen (to drain the water) the corresponding cable, lifting the plug.


The disadvantage of a semi-automatic system is the likelihood of chafing the cable and jamming the shutter mechanism, but this is directly related to the quality of the construction. To protect yourself from such problems, it is recommended to choose equipment from trusted manufacturers that guarantee reliability and durability.
Do-it-yourself shower ladder installation: types and features of ladders
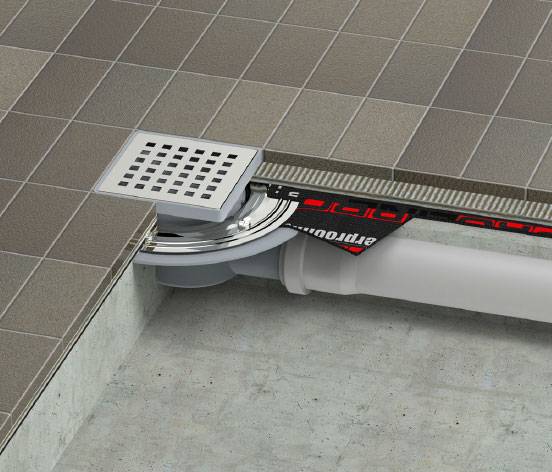
There are two types of drains, both can be made of stainless steel, durable plastic or brass. The main design for all types is approximately the same: a funnel-shaped body with a flange and a siphon with a protective mesh that absorbs water is placed outside. Further, the funnel is connected to the pipe (1-2) and the coupling, which is docked with the sewer pipe. Siphons differ in height, depending on how much you plan to raise the floor in the bathroom. Standard drain height 12 cm, thinnest = 6 cm
Also, when choosing equipment, it is important to pay attention to the throughput, how much water the ladder can hold, it depends on how efficiently the system will work. In addition, the correct installation also affects the efficiency, but more on that later.
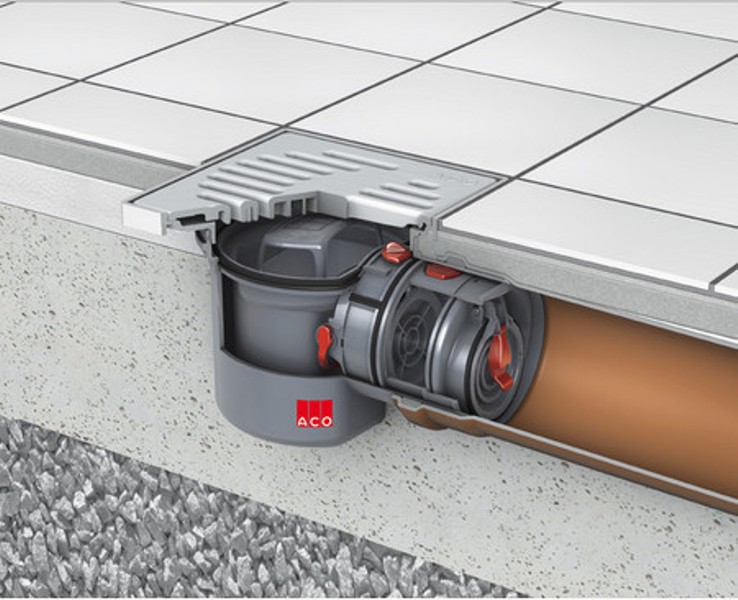
Ladder with a dry lock. Equipment that is configured to automatically close the pipeline under the influence of gravitational force. There are membrane, pendulum and float methods of closing. The dry seal type does not need to be flushed with water and is also available to be fitted with an optional non-return valve that will protect the premises from water backflow. The installation of such a valve is included in the first recommendations for use.
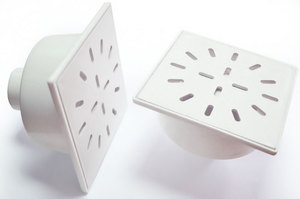
 Photo 2. Dry ladder for the shower.
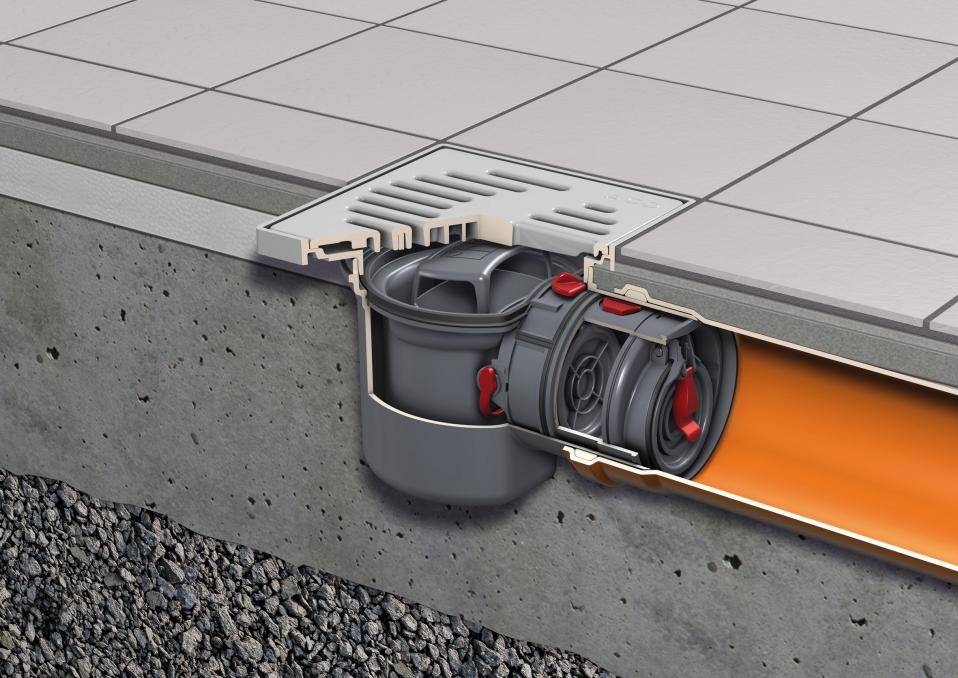
Ladder with water seal. The equipment is equipped with a curved tube, which assumes the constant presence of liquid in it. This design is designed to protect the room from unpleasant odors. The disadvantages of a ladder with a water seal include the need for flushing and constant provision of the tube with water. If it is not used for a long time or if the room temperature is high, the tube dries out and odors leak out. Therefore, it is necessary to regularly pour water into the drain.
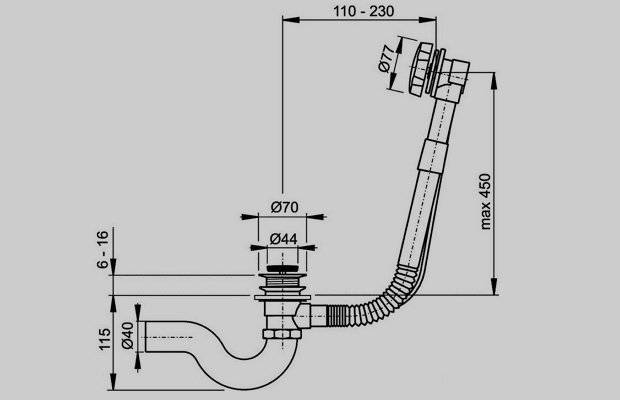
 Photo 3. Ladder with a water seal.
Types of mechanism and materials for its manufacture
The bathroom systems we are interested in can be semi-automatic and automatic. The first type of drain has a small cable. It serves as a connector between the drain plug and the overflow device. Semi-automatic drain is used elementarily. When you need to open its hole, pull the cable and thereby raise the cork. Water from the font rushes into the sewer pipes.
A semi-automatic type drain is inexpensive, it looks quite attractive outwardly, even a child can operate it correctly without any extra effort. The only disadvantage of this design is that the cable that lifts the cork can break with frequent use. However, this problem is inherent in extremely inexpensive mechanisms. Automatic drain is structurally more complex. It functions differently. To lift the cork, you need to click on it. And the automation itself will open the entrance to the drain hole! The mechanism providing this possibility is mounted in the cork itself. The disadvantage of the system is the need to lean towards the bottom of the bath to press the lid.
Drain semi-automatic type
Recently, another type of automatic drain with a special filling device has been actively used. Its installation is recommended for fonts without a mixer. Such a mechanism connects the water supply pipe to the overflow. This allows you to draw water into the bath through an overflow device. Drain-overflow systems are made of metal and chrome-plated brass, as well as polyethylene and various types of polypropylene. Metal products in operation are short-lived. Now they are practically not used.
The most expensive is the brass siphon. He looks great. It is used when they want to create a special interior in the bathroom. But according to some indicators (in particular, in terms of resistance to mechanical stress), brass products are inferior to cheaper and at the same time more resistant polypropylene and plastic structures.
What ladder material to choose
There are different materials used to make a shower drain. Most often, plastic products are found on sale. Their difference:
- affordable cost;
- light weight;
- resistance to detergents and disinfectants;
- simple care;
- durability;
- versatility.
The height of the plastic product varies from 7.5 to 18 cm. Plastic goes well with many finishing materials.
Devices with a stainless steel body and lid have not only a stylish appearance, but also hygiene, so they are more often used in rooms with high sanitary requirements.
Triangular drain with steel perforated grate for a stylish interior
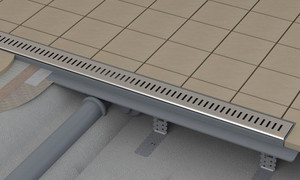
Stylish stainless steel drains of a linear type are used to equip shower rooms in a modern style.They fit perfectly into the style of minimalism or high-tech, as they are almost invisible on the floor of ceramic tiles or porcelain stoneware.


For public spaces, showers and baths, laundries and specialized laboratories, cast-iron structures are chosen. They have the highest throughput and cope with the removal of rain and utility water. Cast iron has anti-corrosion resistance and lasts at least 50 years.
Table. Popular models of ladders
| Illustration | Description | Average cost as of April 2020, rubles |
|---|---|---|
| "BAD415502" by "Tim" | Ladder linear type with water seal and perforated grate. Features:stainless steel; height is adjustable in the range of 8.5 - 15.5 cm; size 7 x 55 cm. | 2600 |
| "BAD011502" by "Tim" | Spot ladder made of stainless steel. Features:hygienic, durable, easy-care material; universal square shape; modern design; size 15 x 15 cm; height 6.7 cm. | 324 |
| Viega 4935.1 557 119 | Ladder for a shower from the German producer. Material - plastic. The height is adjustable. Features: swivel nozzle 10 x 10 cm. | 3400 |
| Viega 4935.1 557 119 | Ladder from stainless steel. Features:height 10cm; universal white color; size 15 x 15 cm. | 300 |
| AlcaPLAST APV31 | Drain made of polypropylene with a stainless steel cover with a connection diameter of 5 cm. The total installation height varies from 8.8 to 17.4 cm. Features: the neck is adjustable; compatible with other models of hydraulic seals; the material is not afraid of mechanical, chemical, thermal influences. | 1100 |
Classification of siphons according to the design of the drain
By design, all siphons can be divided into the following types:
- Mechanical.They have a plastic or rubber stopper for the possibility of blocking the drain channel. Here, all manipulations are performed without the use of any levers and automation - manually. The device is very simple, so it has a long service life.
- Semi-automatic. This is a complex structure that has a shut-off valve, which is controlled by means of cable or lever mechanisms. Place such an adjustment, as a rule, on the overflow hole above the water level. The reliability of this type of strapping is somewhat lower due to the presence of a number of moving parts and assemblies.
- Automatic. In this case, the siphon is included in the same system as the filling device. Manages everything built-in microprocessor. An easy-to-operate click-clack valve is included in the system.
Automation allows you to fill the bath with water at a given temperature and maintain it. When the temperature decreases, the water is drained and the bathroom is replenished with warm water to the set volume.
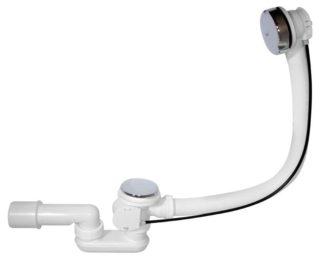
This is how the bottom valve looks like for installation on any bath. Opening and closing occurs by pressing. The model is made of brass and has a galvanized finish.
The click-clack design includes a locking cap fixed to a pin. It rises when a certain water column presses on it and forms a gap through which excess water flows out. Automatic siphons are made from non-ferrous alloys.
Semi-automatic siphons are available in 3 versions. In the first, the overflow hole is opened by pressing the drain plug. To remove used water, simply press the cover to activate the overflow plug.
This type has a direct-flow siphon without automation.When buying a device, you should find out what metal parts such as grates for overflow and drain holes, a coupling screw are made of. The best option is stainless steel. To make sure this is the case, use a magnet - regular coated steel is magnetized, but stainless steel is not.
The design of the semi-automatic siphon includes a special handle with the function of a stopper for the overflow hole. To open or close it, change the position of the handle. The plug is equipped with a special mechanism, by clicking on which you can both open and close the drain. Over time, the quality of work decreases due to the formation of a lime layer.
If there is a washing machine in the bathroom, then for its connection siphon must be metal, because plastic may not withstand high temperatures. We also recommend reading the nuances of installing a siphon for a washing machine.
When choosing a siphon, you should not proceed from the design of the product. The first thing that the siphon should provide is uninterrupted operation aimed at high-quality draining of wastewater into the collector.
Structurally, an automatic siphon differs from a semi-automatic one in a device for driving a drain plug and a system for supplying water to the bath
Water seal system
A fairly simple product, which is a plastic tube that bends at a certain angle. After installation and spillage, water accumulates in the bend, which plays the role of a water seal. She won't let you into the apartment bad smell from sewerage.
The main problem of the device is the possible drying of the water in the shutter, which will lead to its failure and the appearance of sewer odors in the room.The drying of the water seal most often occurs in case of rare use of the system, excessively high room temperature, design errors, and others. However, one must understand that solving the problem is very simple: you just need to spill the ladder with water.
Some useful installation tips
Before assembling and installing the drain fixture, you need to check the level of the bathtub, the diameter and position of the drain pipe. Then you should read the instructions to take into account all the possible nuances.
When installing the device on an old metal or modern acrylic bath, check the drain holes. If roughness is found on them, they are eliminated with an emery cloth.
With a rough drain, it is impossible to ensure the tightness of the siphon to them. Before the final tightening of the device, the correct assembly should be checked, gaskets require special attention. Often they move, so it is better to apply a special sealant to them.
The normal operation of the drain is also ensured by the correct slope of the pipe. The drain piping must be routed directly to the manifold. If the siphon is equipped with several inlets for branching the drain into the manifold, but they are not supposed to be used, they should be plugged with a special nut.
When buying a siphon, its important characteristic is the quality of the material, and if it is plastic, then the main thing here is the wall thickness and processing technology. The denser the walls of the drain fixture, the better it will resist loads.
Cracks, even disguised ones, are unacceptable on a cast-iron drain. If such defects are found, it must be replaced. The surface of the brass siphon must be absolutely smooth, otherwise it will have to be cleaned frequently.


To avoid leaks, drain seals are changed on average once every six months, and those installed between the pipes - every 3 months. To prevent scale deposits on the walls, it is advisable to rinse the device every few months with hot water with an additive in the form of citric acid.
If chemical cleaners are not contraindicated for the material, then you can use Mr. Muscle, Ruff, Phlox and the like.
How to assemble and install?
Each type of "drain-overflow" system has its own subtleties of the mount. Here are only general recommendations and tips for installing a bath piping yourself.
A small installation guide looks like this:
- choose a siphon of such a design that during installation the distance between its base and the floor is 15 cm;
- you need to connect the hole of the tee with a grate blocking the drain;
- when connecting, it is necessary to fix the gasket-seal;
- with the help of a nut, the siphon itself is installed to the outlet from the tee;
- a side pipe is attached to one of the branches of the tee;
- the end of the siphon plunges into the sewer;
- each part of the structure is compacted.
At the final stage, you need to close the drain hole, fill the bathtub with water. Then, when the water flows through the drain pipe, carefully examine the entire structure for holes. You can lay a dry cloth or paper on the surface under the system. Drops on it will immediately show the result.
Mounting Features
Actually, most of the information has already been told, it remains only to assemble the purchased components in accordance with
with a design idea.
The pipes are assembled from the riser (inlet pipe) towards the consumer. In other words, pipes are installed first, which
closer to the point of discharge into the common house riser.
In each connection, the pipe must enter the socket of the previous one by about 50 mm. If the cuffs in the bell are too
dense and it is impossible to insert a tap, then you need to lubricate the cuffs with liquid soap or detergent - it will work
much easier.
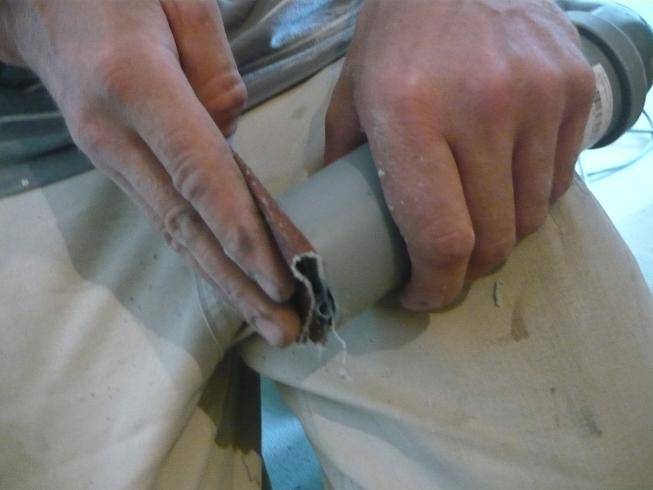
Plastic pipes are cut by any improvised means: a grinder, a hacksaw for metal. You can even cut
with an ordinary wood saw. The main thing is to clean the cut edge from all kinds of burrs - burrs inside the pipe will
provoke blockage, and burrs on the outside will not allow you to properly assemble the parts.
Some craftsmen practice applying silicone to the cuffs of the assembled parts - supposedly the joint is even more
sealed. I would like to note that the cuff connections that any sewer plastic pipe is equipped with
do their job very well without silicone. Therefore, it is still recommended to refrain from amateur performance.
In some situations, it is necessary to fix two parts together so that during operation one does not come out of the other.
It is categorically impossible to do this with the help of self-tapping screws, which some masters twist into the end of the socket. Sticking
inside the pipe, the sharp tip of the self-tapping screw will collect hair and cause blockage. If for any reason the collected
the assembly experiences mechanical stress “for undocking” - you need to fix both parts with brackets or other
fastening methods.
To form and control the required pipe slopes, it is very convenient to use a laser level. By constructing a horizontal
the beam is slightly higher than the horizontal lounger, you can control the slope by substituting a tape measure on the controlled areas and
comparing the distances from the pipe to the beam.

On this, in principle, and all. We considered the main points of installing sewerage in the bathroom, maybe I’ll add something
with time.

Rate this post:
- Currently 4.78
Rating: 4.8 (63 votes)
What is the drain in the floor
Before you equip a shower with a floor drain, decide on the components of such a system.
When installing it, it will be very important
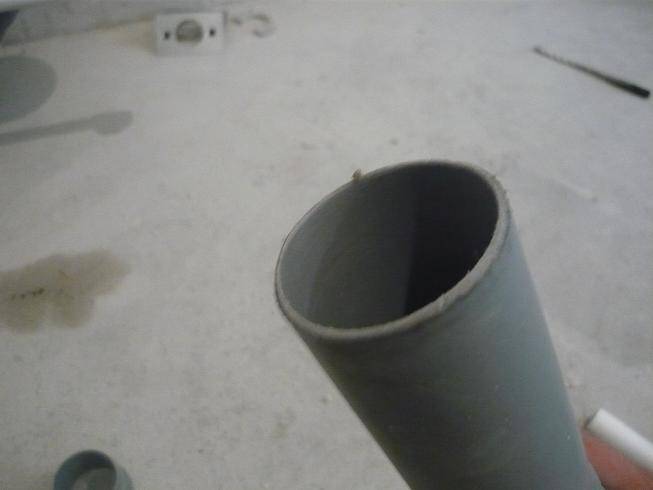
The drain ensures that water from the bath or shower drains into the drain. The outlet for the pipe should be made of plastic with a outlet diameter of up to 50 mm to ensure normal wastewater drainage. A corrugation is also suitable, however, many experts believe that it is better to use a smooth pipe for this device, which is unable to impede the flow of water. Also remember that the drain will be in the floor and access to the pipe will not be easy as usual. Corrugation will impede flow due to the following problems:


- stagnation of hair in it;
- soap bars;
- mud.
All this can subsequently lead to clogging of the entire sewer. Yes, and there is no urgent need to install corrugations, in order to install a drain in the floor, you will need such devices as:
- connections;
- adapters;
- couplings.
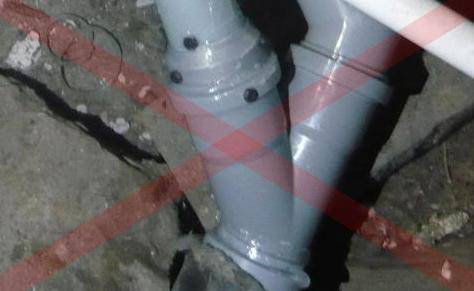
Under the siphon, the outlet must be straight and have an angle of 135 degrees with respect to the main pipe. In this case, its slope should be 15 degrees relative to the drain. Thanks to these parameters, the floor drain will ensure the unhindered flow of water from the bath or shower into the sewer.
Device
The sewer ladder consists of the following elements:
- The body is in the form of an oblong tube with an extension at the top.Performs the function of diverting water.
- Grille (so-called front panel). Acts as a filter. The grate is the only element of the ladder that can be decorated. There are round/square/rectangular faceplates.
- Siphon. Prevents the development of unfavorable odors. There are several types of siphons: with a mechanical / dry / water seal. The most common is a water seal (it is made of durable materials such as steel or enameled aluminum to increase the service life).
- Sealant and clamping elements.
Above is the main device of the product. Various modifications and improvement of the design by various manufacturers are possible. Ask the store staff for more information.
Tile shower drain: installation features
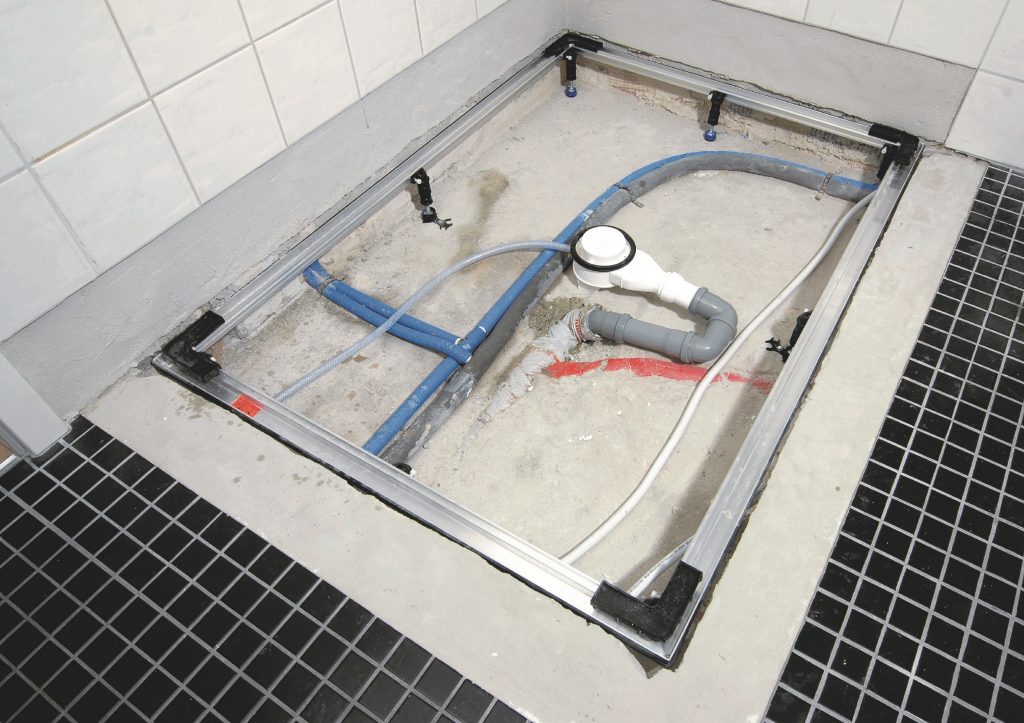
Installation of an emergency drain provides for a thorough step-by-step multi-layer preparation of the floor. In addition, it is necessary to mark the position of the future drain, calculate the distance from the walls if it is planned to cover the walls with tiles, and the height of the floor layers in order to install the drain no higher than the finish layer.
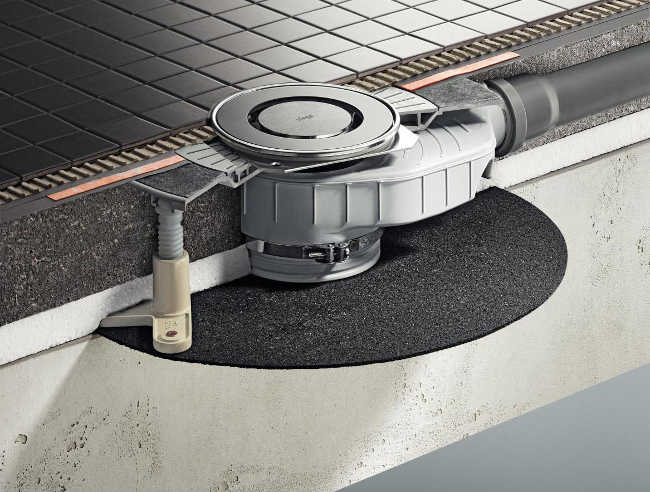
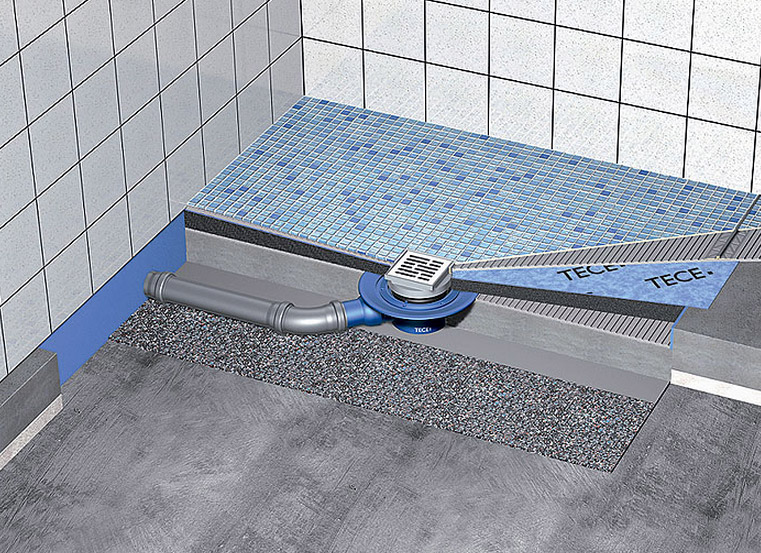
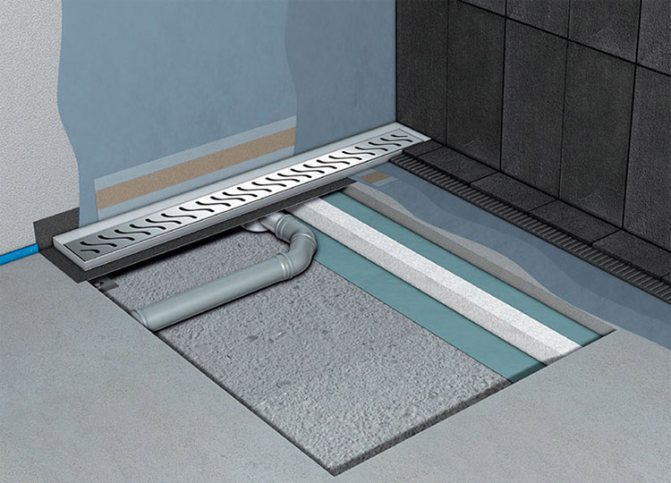
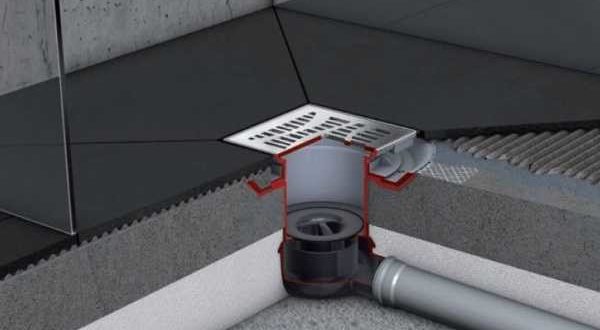
Photo 4. Installation diagram for an emergency drain for a shower.
1. Rough concrete screed. To perform the first layer, it is necessary to take care of thermal insulation, since when applying the screed to a cold concrete floor, it can result in its deformation and subsequent destruction. Expanded polystyrene is usually used as a heater.
2. Waterproofing of the floor surface with access to the walls. For this purpose, polyacrylic plastic is used, it is she who creates a waterproof elastic layer, which must be overlapped on the walls.
3. Screed with a slope towards the drain.Before pouring, it is required to install guides made of polymer or wood.
4. Finishing coat. At this stage, the tiles are laid first on the floor to eliminate the possibility of leaks, then the walls.
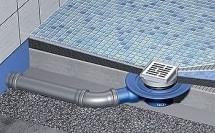
 Photo 5. Shower floor slabs should lead to a drain.
Drain design - simple and reliable
Plumbing siphon - this is what the drain-overflow system in the bathroom is usually called, consists of five main elements. These include:
- Drain neck, consisting of two parts - upper and lower. The first is made in the form of a cup, the second is a branch pipe with a nut and a special extension. These parts are connected with a screw. A mandatory part of the neck, which is installed at the bottom of the bath, is a gasket. It plays the role of a sealer.
- Overflow neck. It has a design similar to the drain. The only difference is the presence of a side, and not a direct outlet for water. The overflow neck, when the font is overfilled with water, removes the latter from the bowl.
- Siphon directly. It always has some water in it. Usually the siphon is made in the form of a curved removable pipe, although it can have a different configuration. This element does not allow sewer odors to enter the bathroom. In the language of professionals, it is called a water lock.
- Hose (corrugated). It connects the siphon and the overflow. The task of the hose is to ensure the drainage of water from the valve. Sometimes the corrugated product is sealed with a crimp type nut equipped with a gasket. But in most cases, the hose is simply pulled onto brushes - special types of nozzles.
- Corrugated or rigid pipe connecting the sewer system and the siphon.Products with corrugations have an adjustable length, it is very convenient to connect them with your own hands to the drain-overflow system in the bathroom. With a rigid pipe, there is more trouble during installation. But on the other hand, it has a higher operational reliability.
Drain-overflow system in the bathroom
As you can see, the drain installed in the bath is quite simple. Its individual parts are sealed between themselves with conical or sealing gaskets and a union nut. Any home craftsman can mount these elements correctly without resorting to professional plumbers.
Why do you need an emergency drain?
A drain in the bathroom floor relieves the room of excessive moisture, puddles on the tiles, eliminates the smell of dampness, and prevents the appearance of mold. Puddles that constantly remain after water procedures negatively affect walls and plumbing, and also provoke the reproduction of pathogens. Installing an emergency drain allows you to keep the bathroom sufficiently dry and free of foreign odors.
- The bathroom is planned to have a shower cabin and additional isolation from water is needed. Or a cabin without sides and curtains, so the drain, along with performing its direct function, insures in case of a flood.
- Additional insurance in case of flooding in the apartment. This reason is especially relevant in apartment buildings, when the apartment is not on the ground floor. Often people think about installing an emergency drain if you plan to install a jacuzzi in the bathroom.
Types of emergency drain devices: DIY
A device that provides emergency water drainage from the bathroom floor is called a drain ladder. The main tasks that the ladder solves:
- freely and quickly drains water into the sewer
- filters wastewater from foreign objects, preventing clogging of pipes
- blocks unpleasant odors from the sewer
- has a design that facilitates cleaning the drain in case of blockage
A drain for draining water in the floor, equipped with a dry seal, has an element that, under the influence of gravity, closes the pipeline. Such ladders can be pendulum, membrane or float. Sometimes a dry trap bathroom drain is fitted with a non-return valve that prevents water from the drain from flowing back into the bathroom. Dry shutter designs do not need the constant presence of liquid, do not dry out if they have not been used for a long time.


Scheme of a drain ladder with a water seal
The drain system, equipped with a water seal, has in its design a tube in which water is constantly present. The water seal device, constantly filled with water, becomes an obstacle to odors from the sewer to the bathroom
For a drain with a water seal, the constant presence of water in the tube is very important, because if there is no water, unpleasant odors can return to the room. The liquid in the closure may evaporate if the bath temperature is too high, the appliance has not been installed correctly, or if the drain is rarely used for its intended purpose.
When deciding which ladder to purchase, take into account its design features and size. To install an emergency drain in the floor, the floor surface is raised to the height of the ladder. Therefore, the smaller the drain, the easier it is to install a drain in the bathroom and the less noticeable the difference in floor height between the bathroom and other rooms will be.
In addition to the height, attention should be paid to the throughput: it must be sufficient to drain total excess water. The drain drain should only be done by a specialist in this matter.
This is interesting: Wet spots with rust on the ceiling - the reasons for their appearance, what to do


