- Preparing for laying laminate flooring
- Completion of work and installation of skirting boards
- Laying technology
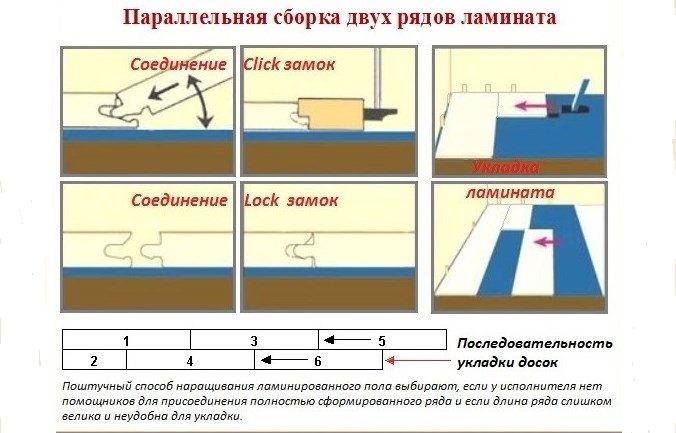
- Laminate with LOK and CLICK locks, and features of their installation
- Video how to lay a laminate with a CLICK lock
- Laying laminate near pipe and door protrusions
- Laminate installation step by step
- Features of finishing walls with laminate
- Underlayment for laminate flooring
- In what cases and how best to lay a laminate
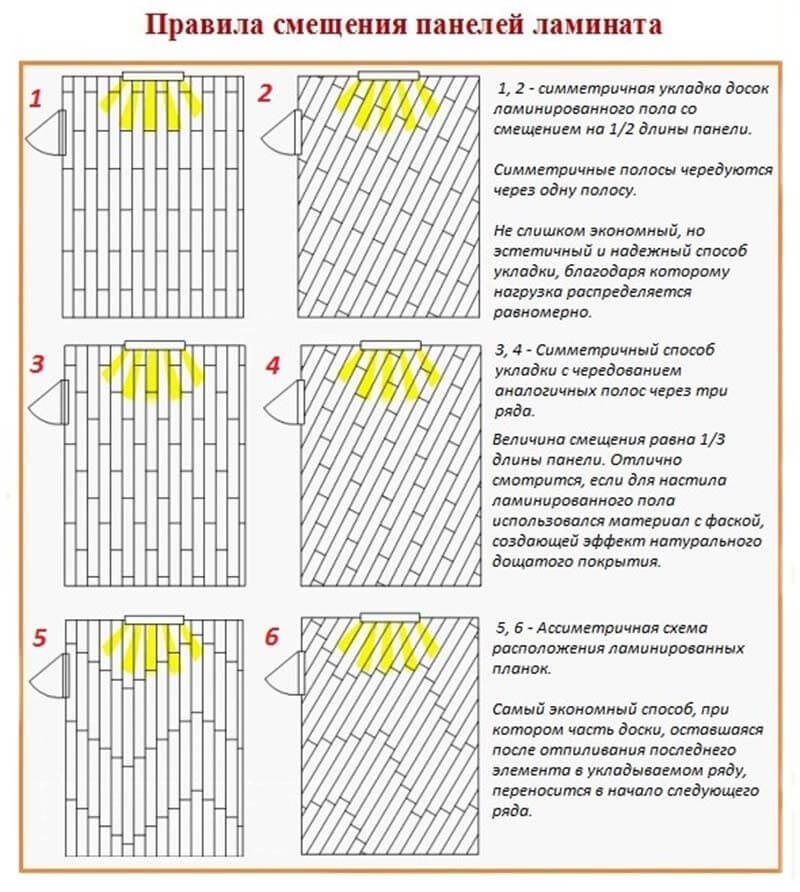
- Diagonally
- Along
- Across
- Choice of insulation and substrate
- The main advantages and disadvantages of laying laminate diagonally
- What will be required?
- Basic rules for laying laminate flooring
- Why laminate? Material advantages
- We lay the laminate with our own hands
- The nuances of laying adhesive laminate
- How long will laminate flooring take?
- Castle features
- Underlayment for laminate flooring
- Additional use of laminate
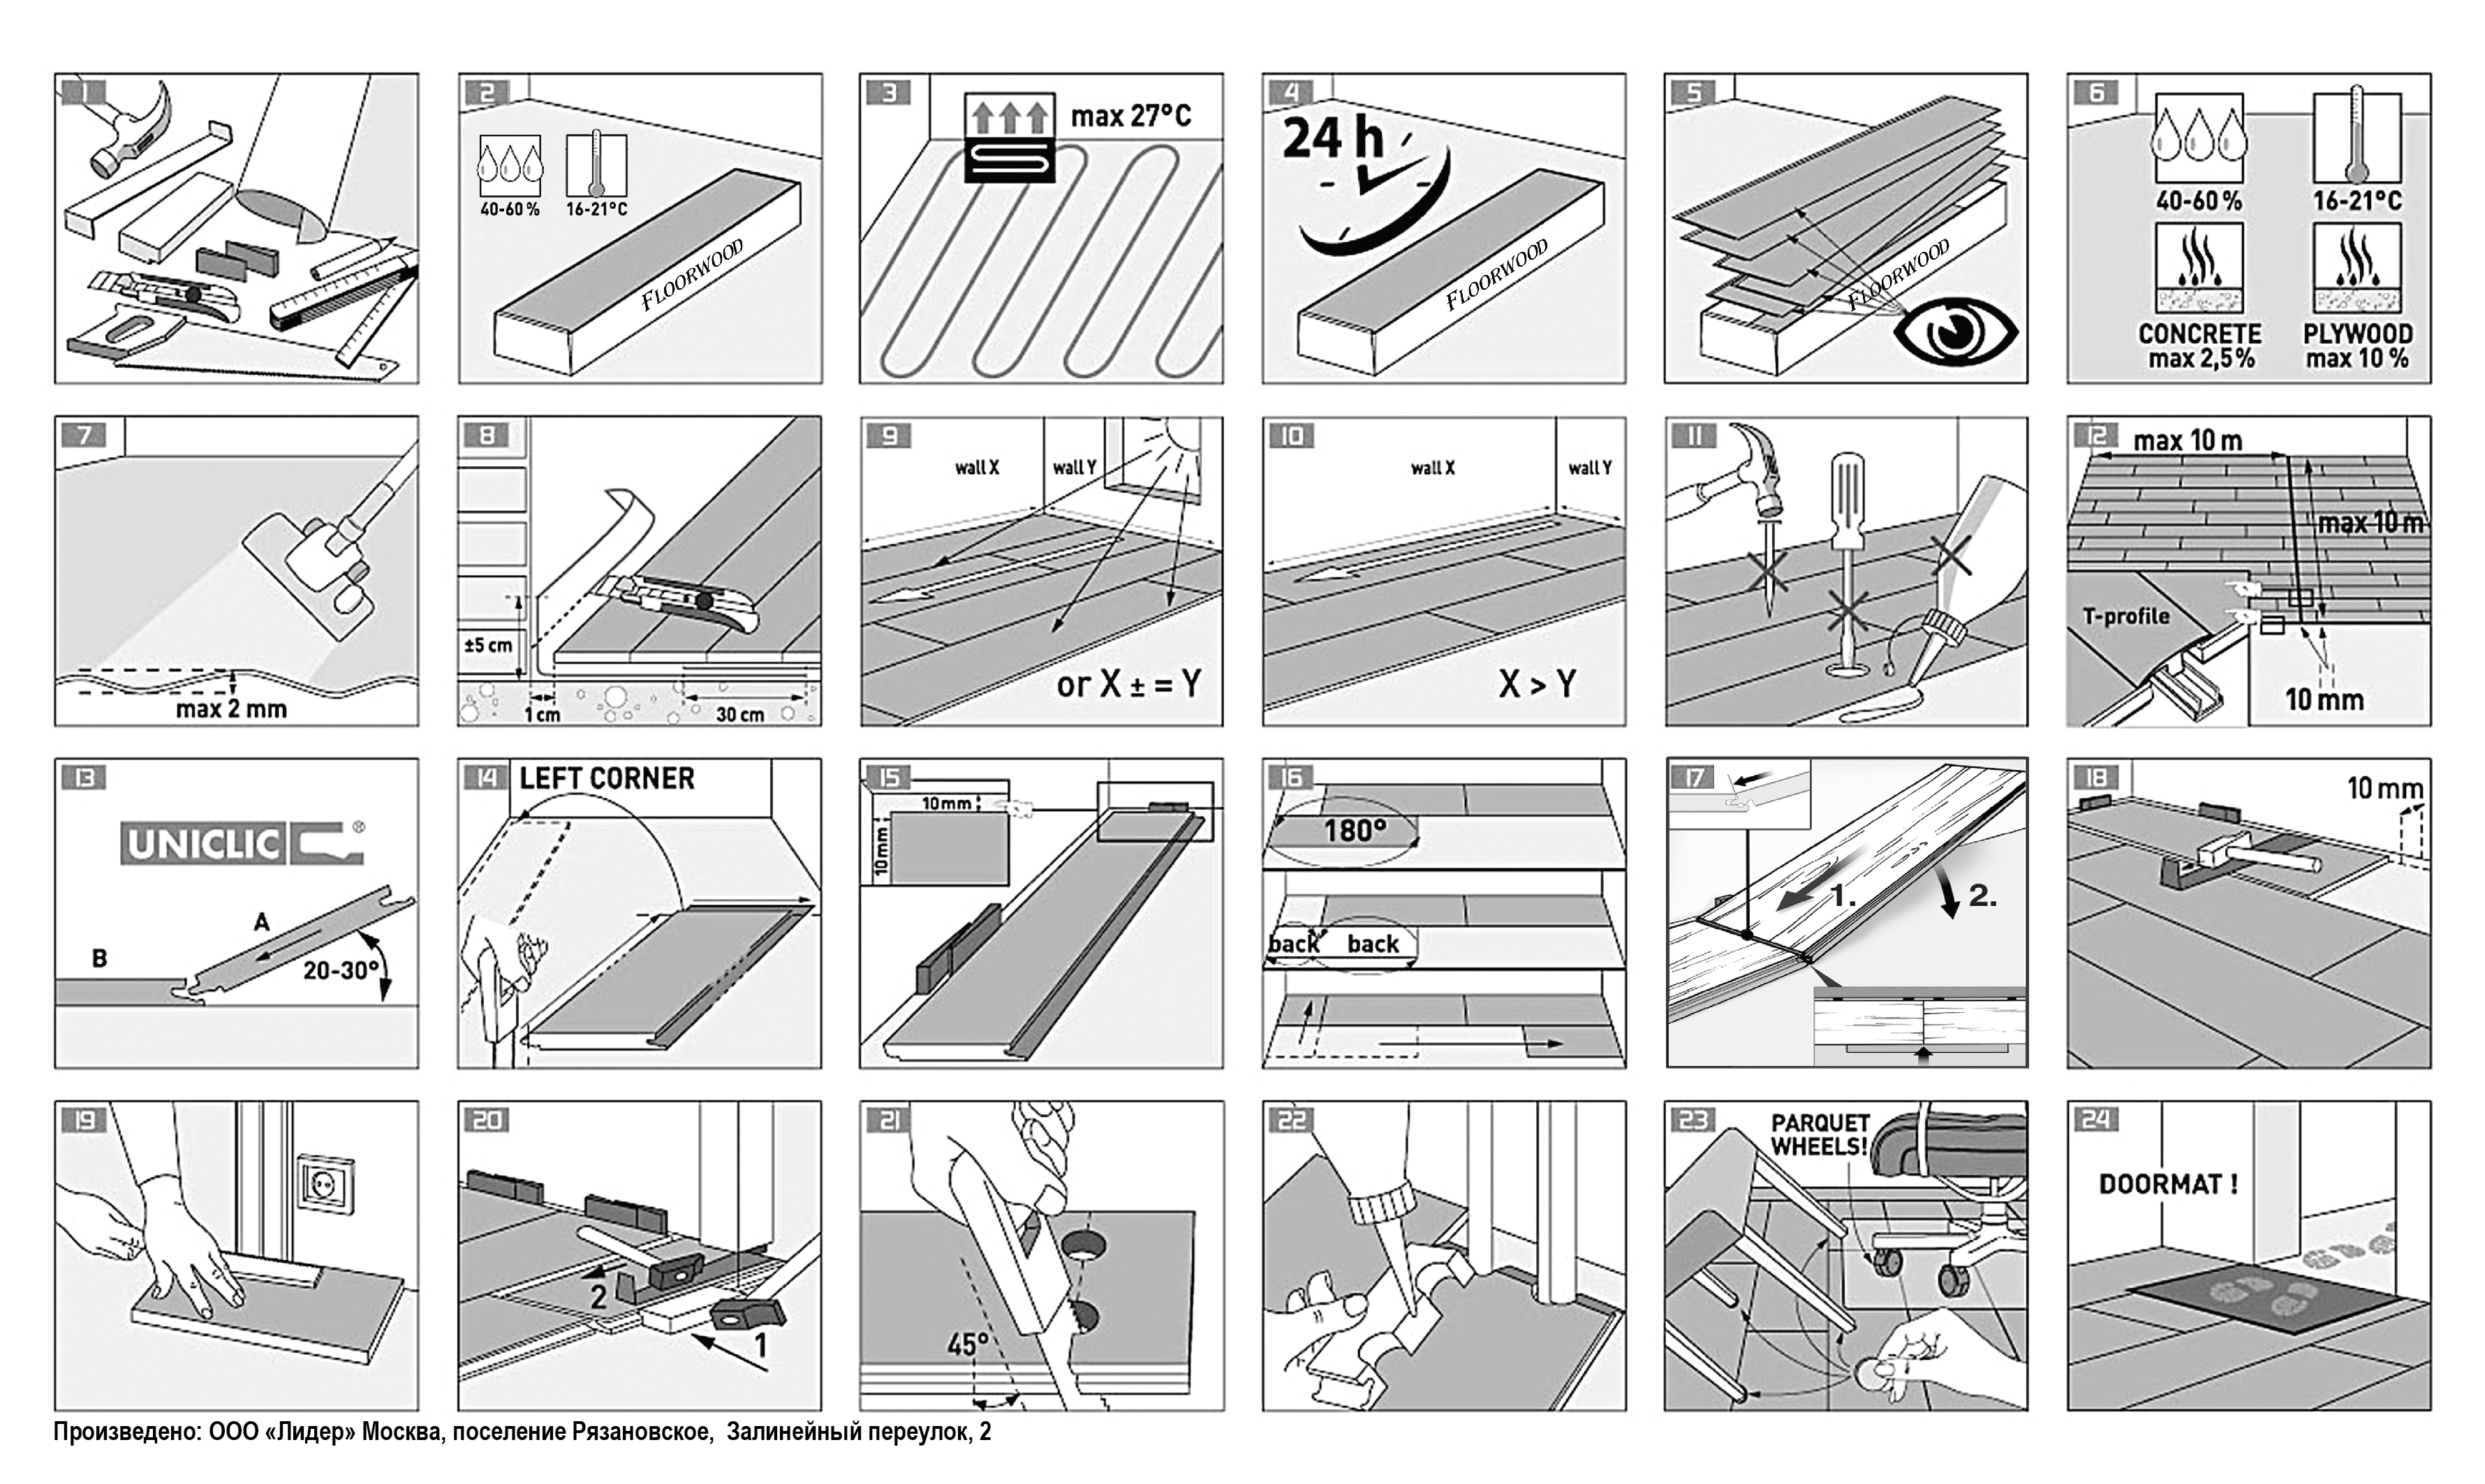
Preparing for laying laminate flooring
Priming the floor before laying the laminate is mandatory with a concrete base. Before priming, the concrete surface must be thoroughly cleaned, leveled and dried. To achieve the desired adhesion, the primer is applied in two layers, allowing the first layer to dry well.The primer penetrates deep into the concrete by 15 mm, filling and clogging the pores, so that the surface becomes stronger, the possible appearance of mold is excluded and an obstacle is created for the penetration of moisture.

An effective and fairly easy method of leveling the floor is a semi-dry screed.
The screed is needed to perform such important functions as:
- final leveling of the floor;
ensuring the rigidity of the base under the laminate; - uniform distribution of the load on the future floor;
- hiding pipes, wires, electric floor, etc.;
- creation of additional heat and sound insulation.
Screed can be done in several ways. An effective and easy method is a semi-dry screed. The main components are sand and cement. Water is added minimally, so the mixture is thick. But the composition of the semi-dry screed includes fiber and plasticizers. A semi-dry screed has the following advantages: it dries quickly, creates a perfectly flat surface, thanks to microfiber fibers, a high-strength, monolithic and durable surface is obtained. Laying laminate on a semi-dry screed is guaranteed to ensure long-term safety of the floor covering.
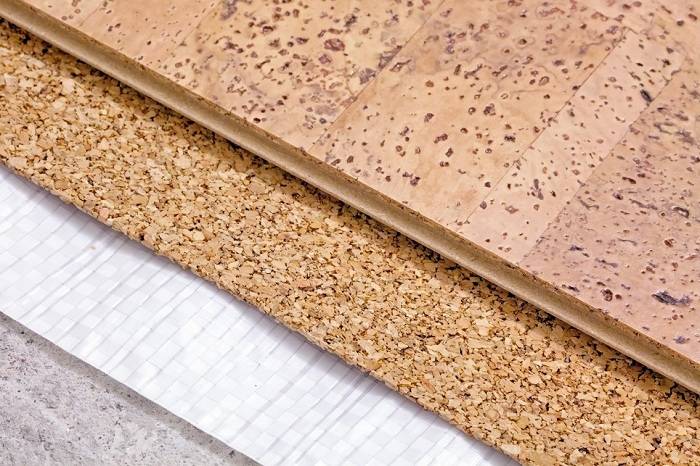
The underlay under the laminate smoothes the screed and eliminates the noise and creaking that occurs due to the friction of the reverse sides of the lamellas and the concrete or plywood base.
It also performs the function of a damper: it dampens the vibrations that arise from people walking on the floor. Without a backing, these vibrations will gradually damage the joint locks.

Substrates are made of natural cork, foamed polypropylene, expanded polystyrene, needles
The substrates are made of different materials: natural cork, foamed polypropylene, expanded polystyrene, needles, foil.The minimum recommended substrate thickness is 2 mm. When laying laminate on a concrete floor with an underlay, it is recommended to first stretch the plastic film.
Coniferous or cork substrate under the laminate are natural and suitable for rooms with low humidity. These substrates are laid on a completely dry surface and require especially careful waterproofing. In particular, it is enough to lay the film under the substrate so that it extends 2–3 cm onto the wall.

Coniferous and cork substrates need good waterproofing
Completion of work and installation of skirting boards
The final step is to clean all the wedges and cut off the protruding parts of the lining. The peculiarity of the floor plinth is that it is attached only to the wall. If the walls in the room have some irregularities, then it will be appropriate to use the plastic version, and if they are even, then wooden skirting boards can also be installed.
After finishing work, it is recommended to equip the legs of all furniture with felt pads to prevent damage to the coating, and also to avoid getting a significant amount of moisture on it.
We invite you to watch a video that shows 7 main mistakes when laying a laminate with your own hands.
Laying technology
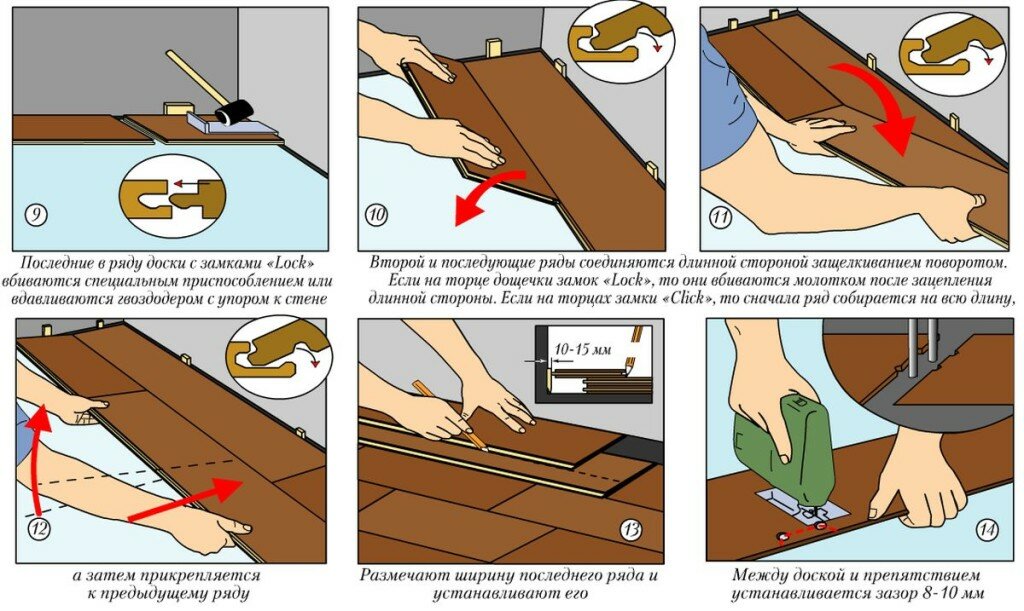
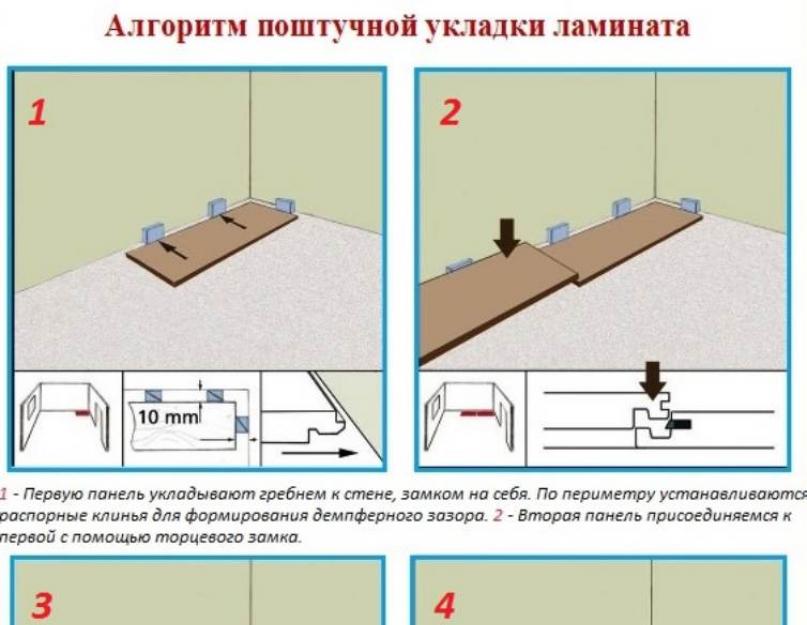
The laminated floor is covered from the far left corner of the room. The panels are laid so that the protruding part looks outward. The end and longitudinal joints are sealed, the adhesive residues are carefully wiped off. They act somewhat differently if they work with locking joints.

Laminate with LOK and CLICK locks, and features of their installation
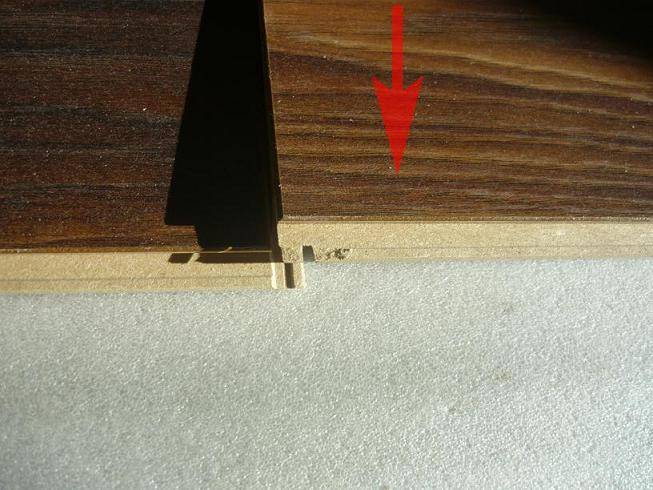
The essence of the lock technology is the presence of a spike, which, with little effort, enters the groove of the adjacent panel, snapping the connection, forming a single whole. Now this method is obsolete, as a new type of lock has appeared.
The differences are as follows:
- LOK. There are two mounting methods. The first involves the articulation of elements with an overlap. The second is when two adjacent plates are placed side by side. With gentle blows of the hammer on the liner, they make sure that the spike enters the groove until a characteristic click.
- CRY. When installing the next strip, it is necessary to place it on the protruding part with an edge, and without removing it from the groove, lay it horizontally. The lock snaps into place by itself, and there is no need to use a hammer, except to make sure the connection is tight.
Video how to lay a laminate with a CLICK lock
The video will be a good help for everyone. From it, directly from the master, you will learn how to properly lay, in what sequence, and what is needed for this. For example, the video shows that the underlay is sold in rolls, and is laid in strips directed perpendicular to the laying lines of the laminate.
Of course, the chances that the joints will match are small, but if this happens, the coating under load will sag along the joint.
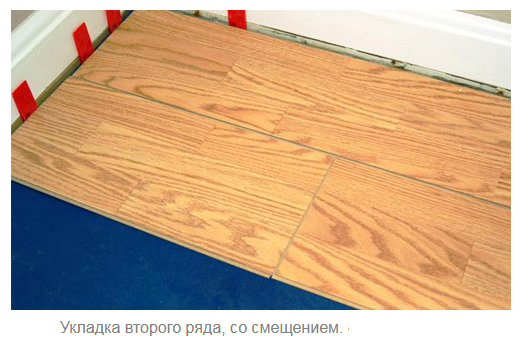
The sequence will also become clear when work is carried out from the far left corner towards itself. It is necessary to drive the first strip to the opposite wall, and then repeat the procedure, but retaining the "dressing". This can be done according to the masonry principle, when the joint of the next row falls in the middle of the previous one. A consistent displacement of the joints by 20-15 cm is also allowed, which forms a kind of "herringbone".This option looks great when the texture of the laminate imitates a shipboard.
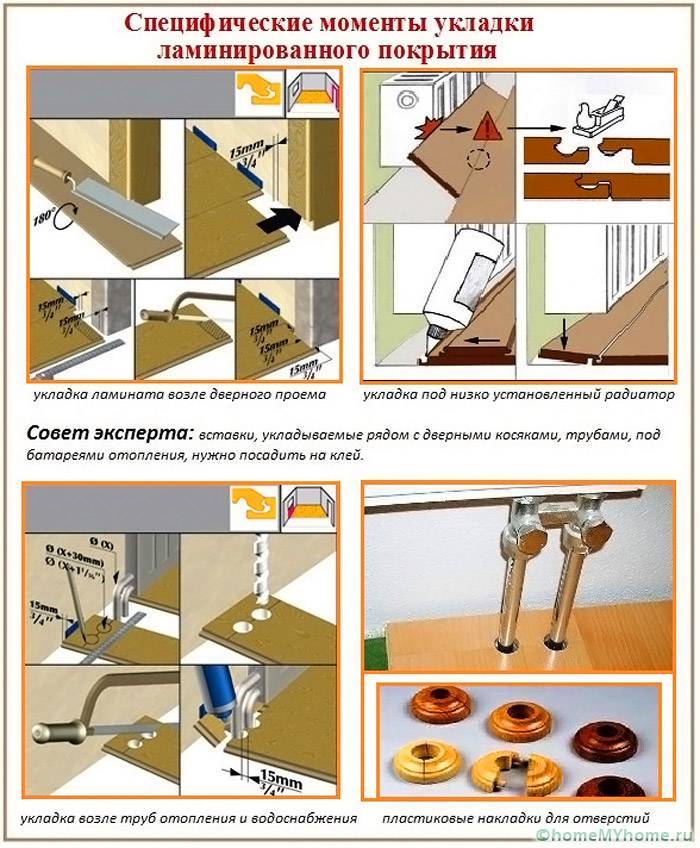
Laying laminate near pipe and door protrusions
To prevent the riser from violating the integrity of the interior, it is necessary to lay a laminate around the pipe. To do this, attach a panel to it, mark the place of contact. Draw a perpendicular line. Measure the distance from the wall to the axis of the pipeline, transfer the markings to the laminated surface. Drill a hole with a diameter larger than the pipe by 1-3 mm.
Allow the lane along the line drawn at the beginning. Lay most of it according to the technology described in the instructions. The smaller one will have to be put on the glue butt-to-butt to make the element look solid. And to hide the resulting gap, buy a special plug that is put on the pipe, placed on the laminate, closing the gap between them. And it is necessary for normal thermal deformation when the air temperature in the room changes.
In the case of doors, the situation is different. It is necessary to make sure that the laminated element is applied flush to the door frame. It is better if there is a cutout in the hole, into which the laminate will enter, which will completely hide the gap.
If there is no threshold with a difference in height, it is better to cover the joint with the flooring of the adjacent room with a special profile. And if you need a rigid fastening, I use clamps, as the master does in the video.
Laminate installation step by step
Before laying the floor, windows are inserted and glazed, work is completed that can lead to contamination of the finish. Heating must be started and pressure tested to avoid leaks on a coating that is unstable to water.Humidity in the room should not exceed 60%. Materials are stored at room temperature for at least 2 days.
When laying laminate flooring, work is carried out according to step-by-step instructions:
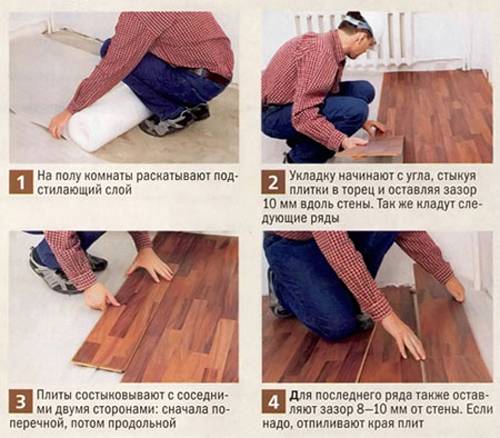
- Prepare the base by dry or wet screed. The surface must dry well.
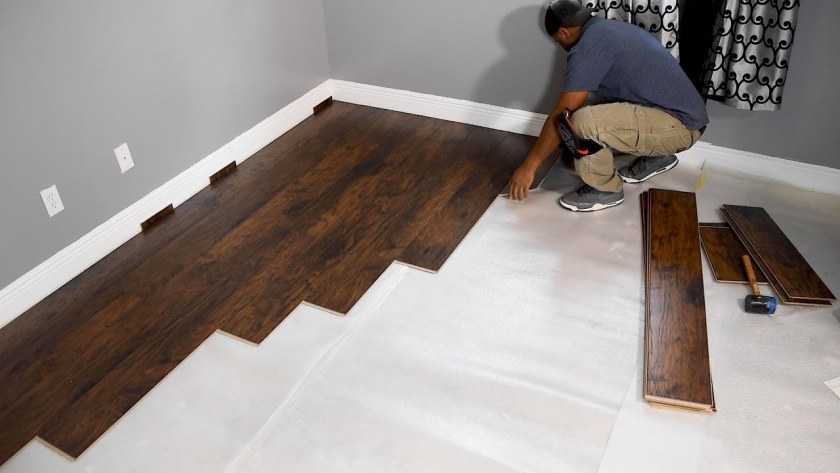
- A polyethylene film is laid on concrete floors with an overlap of 20 cm or more, the joints are glued with adhesive tape. Vapor barrier is not mounted on organic coatings.
- From above, a shock-absorbing substrate up to 3 mm thick is spread. The direction is perpendicular to the laminate boards.
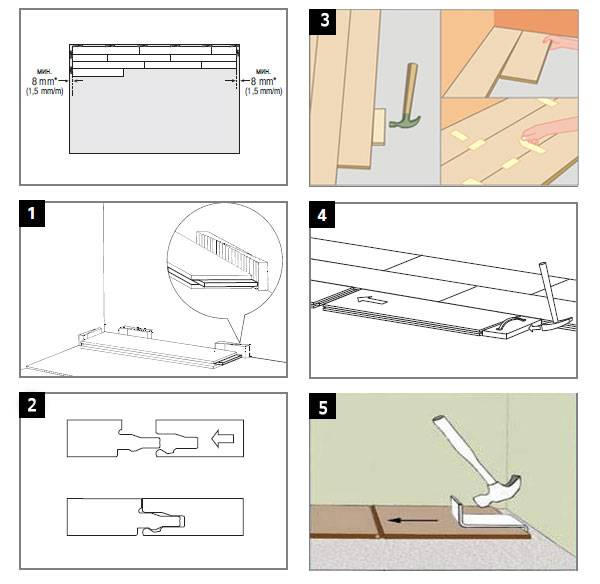
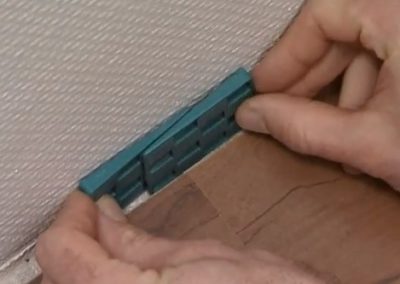
- The first row of plates is laid along the wall farthest from the entrance, observing a minimum gap of 8-10 mm. For this, wedges are installed in increments of 50-60 cm. The comb is turned to the wall.
- The last board in the row is cut to the desired length. When sawing with a jigsaw or hand saw, the decorative side is turned up, the circular side is turned down.
- Control the evenness of the laying of the row with a cord. If the joints are glued, the composition is applied to the ends of the plates and pressed. The excess is wiped off before thickening begins.
- The second row begins to be laid with the trim remaining after sawing. The shift of the transverse joints should exceed 30 cm. If the piece is smaller, cut a new board. An expansion wedge 10-15 mm thick is installed between the wall and the ends of the extreme plates.
- Rows are sequentially assembled, first joining the lamellas along the end lock, then along the longitudinal one, inserting the crest of the product into the groove. If necessary, use glue, if the instructions provide for it. Rallying the parts with a hammer, enclose a piece of board.
Loads, such as laminate packages, are placed on the stacked rows. The last strip is cut to the size of the room.When sawing the plate near the opening, a rounded corner is formed so that when installing the door trim, a gap does not form in the floor. Holes for pipes are drilled with a diameter exceeding its cross section by 20 mm, and the gaps are closed with plastic fittings.
For all adjunctions to the wall, a deformation gap of 8-10 mm is observed. After assembling the laminate and drying the glue, the wedges are removed, the plinth is mounted. Connections to the door threshold or floors of neighboring rooms are masked with overlays. A properly assembled coating does not have cracks and cracks, it serves at least the period specified by the manufacturer.
Features of finishing walls with laminate
Thus, it is quite possible to mount the laminate on the walls. The main thing is to adequately evaluate all the pros and cons and make an informed decision. The recommendations below will help you make your choice.
- Laminate is a wear-resistant material, but it is still recommended to put one that has a good class on the floor. But on the walls you can fix the thinnest - the impact on it will still be much less than on the floor.
- You should not hang laminate on the walls near the batteries - in this place of the room it is better to choose a different finishing option. Hot air during the heating season will adversely affect the condition of the lamellas and may render them unusable.
- In any case, the walls must be leveled before installing the laminate, if they do not have a perfectly flat surface. However, everything here will largely depend on the method of fixing the coating. Also, the masters note that this finishing option helps in some cases to hide defects and irregularities of vertical surfaces.
Photo of laminate on the wall
The main advantage of the material, which I would like to note, is the possibility of its installation without the involvement of craftsmen.Most people are able to cope with the task of fixing the laminate to the walls themselves.


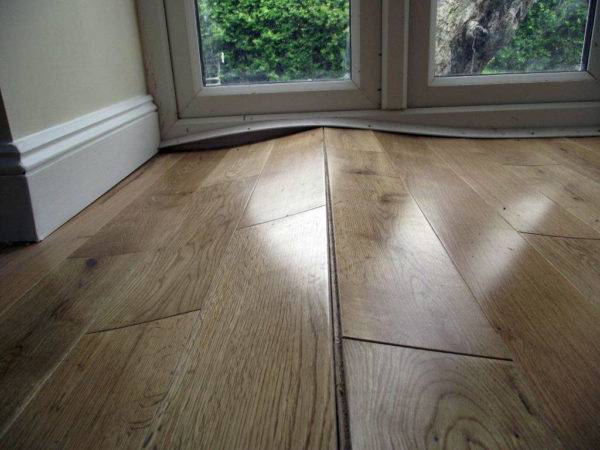
Laminate on the wall can be seen quite rarely. This material has long been recognized as one of the best materials for flooring.
The opinions of the masters regarding the possibility of laying laminate on the walls were divided. Some believe that the arguments in favor of this option are far-fetched, and the installation of the coating is pointless. Others believe that this is an excellent solution that has a place to be implemented. In any case, the owner will have to decide on his own.
Wall decoration with laminate
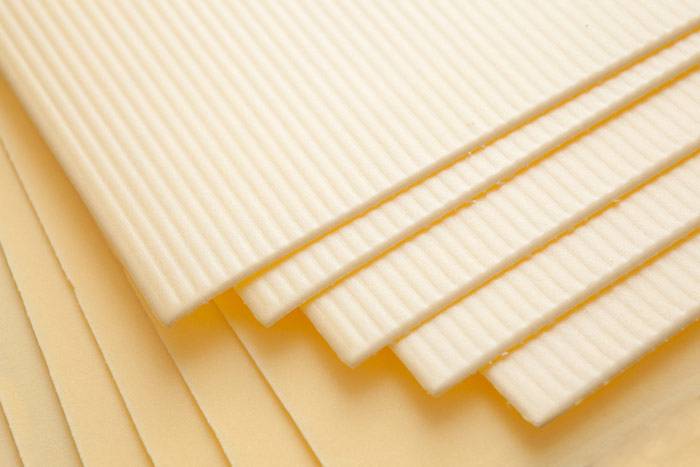
Underlayment for laminate flooring
Even if there are no irregularities on the floor surface, then differences that are invisible to the eye can form voids under the plane of the laminate. These voids lead to deflections, squeaks and inconvenience of using the coating. To compensate for differences and voids when laying a laminate, a special substrate is used, which levels the differences, and also additionally creates thermal and sound insulation.

There are three types of underlay available on the market – polyethylene foam roll, expanded polystyrene sheet and cork roll underlay. According to its performance characteristics, the best option is to use a cork substrate or a polystyrene foam substrate. The foam polystyrene substrate has a minus in the form of the need to fasten the sheets together with adhesive tape to form a single surface. The disadvantage of the cork substrate is a slightly higher cost.
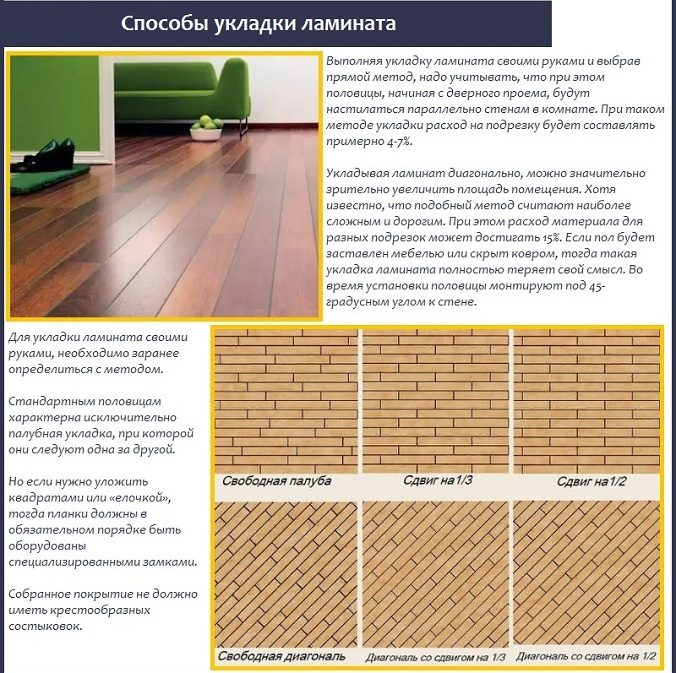
In what cases and how best to lay a laminate
There are several ways to form laminate flooring. Boards are laid:
- across, relative to the source of natural light;
- along;
- diagonally.
In addition to traditional laying methods, there are also options for laying boards in a herringbone pattern (in this case, the boards are fixed at an angle of 90 degrees) or using the labyrinth method, when different lamella formats are combined.
Herringbone arrangement.
To decide how to lay a laminate - along or across the room, or maybe even diagonally, you should understand the features of each method.
Diagonally
Before proceeding with laying the laminate in a diagonal way, the owner should understand that this method is most often used only by experienced finishers, since it will be difficult for a novice builder to cope with mating adjacent panels at the desired angle (usually lamellas begin to be laid at an angle of 45 degrees with respect to to Wall).
In addition to the complex procedure for mounting panels within the framework of this technology, it is necessary to be prepared for increased material consumption and, accordingly, additional costs.
This method is used in the following situations:
- When the owner wants to get a non-standard, spectacular flooring. The combination of different installation styles at the transition points from one room to another in the apartment looks especially interesting;
- When two sources of natural light are provided on adjacent walls (in such a situation, laying boards along or across will not allow obtaining the integrity of the coating pattern);
- If necessary, visually increase the boundaries of the room;
- For finishing in L-shaped narrow rooms.
Along
The installation of lamellas along is considered the most optimal in terms of saving materials, as well as the most popular way of organizing flooring among finishers. The device for finishing the floor according to this method is available even to a novice builder.
This is the default option when the window is on a narrow wall. If the room is two windows on adjacent walls, this method of laying loses its advantages and other methods of organizing the coating should be considered.
Across
The transverse laminate installation method should be used under certain conditions. This usually concerns the visual perception of the flooring:
- If chamfers are provided on the lamellas, at the points of their connection, the texture of the pattern is emphasized in this way, which is why it is not worth trying to mask it by placing the boards along;
- The popular use of 3D patterns also works best when the slats are placed across the room;
- Boards with volumetric embossing, imitating a natural texture, should be placed across to the light source;
- If there is a need to visually expand a narrow and long room or corridor, the transverse laying method is also used.
In addition to the requirements of a visual nature, there are situations where the transverse laminate is required to ensure a long service life of the coating:
- In a situation where the location of large-sized furniture is possible only on the wall opposite the window. In order to avoid an increased load on one laminate board, laying should be carried out across;
- In places of the most frequent movement of residents, it is desirable to place the boards in the direction of travel, across the source of natural light.
Choice of insulation and substrate
As a substrate, you can use several options, they all have different prices, so you can choose for any budget.
- Jute lining.Quite an expensive option, but fully corresponds to the price in terms of its technical characteristics. It is fireproof, because it contains a fire retardant.
- The cork version does not contain chemicals, has excellent technical performance.
- Polypropylene. Not very reliable, inexpensive material.
- Expanded polystyrene insulation lasts a long time, withstands loads well.
- Coniferous material is environmentally friendly and safe.


All types of substrates are laid from the edge of the wall with a slight overlap, the roll type is laid end-to-end. When laying, you must remember - you can not stand on the substrate - the deformation will adversely affect the behavior of the laminate.


The main advantages and disadvantages of laying laminate diagonally
Pros:
- Suitable for rooms with complex geometry;
- Allows you to visually enlarge the space;
- A winning option with a minimum setting;
- Becomes a decoration of the interior of the room;
- Suitable for continuous floor finishing with lamellas, without joints and thresholds.
Interesting: modern designers use this type of styling to zone the room. This can be achieved by combining different textures and colors of slats in the same room.
Minuses
- Increase in consumables. This method requires an average increase in material consumption of 15% compared to horizontal or vertical lamella installation.
- If specialists are hired for laying, they will require a large payment for such work.
What will be required?
Laminate wall finishing is not difficult, but it may still require certain equipment. The mandatory set, which may vary depending on the type of installation chosen, includes:
- perforator;
- mallet;
- jigsaw;
- screwdriver;
- spatulas;
- measuring devices;
- building level.
You will also need the laminate itself and glue if the adhesive fixation method is chosen. In some cases, the need for spatulas can be avoided if liquid nails are used. They are, as a rule, packed in a special tube, from which they are squeezed out directly onto the wrong side of the lamellas.
Wall decoration with laminate - photo
Basic rules for laying laminate flooring
High-quality flooring is possible only with proper preparation of the base for it. Installation can be done on ceramic tiles, concrete or wood or other solid and even floor.
If this indicator is exceeded (using the building level), it is necessary to level the floor. Depending on the base material, this is done with the help of an additional coating of different materials (leveling liquid, OSB boards, plank flooring). Before installation, the base must be absolutely dry and free of debris and dust.
When performing work, the following factors must be taken into account:
-
direction of the light flux;
-
placement of furniture in the room;
-
the structural texture of the laminate: the presence of embossing (simple or in register) or chamfer.
- To hide the connecting seams between the lamellas, their long side is laid parallel to the light flux in the room. If the stacker is right-handed, the far right corner is traditionally the start of the installation. For a left-hander, the layout starting from the far left corner of the room will be more convenient.
- If the geometry of the room suffers, it is better to use a diagonal laying pattern that will mask this drawback.
- Installation of laminate with chamfer and embossing is carried out in rows located perpendicular to the luminous flux.
- When performing work, it is necessary to control the gaps between the locks.
- The cutting of the planks for the divergence of the joints of the locks must be done taking into account the minimum length of 40 cm, otherwise the lock connection loses its strength.
- On the packages, manufacturers apply the installation diagram, which makes it easier to work and know where and where.
Why laminate? Material advantages
Every year the increasing popularity of the laminate is due to its attractive appearance, which is able to compete with many expensive materials. Drawings applied to the coating can imitate any texture without losing a decent appearance.
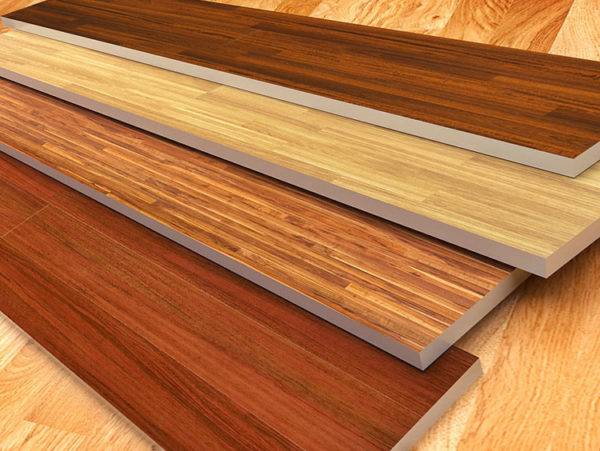 A wide range of laminate allows you to choose panels for any interior
Laminate is classified depending on its quality and operational capabilities. So, the most expensive and high-quality material belongs to the highest class.
However, in general, a laminate of any classification has the following advantages:
- strength,
- easy care,
- environmental friendliness,
- wear resistance,
- long service life,
- ease of installation.
 If properly cared for, laminate flooring can last for decades.
The minimum shelf life of a laminate with proper care is about 17 years. During use, the boards do not wear out, do not fade, do not lose their aesthetic and operational qualities.


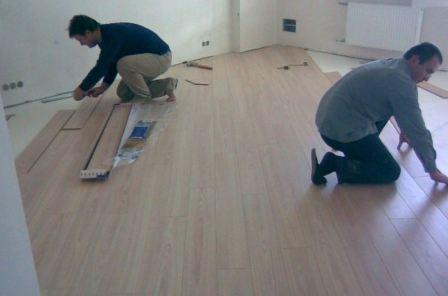
We lay the laminate with our own hands
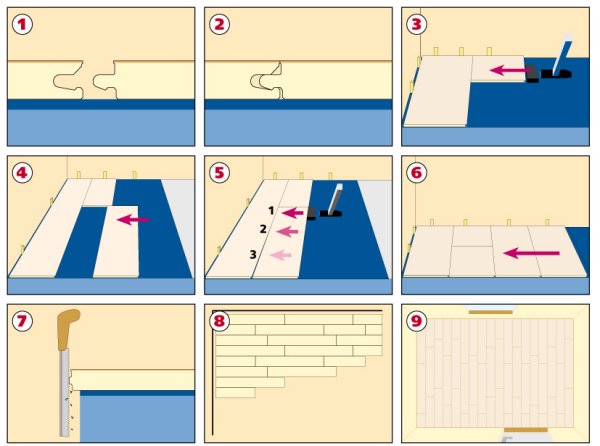
- After you have leveled the floor and decided on the choice of substrate, you can begin laying laminated sheets. You need to lay them end-to-end, gluing with electrical tape for later convenience.
- Pre-cut the comb and lay out the first row of boards. The lock of the board should be directed at you, and the cut off side should be towards the wall.
- We attach the next assembled strip of laminate boards to the first row.
- At this stage, we begin to expose spacers or spacer wedges around the perimeter. This is necessary in order to form an indent. The distance between the wedges should be twenty-five centimeters, and the gap between them should not exceed the width of the plinth.
- According to the same scheme, we lay the remaining strips of laminate. And in order to get a laminate under the door, you need to file two racks of the door frame from below. Moreover, the saw cuts must match the thickness of the laminated panel.
The nuances of laying adhesive laminate
Its main advantage is the reliable protection of joints from moisture ingress, due to which the operational life of such a coating is significantly extended. Minus - complex installation, additional costs for glue. Due to the rigid fastening of the panels to each other, the coating cannot be subsequently dismantled for further use in another room. Adhesive laminate is not recommended to be laid on a heated floor.
It is extremely important to observe the recommended distance between joints
When installing this flooring, glue is applied to the ends of the sheets, which has water-repellent properties. Sheets are connected according to the tongue and groove principle.
Residues of glue should be removed with a damp cloth. After laying three or four rows, you need to take a 2-3 hour break. Then we continue the process until the surface is completely laid. When laying the last row, it is worth using a crowbar to connect the rows. But they should work carefully so as not to damage either the panel or the wall.If the floor is crossed by heating pipes, it is worth making a paper template that is transferred to the sheet to be installed. All necessary holes are cut with a jigsaw. You should not forget about the need for gaps between the sheets and the wall, the sheets and the door.
 Installation of expansion wedges between panels and wall
At the end of laying, all spacer wedges must be removed, and the gaps must be “hidden” under the plinth. The plinth is attached to the wall, not to the floor.
How long will laminate flooring take?
It is very simple to perform an accurate calculation of the number of boards required for work with the classical method - it is enough to find out the ratio of the total area of \u200b\u200bthe entire room and the area of a single board.
At the same time, first lay out large panels and cut them at the end to the desired size, then, in the second row, you will need to put whole panels, in addition to the last one - it is carefully cut to reach the desired size. Do the same with the third, and with any next step.
In general, the laying principle will practically not differ from that of direct installation - with the only difference being that the trimmings will be triangular, and initially the amount of material should be prepared more. So, the amount is calculated from the area of \u200b\u200bthe room, however, it will be necessary to add approximately 15 percent of the amount of material for additional waste. For particularly experienced installers, this number can be reduced to 5 percent, with averages around 10 percent.
How much laminate do you need to lay diagonally
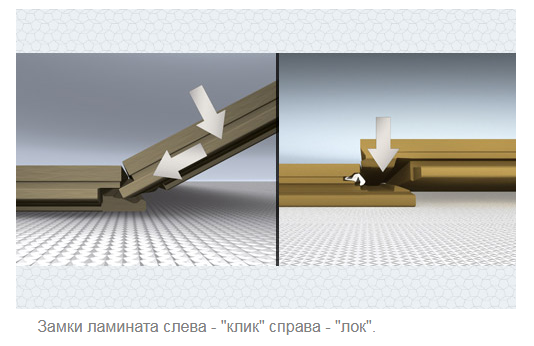
Castle features
The vast majority of laminate flooring comes with two types of locks on the transverse faces: conventional
and easy to assemble (the so-called "Quick-step").
Conventional locks are latched by connecting the ends at an angle and then lowering one of the panels. Such
the flooring is assembled in rows: first all the transverse seams in the row are connected, and then the assembled row at an angle
snaps to the already laid canvas.

Easy-to-assemble panels are mounted one at a time: a longitudinal seam is connected at an angle, then the plate is lowered and
snaps into place with the previous one. Such a coating can be collected both in rows and in a ladder.

There is information on the Internet that there are cross locks of the “LOCK” type - they supposedly snap into place
position, by tapping a row from the end. From my own experience and the experience of my colleagues, I can say that I don’t have such locks.
met. It is possible that such castles exist (existed), but I am inclined to believe that someone
wrote nonsense, and others simply stole it. Unfortunately, this kind of thing does happen.
Often, for panels with ordinary locks, in the attached instructions, you can find such nonsense: a row is assembled without
connections of transverse locks, and then with the help of a clamp and a hammer, these locks are connected. However, in reality
the design of the lock does not allow this. As a result, when trying to connect the transverse seams, either locks break,
or clamp stop. This suggests that it is not always possible to trust the manual from the manufacturer, especially
inexpensive.


In the variants described above, the longitudinal locks are connected in the same way: at an angle, followed by lowering. Very rarely
there is a laminate with more complex locks. Mostly they are found in square dies, which are assembled
without running up subsequent rows.Such locks are assembled in the same way, at an angle with lowering, however, to lock the lock
it is necessary to lower the attached panel below the previous one. This can be done if you put it under the already laid
a small gasket, a few centimeters thick, such as a square.
The canvas with "complex locks" is assembled in separate panels: first, a transverse lock is attached, and then a longitudinal one.
Such locks do not fall apart when a row is slightly lifted to attach new dies.
Underlayment for laminate flooring
All ties, regardless of quality and high cost, have small bulges or cavities. In combination with even strips of laminate, this can provoke undesirable effects, such as: deformation, condensation, crease of the lock between the rails, as well as amplification of the sound from steps and squeaks.
To avoid such undesirable moments, additional materials are laid under the boards - substrates. Laying the footboard is not difficult at all, from the tools you need a construction knife and a ruler. Substrates, like laminated boards, are made from different materials, which will determine their cost and quality.
Substrate types:
- cork tree,
- bituminous cork,
- from styrofoam,
- from polyethylene foam.
Before laying the substrate, it is necessary to dismantle the old coating. If there is a need for leveling, use a special, easily spreading mixture.
The first two options are more reliable and expensive. They are treated with antiseptic compounds against mold and insects, and are not prone to rotting. They also absorb noise well, do not settle and retain their original shape for a long time. Expanded polystyrene is distinguished by its reasonable price and good quality.It can be used as an insulating layer, it absorbs noise well and keeps its shape. And the last, the most budget option, has moisture resistance, insects do not start in it and it does not attract rodents, but it squats rather quickly and does not hold its shape.
Additional use of laminate
Recently, laying a laminate on a wall has become popular, which is easy to do with your own hands. The material is cheaper than wood panels and more environmentally friendly than plastic or metal lining.


The sequence of actions will look like:
- Surface preparation. If the laminate is to be glued, the wall must be leveled and treated with a primer. When it comes to fixing to the frame, the preparation includes only the erection of a structure from wooden or iron slats.
- Start point. If you plan to cover the entire wall with laminate, work begins from the floor. If only the upper part is from the ceiling.
- Layer creation. When working with glue, the inner surface of the panels is lubricated with an adhesive, then the laminate strip is attached to the wall and fixed.
- Fastening to the frame occurs with the help of nails or clamps, with which the panel is stitched in the crest area at the points of intersection with the structure planks.
Laminate on the floor or wall allows you to emphasize the chosen color scheme in the interior, as well as create a warm atmosphere. Depending on the cost of the material, such a coating will last at least 7-10 years.


