
- Foundation laying
- Preparing a mortar for laying the furnace
- Choosing a place for the oven
- Mini oven project with stove
- Building materials and furnace fittings
- Laying progress - step by step instructions
- Foundation for the furnace
- Installation of furnace equipment
- Stove with hob
- The financial and economic aspect of building a Pompeian oven with your own hands
- The choice of location and type of foundation for the stove
- We make a stove with our own hands
- Location selection
- Materials and tools
- The process of building a stove
- Types of stoves for the home
- Russian brick oven
- Swede stove
- dutch oven
- Construction rules
- Firebox, shield and chimney
Foundation laying
Before folding the oven, it is necessary to prepare a solid base. The structure is quite heavy, so it is unacceptable to put it directly on the floors, even those filled with cement screed. The foundation of the stove is a separate structure, not in contact with the base of the building. If you are building a brick heater close to the walls or erecting a corner fireplace, you need to make an indent of at least 150 mm so that there is a minimum clearance of 10 cm between the foundations.
If the floors in the house are filled with a screed, then it is recommended to follow the following step-by-step instructions for installing the furnace foundation:
- Dismantle the section of the screed and dig a pit that protrudes beyond the dimensions of the furnace by 50 mm in each direction.The depth depends on the thickness of the upper layer of subsiding soil.
- Place a sand cushion 100 mm high and tamp it down. Fill the hole to the top with rubble stone or broken brick, then fill it with liquid cement mortar.
- After hardening, lay a waterproofing layer of roofing material and install the formwork protruding above the screed, as shown in the drawing.
- Prepare the concrete and pour the foundation slab. For strength, you can lay a reinforcing mesh there.
After 3 weeks (the time of complete hardening of the concrete mixture), lay a sheet of roofing steel on the finished base, and on top - felt impregnated with clay mortar or basalt cardboard. After that, you can start laying the body of the furnace.
Scheme of the base device for wooden floors
To correctly lay the foundation of the furnace under the wooden floors, use the same algorithm, only instead of a concrete slab, lay out the walls of red brick (you can use it) to the level of the floor covering. Fill the void inside with rubble or rubble and concrete from above. Further - a sheet of metal, felt soaked with clay and a solid first row of oven masonry. You can get more information on the topic by watching the video on the topic:
Preparing a mortar for laying the furnace
The solution for a home brick stove is a clay-sand mixture. Sand must be sifted through a sieve so that its mesh size does not exceed 1.5 mm. Clay at this time should be soaked in water for 2-3 days. It will not be superfluous to pass the finished solution through a sieve (3x3 mm). Each stove-maker chooses proportions for himself.
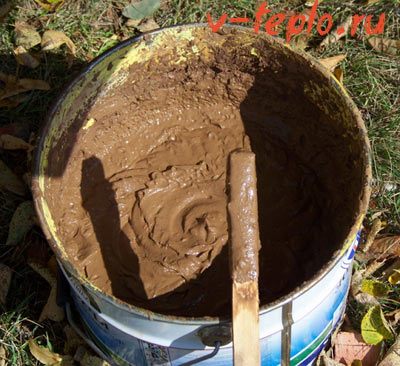
After mixing sand and clay, it is necessary to add water and begin to mix the resulting mixture until a density similar to fatty sour cream is formed.A high-quality mortar should be laid on a brick in a clot and smeared with a layer of 4-5 cm (recommended joint thickness).
Choosing a place for the oven
- The distance between the wooden structures and the smoke channel must be at least 37 cm
- To obtain good draft in the furnace, the chimney must be located in compliance with the minimum distance from the ridge - 1.5 meters and the minimum height above it - 0.5 meters
- If the pipe is located 1.5-3 meters from the ridge, then it can be brought out flush with it
- If this distance exceeds 3 meters, then the pipe may be lower, but between the slope and the line connecting the top of the pipe and the slope, there must be an angle of no more than 10 °
The foundation of the furnace cannot be combined with the foundation of the building, since each of them has specific natural settlement conditions.
The roof of the gazebo with barbecue should be as fireproof as possible. We conducted a comparative analysis of ondulin and metal tiles. Drawing a conclusion from this article, a metal tile is suitable for a gazebo with a barbecue.
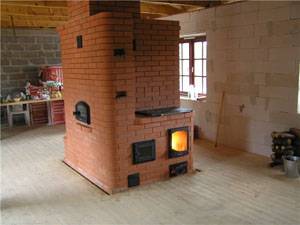
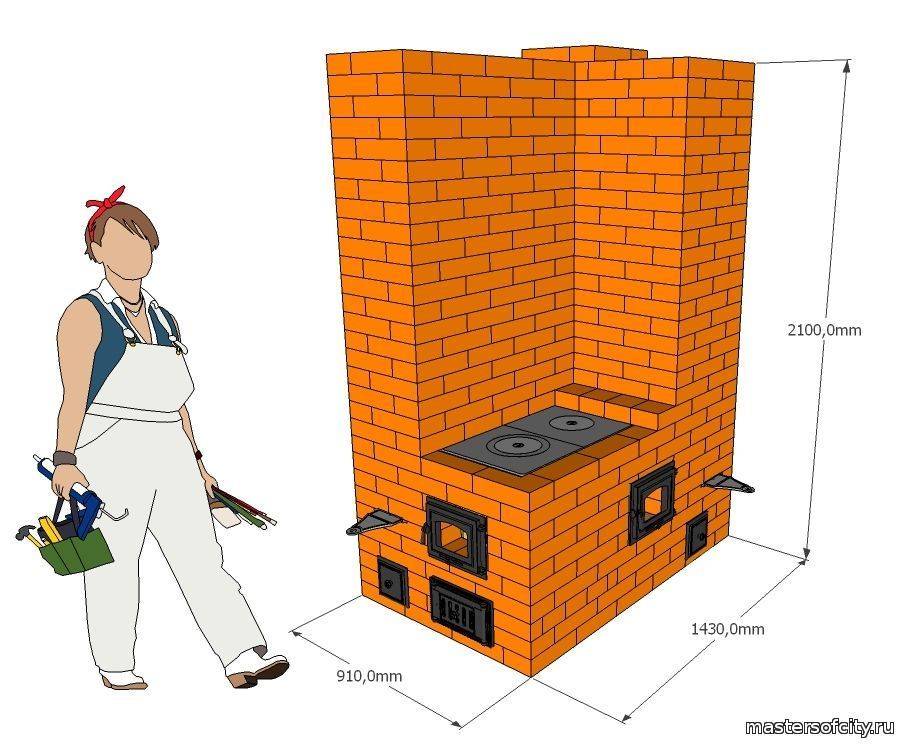
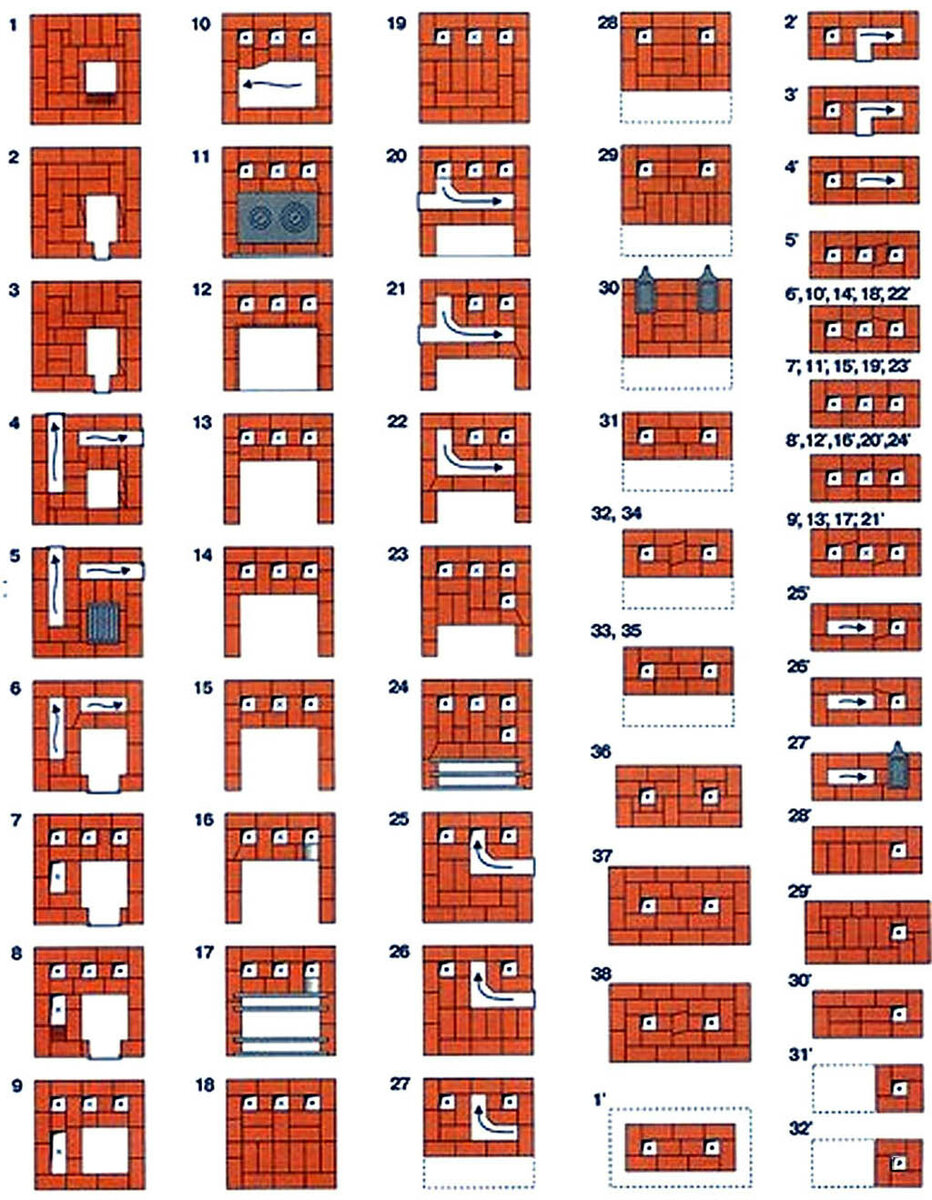
Mini oven project with stove
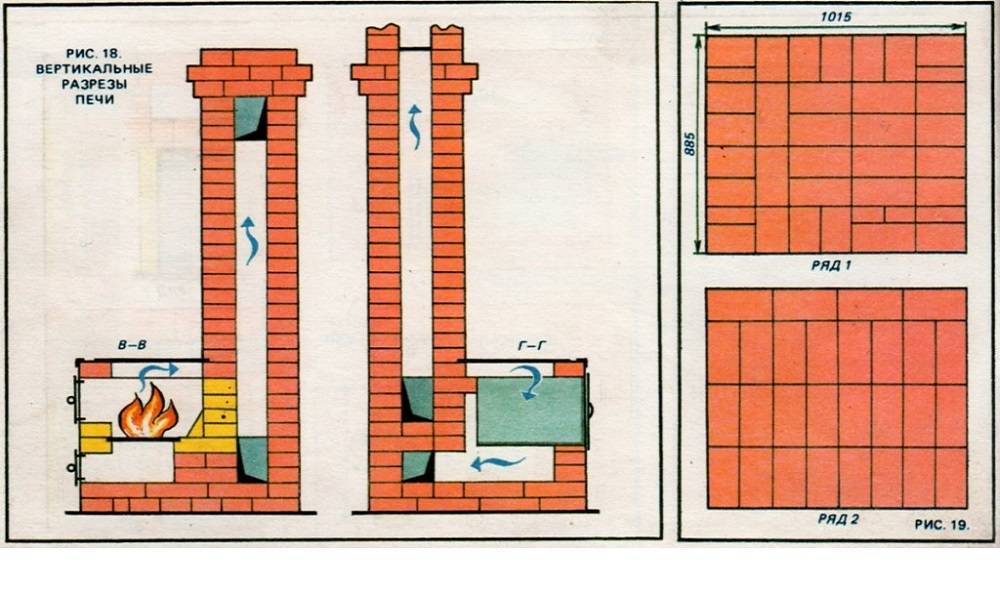
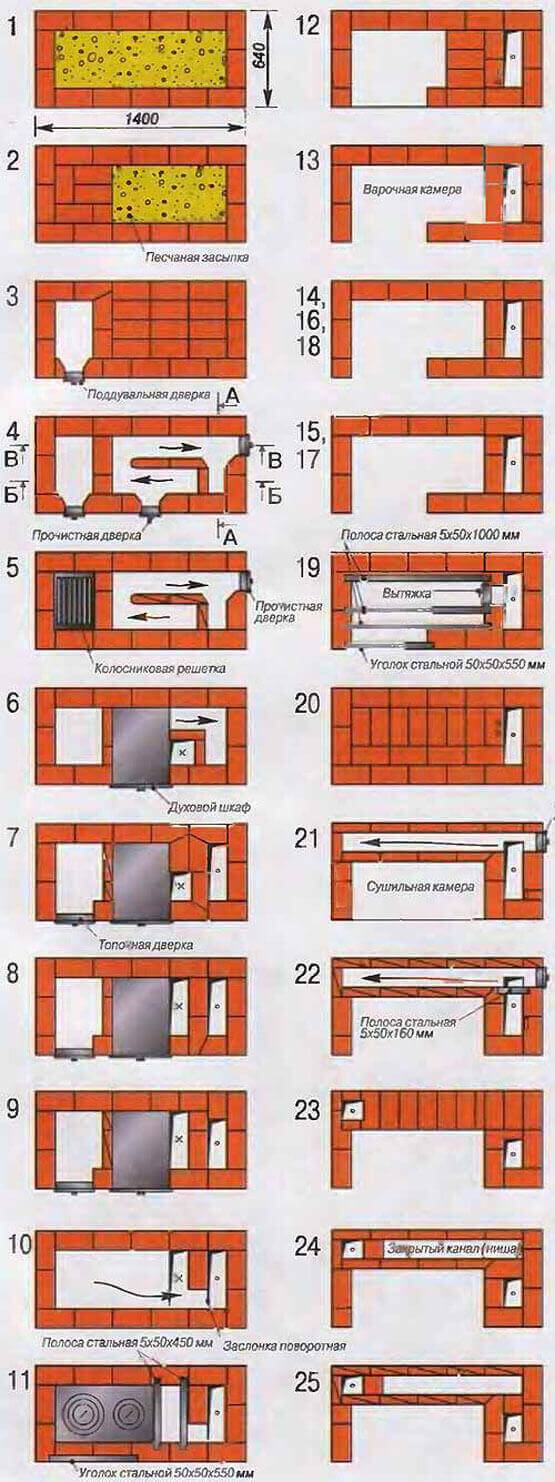
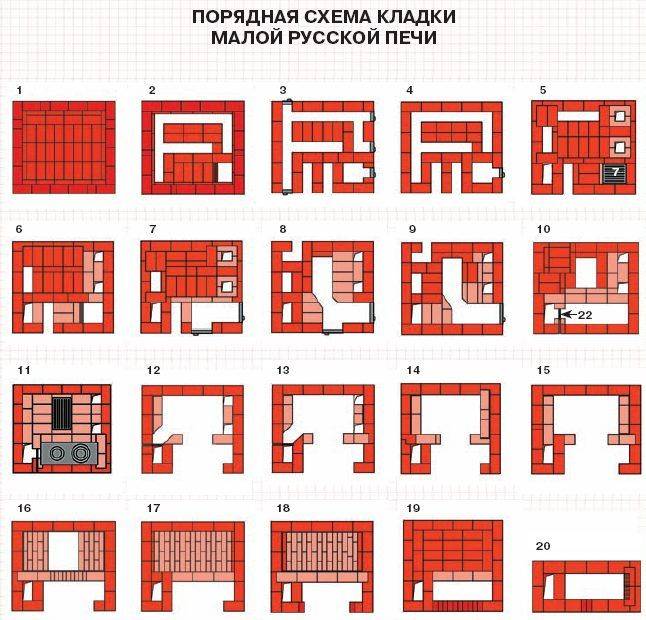
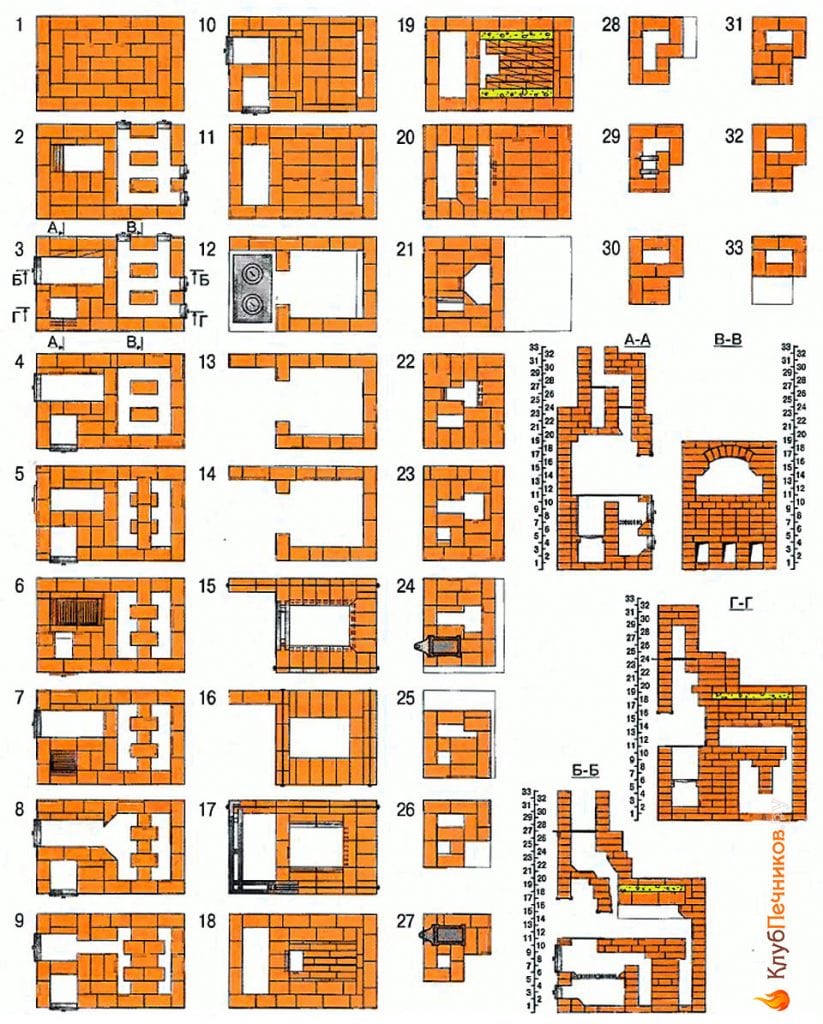
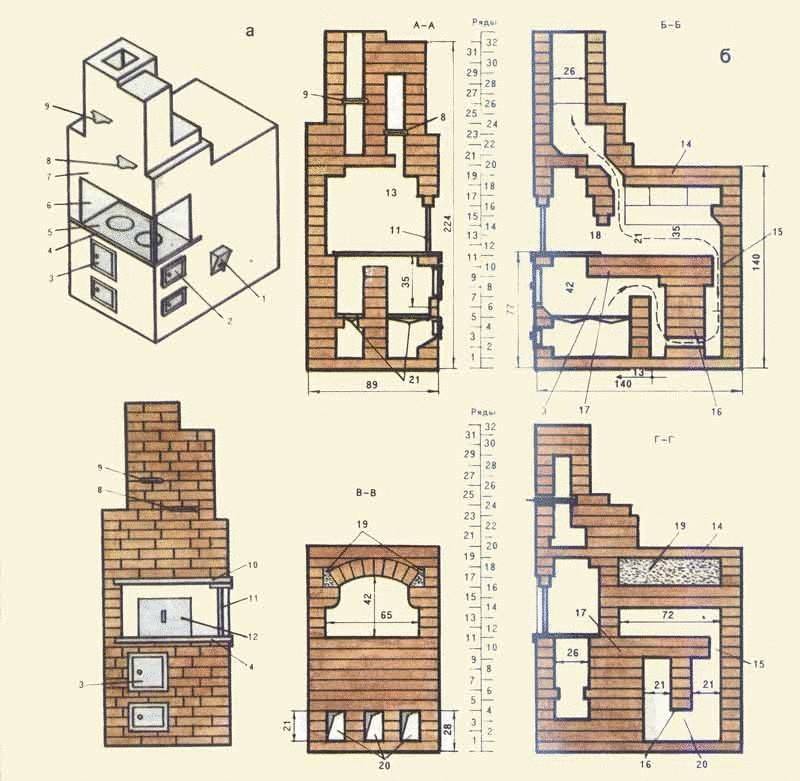
The Russian heating and cooking stove "Teplushka" with an additional combustion chamber has a power of 3.5 kW. The structure is designed for heating a small house or cottage with an area of 30-40 m², as well as cooking in winter and summer. The device of a small heater is shown in the drawing.
The mini-oven is capable of operating in 3 modes:
- Summer move. We open the valves 1, 2 and 3 (see the picture), we charge the firewood with firewood. The gases immediately go through the main channel into the pipe, the stove is heated. Damper No. 3 plays the role of an exhaust hood.
- Firebox in winter. We use the lower chamber again, close the valve No. 1.Then the combustion products move through the crucible and gas ducts in the under-furnace, exit through the channel to the front side and further into the main chimney. The whole body of the furnace is heated, from top to bottom.
- Firebox in Russian. We kindle firewood in the crucible, open the hermetic door of the mouth and damper No. 3, valves 1 and 2 are closed. The smoke goes into the highlo and the main pipe, only the couch is heated. For full heating, we close the door, open damper No. 2 - the gases will go through the lower channels of the stove.
Due to the efficiency and relatively low cost of materials, a mini-stove can be safely called a housekeeper. One minus is the small size of the couch. The maximum height of the building is 2.1 m, in the area of \u200b\u200bthe ceiling - 147 cm.
Building materials and furnace fittings
To make a Russian mini-oven with your own hands, you need to buy components and materials:
- solid ceramic bricks - 670 pieces (the chimney is considered separately);
- fireclay bricks for the firebox - 25 pcs. (brand ShA-8);
- fireclay block of the ShB-94 brand or similar in size - 1 pc.;
- door of the mouth of the main chamber 25 x 28 cm, it is possible with fire-resistant glass;
- loading door 21 x 25 cm;
- ash pan door 14 x 25 cm;
- two grates with dimensions of 300 x 250 and 220 x 325 mm;
- wooden template - circled - with a radius of 460 mm, length - 65 cm;
- cast iron hob for 2 burners 71 x 41 cm;
- 3 gate valves: 13 x 25 cm - 2 pcs., 260 x 240 x 455 mm - 1 pc. (brand ZV-5);
- equal-shelf corner 40 x 4 mm - 3 meters;
- steel sheet 1 mm thick for a shelf in a stove;
- galvanized mesh for reinforcement, cell 3 x 3 cm - 2.1 m;
- kaolin wool, corrugated cardboard.
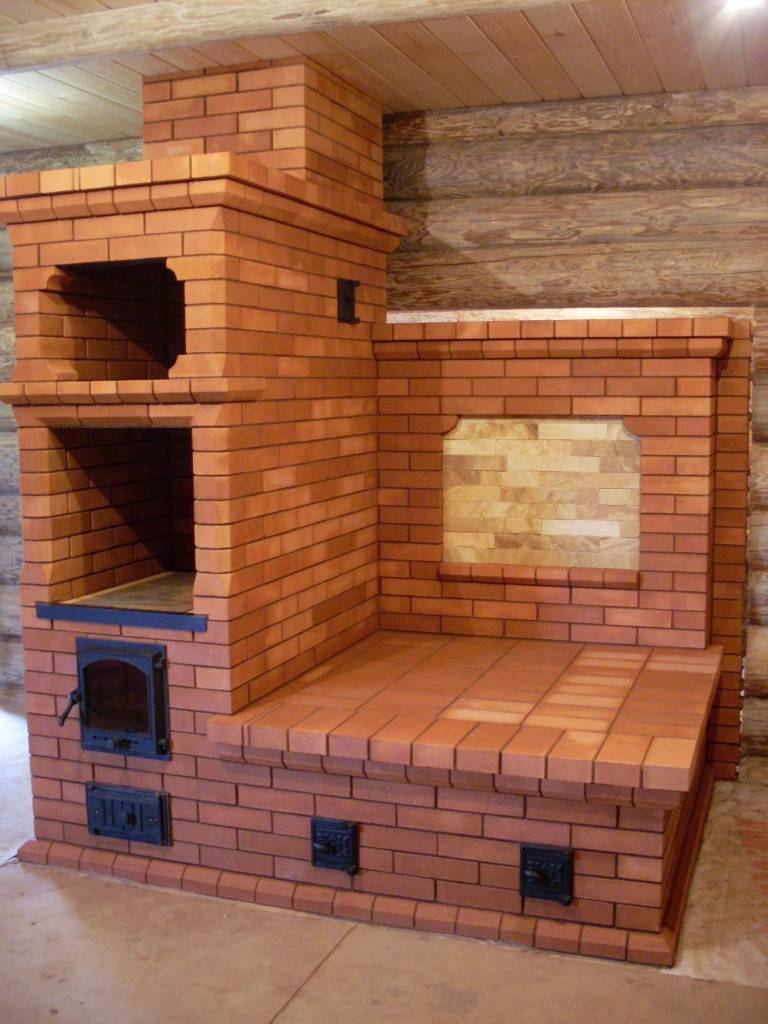
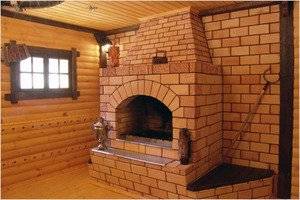
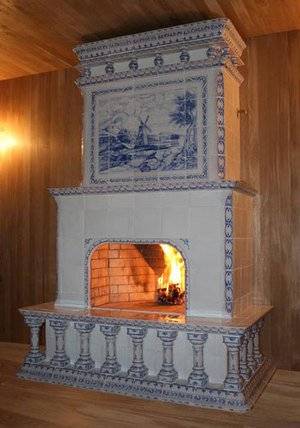
Appearance of the finished mini-stove for a country house
Red brick laying is carried out on a sand-clay mortar.When erecting a chimney, the addition of cement M400 is allowed. Refractory stones are placed on a different solution - fireclay, mortar and the like.
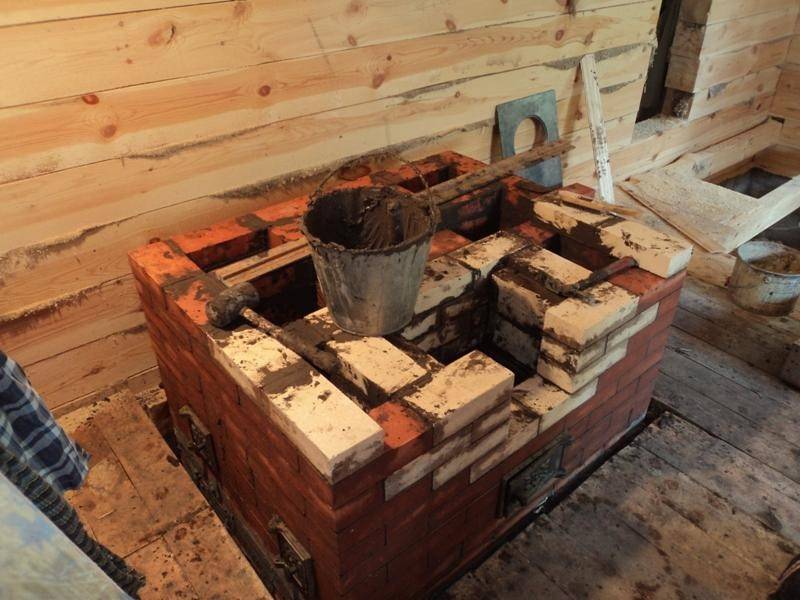
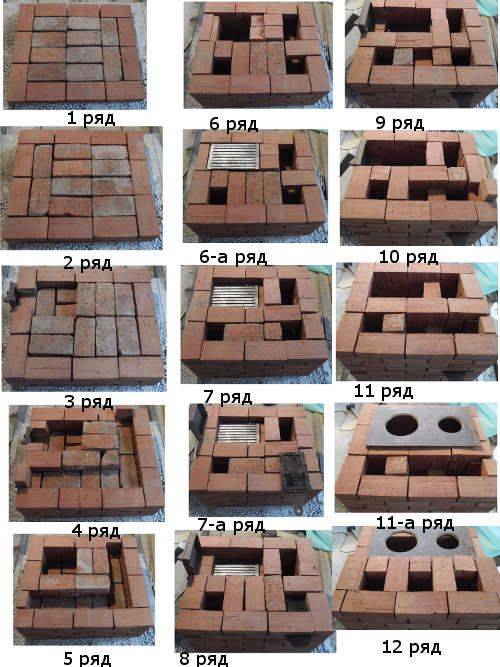
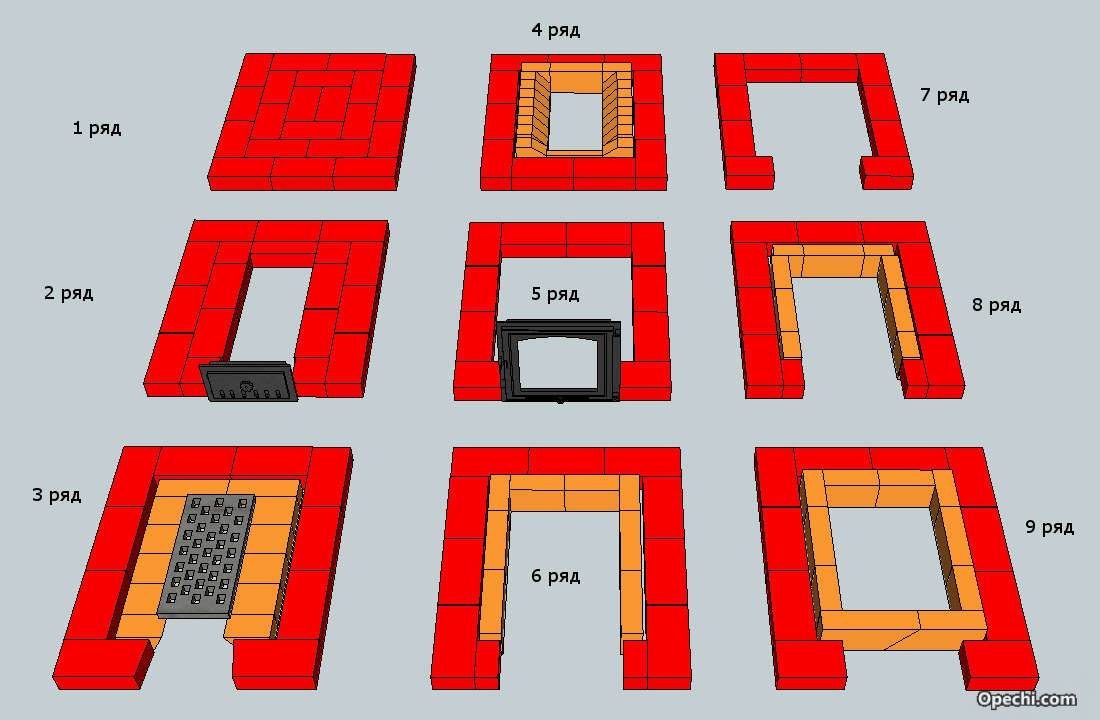
Laying progress - step by step instructions
A reinforced concrete or rubble concrete foundation is cast under the furnace, whose dimensions are 10 cm larger than the dimensions of the structure. Start construction when the concrete reaches 75% strength, under normal conditions, the curing process will take about 2 weeks. This implies an average daily air temperature of +20 ° C and proper care of the monolith.
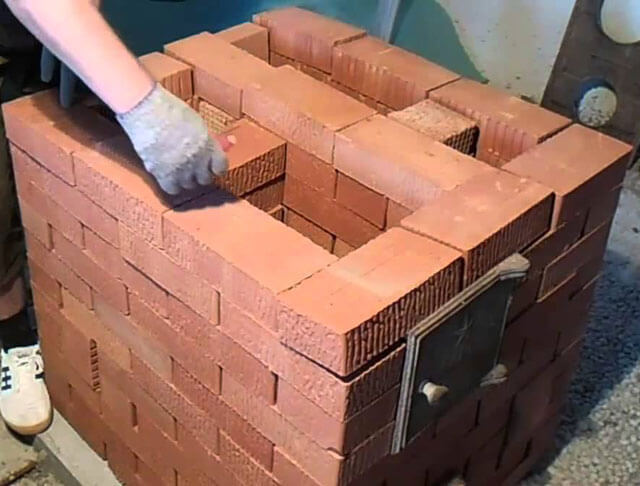
Having arranged waterproofing from 2 layers of roofing material, make the first row solid (40 bricks will be needed). How to fold the oven according to the order, read on:
On 2-3 tiers, an ash chamber is formed, a cleaning door is mounted and columns are built to support the bottom of the crucible. The 4th row continues the main walls of the stove, the ash chamber is covered with cut stones.
Rows 5-6 form the main smoke channel and the bottom of the firebox made of refractory bricks. The grate is placed without mortar, a row of fireclay stones placed on edge is laid on top.
On the 7th tier, a loading door and a vertical summer run valve are installed. 7-9 rows are stacked according to the scheme, at the end the fireclay brick is covered with kaolin wool (marked green)

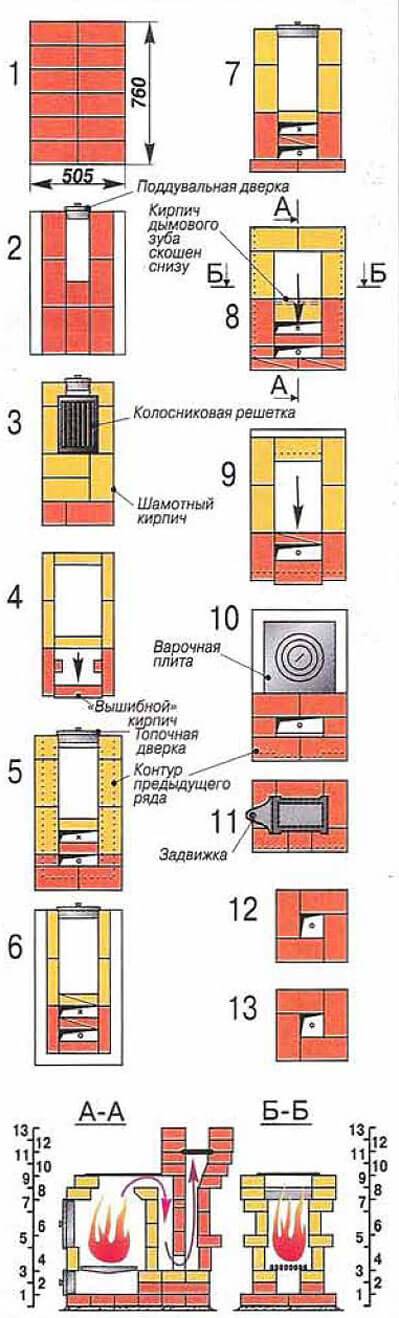


Please note: on the seventh tier, the reinforcement of the walls with steel mesh appears.
Rows 10 and 11 partially cover the gas ducts and the lower heating chamber, a grate for the crucible and a hob are installed. The 12th tier begins to form the main firebox, on the 13th tier a door is attached at the mouth of the crucible.
14-17 rows are laid according to the scheme, corners are mounted to cover the cooking opening
On the 18th tier, steel profiles are covered, an arched vault with a radius of 46 cm is built from wedge-shaped stones.
Tiers 19, 20 are made according to the scheme, the cavity between the vault and the walls is covered with sand or filled with thick masonry mortar. When the filler dries, 21 rows are laid - overlapping.
From 22 to 32 tiers, the front part of the heater is being built. On the 24th row, both smoke valves are placed, on the 25th - an iron shelf measuring 42 x 32 cm. Having laid the 29th tier, cover the stove with the same sheet.
To understand the construction to the smallest detail, we suggest watching a video with a detailed demonstration of the masonry of each row and the master's explanations:
Foundation for the furnace
The basis for a homemade oven is made at the time of construction, since a brick oven requires a strong foundation

First, they dig a hole. It should be noted that the width and length of the pit should exceed the size of the foundation by 20 cm

After the pit is leveled, and half covered with sifted sand, well compacted and leveled. Waterproofing is laid on top of the sand, and formwork is placed. Further, all free space is poured with a solution of concrete, bringing it to ground level. Be sure to check the surface for horizontality with the help of a building level.
After 5-6 days, the concrete should harden. After that, the formwork is disassembled, waterproofing is laid and the foundation is brought to the floor. There are two ways to bring the foundation to the floor:
- lay out of brick;
- re-build the formwork, filling it with concrete to the beginning of the floor. All voids are covered with sand, ramming it.

Concrete mortar recipe - one part of cement contains 2.5 parts of sand and four parts of gravel.
Installation of furnace equipment
Furnaces are installed during the masonry process. Metal and brick have a different coefficient of linear expansion, so the openings for metal parts should be slightly larger than the elements themselves
It is very important that the furnace devices exactly match the dimensions indicated in the specification.
Their non-compliance will make changes in the orders, and without the appropriate experience, it will be very difficult to eliminate the “error” in the following rows.
There should be gaps of about 5 mm on the sides of the cast-iron plate. They are sealed with a solution of clay with asbestos chips. The furnace door must be fixed with soft steel wire, for which four holes are provided in the frame. Pieces of wire are folded in half, twisted and the ends are wound into the seams of the masonry. A small gap is left between the frame and the bricks, which is filled with the same asbestos mortar.
The blower and cleaning doors are attached in the same way (but the blower is installed tightly). 5 mm gaps are left around the grate so that it can be freely removed.
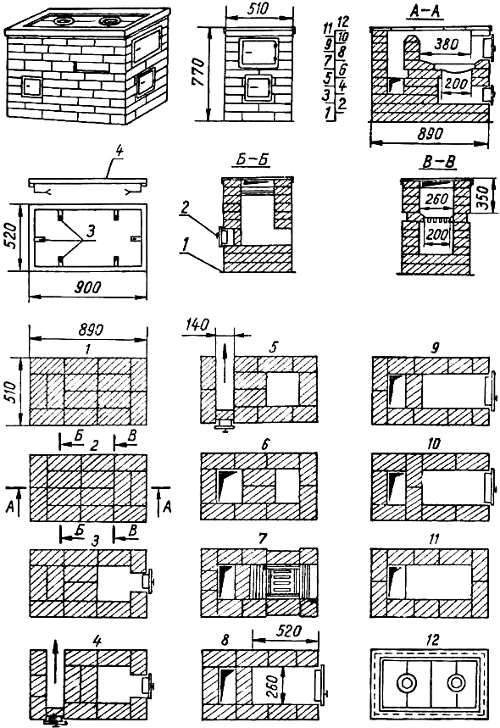
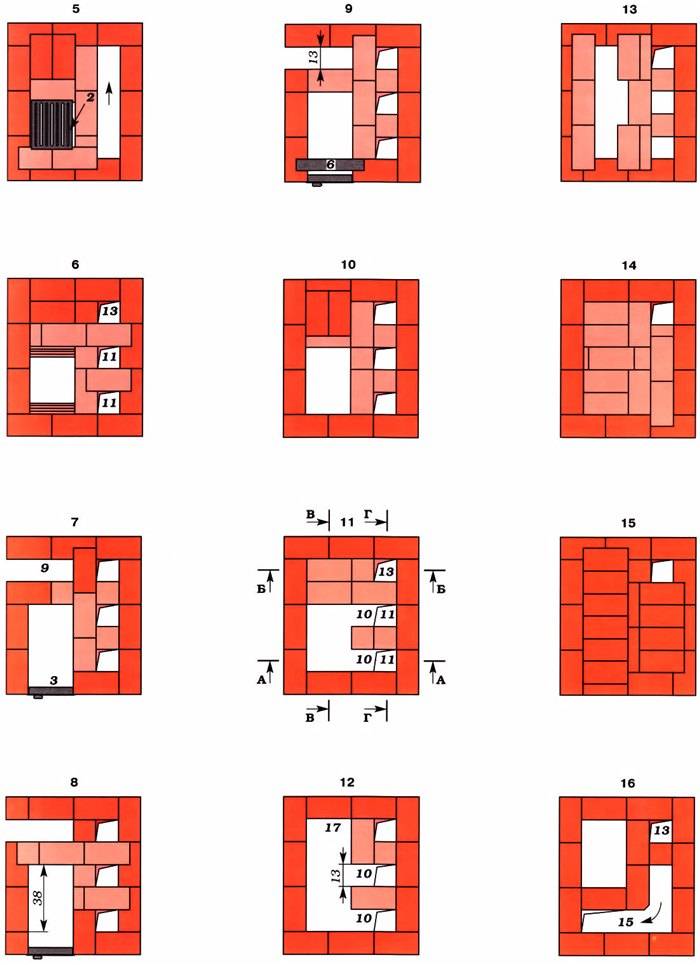
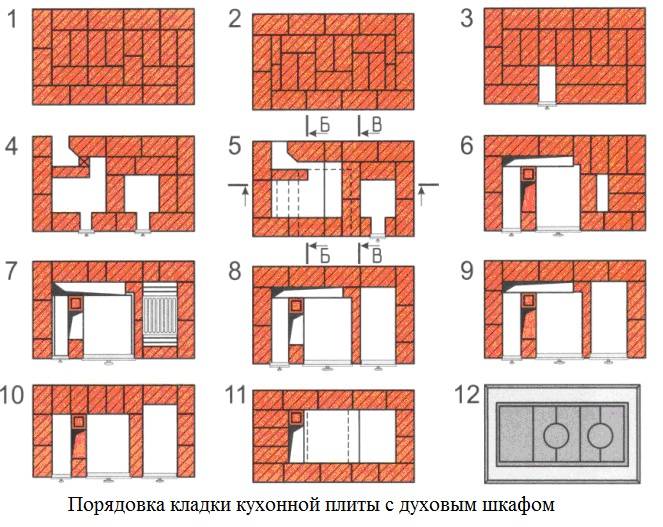
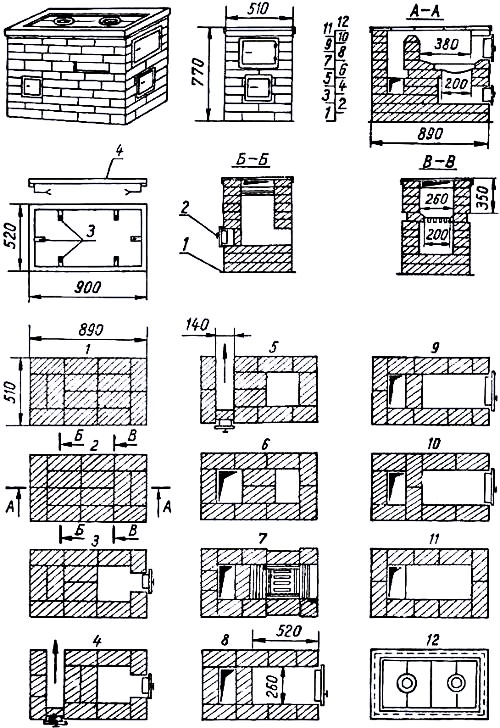
Stove with hob
In the simplest version, this design has small dimensions (width 2, and depth 3 bricks - 78x53 cm). However, even in such a limited area, it is possible to place a single-burner stove.
Work goes smoothly when everything you need is at hand.
Therefore, purchase the following materials and accessories in advance:
Solid red brick - 107 pcs;
Blower door - 1 pc;
Grate - 1 piece;
Single-burner cast-iron stove - 1 pc;
Furnace door - 1 pc;
Pipe valve - 1 pc.
Refractory bricks are not needed for a wood-burning stove. Buying it is a waste of money.But red should be chosen carefully, rejecting cracked and uneven.
Solution preparation
The masonry mixture is made by mixing four parts of clay with one part of water and adding eight parts of sifted sand to them. The normal consistency is determined simply: the solution easily slides off the trowel, leaving no streaks on it. When laying, it should not flow out of the seams.


The volume of the solution is determined, focusing on the number of bricks. With an optimal seam thickness (3-5 mm), one bucket is enough for 50 pieces.
Having prepared the masonry mixture, you can start laying the foundation. Its width is made 10 cm more than the width of the furnace. The height of the foundation is chosen so that the bottom of the first row of bricks is at floor level.
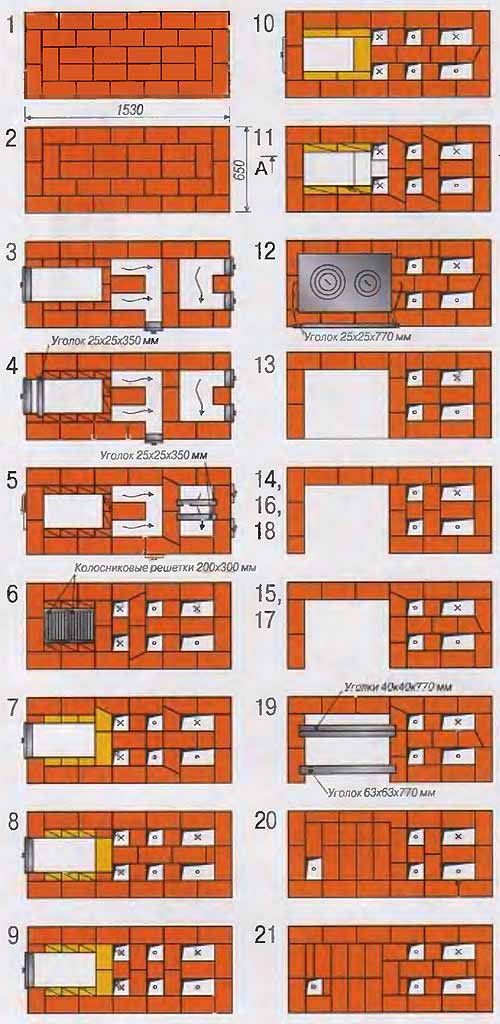
Approximate prototype of the stove
If the underground is deep enough (50-60 cm), then it is not necessary to dig a hole under the foundation. It is enough to make a formwork on the ground with a size in terms of 76 x (51 + 10 cm). Two layers of roofing material are laid on its bottom to protect it from moisture. After laying the concrete, he is given a week to gain strength and then proceed to masonry.
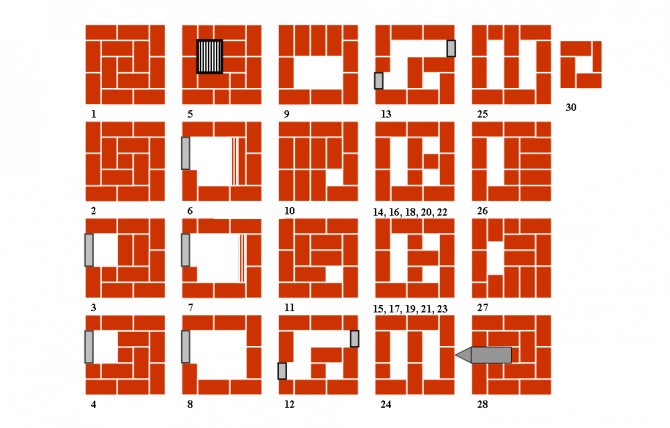
The dimensions of the stove we are considering with a hob are 3 x 1.5 bricks (76x39 cm).
The first row is placed on a layer of clay mortar (4-5 mm). Having leveled the base, lay out the second one, leaving room for the blower door.
Before mounting the door, you need to screw a soft wire to it and lay its ends in the seams for better fixation.
There are four holes in the frame of the cast-iron door for the wire that serves to fix it in the masonry.
To compensate for the thermal expansion of the metal, a gap is left between the door and the brick. Before installation, its frame is wrapped with a wet asbestos cord.
The laying of the third row is carried out, overlapping the seams of the second.At this level, a grate is installed in the firebox.
Ordering scheme from 1 to 8 row
The fourth row is placed on the edge, observing the dressing of the seams, and the walls of the combustion chamber are formed. Behind it there will be the first and only smoke circulation (see section A-A in diagram No. 2). To clean its bottom, a so-called knockout brick is placed in the back wall without mortar, periodically removed to remove ash. Inside the chimney, two supports are made from pieces of brick to support the internal partition.
The stones of the fifth row are placed flat, leaving room for the furnace door. In the back of the furnace, in order, we see the walls of two smoke channels. Their surface during operation must be thoroughly cleaned with a wet cloth from clay protruding from the seams.
This is an important condition for good traction.
Ordering scheme from 9 to 11 row
Having raised it into the masonry up to the eighth row, they close the furnace door, laying a wire in the seams that fixes its frame. At the same level, a brick with a beveled end is placed in the back of the fuel chamber - a smoke tooth. It improves heat transfer by preventing the rapid exit of flue gases into the chimney.
Having finished the ninth row, an asbestos cord is laid on it in a clay solution. It is necessary for sealing the joints of the cast-iron plate and brick. On the tenth row, the firebox is covered with a hob.
At the eleventh, a smoke damper is installed in the pipe. It is also sealed along the contour with an asbestos cord dipped in clay.
12th and 13th row - the formation of the walls of the pipe. After their completion, a light sheet metal pipe is placed on the furnace, which is brought out to the roof.
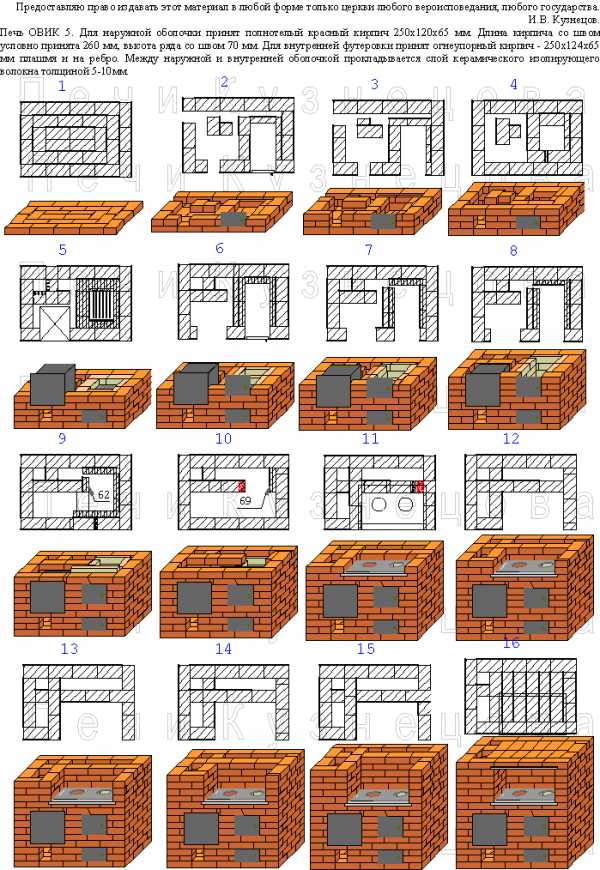
The financial and economic aspect of building a Pompeian oven with your own hands
What is the reason for the high price of such a furnace?
- The Pompeii oven is laid out from fireclay bricks, which cost an order of magnitude more than usual.
- The design of the furnace has a fairly large weight, and for ease of use it must be raised to a height of 80-100 cm. To do this, you will have to lay out a brick stand on which the furnace itself will be erected, which means you need to think of a good foundation.
To slightly reduce the cost of building a furnace, any materials that are on the farm are suitable for the stand: blocks, ceilings, old bricks, etc.


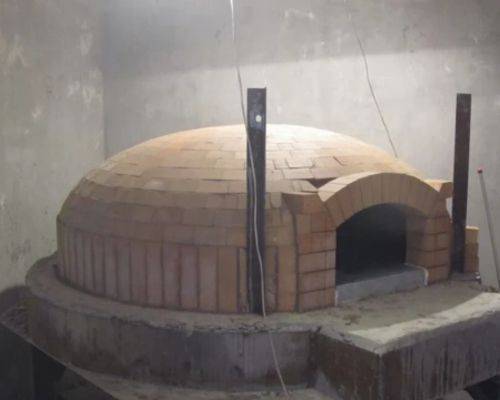
Building a pizza oven
Another disadvantage is the lengthy process of laying the Pompeian oven. A rather complex design, which involves the presence of a foundation, a pedestal, the oven itself, a large countertop, indicates that the whole process will take at least a month.
In addition, you will need significant technological breaks to harden the concrete for the foundation, etc.
If you come to the dacha only for the weekend, then the entire masonry process can be rationally divided into several stages, calculating that the technological break for “seizing” the materials just falls on your absence.
Traditionally, the Pompeian oven has the following scheme:
- solid foundation;
- pedestal under the oven;
- bake.

Pompeii pizza oven
The oven itself, in turn, consists of four parts:
- base (furnace bottom);
- dome (vault);
- entrance arch;
- chimney.
The base (pedestal) is made of small cinder blocks, 20*20*40 cm each.
The tabletop is a monolithic slab made of reinforced concrete with a thickness of 10 cm.

table top
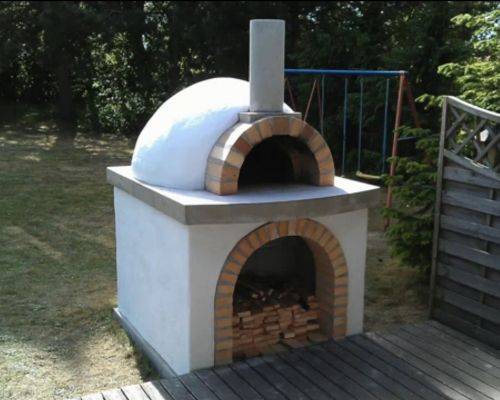
Unlike the traditional stone oven, here the chimney is at the front. This is one of the main design differences. The fire rises up along the dome, heating the vault. Thanks to this, heating is carried out simultaneously from above and below, which contributes to rapid cooking.
The Pompeian oven has undergone many changes over the years of its existence, and today you can find several of its varieties.
Neapolitan oven
There are Tuscan and Neapolitan stoves. The Tuscan stove has a higher vault and is more versatile. In it you can bake not only pies, but also cook stews, meat, soups.
The Neapolitan oven is traditionally used for baking pizza and has a small vault that is approximately equal to 80% of the total height of the dome.
Tuscan oven with a higher vault
As for the shape and size of the oven, the most optimal design is the one with an inner diameter of 80-110 cm. It is not recommended to make the oven smaller than this.
The spherical vault of the stove serves for maximum heating and heat storage, and the arched entrance is used for laying firewood and the food itself.
The size of the furnace may vary, but in any case, a strict proportion should be adhered to: the height of the arch should be approximately equal to 60% of the total height of the dome.
The width of the entrance for laying firewood should be equal to the total height of the dome.
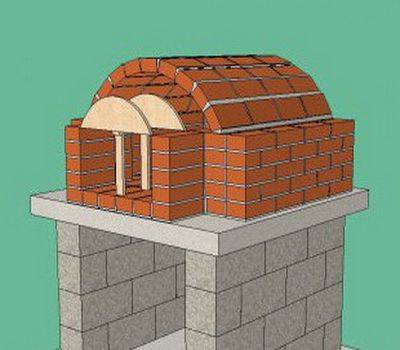
Layered dome of the Pompeian oven
The vault itself has several layers:
- the inner surface is made of fireclay bricks;
- clay coating;
- 1st layer of basalt wool (thermo insulating);
- 2nd layer of perlite;
- Facing layer of cement mortar.
In this case, the thickness of each layer should approximately have the same size of 5-10 cm. The more the heat-insulating layer is laid, the longer the furnace will cool down.


The facing layer can be made of any moisture-proof and water-repellent materials, since its main purpose is protection from atmospheric precipitation. If the furnace is carried out in the house, then this protection can be omitted.
In addition, the facing layer also performs a decorative function, so you can make it to your taste: decorative plaster, painting, mosaic, etc.
The choice of location and type of foundation for the stove
Scheme of laying the foundation for the furnace
Before starting the laying of the furnace, pay due attention to finding a place to place it. For example, if the unit is placed in the middle of the room, it will be able to give off much more heat, warming up from all sides and evenly heating the air around. If you place the stove against the wall (and this option is used most often), cold air will constantly “walk” near the floor
Therefore, in this regard, you need to make your own decision.
If you place the stove against the wall (and this option is used most often), cold air will constantly “walk” near the floor. Therefore, in this regard, you need to make your own decision.
Pre-determine the installation location of the furnace door. This element must be installed so that in the future you can load fuel into the stove as conveniently and quickly as possible without spreading garbage from firewood or coal throughout the house. Usually the furnace door is located on the side of the kitchen or some little-visited room.
The finished brick stove will have a fairly impressive weight.In order for the device to stand as reliably and as long as possible, it is necessary to prepare an individual concrete foundation for it.
We make a stove with our own hands
Location selection
To lay down a good heating structure, you need to choose the right place. The following standards must be taken into account:
From the smoke channel to the wooden structures should be more than 37 cm. The minimum distance of the pipe from the ridge is one and a half meters. The height above the ridge is half a meter. If it is 1.5-3 meters from the pipe to the ridge, it can be placed flush with it.
It is best to fold the stove in the middle of the house. This will ensure even distribution of heat and ease of use.
Materials and tools
In addition to brick, you will also need a number of other materials to fold the stove. These include:
clay, sand, rebar.
These are the main materials without taking into account the components, but you still need to take care of the vent doors, blower, firebox, and so on.
To put together a good stove, you need to knead the right solution. It is best to use special refractory clay, in extreme cases, you can use red. Grains of sand should be no more than 1 mm. The optimal ratio is achieved empirically. Usually it is 1 to 1 or 1 to 2. Plus 25 percent of the water of the total volume of clay.
Metal objects play a fundamental role in the construction of the furnace. To put together a decent structure, you need doors and half-doors, grates, cast-iron dampers, latches and views. All these elements, if necessary, can be made by hand, but you will need to purchase iron sheets.
Of course, without good tools, folding the oven will not work, you will need:
a hammer-pick especially for the furnace, a trowel, a ruler-rule, a wash brush, a tape measure, a plumb line, a level.
With this simple toolkit, you can fold any oven.
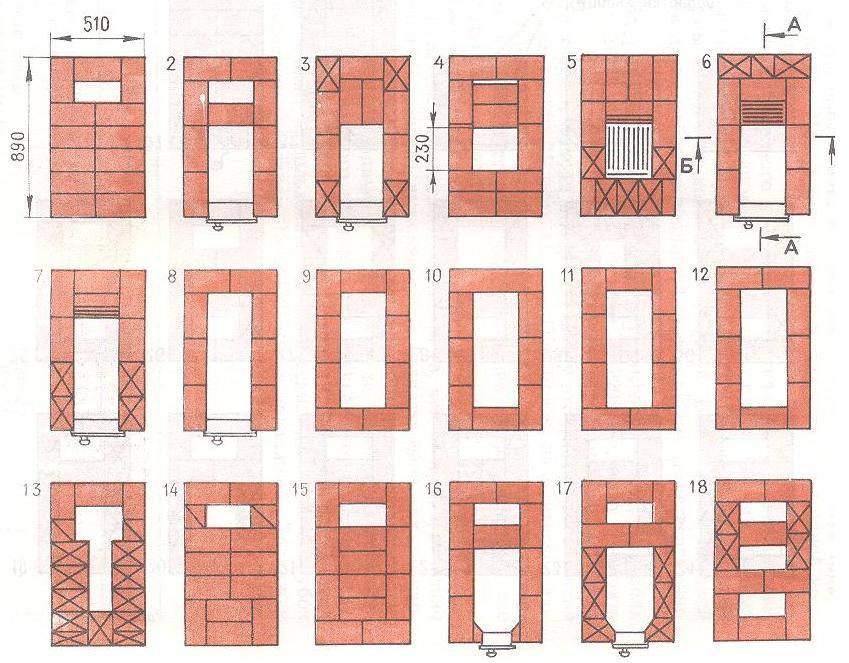
The process of building a stove
For the foundation, a foundation pit is dug, backfilling and a reinforced frame are made. The resulting structure is poured with concrete. Before you fold the stove, make sure you have brick patterns in front of your eyes.
When working, it is very important to keep order. Otherwise, it will not work to fold a high-quality oven
The slightest deviation in the design will lead to the fact that one of the channels will be blocked. The result is more than deplorable. Smoke instead of going outside through the chimney, will go into the room.
The first row is placed along the cord. Each next masonry is checked with a level. Corners are controlled by body kits. After the masonry is completed, furnace equipment is installed, for example, burners. The pipe is brought out at the very end. To learn more about how to fold the oven, watch the video below:
In order to fold the stove in accordance with current regulations, the distance from the inner wall of the chimney to the nearest structure must be at least 38 centimeters. When a cast iron plate is installed, the gaps on the sides must be at least 5 millimeters.


Types of stoves for the home
Russian brick oven
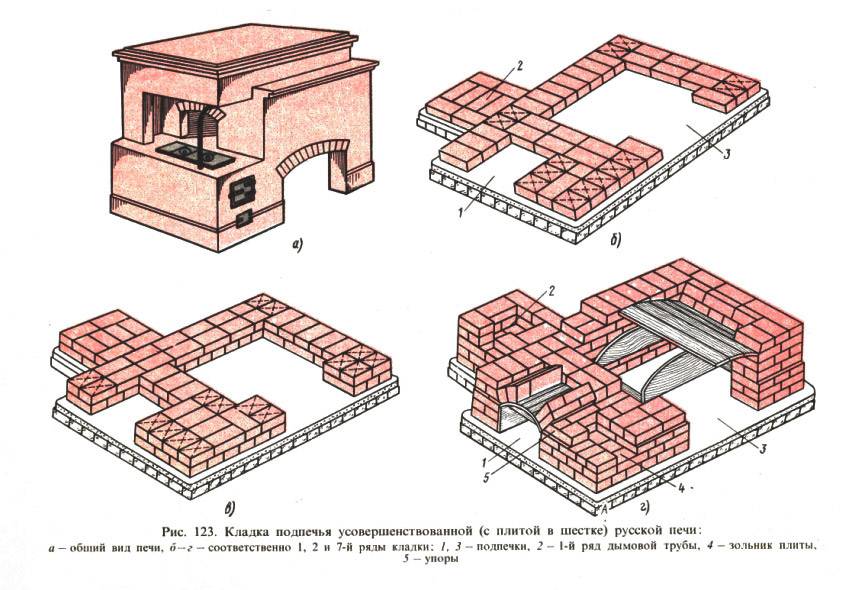
multifunctional hearth or furnace
The standard dimensions of a Russian stove reach two meters in height, two and a half meters in length and one and a half meters in width. Thanks to such an impressive size, the stove heats a room with an area of more than 40 square meters. m. The disadvantage is that the operation of the Russian stove requires a lot of fuel.
Swede stove
It is more compact than the Russian oven: the height of the "Swede" is about two meters, the width and length do not exceed a meter. Such an oven has two purposes - heating the room and cooking. Above the furnace of the Swedish oven is a two-burner cast-iron stove, on the side is an oven. A nuance in the construction of a Swedish oven is that a stove is mounted in the kitchen, while the rest goes into another room.
A serious minus of the Swedish stove is a high fire hazard. To prevent fires, Swedish stoves are equipped with dampers.
dutch oven
compactness and high heat dissipation of the Dutch stove with a capacious firebox.
The Dutch stove is built exclusively from stove bricks, which quickly accumulate heat and then gradually release it. Furnace brick is an expensive pleasure. Therefore, when building a Dutch oven, you will have to spend a lot of money.
There are also garden stoves, wood-burning sauna stoves, cooking stoves, combined heating and cooking stoves, and fireplaces.
Now, having an idea about the varieties of brick ovens, knowing the characteristics of your own premises and the necessary functionality, you can decide on the choice of oven. I must say that for the laying of all furnaces there are general requirements, principles, which we will consider below.
Construction rules
Homemade stove must meet fire safety requirements
Therefore, it is necessary to pay special attention to the preparation for construction
- Decide on the location of the furnace.
- Prepare the correct drawing.
- Buy quality materials for construction.
- Purchase of tools.
- Draw up a cost estimate.

Properly drawn up drawings will become your main assistants, since it is the drawings of a homemade brick oven that help to avoid many mistakes.Ready-made plans can be found on the Internet.
When choosing an installation site, you need to take into account the area of \u200b\u200bthe room and the type of furnace. It’s difficult to calculate everything on your own, so it’s easier to use a reduced brick oven model, a photo of which is on the Internet.
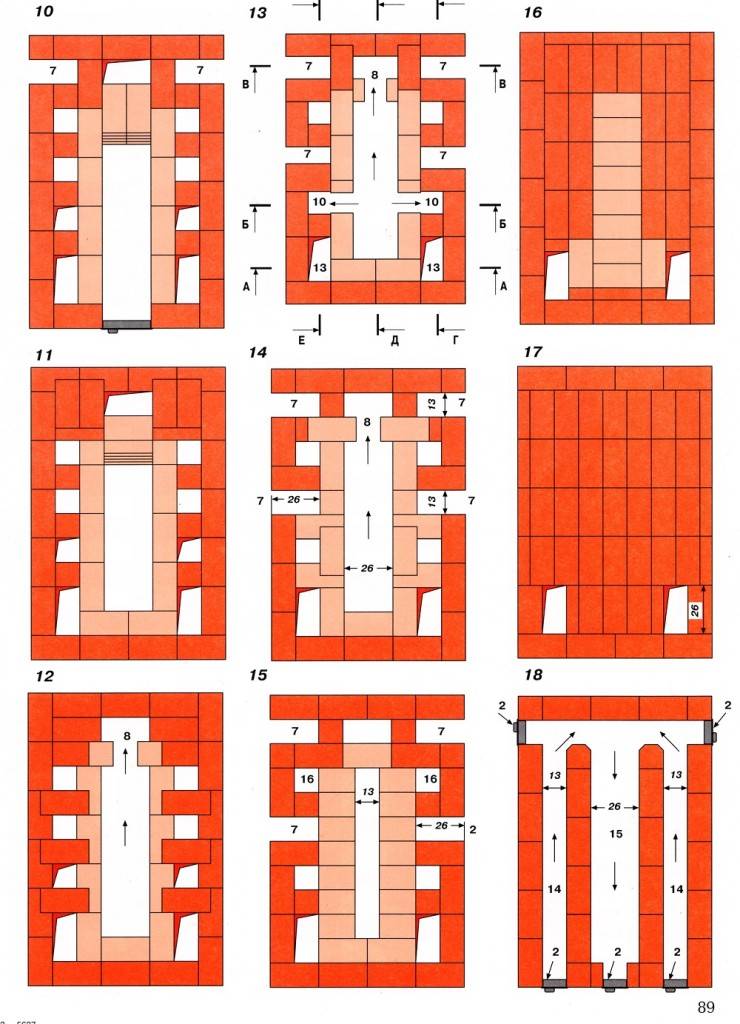
Firebox, shield and chimney
The main differences between a rough stove and a solid fuel stove are a more powerful firebox and the absence of a pass (smoke tooth) in the furnace part. The tooth retains hot gases under the hob, which in the summer stove allows you to reduce fuel consumption for cooking. In rough it is not needed, because. excess heat will be used for heating.
The coarse furnace should have a more powerful firebox because the shield provides additional resistance to the flow of flue gases. A chimney with enhanced draft will not help here: the gases in the shield will immediately expand and cool down. Their thermal energy will turn into mechanical energy, which will successfully fly out into the pipe. Figuratively speaking, a firebox with a chimney in a stove with a shield works according to the push-pull principle, and “push” here is a firebox of greater power. This is the reason for the special requirements for the firebox and furnace fittings of coarse, see below.
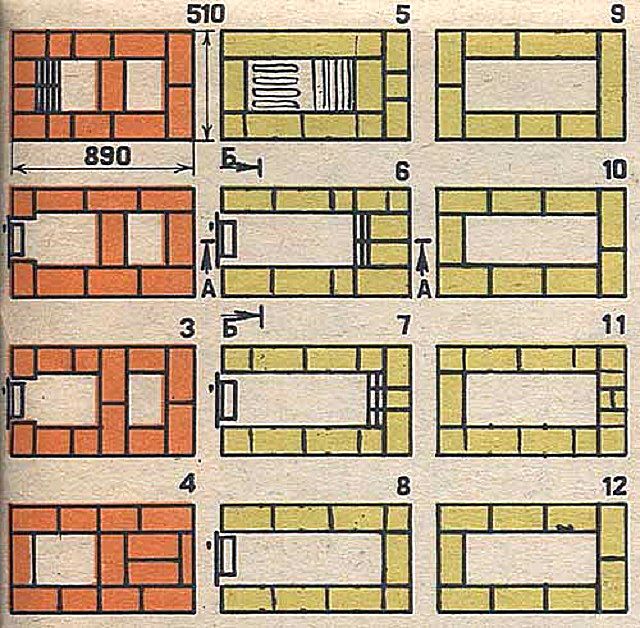
Depending on the purpose, heating shields for them are of different types. Schemes of heating shields for furnaces are given in fig. below; the fuel part is shown conditionally everywhere.
Schemes of heating shields for furnaces
- Consistent stroke with short vertical channels. The least material-intensive and the easiest to build. The resistance to the current of gases is the greatest. The compactness and heat efficiency of the furnace are average. The most commonly used scheme;
- Sequential course with horizontal channels. The mass and dimensions of the furnace are the same as in the previous. case, but building a shield with horizontal channels is much more difficult.Gas flow resistance approx. 1.5 times less. As a result, the heat efficiency of the furnace is higher. It is possible to arrange a couch, i.e. the upper channel does not get very hot;
- Consistent stroke with long vertical channels. Thermal efficiency is like that of a shield with horizontal channels, technological complexity is like that of a shield with short vertical channels. It occupies the smallest area, but requires a lot of materials and a good foundation (see below) due to the high specific pressure on the support. The best option for a house heating stove for 2-3 rooms, see below;
- Parallel move. The highest thermal efficiency, the smallest mass per unit of thermal power. The occupied area and technological complexity are the greatest. Use with a fire chamber of the reduced power is possible. Optimum for an extension to an existing slab without altering it.
Note: there are also series-parallel or chess shields. The most difficult, but also the easiest, gas flow resistance provide the least. The only possible option for being rude to a house with a heated attic, see below.


