- Why do you need a hood in the cellar in the garage
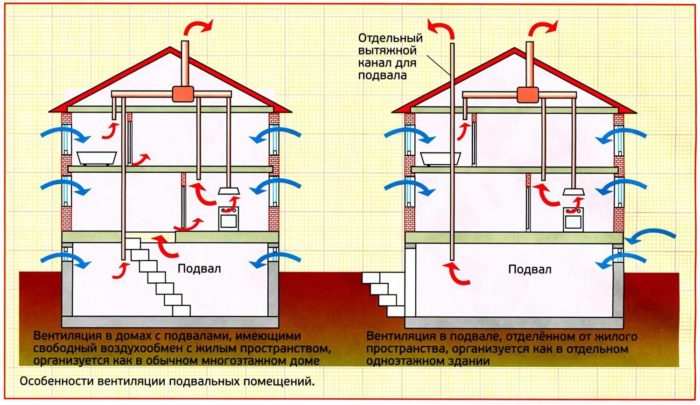
- Natural basement ventilation in a private house
- Supply and exhaust system
- Stages of work
- Forced ventilation of the basement in a private house
- Typical natural ventilation scheme
- Cellar and viewing hole
- What can be equipped?
- How to make ventilation in the garage - with your own hands, with a guarantee of reliability
- How to make natural ventilation of the cellar
- Calculation of the diameter of air ducts and their installation system
- Choice of duct material
- Required accessories
- Stages of work on the installation of ventilation
- Combined ventilation: step-by-step instructions for installing a duct fan
- Installation of natural ventilation
- Forced cellar ventilation
Why do you need a hood in the cellar in the garage
First you need to understand why you need ventilation in the cellar. There are a number of reasons for this:
- If there is no air exchange, condensation quickly begins to appear in the room, which increases the humidity of the air. This will lead to spoilage of products, the appearance of fungus and mold.
- In the cold season, the air temperature in the underground room will be an order of magnitude higher than in the garage. In the absence of an extractor hood, warm and humid air will rise from the cellar to the outside and provoke iron corrosion, which is very dangerous for cars.
- If you do not make an extract, then the products will eventually become toxic and unsuitable for consumption. Harmful fumes from the machine, smells of various chemical liquids, rubber and other things will permeate the stocks.
To avoid condensation - you need an extract
That is why the garage cellar ventilation system should provide for the removal of air from the pit and the entry of fresh air inside.
This is interesting: how to make a hood in the basement.
Natural basement ventilation in a private house
The least expensive way is a natural ventilation device through the vents. At the stage of foundation construction, provide paired holes located on opposite walls. According to clause 9 of SNiP 31.01 * 2003, the total area of vents is at least one four hundredth of the area of \u200b\u200bthe entire basement.
Natural ventilation scheme
Calculate the number and size of each hole. The shape of the air is not regulated.
- To eliminate "dead zones", step back 0.9 meters from the inner corners, and distribute the air evenly along the entire length of the wall.
- Make a similar markup for the opposite wall. If the hole size exceeds 0.3x0.3 meters, reinforce around the perimeter. To prevent flood water from flowing, please note that the minimum height of the lower part of the vent along the outer wall must be at least 0.3 meters from the ground level.
- Cover the openings with a rodent net.
When pouring the strip foundation, insert at regular intervals the trimmings of sewer PVC pipes, hermetically closing the holes. After the concrete has hardened and the formwork has been removed, you will get neat products.
Note! If the layout of the underground floor provides for several isolated rooms, it is necessary to provide air exchange for each.
If it is necessary to break through the air in the finished foundation, calculate their total size in a similar way. To work, you need a puncher or a crown for concrete for drilling round holes. Remember that the violation of the integrity of the foundation can weaken its bearing capacity, consult with a specialist, or choose another method of ventilating the underground space.
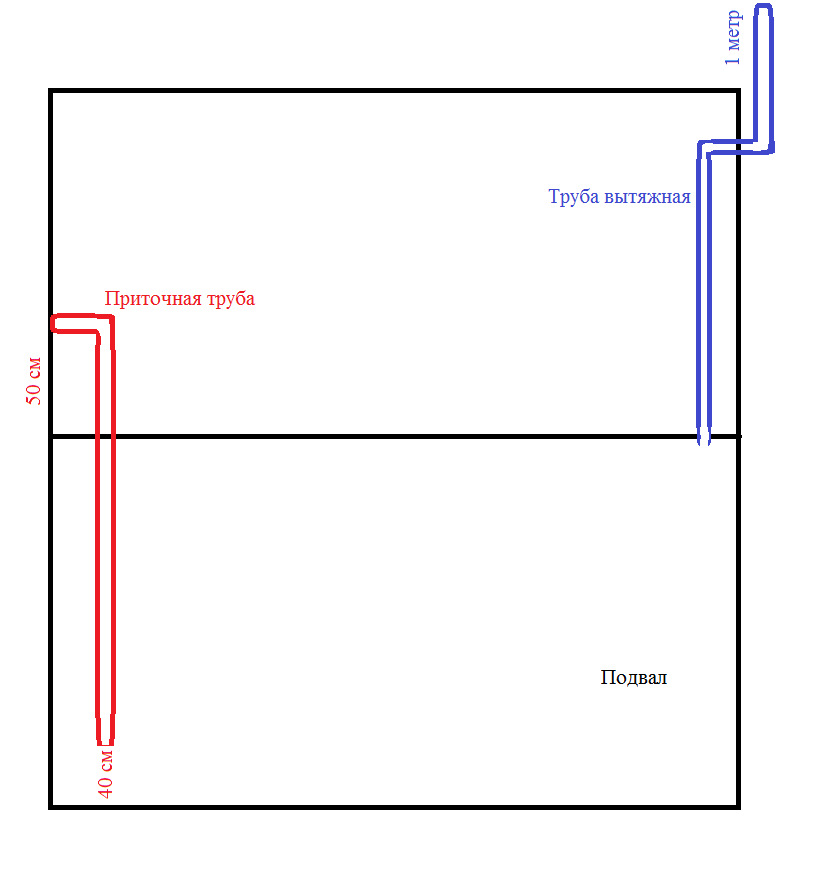
Supply and exhaust system
- low cost;
- ease of assembly;
- the presence of shaped parts;
- low weight of the structure.
Even a person who does not have construction qualifications can perform the installation. It does not require expensive tools to work.
Stages of work
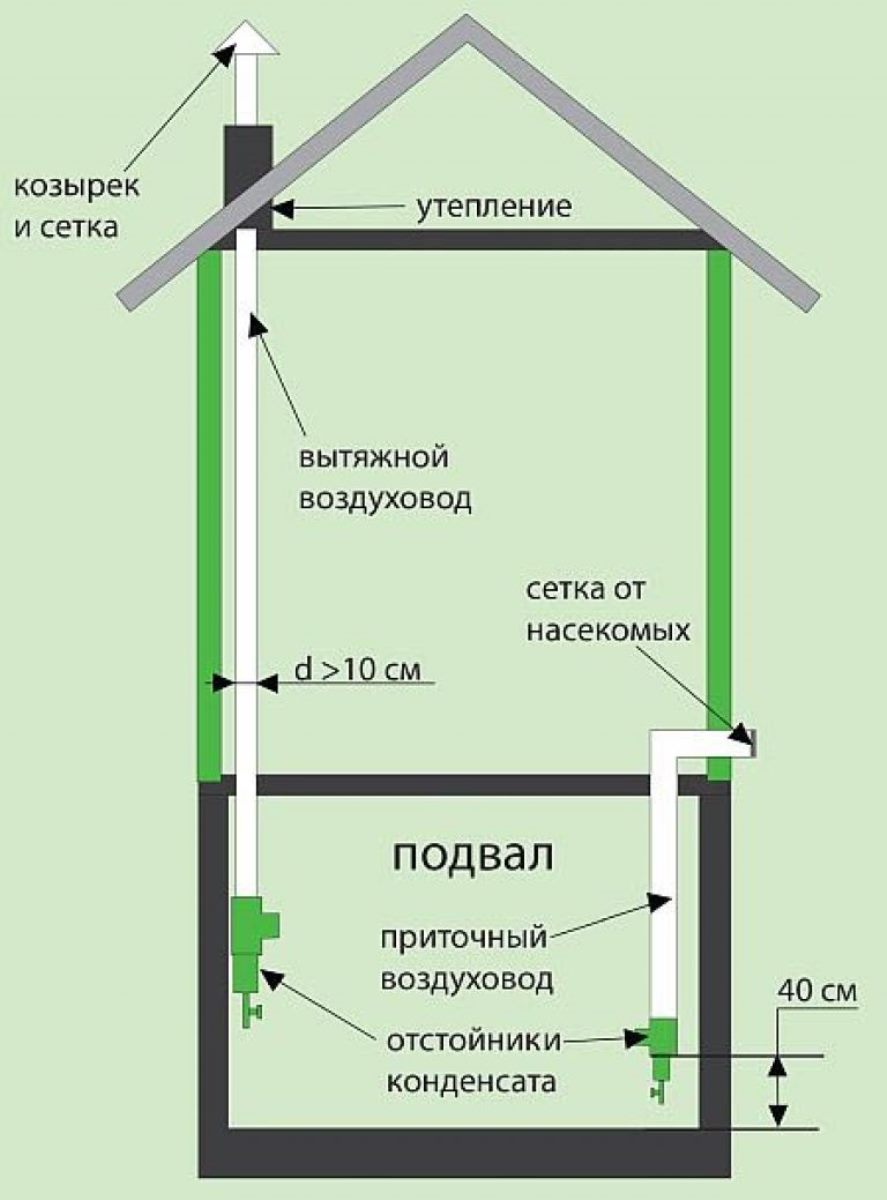
The supply and exhaust pipes should be located on opposite walls.
- At a distance of 0.5 meters from the lowest point, fix the pipe and bring it to the surface at a height of 1 meter, thereby ensuring the flow of fresh air.
- Install the exhaust pipe so that its lower part is 1.5 meters above the floor, and the upper one rises above the roof ridge at a height of 0.5 meters.
- Make sure the joints are sealed.
- Insulate the duct.
- Install an umbrella on top of the system to prevent rain from entering.
In a properly installed system, the temperature difference and pressure difference will create thrust.
At the end of the work, check the draft by bringing a lit candle to the hood. If the candle flame deviates towards its opening, then the system is working correctly. If the light deviates to the other side, this indicates the presence of reverse thrust.You can fix the problem by increasing the height of the exhaust pipe or installing a deflector head.
Forced ventilation of the basement in a private house
If the efficiency of natural air exchange is low, install a duct fan in the exhaust pipe. Installing a second device in the supply pipe will increase the performance of the system. The principle of operation is to pump outdoor air into the underground and more intensive removal of the exhaust air masses to the outside.


The power of the appliances is calculated by the consultant of the specialist shop based on the size of the room.
Modern duct fans are equipped with a casing and are equipped with fasteners, so their installation will not cause difficulties. Some models are equipped with a timer, which allows you to automate the frequency of turning on the system.
According to sanitary standards, the heated living quarters of the basement floor need air conditioning and filtration. Installing a recuperator will allow you to heat the incoming air at the expense of the heat of the exhaust. Due to the complexity of calculations and a large amount of work, entrust the design and installation of such systems to specialists.
Typical natural ventilation scheme
First of all, consider the ventilation device in the garage of the most common type:
- garage - metal or stone without a cellar and a viewing hole;
- mode of use - periodic (on average, the owner stays in the room no more than 1-2 hours per day);
- the facility is used to park a vehicle, store some automotive fluids, and perform minor repairs.
We will immediately analyze the question of whether a forced exhaust and supply system is needed in such a room.The answer sounds like this: if the garage is not turned into a workshop, then a natural exhaust with an inflow is quite enough to remove moisture and gases.
Local suction with a fan will help to catch the smoke from welding
When forced ventilation is needed:
- In winter, indoors, the owner works welding.
- The owner is constantly engaged in the repair or painting of cars.
- In the garage, liquids with harmful volatile vapors are often used, for example, furniture and rubber glue, acetone, white spirit, and so on.
The simplest air exchange scheme with natural motivation
Now let's explain how to do it yourself make ventilation in the garage without basement:
- On the front wall of the garage, on the sides of the gate, punch inlets of the calculated size. The best option is to lay the shells when you build a building. The height of the openings above the ground is 20–50 cm (so that less dust is blown by the wind).
- To correctly select the cross-section of pipes and wall openings, calculate the amount of air. The methodology is presented in the last section of this manual.
- Install external grilles in the holes, and from the inside, come up with gates or doors. The goal is to limit and regulate the air flow during the cold period.
- Seal as much as possible all door porches, from where air can leak uncontrollably, hang a curtain from the inside in winter. The exception is sectional doors fitted close to the opening.
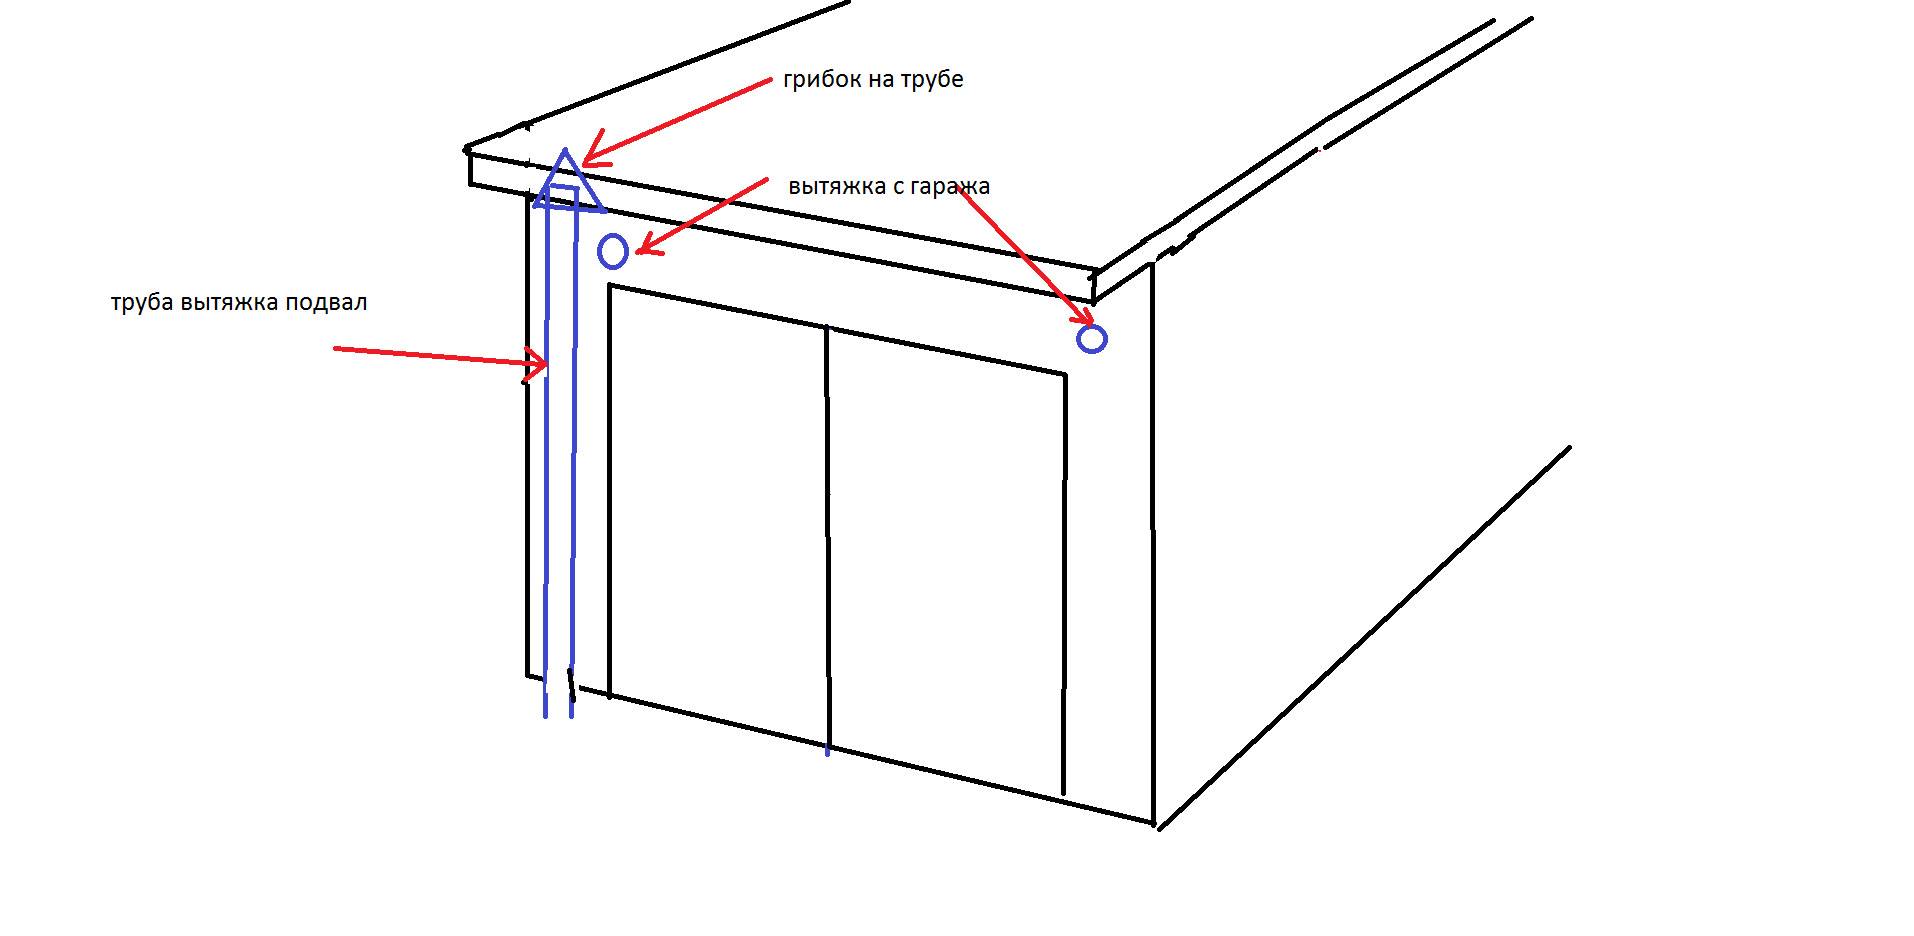
- Drill a hole in the ceiling near the opposite wall and bring out a vertical channel from an asbestos-cement or sewer pipe 2 meters high. Cover the head from precipitation with an umbrella.
Varieties of used umbrellas (in the middle) and deflectors
The scheme functions simply: due to the difference in external and internal temperatures, as well as the height difference between the ends of the exhaust pipe, a natural draft arises that entrains the garage air. The pressure inside the room drops, the rarefaction provokes the suction of the air mass through the grilles of the supply system.
Scheme of the movement of flows in the plan
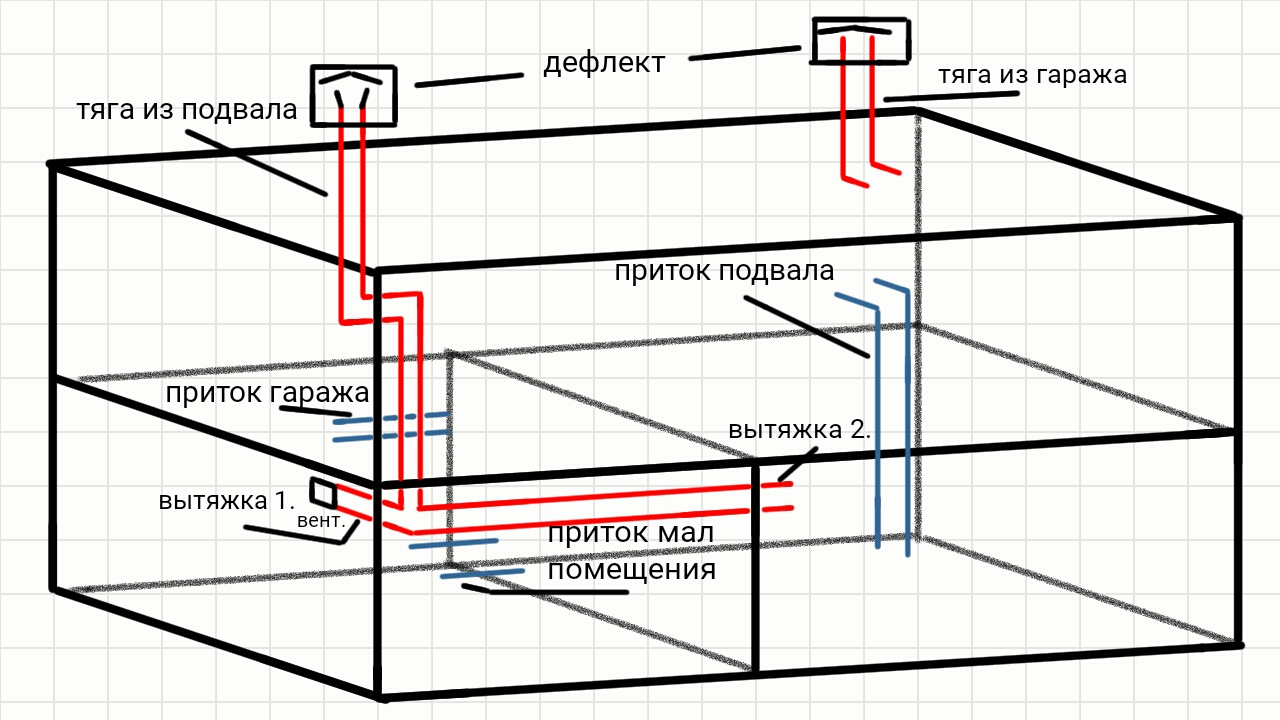
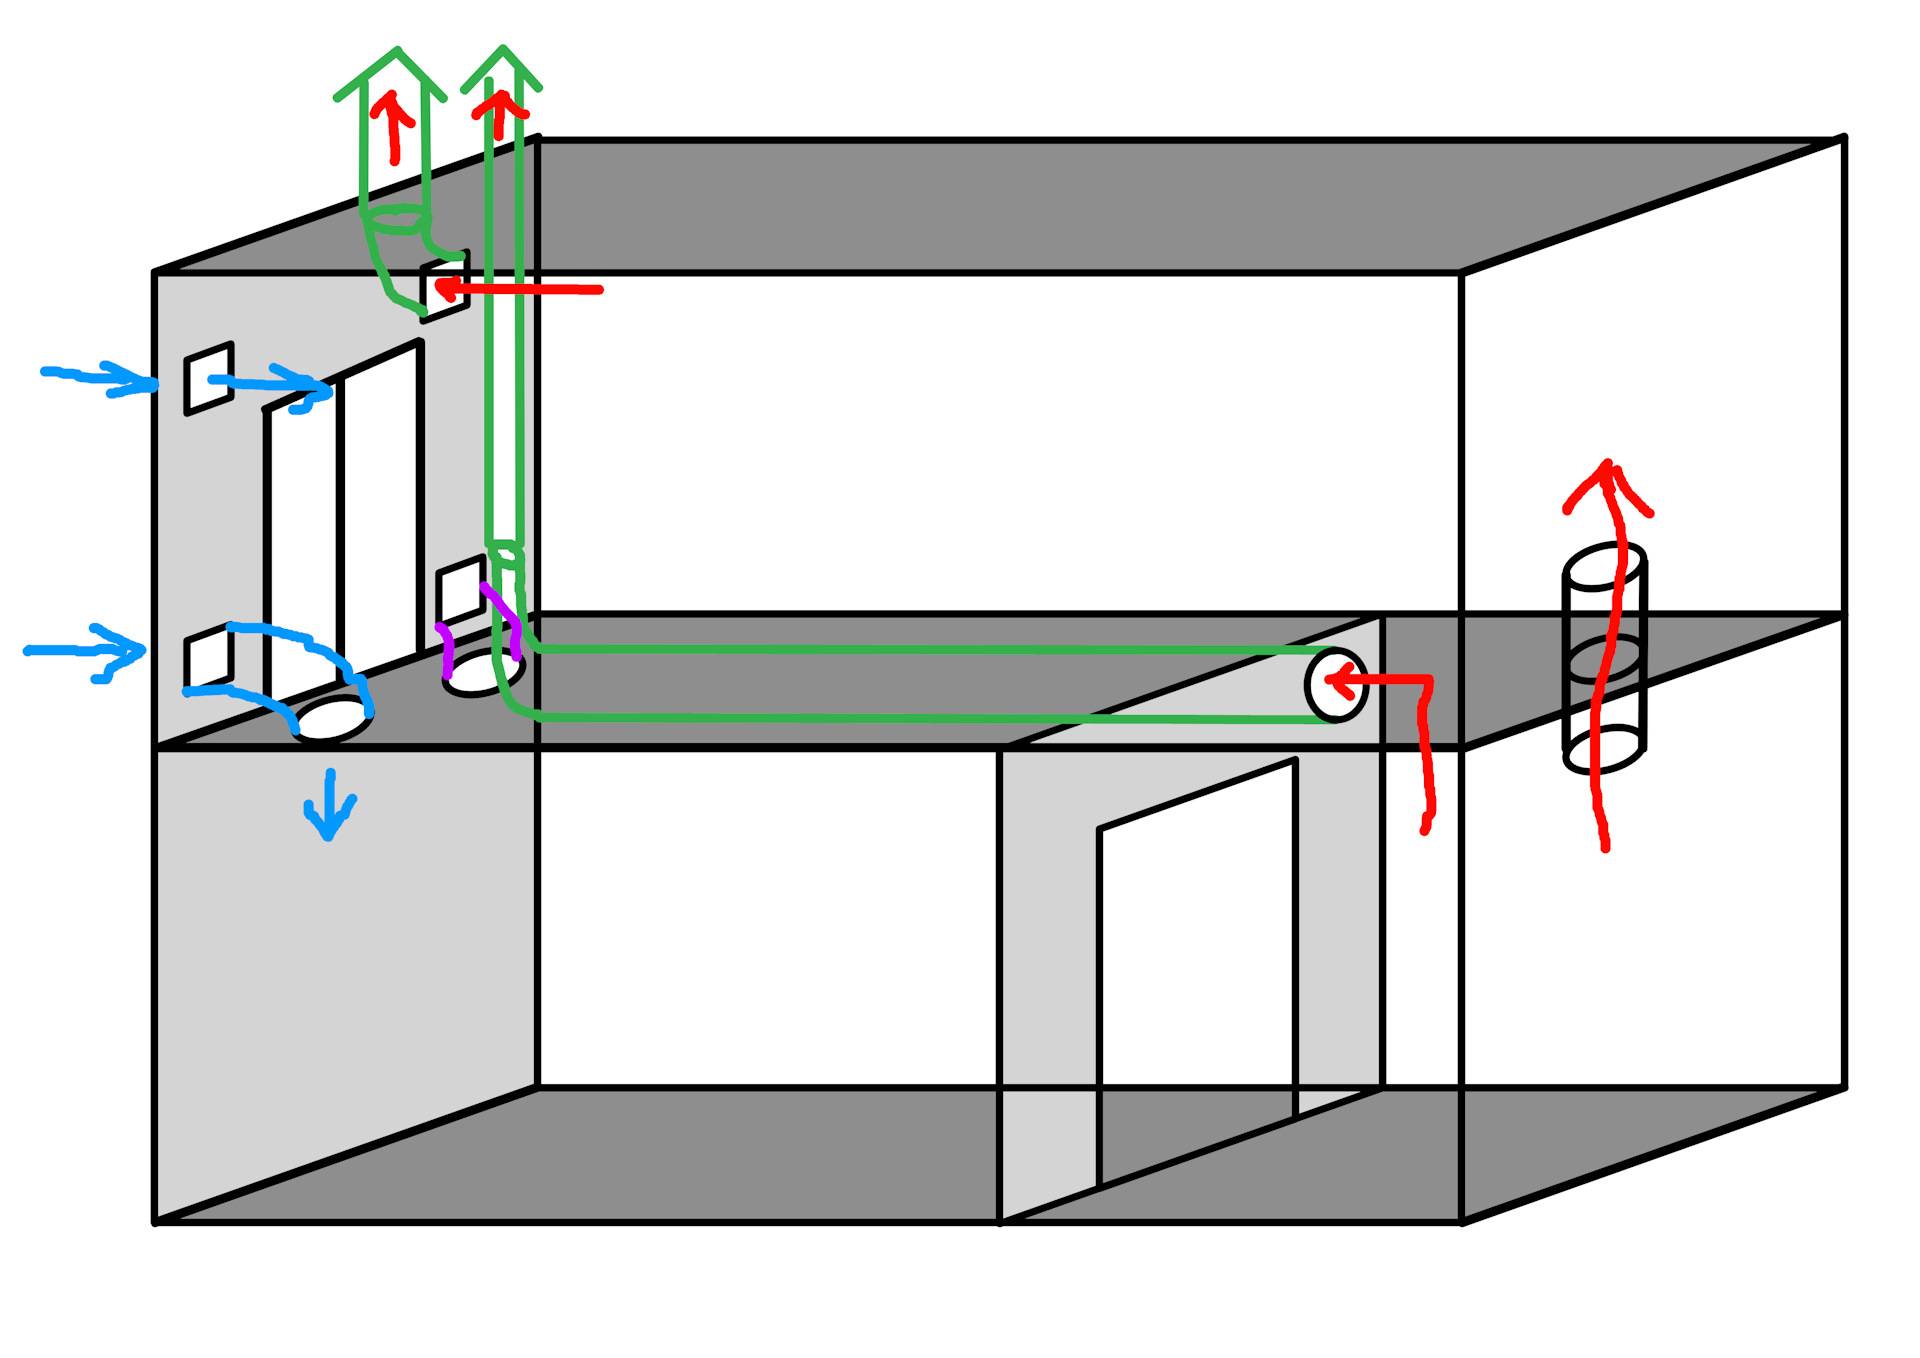
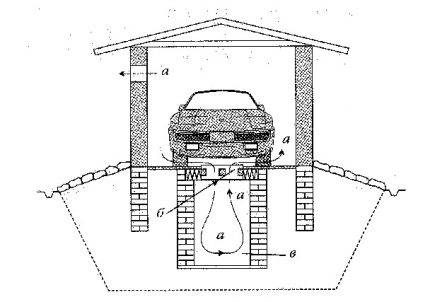
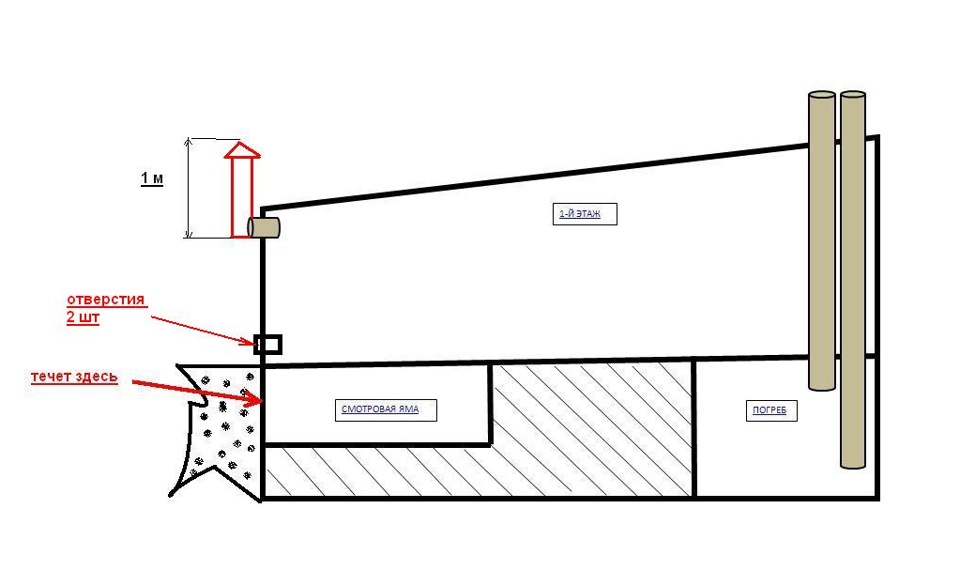
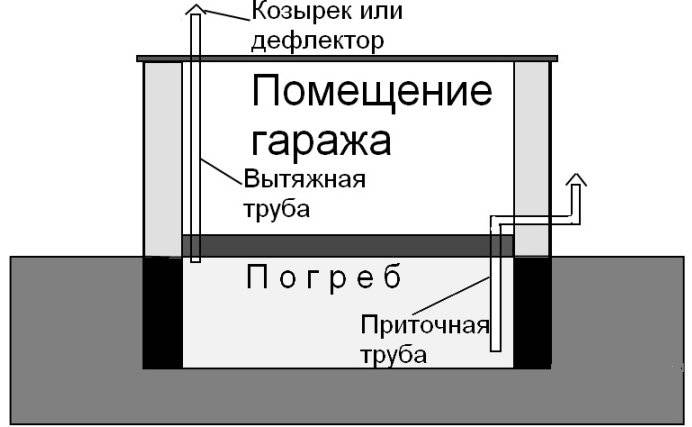
Cellar and viewing hole
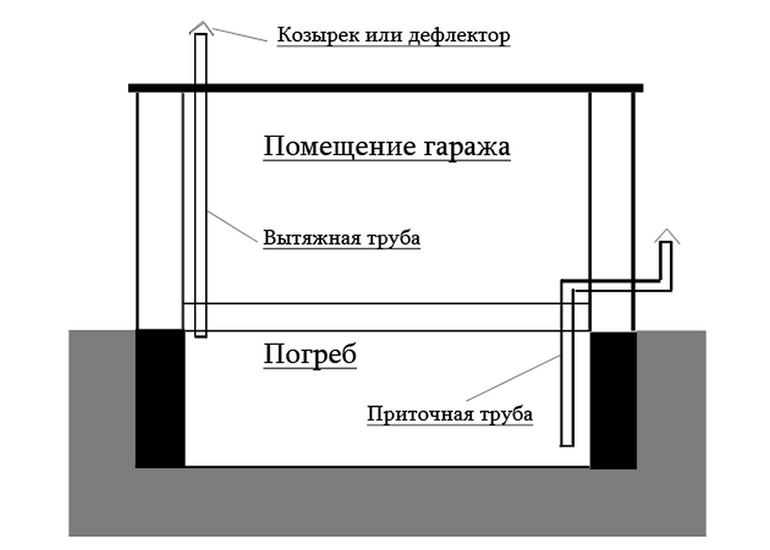
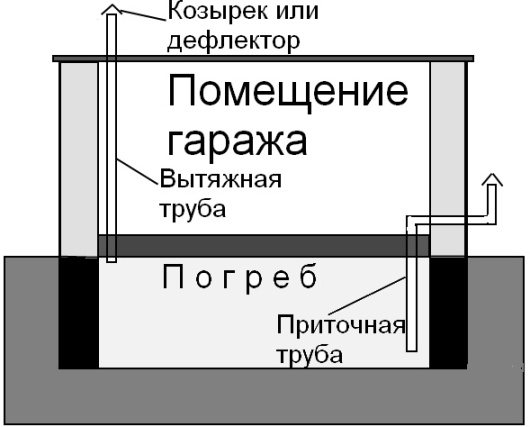
Above, the option of ventilating an ordinary garage was considered. If there is a basement and / or a viewing hole inside, these objects should be taken care of separately. In the case of a basement, it is mandatory to arrange a separate ventilation duct. This is necessary because much more moisture accumulates at the bottom than at the top of the room.
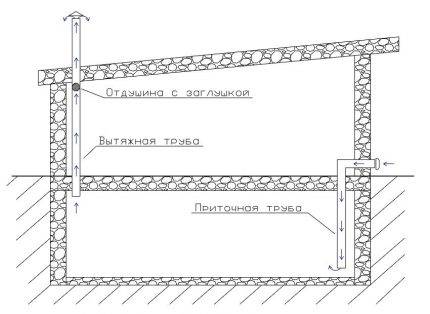
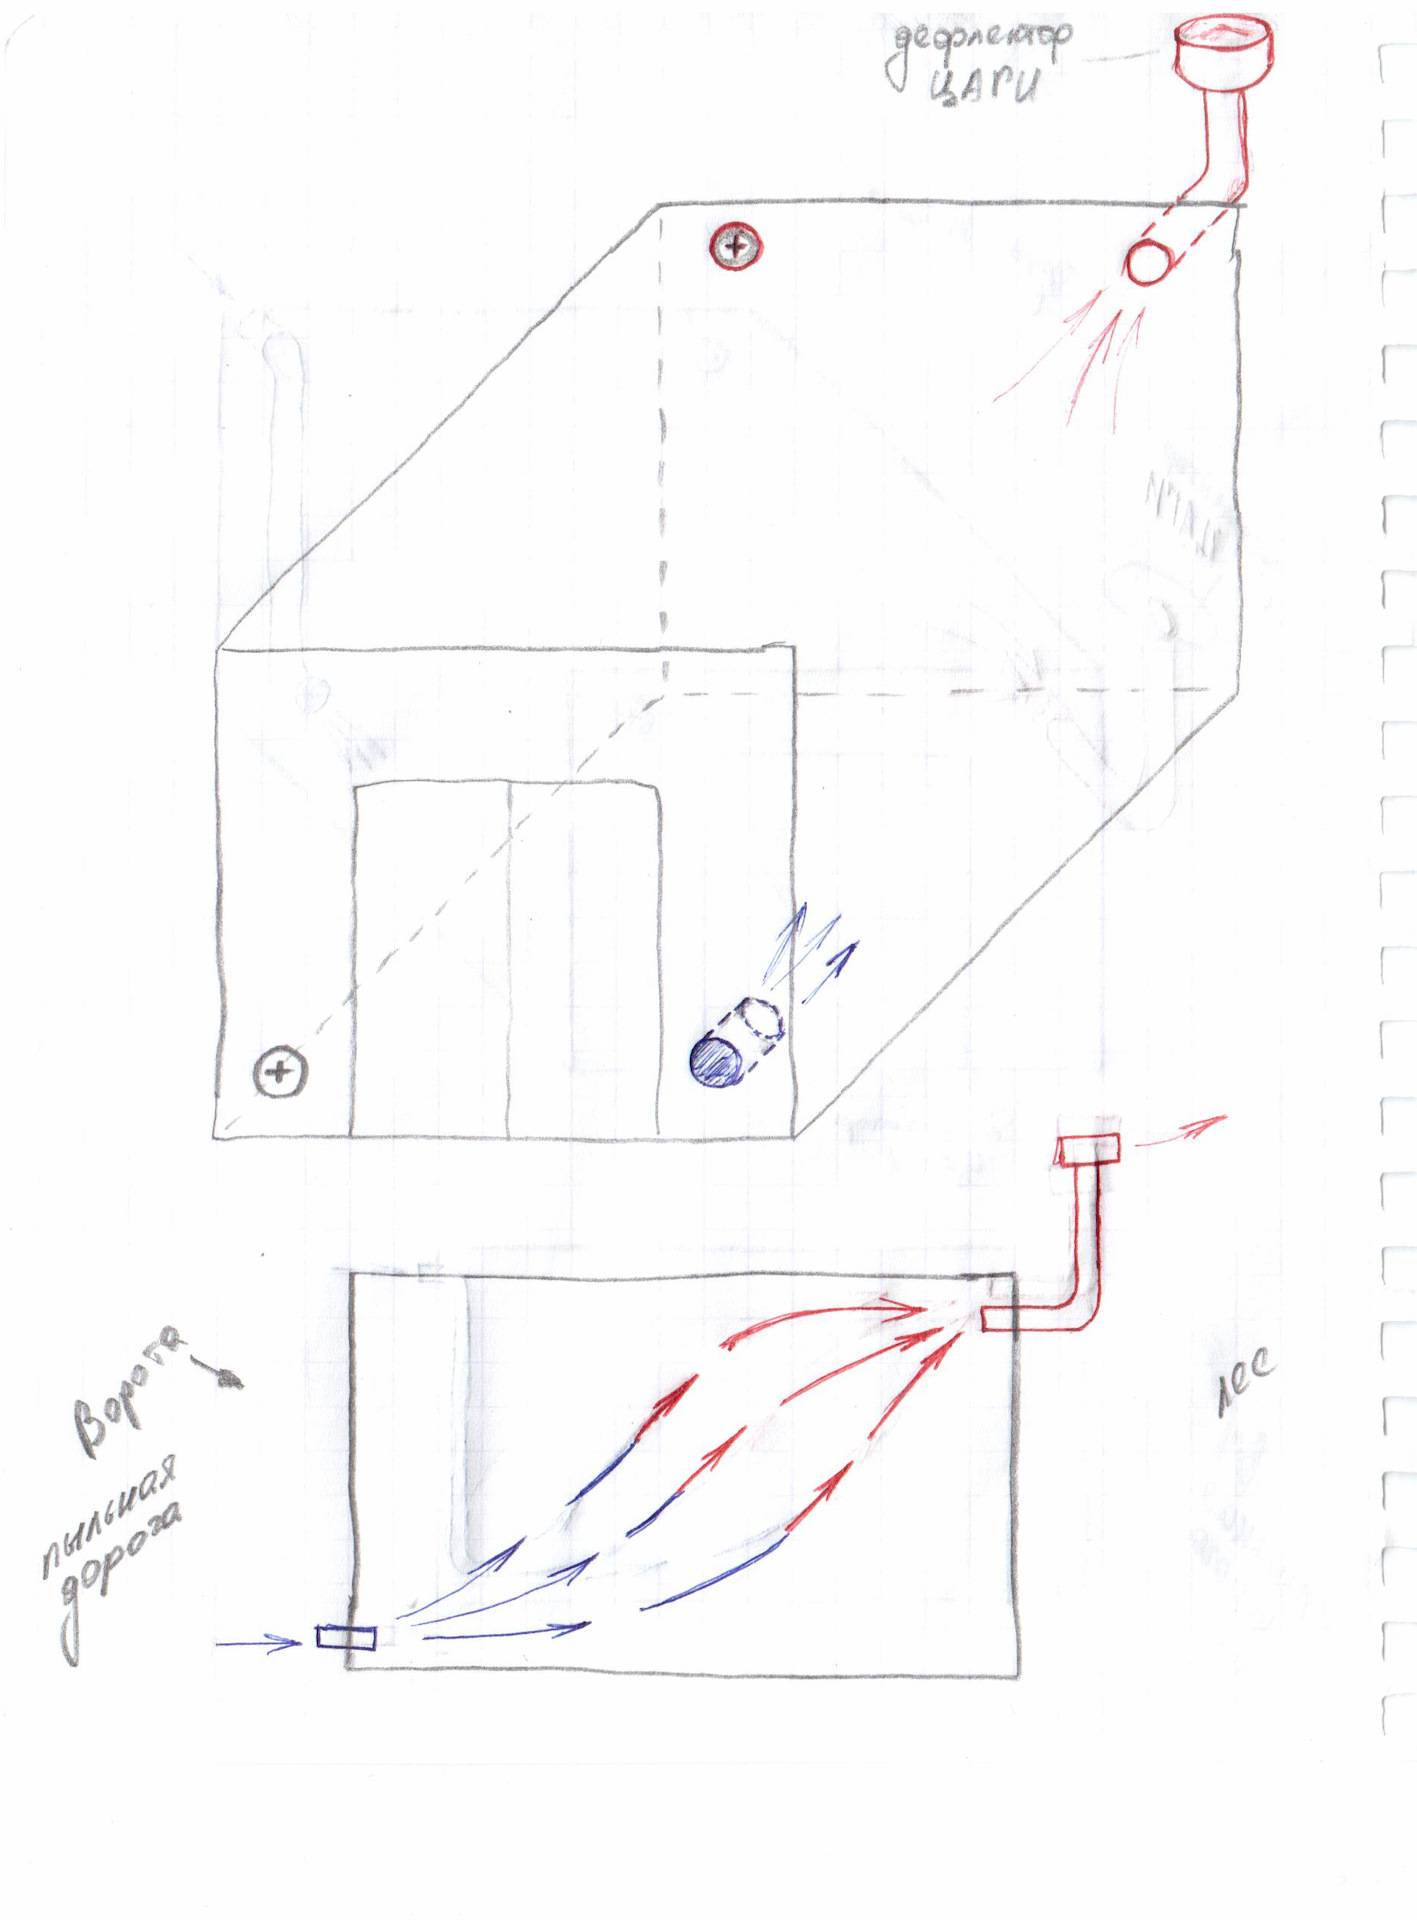
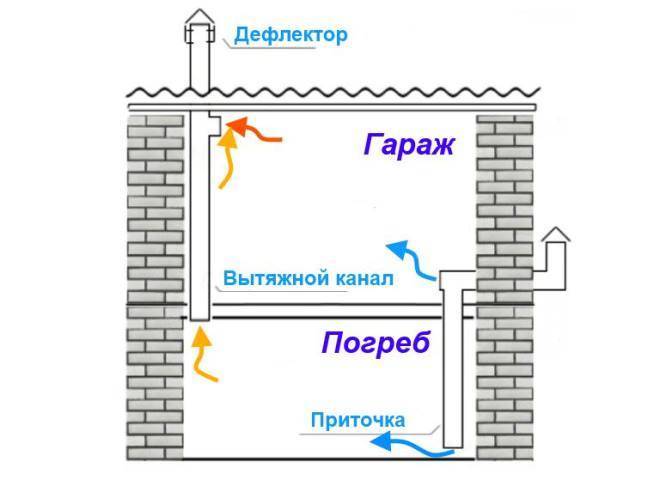
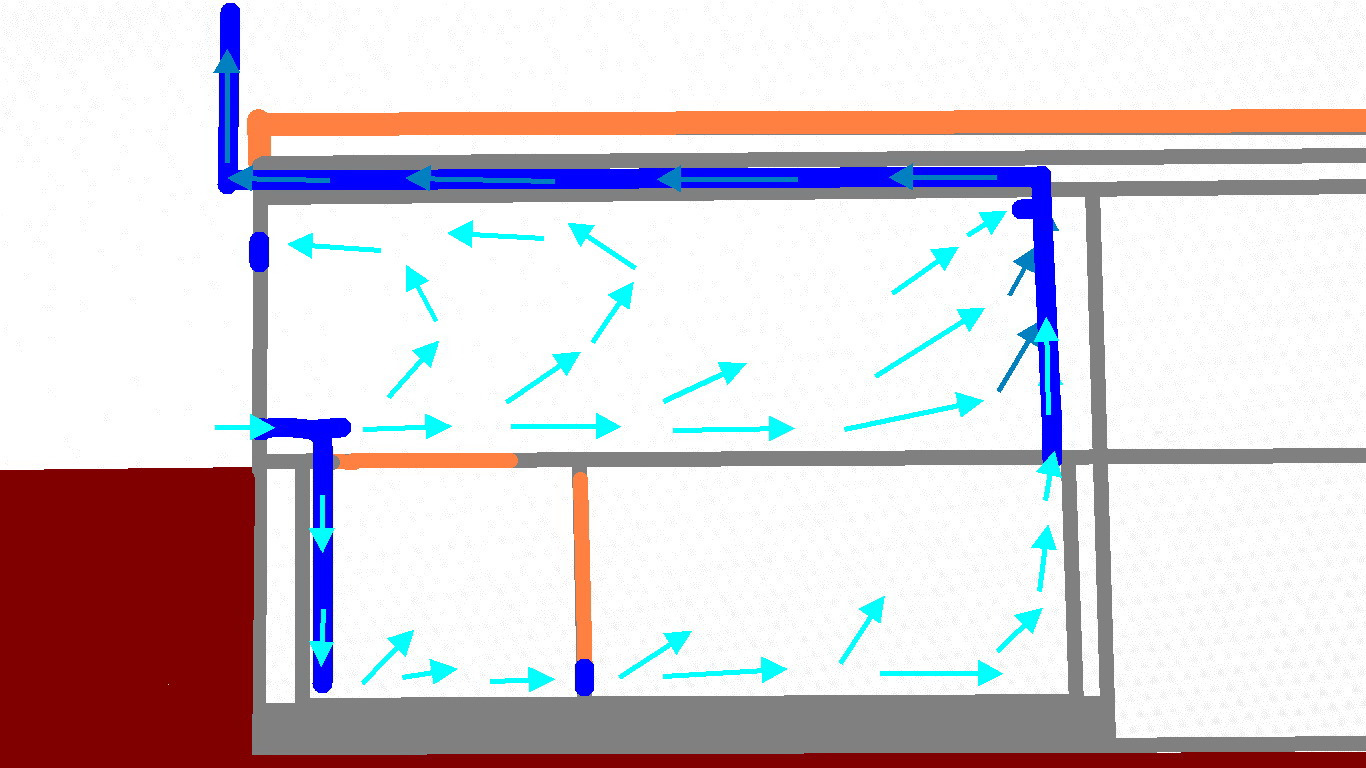
The ventilation scheme of the basement located in the garage: the supply pipe should be lowered as low as possible, and the exhaust pipe should be led high up
If there is no ventilation, this moisture will enter the garage and damage the vehicle stored in it. The ventilation that is arranged in the garage, even when using forced methods of air supply and removal, usually cannot provide a sufficiently intensive exchange of air masses.
For effective ventilation of the basement, two holes should be made: supply and exhaust. It is recommended to ensure that air enters in the southern part of the cellar, and the air flows out from the north.
The supply pipe is usually introduced into the cellar through the garage floor and lowered as low as possible. The hood is arranged in the opposite corner, this pipe is brought up and out through the floor of the garage.As with the ventilation device in the garage, the cross section of the holes for the inflow should be two to three times larger than the dimensions of the hood.


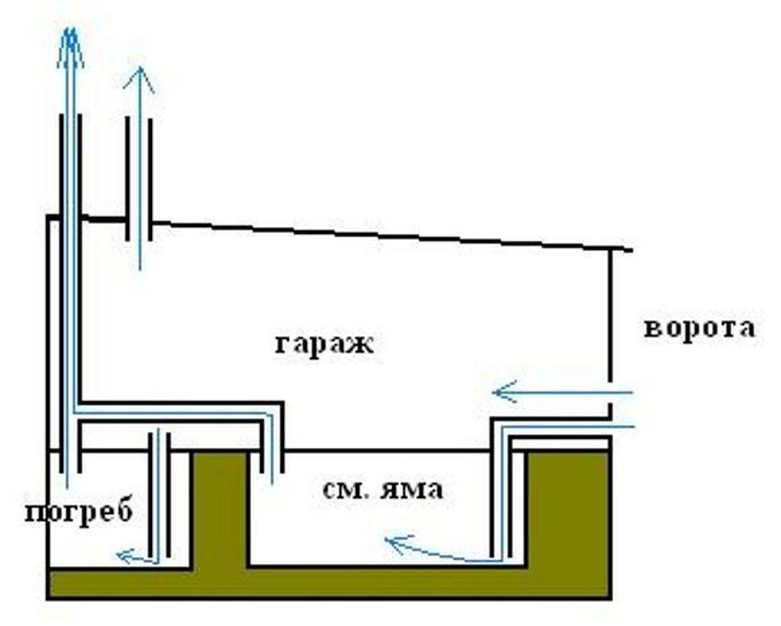
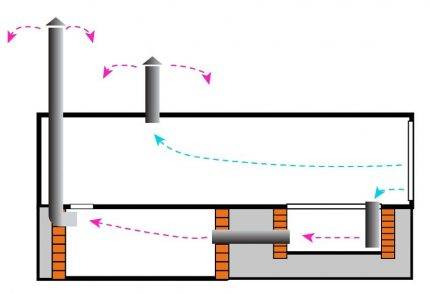
Presented here natural ventilation option garage, which has a basement and an inspection pit, for which separate ventilation ducts are made
The greater the height difference between the edge of the supply and the exhaust, the more effective the ventilation of the cellar will be. A difference of three meters or more is considered optimal. To increase the difference, the vertical part of the exhaust pipe, which is brought out into the street, just needs to be made higher. You can also install a deflector or protective cap here.
Sometimes the installation of a supply pipe for some reason is not possible. In this case, it is recommended to leave the hatch slightly ajar so that the fresh air entering the garage moves into the basement. The lack of fresh air will render useless all efforts to organize an effective extract from the cellar in the garage.
If the garage is heated, condensation may appear on the exhaust pipe in winter. To prevent icing of the pipe, a special glass for condensate is installed.
For an unheated garage, this measure is not required. Products and items that are stored in the cellar in winter should be placed no closer than half a meter from the inlet, otherwise they may freeze.
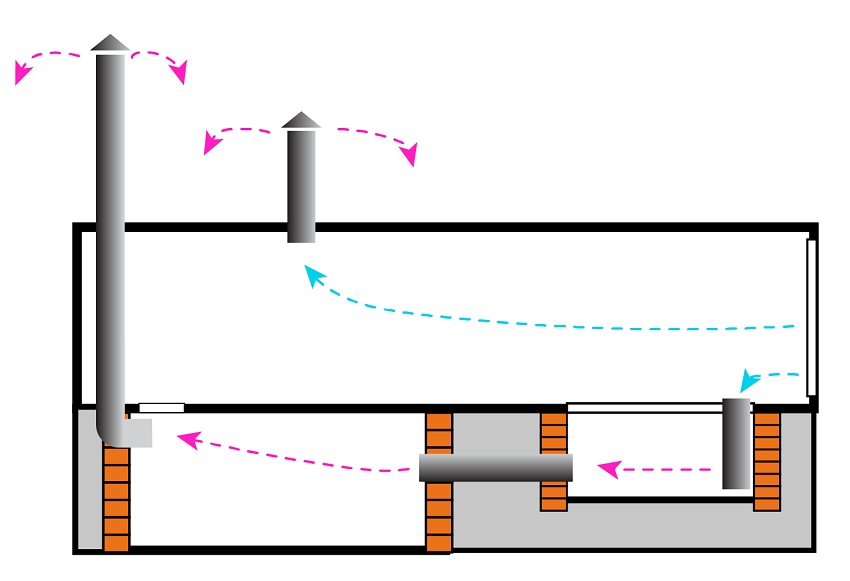
Scheme of natural ventilation of a garage with a viewing hole: the arrows “a” indicate the movement of air flows, “b” - the location of the ventilation slots for the viewing hole
The inspection pit is a small object in volume, therefore, separate ventilation is usually not provided for it. Still, it is worth taking care of a good flow of air.To do this, on the side of the inspection pit that faces the garage ventilation inlet, you need to make a gap of about 10-15 cm. You can open the two sides of the pit in a similar way.
From the side of the hood, you also need to make such a gap, but it should be twice as narrow. For the sake of safety, you can cover these cracks with boards in some places. When installing the car, you need to make sure that it does not block the exhaust slot, as this is dangerous for the vehicle.
Rules and options for ventilation in the garage for do-it-yourselfers outlined in the next article.
What can be equipped?
Installation of air ducts for ventilation systems of any type in our time can be carried out using a wide variety of materials, ranging from plastic or metal-plastic pipes for sewerage and ending with the use of a corrugated hose from a vacuum cleaner.
Let's consider some options.
- You can make ventilation ducts in the box using pipes made of asbestos. Such pipes are not fire hazardous, they can not be painted, or vice versa, if the owner is a creative person, they can serve as material for creating a certain entourage when painting.
- As already mentioned, plastic sewer pipes are also a good option.
- And finally, the simplest solutions are old vacuum cleaner hoses, garden hoses, and other pipe structures.
The perfectly natural desire of any garage owner to have a cellar in it may be faced with the need to install a separate ventilation system into it due to design errors.This can not only lead to food spoilage due to high humidity inside the cellar, but also to sad consequences in the form of corrosion of the car body. For this reason, the ventilation of the cellar should not be neglected in any case.
At natural ventilation cellar it is dried due to thermal mixing of air masses - in accordance with the laws of physics, the lighter heated air in the upper part of the cellar rises, and the air that enters from the outside through the supply air duct fills the rarefied space.
The second option is to install fans and create forced ventilation. This is a scheme with a higher efficiency, but it will require significantly more money and energy costs.
How to make ventilation in the garage - with your own hands, with a guarantee of reliability
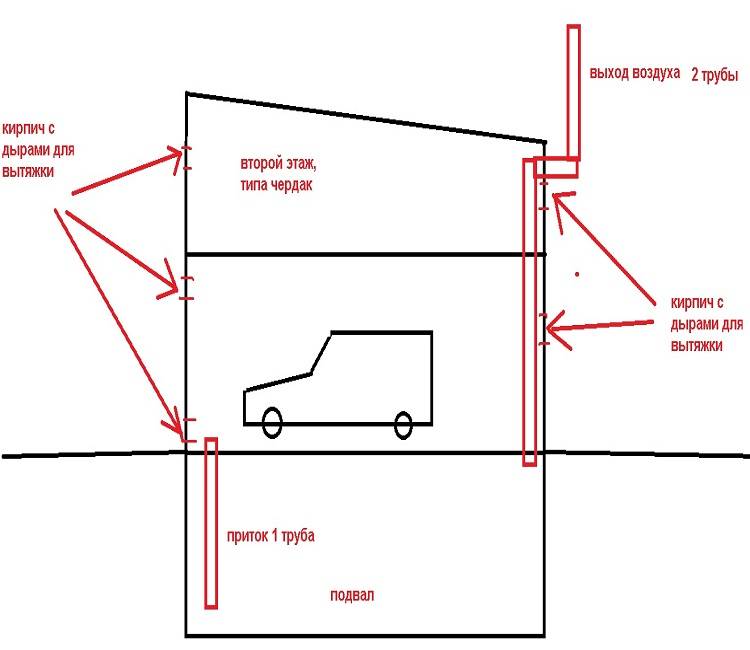
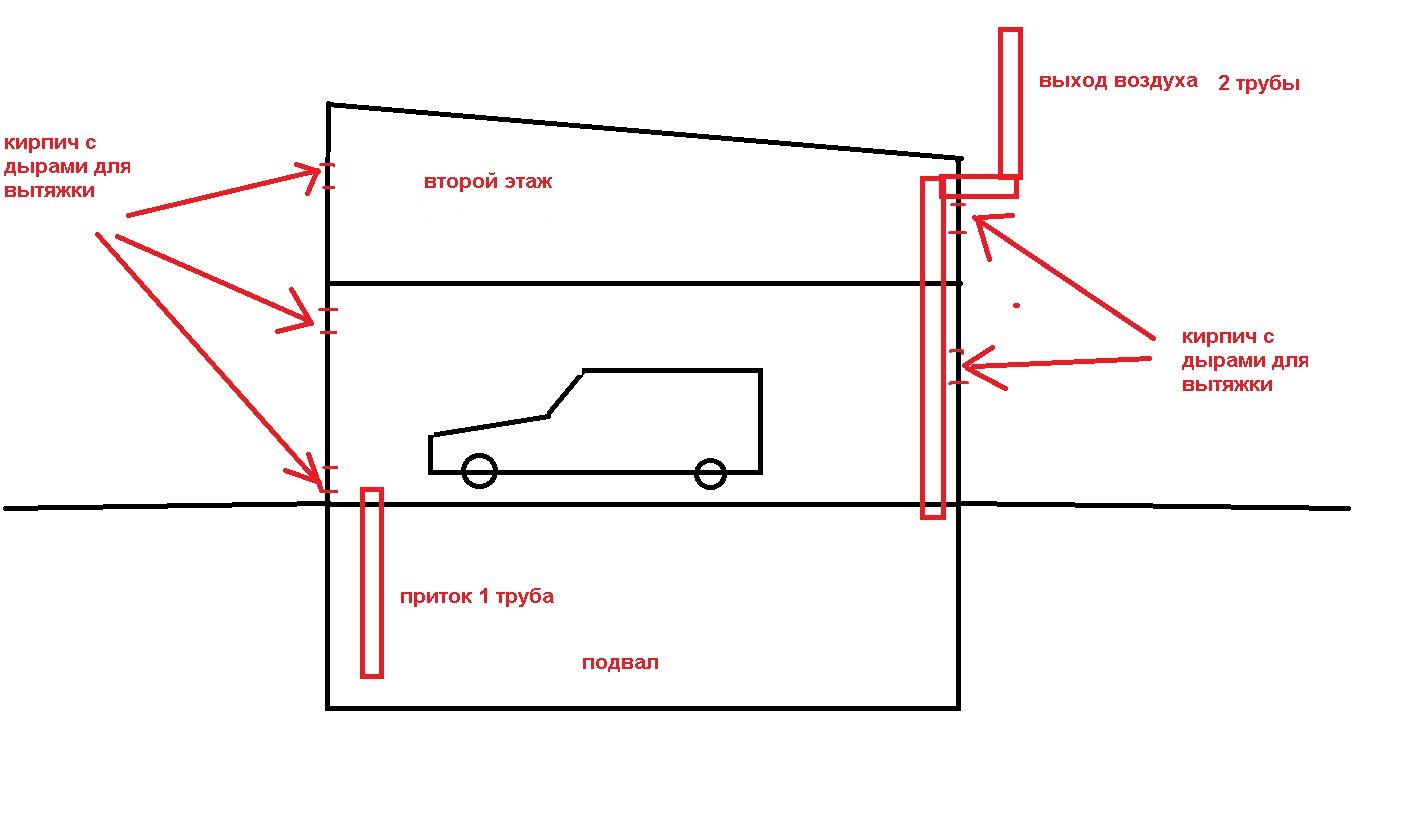
A simple do-it-yourself hood in the garage is calculated based on the area of our car storage. 15 mm diameter of the air duct should be taken per square meter of the floor. For example, a standard garage of 6x3 meters will require air ducts with a diameter of 270 mm - if you lay the "entrance" and "exit" in a single copy.


It is more reasonable to increase the number of inlet and outlet pipes to two of each type. The supply pipes will require mounting holes in the walls, punched almost at the level of the concrete floor screed, no higher than 10 cm from the base. The greater the distance between the inlet channels for air intake, the better, they are located on opposite walls. Brick and concrete walls are punched with a perforator, steel sheets are drilled in a circular manner.
Exhaust pipes are mounted diagonally from the entrance pipes, under the garage roof itself, and lead out through it to the street. All gaps between the ventilation pipes and the wall/roof must be carefully sealed.
Pay special attention to the quality of the sealant, it should “adhere” well with such dissimilar materials as plastic, metal and concrete. One of the exhaust pipes is made up of several pipes and lowered into an inspection hole (if there is one in your garage). It is possible to provide a natural flow of fresh air into the inspection hole only with its shallow depth (up to 1.5 meters) and significant dimensions in length and width
After laying a horizontal plastic pipe into the hole, its outer part must be raised up by 30-40 cm and covered from above with an insect net and a rain dome. You can fix this outer section in the garage wall with staples. The estimated price of such budget ventilation will be about $ 50, the costs are limited by the cost of pipes, plastic turns, mesh and sealant.
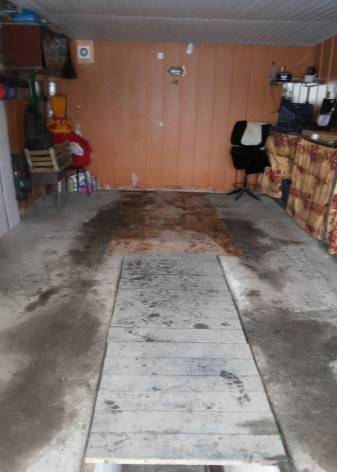
In the photo - a home-made ventilation system in the garage,
DIY garage ventilation pipe photo
In the photo - an exhaust system for ventilation of the garage,
Photo of the ventilation scheme for a garage with a cellar,
Photo of a ventilation pipe from a garage wall,
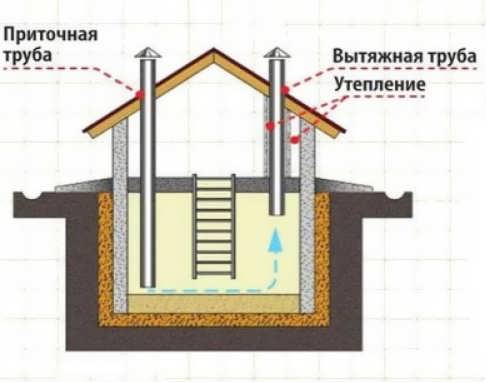
How to make natural ventilation of the cellar
The network is designed and formed at the construction stage of the facility - it's easier than installing air ducts in a finished building. But sometimes the owners make adjustments to the house, and the basement expands, requiring new networks. Here you have to work with the finished box.
A few tips from the pros:
- When installing the system in a cellar, which stands separately, a hole is made in the ceiling.An air duct is brought into the hole, then it is fixed.
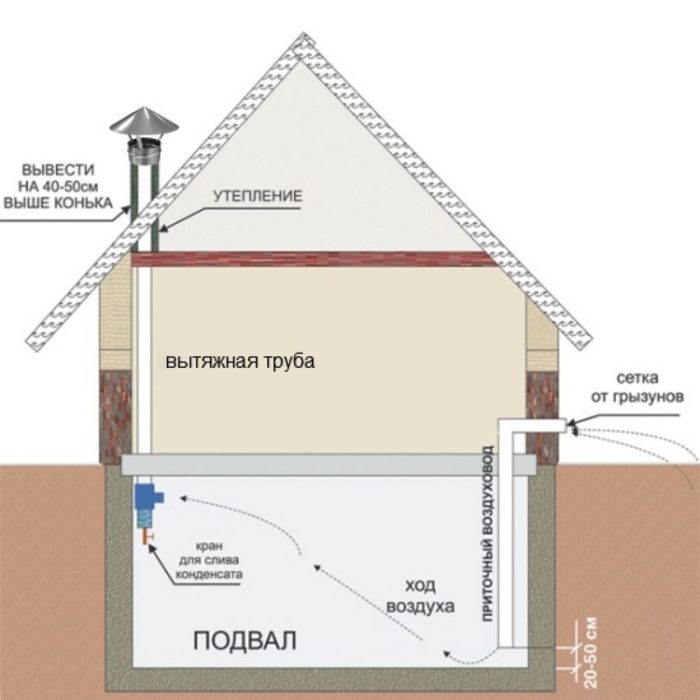
- Installation of the network in the cellar under the living quarters has its own peculiarities. The exhaust pipe is built into the passage area of a common house shaft or canal. This channel must go outside.
- The supply air is formed in the upper part of the basement or cellar. If this is a separate building, the pipe is brought out below the level of the exhaust duct.
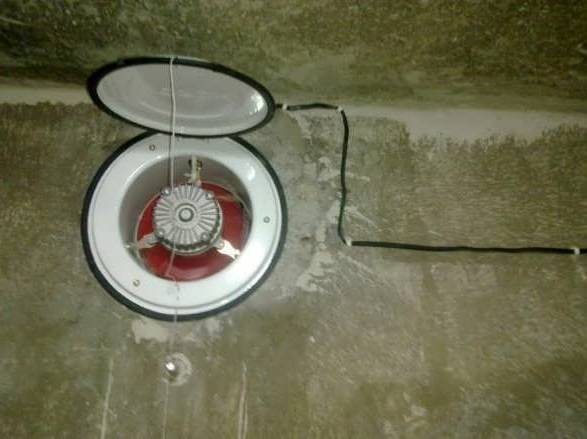
- The external openings of the ventilation ducts are closed with gratings and fungi. The first - to protect against insects, the second - from rain, snow.
Calculation of the diameter of air ducts and their installation system
Masters advise to adhere to a simple formula - for 1 m2 of the basement you need 26 cm2 of section. It turns out that for every centimeter of pipe diameter there are 13 cm2 of section. The calculation is: (S cellar x 26) / 13. Example: cellar area 8 m2, calculation (8 x 26) / 13 = 16 cm. A pipe is bought with a diameter of 16 cm.
The installation scheme differs in the number of pipes. It is recommended to use two ducts of the same size. This ensures that an optimum level of air circulation is maintained. If you need to speed up the outflow, a larger pipe is mounted on the hood.
Air ducts should be located away from each other and with a minimum number of turns throughout the network. The more bends, turns, the stronger the hydraulic resistance to air flow. Ventilation in this case will work with low efficiency.
Choice of duct material
Thinking over how to make ventilation in the cellar with your own hands, the owner needs to choose the material for the air ducts.
The following products are on sale:
- Asbestos cement. Pros - resistance to temperature fluctuations, resistance to corrosion, long service life.Such pipes have a length sufficient for the installation of air ducts without welding. Cons - massiveness, fragility.
- Galvanized metal. Light weight, low cost, ease of installation and resistance to rust are pluses. Minus - any scratch will lead to the appearance of holes.
- Plastic. Durable and practical products with smooth inner walls guarantee good air permeability. PVC air ducts do not rust, they do not need to be cleaned, they last more than 20 years and are inexpensive. In addition, light weight and the possibility of choosing any length help to carry out installation alone.
Required accessories
The master will need the following set:
- air ducts;
- connecting elements;
- sealant;
- lattice;
- fungi.
Depending on the degree of automation, duct fans, split systems, dehumidifiers, hygrometers and sensors will come in handy. The price of the structure depends on the equipment and reaches several hundred thousand rubles.


Stages of work on the installation of ventilation
After the cellar ventilation scheme is selected, all the details are ready, you can proceed to the formation of the structure:
- In a separate building, make a hole in the ceiling. Through it, lower the duct pipe. Fix under the ceiling at a distance of 15 cm from the surface. On the street, raise the hood 150 cm above the ground or the roof of the cellar.
- In the opposite corner, make a second hole in the ceiling or wall. Install the supply air duct, the end of which is lowered to the floor. Placement not lower than 20 cm and not higher than 50 cm from the floor.
- The supply pipe on the street should not be high, 25 cm is enough. The lower the intake of the supply ventilation is located, the higher the pressure difference at the outlet and inlet. The pressure difference affects the draft and the intensity of air exchange.
- When a pipe is led through a wall, a deflector or grate is put on its end.
- Valves are installed on the pipes inside the cellar. The plates help regulate the strength of the air currents. By opening the damper, the user receives a powerful inflow and exhaust, closing it reduces the speed of air transportation.
After assembly, the system is tested. The supply pipe is checked with a sheet of paper - attach, trace. If it sways, there is an inflow, the system is working. The hood is checked with a candle flame or tow smoke - bring it to the pipe, follow the direction of the flame or smoke.
External branches are closed with a lattice, fungi. Sometimes deflectors or recuperators are used. If the owner knows that the installation of fans will be required in the summer, the pipes are selected based on the diameter of the device.
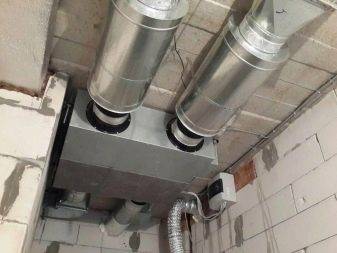
Combined ventilation: step-by-step instructions for installing a duct fan
To make the system work more efficiently, a duct fan is mounted in the pipe or at its end. Its installation is simple, it is carried out without problems with your own hands. You will need the fan itself, mounting hardware, which is usually included in the kit, and fasteners suitable for this type of wall. It is not recommended to use the device without strong fixation to the wall. During the operation of the engine and the movement of air in the channel, vibrations occur, which can lead to the weakening of all components of the system.
First, a gap must be made in the duct, equal in length to the dimensions of the fan. If the installation is carried out in series, the section of pipe adjacent to the equipment is not rigidly fixed to the wall so that further manipulations can be done.
Couplings or clamps are used to connect the fan to the duct. The nodes must be as tight as possible so that there is no air access from the outside, except for the channel. Then the efficiency of the device is maximum.
It is necessary to follow the direction of the air supply. If the fan is installed incorrectly, instead of the hood, pressure will follow, that is, the system will not work.
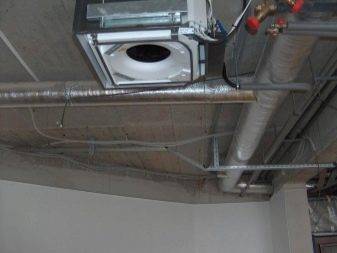
Holes are drilled in the wall, anchors are installed. Mounting perforation is provided on the fan housing, with which the device can be fixed.
Pipes are brought to the supply and outlet and connected to the equipment with clamps.
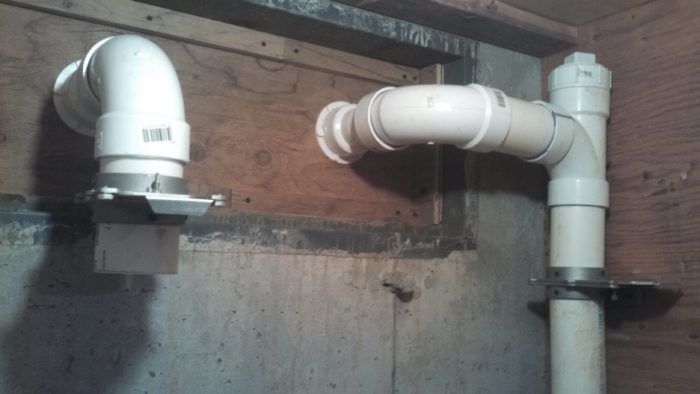
This is what the finished assembly looks like
If the diameters do not match, adapters are used. The power connection is made according to the instructions for the device. During electrical work, safety precautions must be strictly observed.
Installation of natural ventilation
The operation of natural ventilation depends on the correct choice of places for installing air ducts.
The operation of natural ventilation depends on the correct choice of places for installing air ducts. Experts recommend mounting them in opposite corners in the cellar. This will minimize the formation of zones of stagnant air, which is characterized by high humidity.
Initially, a supply channel is created. In the designated place, using a puncher, a hole of the desired diameter is punched through the ceiling and the wall of the garage. Then a pipe is inserted into it so that its lower edge is at a distance of 20 - 30 cm from the floor, and it itself goes out into the street or into the garage. All mounting seams and cracks that formed during its installation are blown out with foam.
Then, according to the same scheme, the installation of the exhaust channel is carried out.There are 2 options for installing it:
- Through, which provides for the removal of the pipe through the floor, ceiling and roof of the garage. In this case, it must be raised to a height of at least 0.6 m above the roof.
- Through the wall in the cellar, when part of the exhaust pipe is first laid horizontally, and then brought up outside the garage. At the same time, its lower edge should be at a distance of 20 cm from the ceiling surface.
The final stage of installation is the installation of a deflector at the upper end of the hood to improve traction
The final stage of installation is the installation of a deflector at the upper end of the hood to improve draft and a protective grille from insects and rodents on the upper cut of the supply pipe. In addition, it is desirable to equip both air ducts with dampers, thanks to which it will be possible to block the inlet and outlet of air during severe frosts, thereby maintaining a normal temperature regime. In winter, it is recommended to take care of their insulation in order to prevent condensation from freezing inside and completely blocking them.


To simplify the work of installing natural ventilation, a hole in the bottom of the wall, covered with a mesh, will help. Acting as a supply pipe, it eliminates the need for its installation.
Forced cellar ventilation
Forced ventilation in the cellar can be implemented using low-power fans (100-200 W is enough), which is installed in the exhaust or supply pipeline (while you should monitor the correct direction of the generated air flow).
Such a ventilation scheme is characterized by stable operation regardless of changes in weather conditions.The only drawback of the system is its volatility; when the power is turned off, the ventilation efficiency is significantly reduced.
The solution to this problem can be forced ventilation in the cellar under the garage or house with the help of deflectors or special turbines that use wind power. The essence of the method is to install a deflector on the upper part of the exhaust duct (instead of a standard cap). Under the influence of wind on the blades of the device, the impeller begins to rotate, while the generated air flow provides a vacuum sufficient to ensure ventilation.
The principle of operation of the turbine is somewhat different. Its rotation is transmitted by means of a flexible shaft to a conventional mechanical fan, the rotation of which provides the necessary vacuum.
These simple mechanisms can significantly increase the efficiency of natural supply and exhaust ventilation, so their installation is advisable in most cases of independent installation of ventilation systems.
As you can see, installing effective ventilation for the cellar is quite simple, the main thing is to follow all the rules described above. If there is no experience in laying communications, then it is better to resort to the help of a specialist who can take into account all the features of your buildings and choose the most optimal scheme.


