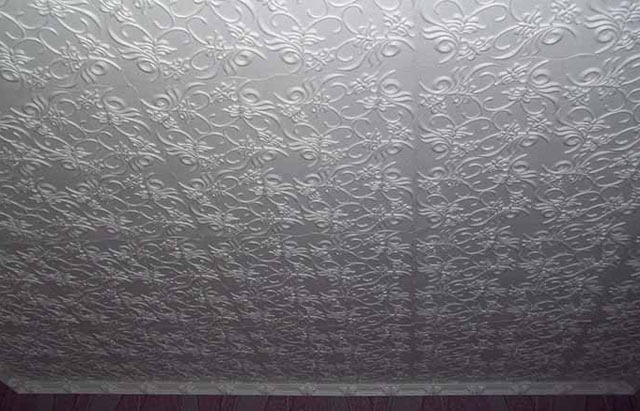
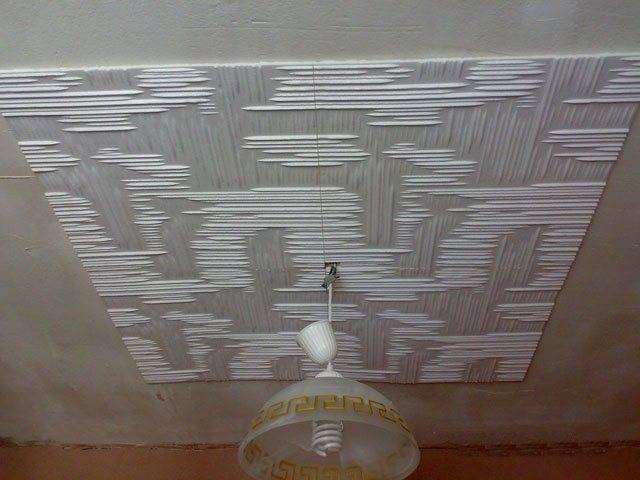
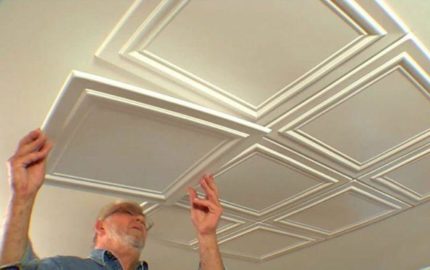
- Seamless ceiling tiles
- Adhesive selection
- How to glue boards
- On a flat surface
- On an uneven ceiling
- Advantages and disadvantages
- Advantages and disadvantages
- Tools
- Ceiling layout examples
- How to apply adhesive to ceiling tiles?
- Styling tips
- Characteristics of polystyrene tiles
- Advantages and disadvantages
- Technological process
- Calculation of basic materials
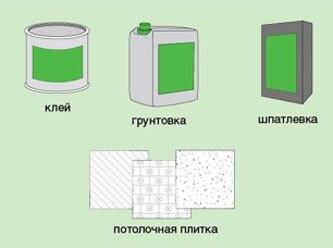
- Material selection
- Choosing the right tools and fixtures
- Surface preparation
- Tile gluing technology
- Types of ceiling tiles
- Rules for the care of tiles on the ceiling
Seamless ceiling tiles
Technology, how to glue ceiling tiles without seams:
A day before the start of finishing work, it is recommended to remove the ceiling tiles and packaging and lay them out on the floor of the room being repaired. This will enable the material to adapt to the conditions of the microclimate of the room, which will protect it from deformation after installation.
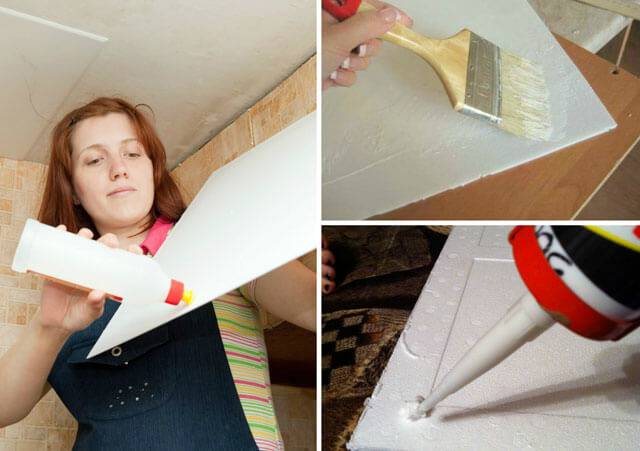
Glue is recommended to be applied on the back side of products, in the central sector and on the edges. For the convenience of uniform distribution, it is better to use a spatula.
For liquid glue, you will need to pause for its setting (the exact time is usually indicated on the package).Viscous mastics do not need such protective measures.
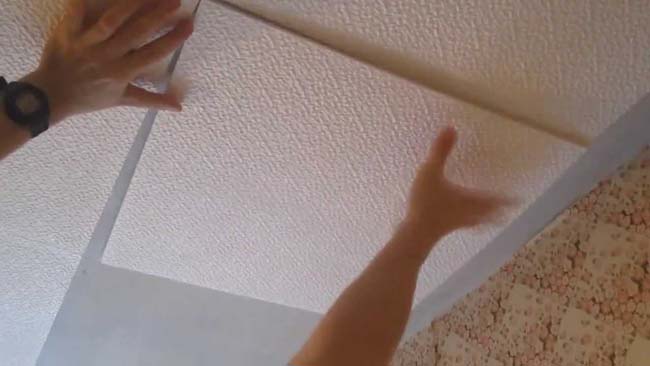
The gluing of the first tile deserves special attention: it must be carefully aligned along the marking lines and pressed with some effort
It is important not to overdo it here, otherwise the product may break or deform. The next three are laid behind the first plate - the result should be a square in the center of the room.
After gluing each panel, it is necessary to wait for some time: it is necessary for a good adhesion of the adhesive to the base base
Each element is carefully adjusted relative to the marking lines and adjacent squares.
- In a similar way, the installation of all other plates takes place, with proper docking with each other. There should be no gaps between them. Adhesive that accidentally gets on the outer surface must be removed immediately using a damp sponge. It is not recommended to leave this procedure for later, because. hardened composition is very difficult to remove.
- The laying of the remaining solid slabs is carried out according to the previously drawn up scheme.
- All polystyrene elements that are farthest from the walls usually need to be trimmed. To do this, use a sharp clerical knife and a steel ruler.
- Acrylic sealant can be used to mask small gaps at the joints. Silicone mixtures in this regard are very impractical, as they gradually turn yellow.
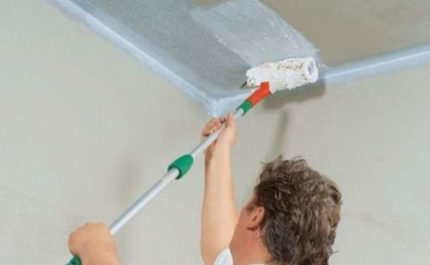
- To make the finished surface as seamless as possible, it is recommended to paint with an acrylic composition.
Adhesive selection
To fix the tiles to the ceiling, several types of glue are used:
- Universal compositions. Glue "Elitans" is suitable for working with wood, plaster, concrete.It is convenient in that it forms an elastic seam, however, the composition dries for a long time. Glue "Titan" is more common, it has a viscous consistency, quickly seizes. Similar in composition to the Master glue, but the pungent odor and longer drying time are the main disadvantages. The advantage over the "Titan" is an affordable price. "Moment" - expensive, but high-quality glue. It quickly bonds, but the consumption is greater than that of analogues. The packaging is made in the form of a syringe, so you need a gun for it. Universal adhesives also include "Dragon", "Power", "Anserglob".
- Liquid Nails. This type of glue is often used by professionals. Liquid nails are thick, so they are placed in a thick layer on uneven areas. For tiles, white glue is chosen, without solvents, especially when working with thin material. It is also used for seams. The most famous brands are Moment Montazh and Tytan. For application, you will need a construction syringe.
- polyvinyl acetate adhesive. PVA and Bustilat practically do not give an unpleasant odor, but they seize longer, and the consumption can be quite large, since the glue is applied both to the tile itself and to the ceiling.
- Finishing acrylic putty. This is a non-standard, but effective use of a product that has the right viscosity. When gluing on putty, the seams are white, and gaps are not formed. The surface can be painted. To work, you need a spatula.
How to glue boards
Laying tiles on the ceiling is possible in two main ways. It all depends on the surface, on how smooth it is. Such a ceiling cladding is designed cheaply and angrily, to hide surface defects.
About the types of marriage or what to look for when buying - video
Often foam lining is considered as a temporary measure, and then you can easily remove it and make a more expensive and beautiful stretch ceiling, for example. Depending on the differences, the method of fastening depends.
On a flat surface
In this case, adhesives for foam or polystyrene foam boards are used, we wrote more about possible materials for gluing above.
The technology of how to glue ceiling tiles with your own hands is as follows:
- Glue is applied along the perimeter of the plate and diagonally. A thin layer is enough, no slippers are needed, no need to apply glue to the entire surface.
- The tile is mounted in the right place, after which it must be held for several minutes until the glue “grabs”. Depending on the adhesive that you have chosen, you need to hold the tile from a few seconds to a minute or more.
- We mount the next part of the cladding in the same way: we apply it to the right place on the ceiling, and then hold it so that it is securely fixed. You need to make sure that the pictures match. The result should be a solid picture, so make sure that there are no gaps and gaps between the tiles, and the pattern matches.
- If there is a need for trimming, use a pencil and a paint knife for this. Mark with a pencil the dimensions you want to cut. Do not cut on the fly, but lay the tile on a level surface.

note
If it becomes necessary to touch up an already glued board, use a small wooden plank. Gently press it against the edge of the plate and try to move it to the desired distance.
Do not do this by hand, because the foam materials are fragile and brittle, so you can easily break off a corner or the plate will crack.
On an uneven ceiling
Mounting on liquid nails or foam adhesive on a ceiling with visible irregularities will not work. There will be too much consumption, and these materials are not intended for leveling uneven bases.
In this case, putty mixtures can be used, which one depends on the magnitude of the differences. If they are within 5-7 mm, you can use finishing putty, if more - use starting rough mixes.


Video tips for pasting the ceiling with foam tiles with your own hands
How to glue ceiling tiles on an uneven ceiling:
- Dilute the putty to the consistency of sour cream.
- Apply the solution to the ceiling, using a notched trowel, remove excess. A notched trowel will save glue consumption and minimize the layer thickness. The solution is applied to the area of several fragments, after which the laying begins. Do not apply too much solution at once, so that it is convenient to work with it, and it does not have time to set and dry.
- Lay the first tile on the applied mortar, press it down to make sure it is fixed on the surface.
- Align the edges of adjacent plates so that there are no gaps, check that the pattern matches.
- You can check on the plane of the plate with a building level. With gentle movements, you can press the tile, which frankly protrudes. If this fails, remove the tile and remove the excess layer of putty underneath.
If the surface of the foam plates is embossed, then visually the differences will not be so noticeable. But still, watch the joints and check the plane with a level.
The advantage of this fastening method is that the cladding adheres immediately, so that the tile does not need to be pressed and held, and then wait for it to fix.
note
Do not lay tiles on a layer of putty more than the maximum indicator, otherwise everything may collapse.
Advantages and disadvantages
Ceiling tiles without seams have numerous advantages, among which are:
- Fire resistance.
- Affordable cost.
- Soundproofing.
- Moisture resistance.
- Thermal insulation.
- Environmental friendliness.
Among the positive features of this finishing material, it should be noted the possibility of painting it in any desired color, as well as ease of maintenance (it tolerates the effects of detergents well). The use of seamless tiles allows you to hide various defects in the ceiling surface.
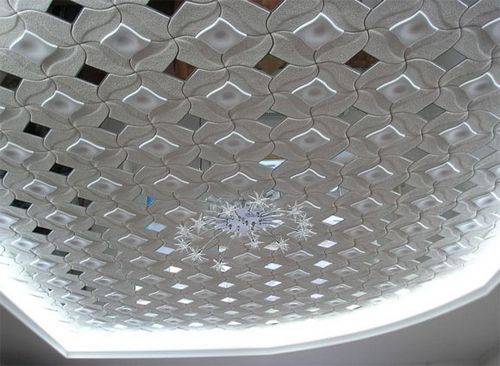
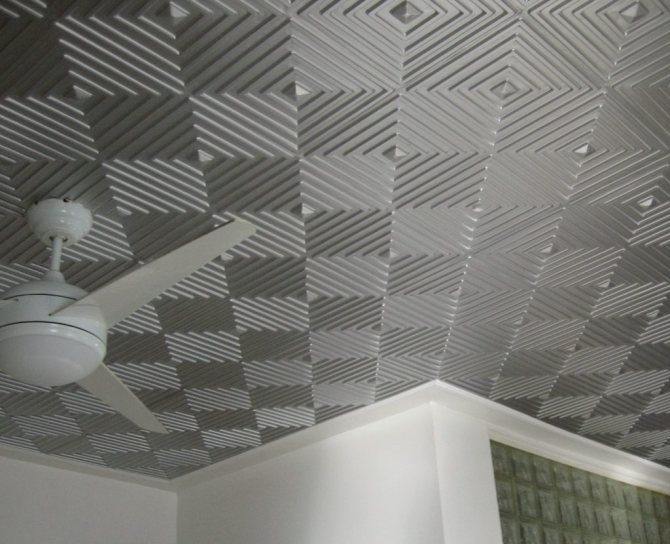
Figure 3 Unique ornament.
Among its shortcomings, we note instability to temperature fluctuations and poor air permeability.
Advantages and disadvantages
The popularity of seamless ceiling panels is due to the presence of a number of advantages:
- Ease. Given the low weight of polystyrene, individual elements and finishes as a whole will not create a significant load on the ceiling. This greatly simplifies installation work and transportation of material.
- Aesthetics. The ceiling finish obtained after installation is monolithic. This is especially appealing to those buyers who do not like ceiling seams.
- moisture resistance. For seamless polystyrene foam tiles, direct contact with water is not terrible. This allows periodic wet cleaning of the surface from dust and dirt, using a soft cloth and detergents.
- Cheapness. Ceiling tiles are among the cheapest options for a beautiful ceiling design. Despite the fact that such a finish is often referred to as budget options, it looks quite presentable.
- Fire safety. As an additional coating, seamless ceiling tiles are treated with fire retardants. As a result, even with direct exposure to a flame, such a finish does not burn, but only melts.
- Sound and heat insulation. Styrofoam products are characterized by low thermal conductivity and the ability to dampen noise from above.
- Easy installation. To glue the ceiling tiles, you do not need special construction skills or the availability of expensive tools and materials. Much simplifies the work without the need to equip the frame.
- small thickness. This makes it possible to avoid known problems when frame suspension systems underestimate the total height of the room by 50-100 mm. For this reason, slab finishes are especially appreciated by owners of small dwellings.
- Large assortment of patterns and textures. After laying, the seamless surface can be painted in any color.
Weak sides of the ceiling without seams from polystyrene foam tiles:
- fragility. When working with expanded polystyrene panels, special care must be taken, because. their edges may break off.
- Zero vapor permeability. The surface created by seamless tiles does not allow air to pass through. In the conditions of a multi-storey building made of concrete or brick, this moment is not fundamental, which cannot be said about country wooden cottages. There, a violation of air exchange can provoke the accumulation of excess moisture inside the ceiling.
- The need to use only high-quality glue. Under the influence of high humidity or temperature, individual trim elements are sometimes partially peeled off. To avoid such phenomena, it is necessary to carefully select the mounting adhesive.
- Heat toxicity. The tile does not burn during a fire, but it exudes smoke and other toxins that are harmful to humans.
Tools
To glue a seamless ceiling, as a rule, the following devices are required:
- Level. Needed to determine the evenness of the base base. Also, with its help, they monitor the correct laying of foam plates.
- Measuring tools (ruler, square and tape measure).
- Construction knife with a set of spare blades. In the course of gluing a tile, it will sometimes be necessary to cut it to size. Basically it is about the last elements from the wall.
- Putty knife. It is convenient for them to spread glue from a bucket. If the mounting mixture is sufficiently liquid, it is better to use a brush or roller instead of a spatula.
- Pencil (marker). Before starting installation, the surface of the black base is marked, which greatly simplifies further installation. A preliminary drawing of the placement of the tiles is carried out on paper.
- Construction goat or old table. Given the fact that you have to work at height, these devices must be comfortable and reliable.
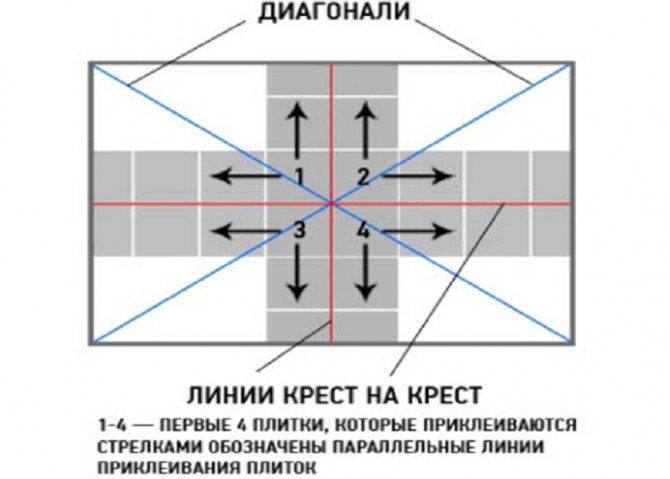
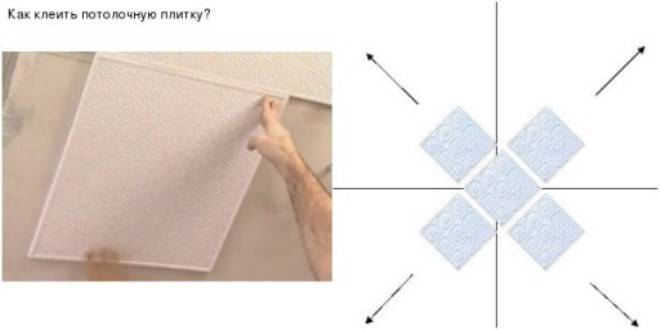
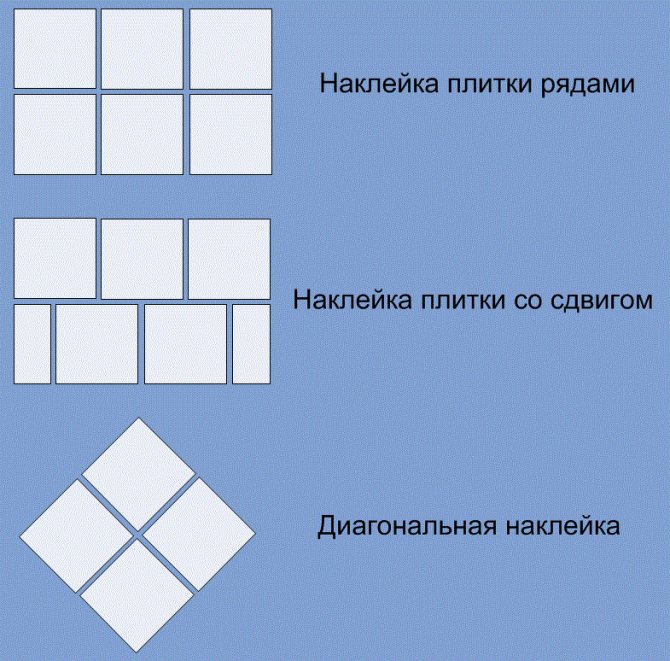
Ceiling layout examples
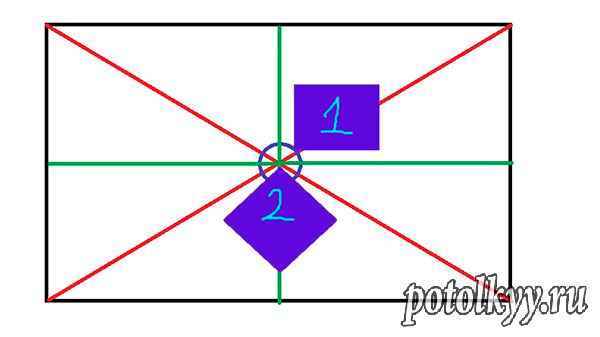
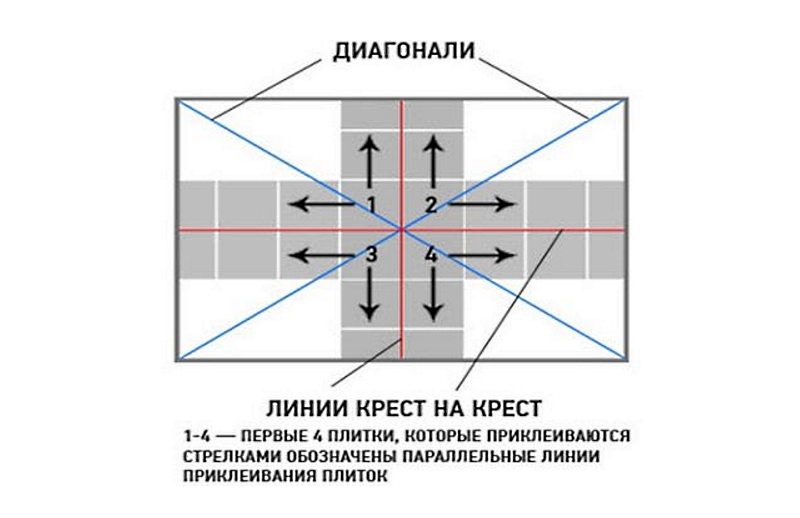
The most versatile is the diagonal drawing. To begin with, the center of the entire plane on which the work is being done is determined, then two lines are drawn from corners to corners. Begin installation from the center to the edge. Then draw lines connecting the midpoints of the parallel walls.
If it turns out that the intersection centers do not match, then you will have to adjust the markup so that the shift and change in the image is not particularly noticeable.
There is also a way to draw a drawing parallel to the walls. Apply options: "in a row" and in rows. In all cases, diagonal and main lines are drawn connecting the midpoints of the walls.


How to apply adhesive to ceiling tiles?
Glue application scheme
Most people who make repairs for the first time in their lives think that applying glue to a finishing material does not require any special knowledge. But as practice shows, even such a simple, at first glance, process must be carried out correctly. If you apply glue randomly, then as a result the tile will not fix as it should, and what is most unpleasant, the resulting seams will not ideally adjoin the ceiling covering.
So, to begin with, apply a small amount of glue to the very center of the tile, then place droplets diagonally from this point, and at the very end, apply a line along the entire perimeter of the finishing material. When applying glue to the tile, make sure that the droplets are not very large. If there is a lot of glue, then when pressing the tile to the ceiling, it will begin to come out and, as a result, you will have to remove the excess, and this can damage the structure of the finishing material.
Yes, and remember, if you want the adhesive to fix the tile on the ceiling as well as possible, you will need to hold it in the air for 1-3 minutes before fixing it. During this time, the adhesive will react with air and this will help the substances that are responsible for adhesion become more active.
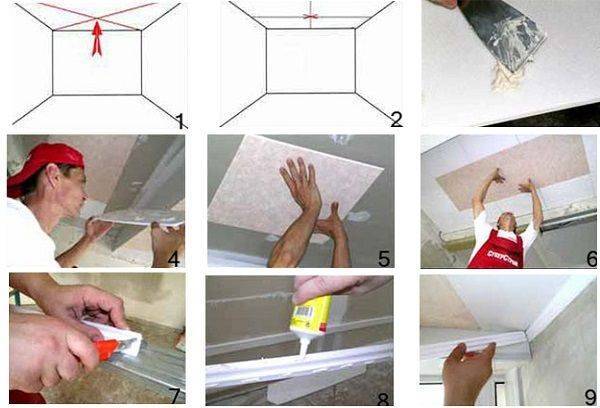
Styling tips
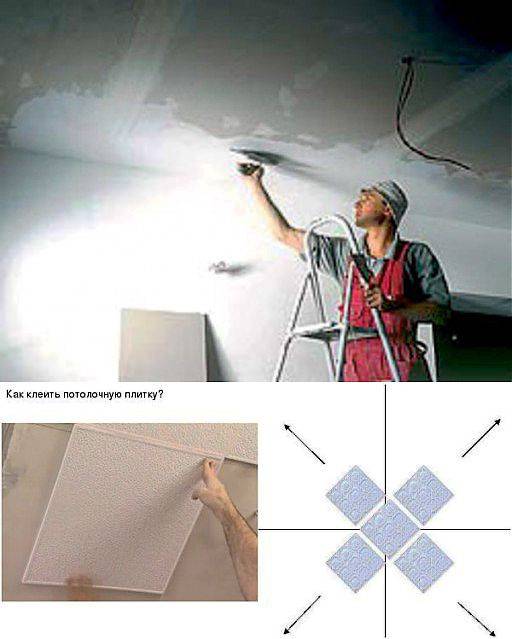
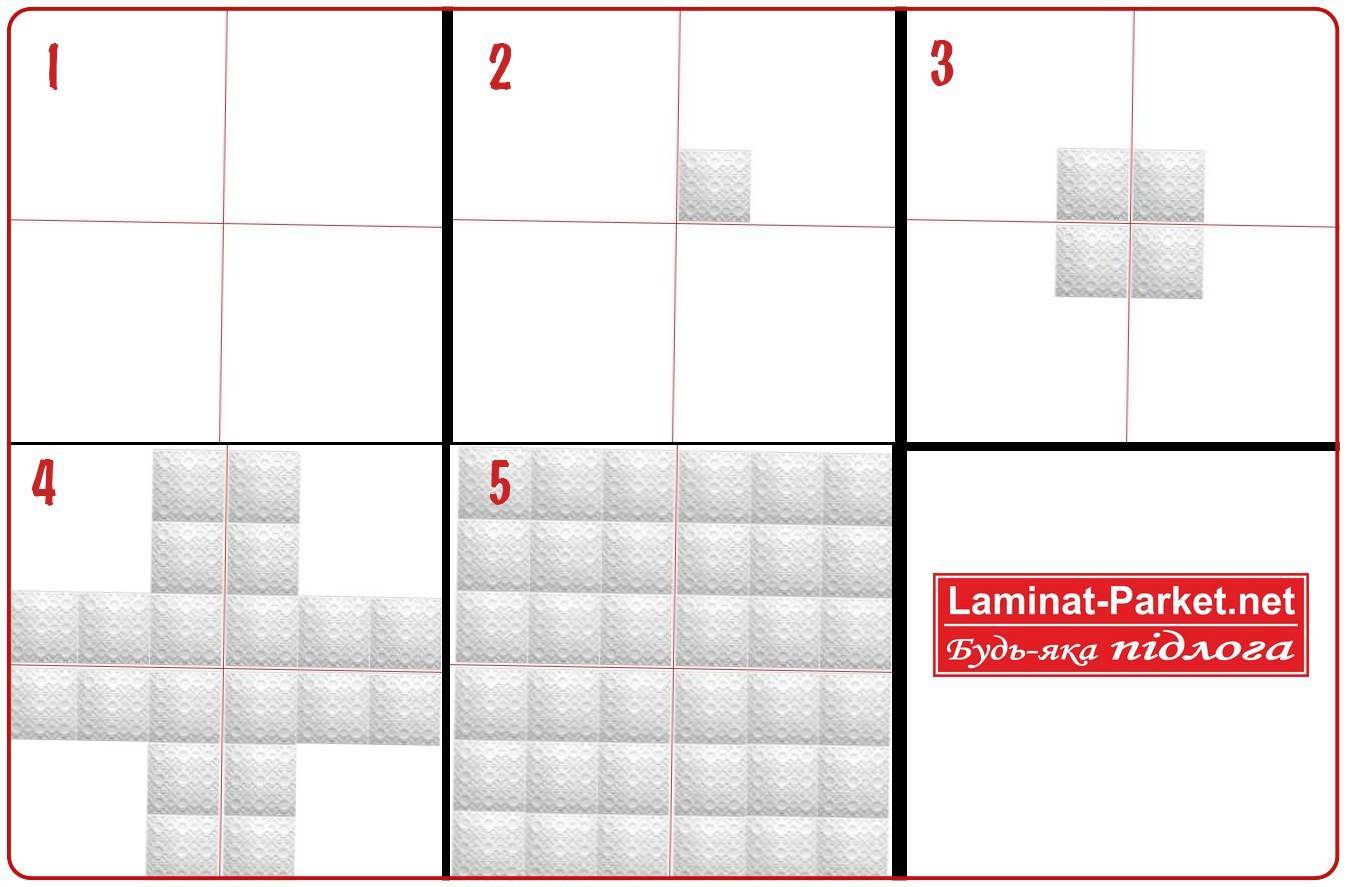
Installation starts from the center of the ceiling or the mounting point of the chandelier. To find the middle, pull the threads from the corners diagonally.The intersection is marked, perpendiculars are drawn from it to the walls. These lines will help orient the tile evenly when laying.
The sequence of work is this. First, one or four elements are glued in the middle. In the first case, it is necessary to set aside distances from the central point equal to half the size of the plate (that is, with a standard one - 25 cm each). And in the second, the corners of the elements are oriented in the middle.
Then the rest of the tiles are glued around. Many manufacturers put arrows on the reverse side. The marks are guided during gluing so that the pattern on the tiles looks in the same direction.
As a rule, the walls have a distance less than the width of the part. Narrow gaps can be closed with a plinth. If the gap is larger, cut the tile with a sharp knife. It must be laid on a flat surface and held so that it does not break in the process.
It is desirable to paint inexpensive pressed tiles. Then the seamless foam ceiling will not turn yellow, dust will not accumulate in the micro-cavities. Laminated cladding is not covered with anything. The injection can be painted if you want to give it a different color.
The walls in the rooms are not always parallel. With a strong discrepancy, it is better to choose a tile with a small pattern. A large drawing is much more difficult to fit.
It is important to consider the location of the chandelier. If it is not in the middle of the room, it is also better to move the central panel
Otherwise, it will seem that the skin is displaced. But if the drawing is small, then the shift will not be noticeable, since there are no visible seams between the elements.
Characteristics of polystyrene tiles
Of the advantages of expanded polystyrene tiles for the ceiling, it should be noted:
- inexpensive cost, which starts in retail from 30 rubles, only lime whitewashing will cost less;
- the ability to hide significant defects in the ceiling surface without puttying and other preparatory measures;
- the material can make unevenness on the base base invisible, but with large differences it is better to opt for a suspended structure;
- tiles are easy to care for, they can be washed with any, most importantly, non-abrasive detergent;
- finishing work using ceiling tiles does not require professional building skills; every owner of a house or apartment is able to stick it without much effort;
- quick completion of the repair, it will take no more than one day to finish the ceiling of a medium-sized room, together with pasting with a decorative baguette;
- decorating the ceiling surface with tiles does not reduce the height of the room. For comparison: any suspended structure will fall below the floor slabs by at least 5-10 centimeters. With a ceiling height of no more than 2.5 meters, tiling is the most reasonable solution. Sometimes it is combined with suspension systems;
- in the event that there is a desire to change the polyurethane tile to another finish, there will be no problems with its dismantling. The material is easily attached to the surface with just a few drops of adhesive, and the weight is negligible, so it is possible to remove the plates with minimal damage to the floor.
Polystyrene ceiling slabs have the following disadvantages:
- the material of their manufacture is combustible and the fire safety of the apartment will be a big question;
- soot, dirt, grease - pollution is inevitable in the kitchen, wiping them off the surface of the tiles is an almost impossible task.This is especially true for the grainy surface of tiles produced by stamping or injection;
Advantages and disadvantages
stretch ceilings suspended structures Advantages of tiled flooring:
- masks minor defects of the base;
- decorative cladding has moisture-resistant, noise- and heat-insulating properties;
- high wear resistance;
- the possibility of dismantling and replacing a separate section in case of damage;
- has a small thickness, keeps the height of the ceilings unchanged;
- a variety of options for colors and textures;
- ease of maintenance.
 Disadvantages of ceiling tiles:
- as a result of prolonged exposure to ultraviolet radiation, the products change color: they fade or acquire a yellow tint;
- when installing the coating, you will have to be careful, because the tiles are fragile, they can crack when pressed;
- it is impossible to hide the wiring: the cables are laid in special boxes on top of the tiles, or before finishing the surface, a strobe is first made in the ceiling slab.
Attention
The tile does not burn under the influence of flame and high temperatures, but melts, releasing toxic substances hazardous to health into the surrounding atmosphere, so the lamps should be at a distance of at least 20-30 cm from the ceiling.
Technological process
To properly glue foam tiles, you need to follow the following algorithm:
Calculation of basic materials
The main materials for this type of finish will be: foam tiles, ceiling plinth and glue.
The calculation of the required amount of materials is carried out by a simple method:
- It is necessary to measure the linear parameters of the room (length and width), then multiply them together. This determines the area of \u200b\u200bthe room in square meters.For example, a room has the following dimensions: length - 3 meters, width - 2.5 meters. The total area will be 7.5 square meters.
- The area of one standard ceiling tile measuring 50x50 centimeters corresponds to 0.25 square meters. To get the right amount, divide the total area of \u200b\u200bthe ceiling by the area of one tile, which in the example is 30 pieces. To this amount, you need to add 10 percent - 3 pieces - in case of scrap or damage to the material.
Material selection
When buying the necessary materials in the store, you should pay attention to the following details:
- The edges of the ceiling tiles should be smooth, without sagging. Otherwise, it will not be possible to join the tiles evenly, and the formed tile gaps will look unaesthetic and cause additional difficulties in their elimination;
- Since the tile pattern can visually enlarge or reduce the room, when selecting material, you need to make a preliminary layout of at least four tiles;
- When choosing glue or a special mastic for gluing tiles, it is worth looking at the adhesion time of the adhesive to the surface. Otherwise, you will have to press the material against the ceiling for a long time, and this can lead to mechanical damage to the tiles.
Choosing the right tools and fixtures
To quickly and easily paste over the ceiling base with foam tiles, you will need the following tools and fixtures:
- tape measure 5 meters;
- cutter;
- putty knife;
- ruler;
- roller;
- pencil or marker;
- ladder;
- table.
Surface preparation
Preparation of the ceiling surface before decorating it is a mandatory technological condition.
For this, the following actions are performed:
- cleaning the surface of the old finish.Be sure to remove the swelling of the old paint or exfoliated whitewash with a spatula, and then wash the ceiling;
- if the surface of the ceiling has a curvature, for example, due to a difference in floor slabs, then it is necessary to level the surface or repair potholes and chips with putty;
- for better adhesion between the ceiling base and the adhesive composition, the surface of the ceiling must be treated with a primer.
Tile gluing technology
Before you start gluing the tiles, you must first draw a ceiling layout and tile layout.
There are two main options for facing the ceiling surface: parallel and diagonal. With the parallel method, the tiles are laid in a square from the center, parallel to the walls. With the diagonal method - from the center diagonally at an angle of 45 degrees.


After determining the method of laying the tiles, it is necessary to determine the starting point for work. With the help of a ruler and a pencil on the ceiling, the center is determined: a cross - if the layout of the plates is parallel, x - if the layout of the plates is diagonal
It is important to draw this designation correctly, because the entire design of the finish and the composition of the picture will depend on it.
Gluing tiles is done as follows:
- An adhesive is applied to each panel in the center and along the edges, pointwise or continuously. It is better to apply glue at a small distance from the edge of the tile in order to avoid getting on the front side of the material;
- The foam panel is pressed tightly against the markings drawn on the surface of the ceiling and held for 20-30 seconds. It is advisable to calculate the clamping force so as not to damage the fragile product;
- At the beginning of work, it will be more correct to stick the center of four tiles, so later it will be easier to navigate on the surface, making sequential pasting of the tiles according to the intended scheme;
- Tiles that will be laid close to the wall must first be cut with a sharp blade on a flat surface so as not to spoil the facing material. If the cutting edge turned out to be not quite even, you should not be upset, because along the perimeter of the room all the irregularities will be covered by the ceiling plinth;
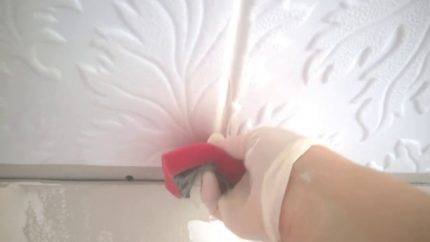
- If tile gaps have formed, then they can be sealed with acrylic sealant;
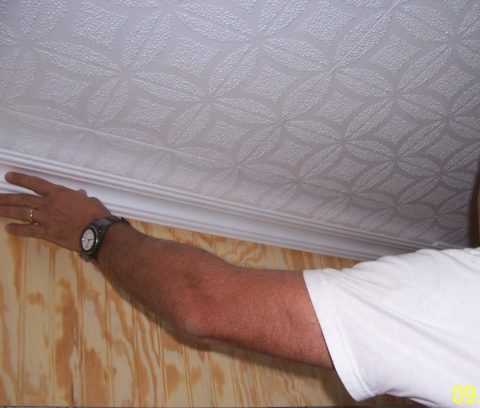
- In order for the finish to take on a complete look, you need to stick a ceiling plinth around the perimeter of the room.
For information on how to quickly and efficiently glue ceiling tiles, see below.
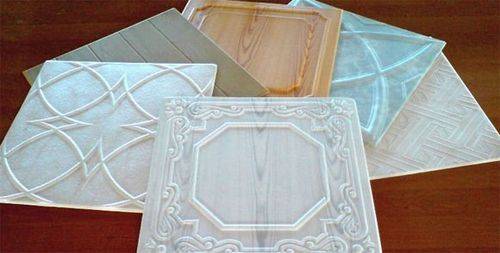
Types of ceiling tiles
Expanded polystyrene products can be glued to concrete, brick, wood. Facing hides small surface flaws. Another advantage is the thermal and sound insulation of the room. If an individual element is damaged, it is simply replaced without resorting to repairing the entire coating. Tiles are easy to care for. It is cleaned with a dry cloth and a vacuum cleaner. Dirt is removed from laminated products with detergents, from this they are not deformed.
Basically, white slabs are produced with various relief patterns imitating stucco molding or decorative textured coating. Such products are intended for painting, but there are also colored laminated panels coated with a protective layer.
According to the production method, tiles are:
- Extruded - made by pressing polystyrene. It has a smooth surface, without graininess. They produce laminated material of different colors, with imitation of marble, wood.This is the most expensive option for ceiling tiles. It has high strength and noise absorption, it is easy to clean and recover after deformation.
- Stamped - made of foam. The surface is looser, granular, polystyrene granules are clearly visible. It costs less than its counterparts. The drawing is created by stamping. Tiles do not tolerate moisture well and are not suitable for bathrooms and kitchens. Due to the wide pores, dirt clogs into it. It is inconvenient to work with stamped foam plastic, because it is brittle, it wrinkles a lot. To make the lining last longer, it is painted with paint.
- Injection - made by sintering polystyrene foam in a special form. It has a clear pattern. This is an intermediate option between extruded and pressed products. The products are characterized by good sound absorption. The product is relatively resistant to moisture and tolerates painting well.
According to the method of designing the edge, they distinguish:
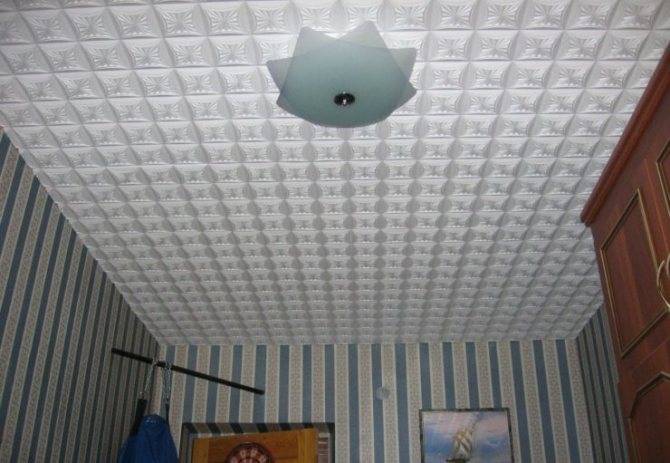
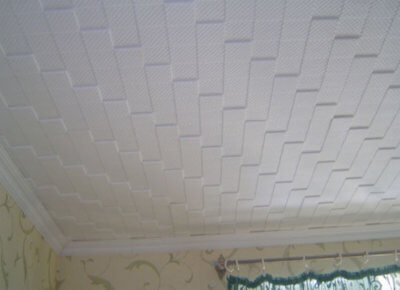
- Seamless tiles. It got its name because there are no seams during installation. There is a feeling of a monolithic surface, as if the ceiling was painted or whitewashed.
- With decorative edging. On panels of this type, a chamfer of various shapes and sizes is cast around the perimeter. When sticking, a small seam remains between the elements, which is intended solely for decorative purposes.
There are two types of seamless polystyrene tiles:
With curly edges (zigzag or wavy) - so the junctions are less visible to the eye.
With a calibrated edge - the edges of the tiles are so even and perfectly sized that the joints between them are barely visible
Often such products are made with a decorative fill - on the front side they are decorated with an ornament (leaves, flowers, waves), which visually distracts attention from the seams and makes them less noticeable.
Usually square-shaped ceiling tiles 50x50 cm in size are on sale. But other formats are also available: 30x60, 30x70, 40x40, 40x70 and 60x60 cm. The shape visually enlarges or reduces the room. The smaller the square, the larger the room appears.


One of the disadvantages of the material is that it fades or turns yellow when exposed to sunlight. Also, the tile can be deformed from temperatures above 80 ° C, so you should choose lighting fixtures that do not heat up, or place them at a sufficient distance from the ceiling.
When choosing tiles, consider:
- the correct shape of the products (smooth edges, no broken corners, the same size);
- clarity of embossing;
- quality of painting, lamination;
- homogeneity of the material, the absence of voids, defects and irregularities.
Expanded polystyrene tiles are best purchased with a margin. Different batches may differ in shade or pattern execution. Some models with decorative fill have arrow markings on the reverse side for convenience - these tips will help you to install in the right direction.
Rules for the care of tiles on the ceiling
In order to keep the tiled ceiling surface in good condition, it must be maintained regularly. Over time, dust pollution is deposited on the coating, which give it a dark color.
Leaks in water pipes or a neighbor's flood form rusty spots on the surface. If you do not remove them in a timely manner, then it will be impossible to do so.
To prevent such consequences, the following rules for caring for tiles on the ceiling must be observed:
- using a vacuum cleaner, dry clean the coating at least once a month;
- every two months to carry out wet cleaning of the lining;
- detergents should not contain aggressive chemicals and solvents;
- the drawings extruded on the surface are processed with a soft sponge moistened with a cleaning solution.
Water is retained in the recesses of the ceiling tiles after wet cleaning. It should be removed with a hygroscopic cleaning cloth, leaving no unsightly streaks. Especially carefully should dry the surface of geometric decorative elements.
Dear reader! Your comments, suggestions or feedback will serve as a reward to the author of the material
Thank you for your attention!. The following video is carefully selected and will certainly help the perception of the foregoing.
The following video is carefully selected and will certainly help the perception of the foregoing.


