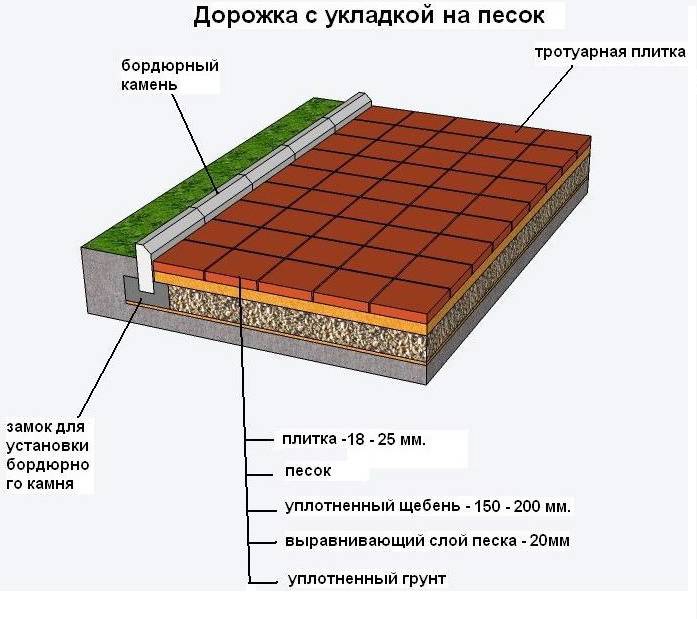
- Detailed instructions: I lay the tiles correctly
- concrete pad
- Border installation
- How to style outdoors
- Installation of tiles on the old base
- Styling options
- Advantages and disadvantages
- Consumables and tools
- Quantity calculation
- Rules and design schemes
- Step-by-step instruction
- Preparing a concrete pad
- Installation of curbs
- How to put
- Seam sealing
- Useful video
- Main steps:
- Planning
- Marking paths and playgrounds
- Excavation
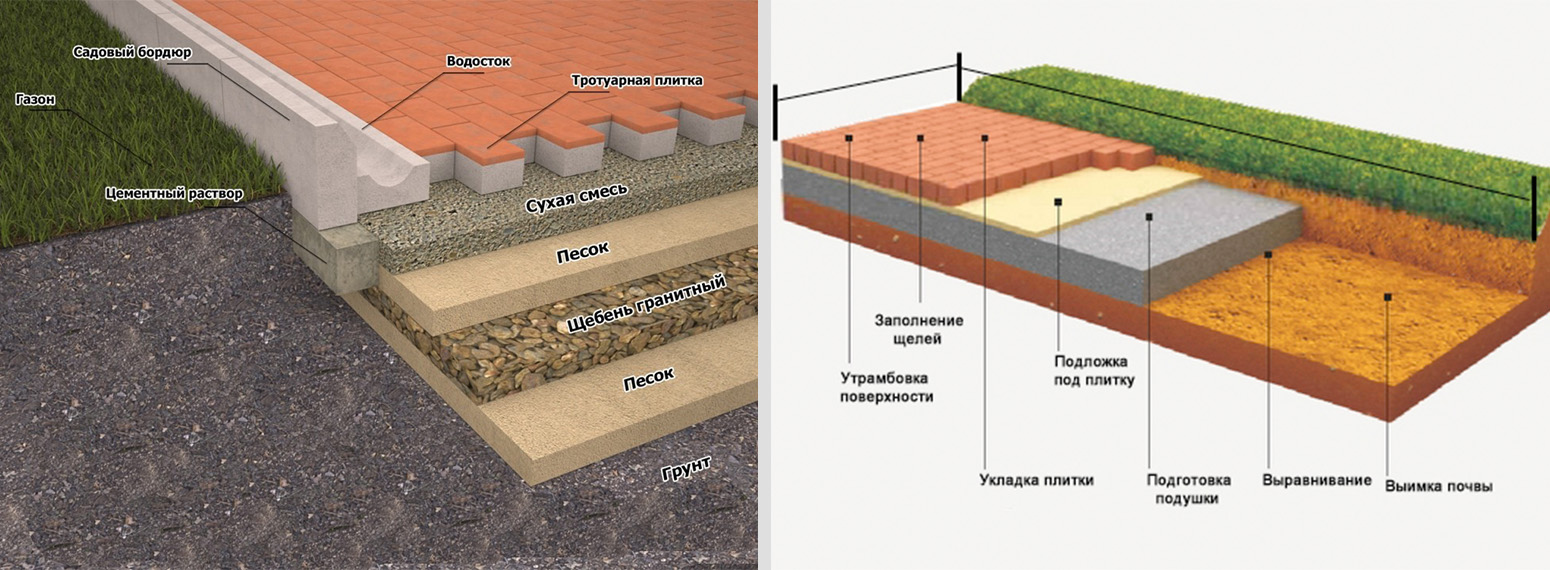
- Foundation preparation
- Installation of curbs
- Main types and selection rules
- Preparatory work
- How to lay correctly: technology and work procedure
- Types and recommendations for choosing paving slabs
- Laying paving slabs on concrete
- Excavation
Detailed instructions: I lay the tiles correctly
How to lay paving slabs? The answer is simple: step by step. All phased work is carried out strictly according to the rules, which helps to avoid defects and get a high-quality result.
concrete pad
Laying paving slabs is easier if you use a geogrid. Such a lattice is a honeycomb made of synthetic material that is resistant to decay. This design will last more than 50 years. It creates a strong frame that reinforces bulk materials.
Installation takes place in the following order:
- The geogrid is placed on the bottom, after which it is covered with crushed stone by 15 cm.
- The crushed stone of the pillow is rammed.
- A reinforcing mesh is placed on top.
- According to the markup, formwork is placed, concrete is poured into it.
- To prevent cold joints that reduce strength, pour concrete continuously immediately after production. In order for the device of the concrete base to be dense, it is necessary immediately after pouring with the help of a submersible mechanism to remove air bubbles.
- If the area of work is large, it is necessary to make an expansion joint every 3 meters. Therefore, boards are placed perpendicular to the formwork and the ground. They will then have to be removed. Before the paving stones are laid, it is necessary to fill the seams with the help of an elastic compound. Thus, the pillow is protected from breakage.
- Drainage holes are filled with rubble.
- When the pavement is laid, moisture gets under it. For drainage, asbestos-cement or polypropylene pipes are mounted. Their upper level is at the same height as the top of the concrete cushion, and the bottom is on a layer of rubble.
- Cleaning the formwork after the cement has set.
 Finished base
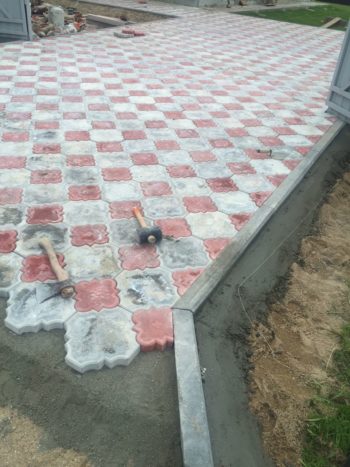
Border installation
Using a trowel, lay the concrete into the ditch. Then the stones of the curb are alternately placed on top. They are driven down into the glue with a rubber mallet. The distance between them is filled with liquid concrete.
As a result, the top level of the curb is 30 mm below the top level of the pavers. Otherwise, water flow is difficult. After 24 hours, fill the gaps formed between the stones and trenches with sand.
If you do as the description advises, the concrete curb will turn out to be reliable and durable.
 Laying curbs
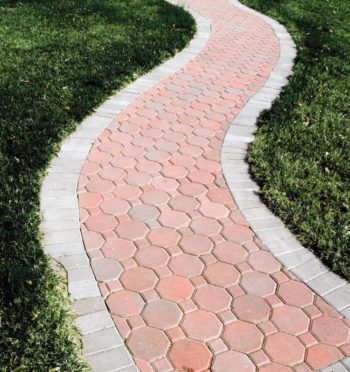
How to style outdoors
How to lay paving slabs? What should be its thickness? What adhesive is needed for paving slabs? These questions are asked by the person who decides to purchase this material.
The thickness of the plates depends on the purpose. If the goal is to create a sidewalk, then 5 cm of thickness is sufficient. If paving stones are needed for the manufacture of car entrances, then the minimum thickness is 6 cm.
 Laying
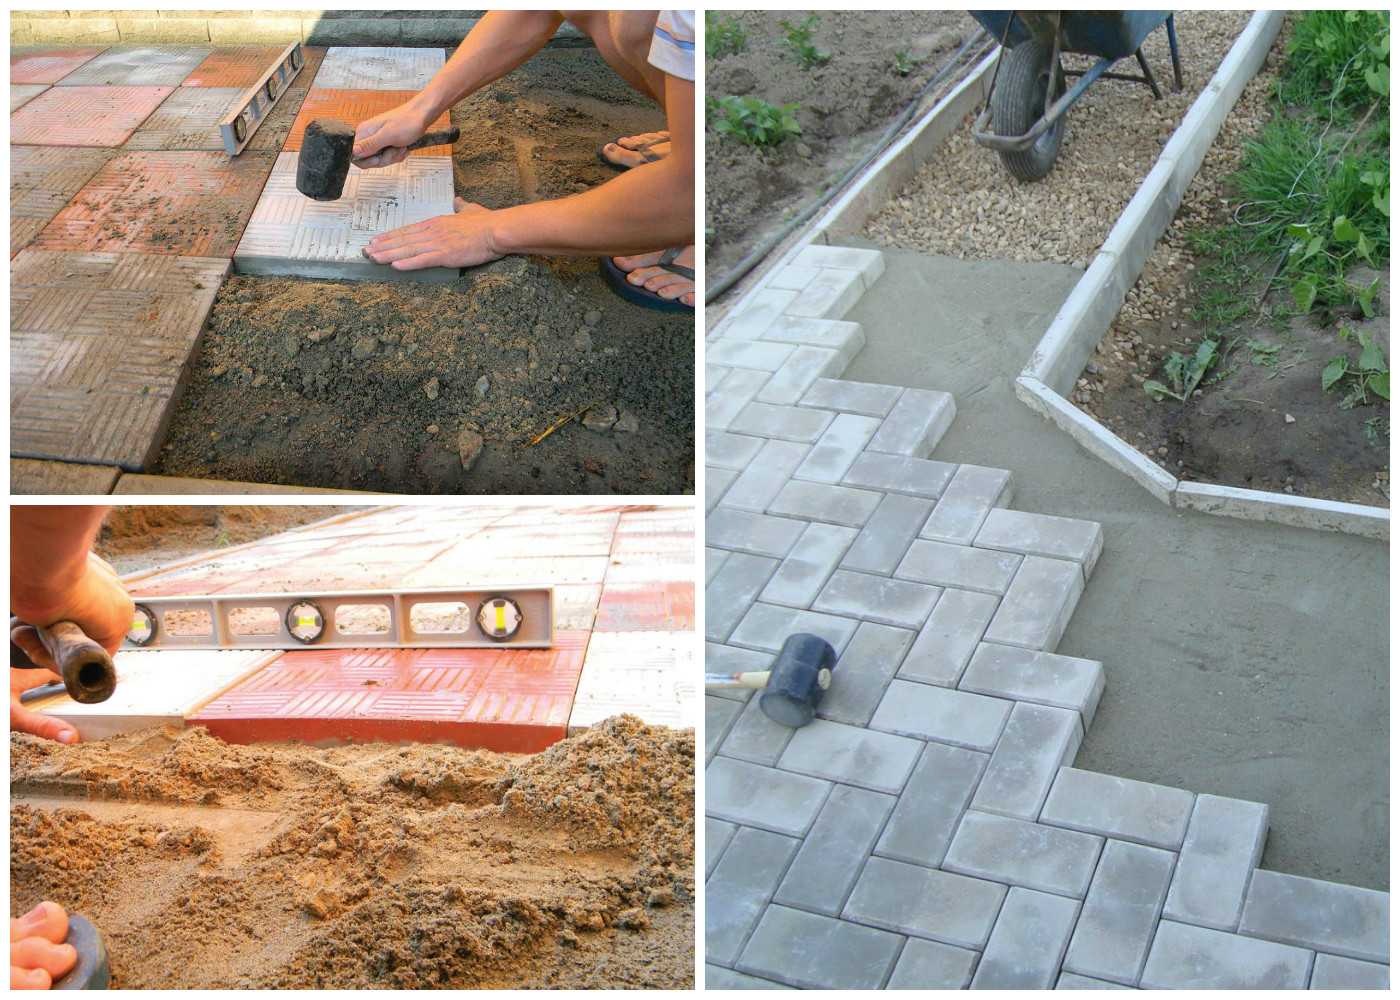
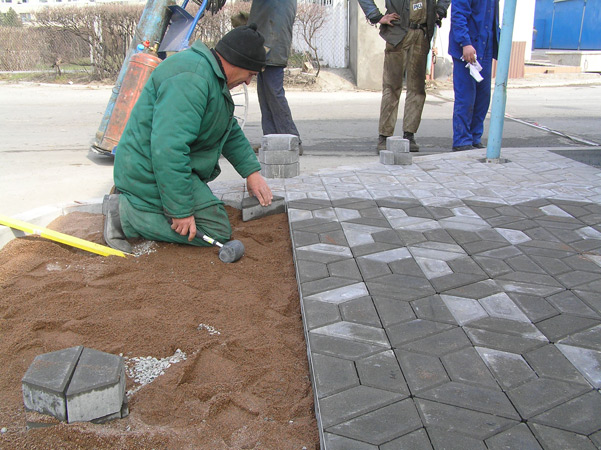
Is it possible to lay ordinary paving slabs on concrete using a dry sand-cement mixture and a cement-sand mortar? Yes. Both types are suitable for this job. There are two options for how to lay the material using a dry sand-cement mixture (PCS):
In this case, well-sifted sand is used. The proportions of sand for making mortar are 3 shares per 1 share of cement. The solution, if properly prepared, is similar in consistency to thick sour cream. With the help of a trowel, 3 cm is applied evenly on a concrete pad. After that, the laying of paving slabs on the concrete mortar begins according to the scheme. With the help of a rubber mallet, the paving stones are driven into the mortar, after which the horizontal surface is verified using the building level.
If you use dry DSP, it is necessary to pour it over the concrete with a layer 4 cm thick. Then, using a rule or a regular board, level the surface. Lay paving stones on these foundations
In order for the tile flooring to turn out to be of high quality, it is important to properly prepare a mixture of 6 parts of sand and 1 part of cement. And after the work, pour water over the site so that it gets under the flooring on the glue and makes it harden.
When the installation is completed, sealing will be required. They put dry TsPS in them and water them with water. And so several times until it stops shrinking.After 3 days, remove the debris and rinse with water from a hose.
 Final stage
Installation of tiles on the old base
How to lay paving slabs on an old concrete base? This is a topical issue. After all, a new track is being laid to replace the old one, which still retains the screed.
To begin with, make sure that time has not affected the old concrete, it has not crumbled, and serious defects have not formed. Before laying the tiles on the old base, you need to clean the debris. Then putty small holes and eliminate bulges. After that, the process will repeat the standard installation.
 Laid tile
You can find more information in this video:
average rating
ratings over 0
Share link
Styling options
Paving must only be carried out by a specialist. Any violation of technology or non-compliance with the rules leads to the fact that after the first rain or heavy load, the masonry can deteriorate significantly and everything will have to be redone. Also, a good master will be able to offer different styling options.
Brick. The easiest way to lay paving slabs is brick. Its main advantage lies in saving materials. Originality can be given by alternating different shades.

Pavement with "brick" laying
Herringbone. One of the most popular ways, the tile lays down at an angle. Guarantees high pavement stability, often used in driveways


However, it is important to remember that the area may visually decrease or increase depending on the chosen masonry angle. Imitation of weaving is carried out using the longitudinal and transverse directions of the masonry with alternation.

Elements are stacked at right angles
Chaotic order.A tile is used that differs in shade and size. Any order of masonry can be used, and the result is very interesting. Such masonry is very advantageously combined with other methods of paving.

With this layout, you can create drawings
Chess. Material that is laid out in this way always looks neat. The symmetry of squares is used, the best option for a strict design. The tile can have a textured surface and alternate color shades.

Diamonds. There are many masonry options for using this scheme. It can perfectly harmonize different shades. On round platforms, figured drawings in the center look great. Be sure to initially make a drawing-scheme of the picture. The special skills of the master will even allow you to achieve a 3D effect.

Tiled rhombuses will help create a three-dimensional pattern on the sidewalk
Circles. Such examples of laying paving slabs are carried out using different patterns, details, shapes and shades, which are laid out radially. Here the master can show imagination and get very interesting results. Suitable for sites of various sizes.

With the help of circles, an interesting styling is also obtained.
Curly. It is very difficult to spread according to this template. It requires strict adherence to direction, as well as color. You can greatly embellish the landscape using a variety of shapes and images. To achieve a particularly spectacular masonry, textured tiles are used. It is necessary to prepare, to select the markup according to the developed sketch.
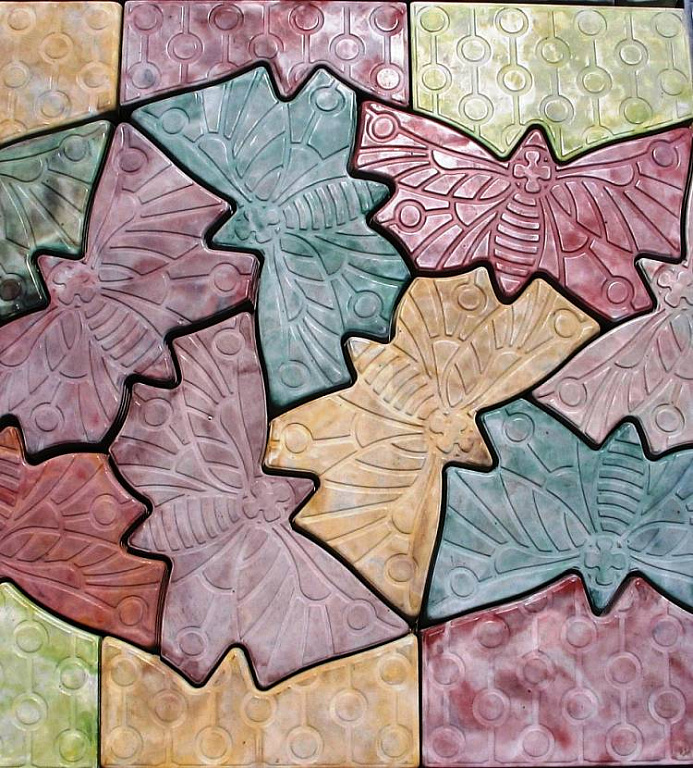
Figured tiles are beautiful, but require attention like when folding a puzzle
Natural stone. Such material has a special surface that imitates natural stone.Can be stacked in any order, can be alternated with other materials. This option allows you to achieve good results without any extra effort.
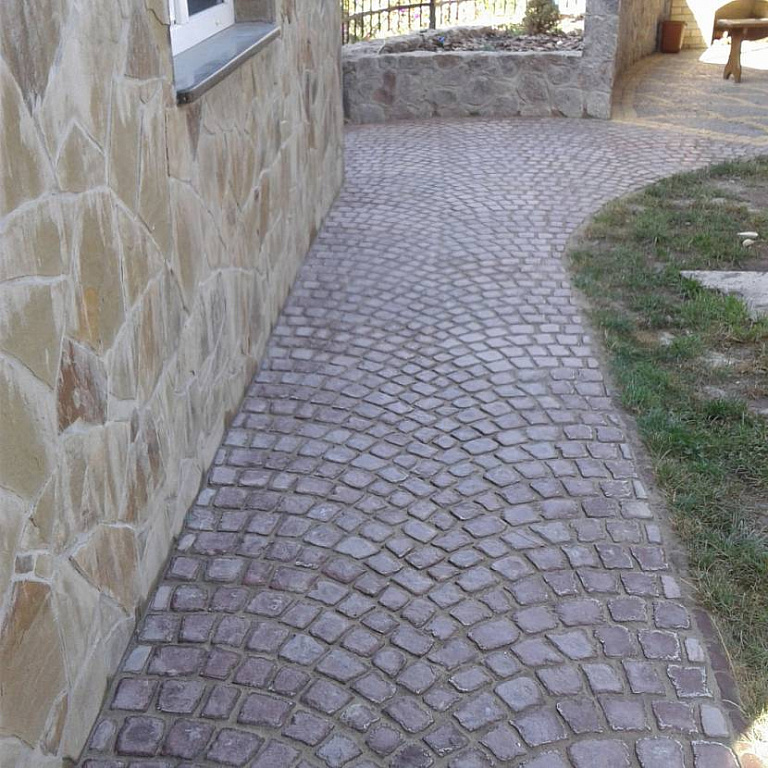
The blind area of the house from a tile under a stone
Mosaic. Hexagonal elements are used to create the appropriate pattern. You can develop any ornaments using multi-colored details.

Mosaic styling will help create different patterns
Advantages and disadvantages
The advantages of this method over laying paving stones on sand are associated with a higher strength of the structure:
- concrete base is resistant to high loads and mechanical damage;
- with the same strength, a simple installation system compared to asphalt pavement - there is no need to fit an asphalt paver.
But it's not without its downsides:
- the technology is more complicated than when laying on a pillow of sand and gravel;
- when removing a damaged slab for repair, adjacent ones can be damaged;
- if the technology is not followed, the concrete base may begin to paint after the first winter.
Consumables and tools
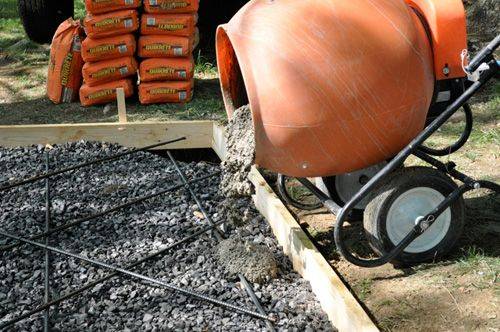 concrete mixer
To comply with the manufacturing technology of tile coating, special tools and building materials will be required:
- concrete mixer;
- sifted sand of medium fraction;
- cement (class M500);
- small gravel or crushed stone;
- building levels (up to 50 and 100 cm long);
- tamping device, automated or manual;
- cord for marking;
- wooden stakes;
- trowels;
- rubber mallet;
- a hose with a special nozzle or a watering can for watering;
- rubber paints;
- broom;
- rake.
Quantity calculation
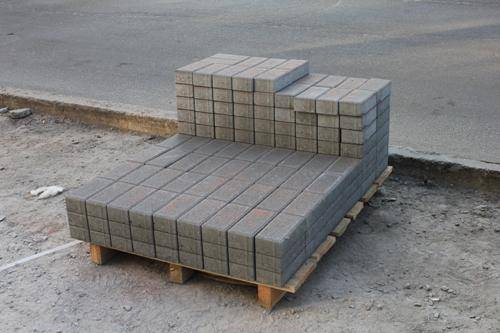 paving slabs on a pallet
When calculating the volume of materials, it is necessary to take into account the width, length and thickness of paving slabs on a concrete base. It will be necessary to mark the territory, determine the perimeter of the paths or the area for the recreation area. The calculation of the total area for paving is carried out, the resulting amount is multiplied by the index of the thickness of the base. It is necessary to add at least 8-10% to the final figure for high-quality performance of work.
The volume of curbstones is calculated taking into account the length of the perimeters of the site. When determining the mass of raw materials for creating a concrete base, the strength class of concrete is taken into account. The composition of class B20 will require 300 kg of cement, crushed stone - up to 1150 kg, screened river sand - about 650-770 kg, water - at least 160 liters.
Rules and design schemes
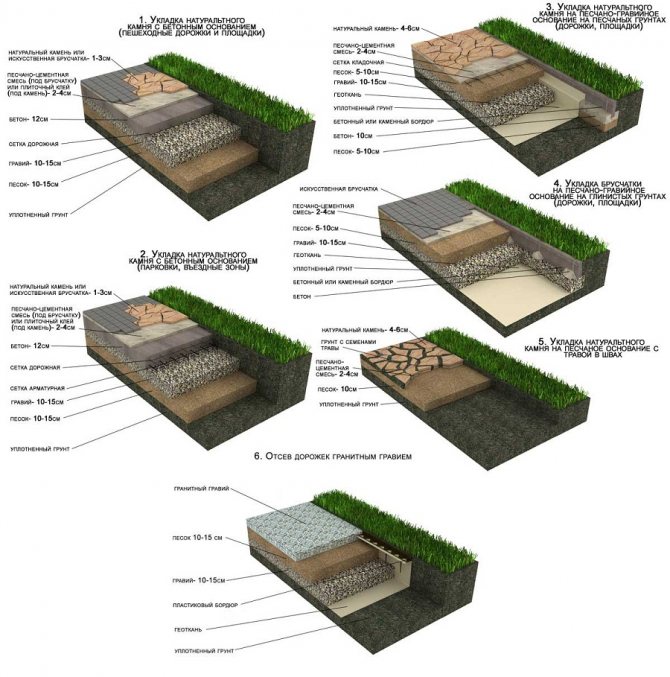
The scheme of laying the finished product depends on the specific type of paving stones, its colors, the presence of a pattern, relief, size. The appearance of the coating depends on the installation method. Also, the design of the canvas should be combined with the landscape. Consider the most popular masonry patterns:
- Linear. Also, this method is called the classic, spoons, brick bundle. Standard type of masonry with a plain image. Paving can be done in two ways: without shear; with an offset. The first option is used extremely rarely, as it reduces the bearing characteristics of the web. The second method is the most common. The main condition for laying is that the joints should not coincide, according to the principle of building an ordinary brick wall. The offset can be half and three-quarters, as well as playing with colors, you can get a diagonal and caterpillar pattern.
- Linear-angular.The bearing capacity of the surface increases, so this method is good to use in places with increased load. Depending on the arrangement of the elements, two main schemes can be distinguished: herringbone and braided. In the first case, rectangular bricks must be laid in rows at an angle of 45 °, with each subsequent element located on the same curve touching with a poke with half a spoon of the previous one. In the second option, the paving method does not differ from the previous one, only the tiles are located at a right angle of 90 °.
- Block. Brickwork is done in blocks. It is possible to lay modules of two elements, alternating their horizontal and vertical arrangement, and also to lay pairs through one perpendicular brick. In the first case, when using only two colors, a checkerboard pattern is obtained.
- Random layout. An excellent choice, the tiles "Old Town", "Brick", "Classic Rusto", flagstone are used. The elements are placed in random order, which allows you to create an original, unique pattern.
- Spiral, circular. One of the most difficult. Components are arranged in the form of a circle or square.
- Artistic. Thanks to different colors, a combination of different methods, a detailed scheme, you can lay out beautiful drawings, ornaments, geometric shapes.

Step-by-step instruction
The quality of the carrier layer in case of laying slabs on concrete is very important due to the use of rigid fixation. In case of unsuccessful execution, the structure will quickly crack
Preparing a concrete pad
To improve the quality of work on preparing a concrete base for paving slabs, you can use a three-dimensional geogrid - a honeycomb-shaped structure made of synthetic material that is resistant to decay and chemical attack.
When stretched, such a lattice forms a frame that is stable in the horizontal and vertical directions, reinforcing any bulk material placed in the cells. The service life of such a grate is up to half a century.


- A geogrid is laid at the bottom of the trench and covered with a 15-cm layer of crushed stone. The height of the grate is selected so that its edges are below the level of rubble and do not interfere with the rammer.
- Crushed stone pillow is rammed.
- A reinforcing mesh is laid over the rubble.
Along the contour of the marking, made of pegs and a cord, a formwork is set into which concrete will be poured.
Concrete is prepared and continuously poured into the formwork so that so-called cold joints do not form in the body of the concrete pad, which reduce the strength of the structure.
Immediately after filling the formwork, a submersible vibrator is used to compact the structure of the material and remove air bubbles.
The concrete pad is covered with a film to avoid too rapid loss of moisture and for the next 3-7 days its surface is periodically wetted with water.
On a large area, expansion joints should be made every 2–3 m. To do this, boards are installed perpendicular to the formwork and the surface of the earth, which then will need to be removed and, before laying the paving stones, fill the seams with an elastic composition. During temperature fluctuations, these seams will help to avoid breaks in the concrete cushion.
To remove moisture that has fallen on the surface of the concrete cushion under the paving stones, cut polypropylene or asbestos-cement pipes are installed at some distance from each other, the upper level of which should be flush with the upper level of the concrete cushion, and the lower end should be located on a layer of crushed stone.
Before laying, the drainage holes are filled with fine gravel.
When the concrete has completely hardened, the formwork is removed.
Installation of curbs
Curbs must be installed in the recess remaining after dismantling the formwork. To do this, hard concrete is made, placed with a trowel into the ditch, and curbstones are installed on it one at a time.
To drive them into the solution, a rubber mallet is used. The gaps between the stones are filled with liquid concrete.
The height of the curbs should be at least 20-30 mm below the top of the paving stones so as not to interfere with the flow of water. A day later, when the solution hardens, the space between the curb stone and the walls of the trench is covered with sand.
How to put
The dimensions of the slabs are selected depending on the purpose: for the sidewalk, a thickness of 4-5 cm is sufficient, and if cars drive into the surface, then pavers are chosen no thinner than 6 cm.
On a concrete base, the slabs are laid on a dry sand-cement mixture or on a cement-sand mortar.
-
When using a cement-sand mixture (CPS), only sifted sand is used. The solution is prepared from 1 part of cement and 3 parts of sand, the consistency should be like that of thick sour cream. With a trowel on a concrete pad, the solution is laid out in an even layer of 2–3 cm.
The paving stones are laid on the mortar according to the planned scheme and lightly driven into the mortar with a mallet.The horizontalness of the surface should be checked as often as possible with building levels.
When using dry DSP for laying, work is carried out similarly to laying paving stones on a sand cushion - a layer of dry DSP (3–5 cm) is poured onto the concrete, leveled with a rule or a regular board with a smooth edge, and then slabs are laid out on this pillow.
Dry DSP is prepared based on 1 part of cement 6 parts of sand, but in dry form it is not able to firmly hold the paving stones, therefore, upon completion of work, the site is well spilled with water, which enters through the gaps between the tiles down and the mixture hardens.
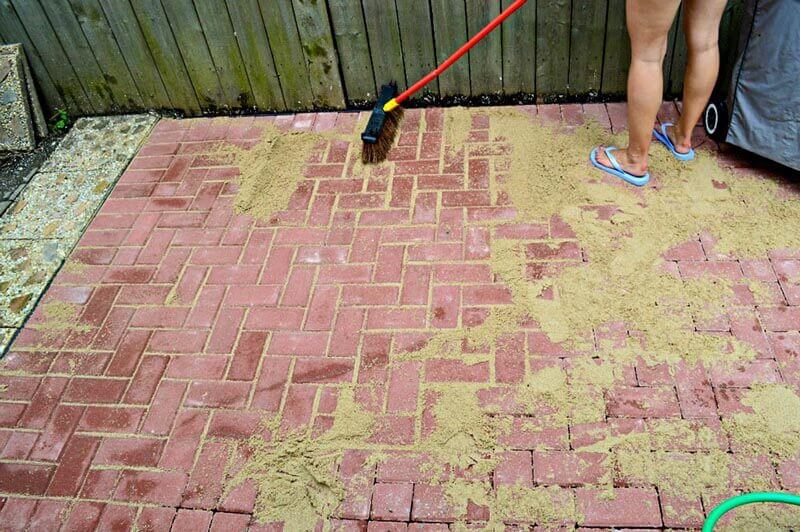
Seam sealing
Between the paving stones, the seams are covered with dry DSP and spilled with water. The operation is repeated until the mixture stops shrinking. After 2-3 days, when the surface is completely dry, remove construction debris, sweep away small debris and dust with a broom and, if necessary, wash the surface with a strong pressure of water from a hose.
Useful video
Learn more about the technology of laying paving slabs on a concrete base from this video:
Main steps:
- Design - geodesy, planning, design (layout drawing, color schemes); constructive solutions (base, drainage, specification of landscaping elements), working drawings.
- Calculation of the cost - materials (paving stones, curbs, inert materials), the cost of work.
- Delivery of materials to the object.
- Carrying out landscaping work.
Planning
- Draw the layout of the area to be paved.
- Measure the area, mark the dimensions on the plan.
- Calculate the required number of tiles for laying, as well as the required amount of raw materials for the base
Marking paths and playgrounds
First you need to mark the paths and sites according to the developed plan. Determine the direction of the water flow. Keep in mind that water should go along the blind area of the building or along the path to drainage wells or lawns. The slope can be made longitudinal, transverse, longitudinal-transverse, but not less than 5%, that is, 5 mm per meter. The direction of the slope should be such that water flows from the paving into the drainage systems or onto the lawn, but not towards the building.
Excavation
- Soil excavation is carried out taking into account that after laying the front surface of the tile reaches the specified level of your site.
- The area formed after excavation must be leveled and compacted.
- If the soil is soft, it must be moistened (spill with water from a hose) and also compacted.
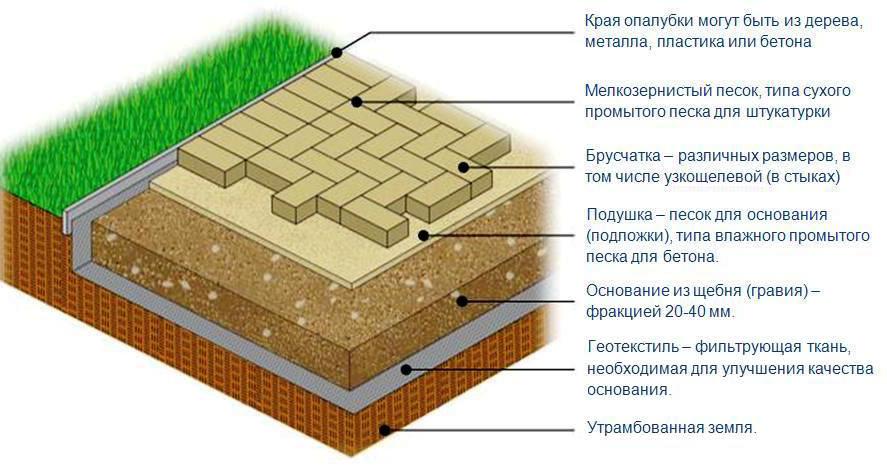
Foundation preparation
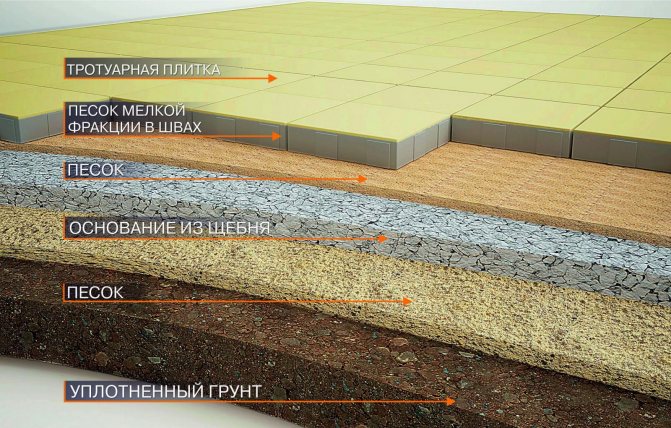
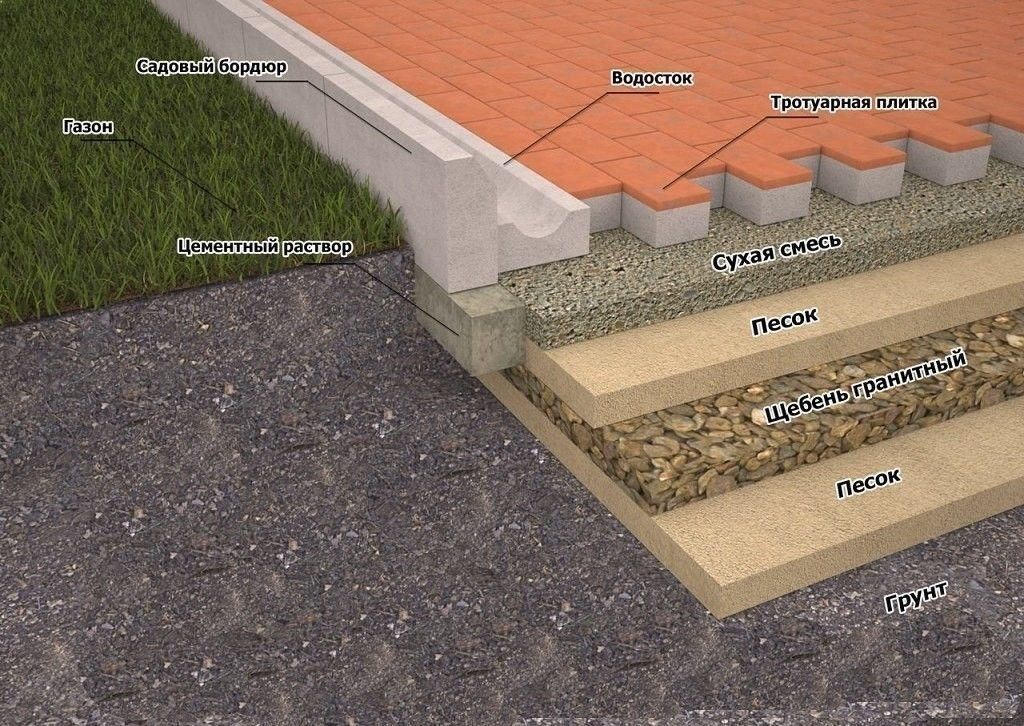
The most important stage in the process of laying paving slabs is the preparation of the base. The correct foundation will not allow the path or platform to “sag” and ensure the longevity of the paving. It must be taken into account that, despite the tight seams of the pavers, the base is still saturated with water. Therefore, a permeable drainage bearing layer (gravel, crushed stone) is needed at the base. Then part of the water from the surface will be diverted through the paving stones and the carrier layer into the soil. Be sure to need slopes and gutters to drain excess rainwater. This is necessary so that a "swamp" does not form under the paving slabs. For the main carrier layer, a frost-resistant, homogeneous material (crushed stone, gravel) is used. This material must be laid evenly in height and with the required slopes.When arranging ordinary footpaths, a layer of 10-20 cm is usually used. When arranging paving stones for the passage and parking of cars, a layer of 20-30 cm is used. Under heavy loads, the carrier layer is increased and placed in 2-3 layers, with each layer compacted with a vibrating plate or vibrating roller.
After removing the elevation levels, it is necessary to remove the top layer of soil
Then, using a vibrating plate or manual rammer, tamp the base and fill in the leveling layer of crushed stone.
All layers of the base must be poured, leveled and compacted, taking into account the slope of 5 mm per meter!
On the pre-compacted main layer of crushed stone, as a leveling (underlying) layer, a layer of sand or screenings of fraction 0-5 is applied, always clean (without clay).
Before laying the underlying layer, it is necessary to expose the guide rails (beacons) and fix it with sand or screenings.
After setting the guides according to all the slopes and fixing them, lay the underlying layer between them and smooth with the help of the rule so that the paving stone, before it is compacted, lies 1 cm above the required level.
After that, the guides are carefully removed, and the remaining grooves are carefully filled with screenings or sand.
It is impossible to step on the laid layer!
Installation of curbs
Observing all the recommendations of the instructions on how to properly lay paving slabs, and in order to prevent it from “spreading” along the edges, curbs are installed that should reach at least half the height of the tile.
Small grooves are dug on the sides of the trench, their bottom is compacted and covered with sand by 5 centimeters. Then curbs are installed on the liquid solution.The joints between them should be shed with a solution and sprinkled with sand.
The procedure for installing curbs is the same for both sand and crushed stone. Only on the rubble then you must not forget to pour a layer of sand-cement mixture with a layer of 5–10 cm.
By the way, a smooth and even surface should be given to the base using a profile or a regular pipe.
Main types and selection rules
The composition of the paving slab is a cement mixture with the addition of various dyes, mineral components, plasticizers. The use of high quality raw materials guarantees compliance with GOST, therefore, the durability of the coating.
The correct dosage, adherence to technology is a guarantee of quality, therefore, it is worth purchasing material from trusted manufacturers, not chasing the cheapness of handicraft production.
It is advisable to give preference to the option that has additives of granite chips, polymers, high-quality clay. It is better to refuse the option consisting exclusively of a concrete-sand mixture, since it will not last long.
Modern manufacturers offer the consumer two main types of paving slabs:
- Vibropressed paving slabs. It has most often a rectangular, square or diamond shape, uniform colors.
- Vibrocast paving slabs. It is made by hand, therefore it is distinguished by a larger range of colors, the maximum variety of shapes.
When choosing, the quality of the base, the functional purpose of the coverage areas are taken into account. Experts advise choosing a material of small sizes, as it is more resistant to cracking.
It is important to consider the thickness of the blocks. Minimum - three centimeters, for parking and car passages - at least 5-6 centimeters
The color and shape are selected in harmony with the decoration of the building of the house, taking into account their own preferences. The installation of a diamond-shaped and rectangular slab is more complicated, it requires the use of some work skills. It is easier to lay the curly one, because the flaws are less noticeable.


IMPORTANT. When choosing a stove, one should take into account its environmental friendliness, since heating the surface in summer will cause the release of harmful substances, which will adversely affect the health of the family. Each stove is carefully examined, its quality is evaluated
It is worth refusing to purchase material that has the following disadvantages:
Each plate is carefully examined, its quality is evaluated. It is worth refusing to purchase material that has the following disadvantages:
- Inhomogeneous structure of the outer side.
- Too bright color.
- Uneven coloration.
- Dark spots on the reverse side.
- Clots of material in the structure.
- Smooth, high gloss surface.
ADVICE. By knocking two copies against each other, you can determine their quality: a dull sound indicates the fragility of the material. A high-quality plate should be sonorous.
Preparatory work
The stage of preparing the soil surface with your own hands is important for the long-term operation of the sidewalk, access roads to the building.
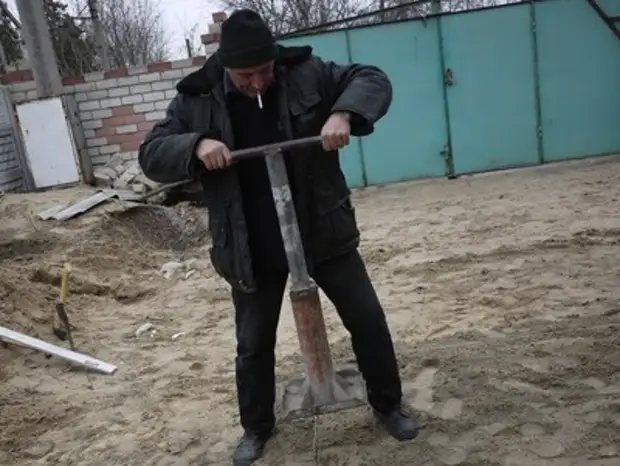
The allotment of land is marked with pegs and a cord, then the soil is removed with a layer of up to 25 cm. It is necessary to free the area in the space behind the cords by 2-3 cm (for installing borders).
The pit needs to be cleared of weeds, pebbles. If there is loose soil on the site, it is necessary to remove the fertile layer of the earth, because. this soil is not subject to compaction.
The bottom of the plot is leveled with a rake.Then it is necessary to moisten the surface with water from a watering can or a hose with a nozzle to prevent subsidence of the soil. On a leveled earthen base, work begins on the creation of a concrete screed.
In some cases, experts recommend waterproofing the area under the sidewalk (lay out several layers of roofing material). The placed layer of geotextile keeps the growth of weeds, allows the coating to maintain integrity for a long time.
How to lay correctly: technology and work procedure
After preparing the base for laying tiles with your own hands, the following steps are necessary:
- Stretch the cord along the edges of the tracks and platforms with the help of stakes.
- Install curbs along the borders, digging them into the soil to the desired height. For greater stability, the curb is fixed with cement mortar.
- Arrange drainage for the outflow of water. The pipe is wrapped with geotextile, placed in a prepared trench next to the curb.
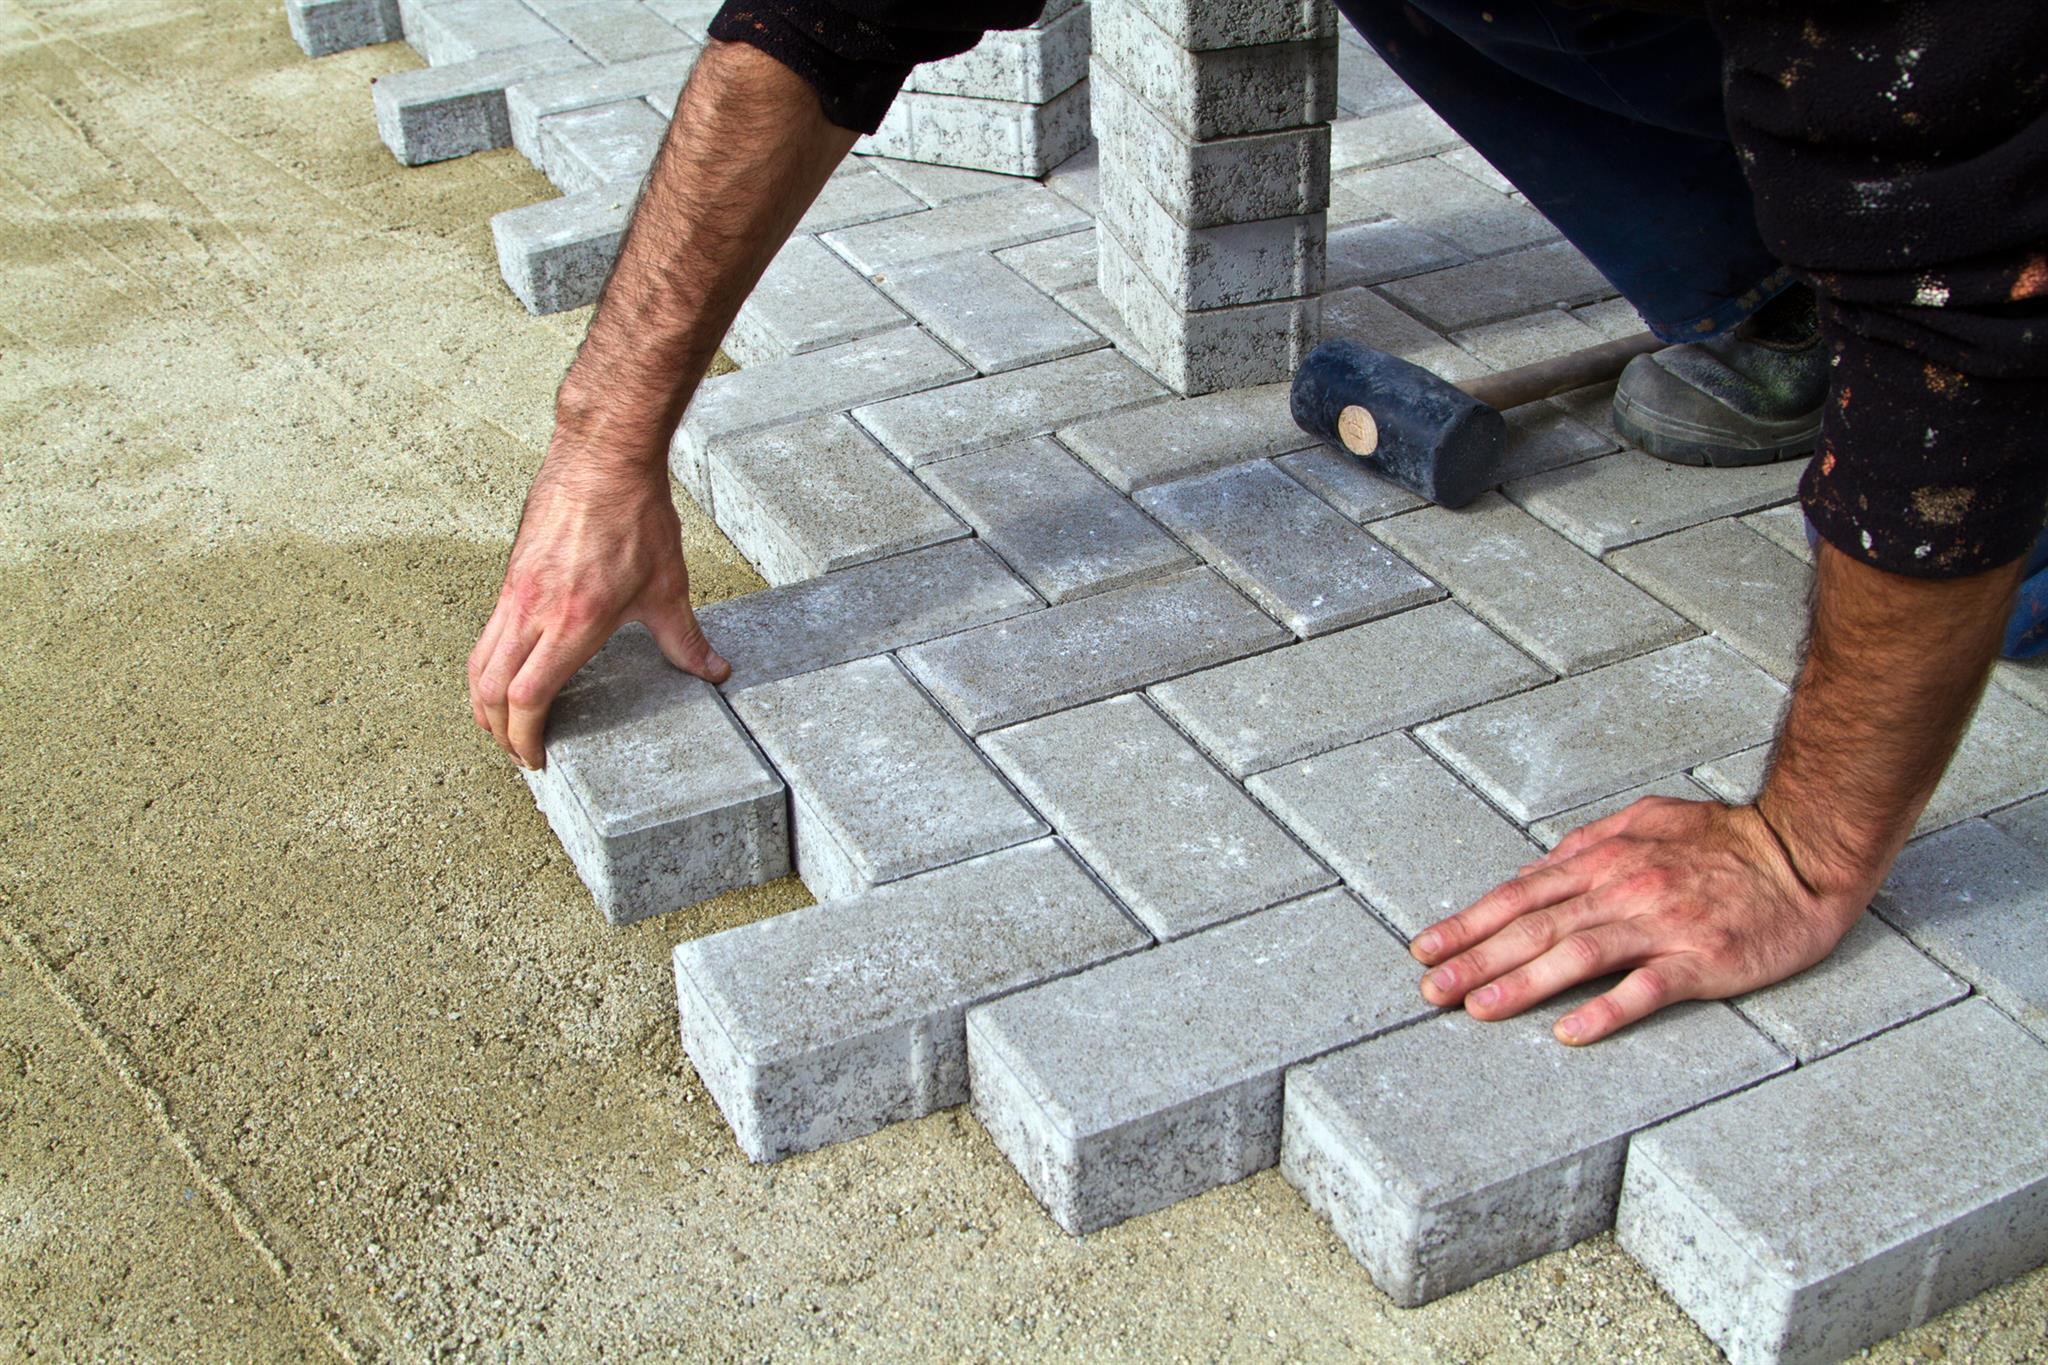
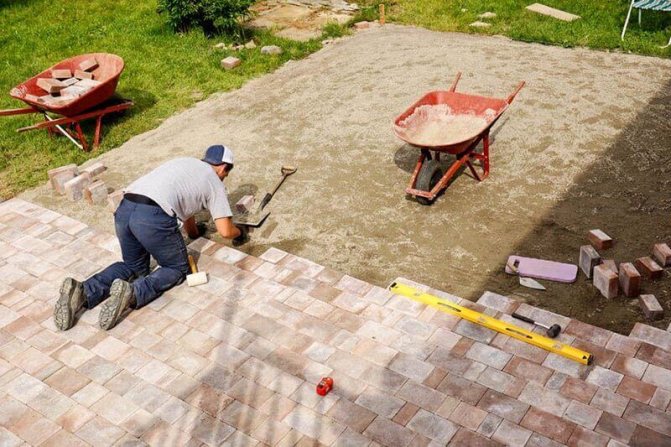
- Further, starting from the curb, begin to lay the slabs. Rows can be arranged diagonally or in a straight line. The rows are laid away from themselves so that the prepared base does not collapse when the workers move along it. The laid paths must be strictly parallel to the stretched cords.
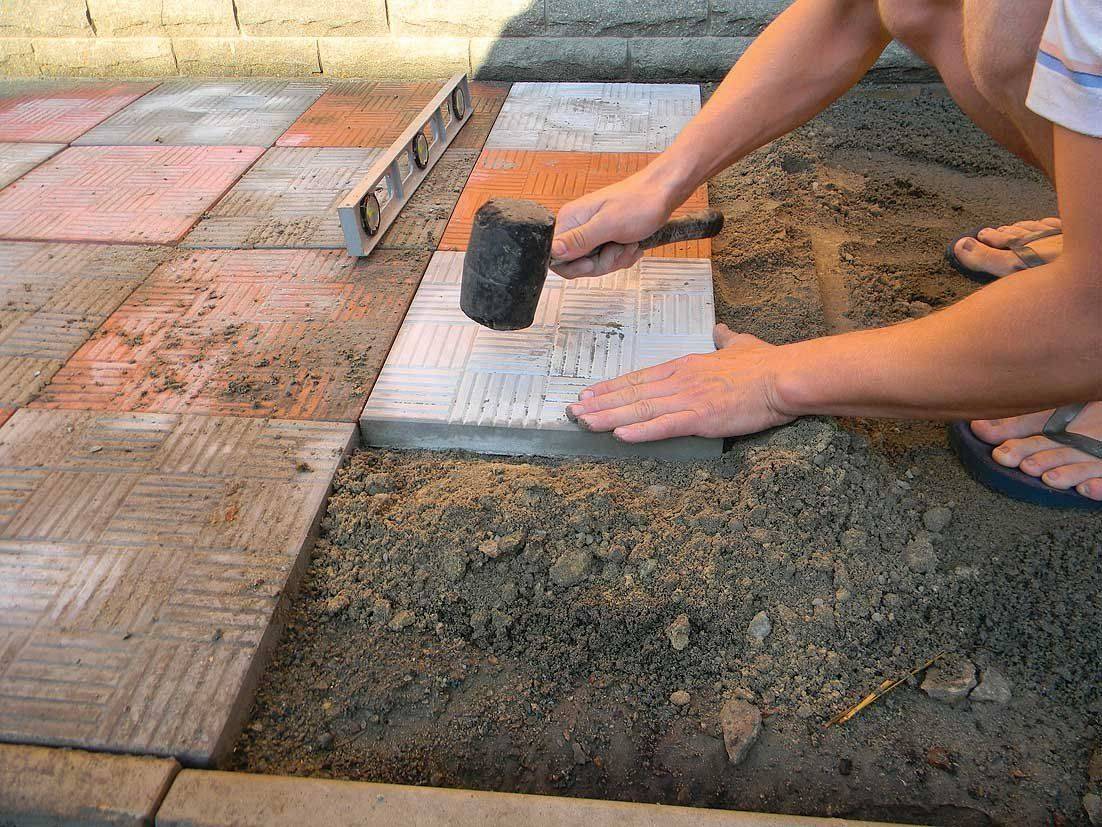
- For uniformity of gaps between tiles, special crosses are used.
- The slab is laid on a sand cushion, tapped on top with a hammer for a snug fit to the surface. If a distortion of some specimens is noticeable, the blocks are lifted, a cement-sand mixture is poured under them for leveling. The building level is used to control the horizontal.
- If corners or obstacles are encountered along the laying path, they should be bypassed with whole specimens. Then the remaining places are filled with suitable fragments.The tile of the required shape for these purposes is cut using a grinder with a disc for concrete. These areas are filled as a last resort.
- After laying all the rows on a continuous area, the seams between the tiles are covered with a mixture of sand and cement. Excess that did not wake up in the cracks must be brushed off with a broom.
- After all the gaps are filled with a sand-cement mixture, the surface is poured with water from a hose so that the blocks are fixed together. It is imperative to put a diffuser on the hose so that the jet of water does not knock out the filling mixture.
You can watch the process of proper laying of paving slabs with your own hands in this installation video tutorial:
Another useful video tutorial on how to properly lay paving slabs with your own hands - what you need for this and how to lay it correctly:
IMPORTANT. When laying each section at the end of the day, it is covered with a sand-cement mixture and carefully swept
If this is not done, moisture that accidentally enters can spoil the appearance of the coating even before the end of all work.
Types and recommendations for choosing paving slabs
Depending on the materials used in the manufacture of tiles, its cost varies. Naturally, durable, reliable and high-quality will cost more. Now in the building materials market, manufacturers offer the following types of FEM, made from:
- Solid natural hard rock.
- Rubble stone of soft breed (sandstones).
- Artificial stone, porcelain stoneware.
- Concrete with or without color pigments.
In the process of laying paving slabs with your own hands, it is better to use different colors to lay out patterns and make the path more attractive. There are three technologies for its manufacture from cement-based concrete mix: vibrocasting, vibropressing, stamping.
The latter option is cheaper, but such elements have less strength. Only vibration allows air to be expelled from the concrete mix. This means that shells are not formed, the concrete is distributed evenly throughout the volume. When pressed, the upper protective layer becomes strong enough to withstand mechanical stress.
When choosing, pay attention to the manufacturer. Craft manufacturers do not give a guarantee, and after the first winter, chips, cracks, leaching may appear on the surface.

Also look at the thickness of the FEM. There are two main standards: 40 and 60 mm. 40 mm elements are used when paving paving slabs on paths not intended for vehicles. These are paths, pedestrian areas, leisure areas. 60 millimeters is enough to use them for parking lots, entrances along which cars will drive. For public roads, elements with a thickness of 80 mm are used.


Laying paving slabs on concrete
Borders are needed so that the paving slabs are fixed in place, do not fidget and do not move out.
For the installation of curbstones, pegs are installed around the perimeter of the site and the thread is pulled (you can leave the markings that were used when pouring the concrete base). The thread is placed at the level of the desired height of the curb
When marking, it is important to take into account the slight slope of the paving for the outflow of rainwater.
A trench is dug along the thread.Its depth should correspond to the height of that part of the curb stone that will be underground, and the thickness of the cement cushion (3-5 cm). The pillow is placed under the curb for a tighter fit. For example, if according to the plan the curb should be 15 cm, the height of the available stone is 25 cm, then the trench must be dug to a depth of 10 cm + 3 cm = 13 cm.
The width of the trench should accommodate the curb and a margin of 1 cm on both sides. Let's say if the width of the curb stone is 8 cm, then the width of the trench will be: 8 cm + 1 cm + 1 cm = 10 cm.
The cement mortar is kneaded (the ratio of cement and sand is 1: 3), a layer is laid out on the bottom of the trench. Next, curbstones are installed, driving them into the solution with a rubber mallet.
A day later, when the solution hardens, the gap between the walls of the curb and the trench is filled with sand, spilled with water and rammed.
Paving slabs are usually laid on gartsovka - a dry cement-sand mixture, which, after moistening, holds the paving elements on the base. The cement-sand mixture is prepared in a ratio of 1:6 (cement - 1 part, sand - 6 parts), water is not added.
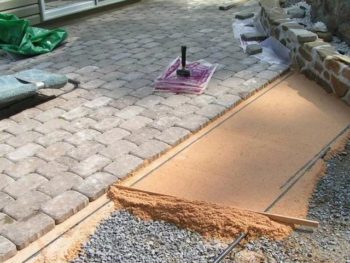
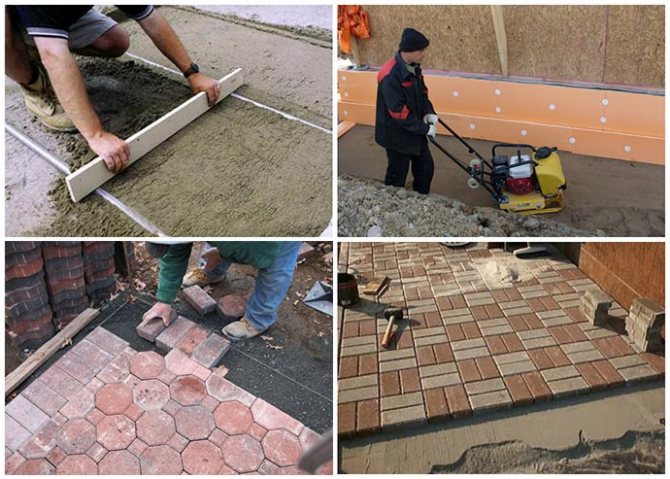
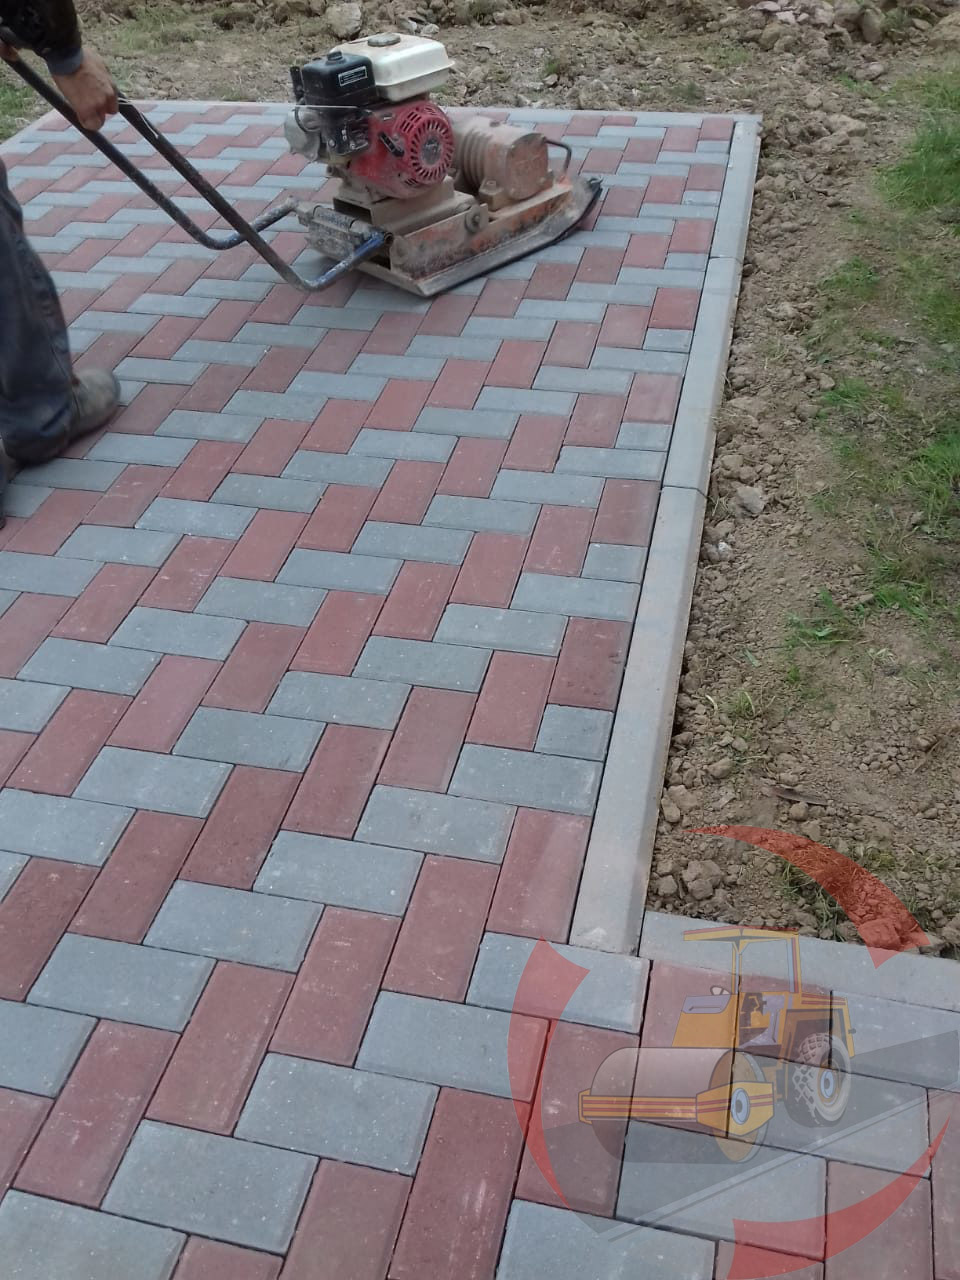
The carving is poured inside the platform with a layer of 5-6 cm, leveled with a rule or an ordinary flat board. The layer is compacted with a vibrating plate or manual rammer.
Thrombing of cement-sand base
Instead of a cement-sand mixture, ordinary sand is often used, but it fixes the paving stones on the base worse, which leads to its subsidence, washing out by spring floods, etc. However, if necessary, it is much easier to repair the paving area, to remove the tiles from the sandy base than when using a strong carving.
In places of congestion of heavy trucks, city squares, even a caravan often turns out to be not very reliable. In this case, the paving stones are placed on glue or cement screed. This option is considered the most durable. However, it is completely unrepairable. If for some reason the concrete cracks or breaks, the tile will no longer be suitable for secondary paving.
How clinker tiles are laid on cement mortar can be seen below:
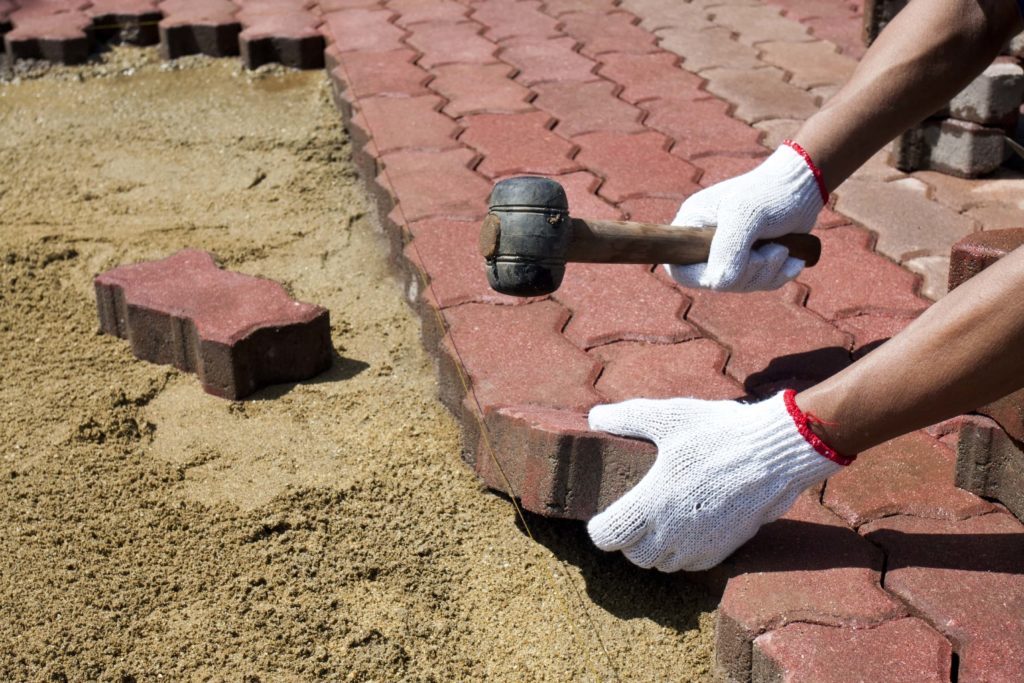
The tile is laid on the underlying layer and tamped down with blows of a rubber hammer.
At the same time, it is important to control the horizontal laying with a spirit level, a building level, a stretched cord
The tile is hit with a rubber mallet, sinking it into the underlying layer
The laying of paving slabs on concrete is carried out from oneself, that is, while doing the work, the master gradually moves forward, stepping on the already finished paving. If there are obstacles on the laying path (sewer manholes, drainage holes, pipes, etc.), they are encircled with whole tiles. And then, at the final stage of the work, they cut the required number of tiles and finally form the border of the desired configuration.
Trimming is also almost always necessary (especially if the tile has a complex shape) in the corners and sides of the paved area.
Laying tiles around a manhole
Tiles are cut with a circular saw or grinder.
A dry cement-sand mixture will not be able to firmly hold the tile. Therefore, after the laying is completed, the site is abundantly spilled with water from a hose or watering can. In this case, water enters through the inter-tile gaps to the base and the carving freezes.


The seams are also filled with a dry cement-sand mixture, and then spilled with water.Do this several times until the mixture stops shrinking.
The seams between the tiles are filled with a cement-sand mixture.
After 2-3 days, the paving will dry completely. After that, the remaining construction debris is swept away from it, if necessary, washed by releasing water from the hose under pressure. Area from paving slabs ready for use!
Paving slabs withstand high loads, therefore they are particularly durable
Excavation
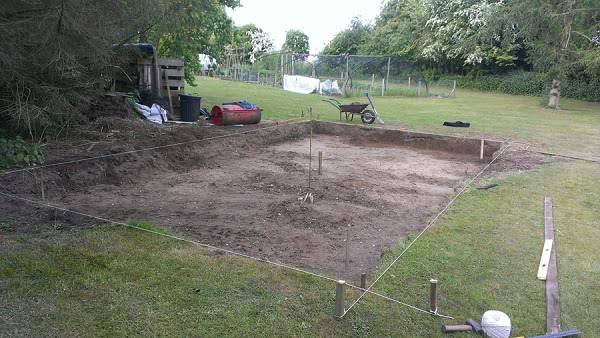
First of all, a construction scheme is drawn up. Binding to the terrain and elements of the landscape is carried out.
After that, the following actions are performed:
- Tracing is in progress. All sides are measured, the correspondence of the length of the diagonals is checked.
- The top layer of soil is removed. The depth of the ditch is made such that the finish surface is flush with the ground or rises 1-2 cm above it. Otherwise, water will accumulate on the path.
- The bottom of the trench is cleared of plant roots and large stones. It is leveled using a level and a shovel.
- The soil is compacted until a solid state is reached. If the earth is loose, then it is recommended to add large gravel to it for binding.
- A geotextile sheet is laid on the bottom. Laying is carried out so that the pieces of material overlap each other by 10-12 cm. After that, the joints are glued with adhesive tape.


