- Material used
- Choosing a place for a TV
- Placing the TV on the wall - advantages and disadvantages
- Types of fasteners
- Rigid fastener
- Inclined fastener
- Swivel mount
- Ceiling mount
- Advantages and disadvantages of mounting a TV on a bracket
- Precautions
- VESA standard
- Types of fasteners
- Rigid fastener
- Inclined fastener
- Swivel mount
- Ceiling mount
- Where is the best place to hide cables and wires from the TV
- How to remove the TV from the bracket
- Mounting the TV on the wall
- Removing the TV from the bracket: step by step
- In terms of convenience
- Characteristics of the installation site
- Location
- wall material
- How to make a DIY bracket
- Fixed rail bracket
- Budget bracket from a wooden plank
- Movable metal bracket
- Restriction of mounting the TV on the wall without using the bracket
- Conclusion
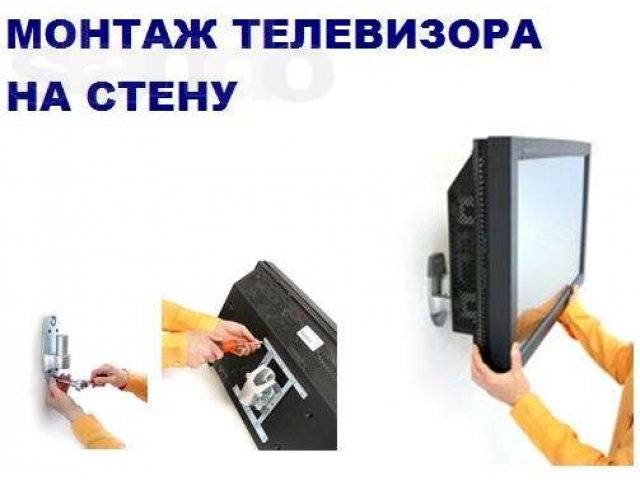
Material used
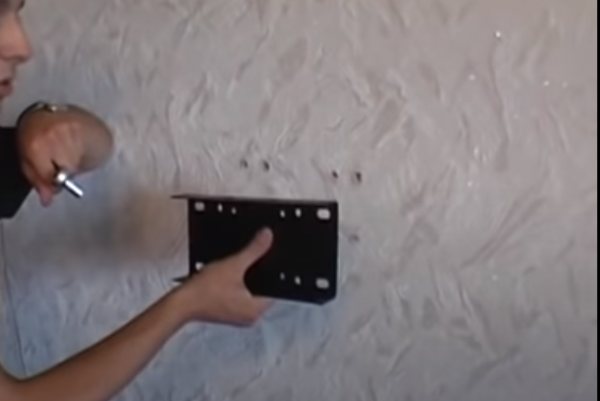
As a rule, factory brackets for mounting it are included with the TV receiver. This greatly simplifies the workflow, because it corresponds to the strength of the selected material, holes and selected threaded connections.
It remains only to fix the bracket to the surface of the wall or ceiling. If this is not possible, you will have to make a rotary tv mount with your own hands.
For this you will need:
- make accurate measurements of the location of the fixation points on the TV case;
- find out its weight;
- pick up metal plates that can withstand this weight;
- make a swivel mechanism with a latch in different positions;
- assemble the product into a single structure and firmly fix it on the TV and the selected surface;
- ensure the quality of the work done.
-
Do-it-yourself stone worktop: a step-by-step master class with a photo! Preparatory work, drawing creation, materials and tools
-
DIY wall clock: 80 photo ideas for inspiration. DIY wall clock design - bright plastic spoon clock, moon print clock, eco-clock made of moss, cork wood, knitted cuckoo clock, clock from a piece of plywood
-
Do-it-yourself rocking chair: types of rocking chairs and materials, the process of making a rocking chair. 75 photo ideas on how to make a beautiful and comfortable chair yourself
Choosing a place for a TV
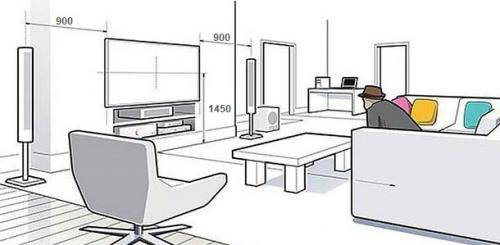
To watch a TV installed in a fixed position was convenient, you should choose the most correct installation location for it. When choosing, it is worth considering the type of your device, the size of its diagonal, and the way in which television channels are broadcast on it.
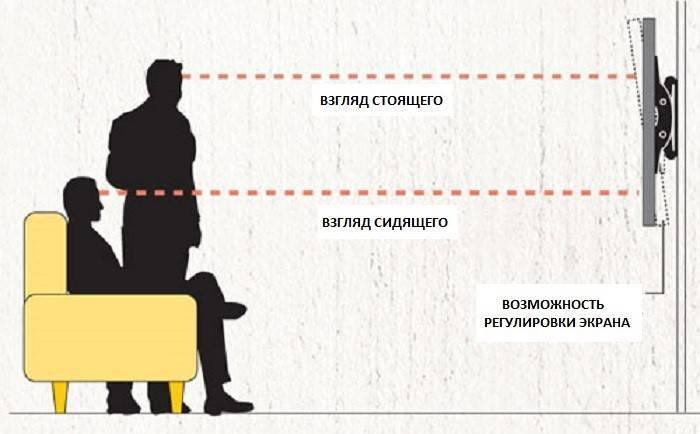
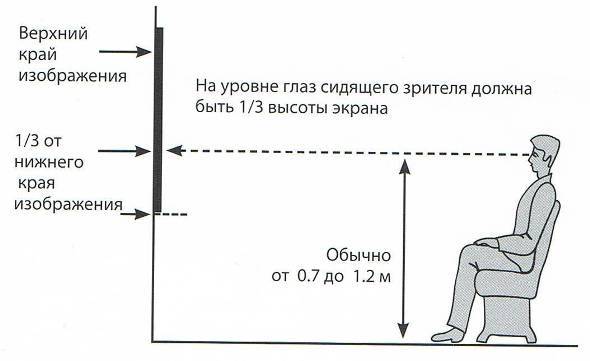
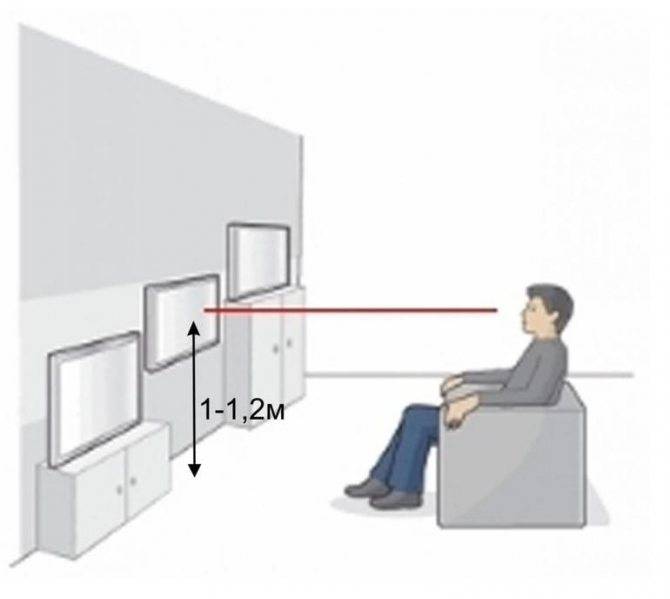
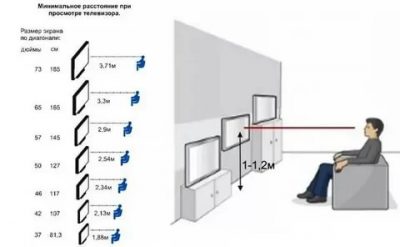
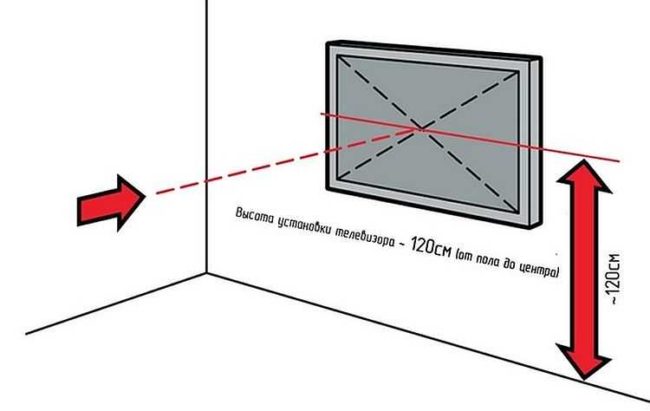
One of the most important installation rules is to place the device at eye level. It is extremely inconvenient to view with your head up or down. Specialists have developed special tables, with the main recommendations entered from them regarding the choice of the distance from the television screen to the location of the viewer.
- Before you hang the TV on the wall, you need to evaluate the chosen place for its suitability for your purposes:
- Check whether the wiring passes along the selected wall and how it passes - this is necessary so that in the process of preparing the holes for the bolts it does not accidentally touch it.
- See if there is a socket in the access zone of the television cable - the closer it is to the device, the easier it is to hide the wires suitable for it.
For installation, it is highly not recommended to choose niches and recesses - the device will be poorly ventilated in them and, as a result, will heat up more. For these purposes, it is necessary to stop in an open space.
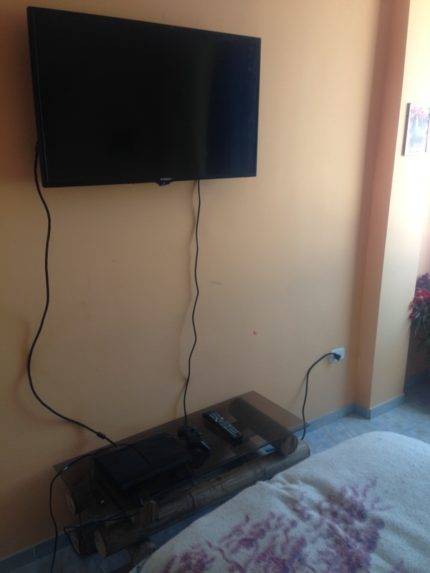
Placing the TV on the wall - advantages and disadvantages
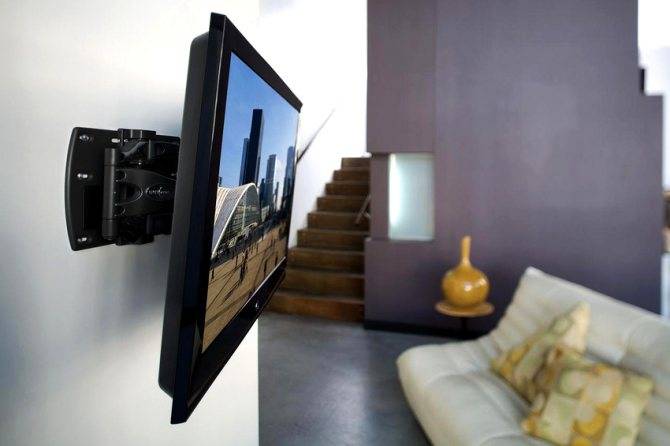
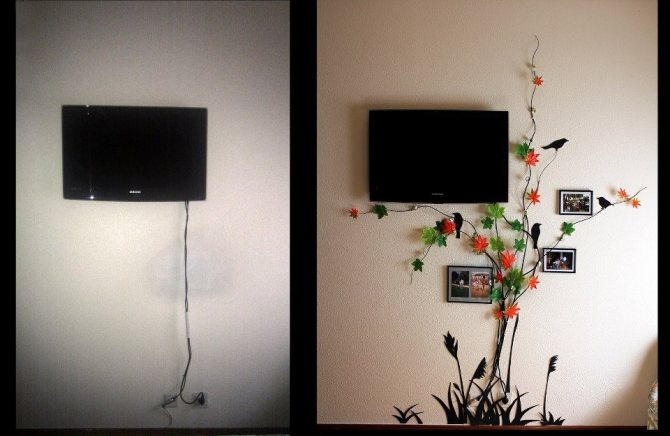
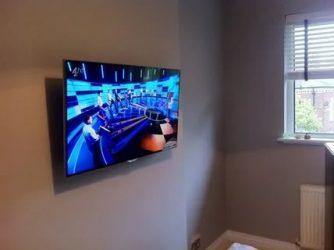
If the TV is placed on the wall, we get a useful and aesthetic space. This solution allows you to install huge TV panels in a relatively small area, helps to beautifully expose TV as an element of interior design.
TV, placed on the wall, has a number of advantages and disadvantages.
Advantages:
- a cheaper solution than buying a chest of drawers or a table;
- children do not have access to it;
- more space for furniture;
- best solution for large size panel;
- modern look.
Flaws:
- harder to mount and then rearrange;
- there is no possibility of storing additional equipment.
Choosing the right TV panel bracket is relatively easy. Nevertheless, you should remember a few simple principles that will save your nerves and warn against unnecessary mistakes.
Types of fasteners
Wall mount, the same bracket is a special mount that serves to mount a modern TV on a selected wall.In total there are 4 types of fasteners, their main difference is that each of them can adjust the position of the screen in its own way, thereby increasing the comfort of watching TV.
Before buying a bracket, you need to be sure that it will fit your TV model. To do this, you need to ask what standard the bracket has and compare it with the standard for mounting our modern TV.
Let's get acquainted with 4 well-known wall fasteners.
Rigid fastener
A rigid low profile mount is a mount that secures your TV 10 to 20 centimeters from the wall. The hard mount does not have an adjustment function, that is, after installation, with its help we will not be able to turn or tilt the TV. For this type of fastener, we advise you to hang your TV at head level, for the convenience of watching various programs and TV shows.
The advantages of this type are low price, safety, and ease of installation.
The downsides include several factors. There is no position adjustment, as well as difficult access to the TV connectors that are behind it.


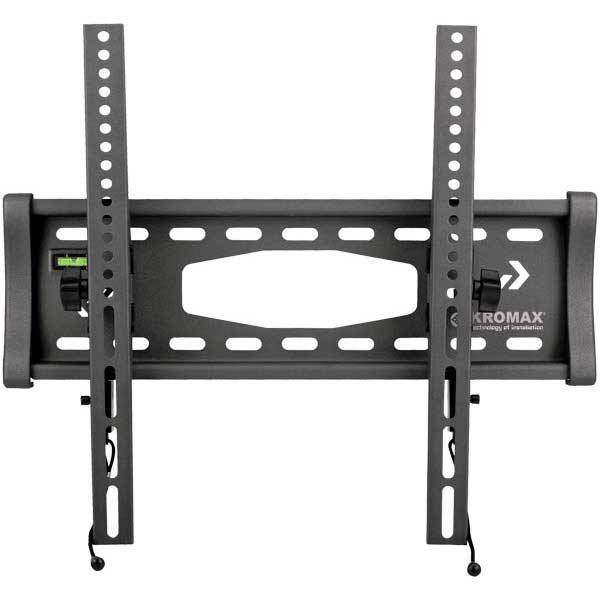
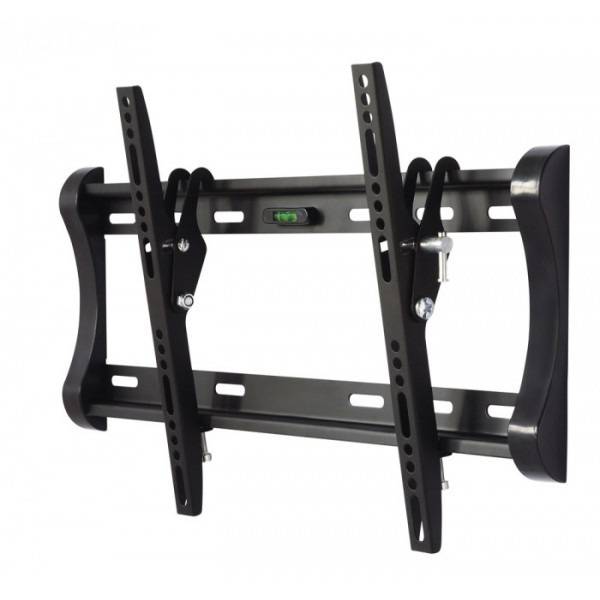
Inclined fastener
With this mount, you can change the angle of your TV, set it at your eye level, adding the same comfort to watching TV. The distance from the wall to the bracket is up to 15 centimeters. The angle of inclination for different brackets is different, but basically it is in the range of 10-25 degrees.
The advantages of this type are affordable price, simplicity of design, and the most important thing is that it allows you to adjust the tilt of your TV.
The only drawback of this view is the lack of rotation of the TV.
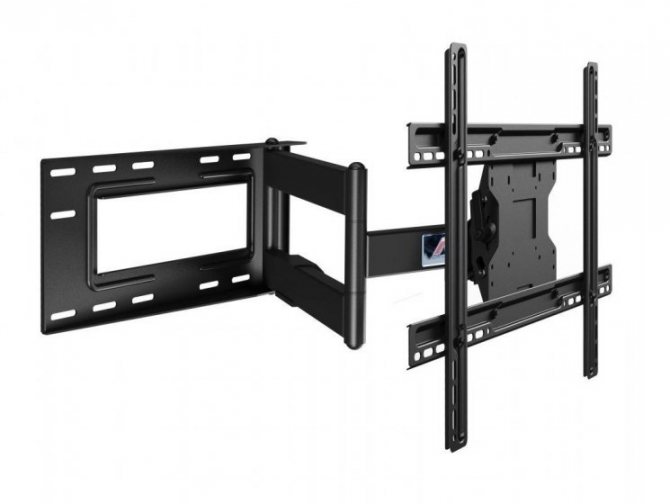
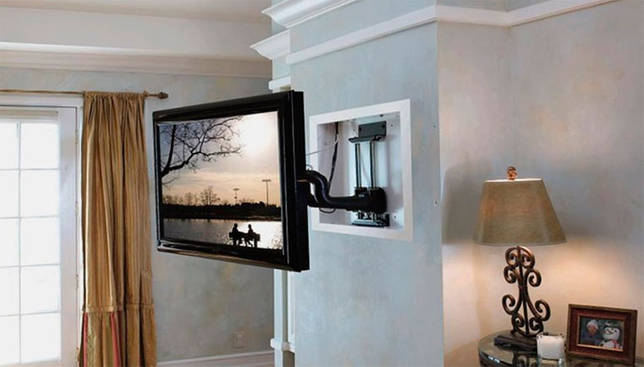
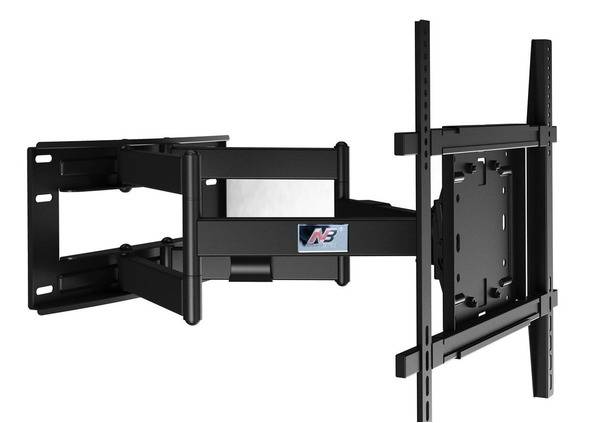
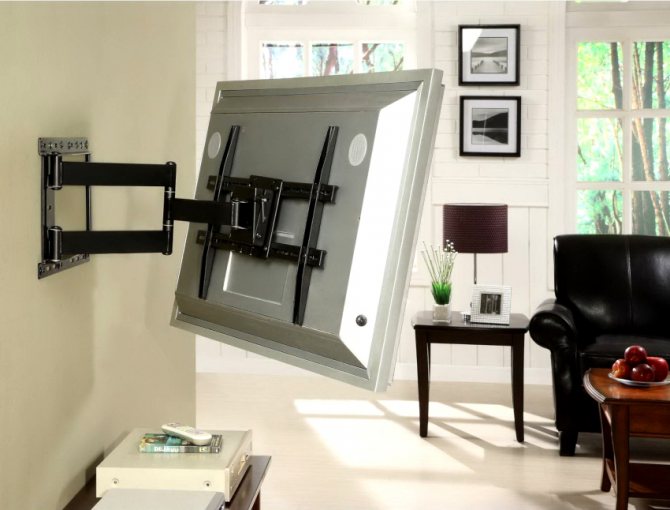
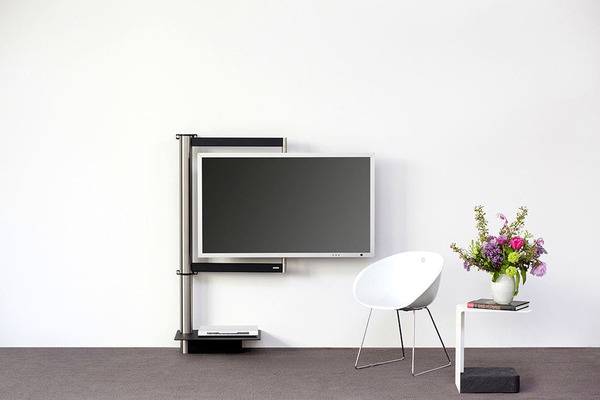
Swivel mount
This mount is unique because it allows you to move, rotate or tilt the TV as you like. This bracket is quite expensive, but worth it. Yes, it has a limitation on the size and weight of your TV, this can be found in the documentation of a specific bracket model, but we are sure that you can find a good and fairly efficient bracket at an inexpensive price.
The advantages include ease of use, beautiful appearance.
The disadvantages include the expensive cost of the bracket, as well as the difficulty in installing this fastener.
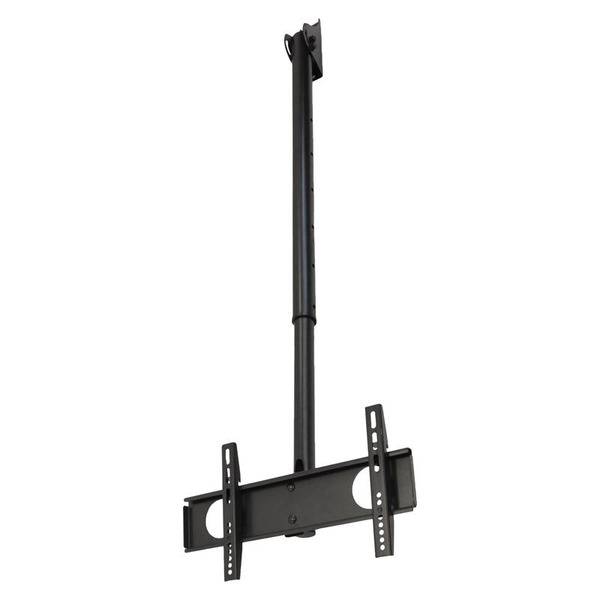
Ceiling mount
This mount is quite popular in various offices and establishments, as it is convenient to provide advertising to visitors and colleagues on it. It allows the TV to rotate 360 degrees and also allows the screen to be tilted. For their use it is necessary to have high ceilings.
With the pluses, I think everything is clear, but the disadvantages include the difficulty in installation, as well as in the cable supply, which, most likely, will be easier to put under the ceiling than to lower to the floor.
Advantages and disadvantages of mounting a TV on a bracket
Before installing the panel on the wall, it is necessary to understand the existing types of fasteners, evaluate the positive and negative aspects of such an arrangement, ensure maximum viewing comfort, and protect the device from accidental damage. Consider the main advantages of mounting on the bracket:
- Space saving. There is no need to purchase a cabinet, stand, table, other furniture that will occupy a certain place in the room.
- Safety. Even if the receiver is accidentally hit, it will not tip over or break.This arrangement is ideal for a family with small children who cannot reach the wires located at the height of the outlet.
- Low cost. Fasteners are inexpensive, such an installation will help save money, in comparison with the purchase of special lockers.
- Ease of use. The panel can be placed at the required height, anywhere, choose the angle of inclination.
- Interior compatibility. Fastening elements are hidden behind the TV, which is compatible with all styles in the interior, there is no need to choose furniture that matches the room design.
The disadvantages of such placement include:
- Difficulty of installation. To attach it with your own hands, you will need the skills to work with the tool, while mistakes made during installation can lead to the fall of the object.
- Switching an outlet. If a place is chosen from which the electric point is located far away, then you will have to move it or use an extension cord. The first option implies additional repair costs, the second will spoil the interior of the room.
- Expensive demolition. If the object is removed from the wall, then it will be necessary to carry out a cosmetic repair of the surface on which it was located, to remove traces of fastening or completely change the wall decoration.

Precautions
Plasma or LCD panel, placed on the wall, most often has a wide diagonal. Therefore, the weight of such a television device will be quite high. In addition, the device is connected to a voltage source of 220 V
Therefore, when dismantling, all precautions must be observed. Before starting manipulations, you must:
- make sure that the TV is de-energized - this will help to avoid electric shock;
- make sure that all existing wires are removed from the corresponding sockets located on the rear or side panel, otherwise the connector or connecting wire may be damaged during sudden movement;
- before removing the TV from the bracket, you need to make sure that it can be moved alone, otherwise you will need an assistant - this will protect the device from possible damage to the case or screen during transfer.
Trouble from the claws of pets should also be avoided. Small children should not have access to the device either. They may scratch the screen with a pencil or other sharp object.
VESA standard
VESA is an acronym for the Video Electronics Standards Association (Video Electronics Standards Association). All over the world they use the VESA standard, which was adopted in 1997. The standard defines the distance of mounting holes in the housings of TVs, monitors and mounts for them.
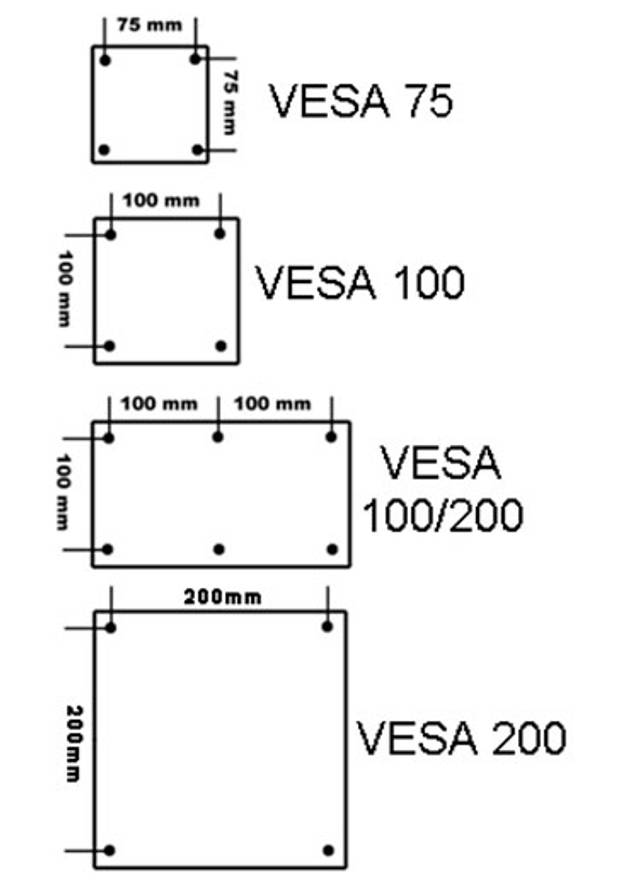
There are several types of VESA standard, differing in purpose depending on the screen size, weight, distance of mounting holes on the back of the LCD panel.
 Currently, the following types of fastening are most common:
- VESA 75×75;
- VESA 100×100;
- VESA 200×200;
- VESA 200×100;
- VESA 300×300;
- VESA 400×400;
- VESA 600×400.
If you're not sure which standard a technique meets, simply measure the distance between the holes. Recall that the first number in the standard is the distance between the bottom hole and the top hole, and the second value is the distance between the holes in the same row.
You can use the VESA standards table, in which the distance between the fixing holes can be determined depending on the size of the screen and the weight of the TV.
If it is not possible to check the distance, you can buy a universal holder that matches any type of interval. This solution has one rather significant advantage. Thus, when buying a new TV or LCD monitor, you do not need to replace the bracket itself. The vast majority of models of brackets and other holders have universal holes that match the standard pitch.
Types of fasteners
Wall mount, the same bracket is a special mount that serves to mount a modern TV on a selected wall. In total there are 4 types of fasteners, their main difference is that each of them can adjust the position of the screen in its own way, thereby increasing the comfort of watching TV.


Before buying a bracket, you need to be sure that it will fit your TV model. To do this, you need to ask what standard the bracket has and compare it with the standard for mounting our modern TV.
Let's get acquainted with 4 well-known wall fasteners.
Rigid fastener
A rigid low profile mount is a mount that secures your TV 10 to 20 centimeters from the wall. The hard mount does not have an adjustment function, that is, after installation, with its help we will not be able to turn or tilt the TV. For this type of fastener, we advise you to hang your TV at head level, for the convenience of watching various programs and TV shows.
The advantages of this type are low price, safety, and ease of installation.
The downsides include several factors.There is no position adjustment, as well as difficult access to the TV connectors that are behind it.
Inclined fastener
With this mount, you can change the angle of your TV, set it at your eye level, adding the same comfort to watching TV. The distance from the wall to the bracket is up to 15 centimeters. The angle of inclination for different brackets is different, but basically it is in the range of 10-25 degrees.
The advantages of this type are affordable price, simplicity of design, and the most important thing is that it allows you to adjust the tilt of your TV.
The only drawback of this view is the lack of rotation of the TV.
Swivel mount
This mount is unique because it allows you to move, rotate or tilt the TV as you like. This bracket is quite expensive, but worth it. Yes, it has a limitation on the size and weight of your TV, this can be found in the documentation of a specific bracket model, but we are sure that you can find a good and fairly efficient bracket at an inexpensive price.
The advantages include ease of use, beautiful appearance.
The disadvantages include the expensive cost of the bracket, as well as the difficulty in installing this fastener.
Ceiling mount
This mount is quite popular in various offices and establishments, as it is convenient to provide advertising to visitors and colleagues on it. It allows the TV to rotate 360 degrees and also allows the screen to be tilted. For their use it is necessary to have high ceilings.
With the pluses, I think everything is clear, but the disadvantages include the difficulty in installation, as well as in the cable supply, which, most likely, will be easier to put under the ceiling than to lower to the floor.
Where is the best place to hide cables and wires from the TV
When installing the screen, you will need to bring wires from the antenna and power supply to it. If we are talking about watching videos from the Internet or using the screen as a display for a laptop, then there may not be an antenna connection.
Before installation, you need to consider the location of the outlet. The best solution would be when the cord from the TV easily reaches the nearest outlet. If this is not the case, then two solutions are possible: using an extension cord or moving the outlet to a suitable location.
In the first case, when using the TV, large clusters of wires will be visible, violating the impression of modern technology. To remedy the situation, you can use special boxes, inside which the wires will be hidden.
The least expensive option would be to use boxes to hide the wires, and the most convenient would be to install the socket in a suitable place.
Installing a TV is done for many years, so it is important to do everything right. If the procedure has been carefully thought out and the installation carefully executed, then the owner will enjoy watching his favorite TV programs for many years.
How to remove the TV from the bracket
First you need to determine what type of bracket is used in our case. This is an important step, it depends on how exactly we will remove the device. There are several types:


- Inclined. A very comfortable look that allows you to raise the device up or lower it down.
- Tilt-swivel.The device can not only be raised or lowered, but also rotated to the sides.
- Fixed. Do not allow you to change the position of the device. On the other hand, they are easy to install, and are cheaper than others.
- Movable. The best view. The device can be placed in any position. They allow you to avoid one of the most important disadvantages of mounts - blocking access to the rear panel. On the other hand, such mounts are quite expensive.
- To the ceiling. From the name it is obvious that the TV will be attached to the ceiling.
To remove the TV, you only need a screwdriver. It will be needed to dismantle the bolts on which the structure is fixed. The size of the screwdriver depends on the size of the bolts. You will also need a screwdriver if you need to attach the device in place (the removed bolts will also be needed here).
For designs with latches, improvised means are not needed. Enough to squeeze them out. When the design is without bolts and latches, improvised means are also not required and everything becomes even simpler. You should also prepare in advance a place where you can put the removed device.
The TV panel is removed as follows:
- We turn off the device.
- Disconnect it from the network.
- You can start filming it. The design consists of several parts: the fastener itself, bolts (anchors or dowels) and special strips (screws). Most bracket models have two screws (right and left).
- There are slots in the bracket for fixing clamps or latches. If bolts are used for fixing, they must be unscrewed. If there are latches, release them.
- We lift the TV, and remove it from the structure on the wall.
- Some designs have dangling laces (common with latches). If there are any, they must be pulled to open the latches.
- There are also wall mounts that do not have latches (that is, no bolts or latches). In this case, everything is simple, you just need to lift the TV and remove it from the bracket.
- Device removed. To fix it, you will need to do everything in reverse order.
If we need to remove the suspended structure itself, it is necessary to unscrew the fasteners that fix it to the wall.
Note!
Removing the TV from the mounts is very easy. Even if you do not have instructions, visually inspecting the bracket, you can understand the principle of operation. Don't forget about safety.
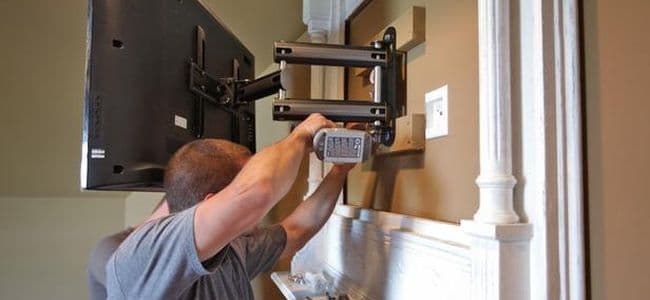
Mounting the TV on the wall
After purchasing the bracket, you will need to install it on the wall and attach the TV to it. To do this, you can contact a specialist or do the installation yourself. For self-installation, you will need the following tools:
- Perforator.
- A drill for a perforator with a diameter suitable for dowel screws.
- Screwdriver Set.
- Level.
- Yardstick.
- Pencil.
 After making sure that all tools and fasteners are available, perform the following steps:
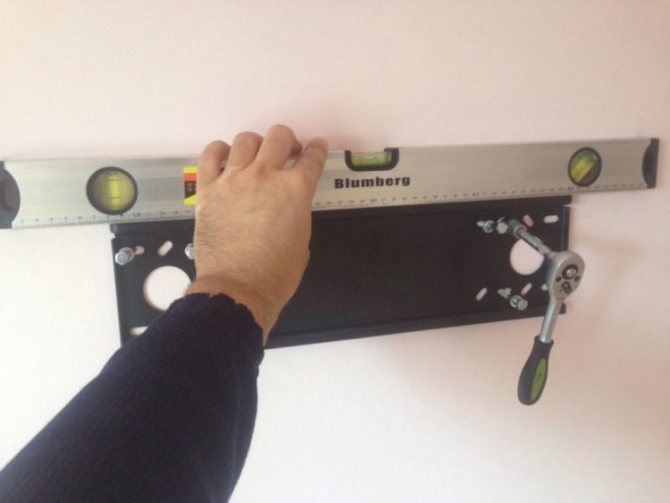
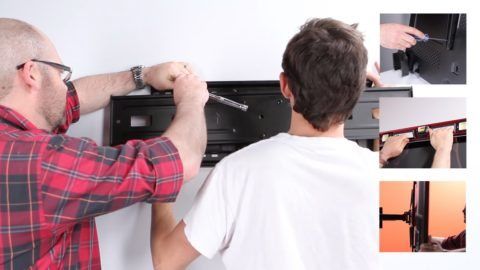
- Using a pencil, a level and a tape measure, mark out the holes for the dowel screws. Be sure to check the even position of the marks in relation to each other, because even a slight distortion of the bracket can, over time, lead to the fall of the TV.
- Drill holes with a puncher.
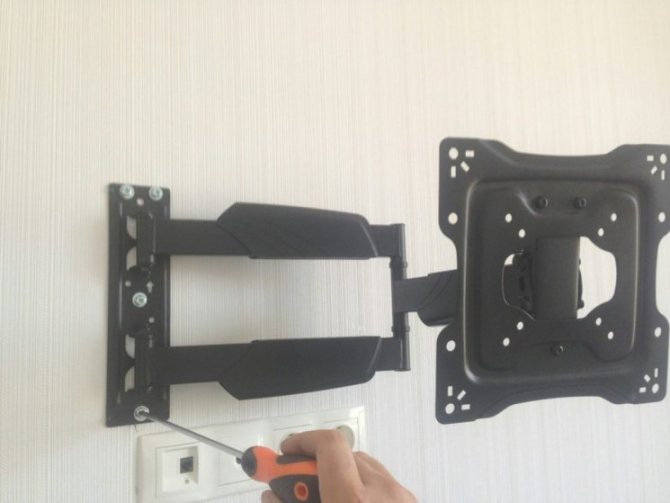
- Install the main part of the bracket on the wall and fasten it with dowel screws.
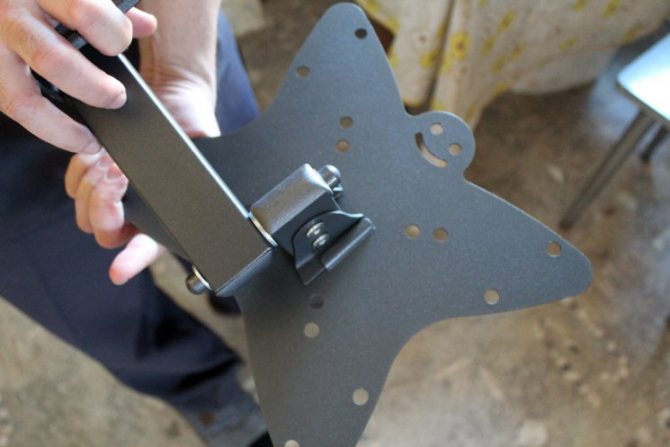
- Install the bracket rails to the TV using a screwdriver and bolts.
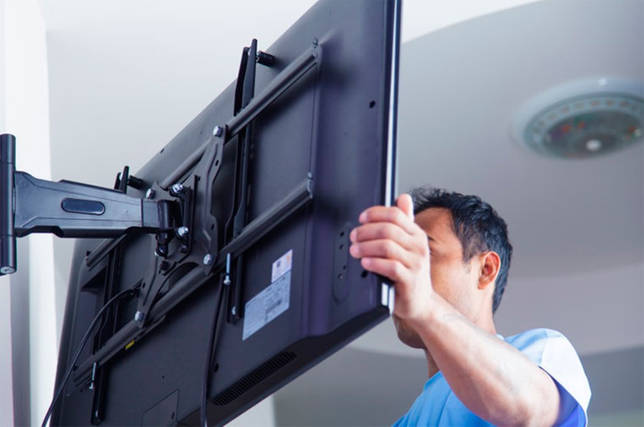
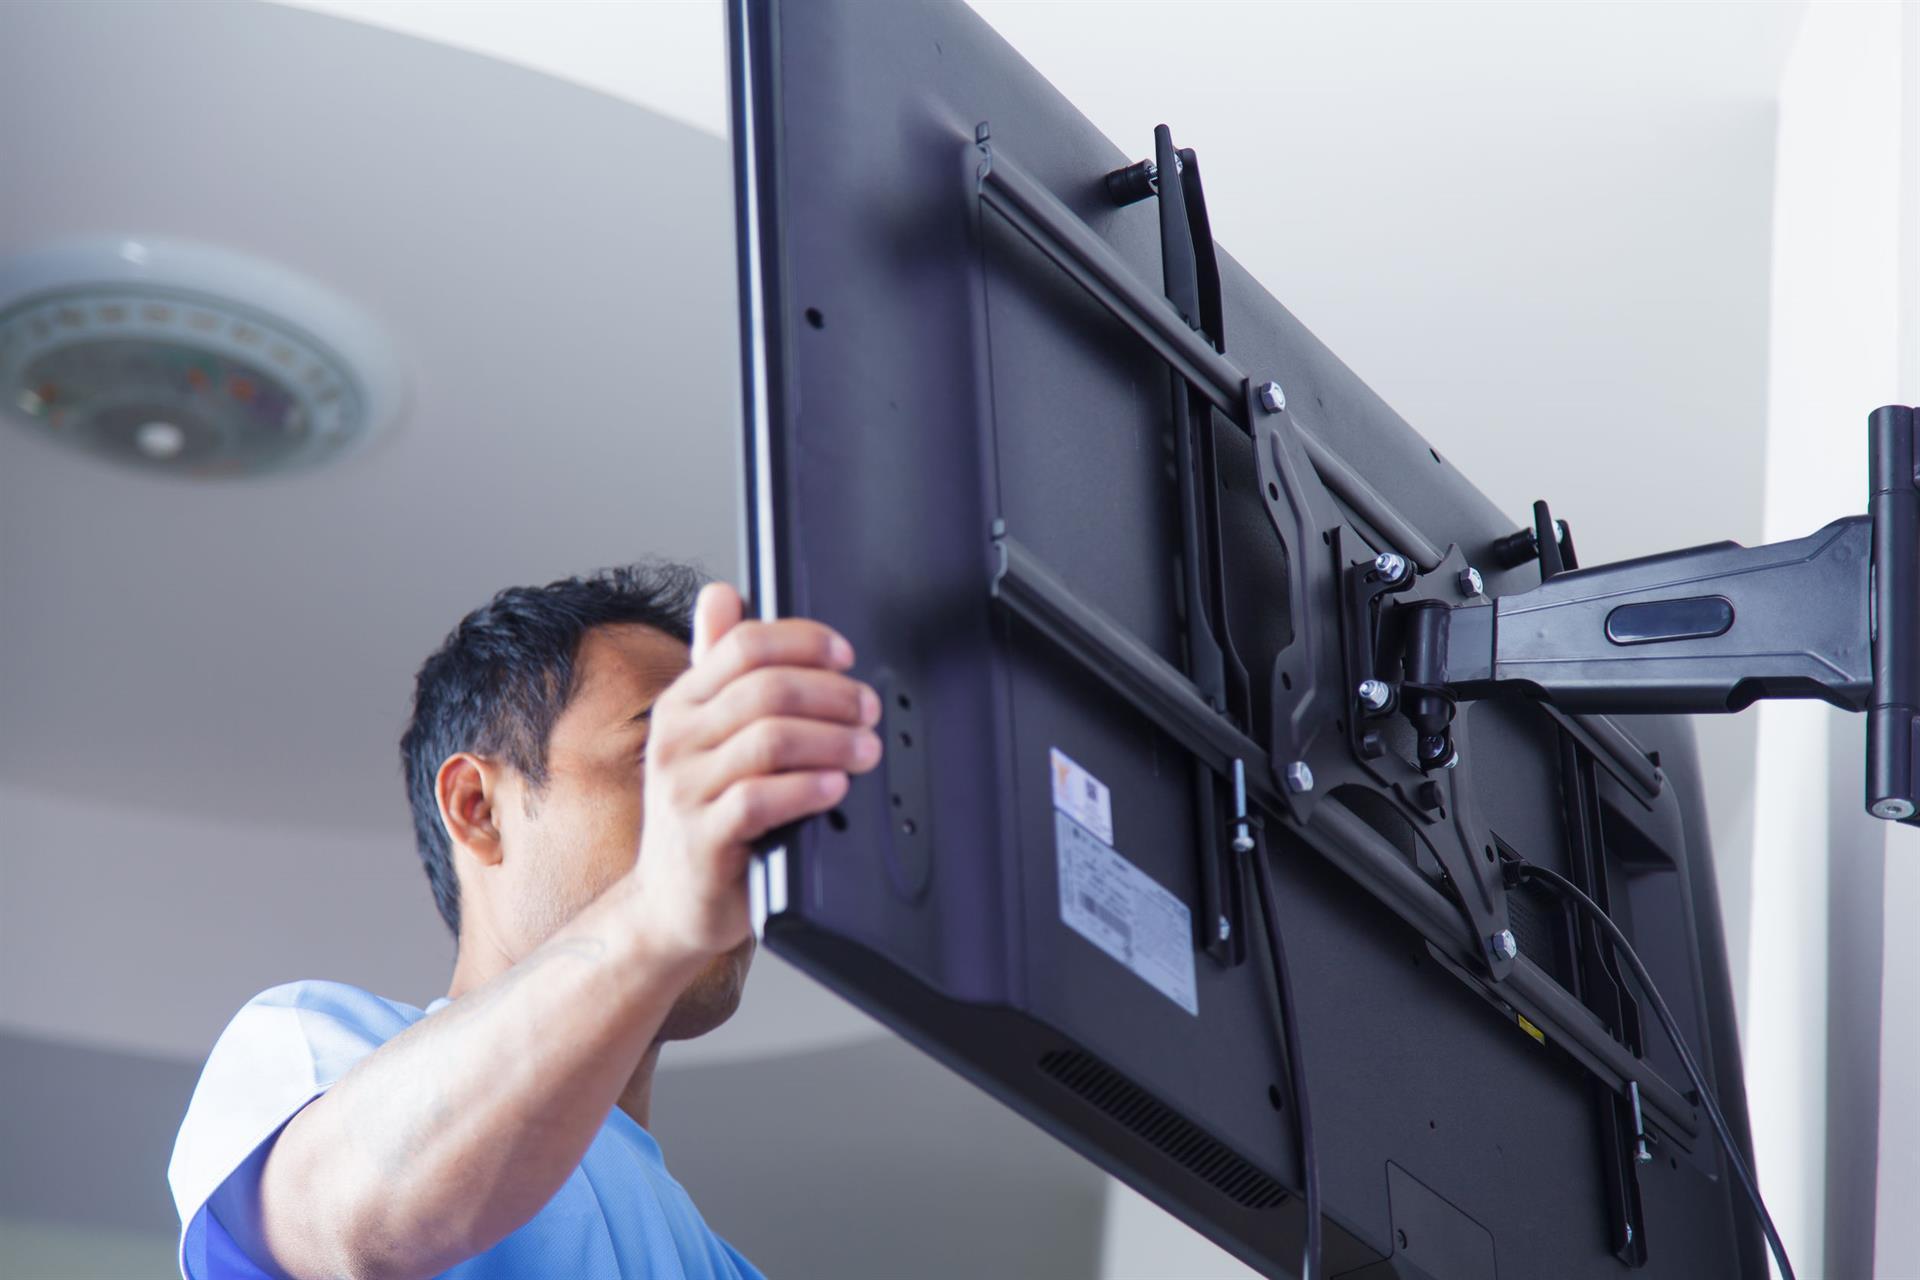
- Place the TV, with the rails installed on it, into the grooves on the main part of the bracket. There are models of non-separable brackets. In this case, the entire bracket is installed on the TV, and the entire structure is put on the dowels. With a large TV size, this installation process is best done with a partner.
- Connect the power cord and TV cable to the TV.
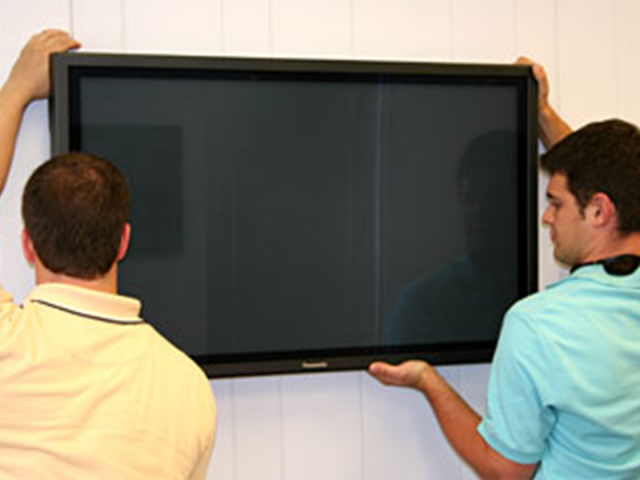 Work with a partner
As you can see, the process of installing a TV is not complicated, but depending on the material from which the walls are made, it may be necessary to use another method of fastening:
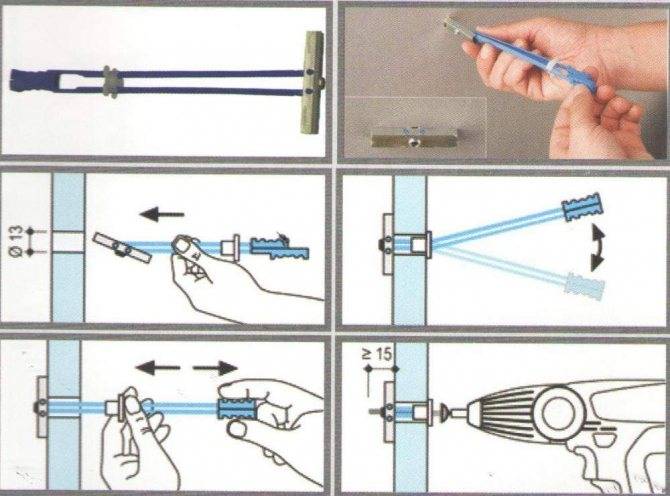
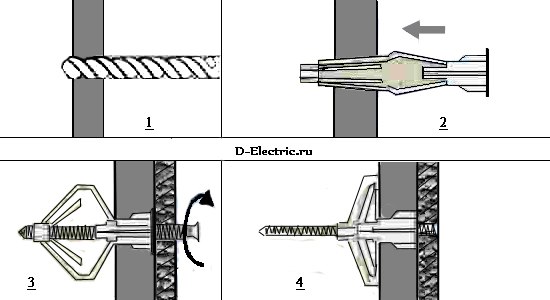 Dowel "butterfly"
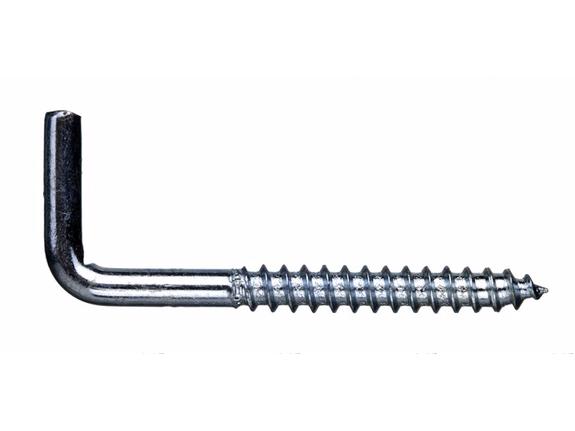 Screw for fastening
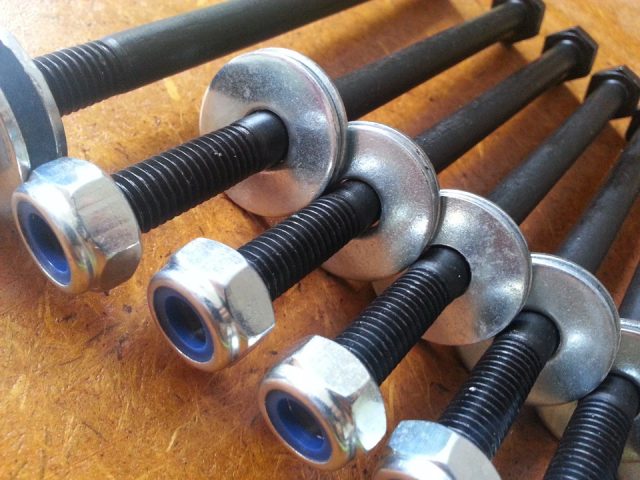 Through bolts
Fragile walls. If your house is built of plaster, wood concrete or low-quality cinder block, then in this case, install the bracket using through fasteners. For through fastening, a hole is made through the wall and instead of dowel screws, bolts with nuts and wide washers are used.
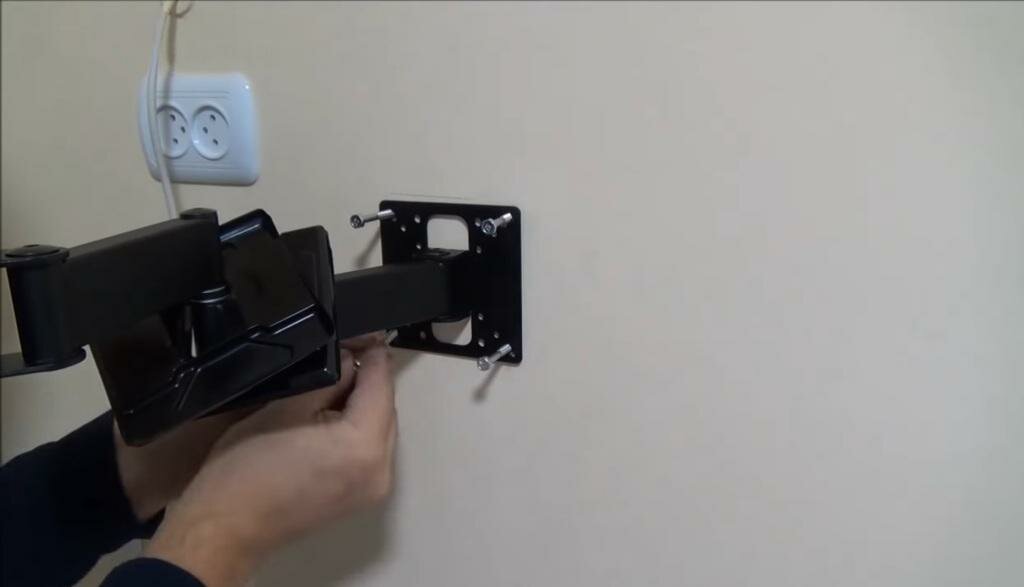
Removing the TV from the bracket: step by step
The device is removed as follows:
- We turn off the device.
- Disconnect it from the network.
- You can start filming it. The design consists of several parts: the fastener itself, bolts (anchors or dowels) and special strips (screws). Most bracket models have two screws (right and left). There are slots in the bracket for fixing clamps or latches. If bolts are used for fixing, they must be unscrewed. If there are latches, release them.
- We lift the TV, and remove it from the structure on the wall.
- Some designs have dangling laces (common with latches). If there are any, they must be pulled to open the latches.
- There are also wall mounts that do not have latches (that is, no bolts or latches). In this case, everything is simple, you just need to lift the TV and remove it from the bracket.
- Device removed. To fix it, you need to do all the steps in reverse order.
- If we need to remove the structure itself, it is necessary to unscrew the fasteners that fix it on the wall.
Removing the TV from the mounts is very easy. Even if you do not have instructions, visually inspecting the bracket, you can understand the principle of operation. Don't forget about safety.
In terms of convenience
When we watch TV, we must consider the following:
- the posture in this case is usually relaxed, sometimes semi-lying. However, throwing your head back or, on the contrary, constantly keeping it tilted or turned, is inconvenient - the neck becomes numb. That is, the screen should be approximately at the level of the eyes of a person sitting in the usual position;
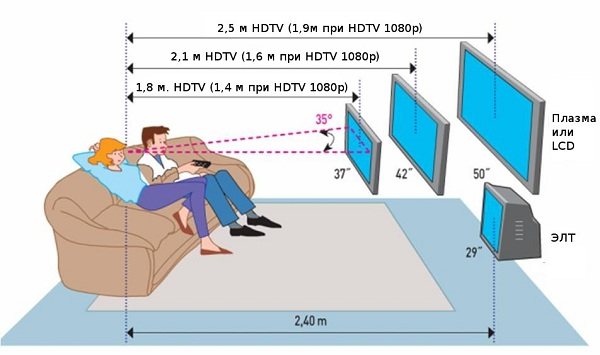
- the distance to the center of the panel should be approximately equal to twice the size of the diagonal of the screen. Example: you have a TV with a diagonal of 55 inches, we convert it to centimeters (that is, we multiply the number by 2.5, you can see more details here) - 140 cm. Multiply by two and we get about three meters from the eyes of a sitting person to the center of the screen. In some cases, this distance cannot be maintained horizontally, then you can place the equipment higher and get the desired distance - but you will have to watch movies and programs lying down. For a bedroom, this is a good option.
Sometimes the problem of the height of the TV from the floor is solved according to the principle "wherever it fits, we'll hang it there." This happens if a niche for the LCD panel is provided in the furniture wall, or if the shelves and racks are comfortably settled in their places, you don’t want to change them.In this case, it is worth checking whether it will be convenient to watch TV: just sit in the planned place and look approximately at the center of the empty space. Comfortable, the neck does not get numb, you don’t have to turn your head? Excellent! Uncomfortable? This means that something needs to be changed - either a sofa (bed, armchair, and so on), or a place for equipment.
So, at the level of the eyes of a seated person, there should be approximately the center of the screen. Another option is possible - at this level there should be a point offset by about a third from the bottom edge of the panel.
This option will be more convenient if a person periodically changes his position, sitting higher or lower. But there is another nuance - it is desirable to be able to change the tilt of the screen.
Let's try to generalize - at what height to hang the TV on the wall:
- at the eye level of a seated person, either the central point of the screen, or located at a height of 1/3 from the bottom of the panel, should be located;
- the distance from the floor to this point should be 1 ... 1.3 m. For people with a height of up to 160 cm, we accept the lower limit, at 160 ... 180 cm - 1.1 ... 1.15 m, for taller ones - 1.2 ... 1 , 3 m. We take into account the height of the sofa!
- if viewing comes from different points of the room, from different poses - sitting, standing, lying down - we choose the arithmetic mean, that is, after all, at the level of a seated person;
- we take into account the possibility of tilting / rotating the screen.
For different sizes of TVs, recommendations can be reduced to a table.
| Diagonal in inches | Height, cm | Distance from the bottom of the screen to the center, cm | Distance from the floor to the center of the screen (eye level of a seated person), cm | TV height from the floor in the living room (height from the floor), cm | TV installation height on the wall (along the top edge of the panel), cm |
| 19 | 42 | 21 | 100…120 | 79…99 | 121…141 |
| 21 | 46,5 | 23 | 77…97 | 123…143 | |
| 22 | 49 | 25 | 75…95 | 125…145 | |
| 24 | 53 | 26,5 | 74…94 | 126,5…146 | |
| 28 | 62 | 31 | 69…89 | 131…151 | |
| 32 | 71 | 35,5 | 65…85 | 135,5…156 | |
| 40 | 86 | 43 | 57…77 | 143…163 | |
| 43 | 95 | 47,5 | 53…73 | 147,5…168 | |
| 49 | 108 | 54 | 46…66 | 154…174 | |
| 50 | 111 | 55,5 | 44…64 | 155,5…176 | |
| 55 | 122 | 61 | 39…59 | 161…181 | |
| 58 | 128 | 64 | 36…56 | 164…184 |
Looking closely, you can understand - if you follow these standards, large-screen TVs will have to be hung almost above the floor, which is risky in terms of the integrity of the equipment. Therefore, a correction can be made. If the minimum distance obtained is less than half a meter, it is worth increasing it to this value.


Important: in the case when the TV is used not only for viewing, but also for working with consoles (Xbox, Playstation, Nintendo) and special devices (active games with motion capture, “augmented reality”), you need to adjust the height. Here follows the position of the central point to take the average between its placement for a seated and standing person
Example: children with a height of 120 cm and adults with an average height of 170 cm watch TV in normal mode, a child with a height of 140 cm plays “fights without rules” using an “augmented reality” device. Therefore, the center of the screen should be located at a height of approximately 125 cm
Here follows the position of the central point to take the average between its placement for a seated and standing person. Example: children with a height of 120 cm and adults with an average height of 170 cm watch TV in normal mode, a child with a height of 140 cm plays “fights without rules” using an “augmented reality” device. Therefore, the center of the screen should be at a height of approximately 125 cm.
Characteristics of the installation site
The most significant moment in creating comfortable conditions for watching television programs is the selection of the best area for placing a flat-screen TV on a wall surface.
In addition, it is important to choose the level of placement of the bracket.Experts advise fixing the TV case so that it is on a horizontal line with the position of your eyes, which allows you to see the image on the LCD screen in full and from any viewing point
Location
Finding out how to properly position the television equipment on the plane of the wall will help you choose the right room for its placement, as well as the size of the furniture available there. If the media device is planned to be hung in the living room, then it is best to do this in a place of rest.
Fixing the TV housing is performed directly at the eye level of an adult who is sitting, for example, in a chair. In this case, the mounting height of the bracket is calculated individually, although it is usually done at a distance of 0.9-1.3 m from the floor surface. Sometimes a flat panel TV is planned to be hung in the bedroom. In this case, a person watches TV in a lying position, which means that it must be placed on the wall much lower than in the previous case.
Often, a flat-screen TV is placed in the kitchen, but it is not so much watched as listened to, and there is not very much space for its placement. For this reason, the fixtures holding this device are mounted to the ceiling. Such a solution significantly saves space and ensures the safety of the TV from damage, since it is almost impossible to accidentally hit the screen with such a placement.
The optimal distance from the TV screen to the place of its viewing, as a rule, is equal to 3 or 4 screen diagonal sizes. At such a distance, watching TV programs will be comfortable, the eyes will be less strained and tired
In addition, it is believed that there should not be distracting objects close to the TV: furniture, plants, paintings, and so on. The reason is simple - all these things will distract your attention from the events taking place on the screen.
It is not recommended to mount the TV panel in places such as:
- a niche made of drywall, or a space formed by shelves or racks, due to the fact that air ventilation is difficult there;
- the surface of the wall, inside which there is electrical wiring, heating pipes, gas supply or water supply;
- a wall with a dilapidated layer of plaster, with a wet surface, and also if its surface crumbles or has deep cracks;
- corner of the wall due to the risk of accidental damage to the LCD screen.
wall material
When performing finishing work in modern interior solutions, a plasterboard panel is often used. With its help, not only level the surface of uneven walls, but also arrange artificial niches or partitions between rooms. There is an opinion that it is impossible to hang a heavy TV on a plasterboard structure, since this material is unreliable, as a result of which the TV set may fall. However, according to experts, if you follow the technology for performing work, then there are no problems when working with drywall and its operation.
To ensure reliable fastening when mounting a LCD TV, dowels such as "butterfly", "hartmut" or "umbrella" are chosen. Their design provides for expansion inside the drywall, which increases the reliability of the fasteners created.Televisions, the mass of which is 20-30 kg, are fixed to the wall using dowels of the "hartmut" type, which consist of a screw and plastic expansion elements. If the weight of television equipment exceeds 30 kg, then it will be possible to fix it on the wall only with the help of a bracket.
Another common finishing material that has gypsum in its composition is gypsum plaster. It is used for zoning space, making partitions from thick double blocks. It is worth noting that fixing a flat-panel TV on a plaster surface is a completely solvable task. In this case, dowels are also used, which open inside the block, thereby ensuring high-quality retention of equipment.
How to make a DIY bracket
A simple fixed TV bracket, it is quite possible to do it yourself. We present you several options for homemade brackets.


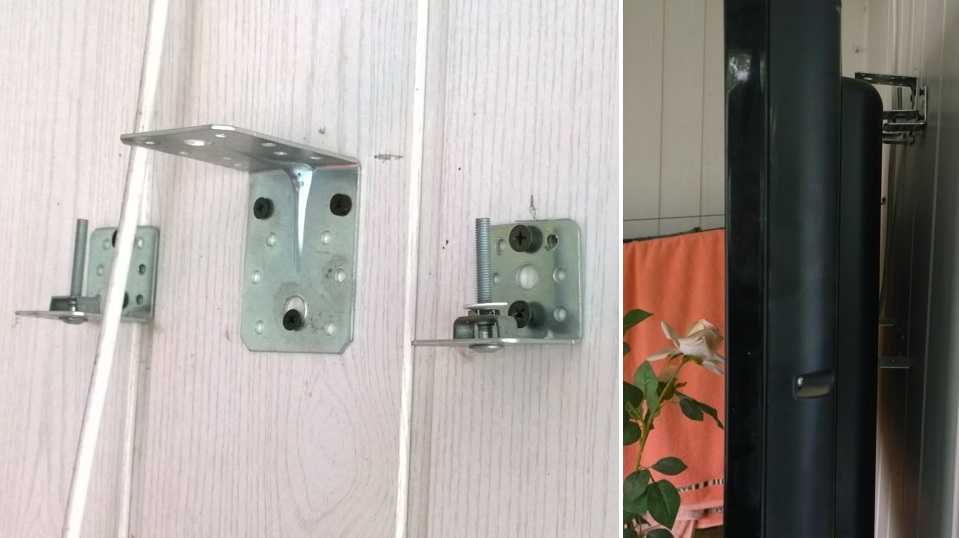
Fixed rail bracket
For manufacturing you will need:
- Rail for attaching wall-mounted kitchen cabinets
- Drill.
- Dowel.
- Screws.
- Bolts.
- Roulette.
- Level.
- Hacksaw for metal.
- Screwdriver.
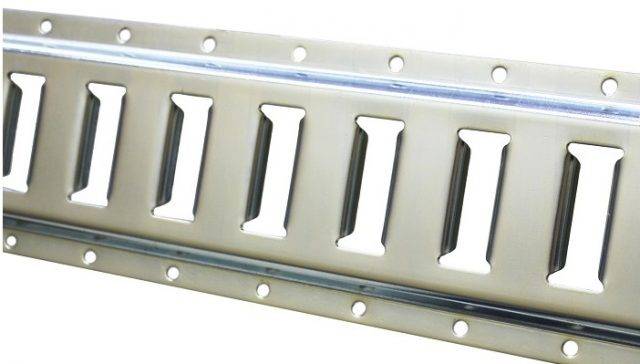 mounting rail
Sequence of work:
- Measure the length of the rail using the holes in the TV and cut it to size.
- If the factory holes on the rail do not match the holes on the TV, then drill additional ones.
- According to the dimensions of the already made rail, cut off the second one for mounting on the wall.
- Attach the first rail to the TV by screwing it on.
- Make markings on the wall for the holes for the dowel screws.
- Drill holes with a drill or hammer drill.
- Install the rail on the wall.
- Insert the bar located on the TV into the groove of the rail mounted on the wall.
For more reliable mounting of the TV, you can optionally install a second pair of rails.
Budget bracket from a wooden plank
It is worth mentioning right away that this type of mount is designed only for small TVs. To make a wooden bracket you need to find:
- A wooden plank with a section of 3-10 centimeters.
- Hanging hooks - 4 pieces.
- Self-tapping screws, with a head in the form of a ring - 4 pieces.
- Bolts for attaching the bar to the TV - 4 pieces.
- Hacksaw.
- Drill.
- Roulette.
- Pencil.
Sequence of work:
- Cut the plank into two pieces along the length of the TV.
- Tighten from the end of the slats, two screws with a ring head. Do not place the screws too close to the edge of the TV or the rails may crack.
- Drill holes in the rails and install them on the TV.
- Make marks on the wall according to the location of the rings on the rails.
- Drill holes according to the marks and tighten the hanging hooks.
- Mount the TV on the wall by inserting the rings into the hooks.
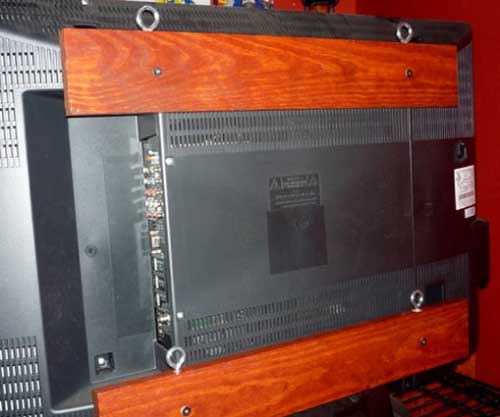 Bracket made of wooden planks
If you want the TV to have a downward slope, then make the bottom bar 1-1.5 centimeters thinner than the top one.
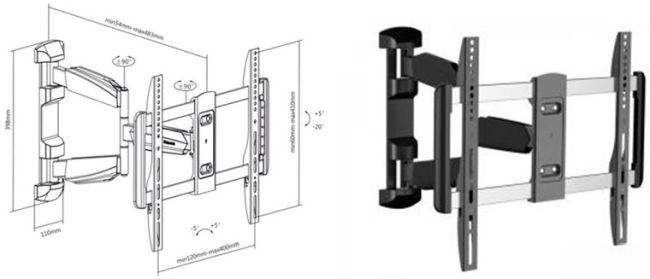
Movable metal bracket
It is almost impossible to make a full-fledged movable bracket at home, but you can make an imitation of it. You need to find the following tools and materials:
- Square metal pipe with a section of 20x20 millimeters.
- Corners of 25 millimeters - 4 pieces.
- Two metal square plates 200x200 millimeters.
- Bolts.
- Nuts and washers.
- Dowel.
- Hacksaw for metal.
- Drill.
- A set of drills for metal.
- Spray gun or brush.
- Black paint for painting metal products.
Work order:
- Take a metal plate and drill four holes for dowels in the corners.
- On the second metal plate, make holes corresponding to the holes located on the back of the TV.
- Cut the pipe into three sections. The first is for wall mounting the bracket, the second is for connecting parts, the third is for mounting the TV. The dimensions of the segments depend on the bracket design you choose.
- Paint all fabricated parts with paint.
- After the paint has dried in the center of the mounting plates, bolt two corners each. The distance between the corners should allow the square pipe to move freely. Please note that on the wall plate-mount, the corners should be horizontal, and on the TV mount vertically.
- Fasten the pipe sections between the corners with bolts, after making holes in them with a drill.
- Fasten the pipe sections between the corners with a bolt, placing washers between the pipe and the corners.
- Place the central section of the pipe from below between the pipes of the fasteners and connect them with long bolts.
- Fix the plates with tightened pipes to the wall with dowels and bolts, then attach the bracket to the TV.
- Set the angle of inclination and tighten the nuts.
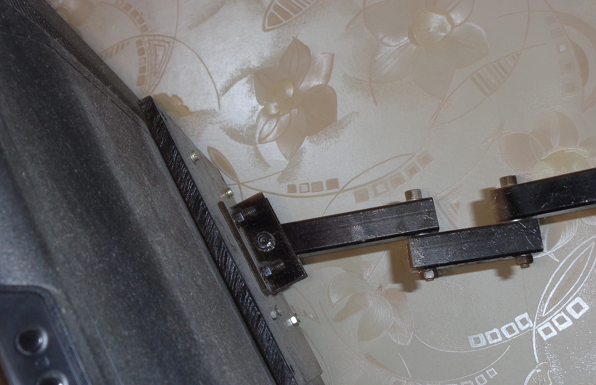 Homemade bracket from square pipes
In conclusion, it must be said that even the most sophisticated home-made brackets will not replace factory products in terms of strength and reliability.
We hope that after reading our article, you have received a lot of useful information and now you can confidently install the TV on the bracket with your own hands!
Restriction of mounting the TV on the wall without using the bracket
We list these restrictions in the following list:
- It is allowed to mount only thin TVs, such as LCD, LED and Plazma
- On your TV, all connectors should be exclusively on the sides
- Installation height should be no more than 1.5 meters;
- After installation, moving the TV is very difficult;
- The opposite wall must be covered.
If you are going to a wall based on a brick, then you can safely proceed with the installation. But here we will give you some useful tips:
- The TV should be hung so that it is at eye level, of course, when you are in a seated position.
- The distance from the TV to your eyes should be equal to the diagonal of the TV multiplied by 3.
- It is not necessary to calculate the length of the bolts, since each TV set comes with bolts of a certain length. They must be used.
- On the side that is opposite, it is necessary to mount a plate (iron) about 5 cm higher and wider than the distance between the holes when mounting on the back of the TV.
Conclusion
Modern flat-panel TVs are much more convenient than bulky CRT "boxes" that take up a lot of space and require a massive stand for installation. LCD monitors, on the other hand, simply hang on the wall and save space while having a much larger screen. But the mount must be very secure. Manufacturers took this moment into account and began to produce special brackets for wall mounting, which, in addition to fixing the device, allow you to change the position of the monitor. However, people who know how to work with their hands often do without them, inventing their own methods of fastening.


