- Kinds
- masonry process
- How to choose a place for construction?
- Russian "teplushka" with a stove bench 127 x 166 cm
- Mini oven project with stove
- Building materials and furnace fittings
- Laying progress - step by step instructions
- Drying out the oven
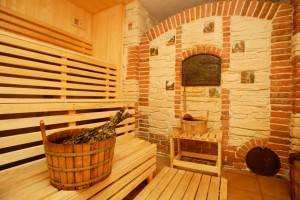
- Russian oven in the house
- Installing oven doors
- The purpose of the stove in the house
- Possible complications for the stove
- The process of laying the furnace Radonezh
- Video - Do-it-yourself heating furnaces
- Video - Do-it-yourself heating furnaces
- Tips
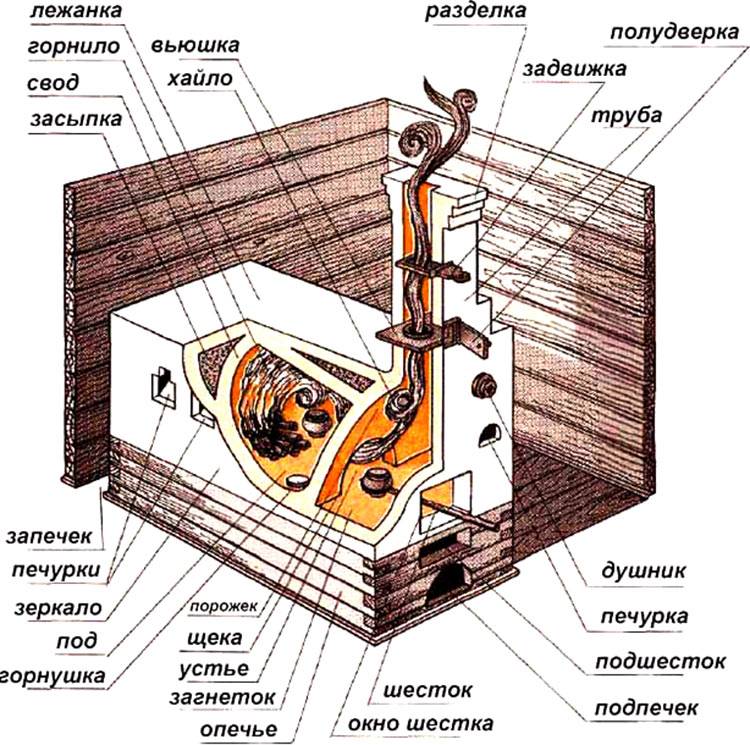
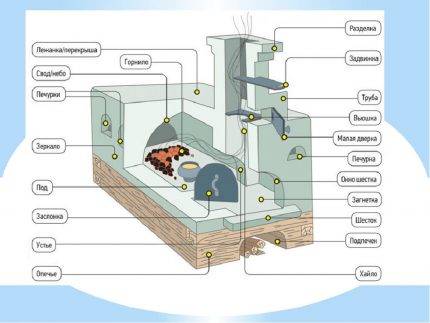
- The process of the Russian stove
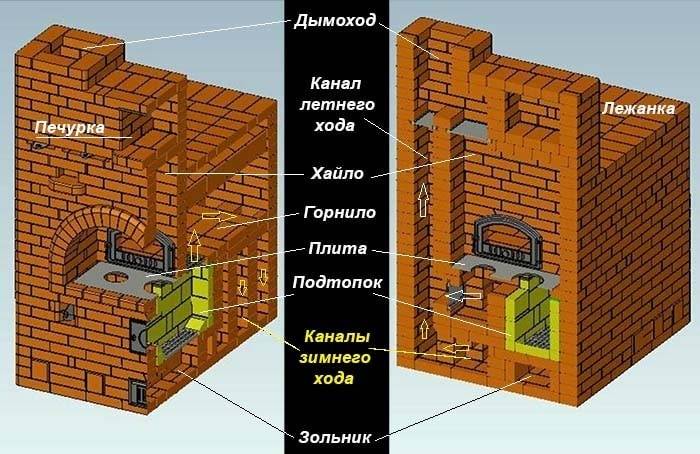
- The device of the Russian stove
Kinds
 According to the material of execution, a metal and brick oven is distinguished.
According to the possibilities of using the furnace are:
- Heating.
- Heating and cooking.
- Bath.
- Fireplaces are used in most cases in saunas.
By size, the designs differ:
- Small (150 * 175 centimeters).
- Large (150 * 230 centimeters).
- Non-standard sizes.
The position in the room may also be different:
- Stand alone.
- Combined with other designs.
There are furnaces with various design features. Some have lateral heating, which allows you to heat the adjacent room, and designs with bottom heating make it possible to warm rooms with a larger area.
masonry process
The masonry mixture is prepared from sifted sand and clay. Clay is left in water for a couple of hours, after which it is sifted through a sieve.Currently, there is no need to prepare this mixture yourself. A number of companies offer ready-made masonry mixtures of various packaging. The use of such masonry mixtures is preferable to their own production.
Industrial sieves sift a finer fraction of sand and clay, which makes it possible to obtain a more plastic and homogeneous mixture. Such a mixture will eliminate the formation of voids and air bubbles in the seams during laying.
The first rows are built with solid bricks. The sutures of the first row require dressing. After the first rows are ready, the brick will have to be cut.
The chopped side of the brick should be inside the masonry. This rule is also used in the construction of smoke paths. The chimney is built of red burnt bricks. And the opening of the firebox is created using a metal corner, a “castle” layout.
Before the first fire, it is recommended to wait 3 weeks.
How to choose a place for construction?
Let us draw your attention to the fact that the Russian stove must be included in the project at the preparation stage. Only in this way can you build one that will serve you for decades.
When designing, you need to pay attention to the following points:
Foundation. It is necessary to pour a separate foundation under the stove. The main condition is that it must withstand all the loads that the stove will create. As a rule, they make a reinforced concrete slab or install blocks. Moreover, it should not come into contact with the main foundation - it is necessary to make a small gap, which is covered with sand. The base should be below the floor level by about the thickness of two bricks. After the first row of masonry, waterproofing must be done.
The chimney must pass freely through coatings and ceilings - this is another important condition. Ridge beams, rafters and other elements should be kept away from the chimney.
The oven must be conveniently located. After all, it and the chimney significantly affect the ergonomics of the entire building. For this reason, it is extremely important to think carefully about all the details: the placement of doors and windows, furniture, etc.
Fire safety requirements must be taken into account. The furnace should be as far as possible from all combustible structures.
Of course, you can cheat a little and reduce the size. We will not tell you how to build a Russian mini-oven - the analogy is the same, only the dimensions are smaller.
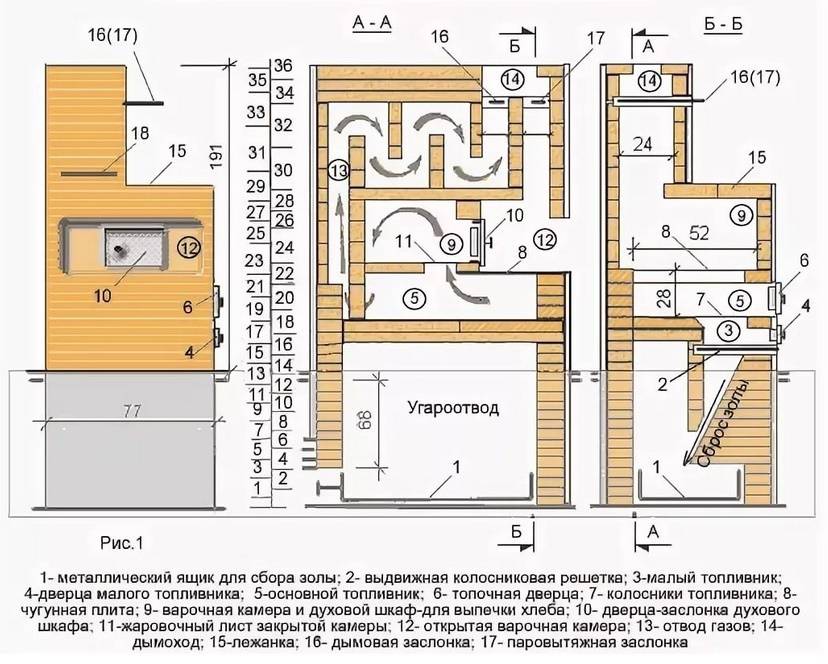
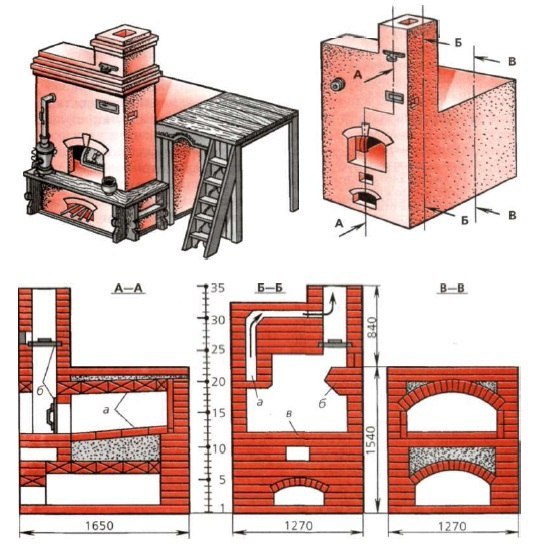
Russian "teplushka" with a stove bench 127 x 166 cm
The device and principle of operation of this stove are similar to the previous heat source. The difference is in size, power and some design features. 3 modes are also available here - winter, summer and a firebox in Russian. The heat output is 4.5 kW, the heated area is 45-50 m².
In winter mode, firewood can be burned on the grate of the crucible or in the firebox - the gases will still go through the lower passages and warm up the entire stove
The size of the furnace in plan is 1270 x 1660 mm plus 10 cm for the foundation ledge. The height of the frontal part is 210 cm, the beds are 147 cm. A set of materials for construction:
- refractory bricks SHA-8 - 26 pcs.;
- red solid brick - 995 pcs. (the chimney is not included in the specified quantity);
- fireclay block type ShB-94 - 1 pc.;
- the main door, installed in the mouth - 41 x 25 cm;
- ash pan door 14 x 25 cm, furnace door - 21 x 25 cm;
- 2 grate grates with dimensions 240 x 415 and 220 x 325 mm;
- stove 71 x 41 cm (2 burners);
- chimney damper type ZV-5, size 260 x 240 x 455 mm;
- 2 gate valves 130 x 250 mm;
- sheet steel 2 mm thick;
- galvanized reinforcing mesh - 1.5 lm (cell 30 x 30, wire 1 mm in diameter);
- template for forming an arch, radius - 322.5, length - 645 mm;
- circled under the arch of the main furnace with a radius of 60, a length of 77 cm;
- corrugated packaging cardboard, kaolin wool.

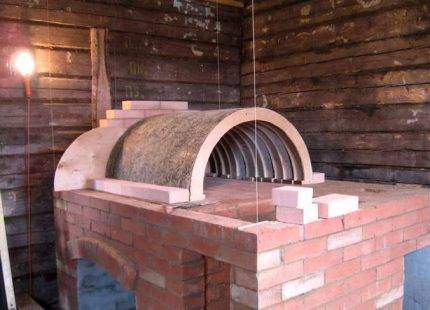
It looks like a big "Teplushka" with a capacity of 4.5 kW
Preparatory work - the device of a reliable foundation. Keep in mind that after pouring the foundation formwork can be removed after 3-4 days (during the warm period), and to build a furnace - only after 2 weeks. The base area is covered with waterproofing - a roofing material folded in half.


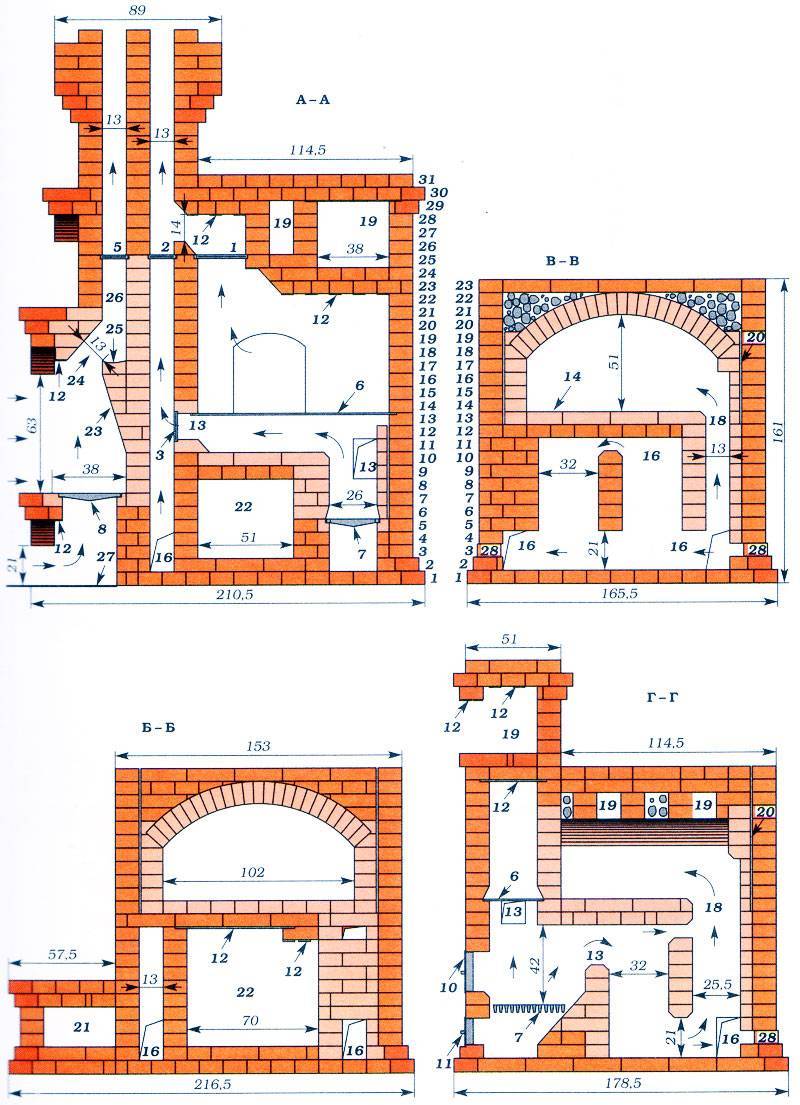
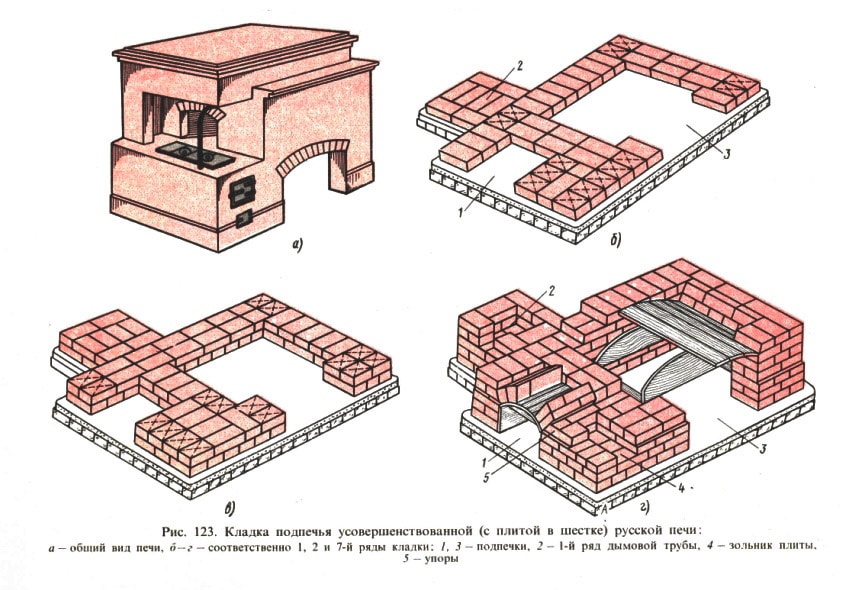
How to properly lay out the full-size "Teplushka":
- Row No. 1 is solid, consists of 65 ceramic bricks. On the second tier, we begin to form the walls of the furnace and support posts, put the door of the ash chamber. We set 8 stones on a poke without mortar and cut them to the height of the 3rd row. We do not connect with the rest of the masonry - these will be cleaning hatches.
- We put the third tier according to the scheme, on the 4th we block the ash pan. On the 5th row, we begin to build the walls of the firebox from refractory, insert a grate 415 x 240 mm.
- We continue to lay rows 6 and 7 according to the scheme, fireclay stones are placed on the edge. After the formation of the 7th tier, we mount the firebox door and the summer valve, installed vertically. 8-9 rows are built according to the orders.
- On the 10th tier, we block the underflow, cover the upper ends of the refractory bricks with kaolin wool. The front part of the chamber must be covered with a fireclay block SHB-94 or similar. We begin to reinforce the walls of the furnace with galvanized wire mesh, then we arrange a second overlap of red bricks (row 11).
- On the finished 11th tier, we insert the stove and grates of the main chamber - the crucible. We make level No. 12 according to the order and mount a large door. Then we lay out the 13th tier and the arch, using the circle.
- We build rows 14-17 according to the drawings, raising the outer walls of the furnace, the smoke channel and the front partition of the crucible. Next, we put an arched vault R = 60 cm from wedge bricks. Tiers 18, 19 continue to build according to the schemes.
- With the twentieth row, we block the front arch and raise the outer walls higher. We fill the void above the arch with a solution of clay and sand. After drying, we build tier 21 - the plane of the couch.
- Tiers 22-32 make up the front section of the stove, where the hailo is combined with a side flue. We line up the rows according to the schemes, at the 24th level we put 2 valves, on the 29th level there is a sheet of metal that covers the stove.
Step-by-step instructions for the construction of a Russian multifunctional stove will be given by an expert in his video:
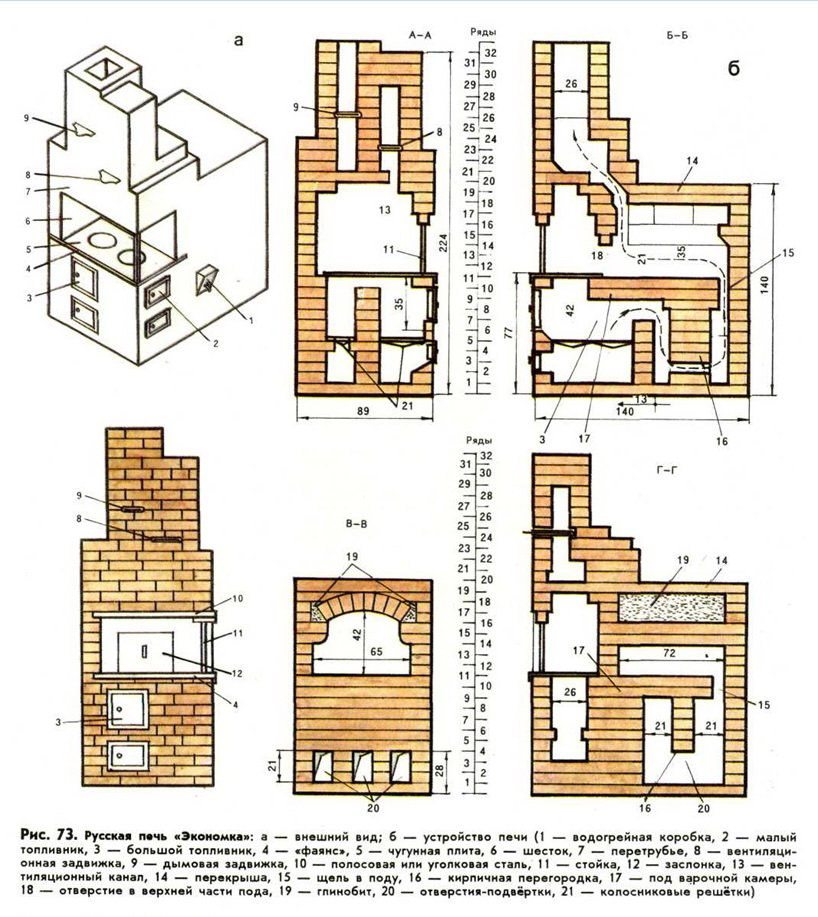
Mini oven project with stove
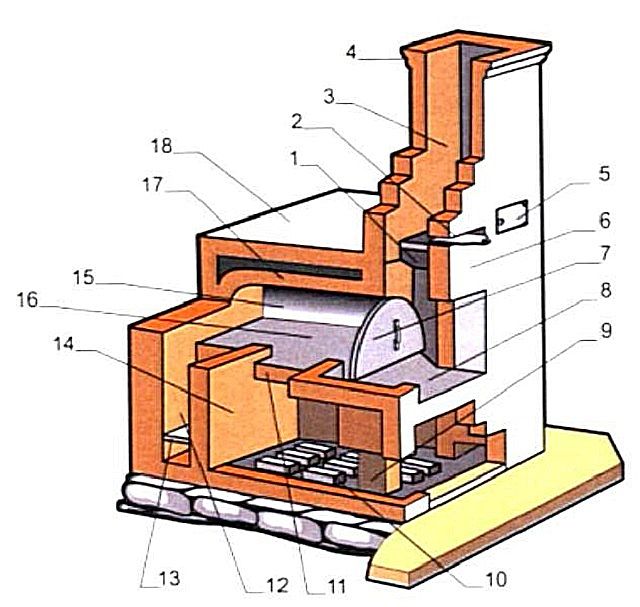
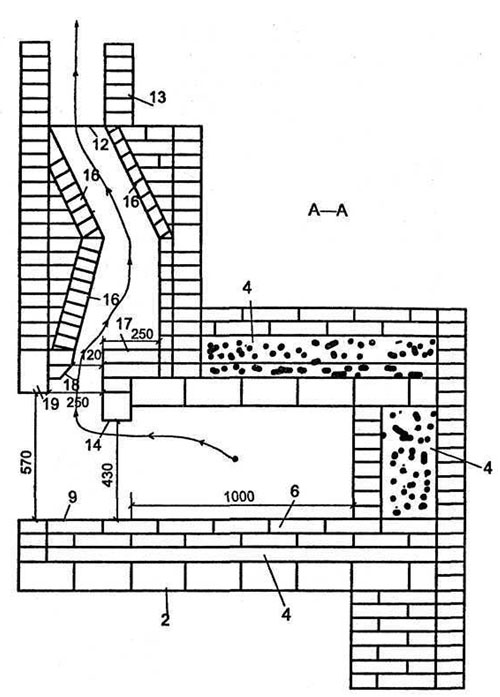
The Russian heating and cooking stove "Teplushka" with an additional combustion chamber has a power of 3.5 kW. The structure is designed for heating a small house or cottage with an area of 30-40 m², as well as cooking in winter and summer. The device of a small heater is shown in the drawing.
The mini-oven is capable of operating in 3 modes:
- Summer move. We open the valves 1, 2 and 3 (see the picture), we charge the firewood with firewood. The gases immediately go through the main channel into the pipe, the stove is heated. Damper No. 3 plays the role of an exhaust hood.
- Firebox in winter. We use the lower chamber again, close the valve No. 1.Then the combustion products move through the crucible and gas ducts in the under-furnace, exit through the channel to the front side and further into the main chimney. The whole body of the furnace is heated, from top to bottom.
- Firebox in Russian. We kindle firewood in the crucible, open the hermetic door of the mouth and damper No. 3, valves 1 and 2 are closed. The smoke goes into the highlo and the main pipe, only the couch is heated. For full heating, we close the door, open damper No. 2 - the gases will go through the lower channels of the stove.
Due to the efficiency and relatively low cost of materials, a mini-stove can be safely called a housekeeper. One minus is the small size of the couch. The maximum height of the building is 2.1 m, in the area of \u200b\u200bthe ceiling - 147 cm.
Building materials and furnace fittings
To make a Russian mini-oven with your own hands, you need to buy components and materials:
- solid ceramic bricks - 670 pieces (the chimney is considered separately);
- fireclay bricks for the firebox - 25 pcs. (brand ShA-8);
- fireclay block of the ShB-94 brand or similar in size - 1 pc.;
- door of the mouth of the main chamber 25 x 28 cm, it is possible with fire-resistant glass;
- loading door 21 x 25 cm;
- ash pan door 14 x 25 cm;
- two grates with dimensions of 300 x 250 and 220 x 325 mm;
- wooden template - circled - with a radius of 460 mm, length - 65 cm;
- cast iron hob for 2 burners 71 x 41 cm;
- 3 gate valves: 13 x 25 cm - 2 pcs., 260 x 240 x 455 mm - 1 pc. (brand ZV-5);
- equal-shelf corner 40 x 4 mm - 3 meters;
- steel sheet 1 mm thick for a shelf in a stove;
- galvanized mesh for reinforcement, cell 3 x 3 cm - 2.1 m;
- kaolin wool, corrugated cardboard.
Appearance of the finished mini-stove for a country house
Red brick laying is carried out on a sand-clay mortar.When erecting a chimney, the addition of cement M400 is allowed. Refractory stones are placed on a different solution - fireclay, mortar and the like.
Laying progress - step by step instructions
A reinforced concrete or rubble concrete foundation is cast under the furnace, whose dimensions are 10 cm larger than the dimensions of the structure. Start construction when the concrete reaches 75% strength, under normal conditions, the curing process will take about 2 weeks. This implies an average daily air temperature of +20 ° C and proper care of the monolith.
Having arranged waterproofing from 2 layers of roofing material, make the first row solid (40 bricks will be needed). How to fold the oven according to the order, read on:
On 2-3 tiers, an ash chamber is formed, a cleaning door is mounted and columns are built to support the bottom of the crucible. The 4th row continues the main walls of the stove, the ash chamber is covered with cut stones.
Rows 5-6 form the main smoke channel and the bottom of the firebox made of refractory bricks. The grate is placed without mortar, a row of fireclay stones placed on edge is laid on top.
On the 7th tier, a loading door and a vertical summer run valve are installed. 7-9 rows are stacked according to the scheme, at the end the fireclay brick is covered with kaolin wool (marked green)
Please note: on the seventh tier, the reinforcement of the walls with steel mesh appears.
Rows 10 and 11 partially cover the gas ducts and the lower heating chamber, a grate for the crucible and a hob are installed. The 12th tier begins to form the main firebox, on the 13th tier a door is attached at the mouth of the crucible.
14-17 rows are laid according to the scheme, corners are mounted to cover the cooking opening
On the 18th tier, steel profiles are covered, an arched vault with a radius of 46 cm is built from wedge-shaped stones.
Tiers 19, 20 are made according to the scheme, the cavity between the vault and the walls is covered with sand or filled with thick masonry mortar. When the filler dries, 21 rows are laid - overlapping.
From 22 to 32 tiers, the front part of the heater is being built. On the 24th row, both smoke valves are placed, on the 25th - an iron shelf measuring 42 x 32 cm. Having laid the 29th tier, cover the stove with the same sheet.
To understand the construction to the smallest detail, we suggest watching a video with a detailed demonstration of the masonry of each row and the master's explanations:
Drying out the oven
Before building a chimney, the Russian stove is subjected to revision and pre-drying. It is necessary to find all the cracks and places with squeezed mortar in the seams, they are rubbed with lean clay with asbestos fiber. Unlike a fireplace or a Dutch stove, in a Russian stove, the heavy brick chimney pipe is shifted to the mouth or, as in the case of the Teplushka described above, is generally shifted to an angle.
The weight of the pipe is more than a hundred kilograms, so the craftsmen try to build a Russian stove in short masonry, no more than three or four rows a day. Most of the time is spent on grinding and plastering the internal channels of the furnace. The mouth and overtube are not plastered, but ground with wet sand to achieve the smoothest possible surface. During the time spent on fine-tuning the channels and details of the furnace, the brickwork has time to dry thoroughly at normal air temperature.
By the time the chimney needs to be built, the Russian stove should already be fully finished, dried and ready for use. To once again verify the correctness selected section for the chimney, a three-meter tin pipe is put on the output, and the furnace itself is fumigated with smoke from a mixture of raw sawdust and dry straw. By how easy the smoke goes into the tin, they specify the parameters of the section and the height of the chimney, which still needs to be built.
Russian oven in the house
The traditional home life of the Russian peasant was literally built around the stove. Under it, during the construction of the hut, a significant part of the internal space was allocated. The stove not only heated the room, but also served as a place for the whole family to sleep, cook food and bake bread.


Old Russian oven in the hut
The advantages of such ovens include:
- long service life with proper care;
- the ability to keep warm for hours;
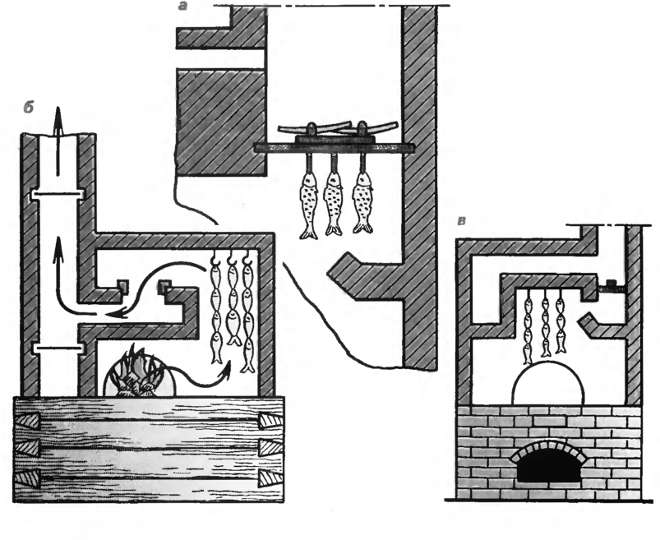
- many additional uses - drying berries and mushrooms, use for household chores and crafts;
- the ability to protect the body from disease.
The latter means that on the bench of a well-heated stove, for almost the entire heating period, a temperature of approximately 25-28 degrees Celsius is maintained.
This design also had disadvantages:
- the stove in the house took up a lot of usable space;
- due to its significant weight, it assumed its own foundation (therefore, it was not possible to equip it in a multi-storey building);
- required a large amount of fuel;
- the furnace could not withstand high temperatures.
The main drawback of the historical design of the Russian stove was that the heating of the room occurred only in the middle and upper zones, and did not come closer to the floor at all. In part, this disadvantage was compensated by the installation of additional fire chambers (fire chambers).
Installing oven doors
Depending on the design of the stove, folding, lifting, sliding or classic folding doors are installed.
When choosing the material for the door for the stove, consider the following points:
cast-iron structures with glass inserts or all-glass products are chosen if they like to admire the play of flame in the house;
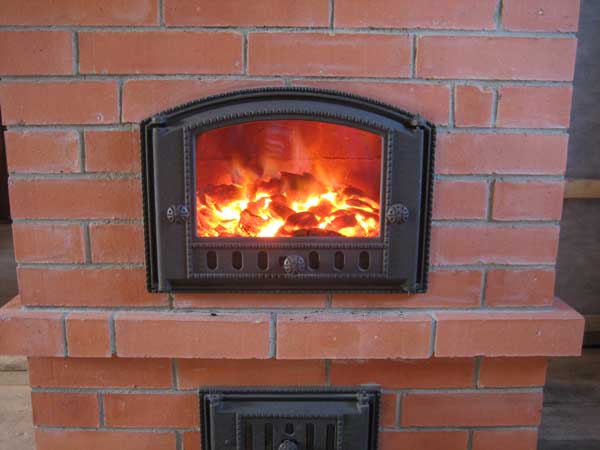
Through the glass you can clearly see how the fire burns in the furnace
- completely cast-iron samples are used if the stove is fired with coke, coal or mixed fuel. Doors made of steel or glass are suitable for a wood-burning stove;
- to avoid burns and protect children or pets from a dangerous environment, a metal door with an additional thermal shield is required.
The selected doors are installed at the appropriate stage of laying brick ovens, according to the given scheme.
The purpose of the stove in the house

It consists in a set of activities carried out daily or once or twice a year. With intensive use, the rough needs to be cleaned from accumulated ash. Its large amount will interfere with normal air circulation, which is why the firewood will not burn completely.
Another nuance in using a brick oven is the cracking of its finish. Experienced users advise not to overheat the surface. The normal temperature is considered to be 17-18 degrees, and the features of the brick allow you to keep moisture inside the room. Such a microclimate is provided only by the use of a stove, other heating devices often dry out the air, and lower temperatures make the room feel damp and cool.
Possible complications for the stove
In a country house built according to a standard project, the location of the furnace, the chimney outlet, and convenient places for maintenance and operation are usually provided in advance. It is much more difficult to arrange a heating and cooking unit in a house built according to an individual idea. Even more difficult if the house is already built.
It happens that after choosing a successful, in the opinion of the owner, location of the furnace, and even after building the foundation, they suddenly discover that the chimney will cross the floor beam or rafter. How to act in such a situation?
The way out in this case is associated with two difficult and rather expensive options. In the first of them, you will have to sort out the ceiling and change the position of the beams and rafter legs, in the second - to destroy and rebuild the foundation of the stove.
In order to eliminate such troubles, before marking and building a foundation in a built house, it should be determined whether the chimney will violate the integrity of existing structures. If there is a possibility and access to beams that have not yet been sheathed, it is necessary to check the exact position of the components of the furnace to be marked with a plumb line.
If it is most convenient to place a brick oven in a house being built with your own hands exactly in the place whose projection intersects the elements of the roofing system, it is better to displace them. In general, of all the options, it is desirable to choose the one that will be easier and cheaper to implement.
When designing a furnace and selecting a suitable model, the following rules should be considered:
The process of laying the furnace Radonezh
First step. Cut a hole in the wall for the oven. Hammer reinforcing dowels into the ends of the timber (if the wall is made of this material).


Second step. Pour the foundation.
Proceed to masonry 1-1.5 months after the arrangement of the foundation.It is during this period that the concrete will gain the desired strength.
Third step. Cover the dried foundation with waterproofing material.
Fourth step. Lay out the first row of the stove. Check the evenness of the masonry with a level. Make seams no wider than 3 mm.
Continue laying the furnace in accordance with the order.
The grates and the blower are arranged in the combustion chamber. The width of the furnace blower must be sufficient for the inflow of the required amount of air to the loaded fuel during the operation of the heating unit.
Lay out the furnace chamber and sew the channels. Cut off excess solution.
When laying the 26th row, make a 20 mm overlap on each side.
Complete the laying of the main part of the furnace in order and proceed with the laying of the chimney.
Continue the arrangement of the chimney in accordance with the previously prepared project.
Dry the finished oven. To save time, install a fan in the combustion chamber.
After the masonry has dried, do a few test runs. Don't make the first fires too intense.
If everything is done in accordance with the instructions, order and basic requirements, after an average of 30-40 minutes, the side of the stove that goes into the room will heat up. After about 1.5 hours, the unit will warm up evenly and begin to fully heat the room.
The self-made construction of a heating furnace is a rather complicated and lengthy process, but if you wish, you can cope with such an event. It is only necessary to follow the proven technology, use only high-quality building materials and adhere to the chosen masonry scheme in everything.
As a result, the heating unit will serve as long as possible, reliably and efficiently, and you will additionally save on arranging the heating system of your home by refusing the services of third-party stove-makers and doing everything with your own hands.
Video - Do-it-yourself heating furnaces
Video - Do-it-yourself heating furnaces
Everything is very well written. From myself I will add that there is no need to look for refractory clay. Now ready-made mixtures for laying stoves and fireplaces are sold on the building materials market. Everything is already mixed in the right proportion. Even after drying the oven, there is one point. Make the first run using only paper and cardboard as fuel. Firewood is highly undesirable. Then you will get the required temperature. Heat it this way for no longer than an hour. As the clay dries, it may smoke a little. That is, the smoke will be in the room. Don't be afraid of this. The clay will dry very quickly and the stove will work as it should.


I want to suggest one interesting idea that I myself experienced. Inside the furnace, you can lay out "Gabrodiabase". This stone is a type of granite and is used to make monuments. Trimmings can be requested at funeral services, after making sure that this is really gabrodiabase, and not simple granite. You can buy, but this stone is very expensive, because it can withstand high temperatures! Good luck!
On my own in the country, I twice made stoves in the house and in the bathhouse. In the latter, the second option turned out to be relatively successful, but there the design itself is simple. In the house, metal stoves lined with bricks served as the basis.I immediately rather modestly assessed my capabilities in the construction of a more complex structure, and still, having already had experience, I think so. That is, for the construction of a good stove and, moreover, a fireplace, it is best to turn to good stove-makers. By the way, my sister did just that, and until they installed the boiler, she worked great for them.
Have we answered your question?
Tips
When creating this element, you can use the following tips:
It is better to choose a place for installing a Russian stove in advance, even at the stage of building a house. It is desirable to include its creation in the project. Most often it is placed in the middle, although in old houses you can see it on the side, against the wall.
It is also important to determine the location of the chimney.
To make the foundation more convenient, you need to calculate the location of the structure in such a way that there are no floor beams there.
For the foundation, you can use not only concrete, but also brick, stone. The main thing is to create a dense and stable base with a horizontal surface.
The mixture for the preparation of the solution can be purchased ready-made
When laying out the walls, you need to remember to leave 2-4 mini-windows with which you can clean the stove.
At the end of the construction, the structure should be dried. Under natural conditions, with open dampers and doors, the oven dries out in 5-7 days. And you can start using the new beautiful Russian stove.
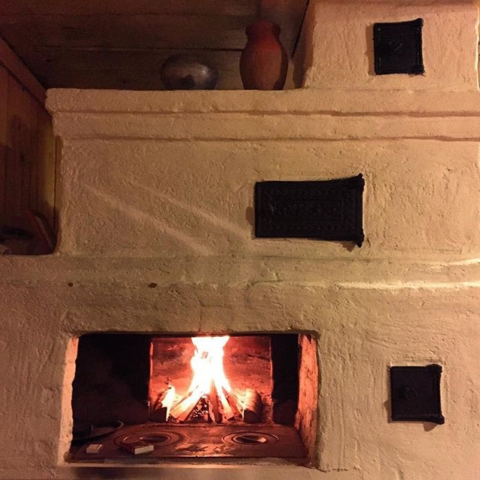
The process of the Russian stove
Despite serious competition and a solid history, the construction is still in demand among owners of suburban real estate.According to the way the Russian stove is arranged from the inside, it will be possible to focus on the dimensions from the outside and, accordingly, plan a place for it and lay the foundation.
Before you fold the Russian stove, you need to understand its principle of operation - the design is a periodic heating device, that is, when burning firewood, it accumulates heat, then gives it away for almost a day. So the building can warm or languish for almost a day, which makes it possible to cook baked milk in it, steam porridges and soups without controlling the process.
Before you make a Russian stove, you should build a separate foundation base that is not connected to the tape, since the structure usually has a lot of weight
This is especially important when the house "dances" on heaving soil during freezing and thawing. In this case, the stove will move along its own amplitude along with its foundation, without destroying the finish and without affecting the walls and openings.
Russian stove in section during heating and languishing
Work principles:
- the whole structure stands on a brick guardianship or concrete;
- firewood for kindling is stored in the stove, where it dries very well and lights up instantly when ignited;
- the top of the stove is made with a hemispherical vault, like a trough;
- sand, clay, brick battle - any heat-intensive material is poured on it, and on top of it is laid out under the furnace - the front part of the furnace (cooking chamber), it is laid without clay mortar.
If you ignore the filling, then you can forget about real hearth bread and pies. By the way, they are baked on cabbage leaves.
Next comes the bail with an overtube and a hail in the form of a tapering nozzle.Ash pans are provided on the sides in the wall near the walls - recesses for smoldering coals (for the next kindling) and ash. Sometimes they are raked into an ocholok - a part of a cast-iron or stone slab (pole), protruding from the face (chela) of the furnace.
To reduce costs and cleanliness in the room, an ash pan and an eyeglass can be omitted. Previously, they were raked into the corner of the mouth, then the coals of birch, maple, elm, oak and aspen kept heat only for a day.
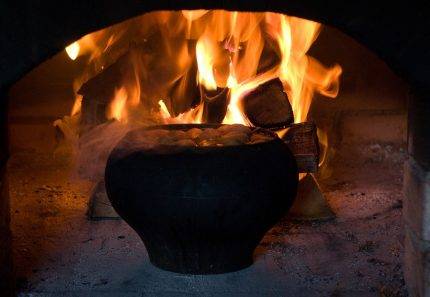
Cooking in a cast iron stove
Most likely, this is where the belief came from that the Russian stove is quite picky in the form of fuel. But this is not so - it works on any solid fuel, including:
- brushwood;
- dung;
- deadwood;
- sawdust
- straw;
- peat briquettes.
The zagnetok, thanks to this configuration, acts as an economizer, where the following happens: the smoke circulation heats up the air, which enters the furnace, without extracting oxygen from it and without preventing combustion - there should be no mixing of heat flows. In fact, the zagnetok is an energy recuperator (heat exchanger).
Before building a Russian stove, you should check the dimensions in advance - this is important so that the building does not smoke, does not cool down quickly and does not use a lot of firewood. For the same purpose, perfectly smooth hail vaults are made.
Moreover, they cannot be plastered, so the bricks on the inside are hewn and polished to a gloss - then there will be no turbulence in the overtube.
The smoke from the oven goes up the chimney
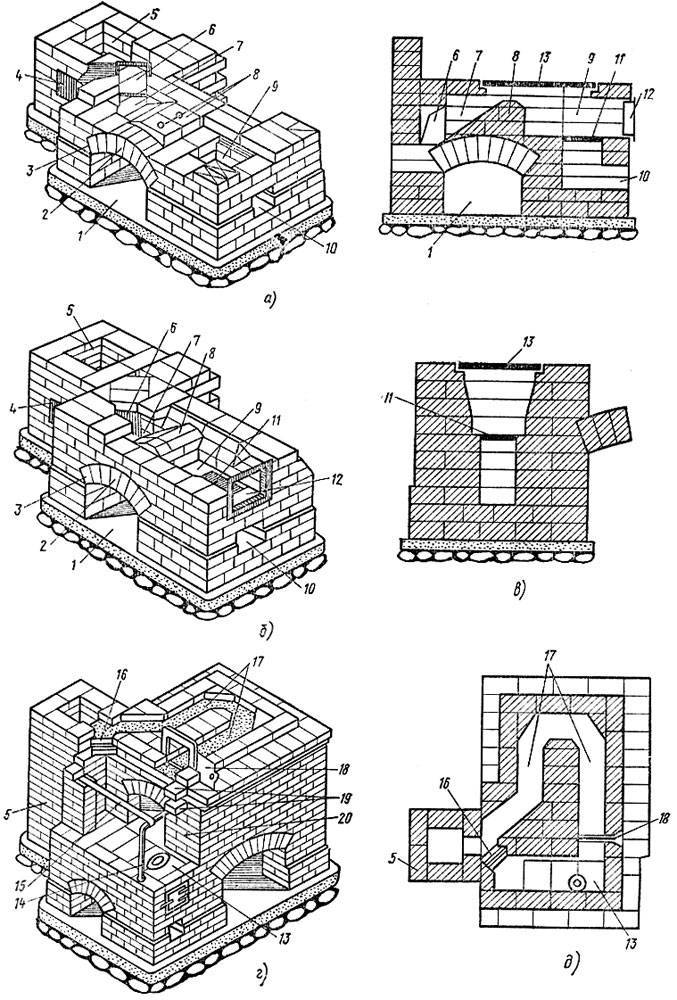
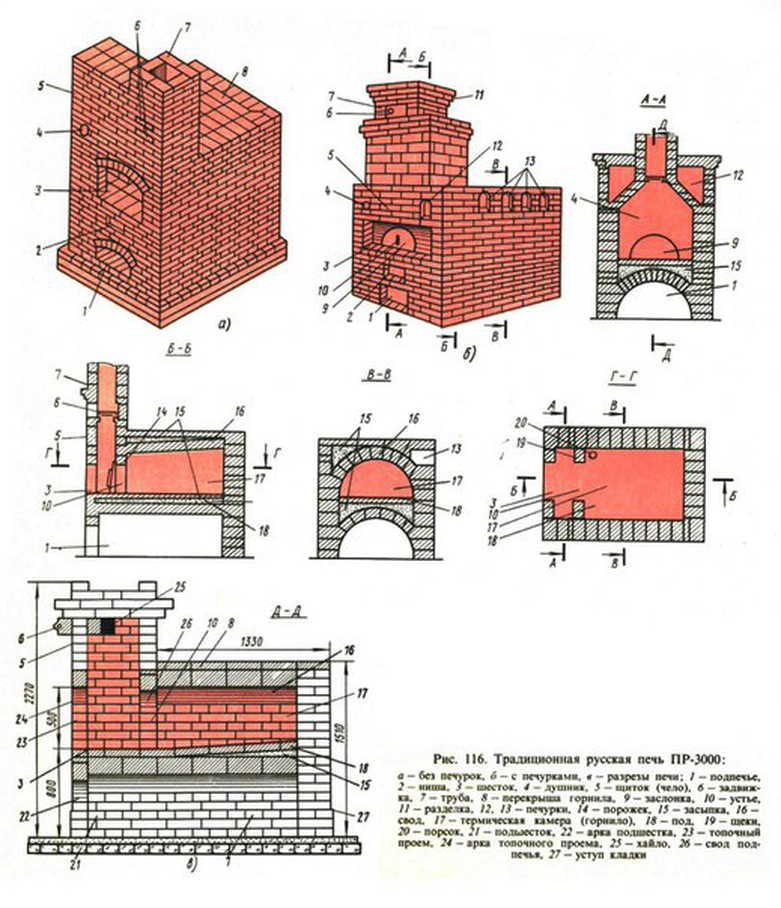
The device of the Russian stove
Russian stoves may differ in size, shape and design features. According to one of the definitions, these are heating and cooking facilities with 2 fireboxes, designed, in addition to heating functions, to cook typical dishes and bake bread.


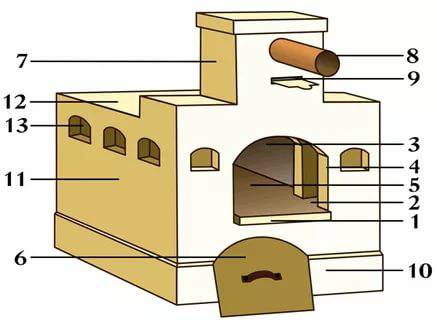
The process of burning firewood in the main firebox occurs as follows: the gases generated during the combustion of logs enter the 1st section of the under-hearth chamber, then through special openings - podverki enter the 2nd section. After that, they move to the upper cooking chamber, from where to the collection channel and into the pipe.
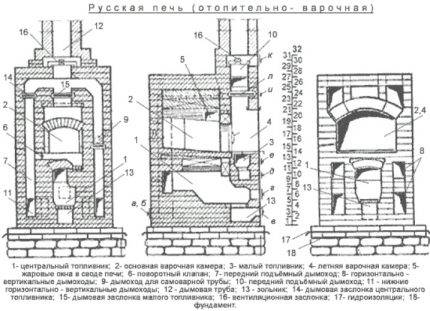 Scheme of the device of the Russian stove. The main firebox is necessary for winter heating, the small firebox is used for cooking at any time of the year
When burning wood in a small firebox, the gases from combustion first enter the main firebox, from it into the pipe. Here you can use not only dry logs, but also bark, wood chips, branches and other waste.
 The Russian stove has a lot of advantages, but it has one noticeable drawback: heat is released at the level of the hearth, that is, at a distance of about 0.9 m from the floor, which prevents the lower part of the room from heating
The basis for the construction is the foundation, usually 0.1 m larger than the size of the lower part of the Russian stove. Here, below, there is an under-furnace - free space for storing a poker, tong, spatula and other equipment.
 The main part is considered to be a crucible - a cooking chamber with a hole (mouth) on the front side. The mouth may have a rectangular or arched shape. Through it, fuel (logs) is placed inside the crucible and dishes with food are placed.
For laying the cooking chamber, and in particular for the vault, the most fire-resistant, selected brick is selected. The thickness of the walls determines how long the heat will last.
The thin walls of the cooking chamber heat up very quickly, but cool down just as quickly. The standard thickness is 1 or ¾ bricks. The front wall is thinner - ½ brick, as is the partition in front of the furnace.
At the bottom of the cooking chamber is located under, for which a durable smooth brick is suitable. Often it is laid dry, without the use of a mortar, on a backfill of coarse sand, to which crushed stone, gravel or broken glass is added. The flooring of the hearth is made with a slope of 3-5 cm towards the mouth.
The shape of the vault affects the degree of heating and the complexity of the masonry.
 For example, semicircular vaults slightly heat under and unevenly reflect gases, but are considered lighter in a do-it-yourself device.
Sloping vaults are more difficult to lay; steel ties have to be used to distribute the load. However, with this design, the under warms up more.
The technology of laying the arch of the Russian stove may differ, but the following rule is often observed: they lay it out simultaneously from 2 sides and finish in the middle. A castle brick is laid in the center, for coating which a clay solution is used.
 The cooking chamber is arranged taking into account that the fuel can be laid close to the mouth - in this case, combustion occurs more efficiently. Pots and pans are also placed on the under next to the mouth.
If bread is baked, then it is cleared under - the ashes are raked out, and its remains are swept away.
Until now, there is a way of baking bread without baking sheets and forms, when it is placed on a special shovel, lightly sprinkled with flour, and then “put in the oven” - they are simply dumped on the floor with a sharp movement.


