- We make a wood-burning stove for the house: Instructions for building a brick stove
- Brick or metal?
- Foundation
- Russian stove in the house: advantages and disadvantages
- Proper operation
- How to make a brick sauna stove
- Ordering the sauna stove
- General recommendations
- How to make a rough oven with your own hands
- Mini oven project with stove
- Building materials and furnace fittings
- Laying progress - step by step instructions
We make a wood-burning stove for the house: Instructions for building a brick oven
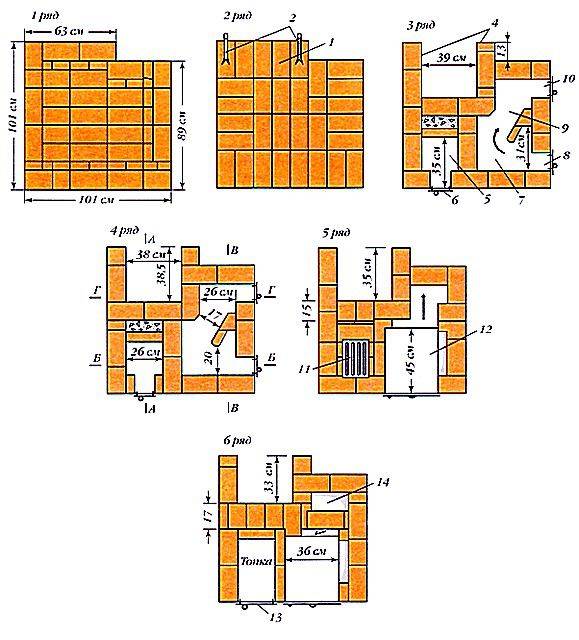
Such a stove is optimal for heating two rooms or a house with an area of 30-40 sq.m.
The furnace has three flue channels arranged vertically. Their length is more than four meters. It has two firing modes - summer and winter.
For work we get:
- full-bodied ceramic bricks M175 - 400 pieces;
- refractory bricks - 20 pieces (SHB8);
- two-burner cast-iron stove 70x40 cm;
- valves 28x18 cm - 2 pieces;
- furnace door 27x30 cm;
- blower doors 2 pieces 15x16 cm;
- masonry tools (trowels, mortar containers, etc.).
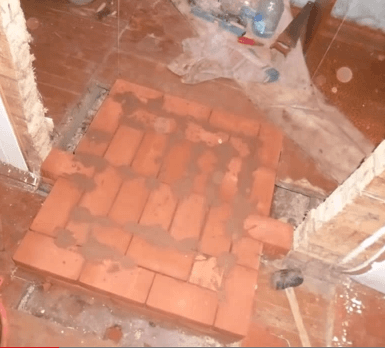
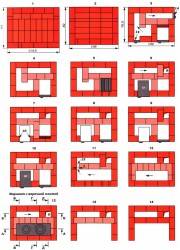
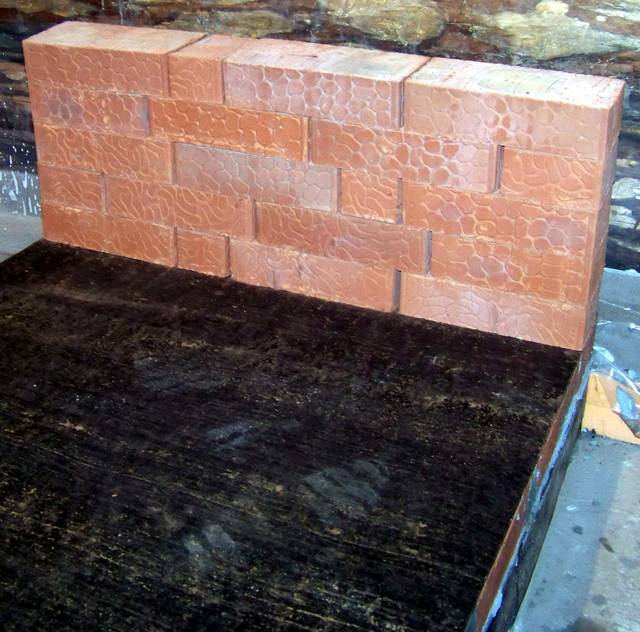
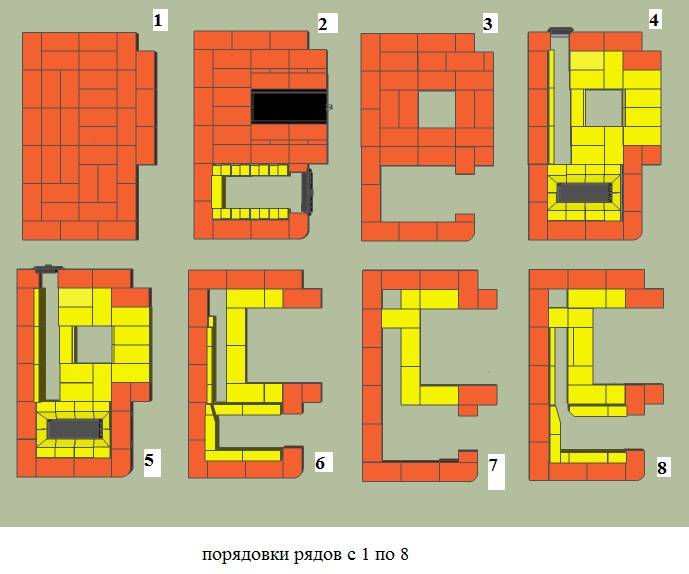
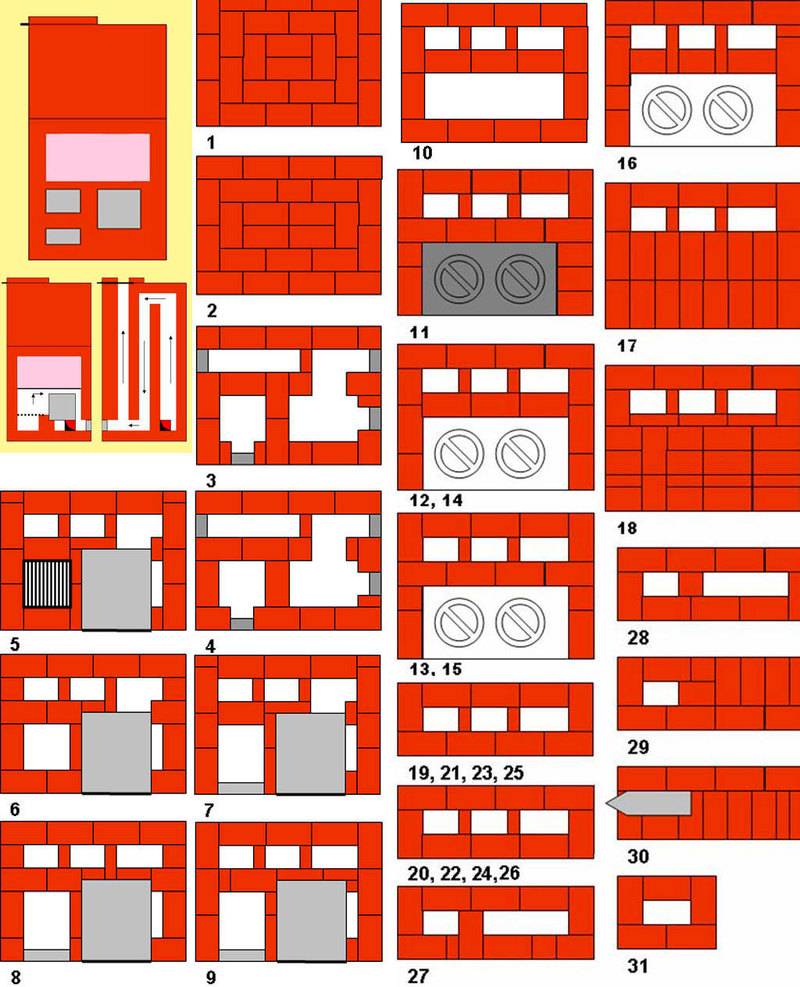
We build the foundation for the furnace and proceed to laying out the first row. It is the most important, as it sets the dimensions of the furnace. The thickness of vertical seams is not more than 8 mm.
Second row: we bandage the initial row and lay the foundation for the fire cut.
Third row: we form a chamber for collecting ash and install a blower door.
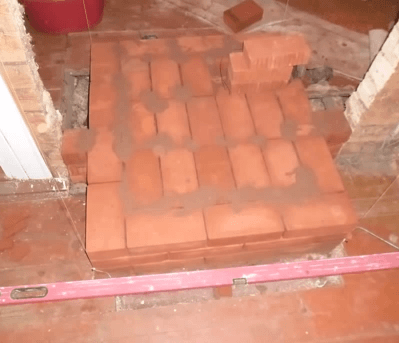
Fourth row: we continue the construction of the ash collection chamber. And in the future, the combustion chamber will be lined with fireclay bricks. In the same row, we produce fasteners for the cleaning door and the formation of the lower horizontal channel.
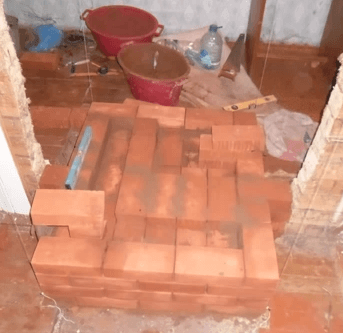
Fifth row: we block the blower door with one solid brick, since its length is only 14 cm. We continue the construction of a horizontal channel and a fire separation between the stove and the walls of the house.
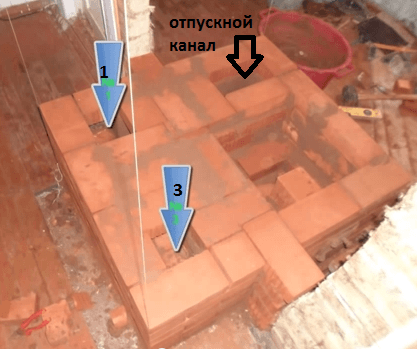
Sixth row: we make the overlap of the cleaning door and the horizontal lower channel. At the same time, we see the formation of two vertical smoke channels 12x12 cm.
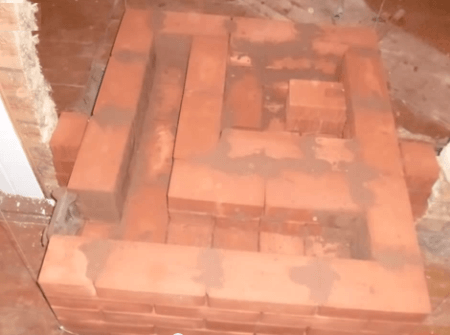
Let's designate the left channel with the number 1 (it will be directly connected to the chimney), the right one - with the number 3 (a long channel for the passage of gases and heating the furnace in winter). The dimensions of the outlet channel are 25x12 cm.
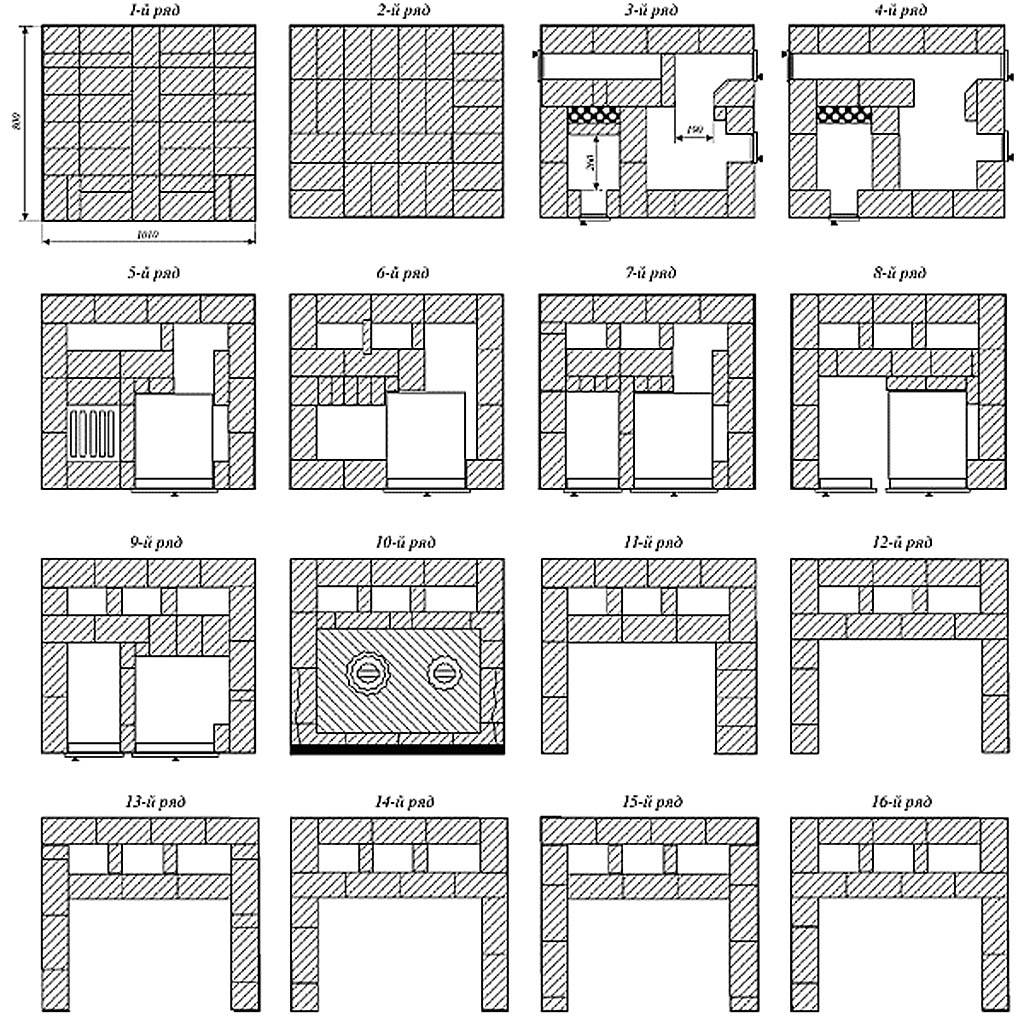


Seventh row: we continue to form channels and install the furnace door.
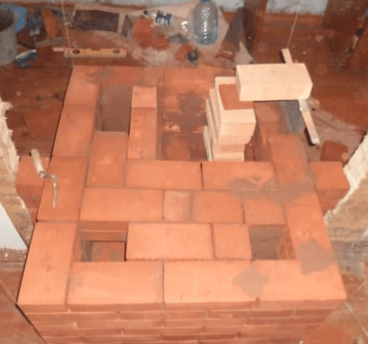
Eighth row: we bandage row number seven and form the second vertical channel of the furnace.
We put the valve of the summer course. If you open it, the smoke will directly enter the chimney without overheating the room excessively. If the valve is closed, flue gases will enter channel number 3 and pass along a long path, heating the entire structure of the furnace and, accordingly, the room.

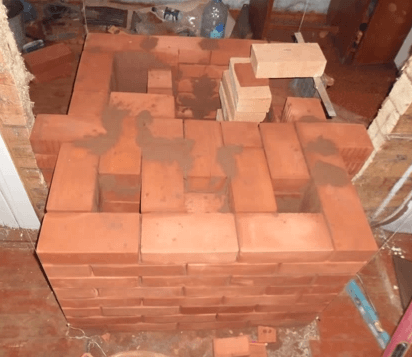
The ninth row is similar to the eighth. We are preparing a support for installing the locking of the furnace door.
Tenth row: we close the furnace door and connect channel 1 and channel 2. Here, flue gases will pass from the second channel to the first when burning in winter mode.
From fireclay bricks we cut out slots for the grate of the grate and put it inside the furnace. We isolate the back wall with mineral wool.
We continue laying the walls ovens and lay the grate.
Next, we produce the lining of the furnace with fireclay.
We complete the pass.
We are laying a cast-iron slab 40x70 cm (11th row).


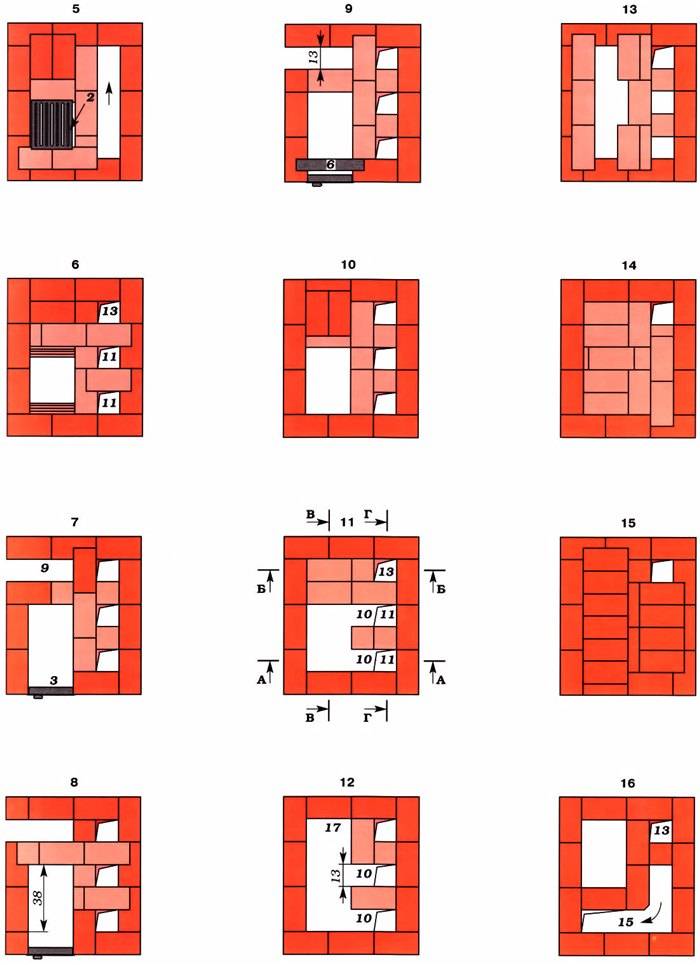


First, we lay the slab on the bricks “dry”, we make a pencil marking of the perimeter of the slab. We cut a recess in the brickwork for the stove with a grinder. The depth of the recess is 10-15 mm. We lay the seal (asbestos cord). Put a plate on top. We check its horizontality.
12 row: we make a three-channel heating shield.
The 13th row overlaps the previous one and so on until the 18th row. In the 18th row, we install the second valve. 19 row - we continue construction. 20-21 row: we block all channels except the first. 22 row: we begin the construction of a chimney.
Such brick wood-burning stoves are able to quickly heat the room, and are suitable for cooking. After construction is completed, it is important to finish the stove with natural or artificial stone, ceramic tiles or plaster the surface.
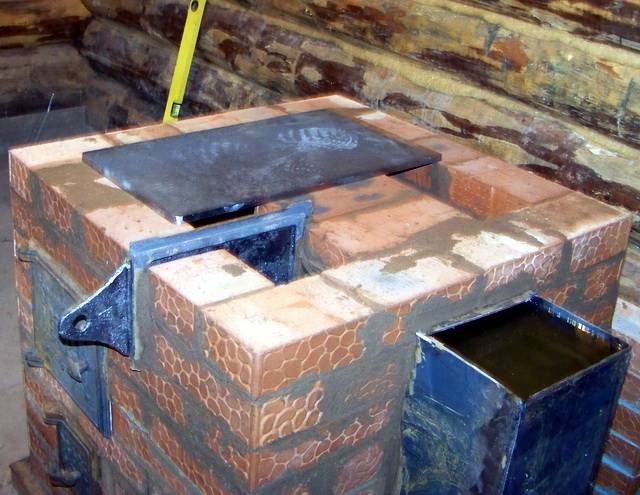
Brick or metal?
If the room is planned to be heated only with a stove, then a brick one is better - it gives off heat to the room longer and cools down more slowly. It needs to install a strong foundation that holds the structure.
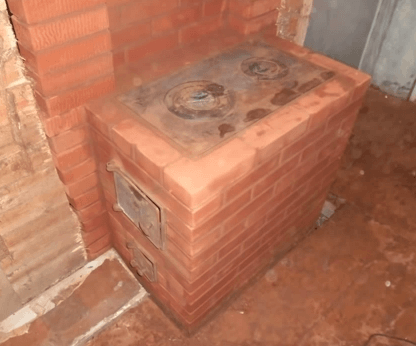
Photo 3. Ready-made simple stove for heating the cottage. Additionally equipped with a cooking surface.
A metal stove is suitable when the house already has heating or the room is used only from time to time and it needs to be quickly warmed up. The metal furnace is lightweight and does not require the installation of a foundation.
The choice of one or another type of furnace depends on the conditions where it is planned to use it.
Foundation
Before you do a Russian stove with your own hands, the drawings must be carefully studied and after that proceed with the construction of the foundation and the acquisition of materials. Although it is better to lay the foundation for the structure at the stage of formation of the foundation for the house. However, they should not be connected.

A separate foundation for a Russian stove with a gap of at least 5 cm - wet sand is poured here and compacted
If it so happened that the furnace needs to be erected in an already rebuilt house, then the floor should be cut to the ground, formwork should be made and concrete should be poured, if required, then with reinforcement. Depending on the location of the furnace, there are the following nuances of building its foundation:
- If the Russian stove will stand against an inner wall with a shallow base, then both soles should be on the same level, and the upper platform for the stove remains 14 cm below the finished floor.
- If the furnace is planned to be placed at the load-bearing wall on a deepened strip foundation, then the foundation pit for the base of the furnace is expanded, a sand and gravel layer is made with a rammer and concrete is poured into the formwork. At the same time, the gap between the two foundations of 5 cm is filled with sand, the sidewalls directed inside the house are formed with brickwork. The depth of the sole should be at least half a meter.

The foundation for the stove in the corner - on both sides of it is the base of the house
If the structure is located in a cut-through opening of the bearing wall, then the interrupted lower crown should be connected with steel strips (6 mm thick and 60 mm wide) by applying them on both sides to the ends of the logs and tightening with bolts (16 mm diameter).The resulting opening is framed with wooden racks, the resulting gap (cutting) should be 5 cm.
When you have decided on the location and foundation, you can.
Drawing-plan of the Russian stove in different angles
Russian stove in the house: advantages and disadvantages
The Russian stove is a massive structure that is mainly used for heating and cooking. In addition, it can be equipped with a stove bench, on which they warm up in the cold season, a hob or a fireplace. Before you build such a structure in your home, you need to understand well all the nuances of its action, evaluate all the characteristics and scale of the upcoming work. Below we will try to list the advantages and disadvantages of a classic Russian stove.


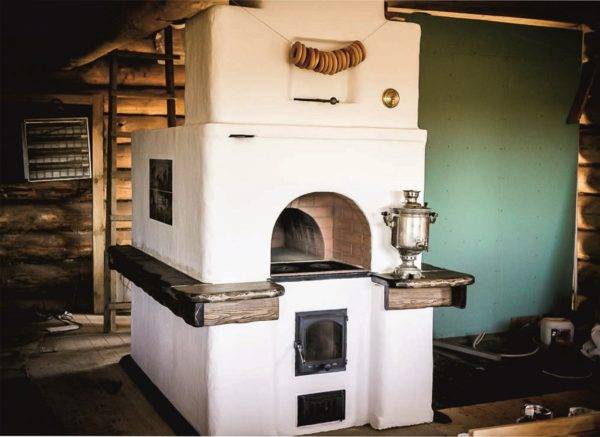
Traditional design of the Russian stove
The advantages of the furnace include the following parameters:
- Durability.
- Fire safety.
- Heat capacity (slow cooling).
- Cooking food without contact with fire.
- Relatively low cost.
The disadvantages include:
- Relatively low efficiency (no more than 30%).
- Uneconomical fuel consumption.
- Uneven heating of the room (the difference between the temperature of the upper part of the room and the lower one can reach 20 ° C).
- Uneven combustion of fuel (near the mouth, fuel burns much faster due to excess oxygen).
- Inability to observe food during cooking.
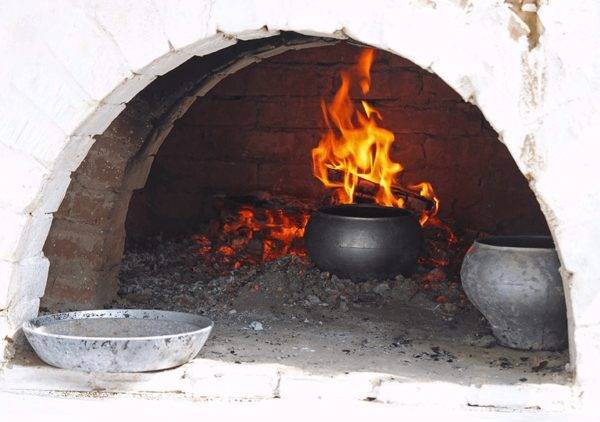
Dishes with food are placed on hot coals near an open fire.
Proper operation
For the correct and safe use of the device, the following rules must be observed:
- Carefully monitor the condition of the chimney, clean it from ash in time.
- Before each kindling, check the quality of the draft - this will help prevent smoke from entering the room.
- If the oven has not been used for a long time, a thorough inspection is carried out for damage and cracks.
- It is impossible to heat the stove in a state of alcoholic intoxication or when very tired, it is not recommended to leave small children alone near the heating stove.
Accurate construction and compliance with all operating rules will ensure high-quality operation of the oven, efficient heating of the house, and the preparation of delicious traditional dishes.
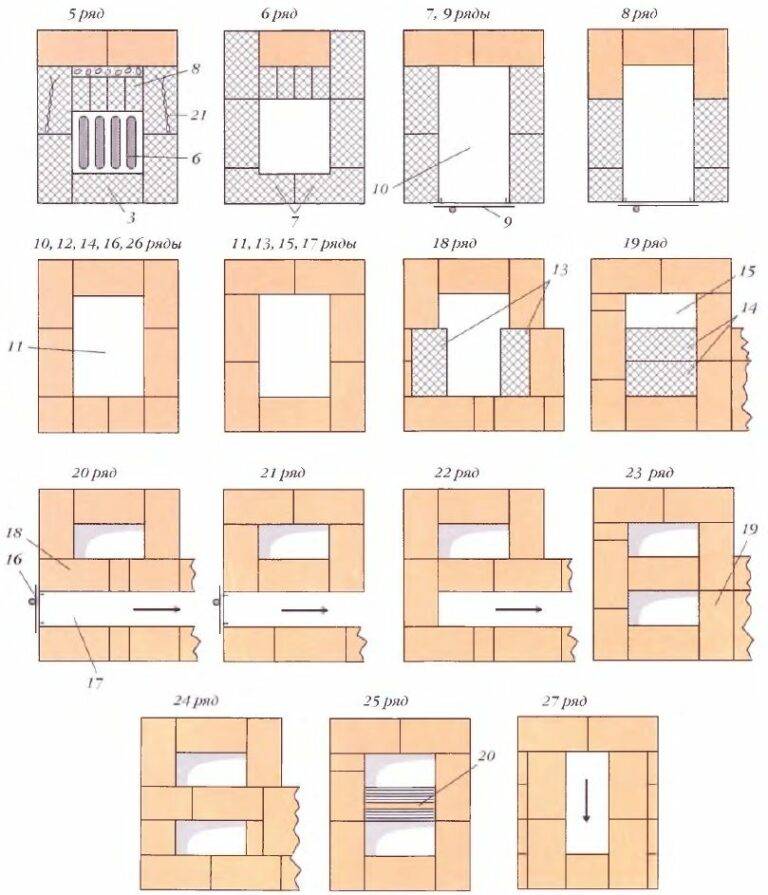
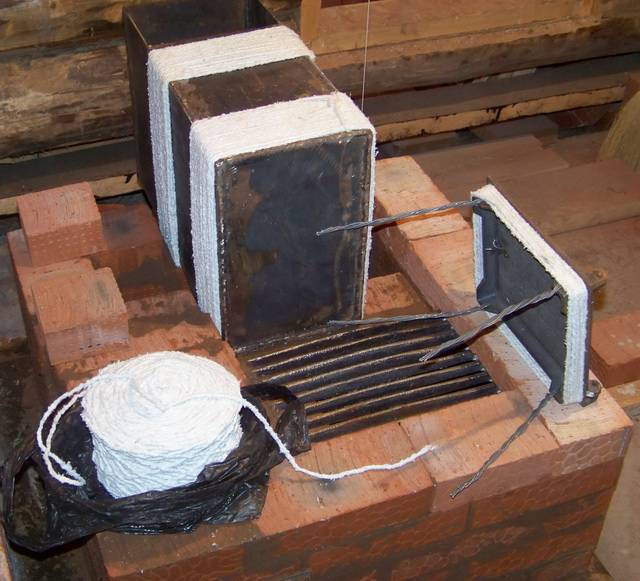
How to make a brick sauna stove
Starting work on laying bricks for the furnace, you should familiarize yourself with the order. It depends on the material and the size of the furnace. In this case, it is imperative to measure the edges every time. Since at any, even a miniature gap, smoke will enter the room. Bricks always fit very tightly, which depends not so much on effort. How much from a well-prepared solution.
The thickness of the seam in each row of bricks should not be less than 3 mm and more than 5 mm.
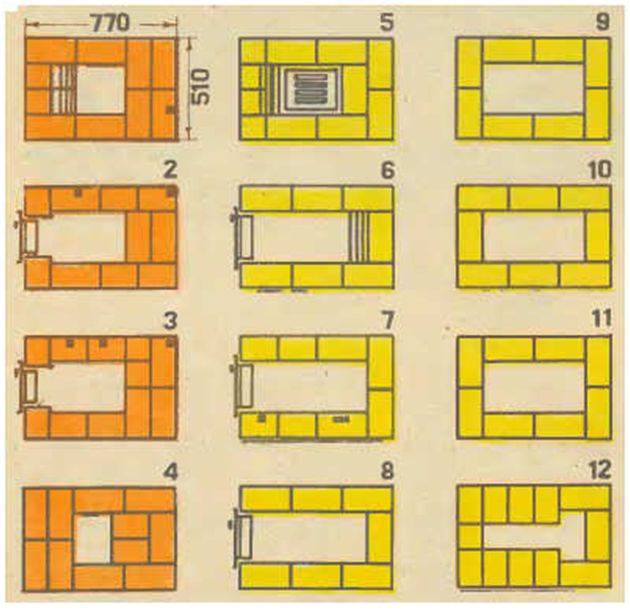
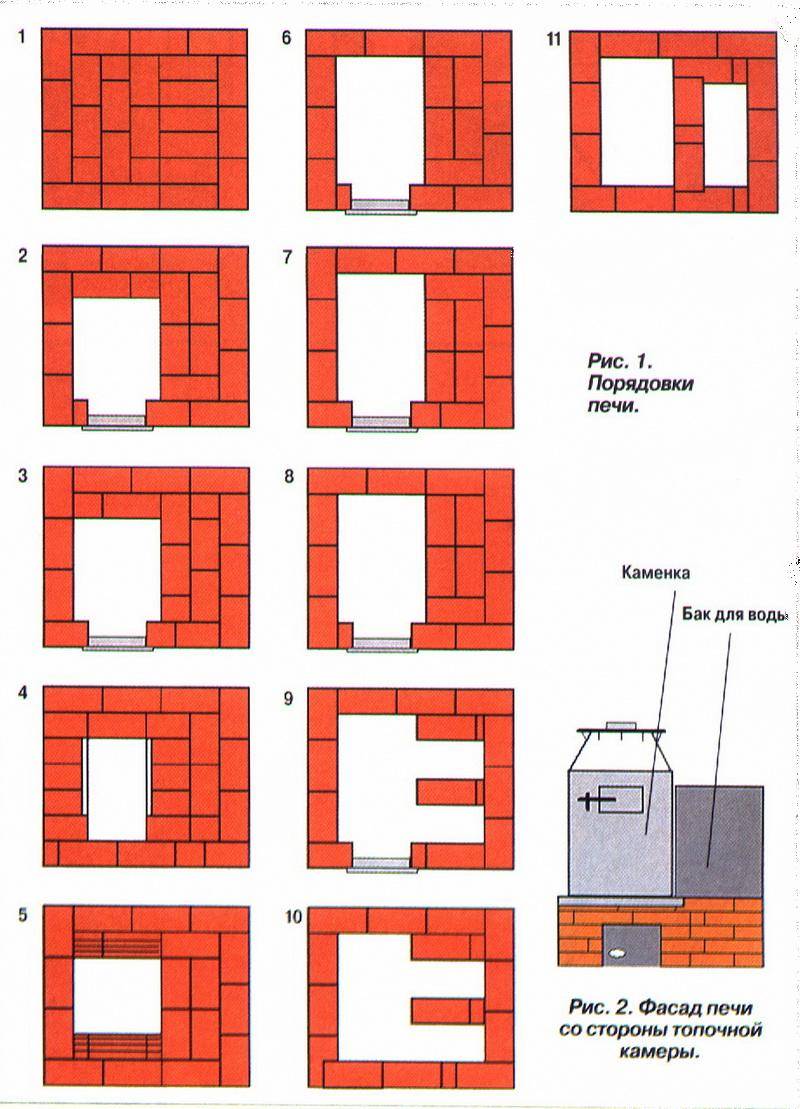
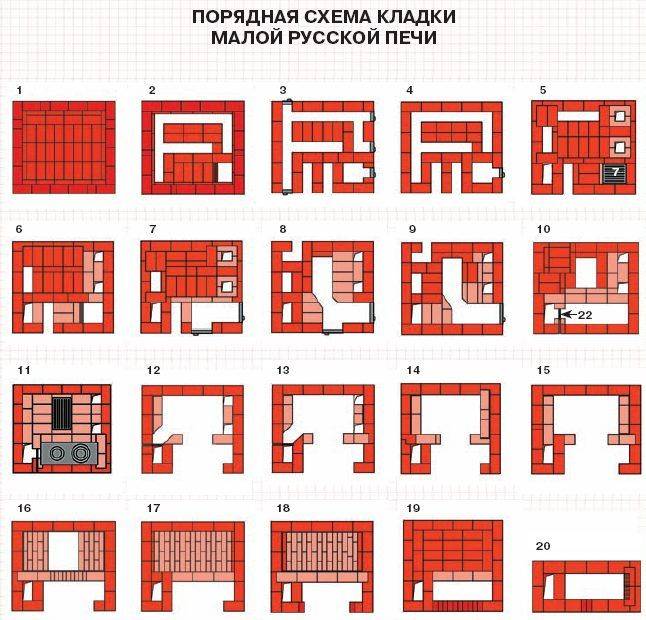
Ordering the sauna stove
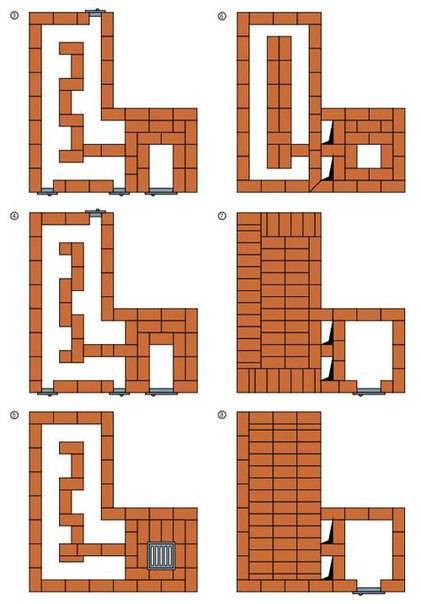
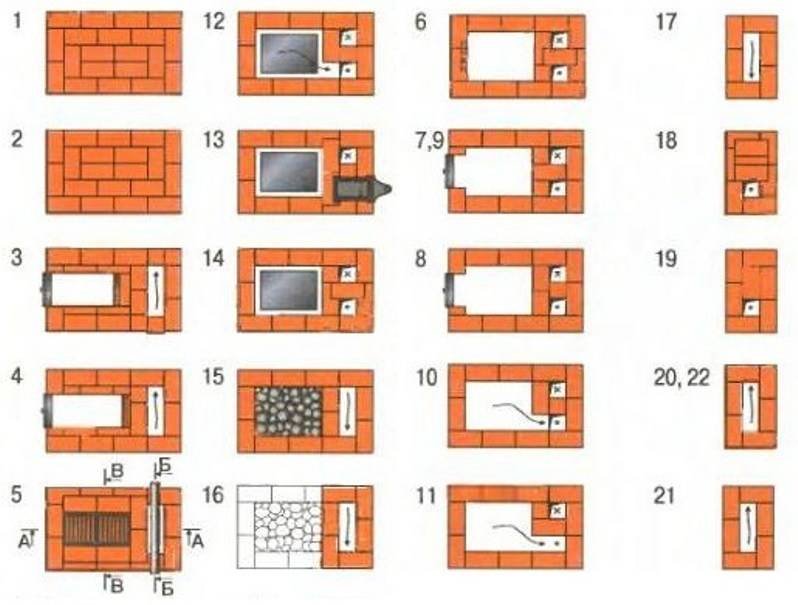
Photo 8 Scheme of ordering the sauna stove
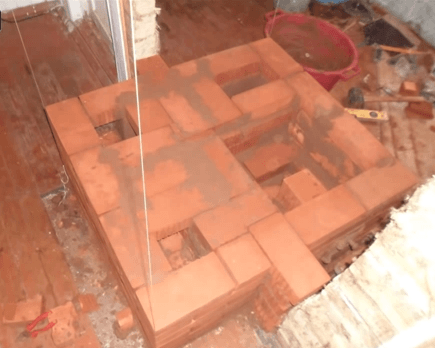
- The first row, as mentioned earlier, must be laid out on a previously prepared base. To do this, the foundation under the furnace is tightened with bituminous waterproofing or roofing material. Moisten all bricks from the first row with water.
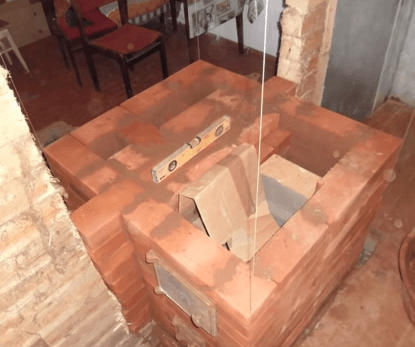
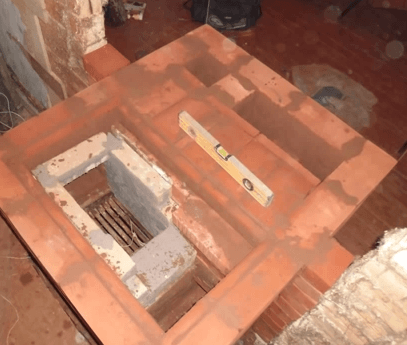
- Install a plumb line with a weight, as shown in the photo

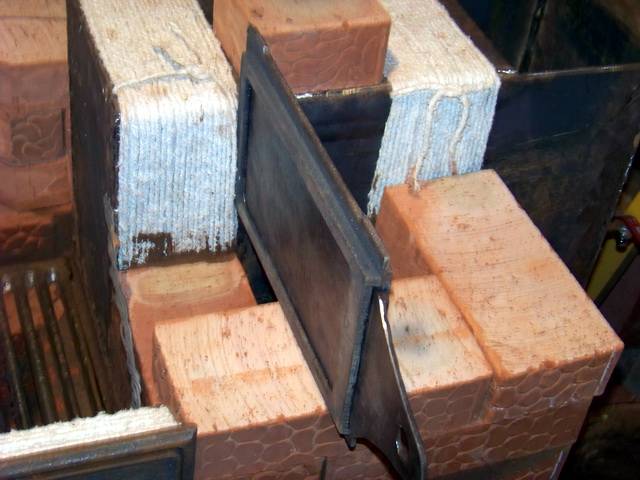
- The second and subsequent rows of bricks are laid in a checkerboard pattern.
- On the 3rd row, as a rule, they mount the blower door and strengthen it with strong wire.
- To securely fasten the door, the bricks around should be cut
- On the 4th row, check the evenness of the walls and the future stove with a plumb line

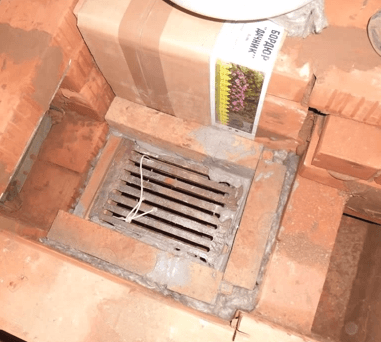
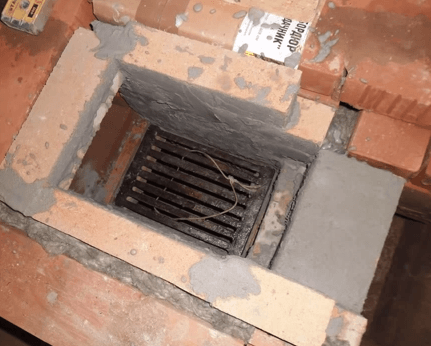
- From the same row, the laying of the ash pan and the grate begins. Before installing the grate, make holes in the surrounding bricks that will level the expansion when heated.

- In the 6th row, a blower door is mounted. In the 7th, a door for the firebox and a grate are installed. From the 8th row, the laying of the chimney begins, which continues until the fourteenth inclusive. Corners are mounted on the 14th row, and an opening is prepared on the front side for a container with water. Be sure to cover the tank and all doors with asbestos.
- From 15 to 18 rows of the wall are laid out in half a brick and at an angle. This is how the formation of a dividing wall begins, where each subsequent brick will close the joint in a checkerboard pattern.
- In the nineteenth row, a door is mounted that removes steam. Before laying 20-21 rows, steel strips are laid out on the bricks to strengthen the fastening (this is where the water container will be installed). Further, the entire container is sewn up with bricks, even incomplete parts or residues.
After laying the bath, it is recommended to plaster it and / or sew it with stones on the mortar, in order, on the one hand, to decorate it, and on the other hand, to eliminate the risk of fire.
General recommendations
For laying the furnace, it is recommended to use the so-called. fireclay brick, which includes refractory clay


Such a brick can withstand even the highest temperatures and does not burst when water gets on it.
In addition, the decorative characteristics are beyond praise.
If you are going to build brick ovens for the house, drawings with orders and safe operation are the most important things you should pay attention to.
The minimum allowable distance from the pipe to the wooden surface is 10 cm;
The gap between the roof and the chimney must be insulated with a sheet of metal;
The area in front of the stove is insulated with a similar sheet
How to make a rough oven with your own hands
The oven consists of the following parts:
- A firebox is a working chamber into which fuel is loaded. Equipped with a door.
- Blower - a chamber attached below the firebox. Serves to improve traction. A door is also attached here to regulate the air supply. A grate is installed between the firebox and the blower.
- A chimney is a pipe that removes carbon dioxide from a home. Equipped with a soot cleaning door and damper.
- Smoke circulation (convector) - vertical (sometimes horizontal) channels through which hot gases from the firebox pass. They connect the firebox to the chimney and accumulate thermal energy.
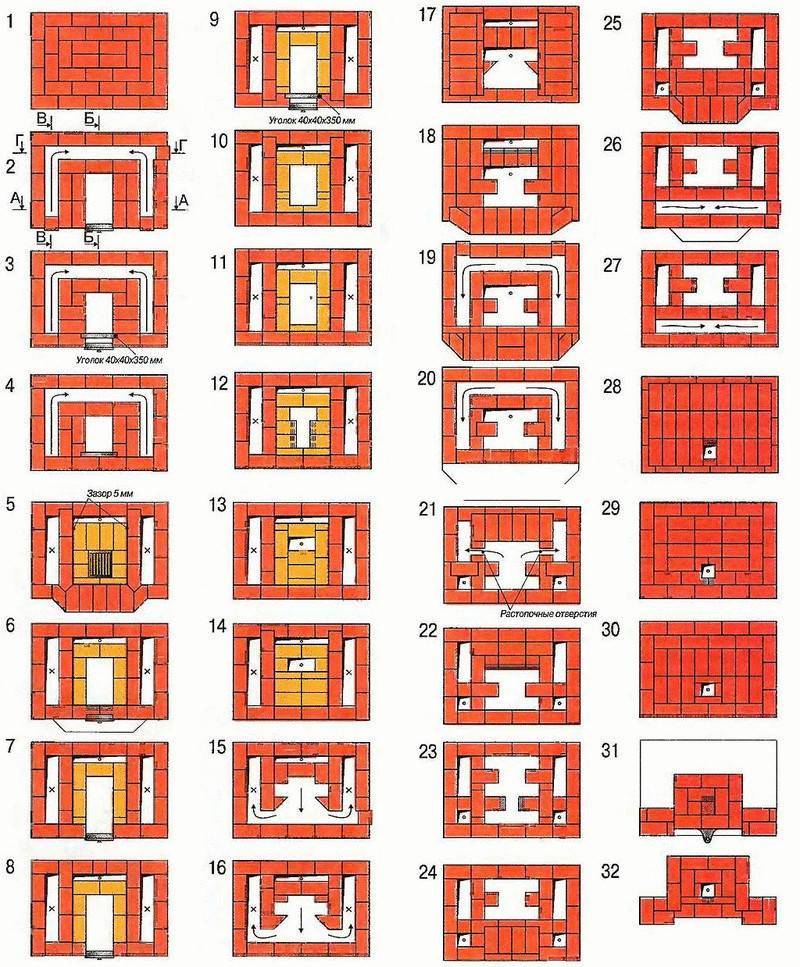
Mini oven project with stove
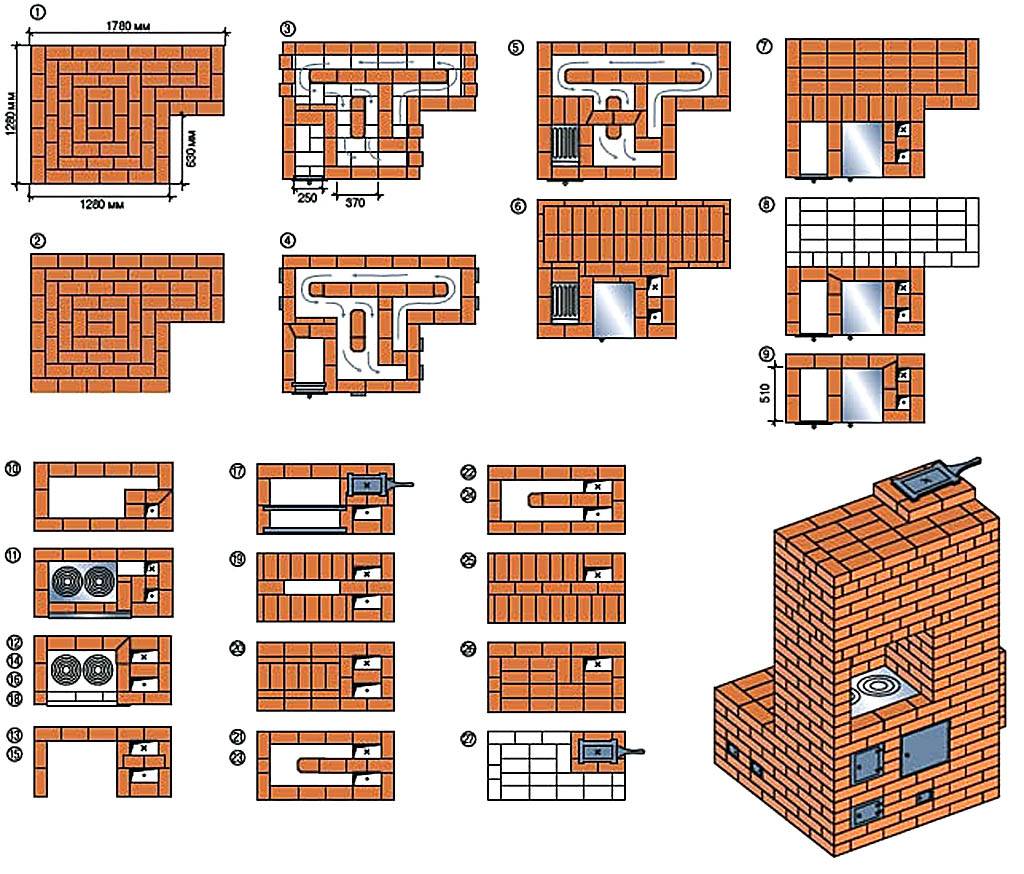
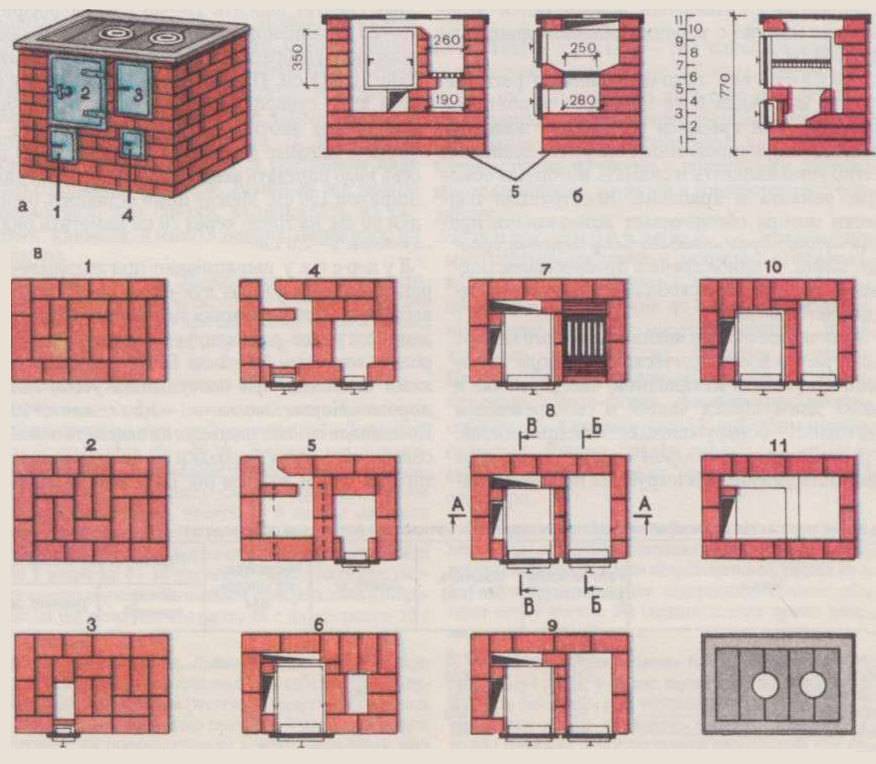
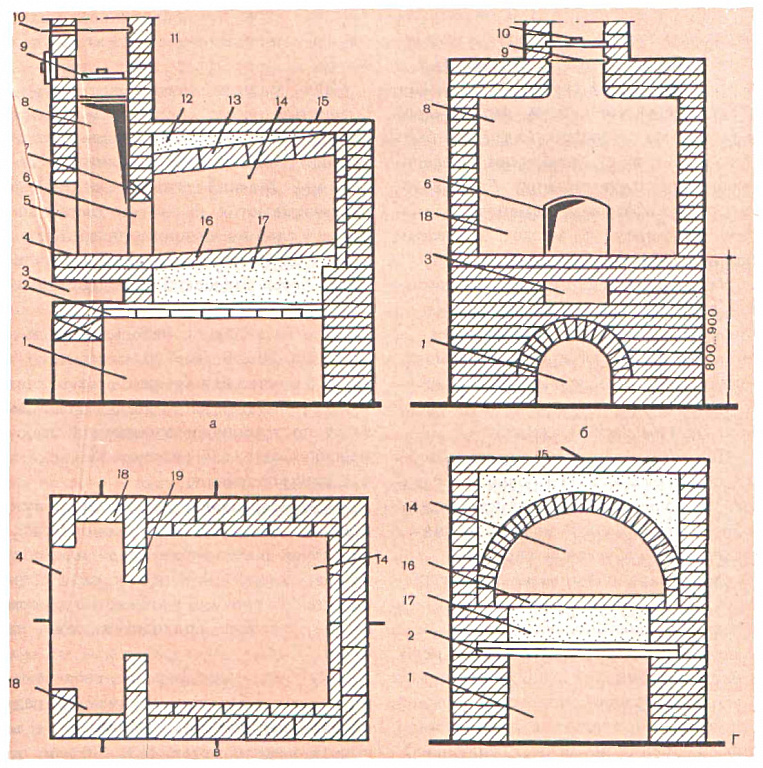
The Russian heating and cooking stove "Teplushka" with an additional combustion chamber has a power of 3.5 kW. The structure is designed for heating a small house or cottage with an area of 30-40 m², as well as cooking in winter and summer. The device of a small heater is shown in the drawing.
The mini-oven is capable of operating in 3 modes:
- Summer move. We open the valves 1, 2 and 3 (see the picture), we charge the firewood with firewood. The gases immediately go through the main channel into the pipe, the stove is heated. Damper No. 3 plays the role of an exhaust hood.
- Firebox in winter. We use the lower chamber again, close the valve No. 1. Then the combustion products move through the crucible and gas ducts in the under-furnace, exit through the channel to the front side and further into the main chimney. The whole body of the furnace is heated, from top to bottom.
- Firebox in Russian.We kindle firewood in the crucible, open the hermetic door of the mouth and damper No. 3, valves 1 and 2 are closed. The smoke goes into the highlo and the main pipe, only the couch is heated. For full heating, we close the door, open damper No. 2 - the gases will go through the lower channels of the stove.
Due to the efficiency and relatively low cost of materials, a mini-stove can be safely called a housekeeper. One minus is the small size of the couch. The maximum height of the building is 2.1 m, in the area of \u200b\u200bthe ceiling - 147 cm.
Building materials and furnace fittings
To make a Russian mini-oven with your own hands, you need to buy components and materials:
- solid ceramic bricks - 670 pieces (the chimney is considered separately);
- fireclay bricks for the firebox - 25 pcs. (brand ShA-8);
- fireclay block of the ShB-94 brand or similar in size - 1 pc.;
- door of the mouth of the main chamber 25 x 28 cm, it is possible with fire-resistant glass;
- loading door 21 x 25 cm;
- ash pan door 14 x 25 cm;
- two grates with dimensions of 300 x 250 and 220 x 325 mm;
- wooden template - circled - with a radius of 460 mm, length - 65 cm;
- cast iron hob for 2 burners 71 x 41 cm;
- 3 gate valves: 13 x 25 cm - 2 pcs., 260 x 240 x 455 mm - 1 pc. (brand ZV-5);
- equal-shelf corner 40 x 4 mm - 3 meters;
- steel sheet 1 mm thick for a shelf in a stove;
- galvanized mesh for reinforcement, cell 3 x 3 cm - 2.1 m;
- kaolin wool, corrugated cardboard.
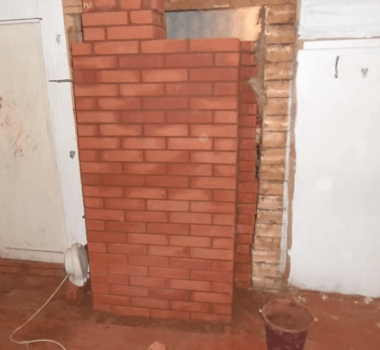
Appearance of the finished mini-stove for a country house
Red brick laying is carried out on a sand-clay mortar. When erecting a chimney, the addition of cement M400 is allowed. Refractory stones are placed on a different solution - fireclay, mortar and the like.
Laying progress - step by step instructions
A reinforced concrete or rubble concrete foundation is cast under the furnace, whose dimensions are 10 cm larger than the dimensions of the structure. Start construction when the concrete reaches 75% strength, under normal conditions, the curing process will take about 2 weeks. This implies an average daily air temperature of +20 ° C and proper care of the monolith.
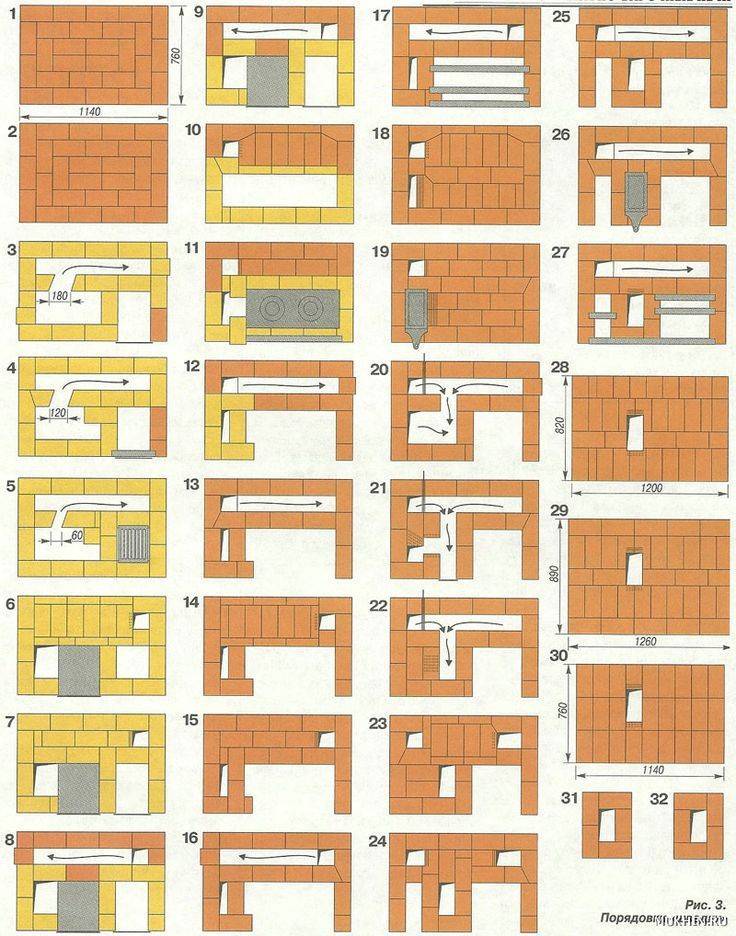
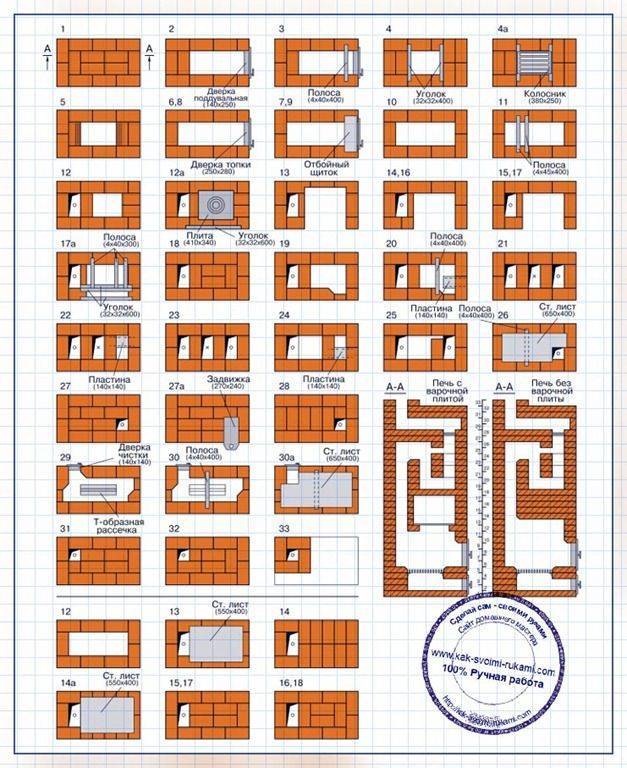
Having arranged waterproofing from 2 layers of roofing material, make the first row solid (40 bricks will be needed). How to fold the oven according to the order, read on:
On 2-3 tiers, an ash chamber is formed, a cleaning door is mounted and columns are built to support the bottom of the crucible. The 4th row continues the main walls of the stove, the ash chamber is covered with cut stones.
Rows 5-6 form the main smoke channel and the bottom of the firebox made of refractory bricks. The grate is placed without mortar, a row of fireclay stones placed on edge is laid on top.
On the 7th tier, a loading door and a vertical summer run valve are installed. 7-9 rows are stacked according to the scheme, at the end the fireclay brick is covered with kaolin wool (marked green)


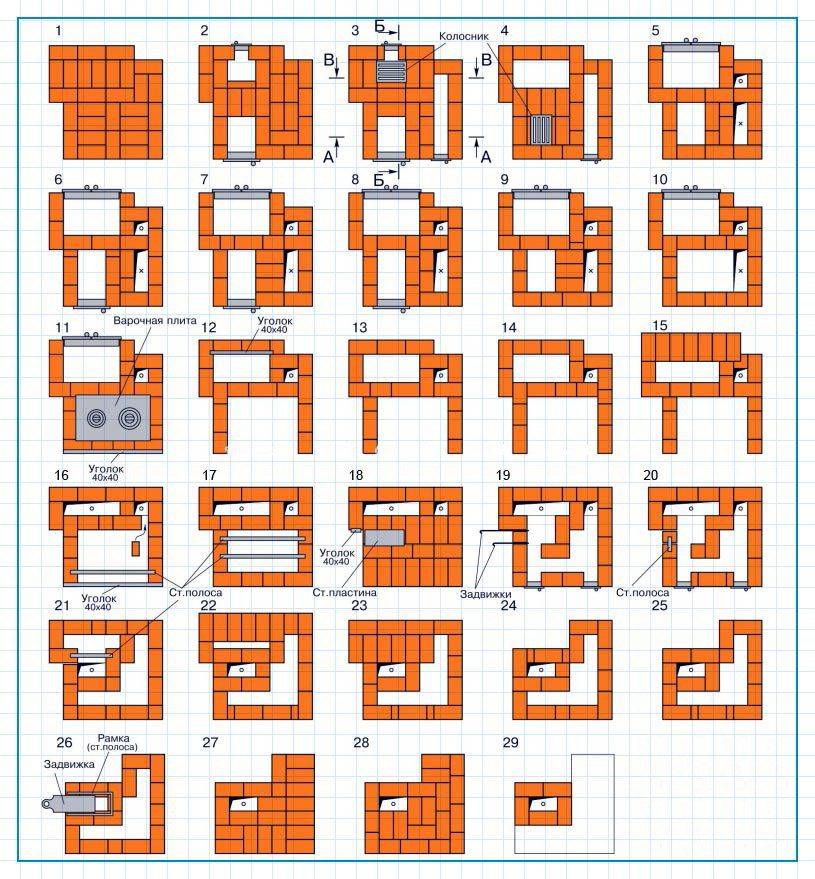


Please note: on the seventh tier, the reinforcement of the walls with steel mesh appears.
Rows 10 and 11 partially cover the gas ducts and the lower heating chamber, a grate for the crucible and a hob are installed. The 12th tier begins to form the main firebox, on the 13th tier a door is attached at the mouth of the crucible.
14-17 rows are laid according to the scheme, corners are mounted to cover the cooking opening
On the 18th tier, steel profiles are covered, an arched vault with a radius of 46 cm is built from wedge-shaped stones.
Tiers 19, 20 are made according to the scheme, the cavity between the vault and the walls is covered with sand or filled with thick masonry mortar.When the filler dries, 21 rows are laid - overlapping.
From 22 to 32 tiers, the front part of the heater is being built. On the 24th row, both smoke valves are placed, on the 25th - an iron shelf measuring 42 x 32 cm. Having laid the 29th tier, cover the stove with the same sheet.
To understand the construction to the smallest detail, we suggest watching a video with a detailed demonstration of the masonry of each row and the master's explanations:


