- How to choose the color of the living room
- Types of devices and their features
- Main popular types
- To conduct or not a socket from a socket?
- Installing a Grounded Socket
- Installing a triple outlet
- Assembling a triple socket
- Connection from junction box
- Connecting one outlet to another
- Cable for sockets: section, brand, requirements
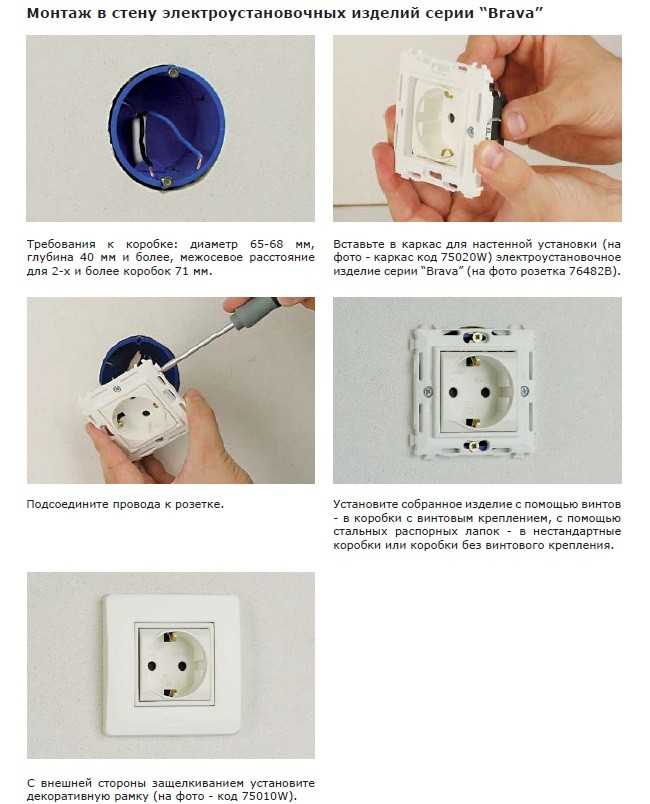
- How to connect a grounded outlet: sequence and installation rules
- How to install a socket with your own hands
- What is a socket
- Characteristics of socket boxes
- Installation of socket boxes
- Differences in the fixation system
- The main types of double sockets
- What is better VVGNG Ls or NYM
- Connection methods taking into account consumers
- Do-it-yourself step-by-step process for installing an outlet
- Extraction of the old design
- Replacing the socket
- Installing a new outlet
- Connection diagram
- Connecting wires to the socket block
- Double socket in one socket
- Dismantling the old outlet
- Installing a new socket
- Preparing to connect
- Wire connection
- Installing a double socket in a socket
- Varieties
- Consignment note 2 x local with grounding
- Passage double with a cover
- indoor installation
How to choose the color of the living room
The color scheme of this room should be made in shades that promote relaxation, both emotional and physical.Psychologists recommend several primary colors:
- Mint.
- Wheat.
- Light blue.
- Lilac.
- Green.

Despite the popularity of wall painting, many people prefer to wallpaper the walls the old fashioned way.

However, among the variety of this material, it is easy to get confused and not everyone knows how to choose wallpaper for the living room. For the right choice, several criteria must be taken into account:
- Properties of a particular type of wallpaper.
- The naturalness of the material.
- Price.
- Coloring (plain or with a print).

In recent years, cork or bamboo wallpapers have gained particular popularity, as they have excellent sound and heat insulation properties, and also look great in the interior.

Types of devices and their features
There are quite a few varieties of plug sockets and blocks. Each type has its own design features and purpose.
- Hidden appliances are mounted directly into the wall - in special sockets.
- Open devices are produced for those apartments where the wiring is not hidden in the wall.
- Retractable socket blocks are mounted on a table or other furniture. Their convenience is that after operation, the devices are easy to hide from prying eyes and playful children's hands.
The devices differ in the method of clamping the contacts. It is screw and spring. In the first case, the conductor is fixed with a screw, in the second - with a spring. The reliability of the latter is greater, but it is not so easy to find them on sale. Devices are fixed on the walls in three ways - with serrated edges, self-tapping screws or a special plate - a support that facilitates both installation and dismantling of the outlet.
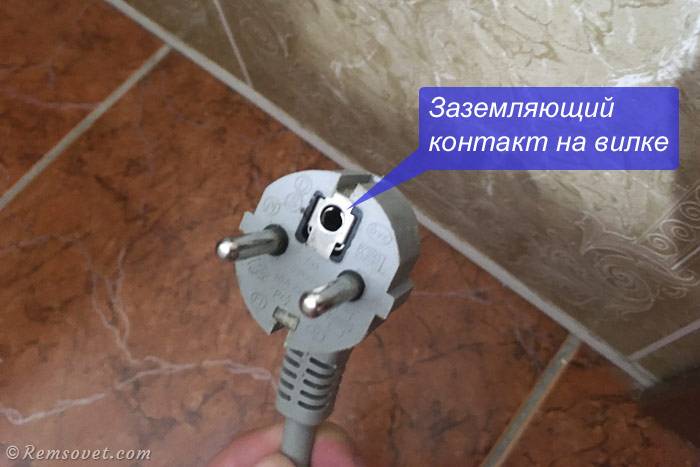
In addition to conventional, inexpensive devices, there are models equipped with grounding contacts.These petals are located in the upper and lower parts, a ground wire is attached to them. To ensure safety, outlets equipped with shutters or protective covers are produced.
Main popular types
These include:
- type "C", it has 2 contacts - phase and zero, usually bought if it is intended for low or medium power equipment;
- type “F”, in addition to the traditional pair, it is equipped with another contact - grounding, these sockets are becoming more popular, since the ground loop has become the norm for apartments in new buildings;
- View "E", which differs from the previous one only in the shape of the ground contact, is a pin, the same as the elements of the socket plug.
The latter type is less common than the others, since it is less convenient to use: turning the plug 180 ° with such an outlet is impossible.
The security of the case is the next difference between the models. The degree of security is indicated by the IP index and a two-digit number following these letters. The first digit indicates the class of protection against dust, solid bodies, the second - against moisture.
- For ordinary living rooms, IP22 or IP33 class models are sufficient.
- IP43 is recommended to buy for children, as these outlets are equipped with covers / shutters that block the sockets when the appliance is not in use.
- IP44 is the minimum required for bathrooms, kitchens, baths. The threat in them can be not only strong humidity, but also splashes of water. They are suitable for installation in basements without heating.
Installing an outlet on an open balcony is a sufficient reason to purchase a product with a higher degree of protection, this is at least IP55.
To conduct or not a socket from a socket?
The option of installing an additional outlet will help get rid of quarrels between family members who need electrical outlets to turn on various household appliances.
This problem is especially acute in the kitchen with the purchase of new appliances - a blender, a mini-combine, a yogurt maker, a bread machine, a slow cooker and other appliances.
It turns out that the existing outlets no longer cope with their duties - their number is physically not enough to meet the needs of all households. On our site there is a whole article devoted to the selection and placement of kitchen outlets.
Therefore, it would be advisable to decide on an additional outlet from an existing one.

The technically equipped kitchen needs enough electrical connection points. This should be remembered even at the stage of drawing up an interior design project for the future premises.
But here you can face a real problem - it is not always possible to complete such a task. There are a number of restrictions when it is absolutely impossible to carry out such a modernization of the existing power grid:
- if you need a socket for an electric stove;
- when you decide to connect a boiler with a washing machine;
- if the total power of the devices is more than 2.2 kW.
In houses or apartments where the owners have purchased a new electric stove to replace the old gas one, a new outlet will be required to connect it. In such a situation, it is impossible to conduct another one from a regular outlet to turn on this powerful device.
Here you will need to install a separate branch from the junction box, and even better - from the shield. Yes, and a residual current device for powerful equipment must be installed. In order to learn about the rules for connecting a socket for an electric stove, we recommend reading this material.
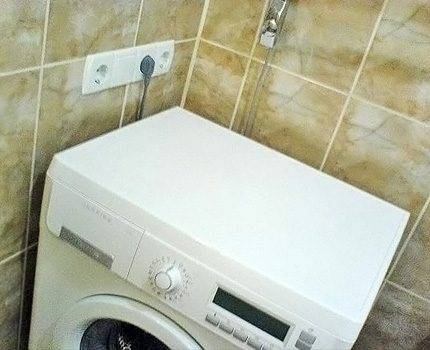
Another unfortunate example is when the bathroom only has an outlet for the washing machine. But over time, purchased a boiler. And how to properly position and connect sockets in the bathroom, read on.
These devices cannot be turned on at the same time in one double outlet - the wiring may burn out. It will be problematic to always control the order in which the boiler is switched on with the washing machine.
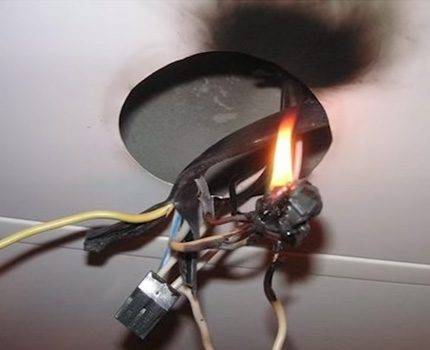
The result of a network overvoltage can be deplorable - it’s good when the problem was discovered in time or the machine worked and the fire was avoided
It is also necessary, even before starting work on installing another outlet, to calculate the estimated power of the devices that will be simultaneously included in the new block of outlets.
Often they plan to upgrade the point of connection to the mains, which is fed by a wire with a cross section of 1.5-2.5 mm2. Therefore, the total power of the devices can be slightly more than 2 kW.


It is impossible to turn on a dishwasher, an oven and a heater, or a boiler and a washing machine at the same time in such neighbor sockets, powered from the same core.
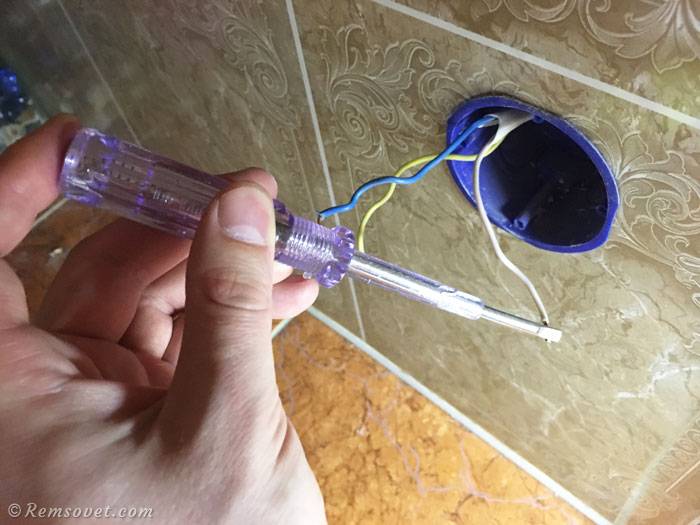
Installing a Grounded Socket
A grounded socket is installed in the same way as simple sockets, the only exception is that a ground wire is connected to this type of electrical device.
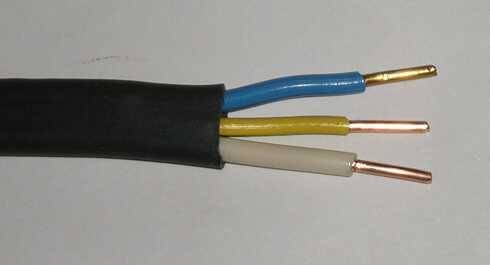
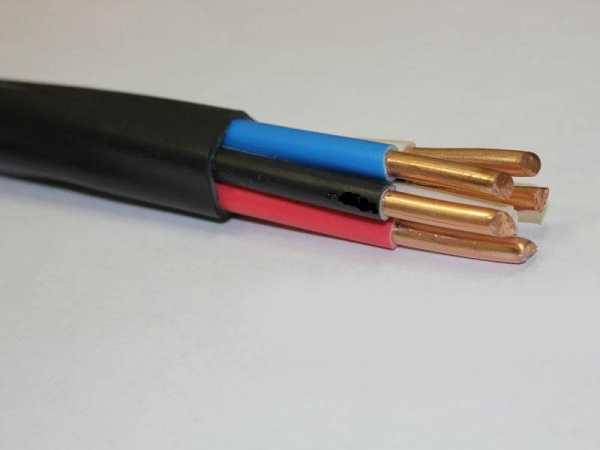
Accordingly, to install a simple 220V outlet, a two-core cable is enough for us (as in the examples above), and for a grounded outlet, a three-core cable is needed.
Grounded sockets can also be internal and external and have a different number of sockets.
Grounded sockets are necessary when connecting any powerful equipment, as well as equipment with electronic control and management systems: electric ovens, hobs, modern refrigerators, desktop computers, LED TVs. Grounding is also required by equipment whose work cycle is directly related to water: washing machines and dishwashers, water-heating boilers, etc. Plugs of such devices have a special grounding contact:
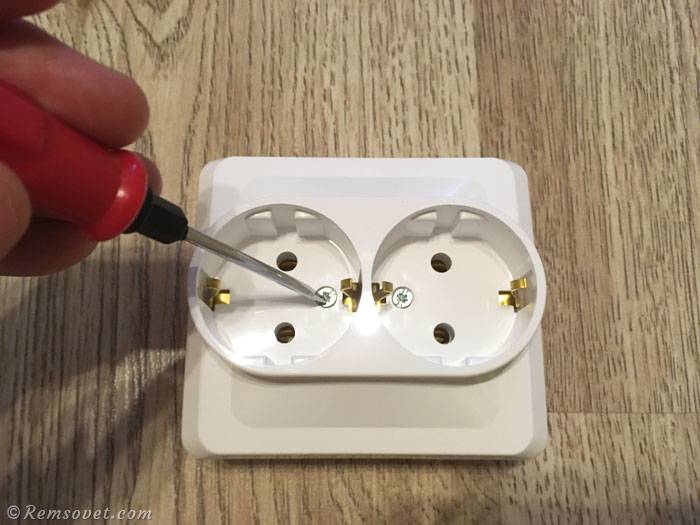
Below is an example of connecting a double socket with grounding "Etude" by Schneider Electric:

Step 1. Removing the decorative panel:
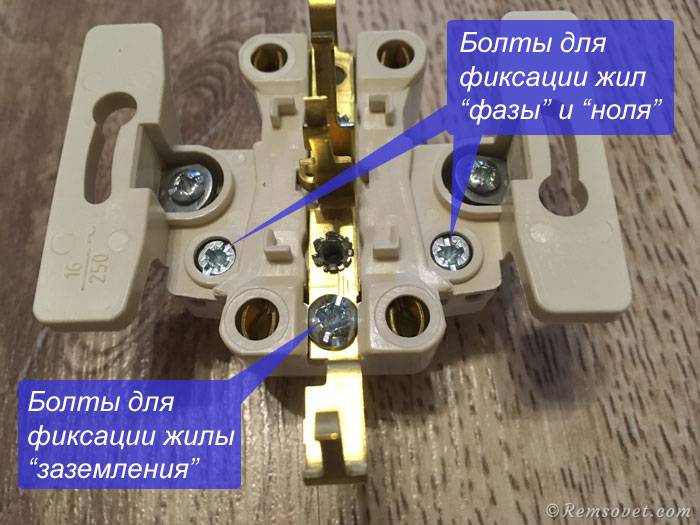
The photo below shows the attachment points for the cores of the supply cable and the bolts for fixing them:
Step 2 Using an indicator screwdriver, we make sure that there is no voltage on the cable:
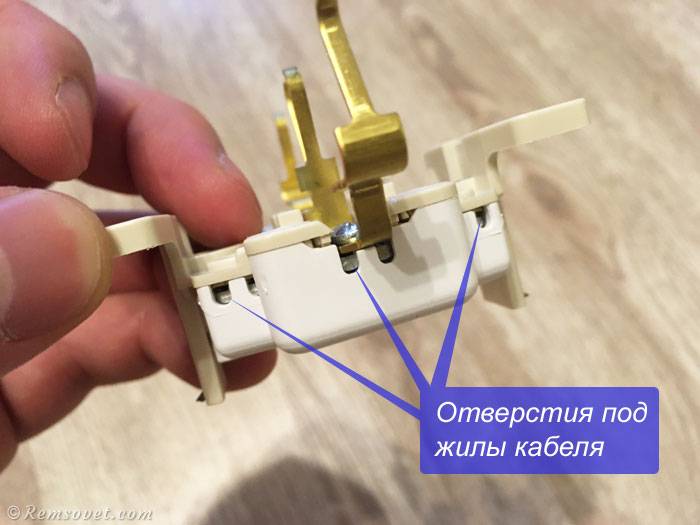
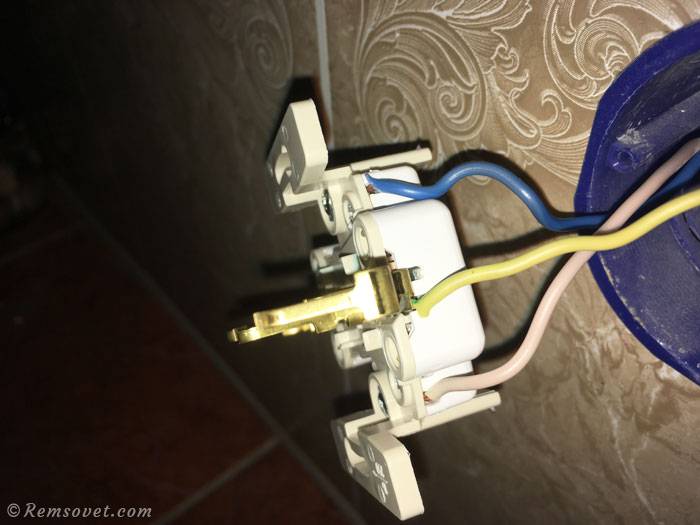
Step 3 We connect the cable to the outlet and carefully fix its cores:
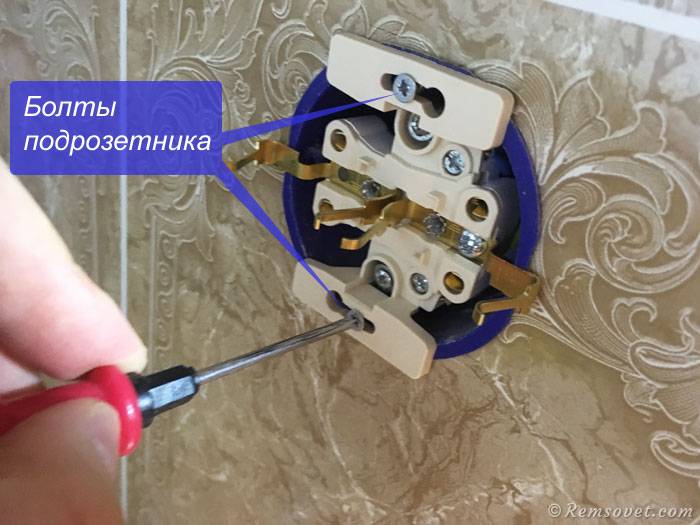
Step 4 We install the socket in the socket and fix it:
Step 5 Installing the decorative socket panel back:
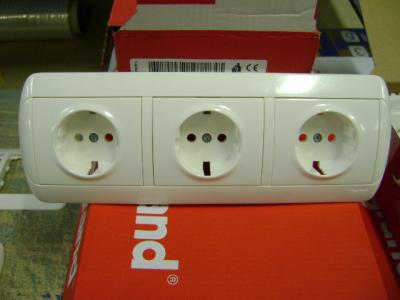
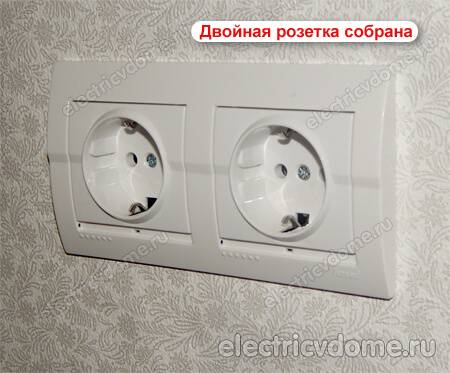
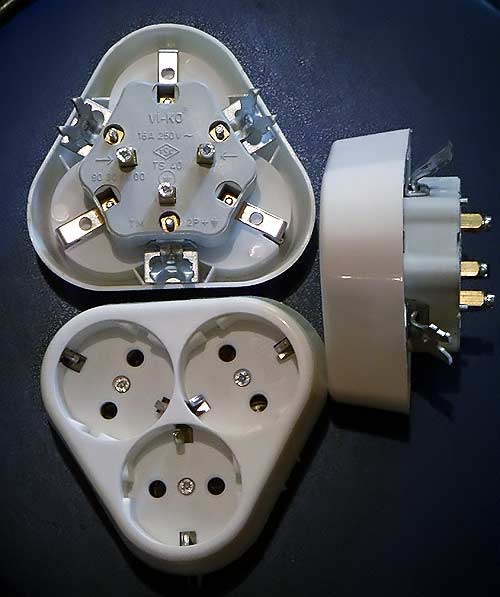
Installing a triple outlet
Assembling a triple socket
At the moment, there are a huge number of different sockets on the market. But either the price of them "bites", or they do not meet our requirements. Therefore, often a triple socket is assembled from three ordinary sockets.
How to make a triple outlet, we will now tell you:
To do this, we need three ordinary sockets, the nominal parameters we require. It can be one socket for 6A, the second for 10A and the third for 16A. The main thing is that they meet the above requirements. We also need an overlay for a triple outlet, which will create the appearance of a single whole.
- We measure the required height from the floor, usually it is 30 cm, but you can choose any other height. At the installation site of the outlet, we draw a horizontal line parallel to the floor.
- Now we remove the decorative covers on the front side of our single sockets and install a triple overlay in their place.
- We put overhead boxes on sockets and apply our triple socket to the mark. We mark the place where the wall is shredded under the embedded boxes (see).
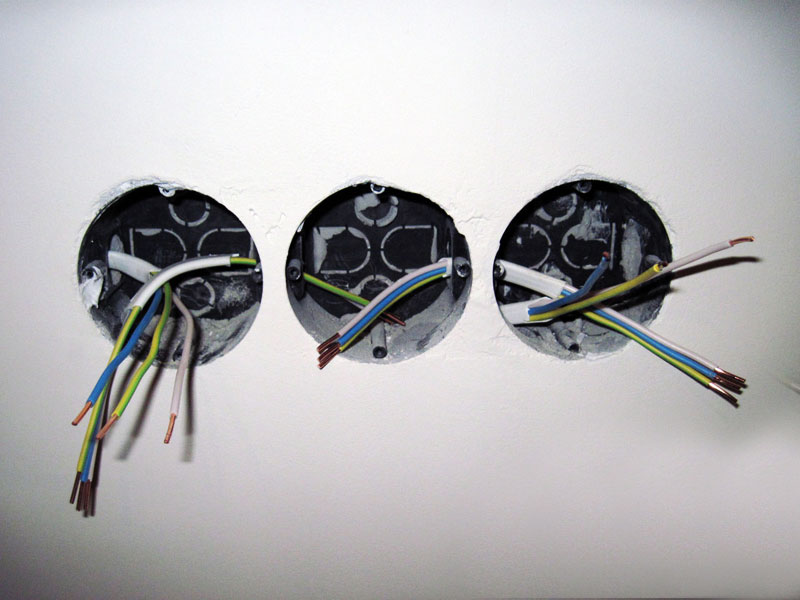
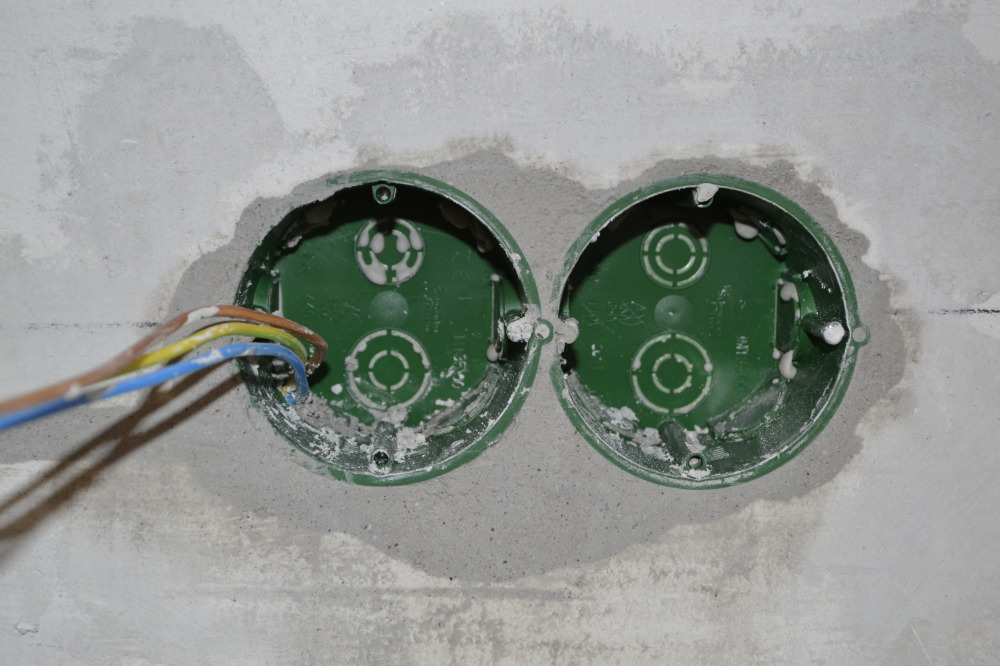
Connection from junction box
The most common case is to connect the outlet directly from. It is used in 99% of cases when installing socket groups, and also in most cases when adding sockets to existing groups.
So:

After connecting all the wires and closing the junction box, you can apply power and test the performance of our sockets.
Connecting one outlet to another
This method is often used when adding a new outlet to an existing group. It is designed to reduce the amount of work associated with wall chasing and reduce the final connection price. And although it is rarely used, it also has the right to exist.
- In order to make such a connection with your own hands, you should first of all assemble our triple socket, as described above.
- The next step is to remove the voltage from the outlet from which the connection is to be made.
- Then we open this outlet and then we act according to the established scheme. In essence, we install a jumper, as between sockets in our triple socket.
- This completes the connection and you can apply voltage to our entire socket group.
Cable for sockets: section, brand, requirements
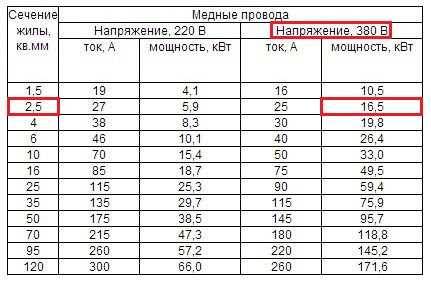
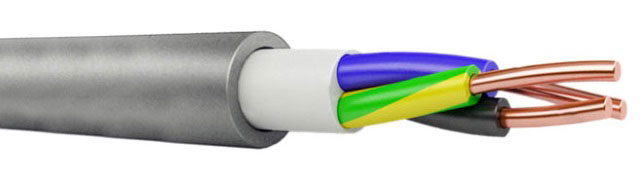
So, let's start with the fact that, according to modern requirements, the cable for sockets must be copper, always with grounding (i.e. three-core or five-core) and a cross section of at least 1.5 mm2 according to PUE table 7.1.1:


It should be clarified here that a group network means a line from shields to socket outlets, lighting fixtures and other power receivers.
Now it has become a little clearer which cable to use for installing a 220-volt outlet line. It should also be noted here that it is not advisable to lay a cable with a cross section of 1.5 mm2 from the junction box to the outlet, because. in this case, it will not work to connect a powerful electrical appliance to it, if necessary. It is better to take a section with a margin of 2.5 mm for a single-phase network
2.
As for the three-phase electrical wiring, things may already be different here, because. with a core cross section of 1.5 mm2, a five-core cable is able to withstand a load of 10.5 kW, according to the table:
This is enough to connect powerful electrical equipment used at home to the outlet. However, as experience shows, even in a network with a voltage of 380 volts, the conductor is taken with a margin, namely, with a cross section of 2.5 mm2.
We figured out the thickness of the conductive cores, now let's talk about another, no less important question - what type and brand of conductor to choose. The fact is that today there are a large number of fakes, the use of which may cause ignition of electrical wiring.
The same PUNP wire is dangerous for wiring. We recommend using a VVG, VVGng or NYM brand cable for sockets.
If you want to conduct electrical wiring for a socket group in an apartment or a private house, just choose the VVG brand.In fire hazardous premises, for example, in a wooden house, we definitely recommend using the VVGng cable for sockets or its more expensive imported analogue - NYM.
That's all I wanted to tell you on this issue. To consolidate the material provided, we decided to summarize and once again indicate which brand of cable and section is best used for sockets in different cases:
- For connecting a washing machine, TV and other not very powerful household electrical appliances - VVG 3 * 2.5 mm2.
- To connect powerful appliances in a three-phase network (for example, if you need to connect a powerful 380-volt pump in the garage or a three-phase stove in the kitchen) - VVG 5 * 2.5 mm2.
- The socket group in a wooden house is VVGng 3 * 2.5 mm2.
- If you are 100% sure that the outlet will be used exclusively to power a lamp or other low-power device, you can connect a conductor with a cross section of 3 * 1.5 mm2.
Finally, we recommend watching a useful video on the topic:
How to connect a grounded outlet: sequence and installation rules
The growth in the power of household appliances dictates the use of effective electrical safety measures, consisting in the installation of appliances with a built-in protective grounding element. This is an additional protection for users and for electric devices from the effects of leaks on the housing. All imported equipment and progressive domestic installations are equipped with plugs with grounding contacts. A special socket is required to use the valuable option. You can install it yourself if you know how to connect a grounded outlet and how it differs from the usual domestic counterparts.
How to install a socket with your own hands
It is no wonder that when carrying out repairs, it may be necessary to install new switches and sockets. Often this is due to changes in the layout and design of the premises. The installation of these products begins with the installation of socket boxes. Despite the fact that they are designed to be mounted on a combustible base, for the convenience of subsequent installation of sockets and switches, they are also installed in a concrete base. In this article we will talk about what kind of sockets are and how the sockets are installed.
What is a socket
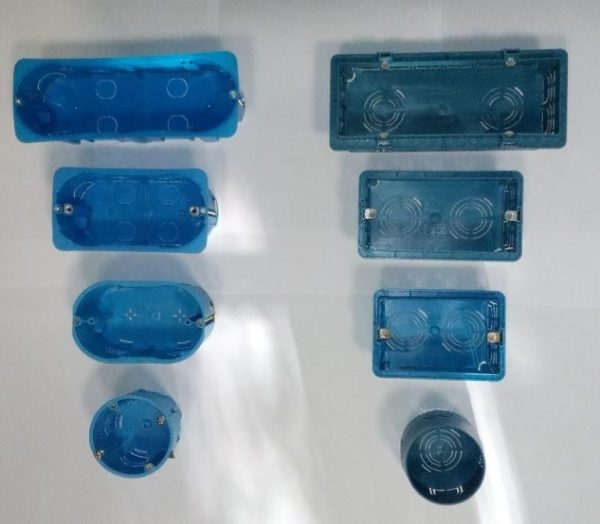
A socket box is nothing more than just a small container that is used when installing switches or sockets. Sockets for concrete, wood walls, drywall - they are all made of non-flammable materials. Today, plastic products are most often used, but you can buy a metal socket and even wooden sockets. The latter are used in cases where open wiring takes place.
Characteristics of socket boxes
- Dimensions. Products are made for a certain inner diameter of the socket. Most often it is 60 or 68 mm. The depth of the socket is also important - from 25 mm and more;
- The form. These products come in various shapes: rectangular, square, round. Round ones are the most commonly used. They are mounted in solid walls and drywall constructions. When installing in drywall walls, special drywall sockets are used, which are equipped with special fasteners that allow you to securely fix the product in the cut hole;
- Material. We have already said that in most cases I use polypropylene as a material for such products.It is not only cheaper, but also more convenient to install;
- Center distance. When block mounting, the distance between the sockets matters. Usually it is 71 mm. Block installation involves the use of products of the same diameter.
Installation of socket boxes
Installing socket boxes is a simple matter, but the subsequent installation of sockets or switches depends on the correct execution of this work. First of all, we need to make a hole in the wall. To do this, you can use a grinder or puncher. In the second case, it is better to use diamond crowns for socket boxes, thanks to which you can get a perfectly even hole: first we drill out the contour, and then we hollow out the amount of material for mounting the products with a puncher with a lance. The fittings found in the wall are cut by the grinder. In principle, a crown for socket boxes is the best solution, using which you can make more than one hole in the wall. They should fit the socket boxes with a margin.
Further, the products are installed in the created hole in such a way that its edges are flush with the wall - they do not sink into it and, at the same time, do not protrude from it. We orient the gusi socket or any other with the help of a level. We take into account the side from which the wires will start - from this side we should have a hole in the product to be mounted.
Monolithic installation of socket boxes is best done using alabaster mortar. Its advantage is that it hardens quickly, and the installation of sockets in a concrete wall will not take several hours. First, the space behind the mounted product is sealed with alabaster, then on the sides. At the same time, we make sure that the position of the element does not go astray.The excess is removed with a spatula and the edges of the hole are smeared. Actually, we figured out how to install a socket box!
A wide range of these products is presented on the construction market. You can always afford to purchase gusi products, and if you don’t feel sorry for the money, then buy legrand socket boxes. For the latest socket boxes, the price is slightly higher, which is due to the high class of these products. We add that this does not play a special role, because they are still hidden from view, and their quality is approximately at the same level!
Differences in the fixation system
Simple socket boxes on which no fasteners are provided. They don't have anything. Some may come with self-tapping screws for mounting the socket, but there is no fixation to the wall at the socket.
So, simple socket boxes are suitable for most monolithic and brick walls. For installation in plasterboard walls (and others, including hollow ones), there are metal “antennae” on the bottom of the socket box, which, when the screwdriver is first turned, turn and pop out of the grooves.


And when you spin it in the wall, it will clamp itself, moving strictly in the direction of the axis. In a twisted state, he will pinch himself with his antennae and will “sit tight” in place. This is the most common installation option in drywall.
Also sold are socket boxes with oversized plastic antennae. In this case, installation is done by pinching them inward with your fingers. When pressed, they are recessed into the body, which is inserted into the wall, and tightened further with the same “Christian” screwdriver or screwdriver.
Clamping antennae are not only plastic, but also metal. But they work, surprisingly, much worse, because they do not fully fit (do not sink) into their grooves (and do not even clog) and tear drywall at the installation site. I prefer the first option.
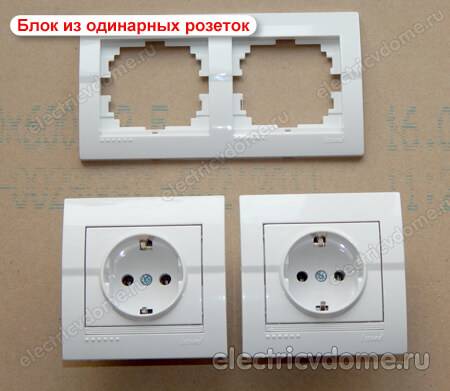
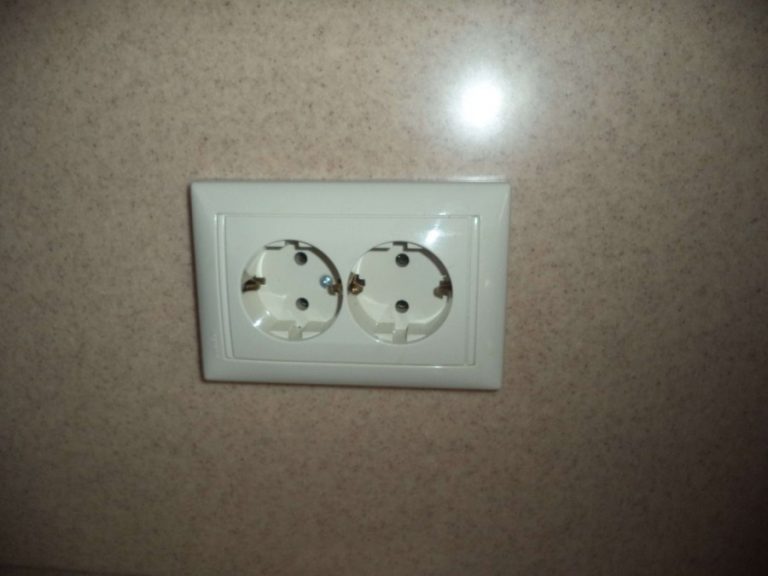
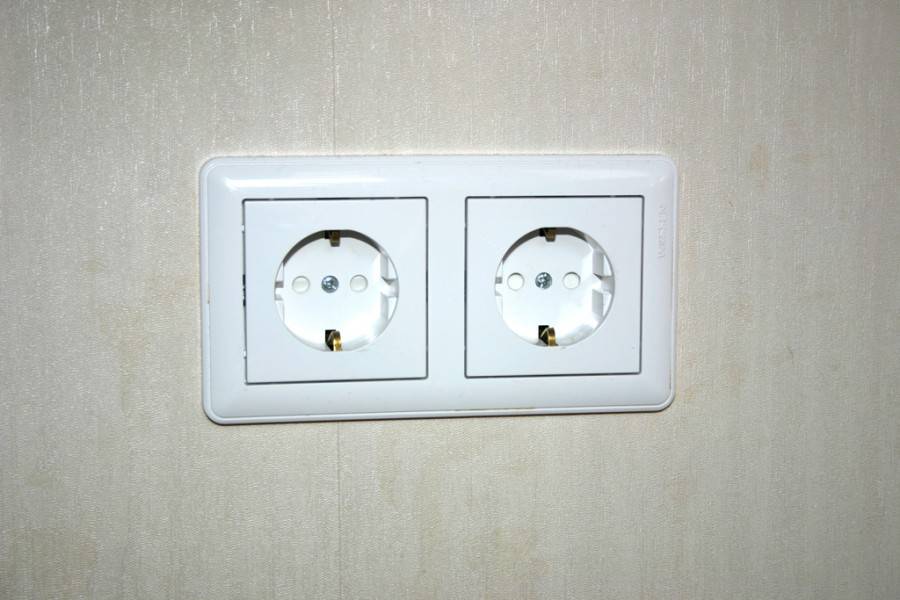
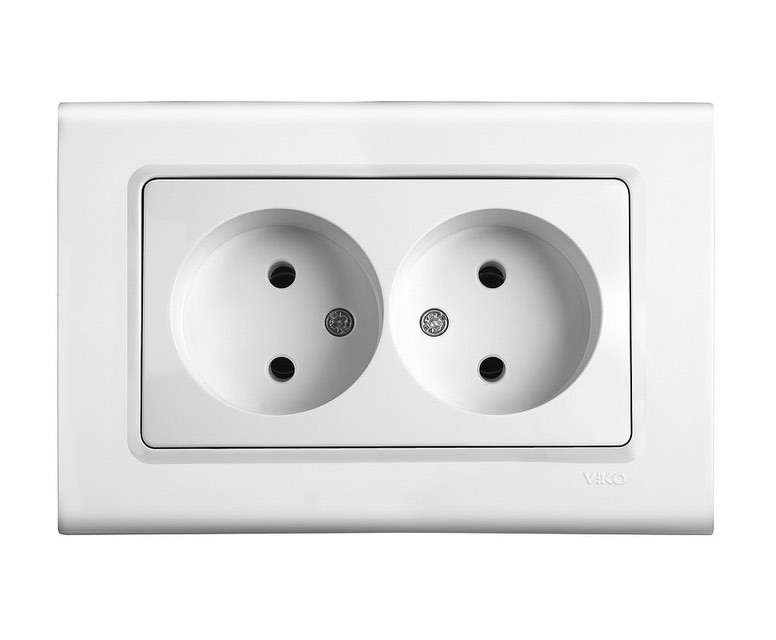
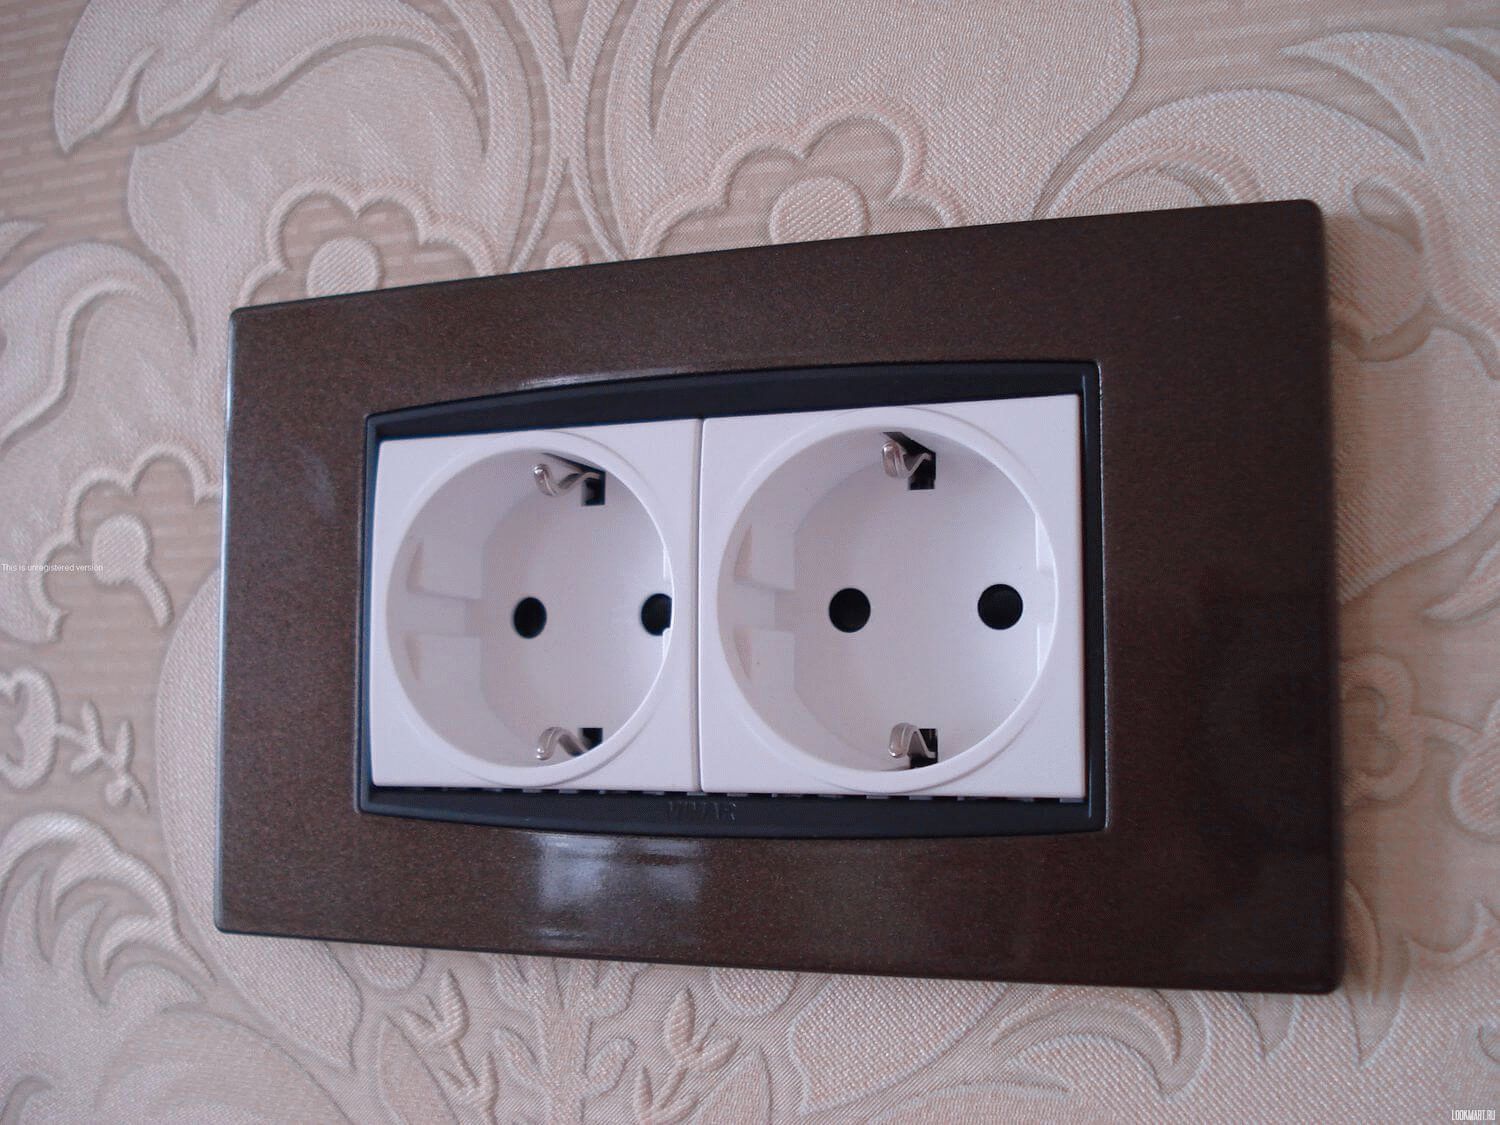
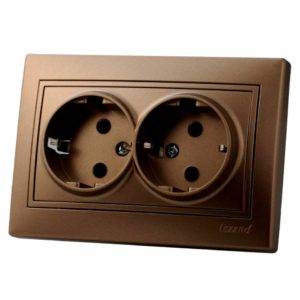
The main types of double sockets
Any types of electrical outlets, including USB, are designed to be connected to the network of various devices. The design includes the main or working part with a contact group, and a cover that protects the internal mechanism from external influences.
Often there is a problem due to the inability to connect an additional device due to the lack of free sockets. Therefore, a double socket installed in one socket is gaining more and more popularity among apartment owners. Almost all models are equipped with contacts for connecting a ground wire.
Connected double sockets are presented as separate devices installed at a close distance from each other. However, as practice shows, this option is not aesthetically pleasing and requires additional drilling of the wall for another socket.
A monoblock made in the form of a double socket is considered more convenient. It can be installed in the old place with the obligatory replacement of the existing junction box and does not cause significant damage to the interior finish. In such monoblocks, the power of the electric current is divided into two parts, and this is their disadvantage, especially noticeable when household appliances are connected at the same time.
Depending on the modification, monoblocks with double sockets are divided into the following types:
- Closed and open. In the closed version, the plug holes are protected by shutters.Such sockets are used in rooms where it is possible to find small children. To activate the shutters, you need to simultaneously press them. Therefore, if a child wants to put an object into the hole, nothing bad will happen. The 2nd option is a standard design with open contacts.
- With or without grounding. In the first case, sockets are equipped with contacts for connecting a ground wire. Thus, additional protection against current leakage to the instrument case is provided.
- Sockets with additional protection against moisture and with the possibility of installation on the street. Waterproof devices have a protection class of IP44, and intended for the street - IP55.
Products can be additionally marked. For example, the letter A indicates a double socket made in the USA, the letter B indicates a ground contact.
What is better VVGNG Ls or NYM
Now that we have decided on the last cable index (LS), it remains to choose whether it will be the NYM or VVG option. Here, from a technical point of view and compliance with the current GOST, there is not much difference.
Choose any type - VVGngLS or NYM, but again, not simple, namely NYMng LS.
The NYM cable is made according to the German standard (at least it should). Previously, this cable was positioned as a desirable replacement for VVG, but with improved characteristics.
Its shape is round, which is very convenient for installation, laying and sealing seals in switch cabinets.

True, for high-quality cutting of such products, you will need a special insulation stripper.
But to buy a round cross-section VVG, it turns out not always quickly. Inside the NYM, between the insulated cores, there is a chalk-filled porous mass.
In fact, this means almost triple insulation. However, the outer shell has a significant drawback.
It is not resistant to ultraviolet radiation, so it is impossible to lay this cable outside the house along the walls. Another drawback is that it is almost impossible to find special brands of NYMng-LS in free sale. The VVGngLS cable is much more affordable, cheaper and easier to manufacture.
Here is a comparison of the prices of both options in online stores. Feel what is called the difference.


By the way, the cable is not NYM, but NUM or NUM. This brand is also produced by cable production plants, but without German VDE quality certificates. They deliberately change the name in order not to have problems with the license.

When buying such products, no one guarantees you how long they will last and whether they will meet all the declared characteristics compared to the originals. Here you act at your own peril and risk.
Some electricians claim that in order to comply with all GOSTs when installing electrical wiring in a house, the usual “correct” NYM will also fit. Indeed, in composition, it practically does not differ from VVGNG-LS.
This is not entirely true. Look at the simple NYM specification table below.

It can be seen from it that there are simply no special functions that would allow it to be used in residential apartments without any problems!
Connection methods taking into account consumers
Connection of the block of sockets of one group is carried out in a loop way. It involves the connection of all elements of the group to a common supply line of electrical wiring. The circuit created by the loop method is designed for a load, the indicator of which does not exceed 16A.
The only "minus" of such a scheme is that in the event of damage at the point of contact of one of the cores, all the elements located behind it cease to function.
Today, the connection of the socket block is often carried out in a combined way, which is based on a parallel circuit. This method is actively practiced in European countries. We use it to provide a separate line of powerful consumers.

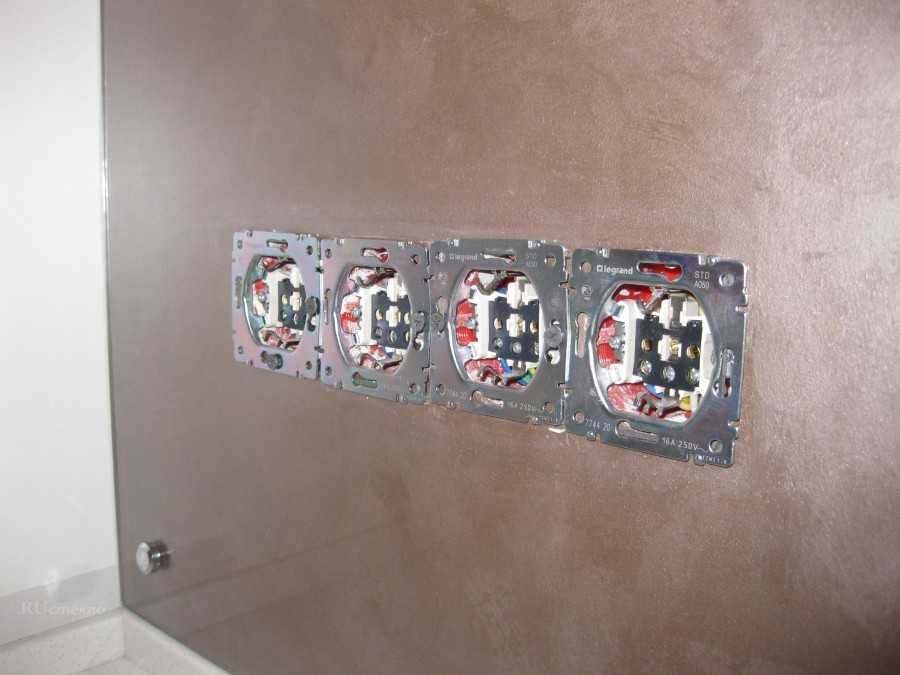


Parallel connection involves laying two cables from the junction box:
- the first is sent in the form of a loop, feeding four of the five sockets of the 5-bed block;
- the second - is supplied separately to the fifth point of the socket group, which will be designed to power a powerful device.
The method is good in that it ensures the operability of a single point and makes it independent of the functioning of other chain participants located nearby.
The main advantage of the combined method is to ensure the maximum degree of safety, which is especially important when operating powerful and expensive devices.
The only drawback of the scheme is an increase in cable consumption and labor costs for an electrician.
Both the daisy chain and the combined connection method can be closed and open. The first involves gouging channels in the wall for laying lines and "nests" for connectors, the second is implemented by laying a PE conductor on the wall surface.
Skirting boards and cable channels used in the open laying method perform not only an aesthetic function, but also protect the PE conductor from mechanical damage.
The use of plastic cable channels increases the safety and aesthetics of open wiring.Most of them are equipped with partitions, between which a line is laid. It is convenient to monitor the condition of the PE conductor through the removable front part.
Do-it-yourself step-by-step process for installing an outlet
Extraction of the old design
- We de-energize the outlet by turning off all the switches in the electrical panel. To make sure that there is no current in the outlet, use a multimeter - an electrical measuring device.
- When starting to disassemble the old structure, the first step is to unscrew the screws and remove the upper part of the case. The cover of the device is made of plastic, usually it is fixed with two screws.
- Under the cover there is an internal mechanism of the socket, with which further work is carried out.
- The working part of the product is also removed by unscrewing the screws. In this case, carefully hold part of the old outlet.
- Using a knife, it is necessary to strip the wires by 10 mm.
- The new device also needs to be divided into 2 parts - the base and the cover.
Replacing the socket
Sometimes it is necessary not only to install the structure, but also to replace the socket at the point. The need to replace equipment can arise for a number of reasons: the socket is cracked, broken, or it turned out that it did not properly perform its functions.
 Types of sockets
Installing a new device will not cause any particular difficulties. After removing the old equipment, it is necessary to follow a certain procedure:
You can remove the old device by unscrewing the screws that fix it in the wall.
To pull it out of the wall, you need to pry it with a knife (when installing a socket in a plasterboard wall).If the room has walls made of concrete and brick, you can remove the mechanism using pliers or a screwdriver.
Wires are threaded into the new socket
It is important to measure the diameter of the hole or the old design before buying a new device, since the dimensions of the sockets may vary.
To fix the device in the wall, a gypsum mortar is used, which is made according to the instructions attached to the product.
After the solution has dried, you can proceed to install the outlet.
Installing a new outlet
When working with a double socket, actions are performed by connecting both structural elements to the same wiring line. 6 wires are connected to one of them, and 3 main wires are connected to the second.
This means that one socket element will receive current and subsequently pass it on to another.
Connection diagram
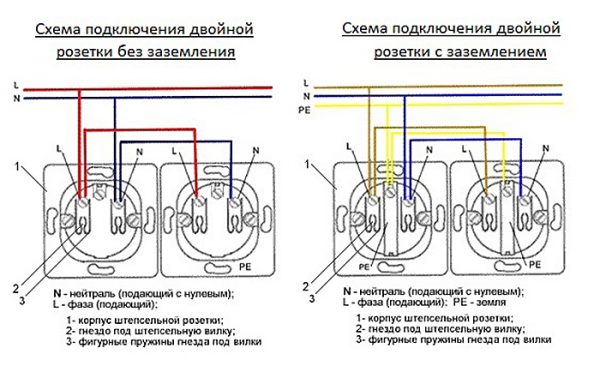 Socket connection diagram
- Before mounting a new device, experts advise cutting the ends of the wires again. With the help of wire cutters, they need to be shortened by about a centimeter, and then the ends should be cleaned of insulation.
- If the wire is stranded, it must be twisted tighter.
- The inside of the new product must be carefully inserted into the socket so that the socket fits smoothly into the hole.
- Firmly pressing the part against the wall, you need to tighten the screws and fix the device in the socket.
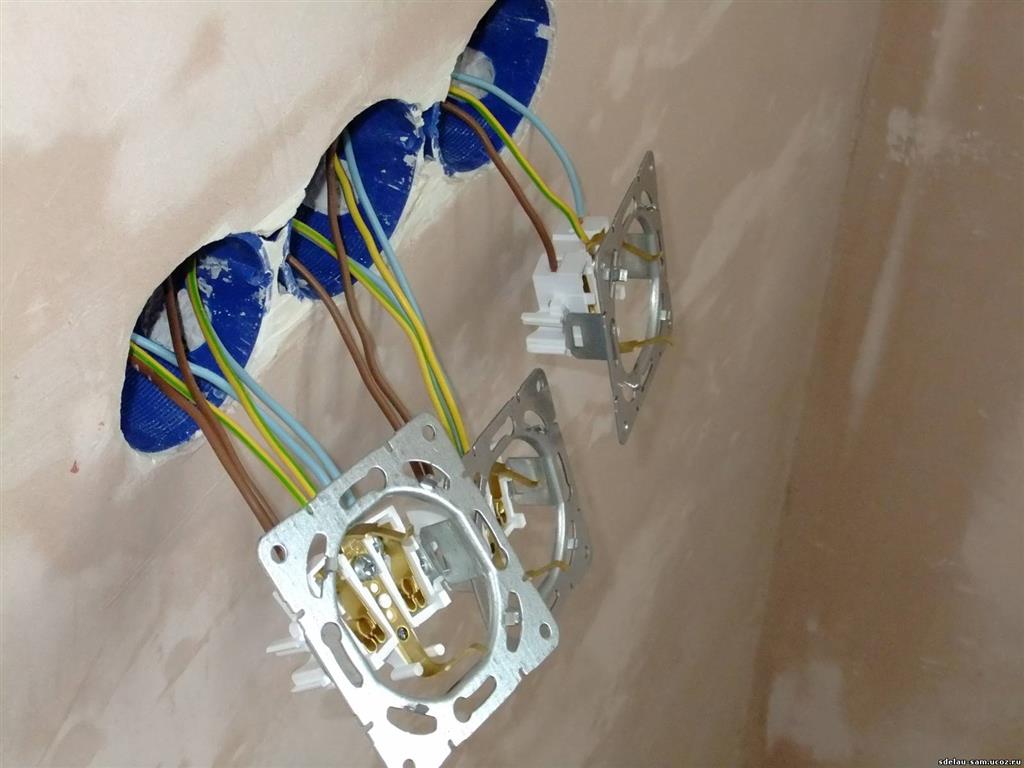
Connecting wires to the socket block
Please note that the wires are connected in a special way (as shown in the diagram below). If instructions are not followed, a short circuit may occur.
 Connecting wires to the socket block
When installing the equipment, firstly, a neatly folded wire is placed in the socket.It should not come into contact with the spacer tabs of the box, otherwise the socket will not work properly.
If the socket is installed on a new point, it is recommended to check the length of the wire. It should not exceed 20 cm, otherwise it may not fit in the socket.
Double socket in one socket
Since in most cases the replacement of single sockets is part of a minor repair, we will consider an example of how to connect a double socket using the old socket or the space left after it, there will be no need to lay new wiring and restore the damaged interior. Although cosmetic repairs may be required.
Dismantling the old outlet
Before you start working with electrical wiring, you need to take care of your safety. First of all, turn off the power switches in the apartment panel. Then check the absence of voltage on the replaced socket - use an indicator screwdriver for this.
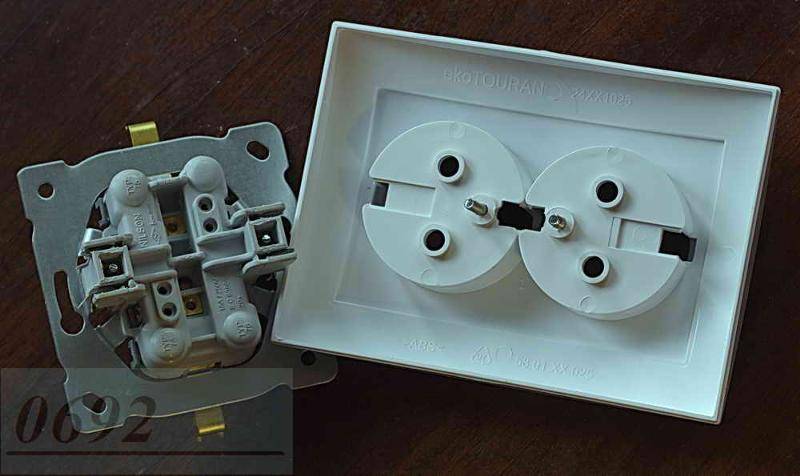
With independent actions, the old outlet is immediately dismantled. To do this, its fixing screws are unscrewed, and the top cover is removed. Next, the wires are disconnected and the fastening tabs of the product itself in the box are unscrewed.
The socket to be installed is disassembled in the same way: its front panel is carefully separated from the working part
Installing a new socket
I have pre-installed a new Schneider Electric indoor socket with a diameter of 68 mm. I have been using them for a long time, I can only say good things about them - they are very reliable and of high quality.
In addition, there are fixing screws on the front part for fixing the socket support. If you have an old-style socket outlet or none at all, then it is better to install a new one.A normal socket box is the key to a securely fixed and captive socket.
In order for the socket box itself to be securely fixed in the wall, it must be grabbed onto alabaster or putty mixture.
Preparing to connect
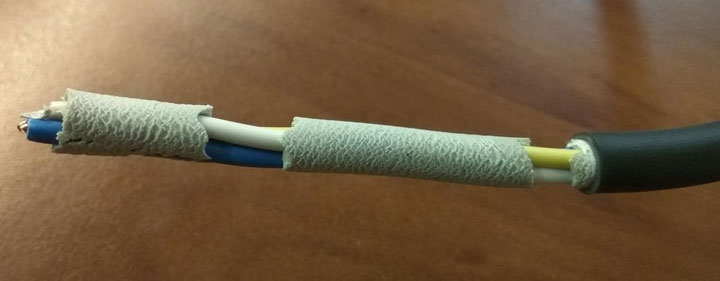
Let's start cutting the cable. To remove the outer insulation, I use a knife with a heel from the STOCK. Some beginners may think that the more wire the better (left for the future).


We don’t need long wires in the box, otherwise, when installing the socket mechanism, it simply won’t fit there. Therefore, we leave a margin of wire of about 10 - 12 cm.
If the wires from the old wiring are short, you can try to build them up. By the way, there is a separate article on this topic, how to lengthen the wires in the outlet.
Next, we clean the insulation from the conductive wires by about 10 mm.
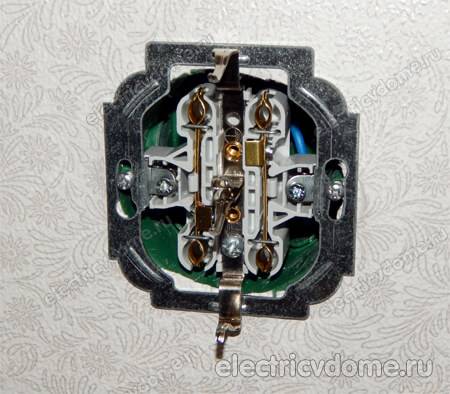
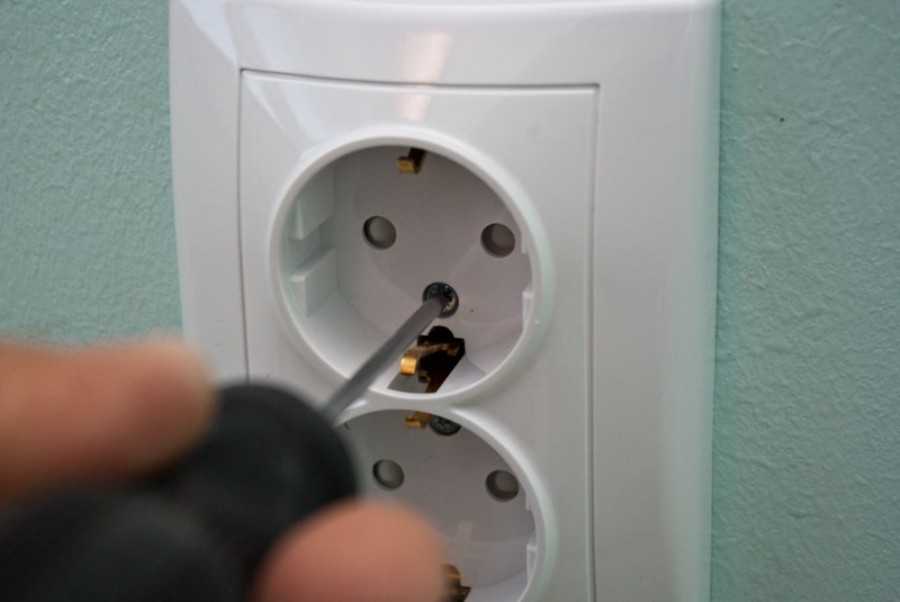
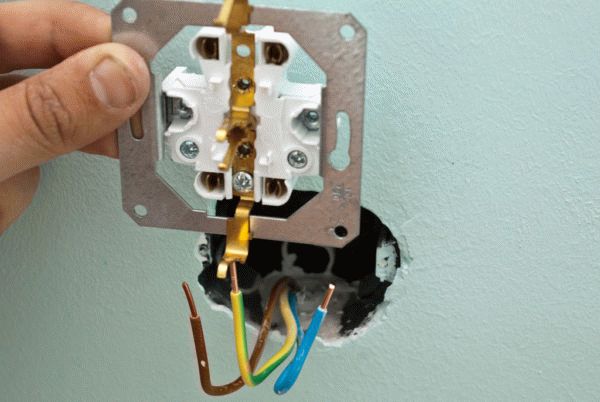
Wire connection
When the wires are prepared, we connect them to our contacts. According to the color marking, the wiring in the junction box is made in such a way that the phase wire is brown, the zero working (zero) is blue, the ground wire is yellow-green.
We loosen the screws on the connection terminals, insert the wires into contact and tighten the screws well with a screwdriver.
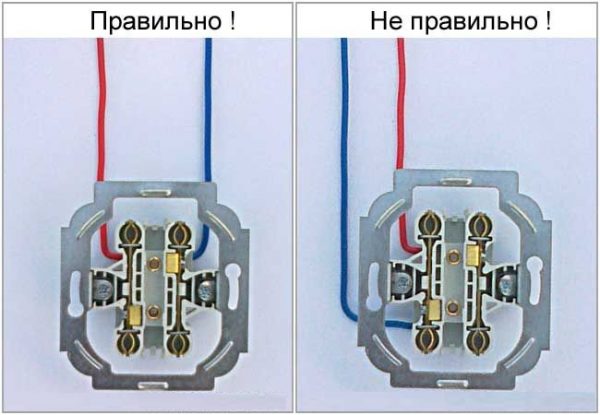
Which terminal to connect the phase or zero does not make much difference. Maybe on the left, maybe on the right. I always connect the phase wire to the right contact of the socket. The main thing is not to connect them to one contact (bus), otherwise a short circuit will occur.
The ground wire is connected to the central contact located on the bracket. Next to this contact there is a "GROUND" icon.
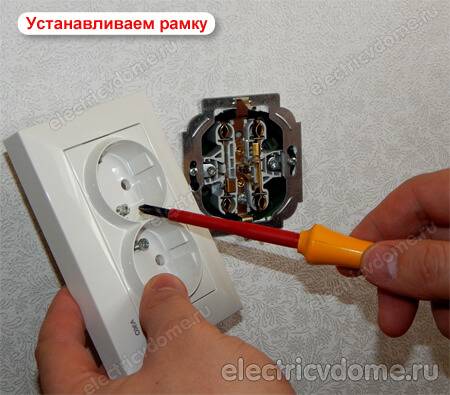
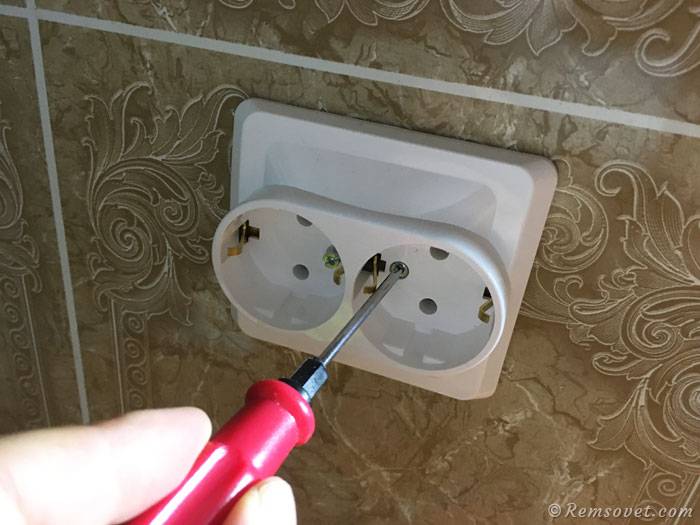
Installing a double socket in a socket
When the wires are connected, you can start laying the entire mechanism in the socket
When installing a double socket in one socket, it is important to make a neat laying of the wires in the box.
They must not be allowed to fall under the fastening tabs (otherwise, when they are tightened, the insulation will be damaged). Before installation, I bend the wires with an "accordion" and they fit perfectly.
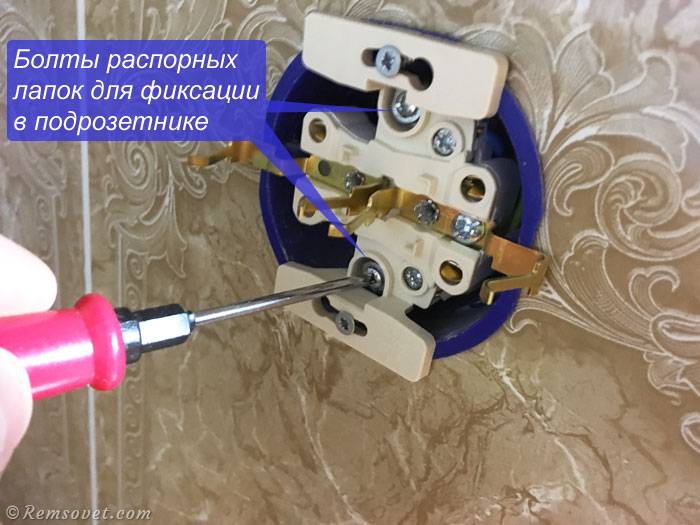
Then the socket is carefully deepened inward and fixed with self-tapping screws or fastening tabs resting against the walls of the socket box. I am using the first option. Then, using the level, we set the even position of the outlet in relation to the corners of the wall and floor
Finally, its caliper is connected with self-tapping screws to the body of the installation box
Then, using the level, we set the even position of the outlet in relation to the corners of the wall and floor. Finally, its caliper is connected with self-tapping screws to the body of the installation box.
When the caliper frame is securely fixed, a decorative overlay is installed. With the correct installation of the outlet, it will lie close to the wall, without a gap.
| Please do not forget that the socket, although its double load capacity, does NOT INCREASE twice. The power cable and the socket itself are designed for a working current of 16 Amperes. When connecting electrical appliances, this must be taken into account. |
Varieties
 Sockets are classified depending on the design features:
- Closed and open models. The first is recommended for use in rooms for children. The second classic sockets without closing curtains.
- Options with or without grounding. In the first case, the owner of the house will provide protection against voltage surges. The devices will be safe and sound.
- Overhead and hidden products.The former are installed to replace existing outlets, and the latter are mounted during repairs, their location is provided for even when the project is created.
- There are also programmed models, polar or standard. The programmed devices turn on and off according to the set timer. But the simpler the design, the less functionality, the easier their installation. The choice of model directly depends on whether the installation will be done by one's own efforts or with the help of a master.
Each type has its own marking, which allows you to choose the right option. For example, "A" indicates that the device is made in the USA, but "B" indicates the presence of a ground contact. The body of each socket is made of durable thermal plastic. From a decorative point of view, inserts are used, products are made in different colors.
Consignment note 2 x local with grounding
 Contacts that are necessary to protect electrical appliances are displayed on the case of this model. Such a socket protects a person from a possible breakdown of current, which may accidentally appear on a plastic case.
For the installation of such an outlet, additional repairs are not needed in the apartment, it is installed instead of any conventional model.
Passage double with a cover
The operating conditions of the device also determine its choice. The case of the device with a closing lid, which allows you to protect the contacts from moisture. Such a product is marked IP-44
If the outlet will be used outdoors, you should pay attention to the product marked P-55. Rugged housing protects against moisture and dust
indoor installation
Indoor installation requires planning of device placement during renovation work.In such options, the holes are hidden behind the curtains, which are moved to the side at the time of connection. Such sockets are grounded, because children can be in the room. Only when pressed simultaneously will the curtains work. Even if you put a foreign object into the socket, it will not work, therefore it does not carry any danger at all. Therefore, closed-plan models are so popular among varieties of double outlets.


