- Features of replacing a heating element in Termex
- Replacing the water heating element
- How to choose the right boiler?
- Peculiarities
- How to check the heater (video)
- Boiler Thermex
- Boiler Ariston
- Helpful Tips
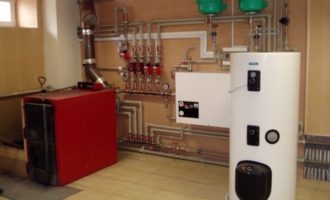
- The design of the water heater
- Boiler repair: troubleshooting common problems
- Damage to the integrity of the inner tank or outer shell
- Gasket replacement
- Breakdown of the heating element
- Other boiler malfunctions
- Replacing the heating element in the Termex water heater
- Checking the health of the heating element
- Visual inspection of the element
- Testing with a tester
- What tasks do heating elements perform
- Boiler malfunction
- Step-by-step instructions for replacing the heating element
- With fixing nut 55
- With mounting strap
- With flange and round fittings
- "Dry" heating element
- Mounting and connection methods
Features of replacing a heating element in Termex
As already mentioned, the company has been operating since 1995 and produces only water heaters of "different" modifications. Why in quotes? Yes, because the difference between the models is minimal and this directly concerns the topic of the article.
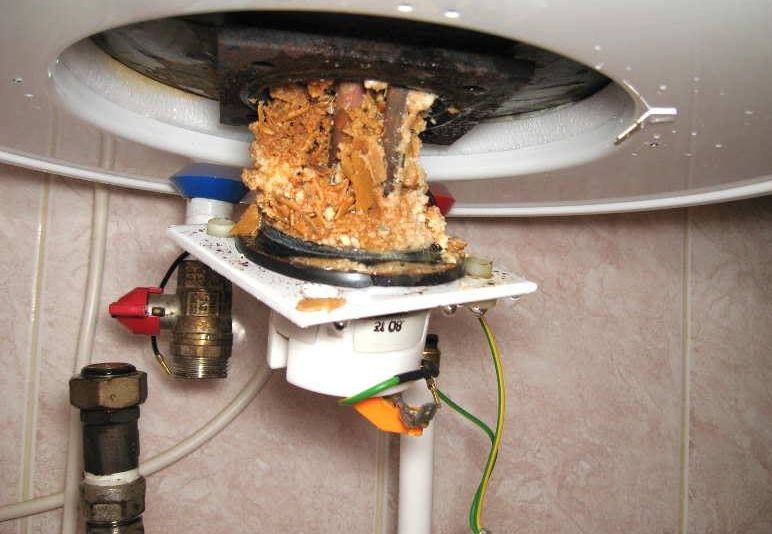
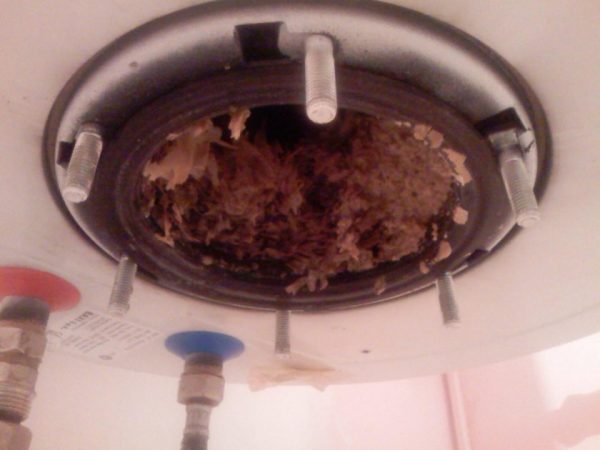
For those who are not in the know, we explain that with each replacement of the heating element in any water heater (if we are not talking about a dry heating element), it is necessary to clean it from the scale formed inside.And in the case of other brands, this can be done through the same heating element mounting flange. This is how, for example, cleaning the boiler looks like when replacing the Ariston heating element (the sight is not very pleasant, but better than with Termex, believe me)
Boiler Termeks you will definitely have to:
- Take off the wall
- fill with water
- Turn over in anticipation that all the "slurry" from the scale will come out
- Repeat steps 2-3 until you have the strength or until clean water flows
There is no way to manually remove the scale!
Another surprise according to customer reviews is that the bolts on the flanges firmly stick to the nuts and there is no way to unscrew them. They are cut with a grinder. Do you have a Bulgarian at home? Didn't come with a boiler? And these 6 bolts are for each heating element, so if you have a 100 liter boiler for two heating elements, then you have 12 chances to use a grinder!
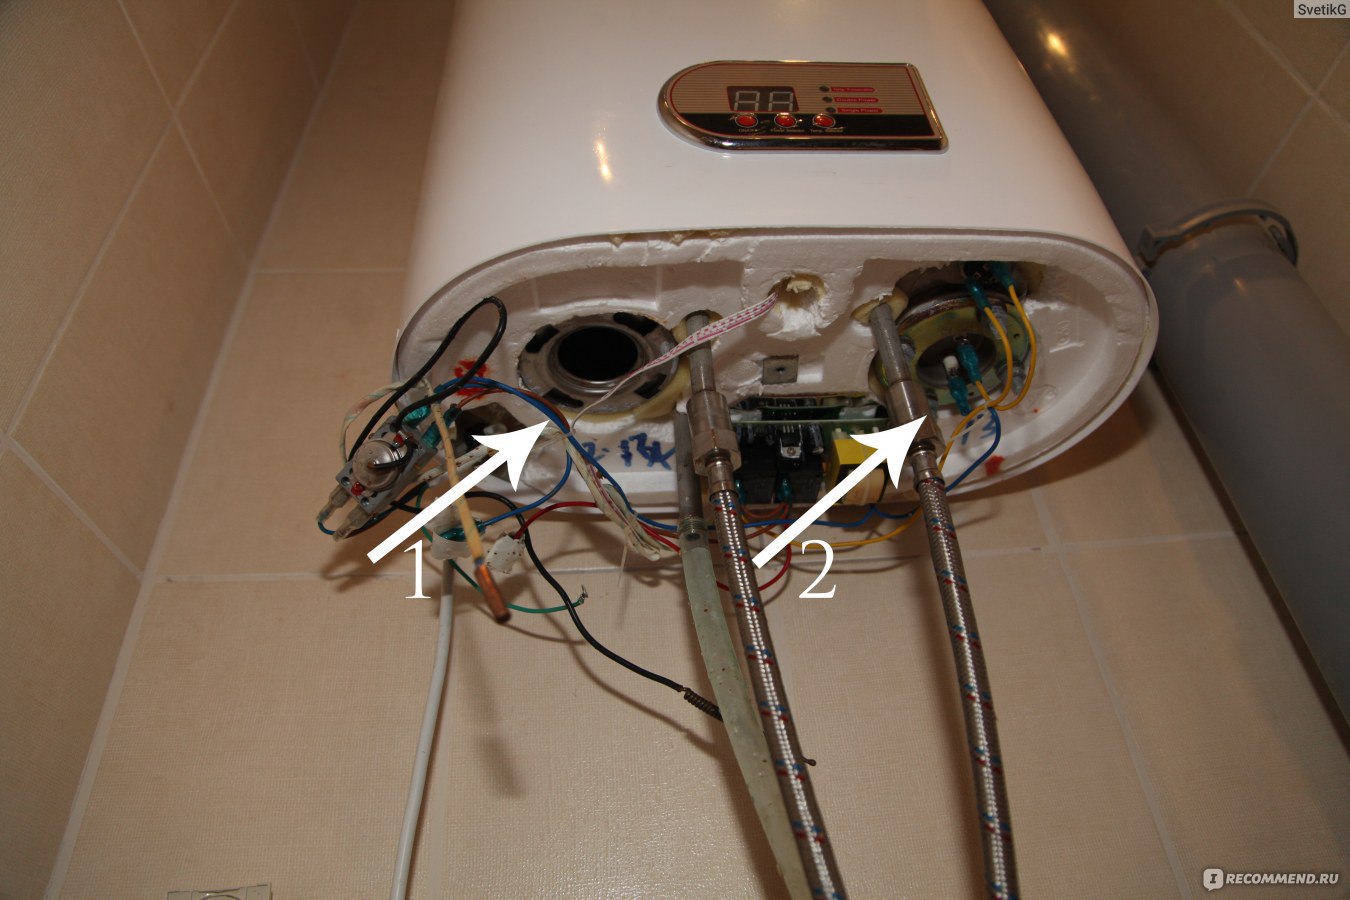
For reliable diagnosis, you will have to remove the cover that closes the heater. Then you can proceed like this:
- Ring the heating element with a multimeter to measure the resistance. The value "zero" on the monitor means a short circuit, and "infinity" means a break in the nichrome spiral, which heats the water.
- Check the heater with a tester with a test lamp. It caught fire - the heater is intact, and the reason for the incorrect operation of the boiler is something else.
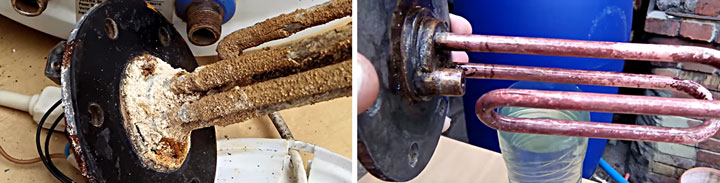
You can take the heater out of the box to visually diagnose it for breaks. Descale the surface. This procedure requires accuracy. It is best to soak the heating element in a solution of citric acid (50 g per 1 liter of water). The scale will completely dissolve in about two days, but you can save time: bringing it to a flaky state, clean it with a soft brush.
Replacing the heating element
- insert the thermostat into the heating element;
- find the terminals on the thermostat that supply current, and connect them to the terminals of the tester device.
The call will mean the serviceability of the device, its absence indicates a breakdown of the thermostat.
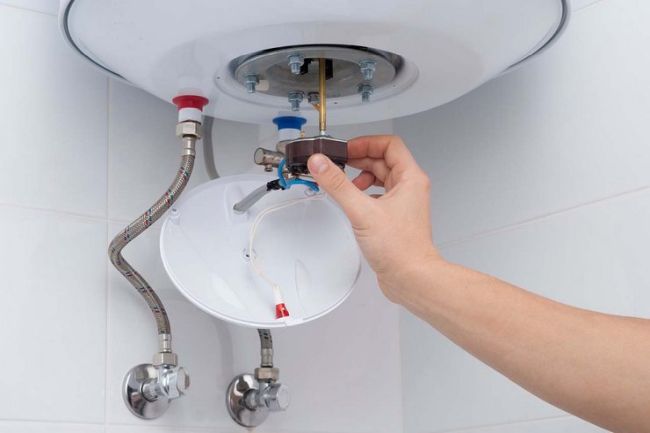
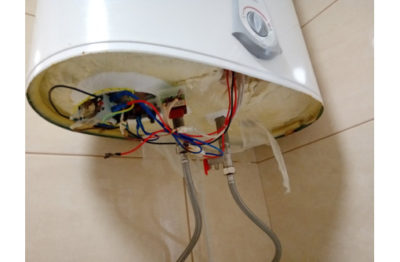
Replacing the water heating element
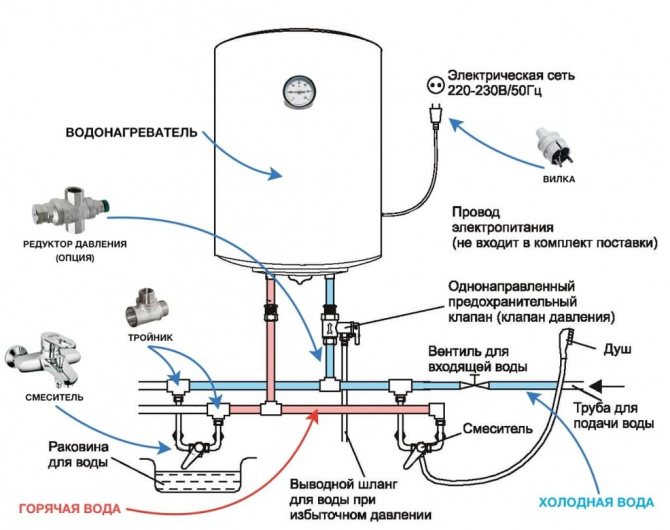
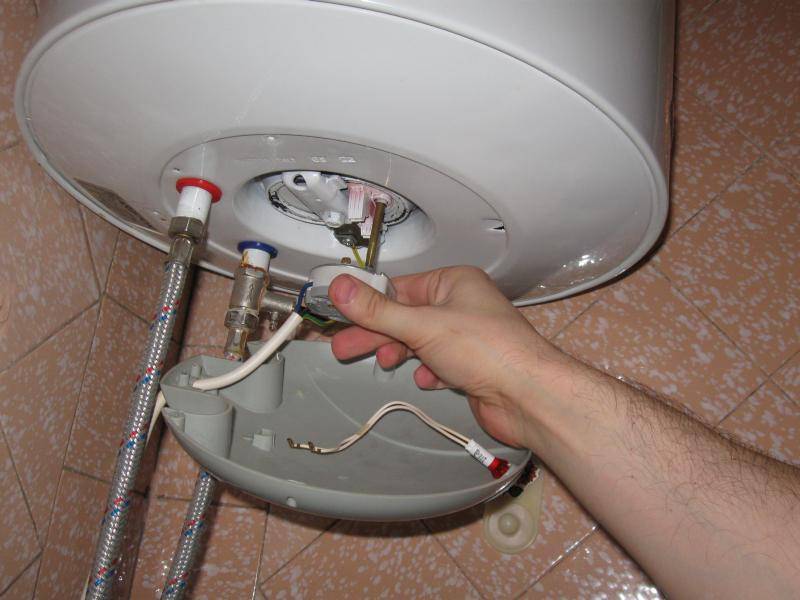
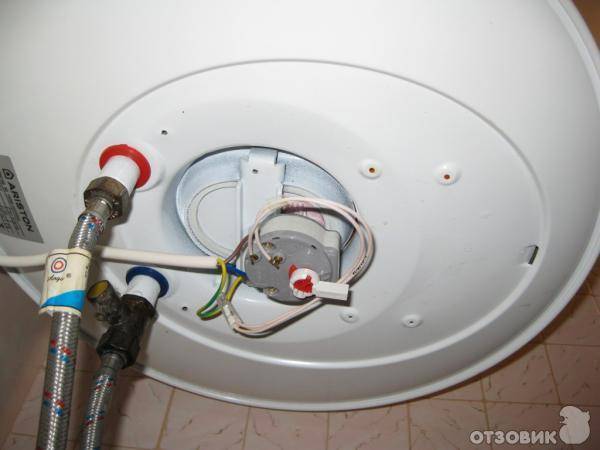
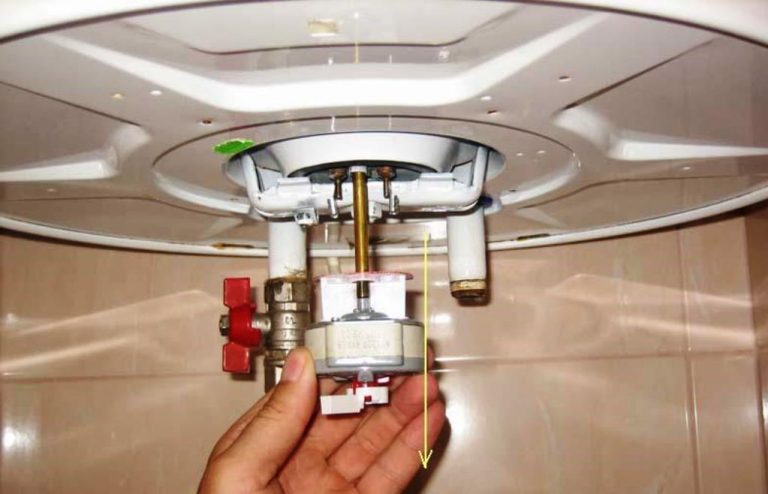
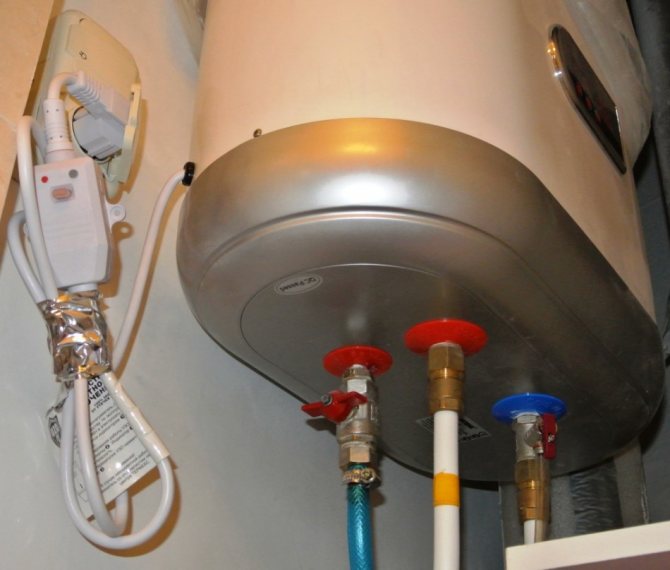
First of all, you need to turn off the water supply. Usually the shut-off valve is located near the boiler. If there is none, you can turn off the water in the entire apartment (from the riser).
Each master can choose any of the two methods. The main thing is to stop filling the tank with water. Please note that the DHW tap must also be closed. Next, you need to do the following:
- drain water from the boiler;
- disconnect the device from the mains;
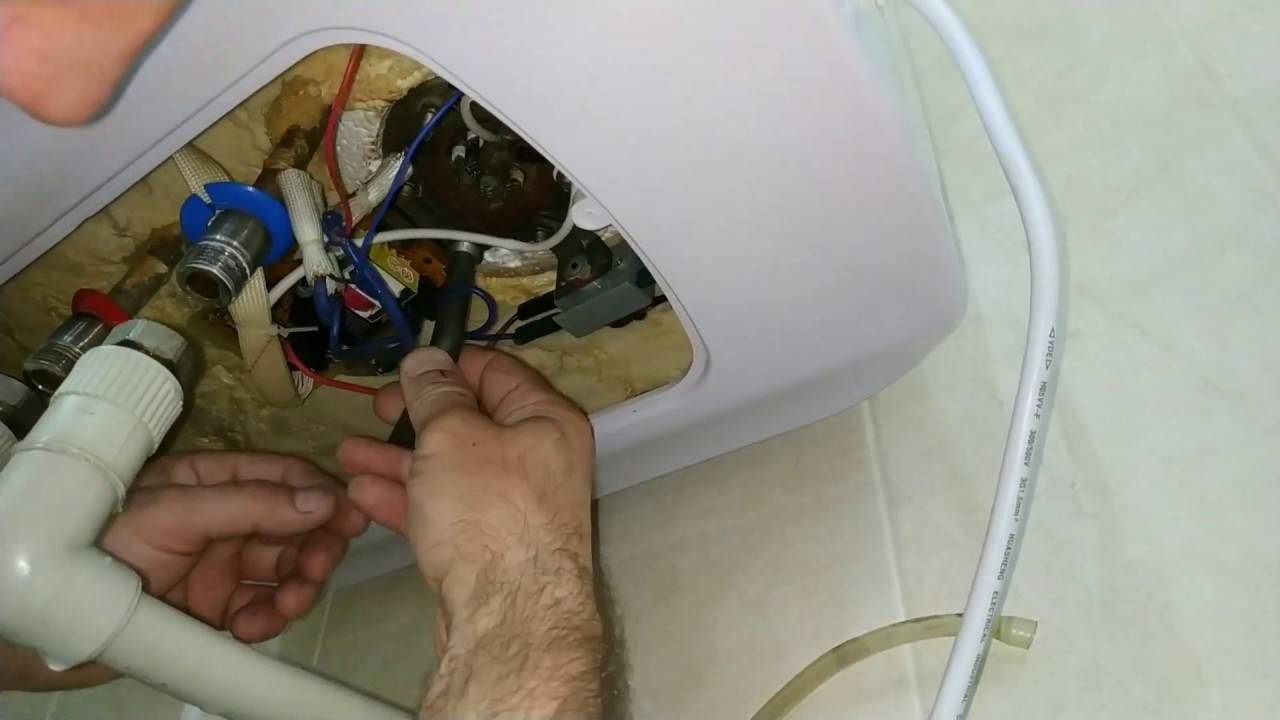
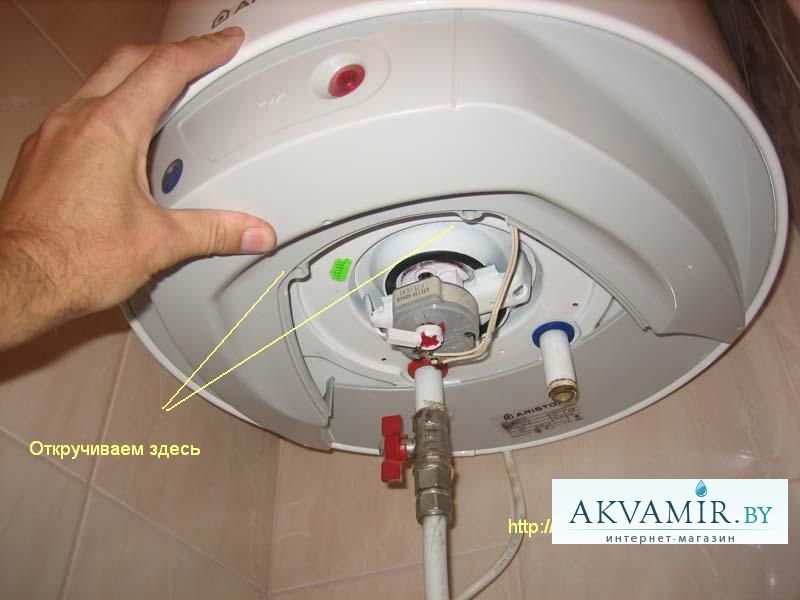
- remove the protective panel, for which a screwdriver is useful;
- using a phase meter, make sure that there is no voltage on the water terminals;
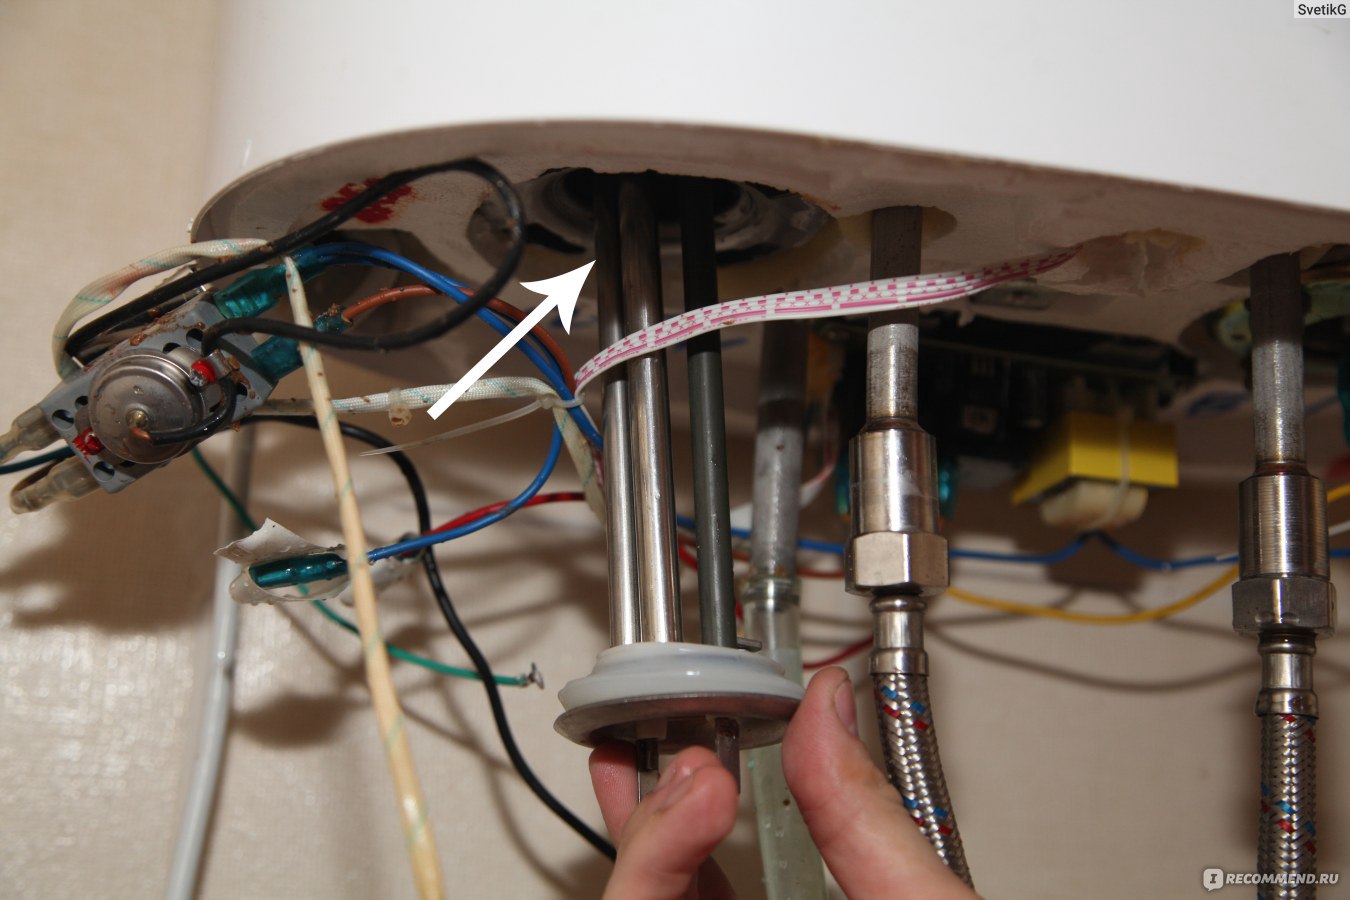
- remove the heating device from the mounts;
- disconnect the wires - before that, it is better to photograph the original circuit, which will save you from many problems;
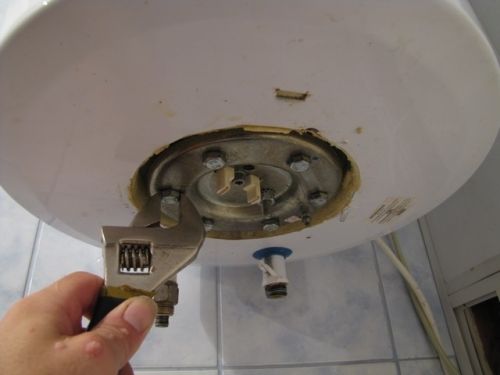
- unscrew the nuts securing the heating element.
Together with the heating element, the anode that protects the boiler from rust should also be replaced. Next, you can install new parts. In this case, it is necessary to ensure that their contacts are dry. Indeed, otherwise, there is a risk of a short circuit.
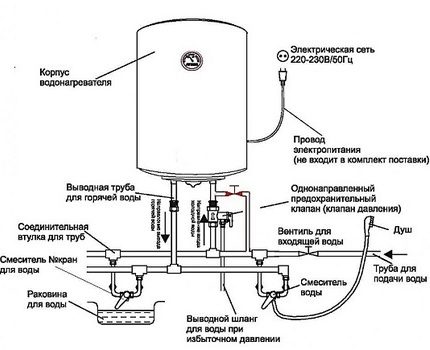
After all hoses have been connected, the equipment is tested for cold water supply. Please note that the appliance cannot be plugged into the socket yet. After all, you first need to check if there is a leak. If there are no problems, then after all the air has escaped through the hot water tap, you can turn on the device in the network.
What should be paid attention to?
To make the operation of the boiler as safe as possible, there are several points to be checked. First of all, you need to make sure that there is a ground connection. A good solution would be to install a residual current device.
A useful detail is the safety valve. It will not allow too high pressure in the inner tank. Also, the element is useful for draining liquid.
In order to preserve the components of the boiler in the event of a water supply failure, it is recommended to install a check valve on the cold line.
How to choose the right boiler?
Before proceeding with cleaning, the boiler must be freed from water. The easiest way to do this is if the device is located above the bath or you can put a volumetric container under it. Well, when the heating element is screwed directly into the tank, it can be pulled out simultaneously with draining the liquid. In some models, to remove the element, you have to unscrew numerous nuts, then we empty the boiler in advance.
The water drain algorithm always looks like this:
- We disconnect the device from the network and turn off the water supply tap (on the pipe).
- We close the tap responsible for the supply of cold water, located near the heater. After that, we start water on the nearest mixer so that the glass is hot.
- We attach a tube to the drain fitting, direct it into the sewer, drain the water by opening the tap.
You should choose a boiler based on indicators such as:
- device type;
- tank capacity (in liters);
- type of heater;
- product power;
- the material from which the body is made;
- how much does the unit cost.
We suggest that you familiarize yourself with How to clean the iron from burnt fabric at home. Equally important should be paid to how much the manufacturer asks for his product.However, the fact remains that the price does not always justify the quality.
Therefore, before buying, it will not be superfluous to “run through” various forums where people who have bought this or that model of a water heater talk about its positive or negative sides.
So, the relatively inexpensive Atlantic and Oasis models have proven themselves well, the price of which starts at 4,500 rubles.
Thus, home cleaning of the water heater is not a difficult procedure. Another thing is that it should be timely. Then the device will not only work smoothly, but also last for a long time.
How to clean a water heater? The answer to this question, it would seem, is known only to masters in plumbing, and only they are able to cope with the contamination of the boiler. In fact, you can clean the water heater from scale and rust at home, you just need to find the right material, get acquainted with it and implement our recommendations.
Peculiarities
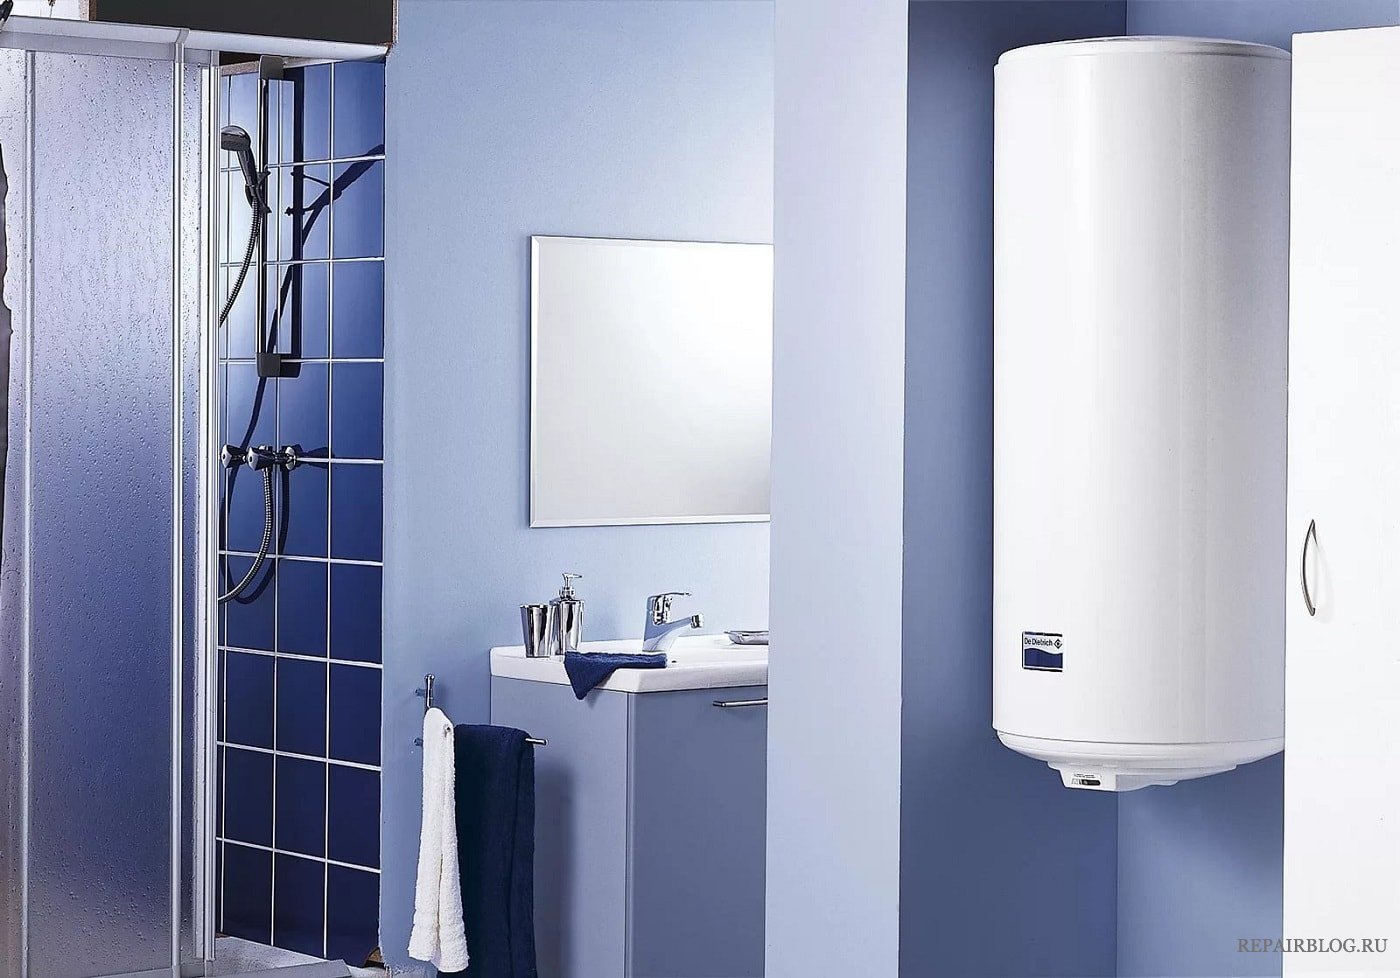
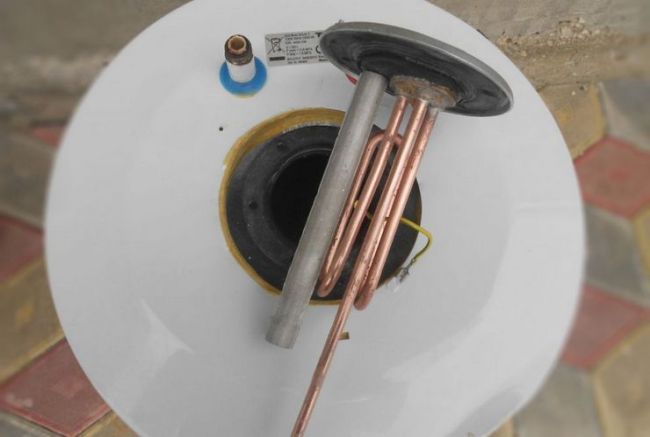
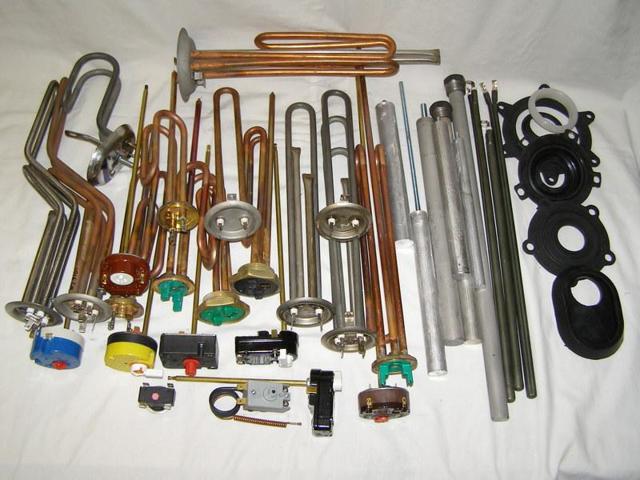
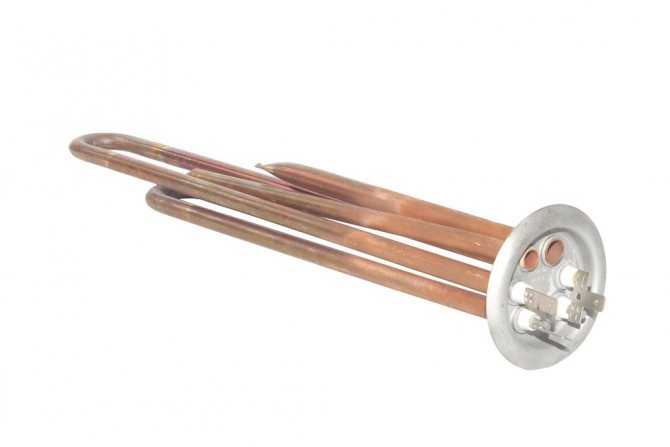
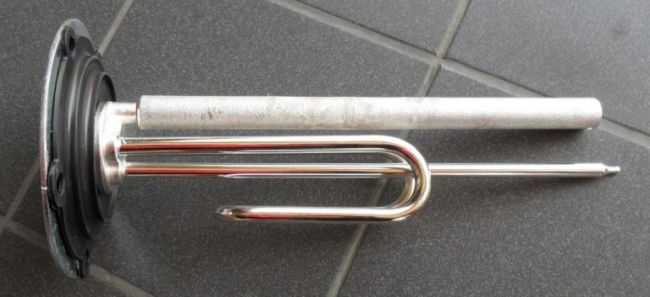
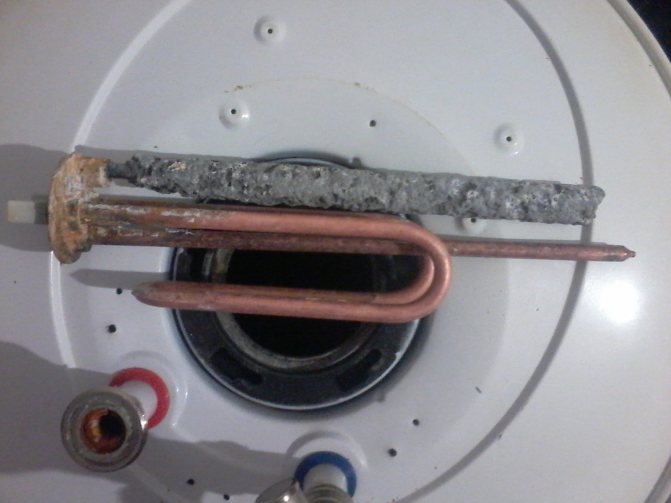
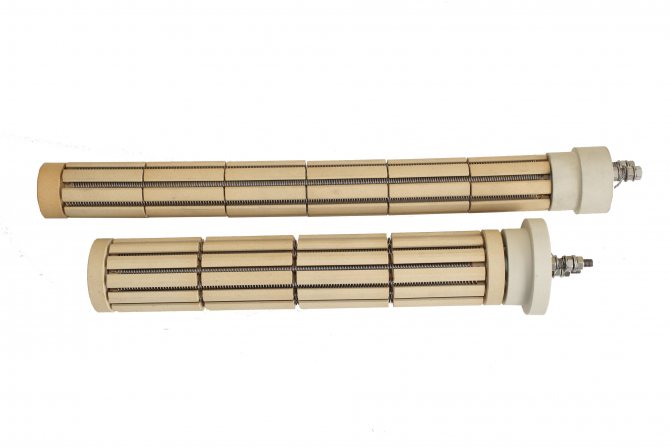
It is impossible to imagine a comfortable apartment or even a private house without hot water today. Where central heating cannot be used, water heaters have to be installed. If such a system is chosen correctly and installed properly, it will provide the domestic needs of a large family quite efficiently. The decisive link in the heating equipment is the heating element, which is a copper or stainless steel element. Its tube contains a spiral inside, through which a strong current passes.
The heater for the Ariston boiler and any other differs from those similar devices that are mounted in electric kettles or in washing machines and dishwashers. Its total electrical power is noticeably greater, because it is required to heat a significant amount of liquid in a short time. The company produces both "wet", made according to an open scheme, and "dry", hermetically sealed, heating elements. Ariston Corporation uses an alloy of copper with chromium and nickel for the manufacture of its heaters.
Power varies depending on the specific model. All the highest quality heating elements are equipped with a thermostat. This block stops the operation of the device as soon as its temperature becomes critical. On the other hand, the automatic system gives a command to start even when the temperature drops below a certain threshold. Therefore, when buying Ariston products, you can not be afraid that some negative phenomena will arise or there will be a risk of fire.
How to check the heater (video)
Boiler Thermex
The tube for heaters is made of copper and stainless steel. Dry elements have a ceramic coating that increases their service life. The maximum heating is 75°C. All models are equipped with a thermostat, and some are equipped with an external thermostat.
Repair instructions:
- shut off the cold water supply on the riser;
- drain the water from the water tank by opening the hot water tap and turning the lever on the safety valve;
- close the taps and disconnect the supply to the boiler pipes;
- dismantle the boiler;
- unscrew the fasteners and remove the protective cover;
- disconnect the contact terminals located on the heater and thermostat;
- unscrew the screws on the clamping flange and remove it;
- dismantle the thermostat and heater.
Boiler Ariston
In the production of Italian Ariston water heaters, copper alloys and a chromium-nickel spiral are used. The bent element is mounted on a brass flange that increases heat transfer. The thermostat allows you to set the optimal temperature level, but not higher than 85 ° C degrees. After reaching the required temperature indicators, an automatic shutdown occurs, and after the temperature level drops by 5 ° C, the boiler starts heating.
To remove and replace the heating element, it is necessary to unscrew the nut and dismantle the bar, then push the flange and the water heating element into the tank. It is necessary to dismantle and replace the heating element in an inclined position, inserting the flange into the neck part. After replacement, assembly is carried out in the reverse order.
Helpful Tips
To protect the heater from high voltage in the network, you can connect the boiler through a control relay. If the set maximum is exceeded (for example, 220-230 V), it turns off the device, preventing the tube from burning out. With frequent jumps or too low voltage in the network, it is recommended to install a stabilizer.
In addition to the heating element and the anode, when disassembling it is advisable to pay attention to the rubber gaskets of the boiler. Timely replacement of sealing elements will prevent leaks
Before starting the boiler, you need to check it for leaks: collect, wipe dry, fill with water and let stand for 3-4 hours. If there are no traces of water on the body and connections, the device can be connected to the network.

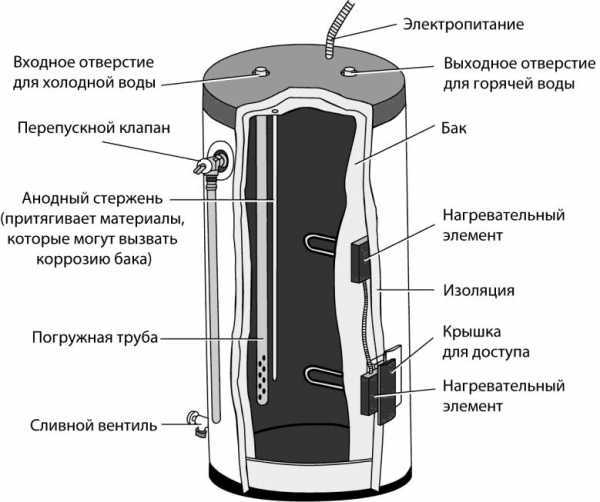
The design of the water heater
The boiler is fundamentally no different from the most ordinary electric kettle, which can maintain a certain temperature of water.
Only in the first case, a safety valve acts as a cover, providing the supply of the required amount of liquid for its subsequent heating.
Today the market offers a large selection of boilers. All modern models have different designs, specifications, appearance and, of course, different prices.
When buying a device, it is recommended to give preference only to trusted manufacturers. This is the only way to be sure that the equipment will last a long time and will not create unnecessary problems.
Therefore, a buyer with any income level will be able to choose the optimal model in terms of parameters, quality and cost.
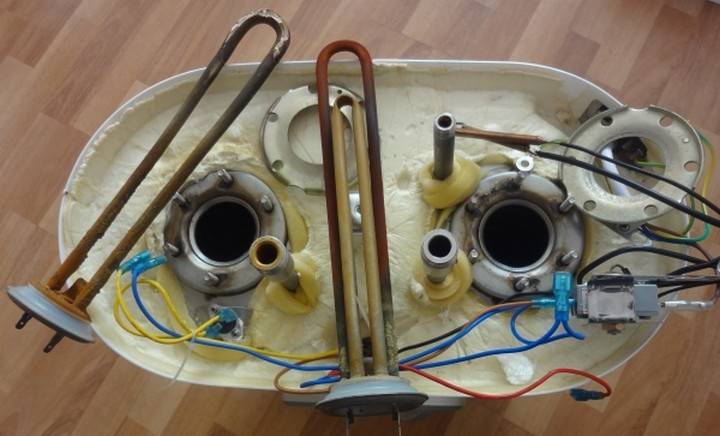
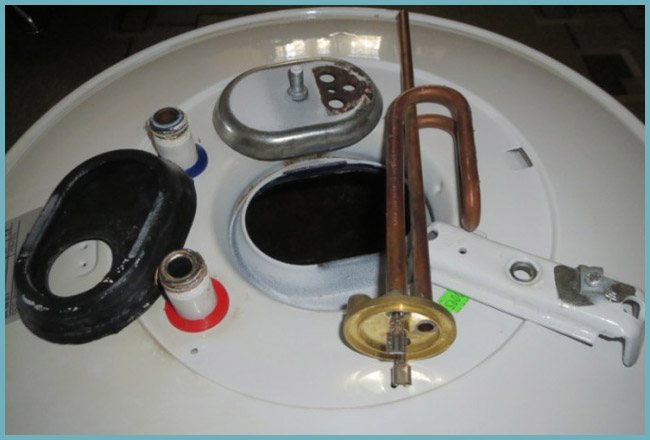
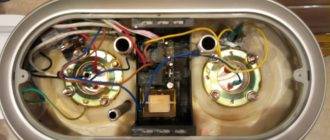
Regardless of the brand, all boilers consist of the following components:
- housing - it must be insulated, which will minimize heat loss;
- heating element - there are two varieties of it: the first is in direct contact with water, and the second heats the liquid through a special ceramic shell;
- internal tank - its volume varies from 15 to 200 liters, and the tank itself is made of stainless steel, which allows it to be resistant to corrosion;
- thermostat - a sensor that monitors the temperature of the water, maintaining it at a user-defined level;
- magnesium anode, the main task of which is to protect the device from electrochemical corrosion, but it in no way affects the formation of scale;
- gasket of the heating element attachment point.
The magnesium anode needs regular replacement - this process should be done at least 1-2 times a year.Such maintenance will increase the life of the boiler and increase its efficiency.
The water heater has a fairly simple circuit. Thanks to this, you can do it yourself, saving both your money and your time.
Boiler repair: troubleshooting common problems
There are some of the most common problems that occur during the use of a water heater. Some of them can be fixed on their own. To eliminate others, you can not do without the help of a professional:
Damage to the integrity of the inner tank or outer shell
Such a malfunction may occur during inaccurate installation or careless use of the device. For example, a chip or crack can occur if you accidentally hit the boiler or drop a heavy object on it.
As a result of such a breakdown, the destruction of the heat-insulating material and the deterioration of the heat-insulating properties of the device will begin. It is also possible to actively develop corrosion. It is almost impossible to fix such a malfunction on your own. You will either need to contact a specialist or buy a new drive.
Gasket replacement
In the event that a leak has formed at the location of the protective gasket, you just need to replace it by conducting an independent maintenance. instrument maintenance.
Breakdown of the heating element
One of the most common malfunctions is the breakdown of the heating element.
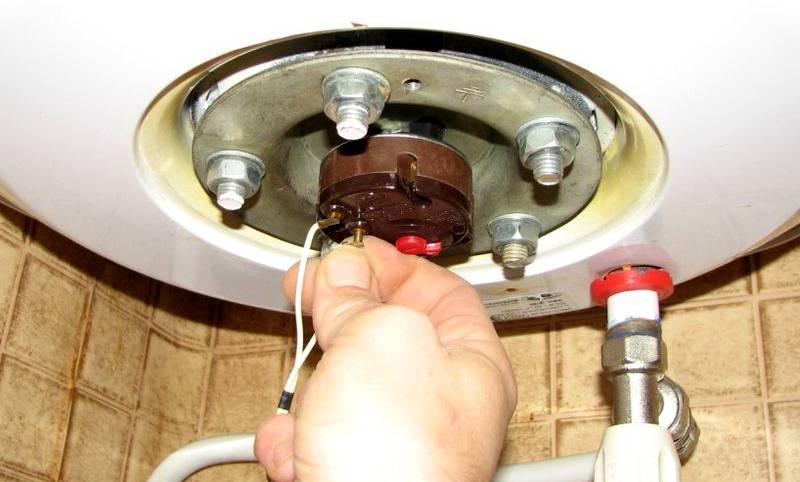
Before starting to replace the heating element, you need to make sure that electricity is supplied to the drive. This can be done with a tester:
- The scale of the measuring device is set within 220-250 V
- We fix the voltage at the terminals of the tester connected to the mains
- Lack of voltage means boiler failure
- In the event that voltage is present, the test must be continued.
- The boiler must be disconnected from the network
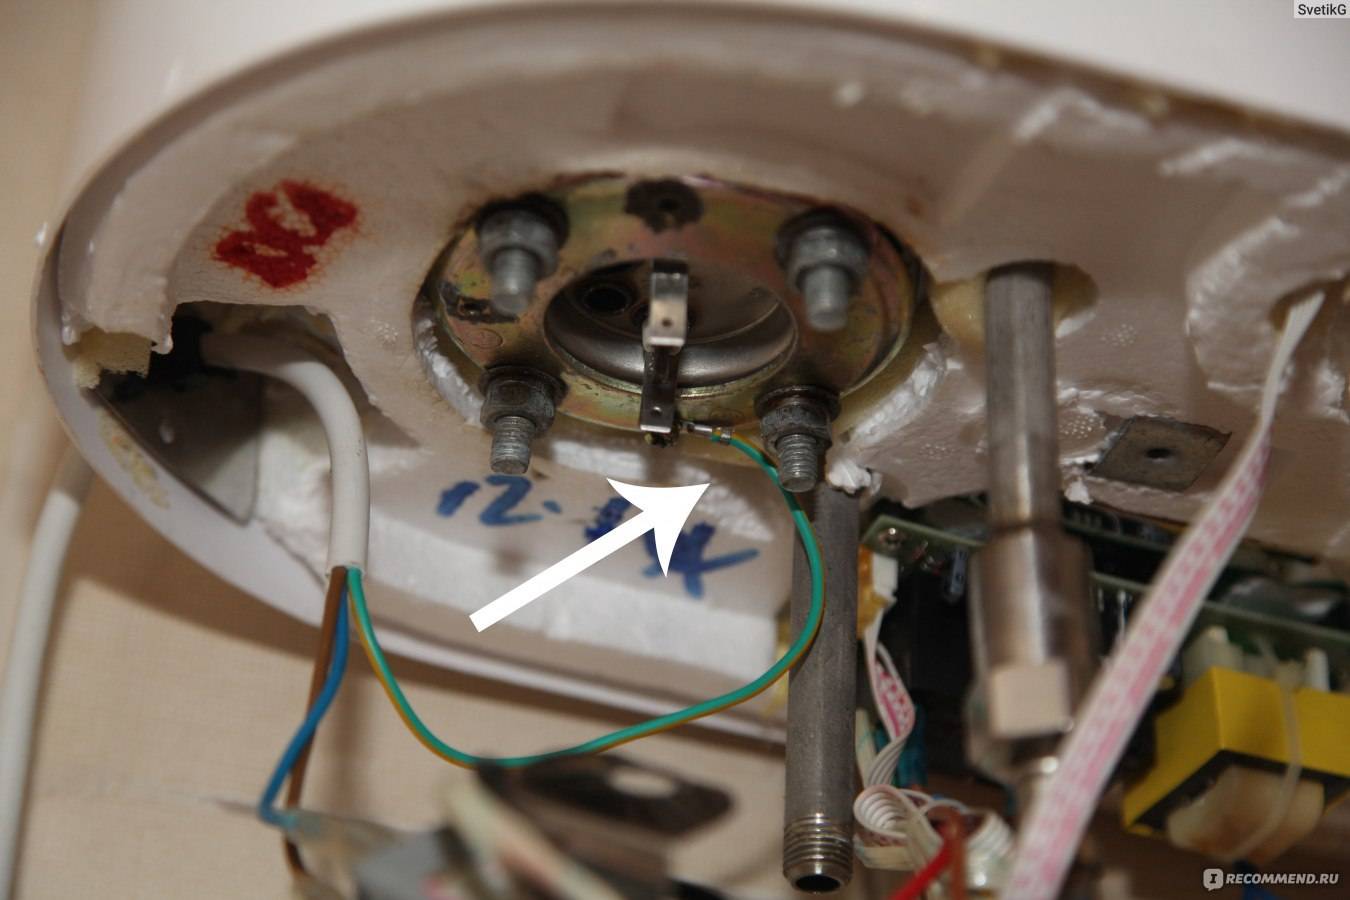
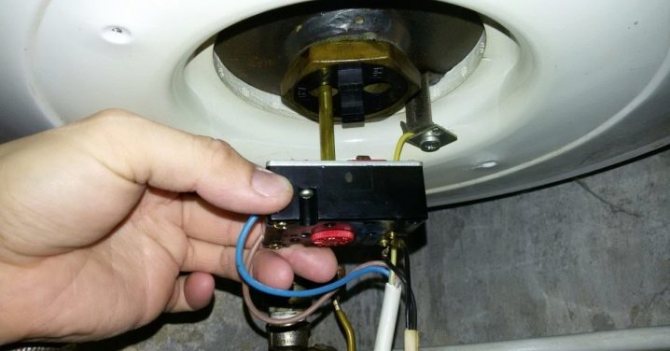
- Then we disconnect the thermostat from the heater and remove the insulation from the contacts of the heater
- Using a measuring device, we take readings on open contacts
- The presence of voltage indicates the health of the heating element and vice versa
It is possible that the heating element is working, but the water does not heat up. Could be the thermostat is the cause.
- The tester should be set to maximum. We check the voltage at the input and output of the device
- In the absence of indications, it is necessary to replace the part (the presence of a positive reaction also does not give one hundred percent confidence in the serviceability of the device. It is necessary to continue measurements)
- We set the measuring device to a minimum and carry out a test on the thermostat contacts for a short time
- We try to warm up the temperature sensor with matches or a lighter and monitor the thermal relay. In the event that heating caused the thermal relay to open, the device is in good order. Otherwise, it will need to be replaced.
Other boiler malfunctions
In cases where the heating element and the thermostat are working properly, but the water is not heated, the possible reason lies in the boiler settings. If this does not help, the control board may be faulty. In this situation, you must contact the service center.
If a breakdown of one or another part is detected, it is necessary to replace it with exactly the same one, corresponding to all its characteristics (not only in appearance). The disassembly of the drive for maintenance should be done very carefully and gradually.In the event that the flasks of the device are broken, it will most likely be necessary to completely change the thermostat.
In situations where you are not confident in your ability to check or replace a particular part, it is better to contact a specialized service so that there is no need to purchase a new drive.
This is interesting: Installing a geyser in an apartment with your own hands: how to do everything right
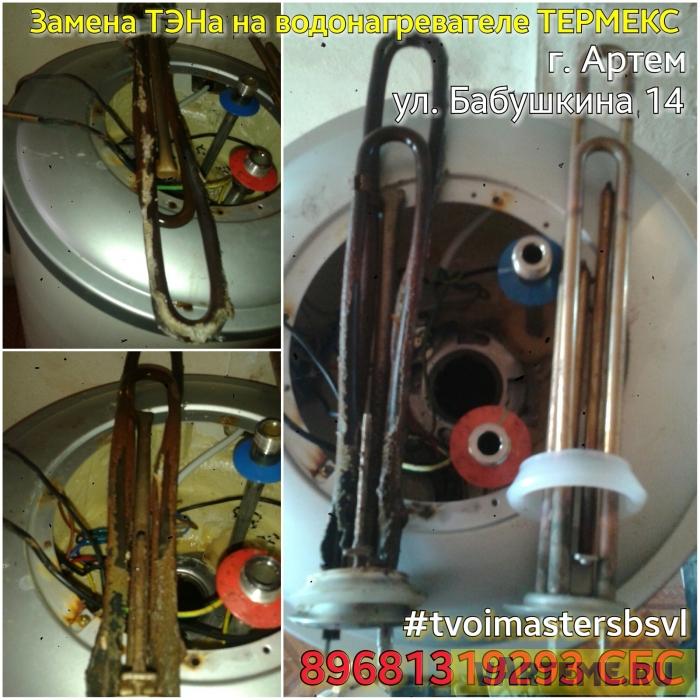
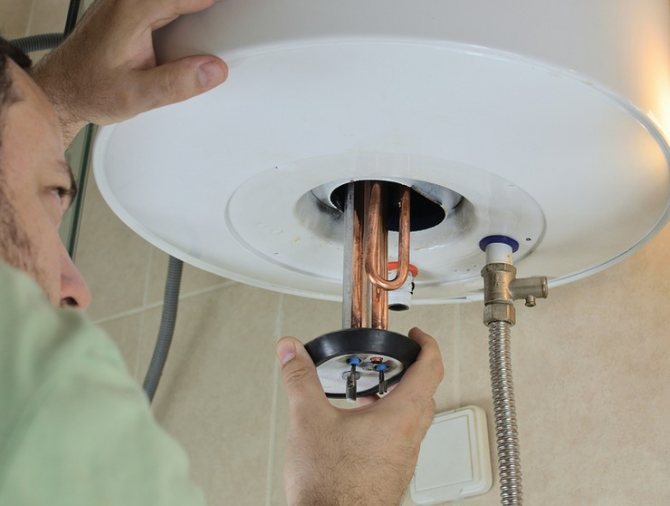
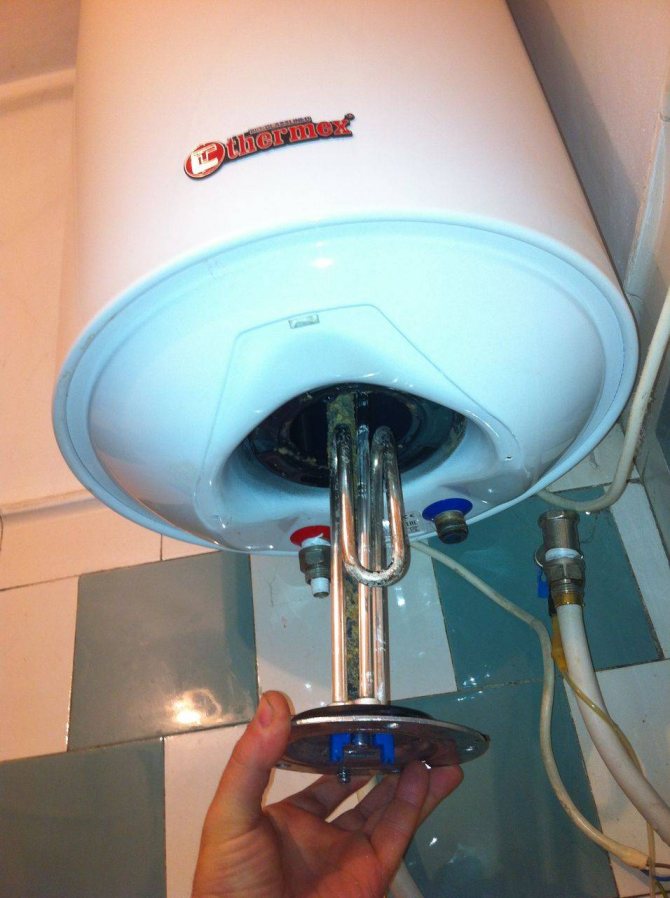
Replacing the heating element in the Termex water heater
Despite the shortcomings, these devices of the Russian manufacturer are popular due to their affordable cost. Here is a sequence of actions when replacing a heating element in a Thermex water heater.


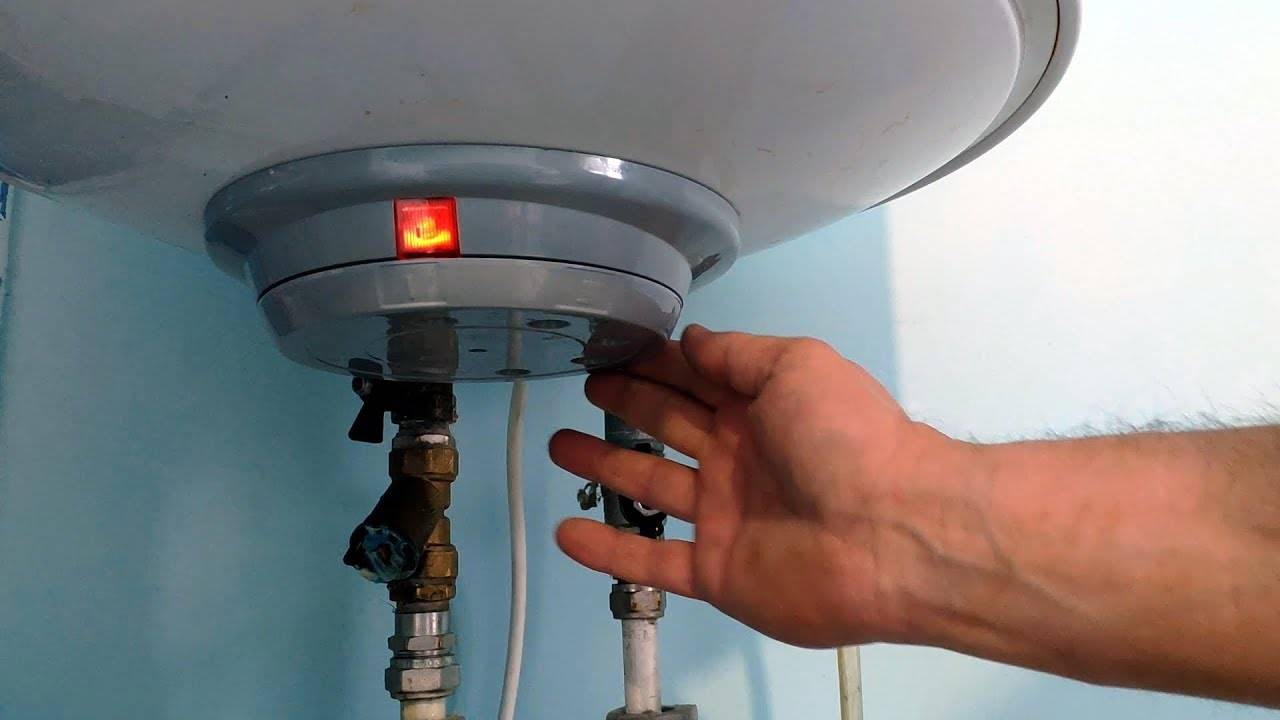
Disconnect the equipment from the power source.
Drain the water from the storage tank.
When dismantling is required, remove the boiler from the wall. If the model allows, replacement can be made without dismantling it.
Turn the dismantled boiler upside down.
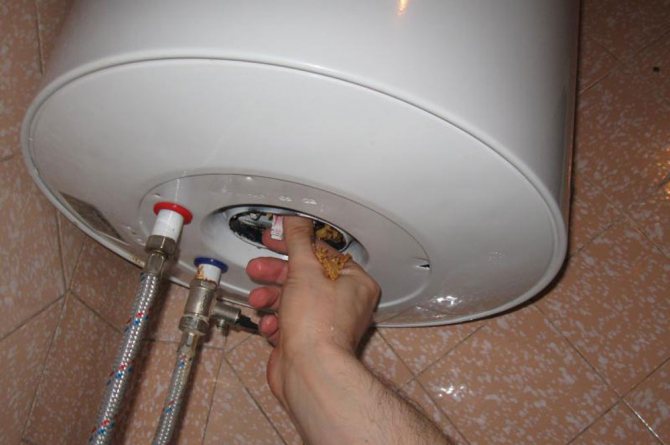
Remove the outer cover of the water heater
You should pay attention to the sticker that closes the screw (typical for Thermex).
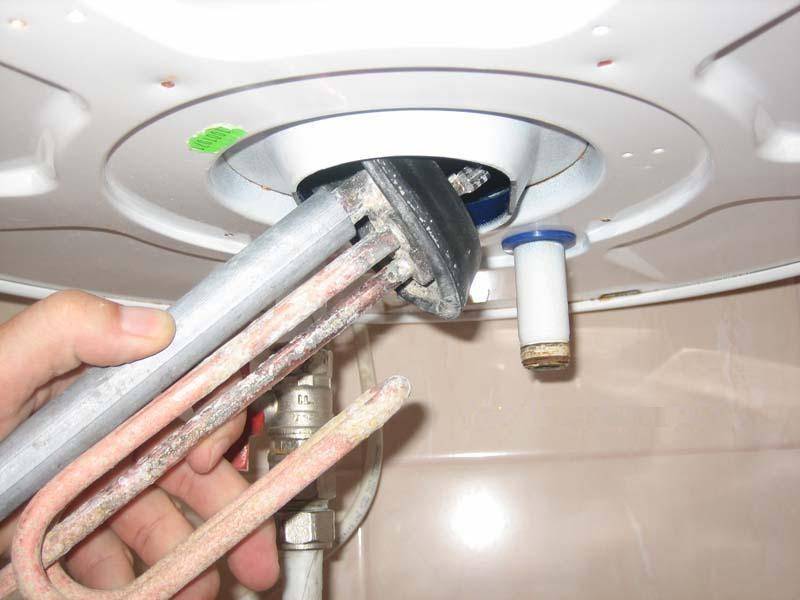
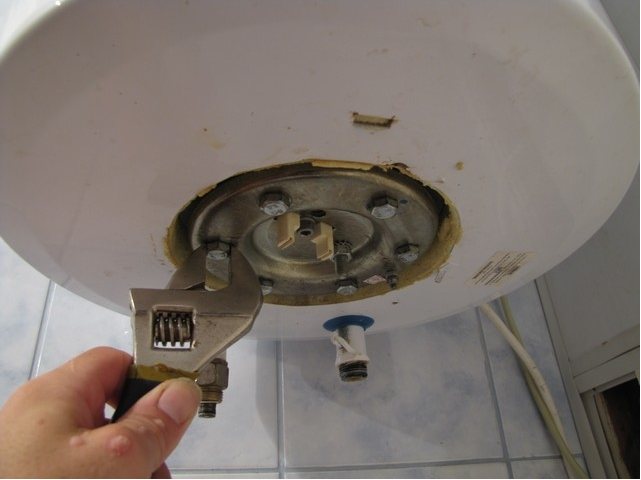
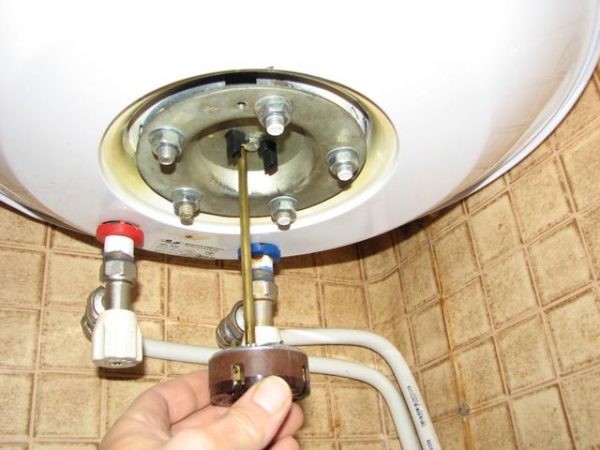
Unscrew the fasteners of the flange on which the electric heater is held.
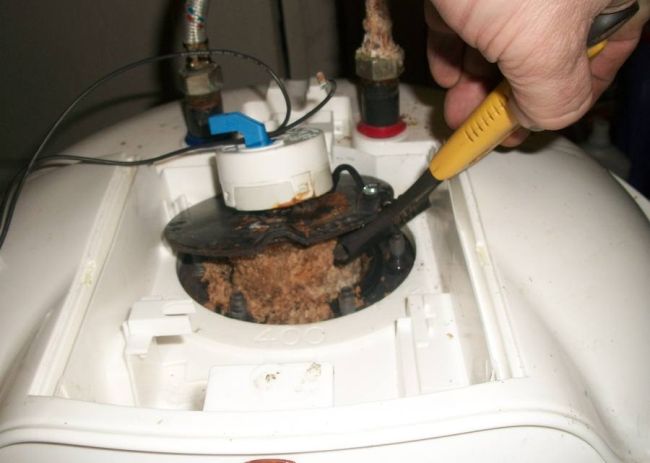
Remove the heating element. It should be remembered that water, scale remains inside the tank, which can leak onto the floor
Provide a container in advance into which the rusty sediment will drain.
If possible, clean the internal cavity of the water heater from the remnants of scale, plaque. With Thermex devices, it looks like a collection of water inside the tank and its subsequent discharge. Repeat until liquid becomes clear.
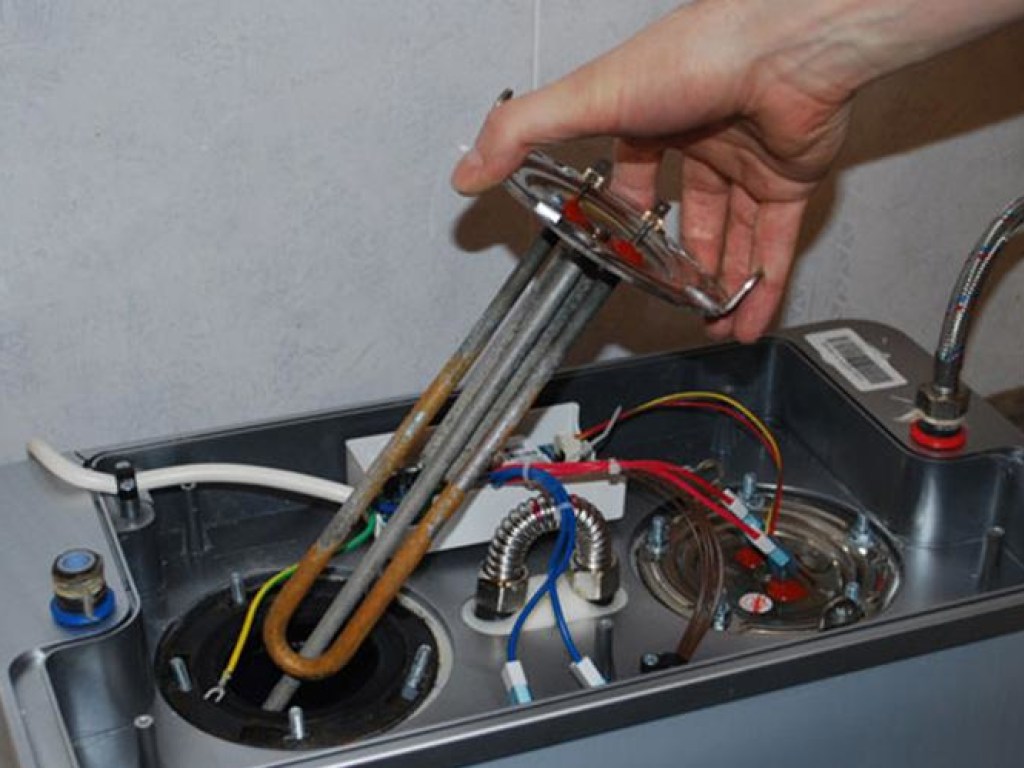
Carefully install a new electric heater that is suitable in terms of power for this water heater.
If necessary, replace the used anode with a new one.
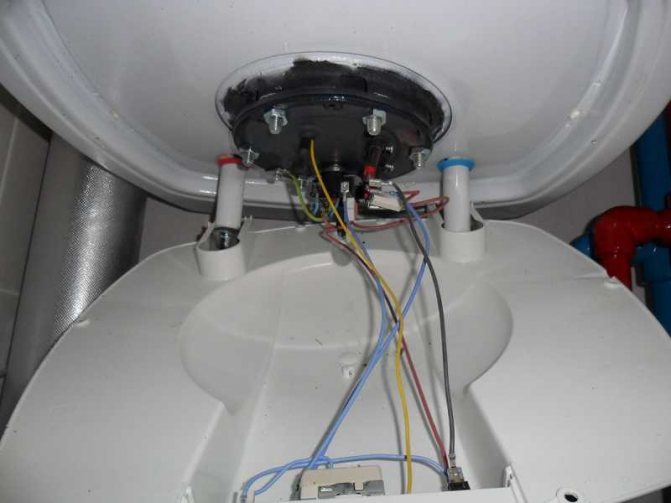
Mount the thermostat in its original place, making sure that the wires are connected correctly.
Install the boiler cover, tighten the screw.
Connect the device to the water supply, electricity. Do not put an empty boiler into operation.
It is necessary to fill the capacitive tank, let it stand for several hours to detect leaks.
If there is a leak, fix it.
If no leak is found, the water heater can be started to heat up.
Checking the health of the heating element
The above method of testing with an ohmmeter is not the only method for determining a breakdown. There are two more options that allow you to identify all kinds of problems and fix them in a timely manner, preventing the complete failure of the device. Let's consider them in more detail.
Visual inspection of the element
In this case, it is necessary to disconnect the equipment from the electrical network and drain the water from it. Then disassemble it and clean the heating element from scale, if it is present on its surface.
It is important to inspect the component for the integrity of the coating
If even small cracks, chips or damage are found, the part can be safely sent to the trash can. After all, in this case, it will not be possible to repair it. The only thing that remains in such a situation is to replace the heating element with a new one.
The reason for damage to the coating of the element most often lies in the low quality of the materials used for its production. As a result, after one or two years of operation, such a heating element is literally torn to shreds and cannot be restored.
Testing with a tester
One of the ways to detect a malfunction of the heating element was given above.But if the ohmmeter did not give results, and nothing could be found during the visual inspection, then the last check is to look for a breakdown.
To do this, disconnect one of the terminals of the measuring device and run it along the surface of the water heating element. If the ohmmeter showed the exact resistance value, then there is a problem and the heating element must be sent to the scrap.
It is best to check the boiler with a digital multimeter or tester. In this case, you can determine as accurately as possible whether there is a malfunction or not.
If everything is in order with the heating element, then you should proceed to check the thermostat. To do this, it is necessary to connect the terminals of the measuring device to the contacts of the temperature sensor, which are used to supply electric current.
If the measuring device showed an accurate value or made a call, then the component is fully functional. Otherwise, the thermostat is broken and needs to be replaced. And for this you don’t even have to drain the water from the boiler.
To restore functionality, disconnect the device from electricity, remove the panel, disconnect all wires from the thermostat and connect a new part. Remember that if you do not solve such a problem, then there is a risk of getting an electric shock if you touch the tank.
What tasks do heating elements perform
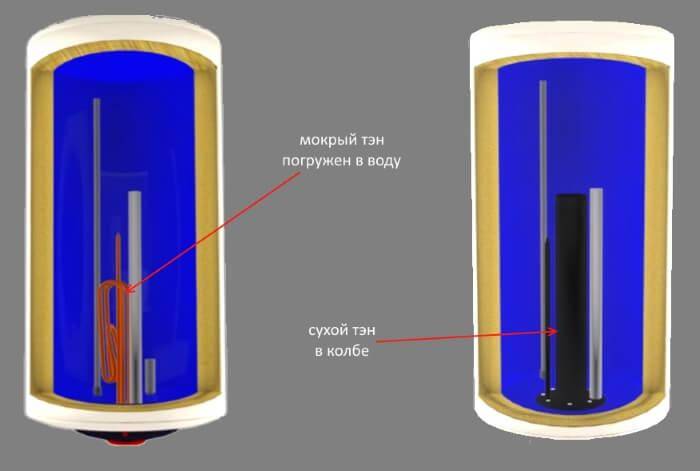
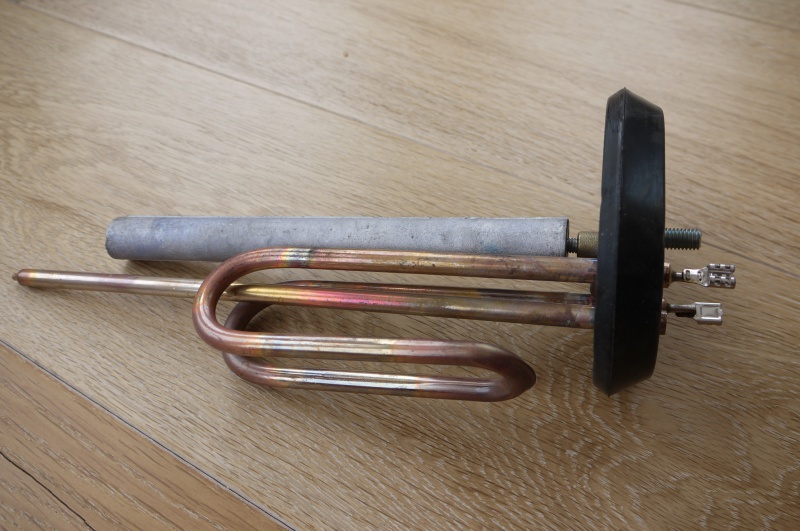
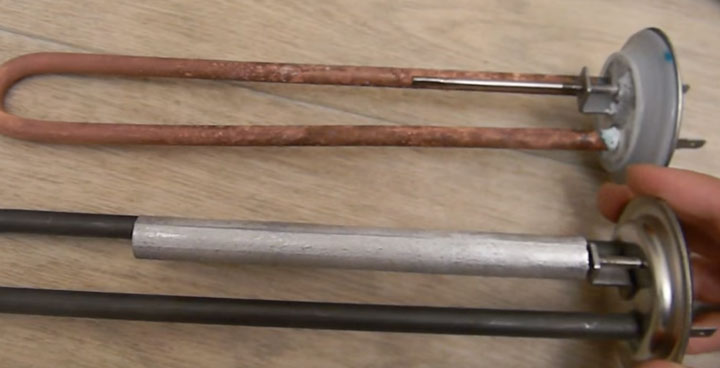
Water heaters with "dry" and "wet" heating elements
The heating element for the Ariston water heater can be “dry” or “wet” and they differ from each other in the principle of their location. "Dry" products are in demand, as they are placed in a protective casing, due to which contact with water is excluded.
Such heating elements have their own characteristics:
- longer service life;
- longer water heating;
- higher cost.
Since "dry" heating elements are at the stage of development, there are several variations of them.
- The simplest and most common option is when the heating element is placed in a flask. Such a product has a minimum cost and does not cause difficulties when replacing.
- There is a mechanism whose flask is filled with quartz sand. This option is easier to replace.
- There are also products where the flask and the heater have a layer of oil between them. Since oil has a higher thermal conductivity than air, this product achieves maximum energy savings.
There is also a heating element for ariston "wet" type.
The exposed element is in contact with liquid in the storage tank. Inside the tubes of the heating mechanism is quartz sand or magnesium oxide. These substances conduct heat efficiently.
Open-type heating elements are classified according to the following technical characteristics:
- Is there an anode socket. A heating element with a nut may not be equipped with an anode mount or have it as an additional one - a clamp on the flange.
- What is the mounting method. The fastening of the element can be flanged and nut. Flange heaters are manufactured using casting or stamping technology.
- The shape of the heating element depends on the type of storage tank. It can be straight or curved in any direction.
For the manufacture of a "wet" device, stainless steel and copper are usually used.
Boiler malfunction
If the magnesium anode is replaced periodically (on average - once a year), then the electric heater is replaced with a new one only as such a need arises. This means that when the water heater stops working, the reason for this may be a malfunction of the heating element. The most frequent situations:
- The water does not heat up when the power indicator is on.
- The boiler automatically turns off when you try to start work.
Before replacing the heater, other options are excluded. After removing the equipment cover with a multimeter, the thermostat is checked for operability. If everything is in order with him, the heating element is checked. The multimeter determines the internal resistance of the heating coil of this element. The value does not correspond to the desired one - the faulty heater must be replaced. Also, replacement is required when a breakdown in the insulation is detected.
Installing a new heating element is easy if you follow the instructions below. They are universal, suitable for working with many models of boilers from different manufacturers. Let's consider the most common differences using the example of popular equipment modifications.
Step-by-step instructions for replacing the heating element
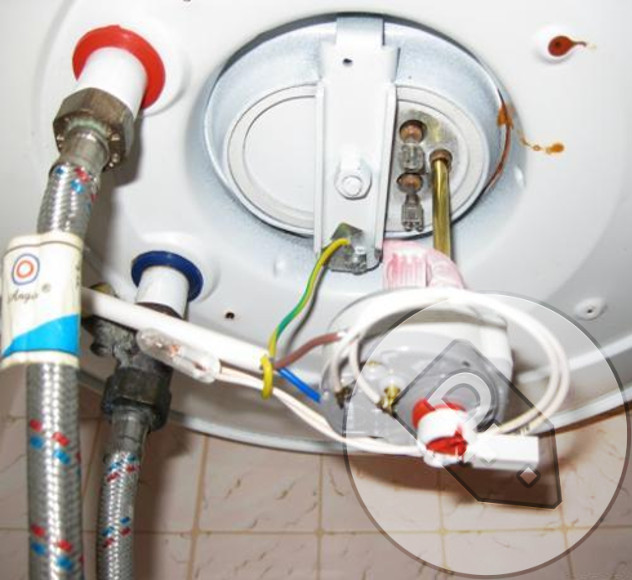
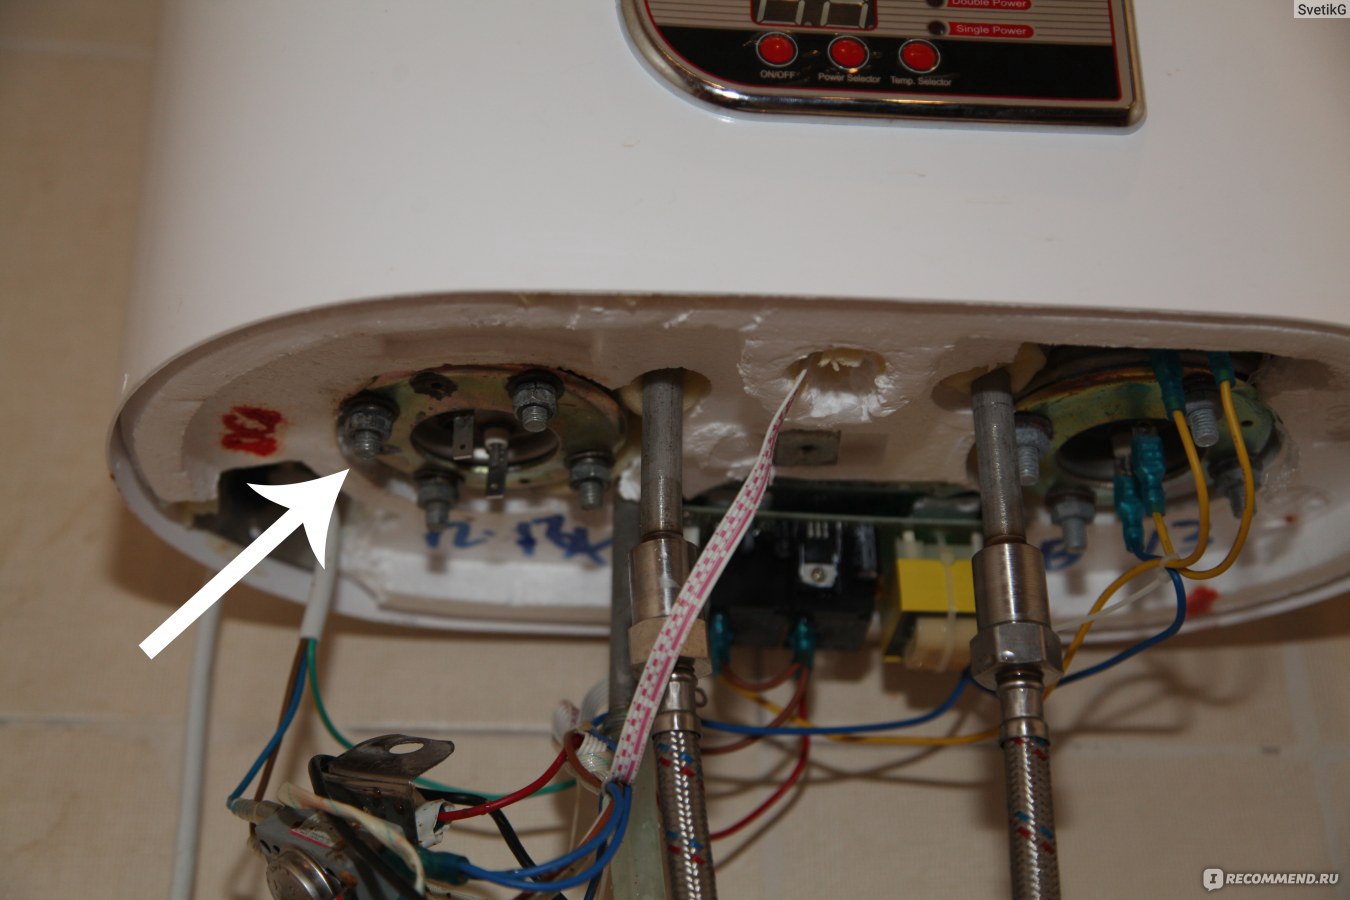
The disassembly sequence may differ depending on the type of heating element mounting inside the tank. On Ariston boilers, 3 types of element fixation are used: on a nut, on a bar or on a flange with screws or studs in a circle.
Before proceeding with disassembly, you must perform the following steps:
- Disconnect the appliance from the mains.
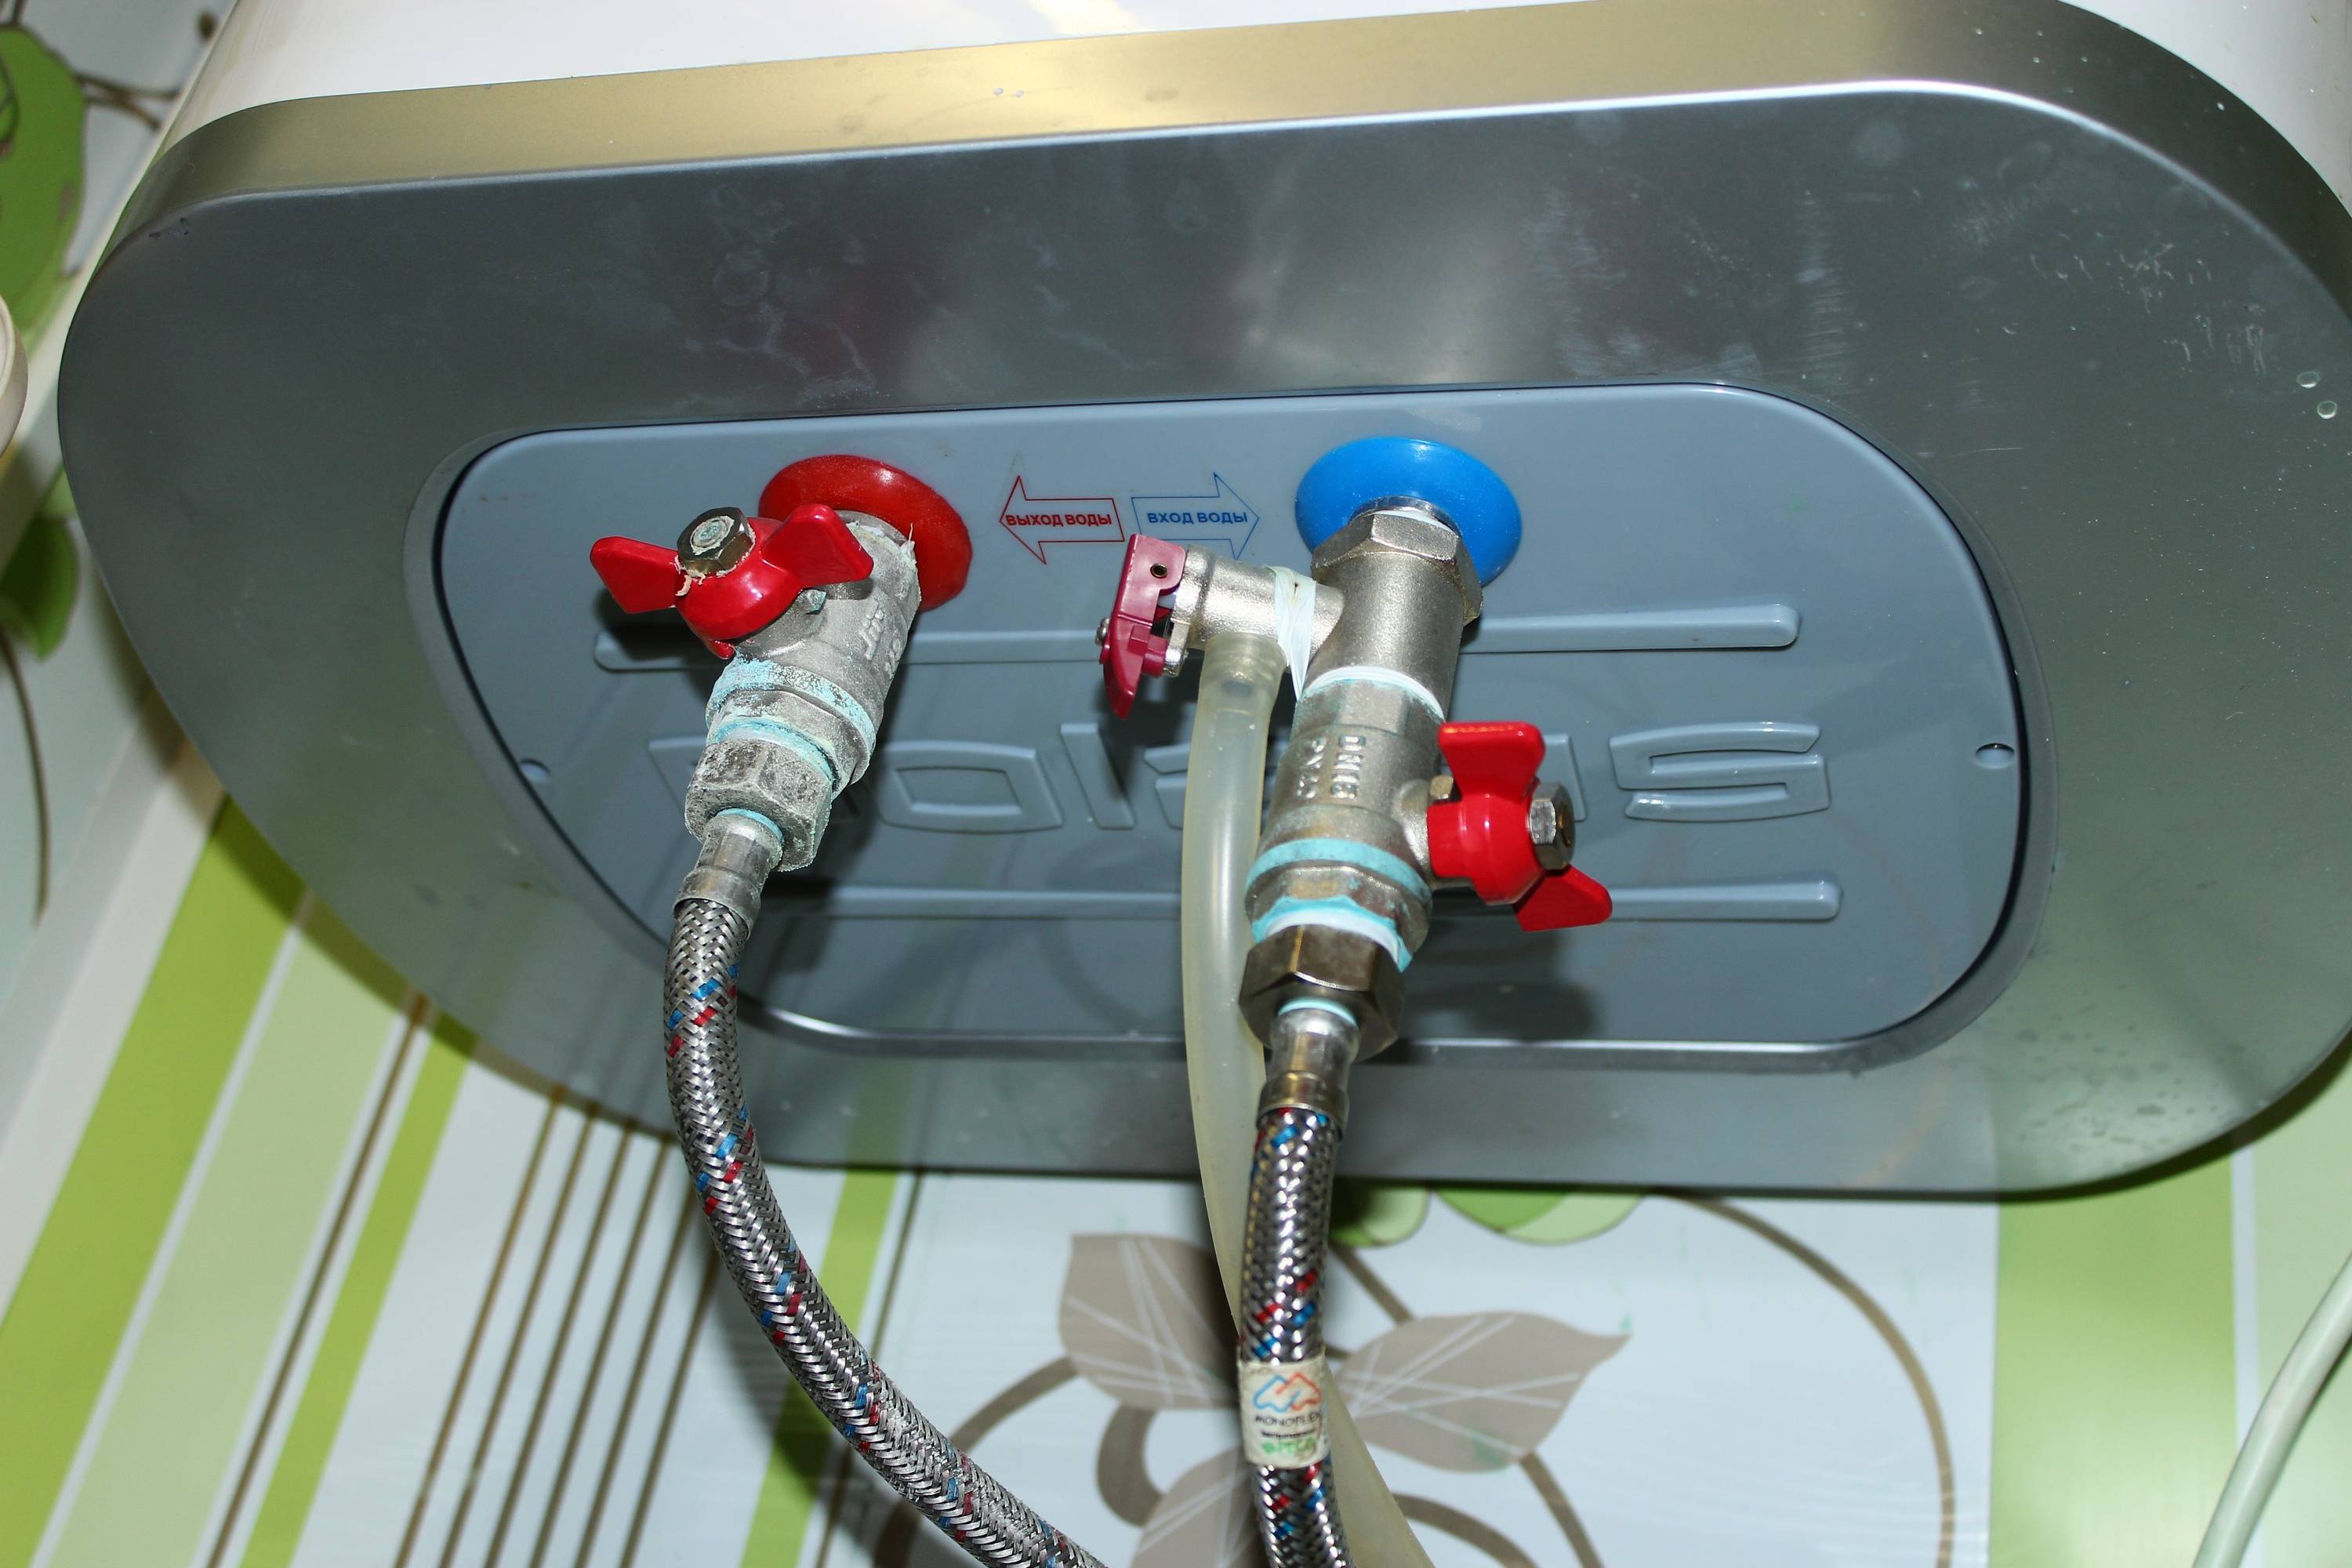
- Turn the stopcock valve, stopping the water supply to the tank. Disconnect hoses from valves. Open check valve. Drain the water from the tank through a hose or your own drain system.
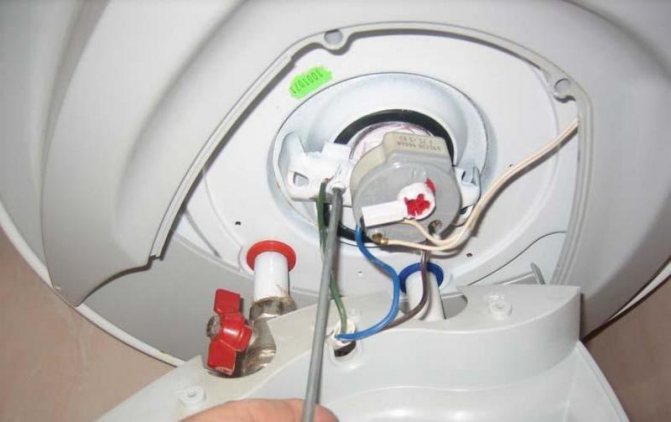
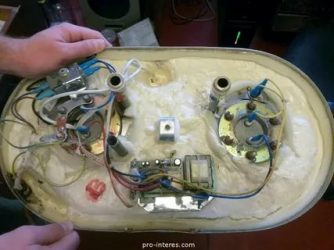
- Remove the protective cover from the boiler control system, which is located under the tank.
- Check the presence of current at the thermostat contacts. Take a picture or draw the order of connecting the wires to the terminals, and then dismantle the contacts and set aside the control unit.
With fixing nut 55
In older models of the Ariston boiler, the heating element, the active electrode and the thermostat are mounted on a 55 mm nut.
After dismantling the control unit, you need to:
Substitute a wide basin under the tank, since the water from the tank could not have completely left
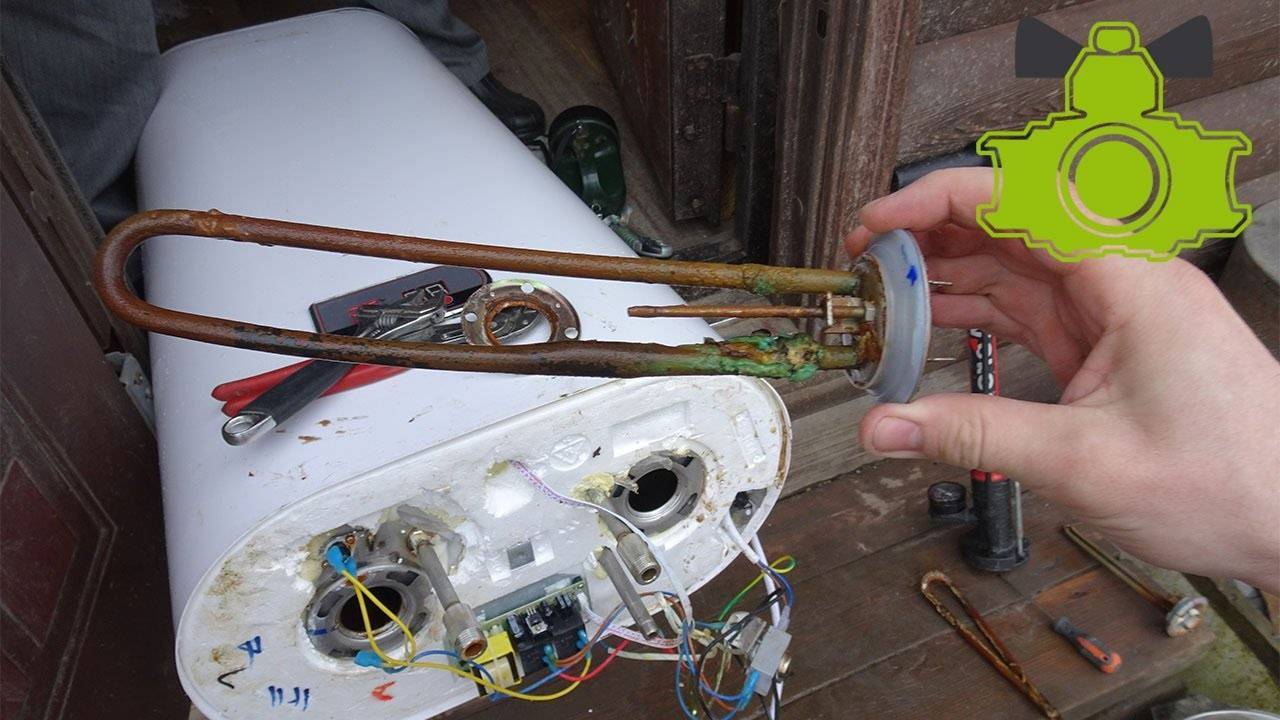
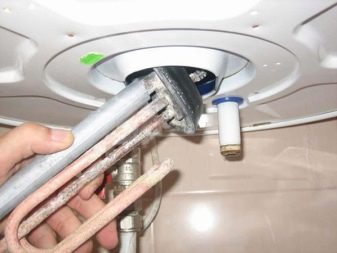
Tighten the nut with a hub wrench or adjustable wrench, carefully turn it counterclockwise. Get the heating element
If it is difficult to remove due to a thick layer of scale, gently knock off some of the deposits from it with a thin but not sharp tool. Inspect the surface of the heating element and the magnesium anode. With complete destruction, only a threaded rod remains in place of the “sacrificial” element. Unscrew the heater mount. Test the filament with an ohmmeter or multimeter. If the resistance is below rated, buy a new part. Rinse the heating element and immerse in an acidic solution for several hours. To prepare the product, you can use 50-60 g of dry citric acid or 100 ml of table vinegar per 2 liters of hot water.
After cleaning and replacing the necessary elements, you need to assemble the device in the reverse order.

In older models of Ariston water heaters, the heating element is fastened with a 55 mm nut.
With mounting strap
In modern designs, instead of a large nut, a clamping bar or flange is used. Disassembly of the tank with a nut can be carried out in an inverted position after removing the boiler, fasteners with a bar can be dismantled only from below.
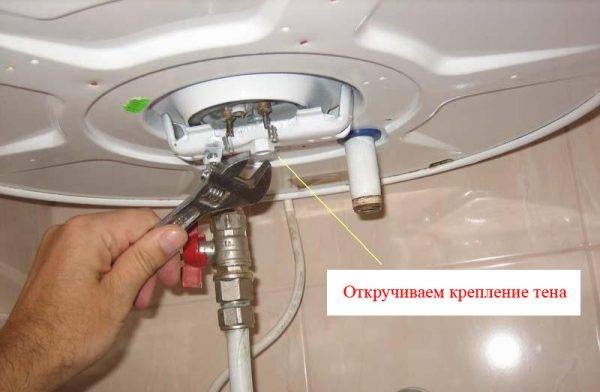
The nut, which secures the flange with the anode and the heating element, is fixed on the transverse bar. The fastener is unscrewed with a ratchet or end tool. After that, the bar is removed and the flange with the heating tube is removed. To speed up the process, you need to swing it and turn it a little.
With flange and round fittings
In new boiler models, the heater flange can be fixed at 4-6 points in a circle. Depending on the instrument configuration, the fixing nuts can be screwed onto bolts or studs.
As in the case of the bar, a socket or ratchet wrench is suitable for dismantling the flange. Having unscrewed the nuts, you need to carefully pull the flat part with the anode and heater fixed on it towards you.
"Dry" heating element
Dry heating element has an additional protective flask that protects the tube from corrosion. Fasteners on the bar or flange are located in the same way as with an open type of heater.
In most cases, the reason for the failure of a dry heating element is scale, which is deposited on the flask.
Mounting and connection methods
"Dry" heating element
Ten is a device that requires regular maintenance. After a while, it needs to be cleaned or replaced, depending on the efficiency and completeness of the work.
To clean the heater yourself, you need to follow the instructions:
- Turn off the electric water heater.
- Disconnect the electric heater from the mains.
- Open the protective panel by unscrewing the screws.
- Under the panel where the thermostat and colored wires are located, disconnect the cables.
- Shut off the water supply to the water supply and boiler.
- Pull out the thermostat together with the heating element, if necessary, removing the flange. At the same time, substitute a container to the opening in case there is water in the tank. Unscrew the heating element using an adjustable wrench.
- Dissolve two packets of citric acid in two liters of water.
- Immerse the heater in the resulting solution and leave for at least 12 hours. After a while, the heating element is ready for installation.
- Install in reverse order.
To check the correct installation of the heating element, you will need to turn on the water.If fluid leaks from the tank, the device is connected incorrectly.
There are three main ways to connect a heating element for an Ariston water heater. Serial - the power of the heater depends on the total power of each element. The disadvantage is that if one heating element breaks down, the efficiency of the entire heating system is lost.
Parallel - allows you to maintain the unit's performance in the event of failure of one of the heating elements. Combined - usually used if there are no heating elements of the required power.