
- Installation instructions
- Description of the connection process
- How to change the outlet: basic rules for working with electricity
- Installing a new outlet
- Removing the old outlet
- Installation instructions
- Installing a new outlet
- Securing wires
- Installing an outlet in a socket
- Working with drywall
- Installing a new outlet
- We carry out the dismantling of the electrical outlet for replacement
- Safety rules: how to remove the switch
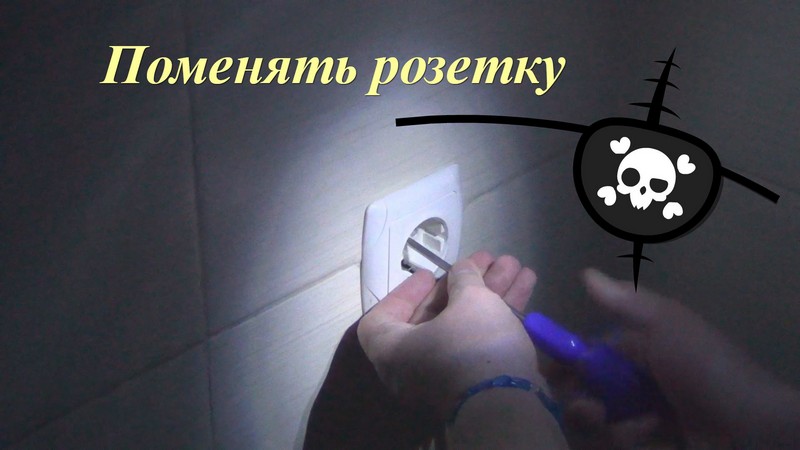
- How to change a power outlet?
- List of tools that may be needed to replace the outlet
- Recommendations and safety precautions
- Conclusions and useful video on the topic
Installation instructions
 device
Euro socket installation:
- We remove the insulation. We measure the depth of the hole intended for the cable. If the size does not match, you need to clean the protective layer of rubber. The bare cable should protrude quite a bit from the hole;
- Using the clamping screw, insert the first wire. The fixation must be very secure. If this is not the case, the outlet will stop working pretty quickly. To do this, the cable must be gently pulled, it should not move from side to side;
- We repeat the same procedure with the second wire. We must not forget about accuracy when exposing wires.
- In case equipment with grounding was purchased, a special cable is required. It is not available in all homes.In new houses or apartments after repair, such a cable is usually present. The cable is inserted into the upper opening of the mechanism. If the house is old and there is no ground wire, then this step is not required. It should be noted that equipment without a ground wire will not be able to supply electricity to all types of plugs. Therefore, it is worth thinking about its implementation;
- The main network connection is complete. Next, you should install the mechanism in the hole in the wall and fix it with the help of quick paws. A protective plastic panel is installed outside.

Installation requiring a new socket box:
- A new box is required when it is not possible to fix the paws on the old socket. It was mentioned above that during dismantling, it is checked whether the new box fits into the old recess. Therefore, during the installation phase, the new structure must ideally fit into the wall. To hold the socket firmly, you need to fill it with a special solution, such as glue.
- The fixation of the new mechanism depends on the design. These will be quick paws or screws that are screwed to the box itself.
- We strip the wires. This is done as in the first option.
- We connect the cables to the common mechanism. The protective frame is not removed, but also remains attached to the equipment.
- We fasten the screws on the top and sides. We install the outer plastic panel and frame. Installation completed.
Description of the connection process
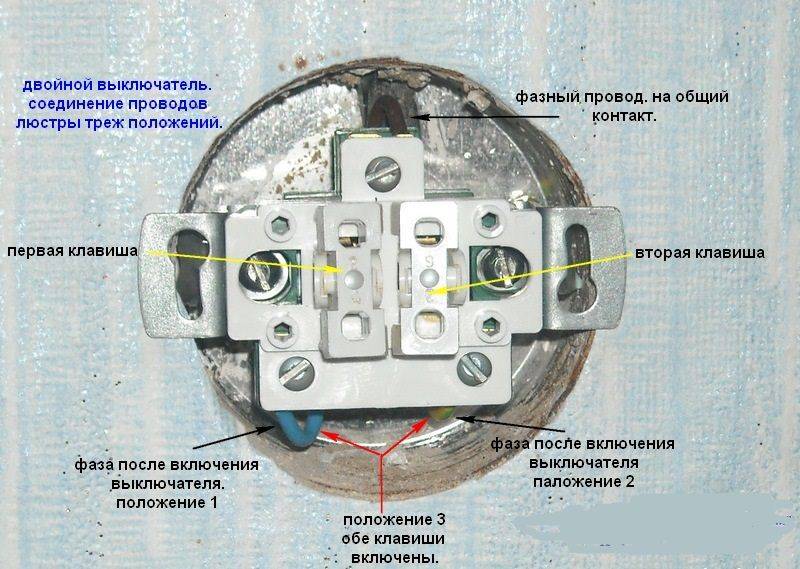
Now let's look at how to properly connect a light switch from scratch. The wiring diagram for a single-gang switch is simple. In order for the lamp to light up, two wires are connected to it - phase and zero.In order for the light to be turned off, you need to cut one of the wires and connect a switching device to this gap.
When replacing lamps, you can touch the live part of the socket and get an electric shock. To avoid this, the switch must be installed in the break of the phase wire.
Regardless of the installation method, in practice it looks like this.
- The main cable is laid, which goes from the power source to the lamp. It is located on the wall at a distance of 150 mm from the ceiling.
- The wire from the switch is drawn vertically upwards.
- At the intersection of the supply wire and the wire coming from the switch, a junction box is installed in which all the necessary wire connections are made.
Now you can start assembling the circuit. We will make the wiring with a two-core cable. For the convenience of performing this operation, the length of the wires coming out of the box is made such that their ends come out of it by 20 centimeters, the wires that will connect the rest of the circuit are made of the same length. The ends of the wires are stripped of insulation. Connections are made in the following order:
- Separate the ends of the wire coming from the network so that they do not touch each other. Apply voltage to this wire and use an indicator screwdriver to determine where the phase is. Be sure to put a label so as not to confuse it with others in the future.
- We turn off the power.
- Connect the neutral wire of the power cable to one of the wires going to the lamp.
- Connect the phase wire of the supply cable to any of the two wires coming from the switch.
- We connect the two remaining wires (wire from the switch and from the lamp).
- We randomly connect the wires to the switch.
- We connect the wires to the lamp holder. It is desirable that the wire coming from the switch is connected to the central contact of the cartridge.
- We supply power and check the operation of the circuit. If everything is in order, carefully lay the ends and close the junction box.
- Install the switch in the mounting box.
How to change the outlet: basic rules for working with electricity
The most basic rule of working with electrical equipment is that you cannot work when current is flowing through the wires. To put it mildly, this is fraught with trouble - an electric shock not only causes discomfort, but also kills a person to death. It is for this reason that you need to be very, very careful with electricity - you should not rely on luck here.
This is done very simply - near the meter in the house or apartment there is a main switch (paired circuit breaker). By changing its position, you can de-energize the entire house or apartment - so you will surely protect yourself from electric shock. Alternatively, if the wiring in the house is modern, you can de-energize any separate room or group of outlets, which is best.
How to replace a photo socket
What else do you need to know about safe electrical wiring?
- First of all, this is the fact that a pair of wires going out in a box under an outlet should not, under any circumstances, bridge with each other - this is a short circuit, as a result of which either the machine knocks out or the wiring burns.
- The second point is the marking of the wire.If the wiring is assembled correctly, then its black wire (optionally brown) is zero, blue or red is phase, and yellow or green (optionally yellow-green) is ground. By the way, grounding is the safest wire that is not able to shock by itself. Another thing is the phase; even by itself, it can be shocked - wet feet or hands contribute to this in the best possible way.
- Contact reliability. A weak and poor-quality connection of the wires leads to their heating and, as a result, burnout - if you tighten the screw in the socket weakly, then the socket will be replaced again in the near future.
It should also be understood that all wires connected to the outlet should have contact only in the right place - not a single wire should touch the outlet body.
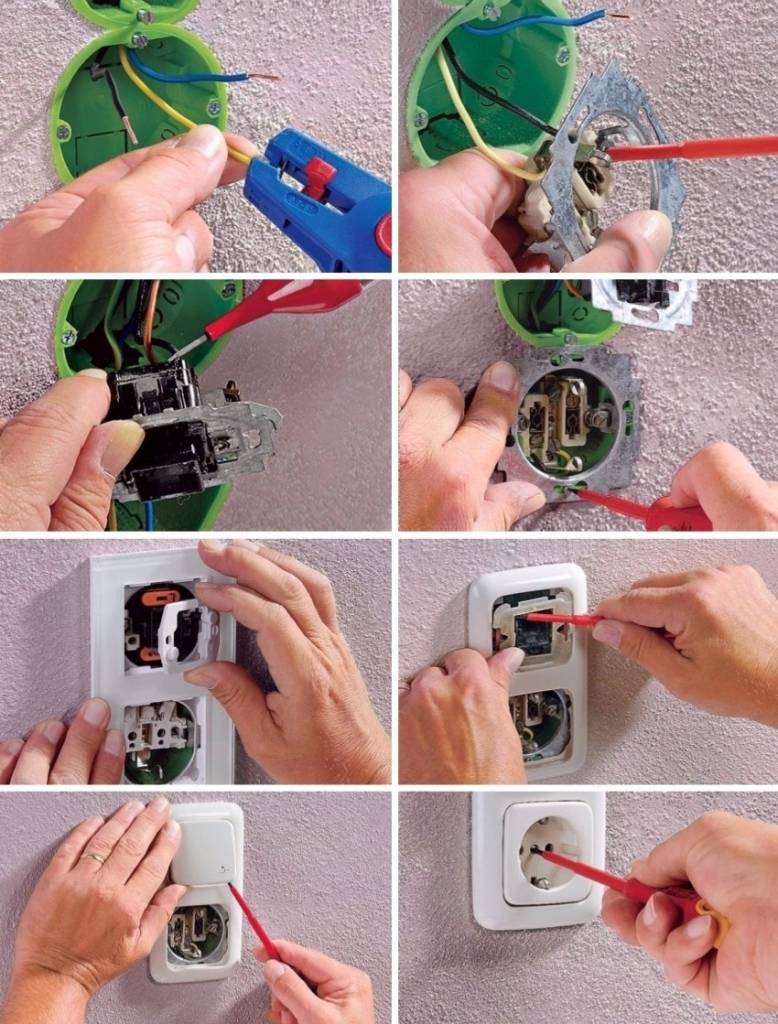
Installing a new outlet
The ends of the wires are inspected for breaks, cleaned and fastened in the contacts in a regular way. The phase conductor must be connected to the right contact.
The cable slack is compactly placed in the mounting box, after which the dielectric base is inserted and fixed there, centering the product in the socket by alternately rotating the screws of the spacer legs.

After installing the base of the socket, turn on the corresponding machine and check the presence of power and phasing on the plug connectors with a tester. If there are no complaints, the line is de-energized again, the front panel is installed on the dielectric base, and the machine is turned on completely.


If there is no voltage at the connectors, the line is turned off, and measures are taken to diagnose possible malfunctions - a defect in a new outlet, a break in the wiring section, etc.
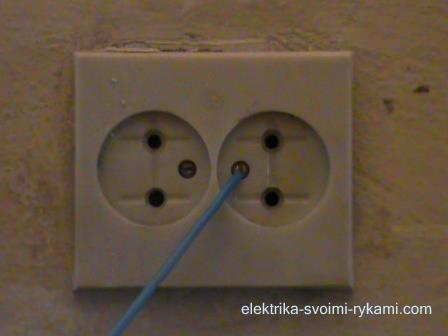
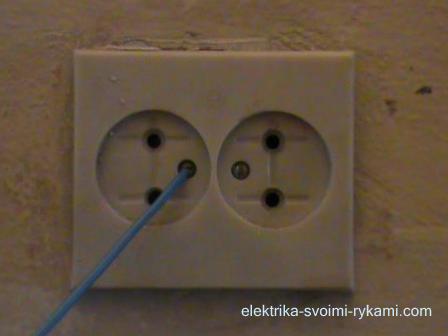
Outdoor sockets do not have a socket box built into the wall, so replacing them is much easier:
- the line is de-energized;
- the front panel is removed;
- contacts are given and wires are released;
- the overhead socket box is dismantled from the wall.
The installation of an external outlet is carried out in the reverse order, while there is room for maneuver - the overhead socket box may differ in size, and it can be moved slightly in any direction.
Replacing a socket on a wooden or plasterboard base is carried out according to the same algorithm, but when dismantling, it is necessary to fix the nuances associated with the material of the walls - the features of the fittings, the methods of its layout and fastening. For example, with hidden wiring in a wooden house, only metal sockets should be used. It will not be superfluous to consult a professional on whether the old outlet was installed correctly, and whether something needs to be changed when installing a new one.
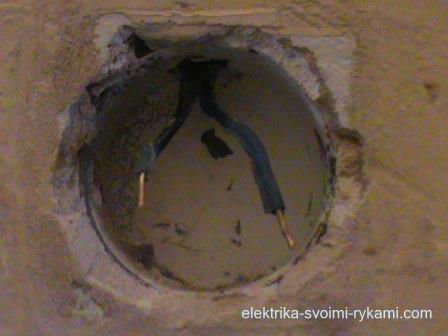
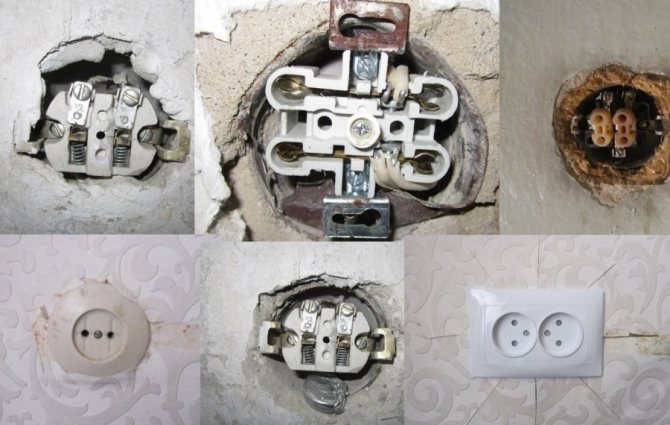
Removing the old outlet
Before starting work, we need to turn off the power supply.
Now, we can move on to dismantling the old outlet.
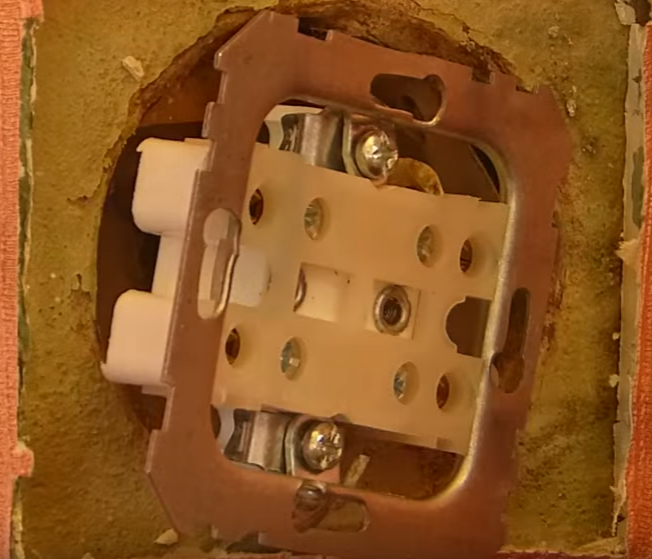
Unscrew the protective cover of the outlet. It is attached to the mechanism with a screw connection, in our case there are two screws.
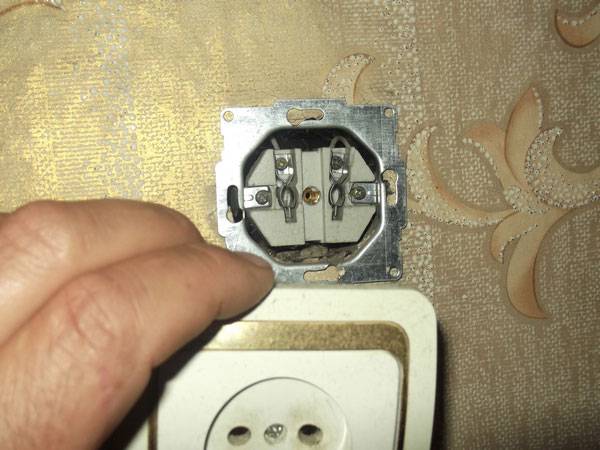
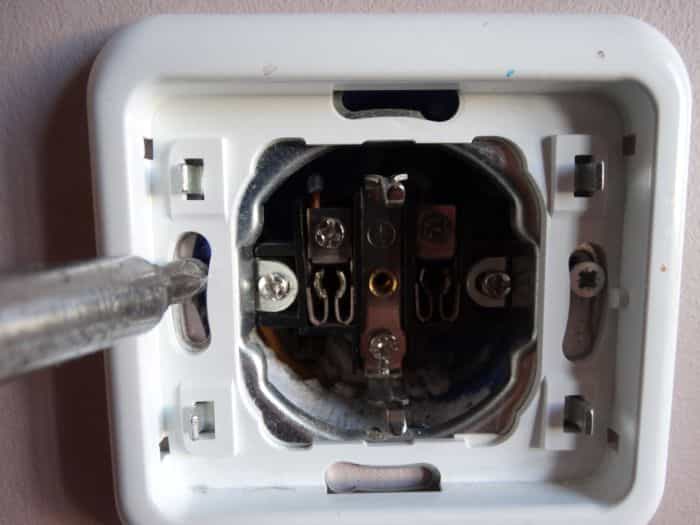
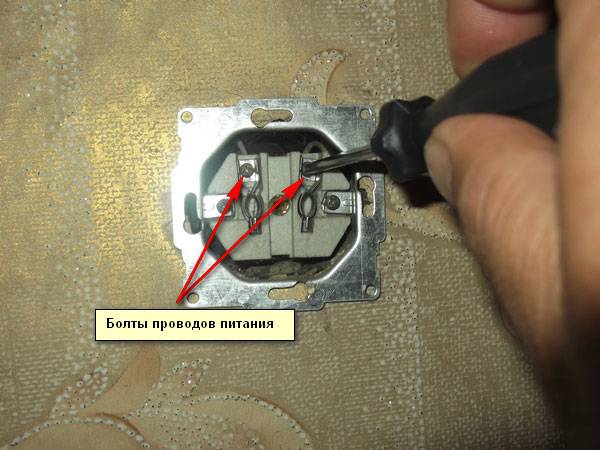
Before us is the socket mechanism.

On the left and right are two screws that drive the spreader tabs. With their help, the socket mechanism is fixed in the socket.
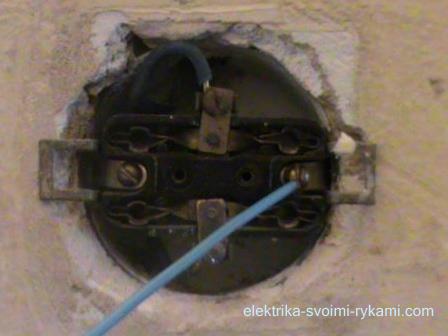
At the top and bottom of the mechanism there are two contact screws, with the help of which the wires are connected and on which the voltage is actually located.

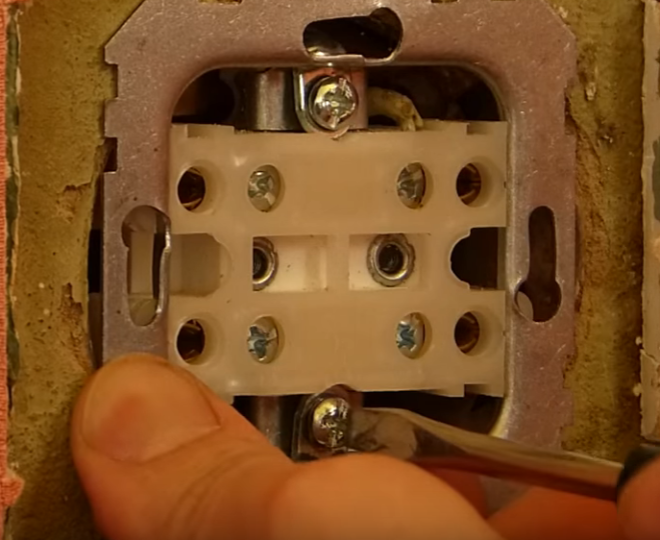
Before removing the mechanism from the socket and disconnecting the wires, it is necessary, using a voltage indicator, to make sure that there is no voltage, which we turned off in advance, on the current-carrying parts of the mechanism.
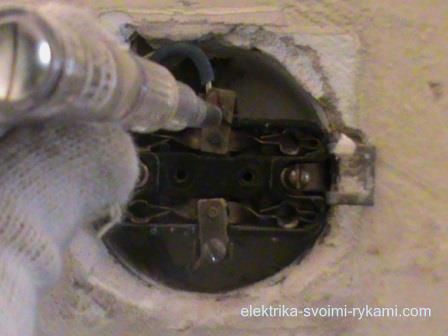
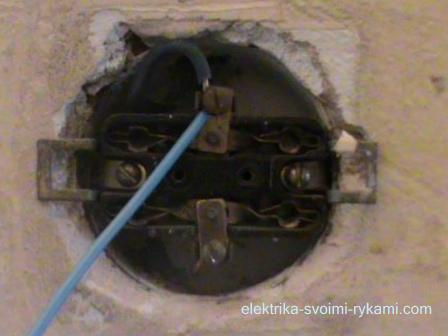
Now, unscrew the screws of the spacer legs and remove the mechanism out.
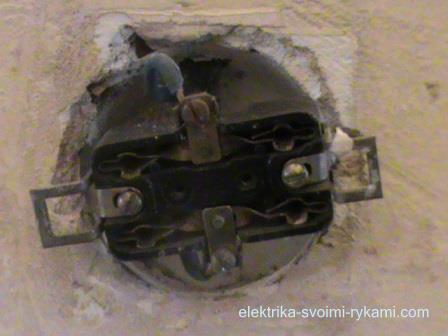
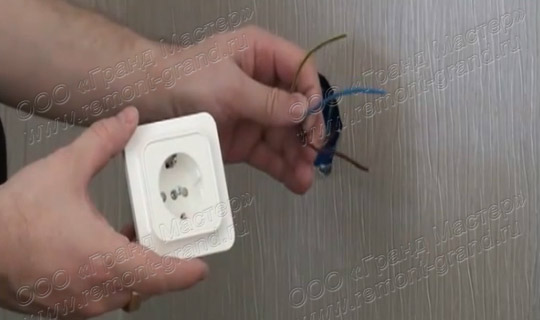
Disconnect the wires by unscrewing the contact screws. If the wires were fastened with screws and rings, straighten them. The old outlet has been removed.


Installation instructions
device
Euro socket installation:
- We remove the insulation. We measure the depth of the hole intended for the cable. If the size does not match, you need to clean the protective layer of rubber. The bare cable should protrude quite a bit from the hole;
- Using the clamping screw, insert the first wire. The fixation must be very secure. If this is not the case, the outlet will stop working pretty quickly. To do this, the cable must be gently pulled, it should not move from side to side;
- We repeat the same procedure with the second wire. We must not forget about accuracy when exposing wires.
- In case equipment with grounding was purchased, a special cable is required. It is not available in all homes. In new houses or apartments after repair, such a cable is usually present. The cable is inserted into the upper opening of the mechanism. If the house is old and there is no ground wire, then this step is not required. It should be noted that equipment without a ground wire will not be able to supply electricity to all types of plugs. Therefore, it is worth thinking about its implementation;
- The main network connection is complete. Next, you should install the mechanism in the hole in the wall and fix it with the help of quick paws. A protective plastic panel is installed outside.

Installation requiring a new socket box:
- A new box is required when it is not possible to fix the paws on the old socket. It was mentioned above that during dismantling, it is checked whether the new box fits into the old recess. Therefore, during the installation phase, the new structure must ideally fit into the wall. To hold the socket firmly, you need to fill it with a special solution, such as glue.
- The fixation of the new mechanism depends on the design. These will be quick paws or screws that are screwed to the box itself.
- We strip the wires. This is done as in the first option.
- We connect the cables to the common mechanism. The protective frame is not removed, but also remains attached to the equipment.
- We fasten the screws on the top and sides. We install the outer plastic panel and frame. Installation completed.
Installing a new outlet
All operations are performed in the reverse order, but with a new outlet
Before installation, you need to pay attention to the wire - if there was poor contact in the old outlet, then the core could heat up during operation - if the insulation has lost its plasticity, then at least you need to remove it, and put on top of the core a cambric, shrink film or wrap it with electrical tape
If the wire is aluminum, then with frequent overheating it becomes brittle and the core itself may break - in this case, it will have to be increased.
When the putty around the socket hardens and everything is in order with the wire, then you can proceed to further installation.
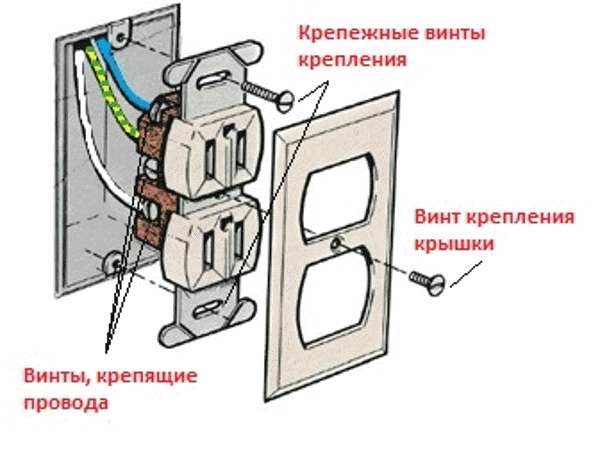
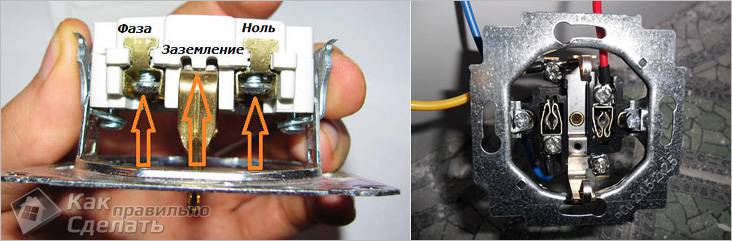
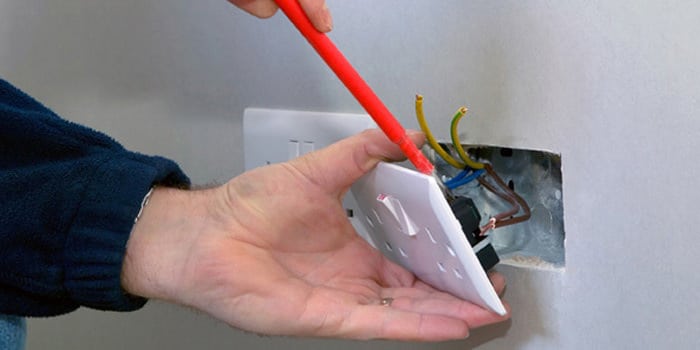
Securing wires
It is considered good manners among electricians to “hang” the phase on the right, and zero on the left terminal of the outlet, if you face it. If you screw the wires the other way around, then nothing will happen. The cores are stripped, inserted into the terminals and tightened into the fasteners. Such stripping of the core is considered correct when its inner wire peeks out of the terminal by no more than 2-3 mm.
Before fixing the wire, check that all terminals are dry and clean. It should be ensured that there is good contact between the bare part of the wire and the socket, and that the bolt is firmly tightened. Otherwise, over time, the contact will begin to overheat and the wire may burn out.
Installing an outlet in a socket
Depending on the type of socket, it will be fastened with spacers, bolted joints or dowels. When it is inserted into the socket, it is necessary to hold the spacer legs, as they stagger freely in a free state and sometimes prevent the socket from fully entering the mounting hole.
To prevent this from happening, they are fixed with a regular clerical rubber band, which will keep them pressed against the socket, but will not interfere with its fixation in the socket.
Additionally, you can fix the socket with bolts, you just need to make sure that the mounting holes match those on the socket.
Dowels are used only if, for some reason, fastening cannot be done in any other way.Not all models have mounting holes for this, so there is a high probability that you will have to search for a suitable one before replacing the outlet. Holes for dowels are drilled obliquely in the wall in different directions.


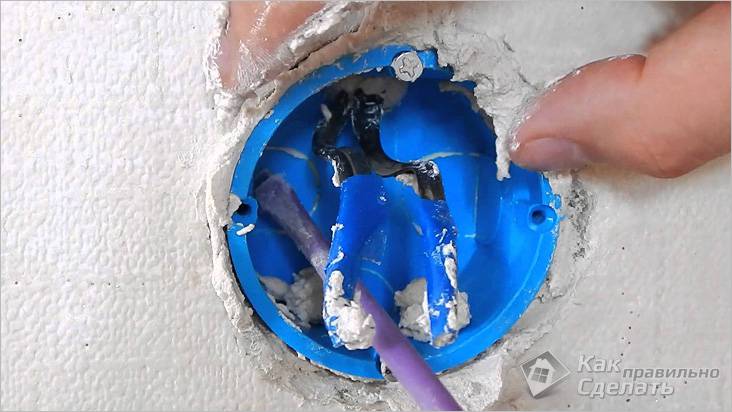
Working with drywall
To install the outlet in drywall, you will need special sockets. They differ from ordinary ones in the grooves in which the screws are located.
We install like this:
- The first step is to run the cable to the places where the sockets will be installed, and bring it out through the cut holes.
- Fasten the socket.
- Separate the front panel and the working mechanism by unscrewing the fixing bolt.
- Connect the cable to the socket contacts. Tighten securely.
- Connect the ground wire to the terminal located in the center.
- Attach the device to the socket.
- Install decorative panel.
Installing a new outlet
 Installing a socket
- Installation of a new outlet begins with the installation of a socket. In size, it should freely enter the hole. If, when installing the socket, it did not completely go into the hole, you need to enlarge the hole to a size that would allow the part to fit in the recess. Deformation of the socket in this case is unacceptable.
- The new part for the outlet must be firmly and securely fixed in the allotted niche. To do this, you need to apply a mixture on a cement-sand or gypsum basis. Gypsum in this case is preferable to use.
- To prepare such a solution, add a little water to the dry mixture and mix the solution. It must be of such a consistency that it can fix the socket in the cell.
- A window is made in the socket on the side from which the wires will enter it.Then the prepared mixture is applied in a certain amount with a narrow spatula into the prepared hole, after which the box is inserted into the prepared niche. Next, the junction of the socket box with the wall surface is leveled with a solution. After that, you need to wait a while until the mixture hardens.
 Wire connection
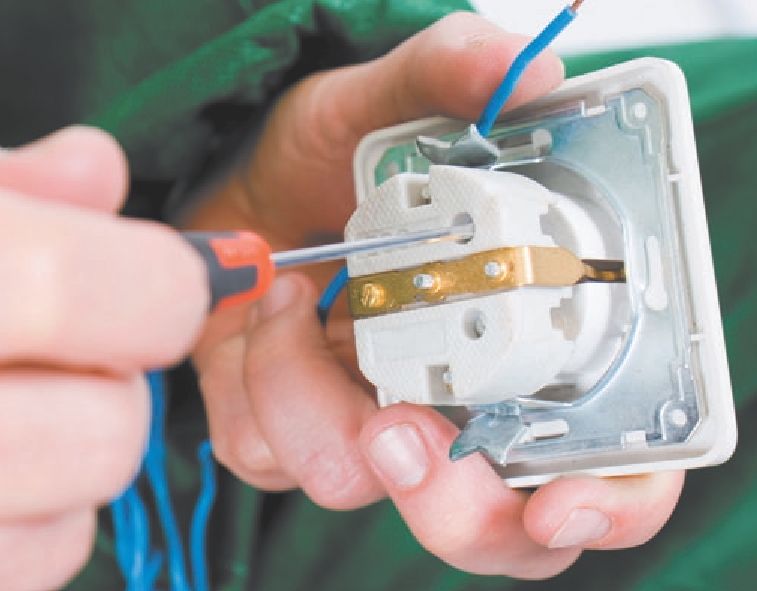
- Usually, aluminum wires are connected to the outlet, which are often a little longer than necessary. You don’t need to cut off the excess - the wires can be bent in the space of the socket. If you need to remove the insulation from the wire, then this should be done very carefully, since the old aluminum wire becomes very fragile even with a slight incision of the core. It is best to warm up the insulation with a lighter fire, and then remove it.
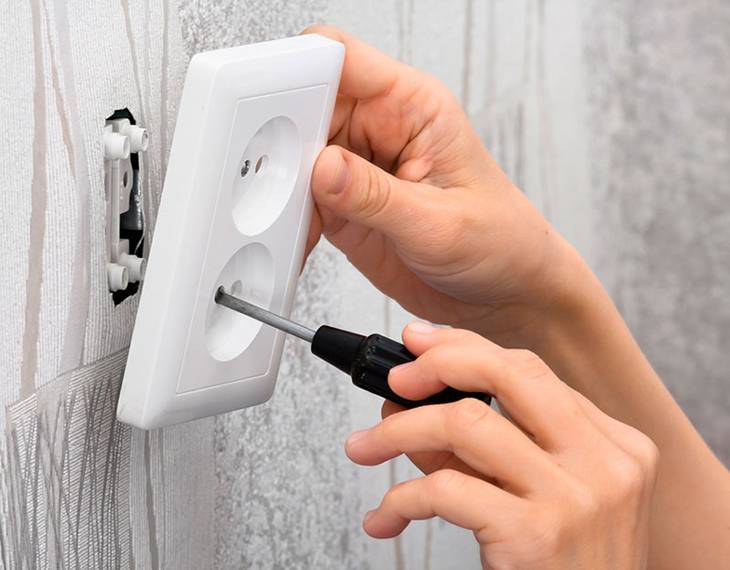
- The next step is to remove the cover from the outlet. To do this, you can unscrew the screw located in the middle of the panel. Bare wires are inserted into the socket clamps and the fixing screws are tightened with a screwdriver.
- After that, the socket can be installed in its place. Following the horizontal installation, the bolts that are responsible for attaching the spacers to the socket box are tightened with a screwdriver.
- The cover is superimposed on the socket and fastened with a central screw.
After installing the outlet, the machine turns on and its performance is checked.
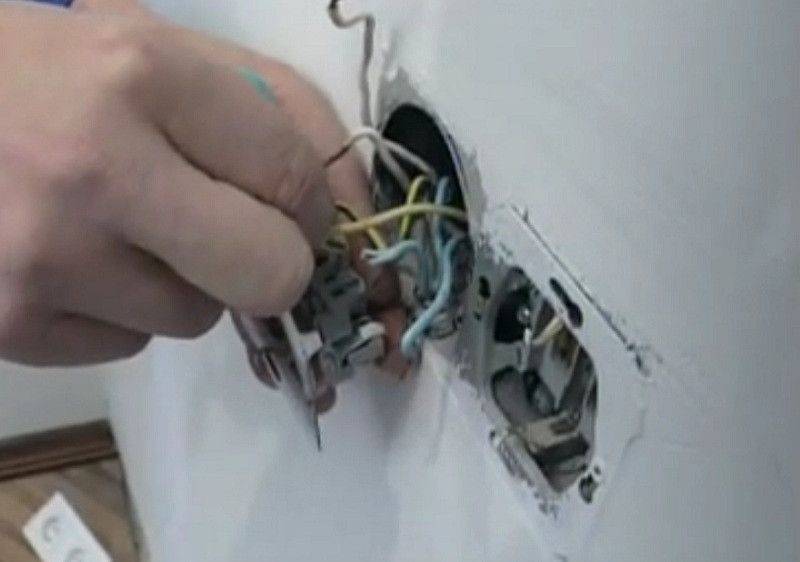
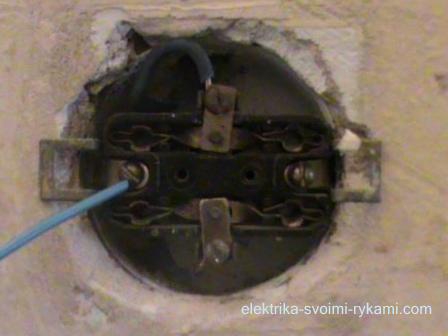
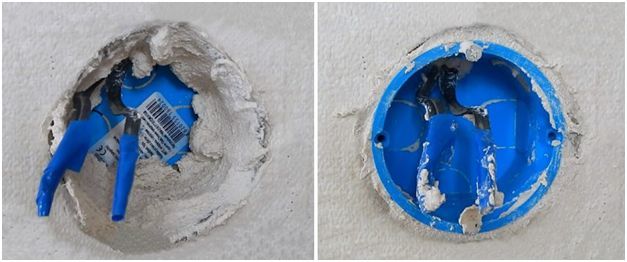
We carry out the dismantling of the electrical outlet for replacement
When dismantling an electrical outlet before replacing it, special attention should be paid to the condition of the contact group of wires that will subsequently be connected to a new outlet.When dismantling an old outlet, you need to carry out the work itself carefully enough so that none of the contact wires breaks, as there are options for using single-core aluminum wires that break quite easily when bent, which subsequently creates very serious inconvenience - you will need to "cut" into the wall, taking out the necessary electrical conductor for connection
We dismantle as follows: we unscrew the decorative part of the socket, unscrewing all the fasteners, after making sure that there is no power to this electrical device, carefully following all the instructions of the preliminary paragraph on “safety measures” when carrying out this kind of work. After the inside of the socket is exposed, a visual inspection of the contacts is carried out and the contact conductors themselves are unscrewed from the inside of the socket; take it out completely, putting it aside.
At the same time, special attention is paid to the presence of a serviceable socket box or its presence in general. If the socket box is broken, or if it has not been previously installed before, you need to carefully prepare the hole by moving the wires to the side, and install a working socket box, fixing it with gypsum mortar or alabaster
The dismantling of the socket has been carried out, and if another socket was installed, then you need to wait for the alabaster to solidify and proceed with the installation of a new socket.
Safety rules: how to remove the switch
2 main types of fastener design for a vertical surface inside the building have been developed, which differ: for hidden and for external wiring.
To avoid the following errors:
- Short circuit.
- Failure of expensive fixtures, energy-saving, LED or fluorescent light bulbs.
- Burnt out insulation in the distributor or wall.
- Electric shock that could be fatal.
It is necessary: to study the basic rules of safety measures. Before removing the switch, it is necessary to familiarize yourself in detail with the design of the wall mount and connection. Products for external electrical wiring are traditionally attached with standard fasteners; through the mounting holes, the housing is tightly attached to a vertical surface.
In the design of the switch, there is a mechanism of sliding bars that create a fixation of the body from two opposite sides in a hole made in advance, a size of 6.7-7 cm. machine. This must be done for safety reasons so that a person who is engaged in dismantling or repairing is not struck by an electric current.


It is necessary to make sure that the shutdowns performed are correct, for this you need to press the keys several times, the lamps should not light up. A warning label must be installed on the circuit breaker in the distributor according to the requirements of the PUE. Better yet, completely close the cabinet and take the keys to yourself while you work, so that outsiders do not have access to the switchboard. Only following this rule, you can start disassembling the Legrand switch or any other (single, triple, double).
How to change a power outlet?
A situation may arise when you urgently need to replace the outlet, but there is no way to turn it off. I warn you right away that you are at risk of getting an electric shock. Touch the exposed live parts of the socket only with well-insulated pliers or an insulated screwdriver.
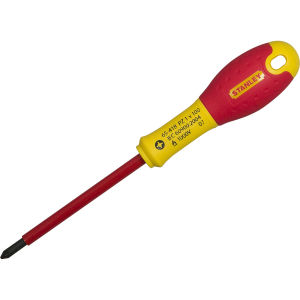
Insulated screwdriver
He puts a cambric on the screwdriver, leaving 5 mm at the end of the screwdriver. Before disconnecting the outlet, determine the phase wire that needs to be insulated after disconnection. Neutral wire can not be insulated
After carefully removing the wires, replace the socket and, after installation in the socket, close the decorative cover
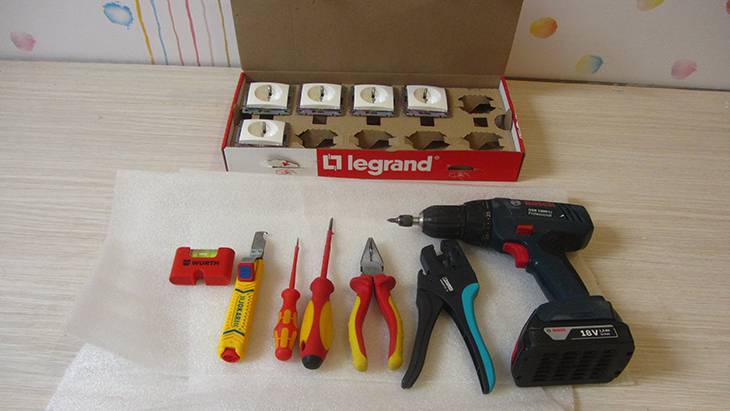
List of tools that may be needed to replace the outlet
To replace an old outlet with a new one, you need to use a certain list of tools, which it is advisable to first check for availability and prepare, knowing in advance that the tools are at hand and they can be used in any development of the situation during this work. When performing work, the following tools may be needed:
- a set of several straight and Phillips screwdrivers;
- a special screwdriver indicator to check the presence or absence of a phase on the wire;
- small hammer and chisel;
- conventional drill with nozzles;
- wire cutters, pliers, round-nose pliers for removing old wires and preparing the contact group before installation;
- a mixture for covering and strengthening a gypsum-based socket box, or alabaster.
Any tool that does not have insulating handles, or is in a faulty condition, should be put aside and not used, at least for the work of replacing an electrical outlet, or in general any other work on electrical circuits.Turning off the power supply in the room does not give a 100% guarantee of protection against electric shock, since situations in life are completely different.
Recommendations and safety precautions
Try to install in easily accessible places. Where they can be easily serviced or repaired.
The normal height for installation is at the level of 30 centimeters from the floor. Also, it is not recommended to place closer than 50 cm from metal products.
If there is an additional fastening (mounting screws on the sides or top and bottom), do not be too lazy to use it. This will give more strength, so it will last much longer.
If there was an ordinary socket in the bathroom, then replace it with a special waterproof one. This will increase safety and eliminate possible short circuits.
All work must be carried out with the electricity completely turned off. Remember! Even professionals can sometimes make mistakes, and the result of such a mistake can be very deplorable.
Regardless of your confidence in the absence of electrical voltage in the network, always check the wires with an indicator or multimeter.
Don't forget to use dielectric gloves.
It is best not to change the outlet alone. The second person will be able to observe the process, prompt and intervene during emergency situations
The reaction time of the observer is very important. If you knock down a person in time (tear him off the wire), who is hit by an electric current, then you can save his life.
Conclusions and useful video on the topic
Video #1 Step-by-step guide in video format about installing an outlet:
Video #2 A detailed and understandable video to help craftsmen planning to install sockets with hidden electrical wiring:
Video #3 A warning video against dangerous grounding methods sometimes used by home craftsmen. If a neighbor has advised you to do something similar, it is better to refuse:


Having become acquainted with the main nuances and stages of installing an outlet, you can perform this type of electrical work with your own hands. Everything that seemed unfamiliar and therefore incredibly complex, became clear and simple.
It is not at all necessary to call an electrician and ask him to connect an additional outlet when this work can be done on your own, pleasantly surprising your loved ones.
Would you like to share your experience as an independent electrician? Do you want to provide useful information for home masters? Please write comments in the block below, ask questions, leave a photo on the topic.


