- Common mistakes when replacing
- Breakdown diagnostics
- Breakdown diagnostics
- Replacing a bearing in a Bosch washing machine. Replacing bearings in a Bosch Max Classic 5 washing machine at home
- Progress
- Video
- How to replace
- Dismantling the pulley and motor
- Removing the top cover
- Removing the drum
- Removing and replacing bearings
- The nuances of performing work on machines from different manufacturers
- «Indesit» (Italy)
- "LG" (South Korea)
- Samsung (South Korea)
- "Atlant" (Belarus)
- We make repairs: step by step instructions
- Mistakes made when replacing
- Replacing a bearing when repairing a top-loading washing machine
- Replacing bearings in washing machines Indesit
- Replacing the bearings of the washing machine Indesit
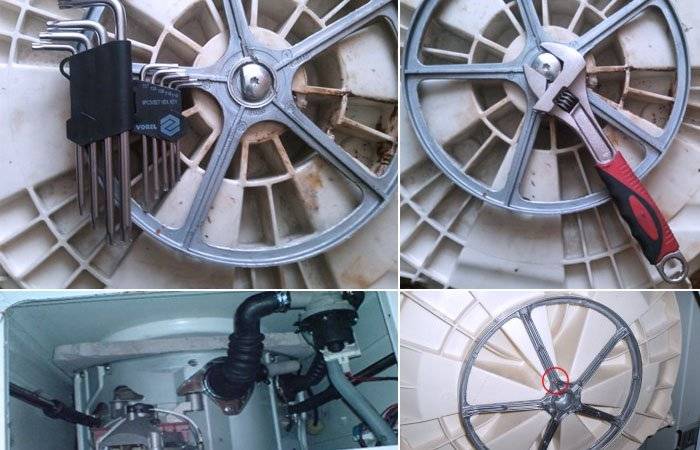
- Tools for disassembling the washing machine Indesit
- Washing machine disassembly
Common mistakes when replacing
Study the following recommendations carefully so that the replacement does not become an expensive repair:
- breakage of the pulley, you can’t pull it, just wiggle it slightly to the sides and pull it gently;
- breakage of the bolt head, if the bolt does not go spray WD-40;
- broken wire of the temperature sensor, be careful with the tank cover;
- damaged movable node;
- the gasket of the movable unit has not been replaced;
- when assembling, all sensors and wires are not connected.
So, you are convinced that the replacement is quite laborious, but doable, if you have at least a little experience with technology.
If this process is difficult for you, we advise you to contact professionals, for example, to the official service center, check the price on the website.
TOP stores of washing machines and household appliances:
- /- household appliances store, a large catalog of washing machines
- - Inexpensive hardware store.
- — profitable modern online store of home appliances
- — a modern online store of home appliances and electronics, cheaper than offline stores!
Breakdown diagnostics
You must first check and find out if the washing machine needs to replace the bearings.
To identify faults, you can rely on the main signs:

- the machine makes a louder noise than usual during spinning;
- during manual rotation, the drum starts to beat.
It is important to consider that the machine can make noise for various reasons, and before diagnosing a malfunction in the bearing system, it is necessary to exclude such factors as the ingress of foreign objects into the device, and also make sure that the water intake and descent system is working properly. In the case when the proven mechanisms work without interference, it can be assumed that it is the old bearings that are the cause of the noise and it is necessary to immediately begin to replace them. noise and should be replaced immediately.
In the case when the proven mechanisms work without interference, it can be assumed that it is the old bearings that are the cause of the noise and it is necessary to immediately begin to replace them.
Breakdown diagnostics
Rumble and rumble during rotation of the drum in the washing mode, breakage of the spin mode and rapid wear of the drive belt indicate a bearing failure.
You can verify this by carefully inspecting the washing machine.
To do this, you need to open the door, grab the top of the drum with your fingers, try to swing it and determine if there is any play in the drum mount. And then spin the drum with your fingers from the inside, listen and try to catch extraneous noises.
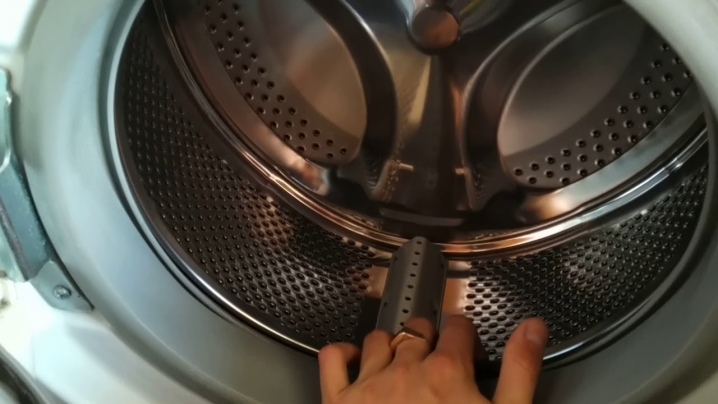
If there is play, but there are no extraneous noises, this means that these parts have begun to collapse, but you can wait several months to replace them.
If there is play, and there are also characteristic noises (grinding, hum, rumble), but the drum rotates freely and does not stop, it is necessary to change the bearings as soon as possible.
If the drum moves with a terrible rattle and even stops, it is generally dangerous to use this washing machine, it needs urgent repair.
Replacing a bearing in a Bosch washing machine. Replacing bearings in a Bosch Max Classic 5 washing machine at home
Replacement of bearings in CMA Bosch. Despite the fact that this unit in Bosch washing machines is designed for a long period of operation, sooner or later it wears out. This happens for several reasons:
- tank overload;
- resource has been developed.
Due to the excess amount of laundry, the seal is damaged, and water begins to get on the bearings, as a result of which they are destroyed. And also, over time, a protective lubricant is produced, and passes moisture. Replacement can be done at home. It is absolutely possible to do the work with your own hands, without the involvement of a master. Consider the CMA Bosch Maxx Classixx 5 as an example.
The destruction of the bearing leads to increased noise during washing, and especially during the spin cycle. There is a characteristic roar of rolling balls. With severe wear, a small amount of rusty liquid flows out from under the machine. You can also find it if you remove the back cover. Brown traces of water will be visible in the pulley area.
Bearing failure can be determined as follows. Grasp the edge of the drum and pull it inward and towards you, as well as in different directions. If there is a noticeable play, then it is necessary to carry out repair work. The sooner the replacement is made, the better.


The fact is that with each wash cycle, loosening increases. This leads to the fact that the drum begins to touch the tank and destroy it. The same thing can happen with the pulley - it will make furrows on the outside. The delay will lead to the fact that you have to change the entire tank assembly.
Enough space is needed. For repair, attachments are removed and the tank is pulled out, which is then halved. Without tools, repairing the washing machine will not work.
List:
- a hammer;
- Phillips and slotted screwdrivers;
- metal punch;
- ratchet;
- pliers;
- a set of Torx screwdrivers;
- penetrating lubricant WD-40, or equivalent;
- blue thread lock;
- high temperature sanitary sealant.
repair kit:
- bearing 6204 and 6205;
- gland 30*52*10/12;
- lubricant.
It must be understood that in other models, for example: WOL, WAA, WFT, WFR, WFD, other bearings and an oil seal may be used. A reasonable decision - after dismantling, go to the supplier and buy similar ones.
Important! We disconnect the washing machine from electricity, water supply and sewerage. Consider all the actions in steps:. Consider all the actions in steps:
Consider all the actions in steps:
- Remove the top panel. We unscrew the two screws at the back and lightly tap the front with the palm of our hand.
- We take out the tray for washing powder by pressing the tab with your finger.
- Unscrew three screws in the tray area, and one on the right side. After that, remove the panel. It is held on with plastic clips. We use a screwdriver to pry them out. It is not necessary to disconnect the wires. You can bring the panel to the side and attach it to the body with tape. One chip leading to the bay valves must be pulled out. Otherwise, she will interfere. Mark the landing site, or better yet, take a picture.
- Remove the counterweight from the top of the tank by first unscrewing the screws. Take it aside.
- Open the hatch and remove the sleeve that holds the cuff on the front panel. Use a slotted screwdriver. Unfasten the rubber.
- Unscrew the self-tapping screws securing the hatch blocking device (UBL).
- Remove the cap that covers the pump filter.
- Loosen the fixing screw and remove the bottom plate.
- Remove the self-tapping screws that hold the front panel - bottom and top, and pull it out.
- Using pliers, unfasten the clamp on the pipe between the dispenser and the tank. Unhook the hose coming from the cuff.
- Unscrew the screws that secure the fill valve. Remove the entire block with the dispenser, wires and can.
- Disconnect the pressure switch and the tube leading to it.
- We dismantle the two metal strips on top.
- We remove the front counterweight, freeing ourselves from the screws.
- From below we take out all the contacts from the tubular electric heater (hereinafter referred to as the heating element). We bite off, but rather unfasten the plastic clamps holding the wiring.
- Disconnect the pump from electricity.
- We loosen the bandage pressing the rubber drain pipe with a socket screwdriver. It is located at the bottom between the tank and the pump. Let's unhook him.
- Then remove the screws securing the shock absorbers to the body.
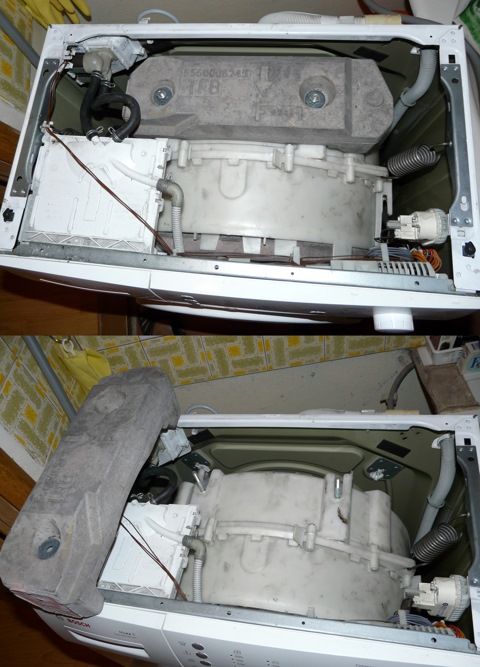
Progress
Now you are ready to start repairing your Bosch washing machine and replacing the bearing.
- Remove the top cover CM.
- To do this, unscrew the two screws securing the rear.
- Remove the detergent drawer.
- Remove the three screws behind the tray and one on the other side that secure the control panel.
- After removing the panel, you will see the wires leading to the main module. If you decide to detach them, it's best to take a picture of the correct location. Otherwise, simply place the panel on top of the case.
- Remove the bottom panel.

- Unscrew fixing bolts.
- Open the hatch door.
- Remove the outer collar of the cuff.
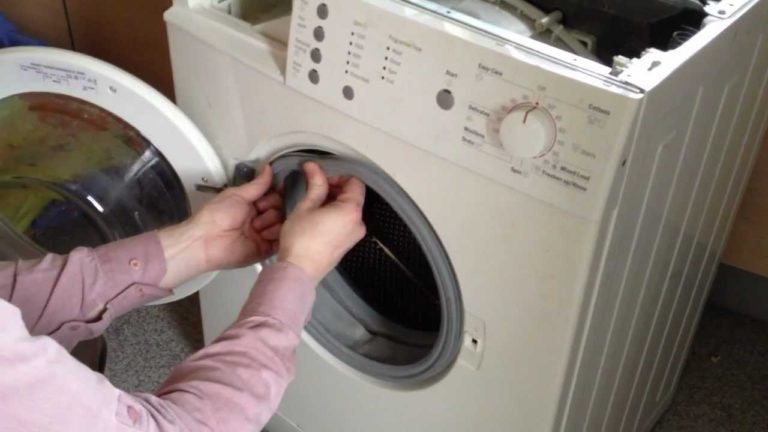
- To do this, bend the cuff, prying with a tool, remove the clamp.
- Having unbent a cuff, remove the lock of the hatch.
- To remove the UBL, unscrew the mounting bolts.
- Disconnect the wires and remove the blocker.
- Lift and remove the front panel.
Great, you have completed the first stage. Set the panel aside and proceed with the next steps.
- Pull out the inside of the detergent drawer.
- Lifting it, you will notice a hose that supplies detergent.
- Remove the spring hose clamp with pliers.
- After removing the tray, proceed to the counterweights.
- Using a 13mm socket, remove the bolts.
- After removing the upper and front counterweights, switch to the heating element (located under the tank).
- Disconnect the wires leading to it.
- Unscrew the central nut (not completely).
- Push the nut inside the tank, pull out the heater.
- Remove the pipe from the tank to the pump.
- Substitute a flat container, as residual water may spill out of the nozzle.
- Remove the pressure switch hose from the side of the tank.
- Loosen the pipe clamp by unscrewing one bolt, remove it.
- Remove the harnesses attached to the tank.
At the front of the car, the work is over for now. Move to the back.
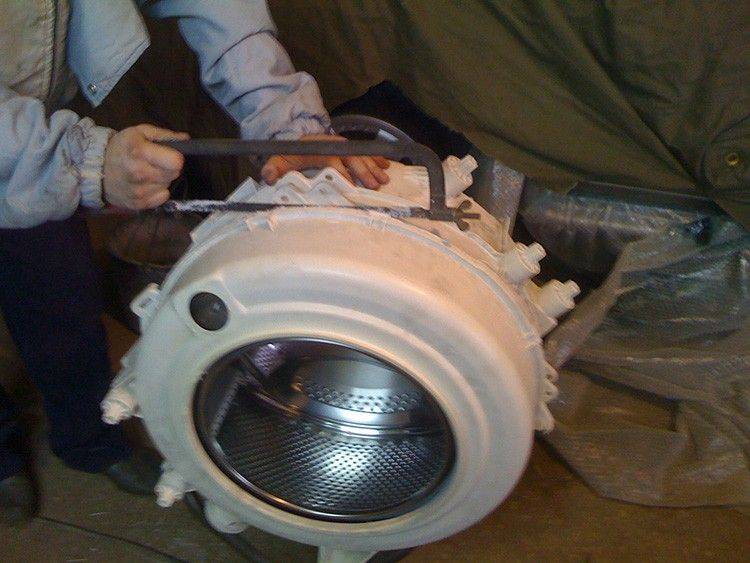
- Remove the screws and remove the back panel.
- Pull the drive belt to the side and, scrolling the pulley, remove the belt.
- Release the motor wire clamps.
- After unscrewing the bolts, remove the motor.
- Release the fastening, remove the pressure test chamber.
- Remove the shock absorber by unscrewing the pin at the bottom.
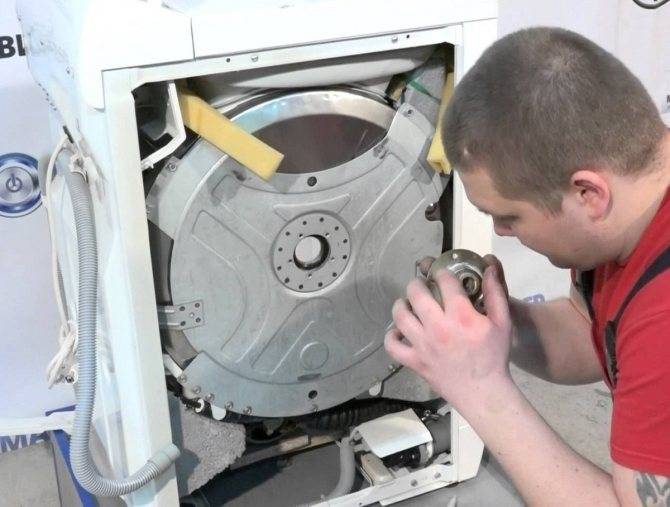
- Remove the tank with the drum from the housing by removing it from the springs.
Lay on a flat surface.
We proceed to disassemble the tank and replace the drum bearing on the Bosch washing machine (Bosch Maxx 5).
Having unclenched the spring clamp, remove it, and then the rubber cuff of the hatch.
- Put the drum on the other side, remove the pulley.
- Using a 13mm socket, unscrew the bolt.
- Unscrew the bolts connecting the halves of the tank.
- Squeezing the plastic latches, divide the tank.
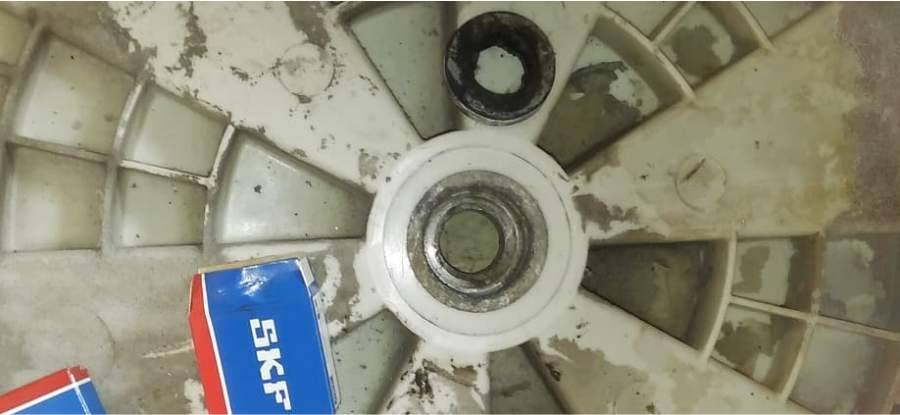
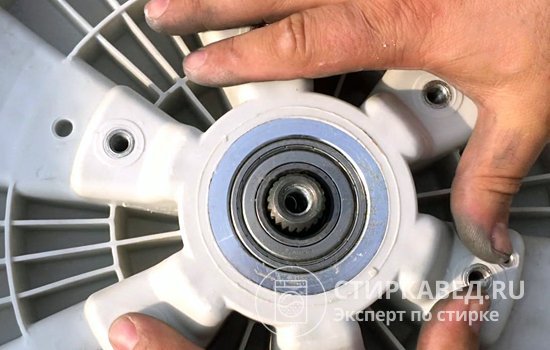
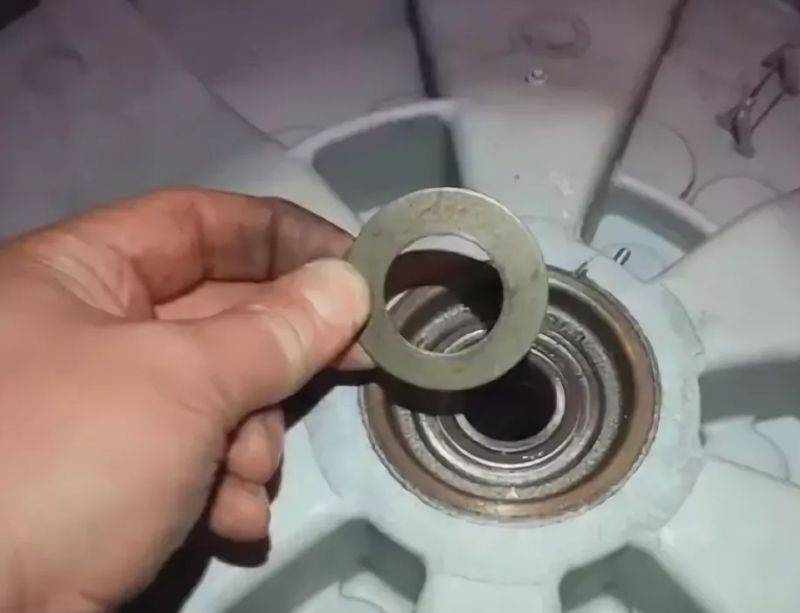
- Pulling out the drum, you will see the bearings at the back of the tank.
- Place the tank on stands.
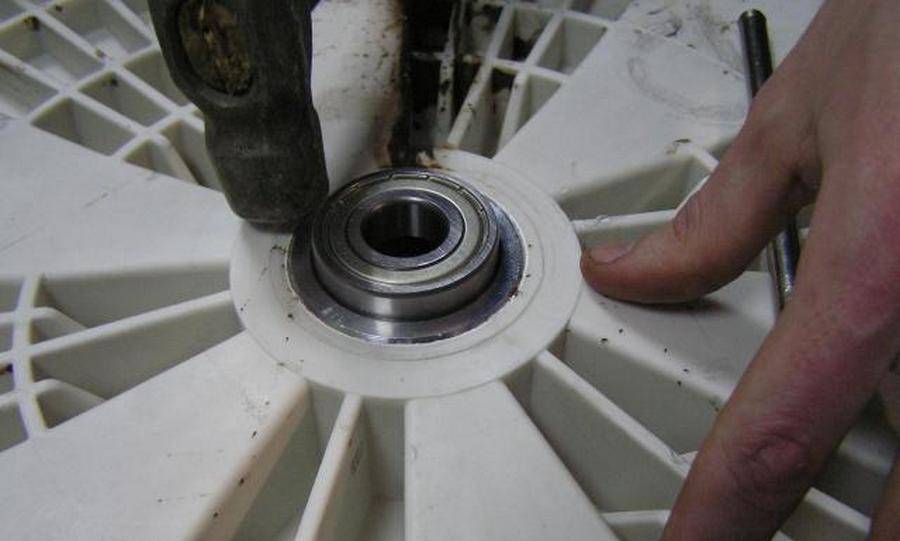
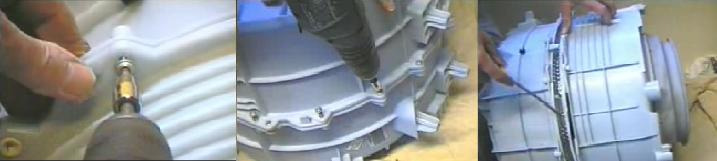
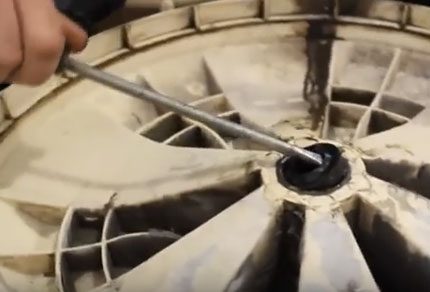
- Install the chisel on the bearing, tap with a mallet and knock it out.

Replace the bearings on the Bosch washing machine: install the new part by gently tapping the outer side of the cage with a mallet. If the bearing no longer moves, it means that it is tightly located - the installation is complete. Do the same with the second bearing.


After lubrication, place the oil seal over the bearing and, tapping with a rubber mallet, put it in place.
Slide half of the tank onto the shaft and assemble in reverse order.
Regardless of the model of the washer and their small differences, the disassembly procedure is the same. You can watch a video on replacing the bearings of a Bosch washing machine:
Happy repair!
Video
In the video below, you can once again familiarize yourself with the procedure for replacing the bearing on Indesit washing machines.
Mom, wife and just a happy woman. He draws inspiration from travel, cannot imagine life without books and good films. Strives to become an ideal hostess and is always ready to share her experience.
Found an error? Select it and press the buttons:
In the 19th century, it took a lot of time to wash ladies' toilets. The dresses were first ripped, and then washed and dried each part separately so that the fabric did not deform. After washing, the clothes were sewn again.
For washing small items on the road or in a hotel, it is convenient to use a regular plastic bag. Socks or tights are kneaded inside a tied bag along with water and a small amount of detergent. This method allows you to pre-soak things and perform washing without damaging the fabric and without spending a lot of powder and water.
There is a washing machine "for bachelors". Linen washed in such a unit does not need to be ironed at all! The thing is that the device does not have a drum: some things can be placed inside the container directly on hangers (for example, jackets and shirts), and smaller things (for example, underwear and socks) can be placed on special shelves.
Washing machines equipped with the "No Iron" or "Easy Iron" functions can wash clothes with little to no wrinkling. This effect is achieved due to a special approach to spinning - it is performed at low speeds, with long pauses, and a small amount of water remains in the tank.
The first officially patented washing machine was made of wood and consisted of a framed box filled halfway with wooden balls.Laundry and detergent were loaded inside, and with the help of a lever the frame was moved, which, in turn, made the balls move and grind the laundry.
The expression "soap opera" ("soap") did not arise by chance. The very first series and shows with a female audience were broadcast on television at a time when housewives were cleaning, ironing and washing. In addition, to attract viewers to the screens, commercials for detergents: soaps and powders were often played on the air.
Astronauts, while in Earth orbit, solve the problem of dirty things in an original way. The clothes are dropped from the spacecraft and burn up in the upper atmosphere.
History knows the fact when a kitten got into the drum of a washing machine and, after going through a full wash cycle on the Woolen Things program, got out of the unit safe and sound. The only trouble for the pet was an allergy to washing powder.
Washing machines are related to the origin of the expression "money laundering". In the 1930s, American gangsters used the laundry chain as a cover for their illegal activities. Passing off the proceeds of crime as proceeds from cleaning clothes, they turned "dirty" money into "clean" money.
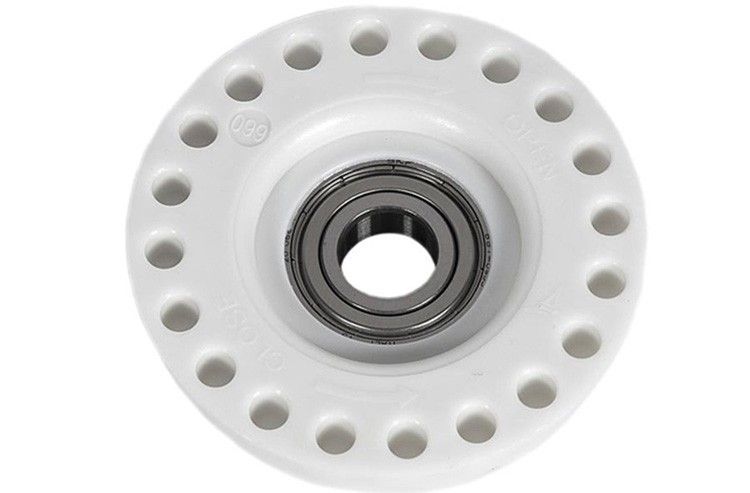
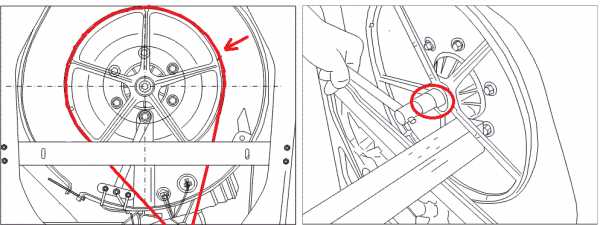
Bearings are important elements of the washing machine. They contribute to the adjustable and silent rotation of the drum. Usually, their breakdown is imperceptible at the initial stage, so the user learns about problems with the bearing assembly much later, when an unnatural loud sound is heard during the operation of the machine (especially during the spin phase). Ignoring a malfunction can lead to disastrous consequences: damage to the tank and complete failure of the unit.How to replace the bearing on the Indesit washing machine, we will understand in our article.
How to replace
Before starting repair work, it is necessary to disconnect the machine from the electrical network in order to avoid the possibility of electric shock. After that, unscrew the water supply and drain hoses by pulling them slightly forward.
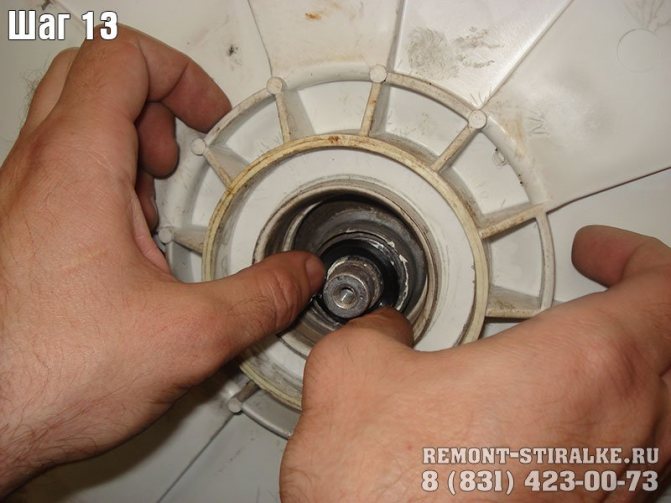
Dismantling the pulley and motor
To solve the problem of wear of oil seals and bearings, the motor and pulley of the washing machine should be removed. To do this, you must first remove the drive belt by screwing the pulley and pulling the belt forward.
After that, fix the pulley by inserting a strong pin into it. You can tighten the pulley if you unscrew the bolt that secures it. The pulley is removed from the shaft by swinging it a little and pulling it towards you. In this case, it is not necessary to dismantle the heating element. Although, this is the time to consider what condition the heating element is in. If there is a thick layer of scale on it, it is better to remove it.
The engine can be removed by unscrewing the bolts with which it is attached. In this case, you need to remove the pipe. It is easier and easier to do this through the bottom of the machine, turning it on its side.


Removing the top cover
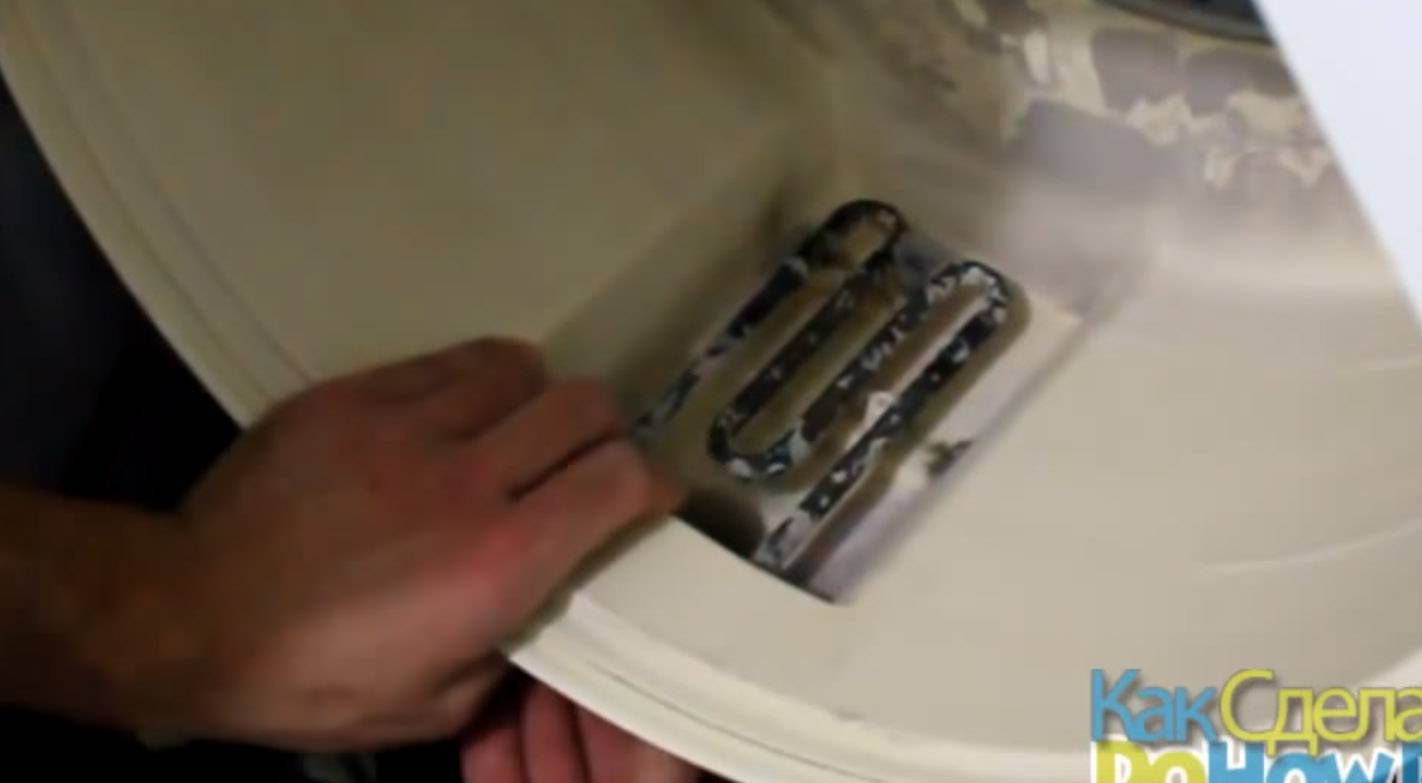
On the back of the machine there are 2 self-tapping screws, through which the cover is attached to the body. Unscrewing them, the cover will move back a little. After that, it can be lifted and removed.
Some models of the Indesit washing machine are equipped with special plastic latches that secure the lid. In this case, it is enough to unfasten them, which will allow you to remove the top cover.
Removing the drum
The next step in replacing the seal and bearings is to dismantle the drum.To do this, you need to get and pull out the tank by pulling it forward. All Indesit models are equipped with a one-piece tank. In order to be able to access the drum, you will have to divide the tank into 2 parts. This can be done by sawing it with a grinder or a saw for metal work.
Before you start cutting the tank, you need to make a final decision on how its subsequent assembly will be carried out. To do this, on its surface, you need to make several holes for the bolts, with which the tank can be assembled into a one-piece structure.
Having disconnected the drum from the tank, experts recommend inspecting it for damage. In addition, you should check the condition of the gasket located under the drum. If it is stretched and has cracks on the surface, it is better to replace it.
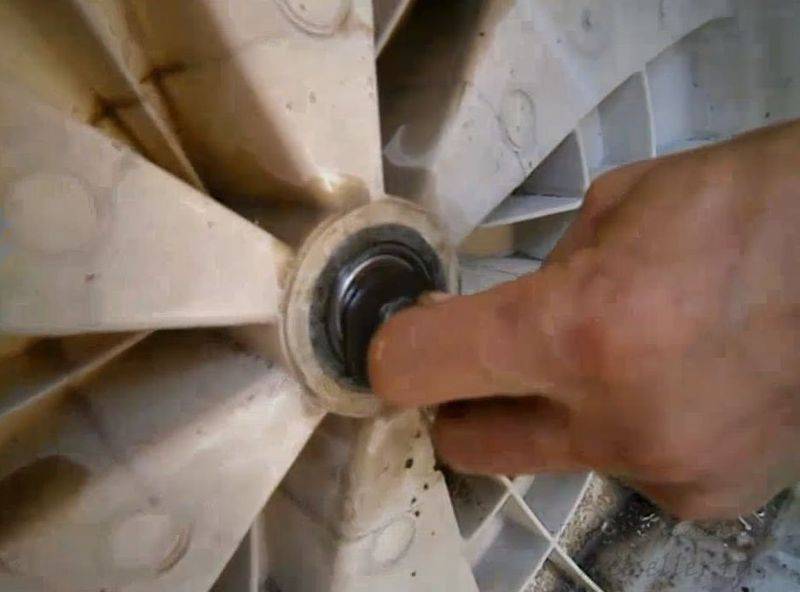
Removing and replacing bearings
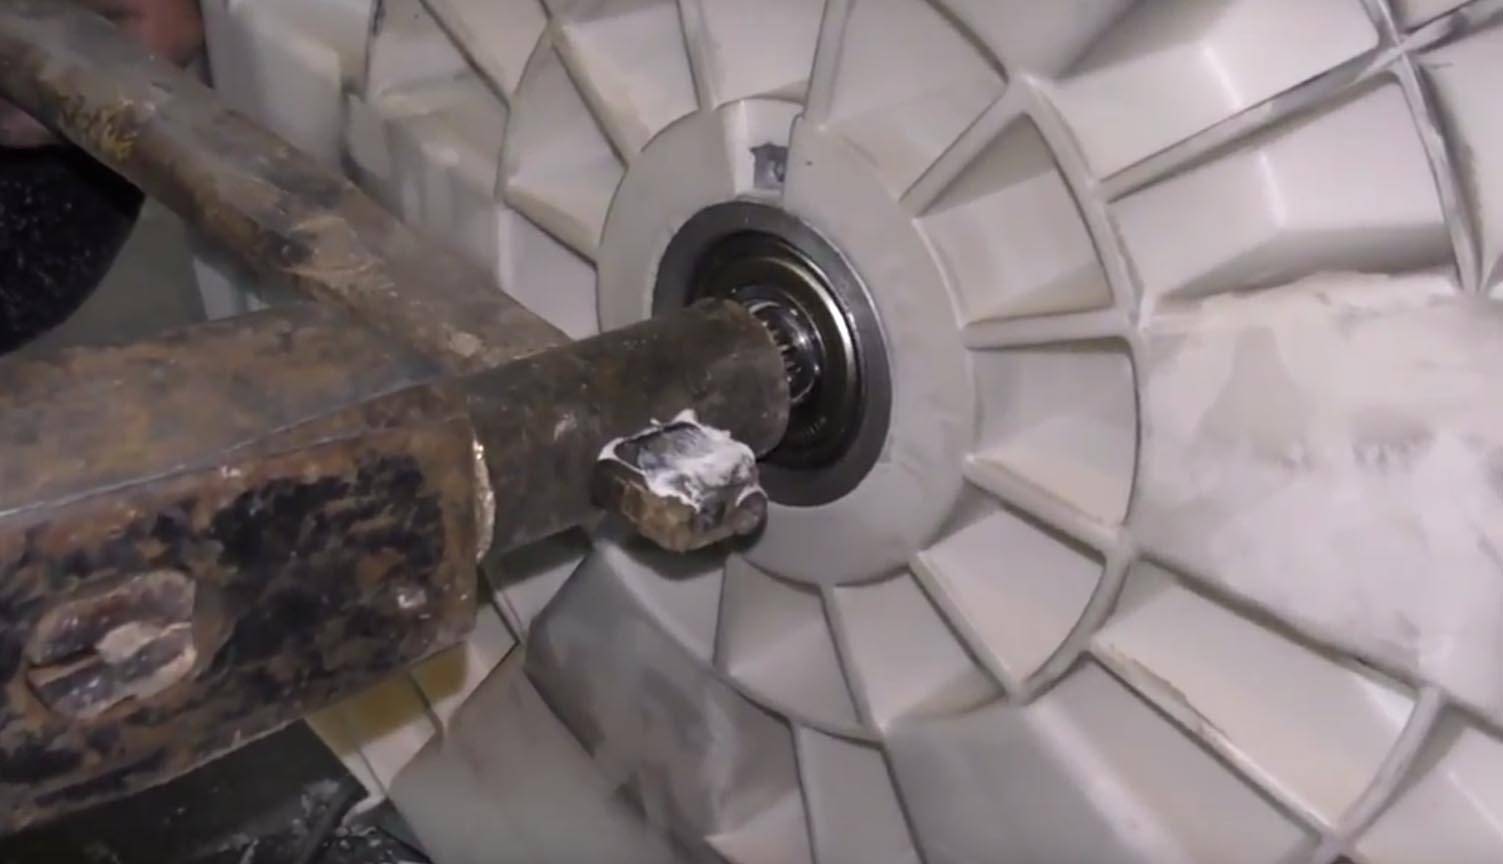
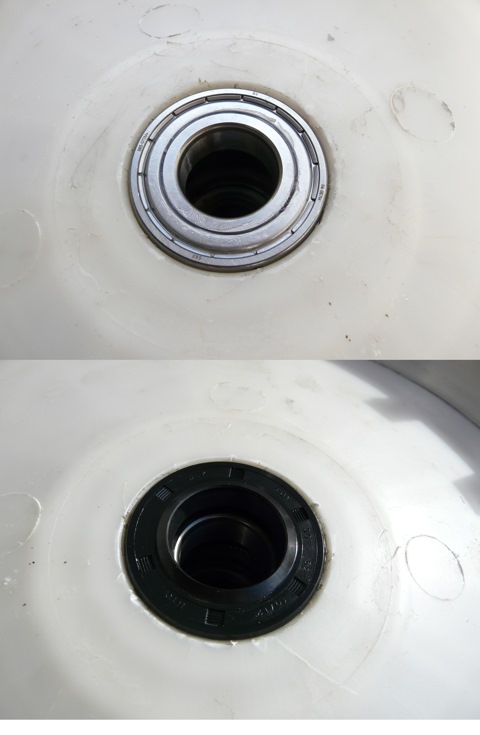
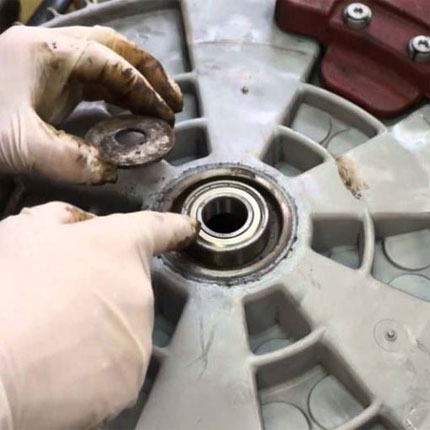
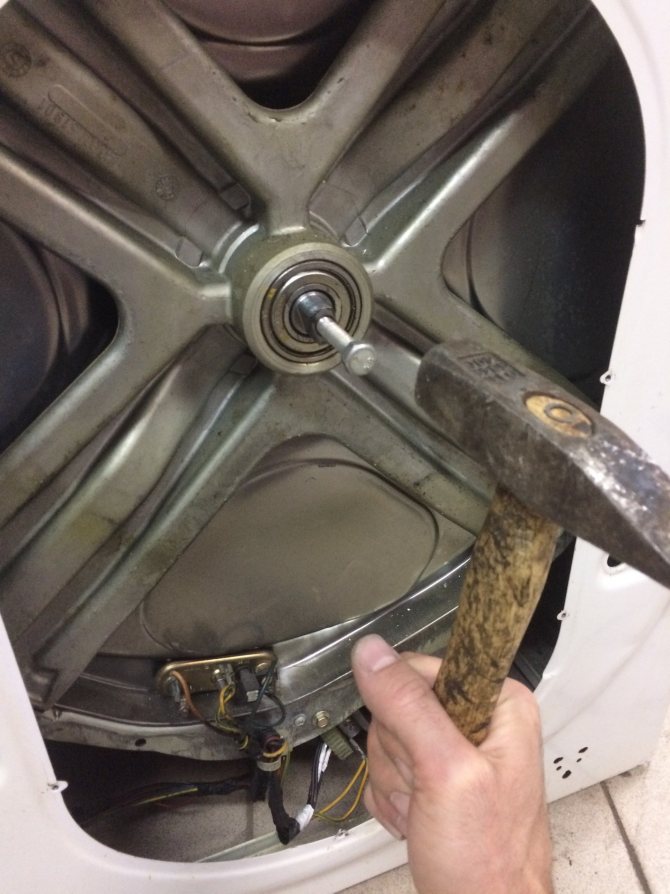
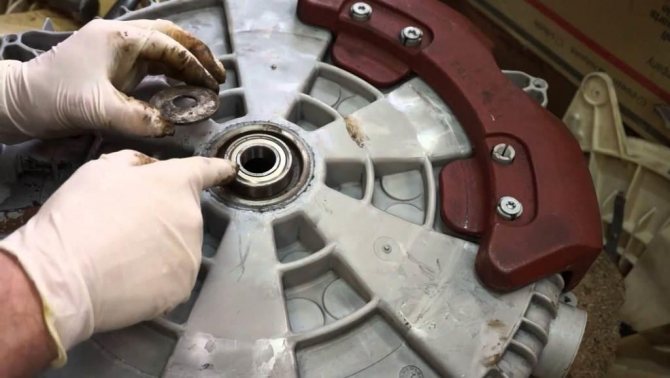
Now it's time to change the oil seal, which performs a protective function for the bearings. To do this, you can use a screwdriver, prying the gland with it. It is possible that this will be difficult to do. You will have to use hammers and a chisel, gently knocking out the bearings, tapping them in a circle.
If it is impossible to do this on your own, you will have to contact the service, where, using special equipment, the cuff will be pressed out of the bearings.
After successfully removing the cuffs and bearings, you need to clean and lubricate the place where the new parts will be installed. For lubrication, it is recommended to use a special sealant.
Purchased new bearings and a cuff can be installed in their original place by using a hammer and a wooden block.As a result of this, it will be possible to significantly soften the force of the hammer blow, preventing cracking of the bearings and damage to the stuffing box. The main direction of impact is recommended to be directed to the edges of the parts. The seal must be on bearings. After that, it remains to assemble the Indesit washing machine in the reverse order.
In order for the replacement not to be too expensive, it is recommended to adhere to the following work rules:
- pulley operations must be performed carefully, without sharp jerks. It must first be easily swung to the sides, and then pulled forward. Otherwise, the pulley can be broken;
- during prolonged use of the machine, its bolts can boil, which complicates their unscrewing. If you apply force when unscrewing the bolts, you can rip off their heads. To avoid this, spray them with WD-40;
- when dismantling the tank cover, you can break the wires of the temperature sensor;
- you should carefully assemble the washing machine, not forgetting to connect all the sensors.
Compliance with these simple rules will help to avoid additional costs for repairs.
The nuances of performing work on machines from different manufacturers
To repair some models of individual manufacturers, you need to know about the nuances due to the design of these units. Washing machines of such brands as: "Indesit" and "LG", "Samsung" and "Atlant" have such features.
«Indesit» (Italy)
When repairing machines of this brand, it is initially necessary to clarify the design of the tank, because. it may be different. New models are produced with a non-separable tank, and old ones with a collapsible one.
This determines the volume and sequence of operations performed.In addition, for some models, the pulley mounting screws may be left-handed (W 84 TX), which must be taken into account.
If the brass bushing installed on the axis of the drum cross is damaged, then it must also be replaced when performing such work. Also, the models of this brand provide for a double mount of the drum axis, which is a certain nuance that should be remembered. The presence of a self-positioning sensor, which must be turned off when dismantling the drum, is another feature that you should know when doing the work yourself.
"LG" (South Korea)
For washing machines of this manufacturer, the tank is removed from the front of the device. Modern models of this brand have improved technical characteristics that allow you to wash a significant amount of laundry in one load. In this connection, such devices are equipped with a tank, which is distinguished by a significant weight, which makes it somewhat difficult to perform the described work.
In addition, when disassembling the drum, you should pay attention to the mount of the electric motor, which is somewhat different from the type of mount from other manufacturers.

Samsung (South Korea)
The design of washing machines of this brand also involves the dismantling of the tank through the outer wall
When working with Samsung washing machines, you should be especially careful when knocking out the bearing, because. in case of damage to the bushing, you will have to change the entire drum. In addition, a distinctive feature of this brand is the use of two bearings of different sizes on one shaft.
In this case, the larger one is knocked out from the outside towards the tank, and the smaller one - from the inside of it
In addition, a distinctive feature of this brand is the use of two bearings of different sizes on one shaft. In this case, the larger one is knocked out from the outside towards the tank, and the smaller one - from the inside of it.


"Atlant" (Belarus)
For machines of this brand, the drum is removed from the back, which is provided for by their design. The tank on Atlant brand machines is used in a collapsible type, so you won’t have to cut it when replacing bearings.

When assembling the tank, it is necessary to use a sealant, this will provide more reliable protection against leakage.
We make repairs: step by step instructions
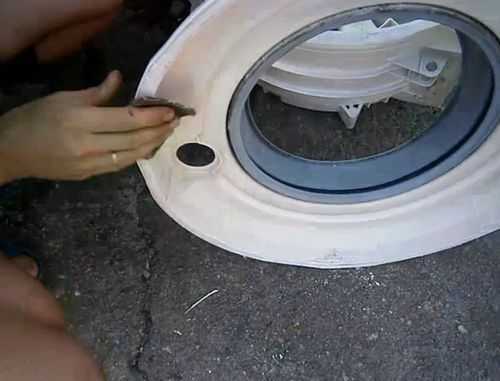
First you need to correctly remove the front and back walls of the Indesit washing machine without damaging any of the sealing gum. First, remove the top cover of the Indesit washing machine by unscrewing a few bolts. After that, it will not be difficult to remove the back wall, it is enough to unscrew a few fasteners, but the situation with the front wall is more complicated. How to remove it correctly?
- First, remove the washing machine powder cuvette, which you need to pull towards you until it stops, then lift it up and pull it out.
- We find and unscrew the fasteners that hold the front panel.
- Now we have access to all the screws holding the front wall of the washing machine, unscrew them.
- We remove the rubber cuff, after that we remove the bolts holding the hatch blocking element and dismantle the front wall of the washing machine.
So, we got access to the "insides" of the Indesit machine. Now the replacement of seals and bearings will be free. First of all, it is necessary to remove the belts from the drum pulley and the motor drive.After that, you need to securely fix the pulley by putting a block of wood into it and unscrew the main fastener that this drum pulley holds.
The next step is very important, you need to carefully pull off the drum pulley. The fact is that it sits quite tightly on the axis along with the drum, and if you try to rip it off with tools, you can easily harm it. If the drum pulley was successfully torn off, you can proceed to dismantle the spacer bar. Next, unscrew the fasteners of all counterweights and carefully pull them out.
We disconnect all wires from the electrical elements of the washing machine, and then unscrew the fasteners of the movable drum assembly. Most likely, the screws will be rusty and “stick” to the metal, so before unscrewing them, you need to spray them with WD-40.
We proceed to the next crucial stage - disassembling the drum and replacing damaged parts. Here you need to follow a strict procedure.
- Remove the clamps that hold the tank cap.
- Carefully remove the seals and the cover covering the tank.
- We take out the drum together with the movable unit where the bearings are located.
- We check the gasket on which the movable assembly lies, if the rubber has deteriorated, then it is necessary to throw away the old gasket, replacing it with a new one.
- We load the moving part with the remnants of the drum into the car and take it to the nearest car service, where we ask the mechanics to press out the bearings. It is possible to do this work on your own, but it is very risky, because it requires skills + equipment that we do not have.
- We mount new bearings and seals, and then we assemble the Indesit washing machine in the reverse order.
Speaking of assembling and disassembling the washing machine, there are many good videos. And if you are interested in information about the features of replacing a bearing in washing machines of other brands, then this article will help you.
Mistakes made when replacing
As part of this paragraph, we decided to set out the warnings of experts regarding all stages of the repair of the Indesit washing machine. Some errors can be easily corrected, and some are too expensive and lead to the fact that you have to change entire units of the repaired washer. What typical mistakes do our "homemade" and how to avoid them?
- They break the pulley, trying to pull it off the axis of the drum. To remove the pulley, you need skill, you can’t help the cause by force, you can only do harm. Try to shake it from side to side and pull at the same time. But in no case, do not hammer along the axis.
- Break off the heads of the fasteners. If any of the bolts could not withstand your pressure and broke, this is not a fatal mistake on your part, but it will require additional fuss. It will be necessary to drill out the broken bolts, and then cut a new thread in the seats.
- They break the temperature sensor, including breaking its wire. There is only one recipe for this problem - be careful with the tank lid. Otherwise, you will have to buy a new temperature sensor.
- Damage to the movable unit during handicraft extrusion. In this case, we have already advised you to contact a car service, because it is 10 times more difficult to do this work with improvised means.
- They forget to replace the gasket on which the movable assembly is located. The inattention of the master, who has looked at the rubber gasket, may result in a repeated repair of the movable assembly.
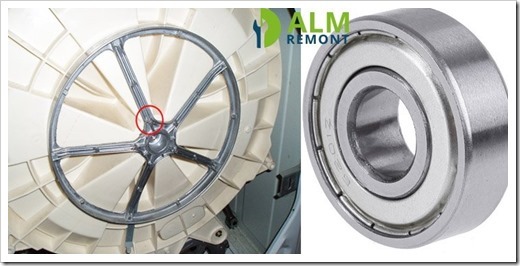
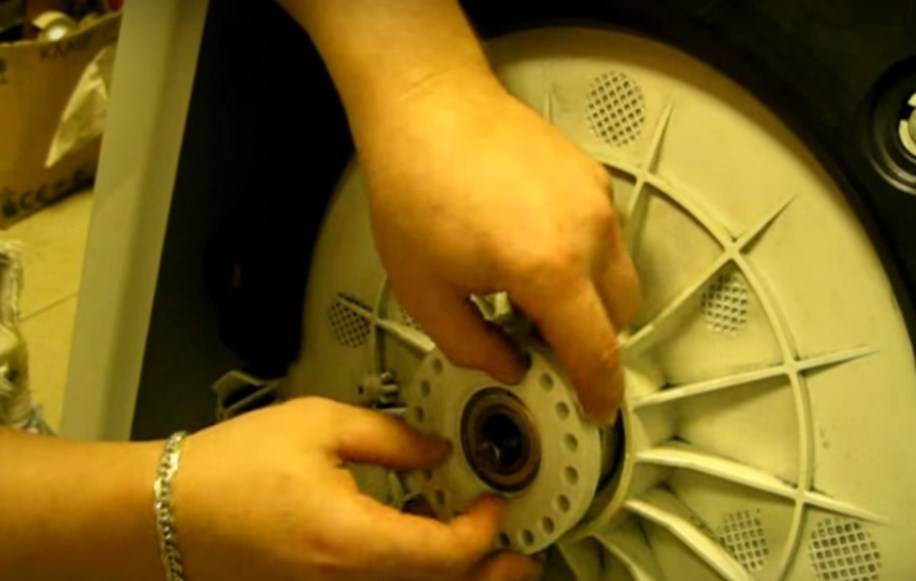
Replacing a bearing when repairing a top-loading washing machine
A distinctive feature of top-loading washing machines is that the drum is attached to the body on two axle shafts, and not on one, as in the models discussed earlier. In this case, the bearings are changed on both axle shafts at the same time, regardless of which one is out of order. Work on units of this type is carried out as follows:
- The outer and rear wall of the machine is removed.
- Electrical wires and hoses that may interfere with work are disconnected.
- The linings located on the sides of the drum are removed, under which the calipers are placed, with bearings installed in them.
- The bearing is changed first on the side where there is no pulley, then on the opposite side.
- Seats before installing a new bearing are cleaned and lubricated.
- The units are assembled in the reverse order with respect to disassembly.
Important! On the side where there is no pulley, the thread that fixes the caliper is ordinary, right-handed, and on the side where the pulley is installed, it is left-handed.

Replacing bearings in washing machines Indesit
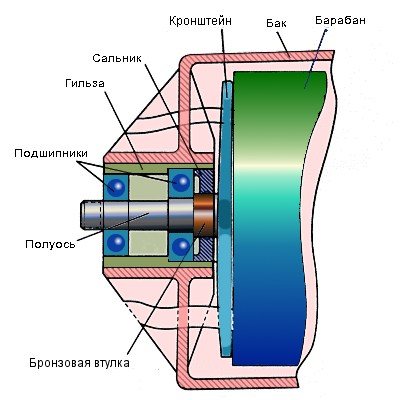
The bearing and oil seal are important parts of Indesit washing machines. The efficiency of the entire unit, the correct execution of the washing program depend on their work, and the integrity of the stuffing box determines the protection against moisture of many other parts of the mechanism.
The bearing is put on the shaft of the cross, which rotates the drum, and ensures its free rotation in the tank opening.
The gland serves for sealing and sealing. It is made of a special material that does not let water through.
If both of these components or one of them began to fail, they should be replaced as soon as possible, taking into account the design features of Indesit washing machines. Otherwise, at one fine moment, the drum may completely stop spinning.


Replacing the bearings of the washing machine Indesit
When choosing bearings for a washing machine in a store, take worn parts with you first so as not to miss. If you buy online, make sure that the selected bearing really fits your Indesit. Prices can also be found online or by phone.
It is important that you need to buy not only the bearing itself, but the whole set: two bearings and two seals, they need to be changed together, otherwise the replacement will soon need to be repeated.
Tools for disassembling the washing machine Indesit
Washing bearing replacement indesit machines with their own hands is not so difficult. The main thing is to get the bearings themselves, while you have to disassemble the entire machine. Be patient and use the following tools: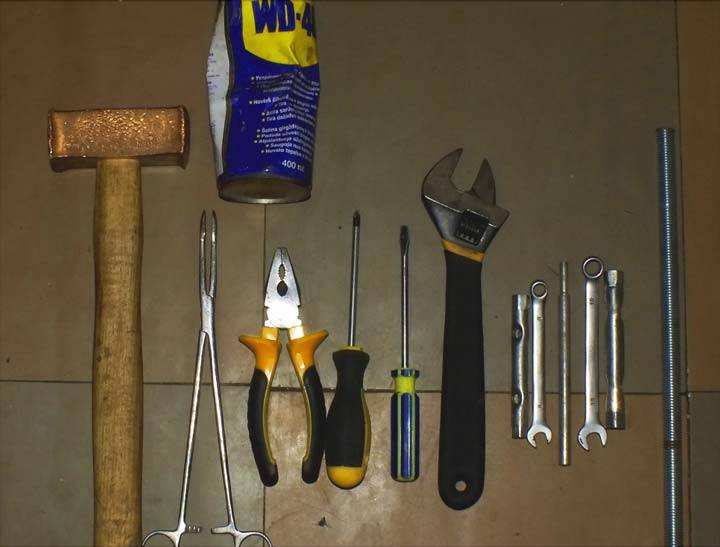
- Phillips and flat screwdrivers;
- socket and open-end wrenches;
- a hammer;
- bit;
- hacksaw;
- pliers;
- lubricant WD-40;
- glue and finally replacement parts.
Washing machine disassembly
First of all, disconnect the equipment from the mains, turn off the water, drain the water and turn off all communications.
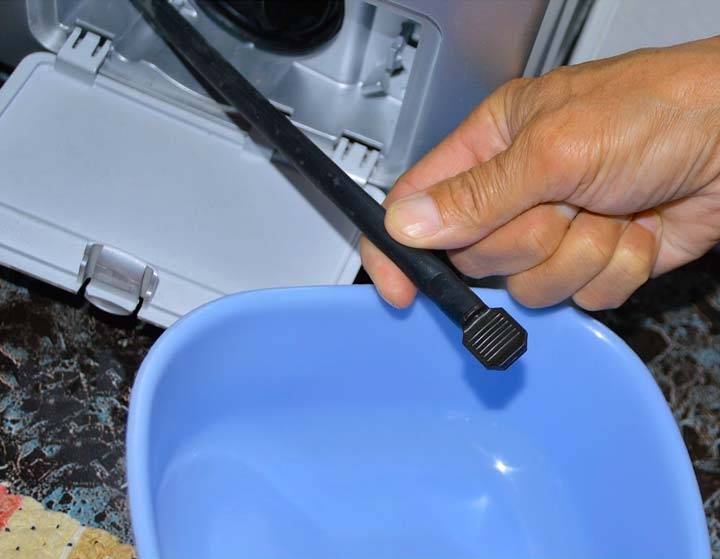
Release the pump filter from water (behind the hatch, under the front panel) - unscrew and pour out the water. Next, move the repaired device away from the wall for further work.
Repair of washing machines indesit ws84tx, wiun 81, wisl 85, wisl 83, w84tx, iwsc 5085, iwsb 5085 and other models, when replacing the bearing, is carried out in the same way.
We proceed directly to the disassembly of the device:
- Remove the top cover, for this, unscrew the two screws from the back with a Phillips screwdriver.
- Remove the back panel, unscrew the bolts and remove the panel.
- Removing the front panel:
- we take out the tray for the powder and detergents by pressing the central clamp, remove the tray;
- unscrew all the screws on the control panel, two behind the tray and one on the opposite side;
- use a flat screwdriver to open the latches on the panel;
- do not touch the wires, place the panel on the top of the case;
- to open the hatch door, bend the rubber, pry the clamp with a screwdriver, remove it;
- we unscrew the two screws on the hatch, disconnect the wiring, remove the cuff inside the tank;
- unscrew the bolts of the door with glass and set aside;
- removing the front panel, unscrew the screws.
- We remove the parts to pull out the tank with the drum:
- remove the drive belt, pull it towards you by scrolling the pulley;
- remove the pulley, fix its wheel and unscrew the central bolt, spray WD-40 if necessary;
- We do not remove the heating element, but we disconnect the wires from it and from the electric motor;
- we take out the motor, unscrew the three bolts and swing back and forth;
- disconnect the pipe through the bottom, put the washing machine on its side, loosen the clamp with pliers and disconnect from the tank;
- unscrew the bolts that hold the shock absorbers at the bottom of the case;
- unfasten the cuvette, first remove the pipe, loosening the clamp, then the hoses, then unscrew the bolt and remove everything together, disconnect the pressure switch hose.
- We take out the tank by pulling it up a little.
- If the tank is soldered, we make holes for future bolts and saw the tank with a hacksaw.
- We take out the drum by hitting its sleeve.
- We remove the gland by pulling it with a screwdriver.
Let's start replacing the Indesit bearing:
- Remove the bearing with a puller, if it is not there, then use a chisel and a hammer to knock out the bearing, tapping it lightly.
- Clean and grease the area for the new bearing.
- Place the part evenly into the seat by tapping on the outside of the bearing. Also install the second part.
- Slide the pre-lubricated oil seal onto the bearing.
- Insert the drum into the tank, glue the two parts, tighten the bolts and proceed with the reassembly of the washing machine.
In addition to the article, we recommend watching a video on replacing the drum bearings of an Indesit washing machine.


