- Recommendations of the masters and possible difficulties
- How to replace the crane box with your own hands?
- 4 comments on Replacing the faucet box in a two-valve mixer - step by step instructions
- How to replace the crane box?
- Crane box stuck to the body - we select the appropriate method of dismantling
- Faucet box for mixer with rubber cuffs
- Causes of failure of a ceramic crane box
- Preparation for repair
- Removal of foreign particles stuck between the plates
- Two types of crane boxes
- Step-by-step instruction
- Faucet Cartridge Repair
- Main malfunctions
Recommendations of the masters and possible difficulties
- Chemical. Implementation is simple as the world. The part is generously lubricated with an acid solution (WD-40, Cilit plumbing or vinegar), and after a few hours it will be possible to try to dismantle it. In difficult situations, you should try to pour the chemical into the problematic compound (for example, with a syringe). In addition, experts recommend trying to boil a completely removed device for 20 minutes in a soda solution - this often helps to turn a stuck valve.
Thermal. It is necessary to apply in the case when the above method did not bring the desired result. It is based on the fact that the crane box itself and the parts of the mixer with which it comes into contact are usually different. Accordingly, they have a different degree of expansion.Processing is carried out with a building hair dryer, with which the thread is thoroughly heated until the bolt moves.
Tapping. Usually helps with the dismantling of an alloy crane box that is leaking. It is carried out with light repeated blows of a hammer or mallet on the body along the threaded connection. Limescale and rust should be removed, and the jammed part should be easy to dismantle.
Jumper swinging. It is used in those situations when the edges of the jumper "sticked together". It is necessary to tightly grasp the bolt with a pipe wrench and try to break it by swinging
In this case, it is important not to apply excessive force - this is fraught with thread breakage and breakage of the part. Drilling a sticky crane box
Drilling
It is considered the most radical way; used when others have failed. The protruding part of the jumper is cut off with a hacksaw, after which the parts remaining inside are drilled with a suitable drill. Instead of a drill, you can use a cutter. Then the thread will have to be cut again.
Leaky fit occurs as a result of increased hardness of water, leaving abrasive deposits on the planes. And to eliminate them, it is enough to rinse and clean the plates. Therefore, experts recommend installing coarse filters in front of bathroom and kitchen faucets when using ceramic cores. In addition, the masters advise:
- before starting work, lay a rug, cardboard or newspapers so as not to lose small parts in the process and protect surfaces from damage if heavy tools fall;
- when the tap fails, when water floods the room, first turn off the water supply, and only then find out the nature of the damage;
- check the new faucet box with a partner: one opens the water to the mixer, and the second monitors whether the leak has been eliminated so that at any time you can immediately close the valve again;
- when buying a new mixer, you should always check which mechanism is being purchased, for which it is enough to unwind the flywheel to the limit; for a design with rubber gaskets, 3-4 turns must be done, for a ceramic one half is enough.
We invite you to read How to remove washing machine filter candy
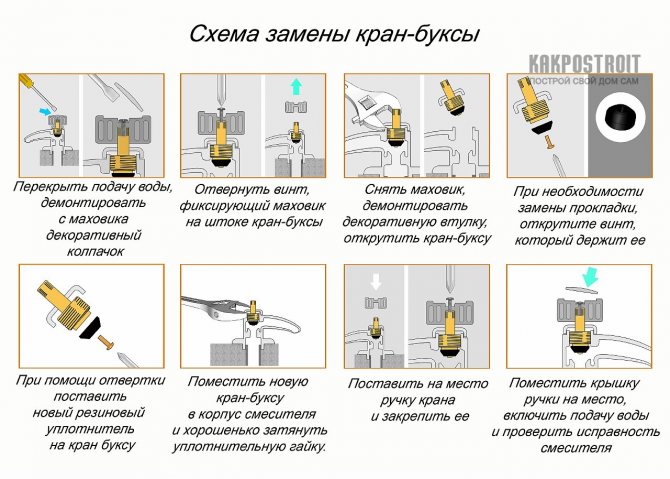
How to replace the crane box with your own hands?
1. Remove the top cap from the flywheel. It may not be easy to do this during a long operation, so pliers will help in this case. Under the cap inside the flywheel is a bolt that must be unscrewed to remove the faucet valve.
2. Often, to unscrew the valve, it takes a lot of effort, because the metal, under the constant influence of water, forms an oxide, which, sometimes, tightly fastens the parts of the mixer to each other. After the valve is removed, it is necessary to clean the thread to which the bolt was attached - during the period of operation, debris could probably accumulate there. The flywheel itself must also be cleaned from the inside.
3. Next, you should start unscrewing the fittings of the crane, which may also not succumb the first time. For convenience, you need to take sliding pliers, and in order not to scratch the glossy surface with them, you can put a piece of dense matter under them.
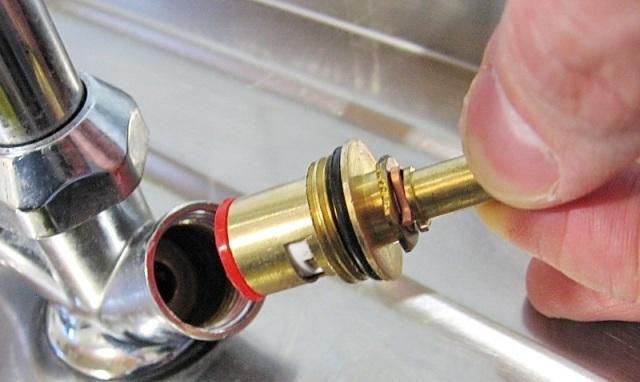
4. After removing the fittings, you can see the axle box screwed into the mixer. Before you unscrew it, be sure to check whether the supply of hot or cold water is shut off (depending on which water was regulated by the failed faucet box).
If the water is not shut off, then it will gush immediately after removing the axle box from the mixer.
5. When the axle box is unscrewed, it is necessary to carefully clean the thread of the mixer. This is necessary so that the new axle box fits tightly along the thread, otherwise, if debris remains there, water will leak not only from the gander nose, but also at the base of the flywheel. For stripping, a card brush is suitable.
6. For each mixer, a certain type of crane box is suitable. It is necessary to select this part in such a way that it matches in thread, size and material (ceramic or rubber). For convenience, a box that is out of order can simply be taken with you to the store.
7. We screw the new bushing into the place where its predecessor stood. If the thread of the mixer is cleaned normally, then there should be no problems with the further assembly of the flywheel.
Since the faucet is often used in the bathroom and in the kitchen, it will be useful to have the skills to replace the faucet box, because most often it is she who is the cause of water leakage. And, thanks to step-by-step instructions with a photo, not only a man can cope with this, but also a housewife who does not have the opportunity to turn to a plumber.


I also suggest watching a video on replacing the mixer tap with your own hands.
4 comments on Replacing the faucet box in a two-valve mixer - step by step instructions
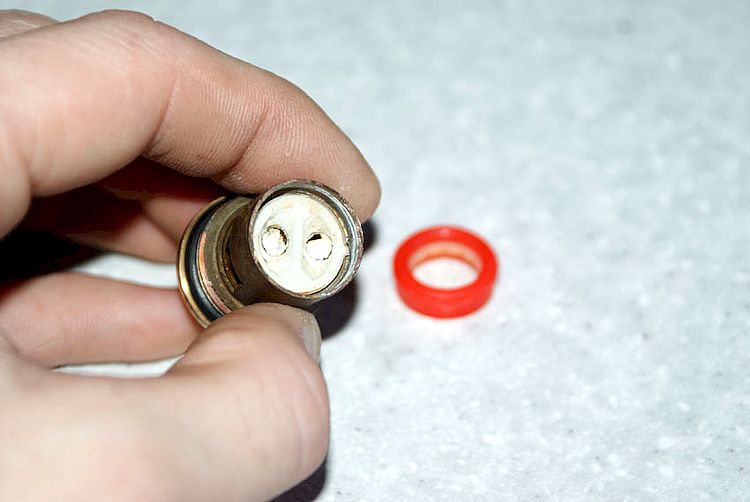
Hello! Thank you for the step-by-step showing of the replacement of the bushing crane. And thanks for the VIDEO. There were two questions left: when the plumbers were replacing, for some reason they looked at the square windows of the bushing faucet, and the brand new bushing faucet was rejected. Why did they do it? And the second "gander" in the kitchen - rotates along with the mixer body: it simply "grown" to the mixer.What can be done? The mixer is good, and the stock of faucet boxes for it is decent. Calling plumbers is very expensive, and ... honestly, more often they cause some kind of damage, not fixes. Yours sincerely, Galina
And yesterday I had to go to the plumbing store twice, because at first I was too lazy to take the unscrewed handle with me. It turned out that there are different numbers of splines on the same-looking crane boxes. They gave me two samples and then had to trudge a second time to return the extra 🙂
Some say that crane boxes with a rubber gasket are much easier to maintain (repair) - I changed the rubber band, and that's it. Others say that ceramic bushings are more durable. What is the best option for a crane box in your opinion?
Ceramic faucet boxes begin to leak water over time, the faucet begins to drip, sometimes after a few months of use. It is necessary, for example, not to fully tighten the valve in order to stop the flow. It's about durability. For whom it is easier to throw it away and buy a new one - the best option. You can repair ceramic faucets with your own hands, but this is no longer as easy as in the case of simple rubber gaskets.
How to replace the crane box?
1. If you mustered up your courage and decided to replace the faucet box yourself, then the first thing you need to do is to turn off the supply of cold and hot water with shut-off valves at the inlet from the riser (water meters).
After you have shut off the water from the riser, you need to check whether the water is completely shut off. To do this, unscrew the cold and hot water taps on the mixer.If water does not start flowing from the mixer, then you have shut off the water well and you can start replacing it.
In the event that you plan to replace only one faucet box, you can only cut off the supply of the corresponding water. Just keep in mind that in this case you will not be able to open the second crane box. So, if you can shut off all the water, you better do it.
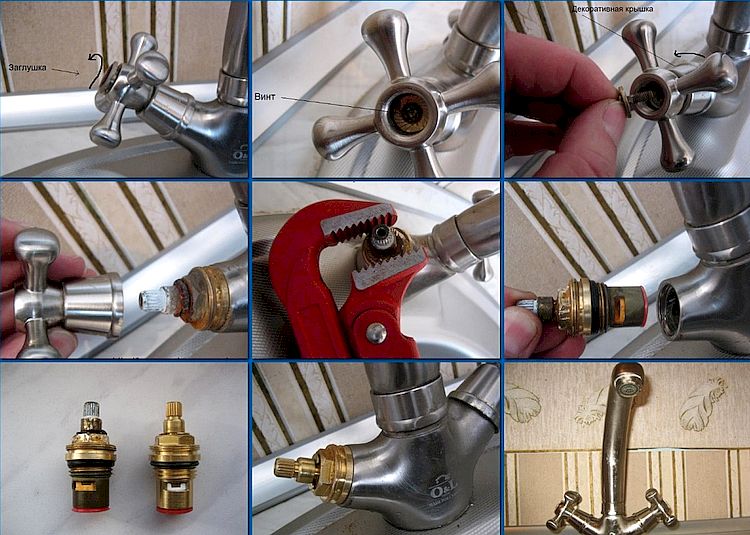
2. Remove the valve handle. To do this, remove the decorative valve cap. If it is screwed onto the body of the handle, then unscrew it counterclockwise with your hands, or carefully using pliers. If the plug is inserted into the handle body, carefully pry it out with a knife or flathead screwdriver and remove it from the valve.
3. Unscrew the screw that has opened to your eyes with a suitable screwdriver and remove the valve.
It often happens that the valve handle is jammed on the splines of the valve stem and does not want to be removed. In this case, try to pull the handle off by loosening it in different directions, or gently tapping it from different sides. You can also try moistening the seat of the handle on the stem with kerosene or a penetrating lubricant.
Some faucets have an additional decorative slip skirt covering the top of the faucet box.
After removing the handle, unscrew the decorative skirt by hand, turning it counterclockwise. If it is not screwed on the thread, then simply pull it off the mixer body.
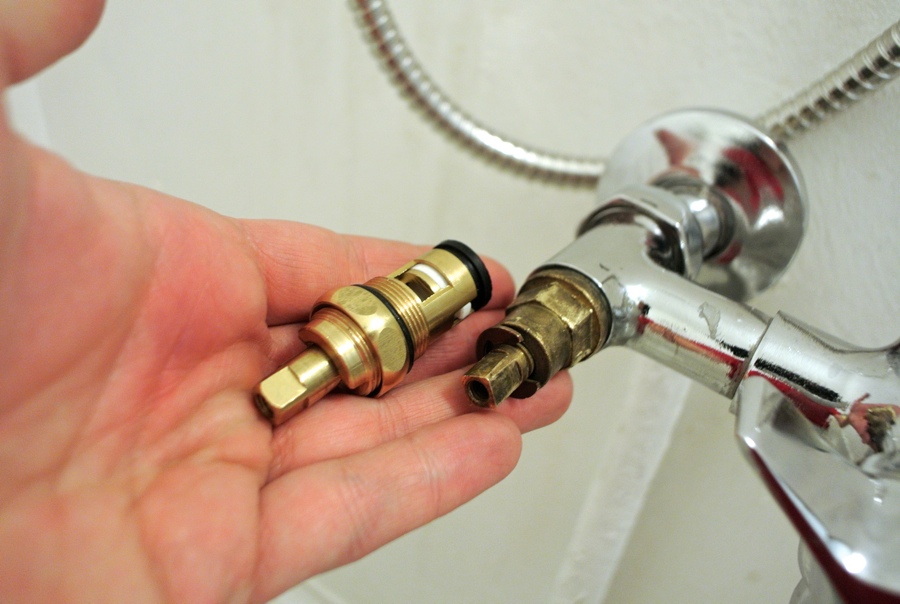
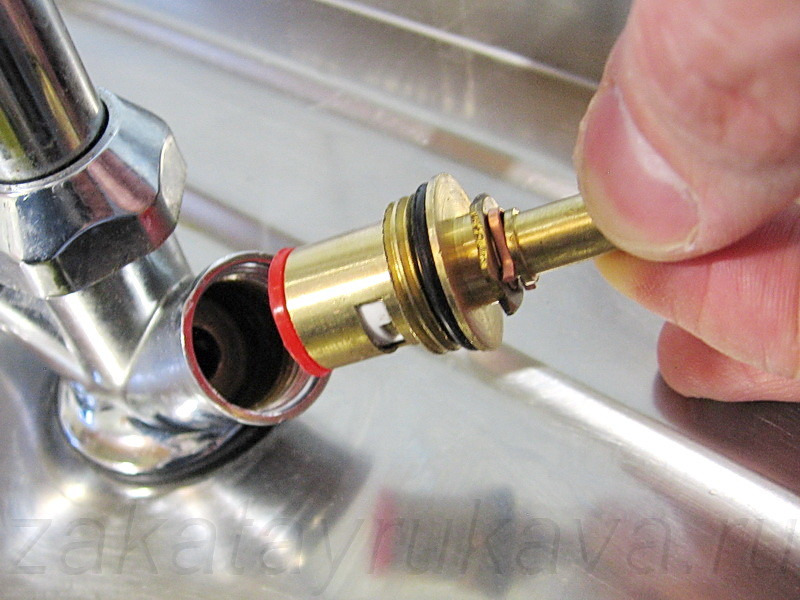
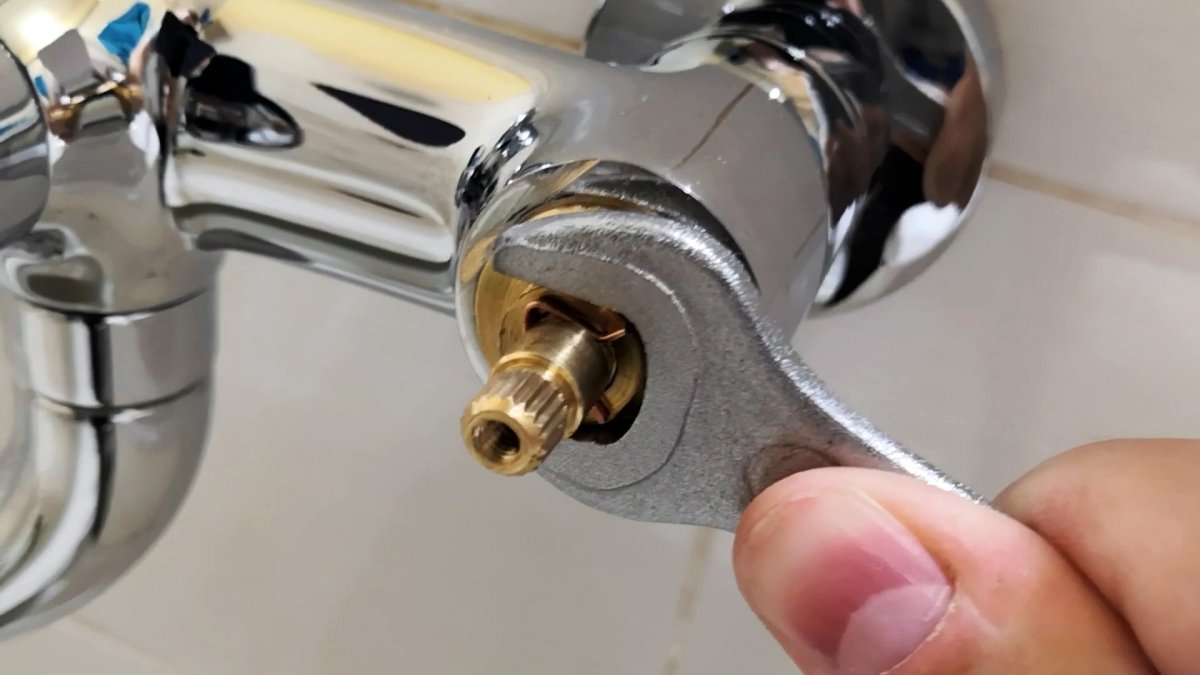
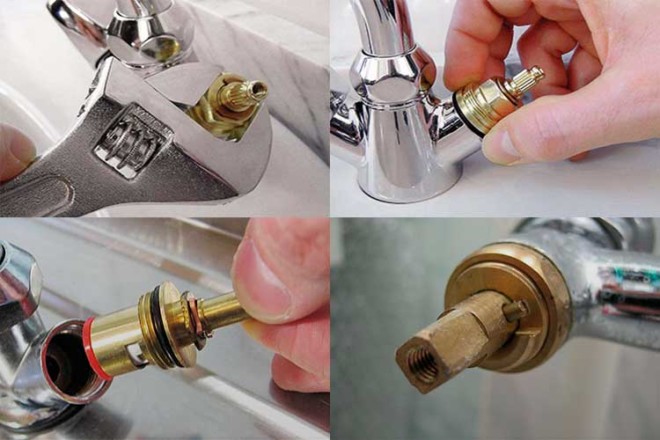
4. Using an adjustable wrench, open-end wrench or pliers, unscrew the faucet box by turning it counterclockwise and remove it from the mixer body.
5. Purchase a new crane box.To be completely sure that you will get the crane box that suits you, take the old crane box that you just removed with you to the store or to the market and show it to the seller. This way you will insure yourself against buying the wrong part.
At this stage, you will be able to upgrade your faucet. If your faucet was previously equipped with worm-type faucets, then instead of them you can purchase and install ceramic faucets of suitable size. In this way, you will increase the reliability of the mixer and significantly improve its user performance. In addition, ceramic bushings are installed in the same places where their old worm relatives previously stood, without the need for any alterations.


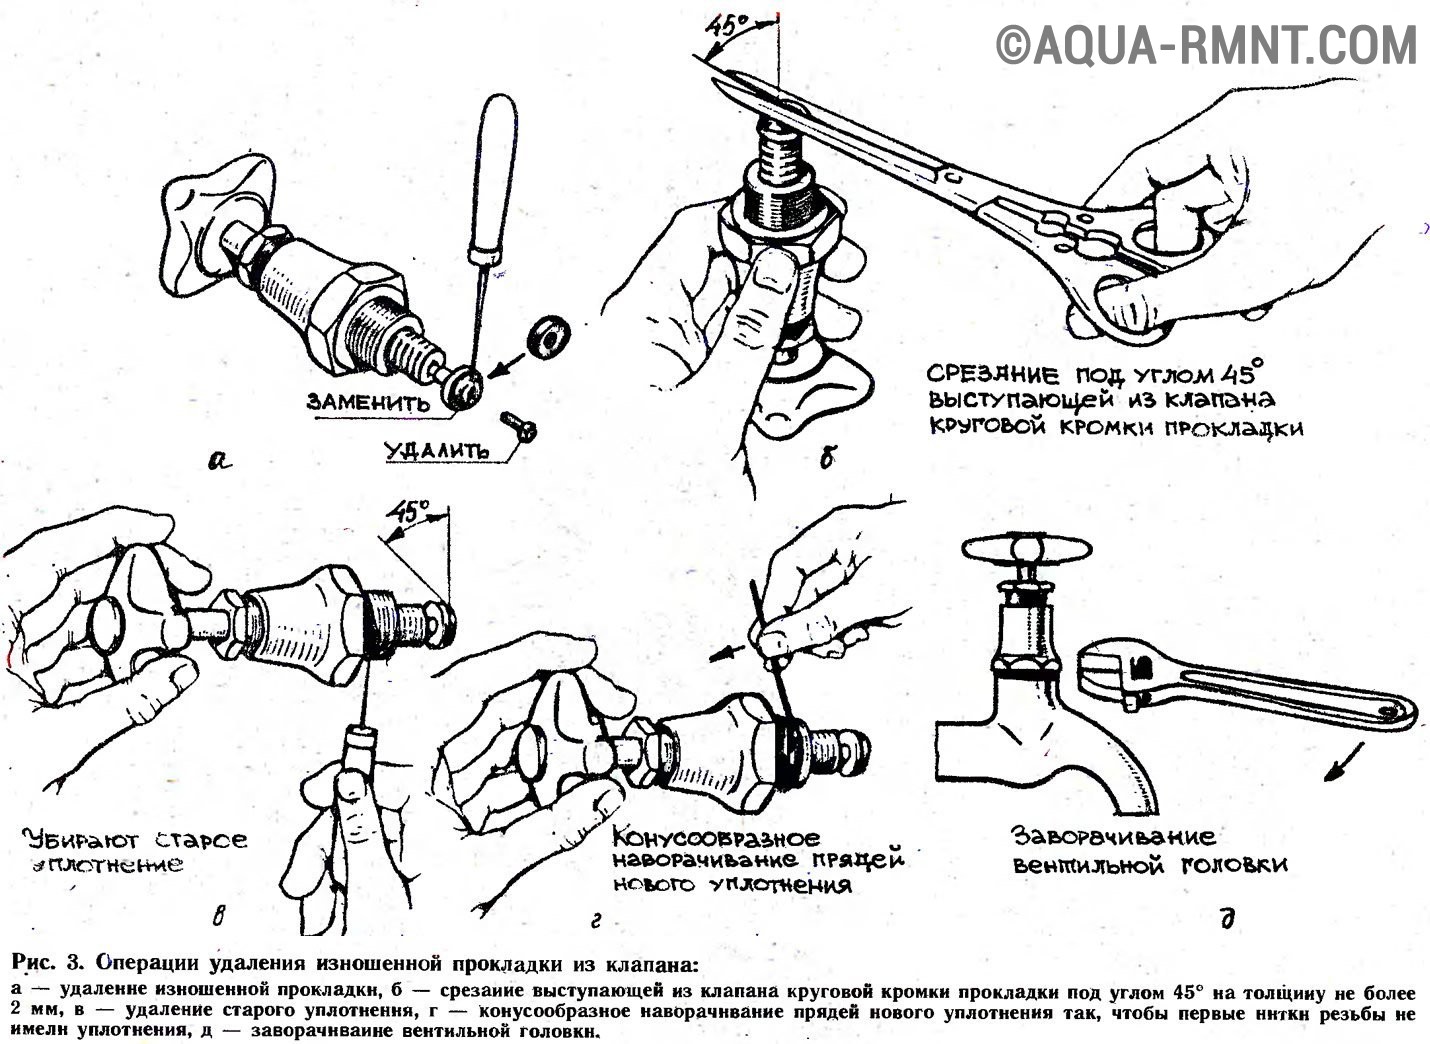


6. Install the new crane box in reverse order. Check for the presence of the necessary rubber seals in the design. Before installation, I recommend cleaning the thread for the tap-box in the mixer and the seat from possible dirt, scale, rust particles, etc.
Take care not to over-tighten the threaded connections during installation. Screw the faucet box into the mixer by hand until it stops. Then, without applying too much effort, so as not to strip the thread, tighten the axle box with a wrench or pliers.
7. Close the installed bushings, then open the shut-off valves to check the quality of the work done. If water drips somewhere after installation, tighten the appropriate connections with a wrench.
Replace the decorative skirt, valve, plug and you can use the updated mixer.
In the event that you decide to only replace the gasket on the worm-type bushing (note that the ceramic bushing changes completely), then you will still need to remove the bushing first, using the instructions you read earlier.
Crane box stuck to the body - we select the appropriate method of dismantling
After removing the valve and plugs, you need to unscrew the faucet box, but it has become stuck and it is impossible to remove it in the usual way using an adjustable wrench. We offer you four methods, from less to more labor-intensive.
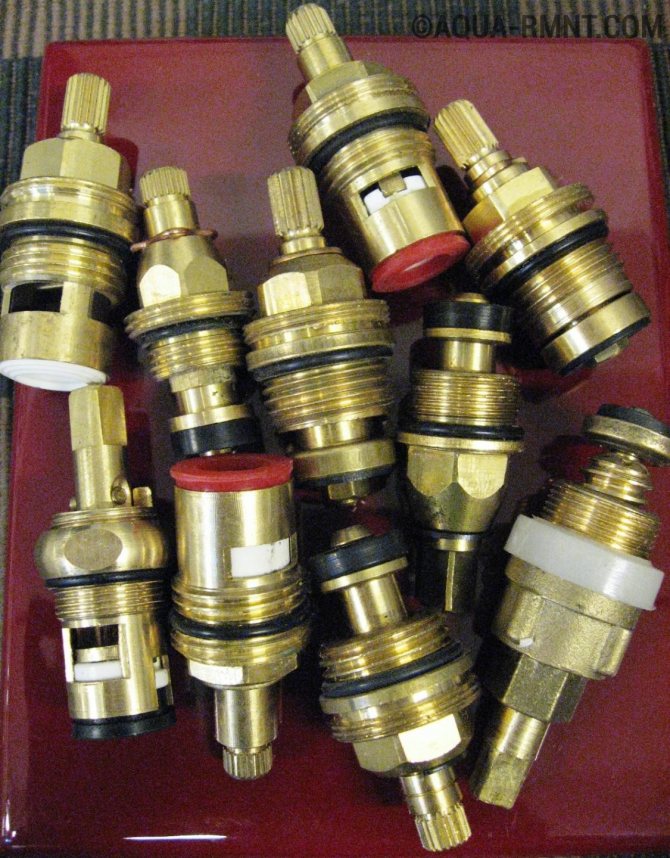
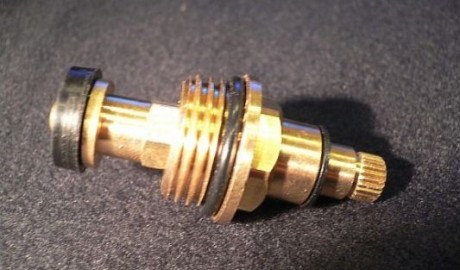
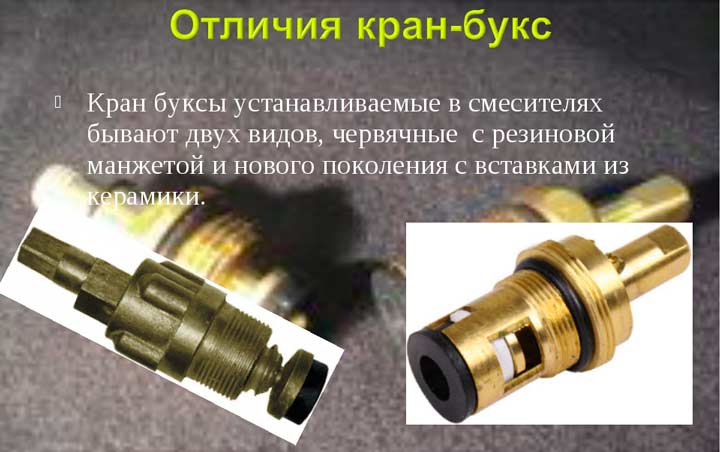
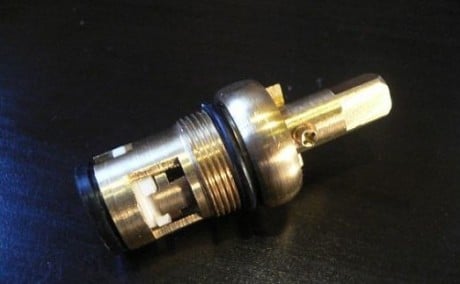
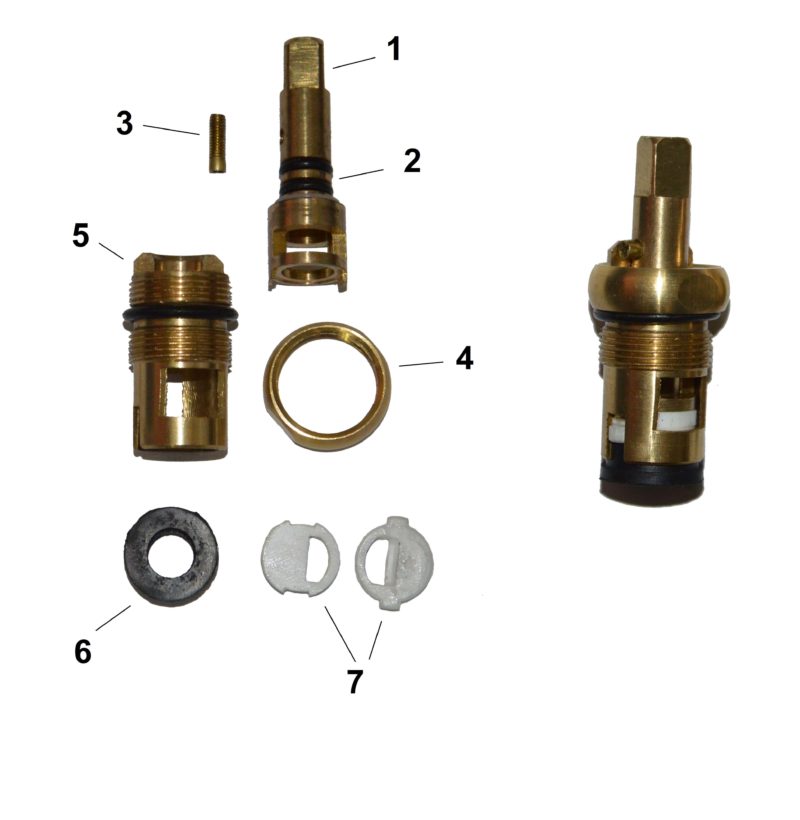
The axle box crane for the mixer is an imperceptible thing at first glance, but its breakdown leads to unpleasant consequences that can disturb the peace of the residents with annoying noise and difficulties when opening the tap. The fact that the faucet box in the mixer is worn out and it is time to change it, we learn from the flowing water from a closed tap and the characteristic rattling sounds. A malfunction of this part causes a lot of trouble, but you can quickly get rid of them by replacing the axle box. Before talking about replacing it, let's figure out what crane axle boxes are, consider the differences between them, as well as what advantages and disadvantages each of them has.
- Ordinary worm with rubber cuffs.
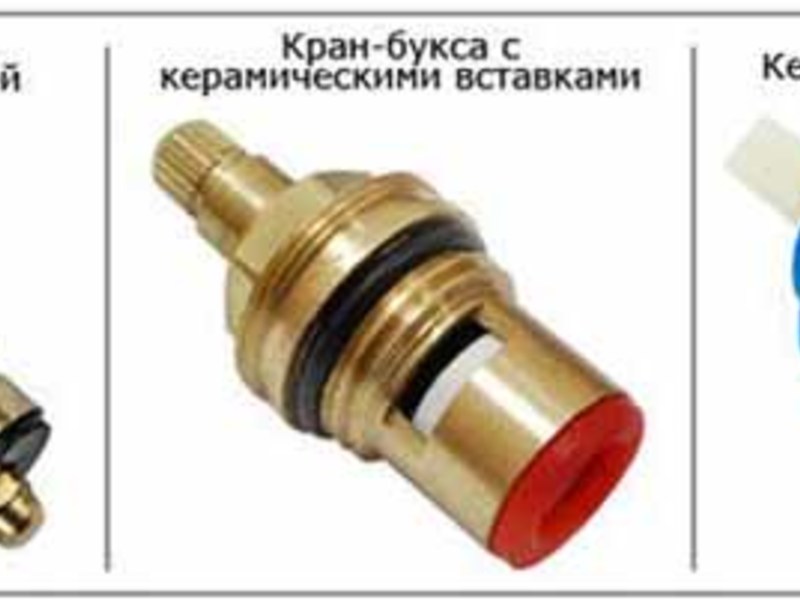
- Boxes of new generation with ceramic inserts.
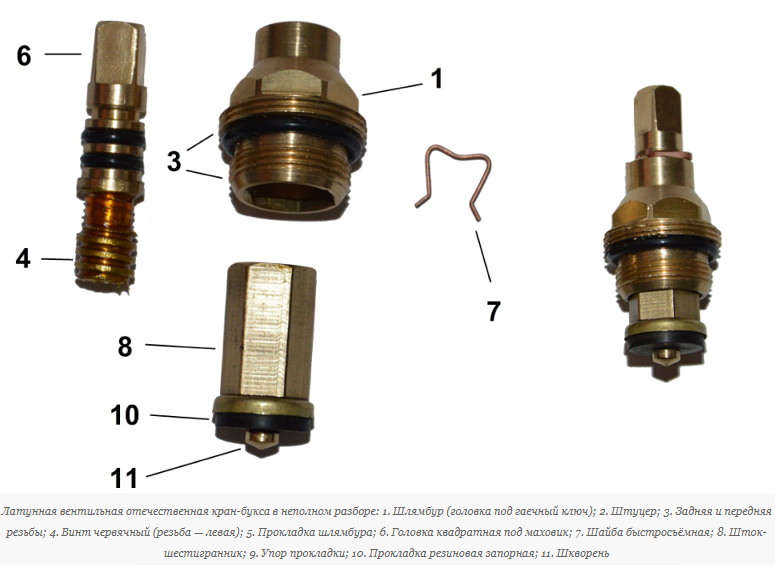
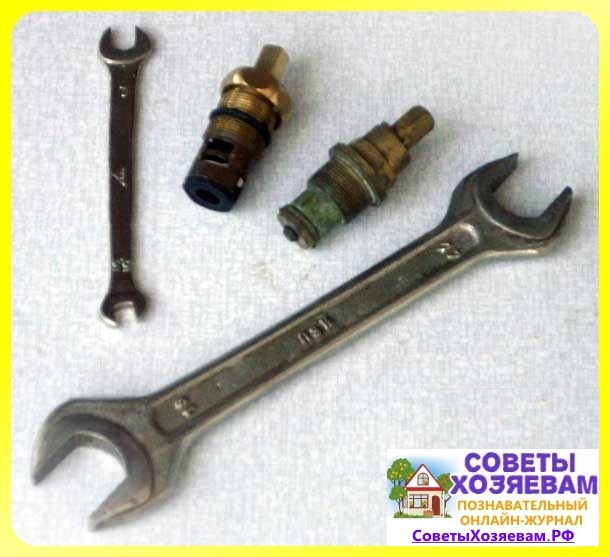
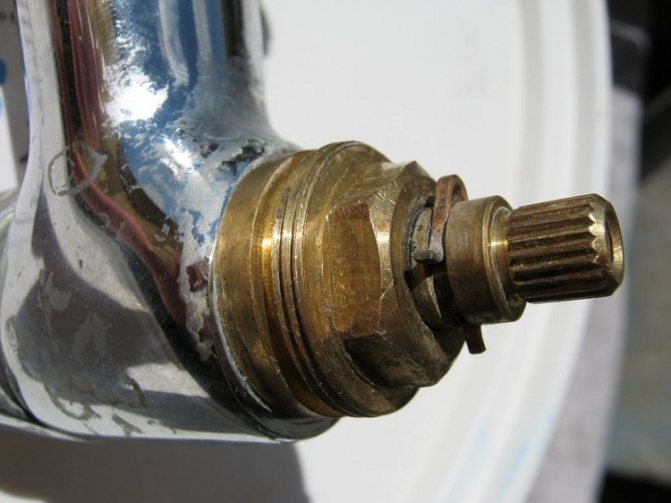
They differ in length and number of slots. On an imported mixer there are 20 and 24 of them (under the handle). The domestic mixer has a square fixture for the handle, equipped with a fixing screw. Also, the differences are in the diameter of the threaded part, the one that is screwed into the faucet. The most common diameter is considered to be ½ inch, the ¾ diameter is less common.It is better to buy a new crane box if you have an old one that can be shown to the seller, and he will pick up a part of a similar configuration.
Faucet box for the mixer, ordinary and with ceramic inserts
Faucet box for mixer with rubber cuffs
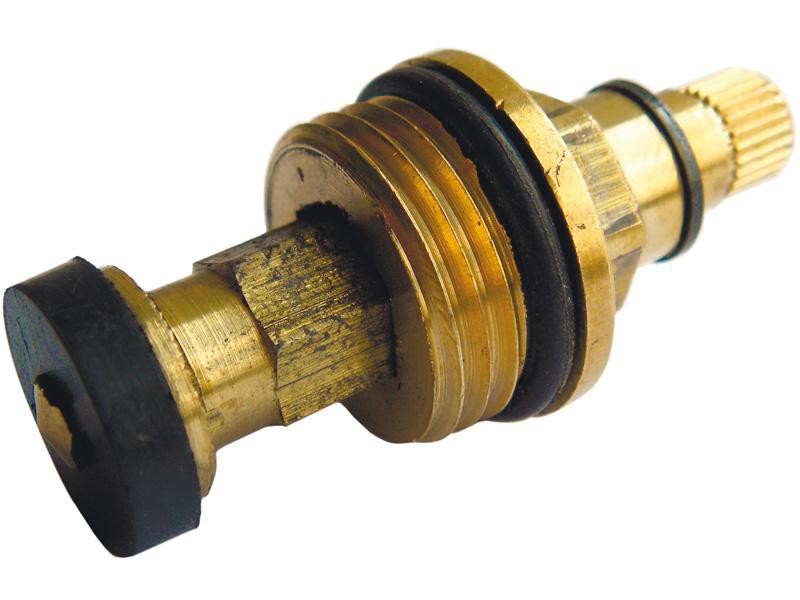
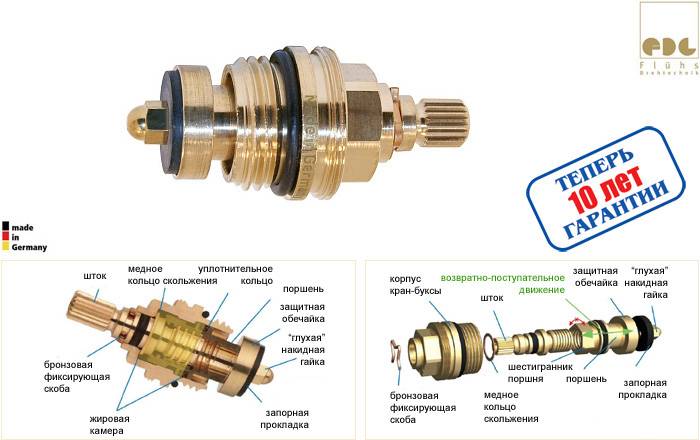
This type of axle box has a worm gear and a rubber seal at the end of the rising stem. Complete closure requires two to four turns. Such an axle box has the following principle of operation: the rubber gasket inside the valve is pressed against it, blocking the path of water. The rubber gasket wears out quickly but can be easily replaced. The gasket can be made of various grades of rubber, on which the duration of its operation largely depends.
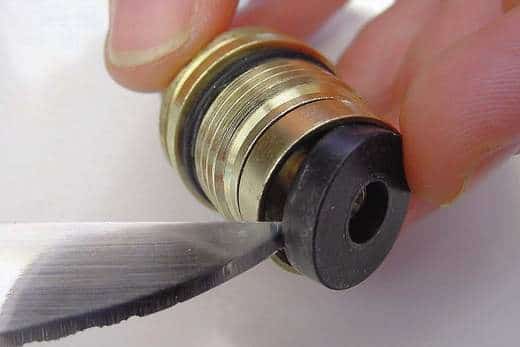
Crane box with rubber cuffs
Advantages
- It is possible to change the gaskets without replacing the entire crane box.
- Low cost pads.
- Possibility of self-manufacturing of gaskets from rubber.
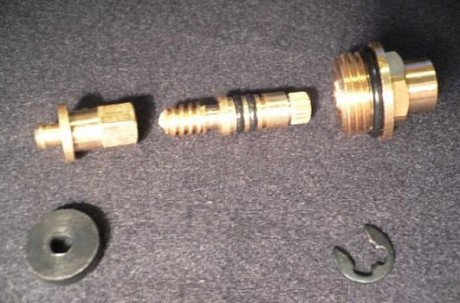
Disassembled crane box with rubber cuffs
Flaws
- Short service life.
- Lots of turns from opening to closing.
- A significant deterioration in smoothness over time, which leads to the need for a stronger twisting of the crane.
- A characteristic unpleasant noise caused by a resonating valve. Resonance occurs when the gasket is worn. This factor can adversely affect the operation of water communications.
Replacement of a cuff of a worm crane box
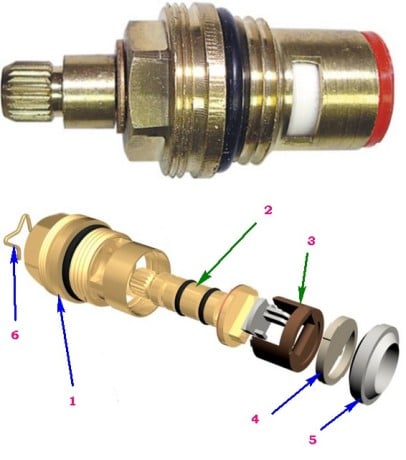
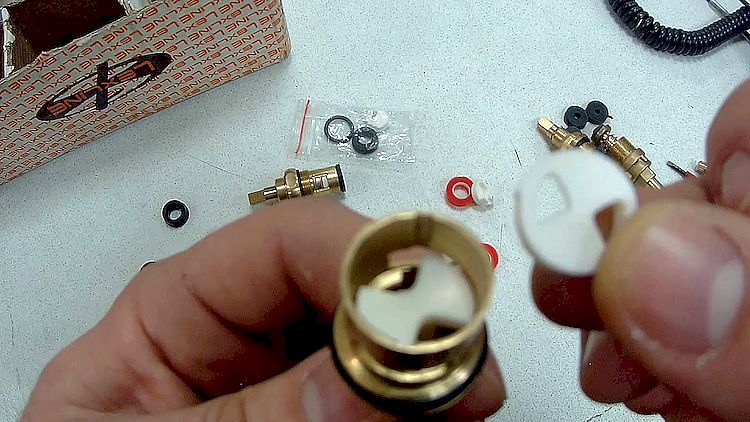
The basis of this crane box is made up of two ceramic inserts made in the form of plates and equipped with identical holes. From full opening to closing the handle, half a turn is made.
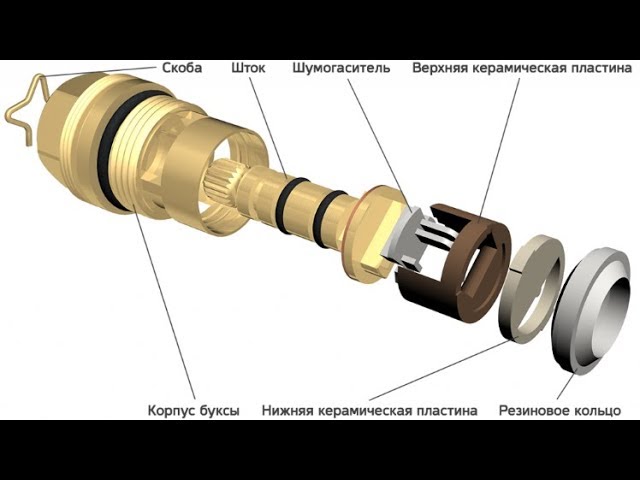


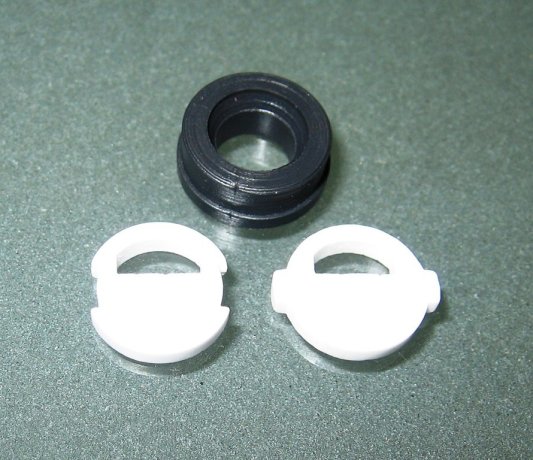
Ceramic inserts in the crane box
The design of the axle box provides for a rigid fixation of one of the plates inside its body. The second plate is fixed on the stem, and a flywheel is attached to the stem, in turn. When the faucet handle is turned, the holes of the plates are aligned in such a way that water begins to flow into the mixer through them. It is possible to replace ceramic components, but this is not as easy as in the case of rubber gaskets, since the inserts will have to be selected individually according to the size of the box. It's easier to buy and install a new box.
Advantages
- Long period of operation.
- Ease of use: it only takes half a turn to open the water.
- Minimum noise level during operation.
- Smoothness of the handle.
Flaws
- The cost is higher than that of models with rubber gaskets.
- The operation of the axle box will be difficult if there is sand and other coarse impurities in the water, therefore, for the smooth operation of the system, it is better to install a fine water filter.
Causes of failure of a ceramic crane box
- Wear of ceramic plates. Occurs rarely and requires replacement of elements. The work is laborious, so it is easier to purchase a new part.
- Foreign objects between plates. For the future, so that such defects do not appear, it is advisable to install a device for purifying water from impurities.
- The appearance of a thread between the stem and the body of the crane box. In this case, it is necessary to change the entire part.
Before repairing any complexity, it is necessary to turn off the water and prepare the tools for work. The minimum set should include a flat and Phillips screwdriver, pliers, a gas wrench and a box wrench.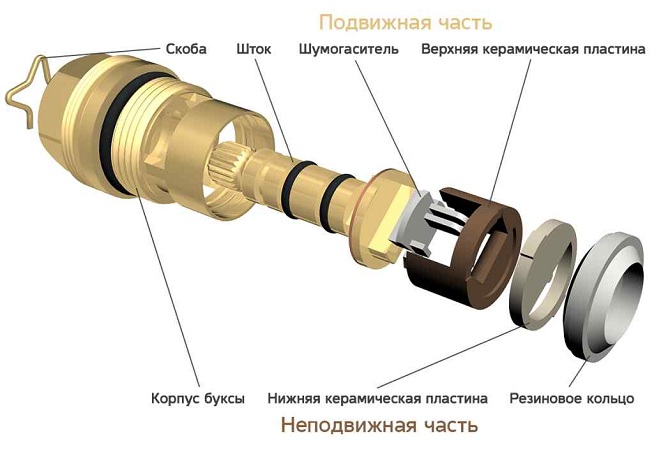
You can choose a team of builders on the website
Preparation for repair
In order to correctly perform operations to restore the mixer's performance, everything must be done in stages. The repair plan is as follows:
- Remove the flywheel from the crane box. To do this, remove the colored decorative cap from the valve. Next, pull the flywheel up. There should be a bolt underneath. Unscrew it, remove the valve.
- Clean threads and flywheel. Under water skip the details a couple of times, use cotton buds or other similar items.
- Unscrew the decorative insert of the tap. At this stage, use a box wrench with a head of 17.
How and how to unscrew the faucet box from the mixer? Adjustable wrench counterclockwise. The main thing is to hold the mixer. Then clean the thread with a brush.
Operating procedure:
- unscrew the crane box;
- put some silicone on the gasket;
- put the part back.
Removal of foreign particles stuck between the plates
Grains of sand contribute to the violation of the tightness of the axle box, its failure. Foreign objects cause leakage. The order of work in this case is as follows:
- unscrew the crane box and disassemble;
- clean the plates, treat them with waterproof grease;
- put the item back in place.
Important! Plates cannot be flipped
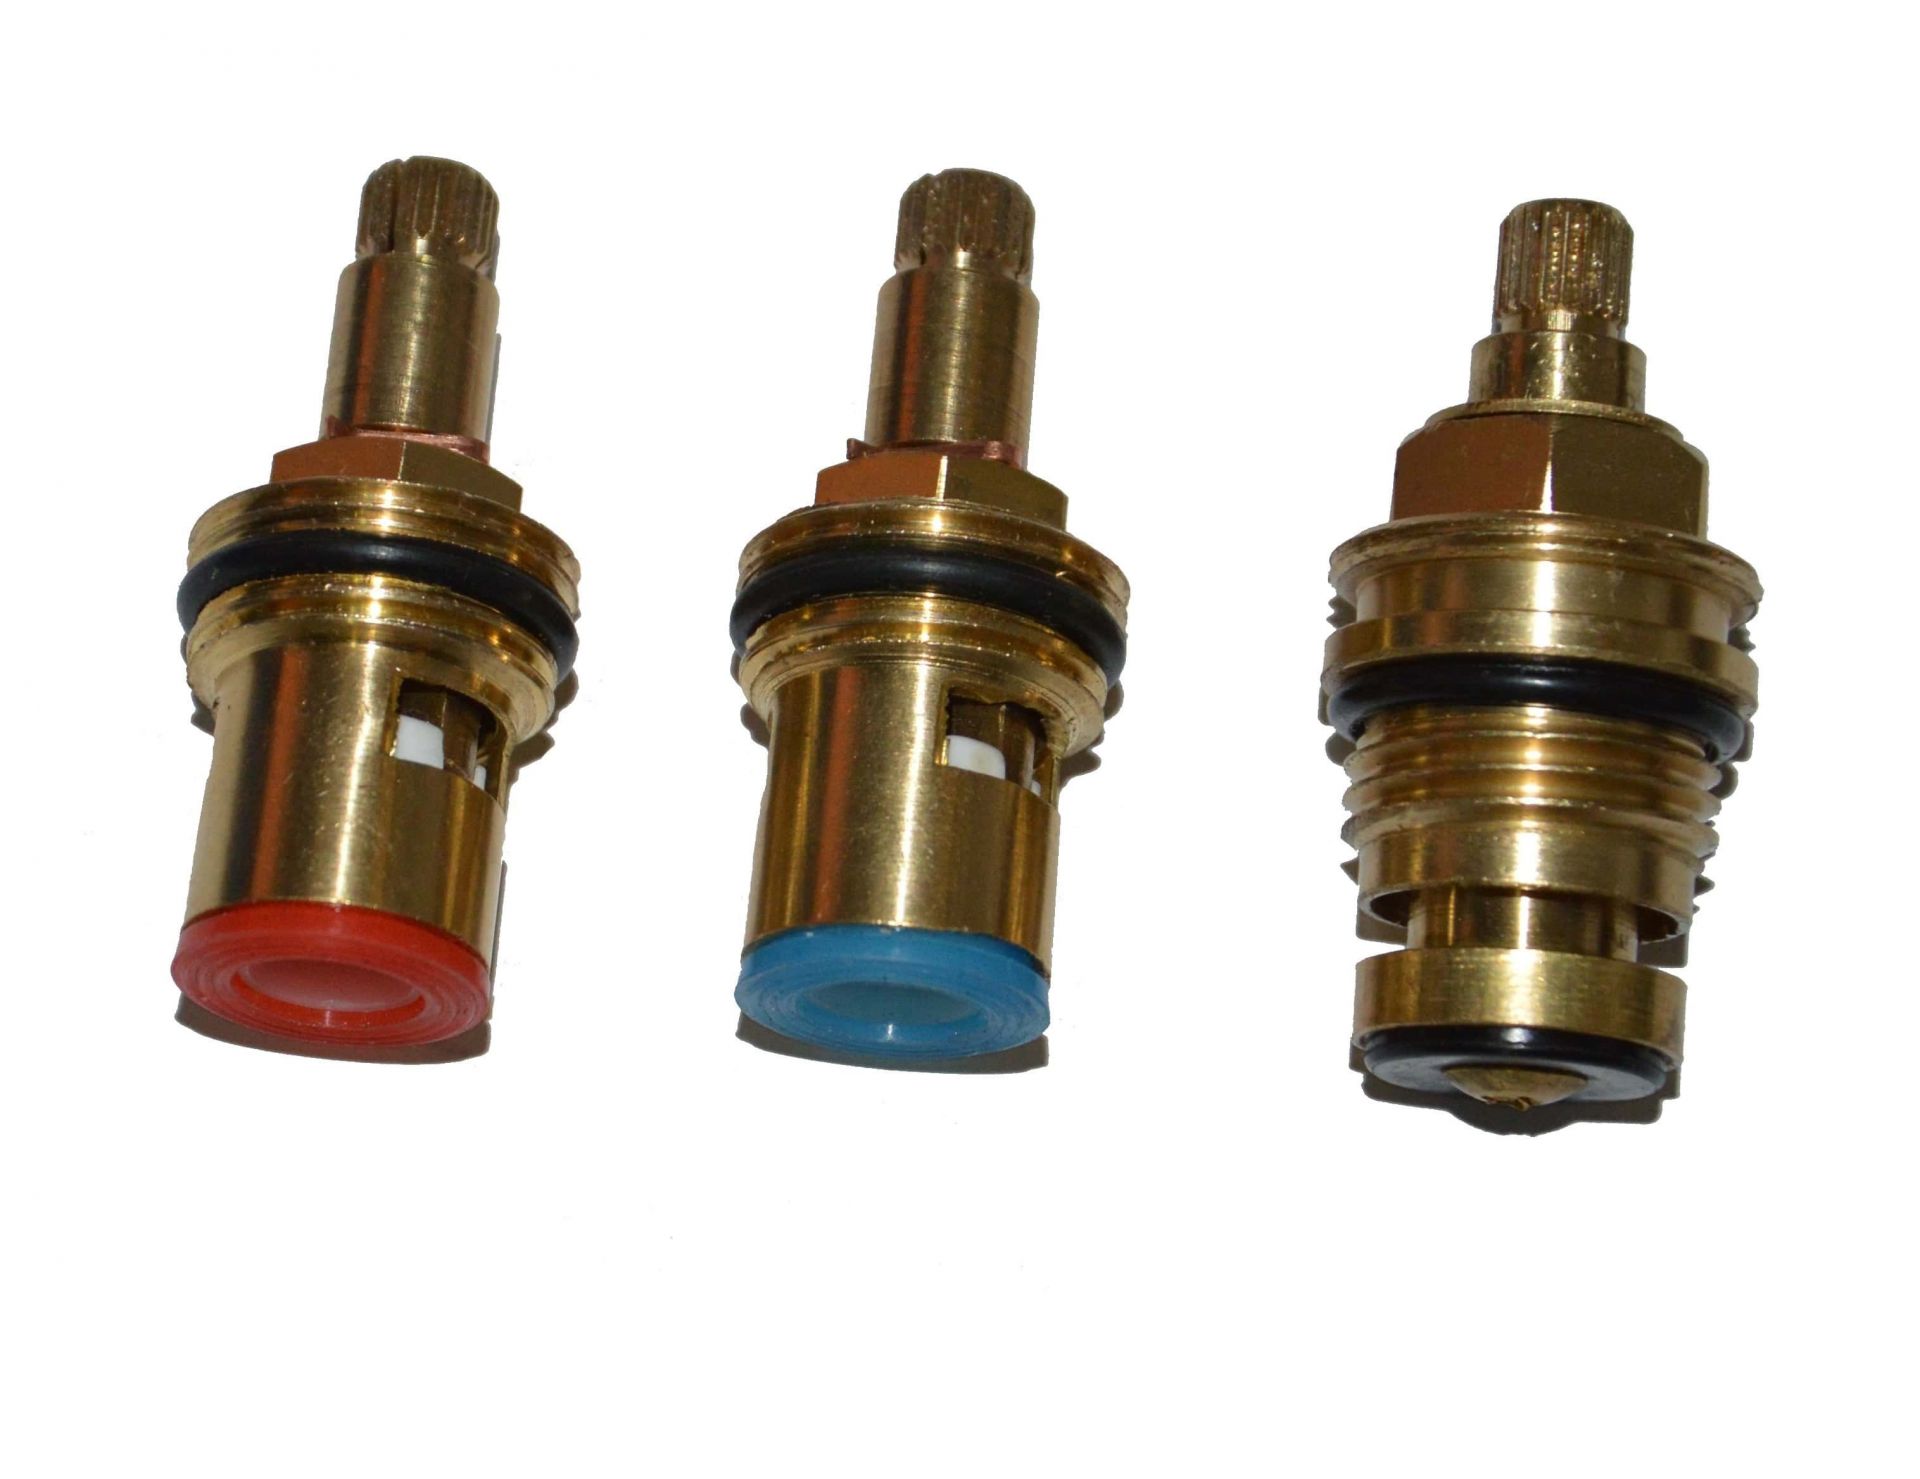
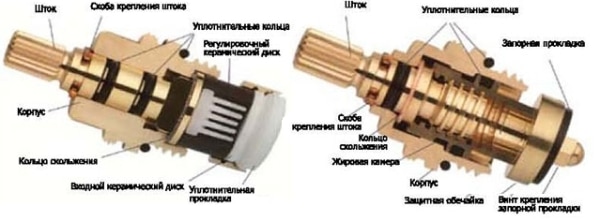
Two types of crane boxes
In faucets for baths and kitchens, two types of faucets are used: with a worm gear and rubber gasket, and with movable ceramic plates that block the flow of water.
Crane boxes of two types
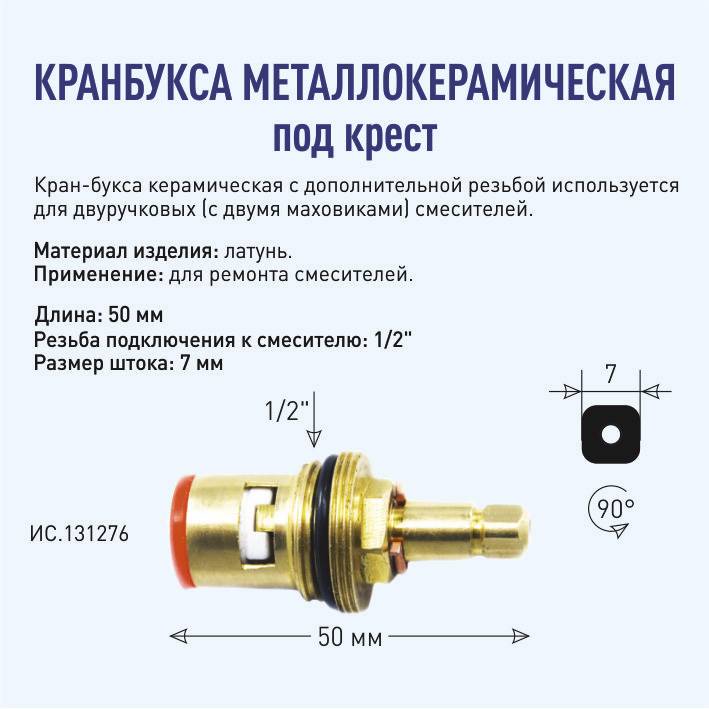
In order to change the crane box, you must first buy a new one.It is easier to do this if you unscrew and bring to the store the one that is to be replaced, since the faucet bushings in the mixers may differ in some parameters, including the length and diameter of the threaded part (1/2 or 3/8 inch), seat under the handle (square or spline connection with 20 or 24 splines). As a rule, consultants in plumbing stores are able to select the necessary product according to the sample.


The difference between a bushing with a rubber-sealed stem and a movable ceramic plate design is as follows.
• The first ones incorporate a stem that is extended using a worm gear and locks the valve seat with a rubber gasket. When worn, such a gasket is easy to change, and it costs a penny. Unfortunately, gasket replacement is required quite often;
Crane box with rubber gasket
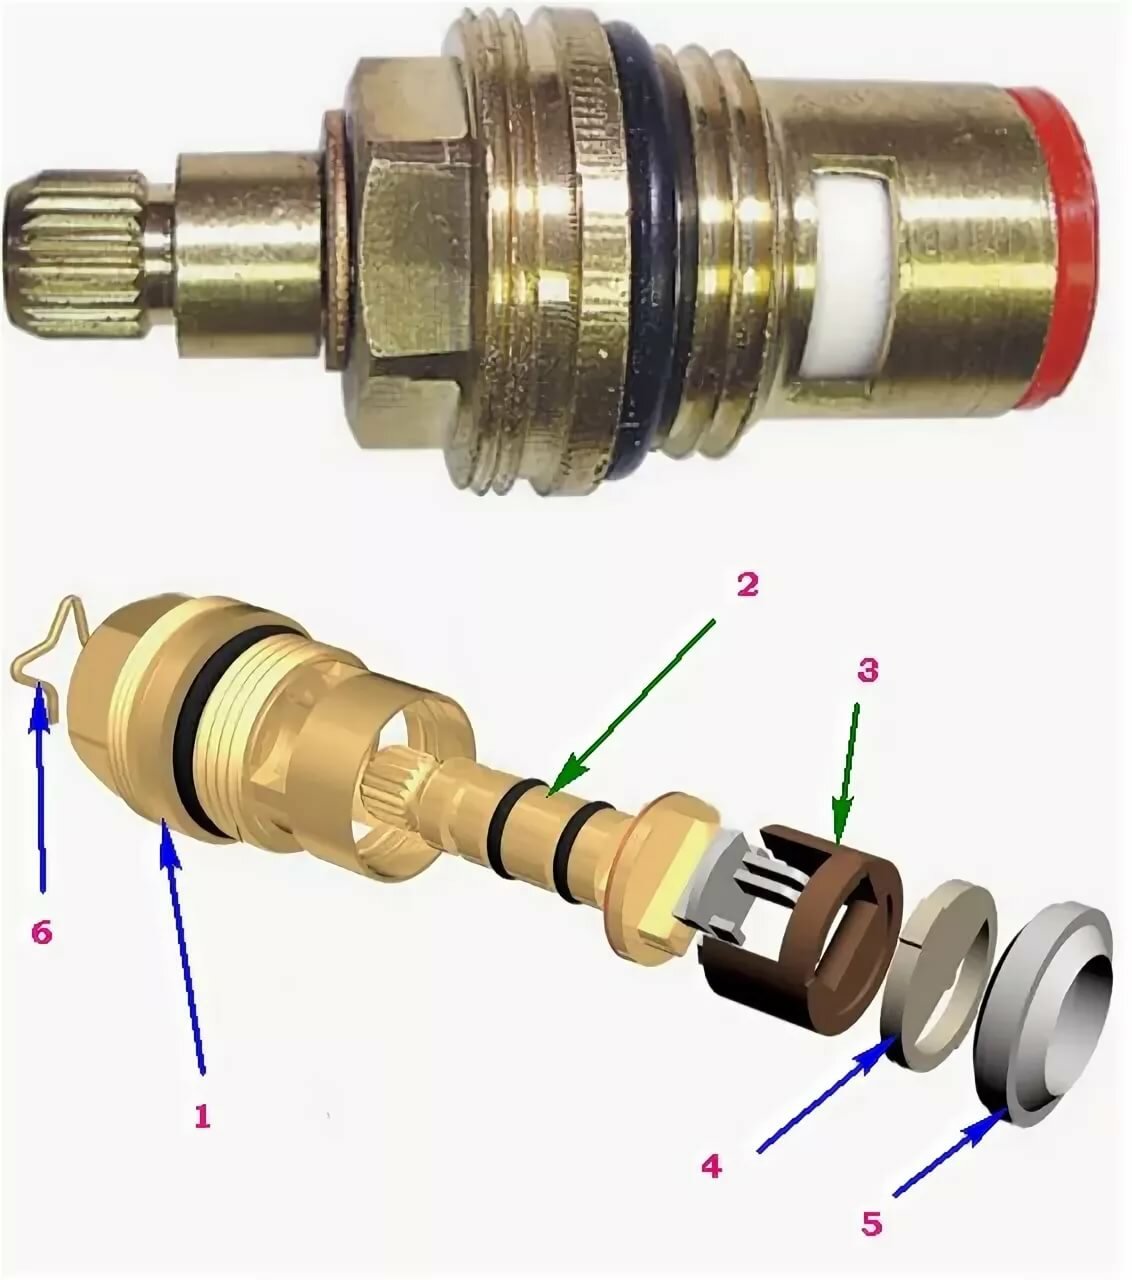
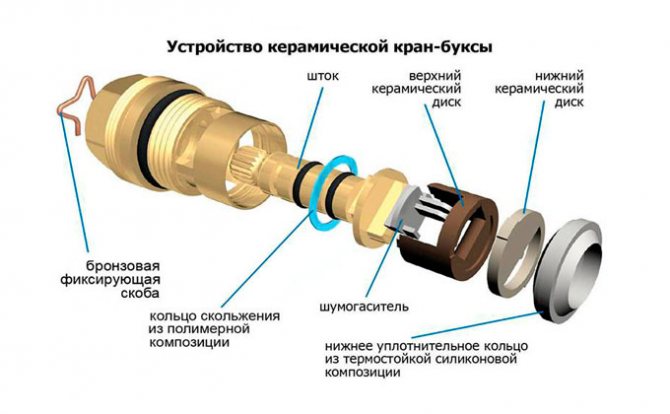
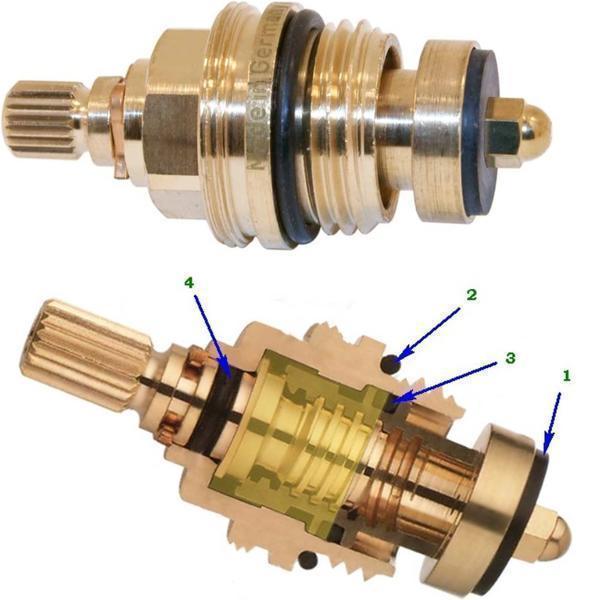
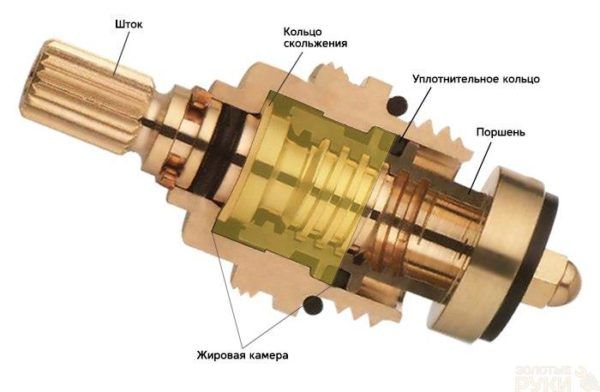
• The faucet box with ceramic plates does not require rotation of the stem (handle) of the mixer in order to open the faucet completely. It is enough to turn its flywheel just half a turn. The ceramic faucet box is arranged simply: a ceramic plate with a hole is fixed on the rod, the second plate (with the same hole in shape) is fixed motionless. A slight turn of the tap and the alignment of the holes on the plates opens the way for water.
Crane box with ceramic plates, its device
In principle, the ceramic plates inside the movement can be changed. However, they break quite rarely, and replacing the entire crane box is much easier.Compared to a rubber gasket, changing a faucet box with ceramics is more expensive, but the convenience of everyday use of a mixer is worth the money, and the service life of such products is very long. The only thing that can limit the use of ceramic faucets is hard tap water, which has a large amount of solid inclusions that have abrasive properties due to which the ceramic plates are erased, they no longer fit tightly to each other, letting water through. Often by disassembling and cleaning these plates from scale and rust, the problem of water leakage is solved.
I recommend: How to repair the crane box on the herringbone mixer?
Step-by-step instruction
- Turn off the water supply.
- Remove flywheel. First you will need a screwdriver to twist the fixing screw under the cap. After the flywheel is removed from its original place, access to the crane box is opened.
- The crane box is removed with a 17 mm key. Some ceramic designs may have a locknut that can be loosened with an adjustable wrench. With a 7 mm wrench counterclockwise, the crane-box “under the square” is unscrewed. Difficulties can arise even at the initial stage, when you need to remove the screw on the faucet handle. Under the influence of water, the device rusts, turns sour, and the place where the screwdriver should be inserted cannot be found. A drill will help to cope with this situation. She makes a hole in the head of the screw, and it is easily removed. In very difficult situations, when the rust has penetrated too deeply, the crane box will have to be treated with a solvent so that it can be removed. But before installing a new part, you need to thoroughly clean the installation site, threads, flywheel from rust and solvent residues.
- The new part must not be tightened too tight, it is better not to hold out a little.
Sometimes the mixer starts to flow not due to a breakdown of the faucet box, but due to the abrasion of the gasket. In this case, repairs can be made without disassembling the structure to the end.
Replacing the gasket in the valve seat
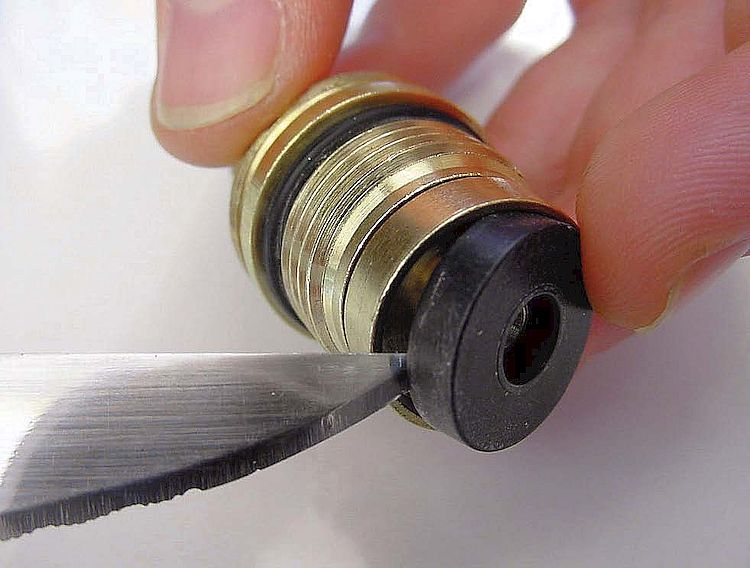
First you need to turn off the water supply - this is a prerequisite for even the most minor work. Using a flathead screwdriver, carefully pry off the top cover of the valve. Then the screw is unscrewed and the flywheel is removed. Now there is access to the crane box, and you need to unscrew its upper part from the saddle.
It is in it that there is a bolt with a rubber gasket put on it. The old gasket must be removed, a new one installed and the structure assembled.
Replacing the ceramic plate gasket
This type of repair is required if the leak comes from the mixer itself, and not the valve. To fix the problem, you will need to disassemble the crane box completely.
You need to do the same operations as when replacing the gasket in the crane seat, with only one change: unscrew not part of the crane box, but the entire part. The crane box is already divided into two parts outside the mixer - upper and lower - a gasket is found between the upper disk and the housing, and replaced with a new one.
Replacement of ceramic discs
Change the discs when the seal between them is broken. This happens if there is some grain of sand between the disks. Therefore, in addition to the replacement of disks, you need to clean the parts well.


Procedure:
- Shut off the water.
- Unscrew the fixing screw and fixing ring of the mixer with a gas wrench.
- Remove swivel mechanism.
- Take out the ceramic discs.
- Rinse new discs and replace old ones.
- Apply lubricant or silicone to the mechanical parts of the mixer, avoiding contact with the discs themselves.
- Contact with a ceramic bushing crane does not require any special knowledge, skills or tools. Armed with our recommendations, you can safely proceed to the repair of this part.
Faucet Cartridge Repair
Cosmetic repair of the mixer cartridge can be done by hand. But, we note right away that this only applies to breakdowns associated with clogging of working surfaces or wear of thrust rings. If the plates or balls are worn out, cracks appear, etc., then the device must be replaced. Neither professionally nor independently repair it will work.
What can be done when redecorating a single-lever mixer:
Video: disassembling a single-lever faucet cartridge
Main malfunctions
If the faucet leaks when turned off, then this is a sure sign of a cartridge failure. The consequences of a malfunction can be anything from flooding your neighbors to a cosmic utility bill.
If the faucet drips, it flows from the spout in the closed position or water leaks from the spout when you switch the “Rain” mode (in the shower), then you need to disassemble the faucet and replace the cartridge. The main reason for water leakage may be that the locking mechanism has worn out or the cartridge itself has cracked.
Similarly, if a flag or two-valve faucet hums, creaks or turns hard. There may also be several reasons for this:
- The cartridge is not the correct size. The diameter of the tap spout is slightly smaller than the outlet of the cartridge or the stem is longer than necessary. As a result, the lever cannot rotate normally on its axis;
- If the tap is very noisy, then this is affected by a sharp pressure drop in the system.Most often, to eliminate such a malfunction, it is enough to replace the sealing gasket in the crane box. It will be useful to check the condition of the seal every few months.


