- Bell installation step by step instructions
- Step 1 - Materials and Tools
- Step 2 - preparatory work
- Step 3 - Installing the bell housing
- Step 4 - mounting the button
- Wireless
- How to connect a bell in an apartment correctly
- How to connect a bell in an apartment
- Wireless
- Video: Wireless call overview and use
- Electric
- Video: electric bell connection diagram
- How to install wireless?
- What are doorbells
- Connection
- Mounting the main unit
- Button setting
- How to choose a call - a few tips
Bell installation step by step instructions
Now reading How to do-it-yourself lampshade for a floor lamp: a selection of ideas ...
Recessed sockets in the countertop: varieties, ...
The installation of the button and the indoor unit is carried out according to the instructions, which must be included with new products. We offer a general instruction suitable for a standard wired model, consisting of 2 main working units - a button and the bell itself.
Step 1 - Materials and Tools
Tools are best prepared immediately so as not to be distracted once again during work. If you plan to ditch the walls, a wall chaser will come in handy, perforator or drill. If necessary, they can be borrowed from friends or rented. Other devices and accessories are not so bulky.

"Dirty" work is best done along with the repair of the corridor or hallway, then the wires will be securely "sewn" into the plaster and the appearance of the walls will not suffer as a result
A set of tools and materials for installing the bell:
construction knife;
Screwdriver Set;
screwdriver-indicator;
screws and screwdriver;
insulating tape;
terminals.
Connecting wires can be done not only with terminals - they are simply faster and more convenient. Some still use soldering, then you will need a soldering iron.
We do not recommend twisting without soldering - this is an unreliable and dangerous way to connect the cores.
For outdoor installation cables, in which you do not have to ditch the walls, protective cable channels are useful. This is an option for hallways with a fresh renovation.
If there is no cable included with the bell, you need to buy it in addition. Before purchasing, please refer to the wiring diagram and specify whether the cable is required: 2- or 3-wire.
Step 2 - preparatory work
If you are installing a wireless model, no preparation is needed. It is required when it is necessary to pave the way for the wires connecting the elements of the circuit.

The most difficult thing is to drill a hole and gouge grooves in a concrete wall. To do this, make a markup, and then use a special power tool: wall chaser, puncher, impact drill
The hole is usually drilled near the front door. Sometimes it is carefully camouflaged with platbands. The wires for the button are brought out, approximately at a height of 150-160 cm from the floor, for the bell housing - to the place of its installation. This is usually the area under the ceiling above the door or a little to the side of her.
If you need to connect to the electrical panel, consider the path to the ground bus.If the bell has an adapter with a plug, choose the mounting location of the case so that it looks organic on the wall.
The wires are laid in the strobes made, covered with plaster on top. In order for the walls and the bell housing to look neat, we recommend finishing the walls only after the installation of fasteners is completed.
Step 3 - Installing the bell housing
First, we connect the conductors, and then we install the case on the bracket or holder. Sometimes it's just 1-2 self-tapping screws for "ears".
Before connecting, we remove the voltage from the involved circuit - turn off the circuit breaker in the electrical panel and warn others not to turn it on
We bring out the cores sticking out of the wall, according to the diagram, into the case through a special hole or unscrew the cover. We find the terminals, start the cores cleaned of insulation, twist.
Often, self-clamping terminals are installed in expensive or imported products, the wires in which are fixed with one click.
We close the lid, “put” the body on screws, self-tapping screws or bolts. If a special bracket is pre-installed - just fix it on the latch
There are products whose body needs to be screwed to the bar. Then we first screw in the screws, and only then close the lid. As a result of correct installation, only the front decorative panel is visible, the fasteners are invisible.


Step 4 - mounting the button
Priority button and indoor unit settings does not matter, you can first connect the button, and then the body. The standard installation height is 150-160 cm, but sometimes, for objective reasons, it is fixed a little lower. It is better to retreat 10-15 cm from the jamb.
First, the wires are inserted into the housing in the same way, connected to the terminals, then the cover is snapped on and the button housing is fixed on the wall.
If you found double-sided tape in the kit, it is provided for attaching the button to the wall. But much more reliable if you screw it on screws or screws.
After installing all the elements on the shield, turn on the machine and check the operation of the call. If possible, adjust the volume.
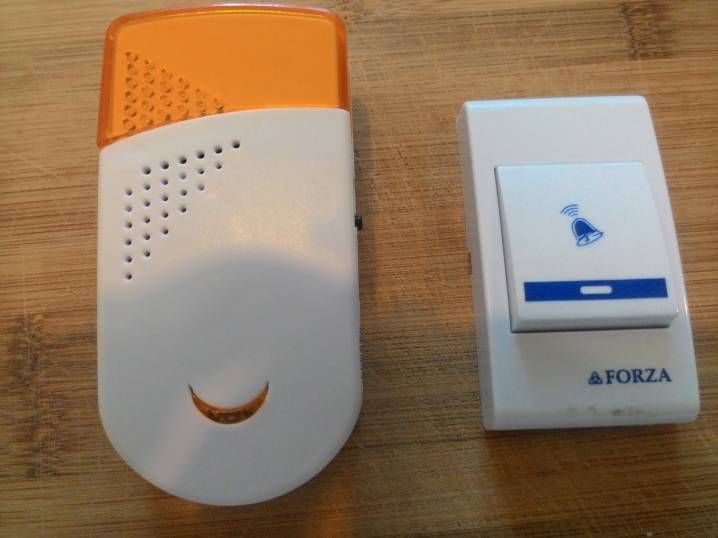
Wireless
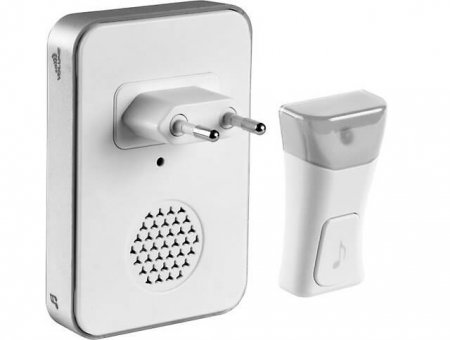
The easiest way to connect a wireless call, because. You don't need to deal with electrical wiring to do this. Most often, the button and the main unit are powered by batteries, so all you need is to fix all the elements on the wall. The button can be put on double-sided tape or drill a small hole in the wall and drive in dowel-nails. The doorbell itself can also be fixed on the wall or just put on a closet in a suitable room. In some models of wireless devices, the buttons are battery operated, and the main unit must be plugged into a power outlet, as shown in the photo below. In this case, there should be no difficulties in connecting either.
By the way, it is recommended to install the button at a height of 1.5 meters from the floor. This height is considered the most comfortable for turning the signal on / off. As for the optimal installation height of sockets from the floor, we talked about this in the corresponding article.
How to connect a bell in an apartment correctly
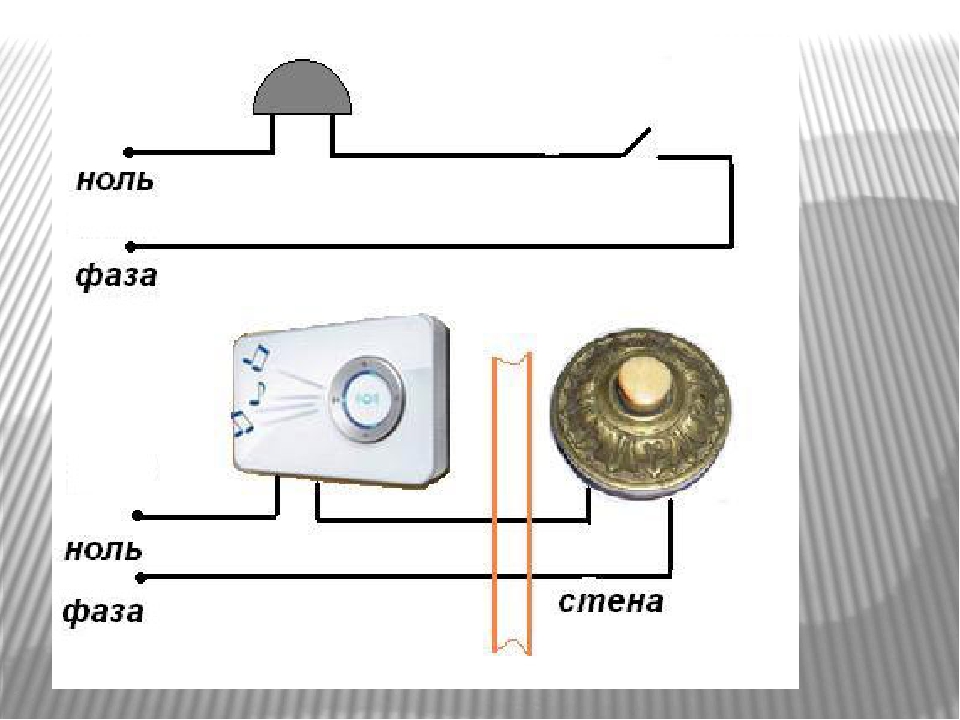
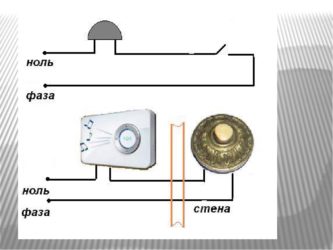
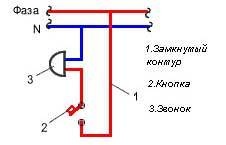
So, how to connect a bell in an apartment so that hooligans, the chairman of the HOA, a drunken neighbor who forgot the keys to the common door on the landing, collectors and other uninvited guests could not disturb you once again. Everything is very simple: we will break the power supply circuit of the bell and put a switch there.
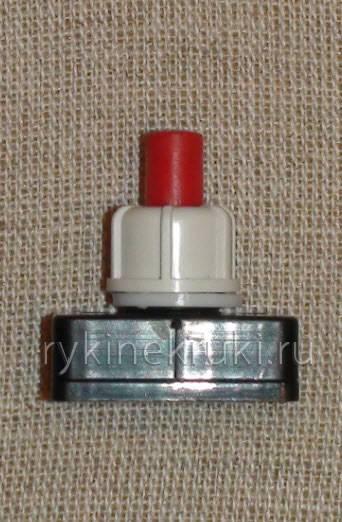
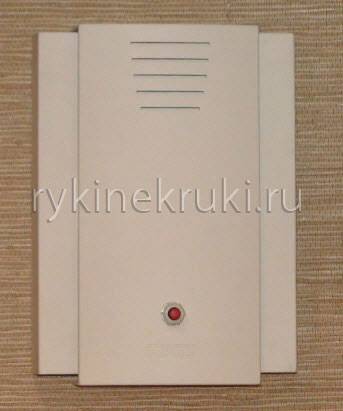
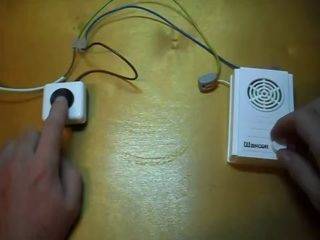
All bells from the side of the stairs look almost the same: in the form of a button. But from the side of the apartment they are all so different from each other. We will be interested in that part of the call, which is just inside the apartment. Before us is the most common call that hangs on our wall (you may have a different one, but the essence of this does not change):
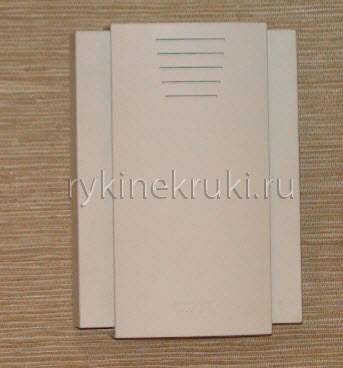
Let's carefully remove the decorative cover of the bell and see what's inside:
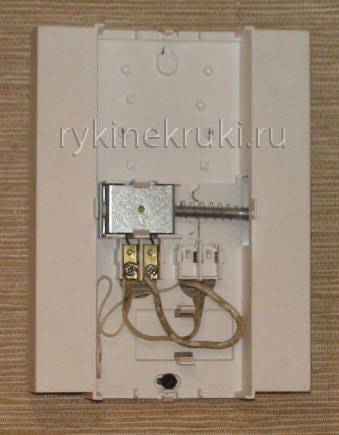
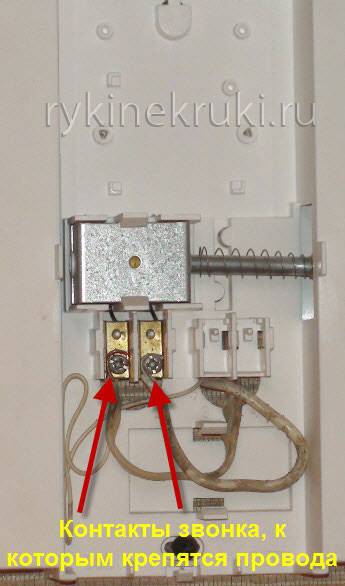
Any bell has 2 contacts, to which wires are connected and form an electrical circuit:
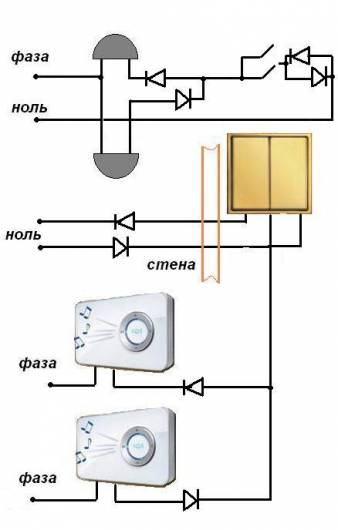
All you need to do is to build a switch into the bell circuit:
The switch can be any. It can be push-button or "tumbler" type. Next, in the decorative cover of the bell, you need drill a hole under this switch. This must be done carefully so that in general everything looks aesthetically pleasing:
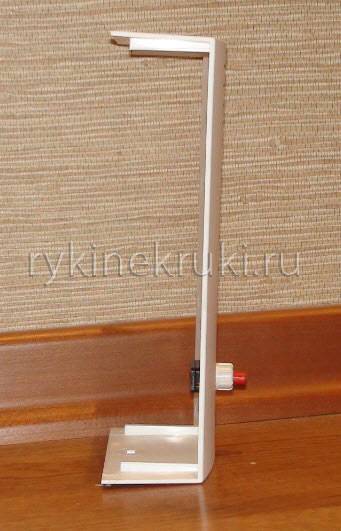

When you have drilled the cover, installed the switch in it, looked that everything turned out beautifully and neatly (you, as they say, tried on), you can take the switch out of the cover for the time being and already deal with the electrician. What should be done? Wires are connected to two bell contacts. You need to unhook one of the contacts and make an electrical circuit through the switch. I think that everyone at school in a labor lesson assembled an electrical circuit consisting of a light bulb, a switch and wires. So, there is a reason to "shake the old days." Instead of a light bulb, we have a bell. There is nothing complicated in the call connection scheme, just look to the next picture:


We passed the wire that was directly connected to the right contact of the bell through the switch, using 2 more pieces of wire for this.
Nuance.
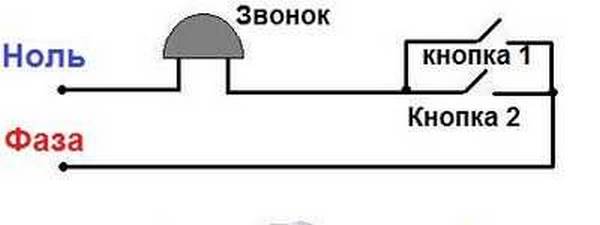
We can have 2 calls to the apartment: one from the landing at the elevator, the second - directly in front of the door. In this case, when you remove the decorative cover, then 2 wires can go to one of the bell contacts at once. In my case, it was like this: 2 wires went to the left bell terminal. It doesn't matter which terminal the switch is connected to. Of course, it's easier to do this where only 1 wire is connected, which is why I chose the right terminal.
So, everything is finished: the wires are connected to the switch. Now you can install the switch in the decorative cover, and put the cover itself on the bell body:
As a result, approximately this is what it looks like now Your call after a little revision. It is possible on the market to choose a switch completely to match the color of the cover, but you yourself will decide how best, how beautiful. But the main thing is different! Now, if you do not want to hear anyone, do not want someone to call you at the door, just press the button from the side of the apartment, and that's it!
So, you know how to connect a bell in an apartment in order to be protected from uninvited guests. By the way, there is a situation exactly the opposite, when you are waiting for guests, but after a while you realize that these are strangers and you need to get rid of them urgently. Read about it here.
How to connect a bell in an apartment
In addition to functionality and quality characteristics, modern manufacturers pay great attention to the design of wired and wireless doorbells. The body of such a device can be made in any color scheme, configuration and shape.
Next, consider how to connect a bell in an apartment (diagram and video).
Wireless
Independent connection of wireless models does not cause difficulties even in the absence of skills in working with electrical wiring.
- Perform a device inspection. Modern models are very often equipped with additional modules: intercoms, video eyes, motion sensors.
-
Choose the best place for mounting device. If the signal unit of the device is volatile, then it is necessary to provide access to the mains.
The best option for installing the bell is the wall closest to the door.
- Unpack all components of the wireless bell. At this stage, you need to make sure that all parts of the device are not damaged.
-
Mark and drill holes for dowels, with which the button will be fixed. And also to fix the button, an adhesive or double-sided tape can be used.
You can use double sided tape to secure the button.
- Install the button with self-tapping screws, adhesive tape or glue.
-
Mark out, drill holes and fix the signal block. Some models do not provide for installation on the wall, so the unit can be located on a pedestal or shelf in the apartment.
To fix the signal block, drill holes in the wall
- At the final stage, batteries are inserted into the device, after which the operability of the entire system is checked.
Video: Wireless call overview and use
Electric
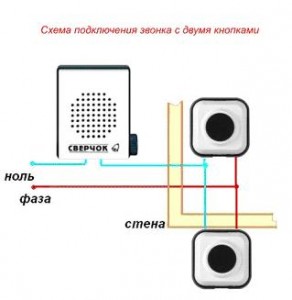
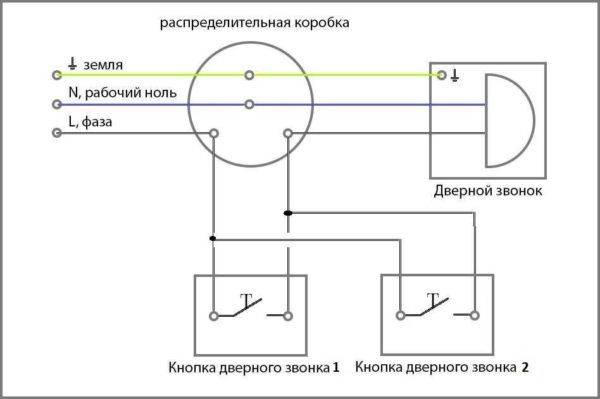
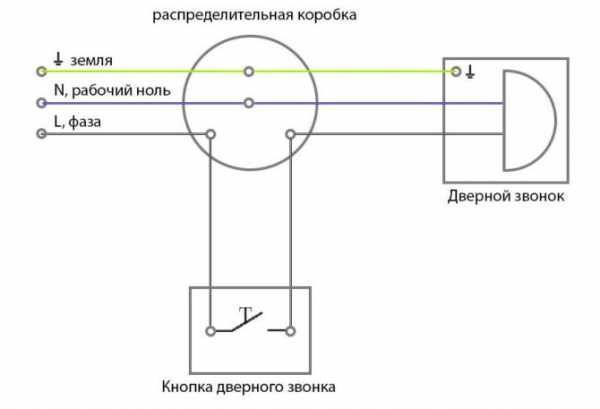
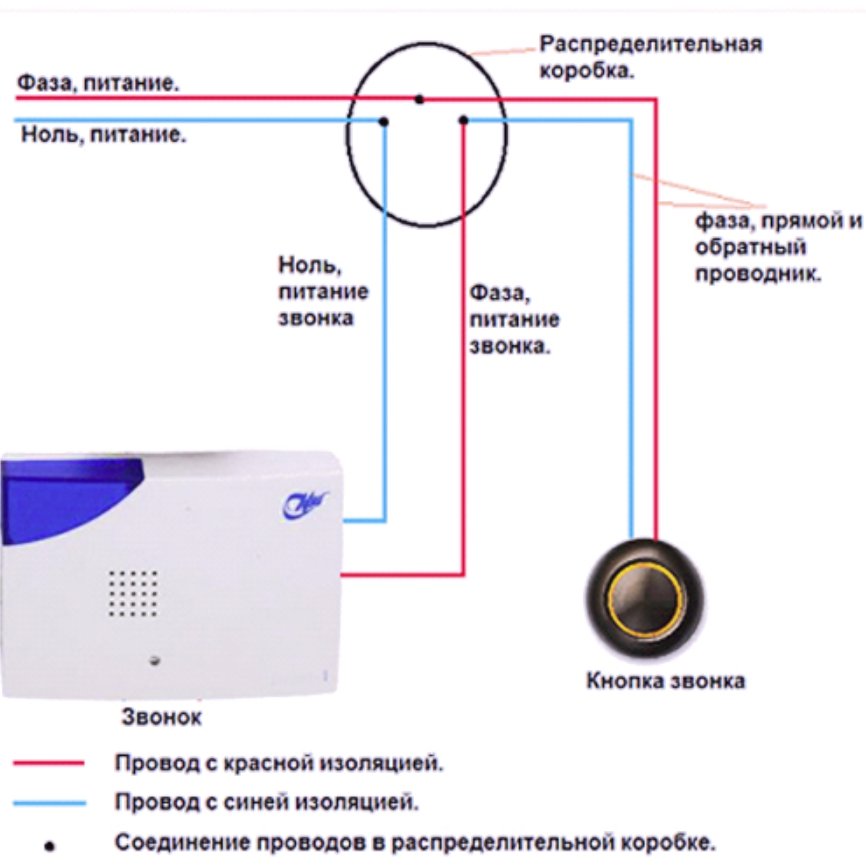
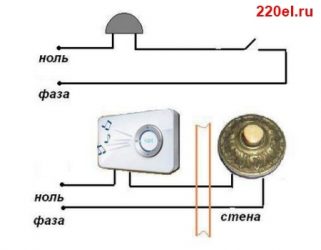
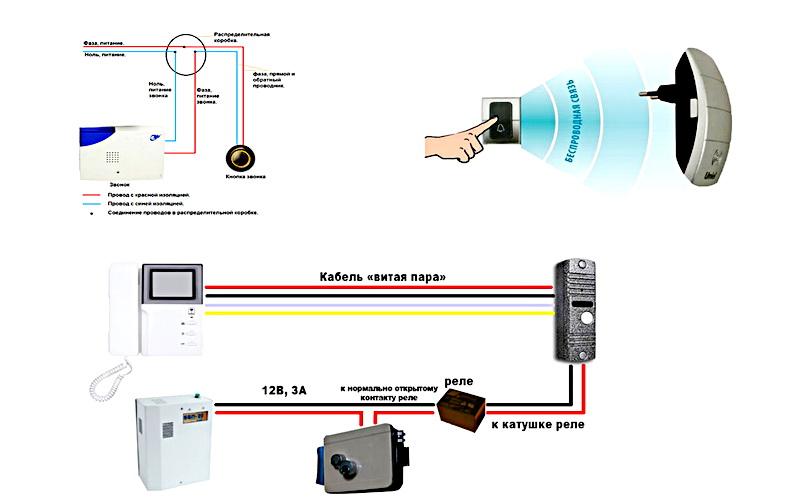
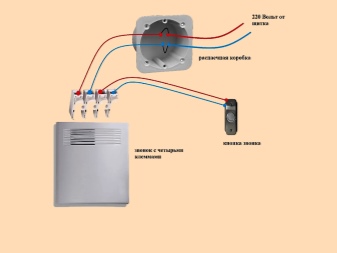
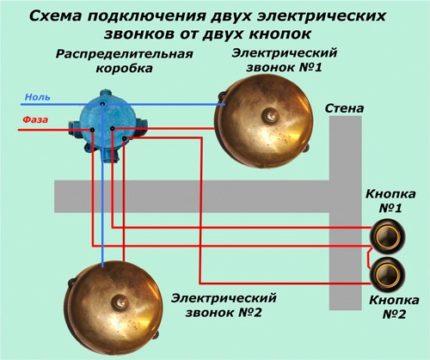
Making an independent connection of an electric wired bell is somewhat more difficult than installing wireless models. In this case, the installation involves connecting the phase through the button, and zero through the signal block in accordance with the standard connection diagram.
Standard wired bell connection scheme
-
Choose the most suitable place for mounting the button and installing the main signal unit.
The process of setting up a wired call is somewhat more complicated than wireless devices.
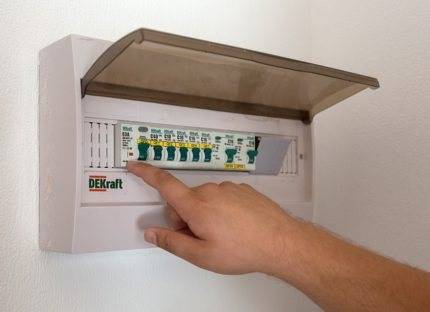
- Turn off all introductory machines located in the distribution switchboard.
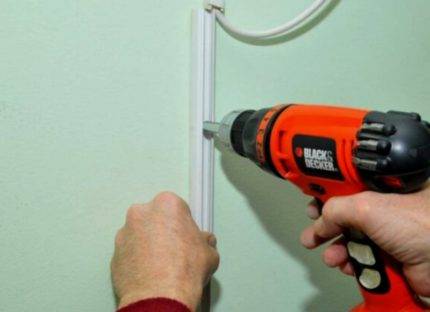
- Drill a hole in the wall for laying the cable connecting all the elements of the electrical circuit.
- From the drilled hole, draw strobes to the place where the button is mounted and the signal block is installed. It is allowed to replace traditional gating with open wiring inside special cable channels.
-
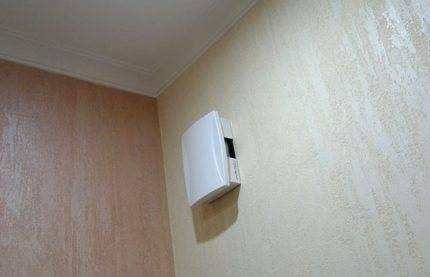
Remove the front cover of the device and fix all the elements on the walls, which will allow access to the inside of the device to make the terminal connection of the wires.
It is easy to remove the cover, since there is a special hook on the bottom of the base
- Make a direct connection of zero to the main signal unit.
- Connect the phase part of the button to the phase of the device.
- Connect the phase from the doorbell to the appropriate terminal inside the junction box.
It is mandatory to ground the doorbell, which will ensure the safe operation of the doorbell. After completing the installation, you need to make sure that the connection is correct, then turn on the machines in the electrical panel and check the operation of the device.


Video: electric bell connection diagram
To keep the doorbell working correctly throughout the period operation, it is necessary not only to choose the most suitable model and connect correctly, but also to correctly select the installation site. The device should not be mounted close to heating devices and sources of open fire, and the street button must be reliably protected from precipitation.
(0 votes, average: 0 out of 5)
How to install wireless?
If we talk about installing a wireless analogue, then everything is much simpler. Especially when it comes to models that work directly from the outlet. Then it is enough to put the bell key on the door or on the wall. Depending on the location of the key and the main unit, you can use dowels or self-tapping screws to secure them.
First, the button should be attached to the surface and through the holes on which it will be fixed, make marks for future fasteners. After that, holes are made using a perforator, into which dowels are hammered. Now you should attach and screw the key where the energy source is inserted. If the installation is made on a surface made of wood, then it will be enough to use self-tapping screws.
Now we turn on the main unit in the outlet, which should be located nearby in the hallway. In general, the closer it is, the better, because the call has a limited range.
The features of the model will also be that the wireless doorbell is usually musical. That is, instead of some kind of call, it reproduces a melody.
Sometimes apartment owners make a small upgrade and connect a wireless bell to a motion sensor. This allows you to make some kind of spare mechanism in case the button does not work.With wireless calls, this happens if there are some serious obstacles between the button and the main unit. For example, concrete walls. True, the failure of the call is still a rarity. But this option allows you to be more confident that the call will work, and sometimes there is no need to press the key at all. True, this method has a disadvantage. If someone just walked on the platform at the door, then the call will work, which will disturb the owners of the home unnecessarily. For this reason, the need for such a device should be considered as much as possible.
What are doorbells
 Connecting the bell does not require special skills in the field of electrics
There are many models, each of which has its own connection method, principle of operation, available functions. All these parameters will ultimately affect the cost of the purchased device.
There are three main options for connecting:
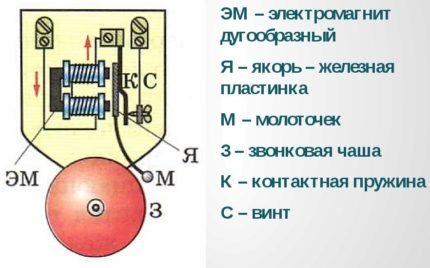
- Mechanical. In the vast majority of cases, they perform a decorative function. Located in the hallway or on the facade. They make themselves felt when a person tries to open the door or touches the tongue of the bell.
- Electromechanical. A more advanced model of the previous type, which is distinguished by a rather simple, but more convenient design, which provides for a button for signaling, which is located outside the house or apartment. There is also a resonator that is mounted in the living room, and an electrical cable that combines both parts of the device.
- Electronic. The most advanced version of the design, which is assembled on the basis of microcircuits and is equipped with a built-in speaker. There is no limit to the variety of sounds that such equipment can produce.Due to the use of electronics, the available list of functions of such devices is also expanding.
On sale you can find wired and wireless electronic calls. The first type is connected in much the same way as most electromechanical devices. However, you can find models that are additionally provided with protection in the form of power supply from 12 volts or using batteries. They must be connected through a specialized step-down transformer or power supply. On the button in such devices, a low-voltage signal is broken instead of a phase.
Wireless calls are easy to use, but the transmitter button often requires constant battery renewal, and at the same time it must be in an area that will not interfere with signal transmission to the device. Some wireless models work by connecting them to a standard 220V network, to an ordinary outlet, while the batteries in the button will need to be changed periodically. Other models have both elements self-powered.
There are a number of models that remotely open the gate or open the front doors. This is a fairly convenient feature for a private home.
If you need to connect a wireless call to an apartment with video surveillance, the procedure will be much more complicated. It is better to entrust the work to specialists who will later be engaged in the maintenance of equipment.
Connection
A wired electric bell requires laying a hidden cable, after which it is necessary to restore the wall decoration. In a private house, this task is more complicated, since the electrical cable is laid outdoors or underground. But the warning system will be reliable for many years.It can be done with mains power, as well as in emergency mode - from batteries.
Installing a wireless doorbell for a private home is preferable, but there are limitations:
Transmitter button batteries may be damaged by high or low temperature environment
It is important to choose the right device in order to minimize this negative effect.
The number of barriers made of reinforced concrete and metal should be minimal so that the radio signal passes better.
A reliable signal transmission zone from the transmitter to the receiver is usually about 100 m, which is quite enough. It is advisable to leave a margin of at least 20% in order to exclude the effect of other factors.
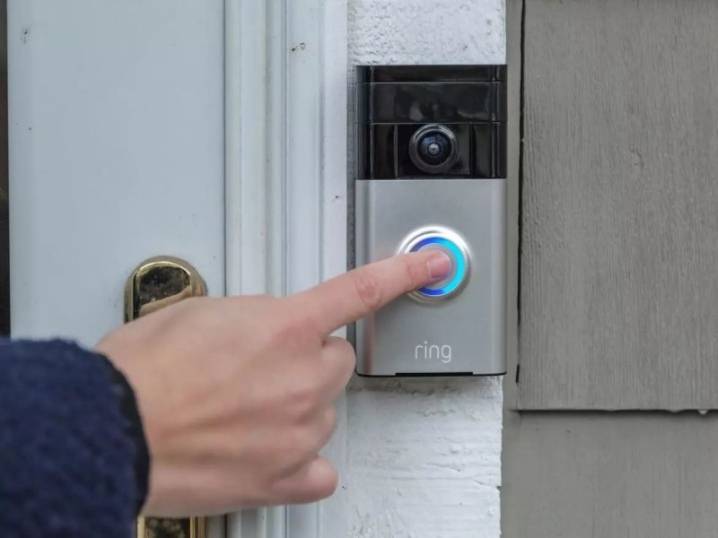
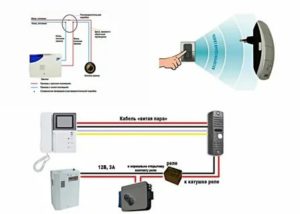
Calls with a video camera and an electromechanical lock, which is convenient to open remotely, are becoming popular. Similar intercom systems are installed in private houses and high-rise buildings.


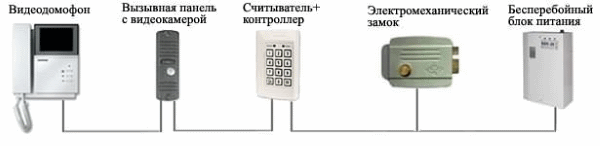
Elements of the intercom system
Before wiring, you should determine the location of the nearest junction box, since the wiring is done through it. Outside the apartment, the electrical wire is hidden, and inside - at the discretion of the owner.
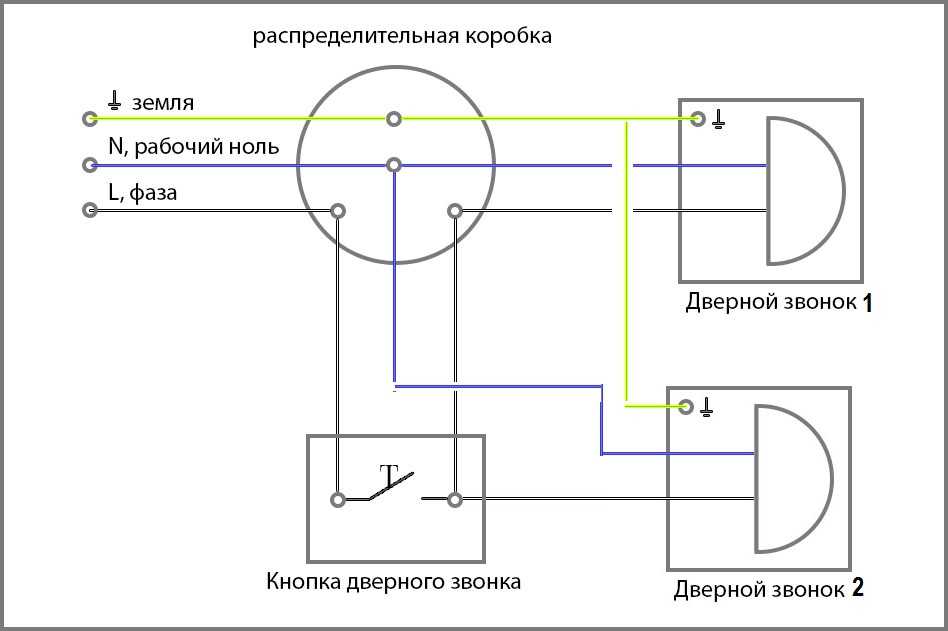
Before you install a room bell, you need to make a sketch. It takes into account all the features of the room. Under the wire bell, you need to cut a groove 3 times wider than the diameter of the cable. It is attached with plastic brackets and self-tapping screws. External wiring is placed in a box fixed to the wall with self-tapping screws. The cable margin at the connection points is left at 10-15 cm. A typical diagram is shown in the figure below.
Mounting the main unit
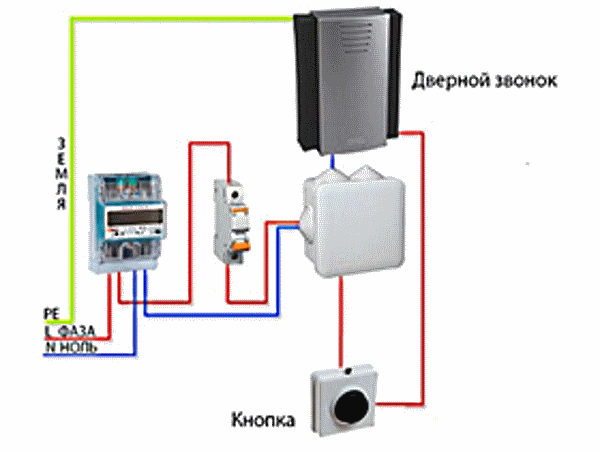
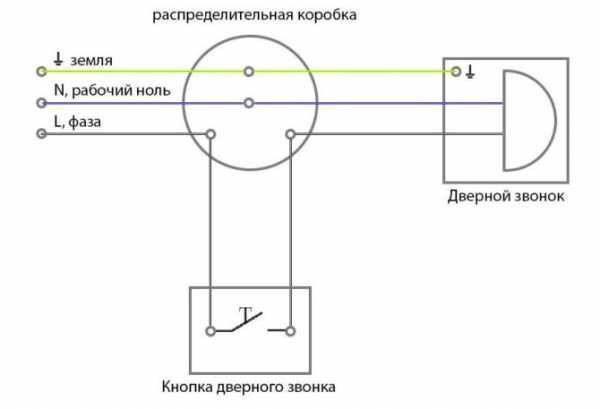
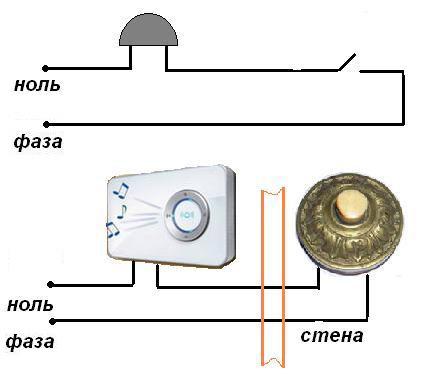
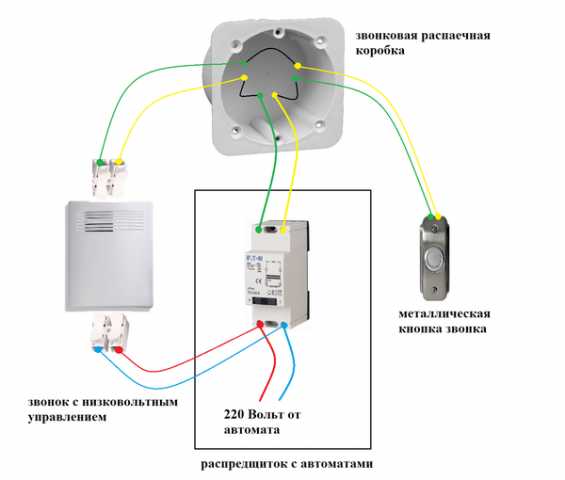
Wire circuit doorbell connection
In the diagram above, the red phase wire from the meter is connected to the machine, and after it it passes into the junction box (from left to right). The neutral wire (blue) is laid directly into the junction box. This scheme exists before the call is established. On the call block, you only need to output zero and the phase into which the button is connected. If the unit contains metal parts, a ground (green wire) is laid to it. The phase is determined using the voltage indicator.
The bell block should be connected to the gap of the neutral wire. If connected to a phase wire, the electronic circuit may fail when the bell button is pressed.
Connections are made through terminal blocks, which are usually included with the bell. The instructions should include a wiring diagram. Power is applied last.
Button setting
The button is recommended to be placed at a height of 1.5 m from the floor and above. It is disassembled and attached to the base of the door frame or wall. After connecting the wires and the button is reassembled. If it is wireless, it is mounted without connection by installing a battery inside.
After mounting the button, cable and unit, connect to the network. On the introductory shield it is necessary to turn off the power supply of the apartment. The phase and neutral wire are taken from the junction box. If the circuit is assembled without errors, then the call immediately works. If it does not work, the tester calls the entire circuit, and the malfunction is eliminated.
In haste, you can make a call from improvised means. To do this, use old sound toys, musical cards, an old mobile phone, etc.
It is important that it can be heard.An exclusive device can be even more effective than a failed expensive call
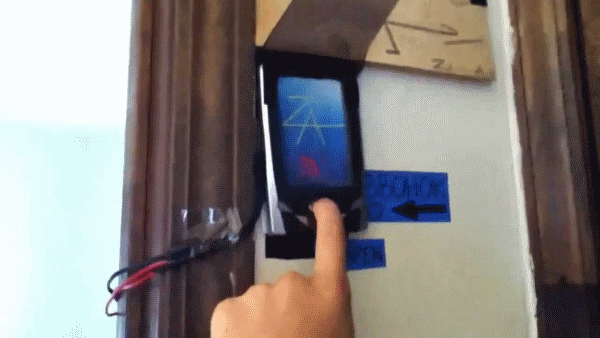
Doorbell from an old mobile phone
An electromechanical bell that has served its time should not be thrown away. It may still be useful if it is restored and postponed until better times.
This is interesting: Connecting an electric boiler to the mains - detailed instructions
How to choose a call - a few tips
So that the bell does not become an irritant that spoils the mood, when purchasing it, you should pay attention to some of its characteristics. Otherwise, his shortcomings can become unpleasant surprises.
The design of the button can also be matched to the design of the front door.
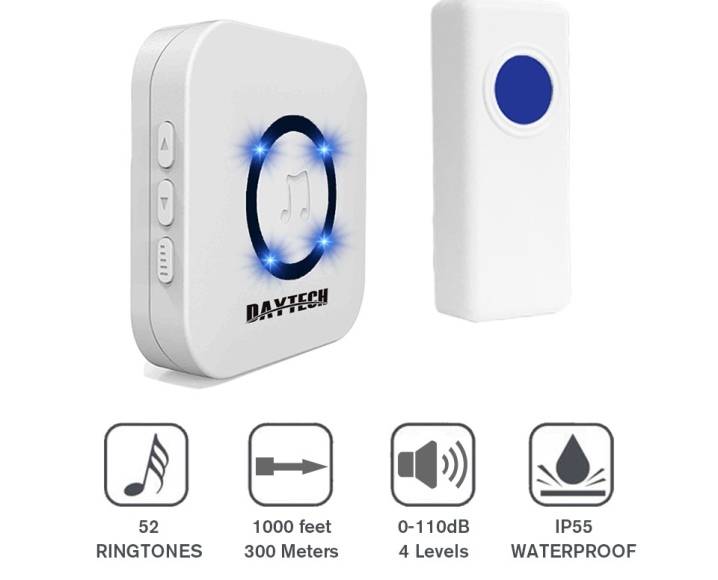
Ringtone selection. The cost of the device depends on the quantity and quality of melodies. Traditional calls, known for many years, are often not only unpleasant to hear, but also sound frightening. These options are still found in stores today, and their cost is low.


There are quite a lot of models with polyphonic melodies for sale, you can choose an option from them for every taste.
You should not purchase a bell with a typical, common soundtrack, otherwise you may have to run to the door every time guests come to one of the nearest neighbors.
If a call with several melodies is selected, then they can be changed from time to time.
The call will be more convenient to use if it has a volume control. Practice shows that there are models tuned "to the taste" of the manufacturer - either wildly roaring, or barely audible.
Designer decoration. If the call is selected for an apartment, then the button for it should be modest, not attracting much attention to itself.The main block can be matched to the design of the hallway. Today, bells are presented, the block surfaces of which imitate the texture of wood, suede, stone, leather, etc.
If a wireless remote model is purchased for a private house, then before going shopping it is worth measuring the distance from the gate to the house. This is necessary so that the button and the device reliably interact with each other. In the characteristics of the call, the range of its action must be indicated.
It is worth buying a call in specialized stores - they are guaranteed to buy a quality product. It is not recommended to buy such a device by hand or in a small hardware store.
As a rule, these products are of dubious quality, and the buyer will not receive any guarantee for the product.
In addition, you should pay attention to such parameters as the reliability of contacts and the strength of the body of the main unit and buttons. If the button is fixed on the gate, then it is necessary that its protection be provided. from moisture and dust (recommended protection class - IP 44).
* * * * * * *
In conclusion, I would like to warn those homeowners who are very far from electrical work, and have little idea even, say, what zero and phase are. You should not take risks and do the installation yourself, as such a “bold experiment” can lead to sad consequences. Therefore, it is best to invite a professional electrician to perform this work, who will quickly cope with this simple task for him.


