
- Circuit solutions for practical operation
- General wiring diagram of the switching device
- How to connect a switch with two keys
- A typical example of combining a socket and a switch in one block
- Device: advantages and disadvantages
- pros
- Minuses
- 7 Lamp flashes - how to get rid of such a problem
- Wire section selection
- Types of devices for domestic use
- How to connect a light switch
- Mounting Features
- How to independently connect the light source from the switch?
Circuit solutions for practical operation
The most commonly used circuits with connection of pass-through devices actions are, as a rule, schemes for one-, two-, three-key instruments. The one-key option was discussed above.
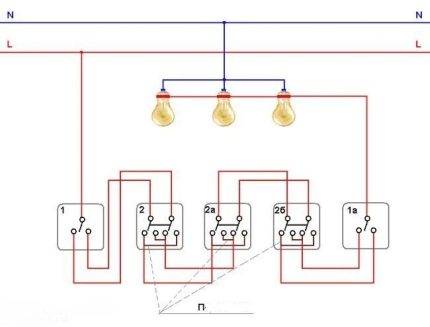 Schematic version of the system design for five control points. Three two-key switches and two single-key switches are used here: N - network zero; L - network phase; 1, 2 - switches; p - jumpers
Therefore, let's see how the step-by-step instructions for connecting a two-key device look like.
- It is necessary to schematically outline the installation of the system.
- Perform work on the installation of the RC and the socket boxes.
- Install the required number of light groups.
- Lay the network, taking into account the supply of phase, zero, grounding conductors.
- Connect the divorced conductors according to the drawn up diagram.
Attention should be paid not only to purely electrical work, but also to technical work. For example, it is recommended to pay high attention to the installation of socket boxes. These elements must be securely fastened to the wall, so that in the future they provide no less reliable fastening of devices.
These elements must be securely fastened to the wall, so that in the future they provide no less reliable fastening of the devices.
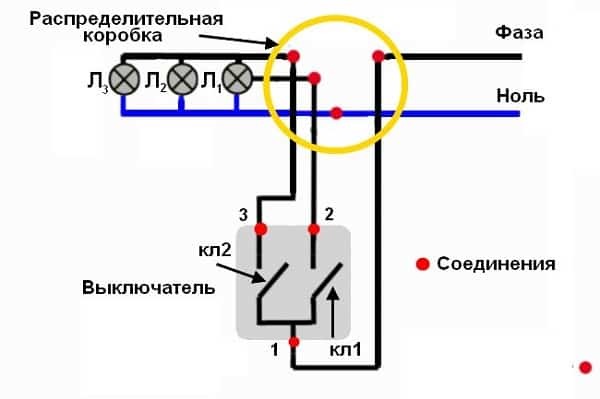
There is a three-point communication system, which is based on the creation of a system that allows you to control a light group of three separated points. The elemental base is three devices, of which two are two-key pass-through and one is cross.
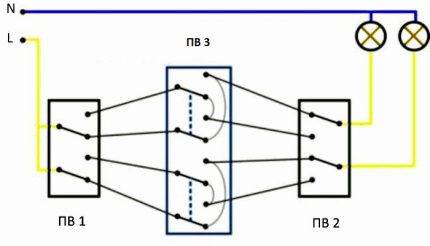 A widespread version of the three-point scheme: N - electrical zero; L is the electrical phase; ПВ1 - the first two-key switch; ПВ2 - the second two-key switch; PV3 - cross switch
A kind of connection instruction in this case looks something like this:
- A wiring diagram is created.
- Works are being carried out on the installation of the distribution box and socket boxes.
- Three-core electric cables are laid in the amount of 4 pcs.
- Electrical installation is carried out - connection according to the scheme.
This option for creating a communication power grid looks somewhat complicated. As is clear even from the cabling, you will have to deal with a total of 12 conductors. 6 wires should be connected to ordinary walk-through switches, while 8 wires should be connected to a crossover switch.
A phase line is connected to the common terminal of any of the two-key switches.The line of the light group is connected to the common line of the second two-gang switch. The remaining conductors are connected by pin numbers according to the schematic drawing.
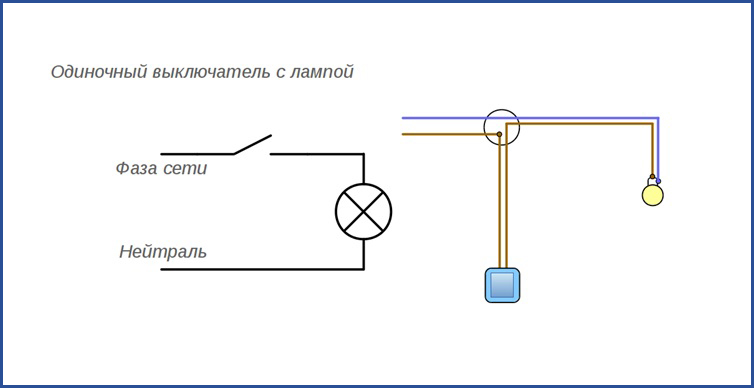
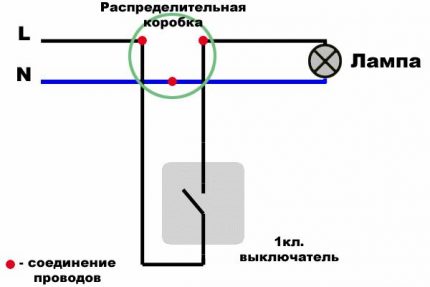
General wiring diagram of the switching device
Failure to follow the basic installation rules, even for such a simple device as a switch, can lead to very unpleasant consequences. Among which are overheating and sparking with a possible subsequent short circuit, as well as the voltage that is stored in the wiring.
This is fraught with electric shock even if you just need to replace the lamp with the lights off.
Therefore, before connecting the switch, it is worth remembering the main connection elements well:
Zero vein. Or, in electrician jargon, zero. It is displayed on the lighting device.
The phase assigned to the switch. In order for the lamp to go out and light up, the circuit must be closed within the phase core
It is important to remember that when the switching device is brought to zero in the opposite direction, it will work, but the voltage will remain. Therefore, to replace the lamp, for example, you will have to disconnect the room from the power supply.
Phase assigned to the lamp
At pressing a key the circuit will close or open at the break point of the phase channel. This is the name of the section where the phase wire ends, leading to the switch, and the segment stretched to the light bulb begins. Thus, only one wire is connected to the switch, and two to the lamp.


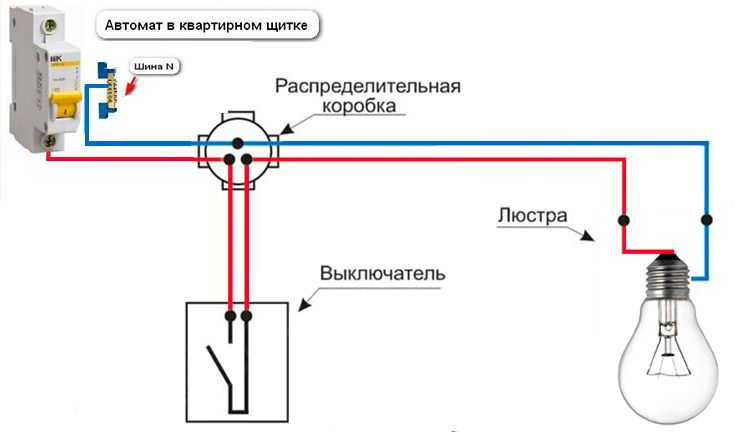


It should be remembered that any connections of conductive sections must be carried out in a junction box.It is highly undesirable to perform them in a wall or in plastic channels, since complications will certainly arise with the identification and subsequent repair of damaged fragments.
If there is no junction box near the installation site of the switch, you can extend zero and phase from the input shield.
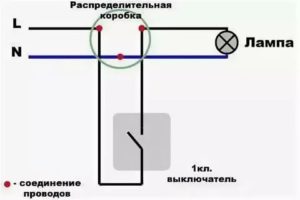
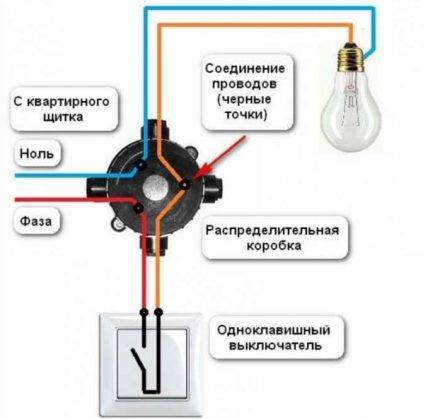 The figure shows wiring diagram of a single-gang switch. Wire junctions are marked with black dots (+)
All the above rules apply to a single-gang switch. They also apply to multi-key devices with the difference that a fragment of a phase wire from the lamp that it will control is connected to each key.
The phase stretched from the junction box to the switch will always be only one. This statement is also true for multi-key devices.
Replacing the switch or installing it from scratch is carried out only if there is a fully formed electrically conductive circuit.
In order not to make a mistake when working with wiring, you need to know the marking and color of current-carrying channels:
- The brown or white color of the wire insulation indicates the phase conductor.
- Blue - zero vein.
- Green or yellow - grounding.
Installation and further connection is made according to these color prompts. In addition, the manufacturer can apply special markings to the wires. All connection points are denoted by the letter L and a number.
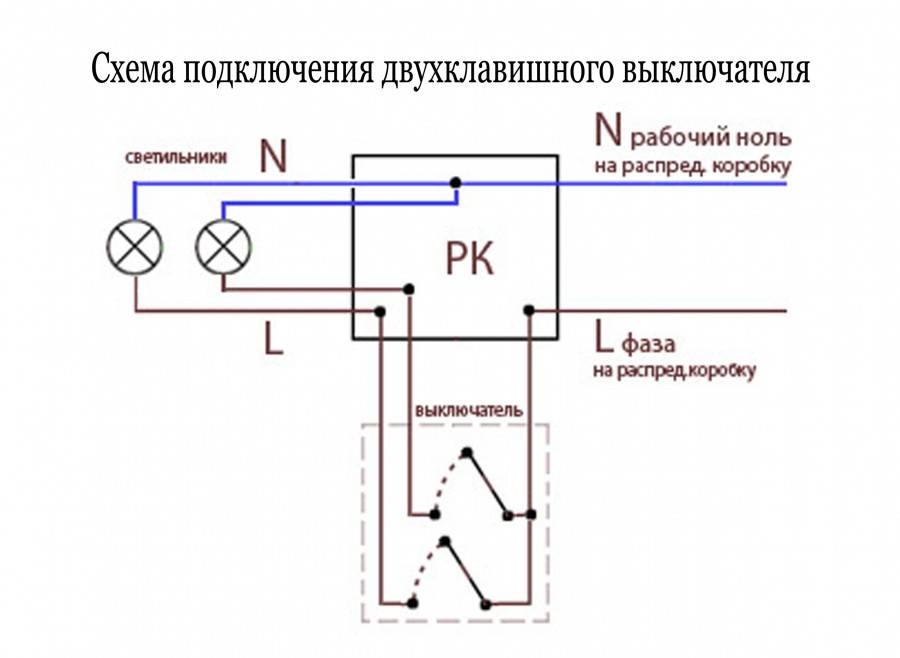
For example, on a two-gang switch, the phase input is designated as L3. On the opposite side are the lamp connection points, referred to as L1 and L2. Each of them will need to be brought to one of the lighting fixtures.
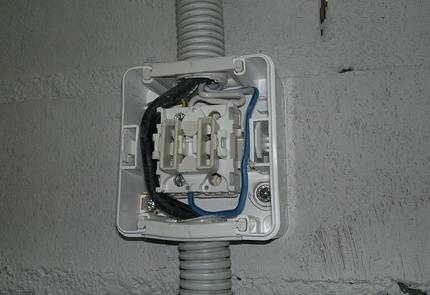
Before installation, the overhead switch is disassembled, and after connecting the wires, the housing is mounted back
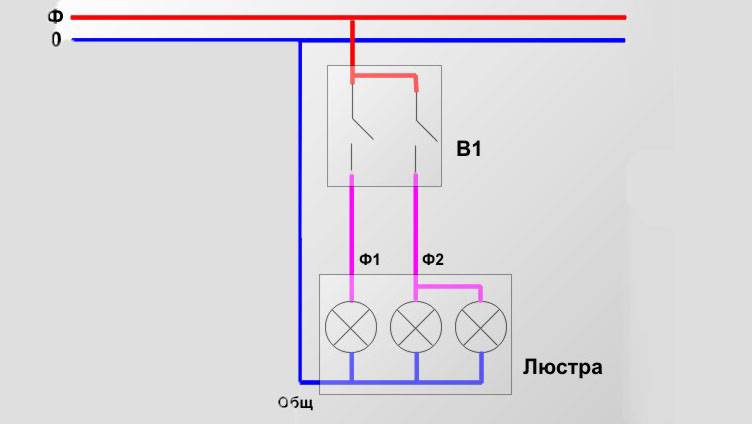
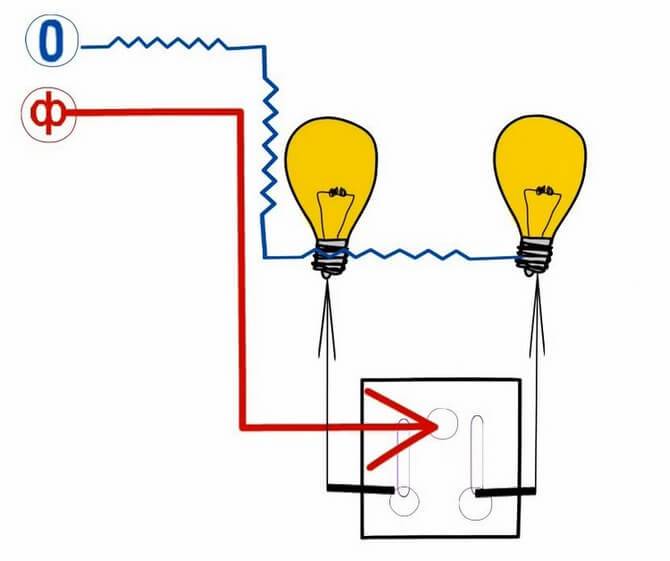
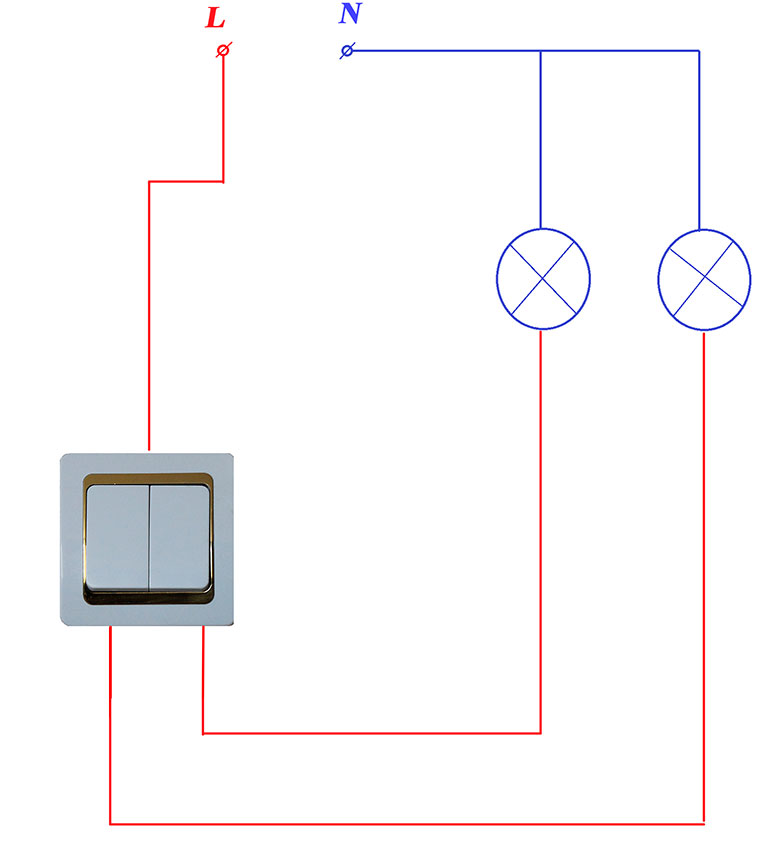
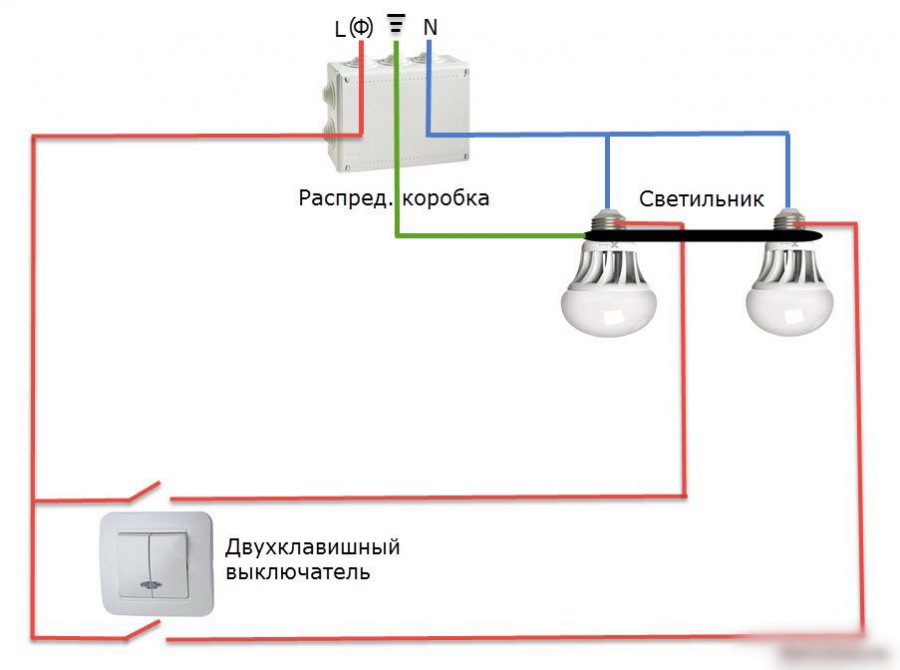
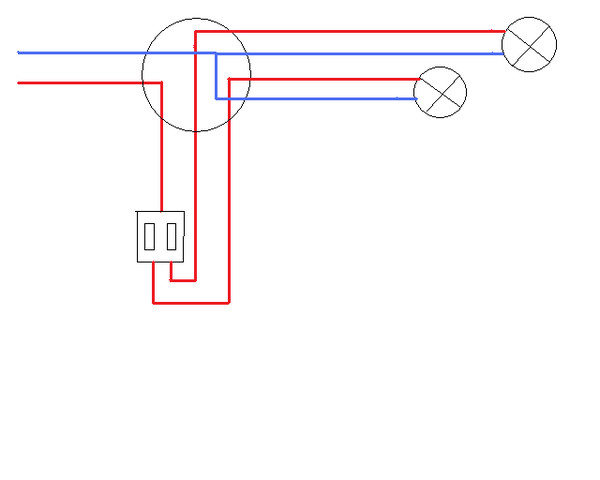
How to connect a switch with two keys
Before installation, you should carefully familiarize yourself with the location of the switch contacts. Sometimes on the back side of the switches you can find the switch contact diagram, which shows the normally open contacts in the off position and the common terminal.
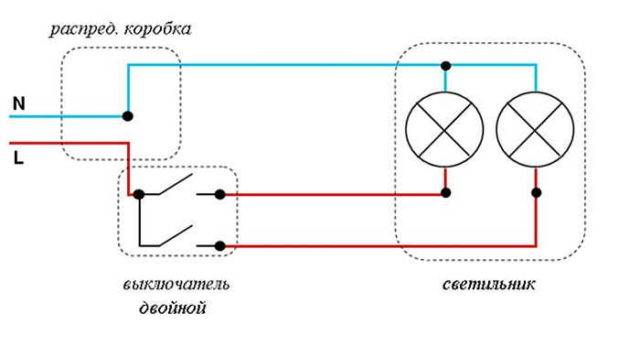
The double switch has three contacts - a common input and two separate outputs. The phase is connected to the input from junction box, and two outputs control the inclusion of chandelier lamp groups or other light sources. As a rule, the switch must be mounted so that the common contact is located at the bottom.
If the circuit on the other side there is no switch, then the contacts are defined as follows: the input contact is on one side of the switch, and the two outputs to which the lighting devices are connected are on the other side.
Accordingly, the two-gang switch has three clamps for connecting wires - one on the input contact, and one on two weekends.
So, we figured out how the switch works. Now you need to prepare the workplace, tools and materials. We must not forget that the most important thing when performing any work related to electricity is safety.
Each of the keys of the two-gang switch can be set to one of two positions, turning on or off the appliance. Each group can have a different number of light bulbs - it can be either one or ten or more lamps. But a two-gang switch can only control two groups of lamps.
First you need to check the wires, that is, test which one is the phase one. With the help of an indicator screwdriver, it will not be difficult to do this: upon contact with the phase in the screwdriver, the signal LED will light up.


Mark the wire so that you do not confuse it with zero when performing further operations. Before you start installing the switch, you need to secure your work area.
If we are talking about a chandelier, you should de-energize the wires coming out of the ceiling. When the type of wires is determined and marked, you can turn off the power (for this you should use the appropriate machine in the shield) and proceed with the execution installation work double switch.
Determine in advance and ensure the presence of connecting material for the wires.
- Usually applied:
- self-clamping terminals;
- screw terminals;
- caps or electrical tape for hand-twisted wires.
The most convenient and reliable way is fixing with self-clamping terminals. Screw clamps can weaken over time, and electrical tape tends to lose elasticity and dry out. Because of this, the reliability of the connection can be significantly weakened over time.
Self-clamping terminals provide a reliable, durable connection. To properly connect the switch to the light bulb, you must carefully study the step-by-step instructions on how to do this. After that, you can not only make the installation according to the scheme, but also identify possible malfunctions. When providing electrical installation in premises, the question often arises of how to lay a cable using a corrugated pipe.
- To accurately perform all operations, you must have the following tools:
- 2 screwdrivers - flat and Phillips;
- assembly or clerical knife or other device for stripping insulation;
- pliers or side cutters;
- construction level.
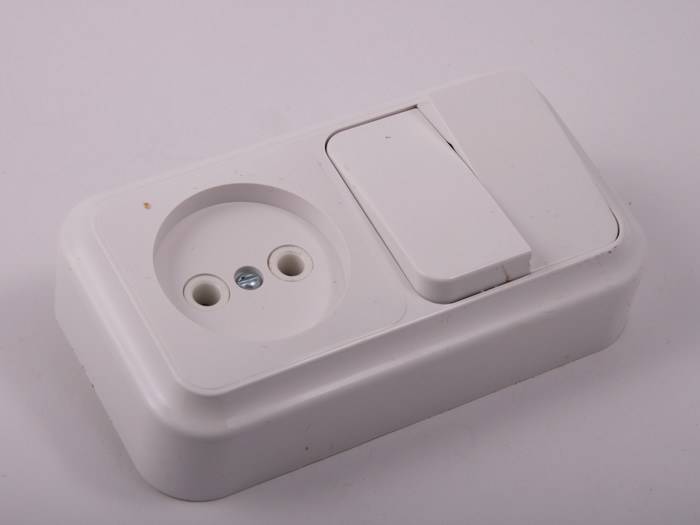
A typical example of combining a socket and a switch in one block
Often in a corridor or hallway, it becomes necessary to combine a network connection point (socket) and a switch for several lighting groups. This method solves several problems:
- An extensive socket network in the corridor is usually not needed: there are no constantly used electrical appliances. Nevertheless, there is a need to connect a vacuum cleaner, or a charger. In addition, a radiotelephone base unit can be installed in the hallway.
- There is little space on the walls in this room; wardrobes, a mirror, and a hanger are installed. Part of the corridor is usually occupied by an input switchboard and a metering device (meter). Therefore, the compact placement of switching equipment is a key issue.
- By combining the socket and switch, wiring is saved, no additional junction box is required.
- If you additionally connect a second device: a switch to an outlet, or vice versa, there is no need to damage the wall, organize a route for the power cable. The connection is made with minimal impact on the room.
As you can see in the illustration, to implement the entire scheme, you will need one circuit breaker (in the panel it can be called “corridor: lighting, socket”), and one junction box.
The zero bus N (blue) passes through a kind of transit to the lighting groups and to the outlet. Grounding PE is brought into the socket housing, and (if one of the groups lighting is in the bathroom) into the luminaire body.The phase after the machine, through the junction box is connected to the outlet. Disconnection takes place in the socket. In this case, any terminal block is used: for example, WAGO.
A small section of wire connects the phase terminal in the socket and the input terminal of the two-gang switch. Further, a phase is laid from the output terminals to each lighting group.
Such a scheme is usually used in the design, since you still have to lay cables for different lighting groups. If such a solution is optional, you do not install additional boxes. Hole for switch or socket done next to the already mounted device. It remains only to lay additional wiring.
If there is a need to separate the socket and lighting to different circuit breakers (for example, apply power socket for powerful electrical appliance), the introduction of the phase is carried out along different power lines.
It is not necessary to use an additional junction box, the phase wire passes through it in transit, without disconnection.
In any case, with this installation method, both wiring and wall space are saved. For example, let's look at the classic version of connecting a socket and a switch to a junction box.


Two cable routes are laid, the connection is in a junction box. Looking at the diagram, it becomes obvious that connecting the switch directly to the outlet is more rational.
Device: advantages and disadvantages
Until recently, the connection of various elements - a socket and a switch - was carried out in a separate junction box, and then they were carried to the places that were determined by the project. Now the first place comes to saving: both time and effort. Paired designs make it possible to carry out the operation much faster.
pros
Among the advantages of combined blocks:
- A simpler circuit, thanks to which there is no need to lay wires to each element.
- Fairly light markup due to the larger block size.
- The fastest installation on the walls.
- Minimum number of holes.
This is not to say that this solution has no drawbacks.
Minuses
These include:
- High price. Combined blocks, naturally, are more expensive than individual elements.
- Impracticality. If one component of the device fails, then more often you have to change the entire unit.
- Increased load on the wires. In this case, it is necessary to calculate their cross section, otherwise the risk of overheating will be high. To connect a block device, it is recommended to take into account the maximum load.
- Location restrictions. The combined element can no longer be placed at the top of the wall, since in this case the view of the room will be spoiled by the plug and cable of the electrical appliance, which is constantly needed. “Turning on the light” will not be very convenient, especially in the dark.
The biggest disadvantage is the need to replace the entire unit if one of the elements suddenly refuses to work. All other shortcomings can be reconciled. But is the purchase of such an invention justified?
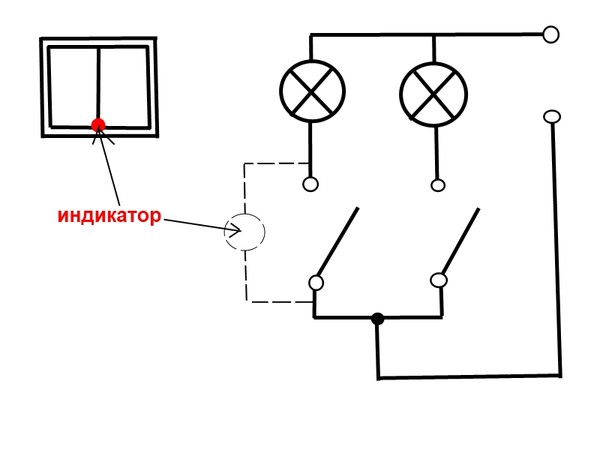
7 Lamp flashes - how to get rid of such a problem
Over time, additional problems arise - a poor-quality transformer, half-power lamps, deterioration of their work even when turned off. Let's figure out how to deal with such situations.
Such devices are especially useful when the lights are off - they can be easily found in the dark.
It is quite possible to solve this problem, and in several ways, differing from each other in complexity.
Below are several options to build between an LED light bulb and a backlit switch, so to speak, "friendship".
- 1. Among the energy-saving / LED lamps, screw an incandescent lamp into the chandelier, followed by power selection.
- 2. In the case of built-in LEDs and the impossibility of installing an incandescent lamp, a capacitor can be installed parallel to the chandelier (its main parameters are: capacitance - 0.22 microfarads, calculation for 630 V).
-
3. "Bite" the backlight circuit or pull out the LED / neon lamp. The switch will be fully operational in this case.
- 4. Conclusion to the socket wire with "zero" from the shield, disconnecting the backlight circuit from the common circuit, followed by connection to "zero". The backlight is always on, the lamps do not blink.
All options, with the exception of the last one, lead to constant heating of the light indicator light of the switch, and this can subsequently lead to its combustion.
Wire section selection
Experts recommend choosing the right cross-section of the wires to which the switch will be connected, this can significantly reduce the likelihood of a fire in the wiring, for this it is necessary to fulfill several conditions:
- You need to know how much power the lamp connected through the switch will be.Using the formula: power \u003d current × voltage, you can find the value of the rated current, in a single-phase network, the voltage is considered to be 220 volts.
- Knowing the value of the rated current, according to the table, you can select the wire of the desired section.
Table:
Table to select the wire of the desired section
Types of devices for domestic use
There is no strict division into categories, since different manufacturers have their own, “branded” model ranges, however, several types of switches can be distinguished, united by some one sign.
The two most common types of modern switches are the single-button wall-mounted model and the control panel, which is usually supplied with the lighting fixture.
For example, according to the principle of inclusion, all devices can be divided into:
- mechanical - elementary keyboard devices, easy to install and use (the function of a key can be performed by a lever, toggle switch, button, cord, rotary knob);
- electronic touch, actuated by the touch of a hand;
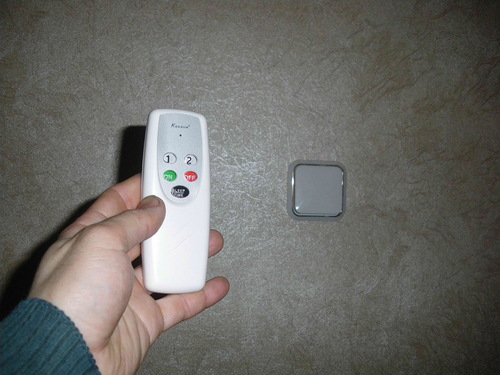
- with remote control, equipped with a remote control or motion sensor.
The first group is considered the most popular, traditional and recognized from the first days of the invention of the electric circuit, the popularity of the third is also gaining momentum, and the second somehow did not take root.
Motion sensors save energy and serve as additional protection. For example, if you install a similar device at the entrance to the house, it will signal the appearance of uninvited guests.


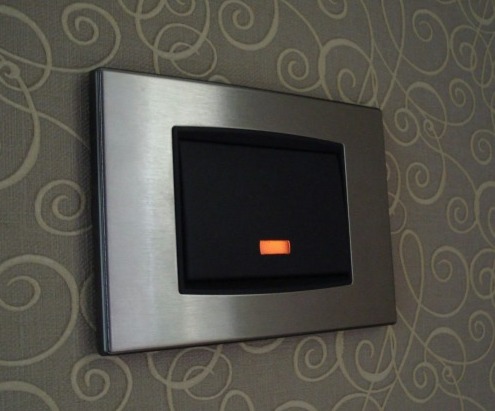
In residential premises, it is preferable to install internal models (with or without lighting), which do not protrude above the wall surface and look more aesthetically pleasing.
By type of construction all switches are divided into single-key and multi-key (standard version for domestic use - with 2-3 keys). Each key is used to close / open one lighting circuit.
If there are several lighting fixtures in the room - a chandelier, a ceiling light and a sconce - a three-gang switch is appropriate, which will allow you to alternately or together turn on/off appliances.
Also quite popular are two-gang switches that can be seen in almost every apartment. They are especially relevant for chandeliers with several lamps.
According to the method of installation, two groups can be distinguished: with outdoor and indoor installation. The external type is usually used when the wiring is open, and the internal type is used with cables sewn into the wall. To ensure the safety and stability of the installation of the built-in switch, use a mounting box (socket box) - a protective plastic case.
According to the installation method, the switches are divided into built-in and overhead. The former are used for closed wiring, the latter for open wiring. Both options are installed in the same way.
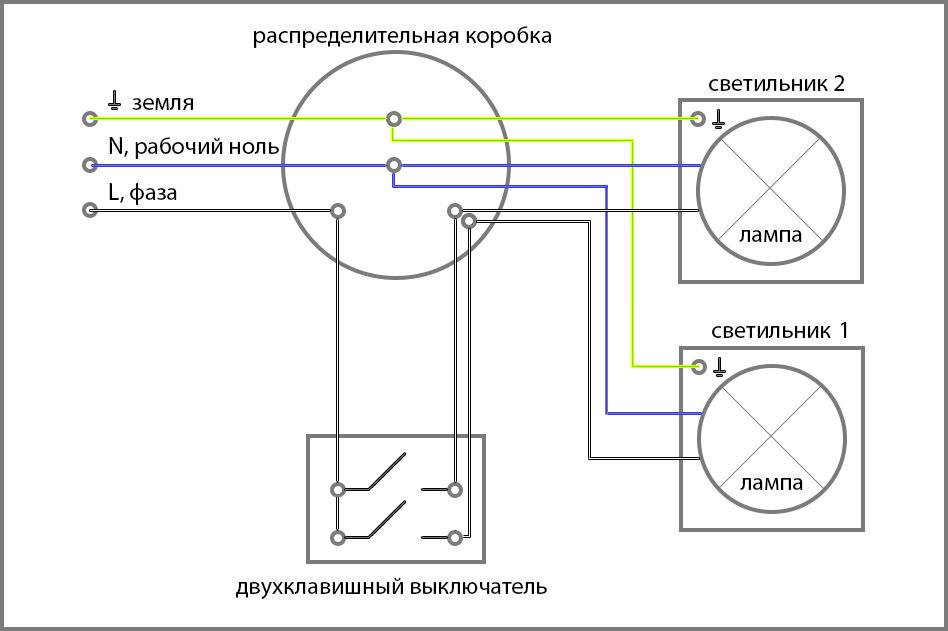
How to connect a light switch
In order to properly mount the switching device, you need to know how the switch connection diagram is assembled. An electrician should understand the color designation of wires:
- Yellow-green is always connected to ground;
- Blue or blue is connected to the neutral wire;
- Red, brown or any other color indicates a phase wire.
There is a rule when installing wiring a phase wire comes to the electric switch.
This rule applies to all devices, one, two, three, etc. keys. You need to start marking the places where the devices will be installed. The installation height of switches for individual housing is not regulated.
The height of the switch is selected from the conditions of ease of use. Previously, the standard provided for the height of sockets 500-600 mm, and switches 1500-1600 mm.
Now there are no such restrictions, but before there were unspoken laws of installation. Which? - find out here. Once the installation location has been determined, perforator with special a crown prepares a place for a plastic box.
A wall chaser cuts the strobes for mounting wires. It remains to install the wires and install devices, for example, a single-gang switch for hidden wiring.
Mounting Features
block
It will not be difficult to install a combined unit without the involvement of a professional electrician, since a minimum of wires is required to connect modern models.
The installation process will have only a few features that you need to consider:
- You need to prepare the necessary tools in advance, they will not require so much: an electric drill with a drill column; several screwdrivers of different sizes; pliers and nippers.
- To ensure safety during work, make sure that the handles of all tools are insulated.
- Some modern varieties are designed for outdoor installation, that is, when installing them, you can completely avoid drilling holes in the wall surface.
- You can choose a variety with an increased level of protection from environmental conditions, such models can be installed not only indoors, but also outdoors. Such devices have an additional element in the form of a special cover in the design, which helps to avoid the ingress of liquid into the device.
- All modern types of blocks are adapted for installation in walls of any material and regardless of the type of finish.
How to independently connect the light source from the switch?
One of the simple ways, according to experts, is to turn on the wall lamp in the circuit through a switch powered by a socket using a neutral and phase wire, it is especially beneficial to do this when the lamp is close to the switch.
To make this work, you need to do the following:
- Carry out installation work to install a light source and a switch, then carry out the steps to connect them.
- From the outlet from which we will connect our voltage breaker, we remove the voltage using the machine in the shield (usually the wiring is carried out according to consumption groups), we check with a “probe” for the absence of a phase.
- We open the socket; if the work on its connection is performed with a copper wire with a color difference, then:
- zero - blue wire;
- ground - the second wire with a double color (yellow-green);
- phase - the third wire, it can be brown.
If there is no color difference and the connection is made with an aluminum wire, it is necessary to briefly apply voltage to the socket and determine the phase of the wire conducting electricity with a “probe”.
- We connect the wire from the switch (to its input), which is already connected to the breaker, to the socket phase, and connect the wire from the lamp to the output from the switch.
- When you do not know how to connect a double switch, the solution is the same, but from the output of the electrical circuit interrupter, each phase wire goes to its own light source, or for a chandelier to its own power consumption bulbs.
- We connect the neutral wire of the switch to the light bulb to the neutral core of the socket, if there is a ground wire in the socket, we connect it to the ground wire from the light source.
- After that, the wiring is laid and all connections are isolated, as well as the test of the assembled circuit.


