- What are the advantages of two-gang switches?
- Prices for adjustable switches
- The design and principle of operation of the two-gang switch
- Types of electrical switches
- Device mounting procedure
- How to choose the location of the switch
- Safety
- How many wires on the chandelier
- Connection to a two-gang switch
- Connecting a chandelier to a single switch
- Connection from a socket
- Application of LED switch
- Correct connection
- Replacing an old device
- How to connect the device
- Connecting a switch and socket
- Conclusions and useful video on the topic
What are the advantages of two-gang switches?
In size, double models do not differ from single ones. This is convenient if it becomes necessary to replace one with another.
Switches differ in their device. The working part of the double includes three contacts: one at the input and two at the output. It is the outgoing contacts that control the operation of two independent light sources (or groups).
Incoming and outgoing contacts
The installation of switching devices having 2 keys has its advantages.
- When installing two single-key models, it is necessary to pull the cable to each of them. Accordingly, their replacement with one device leads to a reduction in labor costs and savings in materials.
- Two separate light sources can be connected to different keys and their operation can be controlled from one point. For example, this is convenient when outputting contacts from fixtures in the toilet and bathroom, if they are located nearby. Moreover, in accordance with the PUE, it is allowed to place switches only outside these premises. In the same way, it is possible to configure the inclusion of different groups of spotlights. They can be switched on alternately or simultaneously (by pressing both keys).
- The switches are quite simple, easy to install, and easy to care for. They serve for a long time without loss of operational and aesthetic characteristics.
- Double switches are installed in premises for various purposes: in apartments and offices, public institutions and in production. Moisture-resistant models can also be used outdoors.
- It is not always convenient when in a chandelier with several bulbs they all work at the same time. Installing a device with two keys allows you to make wiring by connecting a certain number of light sources to each of them. Thus, the work of the chandelier becomes more functional and electricity is saved when there is no need to turn on all the lamps.
Adjustable light switch
Prices for adjustable switches
Dimmer
The disadvantages of the devices include problems with turning on the lighting when the switch fails. Since one device controls two lamps at once, in the event of a breakdown, both of them will not work.
The design and principle of operation of the two-gang switch
The design of a two-gang switch is quite simple. It consists of:
- Two keys (moving up and down parts).
- Housing (shell), which is removed before starting work with electricity.
- Terminal blocks (those places to which voltage or current are supplied).
Switch design
In rare cases, the third element - terminal blocks - can be replaced in the design with screw clamps. The difference is that the former hold the wire for a long time and securely, while the latter do the same, but without clamping the wire, twisting it, so the first option is easier to connect and work longer. The design may also include additional lighting - a dimmer located on each key.
Inside a non-illuminated two-gang switch, there are two wires running parallel to each other + an input for a phase. Each of the terminals suitable for the keys can independently open or close a contact that turns on one lamp, a second lamp, or all lamps at once.
Two-gang switch wires
The principle of operation of the switch is the variability of the degree of illumination:
- You can turn on only one key so that one light bulb (or the first group of lights) lights up.
- It is possible to turn on the second key - the lighting will change, as some parts of the room will be clearly visible, while others will be slightly darkened.
- The third option is to turn on all the lamps at once - both keys are in the “on” position - then the room receives maximum lighting.
Some two-gang switches consist of two single-gang devices isolated from each other. In this case, it is customary to call them modular.


In addition to the external component, such a device can also perform the functions of saving energy and creating a diverse atmosphere.And two-gang switches increase safety, since when they are installed in a room, the number of points with electrical voltage decreases.
Before starting work on preparing for connecting the switch, we suggest that you familiarize yourself with the diagram of a two-gang switch below:
Types of electrical switches
The range of electrical devices presented on the Russian market does not allow listing all the names of this product, but absolutely all devices are divided into the following modifications:
- Concealed mounting - this type of electrical switches allows you to save the interior of the room and place an element of electrical fittings inside the wall. Among the disadvantages of this type of elements of electrical fittings, one can name the need for wall chasing, which significantly increases the time spent on installation work.
- Outdoor installation - used mainly in baths and utility rooms. This type of switches is much more convenient to operate and repair, but is significantly inferior to hidden devices in aesthetics.
Installation of these devices takes a little time, but each type has its own characteristics and installation sequence. How to install a light switch according to all the rules will be described in detail below.
Device mounting procedure
All actions carried out during the installation of the pass-through switch are carried out in accordance with the connection diagram. It differs from mounting a standard switch in that three wires are used instead of two.The two wires in this circuit act as a jumper connecting adjacent switches located at different points in the room. The third wire provides phase supply.
 The difference between the connection diagram of the pass-through switch and the installation diagram of a standard device is the presence of three wires, two of which connect the devices, and the third provides power
When connecting a pass-through switch, any type of lamp can be used, from a traditional incandescent lamp to modern fluorescent, LED lighting sources.
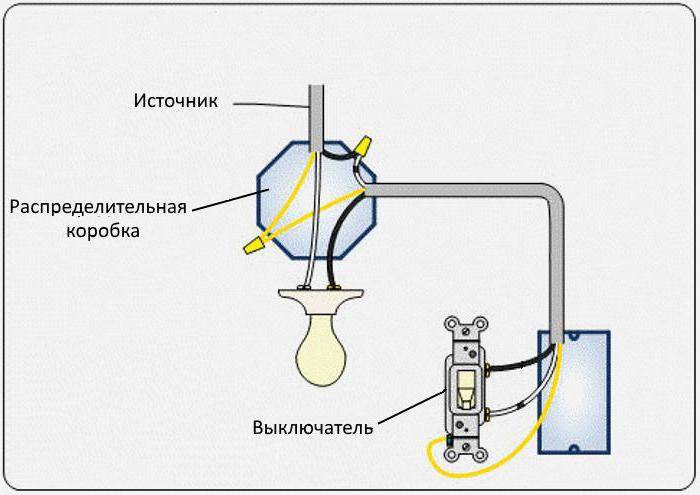
Five wires will fit to the junction box:
- cable from the lighting device;
- power wire from the machine;
- wire from the second pass-through switch.
To ensure a long service life of electrical wiring, it is recommended to choose the right cable size for home wiring.
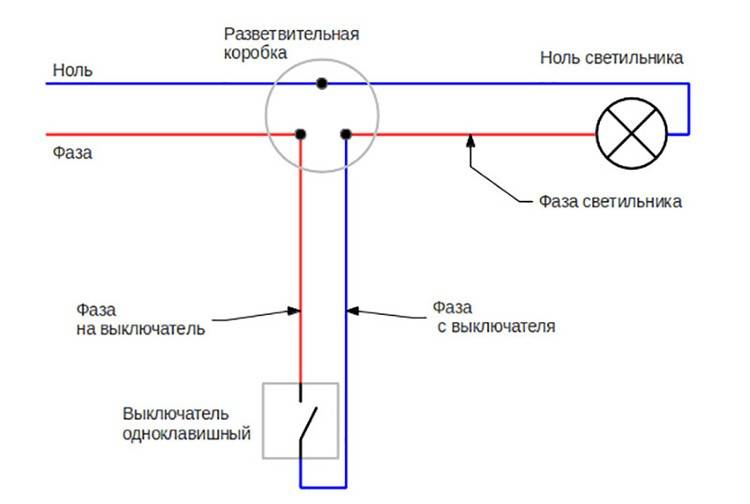
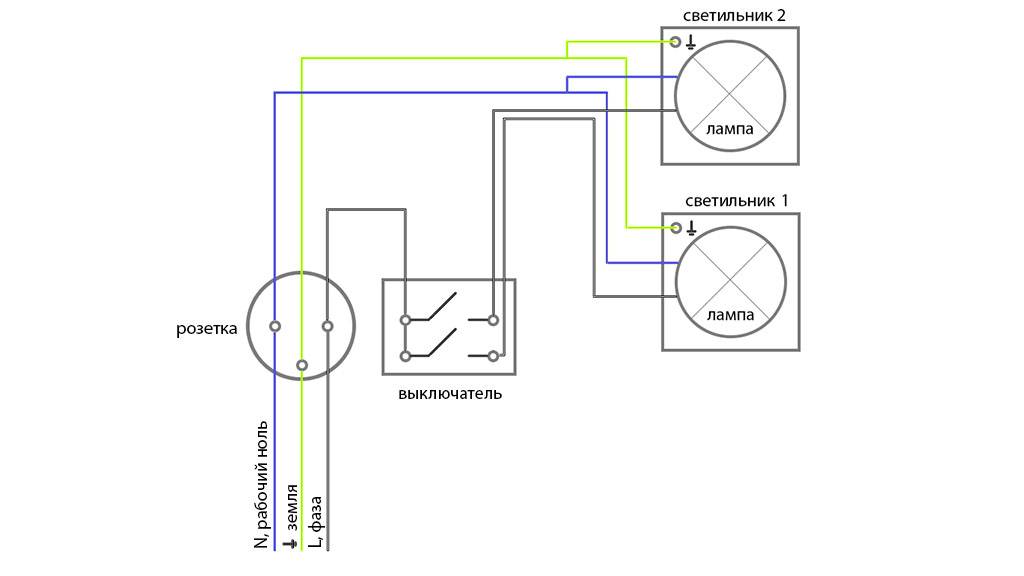
To build a circuit with two single-key switches, a three-core cable is used. In this case, grounding, “zero” is displayed on the light source. And the phase highlighted in brown in the diagram provides power. It passes through both switches and the lamp.
Since these switches are located in the break of the phase cable, the safety of work during the repair and maintenance of the lighting device is ensured.
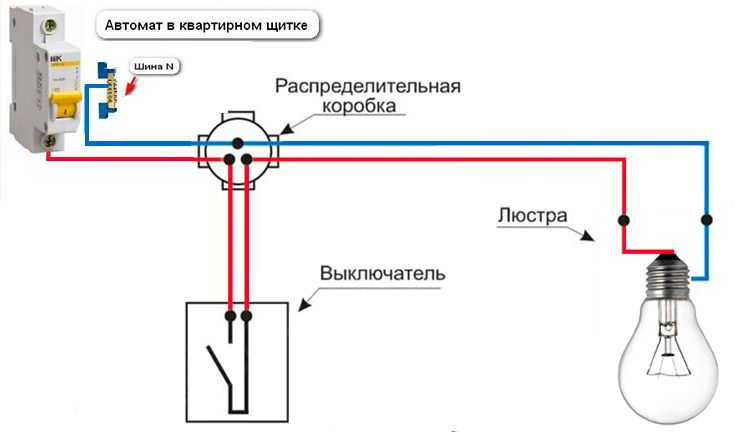
Work on connecting a single-gang switch (through) is carried out in the following sequence:
- release the ends of the wires from insulation;
- using the indicator, find the phase wire and zero;
- lay the neutral wire from the machine through the junction box to the chandelier / lamp.
- to the input contact of the first switch, connect the phase of the supply wire that has passed through the junction box;
- connect (through the junction box) two output contacts of one pass-through switch to two output contacts of the other;
- it remains to connect the phase going (through the junction box) to the chandelier / lamp to the output contact of the second switch.
The joints can be twisted, soldered and wrapped with electrical tape. Or use self-clamping terminal blocks.


 In apartments, private cottages, not one-but two-button walk-through switches are more often used. Devices with two keys allow you to control two lighting fixtures that are located in different rooms
In addition to keyboard models, manufacturers offer touch panels. However, when installing them, professional help is indispensable.
If it is necessary to control lighting from more than two points, up to six walk-through switches can be used in the circuit. In our other article, we examined step by step the nuances of connecting a pass-through switch from two and three places, providing the material with visual diagrams.
How to choose the location of the switch
Before starting the installation of the switch, it is worth deciding on the location of its placement. It is necessary to weigh all the pros and cons of its location. The most common location of switches near the door. This is convenient when, when leaving or entering, you can control the light in the entire room. Other options are also possible. For example, switches are located at the head of the bed.

Before you start installing the switch, you need to figure out the wiring diagram for it.Installation regulations should be taken into account: the switch must not be located closer than sixty cm from the shower cabin and at least half a meter from the gas branch.
According to them, you also need to retreat from the doors about 10 cm and almost a meter from the floor. In rooms with high humidity and large temperature fluctuations, the installation of switches should be avoided.

Safety
During installation work, it should be remembered that zero cannot be connected to the switch, and during repair work it is necessary to check that zero or phase is supplied to the contacts.
Checking must be done for your own safety. In order not to accidentally get under voltage when replacing a light bulb or repair work.
If you do not have the skills to work with electrical appliances, you should contact a specialist who will professionally install a single-gang switch for flush wiring. The electrician will agree with the customer how to properly install the light switch and advise at what height they should be installed.
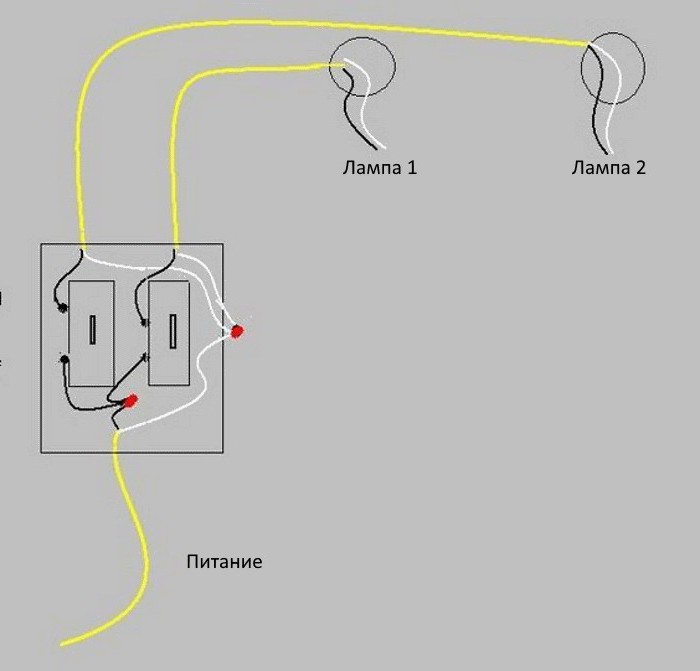
How many wires on the chandelier
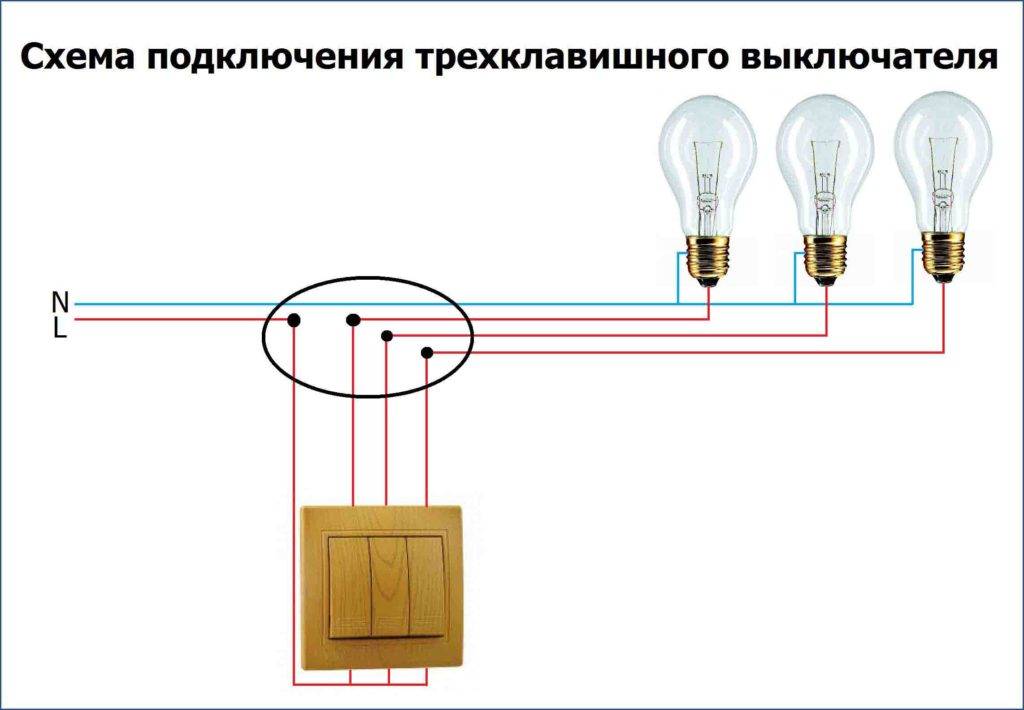
The number of wires on a chandelier depends on how complex the chandelier is and how many bulbs it has to turn on. When there are only two wires on the chandelier, then it is most likely a simple chandelier with only one light bulb. It is not difficult to connect such a chandelier, it is enough to connect each conductor to zero and to the phase (separately). If the chandelier is simple, and there are 3 outlets on the ceiling, and they are connected to a two-gang switch, then:
- It is possible to connect two phase conductors together, thus forming one phase conductor.In this case, the chandelier can be turned on and off with each key, which is not very convenient.
- One phase conductor is isolated, then the chandelier will turn on / off with one of the keys, to choose from.
There are multi-track chandeliers that can have more than one light bulb, so there are more wires, in addition, there may be a wire (yellow-green) for grounding.
When the chandelier has 3 wires, then do this:
- The ground wire is not connected if it is not on the ceiling.
- The ground conductor is connected to the same conductor on the ceiling.
The other two wires are connected to the phase and neutral conductor. As a rule, modern chandeliers are necessarily produced with a ground wire, which is associated with the requirements of safety regulations.


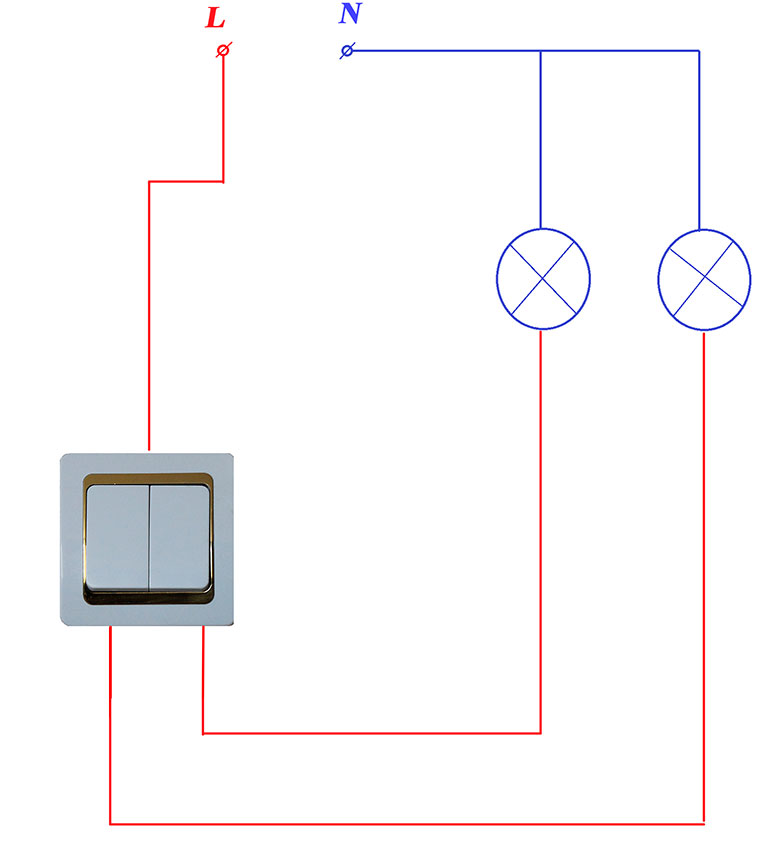


Connection to a two-gang switch
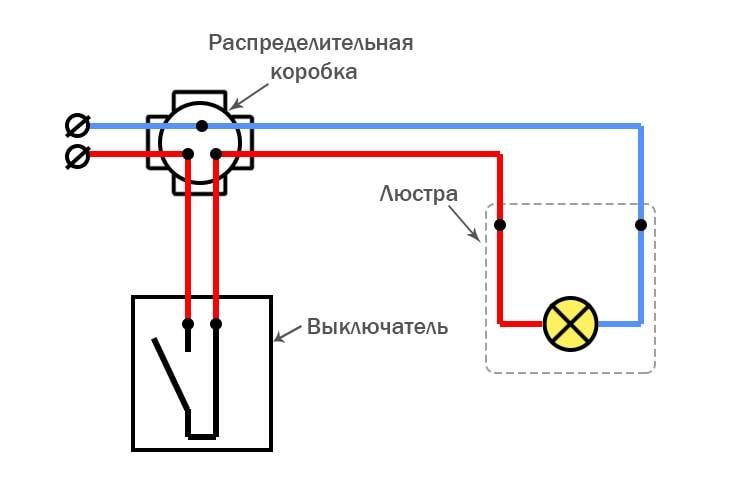
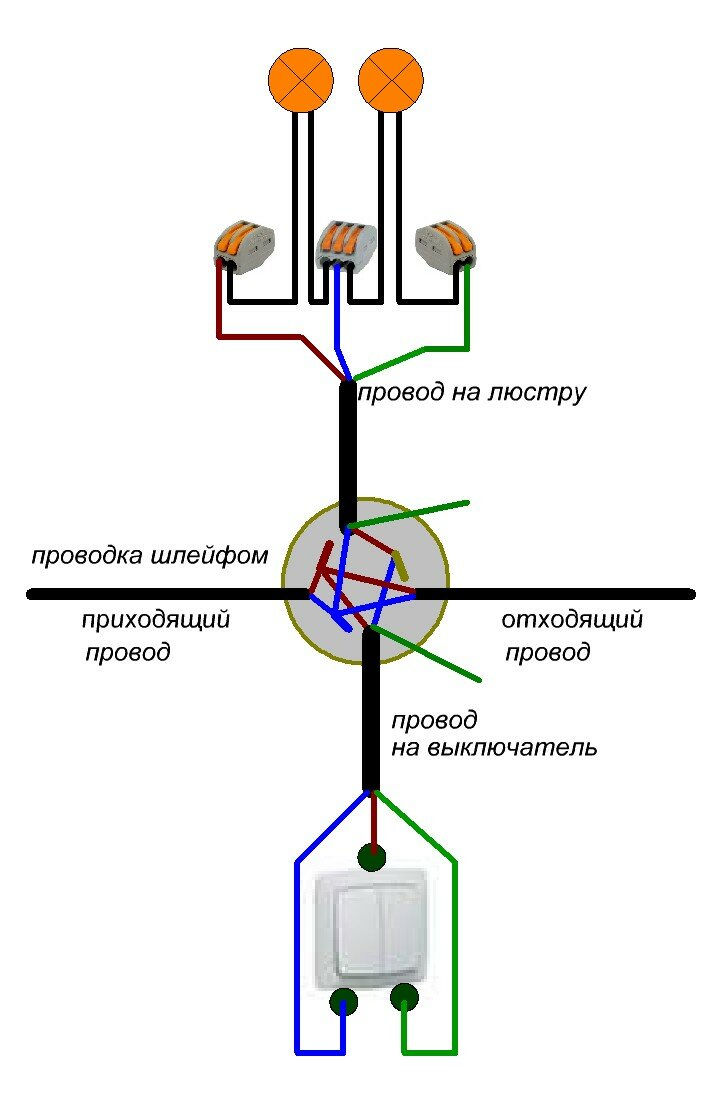
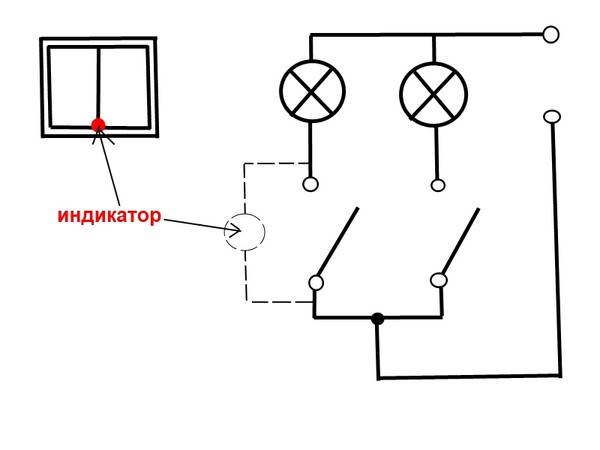
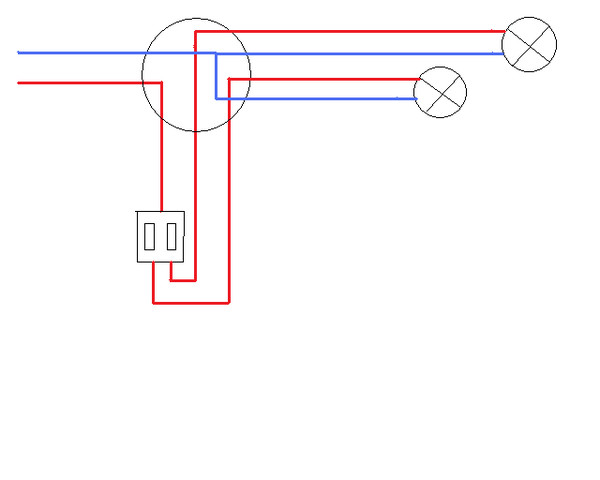
When a chandelier has more than 2 light sources, it does not make sense to constantly turn on a large number of light bulbs, but it is better to break them into two groups. In this case, you get 3 options for switching on: a minimum of light, an average illumination and a maximum amount of light. There must be at least 3 wires on the ceiling - 2 phases and 1 zero.
Connecting a five-arm chandelier to a double (two-gang) switch
Recently, chandeliers are connected inside with multi-colored wires. As a rule, blue and brown conductors are used, although other color options are possible. According to the standards, the blue wire is intended for connecting "zero". Therefore, first of all, “zero” is formed, due to the twisting of all blue wires
It is important to check that no other wires get into this connection.
Before connecting the chandelier, the conductors group
The next step is the formation of groups of light sources. If the chandelier is 3-horn, then there are not many options here: 2 groups are formed, consisting of 1 and 2 light bulbs. For a 5 carob chandelier, the following options are possible: 2 + 3 bulbs or 1 + 4 bulbs. These groups are formed by twisting the phase wires, which may be brown. As a result, a group of "zero" conductors of the same color is obtained, the second group represents a separate "phase" group, which may include one or more conductors, and the third group is also a "phase" group, which includes 2 or more wires, depending on the number light sources.
Wiring diagram for a two-gang switch
Watch this video on YouTube
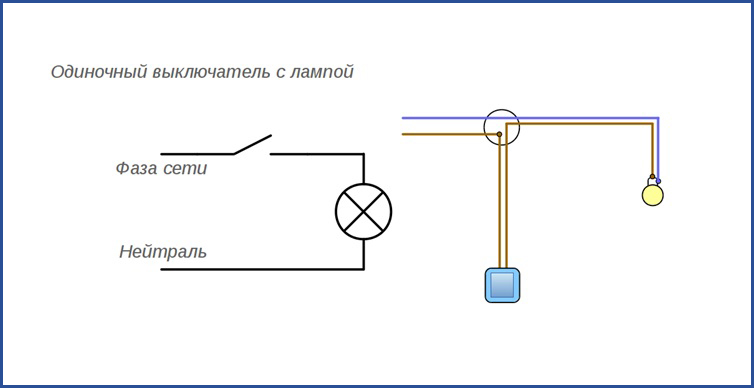
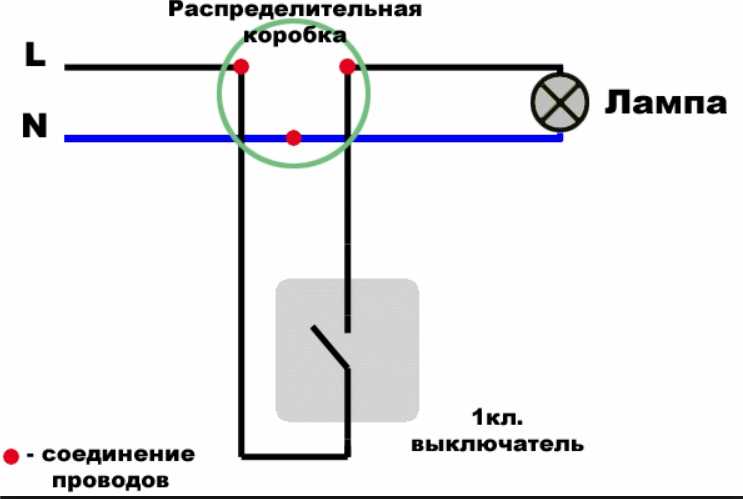
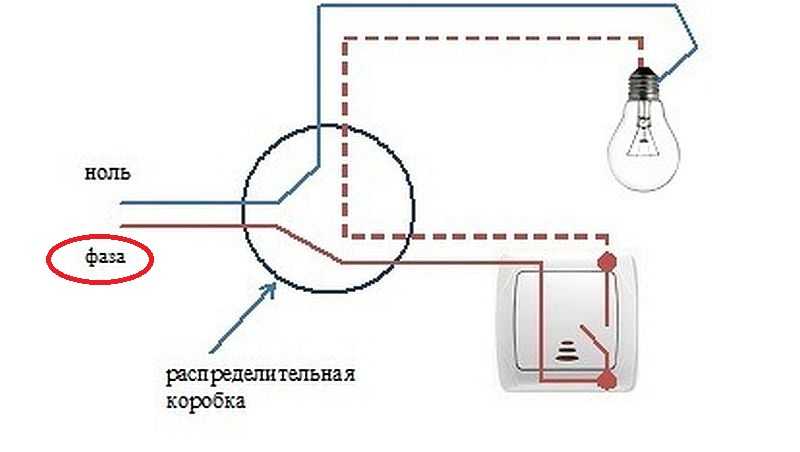
Connecting a chandelier to a single switch
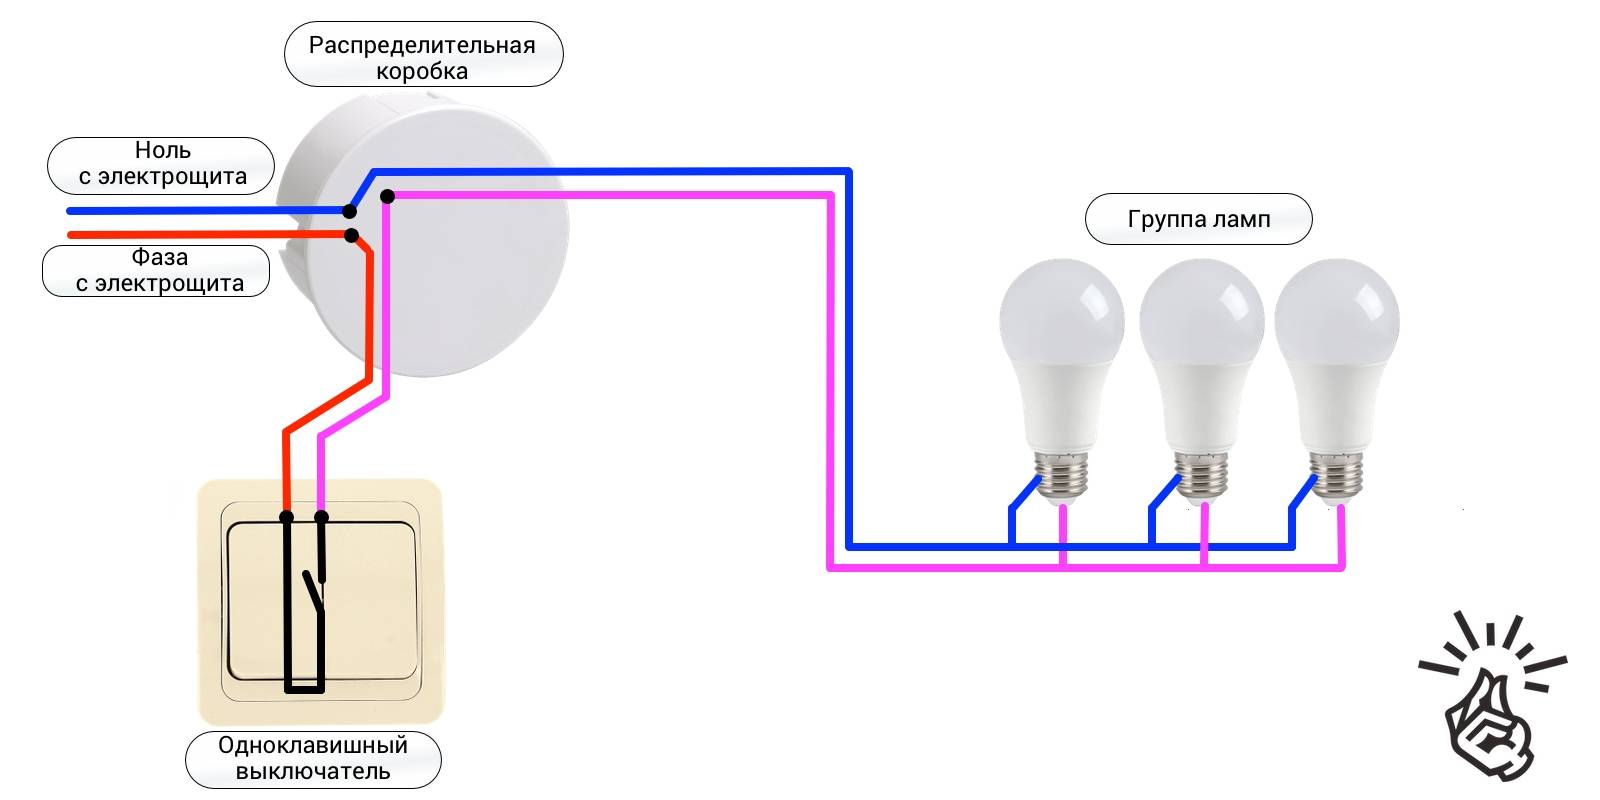
The connection method is quite simple, even if there are more than one or two light bulbs in the chandelier. It is much easier to do this if wires of two colors come out of the chandelier. In this case, wires of the same color are twisted together, thus forming a 2-wire line. The figure below shows a diagram of switching on a chandelier to a single switch.
Scheme for connecting a chandelier to a single-gang switch
Naturally, with such a switching scheme, all the bulbs are simultaneously switched, which is not always justified from an economic point of view.
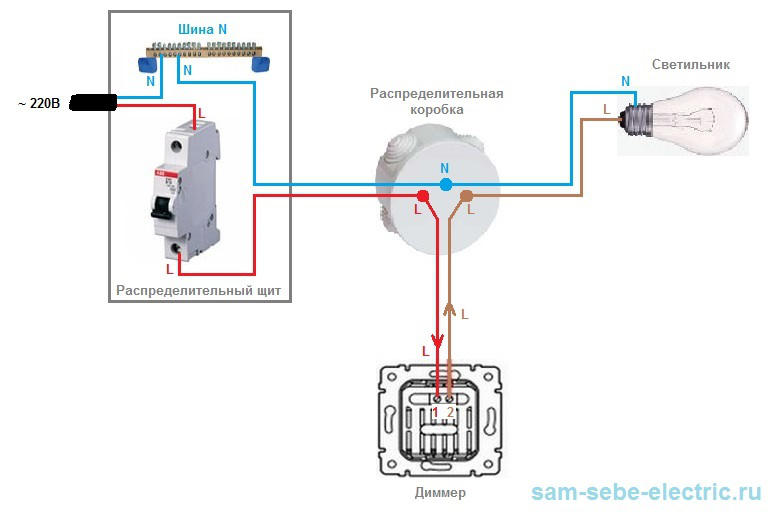
Connection from a socket
But there are cases when it is necessary to connect an additional lamp with a separate switch. Then wiring from an existing outlet is possible. The choice of the method of reference (external or internal) does not make sense now to disassemble, this does not apply to this topic.It is more logical to consider connection options. When installing a single-key switch, no difficulties arise, you only need a two-wire wire and the switching device itself.
If a voltage breaker is installed above the socket, then the neutral and phase wires are removed from it. The phase is interrupted inside the switch, while the zero remains intact. The rest of the lighting equipment connected to the circuit is powered according to the above diagrams.
With this, three wire cores are required (at the output - zero, phase, phase), and if the breaker has three keys, then 4 cores (zero and 3 phases) are needed.
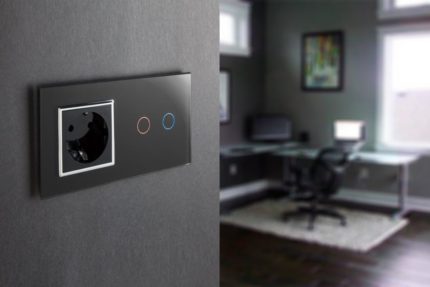
Application of LED switch
A switch equipped with a backlight is installed where it is dark even in the daytime, and the constant use of a lighting device is impractical. It is also used in rooms, access to which is necessary at night.


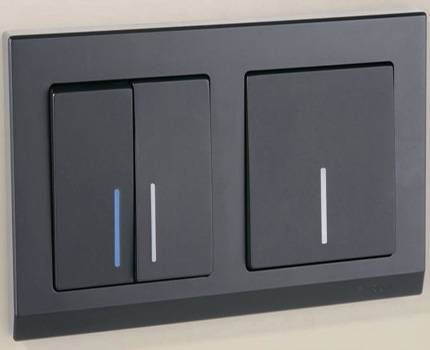
A switch with LED backlight, just like a conventional one, can be one-piece or consist of one, two or more keys
The more light sources, the more keys on the switch will be required. To control lighting, consisting of more than three lighting fixtures, dial switches are used, which are installed in one row.
To control lighting from several places, a special backlit switch is purchased.
Correct connection
After connecting the wires, you need not make a mistake when working with socket boxes, especially in old houses. Modern devices differ in size compared to older products.
Replacing an old device
Often you have to deal with an old device to turn off the light. It needs to be dismantled.To remove the plastic cover under which the old structure is hidden, unscrew all the external screws.
There is a diagram on how to replace a single-gang switch quickly and easily.
- Using an indicator screwdriver, set the phase.
- Put on protective gloves and bring the tool to each contact in turn.
- After checking the first and second wires, turn off the light.
- Only in the absence of voltage can you begin to remove the old product.
- Pulling out the working unit, disconnect the first “phase” wire, and then the second one and isolate them.
- For insulation, multi-colored insulating tape is suitable.
After freeing up space for a new device, it is not difficult to install it.
How to connect the device
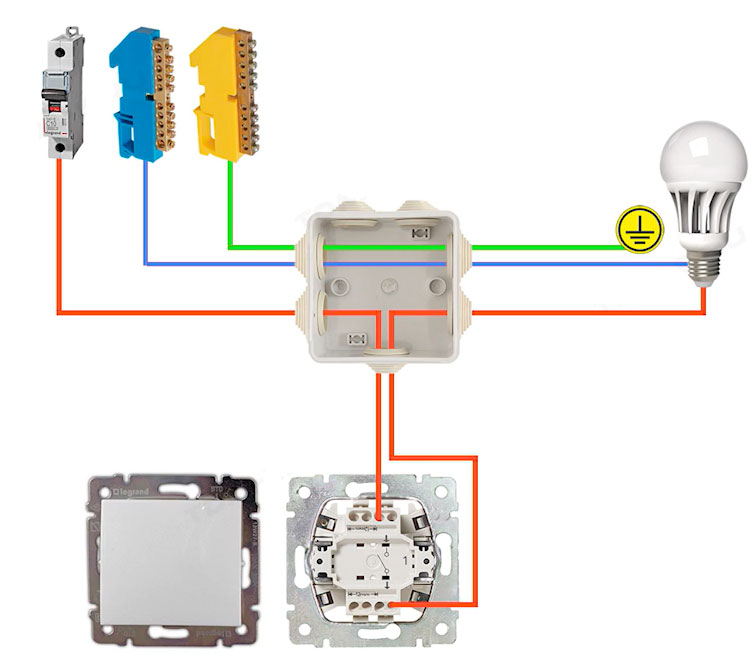
The need to connect from the junction box is due to the presence in one room of several lamps, sockets and switches. The task is complicated by the fact that you need to connect several wires in the device. Connecting the wire to the device directly is easier than connecting the lamp, switch, wires from the electrical panel at the same time.
Connecting a switch and socket
To connect the switch, you need to find the phase - the red wire, as well as zero, it is blue. They all come from the shield. The circuit is not much different, but the socket is installed differently: the red wire is connected to the same red one from the switch, and the blue wire is connected to the blue one. The wires lead to the mounting box, in the same way as with installing the device without a junction box. All wires that have been connected must be secured with electrical tape, soldered and laid in a box.
Conclusions and useful video on the topic
Having a wiring diagram for a pass-through switch, basic experience in electrical work, you can upgrade your home lighting control system yourself.
The video below will help you understand the differences between a conventional and a pass-through switch, and determine the installation procedure:
This video will help you connect walk-through switches without using a junction box:


And this video will help provide lighting control from three or more places.
The possibility of increasing the comfort of living, combined with a reduction in the cost of paying for electricity, is of interest to many, so the use of walk-through switches is becoming increasingly popular among owners of spacious apartments and private cottages.


