- Water connection
- Polypropylene pipes
- Metal-plastic pipes
- Steel pipes
- Installing a storage water heater
- Location selection
- Mounting wall mounts
- Water connection
- Electrical connection
- Connecting the boiler to a steel water supply
- Do-it-yourself boiler installation
- How to install a tankless water heater
- Rules for installing a storage boiler
- Water heater selection factors
- Electrical installation
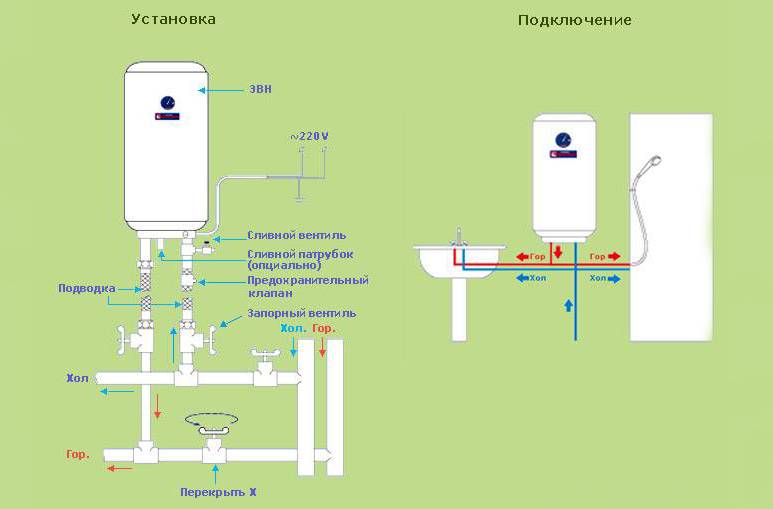
- General scheme of connection to the water supply
- Cold water supply (top to bottom):
- Hot water outlet (top to bottom):
- How to install a flow water heater
- Organization of power supply
- Selecting an installation site
- Wall mounting
Water connection
The choice of one or another method of connecting the boiler to the water supply is determined by the material of the pipes and the scheme of their laying throughout the house.
Polypropylene pipes
Connection to PP pipes is carried out using a special soldering iron and a pipe cutter. For distributing pipes, the master uses polypropylene tees, and the installation of the crane is carried out using an MPH coupling.

Connecting the water heater to PP pipes
The connection itself with external wiring does not create any difficulties.With pipes hidden under decorative panels, before connecting the boiler, the master opens the sheathing layer.
Metal-plastic pipes
Such pipelines are usually laid openly. There are many different fittings, so any wiring diagram can be implemented.
For tie-in, masters mainly use tees. Additional pipes or inlet flexible hoses are connected to them in accordance with the method of placing the pipeline and the location of the boiler.

Connecting the heater to metal-plastic using compression fittings
Steel pipes
When connecting the boiler to a steel pipeline, the master can use welding or replace it with the use of a special device - a tee clip. The element looks like a clamp with a small branch, which is put on the pipe and securely clamped with screws. To increase the density of the connection, the master installs a rubber gasket. Before installation, the water supply must be shut off.

ferrule tee
The pipe section must be cleaned of existing paint, dirt, and corrosion centers are removed. At the end of the installation, a hole is made in the pipe through the branch of the tee. For this, the master additionally uses a special sleeve - it protects the internal thread from deformation. The tap is screwed onto the thread of the branch, the supply hose of the heating device is connected to it.
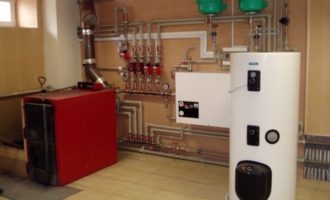
Installing a storage water heater
Location selection
Since the installation of a storage water heater is a more complex and time-consuming process, let's start with it.
Before buying a water heater, it is necessary to determine the place of its future location and make the necessary measurements.
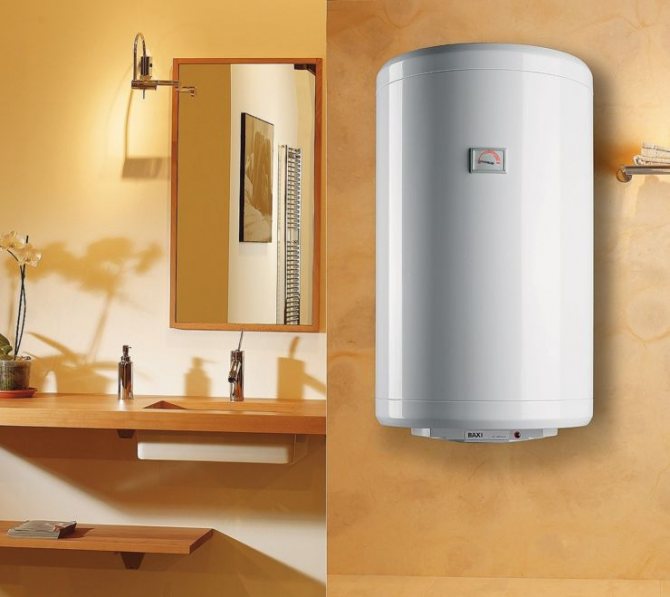
Please note that the water heater cannot be placed in a closed, hard-to-reach place, since it must be freely accessible for maintenance and possible repairs. Storage water heaters can only be mounted on load-bearing walls.
Mounting wall mounts
Installation of a storage water heater begins with the installation of wall mounts. Most models are mounted on 2 (models up to 200 liters) or 4 (more than 200 liters) hooks. As hooks, it is best to use anchor bolts with a special tip. Such bolts are easy to install and at the same time provide reliable fastening of the water heater.
Installation of a storage water heater begins with the installation of wall mounts
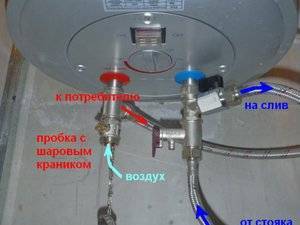
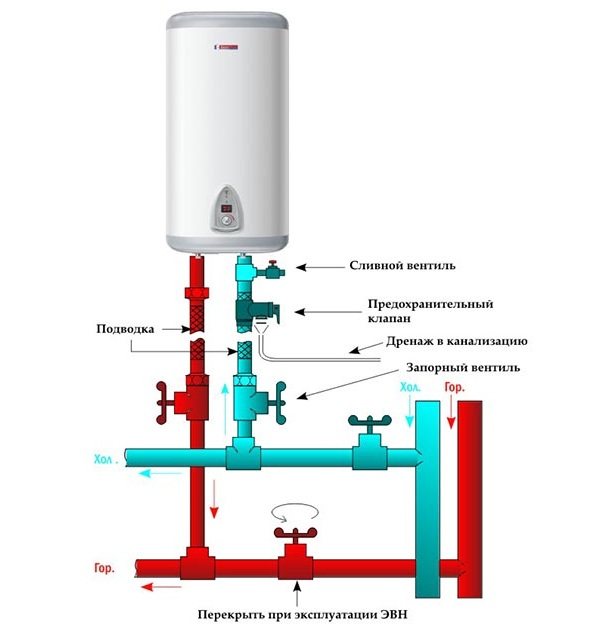
Water connection
Before connecting the heater, the water must be turned off. You also need to release the residual pressure in the pipes by opening the hot (if any) and cold water taps.
It would also be useful to install a pressure reducer, which will protect the device from possible pressure drops in the network.
If you are not satisfied with the purity of the water in your home, then a cleaning filter can be installed on the cold water supply pipe after the shut-off valves. It would also be useful to install a pressure reducer, which will protect the device from possible pressure drops in the network.
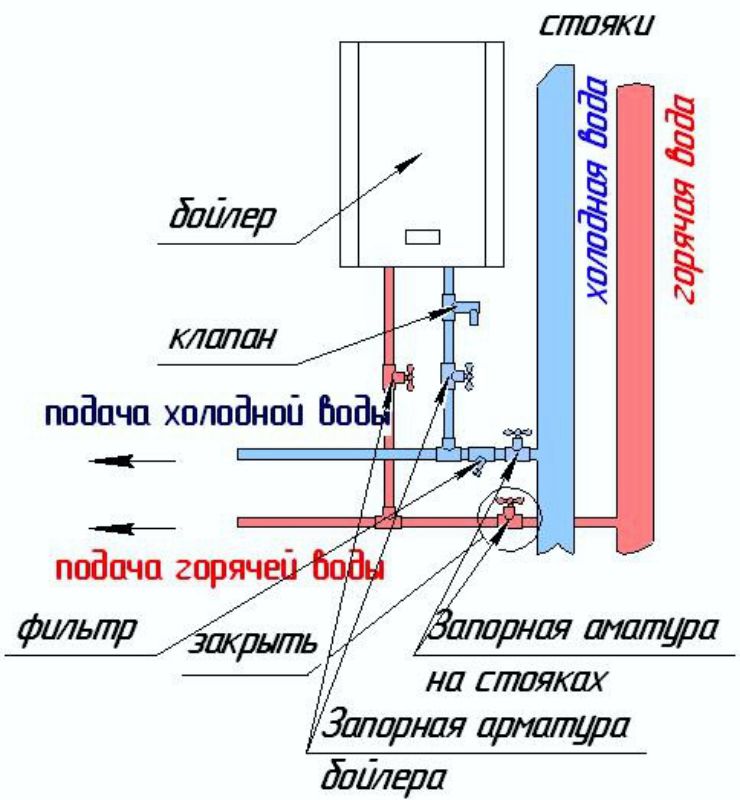
Next, tees are installed on the pipes, from which the connection will be made directly to the water heater and hot water consumption points.
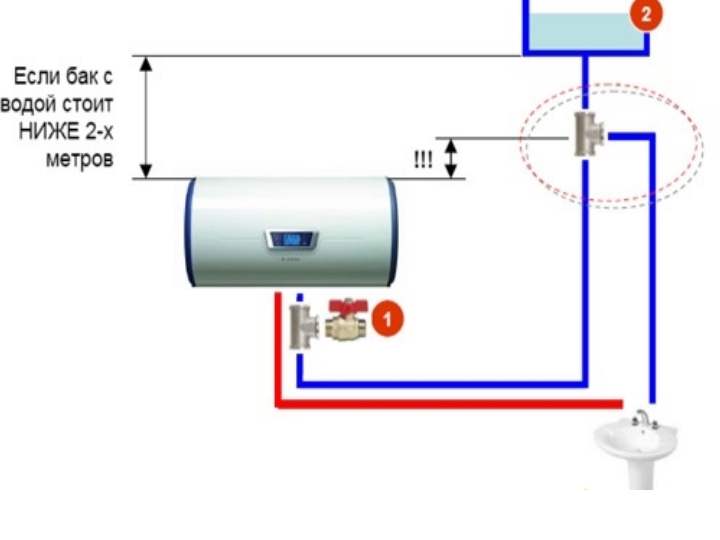
It is best to connect the heater to the water supply using plastic pipes or special flexible hoses.If you did not install shut-off valves immediately after the water riser, we recommend installing it directly in front of the water heater. But it is necessary to put a safety valve for discharging water at elevated pressure inside the device. It is installed on the line cold water inlet into the water heater (on most devices, the corresponding pipe is marked in blue).


All joints must be wrapped with tow or fum-tape.
All joints must be wrapped with tow or fum-tape
When the water is connected, it is necessary to check the system for leaks. To do this, open the shut-off valves on the cold supply pipe water to the heater and hot water faucet above the washbasin or sink. When water runs out of the tap under normal pressure, this will mean that the water heater is full, it should be closed and all connections should be carefully checked for leaks. If it is found, sealant treatment is necessary, or everything should be reassembled by wrapping it with an additional layer of fum-tape.
Electrical connection
Since the water heater is a fairly powerful device, it cannot simply be plugged into the first available outlet.
First, the water heater must be grounded. Secondly, it is necessary to check the section of the electrical cable that fits the outlet chosen to turn on the device, and make sure that it meets the minimum allowable requirements for your water heater. You will find information about this in the instructions.Even if the cable section exceeds the minimum allowable, we strongly do not recommend plugging additional devices into the heater socket at the time of its use.
The water heater must be grounded
And in conclusion, an important tip: you should never turn on the water heater when the tank is not filled with water!
Connecting the boiler to a steel water supply
The "vampire" tee is a metal clamp, on the side of which there is an inlet with pre-cut threads. The tee is fixed on the outer surface of the pipe, cleaned of paint and dirt, through a rubber lining and clamped with fixing screws.
After installing the tee, a drill is drilled on a metal protective sleeve through the pipe in the side surface of the pipe. Naturally, all work is carried out in a closed water supply. After that, the thread is screwed into the ball valve, and this is a flexible hose at the inlet to the boiler or other equipment.
Do-it-yourself boiler installation
You need to install a water heater with your own hands in accordance with existing rules and requirements, depending on its type. So, the features of installing a flow device will be somewhat different from installing a storage device. Let's consider both one and the second case.
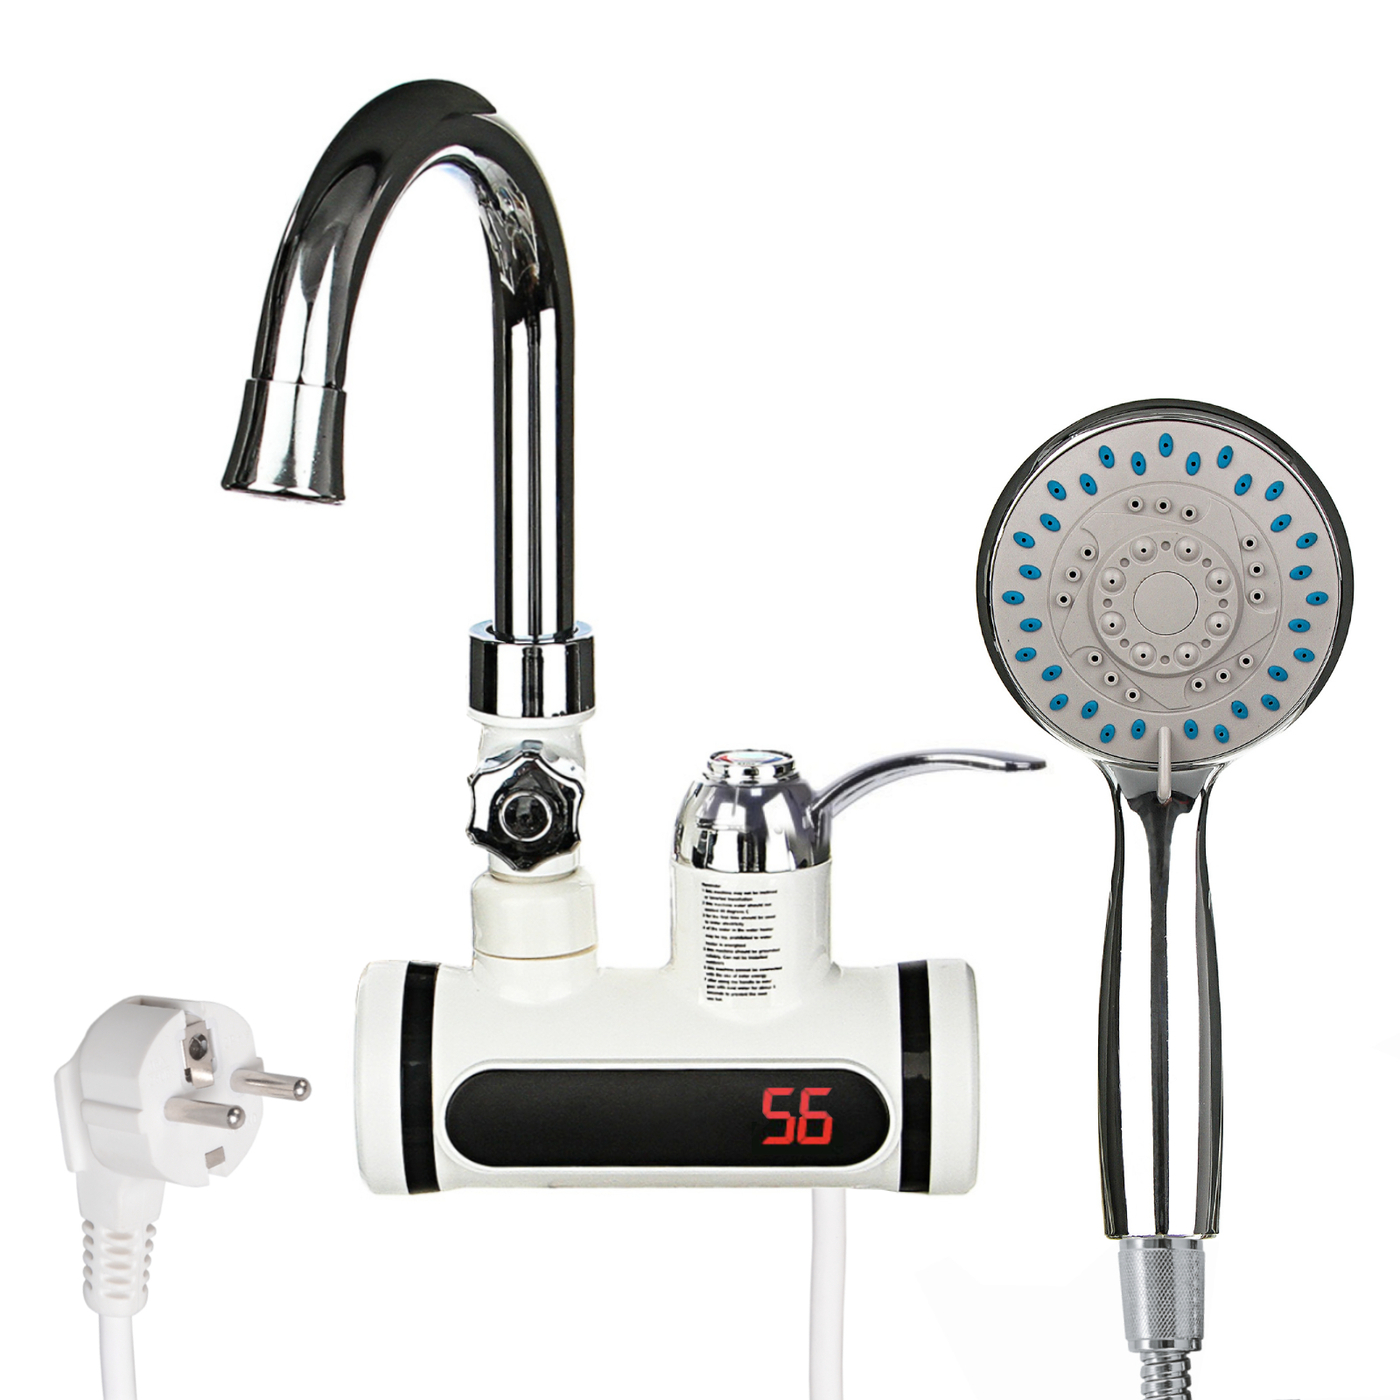
How to install a tankless water heater
One of the key features of instantaneous water heaters is their compactness, which will allow you to put them in the kitchen or bathroom. room right under the sink. The liquid in such devices is heated in a special metal pipe, which contains powerful heating elements.
Such design features of the device require that the electrical wiring in the house or apartment work properly and be able to withstand heavy loads. It is advisable to install a separate machine for a flow-type heater, and connect a wire with a large cross section to it.
After you finish working with the electrical connection, you can install the boiler itself. It is installed according to a temporary or stationary scheme.
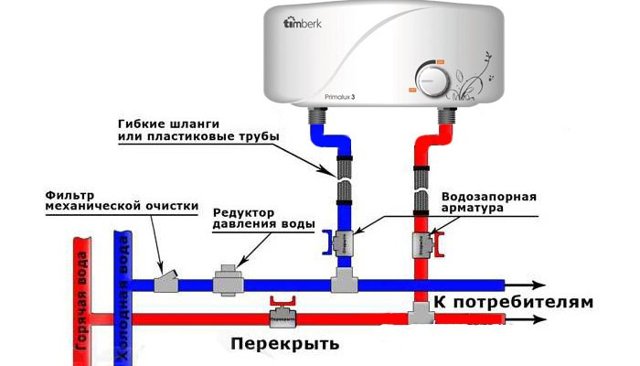
The temporary scheme provides that an additional tee is cut into the pipe with cold water, which will be connected to the water heater through a special valve. To do this, you need to apply voltage to the water heater and open the tap that supplies hot water.
But the stationary scheme assumes that the supply and intake of water in the pipes will be carried out in parallel with the general water supply system. To install the structure according to the stationary scheme, tees for hot and cold water cut into the pipes. Then you need to put stopcocks and seal them with a simple tow or fum tape.
The next steps are:
- connect the boiler inlet pipe to the pipe that supplies cold water;
- connect the outlet to the hot water tap ;
- supply water to the pipes and make sure that all connections are tight when turning on the water in the tap and shower;
- during normal operation of the system, you can supply electricity to the water heater, then hot water should flow from the desired tap;
- to increase the safety level of the entire plumbing system and the water heater, immediately install a safety valve with it.
You can see clearly the installation process of the flow apparatus in the video.
Rules for installing a storage boiler
If you plan to install a storage device with your own hands, then the requirements for the state of the wiring will not be as strict as in the previous case. And storage heaters are somewhat cheaper than flow heaters. In addition, their popularity is explained by the fact that very often they are covered by a scheme in which you can simultaneously supply water to the tap and shower.


You can install such a unit with tools and materials quickly, while the work itself will not seem too complicated, it consists of the following actions:
- eliminate faults in the electrical wiring or plumbing system, if any, check their condition;
- make markings on the wall for the structure and put the necessary fasteners for its installation;
- fix the water heater on the wall and attach the safety valve;
- after installing the boiler on the wall, connect it to the water supply;
- lead the pipes through the valve to the corresponding inlets and outlets on the body;
- first install and connect cold water, and the safety valve must be closed at this time;
- also, with the valve closed, install pipes for hot water;
- connect the structure to the electrical network and check how it works.
If all the steps have been performed correctly, then hot water should flow from the corresponding tap. At this time, all pipes and connections of the boiler must be well sealed, and the wires must not overheat.
Of course, if you are not confident in your abilities and even visual training material in video format cannot help you learn the features of a phased installation do-it-yourself boiler, then do not take risks, but invite a specialist. Incorrect installation of the heater can cause it to fail prematurely and cause leaks and other problems. Therefore, take on an independent installation only when you are confident in your abilities and know that everything will be done efficiently and correctly.
Water heater selection factors
If you have already decided for sure that the instantaneous water heater suits you completely, you need to decide on the desired model.
To do this, try to clarify the desired characteristics of the device, that is, analyze the following information:
- the number of permanent residents;
- the maximum volume of water consumption with the simultaneous inclusion of all points of water intake;
- the total number of all points of water intake;
- desired maximum heating temperature;
Data collection will help calculate the power of the equipment. In this case, it is better to rely on the information provided by the manufacturer. If gas is supplied to the dacha, then you should think about connecting a gas column, and if you permanently live in the house, then a gas boiler.
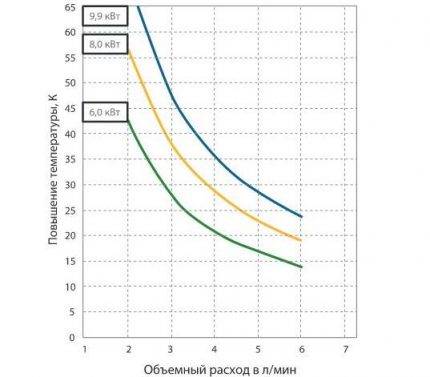
Calculation curve for temperature rise data for instantaneous pressure water heater AEG RMC at a tap water temperature of + 10 ºС and a voltage of 220 V
In residential buildings with more than five storeys, the installation of gas equipment is strictly prohibited. In this case, the choice is predetermined - you need to buy an electric water heater. He will "save" during seasonal shutdowns of hot water.
Owners of private houses who are not able to connect to main gas systems will have to give preference to electric options for equipment that prepares sanitary water.This is if it is not planned to use bottled gas or install a gas tank.
For self-assembly, the degree of complexity of the installation, the cost of the device, the initial configuration, the possibility of quick repairs and the availability of spare parts, the terms of warranty service and the warranty period are also important.
If the seller offers installation services, consider this option, especially when buying an electric pressure model or geyser.
In addition, another article that we recommend reading will introduce the arguments for choosing an instantaneous water heater.
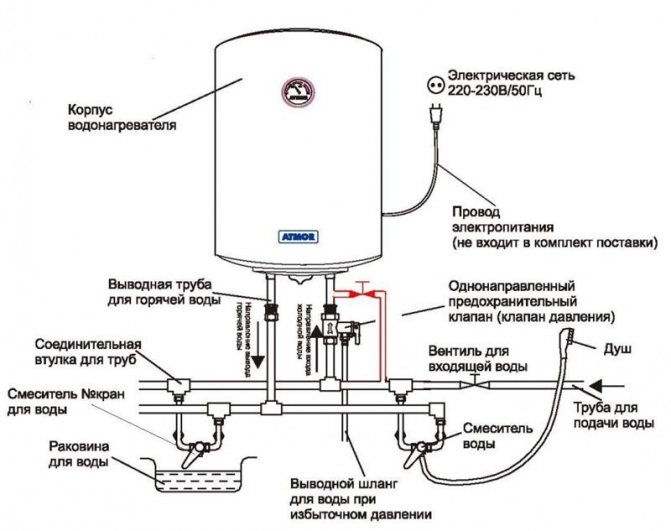
Electrical installation
Connecting the storage water heater to the power supply seems to be a very simple task, because for this you just need to plug the device into a power outlet. Household heaters are usually rated for a standard voltage of 220 V.
But anyone who is at least a little familiar with the operation of electrical networks understands that for such powerful devices, an ordinary outlet may be completely unsuitable.
First you need to assess the condition of the electrical wiring in an apartment or house and find out what maximum load it is designed for. Connecting several high-power devices to one line at the same time can be fatal for the system.
For example, if the heater and the household electric stove/automatic washing machine are turned on at the same time, the wiring may burn out, cause a fire, etc.
It is safer and more reliable to run a separate cable for the water heater from the electrical panel. The most important indicator in this situation is the cross section of the electrical cable.The minimum cable section can be calculated using special tables.
In this case, the operating voltage, phases, material from which the cable is made, whether the wiring will be hidden, etc. should be taken into account. For water heaters, a two-core copper or aluminum cable is usually used, voltage 220 V, single phase.
This table will help choose a suitable cable for connecting the storage water heater to the power supply. Use of a poor quality cable can cause a dangerous accident.
If the heater is installed in a room with high humidity (bathroom, kitchen, etc.), special moisture-proof sockets should be used.


In addition, for two-phase boilers it is almost always necessary to install an RCD - a residual current device. The cable must also be protected from moisture, as well as durable and sufficiently elastic.
Most often, storage water heaters are installed in places with high humidity, for example, in a bathroom. Here it is necessary to use special waterproof sockets.
Do not save on cable by buying products of dubious quality. In addition, you need to take an electric cable to connect the storage heater with a sufficient margin. The wire must not be under tension.
Before connecting, carefully study the marking of the cable. Inexperienced beginners sometimes get confused and connect the phase to the ground loop.
If there is no experience in electrical work, it makes sense to seek the advice of an experienced electrician or entrust him with this stage of installing the water heater.
Be sure to ground the heater.To do this, you can use a piece of metal wire, one end of which is fixed on the heater body, and the other is connected to the ground loop.
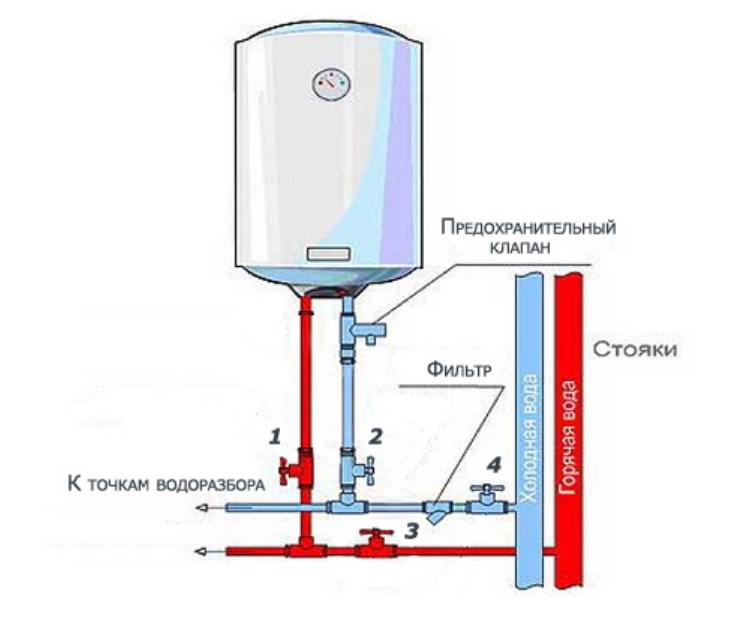
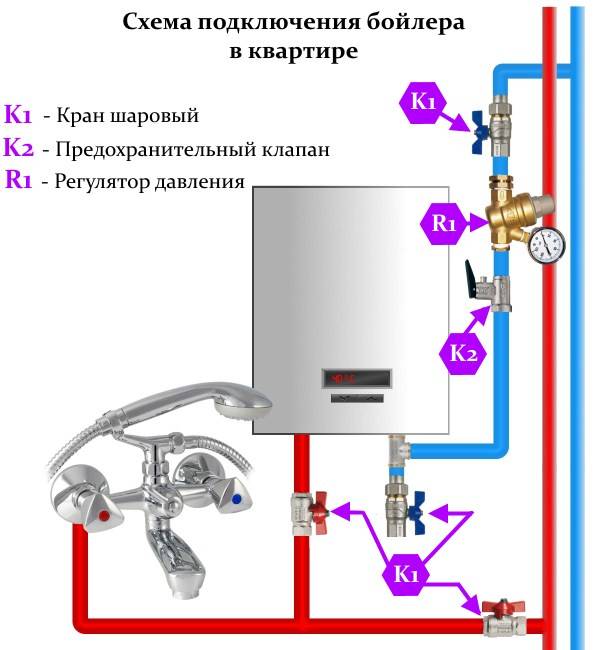
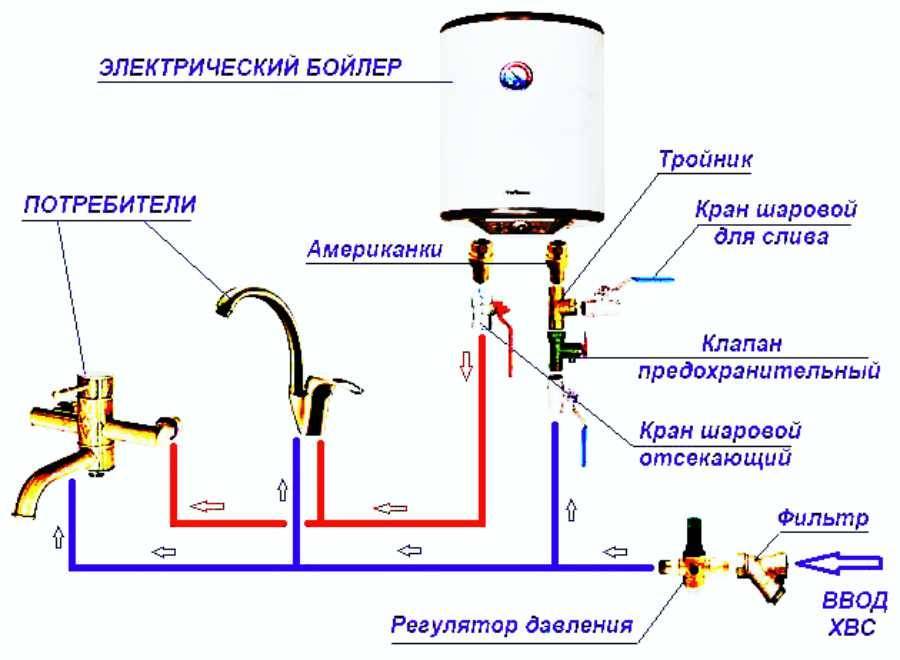
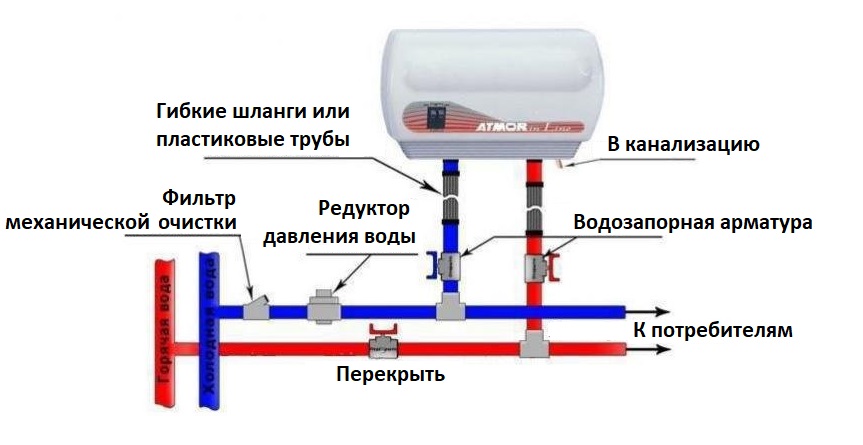
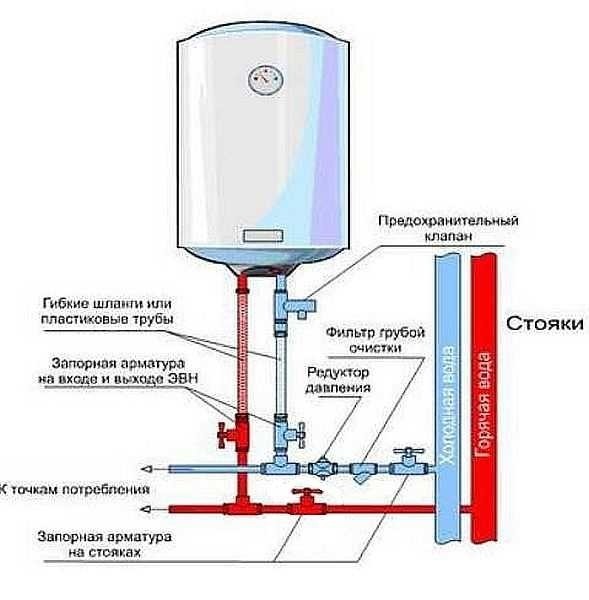
General scheme of connection to the water supply
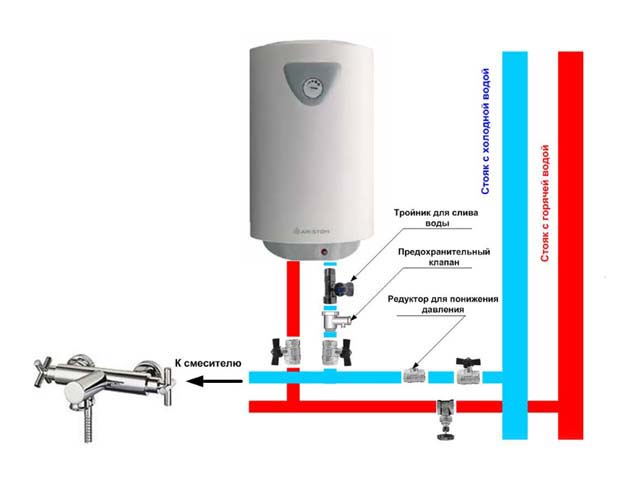
Connecting the boiler to the water supply from any type of pipes is carried out according to one general scheme.
Cold water supply (top to bottom):
- Mounting the "American" to the water supply pipe of the boiler is one of the simplest and most reliable options for connecting the boiler. If it is necessary to dismantle the water heater, it can be disconnected from the water supply in a few minutes.
- Installation of a brass tee with a tap for draining water. This part is not a prerequisite for connecting the boiler. But for the convenience of draining water from the boiler, this is an excellent and durable option.
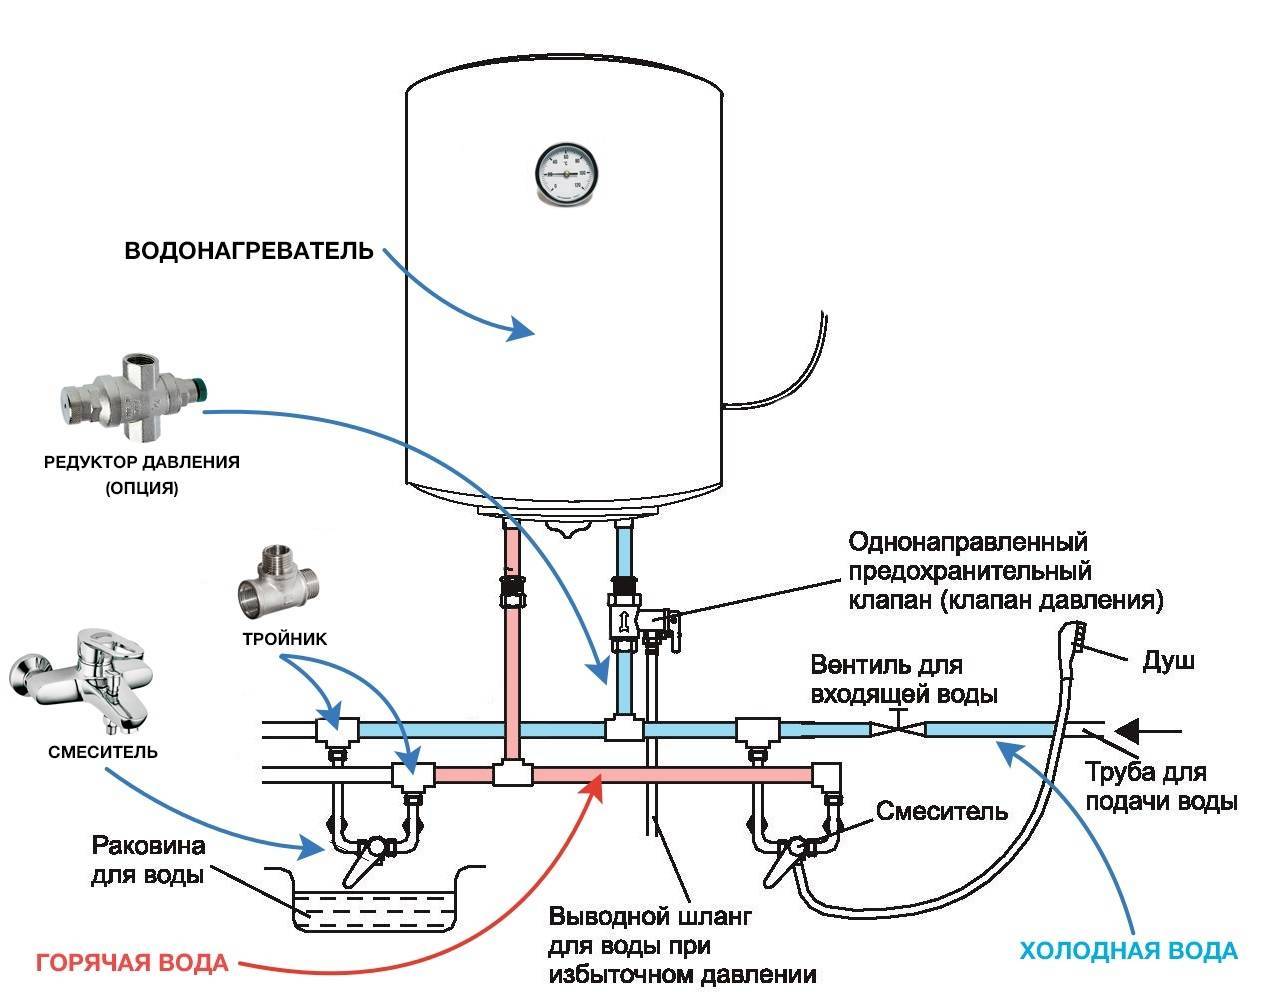
- Installation of a security system is a prerequisite for connecting the boiler to the water supply. The system includes:
 Scheme of water supply to the boiler
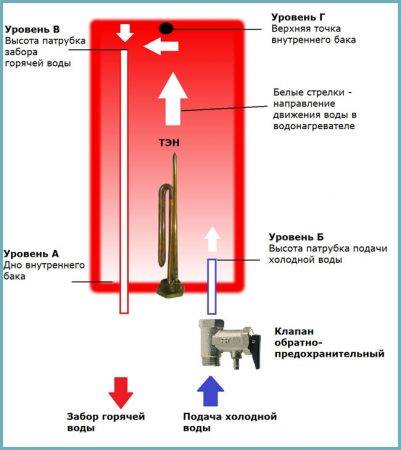
- non-return valve - will prevent the outflow of hot water from the boiler in the event of a drop in the pressure of the cold water supply or its complete absence;
- safety valve - in the event of an increase in pressure inside the boiler tank, excess water is automatically discharged through this valve to reduce internal pressure.
Attention! The security system included with the water heater is not always reliable. To protect yourself from trouble, purchase a reliable check and "stall" valve.
The importance of a security system cannot be overestimated.
So the absence of a check valve in the event of a shutdown of the water supply (for example, repair of the main line) will lead to the emptying of the tank. In this case, the heaters will still heat, which will lead to their failure.
The importance of a security system cannot be overestimated.So the absence of a check valve in the event of a shutdown of the water supply (for example, repair of the main line) will lead to emptying of the tank
At the same time, the heaters will still heat up, which will lead to their failure.
The safety valve is equally important in the system. Let's say the thermostat in the boiler failed. In this case, the heating elements will not automatically turn off and the temperature of the water in the tank can reach up to 100º. The pressure in the tank will rise rapidly, which will eventually lead to an explosion of the boiler.
 Safety valve in the system
- In the case of supplying poor-quality, hard water to the water supply system, a cleaning filter must be installed after the stopcock. Its presence will save the boiler capacity from scale and deposits of water stone, which will significantly extend its service life.
- Stopcock installation. Its purpose is to shut off the water supply to the boiler during its maintenance or repair, while water will be supplied to other points.
- In the case when the pressure in the water supply system “jumps”, experienced craftsmen recommend installing a pressure reducer. If it is already installed at the water inlet to a house or apartment, there is no need to duplicate the installation.
- Inserting a tee into an existing cold water supply pipe.
Hot water outlet (top to bottom):
- Installation of the “American” coupling on the hot water pipe of the boiler.
- Installation of a ball valve for the possibility of draining water from the boiler (if such a valve is already installed elsewhere, there is no need to duplicate it).
- An insert into the distribution of hot water in an apartment or house.
Insertion into a metal-plastic pipe. The easiest way to cut. In the right place, the pipe is cut with a cutter and, using suitable fittings, a tee is mounted on it, from which it will be supplied cold water in the boiler. Metal-plastic pipes are already losing their popularity. Outwardly, they do not look very aesthetically pleasing, and their service life is not too long.


Insert into a polypropylene pipe. Such a tie-in is more time-consuming and costly, but at the same time, the most reliable. A tee with an “American” coupling for connection is mounted using a special soldering iron. Having cut a pipe fragment in the right place with special scissors, it is necessary to maintain the alignment of its two parts. Otherwise, soldering the tee will fail.
Scheme of connecting the boiler to the water supply
Cutting into a metal pipe. Such a tie-in will require certain skills in working with spurs and couplings. If it is possible to cut a thread on a cut pipe, the tee is installed using a conventional plumbing fixture or coupling. If the metal pipes are located so that a bowl is used for thread cutting if it doesn’t work, they resort to using a special clamp with a threaded outlet, popularly called a “vampire”. How to work with a "vampire":
- The metal pipe must be carefully cleaned of old paint.
- Drill a hole at the tie-in point in the pipe. The diameter of the hole in the pipe must match the hole in the coupling.
- The “vampire” coupling is mounted on a metal pipe through a rubber gasket and fixed with coupling bolts. The holes in the pipe and the coupling must match.
Attention! A large hole drilled in the pipe will violate the strength characteristics of the pipe; small - after a short time it will become clogged with dirt.
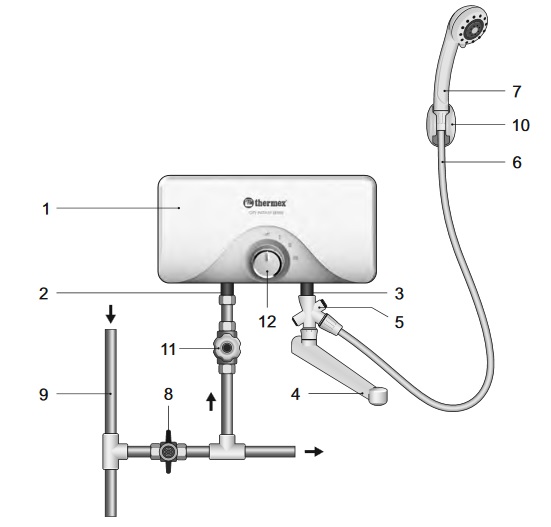
How to install a flow water heater
The process of installing a instantaneous water heater with your own hands includes a preparatory period
First of all, it is important to correctly determine the model. To choose the device that is optimally suited for its characteristics, the following factors are taken into account:
- the number of people living in the house;
- maximum hot water consumption with all taps open at the same time;
- number of water points;
- desired water temperature at the outlet of the tap.
Having a clear idea of the requirements, you can proceed to the selection of a flow heater of suitable power
Separately, it is worth paying attention to other nuances: the complexity of installation, price, maintainability and the availability of spare parts for sale.
Organization of power supply
The power of household instantaneous heaters varies from 3 to 27 kW. The old electrical wiring will not withstand such a load. If a non-pressure device rated at 3 kW can still be connected to an existing electrical network, then powerful pressure models require a separate line.
A powerful water heater cannot be connected to a power outlet. From the device lay a straight line to the electrical panel. The circuit includes an RCD. The circuit breaker is selected according to the power of the flowing electrical appliance. According to the standard, the indicator is 50–60 A, but you need to look at the instructions for the device.
The cable cross section is selected in the same way, taking into account the power of the heater, but not less than 2.5 mm 2. It is better to take a copper wire and be sure to have a three-core one. The instantaneous water heater cannot be used without grounding.
Selecting an installation site
The choice of the location of the water heater is determined by the convenience and safety of using the device:
When installing a water heater in an apartment, it is important to choose a place so that there is a free approach to the device. There are control buttons on the case.All family members will set the optimum water temperature according to their preference.
The installation of the electrical appliance is carried out so that during the use of a shower or sink, splashes of water do not fall on its body.
The device is placed as close as possible to the water points and the electrical panel, taking into account the convenient connection to the water supply.
All family members will set the optimum water temperature according to their preference.
The installation of the electrical appliance is carried out so that during the use of a shower or sink, splashes of water do not fall on its body.
The device is placed as close as possible to the water points and the electrical panel, taking into account the convenient connection to the water supply.


The choice of installation location depends on type of flow device:
- Non-pressure low-power models are designed to connect one draw-off point. The water heater is often made in the form of a faucet mounted on the sink. Non-pressure models are mounted under the sink or on the side of the sink. The device can be equipped with a hose with a shower head. It will be optimal to install a flowing water heater in the bathroom near the shower. If the question arises, how to connect a non-pressure instantaneous water heater, there is only one answer - as close as possible to the mixer.
- Powerful pressure models are able to provide hot water for more than two water points. It is allowed to install an electrical appliance near the cold water riser. With this scheme, hot water will flow to all the taps of the apartment.
The presence of IP 24 and IP 25 markings on the water heater means direct hit protection jets of water. However, it's not worth the risk. It is better to place the appliance in a safe, dry place.
Wall mounting
The instantaneous water heater is installed on the wall by hanging. Included with the product are dowels with self-tapping screws, mounting plate, brackets. When installing an electric flow-type water heater, two important nuances are taken into account:
- Support strength. A wall made of solid materials is perfect. The device is characterized by light weight. It can be fixed even on a plasterboard wall. The main thing is that the wall does not stagger, and a mortgage was provided under the plasterboard for reliable fixation of the brackets.
- During installation, the ideal horizontal position of the body of the flow device is observed. At the slightest inclination, an air lock is formed inside the water heater chamber. A heating element not washed by water in this area will quickly burn out.
Installation work begins with the markup. The mounting plate is applied to the wall and the places for drilling holes are marked with a pencil.
It is important at this stage to set the horizontal level. Holes are drilled according to the markings, plastic dowels are driven in with a hammer, after which the mounting plate is screwed with self-tapping screws. Support base ready
Now it remains to fix the water heater body to the bar
The supporting base is ready. Now it remains to fix the body of the water heater to the bar.