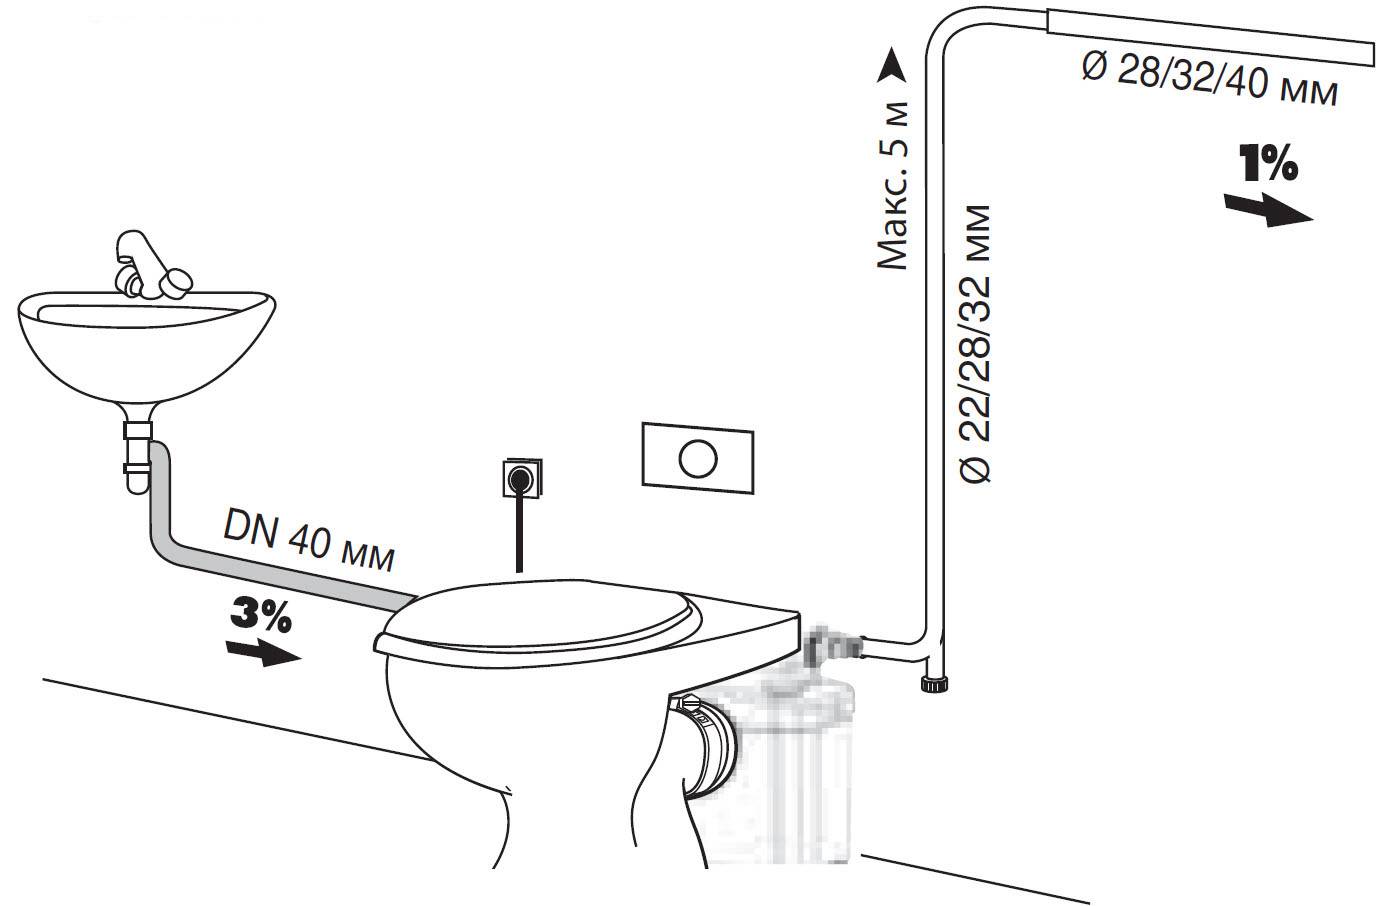
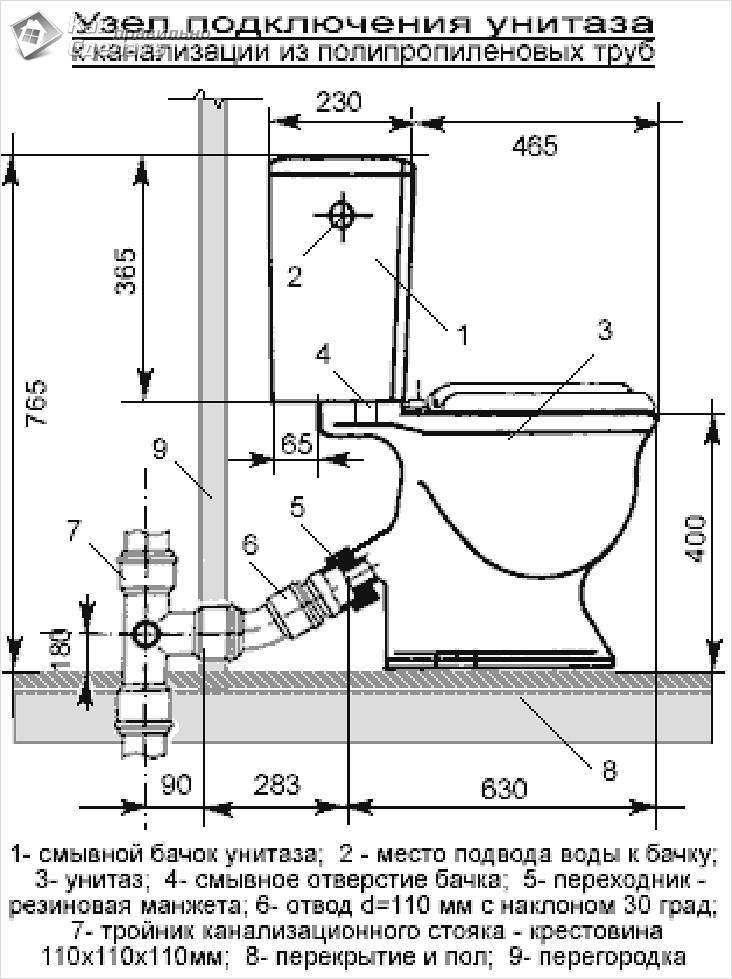
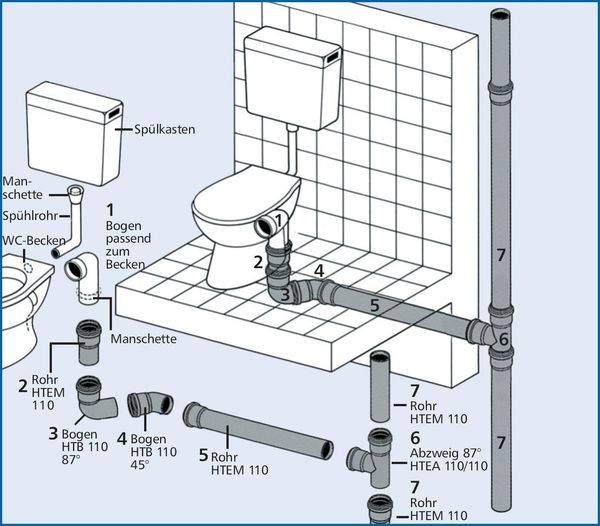
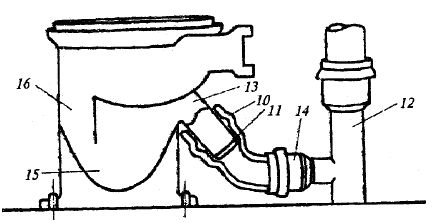
- Connecting the cistern to the toilet bowl and plumbing
- Toilet classification
- According to the method of fastening
- By release design
- By tank mounting type
- By flush type
- Connecting the toilet with a corrugated pipe
- Types of toilets
- According to the installation method
- Release to the sewer
- Algorithm of work on the installation of a conventional frame
- Installation of a finished structure with a toilet bowl
- Wizard's advice
- How to connect a toilet to a sewer
- Tank replacement
- The process of connecting the toilet and sewage in stages with your own hands
- Types of toilet pipes
- Installation of toilet bowls with a vertical branch pipe
- Mounting
- Vertical
- Horizontal
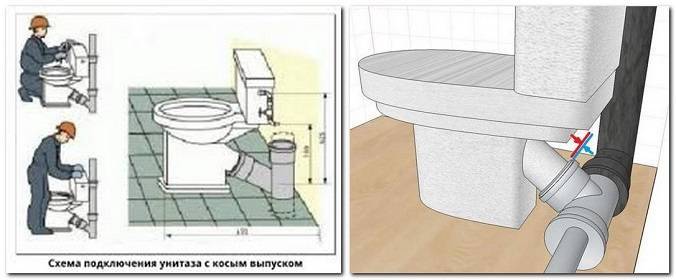
- oblique
- Location selection
Connecting the cistern to the toilet bowl and plumbing
After the toilet is installed, it is necessary to hoist a drain tank on it. We collect the internal filling according to the instructions. We put a gasket on the bowl (it can have a different shape) and fix the tank to the bowl so that it does not move relative to its place. You can glue it to the bowl with silicone. The screws are tightened evenly. We connect a flexible hose from the tank to the water supply. We wrap FUM tape on threaded connections for sealing. It will not be superfluous to install a shut-off valve on the water pipe.
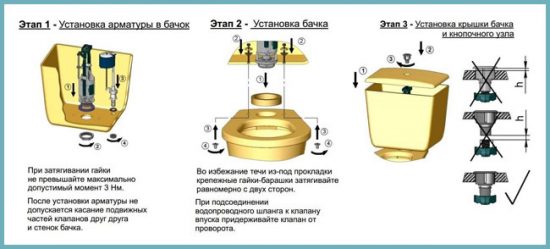 Connecting the toilet bowl
If it is necessary to repair the product, the tap will allow you to locally shut off the water supply. It remains to test the tightness and quality of the system. Shifting the float up or down allows you to adjust the level of filling with water in the drain tank. We fill the tank with water several times and drain it. The absence of leaks and trouble-free operation of the device indicates that the installation was successful. The finishing touch will be the installation of a toilet seat, which after all the work done will be a mere trifle for you.
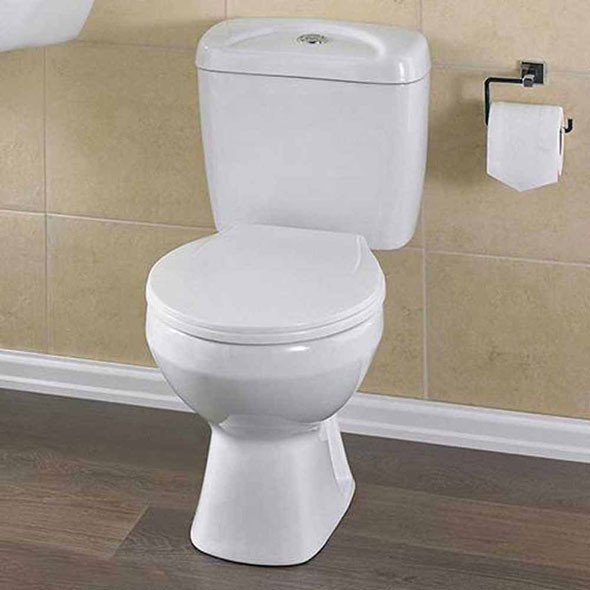
Toilet classification
Many people think that the toilet is a modern invention, but it is not. Already at the end of the 16th century, it was invented for the Queen of England, but due to the lack of centralized water supply and sewerage, it was not widely used.
Modern toilet bowls are available in different versions and differ in the shape of the bowl, the installation method and the type of drain system. To make the right choice of such a device, you first need to familiarize yourself with the existing offer and decide on the parameters of the toilet that you need.
According to the method of fastening
There is a classification of toilet bowls according to the method of attachment:
-
floor. They are the most budgetary and are best suited for spacious toilet rooms. Installation of such a product is carried out on anchor bolts, which allows, if necessary, to dismantle it without damaging the floor covering;
-
wall-mounted. This is one of the varieties of the floor version, designed for installation in small bathrooms. According to the design of the flush system, such toilets are practically in no way inferior to hanging ones. There are corner models of wall-mounted devices that are great for installation in small toilet rooms;
-
suspended.Also designed for installation in small areas. Although outwardly such models seem very elegant and fragile, they are designed for weights up to 400 kg, therefore they are very durable and reliable. Installing a suspended structure makes it easier to clean the bathroom, and also frees up some of the free space. Such a toilet bowl is attached in a frame or block way.
By release design
According to the type of descent of water into the sewer system, there are toilet bowls:
-
with vertical outlet. Such a solution is rare in our country, but, for example, in America it is very popular. This is due to the fact that in this country, communications are often not attached to the wall, but carried out under the floor, so the toilet can be installed anywhere;
-
with horizontal outlet. The descent of the toilet bowl and the sewer hole are located on the same line. Most modern models have this design;
-
with oblique release. The tilt angle of the toilet bowl is 40-45°. Such models were popular in the 80s of the last century, they were installed in apartment buildings.
By tank mounting type
If we talk about the type of fastening of the tank, then the toilet bowls can be of the following types:
-
with separate tank. In this case, the tank is mounted under the ceiling, and it is connected to the bowl using a pipeline. This allows you to get a high flush rate, but the appearance of this design is not very attractive;
-
with a joint tank, which is attached directly to the toilet bowl. The design can be detachable, bolted or monolithic;
-
with hidden tank. This solution allows you to implement a variety of design ideas. The hidden tank is fixed using the frame method;
-
without tank.Typically, such models are installed in public toilets, but can also be used in everyday life. In this case, the pressure in the bowl is supplied directly from the water supply, and the water flow is controlled using an electronic or mechanical valve.
By flush type
There are differences between toilet bowls and in the direction of the flow of water during flushing:
- direct - water is supplied in one direction. The effectiveness of this method is worse than the circular one, because the water does not completely cover the bowl and splashes, but such toilet bowls are more durable and cheaper;
- circular. In such models, water moves in a circle, therefore it completely covers the inner surface of the bowl;
-
non-standard. Water first fills the bowl, after which it drains sharply. The efficiency of such a flush is high, but the water consumption is higher than usual.
Most modern toilets have two flush modes - full and economical, which allows you to almost halve the water consumption.
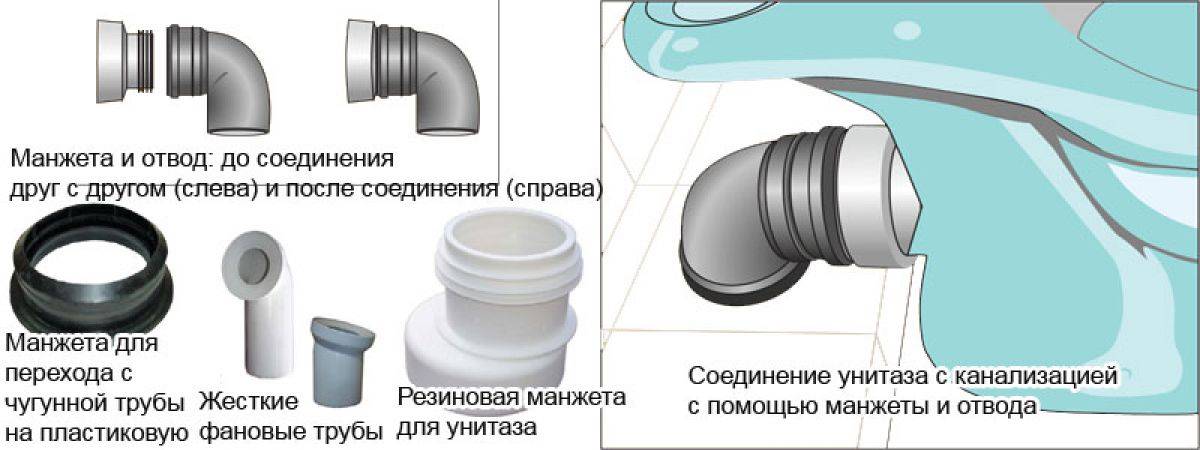
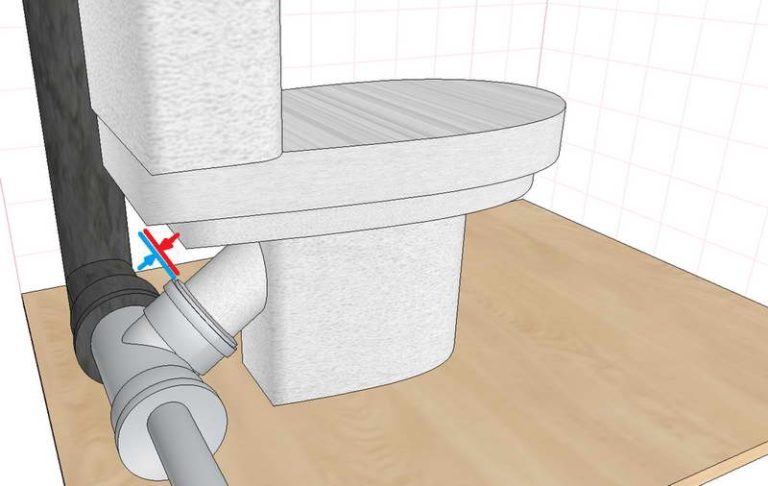
Connecting the toilet with a corrugated pipe
The most common way to connect a toilet to a sewer is to connect with a corrugated pipe, all other options are based on it. Therefore, it is necessary to study in more detail the instructions for connecting the toilet bowl to the sewer riser with a corrugation.
Before choosing corrugated elements, you need to familiarize yourself with the positive and negative sides of this design. Advantageous points include the following:
- Acceptable price.
- Possibility of bending in any direction and stretching in length.
- No need to adjust the axes of the connected parts.
- Use for temporary connection of a toilet bowl with a sewer pipe.
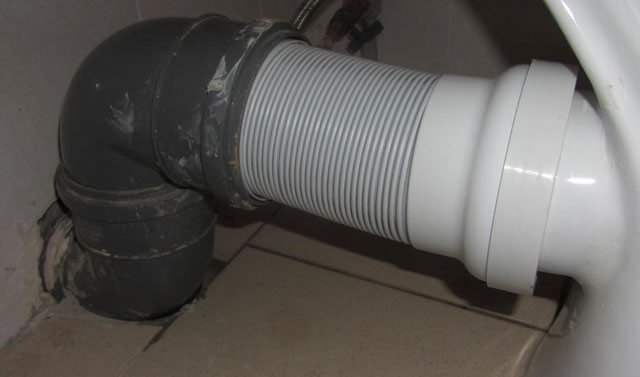
The disadvantages are the following characteristics:
- Poor resistance to mechanical stress, pipe walls are easily damaged.
- A slight slope can cause rapid clogging of the corrugated pipe, which requires regular cleaning.
- Prolonged use leads to sagging of the product.
- Cleaning the outer surface of dust causes some difficulties.
After analyzing the pros and cons, you can make a final decision on the use of a corrugated pipe or abandon it in favor of other elements.
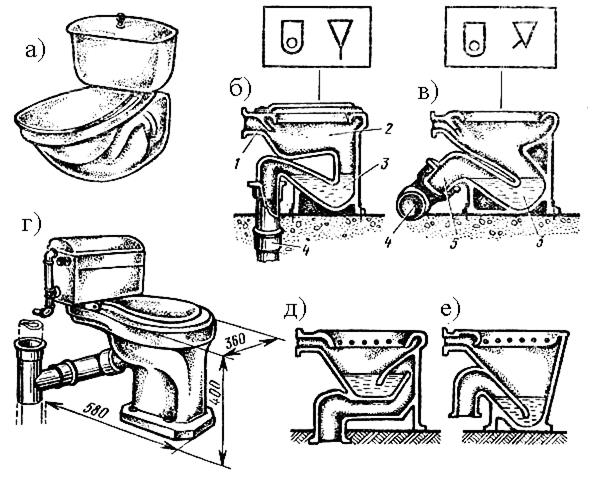
Types of toilets
In this article, we will consider not the features of the flush or the shape of the bowl, but those design features that determine the list of installation work.
According to the installation method
The toilet itself consists of a sanitary bowl and a drain tank. The bowl can be floor mounted or suspended. If the bowl is suspended, then the tank is flush-mounted - built into the wall. In the case of a floor bowl, there are three options for fixing the tank: on a special shelf on the bowl (compact), separate, connected with a flexible hose, in an installation (frame hidden in the wall).


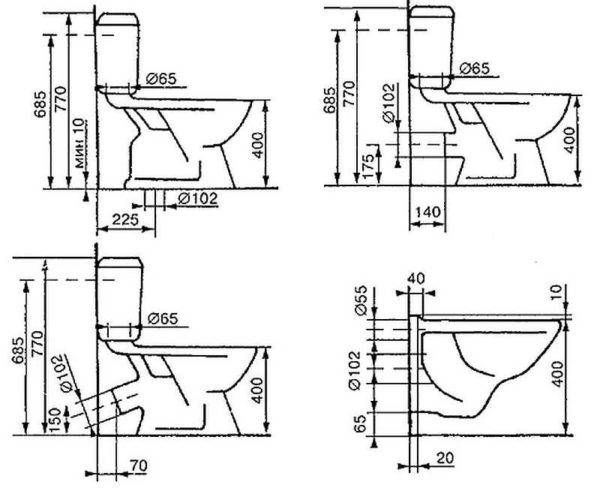
Typical sizes of toilet bowls of different designs
The advantage of a floor-standing toilet with a conventional flush cistern is ease of installation. It can be installed without starting repairs. The disadvantage is that compared to the hanging one, it takes up more space, looks more heavy. Accordingly, the installation of suspended models is complicated - it is necessary to fix the supporting structure - installation - in the wall. Perhaps it is only during the repair.
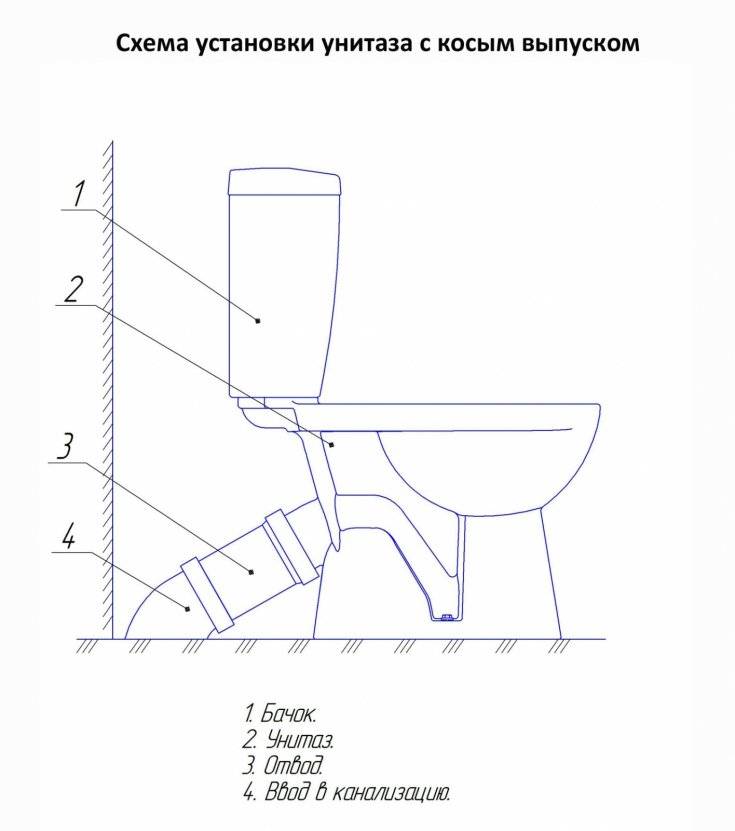
Release to the sewer
The choice of toilet for release into the sewer depends on the location of the sewer pipe. They happen:
- with horizontal outlet;
- oblique release;
-
vertical.
If the pipe is in the floor, a vertical outlet is optimal. If the exit is in the floor, but is close to the wall, the oblique toilet is most convenient. The horizontal version is universal. Using a corrugated pipe, it can be connected both to the wall and to the floor.
Algorithm of work on the installation of a conventional frame
With the choice of a place, work begins to install the installation:
- It should be a low traffic area. Usually the far wall is selected, remote from the front door.
- Communications are located as close as possible to the installation site.
- It is recommended to use a niche in which the sewer and drain are located (main riser). You can replace the niche with a drywall box, then it is better to place the risers in the corners in it.
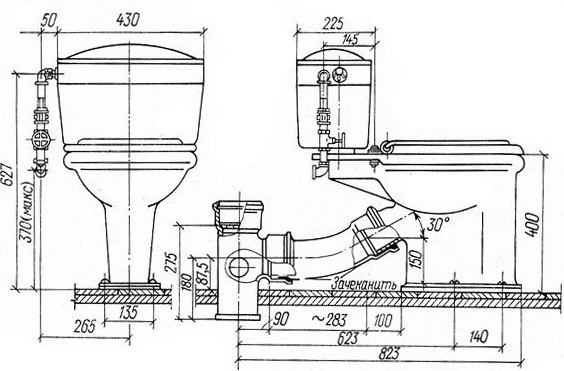
- The structure is fastened based on the height of the plumbing from the floor. Average: 43 cm.
- A frame installation for a toilet bowl with dimensions up to 82 cm is installed under the window.
- In the corner, installation is carried out in small rooms.
- In a spacious or combined room, a three-dimensional frame is installed, on which plumbing is mounted on both sides of the partition.
A place has been chosen, the second step is the assembly of a metal frame. It is to him that the drain system is fixed. Its adjustment is carried out by brackets. You can find them at the top of the structure. Any wall-mounted toilet bowl, the dimensions of which may vary depending on the model, is installed on the installation.
- The maximum frame height is 1.45 m.
- The width of the frame is equal to the size of the flush tank in the width of the hanging toilet.
- The frame is designed for a maximum load of 400 kg.
In strict sequence, a drain tank is hung on the structure, with the fulfillment of certain requirements:
- the drain button on the panel is mounted at a height of 100 cm;
- sewer pipe - no higher than 25 cm;
- toilet bowl - average height 40-43 cm.
The distance between the drain tank and the wall of 1.5 cm is maintained according to the instructions.
The position of the frame is fixed with 4 fasteners.
Installation of a finished structure with a toilet bowl
- An imaginary central axis of the entire structure is displayed on the wall. From it, the attachment points, the installation site of the tank are marked. The distance between the frame structure and the wall is calculated so that the sewer pipe and the tank are placed there in width.
- Fastening is carried out along a horizontal line and vertical. Places are marked on the wall where holes for dowels are made with a puncher. Choose 2 wall mounts and 2 floor mounts if the wall is not stable. Then the main load will be on the lower mounts.
- The installation is attached to the wall with anchors.
- The design of the installation is aligned horizontally by loosening the legs and fixing their position, vertically by adjusting the anchors.
- Connection to the water supply system (bottom or side). Hoses must not be used. Only through pipes. To avoid condensation on the tank and pipes, they are isolated.
- Corrugation can be used to connect to the sewer, but this is not the best option. Used only if the holes do not match.
- The frame is sheathed with a profile for drywall. Moisture-resistant sheets are purchased, 1 cm thick.
- The place where the drain button will be installed is closed with a special plug. This is done so that debris does not fall there when facing the false wall with ceramics.
- Ceramic tiles are glued to the wall. Complete drying of the adhesive occurs after 14 days.
- The place of contact between the bowl and the tile is treated with a sealant or a damper gasket is laid.
- The toilet bowl is seated on studs, nuts are tightened on them, all connections are checked for leaks.
- The last step is to connect the drain button to the tank.
Wizard's advice
- It is recommended to install an inspection hatch under the drain button to facilitate maintenance of the interior of the installation.
- Modern economical drain buttons are installed. There are two modifications. The first model is a button divided into two halves. One for completely emptying the tank, the other empties only half of the tank. The second model is two buttons with "start" and "stop" functions.
- The button is installed between two ceramic tiles or in the center of one of them. To make it happen, it is recommended to start gluing the tiles from the button.
- The false wall should be no more than 7 cm thick.
- The fluid supply to the drain tank is installed through plastic pipes, since their service life is long, and rubber pipes will last about 5 years.
- If the installation of support rods for the bowl is carried out in a loose wall, then they are concreted. In parallel, the position of the sewer pipe and the drain pipe of the tank is strengthened with the same concrete solution.
- A separate tap is installed for the water supply pipe to the tank, to shut off in case of an accident.
How to connect a toilet to a sewer
To bring the toilet to the sewer, you will need the following tools:
- Perforator or drill. To install a plumbing fixture, you will need to drill holes in the floor, into which fixtures will be mounted in the future;
- Silicone sealant, repair mortar (putty), FUM tape for threading;
- Suitable adapters (couplings), supply hose (which will be used to connect the tank), additional elements;
- Rags, spatula, level.
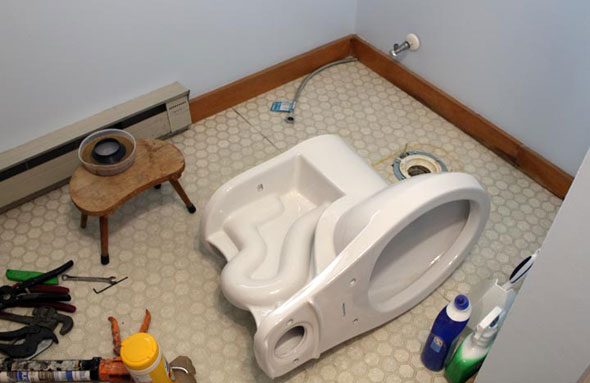
We will consider an option in which the old device is dismantled and turned off and a new one is installed.
Step-by-step instructions on how to dismantle the old toilet and connect a new one in its place:
It is necessary to turn off the water so that during the installation process the apartment is not flooded. After that, the eyeliner is unscrewed from the water outlet;
The flexible hose is carefully disconnected from the tank, the tank itself is removed from the toilet bowl. If the structure is monolithic, then immediately go to step 3;
Using a perforator, the fasteners that hold the toilet to the floor are removed. Be careful not to damage the flooring. Fasteners are anchor bolts that are screwed into plastic bases. If they are not covered with a layer of rust, then you can try to unscrew them with an adjustable wrench;
After removing the bowl or monolith, you can see the wooden taffeta on the floor. It was often used in Soviet buildings to install plumbing fixtures. Now it has been replaced by dowels and professional glue. Therefore, the board can be safely removed. After dismantling the taffeta, a large hole will remain in its place. It must be covered with plaster or putty and leveled to the level under the floor;
After the repair mortar has hardened, the sewer pipe is cleaned. If it is made of cast iron, then you can “walk” with brushes or even knock on visible surfaces. If made of plastic, then only work surfaces are wiped with a hard cloth;
The selected adapter at the attachment points with the sewer pipe is abundantly treated with silicone sealant


Please note that if a threaded connection is used, then this is not necessary. Instead of silicone, FUM tape is wound on the thread;
The outlet of the sewer riser is processed in the same way.
Silicone sealant is used here for better passage of the coupling and a tighter connection of parts. The branches are joined together as tightly as possible;
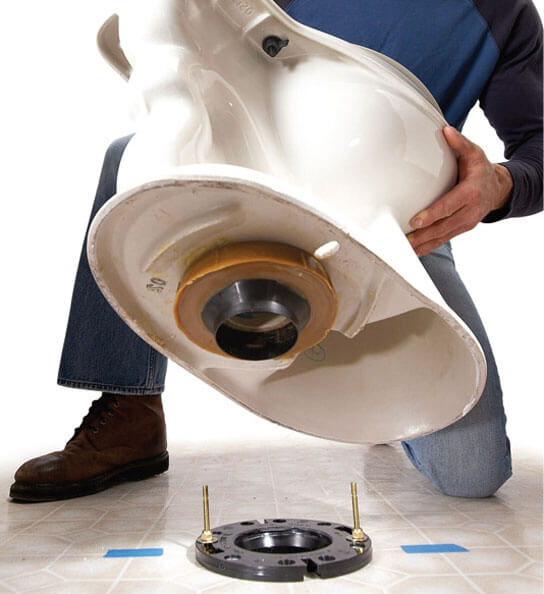
After the preparatory work is completed, a new toilet is installed. The place of its attachment is determined empirically by measuring the center of the toilet room and the distance from the sewer outlet;
In order to determine the places where the toilet bowl is attached to the floor, you need to outline its contour with a felt-tip pen or pencil and mark the holes for the dowels. Holes are made in the marked places, fasteners are installed in them;
After installing the toilet bowl, its drain hole is also treated with silicone sealant and a corrugation or a plastic adapter is brought into it. The tightness of the joint between the coupling and the sewer outlet is checked, after which the entire structure is wiped to remove excess sealant.
It will be possible to use the toilet only after the silicone protective layer has completely cured. If during operation water collects around the toilet bowl, then you need to install a rubber ring under the coupling for additional sealing.
Full video instructions for installing the toilet
Tank replacement
toilet cistern installation
Do-it-yourself toilet cistern replacement is the last step in the process of replacing a toilet bowl.If we are talking about a barrel that is attached to the toilet shelf, then the pipe must be connected to the neck with a rubber cuff. This will be enough to ensure a strong and tight connection. At the same time, one third of the rubber cuff is put on the pipe, and the remaining two thirds are turned inside out. Then this part must be pulled over the previous one. Here it turns out that the end of the pipe is released. Then the pipe and neck are combined with each other. The inverted part of the rubber cuff is pulled over the neck. Thus, we can say that the tank is perfectly fixed. No additional action is required. A rubber cuff is enough to ensure a tight connection. At the same time, it is worth checking the density of the cuff nozzle so that unpleasant events do not occur with neighbors from below.
attaching the toilet cistern to the toilet
Sometimes a situation arises when the tank is mounted at a short distance from the toilet on the wall. In this case, one rubber cuff is not enough. It will take a little more effort and skill. In this case, a pipe is screwed to the barrel, and its opposite end is lubricated with red lead and wrapped with tow. The neck of the toilet bowl and the pipe itself are connected by means of a cuff. It is fixed on the pipe with a thin wire. Now you can power the flush tank and adjust the water level in it.
Thus, the work on replacing the toilet bowl can be considered completed. As you can see, all actions do not require any special preparation. The work may well be done by hand. Of course, if we are talking about a toilet that is installed on the floor.Otherwise, it is difficult to do without the help of a plumbing specialist. By the way, even before starting work on replacing the floor toilet, you should consult with a professional. It will help you understand all the intricacies of the work. For those who are well versed in the work associated with the installation of plumbing, this manual will definitely help. It is also suitable for those who have never tried to do such work on their own before. Here is a detailed instruction describing all the main stages of work, as well as a video showing clearly how the toilet is replaced with your own hands. Many will definitely benefit from this guide. In addition to the work related to the installation of the barrel and the toilet itself, it contains information on how to correctly dismantle the old unit so that there are no further problems in operation. The video will help even those who decide to save money and not call specialists, although they are dealing with this type of work for the first time. Everything is shown clearly and will be understandable to absolutely everyone.
The process of connecting the toilet and sewage in stages with your own hands
Let's imagine this: you have an old Soviet toilet connected to a cast-iron elbow, but you don't want to call the master. And if now they only manage with rubber and silicone sealant, then at that time they were fastened together for centuries: with the help of cement. There is no way to carefully separate it, so there is only one thing left: take a hammer and break the toilet pipe.
Using a hammer, screwdriver and pry bar, remove the pieces of cement from the exit to the sewer. At the final stage, to remove rust and old dirt, fill the pipe with toilet bowl cleaner and scrape it off with a metal brush. The last step is to smooth the surface with a rag.
After fixing the new toilet, it's time to attach it to the sewer. The most common option that is chosen for self-connection is a corrugated pipe, because it is the easiest to use and does not require as many measurements as the others. So I'll start with her.
Lubricate the rubber band of the corrugated pipe from the inside with silicone sealant and put it on the outlet pipe. Its second end is immersed to the very rubber ring into the sewer drain. Previously, both its outer edge and the inside of the riser are also smeared with silicone.
After two hours (as the sealant dries), drain the water 2-3 times and inspect all joints. There should not be a single drop on them. If all is well, you can screw on the tank and bowl and use it to your heart's content. If not, remove the corrugation (after removing the water from the toilet), add more sealant and reconnect.
If you decide to stop at plastic bends, you can be sure that you are guaranteed durability and ease of use in their further operation. However, it depends only on them where exactly the toilet will be located, and you will not be able to put it in any place you want (as is the case with the corrugation). They are connected in the same way, the main thing is not to forget about the sealant.


There are many advantages to plastic knees, and the only drawback is that they are not very aesthetic appearance due to their default gray color. White, in harmony with the color of the toilet, will cost you more.
Now let's move on to the ways in which you can attach the toilet to the sewer directly.
Let's start with vertical release. First, a flange is placed on the sewer pipe using dowels.
A toilet bowl is placed directly on it so that the outlet docks with it. The fixing bolts fall into special holes and are tightened with nuts, and decorative caps are put on top.
To connect a toilet with a horizontal outlet, you will need the same actions as with the corrugation: the sewer hole is lubricated with silicone and a pipe is inserted into it. After two hours, the absence of leaks is checked by flushing.
The oblique outlet is connected in exactly the same way as the horizontal outlet.
As you can see, they didn’t do anything particularly complicated, and the plumber didn’t have to be called. Happy using!
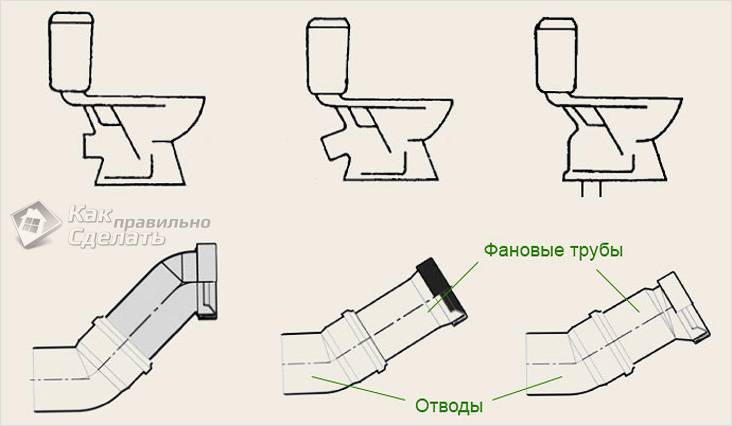
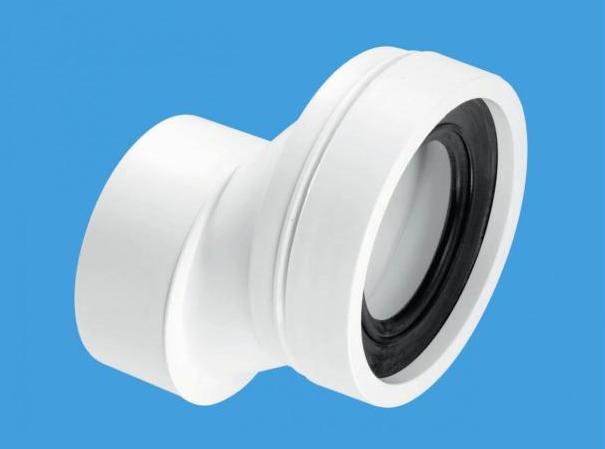
Types of toilet pipes
The phrase "fan pipe" has a broad meaning, today we will consider only a fan pipe for
toilet. This is a continuation of the 110 mm sewer pipe with a cuff for connecting the toilet outlet. In fact,
standard corrugation is one of the varieties of a fan pipe.
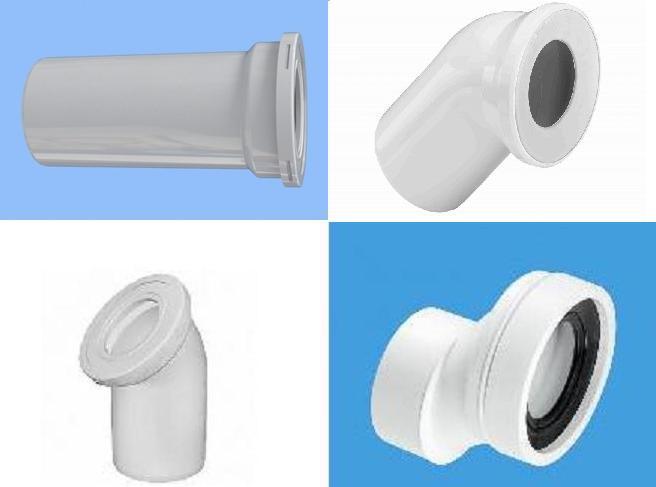
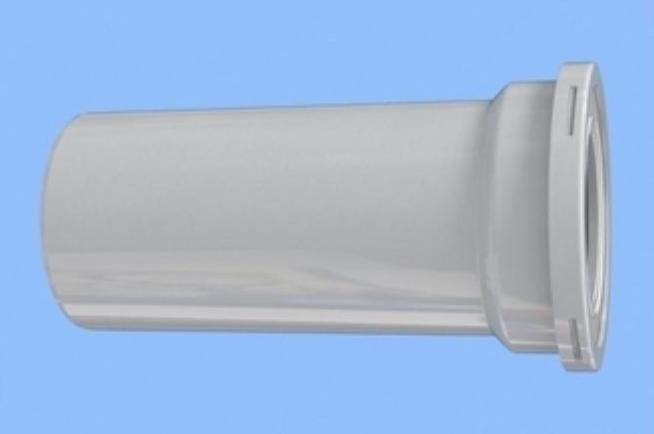
There are many variations of fan pipes, but I would like to highlight the usual, straight line - in nine of
ten times it is usable. As a standard, a straight outlet pipe has dimensions of ∅110 mm
× 250 mm (long) - it satisfies most toilet connection options. Pipe can be shortened
to the desired length, the main thing is that it is inserted into the main sewer at least 50 mm.
When the height of the outlet of the sewer does not match the height of the outlet of the toilet bowl or for some reason does not
docks with an oblique outlet, an eccentric type fan pipe will come to the rescue. The eccentric allows
connect the toilet when the axes of the sewer pipe and outlet do not match. Similar situations arise when
replacing the toilet with another model or rash wiring of sewer pipes in the bathroom.
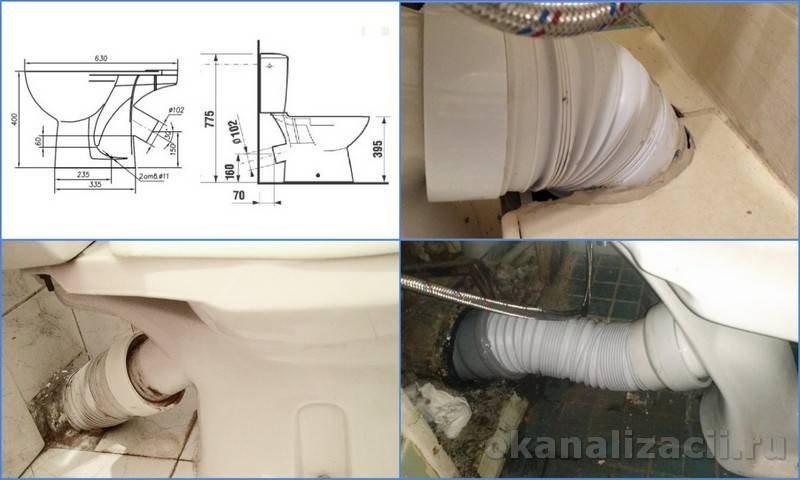
Installation of toilet bowls with a vertical branch pipe
Plumbing equipment with a vertical pipe is suitable for installation in a private house and a city apartment with a sewer system passing under the floor, and not in the wall. This option contributes to a good drain of the liquid, eliminates the formation of blockages and minimizes leakage when draining water.


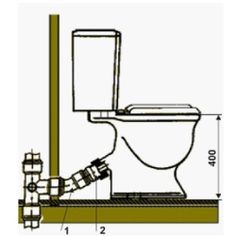


Connection to a toilet with a vertical outlet is carried out according to a certain scheme. A special flange is fixed on the sewer pipe. First, they fit it to the floor, put marks at the attachment points. Then holes are made and dowels are inserted into them. The flange is put in place and fixed.
Next, the sealing element is laid, having previously lubricated it with a composition for sealing the joints. Such activities allow you to create a certain barrier to the unpleasant smell of their sewage into the bathroom.
At the end of the installation work, the plumbing equipment is installed in a permanent place and fixed with special fasteners. Nut caps are covered with decorative caps.
Mounting
So, the dismantling can be considered completed, and therefore it's time to move on to another stage. Understanding how to properly install a toilet is actually not difficult. You just need to understand what type of release you are dealing with. As you remember, it can be vertical, horizontal and oblique.
It is about how to install a toilet bowl with your own hands with all three variations of the release that we will now tell.
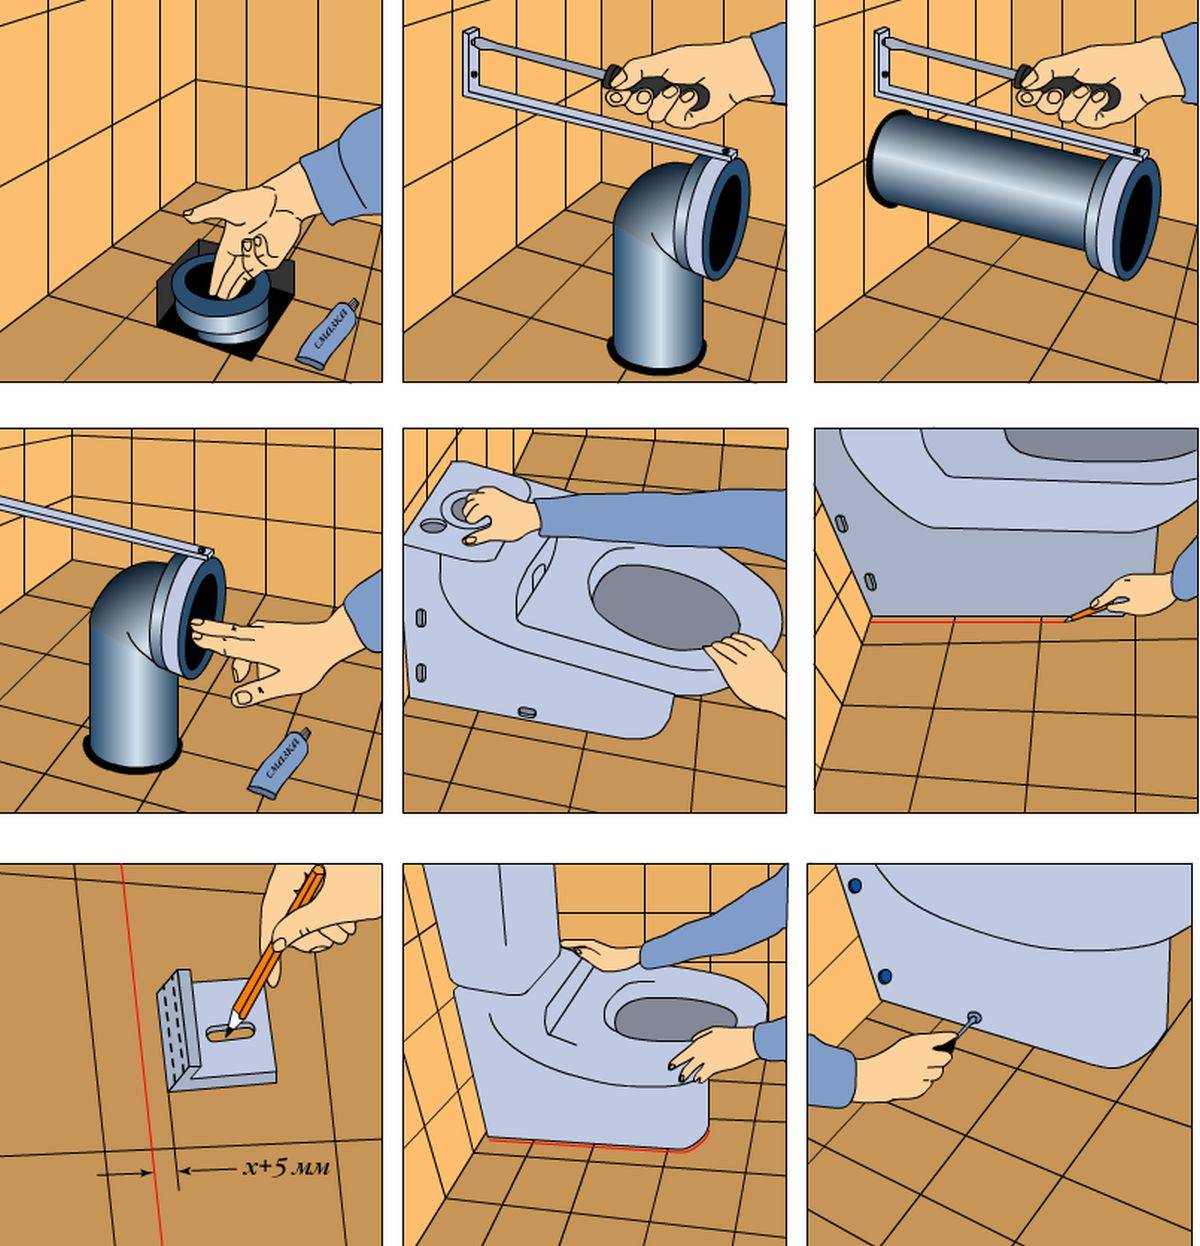
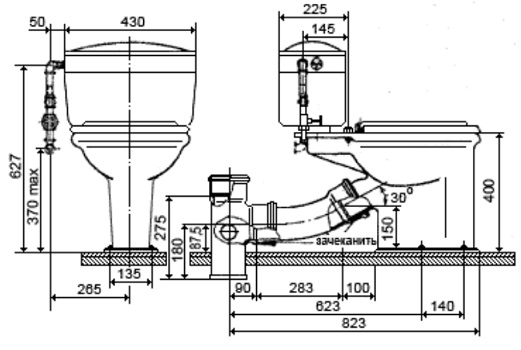
Vertical
Diagram of how to connect the toilet to the sewer and fix it to the floor
- First, remove all debris from the sewer socket, make it relatively clean.
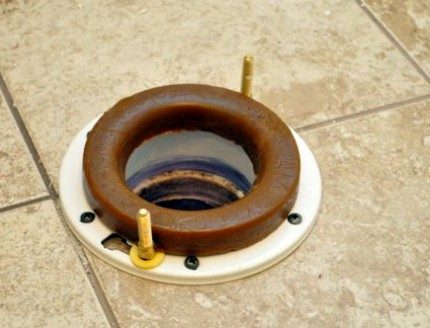
- Place the cuff into the socket using silicone sealant.
- Insert the release into the cuff, but do not use the sealant yet, place it in the required place, make markings for the holes.
- Now installing a toilet bowl with your own hands provides for the need to make the necessary holes with a power tool.
- Please note that installation on a tile has its own characteristics. You need to drill a layer of tiles first with a special drill. Moreover, its diameter should slightly exceed the diameter of the drill, suitable for fastening.
- Apply sealant to the outlet, insert into the cuff and fix with screws.
- The problem of floor damage is quite relevant. Therefore, the installation of the toilet on the tile must be carried out carefully. Try to tighten the screws evenly so that the plumbing does not warp.
- It is necessary to tighten not until it stops, but until the product stops hanging out, staggering.
- For better fastening, grease all cracks with a solution of cement and clay.
- Now you can connect the toilet to the sewer, and you probably know about these subtleties from our previous materials. One way or another, but connecting the toilet is quite simple.
Horizontal
We have already figured out how to install a toilet bowl with our own hands with a vertical release, and therefore we move on to a direct one, that is, a horizontal one.
- If the sewer system is configured specifically for the use of direct release, then the installation process will be similar to the previous method.
- If the toilet is not suitable, then the connection of the toilet to the sewer will be carried out using a corrugation and an eccentric cuff. They are mounted on a sealant, and it is not recommended to stretch the corrugation too much, otherwise there is a risk of collecting fecal deposits in areas that have sagged.
oblique
Instructions for installing a toilet with an oblique outlet
Under certain circumstances, the outlet from the sanitary ware may be located lower or higher relative to the socket. There are two ways out of this situation.
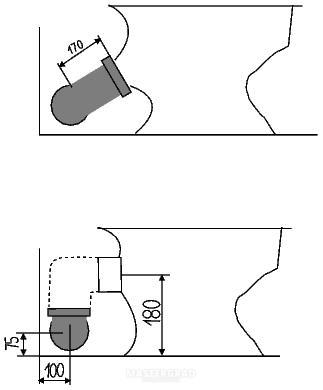
- You can use a corrugation or a sewer-weaving element with a socket made of plastic. Cut off the desired size, put it between the bell and the toilet, and ordinary sealant will help to strengthen such a connection.
- Or arm yourself with a special pipe in the shape of the letter S, and move the toilet bowl a little to the side - about 15 centimeters. As a rule, the size of the room allows this to be done. If this option does not suit you, and replacing the toilet is clearly not an option here, since you just bought a new one, you can make a kind of brick pedestal, thereby raising the product to the desired level in order to connect it to the socket.
Further connection of the toilet will be the final stage of work for you. You can start the system, check its reliability, the presence of leaks and some other problems.
Keep in mind that installing a toilet bowl with your own hands is not as difficult as it might seem. In fact, it is even more difficult to dismantle the toilet bowl in some cases, or to implement the installation of a tank on the toilet bowl. But you will complete many of these tasks based on useful recommendations on our portal.
Don't be afraid to do the hard work yourself.Even the usual instructions for installing a toilet bowl, which is attached to each plumbing product, will greatly simplify the task.


Of course, in some cases, it is extremely difficult to repair a toilet bowl yourself, there is not enough time, experience, certain knowledge, or just a tool. Then turning to specialists will not be shameful at all. Still, not everyone wants to deal with sewage, even if he knows how the toilet is replaced in just an hour.
Location selection
The layout of the toilet room should begin with the choice of a toilet bowl. It is necessary to take into account all its features. Only after that it is worth proceeding to further actions. Of course, if there is an old toilet, it must be dismantled. Most likely, the room will still have to be overhauled. And it includes updating the sewer line, floor screed, cladding.
Before installation, you need to estimate the dimensions of the new plumbing fixture. This will allow you to understand how best to place it: in the center of the room or closer to the wall. It may be better to mount it on the wall or move it close to the bathroom. It is necessary to determine the height at which it is better to install the toilet. Today, modern models are able to satisfy any whim in this regard.
The unconventional location of the sewer pipe can be a difficult task. Therefore, it is worth foreseeing the best options in advance. Perhaps it is worth deploying or extending the pipe itself, or maybe it would be better to choose a non-standard plumbing model. Of course, ideally, if the toilet can be connected vertically at an angle of 90 degrees. It is worth remembering that it is better if there are as few intermediate parts between the toilet and the sewer as possible.
You can draw a diagram of the location of the toilet and other items in the toilet. So it will become more clear whether you need an angular placement of the structure or you can get by with the generally accepted standard. In modern new buildings, everything is simple. After all, here the toilet is installed from scratch, all communications are summed up taking into account various models. In the old Khrushchevs, everything is clearly more complicated.