- Varieties of switches for home use
- The correct circuit of the switches
- Why are pass switches needed?
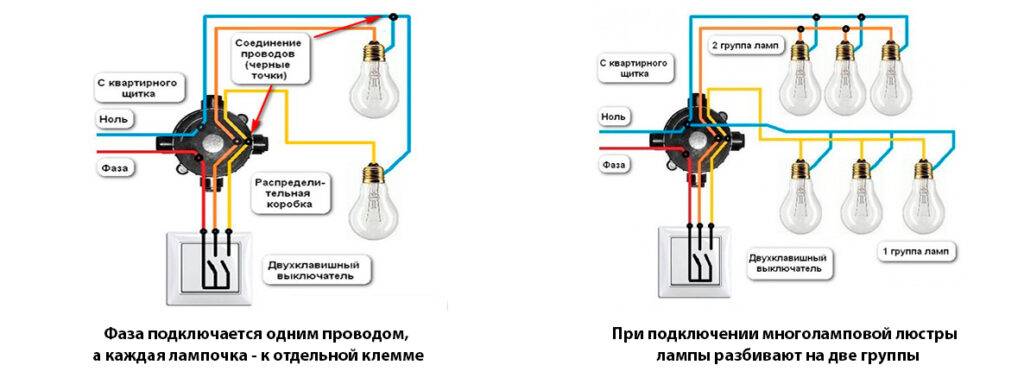
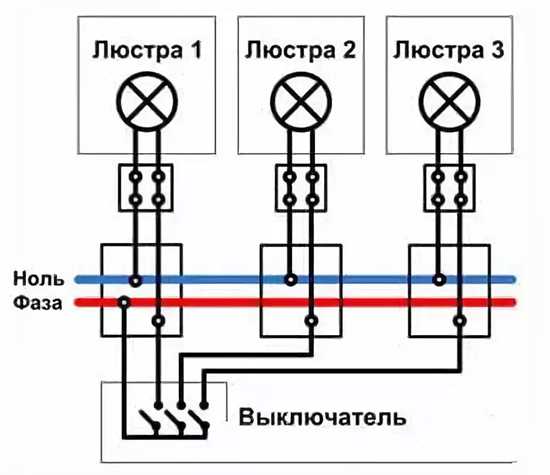
- A device that controls two groups of luminaires
- Direct circuit breaker connection
- How to connect a three-gang switch: step by step
- We analyze in detail the connection diagram, how to connect a light bulb and a switch
- In this work, we used:
- How much we saved by doing the wiring diagram with our own hands:
- How to connect a three-gang switch with your own hands
- Wiring diagram for a triple switch
- Connecting wires to the switch
- Wiring connections in the junction box
- Where are they applied?
- Flaws
- Kinds
- Connection via socket
Varieties of switches for home use
Each manufacturer produces different models of switches, which differ both in shape and in internal structure. However, several main types should be distinguished.
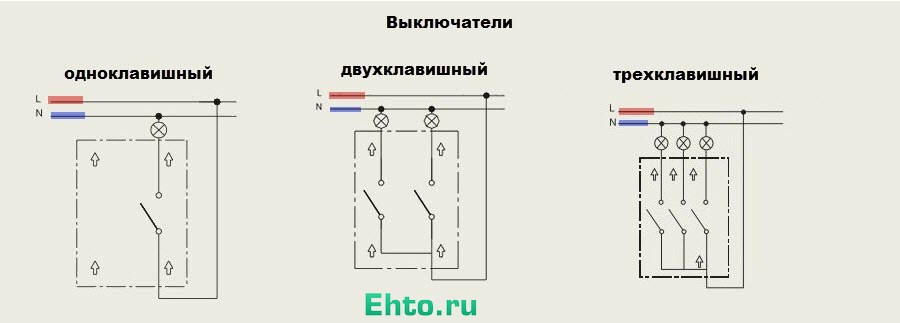
Table 1. Types of switches according to the switching principle
| View | Description |
|---|---|
| Mechanical | Devices that are easy to install. Instead of the usual button, some models have a lever or cord. |
| Touch | The device works at a touch of a hand, and it is not required to press a key. |
| With remote control | This design is equipped with a special remote control that comes with the kit or a sensor, responsive to movement around. |
The most popular is the first option, which is installed everywhere. Moreover, such switches have become in demand from the very beginning of the appearance of the electrical circuit. The second option is less popular, especially in our country. The third option is a modern model, which is gradually replacing outdated switches from the market.
Installing a motion sensor in the structure is advisable both in terms of energy savings and home security. For example, if you install a structure at the entrance, then the residents will notice if intruders get into the apartment.
Switch with additional illumination
According to the design features, there are devices with one or more keys (on average, switches with two or three buttons are used for standard electrical appliances). Each button is responsible for turning on and off a separate circuit.
So, if several lamps are installed in one room at once: the main chandelier, spotlights, sconces, then it would be advisable to install a structure with three buttons.
In addition, no less popular are devices with two buttons, which are installed in all apartments without exception. Most often they are needed for a chandelier in the presence of many light bulbs.
According to the installation method There are internal and external switches. The first option is installed in the apartment, because such structures look aesthetically pleasing. For safety during installation, a special box is installed, which is called a socket box.
Wiring diagram
Recessed switches are used when there is electrical wiring hidden in the wall. Overhead devices are mounted in the presence of external conductors. In this case, the connection scheme has no fundamental differences.
Where is the switch installed?
The correct circuit of the switches
This operation can be performed without the use of a special tool. Scheme of a two-lamp luminaire As a result, the total ripple of the luminous flux of the luminaire is reduced.
There is an opinion that for the installation of intermediate on-off points for lighting fixtures, it is worth using only a four-core cable. As a rule, a special converter goes to them, which feeds these lamps. If such switches are installed indoors, the wiring should be done as shown in the figure below.
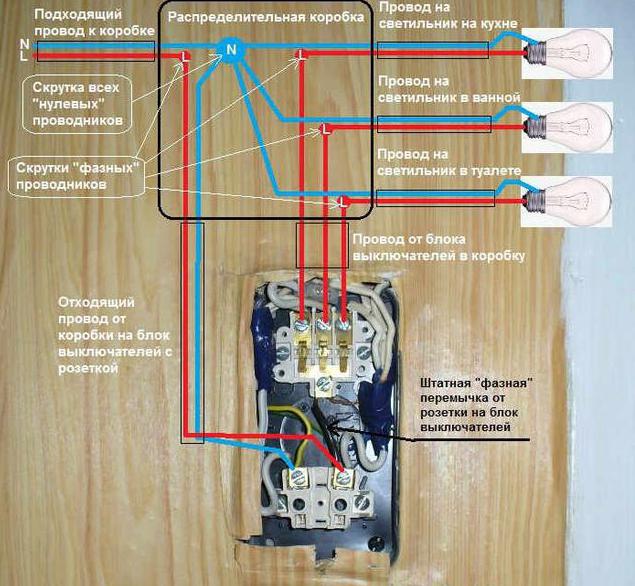
Also, according to the latest standards, all connections occur only in junction boxes and with the help of contactors.
The green circle is nothing more than a junction box, inside which the wires are connected. The first digit indicates the degree of protection against dust, the second - against moisture, on a 6-digit scale.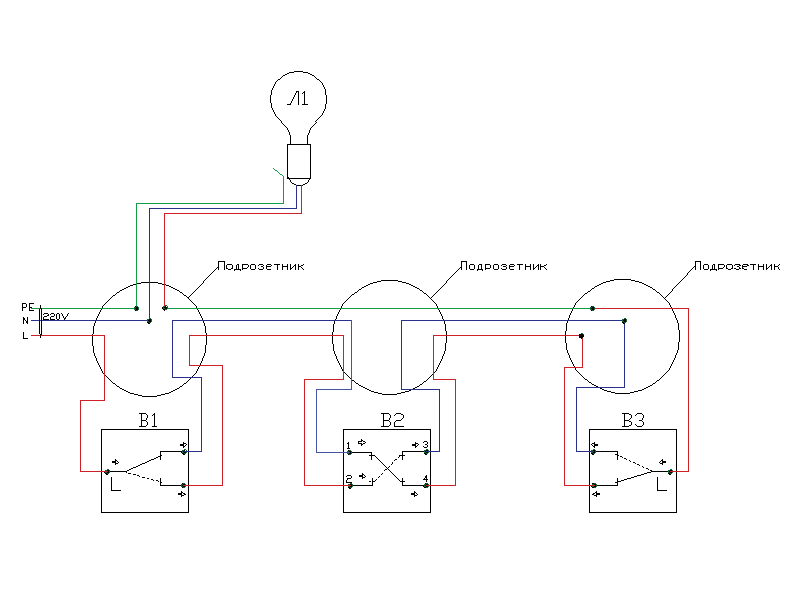
The construction of such circuits, as a rule, is carried out with the participation of the so-called cross switch. Two wires go to it. from the junction box or from an outlet.
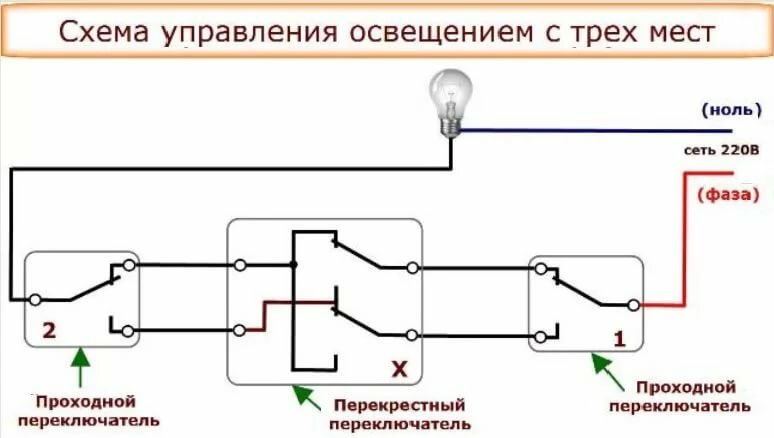
Why are pass switches needed?
You can turn on the light at the exit from the house - after the completion of business there is no need to go in the dark. You only need one. Where is the three-switch system used?
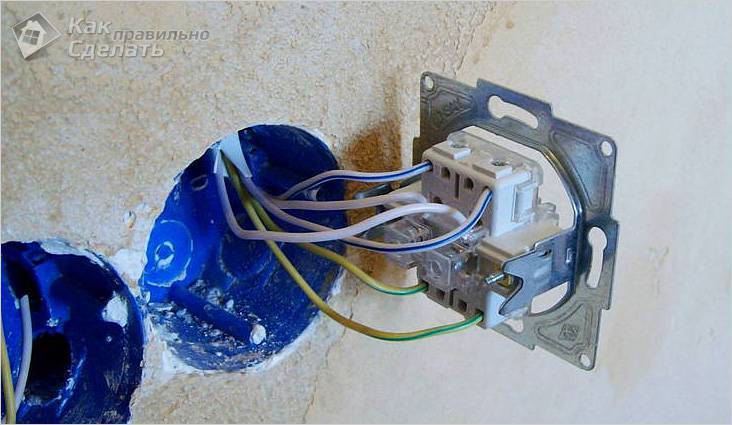
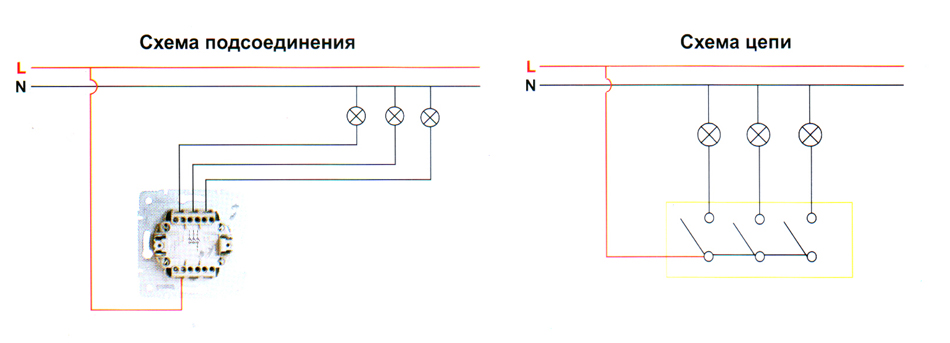
Connecting wires to a three-gang switch There are various models of triple switches: for external, internal installation or combined - in one housing with a socket. The phase reaches the upper contacts of the switch only when the contact of the corresponding key is closed. Here, a double switch is connected to the output voltage of the converter, and the converter itself remains constantly on, which is not very good.
How to connect - detailed in the diagram. Knocking out one technological niche in the wall to accommodate the mounting box instead of several. Impossibility to be used separately, but only with a pair of walk-through switches. In order to install a cross switch, you will need: Junction boxes, their number depends on the area where you need to carry out this lighting control system.
Scheme of connecting the pass-through switch
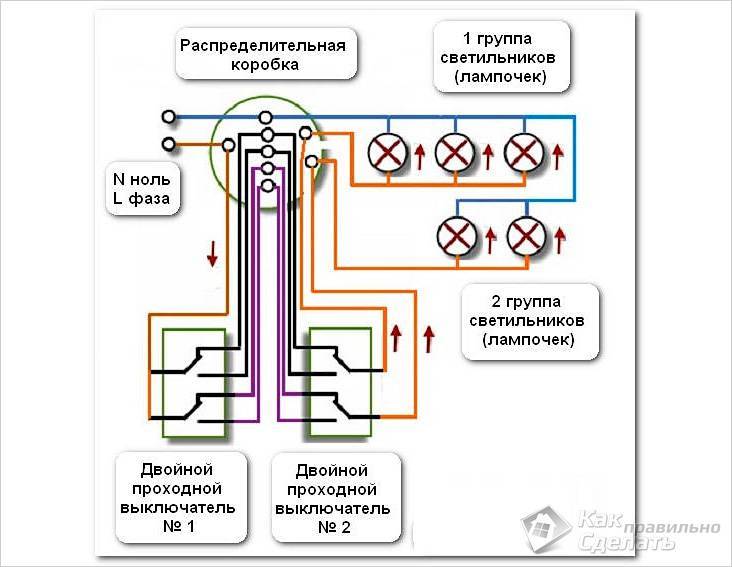
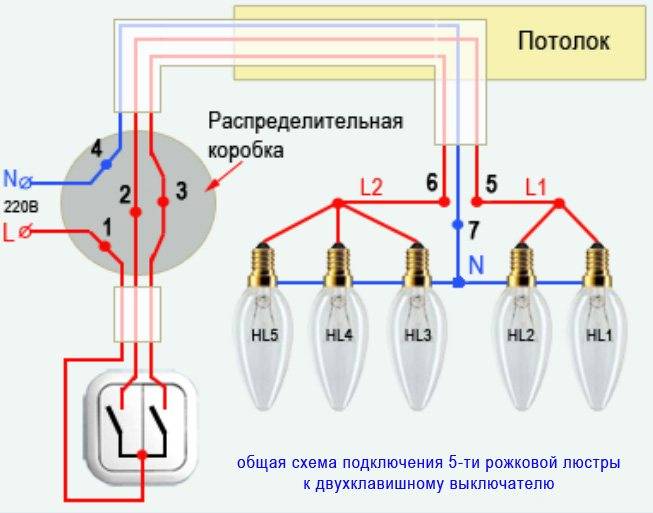
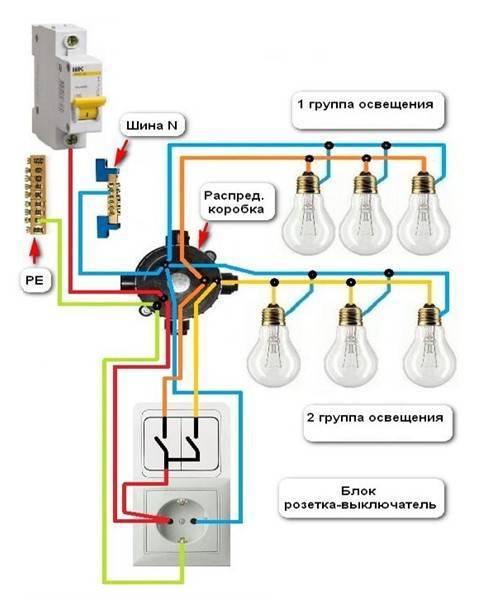
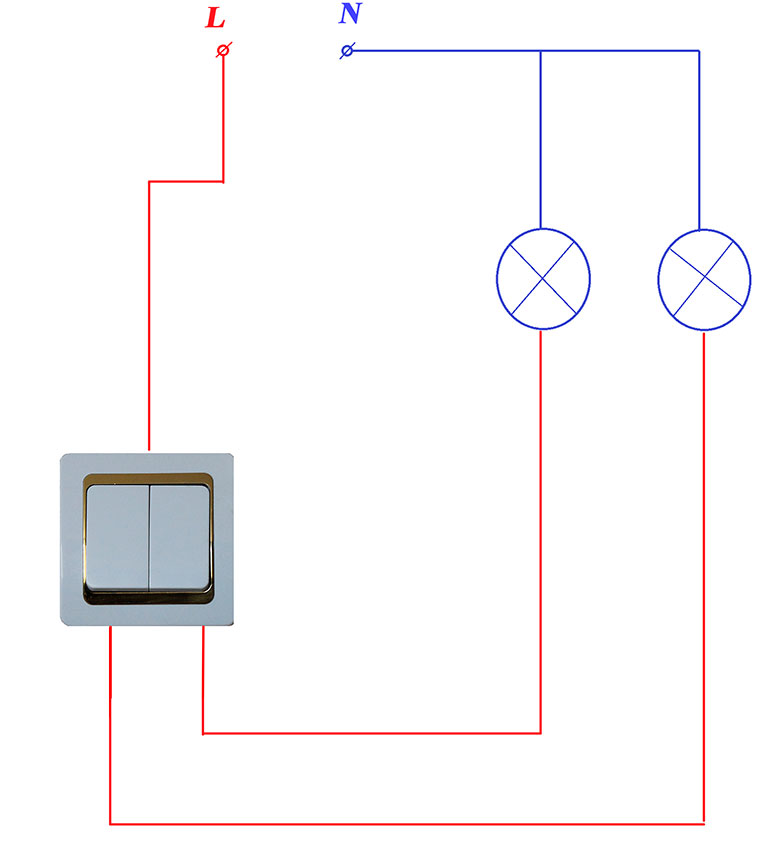
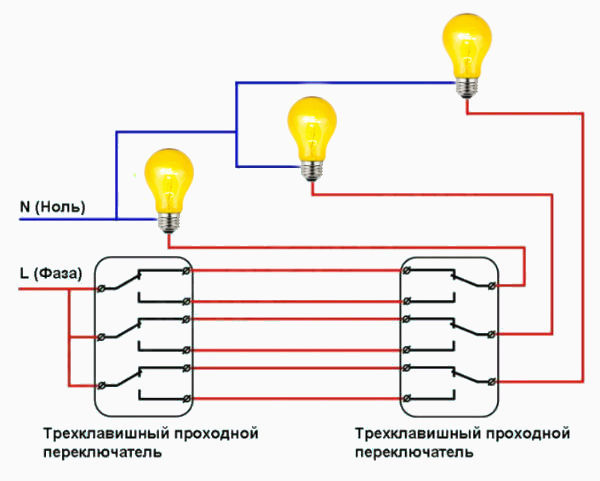
A device that controls two groups of luminaires
 Wiring diagram for two-button walk-through switches
It is advisable to install a two-gang pass-through switch in a large room where it is necessary to control several lighting fixtures. Its design consists of two single switches in a common housing. Mounting one device to control two groups allows you to save on laying the cable to each of the single-gang switches.
 Mounting double pass switch
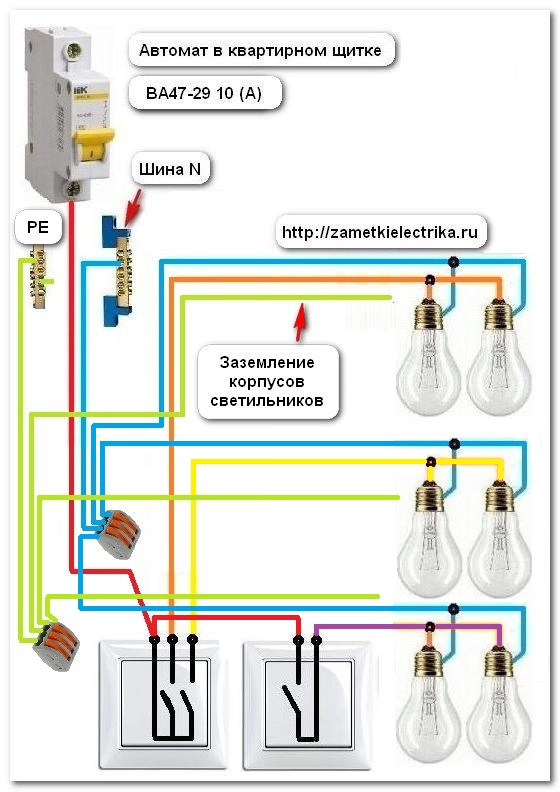
This device is used to turn on the light in the bathroom and toilet or in the corridor and on the landing, he is able to turn on the light bulbs in the chandelier in several groups. For mounting a feed-through switch rated for two light bulbsyou will need more wires.Six wires are connected to each, since, unlike a simple two-gang switch, the pass-through switch does not have a common terminal. In essence, these are two independent switches in one housing. The switching circuit of a switch with two keys is performed in the following sequence:
- Socket outlets for devices are installed in the wall. The hole for them is cut with a puncher with a crown. Two wires with three cores are connected to them through the strobes in the wall (or one six-core wire from the switch box).
- A three-core cable is connected to each lighting fixture: neutral wire, ground and phase.
- In the junction box, the phase wire is connected to the two contacts of the first switch. Two devices are interconnected by four jumpers. Contacts from lamps are connected to the second switch. The second wire of the lighting fixtures is switched with zero coming from the switchboard. When switching contacts, the common circuits of the switches close and open in pairs, ensuring that the corresponding lamp is turned on and off.
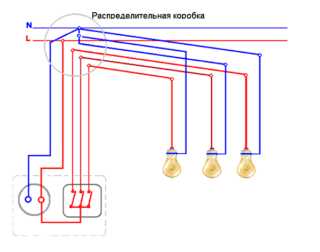
 Connecting a cross switch
Two-gang switches are also used, if necessary, to control lighting from three or four places. A double cross-type switch is installed between them. Its connection is provided by 8 wires, 4 for each limit switch. For installation of complex connections with many wires, it is recommended to use junction boxes and mark all cables.A standard Ø 60 mm box will not accommodate a large number of wires, you will need to increase the size of the product or supply several paired or purchase a Ø 100 mm junction box.
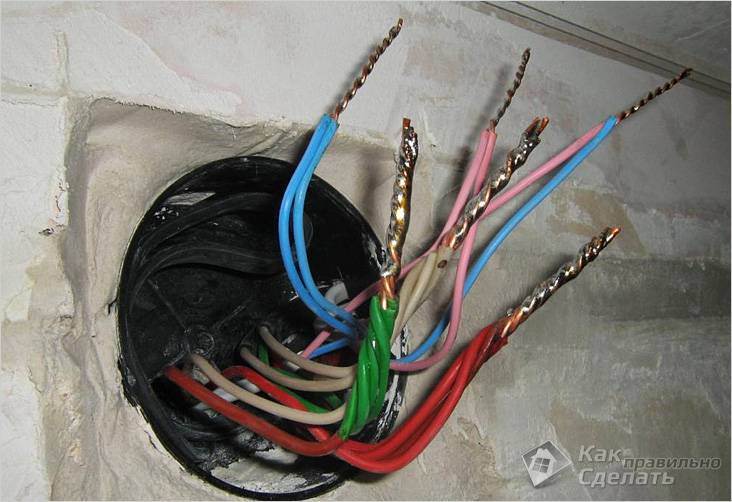 Wires in junction box
It is important to remember that all work with electrical wiring and installation of devices is carried out with the power turned off. This video tells about the device, the principle of connection and installation of pass-through switches:
This video tells about the device, the principle of connection and installation of pass-through switches:
This video shows an experiment in which various wire connection methods:
 Wiring diagram
 The principle of connecting switches
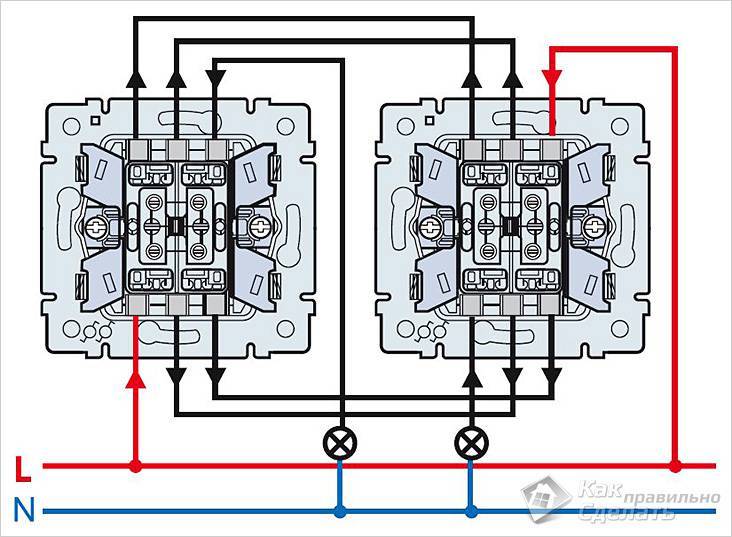
 Wiring diagram for a two-gang switch with connection through a junction box
Everything is written correctly in the article, but I came across the fact that the electrician who installed the switches before did not leave spare wires in the box, and when one aluminum wire broke, I had to tinker with building this wire. I advise you to leave a margin for at least two repairs.


I myself studied to be an electrician and sometimes I work part-time as an electrician. But every year, or even every month, more and more electrical questions are being created. I work on private calls. But your published innovation is new to me. The scheme is interesting and will definitely come in handy in the near future. I always try to take the advice of "experienced" electricians.
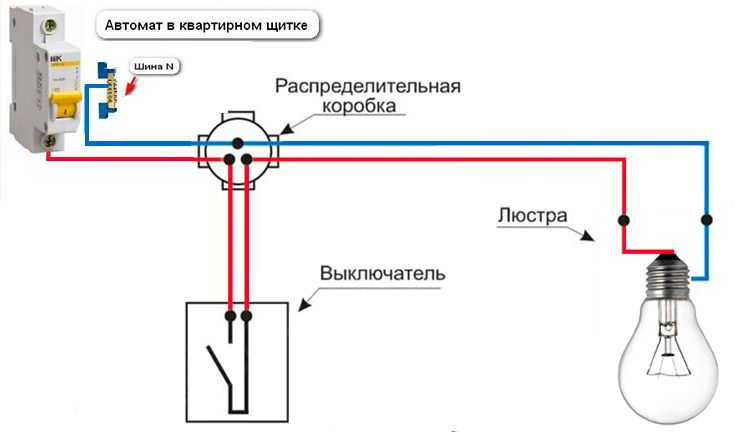
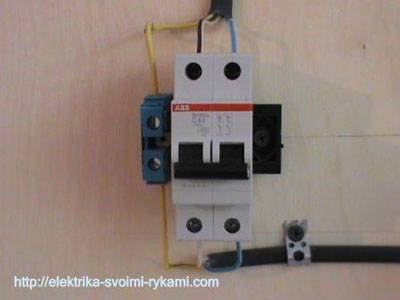
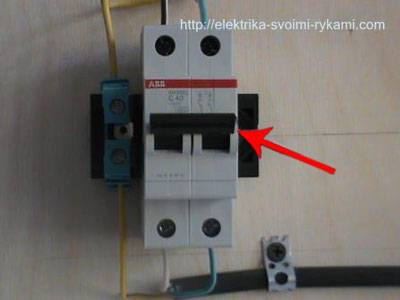
Direct circuit breaker connection
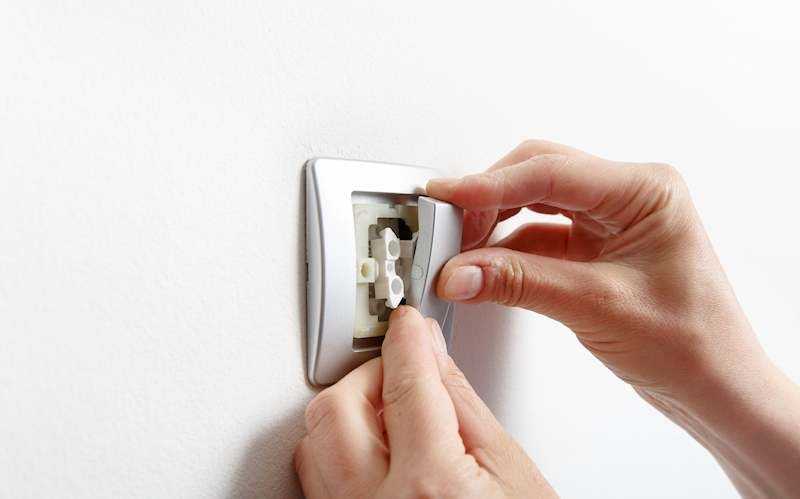
How to connect the switch correctly can be found in various literature sources.
It is worth paying attention that inside the wiring there are wires that are different in color.This is usually the brown wire that is responsible for the phase.
And yellow-green wireresponsible for grounding
When connecting wires to contacts, it is important not to mix them up.


The placed wires must be clamped with the screws that come with each switch. Be sure to check the reliability of the fixed wires. If the ends of the wire are not tightened enough, the contact will break and the switch will not function.

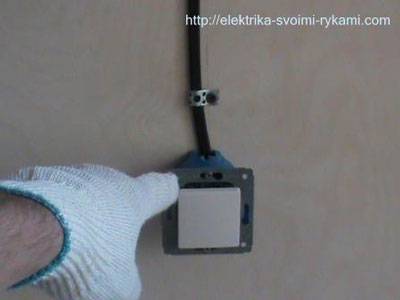
The gap of the connected wiring should be folded so that they fit in the switch box. During the arrangement of the wires, you need to leave a place to fit the switch itself. By attaching the switch housing, it can be slightly fixed with screws. They do not need to be tightened to the end, first the switch needs to be aligned.
You can level the switch using the level that you prepared in advance. After the switch is aligned, be sure to tighten the screws harder. The main thing is not to cut the thread on the screw head, if necessary, this will prevent its dismantling.

The final stage is the process of installing the housing and the switch key. This procedure is performed by hand, lightly pressing these parts to the places where they were at the very beginning.
If, after turning on the electricity in the apartment, the light turns on in the room using the installed switch, then the connection was successful.

Thanks to a detailed article, you can make sure that mounting the switch with your own hands is quite possible. The main thing is to prepare everything and carefully follow the instructions.
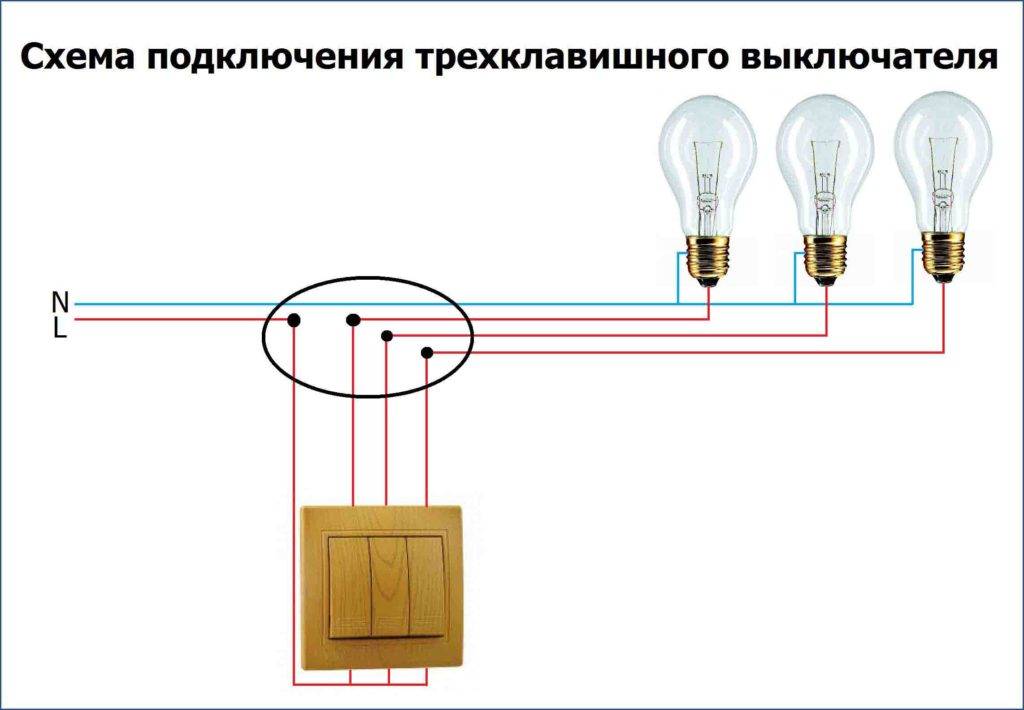
How to connect a three-gang switch: step by step
The sequence of actions when connecting a three-gang switch is as follows:
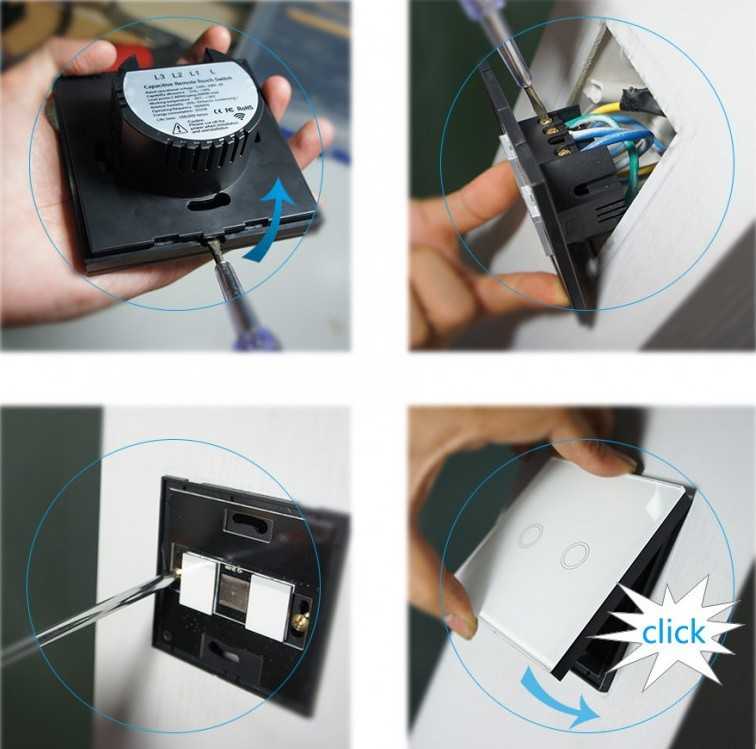
- Turning off the general power (or lighting group) at the switchboard. This is necessary to ensure the safety of the work being carried out. Safety plugs
- Removing the switch. If the switch is new, disassembling it consists in disconnecting the body from the base and loosening the terminal fasteners. In some modern devices, the terminal is arranged according to the latch principle; it is not necessary to release it. The wire is simply inserted into the hole and automatically fixed there. In addition, in order to fix the switch in the socket, it is necessary to loosen the tension of the spacer legs by one or two turns of the screw. Spacer leg screws
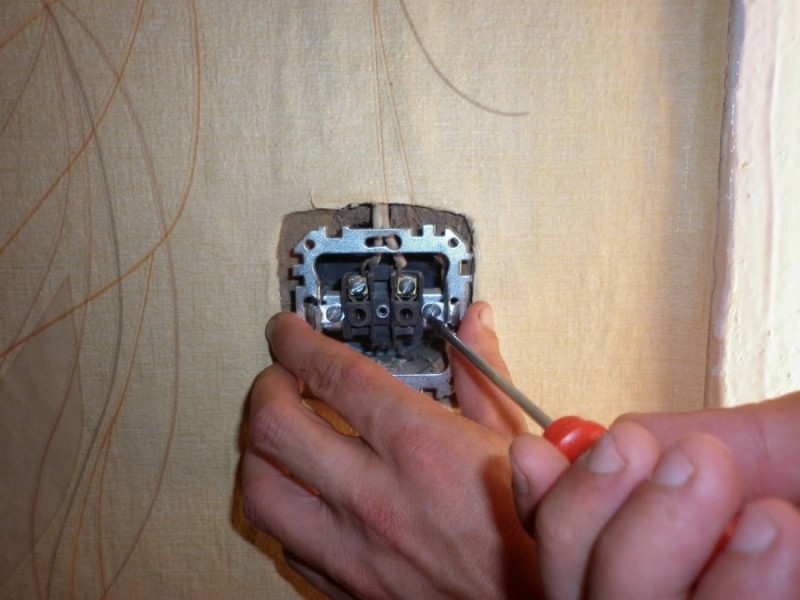
- Connecting wires to the switch. The most important moment. It is necessary to understand 4 wires. One is fixed in a common terminal, from which the “phase” will be supplied to all three lamps. The remaining 3 are connected in the desired order. For example, one powers the center chandelier, the second turns on the wall sconce, and the third lights the island above the sofa in the living room. Or, if the chandelier has 6 lamps, switching on 3 pairs in turn. Cleaning from insulation is convenient to do with a stripper, but you can also use a regular knife. The length of the bare wire should not exceed 10 mm, so that after immersing it in the terminal socket, no more than 1 mm remains outside. If the terminal clamp is screw, it must be tightened firmly enough.
Fastening wires in terminals
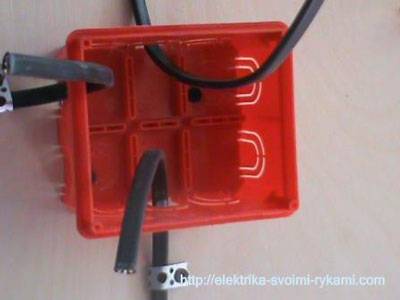
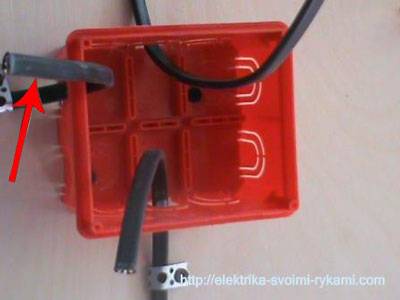
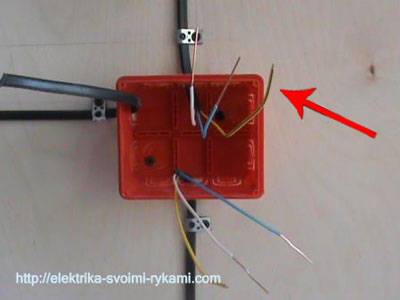
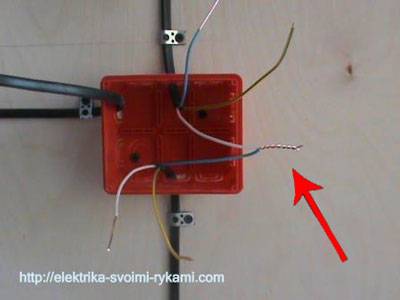
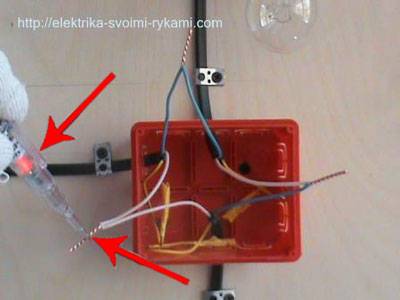
- Connecting wires in the junction box. The most reliable connection of wires is soldering. It is not for nothing that the junction box is still often called “soldering” by electricians today. However, this work requires skills and a soldering iron with all accessories.Therefore, in most cases, the wires are connected by terminal blocks, of which there is a wide variety on sale. In terms of technical characteristics, such a connection is practically in no way inferior to soldering, and in some cases even more progressive (for example, when a transition is made from an aluminum conductor to a copper one). In extreme cases, ordinary twisting of metal conductors is also acceptable, which is done with the help of pliers. Exposing the insulation in the junction box should also be only enough to ensure the reliability of fastening, no more. All cable joints must be carefully insulated so that they cannot come into contact with each other. Connection of wires in the junction box
- Checking the correct connection. Having finally connected all the wires, before the final assembly, you can check the operation of the entire circuit. To do this, turn on the power on the switchboard, test the switch and turn off the current in the network again.
- Assembly of the junction box and switch. If everything is working normally, the wires in the junction box are neatly laid inside and closed with a lid. The switch is installed in the socket. To do this, the screws of the spacer legs are twisted clockwise. You need to wring them out evenly on each side so that the base eventually turns out to be firmly fixed in the center of the hole. But you shouldn’t overtighten either, if you tighten it too much, the legs can pierce the plastic case of the socket box and the switch will “dangle” in it. After that, the protective case is screwed on and the keys are inserted into the grooves. Assembly completed. Switch assembly
- Turning on the general power.
In addition to the first and last points, the order of work may change, it does not matter. You can, for example, first connect the wires in the installation box, and then mount the switch directly.
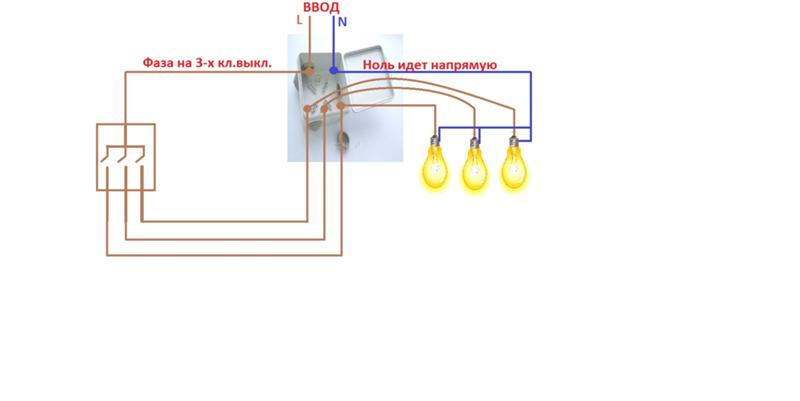
Something else is important. According to the rules for the installation of electrical appliances (PUE), it is necessary to connect the device in such a way that it is the phase current conductor that opens
If you swap the “phase” and “zero”, everything will work, but there will always be voltage on the lamp
And this is fraught with electric shocks in case of careless touching of bare contacts when replacing a light bulb. In addition, the rules regulate the position of the keys
The light should turn on by pressing the button up, and turn off by pressing down.
The connection diagram of a three-gang switch does not fundamentally differ from the connection diagram of one or two keyboard switches. The difference is only in the number of controlled lighting points.


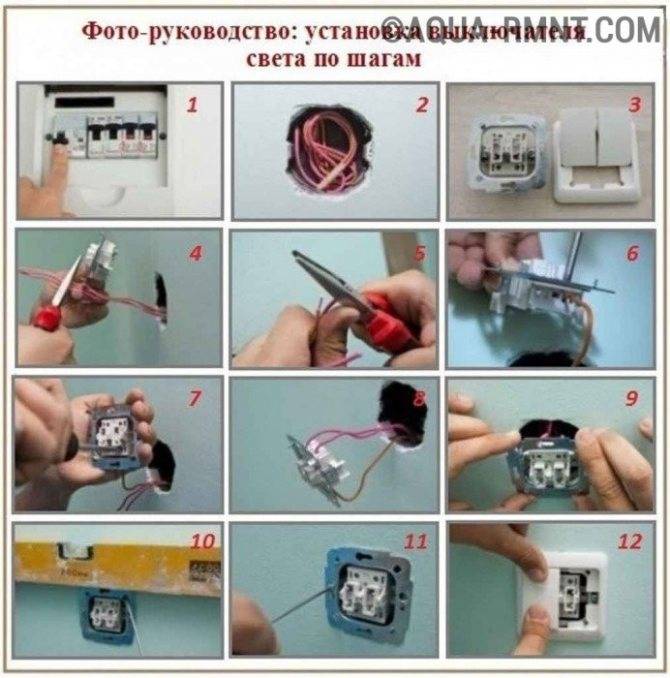
Example of a step-by-step installation of a switch
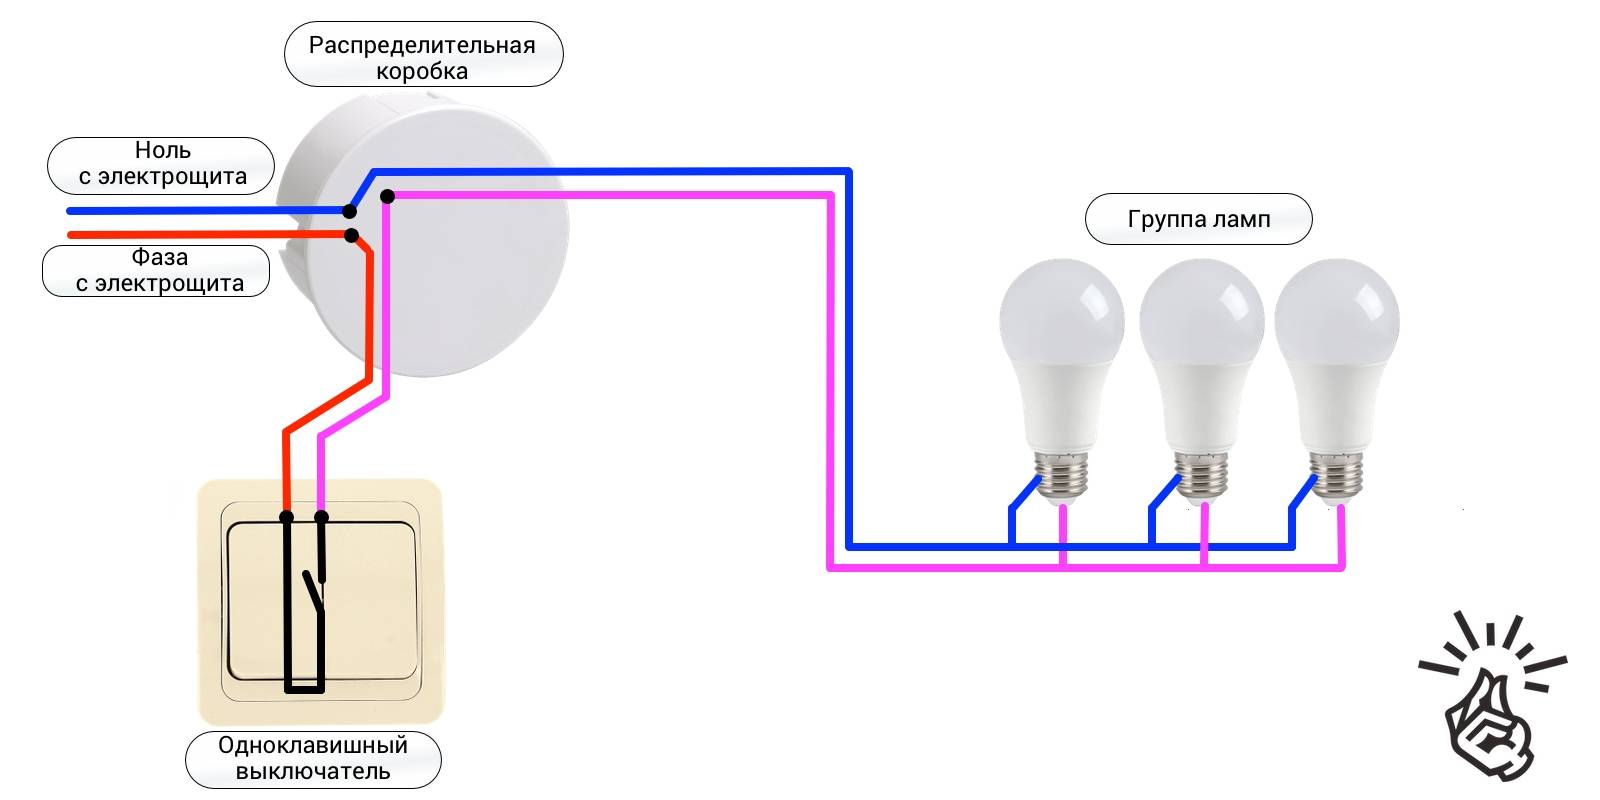
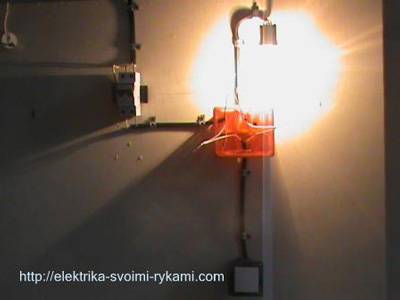
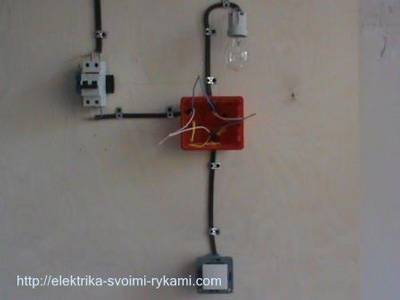
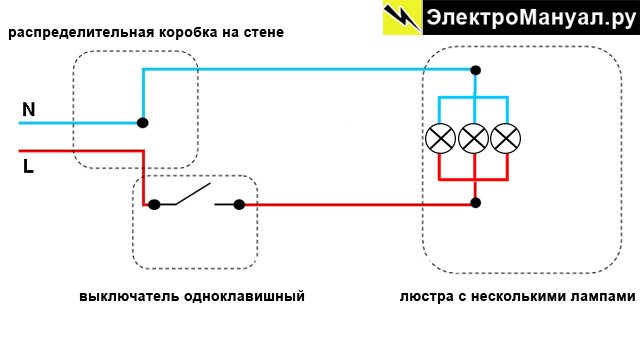
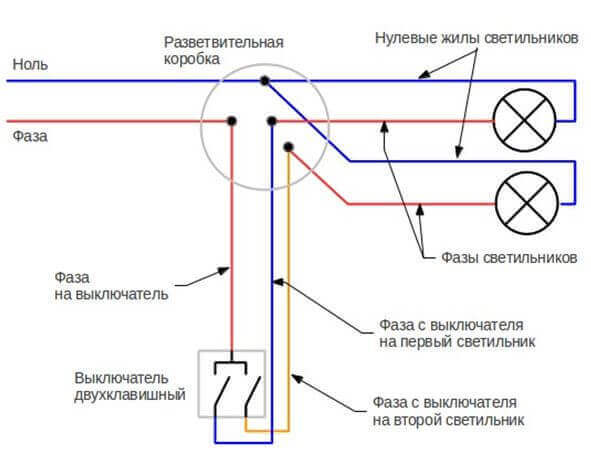
We analyze in detail the connection diagram, how to connect a light bulb and a switch
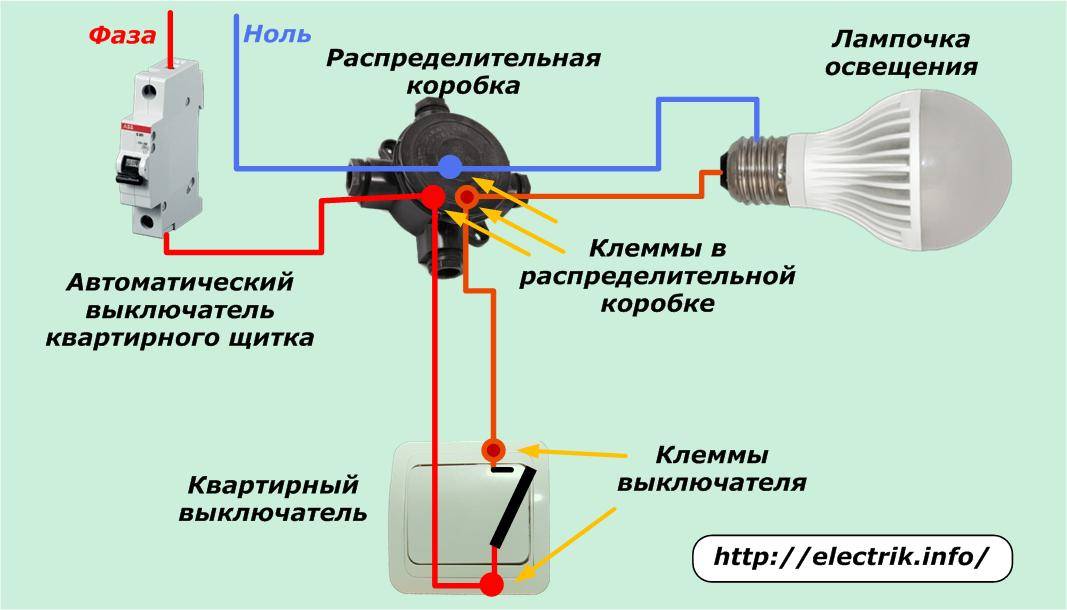
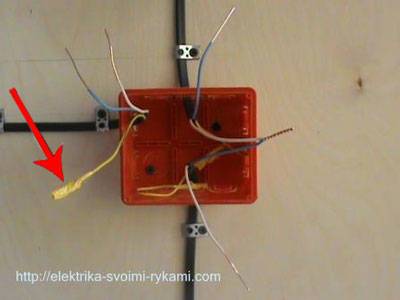
Let's go through the wires again.
Power wire on the left.
The wire suitable from above goes to the lamp (chandelier). In our example, on a cartridge with a light bulb.
The bottom wire goes to the switch.
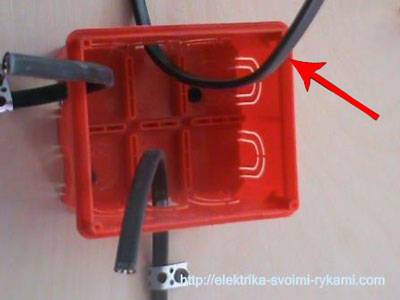
We start desoldering the circuit for connecting the switch with the wire going to the switch. We clean it, remove the first layer of insulation. It is not necessary to cut the wire strongly, at least 10 cm of each wire should remain in the box.
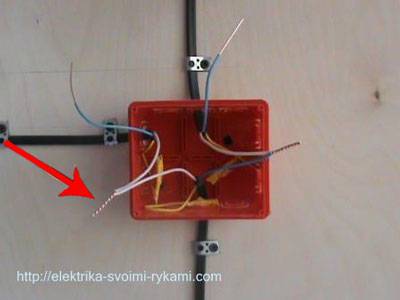
We remove the insulation from the copper core of the phase and neutral wires, about 4 cm.
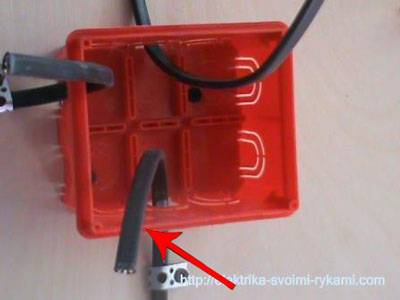
We pass to the wire that goes to the lamp. We remove the upper insulation, we clean 4 cm each on the phase and neutral wires.
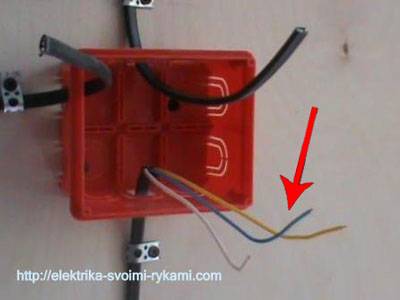
Now we can start connecting the wires.
Zero to the bulb comes directly from the supply wire, and the phase is made into a gap. The switch will break it, when the power button is pressed, it will close the circuit and supply the phase to the light bulb, when it is turned off, it will open and the phase will disappear.
We connect the phase white wire going to the light bulb with the outgoing blue wire of the switch.
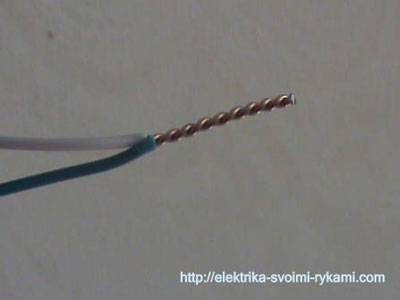
There are various types of wire connections, in our example we perform the connection in the simplest way, by twisting. First, twist the wires together with your fingers.

Then we stretch the connection with the help of pliers tightly twist both cores together.
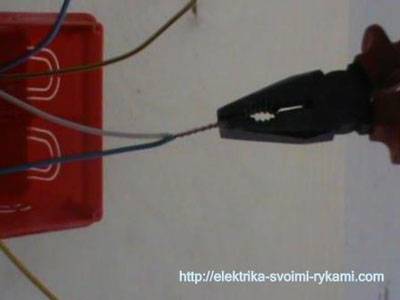
We bite off the uneven tip of the twist.
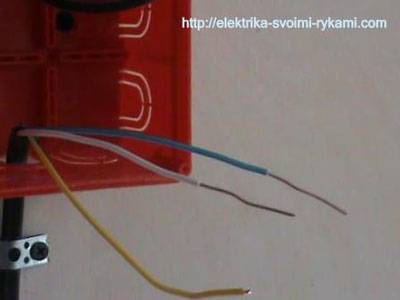
In this scheme, we do not use ground wires, so we isolate them and lay them in a junction box so as not to interfere.
Now let's move on to the power wire. We clean it and prepare the phase and neutral wires for connection.


We isolate the ground wire and put it in a junction box.
Now, we bring power to the switch. We connect the phase conductor of the supply wire to the phase conductor of the wire going to the switch. We twist two white wires.
And at the end of the circuit, we connect the zero conductor of the supply wire to the zero conductor of the wire going to the lamp (lamp).
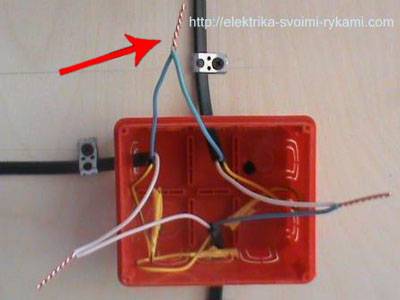
Scheme connecting a single-gang switch ready.
Now, we need to test the scheme in action. We screw the light bulb into the socket.
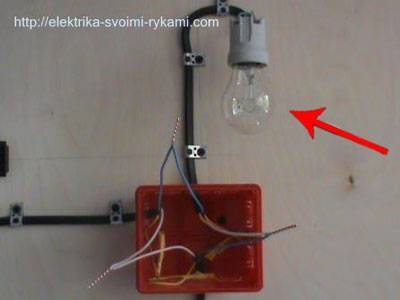
We apply voltage. Turn on the circuit breaker.
Using the voltage indicator, we check the correct connection of the circuit, make sure that we have not confused anything, there should be a phase on the phase wires, zero at zero.
And only after that turn on the switch.
The light is on, the circuit is connected correctly. We turn off the voltage, isolate the twists and put them in a junction box.
The installation of the circuit has been completed, the question of how to connect the light bulb and the switch has been disassembled and disclosed in detail.
In this work, we used:
Material
- junction box - 1
- socket - 1
- single-key switch - 1
- lamp - 1
- wire (measured according to the specific measurements of your room)
- circuit breaker - 1
- ground contact - 1
- insulating tape - 1
Tool
- knife
- pliers
- wire cutters
- flathead screwdriver
- crosshead screwdriver
- voltage indicator
How much we saved by doing the wiring diagram with our own hands:
- departure of a specialist - 200 rubles
- installation of a junction box for internal installation - 550 rubles
- installation of a ceiling lamp - 450 rubles
- installation of an indoor socket box (brick wall, drilling, installation) - 200 rubles
- installation of a single-gang indoor switch - 150 rubles
- installation of a two-pole circuit breaker - 300 rubles
- installation of a ground contact - 120 rubles
- installation of the wire is open up to 2 meters (1 meter - 35 rubles), for example, take 2 meters - 70 rubles
- installation of the wire openly above 2 meters (1 meter - 50 rubles), for example, take 8 meters - 400 rubles
- chasing walls 8 meters (1 meter - 120 rubles) - 960 rubles
TOTAL: 3400 rubles
*The calculation is made for hidden wiring.


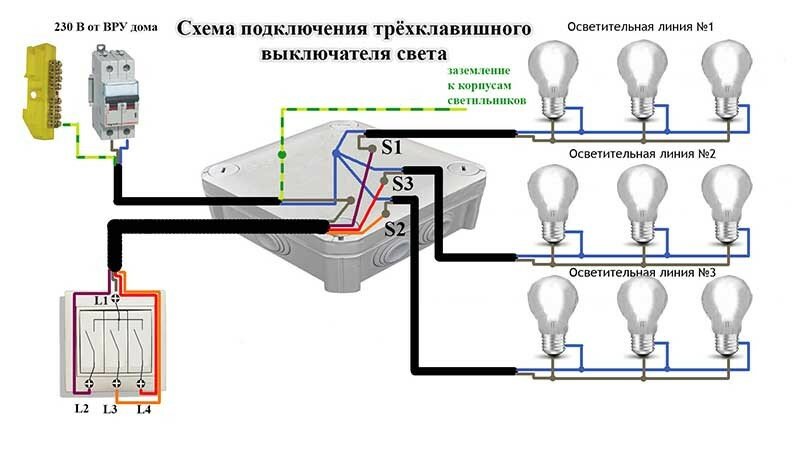
How to connect a three-gang switch with your own hands
Connecting a three-circuit device is extremely simple. To do this That's right, you need to perform a lot of step-by-step actions. The entire connection process is divided into stages:

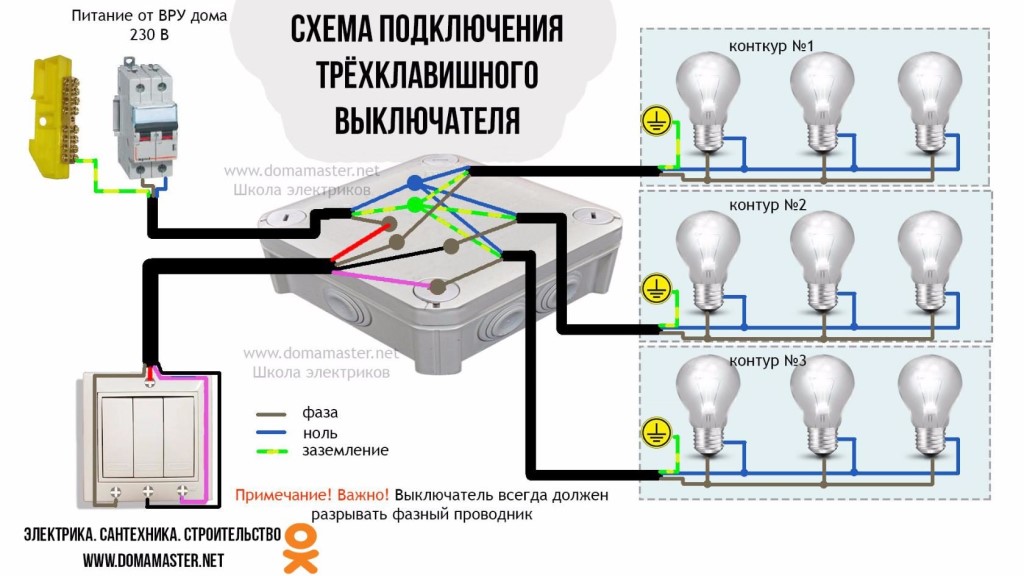


- connecting the cable to the three-keyboard;
- connection of wires in the box;
- checking the correct connection and troubleshooting.
Before carrying out the process, it is advisable to study the connection diagram. This measure will help minimize possible misses.
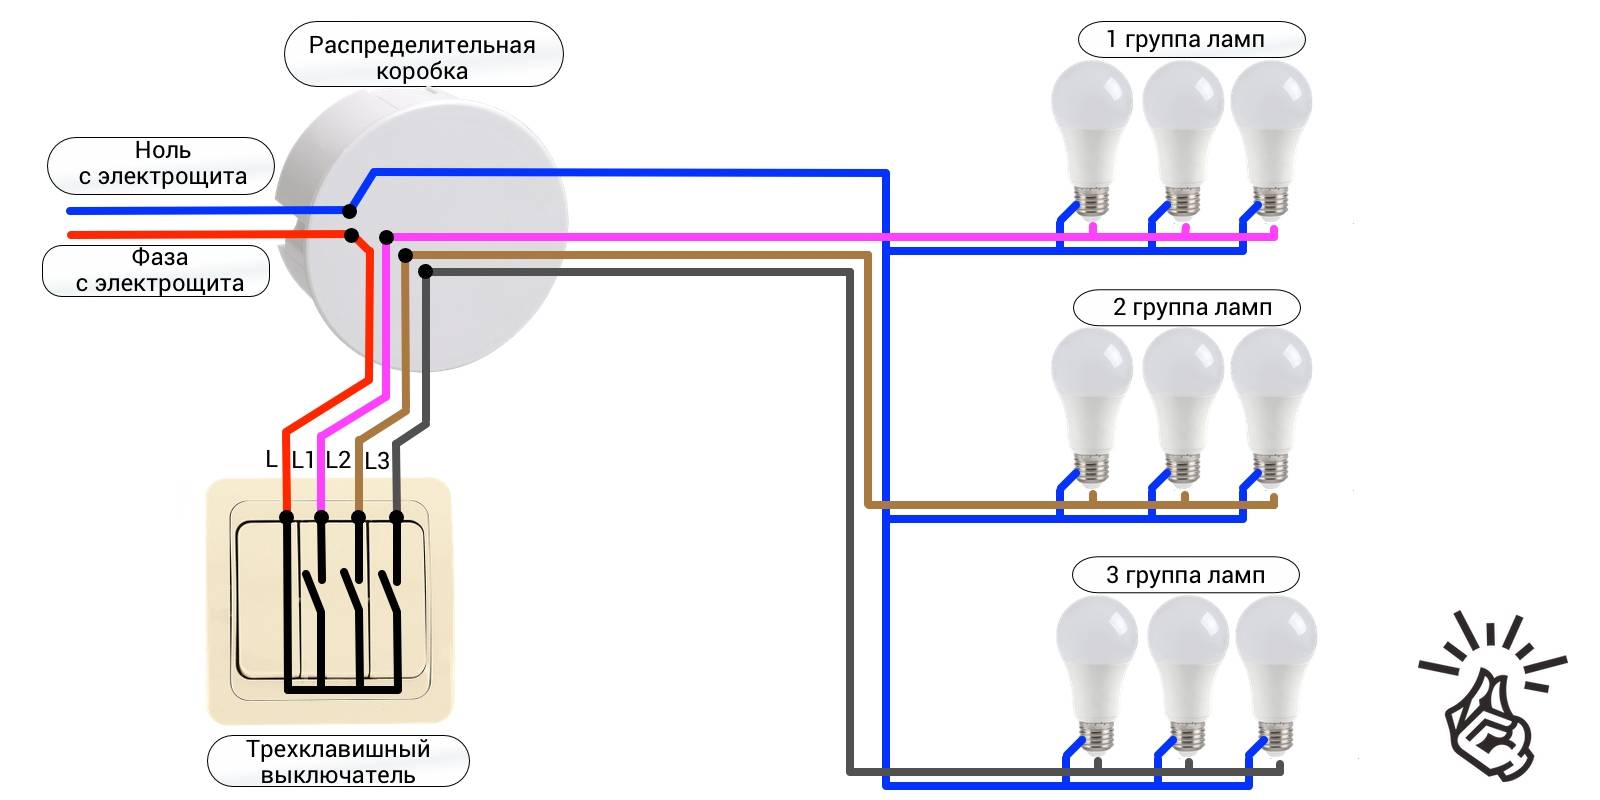
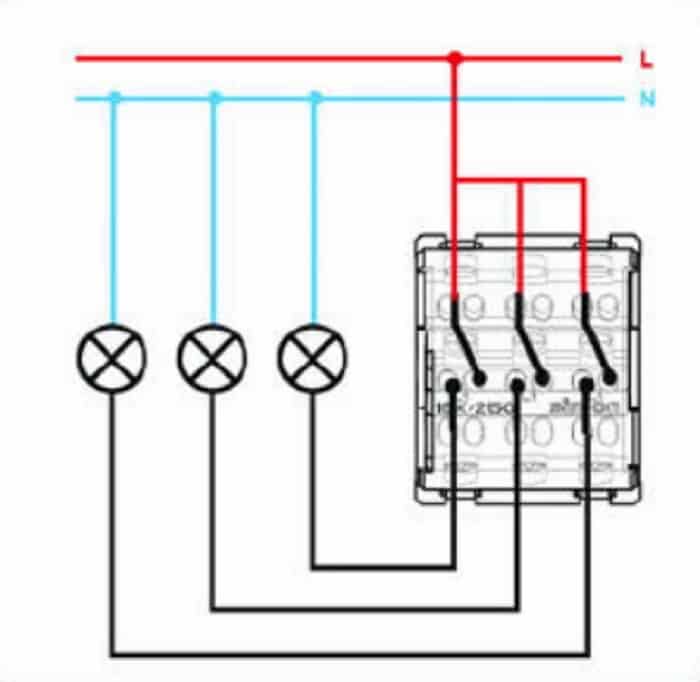
Wiring diagram for a triple switch
There are several conductors in the box. Each performs its own function:
- The cable with 3 cores is located in the machine present in the control room.
- A four-core wire goes down to a three-keyboard connected to the bottom.
- The wiring diagram for a triple switch for 3 lamps implies connection with a 4- or 5-wire VVGnG-Ls wire. Its cross section is 1.5–2 mm. A chandelier with 6 or 9 lights requires the same connection.
- With 3 different luminaires, 3 different three-core cables must be pulled. This method is common.
Now the number of requests for “triple switch with socket circuit” has increased on the network. It is easy to find detailed connection algorithms with photographs or drawings there.
Useful video on the topic:
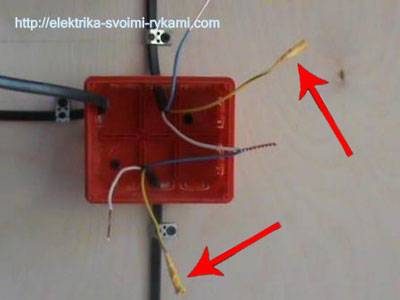
Connecting wires to the switch
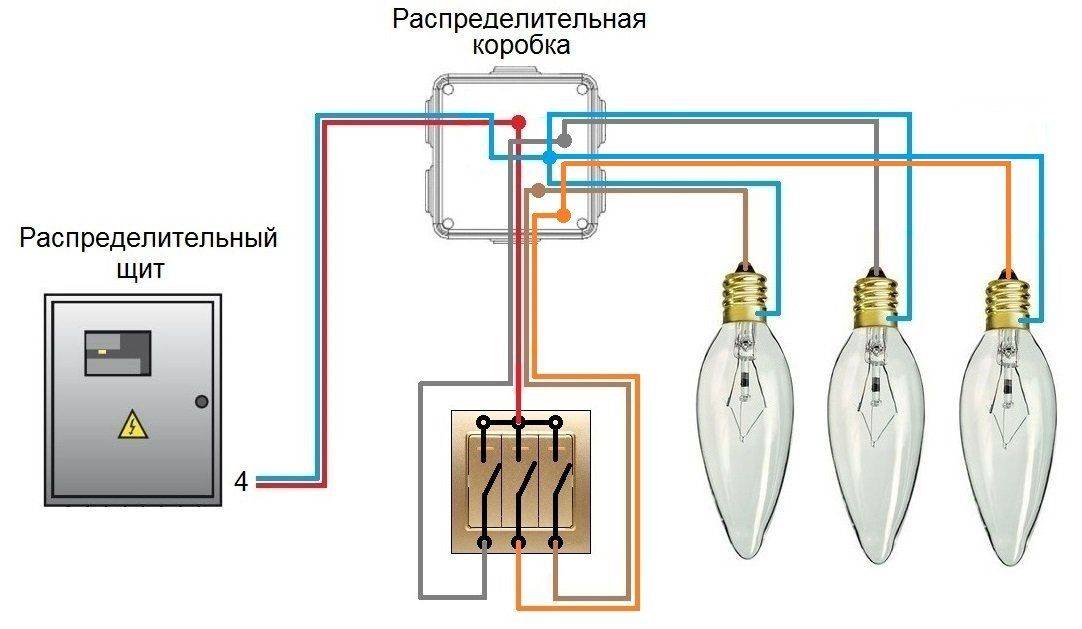
Often the device is installed in a block with a socket. People are interested in how to connect a three-gang switch. You need to take several consecutive steps:
- You will need a copper wire with a cross section of 2.5 mm². Direct the cable from the common shield. When he goes from the box to the switch, this is a mistake.
- Copper wire 5 * 2.5 mm² down the gate. Then it will be near the switch and socket block. Connect the common wire to the contact. This is due to a more powerful load on the sockets. On the lamps, it is not so pronounced.
- By means of a jumper, put the phase on the upper clamp of the device. Zero send to 2 contact. Lead the rest of the conductors under the lower contacts.
Connecting the cable in the box is carried out by the method described above. The difference lies in the connection of the auxiliary zero conductor to the central point.
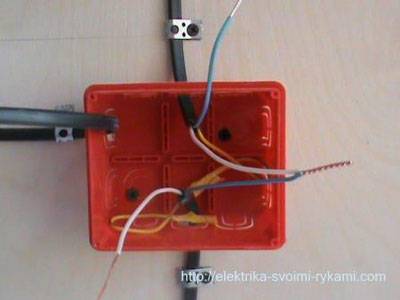
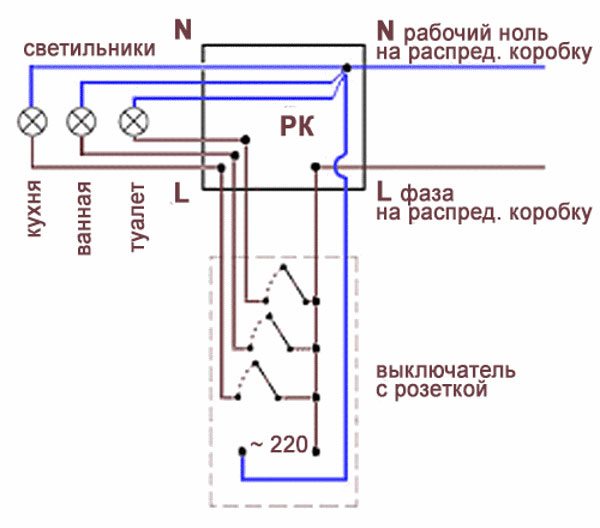
Wiring connections in the junction box
There are 5 conductors in the box. It is necessary not to confuse them and connect the wires correctly. It is worth starting with 2 cores: zero and ground. The number of bulbs doesn't matter. All zeros will be at the same point.
The rule of reduction to a common point applies to grounding conductors. On fixtures, they should be connected to the body. Sometimes wires are missing.
You can quickly connect the cores with clamps for Vago terminals. They are suitable for lighting loads. It is better to choose the colors of the lived, based on existing standards. The blue wires are null. Ground wires are colored yellow-green.
We must not forget that zero is not directed to the switch. It goes directly to the lamps. Through the contact of the device with three keys, 1 phase is broken.
Then you need to connect the cores of the phases. Start with the conductor coming from the input machine. Combine a phase with a common phase conductor. It goes to the common terminal of the three-keyboard. If the core is not directed anywhere else, the phase starts on the switch.
Combine 3 conductors coming out of the keys with 3 phases. They depart from the circuits to the lamps using Vago clamps. The correct marking of the cores will help to quickly recognize them. Each controls a light bulb in the room. There will be 6 connection points in the box.
Before switching on, check the circuit of the triple switch again. Then turn on the machine and start the lighting devices with the keys.
We recommend watching a video on the topic:
Where are they applied?
Modern repairs and design solutions are increasingly offering lighting to be divided into different groups.
For example, a room has a complex configuration - niches, ledges, partitions or curtains. Very often now large one-room apartments are divided into zones, so-called studios are made of them. In this case, a switch with three keys is the best fit. By means of a specially thought out and mounted zone lighting, it is possible to distinguish a working area where there will be a computer desk, a sofa, shelves with books, here the lighting becomes brighter. The second zone is the sleeping area, where a more subdued light is quite suitable. The third zone is the living room, where there is a coffee table, armchairs, a TV, here the lighting can be combined.

When else is it advisable to use a three-gang household switch?
- If from one point it is necessary to control the lighting of three rooms at once, for example, a corridor, a bathroom and a bathroom, when they are close to each other.
- In the case of combined lighting in the room - central and spot.
- When in a large room lighting is provided by a multi-track chandelier.
- If a multi-level plasterboard ceiling is installed in the room.
- When the lighting of a long corridor is divided into three zones.
Flaws
1
If your light bulb has burned out and needs to be replaced, with this scheme it is not immediately possible to understand whether the light is on or off.
It will be unpleasant when, when replacing, the lamp can simply explode before your eyes. AT in this case the simplest and a reliable way to turn off the automatic lighting in the dashboard.
2

If your wiring goes under the ceiling, then you will have to lower the wire from there to each switch, and then lift it back up.The best option here is the use of impulse relays.
And if you don’t want to lay wires and ditch walls at all, is it possible to mount walk-through switches in this case? It is possible, while all costs will be in the region of 800-1000 rubles. How to do this, read the article "Wireless walk-through switch."


Kinds
Do not rush to connect a three-gang switch until you decide exactly which device you want to see in your apartment. After all, these switching devices are of several types:
- Ordinary.
- Checkpoints. They are used in long corridors or on different floors, when at the entrance (at the beginning of the corridor or on the first floor) the lighting turns on one switch, and at the exit (at the end of the corridor or on the second floor) it turns off the other. That is, you do not need to make your way in the dark and crawl along the wall with your hand to find the button of the switching device.
- With indication. Such light beacons have two options for indicating the status of the device. Or they glow when the lighting is off and thus indicate in a dark room where the switching device is located. Or vice versa, the beacons are on when the keys are on, thereby making it clear exactly where the light is on at the moment.
- Three-gang switch with socket. They are most often used in rooms where a toilet, a bathroom and a corridor are located nearby.
Connection via socket
If there is an outlet near the planned installation site for turning off the light, then you can power the phase and zero from it.

To connecting the switch from the socketturned out to be successful, you need to follow the following sequence of actions:
Initially, you need to remove the power supply from the outlet.Similar actions can be performed by relieving stress from the whole house.

You need to open the outlet and check the voltage.

A wire is connected to the socket phase, the second side of which is attached to the input of the switch. A wire directly connected to the lamp is attached to the output of the unit to turn off the light.

A wire is attached to the zero contact of the socket, the second end of which is connected to the output of the lamp. In the same way, the protective wire is connected, only to the corresponding contact of the lamp.


Particularly popular at this stage time, illuminated switches began to be used, it is advisable to turn to a professional when installing them, since improper connection of such switches can refuse an increased load on the wiring, as a result of which it will undergo combustion.

In the absence of basic skills in electrics, it is worth refusing even to independently install switches containing one key.
Some photos of the switch can be found below.


