- Installation of cable under the tile
- Features of connecting electric heating
- Installation progress
- thermostat
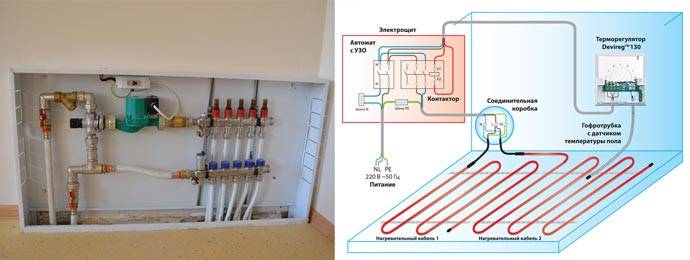
- Connection to the electrical circuit of a film type underfloor heating
- System calculation and design
- Calculation and selection of materials
- How to fit a "pie" in a room with low thresholds
- Faults
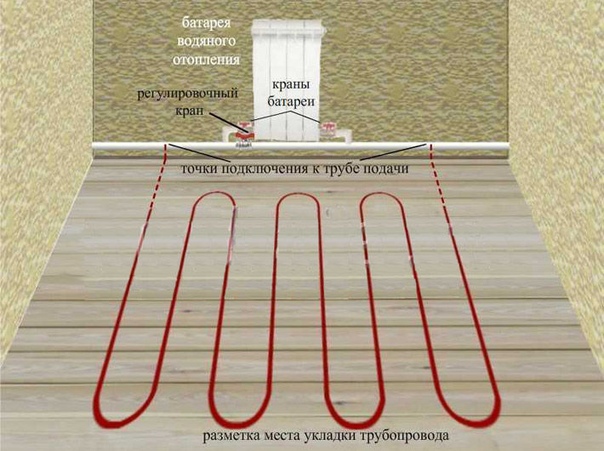
- An example of a warm water floor
- Working with the base
- Laying the contour
- Manifold installation
- Cabinet connection
- Laying a layer of thermal insulation and waterproofing
- Checking the work and making concrete screed
- Features of the floor device without a mixing unit
- Substrate preparation for underfloor heating
- How the system works
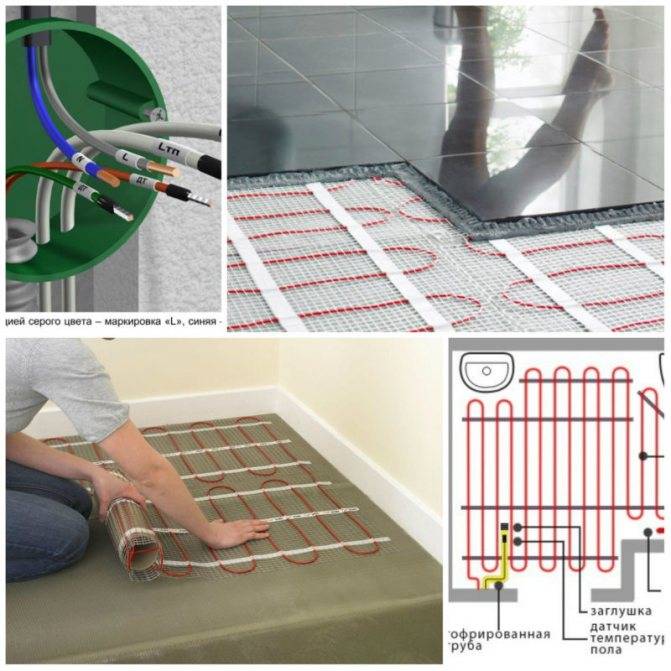
Installation of cable under the tile
There is a certain technique on how to install a warm floor under the tile. This mounting option is easier. This does not require the use of a screed. The system can be operated within a week after installation. The cable, which was poured into the screed, is turned on for the first time a month after installation.
The mat is rolled out onto a clean, primed surface. In this case, it is not necessary to use insulation, especially if the apartment is not located on the first floor. A thin wire is also laid out with a snake. The laying step is 7-10 cm.
Next, install the sensor from the thermostat in the same way.Only in this case, the strobe will have to be done not only in the wall, but also at the base of the floor. Next, the tile is laid. A layer of 3-5 mm solution is applied to its surface. Tile installation is carried out in the usual way.
Features of connecting electric heating
One of the main elements that ensure the optimal functioning of the electric floor heating is a thermostat, it can be:
- mechanical device - in it the desired temperature is set using a rheostat;
- electronic device - the temperature regime is set on it through the use of a relay. In these underfloor heating regulators, in the presence of a microprocessor programmer, it is possible to provide automatic control of the process of functioning of the heating structure in accordance with the specified parameters.
Both mechanical and electronic thermostats have the ability to influence the operation of the following electrical elements of floor heating systems:
- heating cable in reliable insulation with high resistance. It generates heat when an electric current passes through it;
- thermal mat - in this case, the cable is located on the thermal insulation film, having previously performed the calculation of the electric floor heating;
- a special thin film that emits thermal waves (infrared rays). Its thickness is no more than 0.5 mm. A flat semiconductor strip is embedded in the film layer, which provides heating.
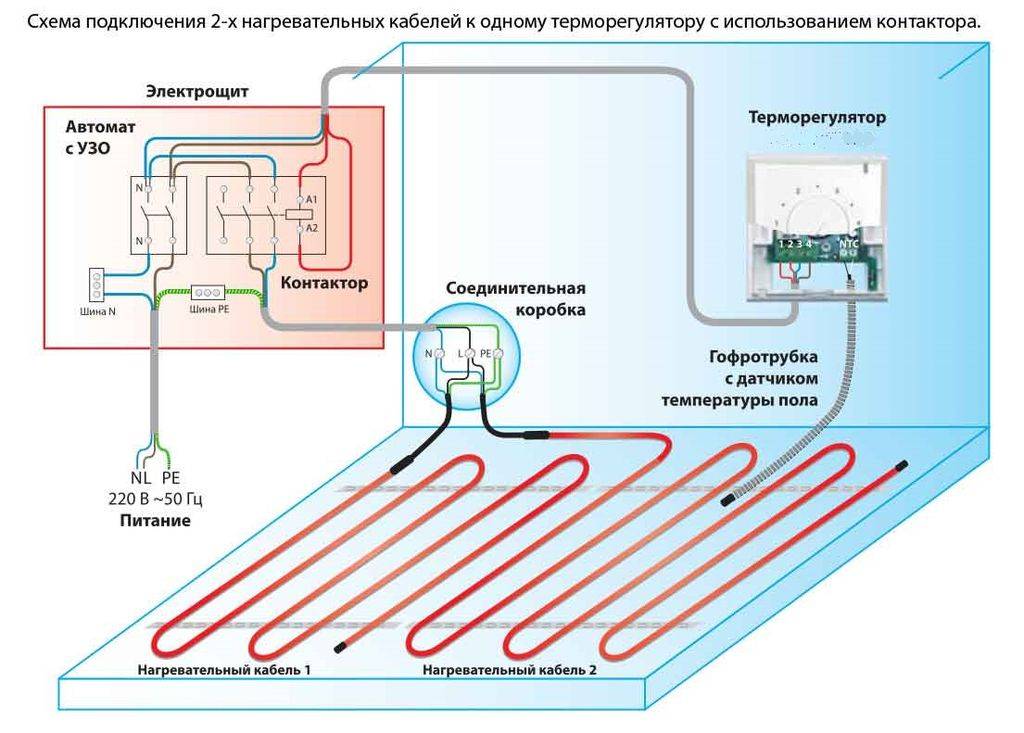
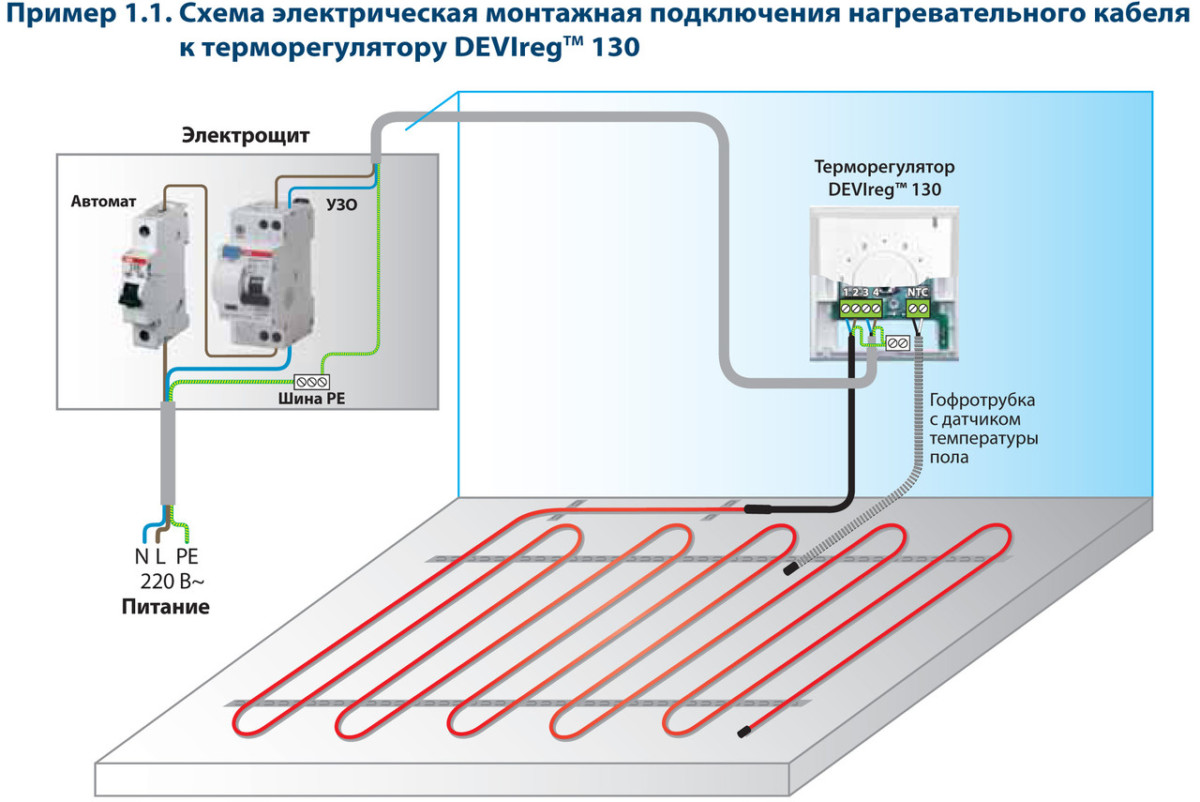
Installation progress
Before laying the wire, check its resistance. Compare with the indicators in the passport. It can differ from passport data by 10 percent - this is acceptable.When mounting the system, you can attach it to the reinforcing mesh using special fastening tapes or ties (the main thing is not to tighten it).
If you are equipping a warm floor in a bath or bath, then ground the reinforcing mesh along them and bring the ground to the regulator. For these purposes, tinned copper wire will do. You can lay a warm floor in a bath, you just need to take care of grounding and installing an RCD module.
If you opted for an infrared floor, then you just need to spread it over the insulation. Based on the technology developed by the manufacturer, it can be fixed by special ears on the strip or glued with construction tape.
In those places where a wire passes above the dividing line (which is between two floor slabs), hide it in a corrugated pipe ten to fifteen centimeters long. Even if the plates expand with excessive heat, the risk of a cable break is still not so high. At a distance of ten to fifteen centimeters from the strobe, there is a junction between the power wire and the heating cable. Here, check that the clips are subsequently recessed into the screed.
It is extremely important to mark the places of all connections on the plan of the apartment. This will come in handy if you later have to carry out unscheduled repairs.
The wire resistance is checked again when all the elements are in place. It is possible to test heating elements only if the resistance indicator is not much different from what is indicated in the passport.
It is important to take into account one more nuance. A corrugated pipe is lowered along the curtain from the regulator
Its end is placed between the nearest heating cable strips, in the middle.We put the sensor inside this pipe. It controls the operation of all systems. Check if the sensor can be easily removed and if there will be problems with its replacement.


If the check is successful, the system must be de-energized, and the regulator removed before the end of the finishing work. Next, pour the floor screed. When it dries, check the operation of the system again. If everything is in order, work with the flooring. If a screed is not needed, then immediately lay linoleum or laminate.
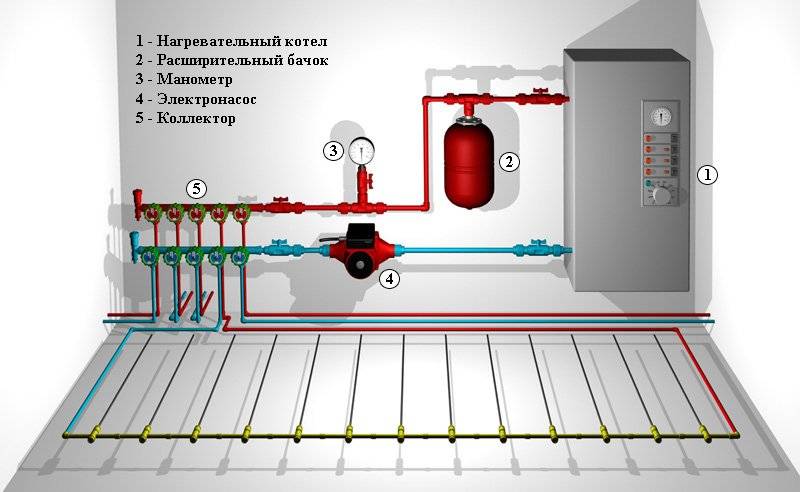
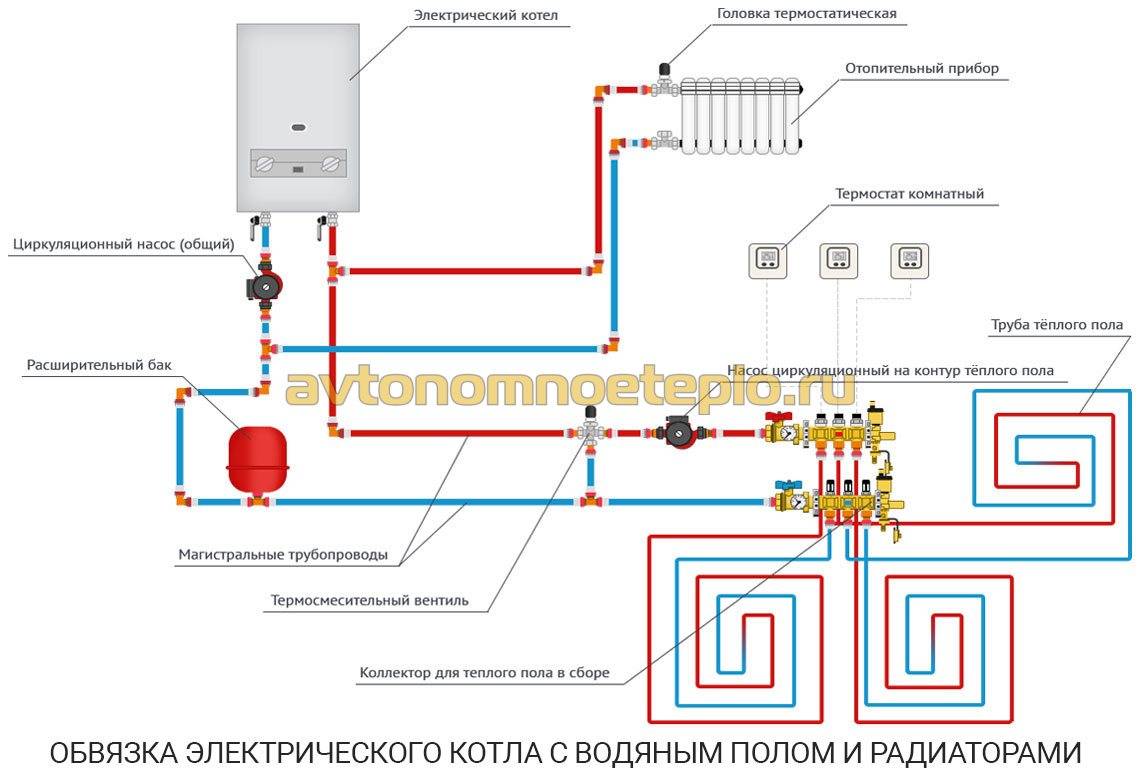
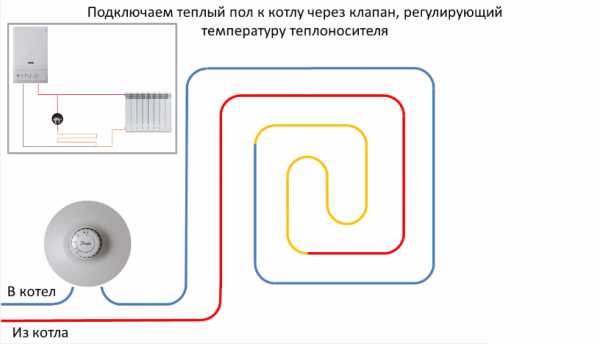
Unlike an electrical system, a water heated floor uses hot water as a heat source. The principle of operation is elementary: a flexible pipe is located on the surface, through which hot water circulates. As a heat source, of course, a gas boiler or a central heating system is used.
Connection to a gas boiler is preferable, since this option does not depend on pressure, temperature differences and seasonal heating shutdowns.
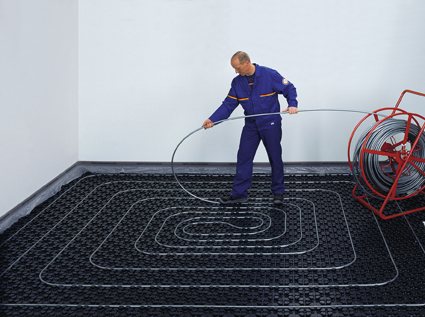
For spacious rooms, a spiral pipe laying method is better suited.
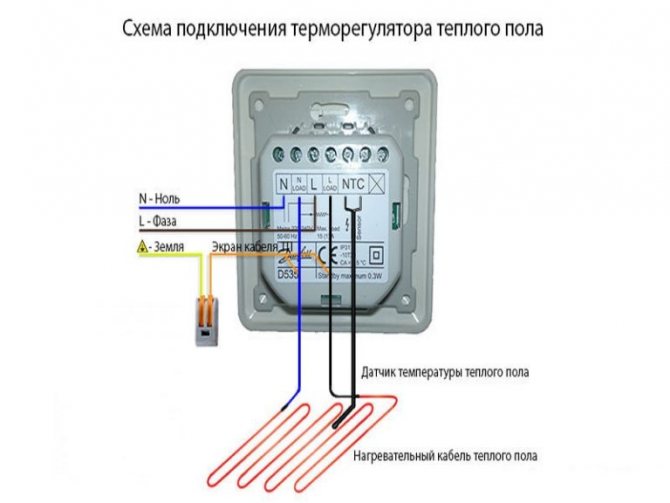
thermostat
The heating temperature of the electric underfloor heating is controlled by a special thermostat sensor. Without this device, the room would become very hot over time, and electricity would be used inefficiently. Before starting the installation of the system, you need to consider how to install a floor heating sensor. This is an easy procedure.
The thermostat may have a sensor built into the housing. The device is installed at a height of at least 1 m from the floor. The sensor detects the air temperature in the room. If necessary, the device will turn off the power supply to the cable. When the temperature drops back to the set value, the thermostat will turn on the system.
Devices are also on sale, which include a remote sensor. It is laid in a special corrugated pipe, directly next to the warm floor. This method of measuring temperature is preferred. Some models of thermostats provide for the presence of an air and remote sensor. In this case, the maximum comfortable temperature is set in the room, based on two indicators.
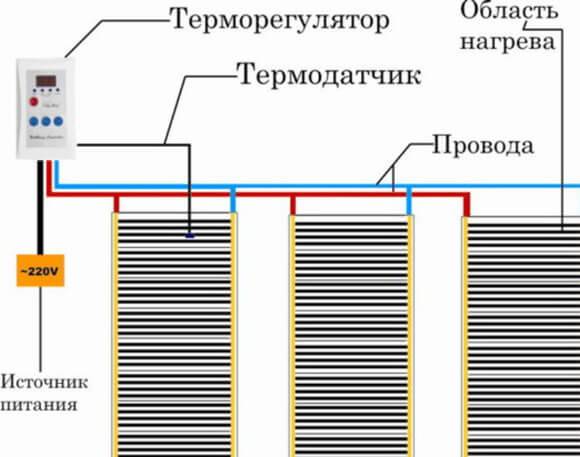
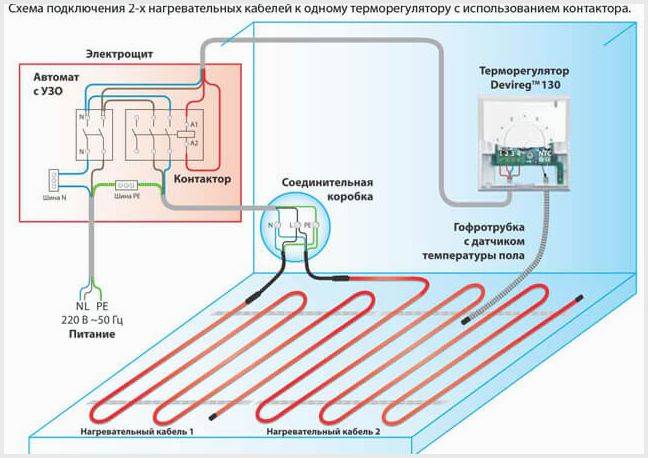
Connection to the electrical circuit of a film type underfloor heating
Underfloor heating film type is a relatively new invention. It is made of a special heating film. With the connection of this system, even the most experienced builders can have problems. In order to do this without problems, it is necessary to deal with the system of film underfloor heating itself.
The sequence of work when laying an electric floor heating
The film underfloor heating system consists of special carbon and bimetallic heating elements, which are soldered in a special heat-resistant material. Copper contacts are located along the edges of the film. They connect the device to the network.
The connection itself is carried out by soldering the wires to the terminals and leading them to the thermostat. A feature of laying is the use of a substrate that has a foil surface. This solution allows heat to be reflected from the lower surface and directed completely to floor heating.
The temperature sensor is installed, as a rule, in a special recess under the film itself, but options for its location on the surface are not excluded.Also, this type can be cut according to special marks that are applied by the manufacturer. They are located at a distance of up to 30 cm from each other. When the laying is done, you can connect the sheets in a parallel way.
The decision to make a warm floor in the house has always been justified. It is convenient, practical and quite economical. And if there are children in the house, a warm floor will allow parents not to worry that they will freeze and get sick.
System calculation and design
How can you make a water heated floor with your own hands? You should start with the calculation and design of the system. This is the most important stage of work, on which the features of heating installation, heating efficiency and durability of the entire structure depend.
When designing, the following factors are taken into account:
- the volume to be heated (area, height, shape of the room);
- features of the temperature regime;
- materials to be used in the work.
When developing a scheme, all the nuances are taken into account, including the location of collectors, expansion joints
It is important that the deformation space and pipeline elements do not intersect.
It is also desirable to know in advance where and how the furniture and / or plumbing fixtures will be located. If furniture is planned above the pipes, then it should be made of materials that tolerate high temperatures well. It is better not to use a tree, because. it dries up.


Be sure to calculate the heat loss. How to do this is described in the video tutorial:
For each room of the house you need a separate circuit. If non-residential premises are heated (for example, a loggia or a veranda), then the circuit should not be combined with adjacent living rooms.Otherwise, the heat will go away to heat the non-residential area, and the living rooms will be cold.
In order not to make a mistake when designing, some nuances should be taken into account. An expert says this:
Calculation and selection of materials
Each room requires separate calculations to determine the amount of consumables based on the length of the pipes, as well as the step during their installation. For this purpose, it is advisable to use special computer programs or use ready-made project documentation developed by specialists.
floor heating pipe
Independent power calculations are classified as complex, due to the need to take into account a lot of parameters and nuances. Even minor flaws can provoke insufficient or uneven circulation of water along the circuit, and in some cases the formation of local areas of heat leakage is possible.
Calculations are based on the use of several parameters:
- area of the room;
- characteristics of the material used for the construction of walls and ceilings;
- the presence and category of thermal insulation of the room;
- view of the heat-insulating layer under the system itself;
- flooring materials;
- characteristics and parameters of pipes in the system;
- temperature indicators of water at the inlet to the system.
The most crucial stage before purchasing the material is the competent choice of heat carriers, represented in such a system by pipes. The following types are popular:
-
cross-linked type of polyethylene pipes. They are produced under high pressure and are characterized by a high level of strength. Optimally resistant to any kind of mechanical damage, temperature changes and pressure instability;
-
metal-plastic pipes. They perfectly combine the main positive qualities of steel and polymers. Are not subject to formation of a rust and are steady against adverse external influences;
-
copper pipes with plastic sheath. They are characterized by maximum durability, which is due to the use of high-strength metals in the production process.
How to fit a "pie" in a room with low thresholds
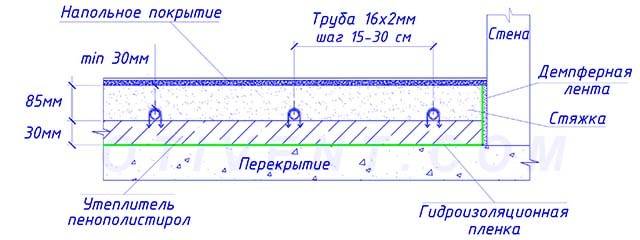
This problem is faced by almost all homeowners who decide to arrange underfloor heating in an inhabited house or city apartment. Essence of the question: the height of the thresholds of entrance or interior doors is not enough for the installation of a full-fledged "pie" of warm water floors with a screed (see the drawing below).
Let us analyze the composition of a monolithic heating circuit located on an interfloor or basement floor:
- Waterproofing - bituminous coating, more often - plastic film.
- Insulation - extruded polystyrene foam with a minimum thickness of 30 mm or 5 cm foam.
- Damper tape around the perimeter of the room.
- Heating pipe (usually metal-plastic or cross-linked polyethylene with a diameter of 16 x 2 mm), laid with a snail or snake.
- Cement-sand screed 8.5 cm thick.
- Floor covering (sometimes a vapor barrier layer is made under it). The thickness depends on the material, laminate and linoleum will take up to 1 cm, ceramic tiles with an adhesive mixture - about 20 mm.
The traditional surface heating scheme is made without reinforcement
The total height of the "pie" with a laminate coating will be 85 + 30 + 10 = 125 mm. No normal owner provides such high thresholds.How to solve the problem and implement underfloor heating in a similar situation:
- Dismantle the existing screed to the very foundation - soil or floor slab.
- Instead of a heat-insulating layer of polystyrene, use multifoil up to 1 cm thick.
- Reduce the screed capacity to 60 mm. The structure will have to be reinforced with masonry or road mesh with dimensions of 150 x 150 x 4 and 100 x 100 x 5 mm, respectively.
- Use flooring systems - "dry" warm floors, mounted in wooden houses without a screed. The total thickness of the "pie" is 6-10 cm.
- Heating the flooring with electric carbon film instead of a water piping system.
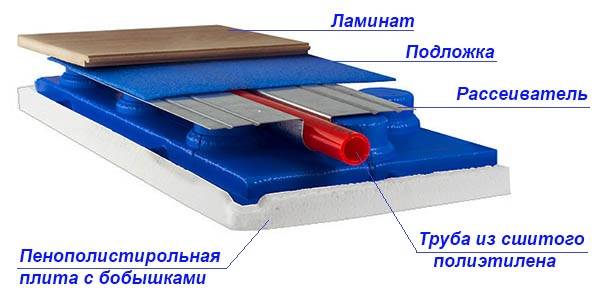
Floor heating system, dry laid
Some home-grown craftsmen do not put insulation at all or reduce the power of the screed to 4 cm. In the first case, half of the heat generated will go to the basement, the ground or to the neighbors from below, in the second, the monolith expanding from heating will soon crack.
About how best to make a warm floor in the premises of an apartment building, the expert will tell in more detail and in an accessible way on the video:


Faults
Warm floors very often fail, which leads to difficult and long repairs.
Water structures can become unusable for the following reasons:
- Pipe damage. Water leakage is a rather dangerous phenomenon, which is difficult to identify. If such a problem is detected, immediately turn off the pump and heating. After that, the place of the breakdown is searched for and the breakdown is eliminated.
- Uneven heating. This problem is due to different lengths of the circuits, as well as incorrect manifold settings. Water simply circulates faster in one place than in another.
- Breakdown of the circulation pump.If this mechanism is out of order, the water will warm up slowly. In this case, the floor will be warm only at the beginning of the circuit.
As for electric floors, all breakdowns can be reduced to only two phenomena:
- Cable damage. You can identify the gap using special devices. But it is not always possible to restore the work, since it will be necessary to install a completely new floor or a separate mat.
- Thermostat malfunctions. There are also several damage options here. One of the main reasons is the failure of the temperature sensor. This leads to uneven heating, as well as premature shutdown of the system.
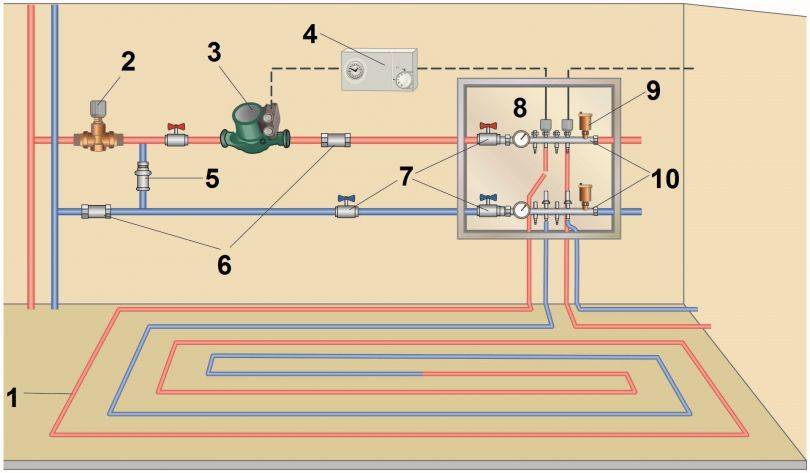
An example of a warm water floor
An example of a warm water floor
Before performing work, you need to know that the device of such a system will take a space of about 8 cm from the floor from the room. The phased arrangement of a warm floor consists of the following points:
Working with the base
Initially, all dirt, debris, grease and oil stains are removed from the surface of the subfloor, and then they begin to arrange the first layer. As a rule, a screed based on a mixture of sand and cement is used in the house. It is laid in strict accordance with horizontality - along the lighthouses. It is allowed to install self-leveling floors using modern self-leveling mixtures. In order for the heat to be distributed evenly, you need to make the surface perfectly flat.
Laying the contour
Laying the contour
According to the scheme you have drawn up, lay out the pipes. Initially, do not fasten them too tightly.
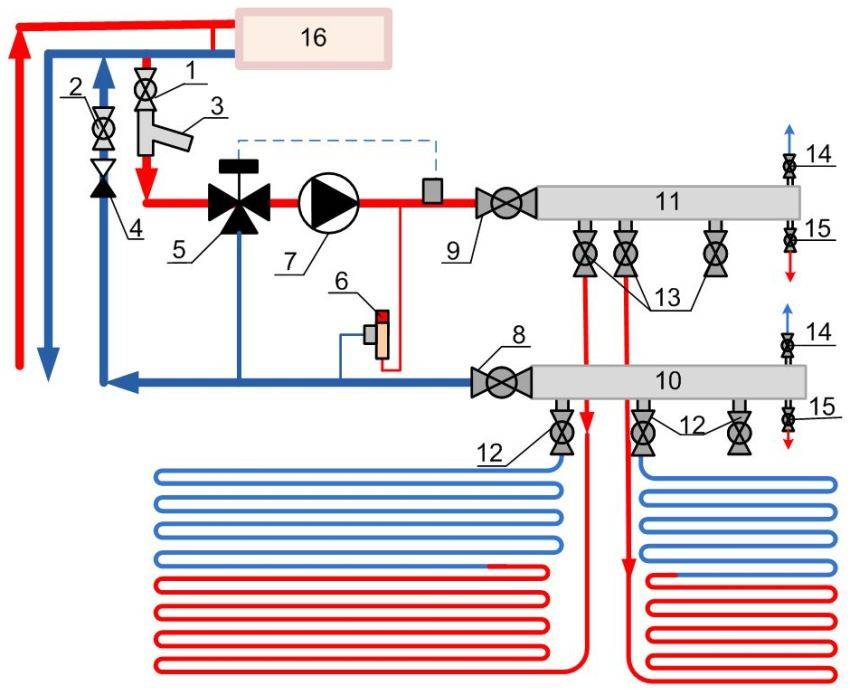
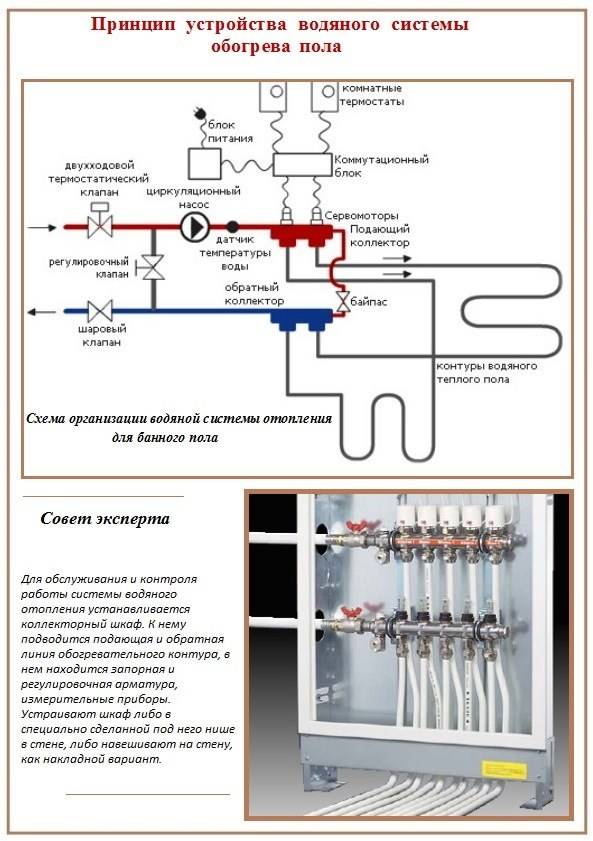
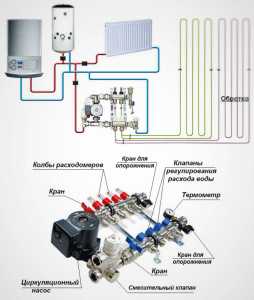
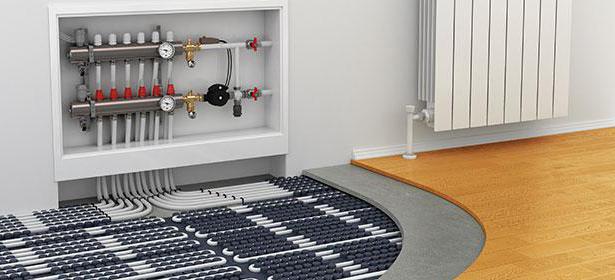
Manifold installation
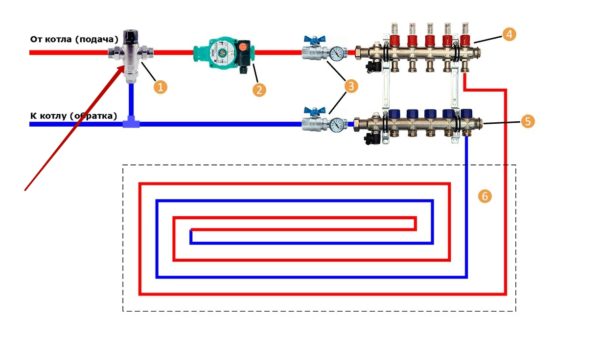
Scheme-example of connecting a water-heated floor
The allocated space for the docking components that connect the heating pipes and the house's heat supply system should be hidden in a special cabinet. It is best to make a niche in order to save space. Approximate cabinet dimensions: 600x400x120 mm. These are standard commercially available manifold cabinets. Both joints and certain regulatory systems can be placed in them.
Cabinet connection
Collector group of a warm water floor
Make access to the return hose and the boiler feed pipe in the cabinet. Attach shut-off valves to them. Connect the manifold and put a plug on its end. A great option would be to install a splitter.


Laying a layer of thermal insulation and waterproofing
- It is necessary to lay sheets of aluminum foil or polyethylene on a concrete base:
- Fasten the damper tape along the perimeter 2 cm above the level of the screed.
- As a heat-insulating material, take slabs of mineral wool, polystyrene foam, polystyrene foam, cork, foam concrete, foam plastic. According to your desire, the selected component should be characterized by a sufficient value of temperature resistance, which will generally exceed all the indicators of the heating layers.
- Additional waterproofing is not required if you took polystyrene with foil as a heat-insulating material.
- The thickness of the layer is taken depending on the power of the autonomous heating system, the presence or absence of a heated room on the floor below, and the thermal resistance of the floor.
- It makes sense to purchase a heat insulator for warm water floors, since it has protrusions for pipes on one side.
Checking the work and making concrete screed
It is important to check the functionality of the system before performing the screed. Only after checking the correct operation of the entire system can the self-leveling floor or cement mortar be laid, making the surface perfectly flat along the installed beacons.
After the mixture has hardened, one more check of the operation of the system must be done and only then take up the flooring device.
Enjoy the warmth of the floor
Features of the floor device without a mixing unit
In a floor heating system with a mixing unit, there are no problems with the temperature regime of the coolant in the circuit. The liquid heated by the boiler enters the collector group, where it is mixed with the cooled coolant from the return branch of the circuit. Thanks to this, the warm floor always has an acceptable temperature.
Installation of water floor heating equipment without mixing unit assumes the working process of the system with the lack of temperature control of the liquid entering the circuit. Therefore, a separate boiler is required for this type of installation.
When installing a warm floor without a collector, the coolant heated by the heating device cools down quickly in the process of entering the pipeline. Due to this, uneven heating of the surface of the floor covering occurs.
In order to maintain the required temperature in the water circuit as much as possible, the following requirements should be taken into account when installing the system without a mixing module:
- do not use such an installation scheme for rooms whose area exceeds 25 square meters;
- the room must have complete thermal insulation of the walls, including the use of insulation from the inside and outside of them;
- eliminate heat loss from windows - install high-quality double-glazed windows;
- the entire area of \u200b\u200bthe sexual base must be covered with heat-insulating materials;
- floor installation must be carried out immediately near the heating system.
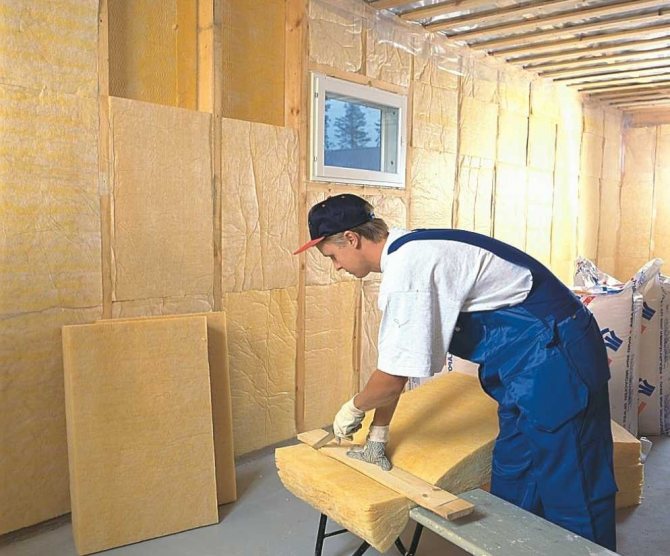
In order to keep warm when installing a warm floor without a mixing unit, thermal insulation of the walls is necessary. When laying a water circuit, the correct calculation of its length is of particular importance. Too large footage of the heating system causes an underestimated temperature of the coolant coming back. This can lead to large amounts of condensate on the boiler heat exchanger. As a result, the heat exchanger will quickly fail.
Substrate preparation for underfloor heating
When your house is just being built, it is not difficult to organize a properly functioning heating system - you are free to pass and connect communication lines in any convenient way possible. But if we are talking about arranging a warm floor in an already living room, where doors are installed, the floor level is displayed, and so on, the task becomes almost impossible. How to be in such a situation? To begin with, let's look at what the underfloor heating “pie” includes, and then think about options for its implementation.
 Underfloor heating layer cake
- The entire floor consists of several layers. It all starts with waterproofing, which will protect the floor from possible leaks. It is especially relevant in multi-storey buildings, because a leak can cause flooding of neighbors, and this is a big expense for repairing someone else's apartment.
- Next comes the insulation - we do not need to heat the concrete slab or the ground from below, all the heat must go up, otherwise the system will become extremely inefficient and expensive. Usually dense extruded polystyrene foam, polystyrene or foamed substrates with heat-reflecting properties are used. Insulation, depending on its type and the base on which it is laid, can occupy from 1 to 10 cm of the height of the room.
- Then the pipes themselves are bred, through which hot water will flow, heating everything around. For this, metal-plastic or cross-linked polypropylene is used.
- Underfloor heating pipes are rolled into a cement-sand screed, the thickness of which should be 8.5 cm.
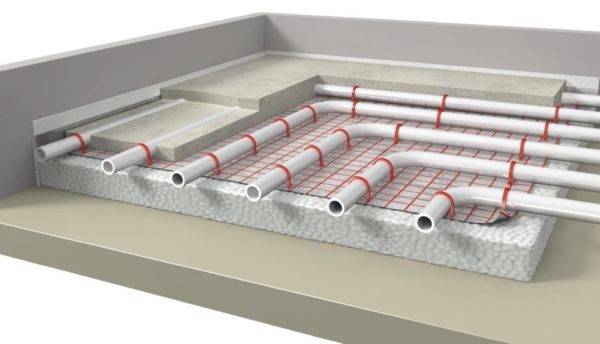 Pipes with coolant are laid on top of the insulation
In total, we get an average height of the cake of 12-15 cm. It is clear that no normal person will raise the floors in the living room so much. How then to be? There are several options for how to reduce the thickness of the cake and fit it into the room within reasonable limits.
Accessible to floor slab
- The very first thing that comes to mind is to knock down the old screed right to the base. This work can be very hard, it will create a lot of noise and dust. You will also need to organize the removal of a large amount of construction waste.
- If the screed is removed in a house where the floors are arranged on the ground, then you can go deep to the desired level. On a concrete floor, this is not possible for obvious reasons.
-
Instead of expanded polystyrene, we can use foil substrates, for example, penofol, as a heater. The thickness of such material will not exceed 1 cm, and its energy efficiency is at a very high level.
- You can reduce the thickness of the screed up to 6 cm.Of course, this is not good, but in some situations there is no other way out.
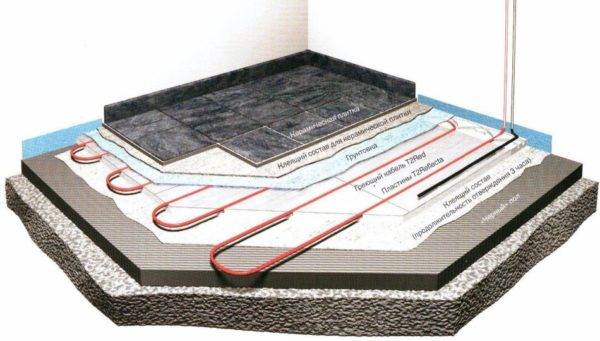
-
You can also use a floor heating system on a special substrate, on top of which tiles can be immediately mounted on a not very thick layer of glue, as shown in the photo below. This material has very good adhesion to concrete, it simultaneously performs the function of a hydro- and heat insulator, however, it is recommended to arrange a good even base under it, for example, to make a thin layer of self-leveling screed.
-
Also, the screed can be replaced by a "dry system" of underfloor heating. The principle of its structure will become clear if we consider the diagram above. The composition has a rigid heat-insulating base, metal plates laid in the groove, which act as a heat distributor. It is not possible to lay ceramic tiles on top of such a floor - it is suitable for linoleum, laminate and other floor coverings.
The last two solutions will cost you much more than the classic "pie", however, they are quite effective in solving the problem of the floor level, which is unacceptably high.
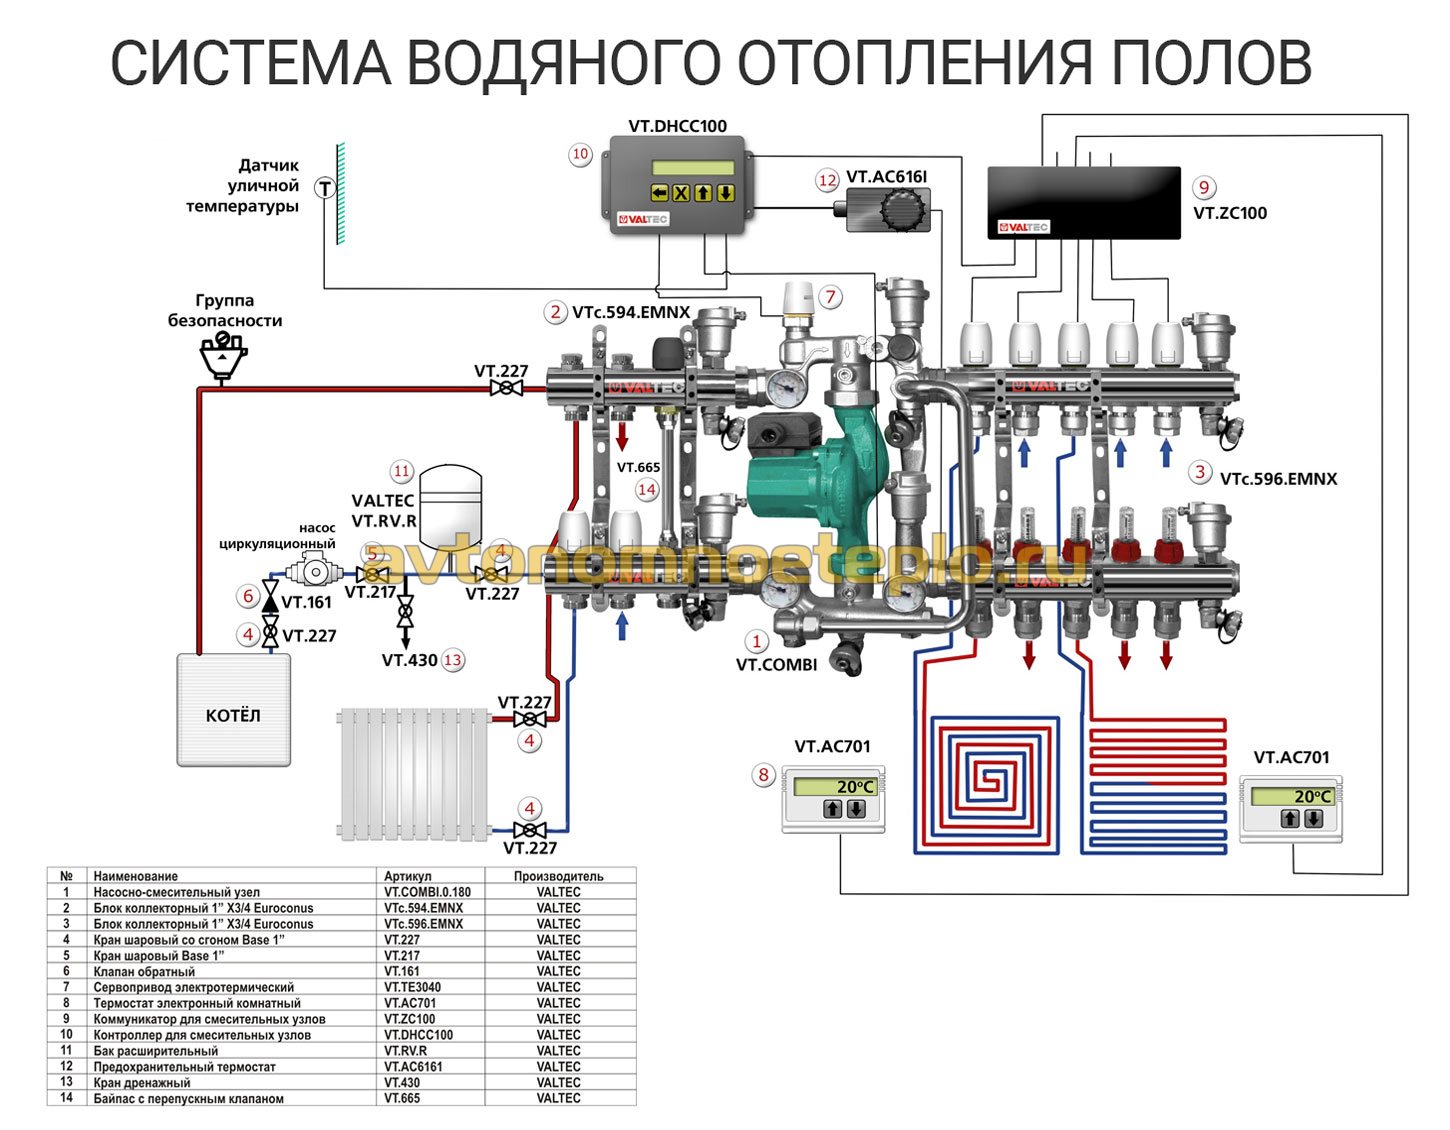
How the system works
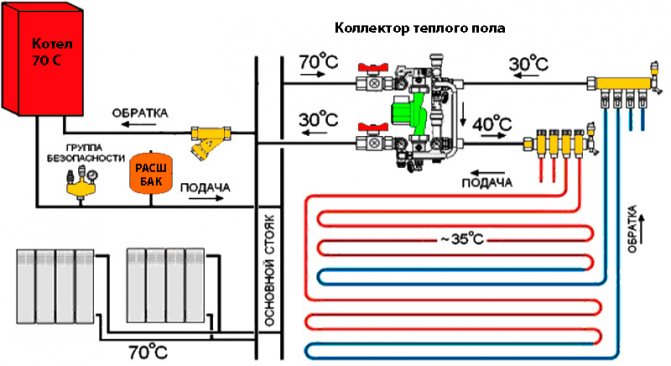
Before considering how and where to install underfloor heating, you need to delve into the principle of the system. Controls the heating of each comb circuit. The boiler heats a certain amount of water, which is fed into the pipes. The movement of the coolant is provided by the pump.
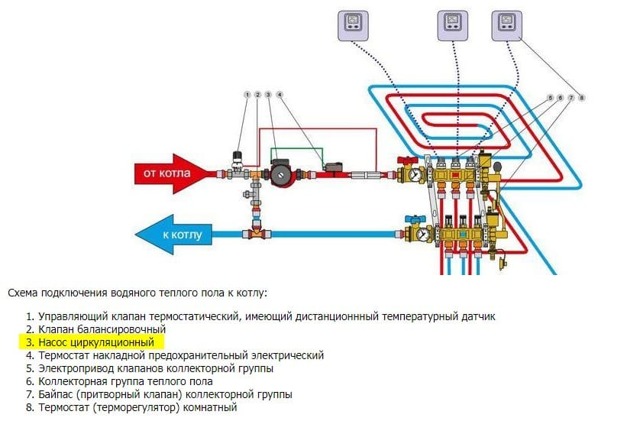


In the circuit, water circulates until its temperature drops below the user-defined level. This indicator fixes the sensor, which is located in the three-way valve. When the time comes, the damper will open. The heated water will enter the circuit again, mixing with the already cooled liquid.
When the temperature inside the system reaches the maximum allowable value set by the user, the three-way valve turns again. The damper will close. No matter what position the damper is in, the pump ensures continuous circulation of water.


