- RJ-45 connection
- Schemes and methods of connection
- Preparatory work
- Step-by-step instruction
- How to connect the telephone socket
- Carrying out preparatory work
- Stripping the ends of the veins
- Connecting the socket wires
- Newsletter subscription
- Installation of a telephone socket of different types
- Proper connection of a surface-mounted RJ11 telephone socket
- Installing a concealed telephone jack
- Connecting a telephone socket
- Old and modern device standards
- Mistakes made when choosing and installing telephone sockets
- How to work according to the scheme
RJ-45 connection
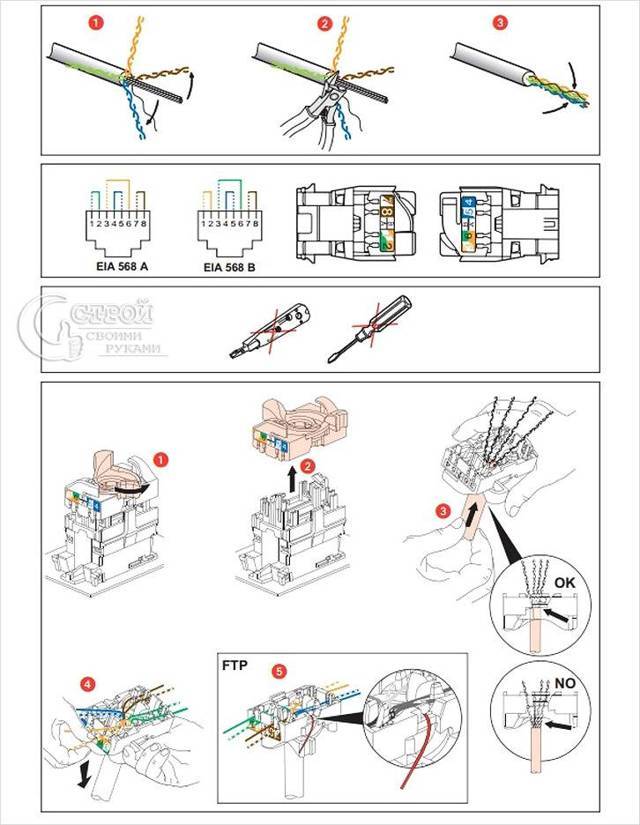
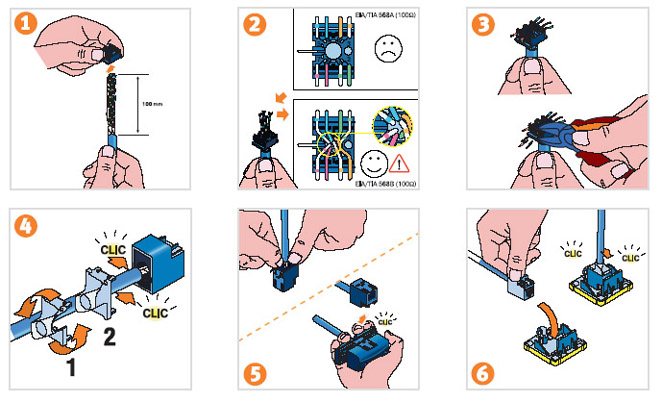
The twisted pair is hidden in the cable channel or under the plinth. The end of the wire (in the case of flush mounting) is led out through the socket or simply left uncovered. 6-7 cm recede from the edge. External insulation must be removed from this area. Pairs of wires untwist and align each strand.
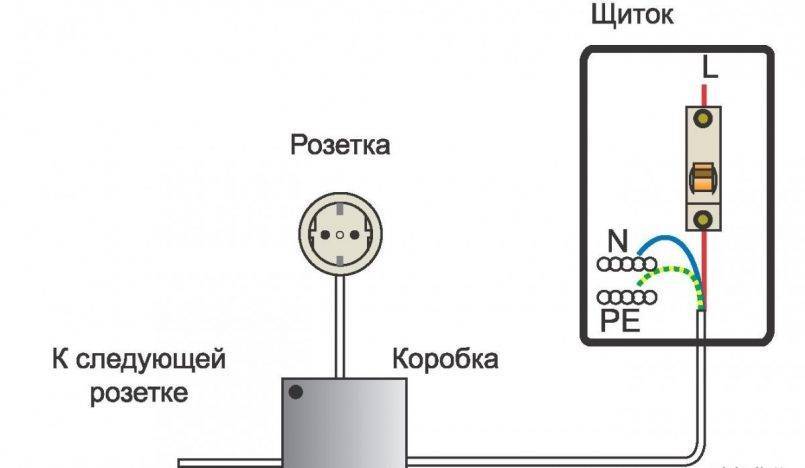
In the event that a router is connected to the connector, it is necessary to place network sockets nearby.
The sequence of how to connect the Internet cable to the outlet looks like this:
- Detach the socket cover. Below it is a connection diagram for two standards: A and B. How to connect the cable depends on which standard the provider uses. You can check this information with him or use the method described above.
- After identifying the circuit, the connection of the twisted pair wires follows. When directing the wires to the appropriate terminals, we carefully monitor that the color of the wires and the contacts of the micropins match. When mounting the Rj 45 socket, the ends of the wires are not stripped, they are pressed into the terminal until they click with the plastic extractor included in the kit. A click indicates that the sheath is notched, which means that the wires have been crimped and are being crimped, the wires should be additionally crimped if the extractor is not included in the kit and the necessary tool is not at hand.
- We fix the twisted pair cable on the case in such a way that the stripped part is 3-5 mm higher than the clamp. After that, we check the operability of connecting the Rj 45 socket. We check using a special tester or by connecting a computer. If the connection does not work, you should first check the pinout.
- We remove excess wires and assemble the outlet.
- If the socket is consignment note, we fix it to the wall with the connector down, since installation in a different way will damage the cable in the future.
If a shielded cable is used, an internet socket connection with the ability to install a shield is required. If this is not done, the screen will stop working, and this will negatively affect the transmission of information.
When implementing a local area network based on twisted pair, soldering and twisting should be avoided. A solid wire is required. Places of such connections extinguish the signal. If it is necessary to increase the cable length, use a connector in which the signal from one cable goes to another on special tracks.
Such a device consists of a board with Rj 45 connectors or terminals, as when installing Internet outlets.
When connected to an outlet with Internet access, twisted pair is also used, but only 4 out of 8 wires are used.
The first pair is needed to receive data packets, the second - to transmit them. In case of damage to the wires, one of the free pairs is used or, using the remaining two pairs of wires, a second computer is connected.
To connect to the network, the hub computer uses only the orange and green lines. The contacts are crimped to terminals of the same colors at both ends.
Watch this video on YouTube
Schemes and methods of connection
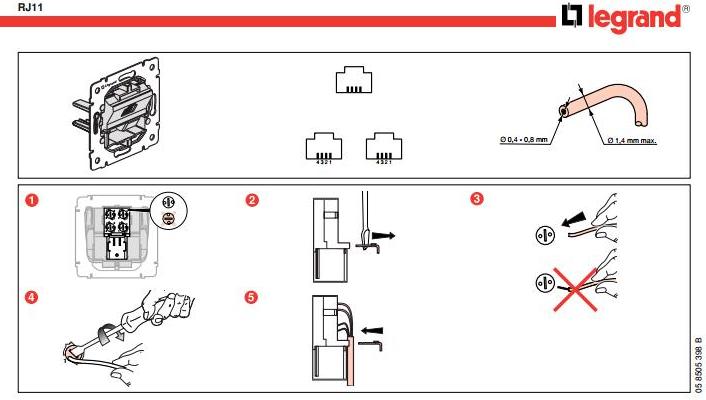
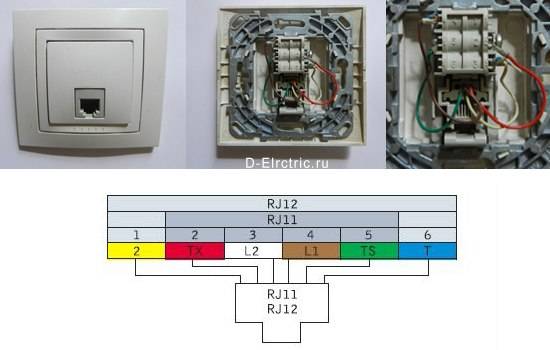
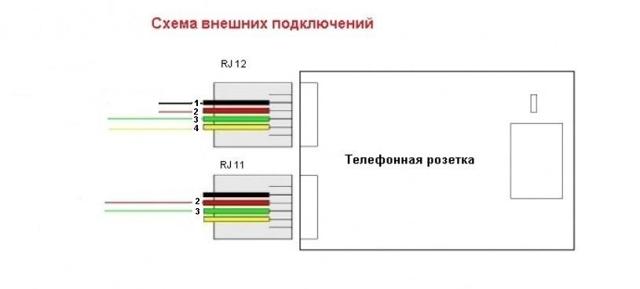
Features of connecting telephone cables vary depending on the type of sockets. For example, installing and connecting the most common of them - RJ-11 and RJ-12 - have several nuances:
- In the design of the socket, there are 2 and 4 contacts, which differ in small sizes. In the center there must be a recess for the cores of the supply cable.
- Phones are connected to two central contacts.
- To deepen the veins, you will need a cross-cutting knife. If it is not there, you should use the usual one.
- Before straightening the cores, it is necessary to strip the wire by about 4 cm.
- During flush mounting, experts advise using a KSPV cable with a copper core. The TRP cable is not suitable in this case - it is better to use it as a distributor.
Preparatory work
Before you install or replace a telephone jack, you need to prepare tools and materials:
- a screwdriver with a handle covered with insulating material;
- socket box;
- cable - useful if you need to install a new outlet, and not just replace the old one;
- perforator;
- socket directly;
- knife;
- several screws;
- wire cutters;
- insulating tape;
- multimeter;
- hand protection gloves;
- Double-sided tape;
- pencil and bright marker.
The set of tools may vary depending on the installation method.
Step-by-step instruction
The action plan for an open-type installation looks something like this:
Protect your hands by wearing rubber gloves
This is important: the voltage in the network sometimes reaches 110 - 120V.
Using a side cutter, peel the wire from the insulating layer by about 4 cm. You need to act carefully, trying not to damage the cores.
Using a multimeter, determine the polarity of the contacts
Although it is believed that it is not necessary to follow the rules of polarity.
Connect the contacts to the conductors.
- Connect cable cores. Fasten with special screws.
- In designs with 4 contacts, 2 central ones should be used when connecting.
- Fix the socket on the wall using adhesive tape. For greater reliability of fastening, it is better to take self-tapping screws.
- Put on the cover.
Connecting a hidden outlet has no fundamental differences. But it has some features:
- Immediately mark the wiring and location of the outlet on the wall.
- Using a puncher, make a hole for the socket. Self-tapping screws are required for fastening.
- The design is fixed in the socket box with spacer screws.
- After the installation is completed, connect the electricity. If everything is done correctly, the socket will work.
 Devices are double and single. Dual phones are usually installed in offices - provided that there is a need to use two phones at the same time. They connect the same way.


How to connect the telephone socket
Connecting the telephone jack should be done with protective rubber gloves. You also need to consider that a small voltage of 60 volts in the telephone socket can rise to 120 volts during a call on the line. Under the influence of such an electrical force, a person can experience severe pain.
Connecting a socket for landline phones includes the following workflow:
- preparation of tools;
- provision of protective equipment;
- removal of the protective film from the cable according to the required length;
- cable connection according to the scheme to the box;
- fixing lived inside the telephone box.
- fastening the connector to the wall;
- installation of a protective cover;
- connecting the plug to a socket.
The instructions that come with each telephone jack contain a valid connection diagram for this model.
Carrying out preparatory work
To facilitate the installation of a connector for a landline phone, it is best to purchase universal devices with a four-pin connecting device.
Also, to install the outlet, you will additionally need:
- voltmeter;
- rubberized gloves;
- screwdriver;
- level;
- adhesive tape with adhesive tape on two sides;
- knife for working with optical crosses;
- needle nose pliers;
- graphite pencil.
If the connector is mounted in a new place, then it is also necessary to have a puncher. A special seventy-millimeter crown is inserted into such a device, with which you can make a corresponding hole in the wall.
 A screwdriver for working with sockets must have a rubberized handle and fit the selected screws in shape
Stripping the ends of the veins
The cable for the phone has a rather delicate coating. Therefore, stripping the cable requires special care.Initially, the ends of the wires are cleaned of four centimeters from the protective insulation.
In order not to disturb the cores that are responsible for the signal quality, it is recommended to use a sharp blade or a special cross-cutting knife. At the slightest damage to the wires when cleaning from the braid, cut off the ends with a defect and strip them again.
Connecting the socket wires
When connecting wires, it is recommended to check the polarity. The basic guideline when connecting standard telephone wiring is:
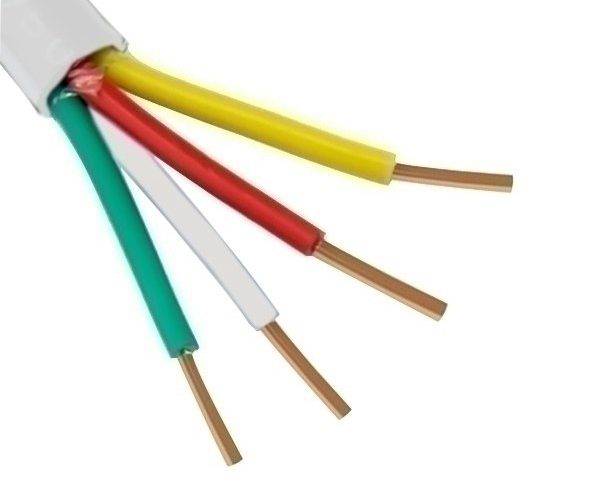
• wire in green insulation means "plus"; • red braid - "minus".
Incorrectly connected poles can cause permanent telephone communication problems. With a voltmeter, you can measure the required voltage. The value of the working line should be in the range from 40 to 60 volts.
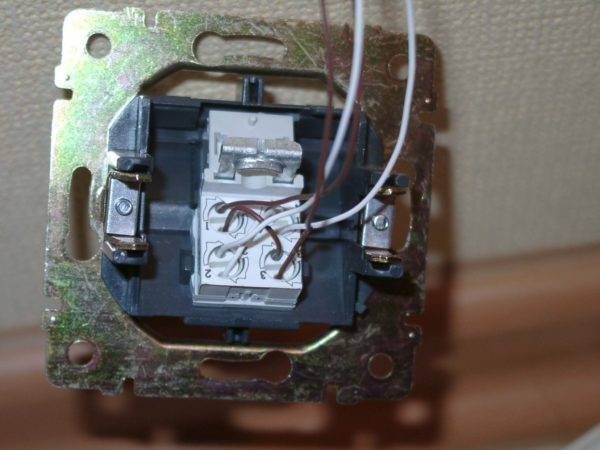
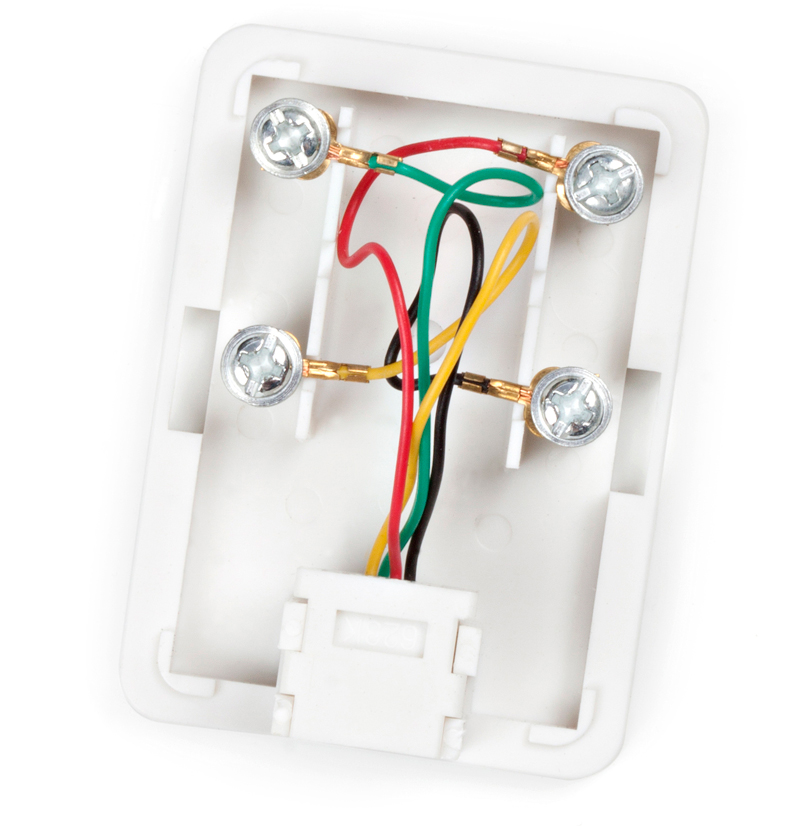
All connected wires must be tightly pressed with the fixing screws. After installation, a protective cover is put on latches or other fasteners. Before closing the outlet, make sure that the wires do not cross each other and that all contacts are recessed into the housing.
Installing a telephone socket is quite simple. The main thing is to have all the necessary tools at hand, know the principle of connecting connectors and have a detailed installation diagram indicated in the instructions for the purchased product.
Repairs in an apartment are rarely complete without replacing items such as electrical, television and telephone sockets. In terms of connection complexity, a telephone socket is a simpler element than an electrical one.
p, blockquote 1,0,0,0,0 –>
p, blockquote 2,0,0,0,0 –>
At the same time, installation work is much safer, since there is no life-threatening voltage in this device.Of course, this does not mean that you should not follow the rules of elementary electrical safety, because in standby mode the voltage between the wires of the telephone line is about 60 V. You should also take into account the fact that disconnecting the telephone line is much more difficult than part of the power wiring. Another unpleasant moment is the appearance of a voltage of 120 V in the circuit at the moment a call arrives at the installed telephone from any subscriber.


p, blockquote 3,0,1,0,0 –>
To understand how to connect a telephone socket, you should carefully consider its internal structure and the procedure for installing this device.
p, blockquote 4,0,0,0,0 –>
Newsletter subscription
Many people think about how to properly connect a telephone socket on their own, and in this article we will tell you how to mount and connect a telephone socket.
Installation of a telephone socket of different types
Currently, several types of sockets are being sold: external and built-in. The first option is easier to install, but recessed sockets have a more attractive appearance. Both types are connected in the same way, the differences are only in the installation method.
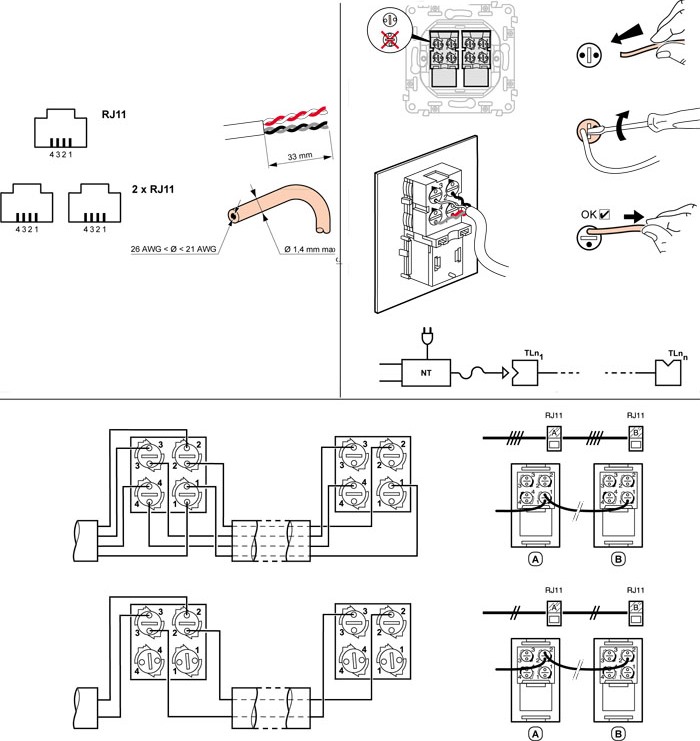
In addition, there are different types of connectors: RJ 11 with two pins, telephone socket RJ 25(12) with 6 pins, and RJ 14 with 4 pins. Most often, an RJ 11 telephone socket is used to connect analog home phones.
In addition, to connect the main wire to several sockets, double telephone sockets are used, the installation of which is somewhat different from single ones.
Correct telephone socket connection open installation RJ11
Installing a telephone jack requires a number of tools and supplies, including:
- telephone socket RJ 11, which will be connected;
- two-core cable with a cross section of 0.3-0.5 mm2, for example, KSPV 2x0.5 or TRP;
- device for removing insulation;
- screwdriver
- multimeter;
- protective gloves.
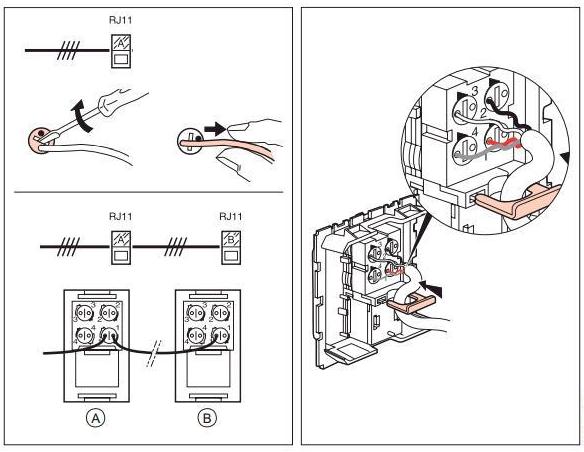
The answer to the question "how to install a surface-mounted telephone socket?" can be divided into several points:
- Wear protective gloves - the voltage of the telephone line at rest is about 60V, and at the time of the call 100-120V.
- Remove the insulation from the cable, being careful not to leave notches on the wire.
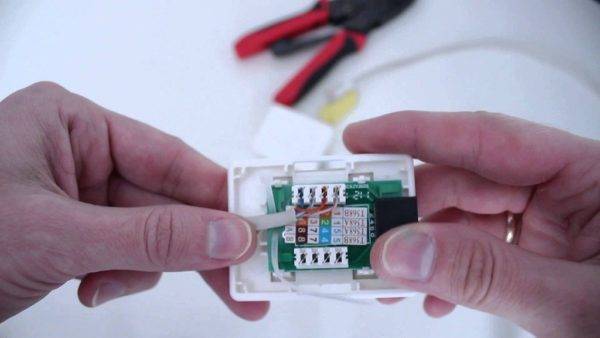
- Open the socket housing. The RJ 11 telephone jack that we connect includes the need to connect a telephone line to the middle pins. The telephone socket circuit may include 4 contacts, in which case they are connected according to the diagram.
- There are also German-made sockets in which you need to connect to 2 and 5 pins, but they are rare. To connect such a device, instead of a green wire, you must use black, and instead of red - yellow.
- Determine the polarity. Red is a "minus" in the telephone line, and green is a plus. As a rule, connecting a telephone jack does not require polarity determination, however, some devices may not work properly if they are connected incorrectly. You can determine the polarity using a tester.
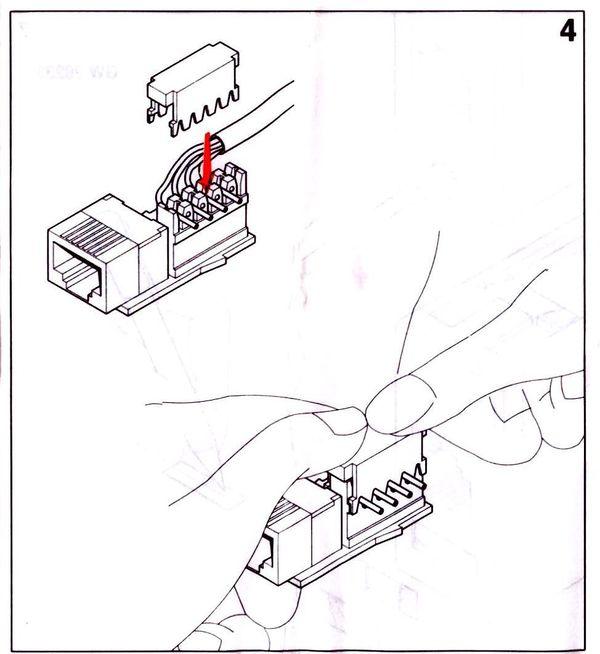
- Bury the cable strands between the metal plugs inside the outlet using a cross-cutting or regular clerical knife. The edges of the grooves are pointed and narrowed. When deepening the core, they cut through the insulation, which ensures good contact.
- Attach the socket to the wall and snap the cover on.
- Connect the phone to the outlet and check if there is a connection.
Method, how to connect phone to such an outlet - you need to purchase an RJ11 plug and, using a special tool, crimp it in accordance with the location of the wires in the outlet. If you have a telephone socket, the wiring diagram of which has 2 contacts, they will be located in the same way as shown in the diagram, and the extreme contacts will remain free.
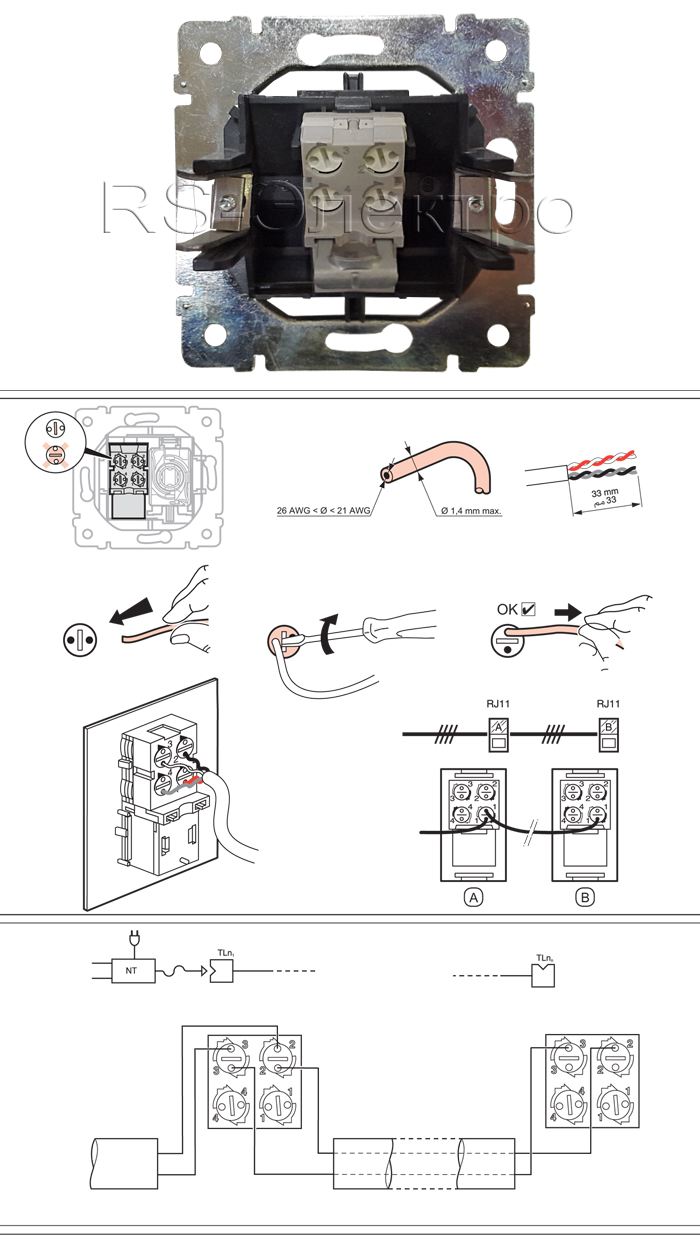
Installing a concealed telephone jack
If you are interested in how to connect RJ 11 hidden, the connection will be the same - the differences are in the installation. First you need to make a hole in the wall, then install the socket and secure it with self-tapping screws.
After that, use the above method of "how to connect a surface-mounted telephone jack", place the jack body in the box and secure with spacer screws, install the outer frame of the jack and connect the crimped cable.
Connecting a telephone socket
We are all used to the fact that the wires in our apartments in their mass are attached to the wall in its lower part. In new houses, all communications are hidden inside the wall, and various cables can also be hidden inside the baseboard. When the wiring is hidden in the wall, a groove is made to lay the cable to the place where the socket is installed. In all cases, a set of the following measures is carried out:
- With the help of a grinder, a channel is cut into which the wire is laid. In order for the wires to stay in the groove, they are reinforced there with plaster.After the gypsum has dried, the groove is plastered and puttied.
- The second option for fixing the cable in the channel is to use plastic brackets that press the wiring against the wall. This method involves an open mount, but it can also be used with a large number of wiring lines inside the channel.
- Mounting under the baseboard is quite simple if you have plastic baseboards with special grooves. Wooden plinths will have to be made to order with milling for wires. Using an old wooden baseboard will force the chisel to gouge the groove.
- The next step is to install and connect the laid cable to the connector. The socket connector is attached to the wall with screws through the holes in the back of the box. After that, the wiring is connected to the terminals and the box cover is closed. This method is suitable when there is an external type connector box.
- If the box is of an internal type, then you will have to make a recess in the wall with a puncher according to the size of the socket box. The box inside the recess is connected to the wiring and fixed with a gypsum mortar. After the gypsum dries, everything around the box is carefully puttied.
Before connecting the wiring, they must be checked with a tester for polarity. If the connection is not made correctly, then the equipment will not work. But this is not a reason for frustration - it will be enough just to swap the wires. All of these actions are not so difficult for a beginner. In this case, the circuit may be needed only in order to know where certain cables will pass.
The site editors advise you to familiarize yourself with the characteristics and principle of operation of the Schottky diode.
Old and modern device standards
As equipment has improved, the methods of connecting telephones to a communication network have undergone a number of changes. In the first models of telephone sets, the connection to the communication line was carried out without the use of sockets at all. To create a closed current loop, the wires were simply twisted together, or connected by any other available means.
In the 80s of the last century, the connections of ATS lines were carried out using two-core copper wires. And to ensure a quick disconnect phone connection, sockets and plugs of the RTSHK-4 standard were used. This abbreviation stands for "four pin plug type telephone socket".
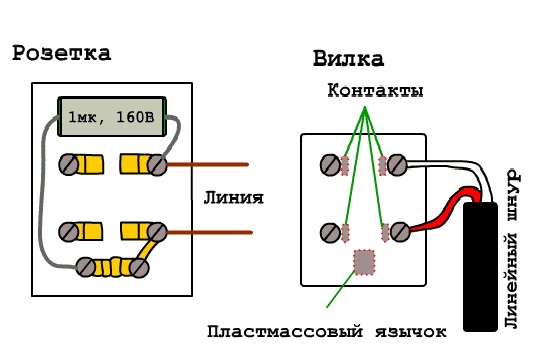
The cases of such devices are equipped with a protective key - a plastic connection that allows you to prevent incorrect installation of the plug into the socket.
The RTSHK-4 design includes a key and two pairs of contacts. The first pair ensures that the phone works in normal mode, the second pair allows you to connect an additional line, provided that both devices are on the same phone number.


In place of obsolete models of the RTSHK-4 standard, as a result of the ubiquitous spread of microprocessor technologies, Registered Jack equipment, marked "RJ", has been actively used. It complies with the international standard IEC 60884-1 and 60669-1.
Modern standardized equipment for low-current circuits allows you to connect up to four pairs of working contacts to the circuit
The connection of modern stationary telephone models for use at the household level is carried out through sockets equipped with one pair of contacts. Cases of such devices are mounted in the cavity of the plastic module and are marked with RJ-11 symbols.Between the two contacts, which are compact metal plugs, the cores of the supply wire are buried.
Models of RJ-11 standard are recommended for connection of devices to telephone lines of linear type.
In the central part of the plastic module, called the manipulator, there are brass contacts through which an electrical network is created between the telephone and the PBX.
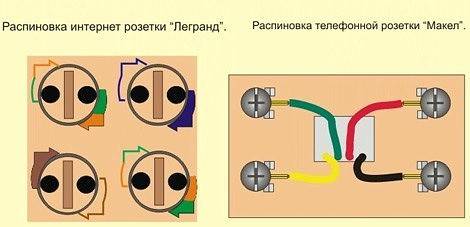
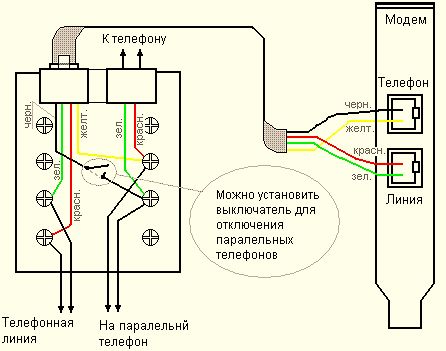
To connect two devices to separate lines and create office mini-PBXs, devices of the RJ-12 and RJ-14 standard are used. Universal four-wire connectors are suitable for most models of telephone equipment.
To connect several devices at once, you just need to assemble the sockets in series into blocks, while observing the scheme: the first line is connected to contacts No. 2 and No. 3, and the second - to No. 1 and No. 4. Devices of this series are more used to create a mini-PBX in the arrangement of office space.
Such modules are mainly used when it is necessary to connect a vintage exclusive old telephone with new telephone wiring.
Models with a combined RTSHK-4 and RJ-11 connector are no less in demand. Installing adapters allows you to connect plugs of both old and new standards with lines equipped with modern technology.
The main difference between RJ-25 standard devices is three pairs of working contacts. For this reason, only a qualified person who is well versed in telephony and electrical issues should connect such equipment.
The RJ-45 connector has four pairs of pins, but only two pins closer to the center are used to create an electrical circuit.
When connecting faxes, modems, computer systems and other complex devices of communication devices, the RJ-45 standard is also used.
When connecting devices of the RJ-45 standard, the main attention is paid to the compliance of plastic keys
Despite the design differences between old and new standards, device plugs have similar connectors and dimensions. The connection of the device to the network is carried out only through two contacts. Only modern models use only medium contacts.
Those who wish to get acquainted with the features of the connection will help the photo gallery:
Image gallery
Photo from
The socket housing is a plastic box mounted on the wall with self-tapping screws or any other flat surface using double-sided tape
The socket is designed to connect a telephone wire with an RJ-12 plug
To connect the telephone cable, the socket mechanism is equipped with screw terminals designed for fastening with a screwdriver.
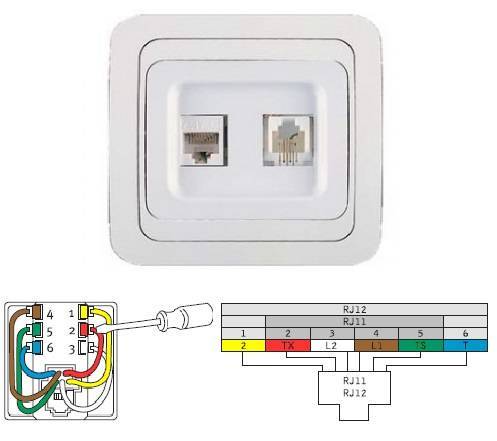
The scheme for connecting a telephone cable to an outlet depends on the number of connectors
Appearance of an overhead telephone socket
Telephone patch cord with RJ-12 connector
Telephone jack interior
Wiring diagram for a socket with two connectors
Mistakes made when choosing and installing telephone sockets
The main cause of all errors is frivolity and inattention. By following these recommendations, you can avoid problems and shortcomings during the installation of switching devices.


Mistake 1. After opening the package, the attached instruction is thrown away in the belief that the wiring diagram is indicated on the product case. The diagram may be missing and then installation difficulties may arise.
Error 2.Carry out installation without dielectric gloves. As already mentioned, the voltage in the network can rise to 120 volts. Given that there is no “safe voltage”, this threatens with unpleasant consequences. Work must be carried out in compliance with safety regulations.
Mistake 3. When purchasing a product, you may want to save money and buy a device from an unknown company at a lower price. This is a false economy: the product may be of poor quality and at the same time not have a guarantee, as a result of which it will not be possible to exchange it or return the money. Well-known brands provide warranties for their products, which is a guarantee of quality and reliability.
Mistake 4. During the installation, the conductors closed with each other and the telephone line was disconnected. No need to panic and call the repair team from the telephone company. The line is disconnected automatically through the central office. Such a shutdown occurs for several minutes, after which the network is restored.
Mistake 5. Using a used wire taken from an old building or in an abandoned room. This wire may have broken insulation or a damaged core. This will certainly affect the quality of the connection. It is better to purchase a new cable that meets modern standards, which will ensure a flawless connection.
In conclusion, I would like to note that, despite the general distribution of mobile phones, stationary devices continue to be widely used due to independence from territorial “coverage” and various roamings. In addition, wired communication provides a better connection, and sometimes remains the only available means of communication.
This is interesting: Parapet on the roof
How to work according to the scheme
So, most professionals work while connecting the phone according to the scheme. If you are using an old standard device, and not a European one, then it is better to buy a universal outlet. It has a modern connector and a four-pin connector. The fifth is a plastic tongue. Connecting an old type socket is similar to the option described above with an RJ11 or RJ12 connection. Two wiring wires are connected to the contacts located near the plastic tab.
It's important to know! Before connecting the socket, make sure that in the plug suitable for the device, the wires are inserted in a mirror image on the same contacts as in the socket
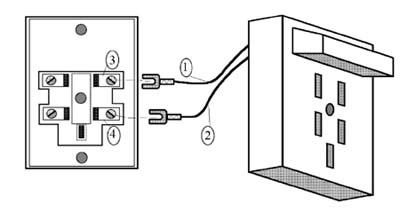
In addition to the listed RJ11 and RJ12 standards, there is also the RJ25 standard. It has six contacts. Such sockets are not installed at home, but there are situations when, out of ignorance, they are nevertheless acquired. If this happens, then the telephone will need to be connected to the third and fourth contacts, as shown in the picture:
The red and green wires are connected to these pins, so they will be easy to find. Standard cables are connected to sockets of any subtype.
As we can see, there is nothing complicated in connecting a telephone socket on your own. Good luck!
-
Wall-mounted electric radiators
-
How to choose heating meters
-
Connecting a three-phase socket
-
Mercury counter connection 201


