- Connecting an outlet to a two-wire network.
- Reliable way to connect wires
- Why do you need grounding in the apartment?
- Step-by-step instructions for connecting and installing an outlet
- Connecting three or four outlets in the block
- Connecting the block socket-switch. Option 1
- How to connect the block switch-socket. Option 2
- How to check sockets
- Preparatory work
- How to check the presence of earth in the socket
- Self check
- On the issue of security
- Installation instructions from an existing
- Varieties
- Wire selection
- Serial and parallel connection
- Sequential rules
- How to hide wires in a niche, drawer or shelf
- Connecting an outlet to a three-wire network.
- The main types of sockets for the home
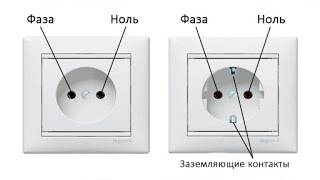
- What does a socket without grounding and with grounding look like.
- Types of sockets with grounding and preparatory work
- What is a protective conductor for?
- Built-in socket with earth
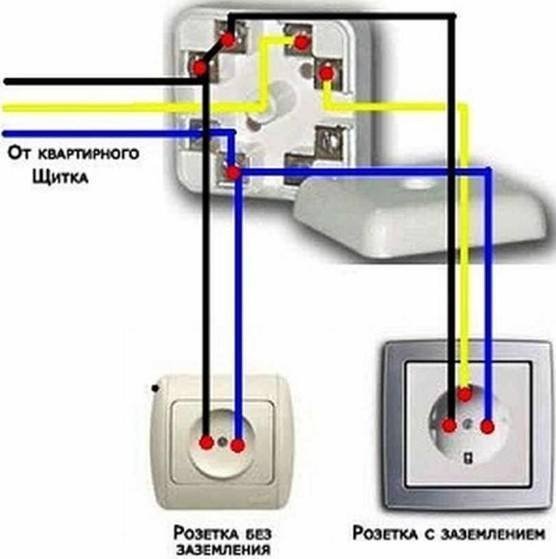
Connecting an outlet to a two-wire network.
Consider the option when you have a two-wire electrical network (without grounding) and a single socket is installed, which you want to replace with a double one.
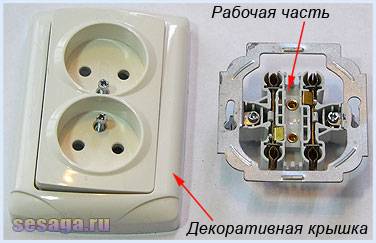
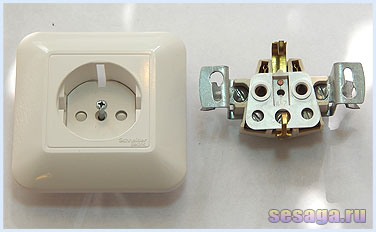
Every socket is made up of decorative cover and working partwhich are screwed together. Before installing the outlet, both these parts are separated from each other.If this is not done, then the installation and connection of the working part will not work.

The decorative cover is made of plastic and, depending on the design of the socket, is attached to the working part with one or two screws. The screws are unscrewed with a screwdriver and both parts are freely separated from each other.

Now you need to dismantle the old outlet, but before dismantling it must be de-energized. If it is not possible to turn off the voltage from this outlet, then we de-energize the entire room, apartment or house. And only after checking the absence of voltage on the contacts of the socket, we proceed to dismantle it..
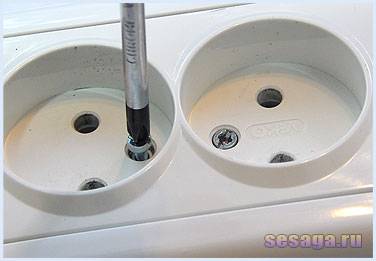
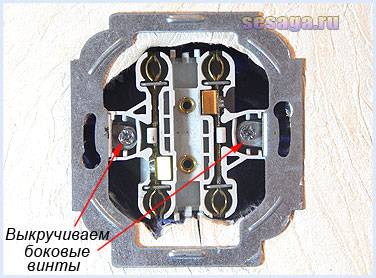
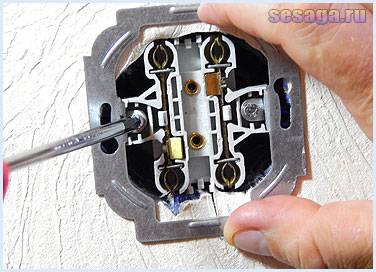
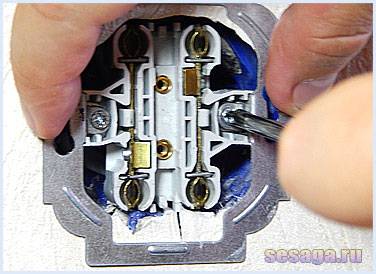
First of all, we unscrew the screws securing the decorative cover. After removing the cover, the working part of the socket remains in the wall, and in order to pull it out, it is necessary to loosen the fastener with which the socket is rigidly held in the socket. To do this, unscrew two side screwslocated on the left and right side of the working part.
The side screws are part of the fastening and serve to fix the socket in the socket. When twisted, they press on spreader legs, which move apart to the sides and abut against the side walls of the socket, rigidly holding the socket. And to relieve the pressure on the spacer legs, these screws are unscrewed.


The side screws are unscrewed alternately. First, one screw is unscrewed a few turns, then the second. In this case, the working part adheres to the fingers. When the mount is loosened, the working part can be freely pulled out of the socket.
Now it remains only to disconnect the wires from the terminal clamps of the old outlet and proceed to connect the new one.
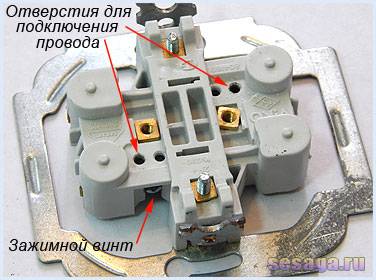
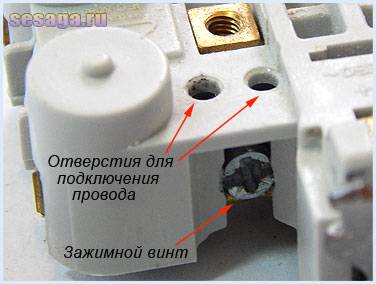
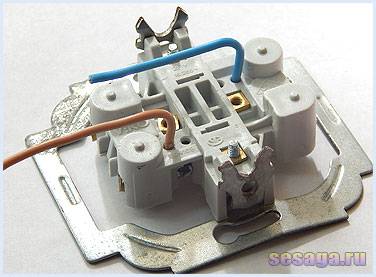
Depending on the design of the socket, the terminal clamps can be located on the side, in front or behind the base of the working part.In my case, the holes for entering the wire strands are located at the back of the base, and the screw that clamps them is located on the side.
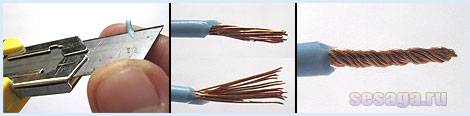
Advice. Before installing the socket, cut the ends of the wire again. Bite off the ends that went into the terminal connections, and then peel them again from the insulation by about 1 cm. In this way, we get ends free of all oxides and, of course, a clean and reliable contact connection. If the wire is stranded, then twist the veins with pliers into a tight twist.
Now all work on connecting a new outlet is carried out in the reverse order: power wires are connected, the working part is fixed in the socket, and at the end a decorative cover is installed. However, there are a few nuances that you may not be aware of.
1. The location of the phase and neutral wires in the socket.
It does not matter which terminal (right or left) to apply phase or zero. It is desirable that the location of the phase and neutral conductors in all sockets of the house coincide. The same location is convenient for maintaining the home electrical network and troubleshooting.
2. Installing the working part of the outlet.
When the working part is recessed in the socket, then at first it is aligned horizontally. Then it is pressed tightly against the wall and the side screws are tightened until the spacer legs firmly rest against the side walls of the socket and fix the working part.
The side screws are tightened alternately: first, for example, the left screw is screwed in a few turns, and then the right screw. In the process of tightening the side screws, the working part is held on the sides so that it is not squeezed out of the socket.
3. Wire length.


If the socket is installed at a new point, then before connecting, check the length of the wire, which should be no more than 15 - 20 cm. If the wire is left longer, then there is a possibility that the socket will not fit in the socket.
4. The location of the wire in the socket.
When installing the socket in the socket, the wire is laid first (it is folded into a ring or arranged with an accordion), and then the working part is inserted, which presses the wire to the bottom of the socket
Pay special attention to ensure that the wire does not get caught in the area of the spreader tabs. If this is allowed, then the paws will either pass the wire or break the insulation
In both cases, we get a short circuit and a broken outlet or line.
Reliable way to connect wires
- remove the voltage from the switchboard from which the connection is supposed to be made;
- open the box and determine the "phase", "zero" and "protection" according to the color coding or the voltage indicator;
- connect the protective wire to the contact group of the socket;
- connect "phase" and "zero" to the power contact group.
At the final stage, the socket wires are connected to the cables inside the switchboard and all connections are isolated.
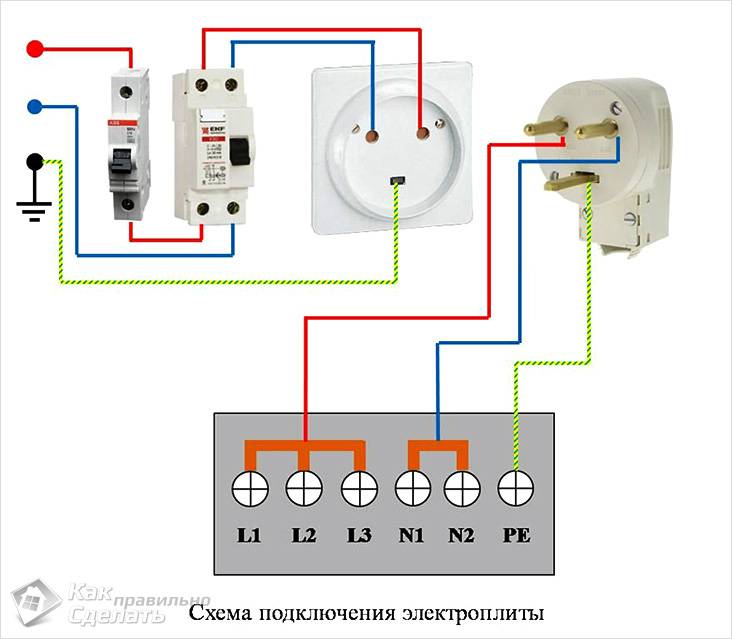
Independent connection of powerful electrical installations requires strict adherence to the sequence of all connections.
Why do you need grounding in the apartment?
Grounding is a forced connection of electrical installations and equipment with a grounding device. In fact, grounding is designed to protect a person (and animals) from the dangerous effects of current when the insulation is broken and voltage is applied to the case.
Suppose a washing machine is connected to an outlet that does not have grounding.If the cable is damaged, it is highly likely that the body of the machine will be energized. If a person touches the body, then he will be shocked. The passage of current for an extended period of time can cause serious injury or even death.
But if the socket is grounded and the grounding itself is implemented correctly, when touching the body of the washing machine under voltage, a person will receive a minimum value shock (about 0.0008 A), which he most likely will not feel. The current will go through the grounding wiring to the "ground". Therefore, grounding sockets should be in every home.
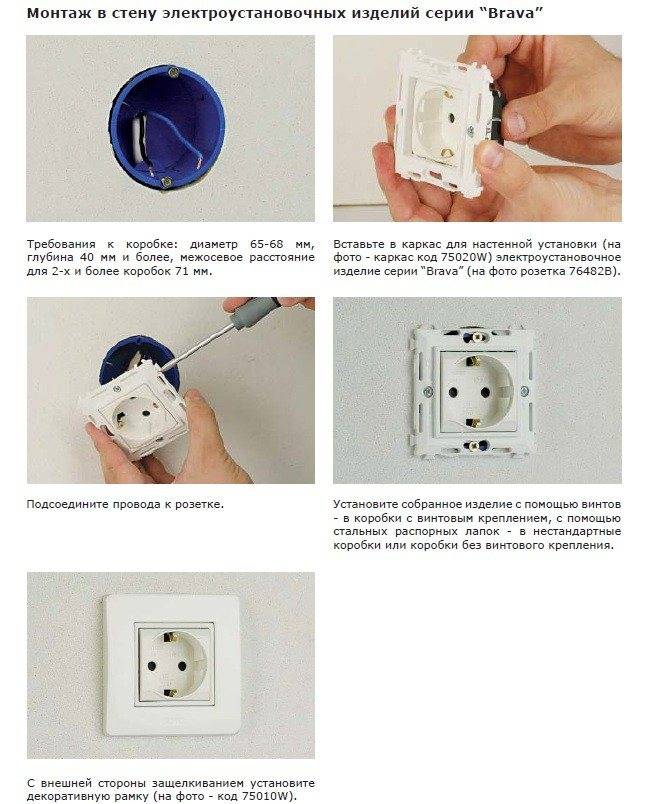
Step-by-step instructions for connecting and installing an outlet
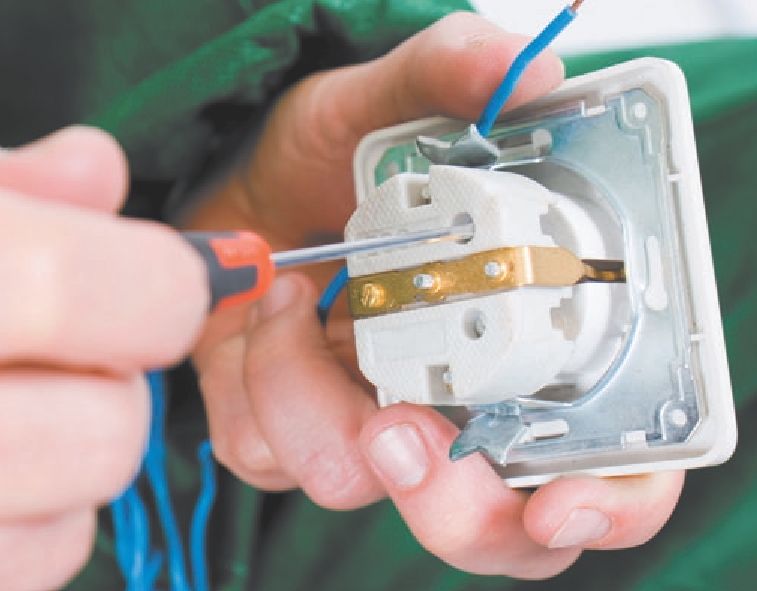
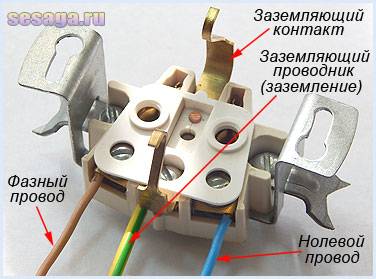
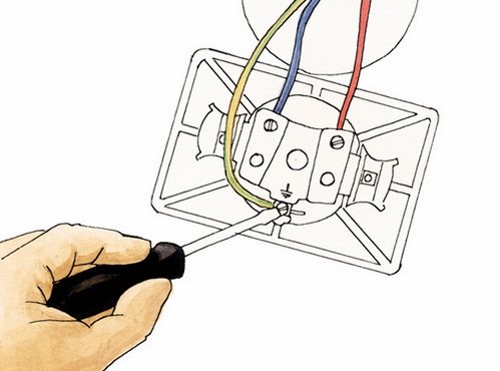
We take a screwdriver in our hands and unscrew the bolt between the two sockets, separate the cover from the core. We see that in the ceramic base, near each contact there are clamps for leading wires to them.
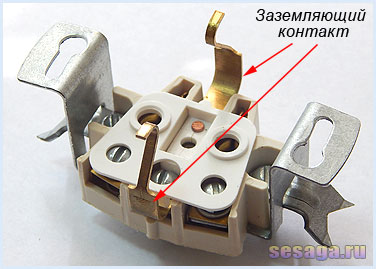
When the socket is grounded, then there is a U-shaped bracket on the sides, located with the “legs” up, attached to the core with a rivet. It also has a bolted contact.
We take a knife in our hands and strip the ends of the wire from insulation by 10-15 mm. We get into the clamps, crimp the contacts
It is important to do this well so that the wires do not hang out. Otherwise, the socket will then spark, heat up, and its body will melt and burn .. So that the socket does not subsequently hang out, one day does not fall out, you need to tighten everything well enough.
So that the socket does not subsequently hang out, one day does not fall out, you need to tighten everything well enough.
We put a frame covering the screws, all connections (it usually snaps into place)
Screw the lid on carefully. We do not apply much force, otherwise it may crack, as it is very fragile.After you have installed a grounded socket with your own hands, you need to check the integrity of the insulation resistance, then turn on the voltage, measure it.
After you have installed a grounded socket with your own hands, you need to check the integrity of the insulation resistance, then turn on the voltage, measure it.
It is also important to familiarize yourself with the PUE (a kind of handbook for an electrician) before installing the sockets directly, which popularly explain in which room, at what height, how much electrical equipment and devices can be installed without the risk of overload and injury. Prudence, concern for personal safety is the key to a long life. You must always remember this!
You must always remember this!
Prudence, concern for personal safety is the key to a long life. You must always remember this!
Connecting three or four outlets in the block
To install several electrical appliances (household appliances, a computer and a telephone), a block of sockets located under one distributor is used.
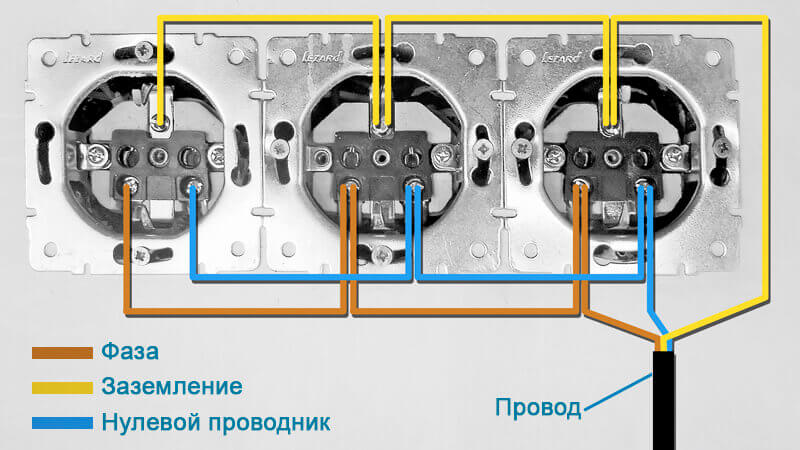
Installation of several sockets in one block is carried out in parallel.
Before connecting the device, jumper the three wires at each outlet location. The size of the jumper should be such that it can easily, but surely fit into the box.
A block of three sockets is installed as follows:
- Analysis of the components of sockets.
- Stripping power cables and jumpers. The wire from the distribution point should be slightly oversized, so that in case of reconnection it will be enough for a new stripping.
- The first outlet, which is also a distribution outlet, is connected to the mains.
- Installing an electrical outlet in a junction box.
- Connecting a second outlet while paralleling the wires according to the colors.
- Connecting a third outlet: only three cables are connected to it, like a conventional single model.
- You cover the block under the cover with special cuts for each of them.
On the video you can see the process of connecting the block from the socket and the switch.
This completes the installation, good luck in business!
In fact, this is an ordinary switch, only combined in one housing with a socket.
There are blocks with one, two and three
keys. In principle, they have the same circuit, the only difference will be the number of pairs of switch contacts.


As an example, consider a block with a two-gang switch and a socket.
One button turns on the lighting in the bathroom, and the other - the lighting in the hallway. Basically, the socket is used to temporarily connect various electrical appliances, such as a vacuum cleaner. when cleaning the apartment or extension cord when carrying out any repairs.
I have a separate outlet in the bathroom, so the electric shaver, hair dryer, washing machine are connected to it, and accordingly, they do not load the outlet in the corridor.
Let's take a look inside the block. To do this, unscrew the screw securing the protective curtain from children and remove it.
The protective cover has been removed from the outlet.
Then, one by one, remove the switch keys.
Now you need to unscrew the two screws securing the top cover and remove it.
The photo shows that this block consists of a socket and a conventional two-gang switch located in one housing.
And now let's move on to the wiring diagram.There are two options. We will consider each option separately.
Connecting the block socket-switch. Option 1
In the first option, consider the scheme that is most often found when connecting such blocks.
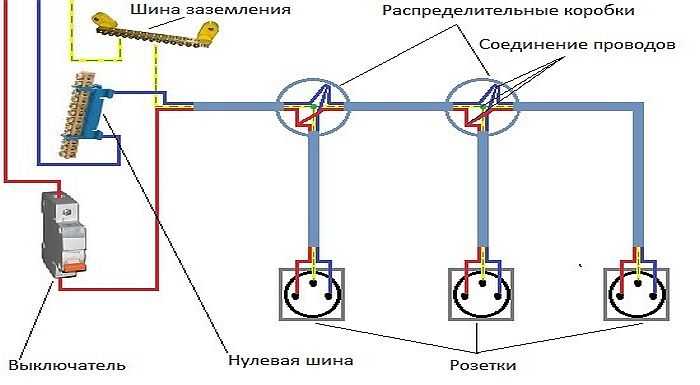
An automatic machine for 16 (A) is installed in the apartment shield. A copper 3-core power cable is laid from it to the junction box, for example, VVGng (3x2.5).
This is due to the fact that the rated current of the outlet is 16 (A). This means that the cross section of the cores of the supply cable must be at least 2.5 sq. mm /
If this is neglected, then in case of overload in the outlet line or lighting line, the cable will start to heat up, which can lead to a fire.
A 5-core copper cable, for example, VVGng (5x2.5), is laid from the junction box to the unit.
The phase (red wire in the diagram) is connected to one outlet of the outlet. From the same output there is a jumper to the common contact (terminal) of the two-gang switch. Zero (blue wire in the diagram) is connected to another output of the outlet. The protective conductor PE (green wire in the diagram) is connected to the screw of the grounding contact of the socket.
Wires are connected to the rest of the switch terminals (they are not visible in the photo), which go to 2 lighting groups: a bathroom and a corridor.
How to connect the block switch-socket. Option 2
As I mentioned above, the first version of the scheme is not entirely correct. But that doesn't mean it can't be used.
The fact is that according to modern requirements, power circuits and lighting circuits are recommended
separate (PUE7 p.6.2.4). And in the first version, we got them combined.
How to check sockets
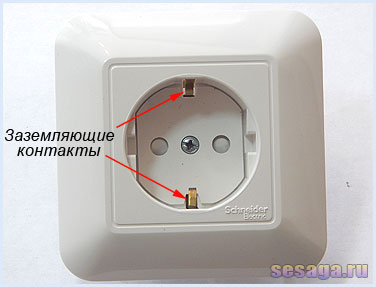
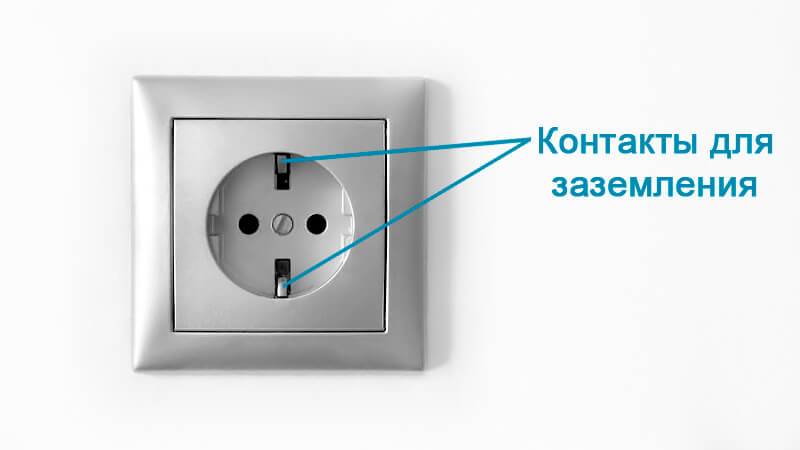
Check for ground contacts. They are usually mounted on the side, perpendicular to the plug holes.It is advisable to replace obsolete outlets with new ones - it is not so expensive.
Even if you see an outlet with grounding contacts, this does not mean that it is safe. It could have been installed by some electrician-hack, if he did not have another. This is a fairly common case.
To make sure the opposite, you have to disassemble and see what's inside. Turn off the power in the shield, and unscrew the screw in the middle of the connector. Next, remove the case with the frame and see how the contacts are connected.
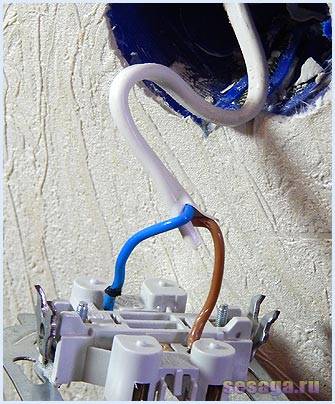
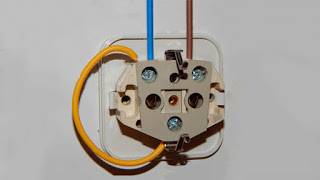
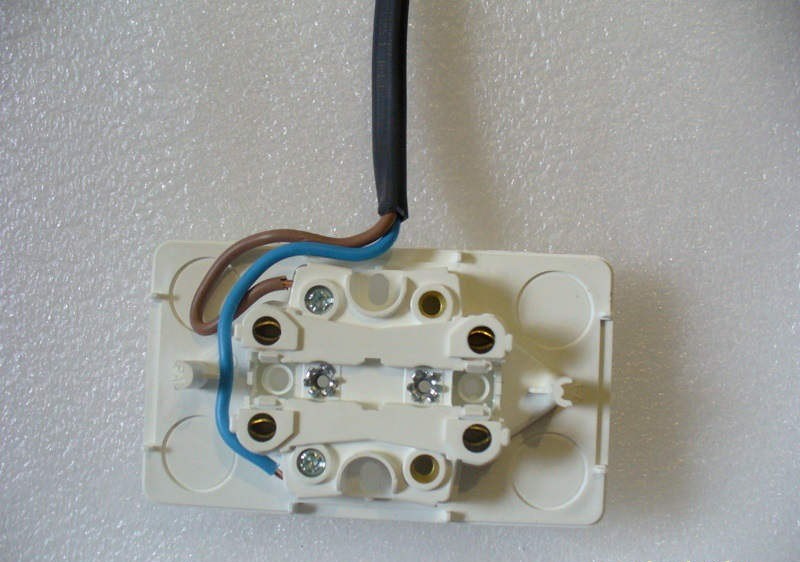
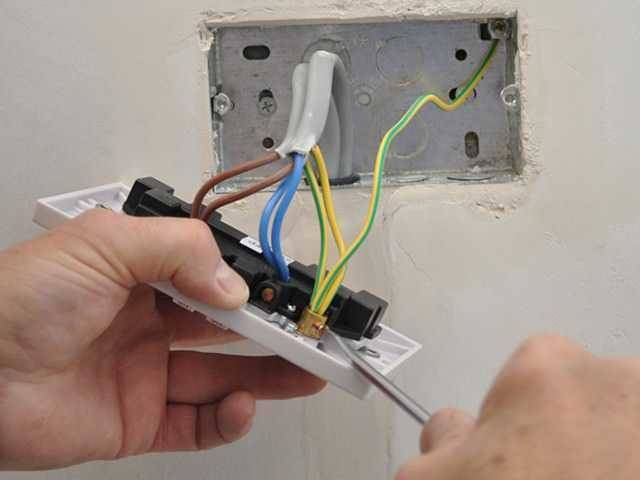
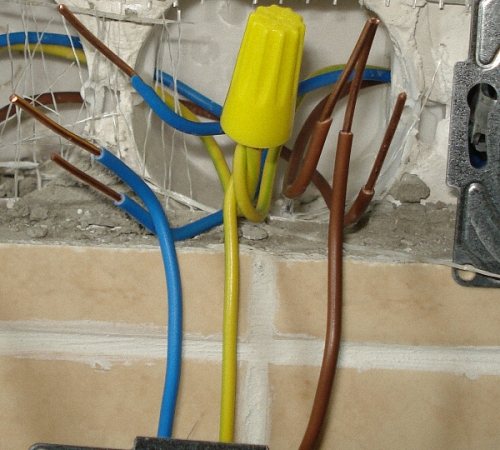
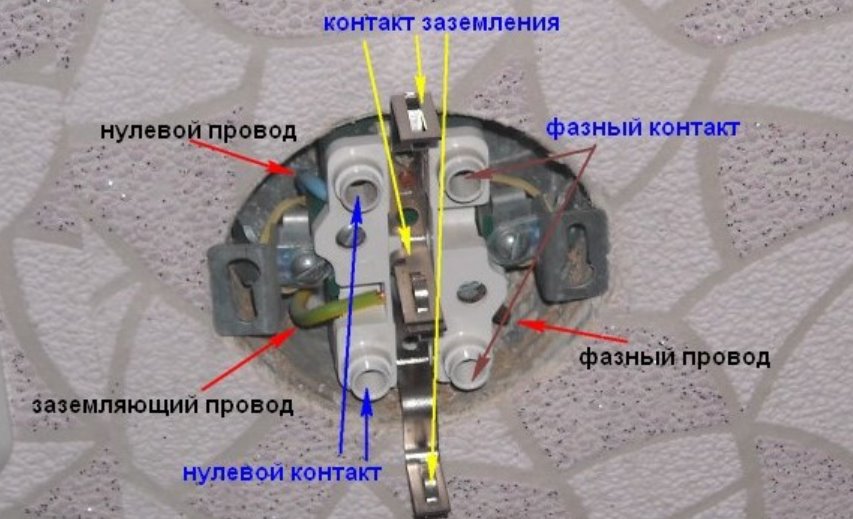
The socket is connected with three wires: phase - brown or black, neutral - blue, and "ground" yellow-green, leading to the side contacts.
If your wiring diagram differs from the above, then something is wrong. The lack of grounding in the wiring suggests that it will have to be redone. It is necessary to replace the two-core cable with a three-core one.
Sometimes the side contacts are connected to the neutral by a jumper - the so-called "zeroing", which is also wrong. This fact already speaks of the incompetence of the electrician who installed the outlet. If he ran all the wiring, it's probably not the only safety violation. It is worth inspecting the entire home network.
If ignored, a leak will cause the damaged area to spark and short out. As a result, a fire will occur, insulation, plastic will begin to melt, and the fire will spread to flammable materials. Again, this does not depend on whether the electrical appliance is working, and a fire can start even if you are not present.
Zeroing is allowed only in a common switchboard or substation. After the access shield, zeroing is dangerous.If the PEN conductor “falls off”, a phase will fall on it, and the electrical equipment case will be energized. This is dangerous, both electric shock and fire.
Remove the jumper and try not to use this outlet until you redo the wiring. Even if all three contacts are connected correctly, it is not a fact that everything is working properly. Therefore, additional verification is needed.
Preparatory work
Planning is an important matter before the direct installation of electrical wiring and the installation of sockets. It is necessary to take this seriously so that in the future there will not be a number of difficulties in the operation of electrical appliances, when something will be missing in one place, and in another place it will experience an increased load.

At the stage of planning and preparatory work, you need to:
- Decide on the location of sockets and connected devices;
- Draw a wiring diagram;
- Separately, for each room, calculate the required number of wires, sockets, switches involved in the installation process;
- Prepare the necessary tools, self-tapping screws, screws, screws, dowels;
- Hollow out a niche under the socket, strobes for cable laying.


In the process, you will need the following equipment:
- Perforator with a diamond crown for preparing a niche for a socket box;
- Screwdrivers with different tip configurations (flat and Phillips);
- Pliers with wire cutters;
- Wire with a cross section of 2.5 mm;
- Sharp knife for stripping wires;
- Socket box;
- Plaster mixture, gypsum or cement mortar;
- Socket of the desired model and configuration.

Ways to install sockets are available for viewing on numerous photos and drawings. They are simple, will not cause any difficulties even for a novice electrician:
- Installation directly into the wall in a pre-installed socket box;
- An overlay on a protected surface without gouging a niche (dielectric fire-resistant plates are used to fix the socket core on them).

A recess is preliminarily made under the socket box, in which it is placed with wires wound up on a cement or gypsum mortar.

We use a perforator with the necessary nozzles, we protect the respiratory organs from dust.
After the mortar has dried and the glass of the socket will hold securely, we proceed to the direct connection and installation of the socket.
How to check the presence of earth in the socket
We figured out how to connect an outlet with grounding, but it is also desirable to understand whether grounding works or not. To make everything official, you need to invite electricians. They will use an ohmmeter to measure grounding parameters. In general, this procedure is mandatory before putting the wiring into operation - today, without grounding, no one will connect electricity to you. Moreover, grounding must meet the requirements, but no one checks it on sockets. You just need to invite electricians.


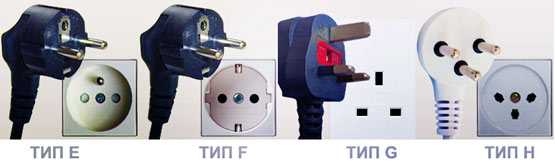
In different countries, sockets and grounding contacts have different shapes. Type F operates in our country
Self check
You can check the quality of the grounding in the outlet yourself. But keep in mind: all such methods are prohibited by regulatory documents. There are simply no “normal” and safe ones. There are risky ones in which you can get an electric shock.They usually check with the help of a control - this is a cartridge with a 220 V incandescent lamp of low power (25-30 W). Two wires with a cross section of 2.5 mm² are screwed / soldered to the terminals of the cartridge. For convenience, crocodiles can be soldered to the ends of the wires. And it is better if they have an insulated case - it will be easier to comply with safety precautions.
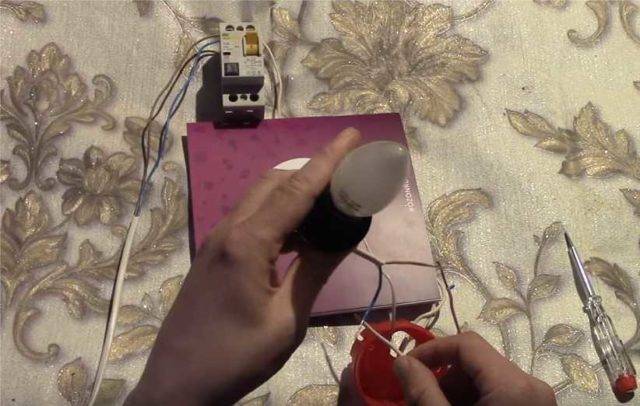
Light bulb checks prohibited
First, we determine the phase on the outlet. Even if you just connected it, double-check. This can be done using an indicator screwdriver: if the LED lights up when touched with a screwdriver probe, this is a phase. Next, we connect one of the control wires to the found phase. We touch zero with the second wire - the light should light up. When you touch the ground wire, the RCD should work, since by your test you created a leakage current. If this happened, the grounding and RCD are working fine for you.
If the wiring is old and there is no RCD, the lamp will simply burn. By the brightness of its glow, you can determine the normal or not parameters at the ground. In theory, the brightness of burning when connected through zero and ground should not differ. This is if the "ground" is working normally. If the brightness drops noticeably with the "ground", the grounding parameters are bad and it is necessary to redo it, check the contacts, pins, etc.
On the issue of security
Once again, we pay attention: to check the operability of grounding in sockets, it is better to invite an electrician. He will take measurements and give an opinion based on the results.
But if you still decide to try one of the self-test methods, you need to prepare well, observe all possible precautions:
Do not touch bare wires and metal parts with your hands
- Place a rubber mat under your feet.
- Handle only insulated parts.
- Do not check alone. So that "in which case" there was someone to respond.
But as we have said repeatedly above, it is better to call an electrician. Let you be able to connect a socket with grounding yourself, but it is better to entrust the quality of work to a professional.
Installation instructions from an existing
First, determine which will be enough
Secondly, pay special attention to the choice of wire to prevent overheating of the contacts.
Varieties
GOST, for operation in domestic premises, several types are recommended for operation
- Without grounding. Type C 1a. Ensures the operation of simple devices, in operating mode withstands up to 250 W, 10A DC and AC up to 16A.
- With two contacts on the sides for grounding. Type C 2a. It is intended for connection of heating columns, washing machines, electric ovens, pumps and other household appliances. The power parameters are similar to the previous ones.
- Equipped with pin-format earthing (how to install a socket with earthing?). Type C 3a. It is intended for connection of powerful consumers of energy. Characteristics are the same as those of C2a.
- Type C5. The old type, withstanding up to 6A.
- Euro sockets with a protruding body, widely spaced holes for the plug. They are type C6, suitable for devices with the same plugs.
Each device consists of
- pads;
- protective case;
- contacts.
Advice
Depending on the method of fastening to the wall, there are external and internal fixation. Often a power point is installed in the form of a twin or a block consisting of several cells.
Wire selection
If the standards are not followed, the contacts will overheat.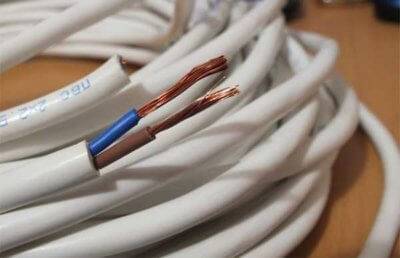
- For grounded, a three-core cable is suitable.
- Without grounding - two-wire, in which the yellow wire is intended for grounding:
- blue - for the neutral wire;
- red and brown - for the phase.
- Ungrounded wiring consists of two cores - zero and phase.
- Three-core (grounding, zero and phase) increases the safety of cable operation, helps to avoid electric shock.
for wiring inside the room, it is advisable to use a wire with a copper core
Important
Copper does not overheat, withstands significant loads compared to aluminum.
Serial and parallel connection
- Professionals advise connecting additional outlets in parallel when the cable is pulled from the junction box to a new point. This method is the safest.
- Most often, a serial connection is chosen, in which the next is taken from one point, that is, the cable is connected from an existing socket to an additional one. This method is also called a loop method, it is chosen if it is inappropriate to use the first one.
Sequential rules
The main condition for serial connection is the ability to use electrical appliances with low power
How to hide wires in a niche, drawer or shelf
At the development stage of the project, special niches and sections can be provided where power supplies will be attached to the required number of outlets. You can also leave a place where you can “pull in” neatly folded wires so that they do not hang around the wall and floor. Indeed, at the measurement stage, it is already clear both the location of the table (or TV cabinets) and the position of the sockets.
An interesting solution is to allocate a drawer or drawer (a shelf for a keyboard in the standard sense) to organize the connection system.
In this case, the retractable mechanism should be supplemented with some kind of folding cable channel for wires, which will not sag and "interfere" with the movement of the box or shelf.
If the TV is hanging on the wall, then the dangling wires to the cabinet can be covered with false panels and shelves. From their inner side, the depth is “selected” in order to mount a compact cable channel. It is recommended to separate low-voltage and power wires (when it comes to connecting audio and video equipment) and hide them in different cable channels.


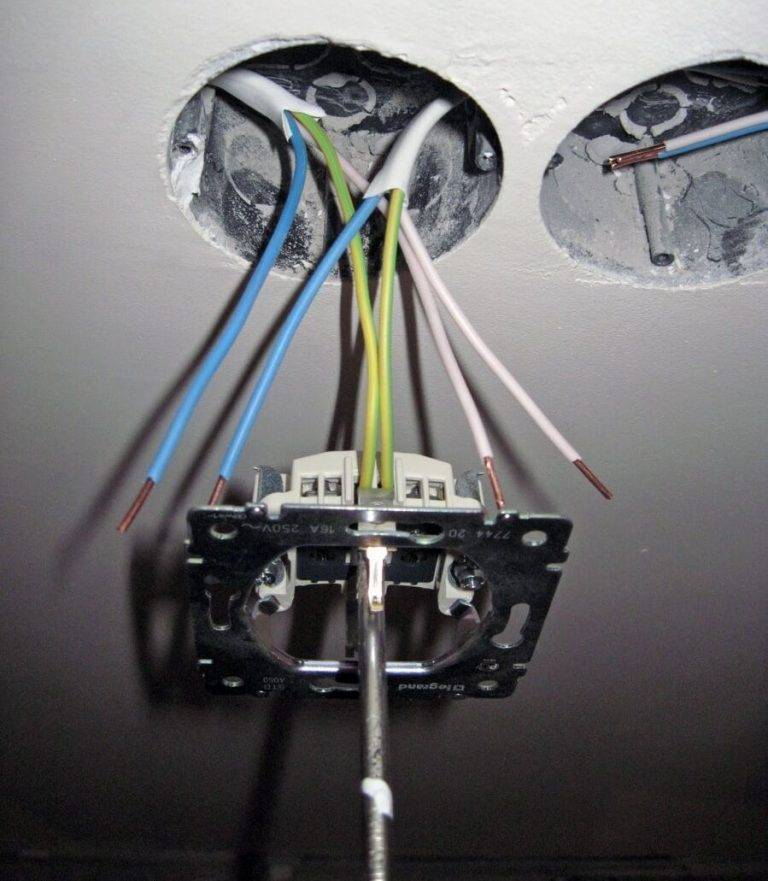
Connecting an outlet to a three-wire network.
Connecting the outlet to a three-wire electrical network has a slight difference. The difference lies in the presence of an additional third wire, called the protective conductor or groundingwhich is connected to ground contact sockets.
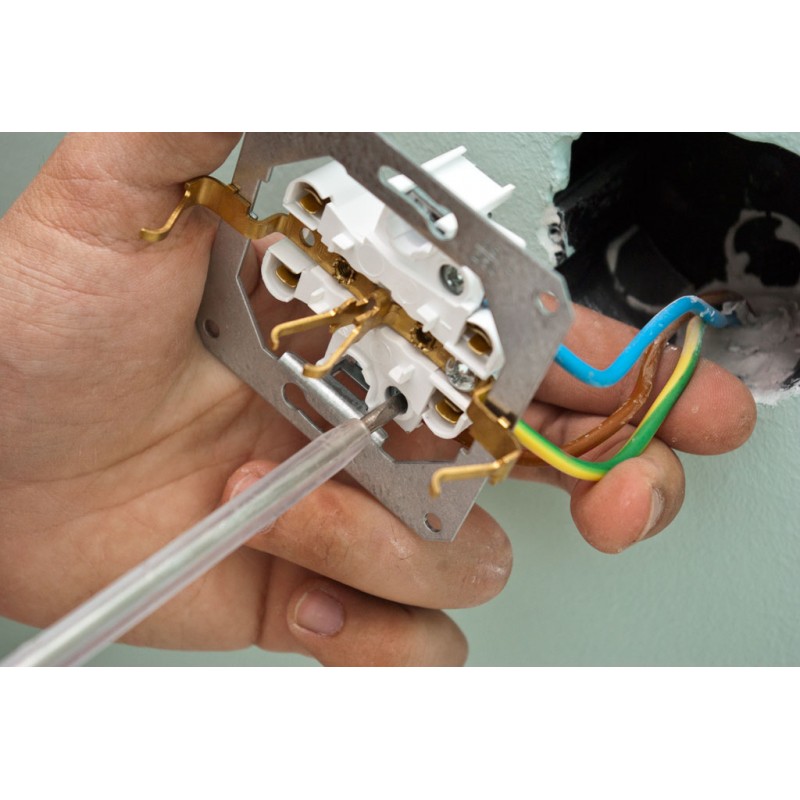
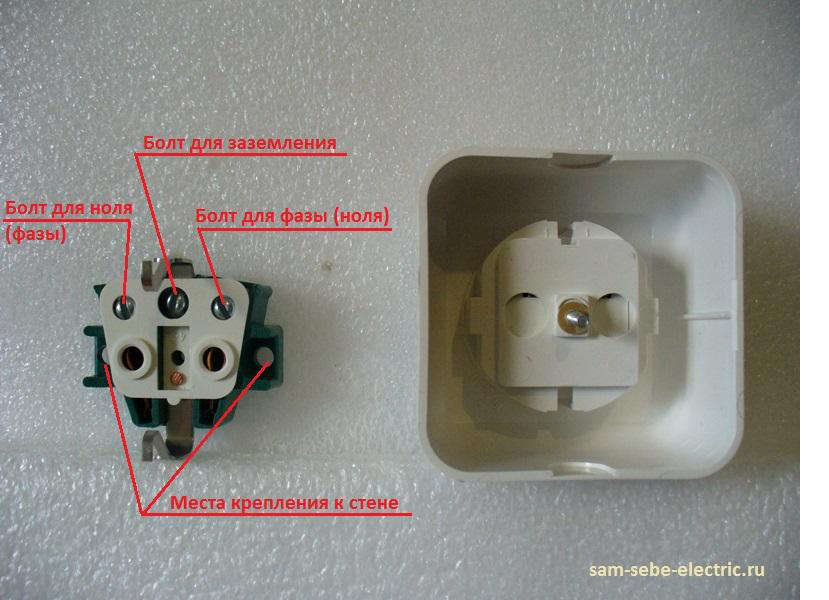
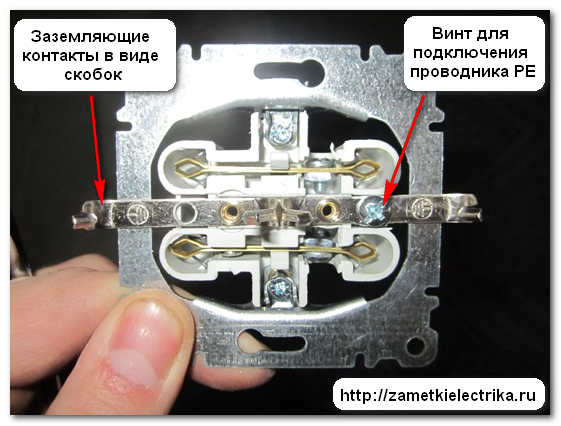
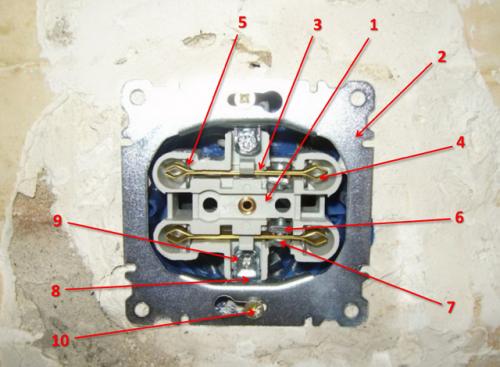
Accordingly, a socket with grounding has a slight structural difference from a socket without grounding. A grounded socket has grounding contacts made in the form of a spring-loaded brass plate and protruding at the point where the plug is connected. Everything else is unchanged.
The terminals for connecting the power wire in the socket shown in the figure are located in the lower area of the working part. The location of the phase and neutral wires is shown as an example. In your case, the phase wire can be located on the right side, and the neutral wire on the left.
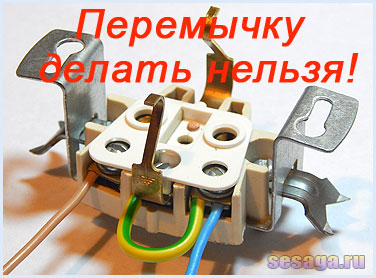
And more advice. Never put a jumper in the socket between the ground and zero contact.. The jumper will not protect you, but will only create problems. If the house has a two-wire network, then connect only the phase and zero.
Now I hope you should not have any questions about connecting a double socket. Thank you for your attention. Goodbye.
Good luck!
The main types of sockets for the home
Before you connect an outlet, two or a whole block of such elements, you should decide on their type. Most professionals and self-wiring homeowners have to deal with the following options:
• Type "C", the easiest and most convenient to connect. Includes only 2 contacts - "zero" and "phase".

It has been used for several decades and is practically the only option for old housing. Not always suitable for some modern appliances, so it is usually replaced by more modern electrical outlets.
• Type "F", Unlike the previous version, it is additionally equipped with grounding contacts (which, however, remain unused if the power supply scheme does not provide for a ground loop).
The product is suitable for most appliances, except for appliances with a round rim without side cutouts.
• Type "E", sockets "phase" and "zero" which do not differ from sockets "F". The difference lies in the grounding, which has the form of a small pin protruding from the plastic.
Products are not in great demand among domestic consumers and master electricians. Although most electrical appliances are suitable for such outlets.
There are other types of classification of electrical outlets - including the level of protection of the body from the ingress of liquid and foreign objects.For ordinary residential and domestic premises, IP22 and IP33 class models are suitable. In the children's room, it is desirable to install a product made according to the IP43 standard, the difference of which is special curtains that protect the child from contact with current-carrying contacts. For bathrooms, showers and a cooking area (kitchen or that part of the studio apartment where the sink is located), choose the IP44 class option, which prevents a short circuit due to splashes on the product.
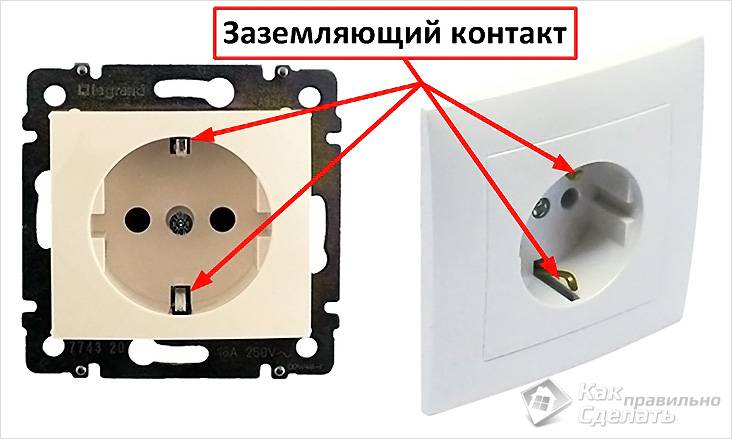
What does a socket without grounding and with grounding look like.
What a grounded socket looks like - the appearance of this type of socket is easily distinguishable due to the presence of 3 metal contacts. To properly install the outlet, you need to know the features of its design. There are also two types of socket design - this is an external socket with grounding and an internal socket with grounding.
Indoor outlets are often installed when there is hidden wiring, such as in modern homes. At the present time, the electrical goods market is replete with different types of sockets, since earlier residential buildings in different countries had their own standards.
A design feature of the socket with grounding is that when turned on, the terminals in the grounding circuit first touch, and then the contacts of the neutral and phase wires of the plug enter the socket. This feature is observed for safety reasons, in case of damage to the mechanism, its case will be grounded even before voltage is applied to it.
Types of sockets with grounding and preparatory work
Sockets can be internal (inserted into recesses in the wall) or external (protruding above the surface of the wall), but their main difference is that the grounding element will turn on first when current is applied, and then the current output.
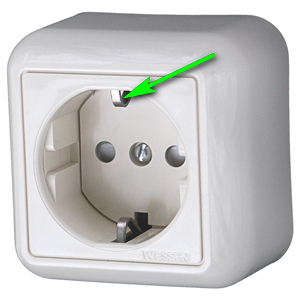
Outwardly, they differ in the presence of a third contact.
In the post-Soviet space, the most common euro socket has two thick pins and a grounding outlet in the form of a bracket or plate.
The wiring in the house can be open (visible, passing to the socket and switch in a special box) or closed (located inside the walls).
Usually, grounding is already connected in an apartment in a new building, and all that needs to be done to install sockets with grounding is to correctly distribute the wires.
In an apartment of an old housing construction, it can be impossible to install sockets with grounding because a grounding circuit is not provided for them.
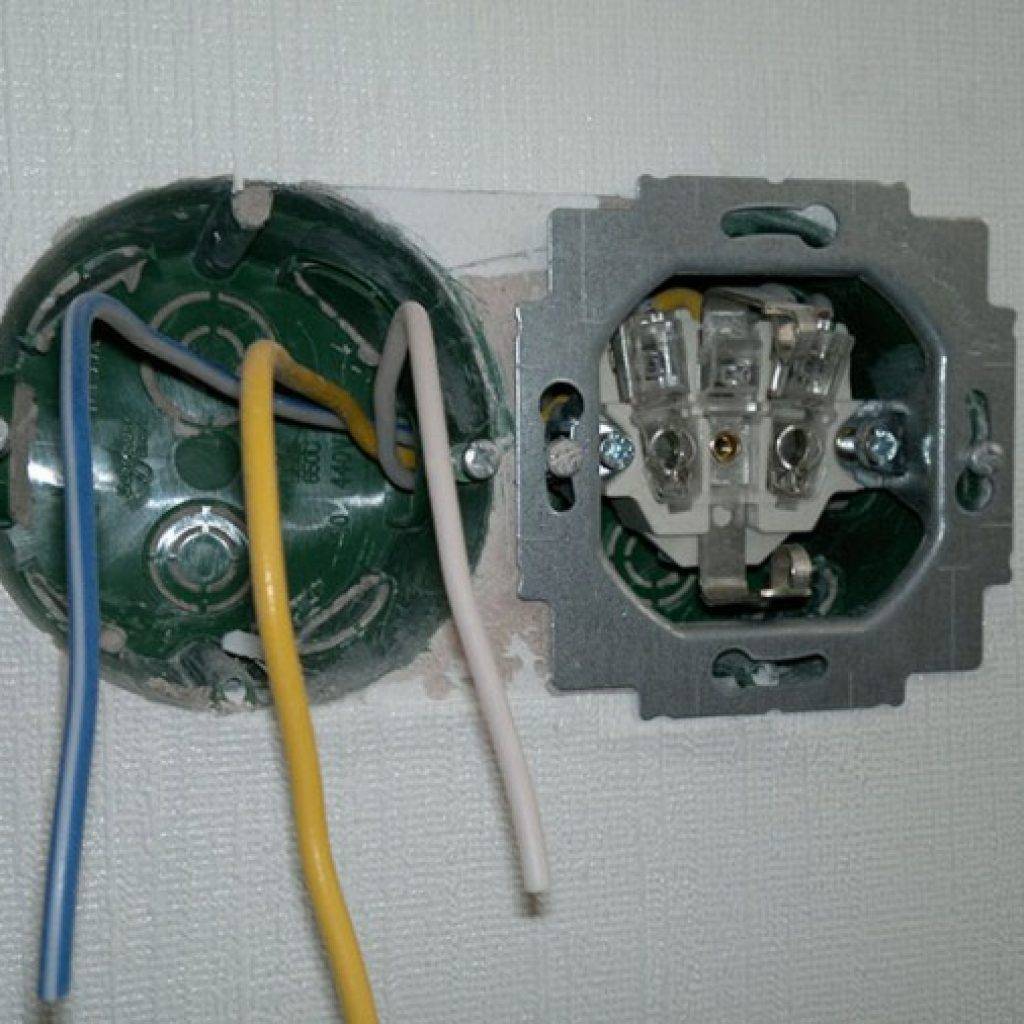
The initial situation for starting work on installing a socket with grounding is the completion of finishing work and the electrical wiring sockets brought out at the attachment points.
The wiring providing grounding is always three-core, the wires differ in color: the yellow-green wire is “ground”, the blue one is zero, and the phase wire can be of any color, most often it is brown.
When in your apartment a two-wire wire is connected to the places of future attachment of sockets, and you want to install sockets with grounding, you need to check with the organization servicing the house whether there is a ground wire.
If you need to connect internal sockets in an apartment or any other room, then additional preparatory work will be required.
Naturally, the power supply in the apartment must be turned off.First, let's install the sockets.


Video:
They are designed to install sockets with grounding and are available for plasterboard walls and for concrete walls.
To install a socket in a plasterboard wall, we drill a hole with a diameter of 6.8 cm for a single socket and a rectangular hole for a double one, insert the socket into it and fix it with self-tapping screws.
Socket boxes in a concrete wall are fixed with alabaster. We pull out the wires, and now you can connect the socket with grounding.
What is a protective conductor for?
Consider what conductors are:
- phase (L);
- zero worker (N), serving on a par with the phase to transfer the load current;
- zero protective (PE), which is used to connect the housings of the connected equipment to the ground loop.
Previously, before the introduction of the new Electrical Installation Rules, the functions of the zero working and zero protective conductors were combined in one - PEN conductor, simply called "zero". At the substation, it was connected to both the ground loop and the neutral terminal of the transformer. If necessary, ground the case of any electrical appliance: a boiler, a lamp or a switchboard - it was connected to a PEN conductor. Such a connection was called "zeroing", and the grounding system was called TN-C.
TN-C system: 1.Secondary winding of the transformer; 2. Electrical receiver; 3. Grounding network; 4.Consumer grounding
But with such a scheme there is a serious drawback that affects electrical safety. If the point of connection to the ground loop is far from the subscriber or the connection with it is interrupted, a life-threatening potential may appear on the case. This is due to the uneven distribution of loads over the phases of a three-phase network.The worst case will occur if the PEN is completely cut off. In this case, the highest voltage will come to consumers connected to the phase with the minimum load, and in the absence of load - 380 V, and the voltage between the zeroed cases and the ground will be 220 V. Touching them will be life-threatening. Imagine that for some reason zero breaks when you brush your teeth in the bathroom, and there is a washing machine with a zero body nearby. Tap water is a conductor of electric current, inside the machine it is connected with the body, and through the pipe system - with the mixer. Your life will be in danger. Breaks in PEN conductors occur primarily due to the fact that load current flows through them. It heats the contact connections, and as soon as they loosen a little, the heating process begins to destroy this connection even more. An oxide film appears at the point of contact, creating resistance to current, which heats up the connection even more, and so on until the contact is completely lost. To eliminate all these shortcomings, the TN-S system is used, in which two are used instead of the PEN wire - zero working and zero protective. The worker serves only for the flow of load currents, and the protective one - for connecting the electrical equipment cases to the ground loop.
TN-S system: 1.Secondary winding of the transformer; 2. Electrical receiver; 3. Grounding network; 4.Consumer grounding
Why do you need grounding in the outlet? The danger to life is the phase conductor. If a short circuit occurs inside the electrical appliance, as a result of which the phase potential is on the case, then touching such a case is life-threatening. If the case is grounded, then a large current will flow between it and the circuit.It will cause the protection devices (circuit breakers or RCDs) to operate and disconnect the damaged area. Even if the shutdown does not occur, the potential on the case will be reduced to a life-safe value.
Built-in socket with earth

Next, they act like this:
- remove the power supply on the shield;
- with the help of a puncher, or a hammer and a chisel, they prepare a place for the socket and try it on;
- by means of alabaster, the socket box is fixed in its regular place;
- connect the wires going to the outlet, having previously tinned them;
- twist the socket with the socket box with screws;
- check the grounding is correct.
-
Connection diagram of a pass-through switch: principle of operation and installation options for a special type of switch
- How to choose and install an electrical switchboard - tips for assembling and installing the main elements with your own hands
-
Types of junction boxes for electrical wiring - device, installation and rules for laying electrical cables


