- Newsletter subscription
- Installation of a telephone socket of different types
- Proper connection of a surface-mounted RJ11 telephone socket
- Installing a concealed telephone jack
- How to connect an RJ11 telephone socket
- Algorithm for laying an Internet cable in the walls
- Old and modern device standards
- Checking the health of the network
- Connecting a computer wall outlet
- How to choose a TV outlet
- Checking the health of the network
- RJ-45 cable pinout features
- How to connect the telephone socket
- Carrying out preparatory work
- Stripping the ends of the veins
- Connecting the socket wires
- Types of TV sockets
- Single TV
- checkpoint
- What is the difference between terminal and simple models
- Various options for connecting the socket block
- Scheme of serial connection of the socket block
- Diagram of parallel connection of the socket block
- Standards and wiring diagram
- Connecting an internal internet socket
- Types and types of Internet outlets
- Conclusions and useful video on the topic
Newsletter subscription
Many people think how to connect telephone socket on our own, and in this article we will tell you how to mount and connect a telephone socket.
Installation of a telephone socket of different types
Currently, several types of sockets are being sold: external and built-in.The first option is easier to install, but recessed sockets have a more attractive appearance. Both types are connected in the same way, the differences are only in the installation method.
In addition, there are different types of connectors: RJ 11 with two pins, telephone socket RJ 25(12) with 6 pins and RJ 14 with 4 pins. Most often, an RJ 11 telephone socket is used to connect analog home phones.
In addition, to connect the main wire to several sockets, double telephone sockets are used, the installation of which is somewhat different from single ones.
Correct phone connection open-mounted sockets RJ11
Installing a telephone jack requires a number of tools and supplies, including:
- telephone socket RJ 11, which will be connected;
- two-core cable with a cross section of 0.3-0.5 mm2, for example, KSPV 2x0.5 or TRP;
- device for removing insulation;
- screwdriver
- multimeter;
- protective gloves.
The answer to the question "how to install a surface-mounted telephone socket?" can be divided into several points:
- Wear protective gloves - the voltage of the telephone line at rest is about 60V, and at the time of the call 100-120V.
- Remove the insulation from the cable, being careful not to leave notches on the wire.
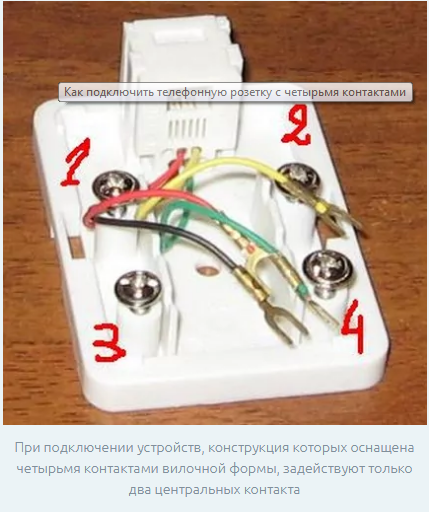
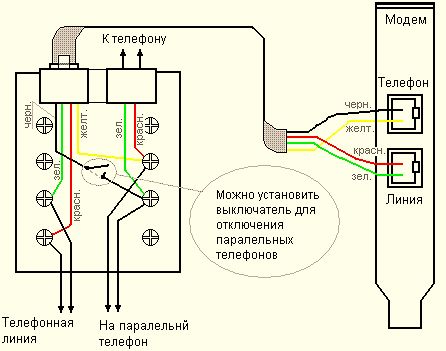
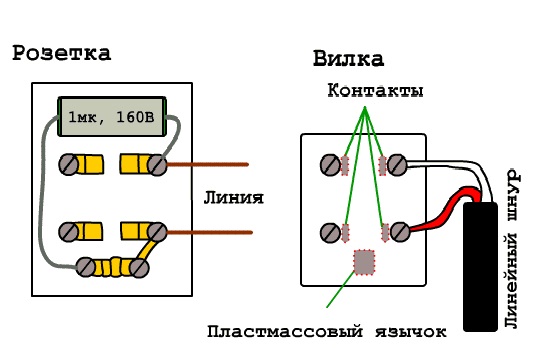
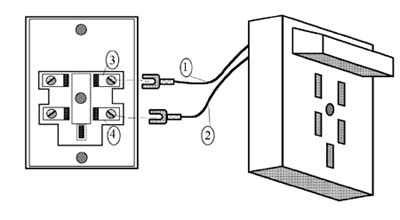
- Open the socket housing. The RJ 11 telephone jack that we connect includes the need to connect a telephone line to the middle pins. The telephone socket circuit may include 4 contacts, in which case they are connected according to the diagram.
- There are also German-made sockets in which you need to connect to 2 and 5 pins, but they are rare.To connect such a device, instead of a green wire, you must use black, and instead of red - yellow.
- Determine the polarity. Red is a "minus" in the telephone line, and green is a plus. As a rule, connecting a telephone jack does not require polarity determination, however, some devices may not work properly if they are connected incorrectly. You can determine the polarity using a tester.
- Bury the cable strands between the metal plugs inside the outlet using a cross-cutting or regular clerical knife. The edges of the grooves are pointed and narrowed. When deepening the core, they cut through the insulation, which ensures good contact.
- Attach the socket to the wall and snap the cover on.
- Connect the phone to the outlet and check if there is a connection.
The method of how to connect the phone to the outlet is this - you need to purchase an RJ11 plug and, using a special tool, crimp it in accordance with the location of the wires in the outlet. If you have a telephone socket, the wiring diagram of which has 2 contacts, they will be located in the same way as shown in the diagram, and the extreme contacts will remain free.
Installing a concealed telephone jack
If you are interested in how to connect RJ 11 hidden, the connection will be the same - the differences are in the installation. To start you need to make a hole in the wall, then install the socket and fix it with self-tapping screws.
After that, use the above method of "how to connect a surface-mounted telephone jack", place the jack body in the box and secure with spacer screws, install the outer frame of the jack and connect the crimped cable.
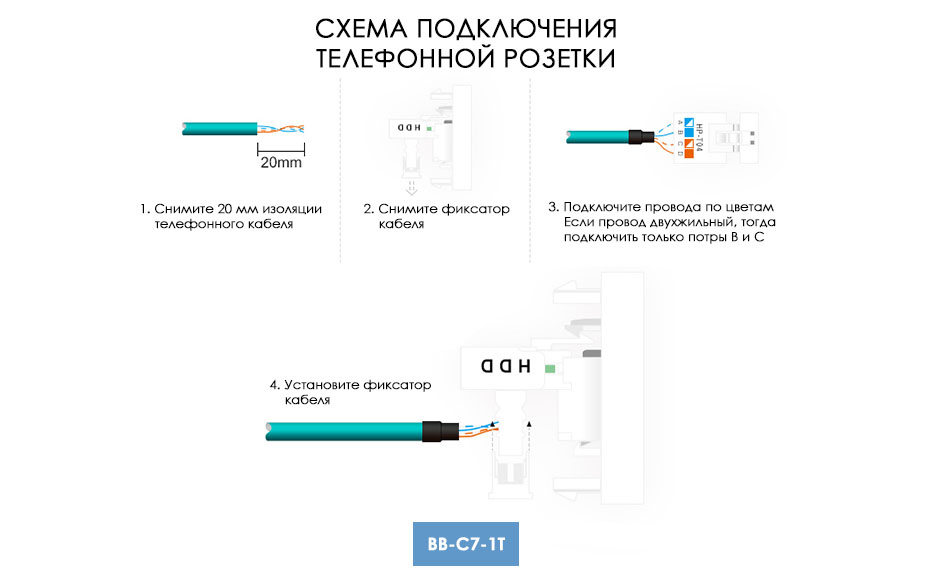
How to connect an RJ11 telephone socket
The current telephone sockets are miniature in size and can be produced in various colors and shades. The connection diagram for a telephone socket of this configuration is as follows:
At the first stage, precautions should be taken in the form of wearing rubber gloves. This is done due to the fact that the voltage on the telephone line can vary. 60 to 120 volts depending on whether a call is incoming or the phone is in standby mode.
Second phase - stripping the insulation from the cable to the desired length
It is important to do this carefully so as not to leave damage and notches on the cable, as it will break in these places.
The third stage is the most difficult
Here you need to connect the socket to the network
In an RJ 11 telephone socket, the telephone network is connected to the contacts that are in the middle. Connecting the phone to the outlet, diagram:
- At the fourth stage, it is recommended to determine the polarity. In telephone networks, red is used to determine the minus, and green is indicated as a plus. Often, connecting a telephone jack does not require finding polarity, however, many telephones will not work correctly or with interference if the jack is not installed correctly. You can determine the polarity using a multimeter or a tester for the mains.
- At the fifth stage, the core of the cable should be buried between the metal plugs inside the outlet. Metal grooves have slightly pointed edges and a conical shape. This is done to improve the contact between the wire and the outlet.
- The last step is directly fixing the socket on the wall, snapping the case and connecting the landline phone to the socket.
By adhering to these rules, you can correctly connect the telephone socket yourself.
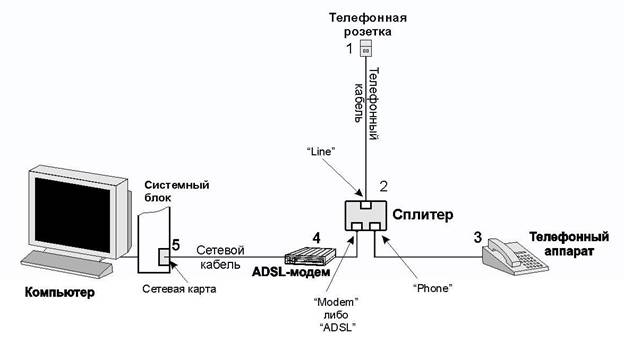
Algorithm for laying an Internet cable in the walls
The most correct, but at the same time, the most difficult solution for laying an Internet cable in a home (office) environment is its installation inside the walls. The advantages of such wiring are obvious: the cable does not get under your feet and does not affect the decorative design of the room.
A significant disadvantage of in-wall installation is that in the future there may be problems with access to the cable for its repair or maintenance.
But with proper cabling along the strobes in a corrugated PVC pipe, you can not only minimize the risk of a malfunction, but also provide relatively easy access to the twisted pair without complicated dismantling.
Before you start laying an Internet cable, it is worth marking the places where it should be located. Please note that unshielded twisted pair made of copperwhich is very sensitive to electromagnetic interference. Try to keep the distance between computer and electrical wiring at least 50 cm.
- We plan the route. When planning a place for a strobe for future wiring, keep in mind that the Internet cable has a certain limit on the bending radius. Specific values can be found in the specifications of the selected cable.
- Choose a cable. The most significant quality characteristic of a twisted pair cable is reliability. Access to the cable after its wiring will be significantly difficult, so it is advisable not to save on quality. To connect to the Internet, UTP of the fifth category and above is most often used. It is necessary to select a specific cable model based on its main technical characteristics:
- the minimum allowable bending radius (the smaller it is, the easier it will be to carry out the wiring in the walls);
- maximum allowable tensile force (the higher this value, the easier it is to insert the cable into the corrugation, and in case of technical problems, subsequently remove it from the strobe);
- warranty (for quality products, the warranty period can be up to 25 years).
- We make installation. The cable is placed in a corrugated pipe of the required diameter (it must move freely inside it). Then the corrugation is fixed in the strobe with a gypsum screed. Then you can start finishing work. As a result, an Internet socket will appear at the output of the cable. However, before that, it is worth making its pinout.
Old and modern device standards
Initially, telephones generally dispensed with sockets - the devices were directly connected to the telephone exchange by wires. To make a call, you just had to tell the telephone operator on the switchboard the number you want to contact. By the middle of the twentieth century, automated analog telephone exchanges came into use everywhere. Progress also touched on telephones: for convenience, standardized sockets began to be used, which received the designation RTSHK-4.
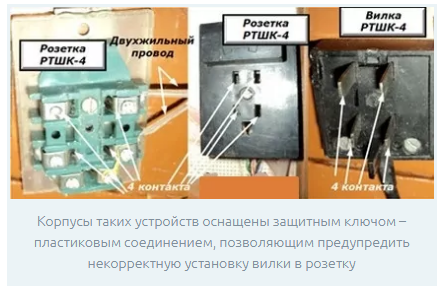
A single standard was used in the Soviet Union for all phone models. This abbreviation was deciphered: “telephone socket, plug, four-pin”. Outwardly, it looked like a flat rectangular platform with five holes. One of them, unpaired, was the key to prevent incorrect plug connection. The remaining four holes of RTSHK-4 contained paired brass contacts.One pair was used when the device was connected in standard mode, the second pair allowed connecting a parallel telephone with the same subscriber number to the plug.
Since the end of the 90s, the outdated standard RTSHK-4 in our country has been replaced by a more modern international RJ. This was due to the widespread introduction of digital technologies into telephony and the replacement of analog PBXs by them. This socket is also used to connect personal computers to a wired Internet network, or to create an internal local area network, for example, in an enterprise. Below is a photo of an old Soviet and new international telephone socket.
In addition, RJ sockets may vary, depending on the purpose of individual models:
| socket type | purpose | Number of contacts |
| RJ-11 | Line type telephone line | 1 pair |
| RJ-12 | Telephone line | 1 pair |
| RJ-14 | Telephone line | Two pairs |
| RJ-25 | Telephone line | 3 pairs |
| RJ-45 | Computer networks and telephone line | 4 pairs |

On the domestic market, there are telephone sockets made in the form of adapters between the old Soviet RTSHK-4 and RJ plugs. In addition, the TAE standard is sometimes found, designed to connect French and German-made phones. Next, consider how to connect a telephone jack to a telephone cable.
Checking the health of the network
Now we can check how successful we were with the connection. To do this, you need to connect your laptop or PC one by one to all the sockets that we have installed and try to access the Internet. If any of the outlets does not work, you need to check:
- correct connection of the outlet itself;
- correct connection of the cable to the router (including the quality of the connector crimp);
- the integrity of the wire along the way from the router to the outlet.
There is another way to check performance. If your router has LAN connection indicator lights (they are usually located on the front panel), then you can connect PCs or laptops to each outlet (at least at the same time, at least in turn). If the corresponding LAN indicator lights up, everything is fine, there is a contact. If not, you need to check for problems.


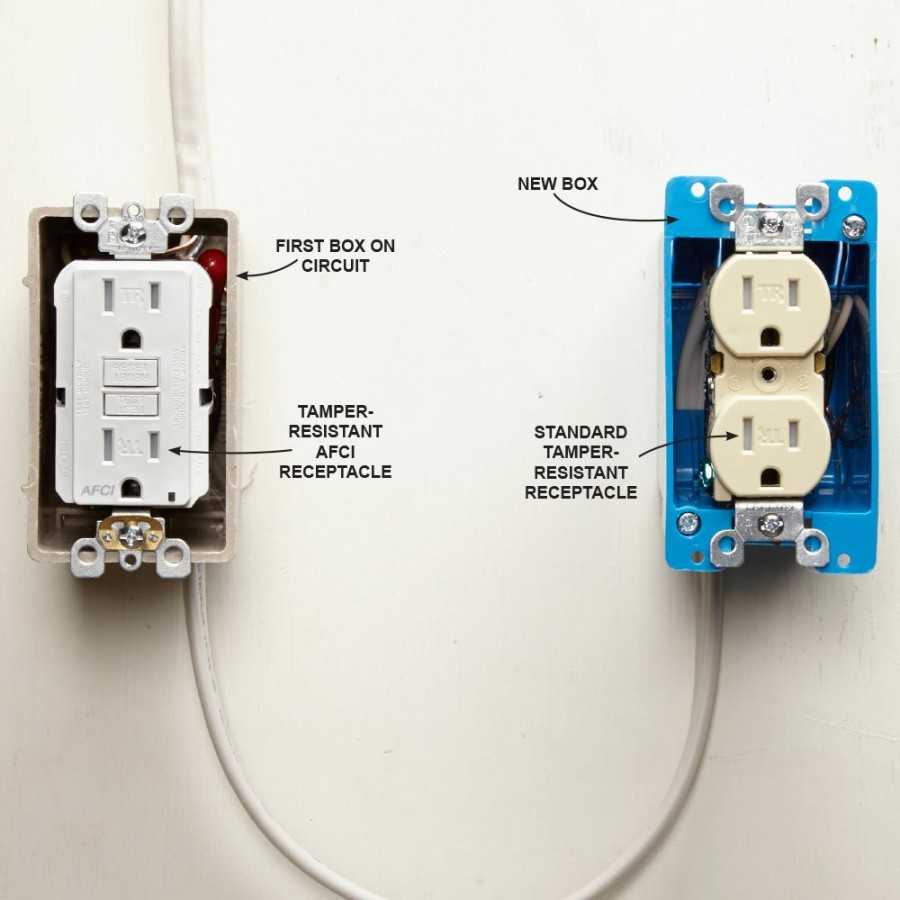
Connecting a computer wall outlet
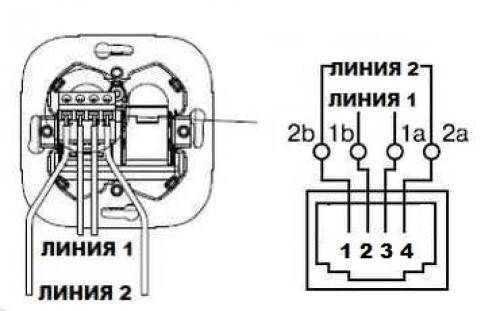
Almost all manufacturers of computer sockets place a connection diagram inside, indicating the order in which the wires are placed, based on their colors. As a rule, both scheme "A" and scheme "B" are indicated.
Scheme "A" should not be taken into account, but focus on the scheme "B"
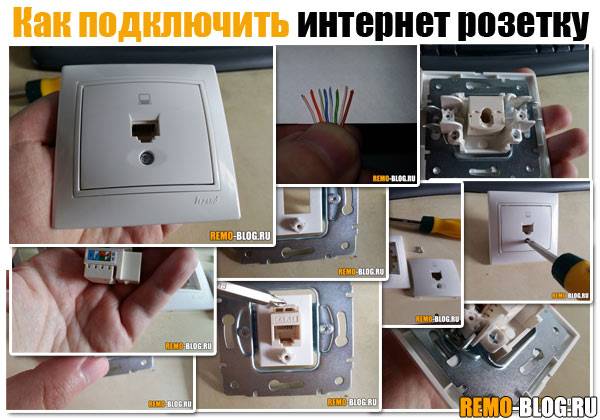
First of all, start installing the case on the wallpositioning it so that inlet for the cable looked up, and the computer connector looked down. Although this installation option can be changed, depending on the specific conditions, the outlet can be installed horizontally.
- After that, proceed to connect the outlet. The protective insulation is removed from the cable by about 5-7 cm. At the same time, it is necessary to control that the insulation of the conductors themselves, twisted in pairs, is not damaged.
- In the photo you can see that there is a small plastic clamp on the board. Wires should be brought into it and fixed so that the wires stripped of protective insulation are below the clamp. As a rule, the fastening is in the place where the protective insulation was not removed.
- On the case you can see microknife contacts, to which wires corresponding in color are connected.The wires are inserted with force so that they reach the very end of the contact group. At the moment the wires pass through the knives, a characteristic click should be heard. This indicates that the knives cut through the insulation and fell into place. If no clicks were heard, then proceed to an additional procedure, picking up an ordinary screwdriver with a thin blade. With its help, the wires are pressed against the micro-knives with force. As a rule, after such a procedure, microknives reliably cut through the insulation of the wires, providing a suitable electrical contact.
- After all the conductors are securely in place, excess unnecessary pieces are removed with a knife or scissors. You can use clippers.
- And in conclusion, the lid is put on
As you can see, connecting an Internet outlet is not a complicated operation and anyone can handle it. This may take only a few minutes. In this case, once is enough, although the first time it may not work, especially if there are no skills in handling wires.
In order not to suffer too much, it is better to watch the corresponding video, which shows and tells how to connect a computer outlet with 4 wires and with 8 wires.
Internet socket connection diagram on inrouter channel
watch this video on YouTube
Despite the different number of wires, the connection technology is the same.
How to choose a TV outlet
Antenna sockets are designed for radio, TV, satellite signals and the Internet. On sale there are devices with different combinations of connectors that are designed for all types of the above signals.The designations and inscriptions on the body of the products indicate the amount of signal attenuation in decibels, the direction of the signal, and the frequency of its transmission. Cable, digital, analog and satellite TV have different frequency ranges: the first three need a connector up to 1000 MHz, and a satellite dish needs more than 1000 MHz.
Selecting the correct device type starts with diagnosing the network type. A parallel or star network is used when each receiver needs a separate cable. This is a more modern network structure, recommended for two reasons: firstly, it is reliable (the receivers operate independently, so damage to one does not affect the operation of the others), and secondly, in a parallel installation, a reverse transmission channel can be used, for example, to support Internet connections. It requires the use of exclusively terminal models.
In the earlier, pass-through circuit (aka serial or “loop”), pass-through models are used, which means that each of them, acting as a kind of divider, is a signal source for the first receiver and transmits a signal to subsequent consumers. The terminal socket closes the highway.
You may be interested in: The correct wiring diagram for television sockets
Checking the health of the network
Now we can check how successful we were with the connection. To do this, you need to connect your laptop or PC one by one to all the sockets that we have installed and try to access the Internet. If any of the outlets does not work, you need to check:
- correct connection of the outlet itself;
- correct connection of the cable to the router (including the quality of the connector crimp);
- the integrity of the wire along the way from the router to the outlet.
There is another way to check performance. If your router has LAN connection indicator lights (they are usually located on the front panel), then you can connect PCs or laptops to each outlet (at least at the same time, at least in turn). If the corresponding LAN indicator lights up, everything is fine, there is a contact. If not, you need to check for problems.
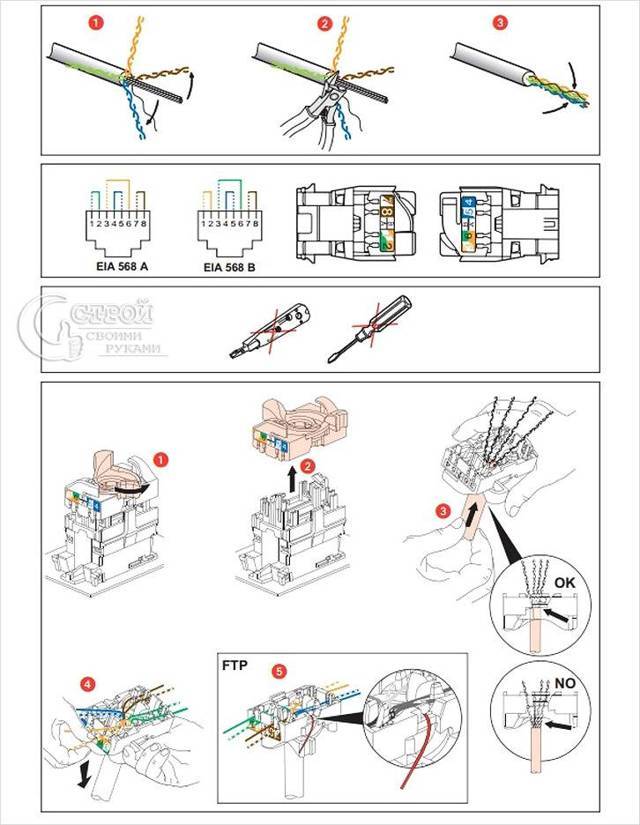
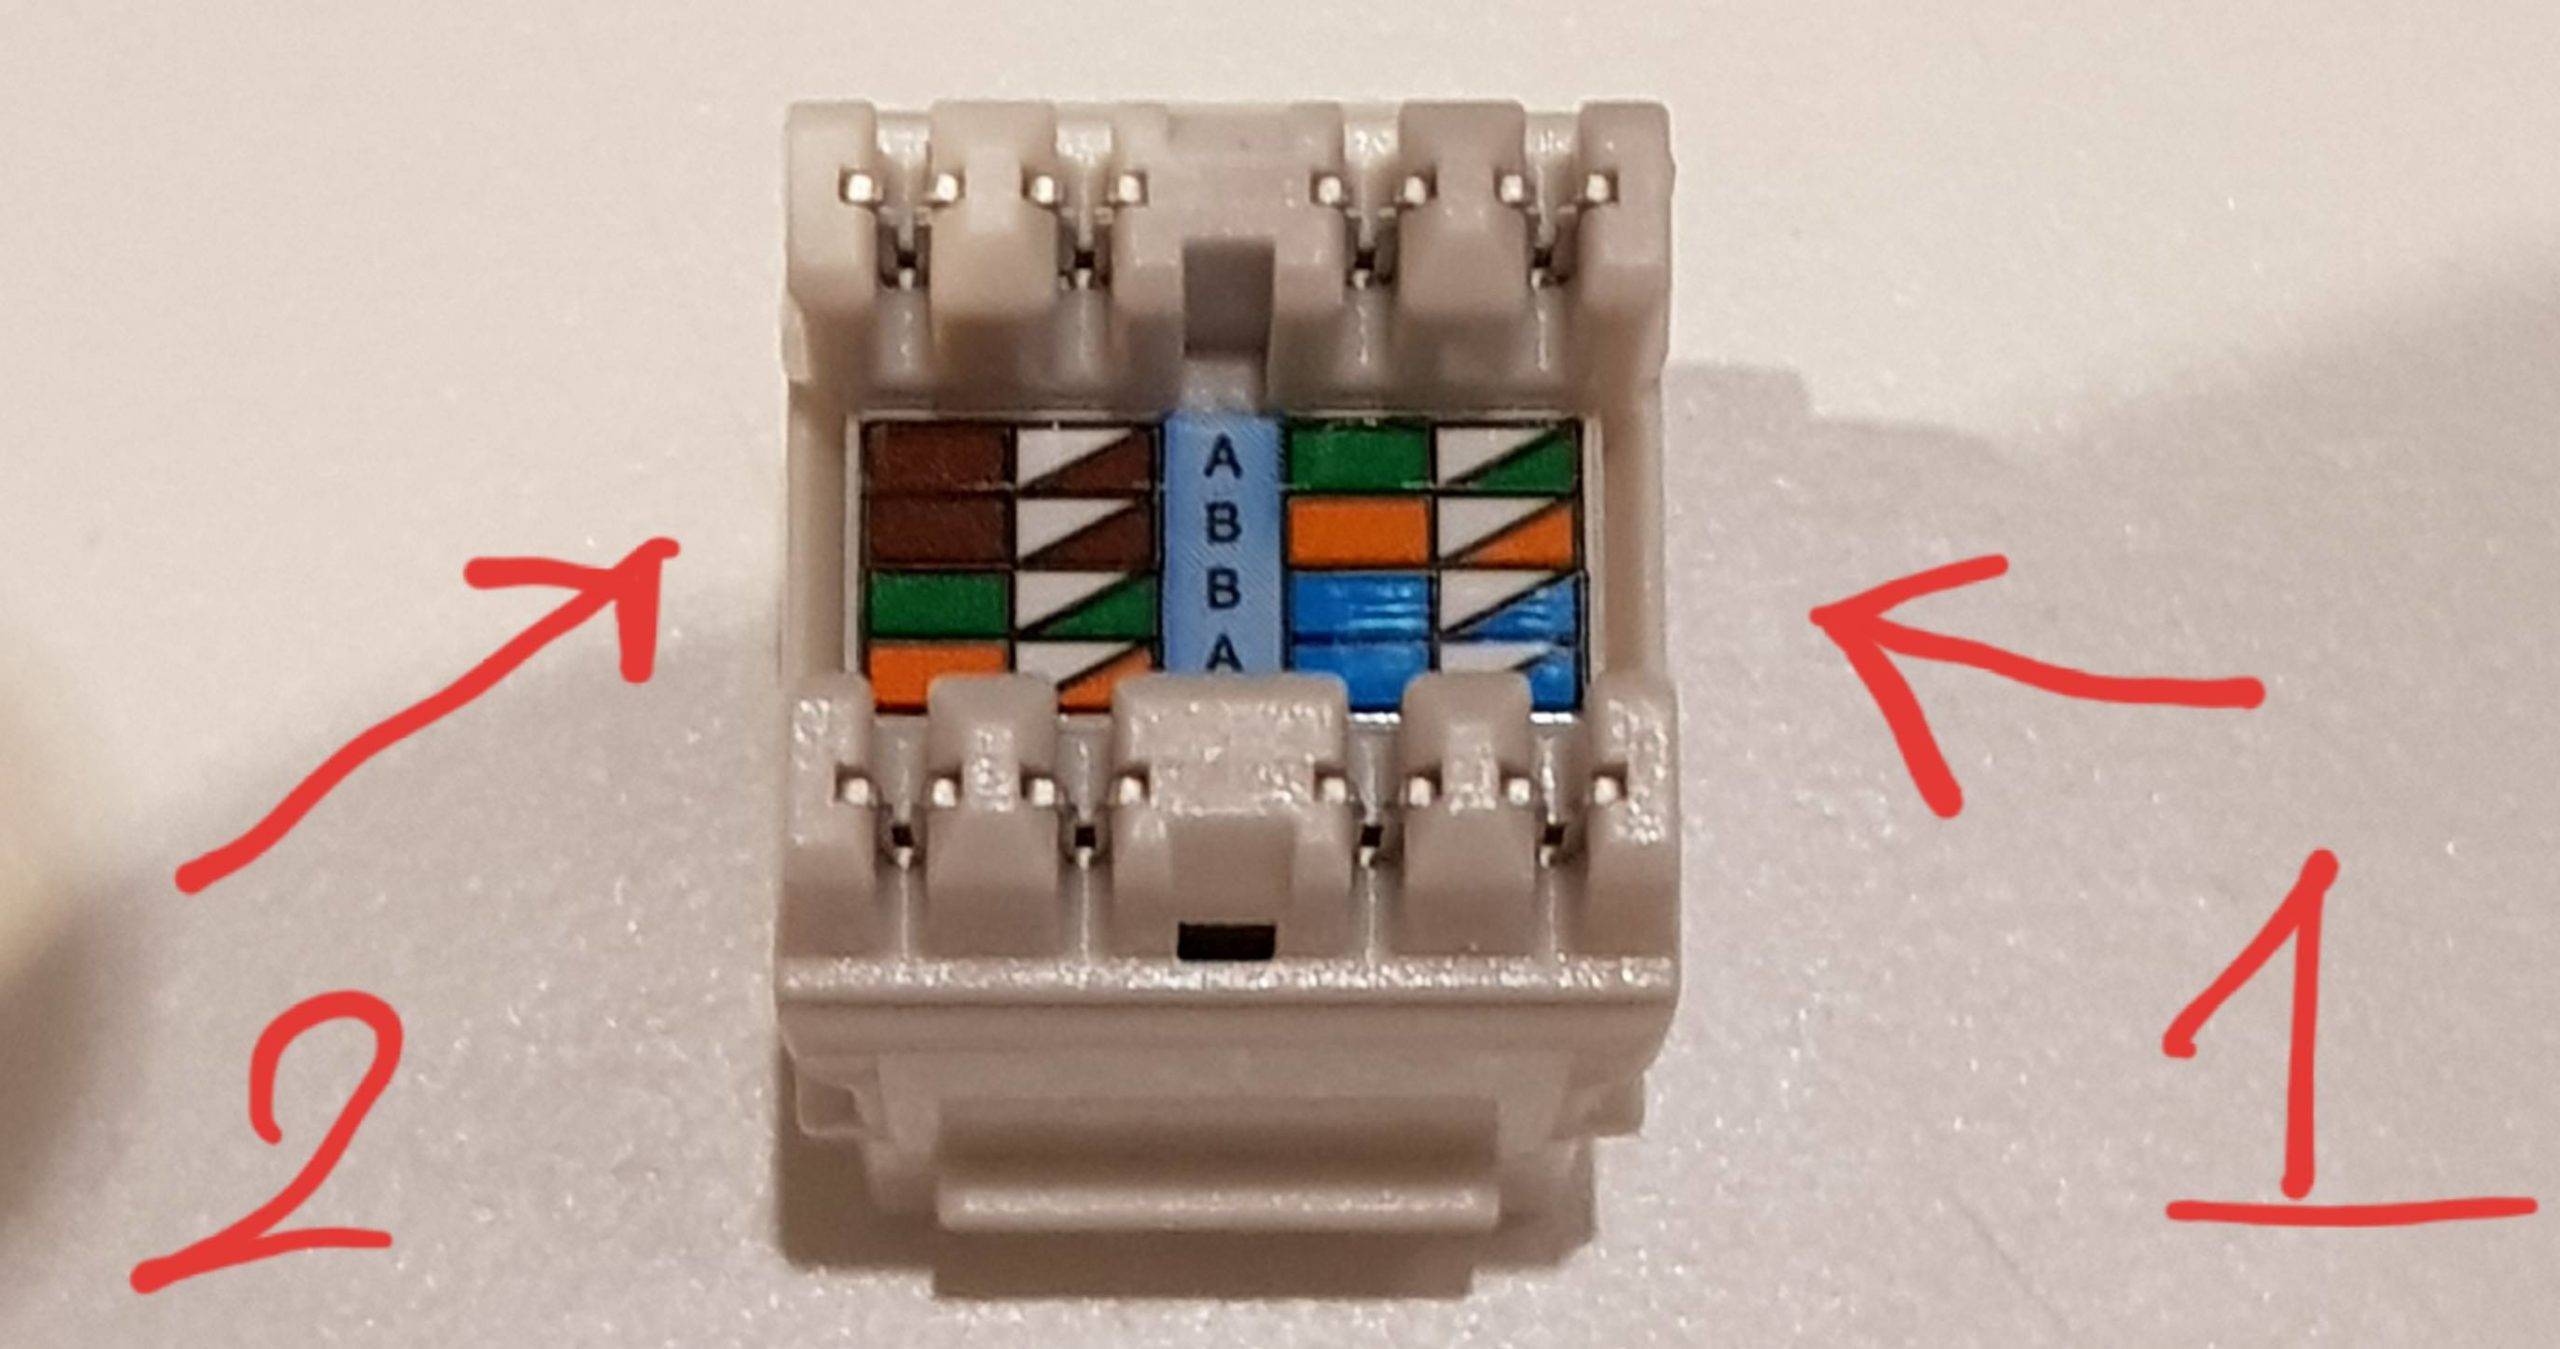
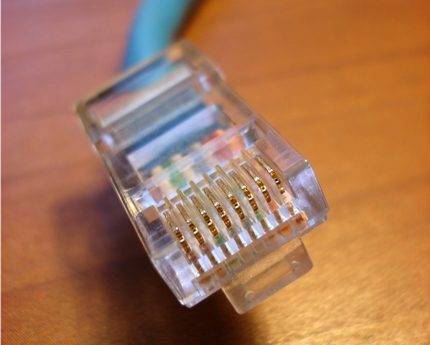
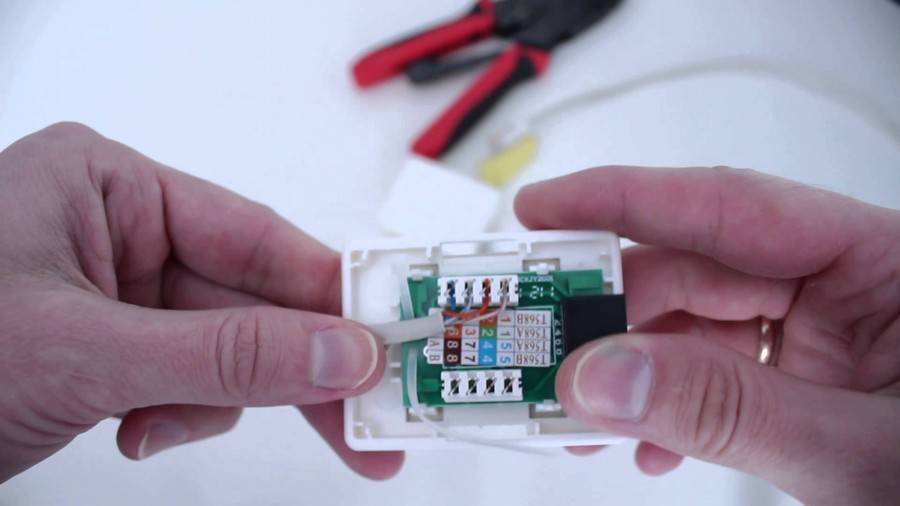
RJ-45 cable pinout features
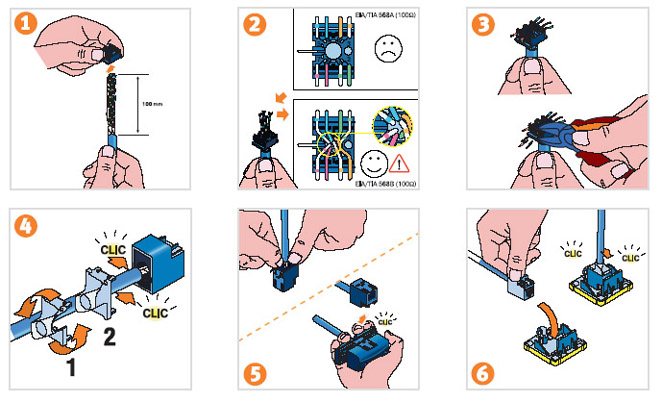
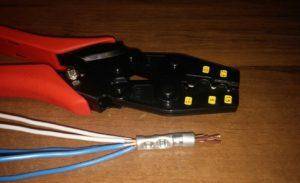
Before connecting an Internet outlet, you must clearly know and understand where and what color to mount each individual twisted-pair wiring. To do this, you need to know the crimping scheme and the rules for crimping RJ-45 cables with your own hands.
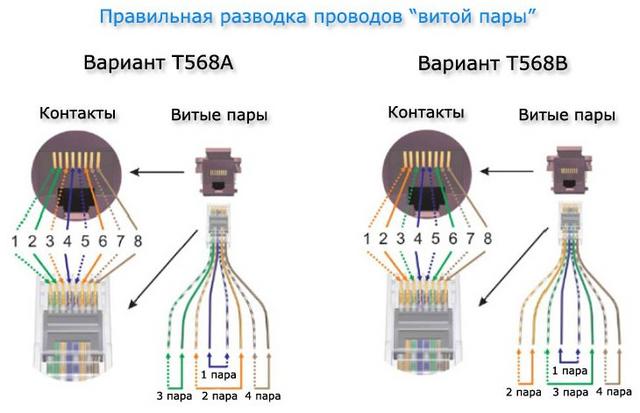
There are two main types of RJ-45 wire pinouts: straight and crossed. The first type of cable is used to connect end devices (computer / PC, smart TV / Smart TV, switch / Switch) to the so-called router (Router).
The second type of cable is used to connect devices with similar functions (computer - computer, router - router, switch - switch) to each other.
For a direct scheme, color matches color in this order white-orange, orange, white-green, blue, white-blue, green, white-brown, brown. For the cross, everything is the same, but the green ones change places with orange ones, respectively.
Previously, we leave about 100-150 mm from the wall plane along the length of the cable, and cut off the rest of the cable. This length will be sufficient for possible subsequent rewiring.
Before starting electrical work, you can familiarize yourself with the twisted-pair crimping schemes for 8 and 4 cores, discussed in our other article.
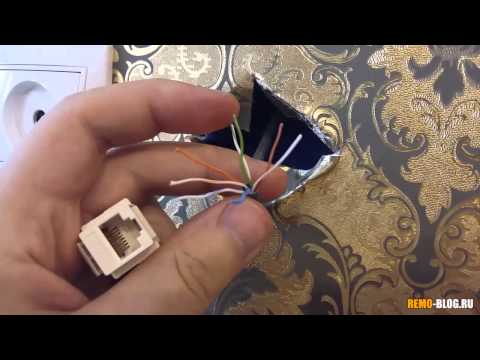
Now you need to release 4 pairs of wires from the outer sheath and from the foil (it acts as a protective shield) if any.
Inside the twisted pair there is also a special thread with which you can easily release all the necessary wiring. You can also use a regular knife or a special cutting surface, which is equipped with almost all crimping pliers.
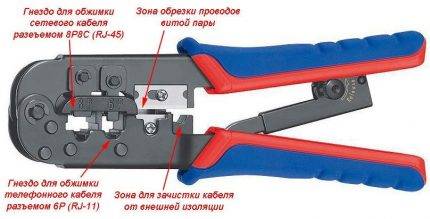 Crimping pliers will help you easily mount any RJ-45 and RJ-11 connector, The most important thing to remember is that if the tool does not press the wires, then you can press it with a knife or a thin screwdriver
At the next stage, we straighten all twisted pairs of multi-colored wires and carefully “seat” each individual color into its own niche according to the color pinout in the socket terminal block.
This must be done in such a way that the rest of the wire with “untouched” insulation falls under the retaining clip of the terminal block. Now we tighten the fixing bolts with a screwdriver on the terminal block and at the same time press the rest of the wires so that they do not come out of their seats.
In conclusion, with a “sense of strength”, we press the clamping connectors on the terminal block with a screwdriver and fix each core separately in the terminal group, while cutting through the braid of small wires. Then cut off the rest. Wiring should be located all at the same height from the base of the terminal block.


You may also find information on how to twisted pair extension.
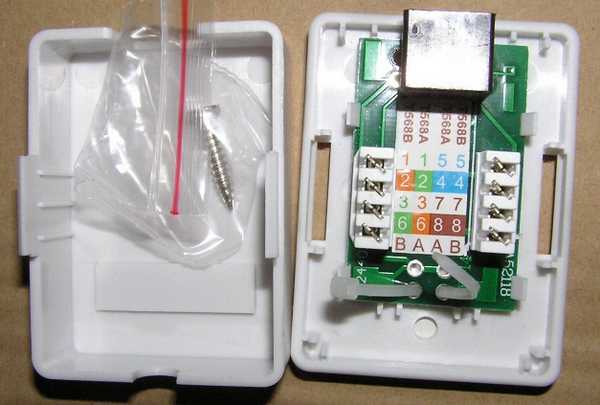
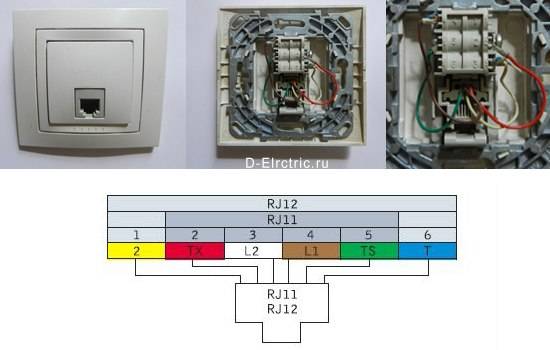
How to connect the telephone socket

Installing telephone sockets is not a very complicated process, in many ways similar to installing a conventional electrical outlet.In everyday life, modifications J-11 and 12 are more common, intended for connecting 1-2 telephone sets. Using their example, we will analyze how to connect a landline phone to the network.
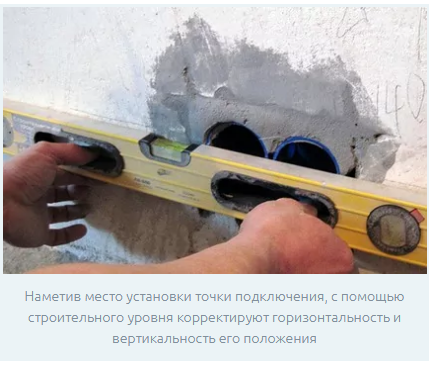
Carrying out preparatory work
The first step is to familiarize yourself with the design of the outlet, the wiring diagram and connection to the telephone network. With models J-11 and 12, everything is quite simple: the leads of the required polarity should be connected to the contacts. Information about this should be available in the instructions that came with the device. The cores connected to the socket must mirror the location of the same cores on the phone plug.
If, instead of a two-phase model, a multi-phase one was accidentally purchased, for example, J-25 or 45, then to connect one device, you need to use contacts No. 3 and 4. When installing an outdated telephone model in the house, with an RTShK-4 type plug, you will need to purchase a universal socket that has connector with 4 pins, as well as a 2-core wire with a cross section of 0.3 mm.
To work, you will need the following set of tools:
- Level.
- Voltmeter.
- Pliers or nippers.
- Crossing tool.
- Pencil.
- Mounting double-sided tape or self-tapping screws.
- Screwdriver.
- Hammer drill.
Stripping the ends of the veins
Next, the cable cores are stripped from the braid to a length of 4-5 cm from the edge. When stripping, it must be borne in mind that telephone wires are very vulnerable to mechanical damage due to their small cross section. Therefore, when working, you need to use a special tool - a cross knife or side cutters.
It is far from always possible to carefully cut, therefore it is recommended that stripping be done with a small margin in length. Excess bare parts of the wire can then be hidden under the socket housing.The stripped ends must be free from damage - cuts or breaks.
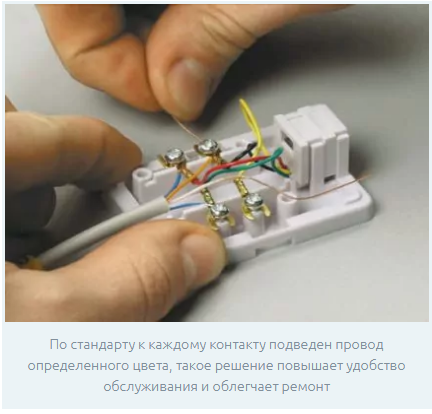
Connecting the socket wires
The stripped ends of the telephone cable are pulled apart and connected to the socket connectors. In this case, one should be guided by the conditional indicators available on the block with contacts. If the connection of the telephone socket is carried out by an open method, then the cable after its installation should protrude from the wall by 5-8 cm.
The polarity of the contacts before connection is checked using a tester. Different cores of the wire differ from each other in the color of the braid. By default, the "minus" wire is red, and the "plus" wire is green.
If the polarity is not observed, the telephone set, after it is connected to the outlet, will malfunction during operation. At the same stage, the readiness of the external communication line for operation is tested. This is done by measuring the voltage in it with a voltmeter. The indicator should be approximately 40-60 V.
The stripped cable cores are inserted into the terminal clamp and carefully tightened with fixing bolts. The wires must be fixed tightly to ensure the most reliable contact. The free parts of the wires fit into special grooves in the inside of the block.
The final stage of mounting the telephone socket is mounting it on the wall. Open installation can be done using double-sided mounting tape or self-tapping screws. In a closed installation, the device is placed in a pre-installed socket box, fixed in it by means of spacer screws, or the same self-tapping screws. This is followed by the final decorative finish - plaster, putty and wall painting.
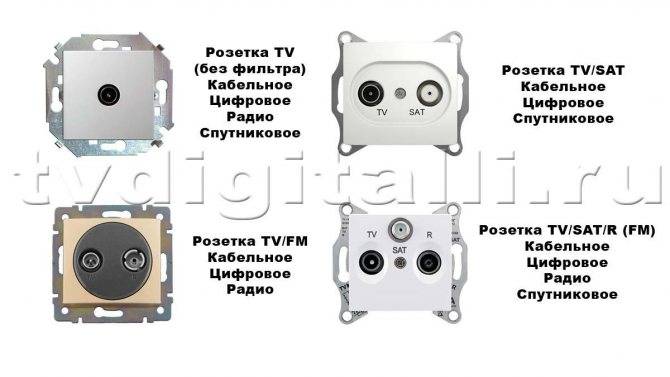
Types of TV sockets
A modern socket for an antenna has filters to suppress noise.The amount of interference from this is reduced, and the reception quality is improved.
- To receive satellite broadcasts, a SAT-marked model is required.
- For radio reception marking FM.
- For analog, cable and digital signal marking TV.
There are single and integrated into blocks, terminal and through devices. Depending on the method of installation, they are made in two versions - surface and hidden. In the latter, the corresponding mounting boxes are provided.
Types of television sockets
Single TV
Single model per connector - conventional wiring device for connecting a TV to an antenna. It is not equipped with matching devices, which is why it is subject to the effect of signal reflection back into the cable, which affects the image quality.
checkpoint
A pass-through outlet is actually a splitter. The signal, getting into it, goes not only to the socket, but is also redirected further, to the next outlet or to the terminal in the chain.
What is the difference between terminal and simple models
All types are characterized by different specifics of signal attenuation. A terminal socket differs from a simple, single socket by a large amount of attenuation.
Various options for connecting the socket block
Works related to electrical networks and switching devices require special knowledge and certain skills. There are two ways to connect the socket block:
- sequential, it is also a loop;
- parallel, another name is a star.
Scheme of serial connection of the socket block
A distinctive feature of such a scheme is that each structural element (electric point) is powered from the previous one, and that, in turn, from its predecessor.In other words, sockets are connected like light bulbs on a garland - only the first one is connected to the network, and the rest are switched with its contacts in a serial way: phase - with phase, zero - with zero. Jumpers (loops) act as connecting links in this chain.
A conventional socket is designed for a current load of up to 16 A
However, in the proposed scheme, this indicator cannot be applied for each connector, since here the total total value of the current strength at all points is taken into account. Therefore, this option is suitable for feeding a group of devices with low power. The disadvantage of the loop option is the dependence of the circuit elements on each other, and, accordingly, the general vulnerability - in the event of a break or damage to one of the jumpers, all subsequent links cease to function.
The disadvantage of the loop option is the dependence of the circuit elements on each other, and, accordingly, the general vulnerability - in the event of a break or damage to one of the jumpers, all subsequent links cease to function.
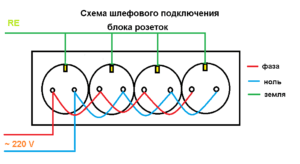
Diagram of parallel connection of the socket block
Unlike the previous method, the star connection implies an independent wire connection to each component cell of the block. That is, splitting is performed in the junction box phase and neutral conductors to taps (the number corresponds to the number of connectors), which are directed to the corresponding contacts of the device. For example, if device consists of three cells, then three phase and three neutral wires are placed in the cable channel, laid from the box to the installation site.


"Zvezda" has the advantage that if one of the elements is damaged or fails, the rest will work in the same mode, providing their consumers with electricity. The disadvantage of this method of switching can be considered the relative complexity of installation and the relative high cost of wiring due to the need to use additional wires.
Standards and wiring diagram
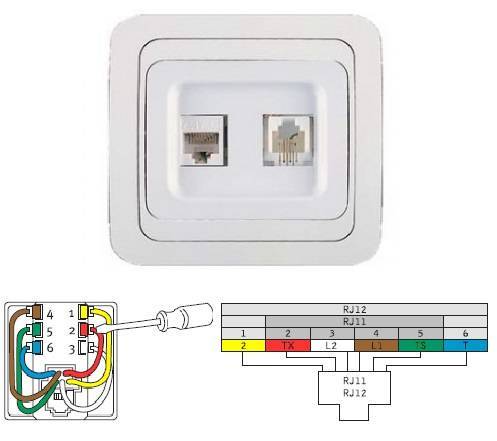
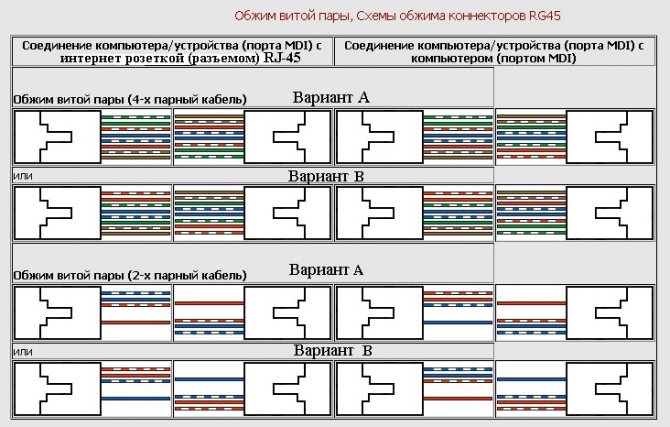
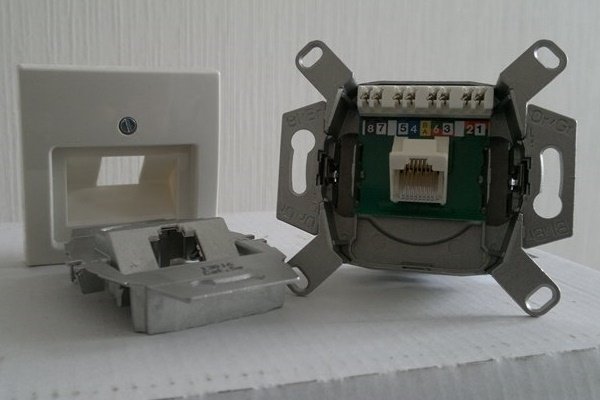
Open the cover of the contact part and carefully study the markings. Each RJ45 socket can be connected in two ways:
according to standard “A”
according to standard "B"
AT used in most cases the second option is "B". To understand where to connect which wires, carefully inspect the case. It should show which standard corresponds to certain contacts.
For example on Unica:
protocol “B” refers to the top color marking. When connected, you will be guided by these colors.
“A” - to the lower color marking
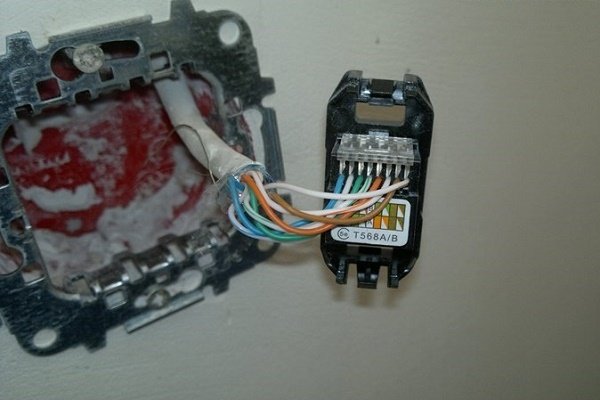
If this is sorted out, then with further installation there will be no difficulties. Protocol “B” corresponds to the color scheme according to EIA/TIA standard-568B. One side of the clip should have the following colors:
white-orange
Orange
white-green
green
blue
white-blue
white-brown
brown
Pass the wire through the cap. In this case, as mentioned above, the top layer of insulation of the UTP cable should not be removed by more than 2.5 cm.
You can’t strip it under the very wall of the socket, as they do with ordinary cables NYM or VVGnG.
The segment without insulation must be of the minimum length. All these layers are not made easily.Their exact number per 1 meter of cable is strictly calculated and regulated.
Otherwise, with the wrong connection and stripping, not only the speed, but also the quality of data transfer may decrease.
Next, insert all the wires into the contact grooves according to the colors.
Then just snap the lid on. Extra segments of veins that protrude outward must be cut off just after closing the lid.
The main advantage of such Internet sockets is that with them you don’t need to remove the insulation from the cores at all and expose it to copper. Special knives are already installed inside the outlet itself.


It's like it's already in the design. That is, when the cover is closed, it cuts off the insulation itself and lays the wires to the desired depth of the connector.
Next, install the front panel and decorative frame.
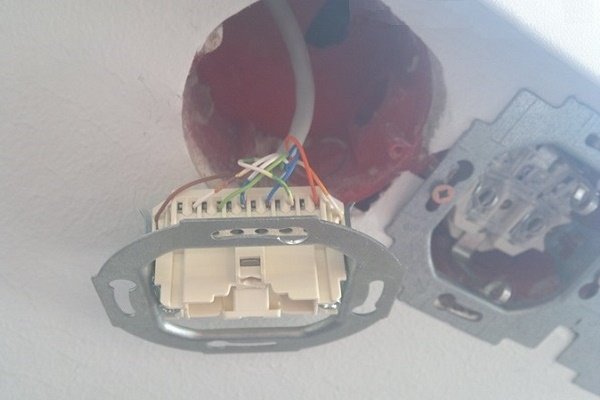
Connecting an internal internet socket
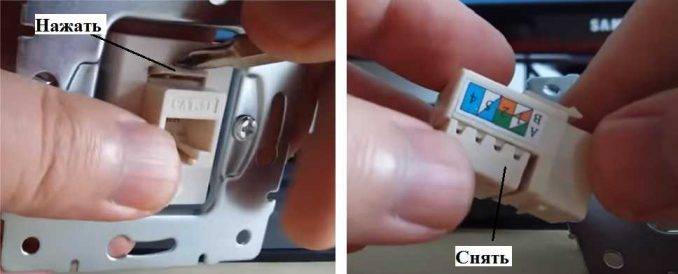
The main task of the connection is to be able to properly disassemble the Internet outlet, since each manufacturer solves this problem in its own way.
The most important thing is to disassemble it so that there is free access to contacts with microknives. It is in this part that the connection is made, after which the housing cover with the contacts is closed. Each model of such an outlet has its own way of assembly and disassembly.
If we take, for example, a Legrand computer socket, then in order to get to the place where the wires of the Legrand Valena RJ-45 socket are connected, you first need to remove the front cover. Inside the case, you can see a white plastic panel with an impeller, where an arrow is drawn (see photo).
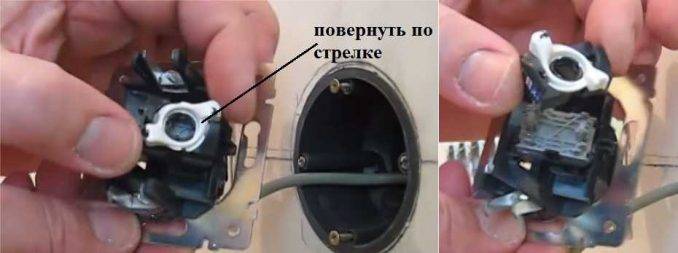
The handle on the panel is turned in the direction of the arrow, after which the front panel is removed.On the surface of the panel there is a metal plate with a pattern, by which you can determine which contacts and which wire should be connected to. The color marking of twisted pairs is also indicated here. Before starting the connection, wires prepared for the connection process are threaded into the hole located on the plate.
To make it more clear, it is better to watch the prepared video.
Installation of computer sockets RJ-45 Legrand.mp4
Watch this video on YouTube
You can also find a socket for connecting the Internet from Lezard. Here the design is completely different. The front panel is designed with screws, so to remove it, just unscrew the screws. As for its insides, everything here is fastened with latches. To pull the insides out of the case, you need to pick up an ordinary, small screwdriver and squeeze the clamps.
To get to the contact group and remove it from the case, you need to press the latch, which can be found on top. As a result of such actions, a box may be in your hands, from which you will have to remove the cover to get to the contacts. To remove the cover, it is enough to pry off the side petals with a thin object. You will still have to make some effort, since the latch is quite elastic. At the same time, you need to remember that in the hands of plastic and, if everything is not done carefully, then you can break it.
For more clarity, it is proposed to familiarize yourself with the video lesson.
How connect internet socket LEZARD
Watch this video on YouTube
In conclusion, it is worth noting that the presence of an appropriate video on the Internet simplifies the process of mastering various actions or carrying out work related to connecting computer sockets.Despite the fact that each socket model is arranged in its own way, the connection process is the same for everyone. The most important thing is to master the connection process itself, associated with certain features. It would seem that it would be easier if the connection was carried out using twisting or soldering, which would be available to almost everyone. But at the same time, it would not be possible to ensure the compactness and accuracy of the connection itself. But such connections have their advantages: you wouldn’t have to stock up on “jacks”. Although, on the other hand, this connection method is more designed for professionalism, simplicity and speed, especially if you use a special tool.
And, nevertheless, if there are at least some skills in working with electrical wires, then such a connection does not contain any difficulties. Without inviting any specialists, it is really possible to wire a computer network around your apartment or private house. Moreover, such specialists will take a considerable amount for this.
Types and types of Internet outlets
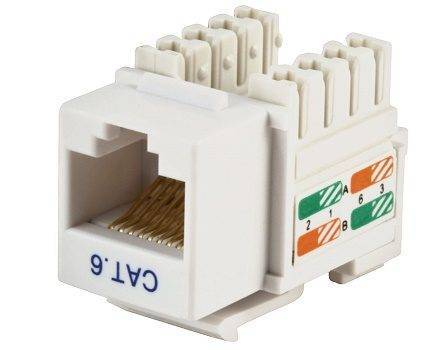
In order to understand what type of sockets we need to use in a particular case, it is necessary to understand the general classification of sockets for the RJ-45 connector.
But before that, RJ-45 is a unified standard for physically connecting computers and network switches using standard 8-wire shielded wire, often referred to as "twisted pair". Because by making a cross section of the cable, you can easily see 4 intertwined pairs of wires. With the help of this type of wire, the vast majority of information transmission channels in local and public networks are built.
Experts suggest the following classification of sockets:
- By the number of slots.There are single, double and terminal sockets with 4-8 connectors. In addition, there is also a separate type of combined sockets. Such modules may contain additional types of interfaces, including audio, USB, HDMI, and RJ-45 itself.
- By data transfer rate. There are many varieties and categories, the main of which are category 3 - data transfer rates up to 100 Mbps, category 5e - up to 1000 Mbps and category 6 - up to 10 Gbps at a distance of up to 55 meters.
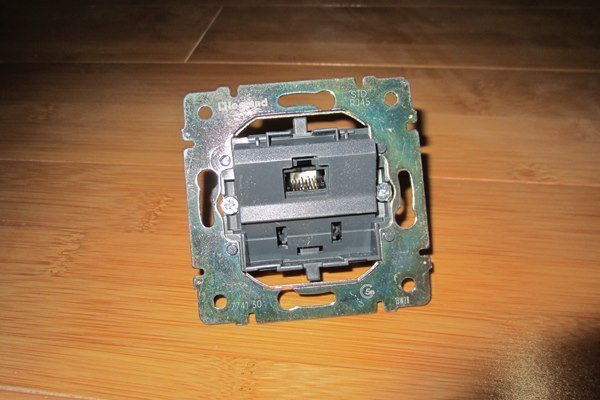
- According to the principle of fastening. By analogy with power wiring products, there are internal and overhead computer sockets. At the inner socket, the mechanism (contact group of terminals) is deepened into the wall, at the outside it is laid along the surface of the wall.
For a socket hidden in the wiring laid in the wall, it is necessary to have a protective plastic "glass" in the wall, where the terminal block is attached. An external socket is usually attached using a patch panel to the wall surface.
Image gallery
Photo from
There are devices with mechanisms that differ from traditional representations. For example, ABB sockets from the Jaeger BASIC 55 series
The modular version of the socket for the Internet differs from the usual models only in appearance. The wiring diagram is exactly the same.
In the ranks of the Internetsockets for concealed installation rare, but there are modifications with terminal blocks. It is also easy to understand the principle of their installation.
Standard Internet socket mechanism Legrand
Internet socket option
Connecting a modular type of Internet outlet
Internet outlet with modular twisted-pair connectors
As for manufacturers: there are many of them, domestic and foreign.Recently, "Chinese" network equipment companies have begun to "align" in terms of the quality of finished products relative to the rest. Definitely high quality products differ from such world brands as Digitus, Legrand, VIKO, etc.


Separately, it is worth mentioning "keystones" - keystones.
This is a modular architecture for placing individual "stones" - modular connectors for a variety of audio, video, telephone, optical, Mini-DIN and other interfaces, including RJ-45 on one standard socket block panel. This is a fairly flexible and scalable system for providing interfaces to the end user.
Conclusions and useful video on the topic
The video materials offered by us will clearly help to understand how to install power outlet block.
Video #1 Arrangement of socket boxes for the socket panel:
Video #2 Instructions for installing a five-socket block:
Installing a socket block is not much more difficult than connecting a conventional or double socket
Having shown attention and maximum accuracy, installation is quite within the power of any owner who has only basic skills in electrical work.
Want to talk about your personal experience for installation and connection group sockets? Do you have any useful information or questions while reading the article? Please write in the box below.


