- How not to do
- Unstable Circuits
- Completely wrong
- Do-it-yourself towel dryer installation
- How to install a heated towel rail "ladder"
- Installation of a water heated towel rail
- Essence of the question
- Design features
- Step-by-step instruction
- Necessary tools
- Dismantling of old equipment
- How to properly install bypass and ball valves
- Fastening
- brackets
- supports
- Fitting
- Installation, tightening "American"
- mark
- Hole preparation
- Fixation
- Tightening fasteners
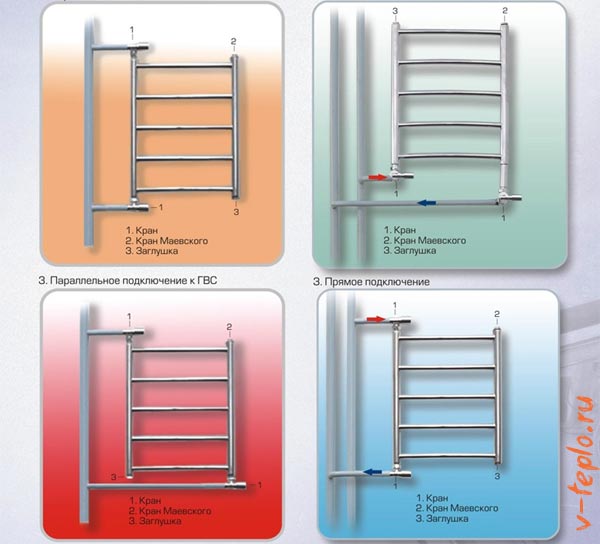
- Choosing a connection scheme for a water heated towel rail
- Basic moments
- Common Mistakes
- Installing an electric towel warmer
- Installation of different types of heated towel rail
How not to do
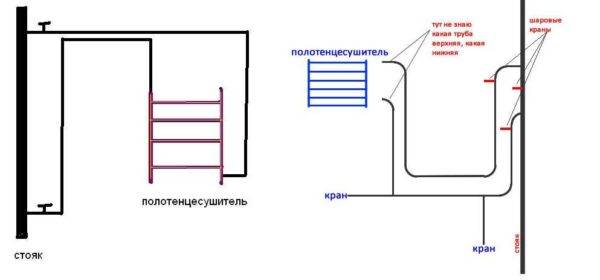
All the above schemes work stably. As you can see, all the bends go straight, without bends in the form of an arc or rings. This is not accidental - air accumulates in all the irregularities, which interferes, and sometimes completely blocks the circulation.
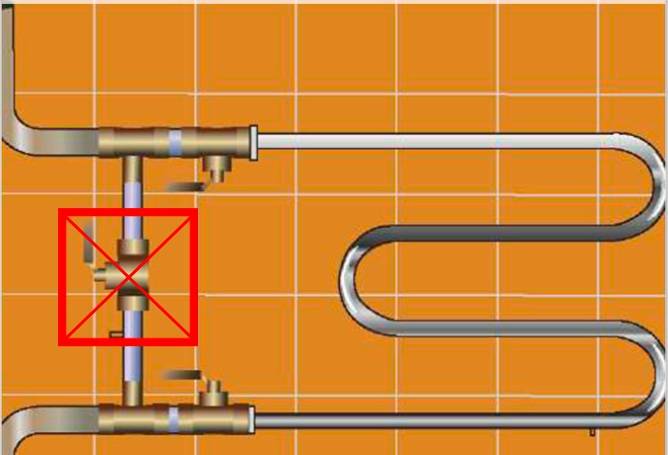
This scheme does not work
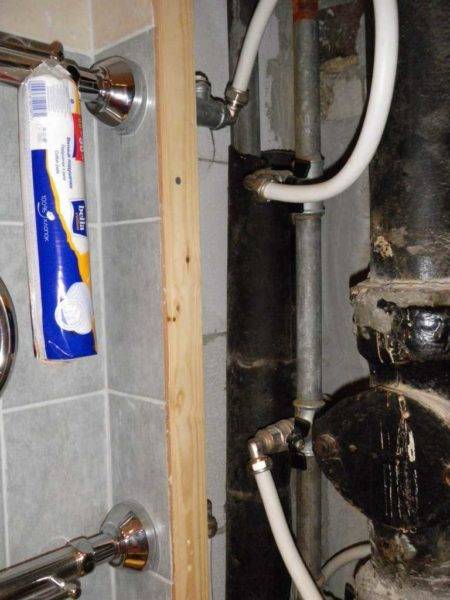
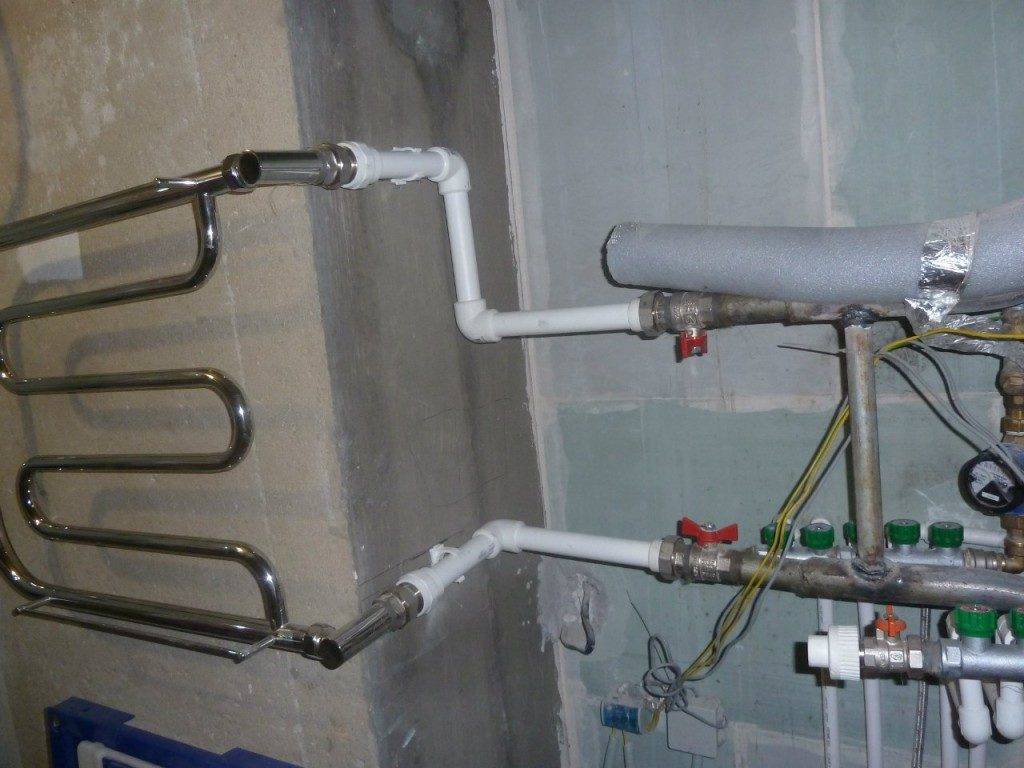
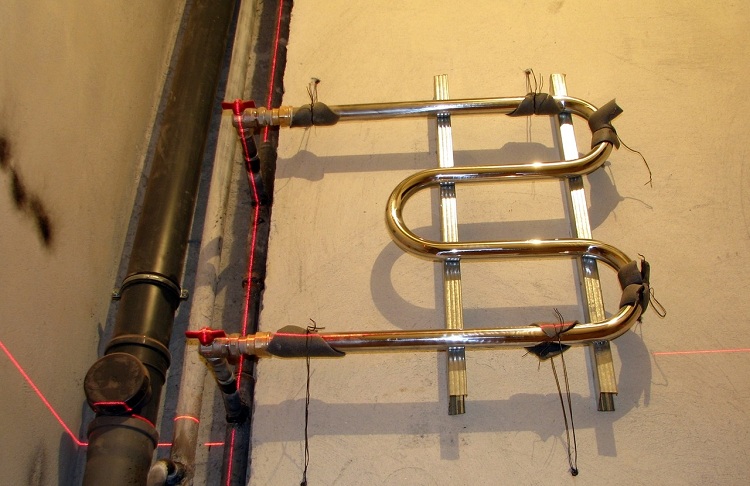
In the photo, the installation of the heated towel rail is incorrect. Made at least two mistakes:
- the taps are made narrower than the center distance of the heated towel rail;
- they are made of a metal-plastic pipe with loops.
Such a connection simply cannot work.Metal-plastic pipes are an excellent material, but not for connecting heated towel rails. Their fittings have a very strong narrowing of the lumen, which has a bad effect on circulation. Plus, air accumulates in the loops, and the flow through the upper loop, even when supplied from above, will not go - too much hydraulic resistance to water must be overcome.
Unstable Circuits
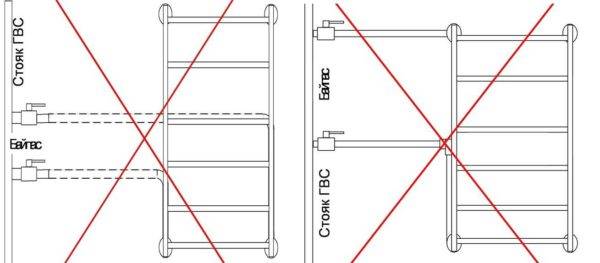
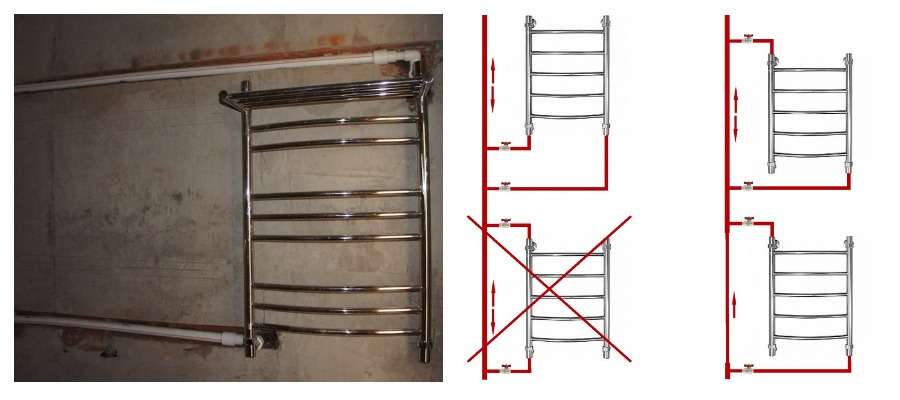
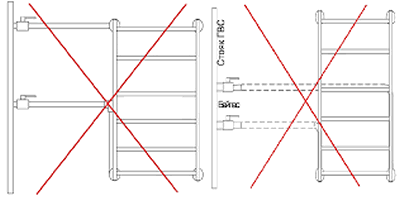
The next two schemes may work, but not always. In the lower part of the heated towel rail, water stagnates and, with some difference in height, cannot rise. No one can say exactly when it will work, and when not. Depends on the pressure in the riser, on the diameter of the pipes and the design of the dryer itself.
Unstable wiring diagrams
With such a connection, even a working connection may suddenly (usually after a stop) stop working. It's simple: the pressure has changed, the pipes are clogged, the water does not “push through” from below, towel warmer not heating.
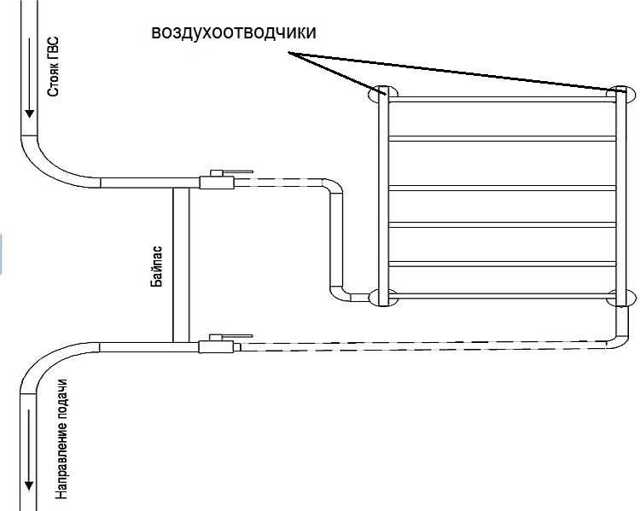
Another option for an unstable circuit is with a loop on top. Again, it will work under certain conditions. But sooner or later, the highest point will become airy and block the circulation. Trouble can be helped if an automatic air vent is installed at the highest point, but if the pressure drops, it will not save.
With a loop at the top
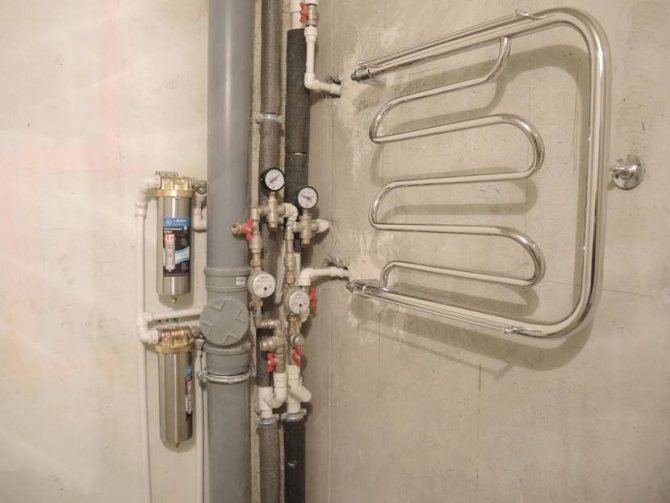
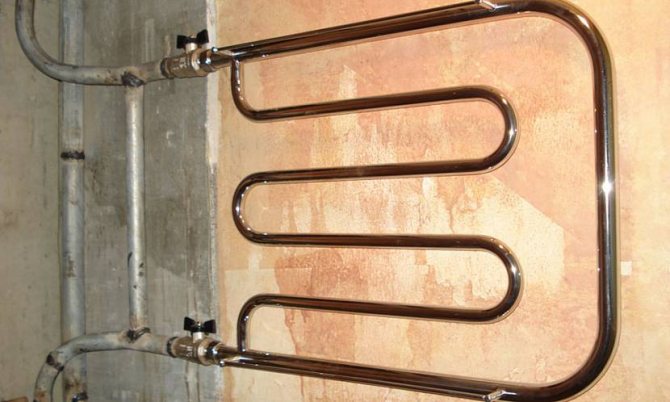
Completely wrong
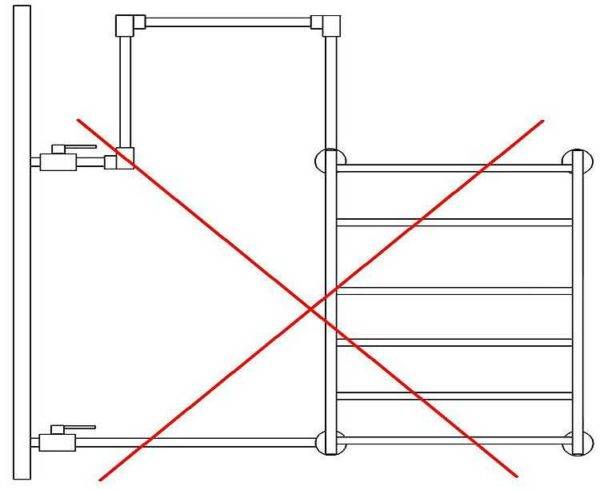
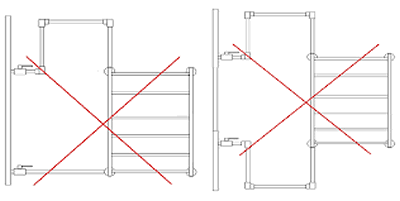
The photos below are examples of what not to do. Schemes without a tap on the bypass are inoperative. What it threatens is known. In addition, after several years of operation, they will generally cease to function. Most likely this will happen after the next shutdown - the system will become clogged with dirt. This is because the entire flow of hot water is started up through the heated towel rail.After repair, the water carries a huge amount of dirt, which safely settles in the bends (in the lowest areas in the first place). In a few years, everything is clogged completely. For good, everything needs to be redone and connected correctly, but only flushing can help grief.
Very bad idea
It is necessary to rinse both the heated towel rail and the supplies to it. To do this, we remove the dryer and wash it in the bathroom, and wash the outlets one by one by connecting a hose to the vacated outlets, the second end of which is connected to the sewer. By manipulating the taps, pass the flow of hot water through one outlet, then through the other. After washing, everything is installed in place. It may be possible to start the system after that.
Do-it-yourself towel dryer installation
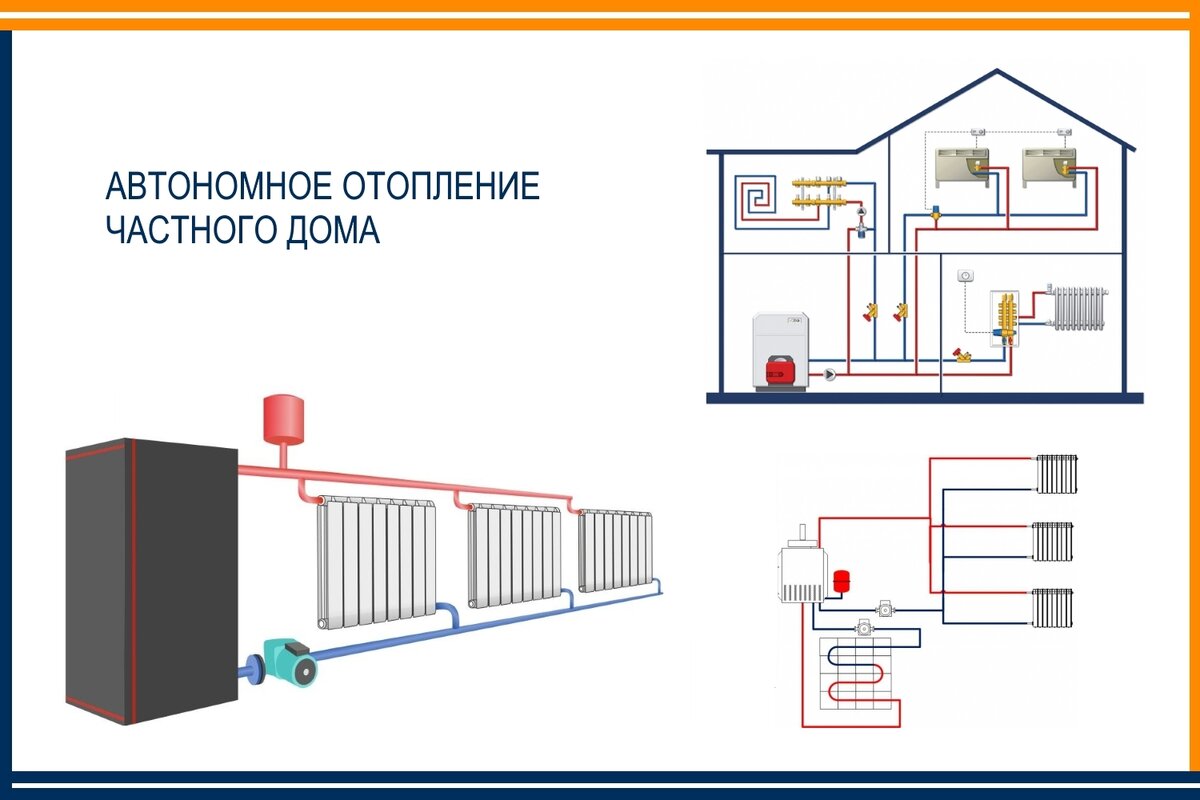
Today, it is quite difficult to imagine a bathroom without a heated towel rail. This important attribute occupies the most important place in our houses and apartments. In addition to the fact that this device dries our towels instantly, it even regulates the air and climate in the room. Everyone knows that bathrooms are dominated by humidity, dampness, etc. And in order to avoid unpleasant odors, it is necessary to install a heated towel rail. We will find out in the article how exactly this is done.
This device, some people install themselves. But in general, it is recommended to invite professional plumbers who are quite well versed in every detail. Whatever decision you make, in this article you will read a clear description of the connection and installation of a heated towel rail. This is done quite easily and simply. Step-by-step instructions will help anyone understand the simplest little things.
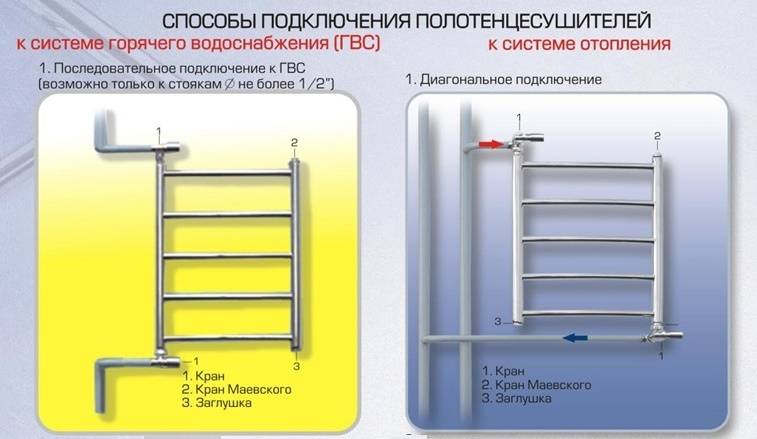
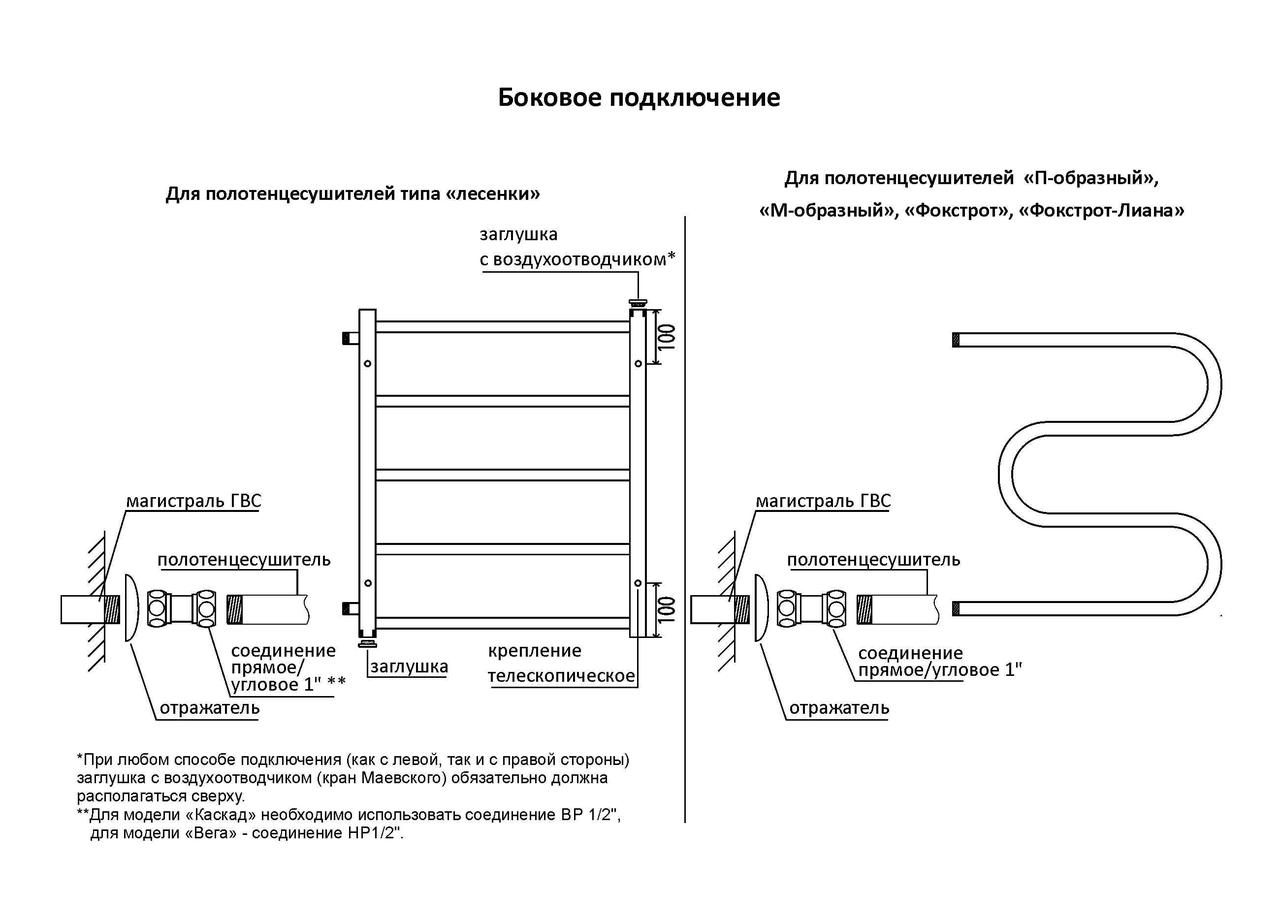
How to install a heated towel rail "ladder"
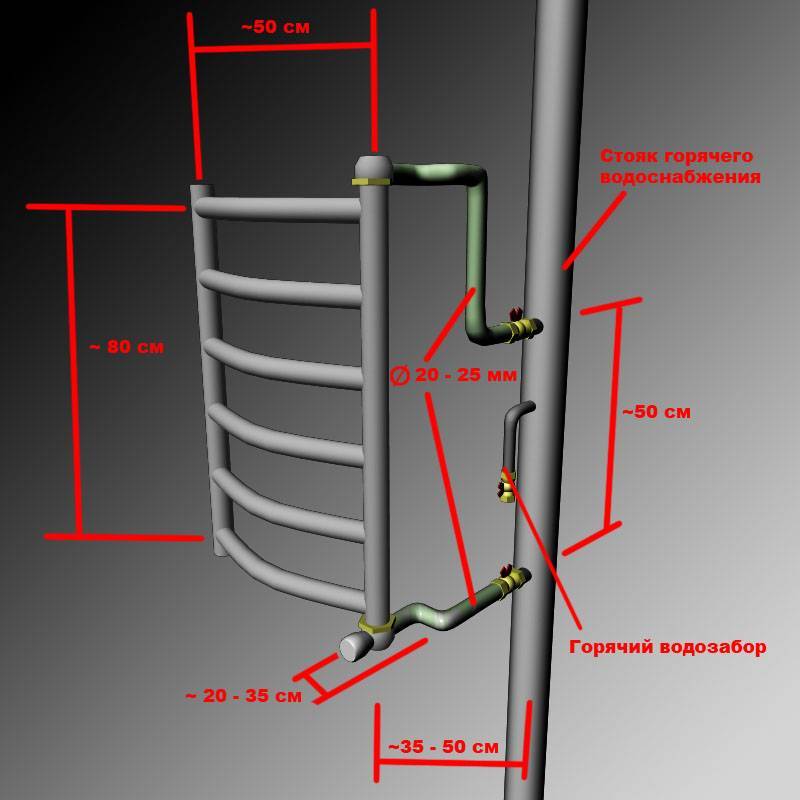
The connection diagram of the "ladder" model provides for the use of such methods of connecting the unit to the riser, such as diagonal or lateral. A model that provides high heat dissipation, allows you to decorate the bathroom. You can mount the device yourself without special knowledge, but with a little experience. It is necessary to connect the unit in a specific sequence, reminiscent of the installation steps for a simple configuration model. To correctly install the unit, you need to consider the following nuances:
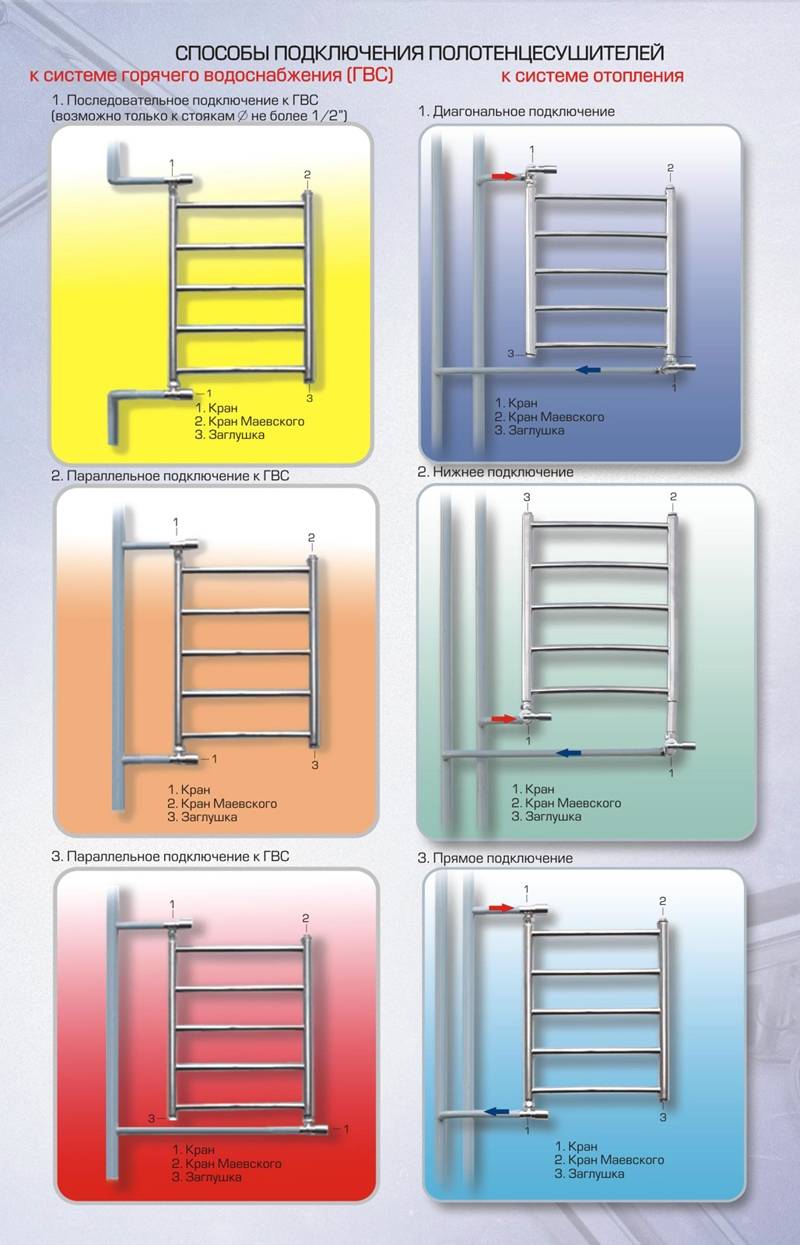


- Place the riser outlet at the bottom below or at the level of the lower point of the device, and at the top - above the top.
- Observe the horizontal level of the supply pipes or make a slope equal to 5-10 mm along the total length so that air plugs do not appear.
- Do not use pipes with the smallest diameter for the bypass when bottom feed is selected.
- Select pipes for uniform heating with a diameter of at least 25 mm, for the manufacture of which polypropylene was used.
- Place the pipes in special insulation if you plan to wall up the pipeline in the wall.
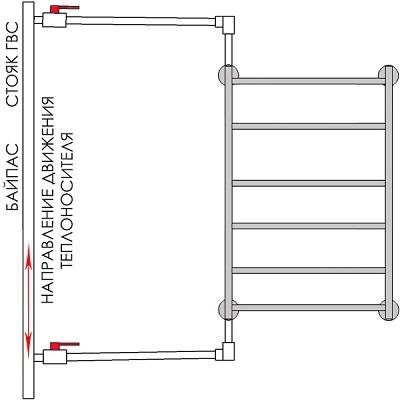
When installing a narrowed bypass or its displacement, natural circulation will work simultaneously with forced circulation. This scheme has the only drawback, since only the top way to connect a heated towel rail is possible. The lower installation option of the unit is due to the complete inoperability of the system.
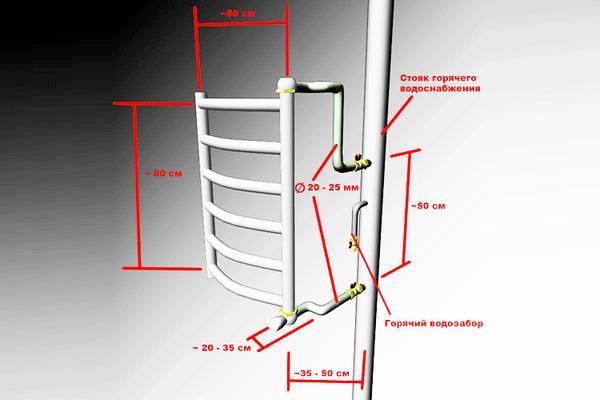
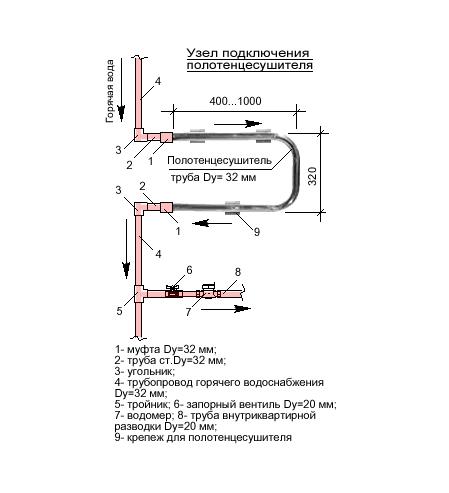
Installation of a water heated towel rail
The installation of a heated towel rail with a water coolant is preliminarily coordinated with the utilities. This is necessary to determine the time to turn off the water supply service. Connecting the unit to the general communications is carried out as the developer did.Alteration of the system can lead to pressure and temperature drops in the network, less often to depressurization of the line.
Water models work by connecting to a heating network or a hot water supply system. Thus, the circulation of the coolant through the pipes of the heated towel rail is carried out. The choice of equipment is determined by the pressure in the serviced line:
- old fund - 5-7 atm;
- new buildings - up to 10 atm;
- autonomous system - as a rule, below 1.5 atm.
It is also necessary to read the recommendations from the manufacturer. So, there are models that are unacceptable to be connected to the hot water supply. In this case, units intended for installation in the water supply system can be embedded in the heating circuit. And there are coils for installation in any pipeline with an aqueous medium.
Connecting equipment to hot water supply
Before connecting a heated towel rail to a hot water or hot water supply system, you need to familiarize yourself with the pros and cons of the solutions. So, in the first case, there is a seasonal dependence and the presence of a system with a water coolant. But the circulation of the medium occurs around the clock. In the second case, the heating of the unit occurs during the active use of hot water, which is why the pipes are noticeably colder at night than during the day. But the equipment works all year round.
Replacing a heated towel rail in a building with central service with an analogue from the developer can be carried out independently. It will be enough to agree on the suspension of water circulation. If the devices differ from the original ones, then drafting and approval of documents in the housing and communal services will be required.
To understand how to connect a heated towel rail, you need to familiarize yourself with the general requirements:
- narrowing the diameter of the coolant source is unacceptable;
- a bypass is installed between the riser or water supply and the unit;
The location of the bypass in front of the heated towel rail excludes the installation of shut-off valves on the jumper and in the area between it and the supply line.
The bypass will ensure that the circulation of water in the central system is maintained in the event of a failure of the heated towel rail. If you install ball valves in front of the equipment, you can will repair or replacement of the device without coordination of the event with utilities.
Essence of the question
 Optional installed bypass
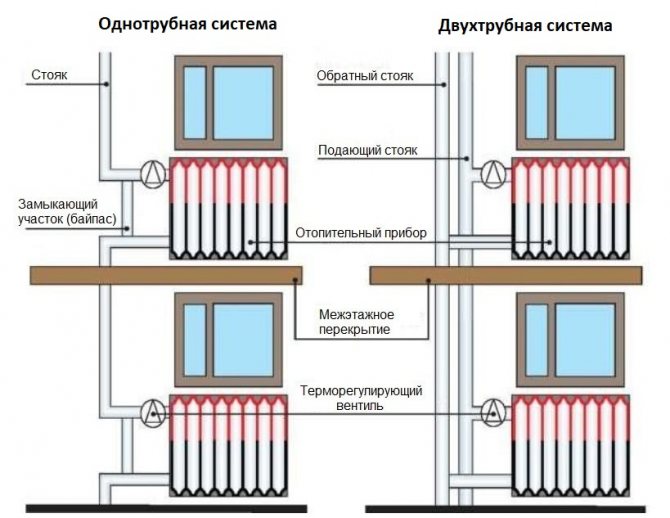
At its core, a heated towel rail is no different from a heating battery, representing one of its varieties. Moreover, as a rule, it is connected to the riser of the general heating system. In turn, the bypass is a jumper between the inlet and outlet pipes before the coolant enters the consumption device. In the case under consideration, this is a jumper in front of the entrance to the heated towel rail.
What is such an element intended for, and is a bypass needed when installing a heated towel rail in the bathroom? The main purpose of such a jumper in any system is to provide a channel for the passage of fluid, bypassing the device. In the case of a heated towel rail, the installation of a bypass allows solving such problems as directing the coolant flow around it during repair work and reducing the pressure in the dryer if necessary.
In addition, through the formed additional channel, it is always possible to redistribute the hydraulic load, i.e., if necessary, reduce the pressure directly in the parts of the dryer.In particular, in the heating system (especially during pressure testing), the pressure sometimes exceeds 9-10 atmospheres, which not every dryer can withstand. Another advantage can be noted: the bypass makes it possible to maintain the desired temperature to ensure drying and install automatic control circuits and maintain the drying mode.
Summarizing what has been said, certain conclusions can be drawn. A jumper for a heated towel rail is not a mandatory element, the installation of which is regulated by the standards, but from a practical point of view, it is necessary to eliminate unnecessary problems, as well as increase the reliability and functionality of the device. However, one should also decide on the question of whether a jumper is always necessary.
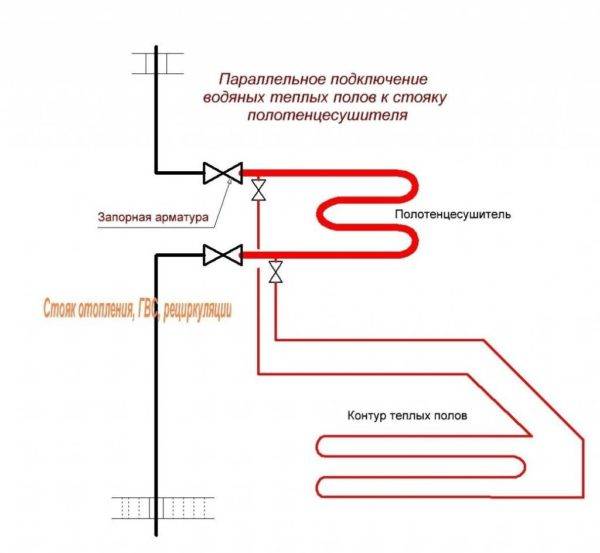
If the connection of the heated towel rail is carried out by serial insertion into the main, then a bypass is required. This option is the most common in practice. At the same time, when we assemble a parallel system, the riser itself plays the role of a jumper. The heat carrier in this case moves along the main pipe, regardless of the presence of an additional, parallel circuit, and the heated towel rail can be turned off without blocking the common line.
Design features
 The water heated towel rail offered for sale today can be made in various versions. Among the models available for sale today, the coil is especially popular, the connection point of which is the common hot water supply system. Most often, this sanitary ware could be found in Soviet-built houses.
If you pay attention to new buildings, then there is another option for installing a heated towel rail, which boils down to connecting to a hot water riser using a separate outlet. This option makes it possible to install a heated towel rail of any modification, from the traditional U-shaped to the popular "ladder"
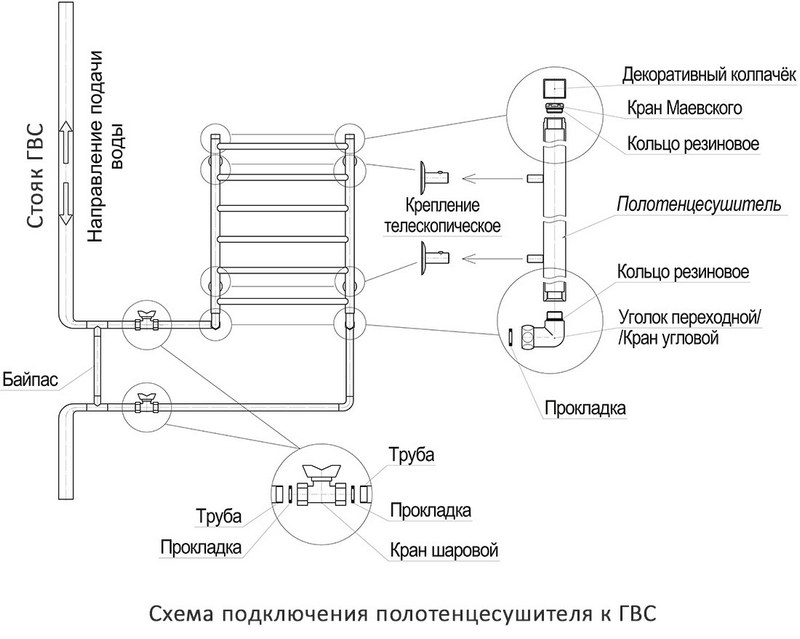
And among all the options available today, it is the last one that can most often be found in the apartments of our fellow citizens. Interest in it is due primarily to its ease of use, as well as high functionality. To connect such a plumbing product, you will need the following items:


- valves with which water will be turned off;
- water circulation system, presented in the form of supply and return pipelines;
- stopper plug;
- air release valve;
- a bracket with which the sanitary ware is mounted on the wall.
Step-by-step instruction
The order of installation and connection to the system that provides the supply of coolant does not depend on the selected scheme.
Necessary tools
The type of tools is selected based on the type of heated towel rail. Coils are generally supplied with all parts required for installation. Additionally, a soldering iron and a knife may be required if polypropylene pipes are used.
Dismantling of old equipment
Before proceeding with dismantling, it is necessary to coordinate these works with the management company (if the coil is installed on the wall in an apartment building). Then you can remove the old heated towel rail.
In this case, two options are possible:
- Union nuts are unscrewed, through which the dryer is attached to the supply lines.
- The coil with the help of a "grinder" is cut off from the supplies. The rest of the latter should be enough to cut the thread.
In both cases, the length of the supply pipes must be sufficient to insert the jumper.
How to properly install bypass and ball valves
You can hang a heated towel rail without a jumper. However, most plumbers recommend installing the latter. The bypass is mounted on couplings pre-cut into the pipes. If necessary, threads are cut on the inlets. If work is carried out on steel pipes, then a bypass of the same section is welded to the latter. Ball valves are mounted at the ends of the coil. In this case, it may also be necessary to thread the old pipes.
Fastening
As mentioned above, various fasteners can be used to install heated towel rails, regardless of the type of coil.
brackets
Arms are subdivided on telescopic and demountable. The order of installation of these fasteners in both cases is the same. Installation is carried out as follows: marks are applied to the wall, along which holes are drilled. Then a bracket is screwed into the latter by means of anchors and screws. Telescopic models are convenient in that they not only fix the heated towel rail, but also allow you to adjust the gap between the pipes.
supports
Like detachable fasteners, supports can be attached to the wall using self-tapping screws or screws that are screwed into the wall. Such elements are rarely used to fix the coolant pipe, as they create certain difficulties during installation.
Fitting
Fittings are used to fix the supply pipes to the heated towel rail. There are several types of these fasteners, each of which is used in the appropriate conditions: "American" (with a union nut), plugs (close unused inputs), manifolds (create a separate branch), and so on.
Installation, tightening "American"
"Americans" are mounted at the outlet of the heated towel rail. The thread before starting work is treated with a sealing paste, and then the nuts are tightened. When performing the last work, it is not recommended to apply excessive efforts.
mark
In order to determine the points at which holes for installing fasteners will be drilled, it is necessary to attach the heated towel rail to the outlet pipes, align it with the building level and make appropriate marks on the wall.
Hole preparation
When installing coils, it is recommended to make deep holes. To do this, you need to drill a concrete wall. Then you need to insert dowels into the holes obtained, into which the screws of the fasteners will be screwed.
Fixation
Before installation, fasteners are put on the pipes of the heated towel rail, which are then screwed to the wall with screws. In this case, it is recommended to use brackets, since the latter allow, after installation, to adjust the position of the coil according to the level and relative to the supply pipes and the wall.
Tightening fasteners
At the last stage, all fasteners and fittings are tightened with an adjustable wrench. With excessive force, you can strip the threads, because of which you will have to repeat the described procedure.
To check the performance of the system, you need to slowly, in order to avoid water hammer, open the inlet and outlet stopcocks.Water should not seep through at the pipe connections.
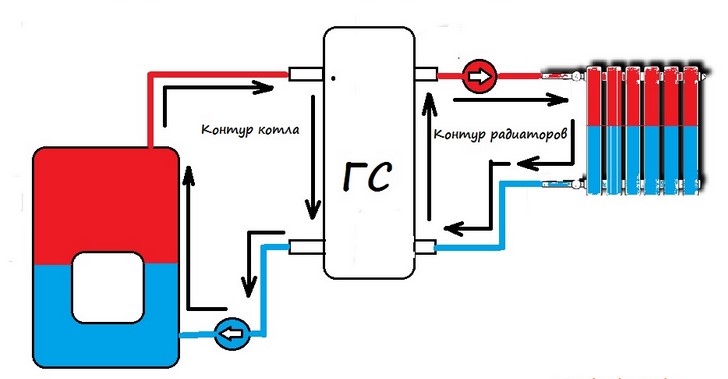
Choosing a connection scheme for a water heated towel rail
Before starting plumbing work, the most important step in installing a heated towel rail is the choice of the scheme by which it will be connected. Without this, the probability of making an error increases, due to which the system will be inefficient or will not work at all. We will study the basic schemes for connecting heated towel rails, the rules for execution and typical shortcomings made during illiterate installation.


The simplest and most reliable scheme is the one in which the "towel" is an integral part of the riser, and, in fact, its offshoot of a U-shaped or some other shape. Thus, heated towel rails are connected in most houses with an old water supply system (unless the owners of the apartments replaced them with more advanced models).
Scheme of the direct and most simple connection of a heated towel rail to a riser
The implementation of the scheme presented above in practice
When using this method of connecting a heated towel rail, mounting ball valves or other locking elements on it is unacceptable, since when they are locked, the riser is blocked, and the neighbors are left without hot water. In addition, it reduces water pressure and temperature for the following apartments
To be able to turn off the heated towel rail or regulate the temperature of its operation without interfering with the activity of the riser, it is necessary to connect a bypass. It will be discussed in more detail in the next section of the article.
Bypass connection examples
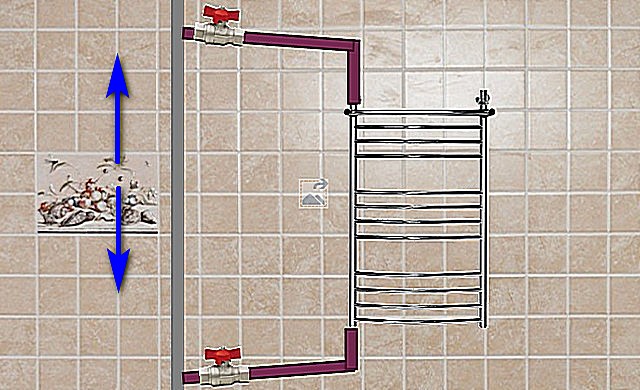
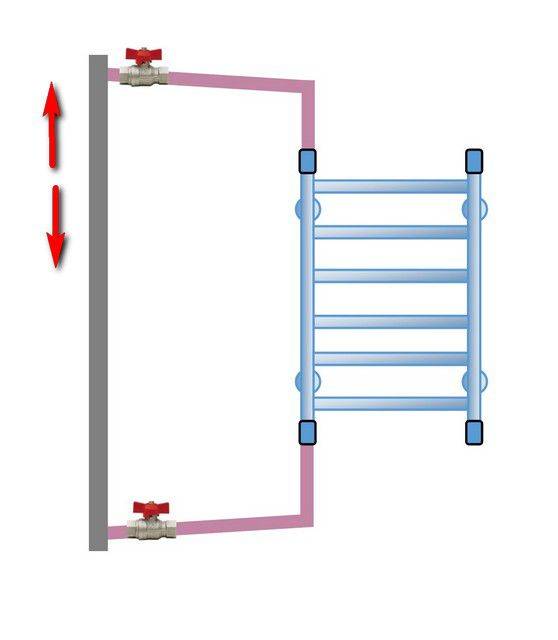
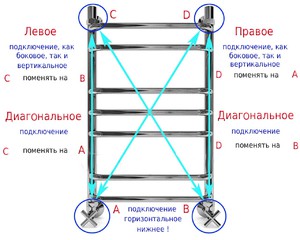
Now let's consider the first connection scheme for a heated towel rail with taps and bypasses - with a side or diagonal supply.The difference between them is insignificant and the choice depends on your personal preferences. The effective operation of such a connection scheme is ensured when the following rules are followed.
- When the heated towel rail is located 2 or more meters from the riser, the tie-in of the upper outlet must be higher than the connection point to the heated towel rail, and the lower one, respectively, lower. If the distance is less, direct approaches are acceptable, without a slope.
- The pipes connecting the heated towel rail to the outlets should not have "humps" - air will begin to accumulate in them.
- It is advisable to cover the supply pipes with thermal insulation.
Connection diagrams for a heated towel rail with a direct bypass and taps with side and diagonal inlets, respectively
Valid variant of the scheme presented above
The most common mistake with a lateral or diagonal connection scheme is that a “hump” is formed in the upper supply pipe, in which an air lock forms over time. It will block the circulation of water in the heated towel rail, and it will cease to be effective.
If it is impossible to arrange the supply pipes without a "hump" - mount a Mayevsky crane on the heated towel rail. It will help bleed air from the system after turning off hot water or plugging
Another mistake that is not uncommon when connecting heated towel rails to the side is that water circulation will be disrupted in it under the lower outlet and over time, work efficiency will decrease to a minimum.
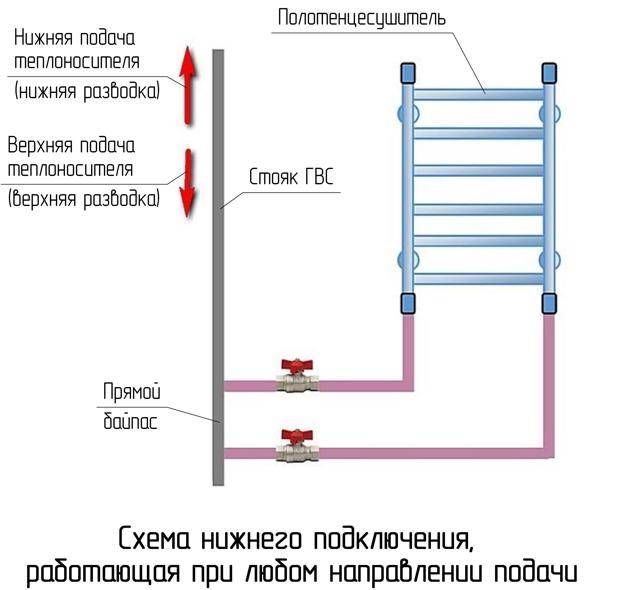
For some H-shaped towel warmers and larger sizes, the connection diagram with the bottom connection is used, as shown in the image below.As for the side or diagonal connection, there are several rules for it, the implementation of which will ensure the efficiency of the entire plumbing system.


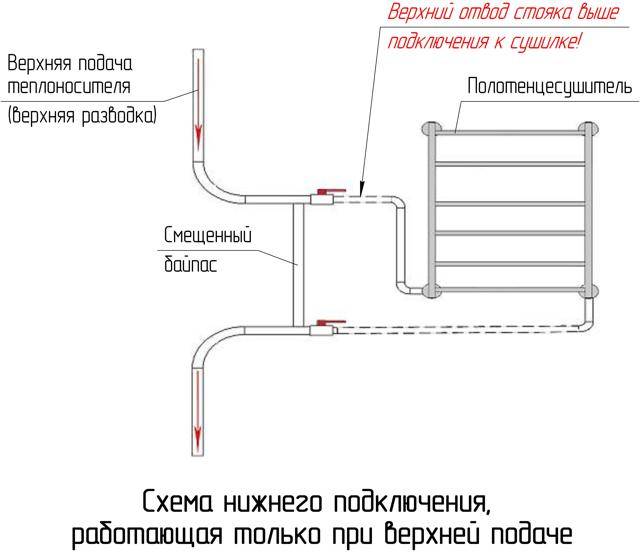
- If the diameter of the riser is greater than the diameter of the bypass or the latter is displaced, then the upper tie-in of the outlet must necessarily be located below the heated towel rail itself.
- The lower tie-in to the riser must be located below the heated towel rail, regardless of the conditions.
- It is advisable to cover the supply pipes with thermal insulation.
- The presence of humps in the supply pipes is undesirable - air jams will quickly arise in these places.
- It is necessary to mount a Mayevsky tap on the heated towel rail.
Wiring diagram for a heated towel rail with a bottom supply
An example of the bottom connection of a heated towel rail. Since the bypass has the same diameter as the riser and is not offset, the location of the upper tie-in of the outlet above the bottom of the heated towel rail is acceptable
With this connection of the lower outlet, the circulation of water in the heated towel rail will be disturbed, over time it will cool down and stop working
Basic moments
Competent installation of any sanitary ware in the bathroom requires a specialist to have professional skills. The fact is that it is enough to allow a small error in measurements to cause serious troubles and problems with the operation of the device. Therefore, if you are faced with the task of installing a heated towel rail, it is best that this work be entrusted to a qualified specialist.
There are some important things to keep in mind when doing this kind of work:
- When taking measurements, rounding is not allowed;
- Before installation, it is necessary to accurately select the installation location of the sanitary ware;
- It is mandatory to use in the design of elements such as couplings, fittings, brackets, etc.
- Be sure to choose the correct connection scheme for the device.
Common Mistakes
Since connecting a heated towel rail does not imply any particular difficulties, they often do the work themselves. However, after installation, problems still arise. Possible causes are connection errors.
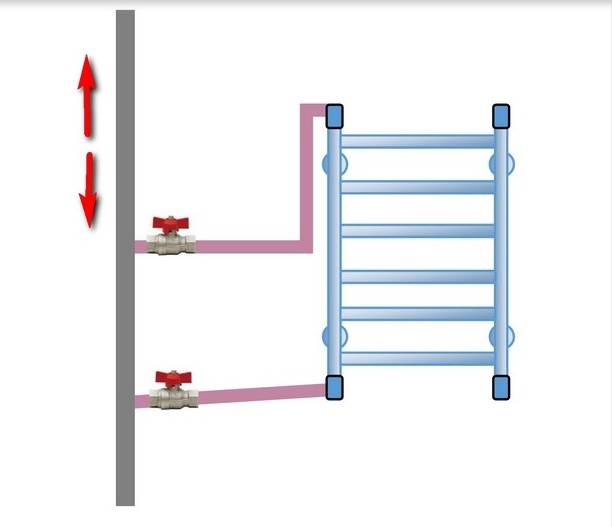
- Return (bottom inlet) installed at or above the lower drying point. The result is coolant stagnation.
- Installation of the dryer above the supply, in this case, the movement of water is difficult.
- The use of pipes-supplies with bends. The result is an air lock that prevents the free circulation of the coolant.
- An unacceptable scheme when the outlet and inlet pipes are reversed.
- Mismatch in the diameters of the riser, liner, coil.
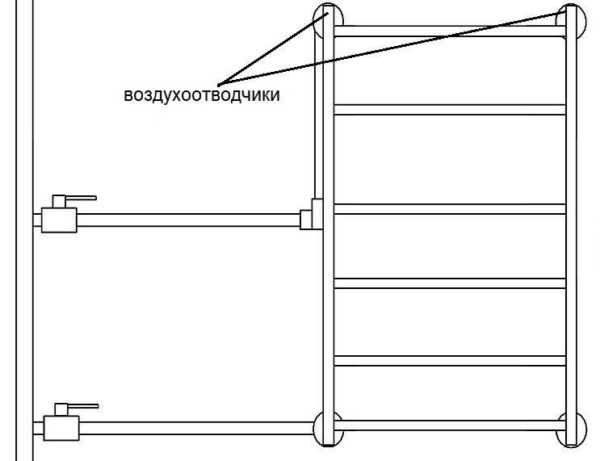
A common nuisance is the presence of air in the system. To avoid such excesses, a Mayevsky crane is installed to bleed it. This device will allow you not to know such problems throughout the entire service life of a simple but effective design for drying.
Connecting a heated towel rail, as well as choosing the optimal scheme, cannot be called very difficult, this mission is doable by home craftsmen
The important thing is to follow the rules. In this case, the chance of encountering an error is minimized.
For a better understanding of the “Connecting a heated towel rail” operation, it does not hurt to see and hear in advance what other craftsmen think and how they do it. One of the useful videos can be viewed here:
Installing an electric towel warmer
The main advantage of an electric heated towel rail is the ease of installation. Like any wall-mounted electrical appliance, it must be hung on the wall and connected to the power supply. It remains to turn on the device itself and use it for its intended purpose.
An important requirement is compliance with electrical safety rules
Such a device should be connected only through the so-called “automatic device” or RCD - a residual current device. If the socket for connecting the device will be installed directly in the bathroom, be sure to use a special device with protection against moisture.


Such a socket is mounted in the thickness of the wall, it has a special cover. In addition, the appliance must be grounded.
When installing an electric heated towel rail, special sockets with increased moisture protection should be used. Connect such a device through an RCD
It is believed that the option with an electric heated towel rail is not economically viable compared to water models, as it increases heat bills. However, the power of such devices is not so great, as is the consumption of electricity.
This is enough to dry a damp terry cloth, but it does not do very well as a bathroom heater.
The choice is yours!
Installation of different types of heated towel rail
To consider the installation features of heated towel rails, it is necessary to remember the types of devices, the principle of their operation and the type of coolant depends on the connection scheme of the heated towel rail and the amount of work.
Installing an electric heated towel rail is a quick and easy job.In fact, its installation is no different from the installation of any electrical product, for example, from connecting a chandelier
It is important to correctly stretch the electrical wiring and securely fix the heated towel rail on the wall.
Installing a water heated towel rail is the most difficult job associated with closing the riser and requiring, if not experience, then at least an understanding of one's own actions.
According to the complexity of the work, the installation of a combined heated towel rail is classified as a water heater, since the product combines two types of coolant and, in addition to connecting to a hot water supply or heating system, also requires an electrical connection.
I will make a reservation about one important feature in connecting a heated towel rail. Experts recommend connecting a heated towel rail specifically to the hot water supply system for one simple reason: heating is absent in apartments of apartment buildings for half a calendar year, and it is quite difficult to stay without a heated towel rail, because its main function is still not heating the room, but drying clothes