- Twisted pair laying
- What are internet sockets
- Classification of Internet outlets
- Internet socket Legrand
- Internet socket Lezard
- Mistakes made when choosing and installing telephone sockets
- How to connect an internet cable to a power outlet
- How to connect twisted pair
- Types and types of Internet outlets
- Wiring signal check
- Checking your internet connection
- What explains the need for sockets
- Connecting Legrand sockets
- Possible connection methods
- Loop - sequential method
- Star - parallel connection
- Combined compromise
- What to do with protective wire?
- Connecting Legrand sockets
- Connection methods taking into account consumers
- Connecting to the router and crimping the connector
Twisted pair laying
If the premises are being built from scratch, then everything is simple. The twisted pair is hidden in the corrugation, then stacked with other communications. Do not forget about the number of wires that start. The diameter is also important (+25% of the total).
If the repair occurs by creating new channels, it is worth considering what the walls of the rooms are made of.
Note! When working with a concrete wall, it should be remembered that there will be a lot of dust and dirt.First you will need to free the room from foreign objects and prepare clothes for work: thick outerwear, a hat, glasses, gloves, a respirator and boots
The depth of the strobe channel is 35 mm, and the width is 25 mm. They are made only at an angle of 90%.
What are internet sockets
Internet socket rj 45 can be found in two different versions:
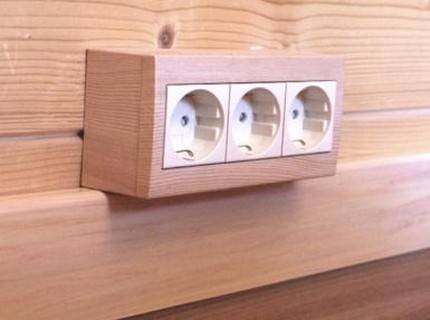
- outdoor. This type of socket is mounted on the wall. Use such sockets when the network cable runs along the wall.
- Internal. Such sockets are installed in the wall. If your twisted pair wire is hidden in the wall, then for convenience and beauty, use an internal socket.

Both options are easily disassembled into several parts. One half of the case performs a protective function, the other half is intended for mounting on a wall or in a wall.
There is also an inner part, it is needed to connect the socket to the wire. It is equipped with thin contacts, with their help, with a slight pressure, the insulation of the twisted pair is cut through and a reliable contact appears.

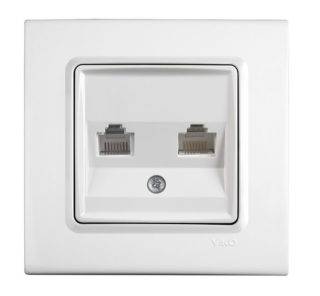
You can find single and double RG-45 sockets on sale. Internet outlets, depending on the manufacturer, will differ visually and in quality, but functionally they are all the same.
Classification of Internet outlets
IT specialists classify Internet sockets according to their distinctive features:
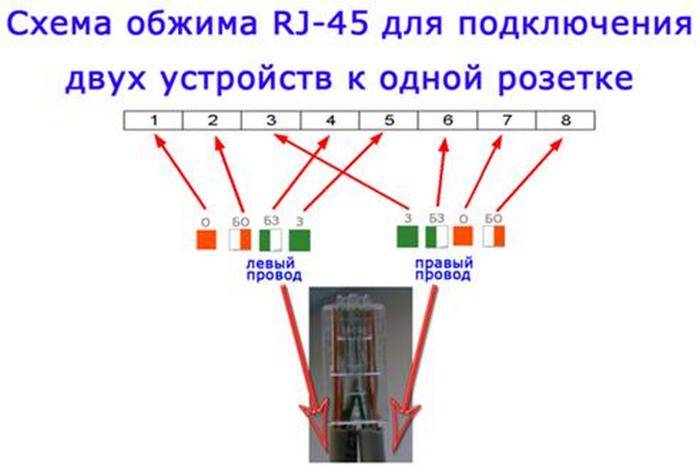
- By the number of available slots. There are single, double, as well as terminal modifications (for 4-8 connectors). A separate subspecies of the terminal socket is the combined one (with additional types of connectors, for example, audio, USB, HDMI and others).
- According to the bandwidth of the information channel. They are divided into categories:
- UTP 3 - up to 100 Mbps;
- UTP 5e - up to 1000 Mbps;
- UTP 6 - up to 10 Gbps.
-
According to the installation method. As in the case of electrical outlets, there are internal (the mechanism and the contact group of terminals are recessed into the wall) and overhead (the mechanism is mounted on top of the wall).
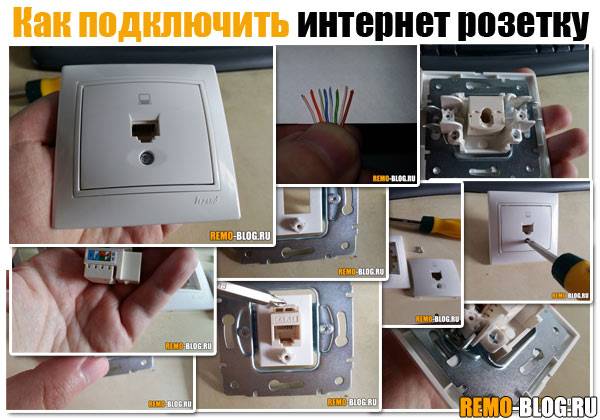
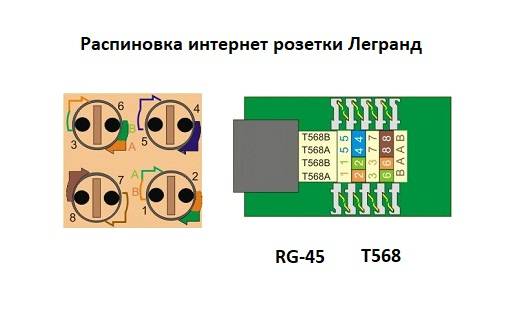
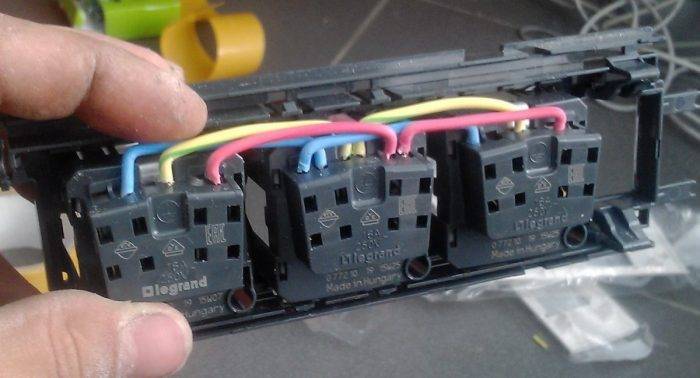
Internet socket Legrand
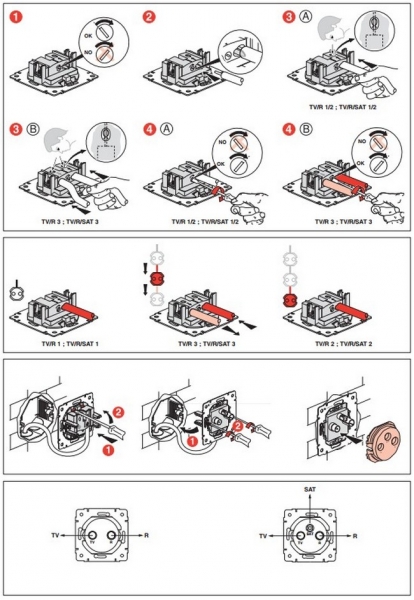
- To connect the Legrand internet outlet, you must first remove the front cover.
- Further inside you will see a white impeller, it must be turned in the direction where the arrow points.

- After turning, the front panel is removed. On this panel you will see a color scheme where to connect which wire.
- Now you can thread the wires into the hole on the plate and start connecting. See photos and video below.

Internet socket Lezard
If you buy a Lezard socket, then you need to disassemble it in a different way.
- To remove the front panel, you will need to unscrew a few screws.
- Then use a screwdriver to open the latches so that you can pull out the inside.
- After that, you will have a small box with a lid on top in your hands. We pry off the lid with a screwdriver and open it.

- Done, start inserting each core into the slot by color.
- The last thing to do is close the lid, assemble the entire internet outlet and mount it on the wall.

The disassembly of sockets from different manufacturers is different, but the principle is the same for everyone. Whichever company you choose, you can handle the disassembly, the main thing is not to make a mistake in the color scheme. And then you will not only have to spend a lot of time, but also re-assemble and assemble in a new way.
Using the example of two Internet sockets from different companies, we showed you how to properly connect an Internet socket.
Mistakes made when choosing and installing telephone sockets
The main cause of all errors is frivolity and inattention. By following these recommendations, you can avoid problems and shortcomings during the installation of switching devices.
Mistake 1. After opening the package, the attached instruction is thrown away in the belief that the wiring diagram is indicated on the product case. The diagram may be missing and then installation difficulties may arise.
Mistake 2. Carry out installation without dielectric gloves. As already mentioned, the voltage in the network can rise to 120 volts. Given that there is no “safe voltage”, this threatens with unpleasant consequences. Work must be carried out in compliance with safety regulations.


Mistake 3. When purchasing a product, you may want to save money and buy a device from an unknown company at a lower price. This is a false economy: the product may be of poor quality and at the same time not have a guarantee, as a result of which it will not be possible to exchange it or return the money. Well-known brands provide warranties for their products, which is a guarantee of quality and reliability.
Mistake 4. During the installation, the conductors closed with each other and the telephone line was disconnected. No need to panic and call the repair team from the telephone company. The line is disconnected automatically through the central office. Such a shutdown occurs for several minutes, after which the network is restored.
Mistake 5. Using a used wire taken from an old building or in an abandoned room. This wire may have broken insulation or a damaged core. This will certainly affect the quality of the connection.It is better to purchase a new cable that meets modern standards, which will ensure a flawless connection.
In conclusion, I would like to note that, despite the general distribution of mobile phones, stationary devices continue to be widely used due to independence from territorial “coverage” and various roamings. In addition, wired communication provides a better connection, and sometimes remains the only available means of communication.
How to connect an internet cable to a power outlet
To begin with, it should be noted that there are two types of Internet outlets, like electrical outlets: for outdoor installation and for indoor installation.
- Indoor sockets are used when the Internet cable is hidden in the wall, just like electrical wires.
- And outlets for outdoor use assume that the Internet cable runs along the surface of the wall in the visibility range. Surface mount sockets are similar in appearance to ordinary telephone sockets that are attached to any surface.
At the same time, it should be noted that all sockets are collapsible and consist of three parts: half of the socket body serves for fastening, the inside of the socket is designed for connecting wires, and the second part of the body serves as a protective element. There are both single and double Internet sockets.
Computer sockets may differ in appearance, but they work the same way. All of them are equipped with microknife contacts.As a rule, they are designed to cut through the insulation of conductors, after which reliable contact is established, since the process is carried out under a certain gain.
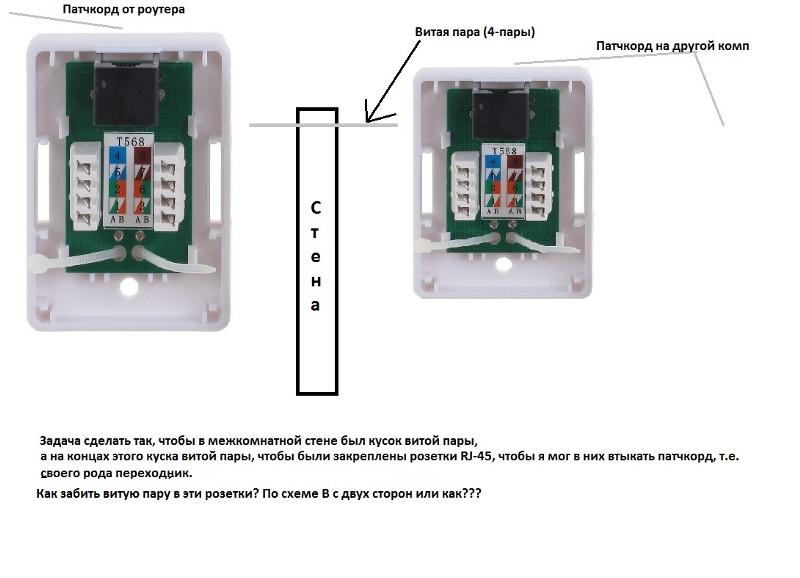
How to connect twisted pair
This is the final stage of our work. But first, a little theory again. Internet sockets are of two types:
- designed for indoor installation, in which the box is inserted into the wall niche, and the contact group of the socket is already mounted in the box. Outside, the box is decorated with a plastic panel;
- external mounting assumes that the housing of the Internet socket will protrude from the wall. Typically, such a socket has the shape of a parallelepiped and consists of a main body in which the contact group is mounted, and a decorative cover.
The most common sockets with 1-2 connectors. The principle of their connection is the same: the wires are inserted into special contacts equipped with micro-legs, while their braid is cut through, providing a reliable connection.
Consider the features of connecting a wall outlet. Usually, manufacturers put a ready-made color scheme in the sockets, suggesting which wire to connect where, so as not to confuse. It corresponds to the straight pattern used when crimping an RJ-45 connector.
We mount the case on the wall in such a way that the cable outlets are located at the top, and the connectors going to the computer or other consumer are at the bottom.
Further detailed instructions on how to connect the cable to a standard computer wall outlet:
- the braid is removed from the terminal part of the twisted pair, this operation must be performed carefully so that the insulation does not suffer;
- on the circuit board we find a special clamp, we put the wire into it, we make sure that after fixing the bare wire is below the clamp;
- now we insert the wires into the micro-legs, according to the color scheme. Try to stretch the wires to the bottom edge of the contact group. As soon as the wire reaches the knives, you should hear a characteristic click, which means that the wire has settled into place. If there is no click, complete the operation with a regular flat-blade screwdriver, pushing the wire down with it. Instead of a screwdriver, you can use the back of a knife blade;
- after fixing the wires, cut off the extra pieces;
- close the box on top with a decorative lid.
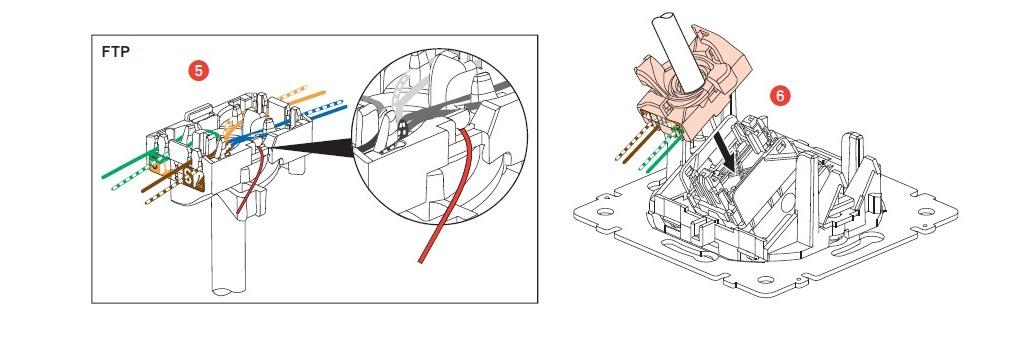
Consider the option of connecting an internal Internet outlet
Let's skip the installation procedure of the box itself, it is important for us to understand how the wires are connected. Here you will face the problem of how to disassemble the Internet socket in order to have access to the contact group, which is a small ceramic board with integrated microknife contacts.
The wires must be connected to this mounting plate, and after the operation is completed, it remains to assemble the case back. But the process itself can vary greatly depending on the manufacturer and model.
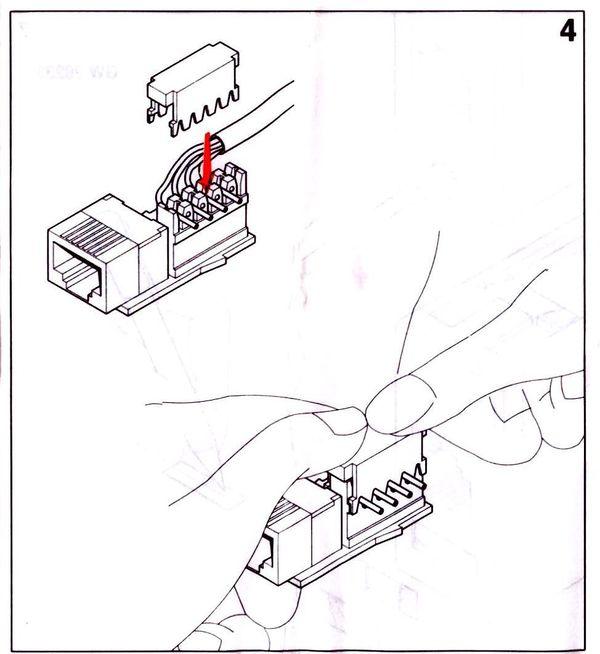
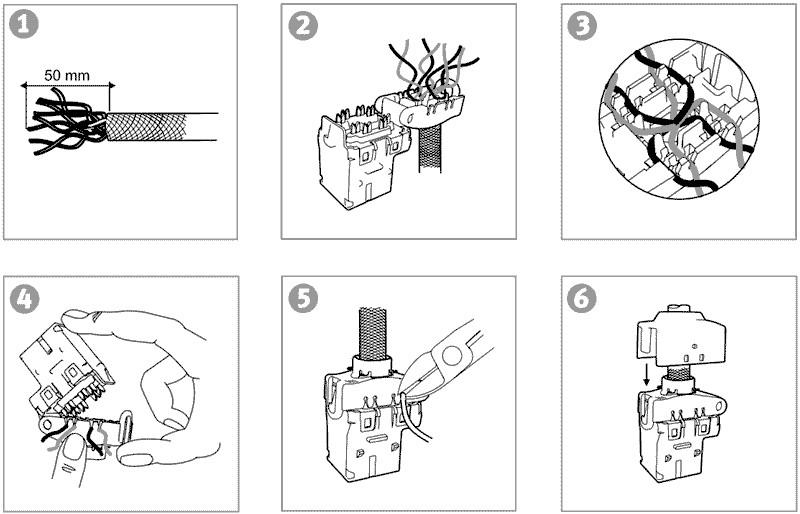
Connecting an Internet outlet manufactured by Legrand (one of the most famous manufacturers of such products) begins with the dismantling of the front decorative cover. Inside, a white plastic impeller will be visible, which must be turned in the direction of the arrow. This action will open access to the contact plate, on which the color scheme for connecting wires will be applied. It remains only to insert them into the nests in the manner described above.
Connecting an Internet outlet manufactured by Schneider is done in a different algorithm:
- since such sockets are double, we remove the insulation from both wires at a distance of about five centimeters from the ends;
- we disconnect 4 pairs of wires so that all eight are located separately;
- alternately connect the wires to the terminal block in accordance with the color scheme;
- clamp the terminals;
- we mount the socket;
- we test the connection of the Internet cable.
Consider how to connect an Internet outlet from the Lezard brand. For these products, the decorative panel and frame are fixed with bolted connections, which are easy to unscrew. As for the contact plate, clamp fasteners are used here. When connecting the wires, it is necessary to carefully press the contacts with a screwdriver in the appropriate places
To dismantle the contact group without fanaticism, we press on the upper latches and carefully pull the contact group towards ourselves. Now you need to dismantle the plastic cover that serves to clamp and insulate the wires.
It is also removed with a screwdriver, prying off the lateral processes, but since the material is elastic, significant efforts will be required here. The main thing is not to break the plastic. He is tough, but fragile. It remains to get the wires according to the color scheme and clamp them, and then assemble the box and install it in place.
Types and types of Internet outlets
In order to understand what type of sockets we need to use in a particular case, it is necessary to understand the general classification of sockets for the RJ-45 connector.
But before that, RJ-45 is a unified standard for physically connecting computers and network switches using standard 8-wire shielded wire, often referred to as "twisted pair".Because by making a cross section of the cable, you can easily see 4 intertwined pairs of wires. With the help of this type of wire, the vast majority of information transmission channels in local and public networks are built.


Experts suggest the following classification of sockets:
- By the number of slots. There are single, double and terminal sockets with 4-8 connectors. In addition, there is also a separate type of combined sockets. Such modules may contain additional types of interfaces, including audio, USB, HDMI, and RJ-45 itself.
- By data transfer rate. There are many varieties and categories, the main of which are category 3 - data transfer rates up to 100 Mbps, category 5e - up to 1000 Mbps and category 6 - up to 10 Gbps at a distance of up to 55 meters.
- According to the principle of fastening. By analogy with power wiring products, there are internal and overhead computer sockets. At the inner socket, the mechanism (contact group of terminals) is deepened into the wall, at the outside it is laid along the surface of the wall.
For a socket hidden in the wiring laid in the wall, it is necessary to have a protective plastic "glass" in the wall, where the terminal block is attached. An external socket is usually attached using a patch panel to the wall surface.
Image gallery
Photo from
There are devices with mechanisms that differ from traditional representations. For example, ABB sockets from the Jaeger BASIC 55 series
The modular version of the socket for the Internet differs from the usual models only in appearance. The wiring diagram is exactly the same.
In the rows of Internet sockets for hidden installation, it is rare, but there are modifications with terminal blocks. It is also easy to understand the principle of their installation.
Standard Internet socket mechanism Legrand
Internet socket option
Connecting a modular type of Internet outlet
Internet outlet with modular twisted-pair connectors
As for manufacturers: there are many of them, domestic and foreign. Recently, "Chinese" network equipment companies have begun to "align" in terms of the quality of finished products relative to the rest. Definitely high quality products differ from such world brands as Digitus, Legrand, VIKO, etc.
Separately, it is worth mentioning "keystones" - keystones.
This is a modular architecture for placing individual "stones" - modular connectors for a variety of audio, video, telephone, optical, Mini-DIN and other interfaces, including RJ-45 on one standard socket block panel. This is a fairly flexible and scalable system for providing interfaces to the end user.
Wiring signal check
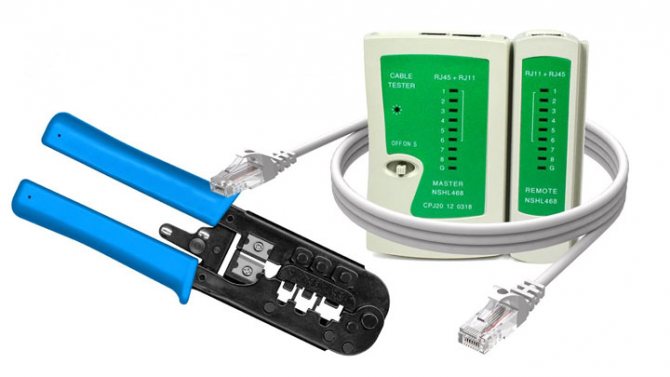
An important step is to make sure that all wires are connected correctly. Such a check is performed using a conventional tester. We need a five-meter patch cord (a cable terminated with connectors at both ends in a straight line). We connect the cable to the outlet, the tester is switched to the beeping mode. Testing the connection. The presence of a sound signal will indicate the correct connection.
If you have a tester model without the ability to give an audible signal, use the resistance mode, then when the wires are closed, the numbers will flash on the screen, indicating the presence of a contact.
But if possible, it is better to use a special device - a cable tester.To test, we need another patch cord. The testing itself is very simple: we insert two cable connectors into the socket, and connect the other two to the tester. If the connection diagram is without blunders and errors, the tester cable will respond with an audible signal.
If there is no beep, you should check if the pinout of the patch cords matches the one you used in the outlet. Perhaps this is the reason. If everything matches, check the quality of the outlet itself - cheap products may have poor soldering.
Note that cable testers are able to determine the cable category - this will be useful if you want to make sure that you have purchased the right cable.


Checking your internet connection
After installing the Internet outlet and the connector at the other end of the cable, it is advisable to check the connection and integrity of all connections. You can do this with the cheapest Chinese device.
What is its essence? There is a signal generator that sends pulses according to certain codes, and a receiver. The generator is connected at the installation site of the router, and the receiver directly into the outlet itself.
After the pulses are applied, the signals are compared. If everything is in order, the green LED lights on the receiver case light up in turn. If there is an open or short circuit somewhere, then one or more bulbs will not light at all.
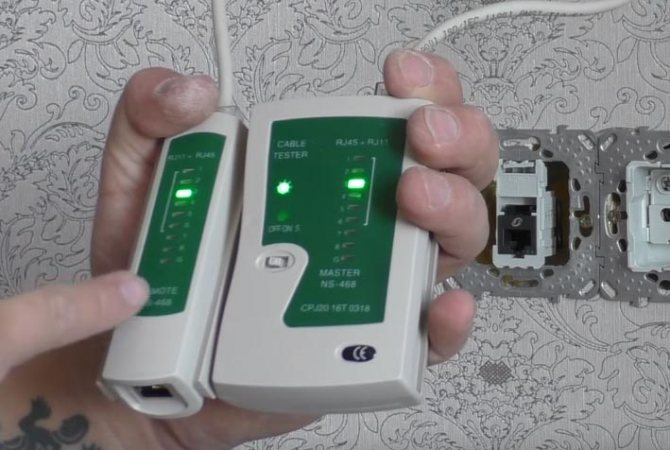
When this happened, then first of all you need to sin on poor contact in the connectors. Most often, it is there, on any core, that the insulation is not completely cut off and, accordingly, there will be no connection.
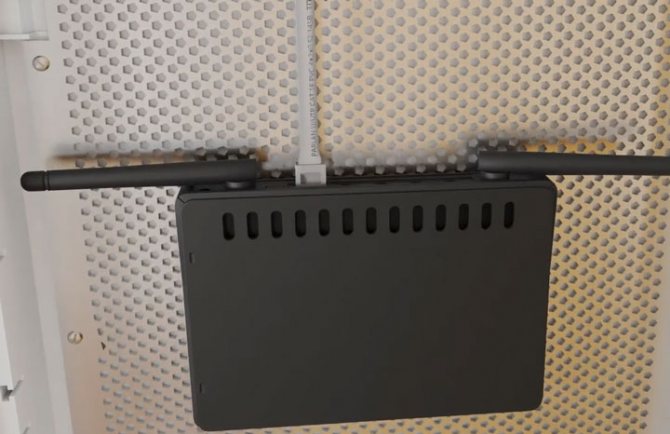
At the very end, a ready-made tested cable with a connector is connected to the router.
A complete set of all tools for cutting, crimping, dialing the utp internet cable can be ordered on Aliexpress here (free delivery).
What explains the need for sockets
Any Internet user can say that if there is a router, installing LAN sockets throughout the apartment will be an unnecessary measure and duplication of functions. However, many people who are worried about their health and who are trying to reduce the level of high-frequency radiation generated by the device will object to them.
There is another strong argument in favor of installing a LAN socket in remote rooms of a private residential building or city apartment.
It lies in the fact that even the most expensive and advanced routers are not able to cover the significant spaces occupied by modern buildings. Within their boundaries, there will definitely be a point where the signal is weakened so much that there will be no reliable connection.
In city apartments, such a place is a loggia remote from the router, where Internet access in the summer is also in demand.
Connecting Legrand sockets
Now we come to the most important question. How are Legrand, Lexman computer sockets connected, and in general how to connect an Internet socket ?. To do this, let's first analyze the general principles of connecting information cables, and then the peculiarity of their connection to connectors of various types
To do this, let's first analyze the general principles of connecting information cables, and then the peculiarity of their connection to connectors of various types.
To connect sockets and connectors of this type, a twisted pair cable is used, which has a strictly standardized color code for each core. Based on this color designation, the connection is made.
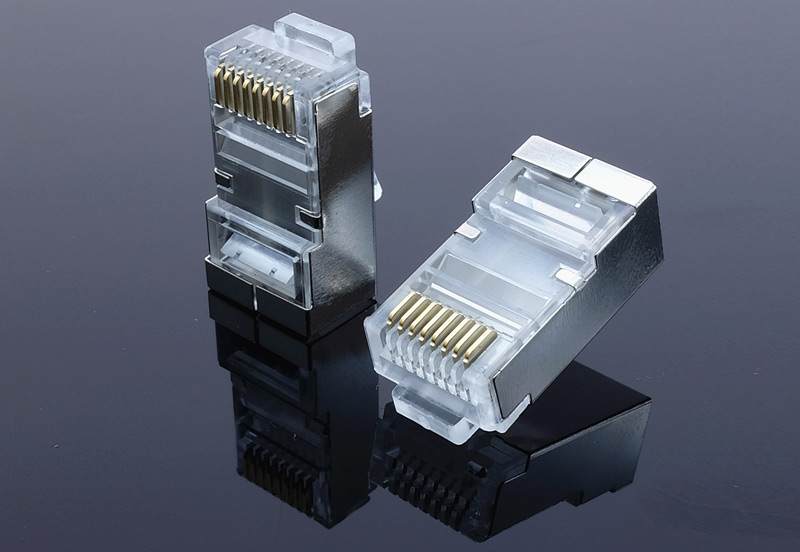
Almost all modern local networks use the RJ-45 connector for connections. Although the official name of this connector is 8Р8С, which in deciphering the abbreviation means: 8 positions, 8 contacts. So:
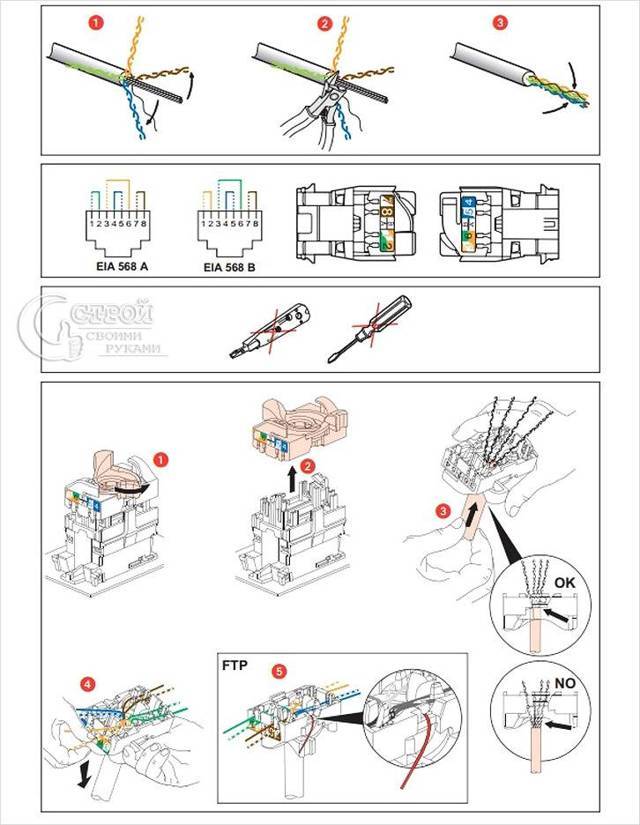
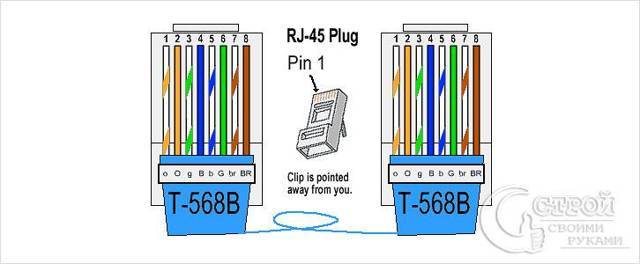
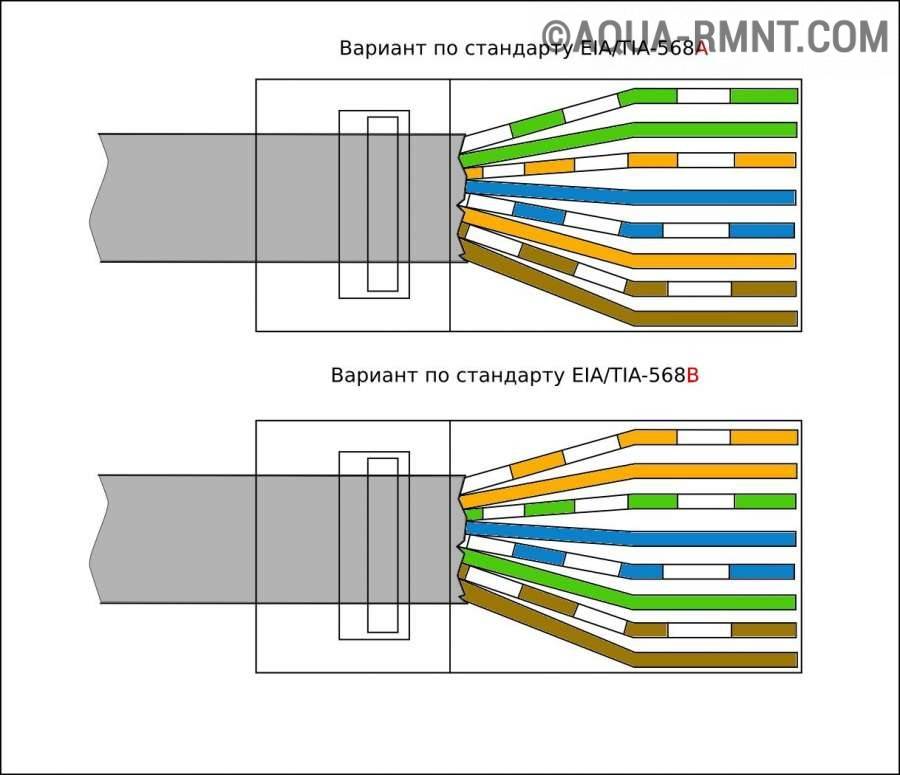
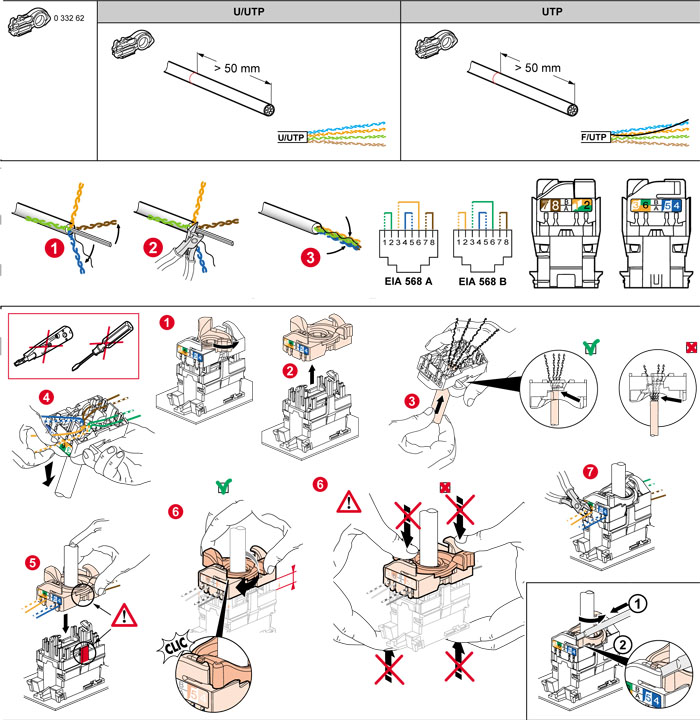
- There are currently two generally accepted connection standards: TIA/EIA-568A and TIA/EIA-568B. The difference between them is the location of the wires.
- For the TIA / EIA-568A standard, a green-white wire is connected to the first pin of the connector, then in ascending order: green, orange-white, blue, blue-white, orange, brown-white and brown. This connection method is somewhat less common.
- For the TIA/EIA-568B standard, the wire sequence is: orange-white, orange, green-white, blue, blue-white, orange, brown-white, brown. This type of connection is used much more often.
The wiring diagram for a Legrand computer outlet is no different from generally accepted standards. In this case, any outlet can be connected according to both standards. The corresponding color designation is available on the surface of the connector.
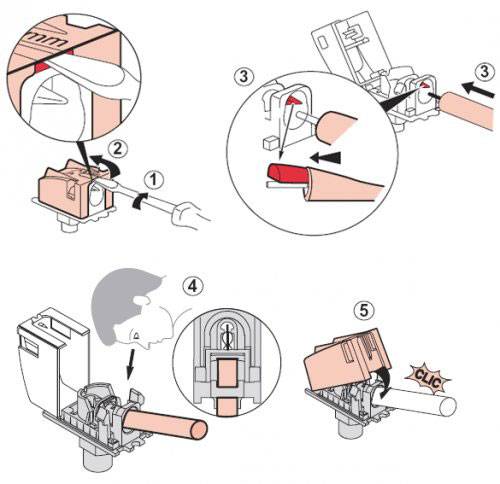
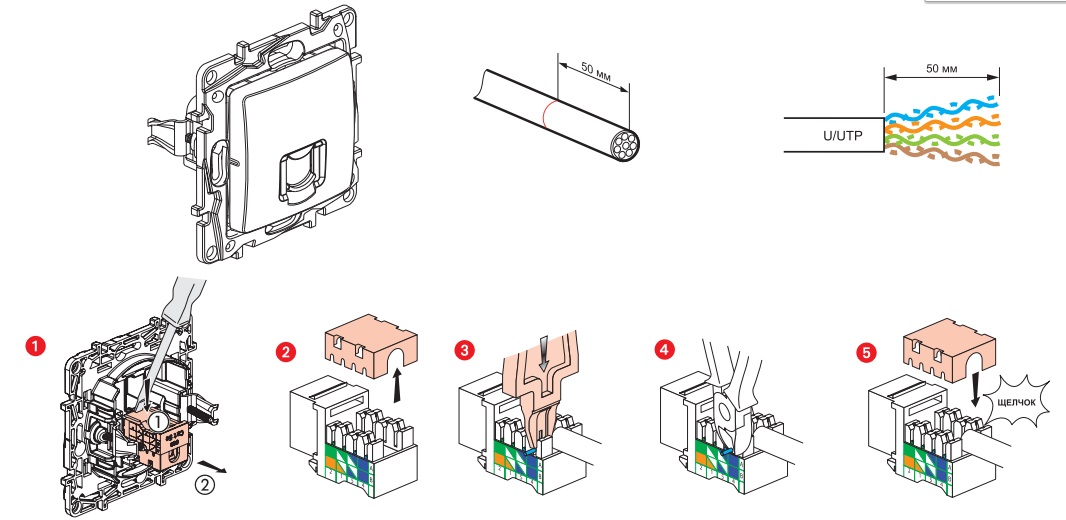
- First of all, we should get to the connector. In some models, it may be necessary to disassemble the socket, but in most, the connector can be reached without additional effort.
- We open the cover that covers the contact part. To do this, using a screwdriver, insert it into the cable slot and pry the cover up.
- Now we cut the cable and lay the cable cores according to the color marking on the connector cover.
- Firmly close the top cover. During this, the cable cores are crimped and reliable contact is ensured. After that, you can cut off the excess cable cores protruding beyond the cover.
- After that, it is necessary to install the information socket in the socket and fix it with screws. The socket is ready to go.
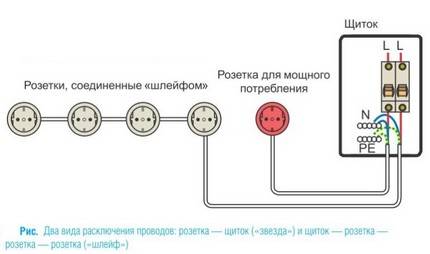
Possible connection methods
There are several ways to achieve the result, but it all depends on the potential load on such outlets.
Loop - sequential method
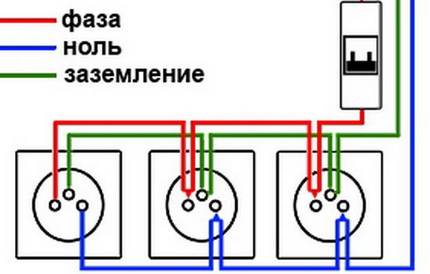
If it is necessary to install blocks consisting of several sockets, all elements are connected by a loop method. The phase is connected to the second device with jumpers, then the next device is switched in the same way. Do the same with zero contacts.
The method is quite simple, but not without drawbacks. So, poor contact in one of the intermediate sockets automatically causes the following elements to fail. Checking and tightening the terminals will help to avoid trouble, the operation must be planned and carried out at least once a year.


If the terminals allow, then instead of individual jumpers, it is better to use a solid wire. The insulation is removed from a small area, then it is bent with a loop, clamped in the terminal, then the following sockets are “dealt with” in the same way. The reliability of all elements of such an electrical network is a big plus of this method. Cons - the need to calculate the length of the wire, a relatively long, more difficult job - is still insignificant.
A much bigger minus is the impossibility of simultaneous operation of several powerful devices, since the maximum current strength for one outlet is 16 A. If several “serious” pieces of equipment are involved in the work at once, then the power cable simply may not withstand the increased load.
Star - parallel connection
In this case, all sockets in the room are connected with a separate, “own” wire, suitable for the junction box, where the main cable is connected from the shield. This method does not limit the operation of the outlets, because even if one of them fails, the rest will remain in working order.
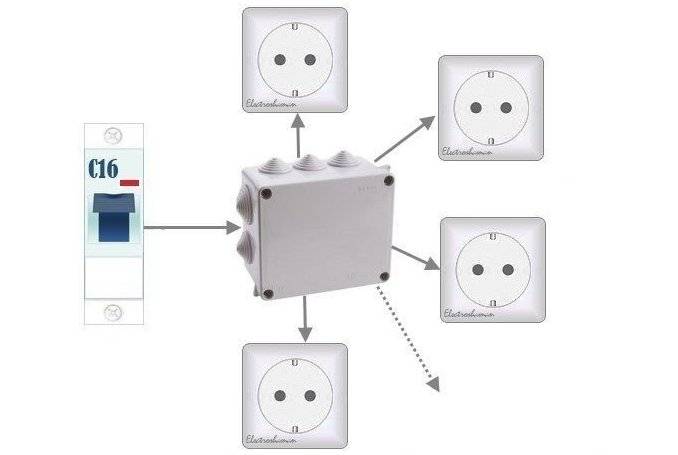
The biggest disadvantages are wire consumption and laboriousness of work. You can save money if you lay a thicker wire to the central contact from the shield, and thinner wires to connect to sockets. However, this option is called in a different way - the mixed method.
Combined compromise
With this connection of sockets, the main cable is laid to the junction box and further to the nearest socket. On this last segment, branches are made for the rest of the devices. Advantages - cable savings and greater reliability of the power supply, as the option provides autonomous operation of devices.
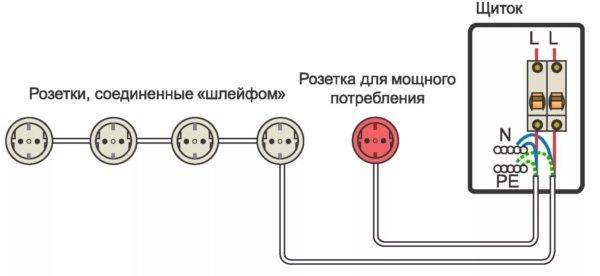
The second solution is to lay two cables from the junction box at once. One of them is for a loop that feeds, for example, 4 out of 5 outlets. The second is intended for the fifth group, which is going to be used to operate especially powerful equipment.
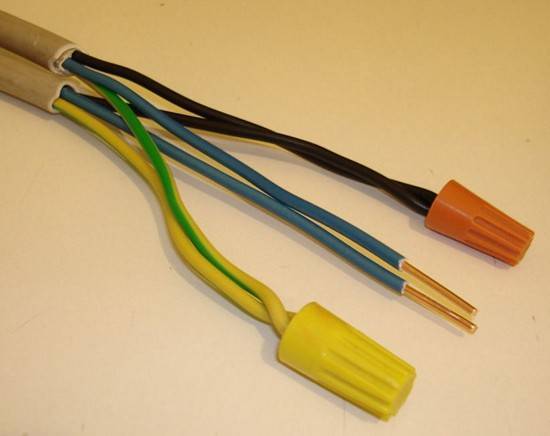
What to do with protective wire?
Grounding some (and often) do a consistent method. However, it is not entirely correct, therefore, the PUE prohibit such a practice - the use of a daisy chain connection, if it is used for protective wires.
The best option is to perform desoldering (twisting) on the ground wire going to the first “in service” outlet. A separate wire is led through it to each element of the block.The only difficulty is the placement of protective wires in the first socket, however, for such a case, you can purchase a deeper product (for example, "height" 60 mm).
Connecting Legrand sockets
Now we come to the most important question. How are Legrand, Lexman computer sockets connected, and in general how to connect an Internet socket?
To do this, let's first analyze the general principles of connecting information cables, and then the peculiarity of their connection to connectors of various types
To do this, let's first analyze the general principles of connecting information cables, and then the peculiarity of their connection to connectors of various types.
To connect sockets and connectors of this type, a twisted pair cable is used, which has a strictly standardized color code for each core. Based on this color designation, the connection is made.
Almost all modern local networks use the RJ-45 connector for connections. Although the official name of this connector is 8Р8С, which in deciphering the abbreviation means: 8 positions, 8 contacts. So:
- There are currently two generally accepted connection standards: TIA/EIA-568A and TIA/EIA-568B. The difference between them is the location of the wires.
- For the TIA / EIA-568A standard, a green-white wire is connected to the first pin of the connector, then in ascending order: green, orange-white, blue, blue-white, orange, brown-white and brown. This connection method is somewhat less common.
- For the TIA/EIA-568B standard, the wire sequence is: orange-white, orange, green-white, blue, blue-white, orange, brown-white, brown. This type of connection is used much more often.
The wiring diagram for a Legrand computer outlet is no different from generally accepted standards. In this case, any outlet can be connected according to both standards. The corresponding color designation is available on the surface of the connector.
- First of all, we should get to the connector. In some models, it may be necessary to disassemble the socket, but in most, the connector can be reached without additional effort.
- We open the cover that covers the contact part. To do this, using a screwdriver, insert it into the cable slot and pry the cover up.
- Now we cut the cable and lay the cable cores according to the color marking on the connector cover.
- Firmly close the top cover. During this, the cable cores are crimped and reliable contact is ensured. After that, you can cut off the excess cable cores protruding beyond the cover.
- After that, it is necessary to install the information socket in the socket and fix it with screws. The socket is ready to go.
Connection methods taking into account consumers
Connection of the block of sockets of one group is carried out in a loop way. It involves the connection of all elements of the group to a common supply line of electrical wiring. The circuit created by the loop method is designed for a load, the indicator of which does not exceed 16A.
The only "minus" of such a scheme is that in the event of damage at the point of contact of one of the cores, all the elements located behind it cease to function.
Today, the connection of the socket block is often carried out in a combined way, which is based on a parallel circuit. This method is actively practiced in European countries. We use it to provide a separate line of powerful consumers.
Parallel connection involves laying two cables from the junction box:
- the first is sent in the form of a loop, feeding four of the five sockets of the 5-bed block;
- the second - is supplied separately to the fifth point of the socket group, which will be designed to power a powerful device.
The method is good in that it ensures the operability of a single point and makes it independent of the functioning of other chain participants located nearby.
The main advantage of the combined method is to ensure the maximum degree of safety, which is especially important when operating powerful and expensive devices.
The only drawback of the scheme is an increase in cable consumption and labor costs for an electrician.
Both the daisy chain and the combined connection method can be closed and open. The first involves gouging channels in the wall for laying lines and "nests" for connectors, the second is implemented by laying a PE conductor on the wall surface.


Skirting boards and cable channels used in the open laying method perform not only an aesthetic function, but also protect the PE conductor from mechanical damage.
The use of plastic cable channels increases the safety and aesthetics of open wiring. Most of them are equipped with partitions, between which a line is laid. It is convenient to monitor the condition of the PE conductor through the removable front part.
Connecting to the router and crimping the connector
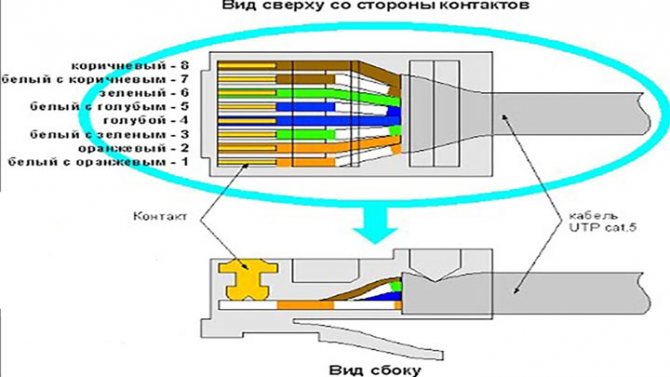
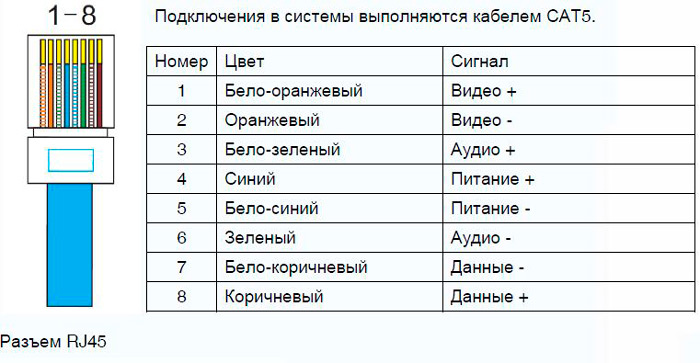
After installing the Internet outlet itself, it remains to correctly connect the cable to the router in the communication board. Remove the insulation from the other end of the cable by 2-3cm.The cores are fluffed and inserted in a certain order, according to the TIA-568B standard, or simply “B”.
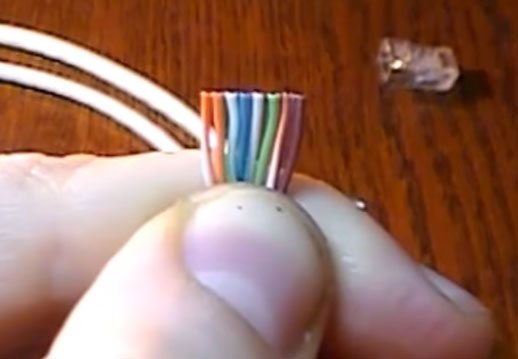
The arrangement of colors is considered from left to right:
white-orange
Orange
white-green
blue
white-blue
green
white-brown
brown

The “A” standard is sometimes used when you need to connect one computer to another. Here you crimp one end of the cable according to the “B” standard, and the other according to “A”. In general, if both ends of the cable are crimped according to the same standard (AA or BB), then this is called a patch cord. And if they are reversed (AB or BA), then - cross.
Again, the veins do not need to be cleaned. Just insert them into the connector until it stops.
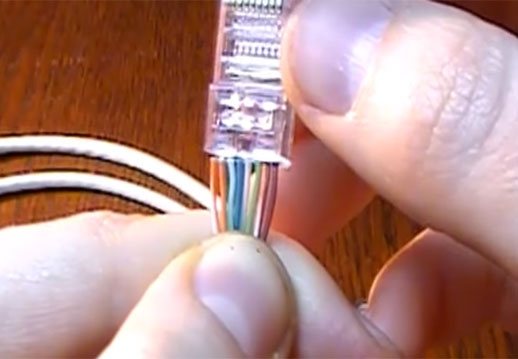
After that, all this is pressed in with a special crimper. Some do this with a thin screwdriver or a knife blade, though this can easily damage the connector.
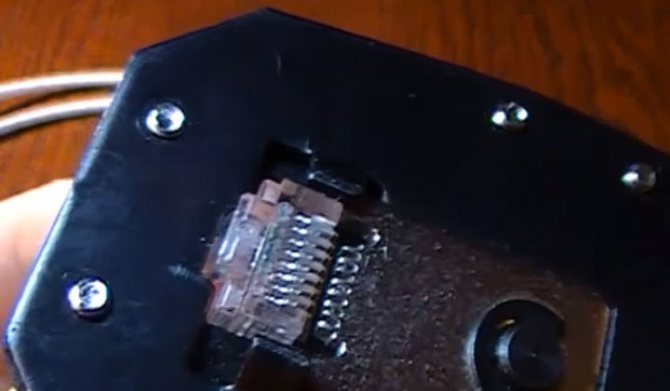
The cat5E and cat6 cables in the RJ45 connector are crimped according to the same principle. Another "fork" is not required here. Differences between cables in data transfer speed, cat6 has more.


