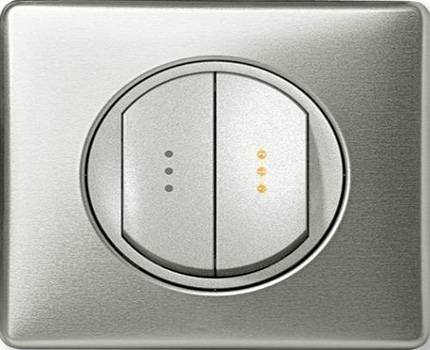
- The design and features of the two-gang switch
- Connection to the power supply system
- Wiring diagram for a two-gang pass-through switch
- Principle of operation
- Accession
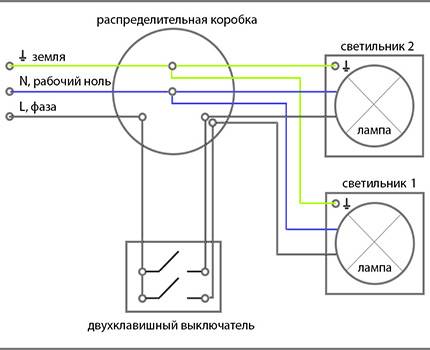
- Wiring diagram for a two-gang switch for two bulbs
- Block installation
- Safety Precautions When Connecting a Double Switch
- Preparatory work
- Preparing wires for correct installation
- Switch device
- Circuit breaker internals
- How to connect a switch with two keys
- Types of household electrical switches
- Switch installation
- Advantages of double switches
- What can go wrong?
- Proximity switches
- Installation of pre-installation circuit elements
The design and features of the two-gang switch
The two-gang switch allows you to switch 2 lamps or more. With it, you can organize the regulation of the brightness of the backlight, turning on and off the light bulbs, and similar devices are also used to create lighting for a separate bathroom.
Advantages of double switches for two lamps:
- only one seat required;
- the price of one two-gang switch is almost the same as two one-gang switches;
- aesthetics;
- Ease of use;
- the ability to control the intensity of light;
- savings in assembly materials.
The two-button switch consists of several components:
- frame;
- keys;
- terminal blocks;
- switching mechanism;
- contacts.
There are devices for lighting with backlight or indicator. With the help of highlighting, it is convenient to find the switch in a dark room. The indicator plays the role of annunciator of circuit closure. There may be other additional options, but they do not affect the installation and connection method.
Connection to the power supply system
It is possible to determine that the wiring was carried out according to the new system by the laid cable. It will be three-wire for single-phase power or five-wire for three-phase power. One of the single-phase power wires will be the phase marked in brown or red, the other will be the neutral (zero) marked in blue, and the third will be the protective wire marked in yellow-green.
To facilitate identification, alphanumeric designations are used:
- A, B, C - phase;
- N - neutral or zero;
- PE - protective.
The difference of this connection scheme lies in the additional protective conductor PE, which is led directly to the fixtures.
Wiring diagram for TN-S electrical installation devices require connection to the grounding system
After connecting the wires to the working mechanism, they are pressed closer to the body, and then installed in the socket. Fix in the mounting box with clamping tabs or bolts. They put on a decorative case and keys.

Before assembling the entire structure, turn on the light and make sure that the lighting system is working.
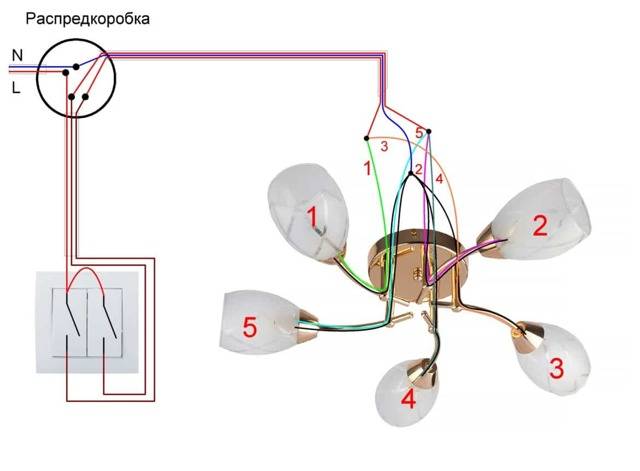
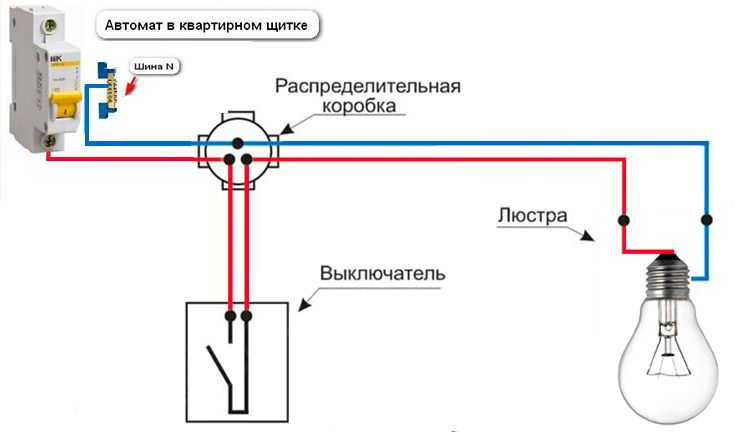
Wiring diagram for a two-gang pass-through switch
Although the switch is usually installed at the entrance to the premises, there are situations when this does not suit users. So, when passing a long corridor at night, a person experiences significant inconvenience due to the fact that he must go most of the way in the dark if he enters from the other end of the room where there is no switch. To solve such problems, pass-through switches are produced, for example, by Legrand.
In the described example, to correct the situation, at different ends of the corridor it is necessary to install two pass-through switches, one of which turns on the light, and the other turns off the lighting and vice versa. Thanks to this switching, the entire path passes through the illuminated space, which is much more comfortable and safer.
Principle of operation
Unlike a standard two-button switch, there is no “on” and “off” position in the walk-through. Due to a different principle of operation of the mechanism, in it each key controls a changeover contact, that is, voltage is applied to one outgoing contact and the power is turned off at the same time from the other outgoing terminal. Two two-button devices control two different lamps/luminaire groups from two different locations in the room.
The main feature of mounting a pass-through switch with two keys is that one four-wire cable or two two-wire cables are laid between such switches. At the same time, as between single-gang switches, it is enough to lay a two-core cable.
Accession
The installation of a two-gang pass-through switch, or rather a pair of such devices, differs significantly from a standard switch.Therefore, it is recommended to print out the wiring diagram, mark / number all the wires laid, and then proceed strictly according to the diagram. Otherwise, some wire will definitely be mixed up and the switches will not work correctly.
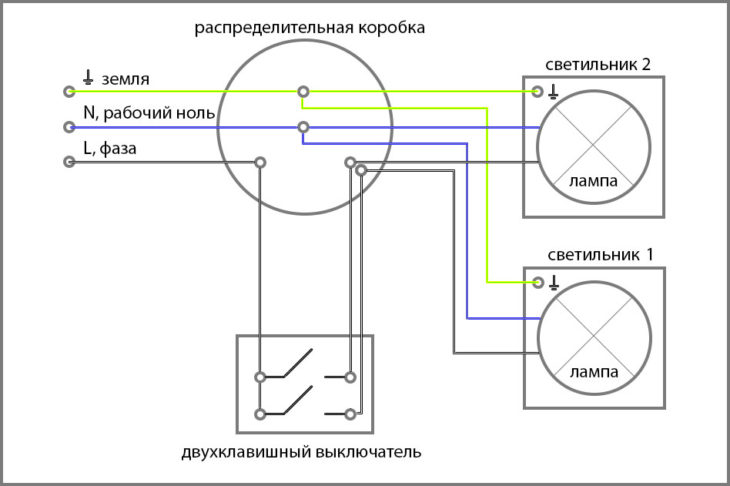
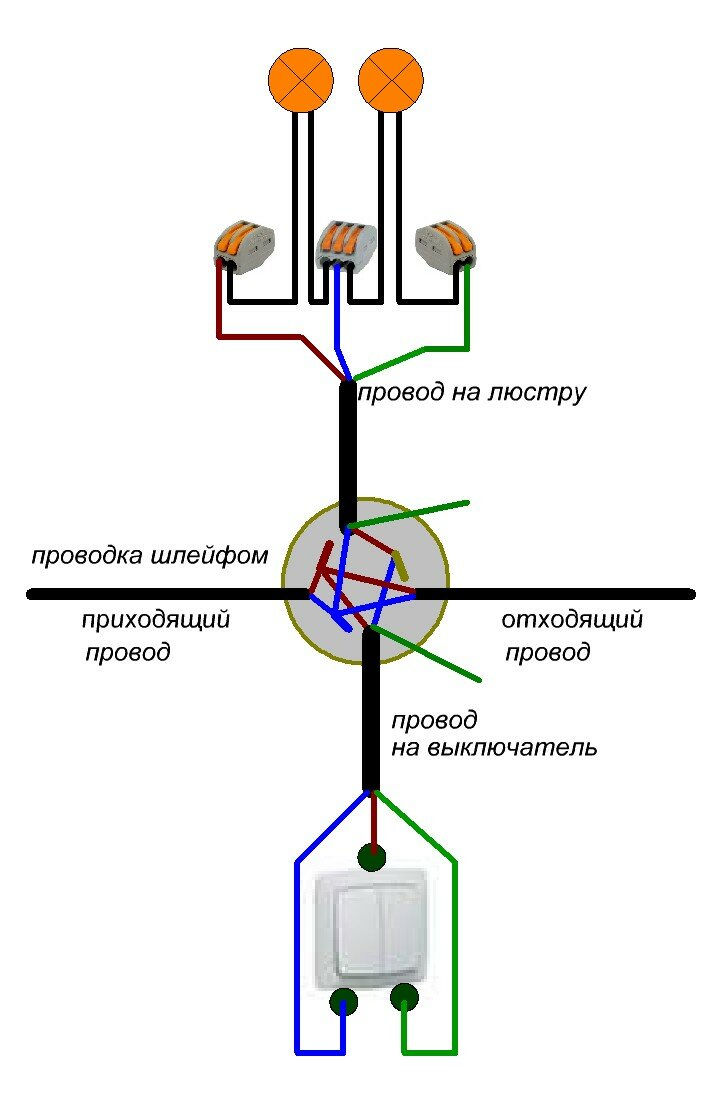
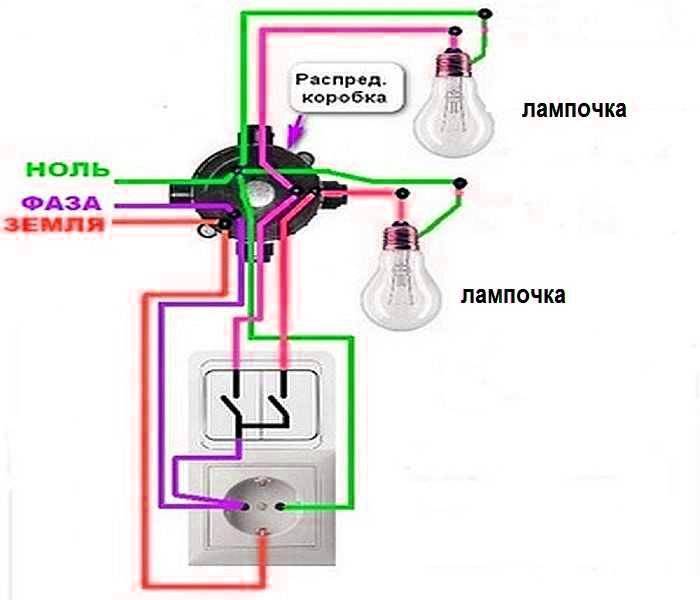
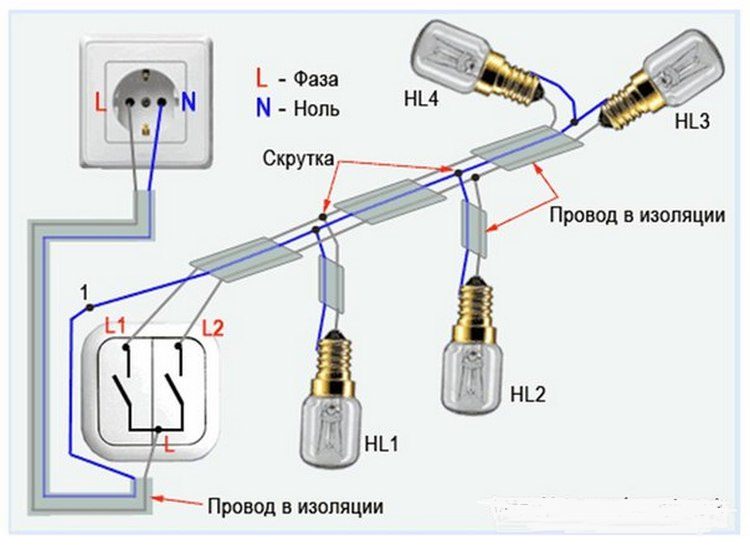
Wiring diagram for a two-gang switch for two bulbs
For a correct connection to the electrical network, you should understand the electrical circuit of its installation.
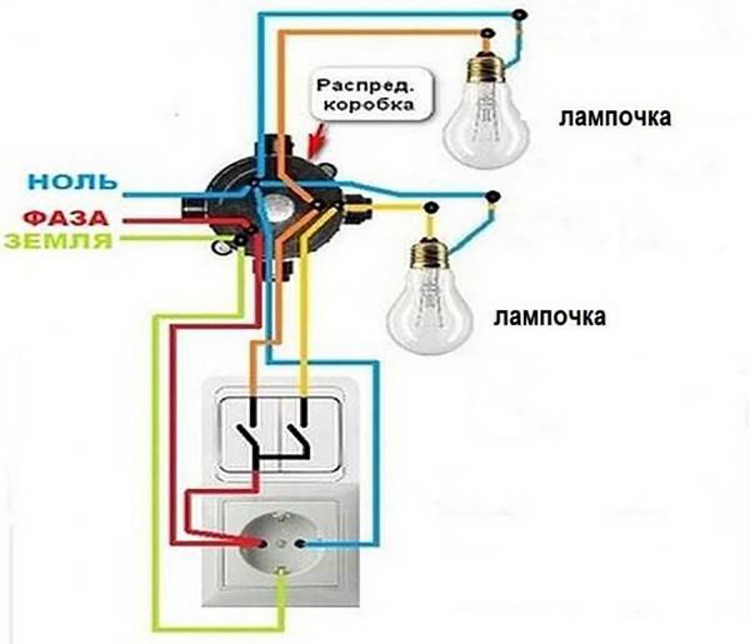
 Connecting a two-gang switch with a grounding conductor in the network
The modern electrical network provides for the presence of a grounding conductor in the supply networks of all electrical consumers. In the electrical wiring networks of Soviet-era houses, such a conductor is absent. And in many private buildings it is not always there, especially in lighting networks. This can be explained by the relatively low electrical power of household lighting fixtures.


Therefore, it will be objective to consider the connection diagram of a two-gang switch for wiring without a grounding conductor.
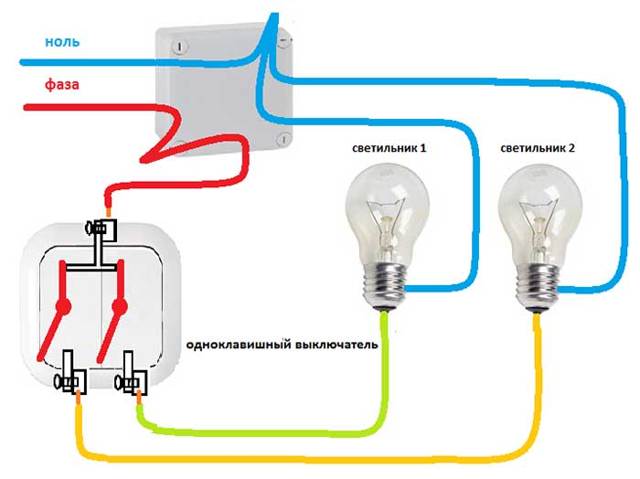
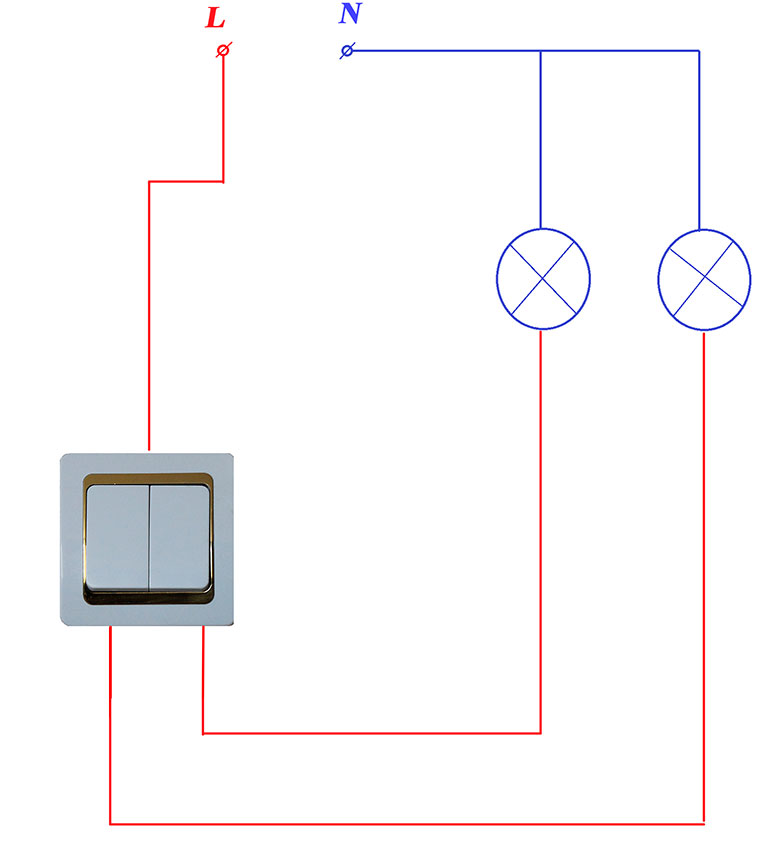
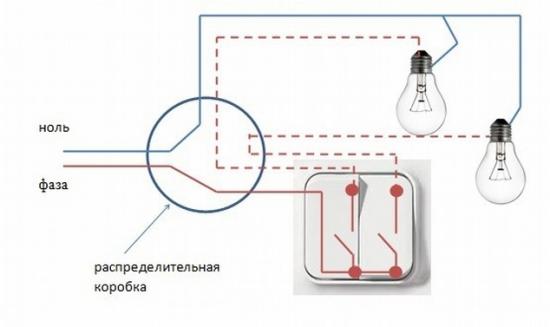
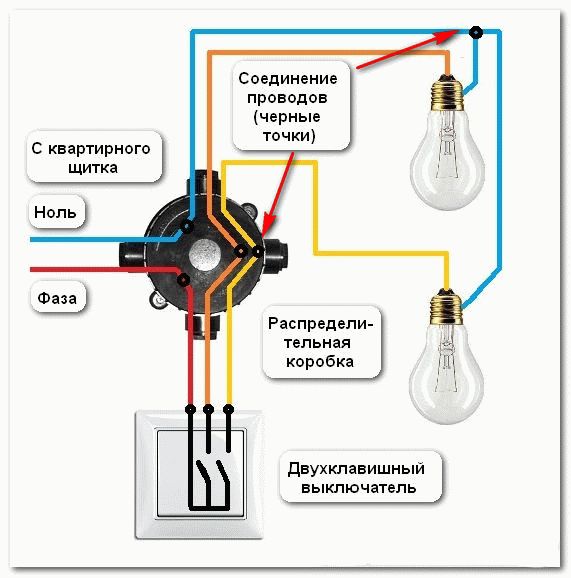 Connecting a two-gang switch to a household network without a grounding conductor
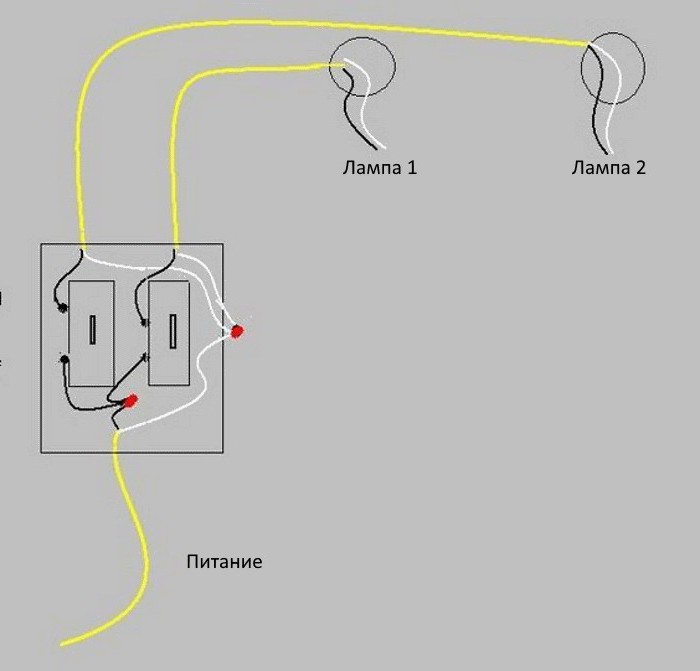
This diagram shows an example of connecting two lamps of one lamp, or two independent lamps. In this case, the phase wire comes to the input terminal of the circuit breaker and is directed to the consumers through independent outgoing contacts with two separate wires.
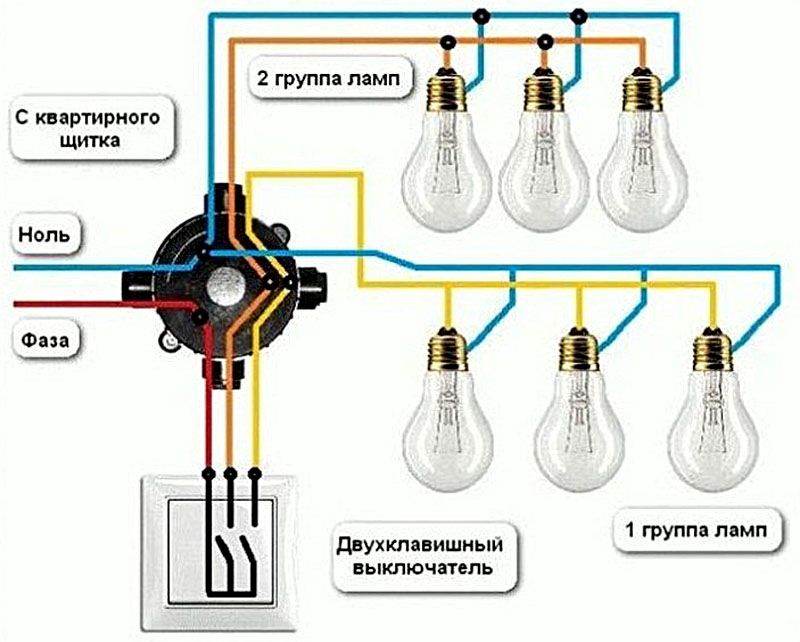
For greater clarity, a connection diagram is given for two independent groups of lamps, or lamps connected in series.
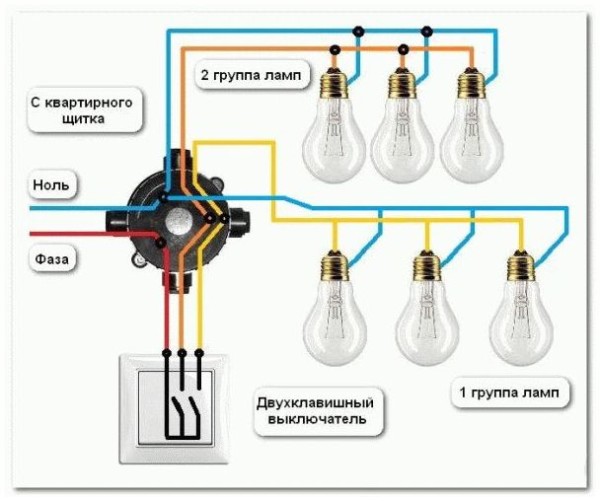 Management of two independent groups of lighting consumers
When using such a scheme, the connection of the working part of the device does not change and is performed similarly to the previous example.
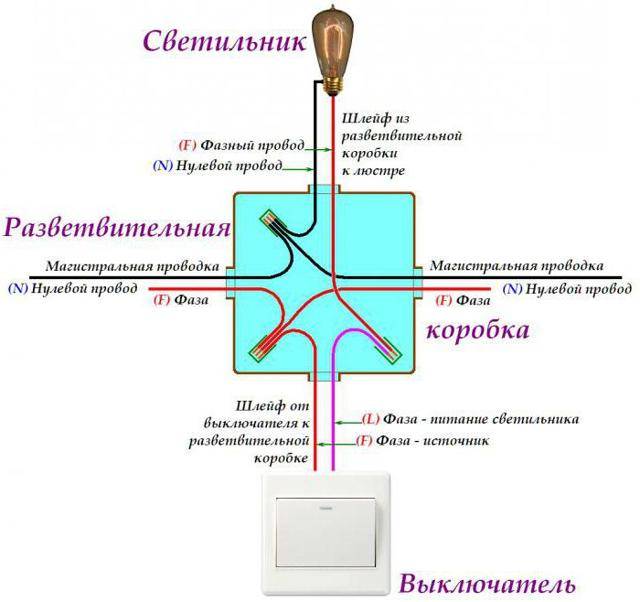
Block installation
First of all, they strip the ends of the wires: one input and two output. which are connected directly to the lamps. Clean the wires from the insulating layer by 10 cm.
The input phase is connected to a terminal or screw terminal, which is located separately from other holes and is called the input. The two output wires are attached using two other terminals/clamps. This connection option is suitable for two-key devices that do not have additional modules.
The modular device is connected in a slightly different way. The input cable is inserted into the terminal of the module, which is signed with the Latin letter L. The second terminal is located nearby. They are both connected with a short wire. The output wires are connected in the same way as on single-case devices.
After completing the procedure, the switch is installed in the mounting box and bolted to the socket. Some models have removable keys and frames. They are attached at the end of the installation.
We bring to your attention another training video on how to connect two lamps to a double switch:
Learn to do everything with your own hands - it will come in handy in life!
So, now you know how to connect a two-gang switch to two light bulbs and connect it to two chandeliers or lamps. It not only increases the self-esteem of any man, but also significantly saves money that was previously spent on calling an electrician.
Safety Precautions When Connecting a Double Switch
There is nothing complicated in installation, for this you do not need to be an electrician.There are safety rules for the installation of double switches, if they are violated, electric shock is possible, with the ensuing consequences.
Here are the rules:
- You can not take bare wires in two hands.
- All tools used for work must have handles made of insulating material.
- Before starting work, it is necessary to find and mark the wire corresponding to the phase. If the wires are of the same color, the phase must be marked with a bright piece of electrical tape that catches the eye, or some other noticeable marking should be applied.
- Check for lack of power before starting work.
- It is advisable to work in shoes made of insulating material, use dielectric mats.
- It is forbidden to work in wet clothes and shoes.


When touching the neutral wire or the wires going to the consumers, the signal light will not light.

Preparatory work
No matter how many keys your switch has (one, two or three), the preparatory work will be the same.
To begin with, in the room it is necessary to mount a common junction box and a mounting box for a switching device, it is also called a socket box in another way:
- If the walls in your room are made of PVC, plasterboard, wood or MDF panels, install a special bit with serrated edges on the drill and make a hole. Insert the mounting box into it and fix it to the wall with self-tapping screws.
- In the case of concrete or brick walls, make a hole using a hammer drill or drill with a nozzle that works with concrete surfaces. But in this case, the mounting boxes must also be fixed with gypsum or alabaster mortar.
As a rule, the installation of holes is carried out simultaneously with the laying of the strobe. This is done purely for aesthetic reasons, there is a lot of dirt from such construction work, and it’s better to spray and clean it once. Gates are such grooves in the wall surface, into which the connecting wires will then be laid. They can be done using various tools:


- Hammer and chisel. This is an old grandfather's method, its advantage is the complete absence of the cost of acquiring a tool (every man has a hammer and a chisel). The disadvantage of this method of gating is that it takes a lot of time and effort.
- Bulgarian. This tool is often referred to as the worst of the best. It is convenient that strobes can be made quickly and without much effort. But it is from the grinder that there is a lot of noise and dust, besides, it is not possible to make strobes of the same depth along the entire length, and it is almost impossible to work as a grinder in the corners of the room. So choose such a power tool as a last resort.
- Perforator. All that is required is to purchase a special nozzle for it - a strobe or a spatula. In all other respects, there are no shortcomings, quickly, conveniently, the grooves are more or less even.
- Wall chaser. For this type of work, this is the perfect tool. Works efficiently, safely and quickly. The strobes are smooth, there is no dust, since the strobe cutter is connected to a construction vacuum cleaner. It is convenient for them to work, the tool does not make much noise. The only downside is the high price. But there are services where you can rent a wall chaser.
Briefly about wall chasing using the tools listed above is described in this video:
It is necessary to lay two-core wires into the strobes made and fix them with cement or alabaster mortar.
So, the preparatory work is over, the boxes are mounted, the wires are laid, you can connect the light bulbs and the switch.
Preparing wires for correct installation
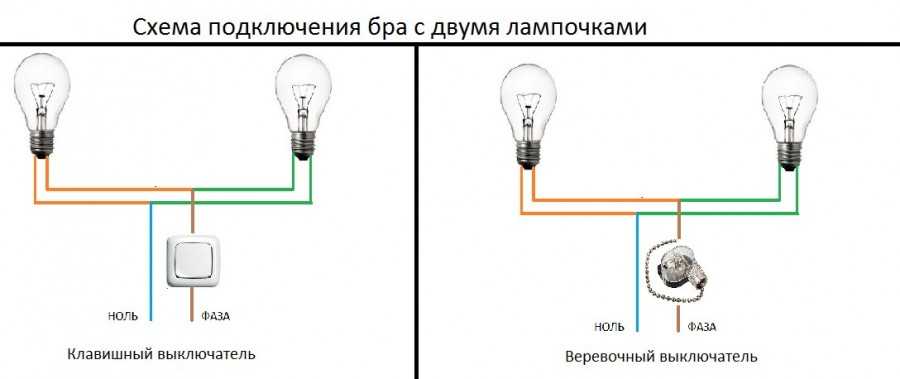
Depending on the type of connected device, the preparation of wires may consist of various manipulations. If a chandelier is being installed, where 2 wires leave each lamp group, you can connect it in accordance with your preferences.
Modern fixtures are often sold with sections of wires ready for switching, mounted in a certain way. In this case, to change the options for lamp combinations, you will have to disassemble the base of the chandelier or sconce
If this is of great importance to you, pay attention to the wires at the time of purchase in order to avoid unpleasant surprises when connecting the device.
There are usually three wires coming out of the junction box. It is necessary that their length does not exceed 10 cm. This is quite enough for comfortable work. If the wires are longer, just cut them off.
Next, you should clean the ends of these wires from insulation by about 1-1.5 cm and connect them to the corresponding terminals of the switch. The phase is connected to the terminal marked “L”, and the remaining wires, depending on which switch key you want to use for a particular section of the lamp or a separate device.
If you have a modular type switch, that is, consisting of two separate single-gang components, you must provide power to both of its parts.To do this, make a jumper from a small wire and install it between the two halves of the switch.
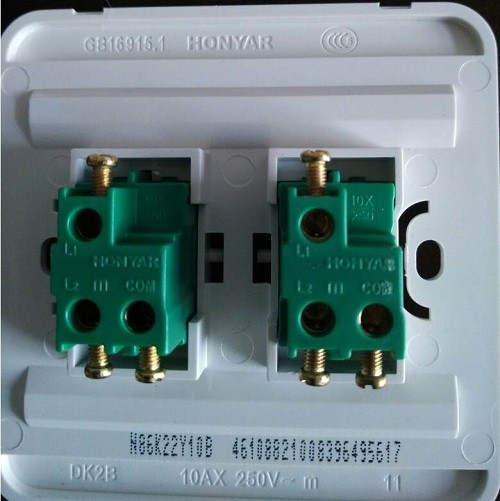
Switch device
The working part of the switch is a thin metal frame with a drive installed on it. The frame is mounted in a socket. The drive is an electrical contact, that is, a device on which the electrically conductive wires are connected. The actuator on the circuit breaker is movable and its position determines whether the circuit is closed or open. When the circuit is closed, the electricity is on. An open circuit makes it impossible to transfer current.
The drive provides the flow of electricity or an obstacle in the path of a signal transmitted between two fixed contacts:
- the input contact goes into phase from the wiring;
- the outgoing contact is connected to the phase going to the lamp.
The normal position of the contact on the actuator implies that the switch is off. The fixed contacts are open at this time, there is no lighting.
Pressing the control button on the switch closes the circuit. The moving contact changes its position, and the fixed parts become interconnected. Along this path, the voltage network transmits electricity to the light bulb.
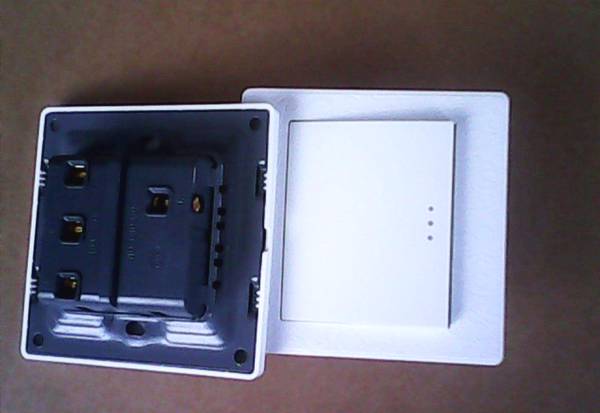
To ensure the safety of the system, the working part must be placed in an enclosure made of materials that are not capable of conducting electric current. In the switch, such materials can be:
- porcelain;
- plastic.
Other design elements protect the user directly:
- The control key allows you to change the state of the circuit with one touch, closing and opening it at the request of a person.As a result of light pressing, the light in the room turns on or off.
- The frame completely isolates the contact part, which eliminates accidental touches and electric shocks. It is mounted on special screws, and then sits on hidden latches.
As the main material for their manufacture, plastic is effectively used.


Circuit breaker internals
The internal structure of a two-phase circuit breaker differs from a single-phase one by the presence of two output terminals instead of one.
More specifically, it consists of the following elements:
- mechanism and decorative panel;
- one input terminal;
- two output terminals;
- two keys.
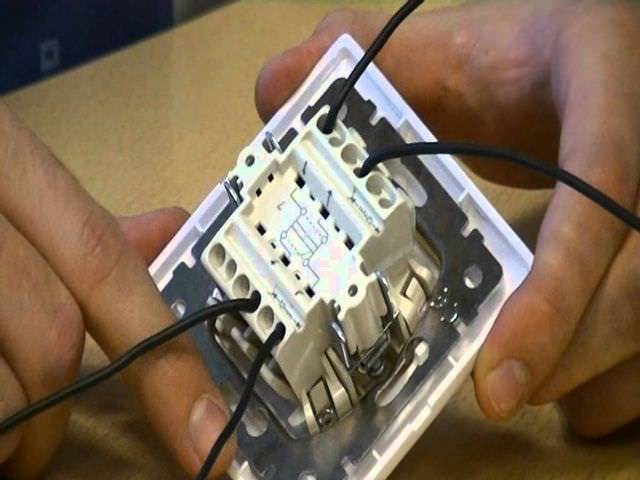
Terminals are special clamping mechanisms. To connect the wire, you just need to strip it, insert it into the terminal block and clamp it with a screw. The input or common terminal is located mainly separately and is marked as L.
On the opposite side are two output terminals. They may be referred to as L1, L2 or 1.2. Some models may have screw terminals instead of a terminal block. It is undesirable to use them, since the mount may gradually loosen and will have to be tightened.
The main difference between a switch with two keys and a one-button counterpart is that it controls a pair of lighting fixtures.
You need to install the device so that when you turn it on, press the upper half of the key. You can determine the top and bottom of the element using the indicator - a special screwdriver that works on the circuit.
To do this, they take a nail or a piece of wire and touch it to one contact, an indicator is applied to the other, holding the thumb from above.
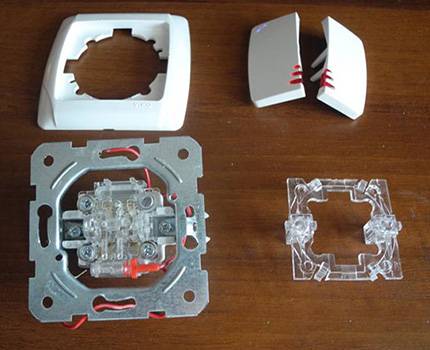
The device of a switch with two keys is slightly different from a single-key switch. The main components of the device: mechanism, keys and decorative case
If the light inside does not burn, then the switch contacts are open. When the keys are on, it should glow. It remains to mark the top of the element.
How to connect a switch with two keys
Before installation, you should carefully familiarize yourself with the location of the switch contacts. Sometimes on the back side of the switches you can find the switch contact diagram, which shows the normally open contacts in the off position and the common terminal.
The double switch has three contacts - a common input and two separate outputs. A phase from the junction box is connected to the input, and two outputs control the inclusion of groups of chandelier lamps or other light sources. As a rule, the switch must be mounted so that the common contact is located at the bottom.
If there is no circuit on the reverse side of the switch, then the contacts are defined as follows: the input contact is on one side of the switch, and the two outputs to which the lighting devices are connected are on the other side.
Accordingly, the two-gang switch has three clamps for connecting wires - one at the input contact, and one at two output contacts.
So, we figured out how the switch works. Now you need to prepare the workplace, tools and materials. We must not forget that the most important thing when performing any work related to electricity is safety.
Each of the keys of the two-gang switch can be set to one of two positions, turning on or off the appliance.Each group can have a different number of light bulbs - it can be either one or ten or more lamps. But a two-gang switch can only control two groups of lamps.
First you need to check the wires, that is, test which one is the phase one. With the help of an indicator screwdriver, it will not be difficult to do this: upon contact with the phase in the screwdriver, the signal LED will light up.
Mark the wire so that you do not confuse it with zero when performing further operations. Before you start installing the switch, you need to secure your work area.
If we are talking about a chandelier, you should de-energize the wires coming out of the ceiling. When the type of wires is determined and marked, you can turn off the power (for this you should use the appropriate machine in the shield) and proceed with the installation of the double switch.
Determine in advance and ensure the presence of connecting material for the wires.
- Usually applied:
- self-clamping terminals;
- screw terminals;
- caps or electrical tape for hand-twisted wires.
The most convenient and reliable way is fixing with self-clamping terminals. Screw clamps can weaken over time, and electrical tape tends to lose elasticity and dry out. Because of this, the reliability of the connection can be significantly weakened over time.


Self-clamping terminals provide a reliable, durable connection. To properly connect the switch to the light bulb, you must carefully study the step-by-step instructions on how to do this. After that, you can not only make the installation according to the scheme, but also identify possible malfunctions.When providing electrical installation in premises, the question often arises of how to lay a cable using a corrugated pipe.
- To accurately perform all operations, you must have the following tools:
- 2 screwdrivers - flat and Phillips;
- assembly or clerical knife or other device for stripping insulation;
- pliers or side cutters;
- construction level.
Types of household electrical switches
A household electric light switch is a device for closing and opening a circuit in order to connecting or disconnecting certain energy consumers. Most often, lighting devices act as the latter: chandeliers, lamps, sconces, etc. The 1-key switch can be used both for connecting single-lamp and multi-lamp devices.
In everyday life, two types of circuit breakers are used:
- invoices;
- embedded.
The first type is used mainly for mounting on wooden or brick walls of rooms with external (open) wiring. Such devices are attached to the surface using a special platform (socket box) and two screw-in screws.
Recessed light switches are installed inside a mounting box installed in a wall hole. They are intended exclusively for concealed wiring, which provides for preliminary chasing of walls, laying wires and hiding it with subsequent puttying.
According to the principle of operation, both types are no different. It lies in the fact that when you press a key, the electrical circuit either closes, turning on the devices, or opens, turning them off.
Switch installation
Finally, let's talk about how to mount switches. It doesn't matter how many keys they have. The sequence of work is the same:
- From the junction box, a strobe is lowered vertically down (or up with the bottom wiring).
- At the selected height, a hole is made in the wall for the socket. Usually use a nozzle on a drill - a crown.
- A socket is installed in the hole. The voids between the socket box and the wall are filled with mortar, preferably with good adhesion to concrete and plastic.
- A corrugated hose of small diameter is laid from the junction box to the entrance to the socket. Wires are then passed into it. With this method of laying, it is always possible to replace damaged wiring.
- The switch is disassembled (keys, decorative frame are removed), wires are connected.
- They are installed in the socket, fixed with spacer petals by tightening the fixing bolts.
- Set the frame, then the keys.
This completes the installation and connection of the double switch. You can check your work.
Advantages of double switches
Devices with two keys have the following advantages:
- one device can control the operation of several lamps or lighting fixtures;
- providing control over the intensity and brightness of light in the premises. A single switch, with one press, turns on all the bulbs of the lighting device, however, a double switch can not be used at full strength by turning on one key;
- the ability to control lighting in two rooms at once;
- economical use of electricity;
- rational use of cables and wires;
- it is allowed to turn on one lamp, which has a beneficial effect on eye health.Everyone knows the feeling when all the light bulbs are connected at once, this happens with a single switch;
convenience when connecting two-button switches for damp rooms or street lighting, since it is much more convenient to mask one device from bad weather or shocks. When installed outdoors, the switches must be protected by special covers.
What can go wrong?
To successfully connect the general switch, you must follow a few simple rules to make the system as reliable and safe as possible in order to avoid fire and short circuits:
- All work on connecting the equipment in the switchboard must be carried out by qualified electricians; it is strongly not recommended to independently intervene in the security system located on the site.
- Any actions with electrical installations and appliances should be carried out only after a power outage at the general apartment panel. Before any operation with wires, it is necessary to make sure that the electrical circuit is de-energized.
- If instead of a conventional two-button switch it is planned to install a non-contact type device or a device with a dimmer, it is necessary to study the diagram, since the principle of their installation may have a number of specific nuances.
Thus, connecting a two-gang switch to two light bulbs is not at all difficult, especially if you have the appropriate professional skills. However, if there is no experience with electrical equipment, it is better to entrust the work to specialists.
Proximity switches
For ease of use, switching devices without mechanical keys are produced. For example:
sensory trigger on a raised hand;
- acoustic turn on (turn off) the light by clap or voice command;
- switches with motion (presence) sensors also work without mechanical contact.
There are also circuit breakers that are triggered by a timer, or when an external command is given (phone call, SMS, or control using a computer application). True, the installation of circuit breakers should provide for the possibility of forced unlocking. Just in case the electronics fail.
Installing a touch switch, as well as any other with a control circuit, from the point of view of electrical work, is no different from the usual "mechanics". Power contacts are connected according to the same principle. Unless the “remote switch” circuit from the junction box may not work.
But the control scheme may require a qualified approach. At a minimum, the control unit requires a separate power supply. This can be a built-in module in the case, or a remote device that needs to be discreetly mounted nearby.


Installation of pre-installation circuit elements
Let's start by installing the junction box. In the subsequent stages of installation in it, we will collect all the wires necessary to complete the circuit, and then, we will connect their cores in a certain sequence.
Also, we need a protective device that will protect the lighting circuit from short circuit currents and overloads. Usually, it is installed in a power apartment shield, but in our case, for greater clarity, we will install it on a rail next to the circuit.
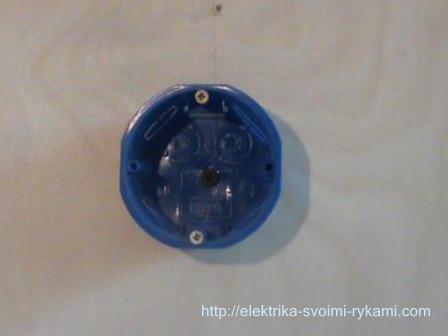
Now, we mount the socket box, we will install a two-gang switch in it.
How to make a real installation, you can see on our website in the relevant instructions, the installation of sockets for concrete and drywall.
The main elements are prepared, we proceed to the installation of the wire.


