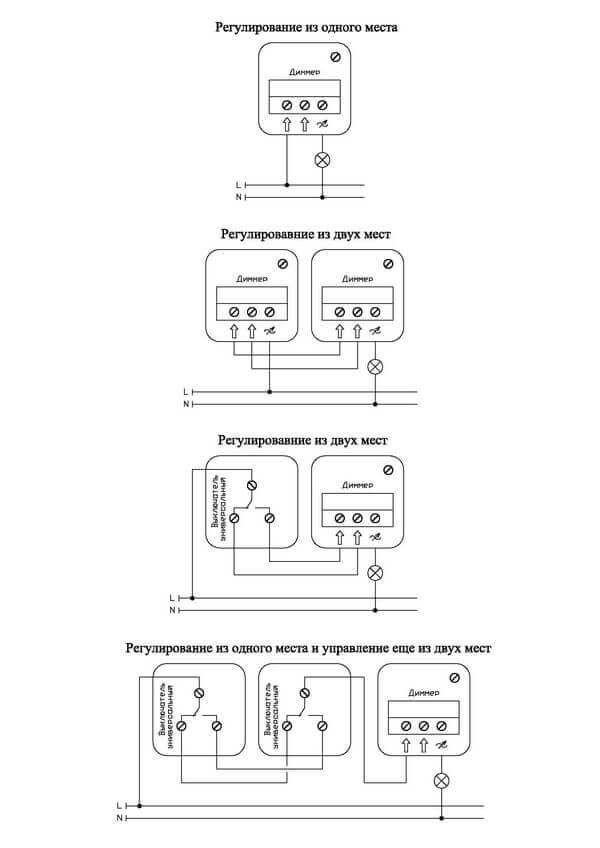
- Analysis of connection diagrams
- The main purpose and essence of the dimmer
- Purpose and functions
- The principle of operation and the main types of dimmers
- Classification of the dimmer by type of execution
- Classification of dimmers by control method
- Classification by type of lamps
- Video - Rules for connecting lamps to a dimmer
- Video - A few words about the dimmer for LEDs
- What it is
- Device and types
- How to connect a dimmer
- Schematic diagram of connecting a dimmer
- Circuit with a switch
- Installation diagram with two dimmers
- Turning on a dimmer with two pass-through switches
- Connecting a dimmer to LED strips and lamps
- Video: how to replace a switch with a dimmer
- 100 watt dimmer. Constructor.
- Dimmer with switch
- With a light touch...
Analysis of connection diagrams
The choice of circuit depends on many factors, including the model of the dimmer, the connection method - separate or with switches, the number of dimmers or lighting devices.
You should also take into account a very important point: different devices are used for incandescent lamps, LED lamps and tapes, low-voltage halogen light sources.
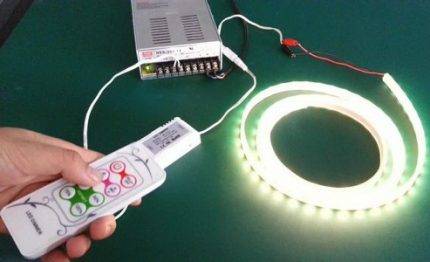
Testing a remote control dimmer connected to an LED strip. LED strips are successfully used to illuminate suspended two-, three-tier plasterboard structures
The most elementary dimmer connection diagram can be easily confused with the switch installation diagram, since it really repeats it one to one.
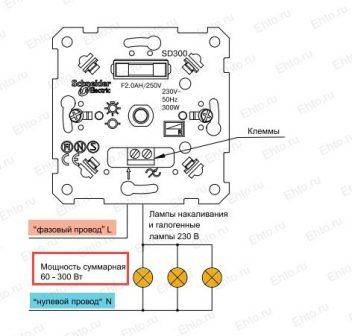
Wiring is usually done with two- or three-wire wire, depending on the grounding system. In new houses, it is recommended to use a wire with three cores - VVGng with a cross section of 1.5 mm².
 Three wires are pulled from the machine in the electrical panel: ground - to the metal case of a chandelier or lamp, zero - to the lamps, and phase - to the dimmer, to the input terminal
But often the chandelier has many horns, and the dimmer is used to control a group of separately located lamps.
In this case, it is advisable to install two devices instead of one, so that the level of illumination of two separate groups can be controlled.
The fundamental difference is in the number of load wires. One common phase is supplied to the regulator, and at the output there are two phase wires directed to different groups of luminaires. Accordingly, zero is also divisible by two
How is the connection made if, instead of setting the control for conventional or energy-saving lamps, it is necessary to adjust the control of the LEDs?
Usually, complete with tapes or lamps, along with a dimmer, there is an adapter from 220 V to 12 V. This can be a power supply that is plugged into a power outlet.
 Both wires from the converter are pulled to the dimmer, connected according to the diagram to the required connectors, and from the output terminals they are fed to one lighting device or several lamps connected in parallel
Paired with often used as a dimmer one or more walk-through switches - the power grid with such a kit becomes more perfect in terms of ease of use.
The place of the switch is determined in different ways: it can stand between the shield and the dimmer or between the dimmer and the lamp.
The schematic of the through devices differs from the standard device, and this must be taken into account when connecting
The main attention is paid to the connection of phase conductors in both devices. Finally, consider the arrangement of wires and terminals with a standard dimmer connection - yet it is it that is the most popular in everyday life.
Finally, consider the arrangement of wires and terminals with a standard dimmer connection - yet it is it that is the most popular in everyday life.
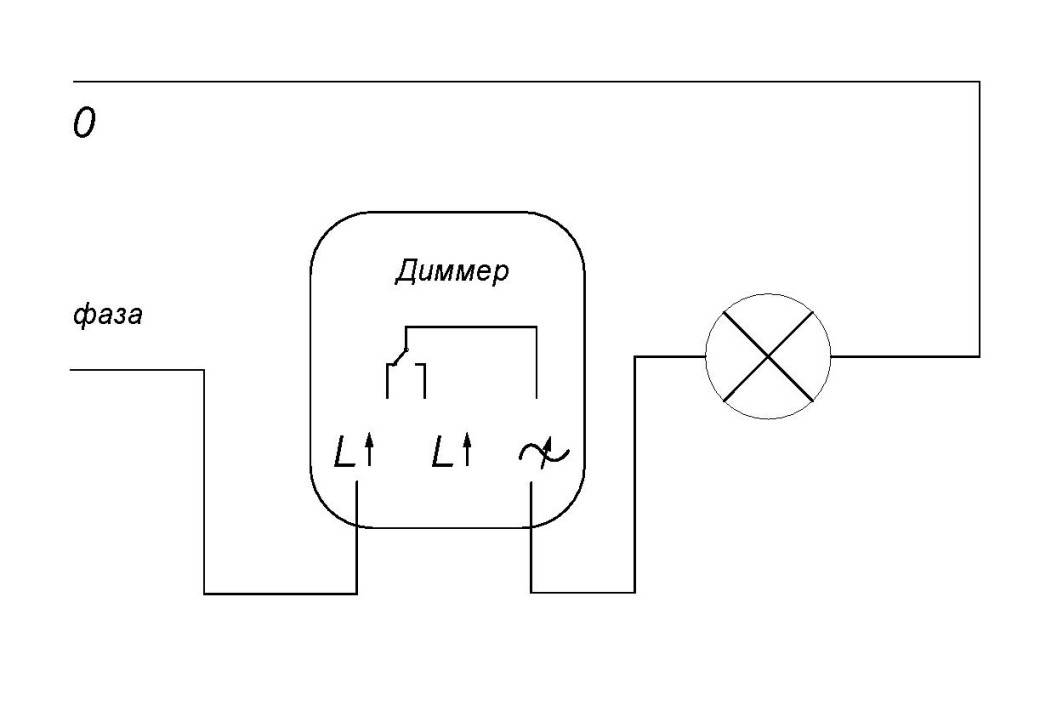
The simplest circuit that can serve as a standard for connecting a standard regulator. The phase conductor is fed to the input, and from the output, the adjacent terminal, goes to the lamp
The listed examples are only a small part of all possible schemes for mounting the device. In order to make an error-free connection, it is necessary to use the manufacturer's instructions as the main guide.
The main purpose and essence of the dimmer
A few words about what a dimmer is and why is it needed at all?
This device is electronic, designed to use it to change the electrical power. Most often, in this way they change the brightness of lighting devices. Works with incandescent and LED lamps.
The electrical network supplies a current that has a sinusoidal shape. In order for the light bulb to change its brightness, a cut-off sine wave is required to be applied to it. It is possible to cut off the leading or trailing front of the wave due to the thyristors installed in the dimmer circuit. This helps to reduce the voltage supplied to the lamp, which accordingly leads to a decrease in power and brightness of the light.
Important to remember! Such regulators generate electromagnetic interference. To reduce them, an inductive-capacitive filter or a choke is included in the dimmer circuit
Purpose and functions
Dimmers (in English dimmer) are used in everyday life to adjust the brightness of lamps, the temperature of heating devices (soldering irons, irons, electric stoves, etc.). These devices are also called dimmers or dimmers, although this is only one of the possible applications. They work most effectively with incandescent lamps, allowing them to extend their service life, since if there is a dimmer in the power circuit, the minimum current is supplied to the lamp when turned on. And as you know, it is the starting throws that cause them to fail.


What does a dimmer look like?
Do not use dimmers with transformer or switching power supplies (TVs, radios, etc.). This is due to the peculiarities of the operation of the device - at the output, the signal does not look like a sinusoid, but only part of it (the tops are cut off with keys). When such power is supplied, the equipment fails.
The very first dimmers were electromechanical and could only control the brightness of incandescent lamps. Modern ones can provide a number of additional functions:
- turning off the light on a timer;
- turning the lighting on and off at a certain time (presence effect, used for long departures);
- acoustic control (by clap or voice);
- possibility of remote control;
- various modes of operation of the lamps - flashing, changing the temperature of the light, etc.;
- the possibility of embedding in the "smart home" system.
The simplest dimmers still only adjust the brightness of the lighting, but this function turns out to be very useful.
The principle of operation and the main types of dimmers
Before installing a dimer, you should understand how it generally works. As for the principle of operation, in this case it is quite simple. The dimmer pre-regulates the voltage supply to the lighting fixture in the room. If you properly deal with this, then the device will be able to change the voltage supply to the lamp from 0 to 100 percent.
The lower the voltage will be applied, the correspondingly lower will be the brightness of the lighting in the room. In addition, this device has various design variations. There are several parameters at once by which modern dimmers are classified. Let's get acquainted with each of them in more detail.
Classification of the dimmer by type of execution
From this point of view, all dimmers are divided into three large groups, consider them.
- Model. Such devices are intended for installation in a switchboard. With their help, you can adjust, as well as turn on the lighting in places that can be classified as public (this can be a corridor or, for example, a staircase, an entrance).
- Monoblock. Representatives of this category are mounted instead of a conventional switch. That is why problems with installing such dimmers with your own hands often do not arise at all. The devices are quite popular, so recently they have acquired some subspecies that differ in the way they are controlled.
- With switch. And such devices are installed in a special box, where sockets are often mounted.As for the control organ, in this case the button acts as such (not always, but in most cases).
Classification of dimmers by control method
So, monoblock household models can have, as we just noted, several control options.
- Rotary models. They have a special rotating handle. If you move it to the leftmost position, this will turn off the lighting, and if you turn it to the right, the brightness of the lamps will increase.
- Keyboard models. Outwardly, they are an exact copy of a two-button circuit breaker. The purpose of the first key is to adjust the brightness of the light, and the second is to turn it off / on.
- Turn-and-push models. They operate on almost the same principle as rotary ones, however, they differ in that in order to turn on the lighting, you need to drown the handle a little.
The most convenient are rightfully considered dimmers with a remote control function. Thanks to the remote control, you will be able to adjust the brightness of the light from anywhere in the room. In addition, some models also perform the function of a switch. Each has its own dimmer connection scheme, but more on that later.
Classification by type of lamps
We cannot but agree that the use of different regulators for each particular type of lamp is at least strange. But the fact is that modern lamps are very diverse and have a variety of design features.
As for incandescent lamps, the simplest dimmers are used for them, which operate according to an extremely simple principle: the brightness of the illumination of the filaments is regulated by changing the voltage.In addition, such dimmers can also be used for halogen lamps powered by a standard 220-volt voltage. Finally, the device data design itself is not fundamentally complex.
Video - Rules for connecting lamps to a dimmer


But for halogen bulbs operating from 12-24 volts, more complex dimmers are used. Ideally, a step-down transformer should be present in the connection diagram, but if this is not possible for one reason or another, you can choose a dimmer according to the type of an existing transformer. If the latter is electronic, then you will need a model marked C, and if winding - marked RL.
Finally, a special dimmer must be used with LED dumps, which pulse modulates the frequency of the current.
Video - A few words about the dimmer for LEDs
The most difficult in terms of adjusting the intensity of lighting are fluorescent lamps (or, as they are also called, energy-saving). Many even believe that such lighting networks should not be dimmed at all. But if you do not agree with these people, then be sure to include an electronic starter (or electronic ballast for short) in the circuit.
What it is
Dimmers are devices that are used to reduce the brightness of light. By changing the voltage signal applied to the lamp, it is possible to reduce the intensity of the light flux. Dimmer is related to various electrical appliances, but most often this concept is used as an addition to lighting fixtures. More specialized equipment is needed to darken fluorescent vapors, mercury fumes, and control other chemical processes.
Photo - push dimmer
These devices are used both in everyday life and for lighting large industrial facilities. Small household dimmers, for example, Legrand (Legrand), Schneider Electric (Schneider), Triac, Blackmar, ABB can be equipped with a remote control (radio-controlled device). Modern professional home dimmers are controlled by a digital DMX or DALI control system.
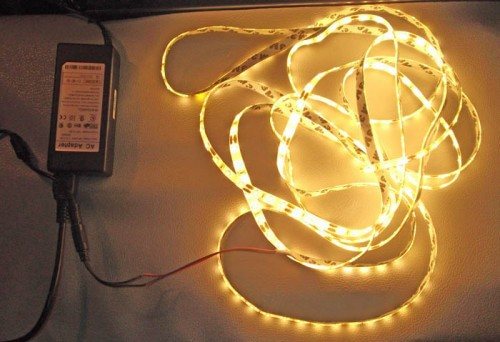
Photo - LED strip and dimmer
Previously, even mechanical dimmers were used for energy-saving lamps, fluorescent and halogen, which made it possible to slightly muffle or, conversely, increase the luminous flux. This is quite convenient, because you can control the lighting system. The dimmer circuit on the triac allows you to extend the life of the lamps, due to the fact that the touch switch changes the lighting scheme, depending on natural light or individual settings.
Advantages of using a dimmer type Agate, Jung, Gambit:
- Energy saving;
- Extending the life of lighting fixtures;
- Wide scope. Dimmers are used for vacuum cleaner, fan, soldering iron, electric motor and many other electrical devices.
Modern dimmers are made from silicon rectifiers or diodes (SCRs) instead of variable resistors. This allows you to make regulators more durable. The variable resistor dissipates power as heat and divides the voltage. In this case, the rectifying diode switches between low resistance and high stability, dissipates very little power and is able to drive high voltages.
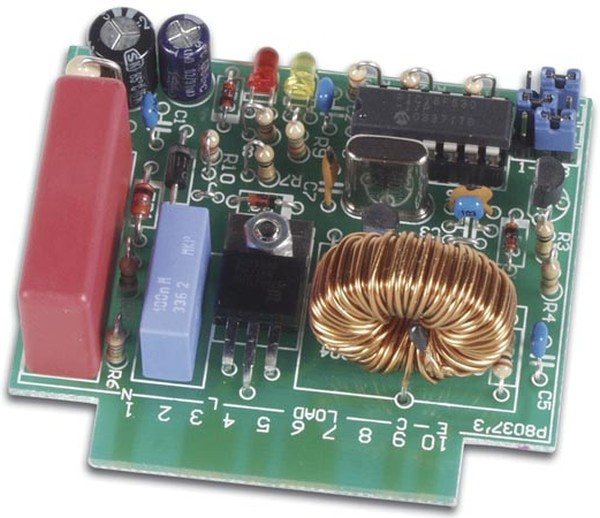
Photo - dimmer for lighting system
Device and types
Dimmers are made on the basis of a different element base. All of them have their own characteristics and disadvantages.And in order to understand what a dimmer is and how it works, you need to figure out what a particular device is made of. So, there may be options:
- Based on a rheostat (in particular, a variable resistor). This is the simplest, but also the most inefficient way to control brightness. Such a device is very hot, so a cooling system is needed, it has an extremely low efficiency. Currently not mass-produced.
-
Electronic dimmers based on triacs, thyristors, transistors. These devices cannot be used with equipment that is demanding on the form of power supply, since the output is something similar to a sine wave with cut tops. It is also worth knowing that such circuits can produce interference that interferes with the operation of radio receivers or equipment that is sensitive to electrical interference. Despite their shortcomings, it is electronic dimmers that are used more often - because of the low price, small size and the possibility of implementing additional functions.
- Dimmers based on autotransformer. Such devices produce an almost perfect sine wave, but they are large in weight and size, and a lot of effort is required to adjust. Another point: a more complex circuit leads to a rise in the cost of the regulator. However, they are also on the market, used in places where radio interference cannot be created or a normal form of supply voltage is required.
When choosing a device, it is not so important to know what type it belongs to, how important it is to take into account the nature of the load to which it will be connected (lamps incandescent and LED or fluorescent and housekeepers).
By type of execution, dimmers are:
-
Modular for installation in an electrical panel on a DIN rail. You can connect this type of dimmer with incandescent lamps, halogen lamps with a step-down transformer. For ease of use, they have a remote control button or a key switch. Such devices are convenient, for example, for controlling the illumination of the yard and the entrance gate from the house, landing or front door.
-
Dimmers on a cord. These are mini-devices that allow you to adjust the brightness of the glow of lighting fixtures that are plugged into an outlet - table lamps, wall lamps, floor lamps. It is only worth knowing that they are compatible mainly with incandescent lamps.
-
For installation in a mounting box. They are placed in the mounting box under the switch (in the same box). Compatible with incandescent, LED, halogen step-down and electronic transformer. They are controlled by a button that is placed on top of the device or connected to the "smart home" system.
- Monoblock. In appearance, it is very similar to a conventional switch, it is placed in the same mounting box, it can be used instead of a switch. They are included in the phase circuit break (diagrams below). This type has a large species diversity. Which lamps such a dimmer can be connected to should be indicated on the case, but if it is an electronic circuit, then they work with incandescent lamps and some halogen and LED lamps (which say dimmable or have an appropriate sign). Can be managed:
-
By means of a rotary disk (rotary dimmers). Turning off the light occurs by turning the disk to the leftmost position. The disadvantage of this model is that it is impossible to fix the last illumination value. When enabled, the brightness is always set to the minimum.
- Swivel-push.In appearance, they are similar, but on / off occurs by pressing the disk, and adjustment - by turning it.
-
Keyboards. In appearance, they are very similar to conventional switches. Turning the light on/off is standard by flipping the key, and the adjustment starts after holding the key down for more than 3 seconds. There are models in which switching on and off occurs with one key, and adjustment with another.
-
Touch. All control is done by touching the screen. These models are the most reliable - no mechanical parts, there is practically nothing to break.
-
In private houses and apartments, monoblock dimmers are most often installed. In the house, a modular design can still be useful - to change the brightness of the lighting in the local area with the ability to control it from home. For such cases, there are models that allow you to control the illumination from two places - pass-through dimmers (they work on the principle of a pass-through switch).
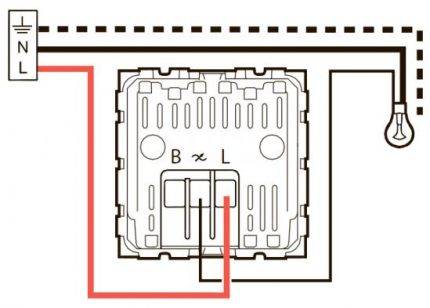
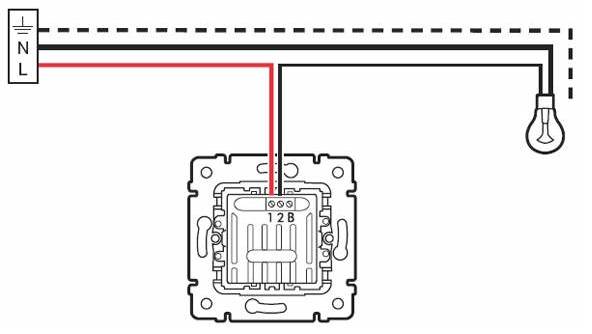
How to connect a dimmer
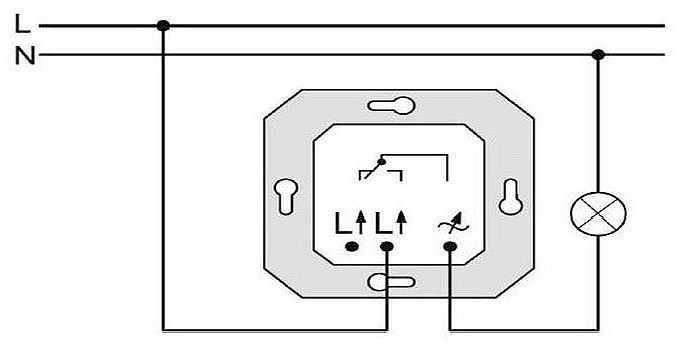
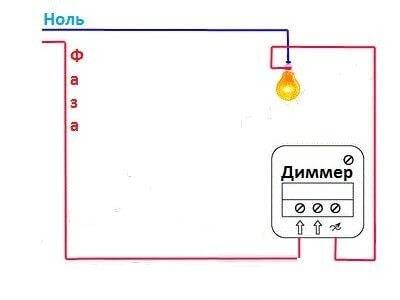
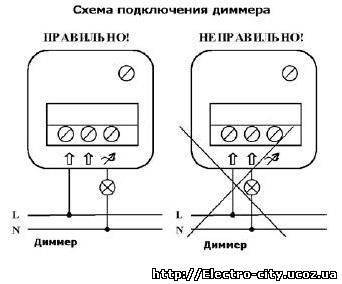
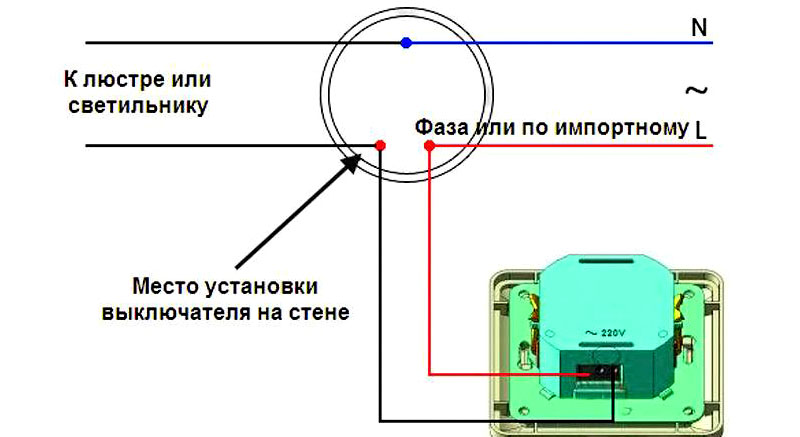
In the general case, the dimmer is connected like a conventional switch, but there is a condition: the regulator must be turned on only in a phase break (switches can be set both in phase and in “zero”).
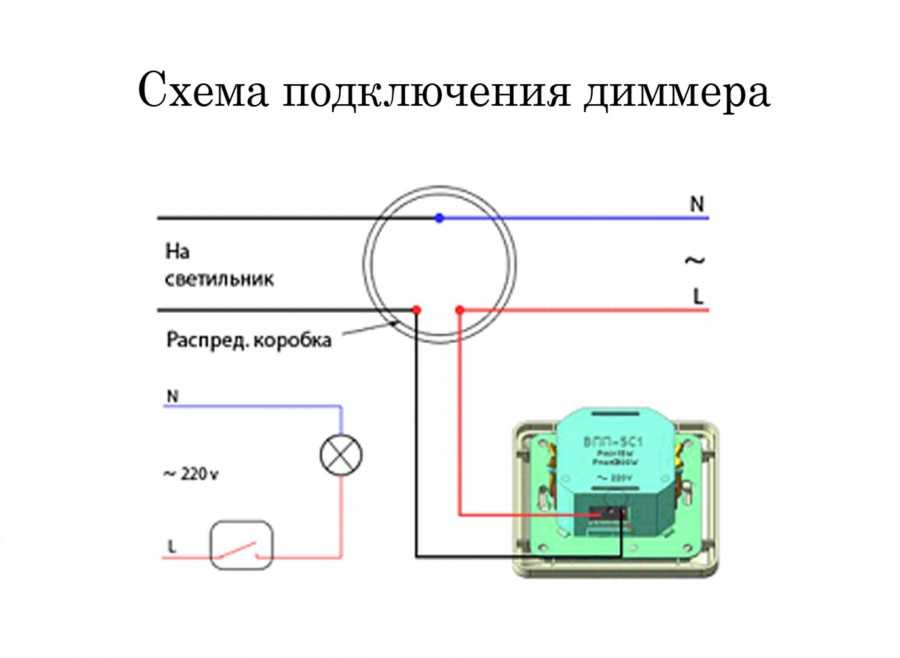
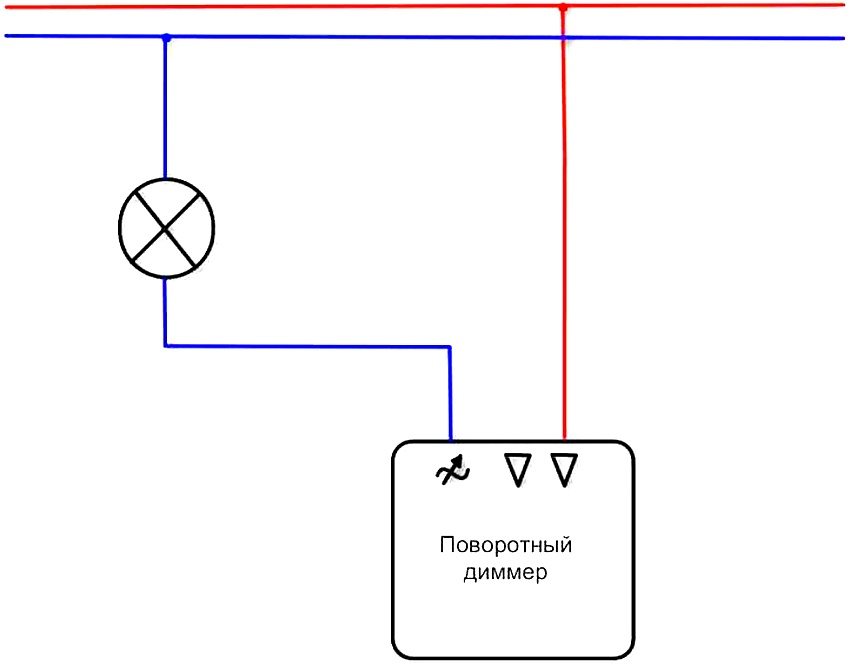
Schematic diagram of connecting a dimmer
Dimmers are connected like switches. Both of these elements are mounted in series with the load. The dimmer can be safely put in place of a conventional switch. To do this, turn off the mains power, disconnect the wires from the terminals of the old switch, and install a dimmer in its place. This operation is also simplified by the fact that the mounting dimensions of the dimmers correspond to the dimensions of simple switches.


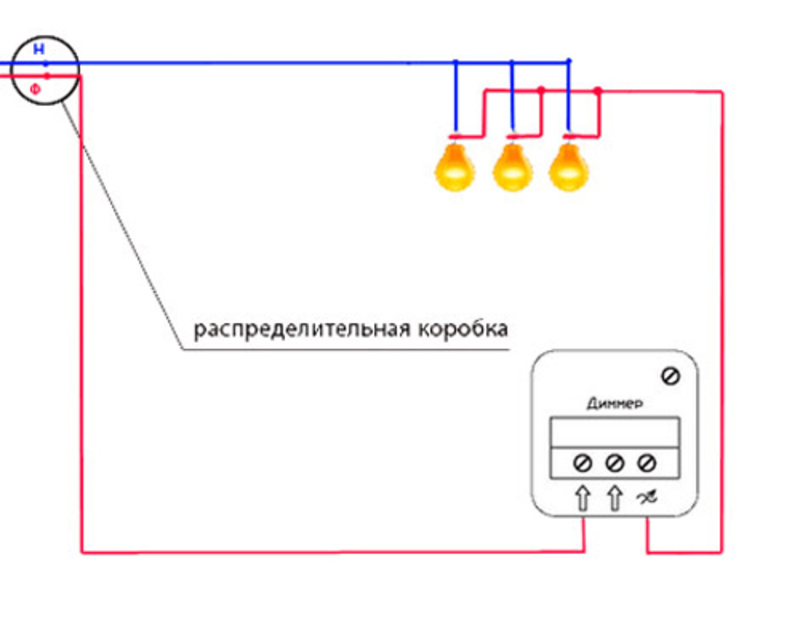


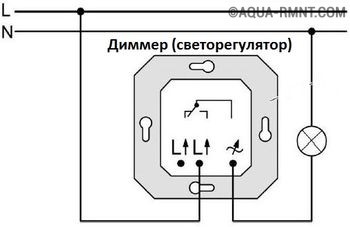
Schematic diagram of connecting a dimmer
When connecting a dimmer to the mains, remember: it must be included in the break of the phase (L), and not the neutral (N) wire.
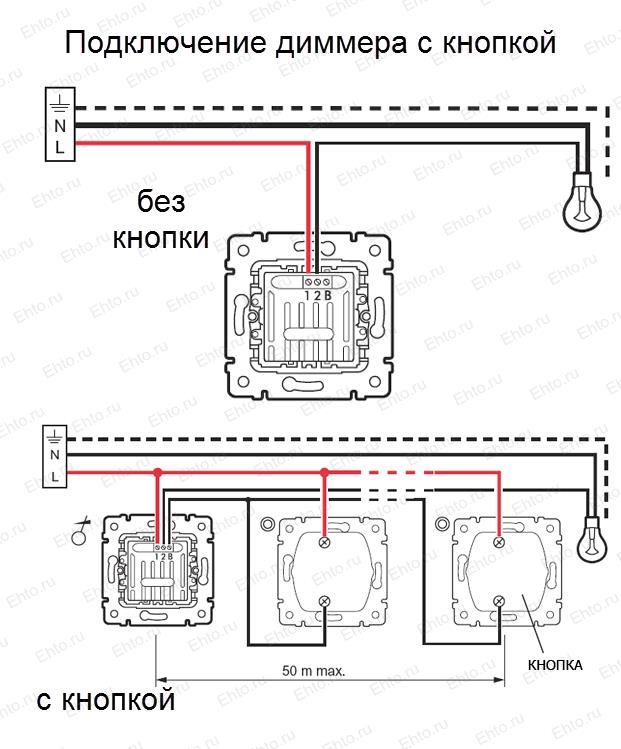
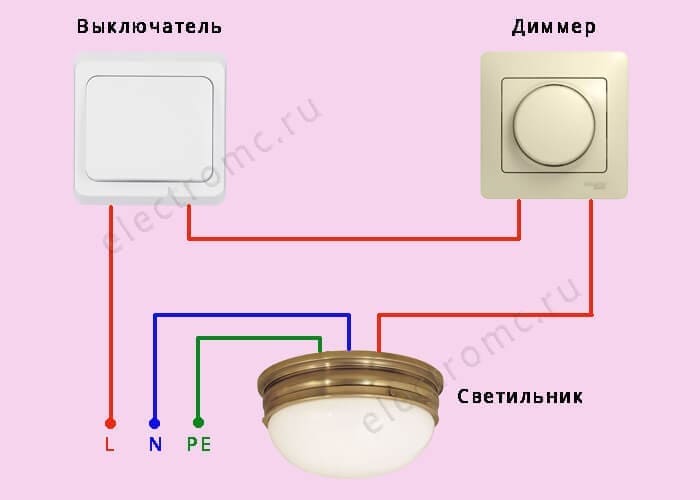
Circuit with a switch
Such schemes are extremely convenient: they allow you to control the intensity of lighting from anywhere in the apartment. In the bedroom. For example, it is advisable to install a dimmer next to the bed - in this case, the user does not have to leave a warm bed to reduce or increase the light intensity.
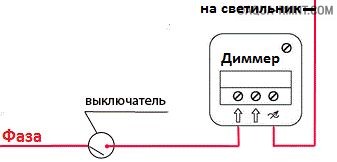
Connection diagram for a dimmer with a switch
Such a scheme is appropriate to apply in "smart home" systems. Effective light control allows you to highlight individual areas of the room or interior details. A simple switch is installed near the interior door. They are used when entering and leaving the room - when you need to turn the light on or off.
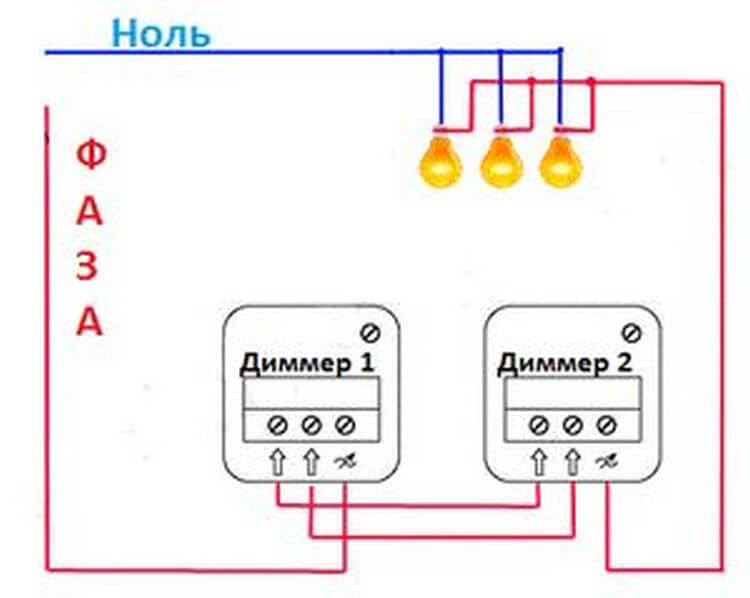
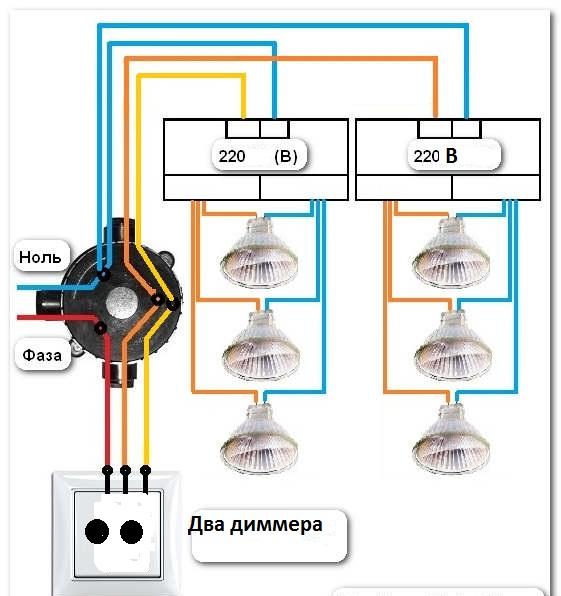
Installation diagram with two dimmers
If necessary, you can adjust the light intensity from two points. in this case, two dimmers are installed, and their first and second terminals are connected to each other. A phase wire is connected to the third terminal of any of the dimmers.
Wiring diagram with two dimmers
The wire to the load comes from the third terminal of the remaining dimmer. As a result of such manipulations, three wires should come out of the junction box of each of the dimmers.
Turning on a dimmer with two pass-through switches
The principle of operation of this scheme is as follows: one switch is installed at the entrance to the room, the second - at the other end of the stairs or corridor. In this case, the dimmer is mounted between the switch and the load in the phase wire.
Connection diagram for a dimmer with two pass-through switches
A dimmer cannot be installed between the walk-through switches.
Please note: if the dimmer in this circuit is turned off, none of the walk-through switches will work.
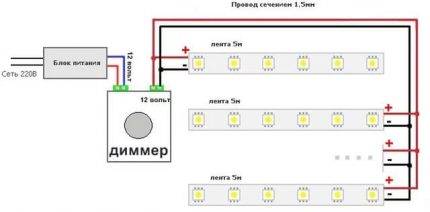
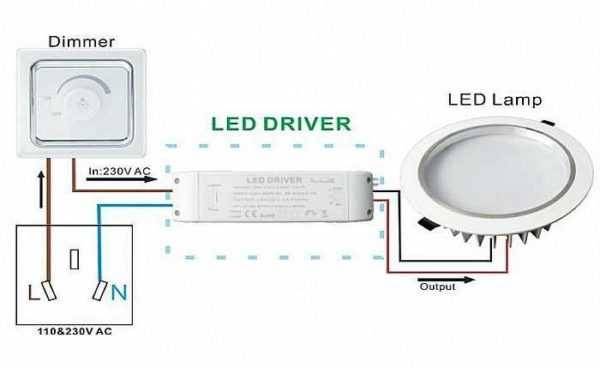
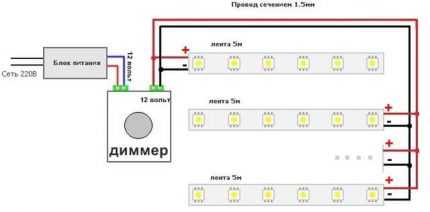
Connecting a dimmer to LED strips and lamps
If you connect a dimmer to the LED strip, it will be possible to change the brightness of its glow. Choose a dimmer according to the total power of the LED strips.
When implementing this scheme with single-color tapes, a power supply is connected to a dimmer. The outputs of the dimmer are connected to the load itself, while observing the polarity of the current.
In the case of using LED strips with RGB channels, the dimmer is also connected to the power supply, and its outputs to the signal controller.
The power of the dimmer in any of the above cases should be 20–30% higher than the calculated power consumption of the tapes.
Please note: special dimmers are available for working with LED lamps and strips
Video: how to replace a switch with a dimmer


Dimmers are very popular, and this encourages manufacturers to actively develop this branch of instrumentation. By now, we have learned how to make regulators for any type of load, including those with transformer power supplies. But if we talk about conventional incandescent or halogen lamps for 220 V, then the dimmer for them is an extremely simple device and, as the reader could see, it is quite easy to do it yourself.
(0 votes, average: 0 out of 5)
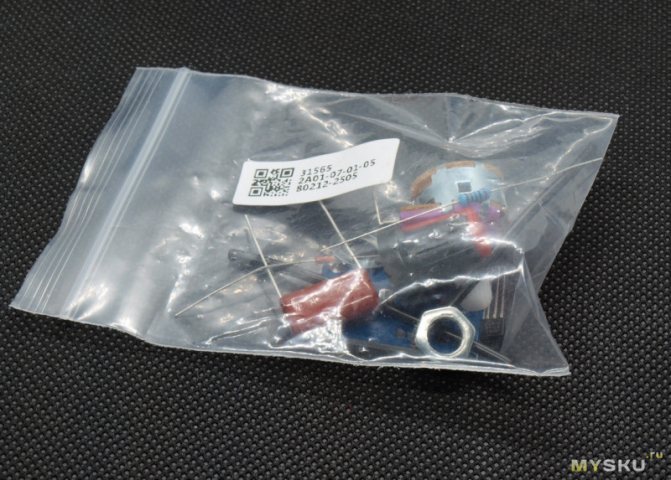
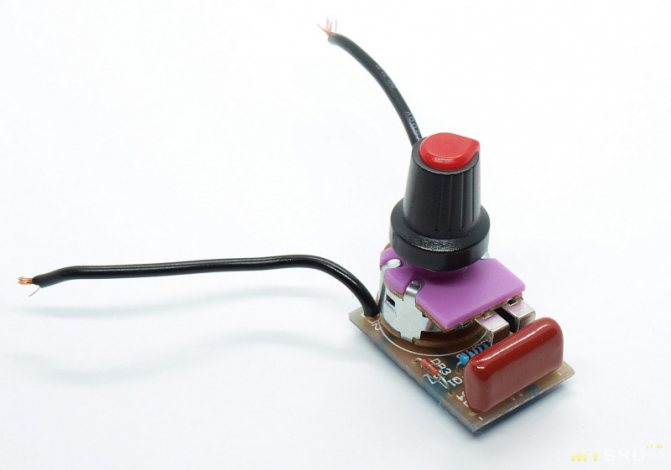
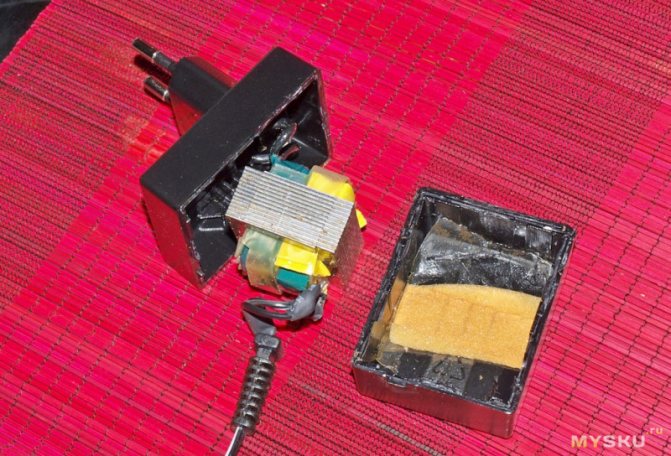
100 watt dimmer. Constructor.
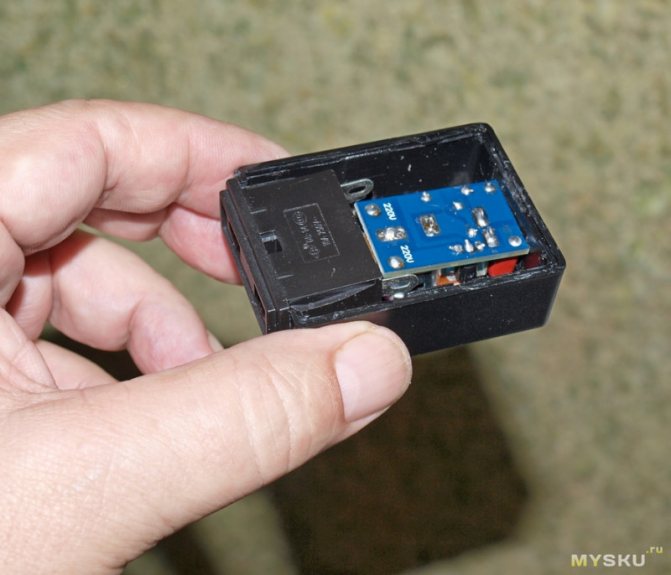
Hello. Overview of the electrical power control module with application examples. I bought this kit to change the power of the soldering iron.I used to make a similar device, but for a soldering iron, that dimmer is too large, both in size and in power, and I have to place it in a separate box. And then a subject caught my eye, which can be built into a network plug, not any truth, but you can find it. Description:
PCB size: 2*3.3cm Rated power: p=UI; 100W=220V*0.45A Model: 100W dimmer module; Rated power: 100W;
PCB x1 pcs Potentiometer with switch WH149-500k x1 Potentiometer handle x1 Dinistor DB3 x1 Resistance 2K, 0.25W x1 Triac MAC97A6 x1 Capacitor 0.1uF 630V CBB x1
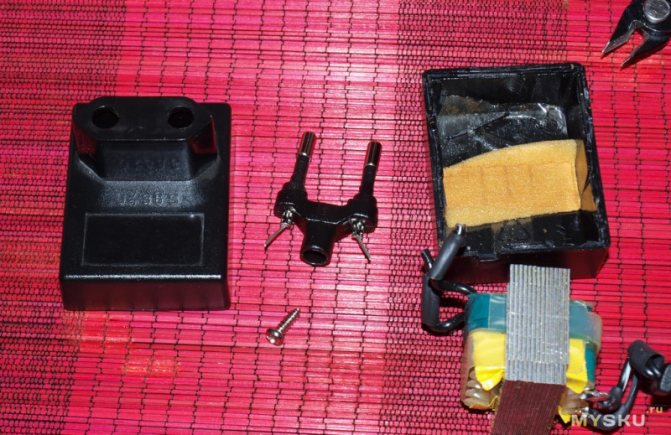
My sizes.
The dimensions of the board are 30x20mm. In depth from the protruding contacts of the regulator to the thread 17 mm. Mounting hole 9.2 mm. Thread diameter 6.8 mm.
I ordered a lot of ten sets. Each set is placed in a plastic bag.
Few details. Variable resistor with built-in switch.
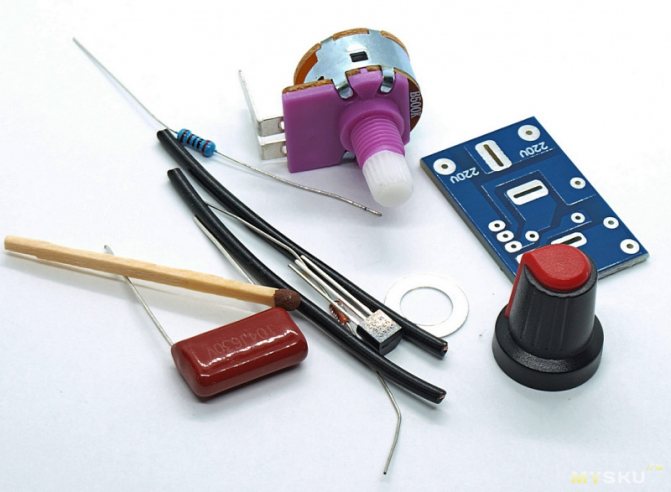
The circuit diagram is similar to this, only the denominations are different.

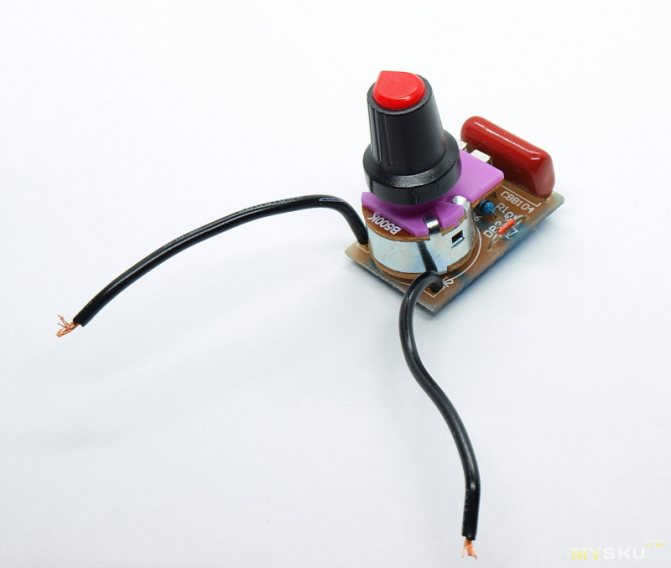
The module can be soldered in a few minutes.
The wires are too thick and do not allow the alternator to fully fall into place. Therefore, they should be soldered last, if they are needed, of course.
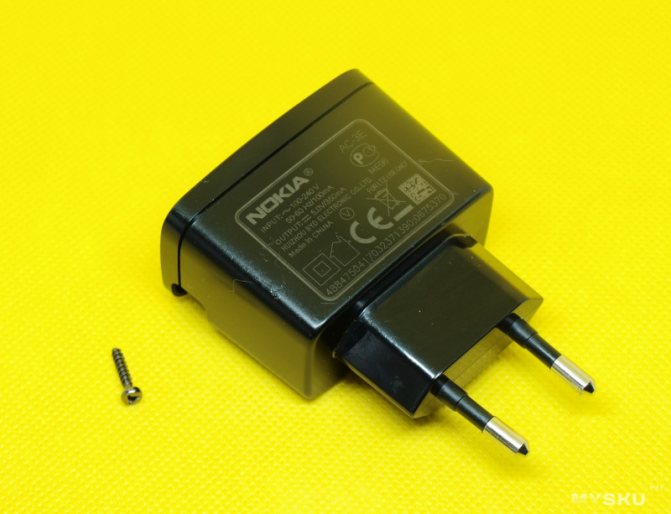
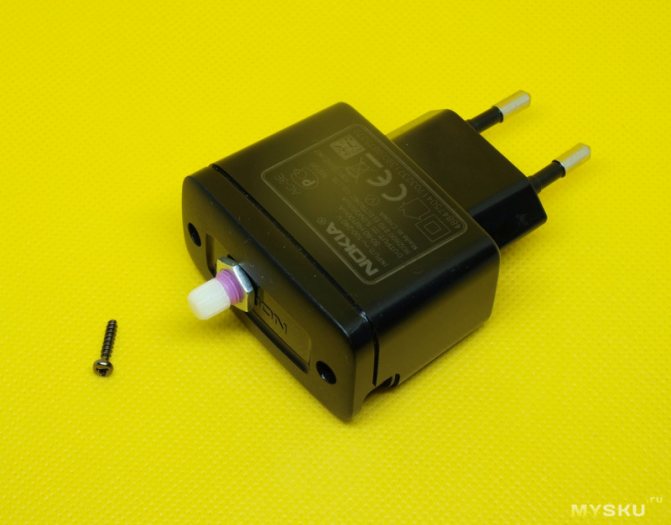
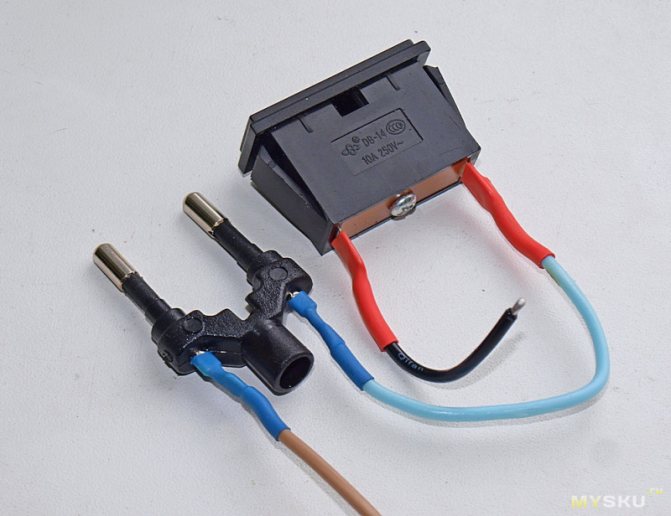
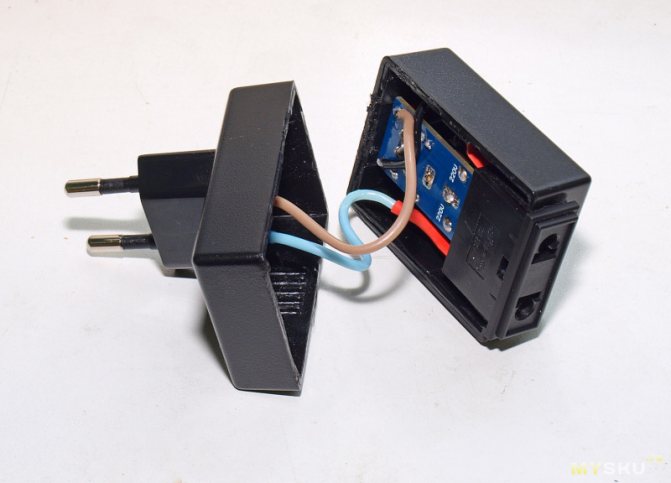
Now you need to pick up a fork. I did not find anything better than a Nokia charging case. The case is fastened with screws, though with a tricky slot, but you can unscrew it with an ordinary flat screwdriver.
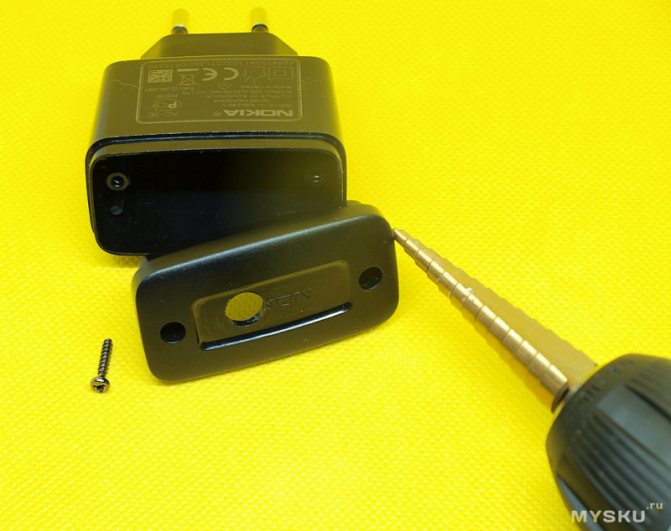
I take out the insides, make a hole in the lid.
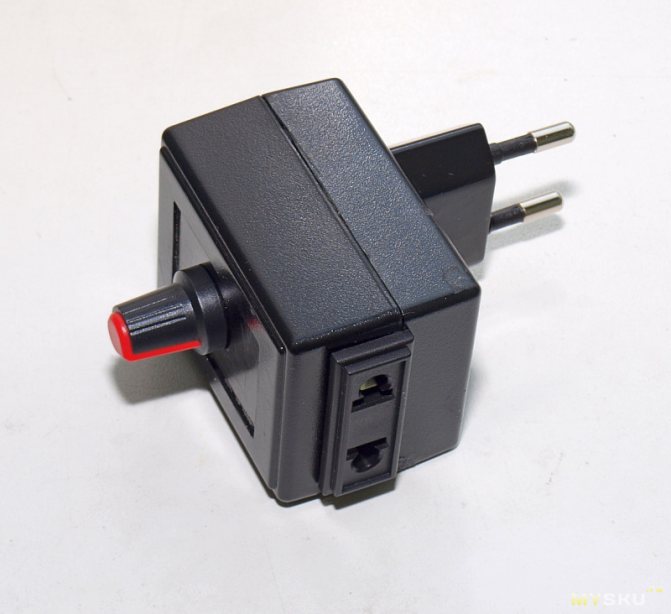
Everything, the device is ready.
The regulator knob has the same texture and color as the body and does not give the impression of a foreign body.

It remains to connect the load - a soldering iron.
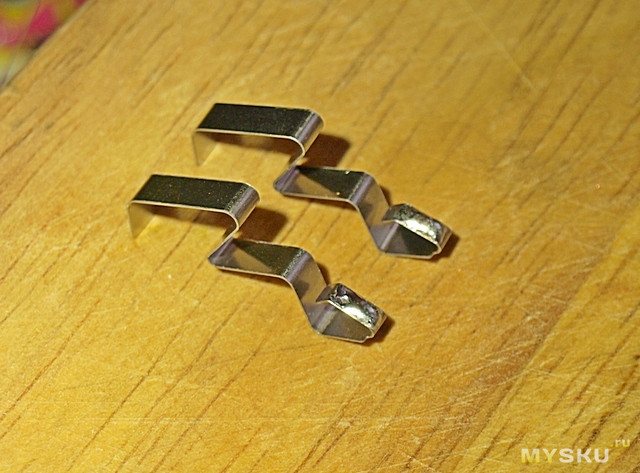
Puddle spring contacts from charging with acid.
And I connect the soldering iron wire to the dimmer and contacts.
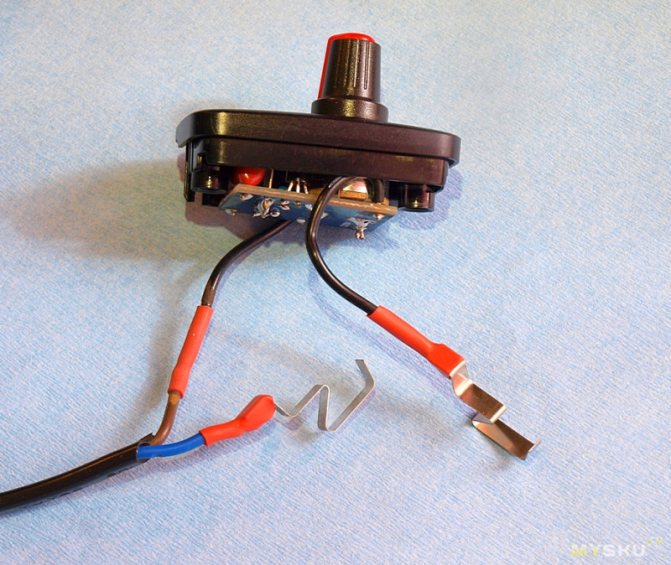
And I put all this inside the charging case.The wire in the case did not fix additionally, it got in quite tightly.

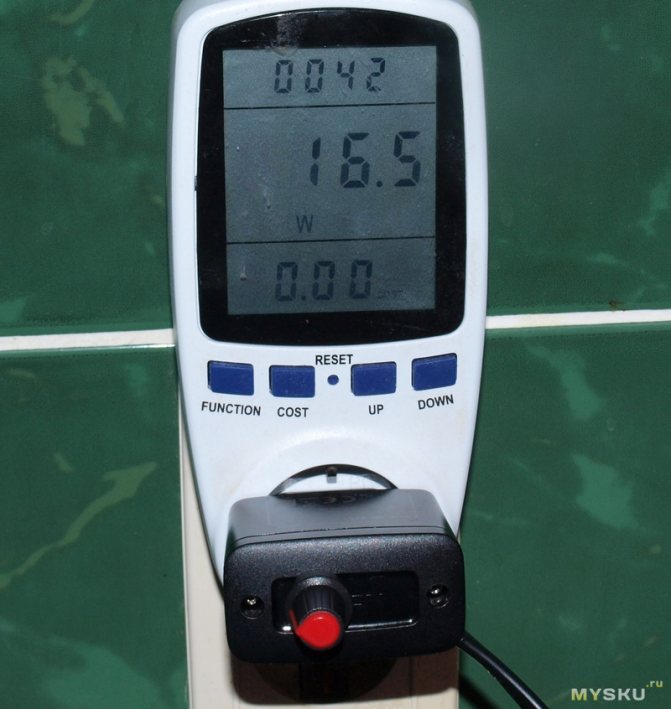
Now it remains to adjust the temperature. Although the soldering iron is 25 watts, it heats up to 350 degrees.
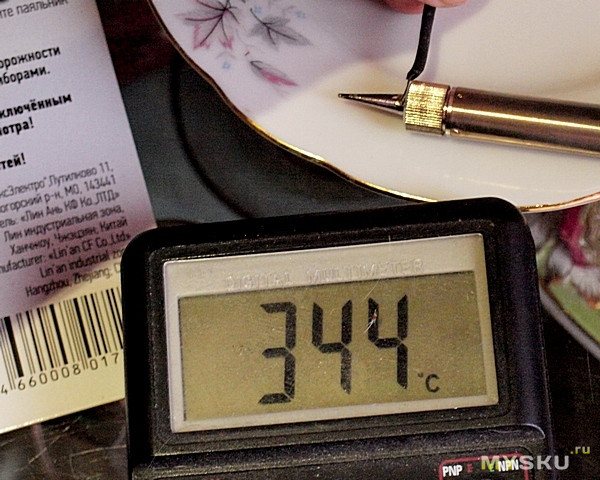
By rotating the regulator, I achieve that the sting is 270 C and rearrange the regulator knob with a pointer to the screw, so that it is easier to navigate later. At this time, the soldering iron consumes 16.5 watts.
Video demonstrating power adjustment.
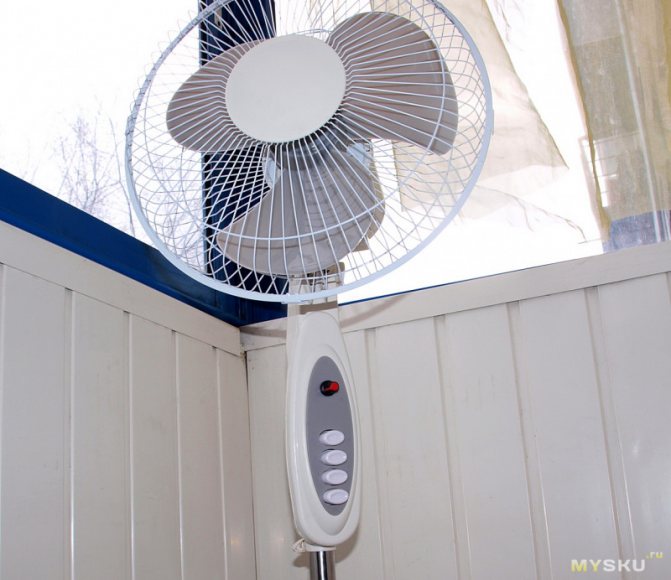
For the sake of experiment put a subject in the fan.
But here the speed adjustment can be painlessly done only within small limits. With a sufficient decrease in speed - the motor windings begin to hum, overheat and sooner or later, rather sooner, with such operation the engine may burn out
Well, a universal regulator, to which you can connect a soldering iron, a lamp and a fan. The case was taken from the power supply from the phone's deck. The power supply is the simplest - only a step-down transformer, the output is alternating current. Therefore, I dismantled it without regret. The case was split into 2 parts along the seam by light tapping of the hammer on the knife.


A pleasant surprise - the plug is unscrewed, which facilitates the process of home-made.
Of course, you need to cut a little.
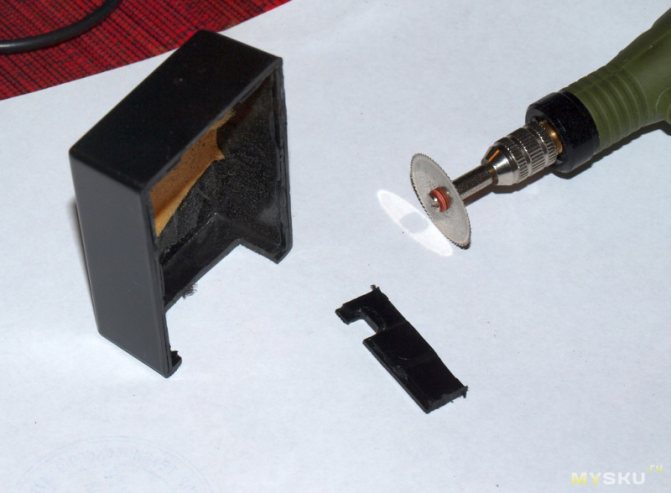
The necessary parts fit into the case quite compactly.
I connect the plug and socket with wires.
I put all this in the case where the dimmer is already installed. The wires in the photo are soldered incorrectly, due to inattention. The current with this wiring goes directly through the capacitor and the dimmer naturally does not work. And then I thought - they put the marriage. I soldered the wires, as expected, to the contacts signed "220V".
Ready product.
I use a dimmer for its intended purpose - an incandescent lamp can be spiritually darkened.

During operation, I did not find any excessive heating of the device, but I used the subject for power below the nominal one.
That's all
Thank you for your attention
Dimmer with switch
A slightly more complicated circuit is also popular, but, of course, very convenient, especially for use in bedrooms - a switch is installed at the phase break in front of the dimmer. The dimmer is mounted near the bed, and the light switch, as expected, at the entrance to the room. Now, while lying in bed, it is possible to adjust the lamps, and when leaving the room, the light can be completely turned off. When you return to the bedroom and press the switch at the entrance, the bulbs will light up with the same brightness with which they were burning at the moment of switching off.
Similarly pass-through switches are connected and pass-through dimmers, which makes it possible to control lighting from two points. From each dimmer installation location, three wires should fit into the junction box. A phase from the mains is supplied to the input contact of the first dimmer. The output pin of the second dimmer is connected to the lighting load. And the two pairs of remaining wires are interconnected by jumpers.
With a light touch...
Another type of dimmer is touch. With a light touch of your hand, you can simply control the lighting, change the speed of rotation of the engine. The output load can be any - from LED strips to powerful spotlights of several kW. But the scheme is somewhat more complicated.
The main element is the HT7700C/D chip. This is a CMOS device designed for smooth brightness control. The triac is selected with the required power, taking into account the fact that the current at pin 5 of the microcircuit is 14 mA. Supply voltage: 9–12 V. The sensor is connected via a diode to pin 2.
Any metal plate or piece of bare copper wire will work as a sensor. All of this needs to be done nicely.
The device works like this: the first touch is turned on. The second - a smooth decrease in brightness, the third - the brightness will be fixed. Fourth touch - shutdown.
As you can see, it is possible to assemble a dimmer with your own hands. This will save on purchases and try your hand at electronics.


