- Motion sensors, their purpose, principle of operation
- Placement and orientation
- How to choose a home motion sensor
- Three-wire motion sensor connection diagram
- Mounting
- Sensitivity setting and adjustment
- Advantages and nuances of use
- Flaws
- Motion sensor installation
- Combination of a motion sensor with a switch
- Wiring diagram for multiple sensors
- Placement nuances: how to connect an infrared motion sensor correctly
- Specifications
- Viewing angle
- Range
- Power of connected lamps
- Method and place of installation
- Additional functions
- Assignment of parameter adjustment knobs
- How to connect LED spotlight?
- Possible problems and solutions
- Wrong installation location
- Lamp burnout
- Wiring faults
- Marriage and improper operating conditions
- Principle of operation
- Overview of popular models of street lighting sensors
Motion sensors, their purpose, principle of operation
The main task of the motion sensor, as, indeed, of any sensor, is to control the electrical network. Work can be carried out with an active load or with an active-inductive one. Having detected movement in its area of responsibility, the sensor begins to determine how much it is illuminated. If the light level is below the set value, then the lighting turns on.This allows the device to work regardless of the time of day. The response threshold is set using special regulators.
Sensors, which are commonly used in the home, pick up fluctuations in electromagnetic waves in the infrared light spectrum. Separately, you can configure the time it takes for the device to start working if it suddenly notices movement in the sector.
By turning the knob, we can set the shutter speed. The time depends on the specific device model. It can vary from ten seconds to seven or fifteen minutes.
Placement and orientation
The general rules for installing sensors are as follows:
- installation height above the observed surface can be from 2.5 to 4 m (the parameter depends on the device model);
- when choosing a mounting location, take into account the fact that the detector is more sensitive to movement that occurs across the observation area;
- The total load power of the lamps is limited and can be, for example, from 60 to 1200 W for incandescent bulbs and from 0 to 600 W for fluorescent illuminators.
Temperature also affects the sensitivity of the detector. The range of temperature values at which the device normally performs its functions is from -20 to 40 ° C.
 Methods for installing motion sensors on the example of TDM ELEKTRIK devices: DDPt-01 is mounted in a cartridge; E27, DDT-03, DDT-02, DDT-01 are installed in the mounting hole for spotlights (the diameter of different devices is different and can be 40-65 mm); DDSK-01 can be mounted in the wall, ceiling, luminaire housing
It is forbidden to install lamps:
- on vibrating surfaces;
- near fans, air conditioners;
- on glossy white wall surfaces;
- near heat sources - electric radiators, lamps;
- on surfaces exposed to direct sunlight.
To avoid false triggering, the infrared detector is not exposed to sources of electromagnetic waves, wind and heat flows.
 When choosing a suitable place for installation, the object detection zone is taken into account with different placement of the device
It is also impossible for an incandescent lamp to fall into the coverage area - a gradually cooling thread will trigger the detector, since it will react by switching on to a change in its temperature.
This can continue indefinitely - the light will turn on and off. False alarms can also occur in windy weather due to swaying branches.
When choosing the installation location and location of the sensor itself, it is necessary to take into account: installation height, ambient temperature, make sure that there are no interference
How to choose a home motion sensor
The following types of sensors are distinguished, differing in the way they appear in the range of a person:
- Passive - the most common type of motion sensors, based on capturing the heat radiated by the human body. Perfectly suited for controlling the inclusion of lights in apartments and small rooms.
- Active - the principle of their operation is similar to echo sounders or radars, that is, a signal is emitted with subsequent analysis of its reflection. The device is triggered when the distance traveled by the signal from the sensor to the obstacle and back changes. They operate in the ultrasonic range and high radio frequencies. The first type is not advisable to be installed in rooms where there are pets that behave restlessly due to ultrasonic frequencies.The second type, if installed incorrectly, may not notice obstacles in the form of walls and work even from the movement of the wind.
- Combined - combine active and passive methods of control.
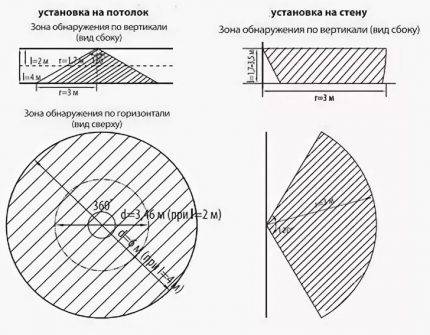
Special attention should be paid to the detection angles (horizontal and vertical) and the operating range of the equipment. Motion sensors installed under the ceiling have a tracking area of 360 degrees in a circle
For wall-mounted devices, the detection angle from left to right is 180 degrees, and from top to bottom only 20 degrees
Often, motion sensors do not cover the entire area of the room, so when choosing a place to place the device, it is important to carefully analyze the detection zone and angles. Motion sensors installed under the ceiling have a tracking area of 360 degrees in a circle
For wall-mounted devices, the detection angle is 180 degrees from left to right, and only 20 degrees from top to bottom. Often, motion sensors do not cover the entire area of the room, so when choosing a place to place the device, it is important to carefully analyze the detection zone and angles
Motion sensors installed under the ceiling have a tracking area of 360 degrees in a circle. For wall-mounted devices, the detection angle from left to right is 180 degrees, and from top to bottom only 20 degrees
Often, motion sensors do not cover the entire area of the room, so when choosing a place to place the device, it is important to carefully analyze the detection zone and angles
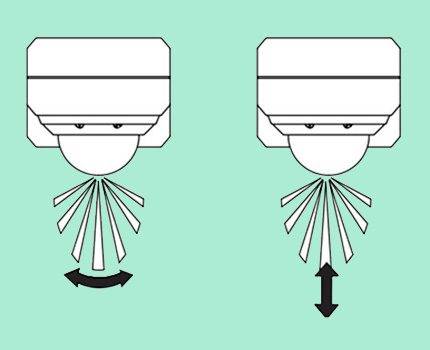
Devices differ in design:
- mobile - allows you to change the detection zone, since it is possible to move along the base in vertical and horizontal directions.
- fixed sensors.
For the most common models, the operating range is limited to 12 meters. This distance is sufficient to operate the device at home. If the room is irregular in shape, large area or has several floors, then to detect human activity, it is necessary to install several motion sensors.


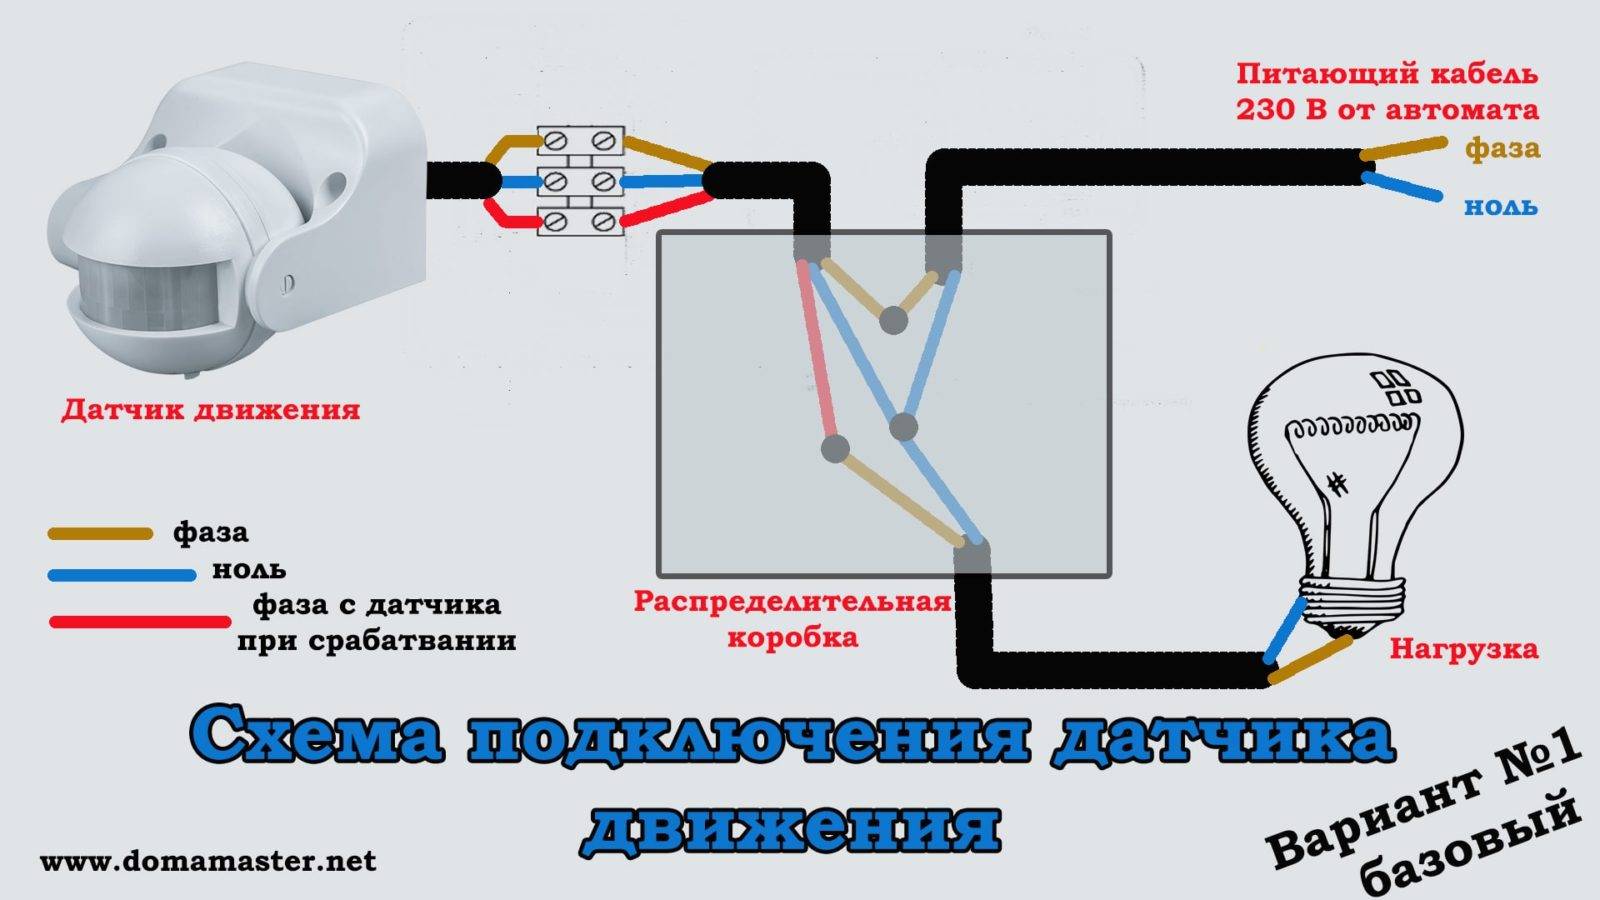


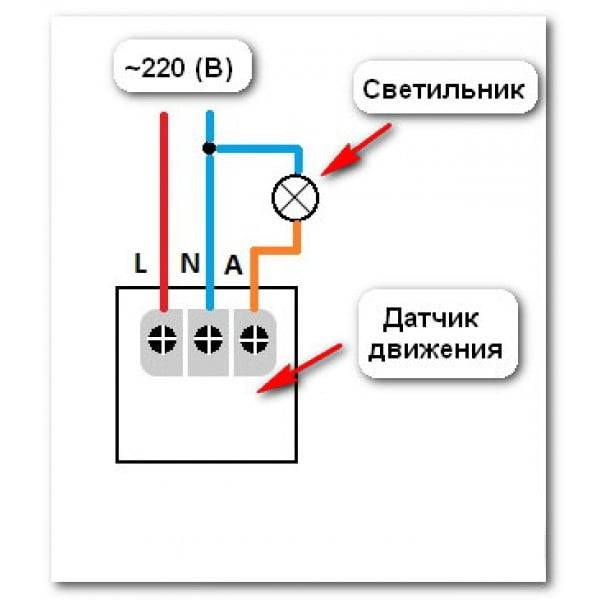
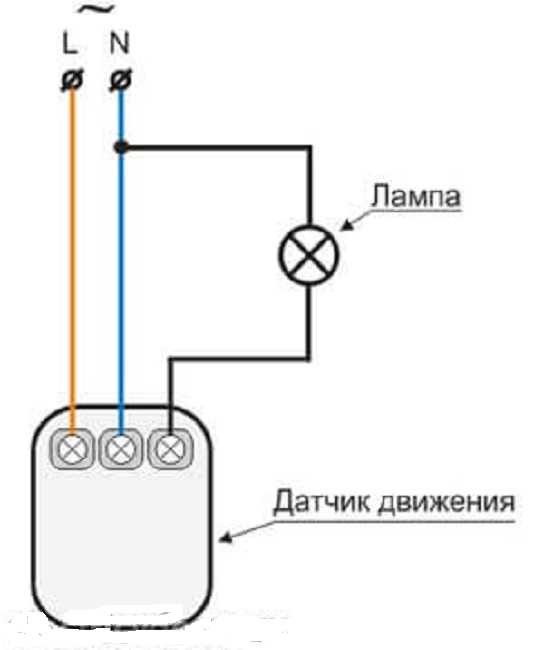
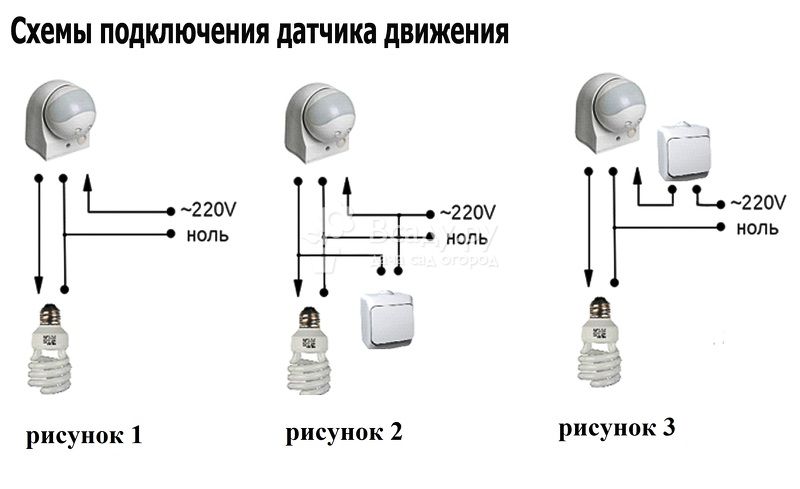
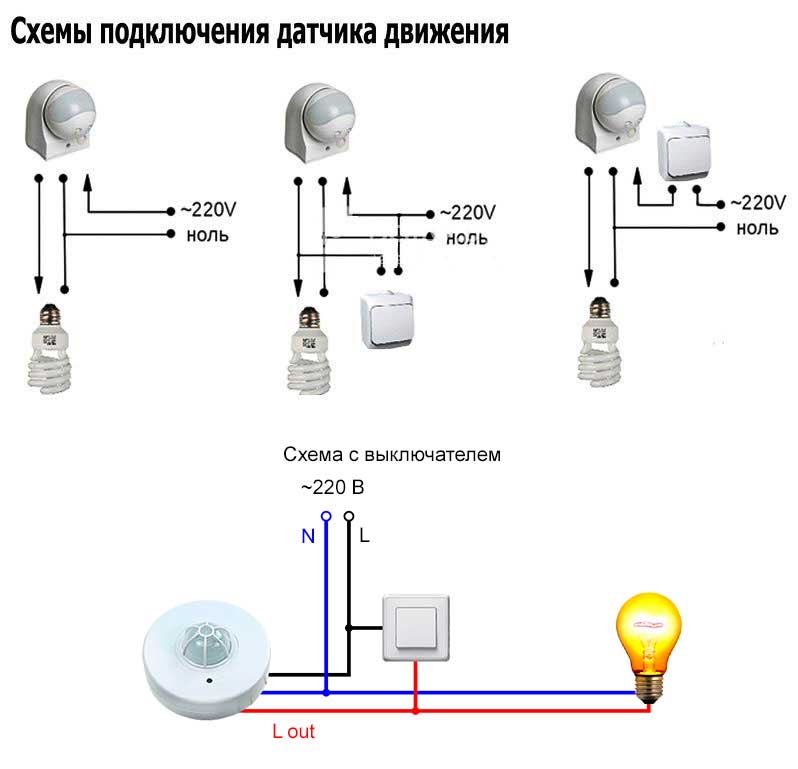
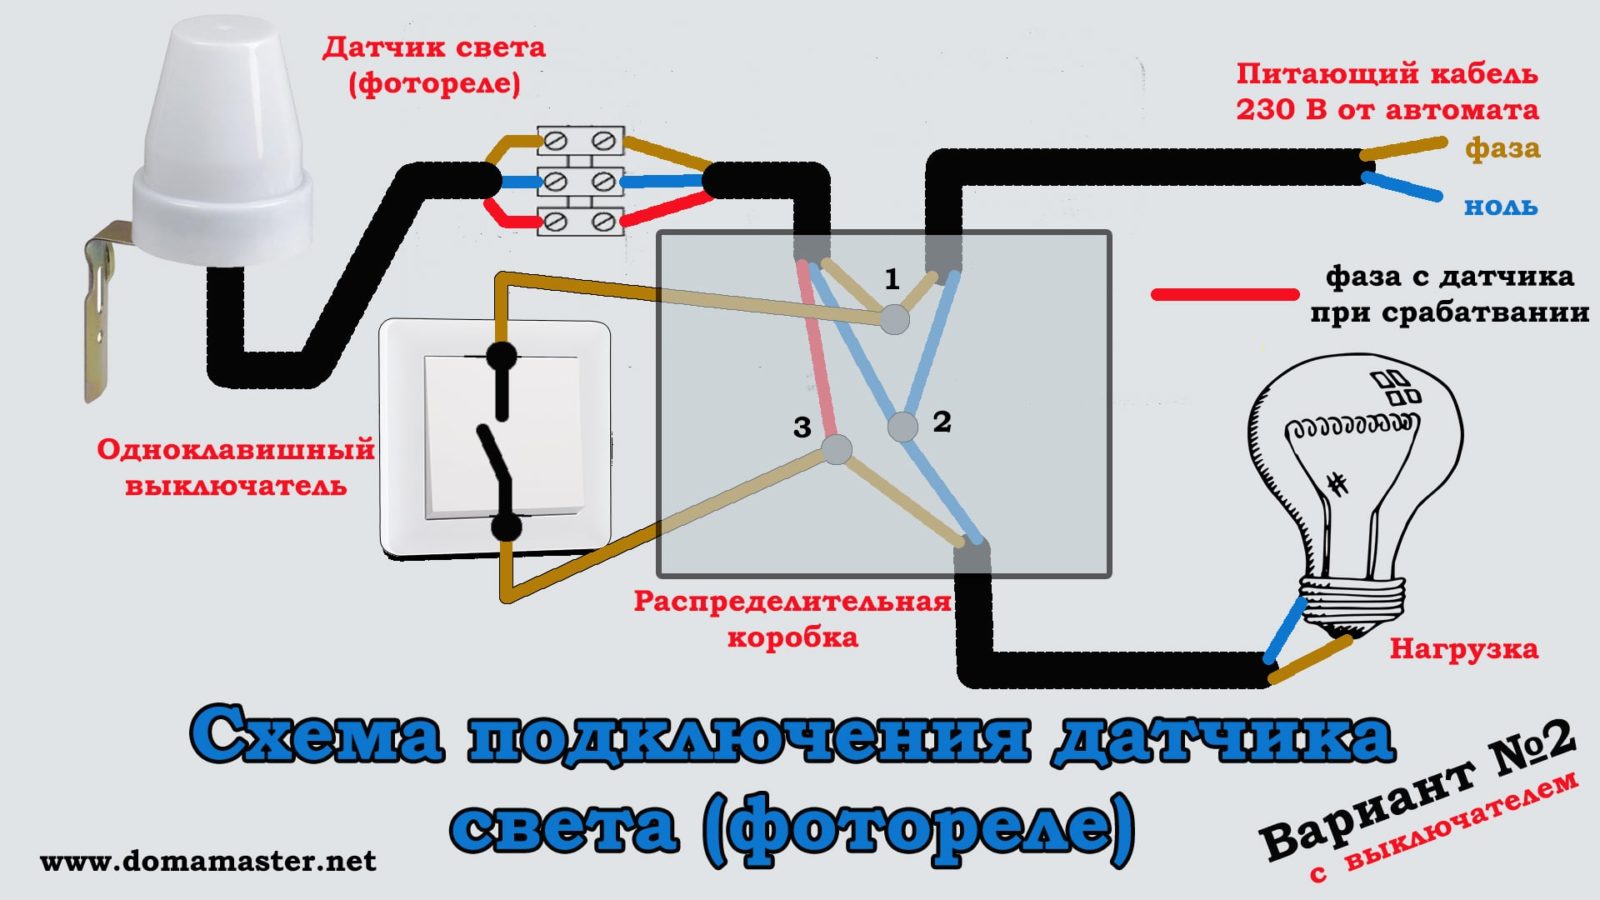
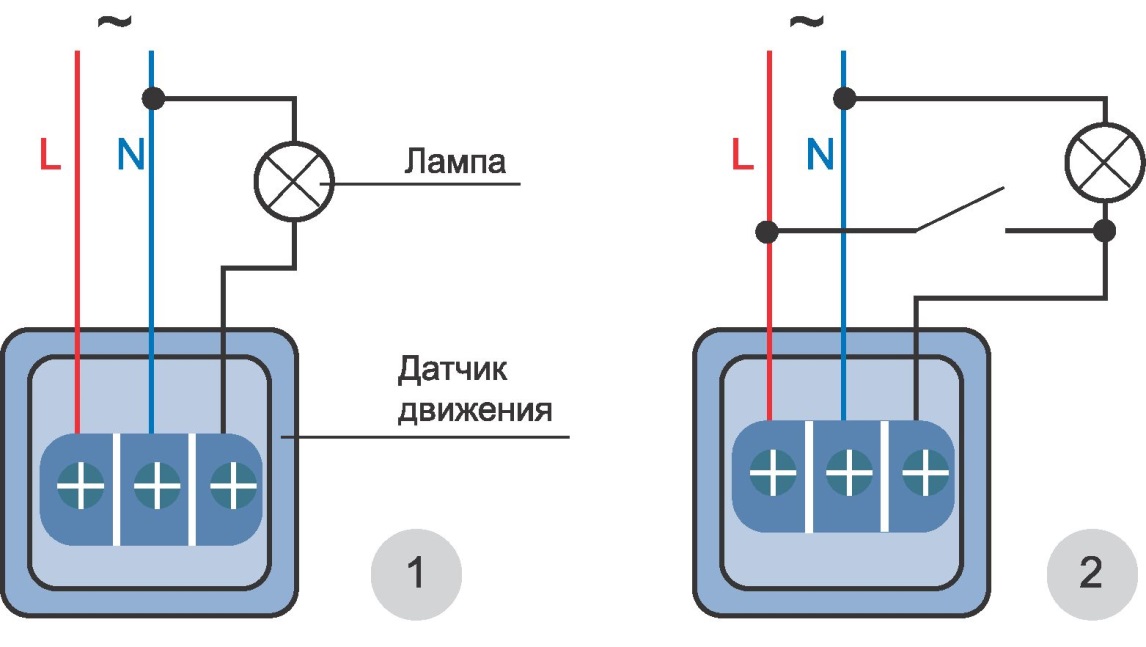
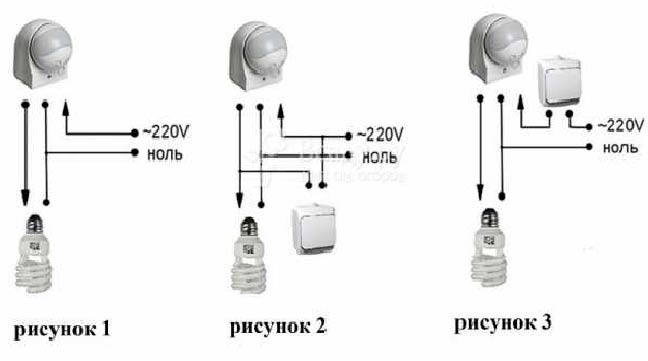
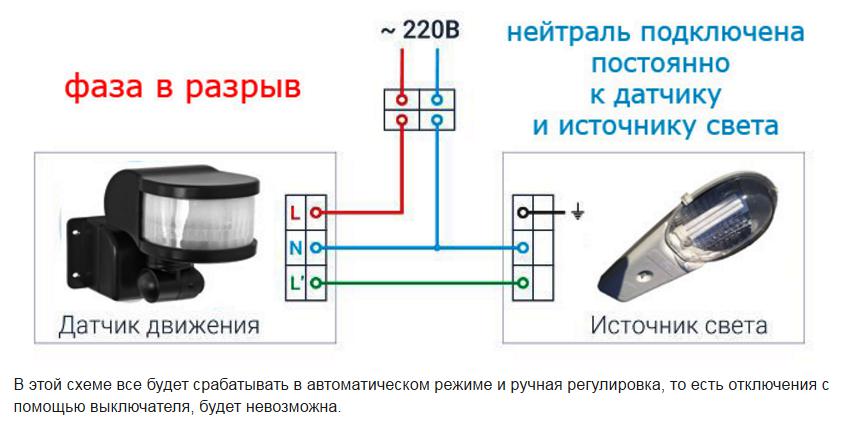
Three-wire motion sensor connection diagram
Sensors with three terminals are usually used in the IR sensor design. A fairly common manufacturer of inexpensive infrared motion sensors is IEK. Without any problems, you can find good products on Aliexpress.
More expensive products are made according to a similar principle, the connection diagram of a lamp with a sensor is similar to a sensor model from any manufacturer. The devices must have a degree of protection IP44 against the ingress of solid objects over 1 mm and drops of moisture. If the motion sensor needs to be moved outside the house, then installation is possible only under the visor.
If you want to protect the device from rain and snow, look for a model with IP65 dust and moisture protection and temperature control for your climate. Most IR sensors can only work down to minus 20 degrees Celsius.
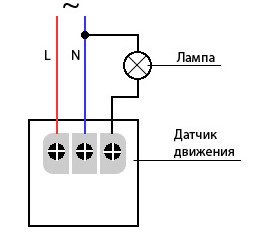
To connect a three-wire IR motion sensor, a full phase and zero are started. For the correct placement, you will need all the same basic 4 elements:
- Circuit breaker (which is in the switchboard).
- Junction box (in which the main installation).
- Sensor (a wire from the distribution box is connected to it).
- Luminaire (second wire from the junction box).
The connection of the sensor with three wires will be carried out with the plant in a junction box of three cables:
- There are three cores from the machine: L (phase), N (working zero), zero protective or ground (PE).
- There are three wires on the lamp, if the body of the lighting device is made of metal.
- Three wires per sensor.
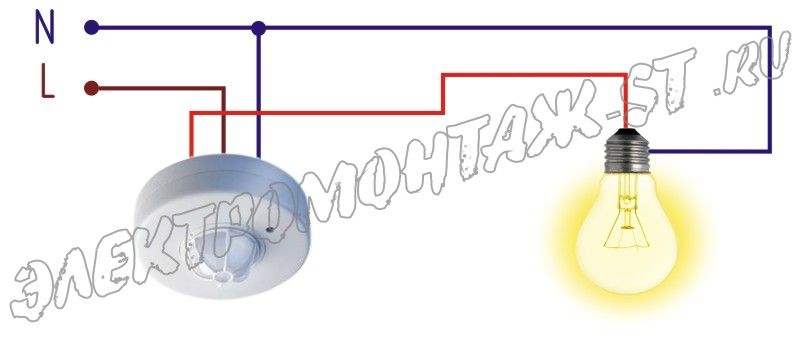
How to connect a motion sensor to a light bulb using three wires is discussed in detail in the diagram.
Zeros (N) are collected in one point (as in the case of the previous scheme). The ground from the circuit breaker is also connected to the ground of the luminaire (zero drive or PE). Phase-zero is now applied to the motion sensor with three terminals:
- Two inputs - for 220V power supply, usually signed as L (phase) and N (zero).
- One output is denoted by the letter A.
Mounting
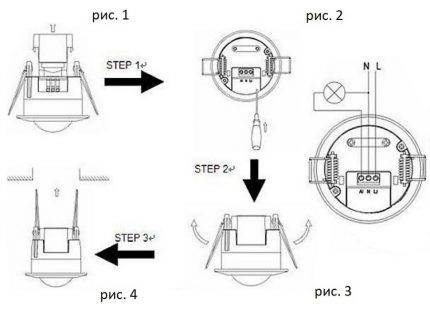
To install a three-wire motion sensor:
-
Loosen the two screws in the case. The terminals are located under the rear cover.
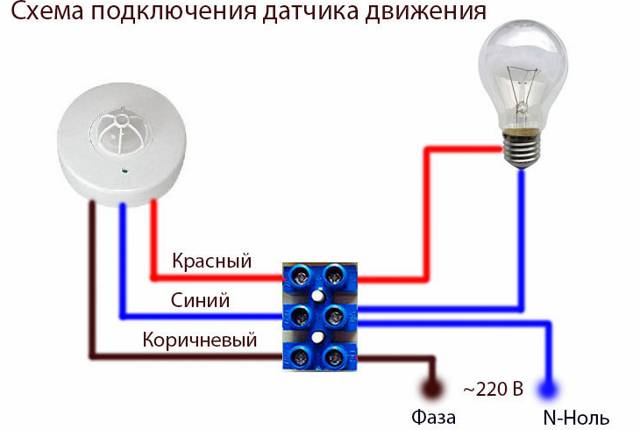
- Some models are already removed from the case with three wires of different colors. By color, you can determine what it means: earth (A) red, zero (N) blue, phase (L) brown. But if the cover opens without much effort, it is recommended that you verify the correctness of a certain marking personally by looking at the inscriptions next to the terminals.
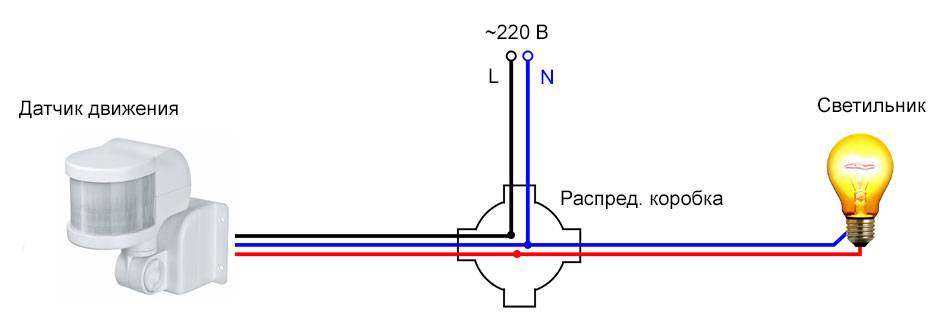
- A simplified diagram of connecting a motion sensor to a light bulb looks like this:
- A bit of clarity here in this picture.
- You can do without a junction box for connecting wires and lead all the wires directly into the sensor box if it is spacious enough inside and has its own terminal block. Phase-zero was applied from one cable, and phase-zero was taken out from the other.
- It turns out a simplified, but the same three-wire circuit, only without a junction box.
Sensitivity setting and adjustment
After successfully connecting a lamp with a motion sensor, you need to correctly set its parameters:
- On the back of the case, find the main controls. LUX with the positions of the month and the sun is responsible for triggering depending on the illumination. Do you need the sensor to turn on in a room with a window only when it is cloudy or the sun sets? Turn the regulator towards the moon.
- Set the turn off time with the second knob. The delay can be set from a few seconds to 5-10 minutes.
- The angle of rotation of the entire sphere allows you to adjust the detection of animals.
Advantages and nuances of use
To prevent the sensor from responding to animals, do not turn the sensor head down towards the floor. Expose it so that it captures the movements at the level of the head (shoulders) of all the inhabitants of the house. Usually at this level, the capture of animals does not occur.
If it is necessary that the sensor temporarily does not work, then direct its head to the ceiling. Therefore, motion capture is not possible. Motion capture by the sensor depends on the tilt angle. In reality, the maximum distance reaches 9 meters. But according to the passport it can be higher.
The sensor for detection uses infrared rays. If you move from beam to beam, the device notices activity and reacts. When you walk directly into the beam, the sensitivity of the sensor is minimal and the device may not immediately respond to you.
For this reason, the installation of motion sensors is not carried out directly above the doorway, but slightly to the side. For example, in the corner of the room.
Flaws
The disadvantage of the three-wire circuit for connecting the motion sensor to the lamp is the lack of forced light on. If the sensor for some reason fails, problems with its correct operation will begin.To avoid this, it is recommended to add a switch to the circuit.
Motion sensor installation
 Motion sensor with housing cover removed
To begin with, determine the method of connecting the additional cable to the switch (external, internal). Before direct connection, remove the outer cover of the case - at the location of the latch, pry off the panel with a slotted screwdriver. There are two ways to connect the wire to the device:
- rear - the option is suitable for electrical wiring laid inside the wall;
- on the side - suitable for an external electrical network.
The temporary plug is removed. Start connecting wires. Microcontacts are separated by letter designations. Typically, the symbols L, N and L1 are used - it depends on the manufacturer and the configuration of the indicator.
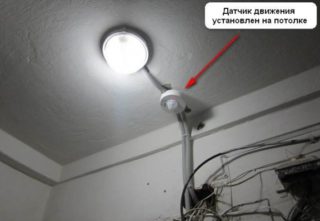 The next step is to attach the sensor to the ceiling. The method of fixation is selected based on the material of the surface and the detector. In most cases, there are special holes on the back of the case.
General installation tips:
It is not recommended to connect motion sensors with energy-saving light bulbs.
The service life of the latter with such an addition is significantly reduced.
It is important to exclude trees and shrubs from the field of view of the detector. They can radiate a small amount of heat, which will be enough to activate the indicator;
The sensor beam should be turned in the direction where the movement begins: to the front door, gate.
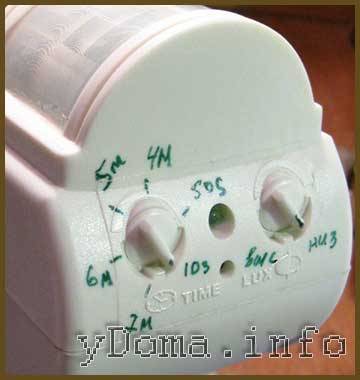
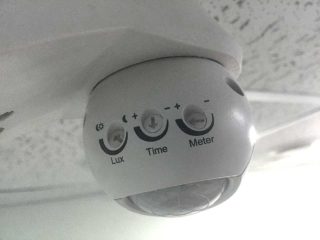 Sensor setup
It is necessary to adjust the sensor to the required level of sensitivity using the service values of the potentiometers. In classical devices, there are three rotary levers:
- delay period (Time);
- sensitivity (Meter);
- brightness (lux).
The turn-off delay indicates the time after which the lamp will turn off if there is no movement in the room. The brightness level - the strength of the light when turned on in complete darkness - must be adjusted so as not to blind the eyes. First set to a minimum, during operation - to the desired level of comfort, as well as the sensitivity indicator.


The last step of the installation is testing the operation. To do this, use the Test mode of the Time indicator.
Approximately one minute after connecting the current, the device will initiate and activate. Checking the performance of the mechanism can be carried out without connecting lighting devices - you can navigate by a small LED on the case.
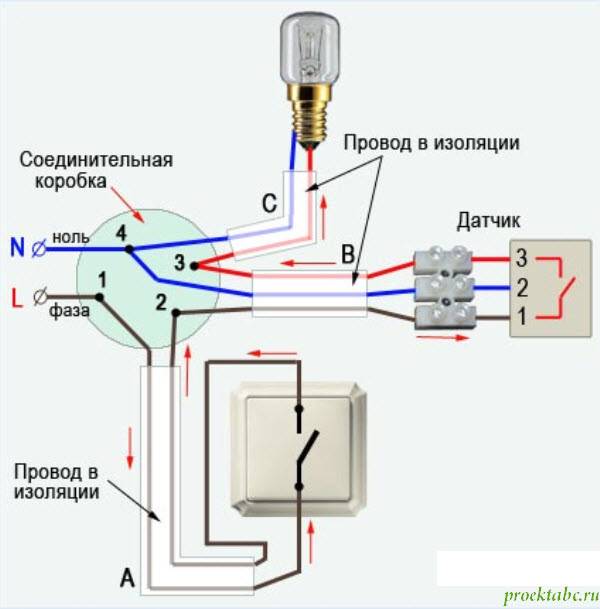
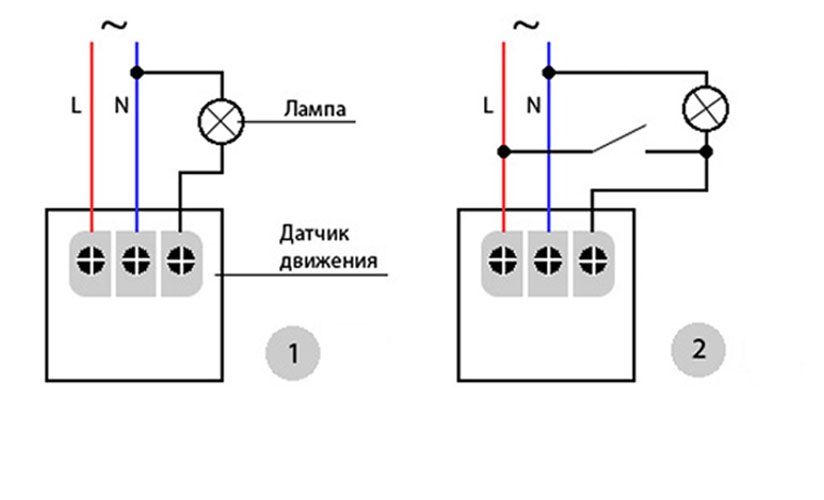
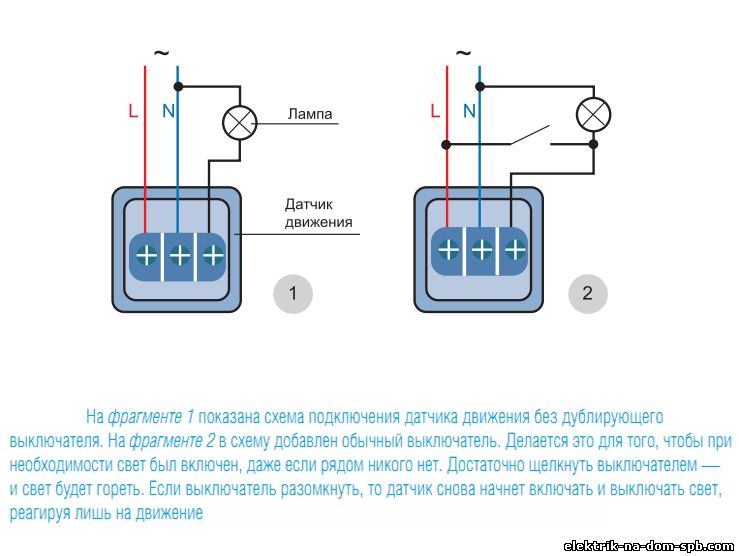
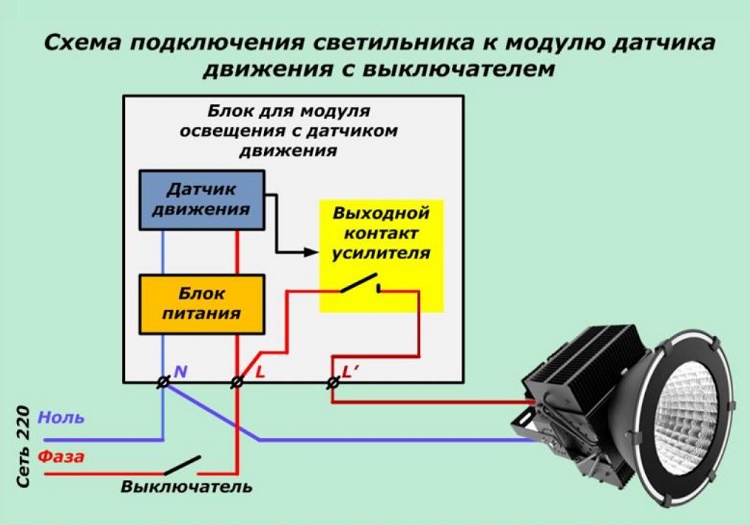
Combination of a motion sensor with a switch
To ensure the constant operation of the lamp, regardless of the level of illumination and the presence of a human sensor in the area of action, a switch can be placed in the circuit. A single-key type switch can be used as it. When it is turned on, the switching contacts of the sensor are shunted, which ensures a constant illumination mode.
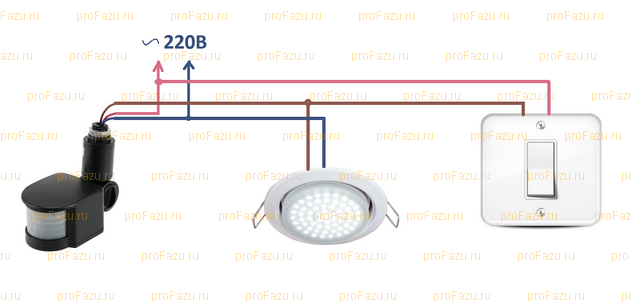
The neutral or neutral wire from the switch goes directly to the lamp (lamp) from the network, the phase wire passes through the switch, the contacts of which are parallel to the switching group of the sensor. If a starter is used in the circuit, then its winding must be powered from the switch.

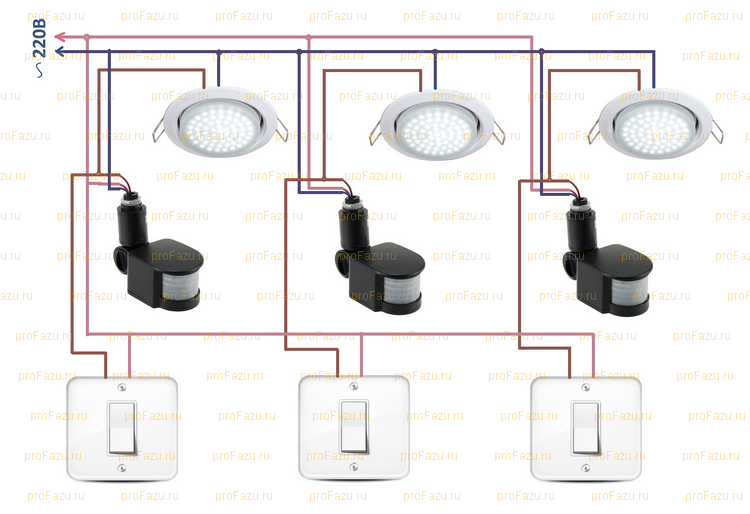
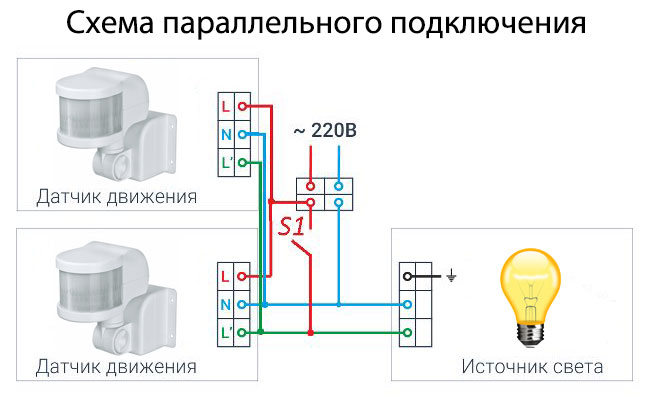
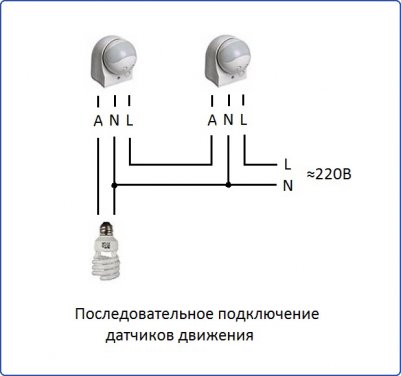
Wiring diagram for multiple sensors
The scheme of the first type has been widely used in rooms of a simple form. It can be a square, a rectangle or a circle, in general, where only one specific zone needs to be controlled.If you want to organize automatic switching on of lighting in rooms of complex shape with additional branches and bends, for example, in curved corridors, then you need to use several sensors. But this scheme also has its own nuances. For example, if you want to organize the comfort of movement along a long corridor, but at the same time you need to ensure maximum savings, then the sensors should be switched on independently of each other, that is, in parallel.

If you want to create a reliable security system, then the motion sensor should be connected to the light according to the diagram below.

Here, the sensors are interconnected by a phase wire from the network. The neutral wire goes to all sensors and a lamp or an alarm system without intermediate switching
It is important here not to confuse the colors of the wires and to control the phase on all devices so as not to create a short circuit in the circuit. When any of the sensors is triggered, the main signal lamp or the sound warning system will turn on. When creating a system with controlled lamps, a switch is installed in parallel with the contact group of sensors
If the circuit consists of several motion sensors, and it is required to ensure independent switching on of each of the lamps, then the switch is installed on each sensor
When creating a system with controlled lamps, a switch is installed in parallel with the contact group of sensors. If the circuit consists of several motion sensors, and it is required to ensure independent switching on of each of the lamps, then the switch is installed on each sensor.
Before checking the motion control device, make sure that the colors of the wires are observed and that they are securely clamped in the terminals.
Placement nuances: how to connect an infrared motion sensor correctly
PIR tracking devices have their own characteristics that form the rules of placement.
- Despite the protection against false positives in the light of the “daylight” spectrum by the Fresnel lens, it is undesirable to place the devices in direct sunlight, under lighting fixtures.
- In the zone of "visibility" there should not be large objects, partitions (including glass), blocking the view.
- Avoid "blind spots", not visible areas of the room.
- In large rooms, it is better to mount the sensors on the ceiling - this provides a wide coverage angle.
- If there are animals in the house, it is better to use models with a limit on the mass of tracked objects.
Since the rays falling on the tracking device have the form of a fan converging to the lens, the location of the device is chosen taking into account this factor. The same applies to determining the installation height of the model.
Specifications
After you have decided which motion sensor you will install to turn on the light, you need to select its technical characteristics.
In the technical characteristics of wireless models, there is also the frequency at which they operate and the type of batteries.
Viewing angle
The motion sensor for turning on the light can have a different viewing angle in the horizontal plane - from 90 ° to 360 °. If an object can be approached from any direction, sensors with a radius of 180-360 ° are installed, depending on its location.If the device is mounted on a wall, 180° is enough, if on a pole, 360° is already needed. Indoors, you can use those that track movement in a narrow sector.
Depending on the installation location and the required detection zone, the viewing radius is selected
If there is only one door (utility room, for example), a narrow-band sensor may be sufficient. If the room can be entered from two or three sides, the model should be able to see at least 180 °, and preferably in all directions. The wider the "coverage", the better, but the cost of wide-angle models is much higher, so it is worth proceeding from the principle of reasonable sufficiency.


There is also a vertical viewing angle. In conventional low-cost models, it is 15-20 °, but there are models that can cover up to 180 °. Wide-angle motion detectors are usually installed in security systems, and not in lighting systems, since their cost is solid. In this regard, it is worth choosing the height of the device installation correctly: so that the “dead zone”, in which the detector simply does not see anything, is not in the place where the movement is most intense.
Range
Here again, it is worth choosing taking into account whether a motion sensor will be installed in the room to turn on the light or on the street. For rooms with a range of 5-7 meters, it will be enough with your head.
Range of action choose with a margin
For the street, the installation of more "long-range" ones is desirable. But look here too: with a large coverage radius, false positives can be very frequent. So too much coverage can even be a disadvantage.
Power of connected lamps
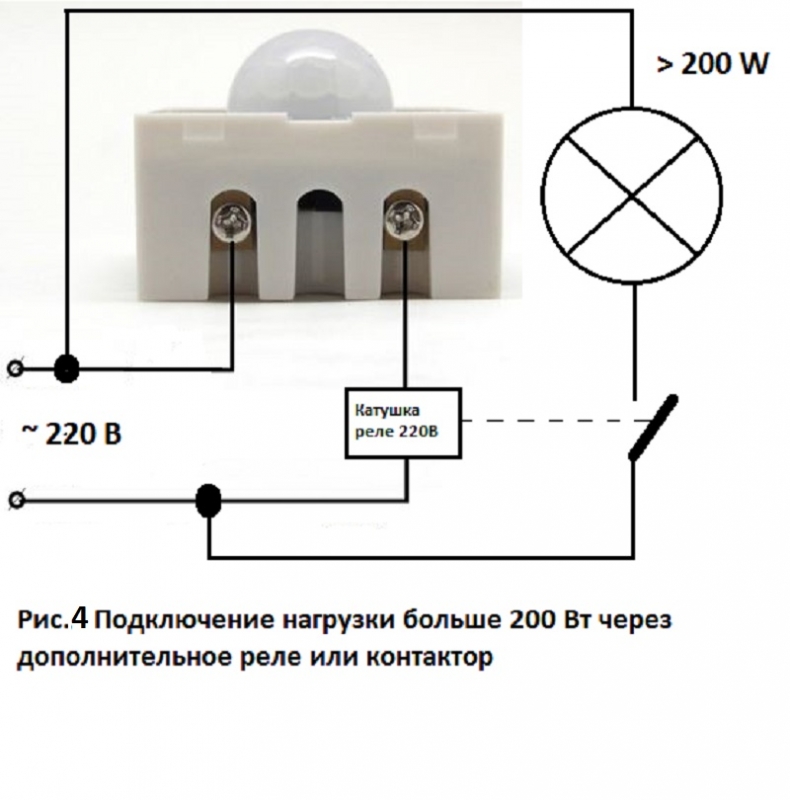
Each motion sensor for turning on the light is designed to connect a certain load - it can pass a current of a certain rating through itself. Therefore, when choosing, you need to know the total power of the lamps that the device will connect.
The power of the connected lamps is critical if a group of lamps or one powerful lamp is turned on.
In order not to overpay for the increased bandwidth of the motion sensor, and even save on electricity bills, use not incandescent lamps, but more economical ones - gas discharge, fluorescent or LED.
Method and place of installation
In addition to the explicit division into street and "home" there is another type of division according to the installation location of motion sensors:
- Body models. A small box that can be mounted on a bracket. The bracket can be fixed:
- on the ceiling;
-
on the wall.
- Embedded models for concealed installation. Miniature models that can be installed in special recesses in an inconspicuous place.
If lighting is turned on only to increase comfort, cabinet models are chosen, since with equal characteristics they are cheaper. Embedded put in security systems. They are small but more expensive.
Additional functions
Some motion detectors have additional features. Some of them are overkill, others, in certain situations, can be useful.
- Built-in light sensor. If the motion sensor to turn on the light is installed on the street or in a room with a window, there is no need to turn on the light during daylight hours - the illumination is sufficient. In this case, either a photo relay is built into the circuit, or a motion detector with a built-in photo relay (in one housing) is used.
-
Animal protection.A useful feature if there are cats, dogs. With this feature, false positives are much less. If the dog is large, even this option will not save. But with cats and small dogs, it works well.
- Light off delay. There are devices that turn off the light immediately after the object leaves the area of action. In most cases, this is inconvenient: light is still needed. Therefore, models with a delay are convenient, and even more convenient are those that allow this delay to be adjusted.
These are all the features that might be useful
Pay particular attention to the animal protection and shutdown delay. These are really useful options.
Assignment of parameter adjustment knobs
On the body of the motion sensor there are knobs for adjusting its parameters. Depending on the model and its purpose, there are from two to four handles. Next to the knobs, there is usually a letter designation of the type of adjustment, a picture of the purpose of the adjustment and the direction of rotation of the knob to change the setting. Therefore, before installing a motion sensor, you need to figure out which parameter and how each of the handles affects and in what position they need to be set for optimal operation in specific conditions.
Before you start searching places for installation motion sensor, it is advisable to adjust its parameters on the table and make notes with a marker to make it easier in real conditions. In low light, the factory markings are hard to see.
| Name and designation of motion sensor parameter | |||
|---|---|---|---|
| Designation | Parameter name | Function | Note |
| LUX | illumination | Adjusts the level of illumination at which the motion sensor is triggered | from 5 to 10000 Lux |
| TIME | Time | Timer duration | 5 to 420 seconds |
| SENS | Sensitivity | Adjusts the range | up to 12m |
| MIC | Microphone | Adjusts the noise level at which the motion sensor is triggered | 30-90db |
Dimmer LUX allows you to set the illumination threshold, above which the motion sensor will not respond to movement. Why turn on the light during daylight hours, if you can see it so well. Initially set to max..
Timer time controller TIME motion sensor. This is the time during which the light will be on after the motion sensor is triggered. Initially set to the minimum turn-on time. It should be noted that if, after the motion sensor is triggered, a person continues to move in the detection zone, the timer is restarted, and the countdown until the motion sensor turns off will begin from the moment the person stops moving. For example, if you set the timer to 10 seconds, and a person moved or waved his arms in the detection zone for 10 minutes, then the light will be on all this time.
Sensitivity knob SENS rarely installed on motion sensors, as it is a practical necessity. It happens, it is needed if it is required not to control part of the room, and this can always be done by adjusting the position of the motion sensor during installation. Initially, you need to set it to maximum.
Microphone sensitivity control MIC is present very rarely, since it is not in demand in everyday life and has low noise immunity. The noise of a passing truck or a child screaming in the entrance of the house can trigger the motion sensor.But to perform the function of protection, if properly adjusted, it can serve as an excellent means of protection, since the detection zone will be practically unlimited. Initially, you need to set it to a minimum.
Now that the preparatory work has been done and all the controls are set to the desired positions, you can begin to determine the location of the motion sensor. To do this, you can temporarily fix the sensor on a ladder or board, and by placing the motion sensor in the intended installation locations, try to find the best one. As I wrote above, a frequently blinking LED will indicate a trigger.
It is convenient to connect the motion sensor for lighting to the electrical wiring in two places, in the junction box or directly at the point where the chandelier is connected to the wires coming out of the ceiling or wall. Therefore, before looking for a place to install a motion sensor, you need to determine in which place it is easier to connect it. Dealing with the wires in the junction box, especially in long-built houses, is difficult even for a professional electrician, and the boxes are often covered with wallpaper or are under plaster. The easiest way to deal with the connection to a chandelier or wall lamp.


After determining the installation location of the motion sensor, you can begin to mount it on the wall and install the electrical wiring.
Attention! Before connecting the motion sensor to the wiring, to prevent electric shock, it is necessary to de-energize it. To do this, turn off the corresponding circuit breaker in the switchboard and check the reliability of the disconnection using the phase indicator
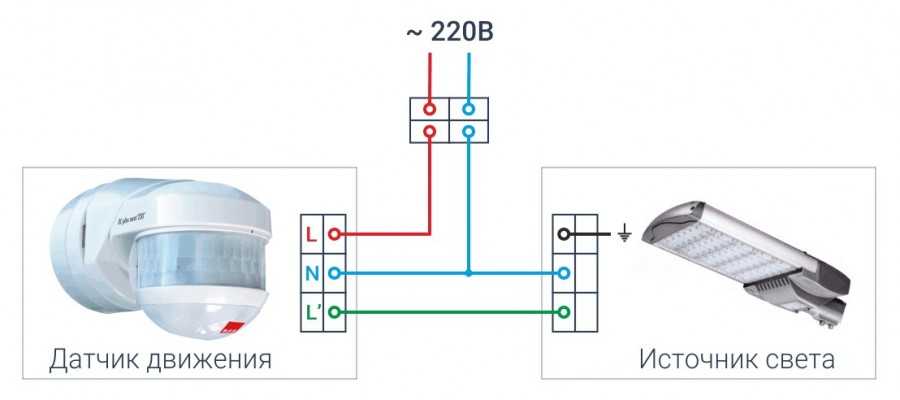
How to connect LED spotlight?
LED spotlights are considered to be a common type of lighting with affordable cost and high technical performance. The main scope of application: garages, parking areas, yards, private houses. They can be outdoors or indoors.
The wiring diagram for an LED spotlight consists of several important nuances:
- Open the working case and find the mechanism.
- Remove the nut on the "input" terminal and remove the stuffing box.
- Thread the electrical wire and close the structure with fasteners.
It is not advised to carry out the installation for those who have nothing to do with electrics or do not understand even simple circuits. Before carrying out the procedure, it is forbidden to wet your hands, monitor the performance of the electrical network - no more than 220 V. It is possible to determine whether the searchlight is suitable for operation only if it starts flashing or the shade of light has changed.
The procedure for connecting an LED spotlight to the 220 network requires compliance with all safety rules for working with electrical appliances. If the current is applied incorrectly, a short circuit is possible.
To install it yourself, you need to prepare in advance inventory and tools. Their list includes: a screwdriver, pliers, electrical tape, a soldering iron and others. For LEDs, a thin wire is used, with a total diameter of 0.5 - 1.5 mm2. In addition, the same metal material is selected that is used on the device.
In inexpensive models, there may be dried thermal paste or some wires are not connected. To do this, you need to disassemble the structure and check all connections, the amount of thermal paste.
Possible problems and solutions
If the sensor turns on the light properly, but there are problems with turning it off, the first thing to check is the light delay switch. It is possible that the TIME controller is set to the maximum operating time, which is why the intervals between responses are too short: the lamp does not have time to turn off.
Advice! Perhaps there is insufficient sensitivity of the detector or an incorrect setting of the LUX parameter. It is necessary to unscrew the knobs to the maximum, check the health of the device.
TIME and LUX layout option
Wrong installation location
For the correct installation of the device, it is necessary to take into account the principle of its operation: the IR sensor responds well to movements "past", but may not work when moving towards it, and ultrasonic and microwave sensors perceive the movement "towards themselves".
If there is any object between the device and the coverage area, this also causes misfires: it is necessary to remove obstacles in front of the emitter. Sometimes electrical appliances give false alarms when they are close to the lamp. If such a problem is noticed, it is necessary to place the lamp a little further.
Advice! Infrared detectors react to any object that emits heat. Therefore, it is worth inspecting the room for the presence of heating devices.
Motion Tracking Technologies
Lamp burnout
If the device does not react at all to the ingress of an object into the zone, the cause is most often the usual burnout of the lamp. Before installation, you should check the bulb in another lamp.
Wiring faults
When all possible causes of problems have been checked, but the sensor still does not start, you need to ring all sections of the circuit with a multimeter.If the problem is in the wiring, you need to de-energize the system and reconnect the device.
Important! Sometimes the problem lies in the connection of the wire to the terminal block. Due to the ingress of dust and debris, the wire oxidizes and the detector stops working. It is necessary to clean the cable from oxidation, press the end of the NShVI
It is necessary to clean the cable from oxidation, press the end of the NShVI.
NShVI tips
Marriage and improper operating conditions
It happens that the cause of the problem lies in the device itself: a factory defect or damage during transportation (typical for cheap devices with a low degree of protection). If the sensor does not have good protection against moisture, but it was placed in a place open to water (on the street of the protective visor, in the bathroom), then water could get inside, due to which the electrical appliance would fail.


Advice! Before buying, you should always inspect the detector for visible damage, if possible, it is better to check its performance in the store. You can not throw away warranty cards and boxes from equipment: in case of malfunctions, it will be possible to replace the device under warranty.
Motion sensor packaging
You do not need to be a master to understand how to properly connect a motion sensor to automatically turn on the light: just follow the simple instructions for operating and setting up the device. The motion sensor can save up to 50% of electricity, which, coupled with ease of use, will pay for the cost of the device many times over.
Principle of operation
The functioning of the automatic lighting system is provided by a special motion sensor. When a change in the volume of the room occurs in his field of vision, thermal radiation or sound occurs, a signal is sent to the control circuit.Which allows current to the lamps, and also continues to support it for the entire period of the sensor's operation. More "smart" versions of the controller perform a similar action for some time after the end of the signal from the sensor. Such a system prevents the lighting from turning off when objects in the sensor field are temporarily immobile or there are no signals to which the detector responds. In cases where the motion sensor does not register the presence of a person for a long time, the power supply to the lamps is interrupted.
In the simplest systems, the control circuit is mounted directly inside the sensor, which imposes certain restrictions on the number of connected consumers.
There is another method of using motion detectors - they are used in security systems. In such cases, their reaction to finding a moving object leads to the activation of a siren or other warning devices.

Overview of popular models of street lighting sensors
As for manufacturers, the products of the following brands are in demand:
- ElkoEP;
- Euroelectric;
- hager;
- Theben;
- PromAvtomatika.
- Euroelectric 10A NEW. Plastic housing, there is a wall mount, suitable for connecting one line. Maximum current - 10A, working - up to 6A (1.3 kW). Of the settings - only the sensitivity control. One of the simplest models, but very reliable. The average price is 600 rubles.
- PromAvtomatika FRA 1-10. Universal relay, suitable not only for street lighting, but for turning on any electrical appliances. The maximum current strength is 10A, the cost is 400 rubles.
- Theben LUNA 122 top2. Twilight relay with DIN rail mounting.Professional model, a lot of settings (sensitivity, delay, connection of additional sensors, timer function, and so on). It can be used to control street lighting in large areas with several separate lines. The average price is 17 thousand rubles.
- Eurolamp ST-303WSR. There is an adjustment of the response threshold, the maximum current strength is 25A. But it has low protection against moisture penetration, so it is installed only in dry places or in a protective housing. The average price is 350 rubles.
By the way, if you make a photorelay yourself, then it will cost only 50 - 100 rubles - that's how much all the necessary components cost in radio stores.


