- Do-it-yourself boiler installation
- How to install a tankless water heater
- Rules for installing a storage boiler
- How to connect the boiler to the mains?
- Schemes for connecting the water heater to the mains
- Cable
- Socket
- Protection Devices - RCDs and Circuit Breakers
- Wiring diagrams
- Technical features of connecting the boiler
- How to connect a heater to steel pipes
- Working with polypropylene pipes
- Connection to structures made of metal-plastic
- 3 We mount the storage heater - warm water is provided
- Standard wiring diagram
- How to install an electric storage heater
- Types of instantaneous water heaters
- What can you do yourself
- Common mistakes in installing water heaters
Do-it-yourself boiler installation
You need to install a water heater with your own hands in accordance with existing rules and requirements, depending on its type. So, the features of installing a flow device will be somewhat different from installing a storage device. Let's consider both one and the second case.
How to install a tankless water heater
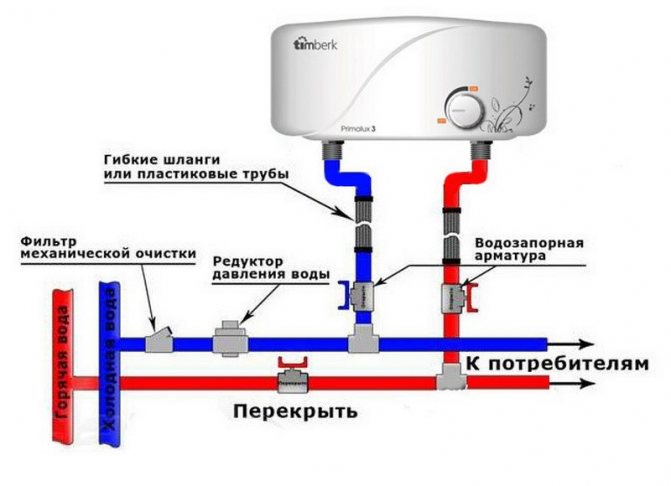
One of the key features of instantaneous water heaters is their compactness, which allows you to put them in the kitchen or bathroom right under the sink.The liquid in such devices is heated in a special metal pipe, which contains powerful heating elements.
Such design features of the device require that the electrical wiring in the house or apartment work properly and be able to withstand heavy loads. It is advisable to install a separate machine for a flow-type heater, and connect a wire with a large cross section to it.
After you finish working with the electrical connection, you can install the boiler itself. It is installed according to a temporary or stationary scheme.
The temporary scheme provides that an additional tee is cut into the pipe with cold water, which will be connected to the water heater through a special valve. To do this, you need to apply voltage to the water heater and open the tap that supplies hot water.
But the stationary scheme assumes that the supply and intake of water in the pipes will be carried out in parallel with the general water supply system. To install the structure according to the stationary scheme, tees for hot and cold water cut into the pipes. Then you need to put stopcocks and seal them with a simple tow or fum tape.
The next steps are:
- connect the boiler inlet pipe to the pipe that supplies cold water;
- connect the outlet to the hot water tap ;
- supply water to the pipes and make sure that all connections are tight when turning on the water in the tap and shower;
- during normal operation of the system, you can supply electricity to the water heater, then hot water should flow from the desired tap;
- to increase the safety level of the entire plumbing system and the water heater, immediately install a safety valve with it.
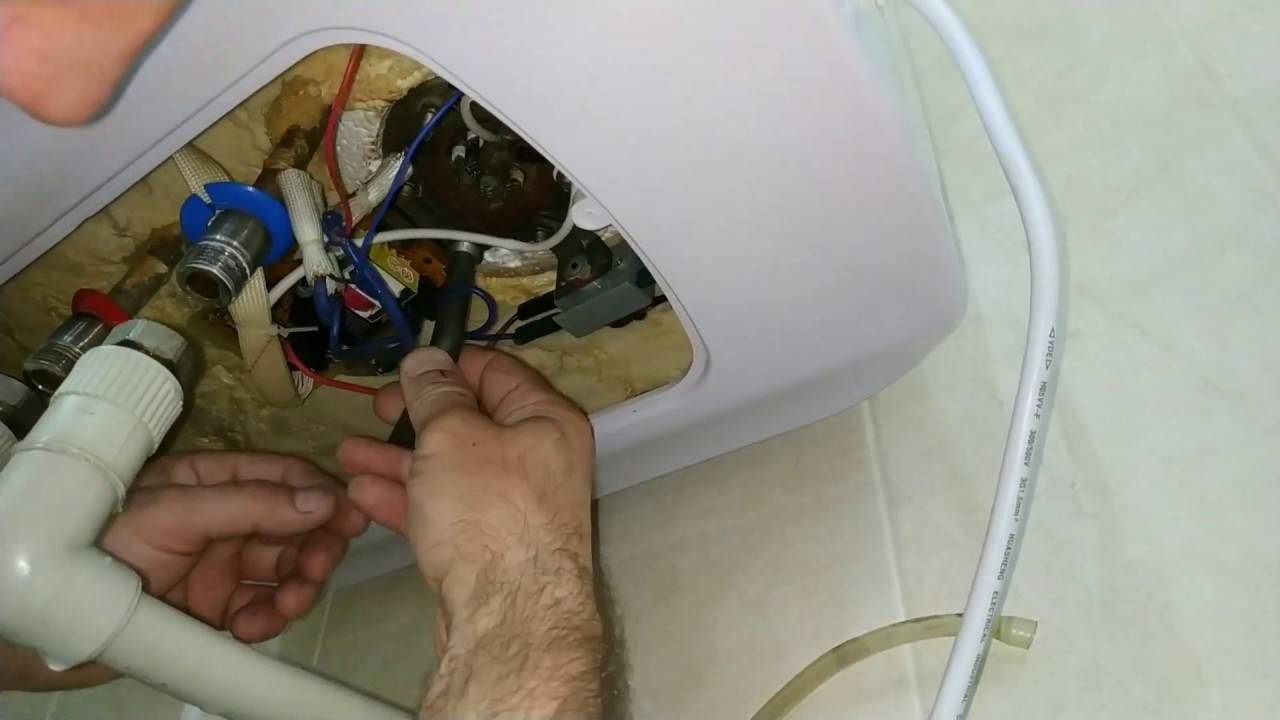
You can see clearly the installation process of the flow apparatus in the video.
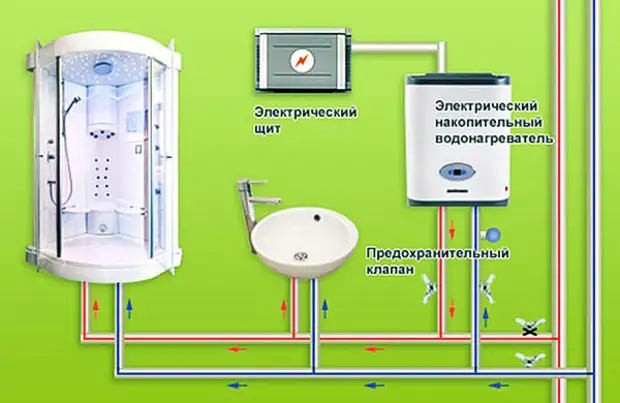
Rules for installing a storage boiler
If you plan to install a storage device with your own hands, then the requirements for the state of the wiring will not be as strict as in the previous case. And storage heaters are somewhat cheaper than flow heaters. In addition, their popularity is explained by the fact that very often they are covered by a scheme in which you can simultaneously supply water to the tap and shower.
You can install such a unit with tools and materials quickly, while the work itself will not seem too complicated, it consists of the following actions:
- eliminate faults in the electrical wiring or plumbing system, if any, check their condition;
- make markings on the wall for the structure and put the necessary fasteners for its installation;
- fix the water heater on the wall and attach the safety valve;
- after installing the boiler on the wall, connect it to the water supply;
- lead the pipes through the valve to the corresponding inlets and outlets on the body;
- first install and connect cold water, and the safety valve must be closed at this time;
- also, with the valve closed, install pipes for hot water;
- connect the structure to the electrical network and check how it works.
If all the steps have been performed correctly, then hot water should flow from the corresponding tap. At this time, all pipes and connections of the boiler must be well sealed, and the wires must not overheat.
Of course, if you are not confident in your abilities and even visual training material in video format cannot help you learn the features of a step-by-step installation of a boiler with your own hands, then do not risk it, but invite a specialist. Incorrect installation of the heater can cause it to fail prematurely and cause leaks and other problems. Therefore, take on an independent installation only when you are confident in your abilities and know that everything will be done efficiently and correctly.
How to connect the boiler to the mains?
An important factor that directly affects the uninterrupted and safe operation of the boiler, the convenience of its operation, is its correct connection to the mains.
To ensure the above, the following conditions must be met:
- The connection should be made through a separate circuit breaker of the corresponding rating. This auto switch can be located both in a common shield and in a separate one located in the immediate vicinity of the water heater.
- Also, according to modern standards of PUE and SNiPs, it is necessary to connect any power electrical appliances, which include the water heater, through a differential relay (in other words, a residual current device). Typically, an RCD is installed on the entire power wiring of an apartment or floor of a private house.
- To connect the storage water heater to electricity, you must use a double-insulated cable of the appropriate section.
Thus, self-installation, connection of water-heating plumbing equipment is within the power of almost everyone.If you are not confident in your strengths, abilities, or you do not have enough free time, you can turn to the services of professional plumbers.
Schemes for connecting the water heater to the mains
For safe operation, it is advisable to connect the water heater to the network in a dry place, and it is recommended to cover the cables in a moisture-proof channel. Apart from the boiler, other electrical appliances, especially powerful ones, should not be connected to this branch of the mains. The main elements of the circuit: electrical cable, socket, RCD and automatic.
Cable
The cross section of the cable must be sufficient so that the wiring does not overheat and cause a fire. You will need a copper three-core cable of the NYM brand or its equivalent VVG. The recommended values of the minimum cross section of a copper core for different capacities of a single-phase water heater are shown in Table 1.
Table 1
| Boiler power, kW | 1,0 | 2,0 | 2,5 | 3,0 | 3,5 | 4,0 | 4,5 | 5,0 | 6,0 | 8,0 | 9,0 |
| Minimum cross-section of the core, mm2 | 1 | 1,5 | 2,5 | 2,5 | 2,5 | 4 | 4 | 4 | 4 | 6 | 10 |
Socket
Water heaters of small capacity can be connected directly to a three-wire waterproof socket with a degree of protection against moisture in accordance with GOST 14254-96, for example, IP44 or another suitable for your situation (see table 2), which is installed on a separate supply from the electrical panel.
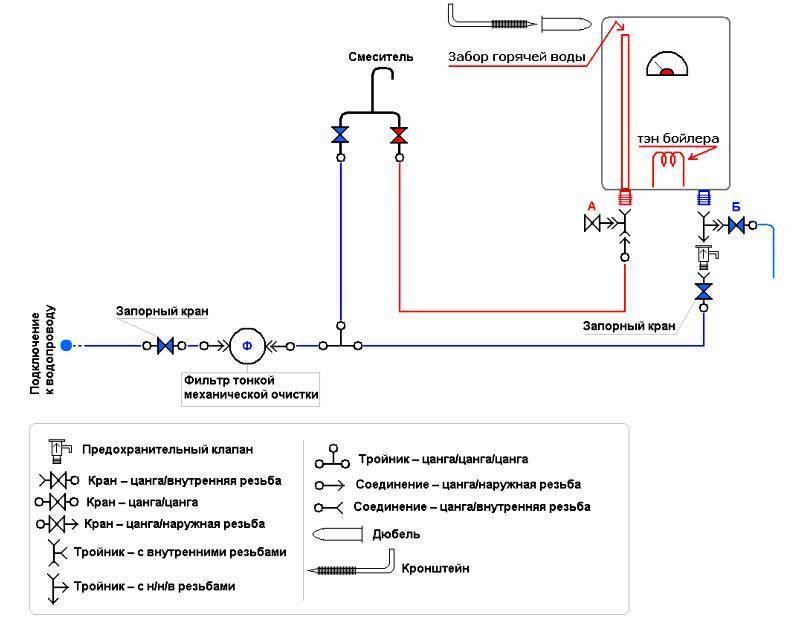
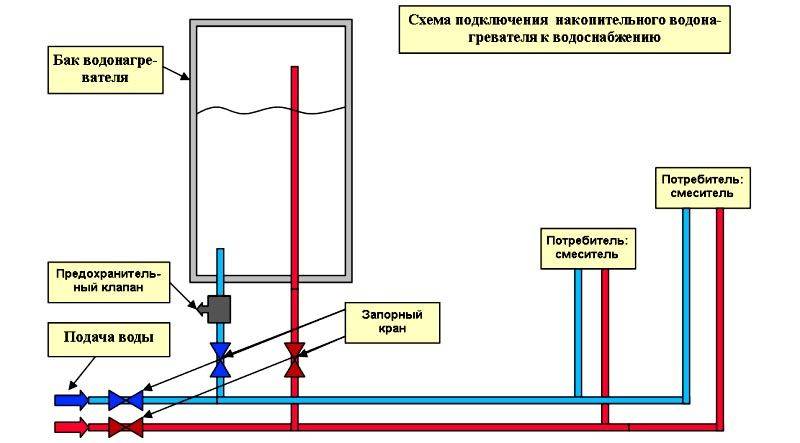
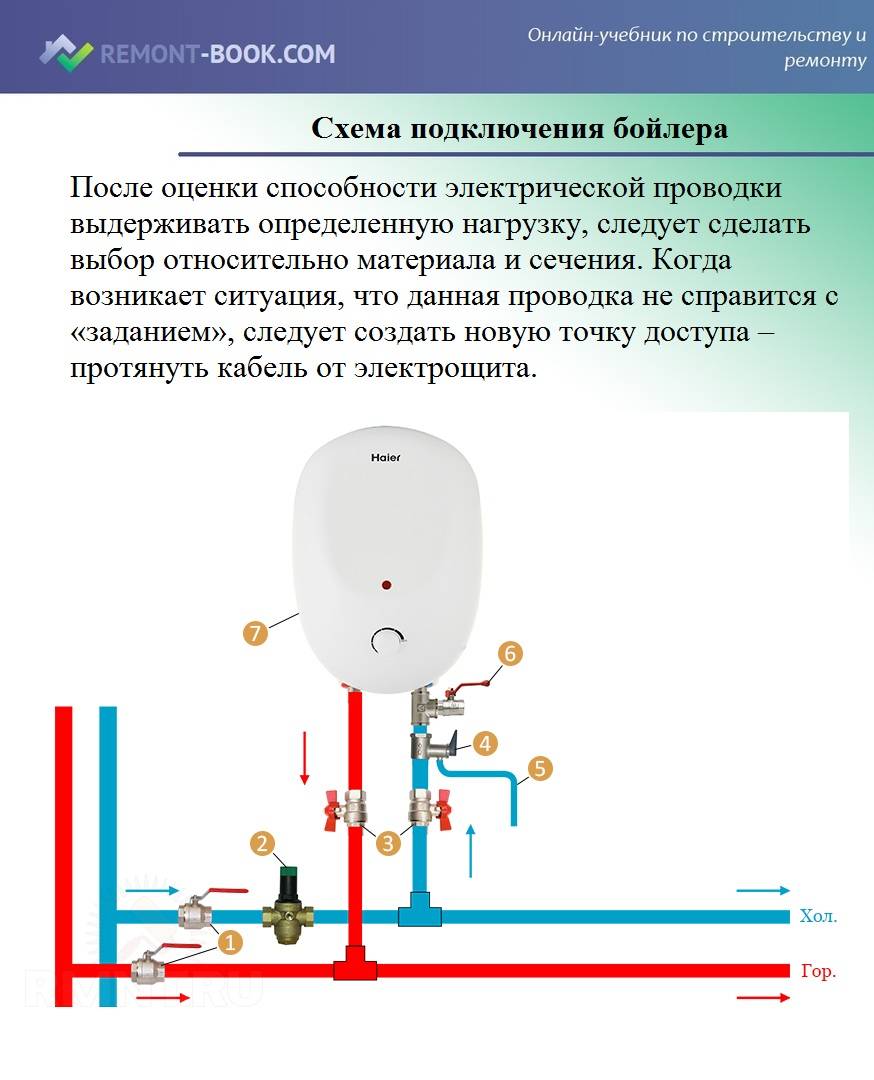


table 2
| Degrees of IP protection | IPx0 | IPx1 | IPx2 | IPx3 | IPx4 | IPx5 | IPx6 | IPx7 | IPx8 | |
| No protection | Falling vertical drops | Falling vertical drops at an angle of 15° from the vertical | Spray at 60° from vertical | Spray from all sides | Jets from all sides under low pressure | strong currents | Temporary immersion (up to 1 m) | Full immersion | ||
| IP 0x | No protection | IP 00 | ||||||||
| IP 1x | Particles > 50 mm | IP 10 | IP 11 | IP 12 | ||||||
| IP 2x | Particles > 12.5 mm | IP20 | IP 21 | IP 22 | IP 23 | |||||
| IP 3x | Particles > 2.5 mm | IP 30 | IP 31 | IP 32 | IP 33 | IP 34 | ||||
| IP4x | Particles > 1 mm | IP40 | IP 41 | IP 42 | IP 43 | IP44 | ||||
| IP 5x | Dust partially | IP 50 | IP 54 | IP65 | ||||||
| IP6x | Dust completely | IP60 | IP65 | IP66 | IP67 | IP68 |
Ground socket
Such a socket outwardly differs from a two-wire socket by the presence of metal contacts (terminals) for grounding.
Wiring diagram for a grounded socket
Protection Devices - RCDs and Circuit Breakers
It is recommended to include a residual current device (RCD) in the electrical circuit for connecting water heaters (especially at increased power). It is designed to block the operation of the equipment in the event of a current leakage to the case. The current strength at which blocking occurs is indicated on the device and must be 10 mA for the operation of the boiler. This parameter indicates the difference between the current entering and exiting the water heater.
The choice of RCD based on the power of the water heater is shown in table 3.
Table 3
| Water heater power, kW | RCD type |
| up to 2.2 | RCD 10A |
| up to 3.5 | RCD 16A |
| up to 5.5 | RCD 25A |
| up to 7.0 | RCD 32A |
| up to 8.8 | RCD 40A |
| up to 13.8 | RCD 63A |
The type of RCD for the AC network is "A" or "AC". When choosing a device, preference should be given to a more expensive, electromechanical one - it is more reliable, works faster and provides higher protection.
In some boilers, the RCD is included in the basic package and is located directly in the case, in other models it must be purchased additionally.
Outwardly, the RCD and the differential switch (diffavtomat) are very similar, but they are easy to distinguish by marking. A conventional machine cuts off the current to the equipment when the voltage rises, and the differential machine simultaneously performs the function of both the RCD and the machine.
The choice of a two-pole machine for the power of a single-phase water heater is given in table 4.
Table 4
| Water heater power, kW | Machine type |
| 0,7 | 3A |
| 1,3 | 6A |
| 2,2 | 10A |
| 3,5 | 16A |
| 4,4 | 20A |
| 5,5 | 25A |
| 7,0 | 32A |
| 8,8 | 40A |
| 11,0 | 50A |
| 13,9 | 63A |
When choosing overly sensitive protection devices, the boiler will constantly turn off, and the water will not heat up normally.
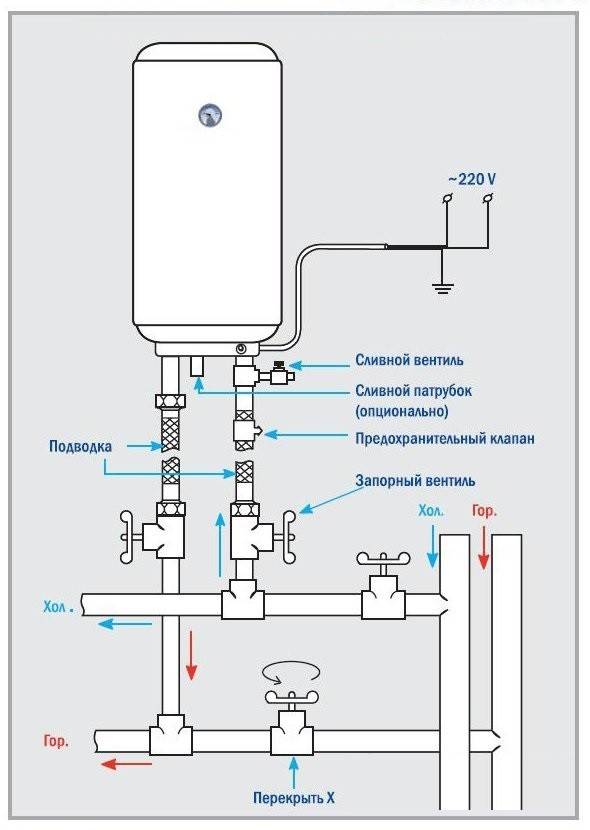
Wiring diagrams
The connection scheme is adopted depending on the desired level and instrumentation of protection of people and equipment. Below are a few common circuits, as well as a video that provides detailed explanations of these circuits.
Plug-in connection only
Protection - double automatic: 1 - fork; 2 - socket; 3 - double machine; 4 - shield; grounding
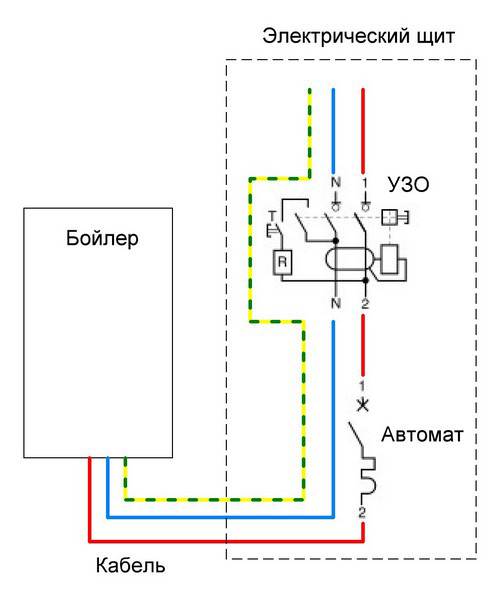
Connection through the electrical panel: 1 - automatic; 2 - RCD; 3 - electrical panel
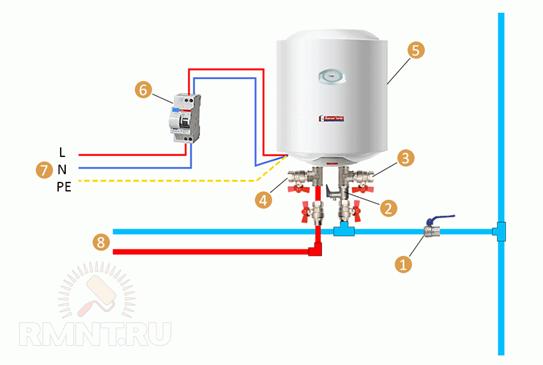
In the RCD + double automatic circuit: 1 - RCD 10 mA; 2 - fork; 3 - socket IP44; 4 - double machine; 5 - water heater line; 6 - apartment line; 7 - electrical panel; 8 - grounding


According to safety rules, all electrical work is carried out with the power supply turned off at an individual electrical panel. Do not turn on the water heater without filling it with water. Do not drain the water from it without turning off the electricity.
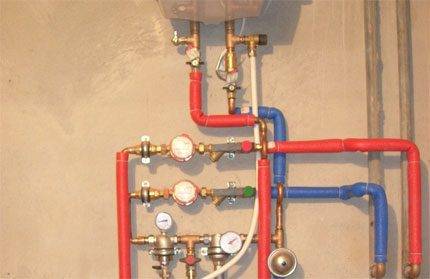
Technical features of connecting the boiler
If the diagram for the correct connection of the boiler to the water supply is drawn up, it's time to start implementing it. In this case, a lot depends on which pipes were used to create the water supply.
In old houses, steel pipes can often be found, although they are often replaced with more fashionable polypropylene or metal-plastic. When installing the boiler It is necessary to take into account the peculiarities of working with pipes of various types.
There are no special requirements for the material of the structures connecting the boiler and the water supply. They can even be connected with a sufficiently strong hose of a suitable diameter and length.
Regardless of the type of pipes, before starting any work on connecting equipment to the water supply, be sure to turn off the water supply in the risers.
How to connect a heater to steel pipes
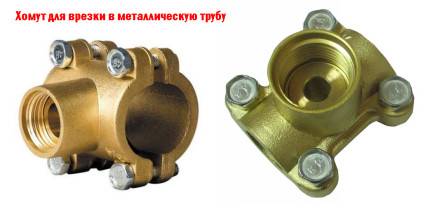
For this, it is not necessary to use a welding machine, since the connection can be made using special tees, the so-called “vampires”.
The design of such a tee resembles a conventional tightening collar, on the sides of which there are branch pipes. The ends are already threaded.
To install the vampire tee, first install it in a suitable place and tighten it with screws.
Between the metal part of the tee and the pipe, put the gasket that comes with the device
It is important that the gaps in the gasket and the tee intended for mounting the hole match exactly.
Then, using a metal drill, make a hole in the pipe through a special clearance in the pipe and rubber gasket. After that, a pipe or a hose is screwed onto the opening of the pipe, with the help of which water will be supplied to the heater.
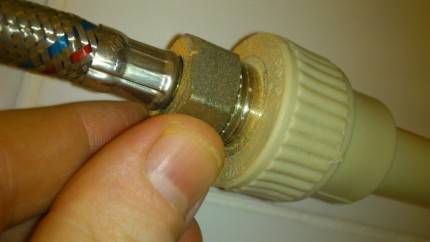
 To connect the storage water heater to a steel water supply, a metal coupling is used with special threaded pipes, onto which a stopcock, hose or pipe section can be screwed
The most important point when connecting a water heater is the sealing of all connections. To seal the thread, FUM tape, linen thread or other similar sealant is used. There should be enough of this material, but not too much.
It is believed that if the seal protrudes slightly from under the thread, this will provide a sufficiently tight connection.
Working with polypropylene pipes
If the boiler is supposed to be connected to a polypropylene water supply, you should immediately stock up on stopcocks, tees and couplings intended for them.
In addition, you will need special equipment: a device for cutting such pipes, as well as a device for soldering them.
To connect the boiler to a polypropylene water supply, the following procedure is usually followed:
- Shut off the water in the riser (sometimes you need to contact the housing office for this).
- Using a cutter, make cuts on polypropylene pipes.
- Solder tees at the outlets.
- Connect the pipes designed to connect the boiler to the water supply.
- Install couplings and valves.
- Connect the boiler to the faucet using a hose.
If the water pipes are hidden in the wall, you will have to dismantle the finish in order to gain free access to them.
It happens that access to pipes laid in strobes is still significantly limited. In this case, a special split-type repair coupling can be used.


The polypropylene side of such a device is soldered to a tee, and the threaded part is connected to the water supply. After that, the removable part of the coupling is removed from the structure.
 To connect the water supply from PVC pipes to the storage water heater, you can use a special adapter, part of which is soldered to the pipe, and a hose can be screwed onto the other part
Connection to structures made of metal-plastic
It is not as difficult to work with metal-plastic pipes as with polypropylene products. Such pipes are very rarely laid in strobes, but are connected with very convenient fittings.
To connect the boiler to such a water supply, you can use the following procedure:
- Shut off the water supply to the pipes in the house.
- In the place of installation of the branch pipe, make a cut using a special pipe cutter.
- Install a tee in the section.
- Attach a piece of a new metal-plastic pipe or hose to the branches of the tee, depending on the situation.
After that, all connections should be checked for tightness. To do this, water is supplied to the system and it is observed whether a leak appears.
If the tightness of the connection is insufficient, the gap should be sealed or the work should be done again.
3 We mount the storage heater - warm water is provided
After we have studied the basic rules for installing boilers, you can get down to business. Let's start with the installation of the storage unit. Installation of a water heater with a tank begins with determining the place of its attachment to the wall. Then we take a tape measure and measure the distance between the holes in the anchors of the boiler. We transfer the obtained measurements to the wall. We drill holes in it in the designated places with a puncher with an appropriate nozzle for fasteners. As such, we will use dowels. Some boilers have four mounting holes, while others have only two. The number of dowels used must be the same (4 or 2).
Water heater ready for use
Next, we insert the dowels, carefully twist (in some cases we hammer in) the hooks. There may be a small problem here. It is associated with inaccurate markup.We definitely need to measure the height from the top of the water heater to the holes and maintain exactly the same (slight deviation is allowed) distance between the ceiling and the dowels. If everything is done correctly, the hooks will spin without problems. Otherwise, dressing them will be very problematic.
After fixing the boiler on the wall surface, we proceed to connect it to the water supply system. Well, when the conclusions for this are already available. But usually they don't. The workflow for arranging the conclusions will be as follows:
- 1. Turn off the water supply.
- 2. We cut the pipe with a grinder in the area where we will mount the tee.
- 3. We cut the thread with a die (we use a tool whose cross section is equal to the diameter of the pipes) and seal it with fluoroplastic tape (FUM) or linen tow.
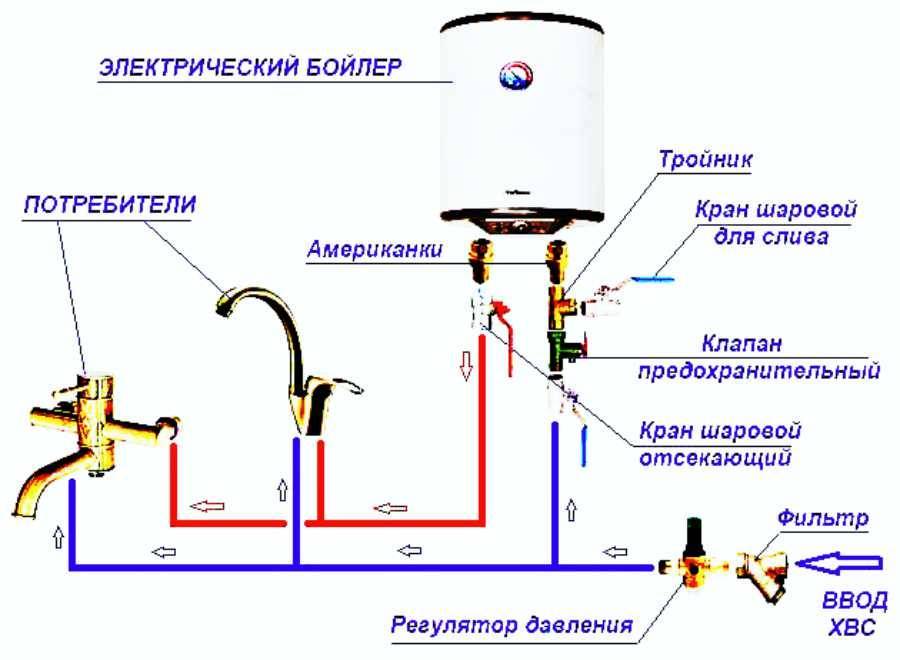
- 4. Install the tee, attach a tap to it, seal the resulting assembly in the manner indicated above.
We connect the outputs of the boiler to the conclusions drawn. This can be done using metal-plastic pipes or flexible hoses. In the first case, the resulting connection must be sealed with FUM tape. When using flexible products, additional sealing of the assembly is not required.
The next step is to install a special valve for the cold water inlet on the heater. This element is of great importance for the normal operation of the boiler. The valve automatically relieves excess pressure in the system, saving equipment from failure. Such a device may not be included in sets of inexpensive water heaters. But this does not mean that it can not be installed. Buy the valve separately and mount it if you want to use the boiler without any problems.
It is also recommended to put an additional tee in front of the shut-off valve and connect another faucet to it. In principle, this element can not be installed. But then it will be quite difficult for you to drain the water from the boiler during regular maintenance of the heating equipment. It is better to make your life easier in advance by mounting an inexpensive crane in a couple of minutes. Areas for connecting additional parts also need to be sealed.
Next, we connect the outlet of the boiler to the hot water supply tap. We connect the water supply to the dwelling. We open the taps and wait for hot water to flow. Nuance. First, air will come out of the hot water faucet. Do not worry. This is normal. Then we inspect all existing connections for leaks. If everything is fine, proceed to connect the unit to the mains. More on this later.
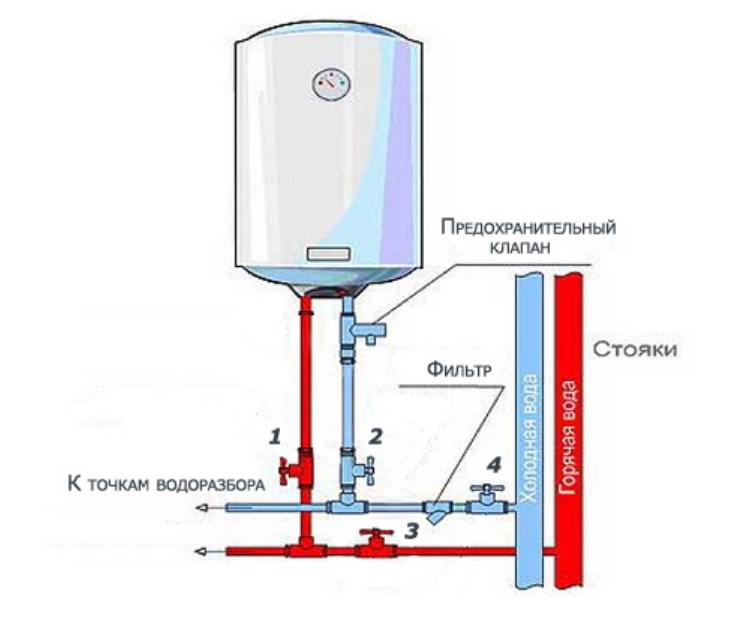
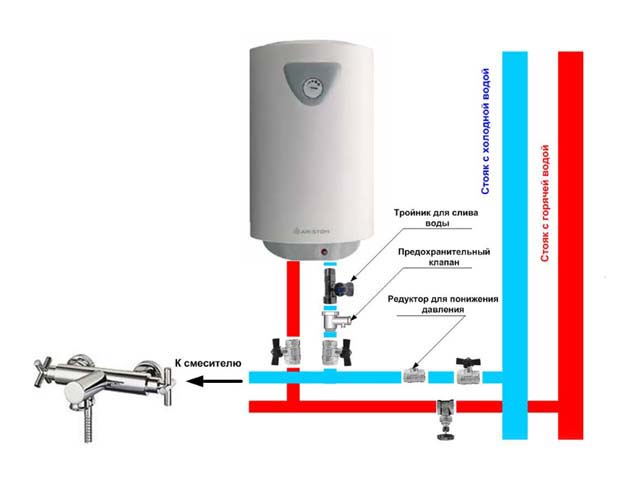
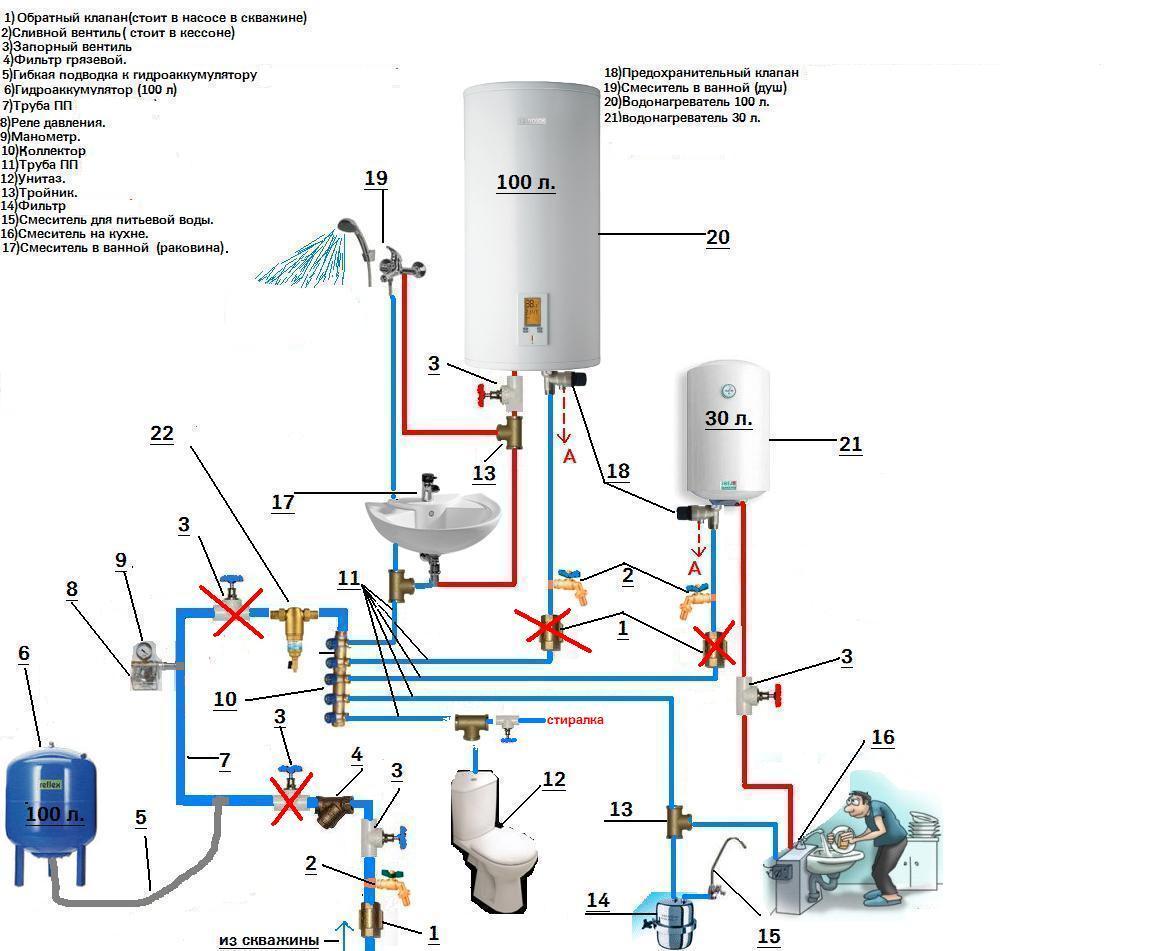
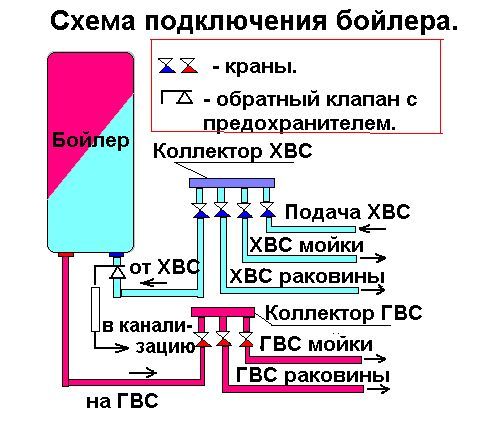
Standard wiring diagram
A person who has a general idea of the layout of the water supply network on an apartment scale and the concept of operation of a storage electric water heater will not be difficult to figure out with the order of its connection to the pipes of cold and hot water supply.
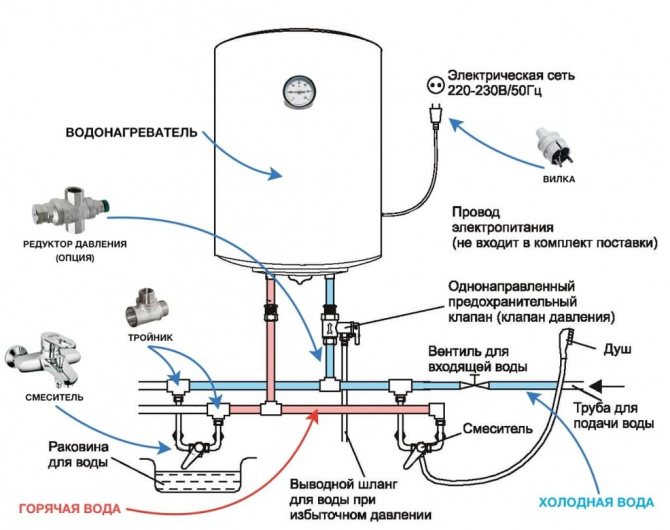
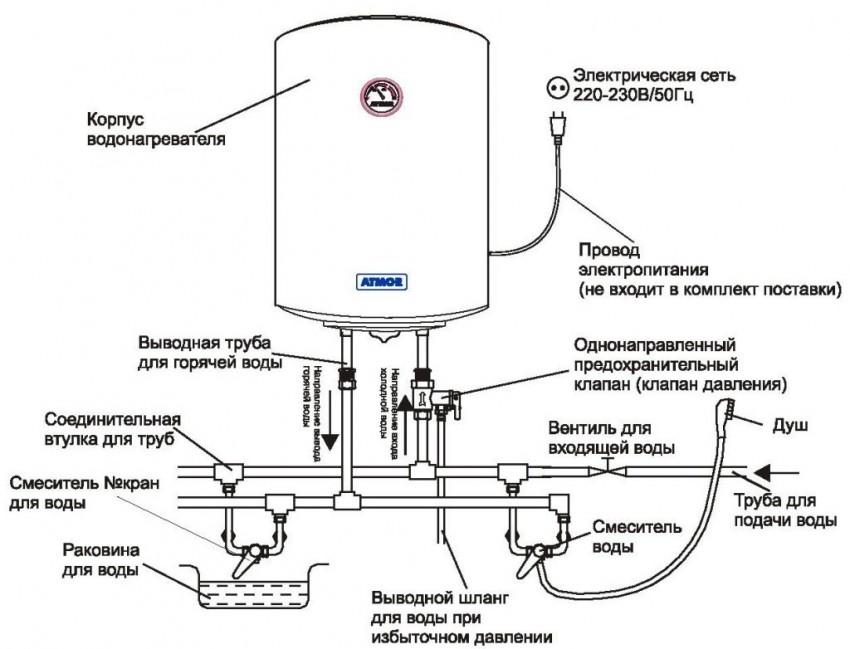
Boiler connection diagram in the apartment
So, cold water must be supplied to the boiler
This is done by inserting (mounting) a tee in the most convenient place under specific conditions.
A safety group must be installed on the supply pipeline - one or more special valves. Their importance and installation rules will be discussed below in a separate section of the article.
The outlet pipe of the heated water cuts into the network of the local apartment hot water supply - directly to the passing pipe - through the installed tee, or, preferably, to the collector. If the apartment is connected to a centralized hot water network, a tap must be installed that will cut off, as necessary, the internal network from the common riser.
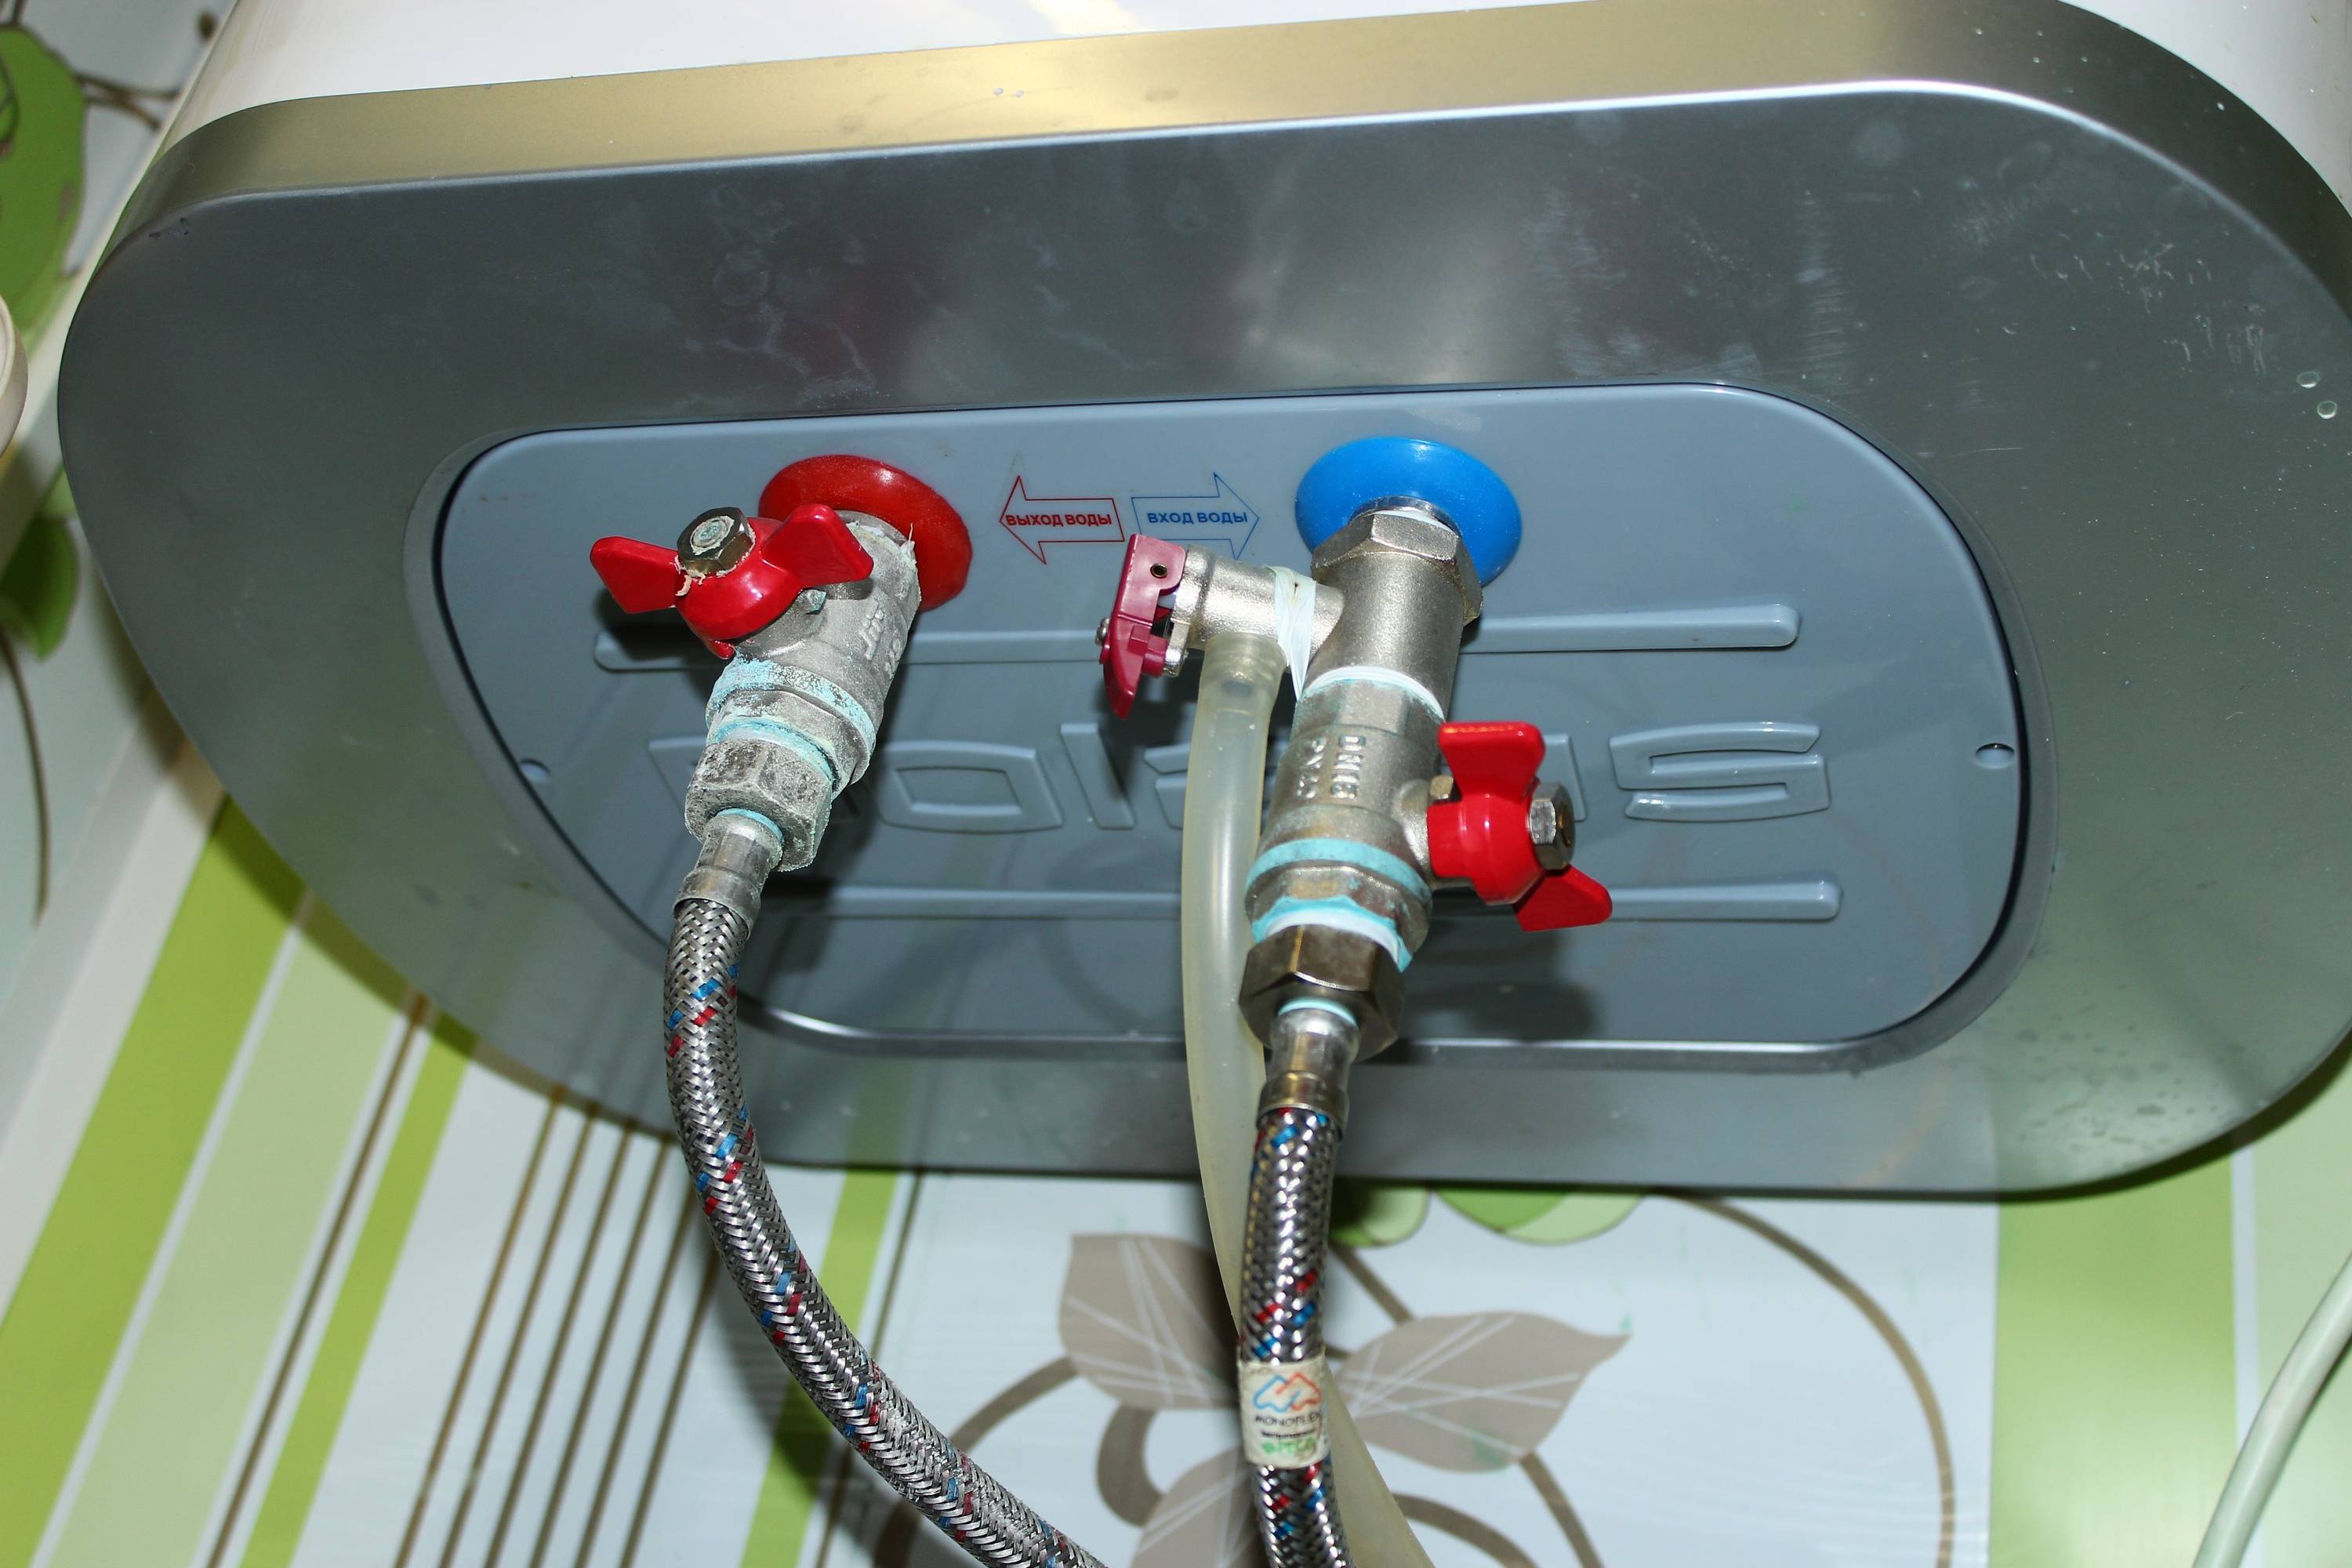
- This generally accepted scheme can be supplemented with some elements. So, many masters prefer to install tees with taps in front of the entrances to the boiler on both hot and cold pipes, which make it easy to empty the electric heater tank for maintenance or repair work. This somewhat “weights” the installation process, but gives certain conveniences in the future.
-
If pressure surges often occur in the cold water supply network, or the water pressure goes beyond the values \u200b\u200ballowable for a particular boiler, a water reducer will be required. It will equalize the pressure and protect the electric heater from hydraulic shocks.
-


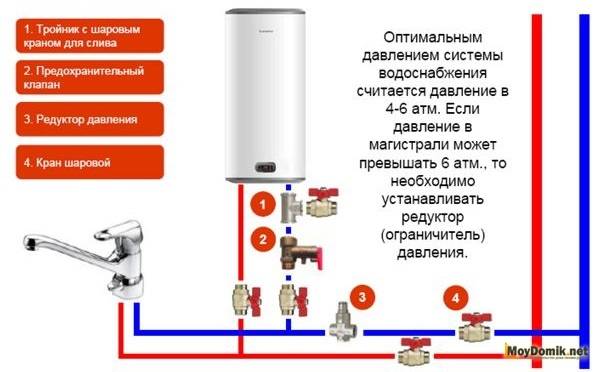
Another addition would be a thermostatic mixing valve. It will provide an even, pre-set temperature in the hot water supply system, eliminate the possibility of possible burns, etc. However, to install it, you will need to insert another tee in the cold water pipeline - in the thermostatic valve itself, hot and cold flows are mixed to the required temperature.
Scheme using a thermostatic valve
How to install an electric storage heater
Connecting a storage water heater is more convenient and most correct to do as follows:
- Preliminary assessment of the place for installation.
- A room with a small area, as a rule, does not have a large space for household appliances. Connecting the water heater to the water supply in the apartment, in this case, is performed in hidden niches or plumbing cabinets.
- Equipment with a volume of up to 200 liters can be mounted. Strictly on the floor, devices with a large volume are installed, otherwise a break is inevitable.
- A water heater from 50 to 100 liters is best fixed to a load-bearing wall. Use an anchor bolt for fastening. Such fasteners must be purchased additionally, because they are not included in the kit. In no case can you save on an expensive device. The more brackets for the heater are fixed, the more reliable the operation process is from year to year. For hinged models of 100 liters or more, there must be at least 4 brackets.
- If you decide to put the device in a hard-to-reach place, then consider maintenance in advance. A poor quality model will often have to be repaired, and this is not comfortable to do in hard-to-reach places.
Types of instantaneous water heaters
Instantaneous water heaters are divided according to the type of energy that is used for heating. Therefore, they can be divided into the following types:
- Electric, in which the passing water is heated by a heating element (tubular electric heater) or a metal tube, which is affected by an alternating magnetic field (inductor). Therefore, they are divided into two types: induction and heating elements. This type of water heater consumes electrical energy, therefore it is not suitable for places where it is impossible to connect to the mains;
- Water, working from the heating system.These devices do not require an electrical connection, so they can be used even in non-electric homes. However, dependence on the heating system does not allow their use in the summer;
- Solar, receiving heat from the luminary. They do not depend on the heating system or electricity, so they can be used in summer cottages. However, these devices heat water only on warm sunny days;
- Gas, powered by liquefied or main gas. Such devices are used only in houses and apartments connected to the central gas pipeline.
This device heats the flow of water passing through it.
The basis of an electric water heater is nichrome wire, which has a high resistance, wound on a ceramic frame. The induction heater works on a different principle. A thick copper bus is wound around a metal pipe, then high-frequency (up to 100 kilohertz) voltage is applied. The alternating magnetic field heats the metal pipe, and the pipe, in turn, heats the water. There are flow heaters that are built into boilers or heat accumulators filled with water. That is why they are called water. The best option for a summer cottage is a solar instantaneous water heater. It runs on solar energy and heats the water to 38-45 degrees, which is enough to take a shower. Gas instantaneous water heaters appeared in the student environment out of desperation caused by a broken column or other similar factors. They are a copper tube twisted into a spiral, located above the fire of a kitchen gas stove.
What can you do yourself
Before choosing a specific type of water heater, you need to determine what tools, materials and skills are available to you. If you know how to work well with a welding machine, you can make an electric water heater. If you already have a working heating system with a heat accumulator and you know how to use a welding inverter, you can make a water heater. If you do not have such talents or you do not have electricity or water heating, then a solar water heater is quite capable of you.
Gas instantaneous water heaters are a means of increased danger. To work with any gas devices, you must undergo special training, otherwise it is likely that instead of a tankless water heater you will get a time bomb that will explode one day. If the concentration of gas in the room is 2–15%, then an explosion will occur from any spark. Therefore, in this article there are no instructions with which you can create a gas instantaneous water heater.
To create most water heaters, you will have to learn how to use welding
Common mistakes in installing water heaters
The installation rules for such equipment provide for the use of insulation on cold water / hot water pipelines. At the same time, the technical requirements for installation determine the minimum possible size of the insulation thickness - 20 mm.
The level of thermal conductivity of the insulating material must be at least - 0.035 W / m2.
An example of the insulation of the heater system, where obvious errors are noted. It is necessary to insulate not only the pipes, but also the working components installed on the pipeline section.With modern insulating materials, this is done easily.
When installing water heaters, they often violate the scheme for connecting a home unit to a water supply system, using insulating material of small thickness, or not using insulation at all.
As a result, when the full operation of the device begins, significant losses of thermal energy are noted. These losses are reflected in the heating time, which increases significantly.
Incorrect or missing insulation is the main cause of condensation on the cold water line. This state of the system reduces the level of user comfort, contributes to the formation of an unsanitary environment inside the premises where the equipment is located.
A common mistake is to install a boiler without an expansion vessel. The scheme, which provides for the introduction of an expansion vessel, is relevant specifically for storage-type water heaters.


Thanks to the expansion vessel, it is possible to compensate for the increase in pressure caused by the increase in the volume of water in the boiler storage.
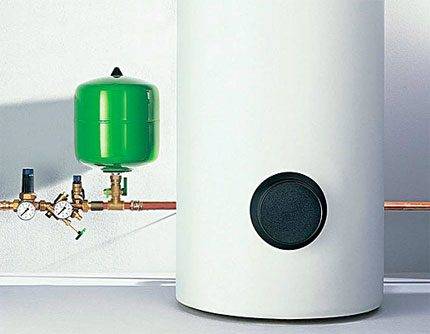
Installed expansion tank in an indirect heating system. In fact, the installation of the expansion vessel is made with an error. This element of the system must be located above the line of the top cover of the boiler. In addition, there is no pipe insulation
As a rule, the installation of storage-type heaters is limited to turning on the safety valve in the section of the cold water main. Such a peculiar replacement of the expansion tank with a safety valve is permissible, but, from the point of view of correct installation, this is a technical error.
In fact, on storage boilers, an expansion vessel must always be installed along with a check valve.
List of other installation errors:
- the electrical cable is laid on sharp metal edges or on high temperature surfaces;
- the order of connecting trunk lines does not correspond to the order indicated in the diagram;
- the installation level of the water heater relative to the horizontal and vertical is violated;
- there is no grounding circuit of the water heater;
- the parameters of the electrical network where the equipment is connected do not meet the passport requirements;
- installation is carried out in a room where there is no water supply and sanitation system.
Any, even an insignificant mistake in the installation of water heating equipment can play a fatal role after the start of operation of the device.
We offer you to familiarize yourself with the detailed instructions for installing a storage and instantaneous water heater:
- Do-it-yourself installation of a storage water heater: a step-by-step guide + technical standards
- Do-it-yourself instantaneous water heater installation: step-by-step instructions