
- Vacuum cleaner device
- Design features of the engine
- Vacuum cleaner hose diameter
- How to disassemble a rain shower
- Vacuum cleaner hose extension
- Measures for repairing a vacuum cleaner hose
- 1 Types of check valves and their common problems
- Finally about electronics
- Instructions for disassembling and replacing the vacuum cleaner motor
- Vacuum cleaner hose repair
- Troubleshooting
- The main causes of failure
- 1. Leakage from under the lever
- 2. Valve leakage
- 3. Leaking shower diverter
- 4. Broken shower switch button
- 5. Hose leak
- 6. Leak between watering can and hose
- 7. Blockage in the watering can
- 8. Weak pressure in the mixer
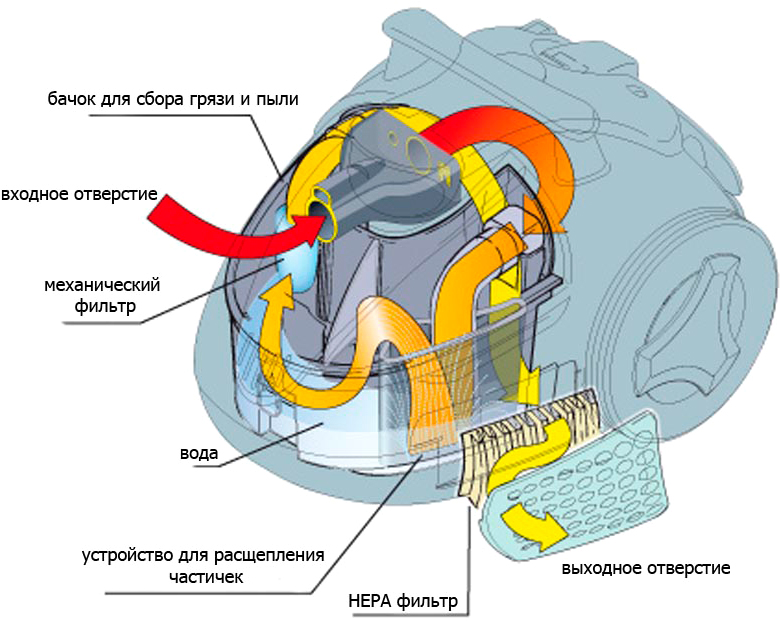
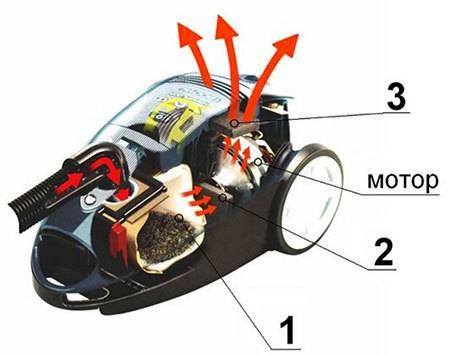
Vacuum cleaner device
The ability to repair a vacuum cleaner with your own hands lies in its simple design.
There are three main types of devices:
- with dry dust bag;
- with aquafilter (air-water mist filter);
- with a non-replaceable dust collector-cyclone (stationary).
In this case, a model of any type consists of the following basic components:
- the main building, where the engine, dust collector and filtration system are installed;
- dust collection unit (bag, reservoir);
- waste transportation system (hoses, nozzles).
 The availability of self-repair is due to the simple device of a vacuum cleaner
Also, regardless of the type of vacuum cleaner, the delivery set usually includes hoses, adapters and nozzles, which are also subject to wear and tear during operation, like the engine.
Next, we will separately consider the engine device.
Design features of the engine
Behind the filtration system is a tangential fan. The blade is closed with a lid, the element is made in the form of curved aluminum partitions between a pair of metal planes. This is how closed channels are formed. The engine itself is covered by a casing made of plastic, in which the output path of the air flow is made.
Interesting! Since the devices use a tangential type fan, the efficiency of the vacuum cleaner is no more than 20-30%. In other words, with a power consumption of 1600 W, the actual suction power will be about 350 W.
Graphite (carbon) brushes are fixed in shafts. If necessary, the parts can be sharpened and adjusted to size so that they become in place. Each brush is pressed by a spring through which an electric current flows. Carbon has a long life and will work until it is completely worn out. At the same time, it is recommended to clean the copper collector.
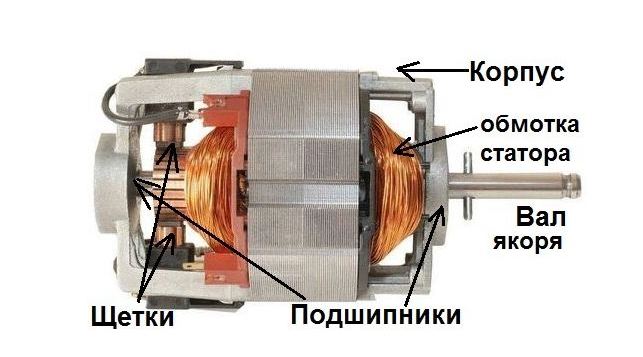 Collector motor of the vacuum cleaner
The shaft is attached to the stator using two bearings of different sizes (front - large, rear - small). This feature is provided to facilitate engine disassembly.
The bearings are equipped with dust boots that can be carefully removed with a grease screwdriver.
Vacuum cleaner hose diameter
Hoses for modern vacuum cleaners have the following inner diameters: 32, 36, 38, 50.The hose branch pipe can be connected to the inlet of the vacuum cleaner with threaded dimensions, mm:
| Outside diameter | 44 + 0,3 (+0,1) |
| Inner diameter | 38 + 0,3 (+0,1) |
| thread pitch | 6 + 0,1 |
The vacuum cleaner hose is a very important component. If it breaks, the vacuum cleaner may become unusable. The hose may break due to improper storage or operation. Buying a new hose is not always possible due to the lack of accessories for this vacuum cleaner model or the high cost of a new hose. In some cases, the repair of the hose can be done independently in various ways: using a simple cut, applying a bandage or using a thermal method. After such repairs, the hose can last for several more years.
The telescopic tube for the vacuum cleaner is one of its integral parts. This is the element that connects the hose and nozzle. Some believe that it is not possible to disassemble this part without breaking the latches and damaging the integrity. But if you understand the essence of the device, the pipe can be disassembled and repaired if necessary. Consider the analysis options using the example of different brands of vacuum cleaners: Samsung, Lg, Dyson.
How to disassemble a rain shower
In addition to the classic watering can, it is possible to install a rain shower in the shower cabin. The popularity of this type of plumbing is due to its properties: the ability of a soft or, conversely, invigorating effect on a person. The rain shower can also break.
There is a breakdown due to the fact that the body is gradually clogged with limescale. Unable to withstand the strong pressure of water, with a sharp jump in pressure, the rain shower becomes unusable and requires urgent repair - a complete replacement of the watering can. But the malfunction can be eliminated without drastic measures. It is enough to disassemble the structure.
For this:
- Outside, on the cabin roof, unscrew the nut that secures the water supply hose.
- Disconnect the nut that secures the rain shower inside the cabin.
- Unroll the top block. Inside is the switch cartridge.
- Disassemble the cartridge, clean it from scale.
The rain shower is assembled in the reverse order.
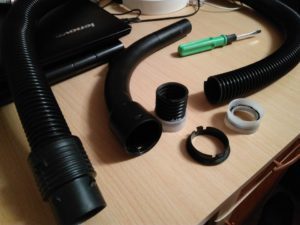
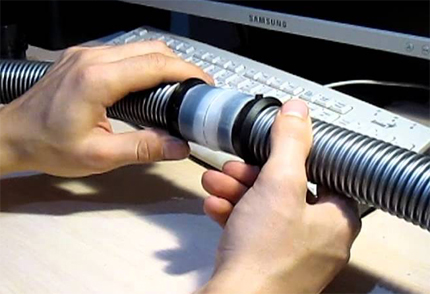
Vacuum cleaner hose extension
In some cases (cleaning large rooms, hard-to-reach areas), the hose may not be enough. Then it can be extended up to 5 m. In order to do this, you need to choose the same diameter and pitch of the coil. Prepare the ends to be joined: sand and degrease. Extension can be done in three ways.


- With a bike camera. Cut off a piece of 5-6 cm from the camera, put it on the surfaces to be joined. Fill the places of contact with the corrugation with cold welding or rubber glue.
- With a simple corrugated pipe. Take a piece of 10 cm from the corrugated pipe and, cutting it lengthwise, put it on the junction of two hoses (you can screw one hose into another). Wrap this place with tape or tape.
- With a half liter plastic bottle. Cut the bottle on both sides - you get a sleeve. Put on one end of the hose, attach the other so that the bottle is in the center of the connection. Warm up this place with a building hair dryer. The plastic will shrink and tightly connect the joint.
Measures for repairing a vacuum cleaner hose
It is not difficult to repair the vacuum cleaner hose with your own hands if it has been depressurized. So do not rush to immediately get rid of the equipment and try to fix the breakdown yourself, or use the services of a service or a specialist.
So, if you plan to self-repair the vacuum cleaner hose, then this will require:
- Wrap insulating tape or tape at the break point is the most short-lived option.
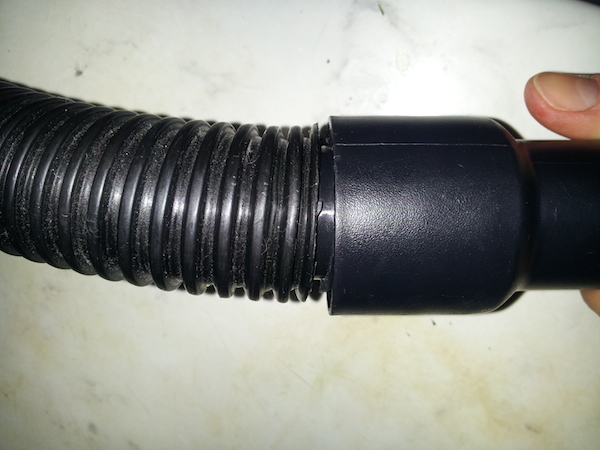
- Trimming the damaged part, making the hose a little shorter is the most optimal course of action for such a breakdown.
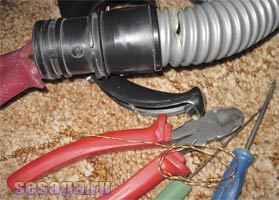
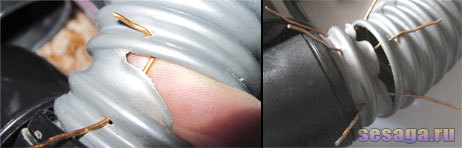
- Cut pieces of 6-7 cm using copper wire cutters, depending on the size of the gap, and insert them into the holes made on the hose at the break points. Since the hose of the vacuum cleaner, in essence, is a spiral of steel wire with a PVC or fabric cover put on top, the threaded small wire hooks are aligned and pulled together in turns so as not to damage the insulation. Next, the excess wire is removed with pliers, and the sharp edges are processed with a file. Finally, the seam on top is wrapped with electrical tape.

A patch applied to a damaged vacuum cleaner hose made of wire and insulating tape will make it possible to operate the device much further and more fully.
Among other things, for optimal performance of the vacuum cleaner, you should periodically clean the filter and keep it in a dry place. Moisturizing and washing the filter is not recommended, because. in this case, the throughput of the device will decrease, which can lead to its overheating. A vacuum cleaner, like any other appliance, requires constant care. It is strongly recommended to change the grease of the motor bearings at least once every two years and to check the condition of the graphite brushes of the motor annually. Compliance with the elementary rules for the operation of electrical household appliances will help them last much longer and make your life more pleasant in terms of the comfort of living in a modern, truly functional home.
1 Types of check valves and their common problems
Over the past decades, the design of switches has undergone significant changes. Many of the Soviet types of switches have been replaced with more modern counterparts. Let's take a closer look at new and outdated models in order to understand what you have to deal with. Let's start with the outdated types of shower switches - spool and cork. They have a lever that rotates 90 and 120 degrees. The spool switch is practically not found on the market today, however, if you have an old Soviet-style mixer installed, most likely you are dealing with this particular design. A spool is installed inside the switch, which consists of a barrel and an eccentric. The mechanism is actuated by rotating a rod with a protrusion displaced from the center. The stem controls the movement of the keg up or down. The external feature of this type of switch is the presence of a plastic or metal handle in the form of a flag. Frequent problems of the spool system are breakage of the eccentric lug, failure of the keg, sensitivity to liming, as a result of rotting of the bolts and destruction of the gaskets.
Spring type shower diverter
The plug switch is an improved model of the spool switch. A distinctive feature of the cork system is the presence of a slotted brass plug and a switch handle 7–10 cm long inside. This type of switch ceased mass production in the 90s of the last century. However, there are those who still use the mixer with this type of switch.Common reasons that owners of a cork switch can expect are an overtightened nut that disrupts the smooth rotation of the handle, flow along the stem due to partial wear of the cork.
Modern bath-shower switches are available in push/pull, ball and cartridge types. The pushbutton switch is externally an exhaust plug with a spring-loaded rod that actuates the shut-off valve. When moving down, it shuts off the water to the spout (gander), switches it to the shower. When the rubber valve wears out, the operation of the locking system is disrupted, water flows simultaneously from the spout and shower head. The wear of the fittings of the exhaust switch also leads to spontaneous return of the button after pressing at a minimum water pressure. In such a situation, we advise you to carefully bite out a couple of turns of the spring with tools and the system will again work properly.
It is easy to recognize the ball switch by the presence of a brass ball with perpendicular holes inside, which is clamped between two plates, and the free rotation of the handle by 360 degrees. When the switch is turned, the ball takes a certain position. It blocks one of the holes, and through the second - water enters the spout or shower. The intermediate position of the lever completely blocks the access of water. Such a system is considered durable. The only thing she is afraid of is the ingress of particles of sand, lime. As a result of sticking, deposits and rust form on the surface, which prevent smooth switching, the lever begins to jam. If nothing is done, the system completely breaks down and fails. Therefore, we advise you to clean the internal fittings of the ball switch from limestone deposits at least once every six months.
The ceramic cartridge is a wear-resistant shut-off valve found in most modern faucets. But like the ball type, it is sensitive to sand particles, scale. Therefore, we recommend installing a coarse water filter in advance. If the switch knob starts to jam, do not make sudden movements. Disassemble and clean the system. Otherwise, you will break one of the ceramic plates or the plastic retainer, the cartridge will have to be completely replaced.
Finally about electronics
I must say that the electrical circuits of vacuum cleaners, except for the most expensive ones with microprocessors, do not differ in particular complexity. The electrical circuit diagram of the vacuum cleaner, which can be considered close to typical, is shown in fig. below. The mains voltage in this case is 110 V. For a voltage of 220 V, the resistance R1 is increased to 150 ohms and its power is up to 2 watts. R5 take 330 kOhm, VR1 and VR2 each 470-510 kOhm, R3 - 24 kOhm 2 W. The operating voltage of all capacitors is 630 V.
Electrical circuit diagram of a vacuum cleaner with power control
R3 sets the maximum power of the vacuum cleaner, it can be changed within 12-47 kOhm. VR1 is an operational power adjustment, and VR2 is set to its minimum value, and here you need to be more careful. The fact is that if the motor armature stops, each half-cycle of the mains voltage, an inrush current equal to 3-5 working current will flow through it, and the expensive powerful triac (TRIAC according to the circuit) will burn out
Therefore, when setting up the circuit, the VR2 engine is first set to minimum resistance, then from LATR they give a voltage of 175 V and VR2 very carefully, without overshooting, reduce the engine speed to 700-800 rpm
Thermal protection in such a circuit is also simple: in parallel with C3, a 1-1.5 MΩ thermistor is connected (for a mains voltage of 220 V) with an inverse-logarithmic temperature characteristic. Physically, the thermistor must be in thermal contact with the motor housing, but electrically isolated from it. A "cold" thermistor (at room temperature) does not affect the operation of the circuit, but when heated to 70-80 degrees, its resistance will drop to 1-0.5 R3, C3 will charge more slowly during the half-cycle, the low-power triac DIAC will open and open TRIAC later , and the motor power will be reduced by half or four times. In approximately the same way, it is possible to modify most vacuum cleaners with power control, but without protective automation.
***
2012-2020 Question-Remont.ru
Display all materials with a tag:
Go to section:
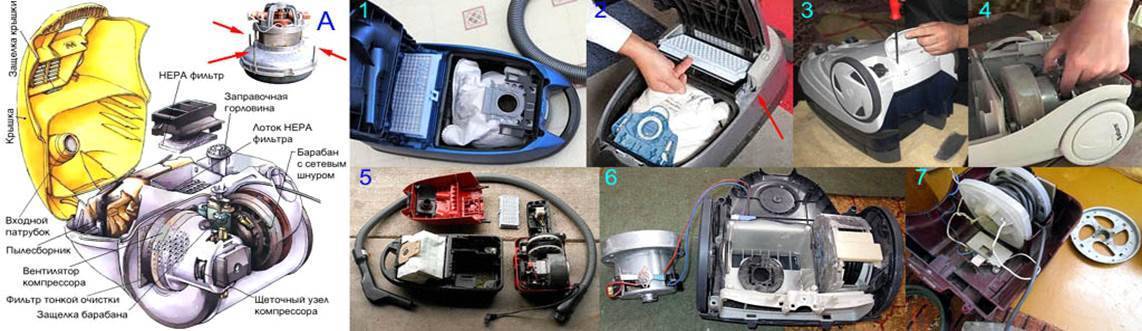
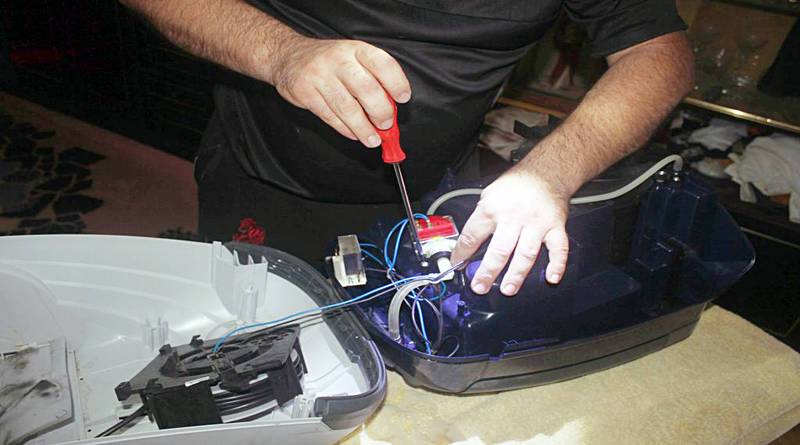
Instructions for disassembling and replacing the vacuum cleaner motor
The heart of the vacuum cleaner is the motor, and usually the collector. Regardless of what cause of the malfunction occurred, whether the vacuum cleaner motor needs to be repaired, it is necessary to understand the sequence of disassembling the unit. To do this, you need to have an idea about the device of the vacuum cleaner.


So, in order to repair a Samsung vacuum cleaner with your own hands, you will need to perform the following list of works:
- Disconnect the appliance from the mains.
- Remove the sealing grid and unscrew the bolts on which the cover of the dust collector compartment is attached.
- Disconnect the control unit and the cover of the dust collector (the dust collector is either unscrewed or simply removed).
- In order to get to the motor of the vacuum cleaner, under the dust collector there is a garbage collection system, under which the body is connected to the engine, it is necessary to unscrew the countersunk screw, or by performing simple manipulations to separate the body of the device from the base.
- Since the engine is protected by a special gasket that is fixed at the inlet of the intake hose, it will need to be removed and cleaned, or replaced with a new one.
- The wires supplying power are dismantled from the engine, which are screwed to it with screw clamps.
When the engine is “on hand” outside the device, it will first need to be checked for the integrity of the bearing pairs (upper and lower). If cracks or irregularities are found, it is recommended to replace the bearings with new ones.
In addition, attention should be paid to the serviceability of the motor armature and the integrity of the brushes.
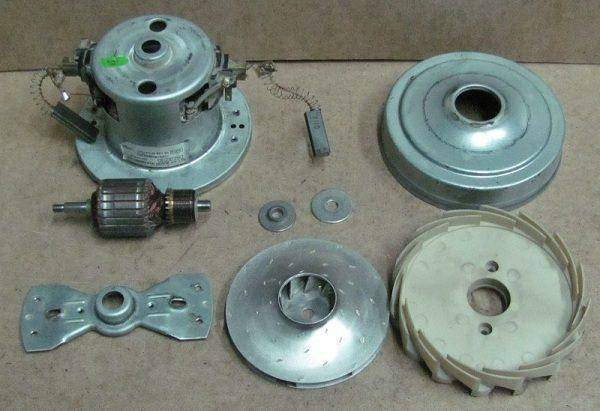
After the installation-disconnection from the electrical wire is carried out, it will be necessary to disconnect the motor from the frame. Then the engine will need to be removed from the casing by unscrewing the bolts with a screwdriver, ruler or bar and lightly tapping the casing with a hammer, because it is very easy to damage its integrity. Next, the fan (impeller) is disconnected from the motor, which is held on the built-in nuts. Sometimes the nuts are additionally fixed to the engine with glue, so at this stage it is advisable to have a solvent in stock. There are usually 4 screws under the fan, which are unscrewed one by one, and thus get free access to the motor.
If violations or breakdowns are detected - breakage of couplings or gear teeth, as well as winding displacement - faults are eliminated, and failed parts are replaced with new ones.The assembly of the vacuum cleaner motor is carried out in the reverse order.
Vacuum cleaner hose repair
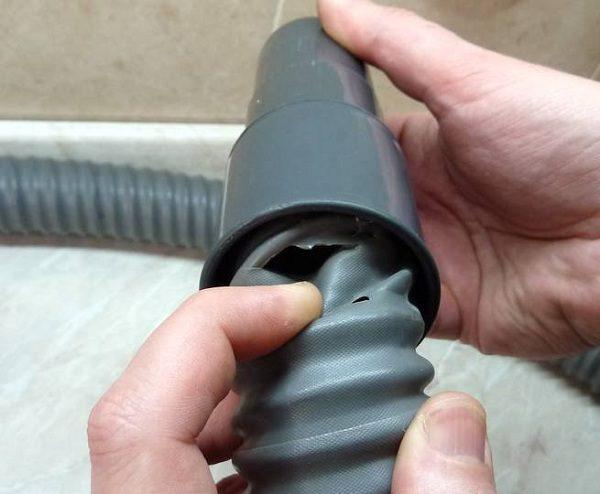
If your vacuum cleaner hose is torn, then do not rush to throw away the vacuum cleaner and buy a new one, especially if the old vacuum cleaner completely tires you: excellent suction power and the engine runs smoothly. Usually the hose breaks in the places of the strongest bends - this is either in the place where the hose is attached directly to the vacuum cleaner itself, or in a place near the handle of the hose holder. I have repeatedly seen how a torn hose is wrapped with electrical tape or tape. But in this case, usually such a repair is short-lived, and it looks somewhat rude and miserable. The hose can be repaired by cutting off the torn part. In this case, it will be shorter by 3-5 centimeters, but it will look and work like a brand new one.
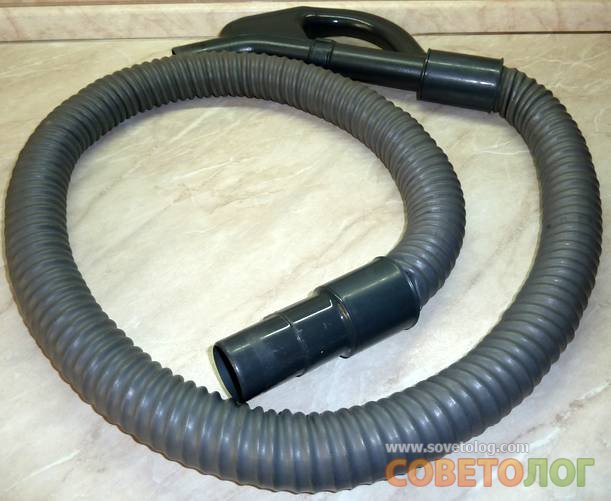
For repair, we took a hose with a power regulator on the hose handle:
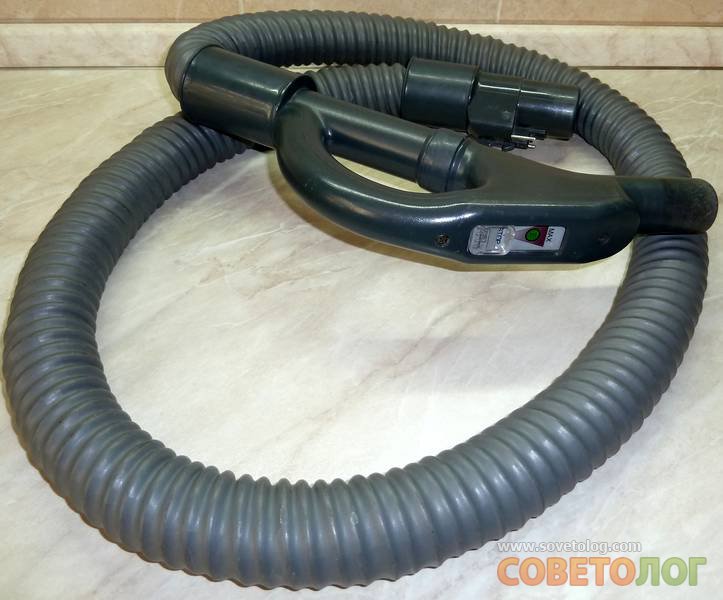
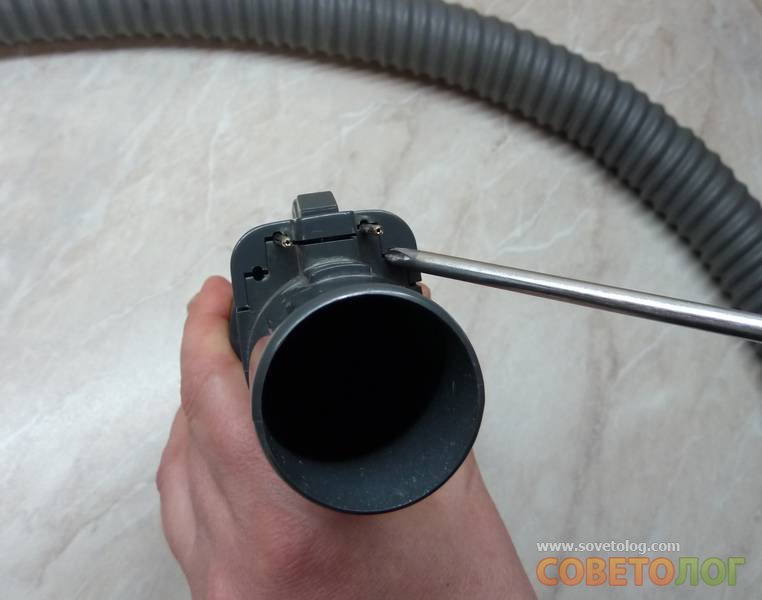
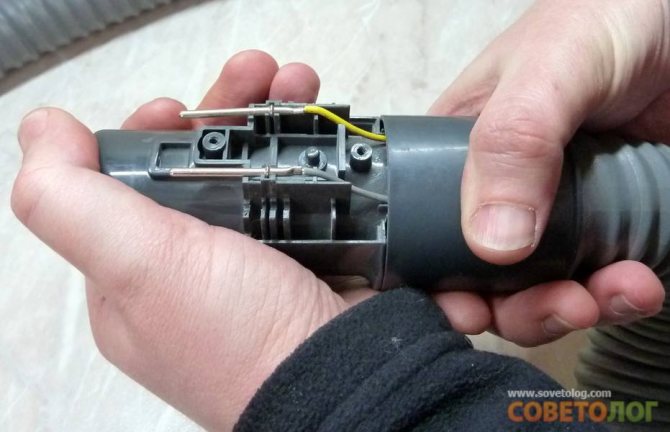
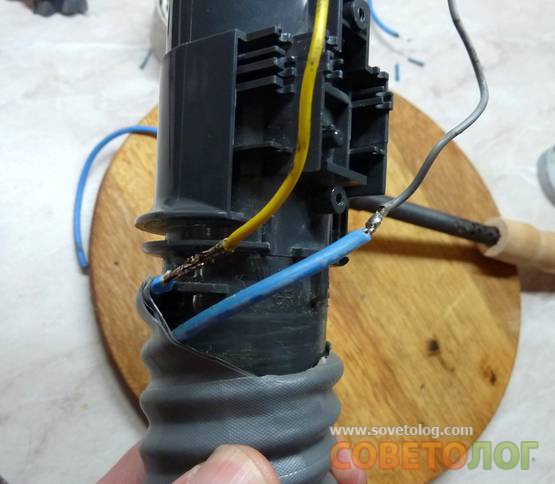
This hose differs from the usual one in that it uses two insulated wires as a spring, through which voltage is supplied to the switch and power regulator (rheostat) located on the handle of the holder. As expected, the hose broke at the point where it was attached to the vacuum cleaner:
Since this hose is wired, it has two contacts in the form of a plug for an electrical outlet, which close the electrical network when connected to the vacuum cleaner body:
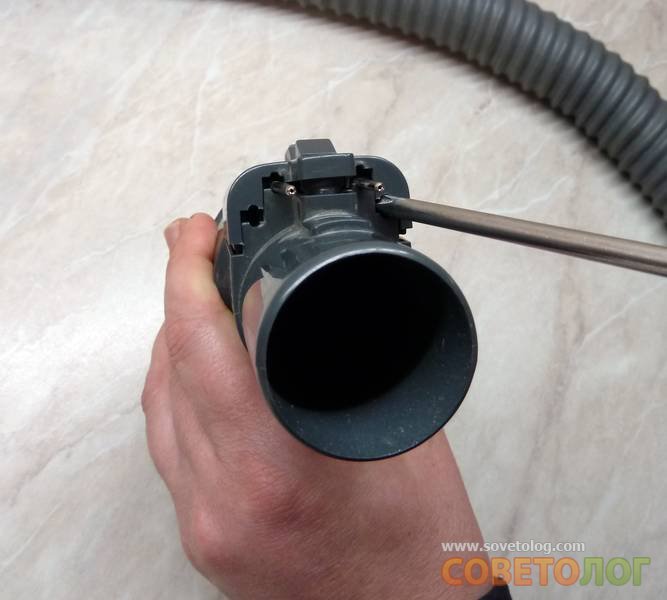
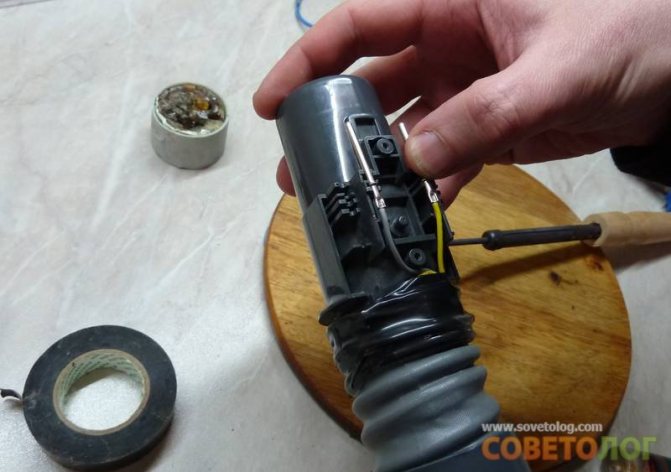
First you need to disassemble the mount to access the hose wires. To do this, use a Phillips screwdriver. We unscrew the two screws on the holder mount:
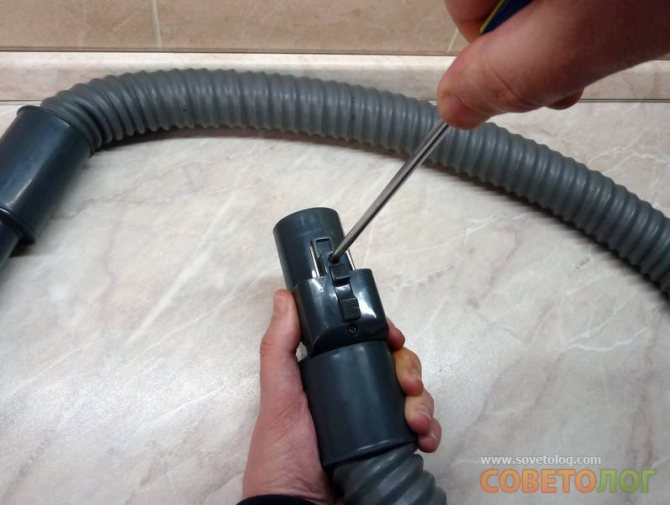
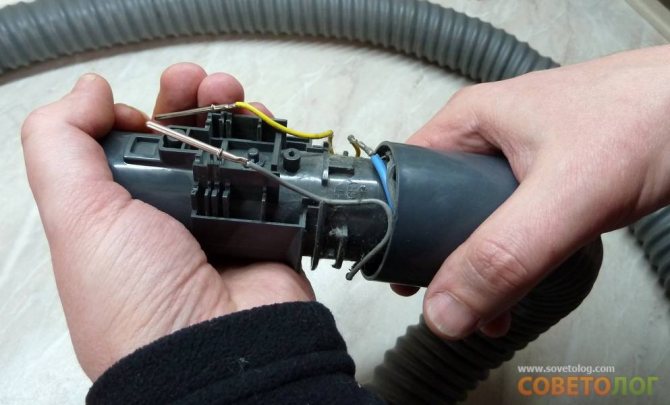
On the end side of the hose holder there are round technological holes for easy removal of the mount.With the same screwdriver, gently press into these holes deep and at the same time up to remove the spring fastening mechanism
Thus, the spring-loaded hose fastening mechanism opens slightly:
After that, the plug with a spring-loaded mechanism for attaching the holder is removed:
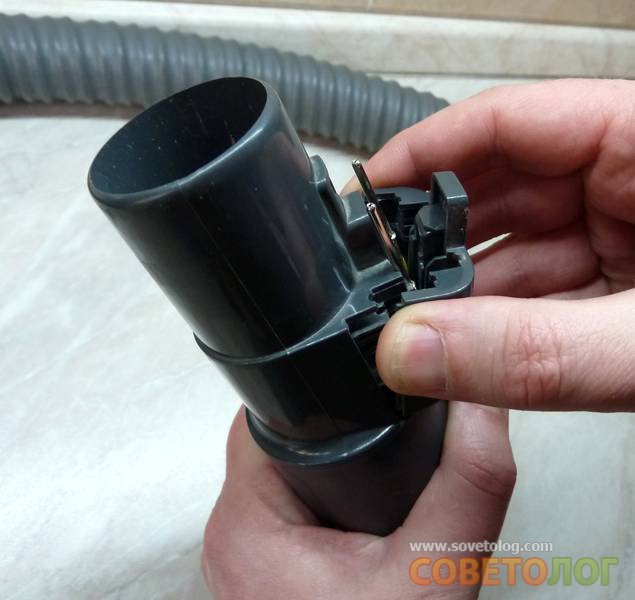
Attachment removed:
Carefully remove the spring latch:

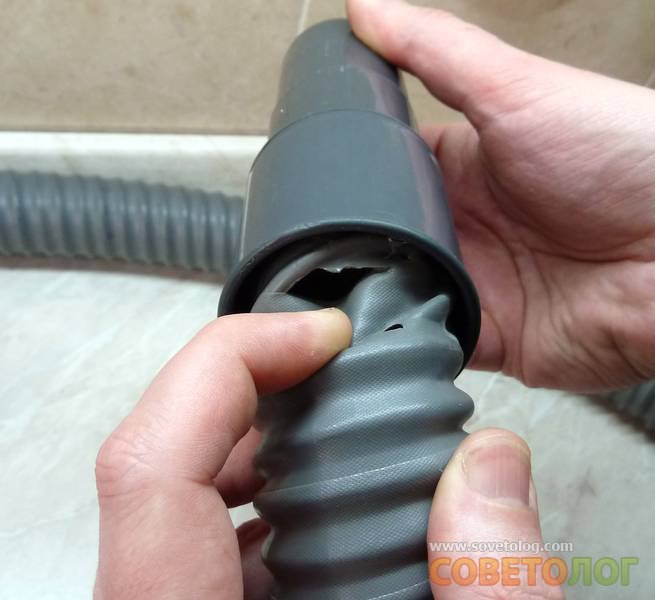
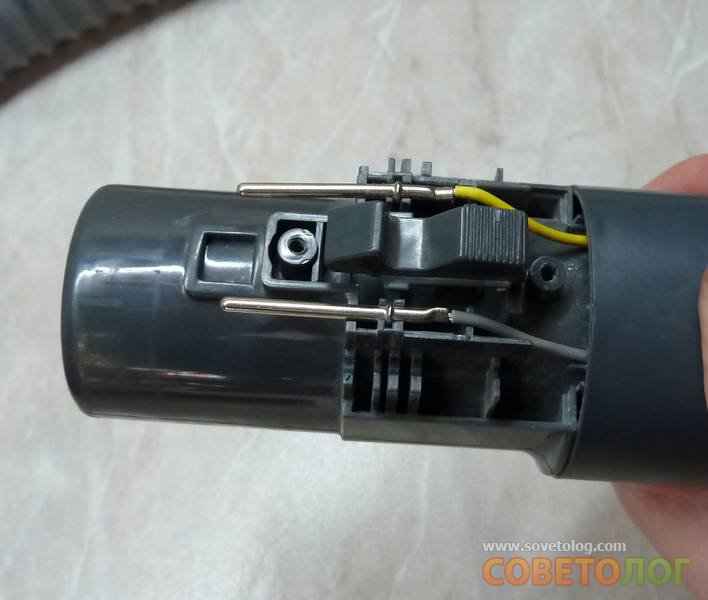
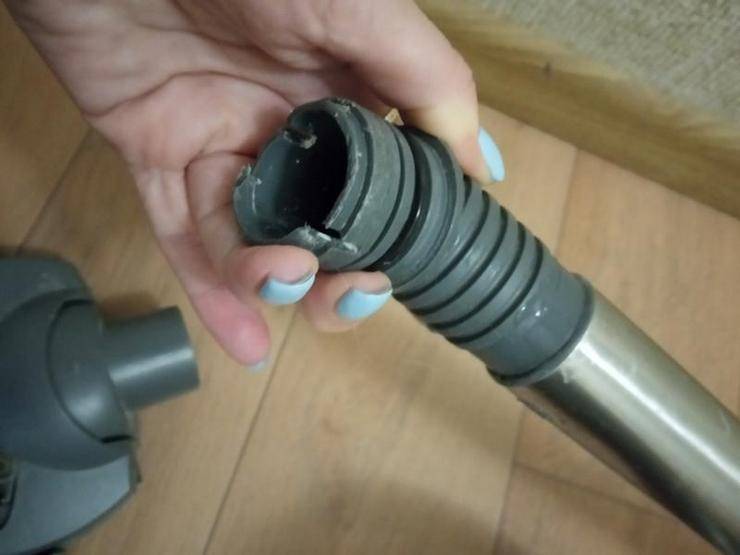
Next, unscrew the plastic hose guide:
Unscrew counterclockwise towards you. It holds quite tight, but after a few seconds it lends itself:

and then removed:
The wires are released, and the hose itself is removed from the nozzle of the vacuum cleaner by the same twisting:
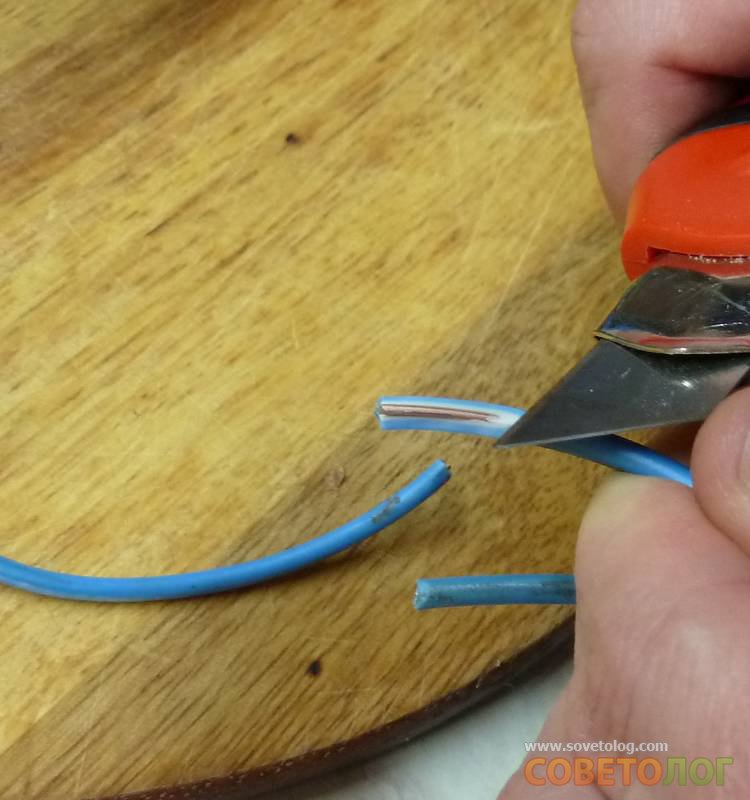
The plastic flexible shell of the torn part can be easily cut off with ordinary scissors:
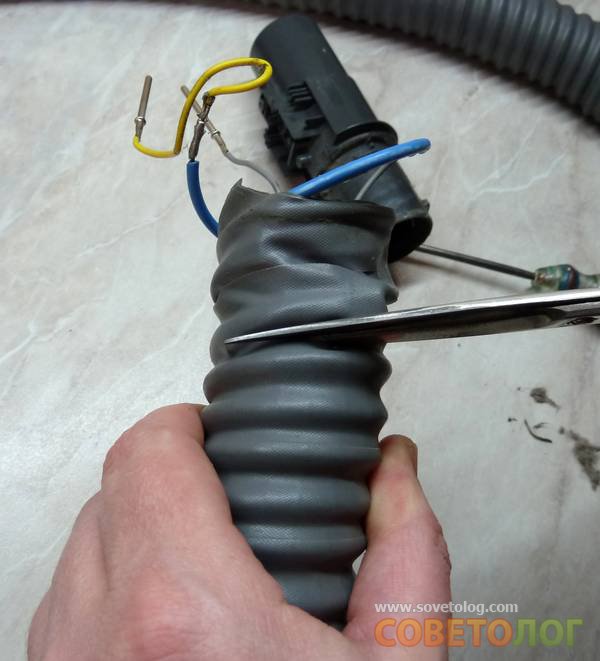
We free the wires glued to the sheath and cut off the excess part with side cutters:
When cutting wires, please note that it is better to cut an integer number of turns (one, two, three, etc.). This is necessary so that when assembled in a natural position, the suction end of the hose is directed, as before, down, and not somewhere sideways or up.

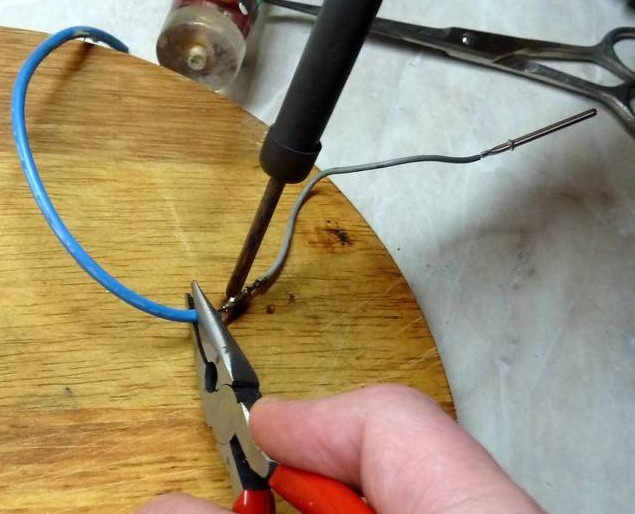
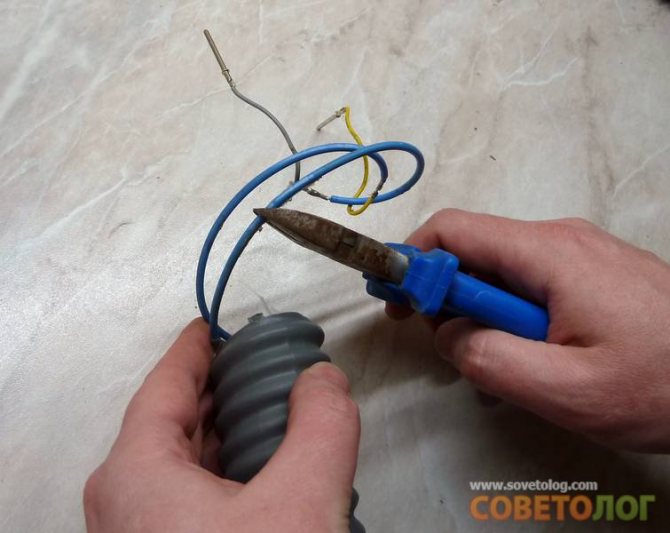
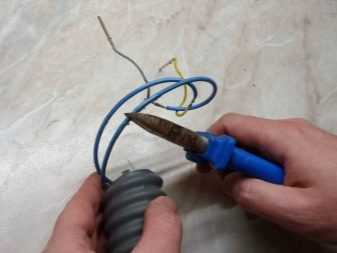
Next, we will use a soldering iron to solder the ends of the wires previously soldered to the wire - the spring, which were cut off:
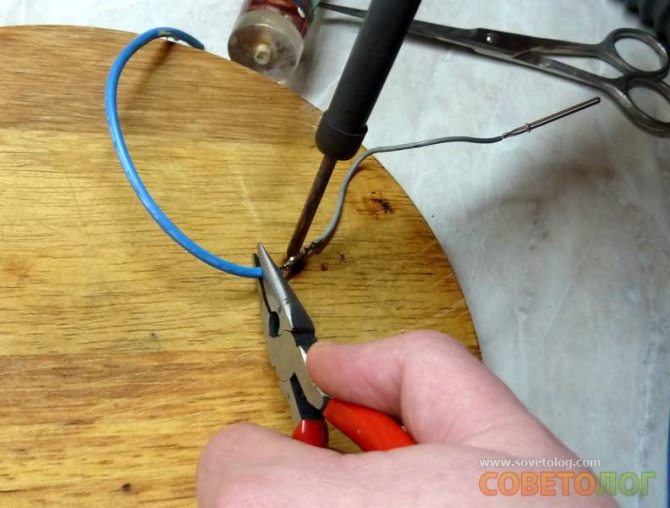
You need to solder them again. To do this, you need to clean the new ends of the wires from insulation (you can use a regular construction knife):
For a better solder fight, it is better to treat the cleaned ends with rosin:
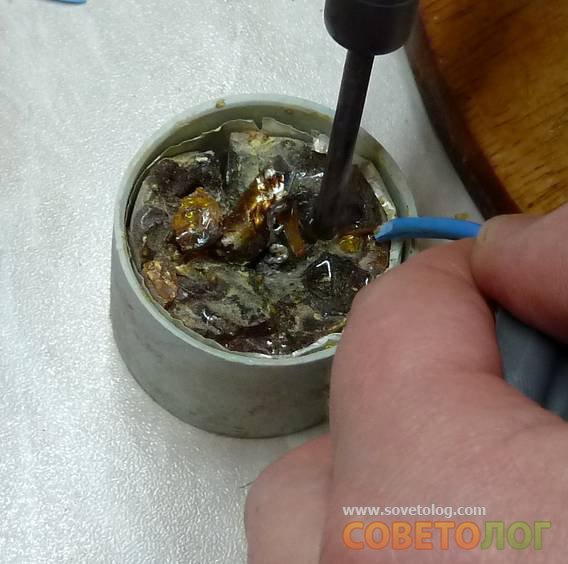
Then solder the ends of the wires with pins to our cut part
They should not come into contact with bare wires - pay special attention to this!

All is ready. Now you can reassemble what was disassembled. When assembling, first screw the nozzle of the vacuum cleaner:


When planting wires, it is convenient to use electrical tape to fix the wires:
Also, when assembling, it is better to first install the spring-mounted holder, and then put on the plastic hose guide, as it comes on top of the holder:

Next, screw the screws back. That's all. We get an updated hose. The whole job took about 30-40 minutes, no more. Of course, the mounts for different brands of vacuum cleaners are different, but the principles are common to all.
Troubleshooting
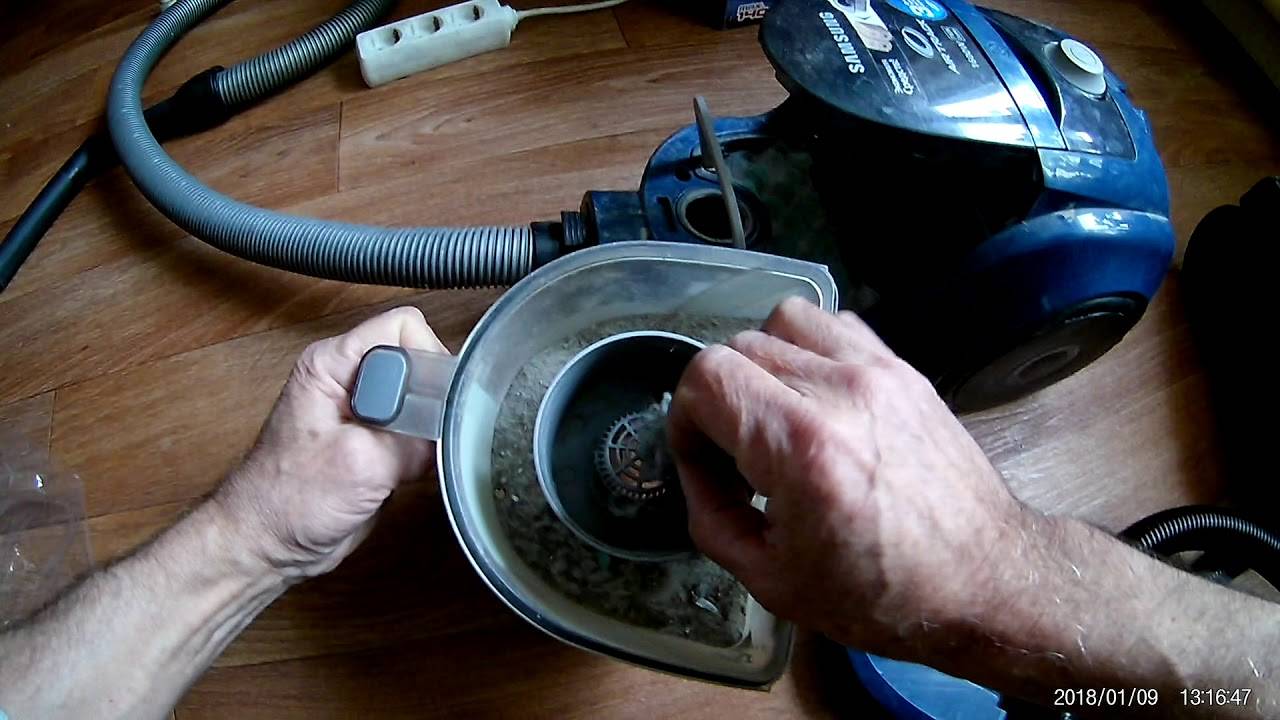
When using a Samsung vacuum cleaner with clogged filters, dust is not sucked in. A few minutes after it starts (from 1 to 15), the power is automatically reduced. In this case, in the presence of protective automation, the emergency thermostat will turn it off, and in its absence, the device will burn out. Typical signs of clogged vacuum cleaner filters are the appearance of poor traction, a strong hum and heating. Before proceeding with the disassembly of the device, all filters should be checked, if necessary, they should be replaced or cleaned (certain types need to be washed) and refilled.
If you cannot remove the dirt, you need to remove these elements and turn on the vacuum cleaner without them to make sure that the suction power is normal. If it is small, you will need to clean the impeller from accumulated small debris, and then check the condition of the turbo brush and engine manifold. Unsuitable brushes must be replaced, and the commutator will need to be cleaned with fine N0 or N00 sandpaper.
If the vacuum cleaner is used for a long time, the fuse may blow, and the device will not turn on. In this case, it should be inspected and replaced before start-up.The next common failure is a break in the network wire. The vacuum cleaner will not work if it has a faulty switch. To identify this defect, you will need an ordinary wire continuity tester to determine the location of its break. First you need to make sure that the temperature sensor did not work in the vacuum cleaner, which could forcibly turn off the power to the engine. You can eliminate such a malfunction with a soldering iron in a few minutes. The vacuum cleaner will cool down and turn on automatically.
If at the time of operation the device begins to vibrate, make unpleasant cutting sounds, rattle, this means that the bearings should be lubricated or replaced with new ones. Such signs indicate wear of parts.
Also, the power wire may not be retracted. This is due to the weakening of the spring in the winding drum or the tightening of the cord. To fix the problem, you need to remove the drum, inspect it and solve the problem by rewinding the cord. If the pressure roller does not work, it is necessary to contact a specialist. The vacuum cleaner is assembled in the reverse order.
The main causes of failure
Do-it-yourself mixer repair will not take much time if you correctly determine the cause of the malfunction. Any device will eventually fail. The mixer is no exception.
It can break due to wear of the components. The lower the quality of the materials, the shorter the service life of the components and the more often you have to repair the faucet in the bathroom. How to repair a faucet in the bathroom with your own hands?
1. Leakage from under the lever
Usually caused failure of the cartridge in a single-lever mixer. The following signs will indicate that the cartridge is out of order:
- the handle is difficult to rotate;
- the water supply is not completely shut off;
- the water temperature changes arbitrarily;
- cold water flows from a hot faucet, and vice versa.
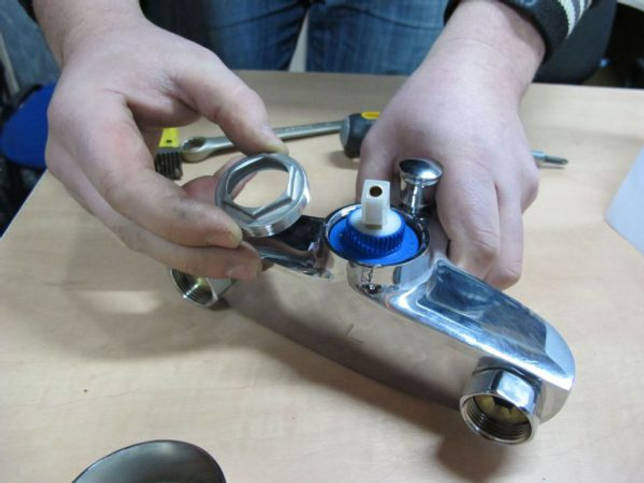
Cartridge replacement
To replace the ceramic cartridge:
- remove the plug, painted blue-red;
- unscrew the fixing screw with a Phillips screwdriver or a hex wrench;
- pulling the handle up, disconnect it from the body, after which the cover is unscrewed;
- with an adjustable wrench, unscrew the nut that fixes the cartridge in the housing;
- replace the damaged cartridge.
2. Valve leakage
In two-valve mixers, the sealing washer often wears out. Sometimes the crane box becomes unusable. Such breakdowns lead to leakage. To replace the faucet box or rubber ring:
- remove the plug from the faulty valve;
- unscrew the screw securing the valve to the mixer;
- with an adjustable wrench, disconnect the crane box;
- replace the crane box or ring.

Crane box replacement
3. Leaking shower diverter
Before repairing the bathroom faucet switch, be sure to turn off the water in the room. A leak from under the switch indicates that the gland between the repaired mixer and the switch has become inoperative. To replace it:
- remove the button by clamping the stem with pliers;
- remove the valve with the stem;
- pull out the damaged seal.
Switch button replacement
4. Broken shower switch button
If, after water procedures, the button cannot be returned to its original position, then its spring has broken. In this case, the switch is disassembled according to the algorithm described above, the faulty spring is taken out and a new one is put in its place.


Sometimes the shower switch does not work, and water flows into the shower head and faucet at the same time. This is due to a crack in the stuffing box, which is located on the stem.To fix this problem, you need:
- remove switch;
- get a stock;
- replace the damaged seal.

Button switch
Many apartments still use the old cork switches. Over time, the button moves away from the body, resulting in a leak. To eliminate it you need:
- disconnect the screw;
- remove the handle;
- unscrew the nut;
- remove the lock washer;
- get a cork;
- wipe the cork and the inside of the case with kerosene;
- to grind the cork to the body, use abrasive paste, paraffin or petroleum jelly.
In spool switches, the gasket may wear out. To replace it, you should:
- disconnect the hose;
- remove the spout;
- unscrew the adapter;
- unscrew the valve;
- get the gold plate;
- replace rubber rings.
The repaired button will last a few more years.
5. Hose leak
Over time, the gasket at the attachment point of the hose to the faucet wears out. A leak is formed. The easiest way to fix such a breakdown: you just need to unscrew the nut of the shower hose, remove the damaged washer and insert a new one in its place.
6. Leak between watering can and hose
To eliminate this malfunction in a mixer that has broken down, it is also not necessary to use tools. It is only necessary to unscrew the nut that secures the watering can to the hose and replace the insulating gasket.
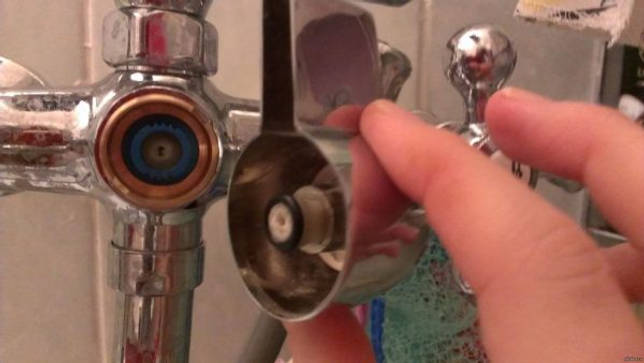
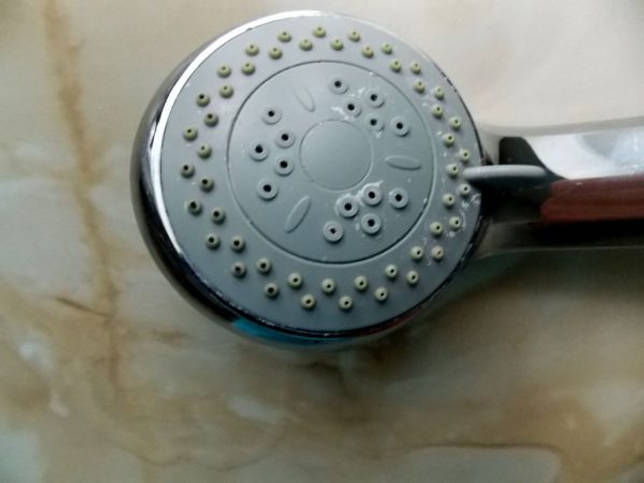
7. Blockage in the watering can
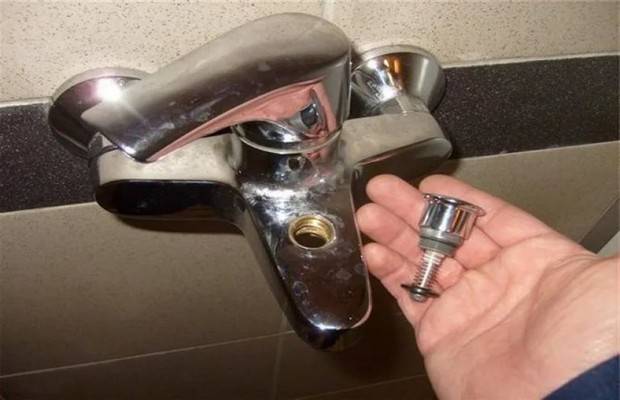
When troubleshooting bathroom faucets, the repair is not limited to replacing gaskets and cartridges. With prolonged use, the holes in the shower head become clogged with sand, limestone and other hard deposits.
In order for the shower to work as expected again, the mesh must be disassembled and washed. In some models, the screw is located under a plastic cap in the center of the watering can.Sometimes, in order to disassemble the grid, it is necessary to turn it counterclockwise.
8. Weak pressure in the mixer
An aerator is attached to the end of the spout. It retains solids and increases water pressure. If the water flows in a thin stream, the reason lies in the blockage of the filter. To clean it, unscrew it with pliers, carefully disassemble it into its component parts and rinse them under running water.


