- We dismantle the tank
- How to change installation
- The main malfunctions of the toilet bowl
- Crack repair
- Cuff replacement
- Removing blockages
- The tank fills up with water
- Troubleshooting the "two-button" tank
- How to repair the installation with your own hands
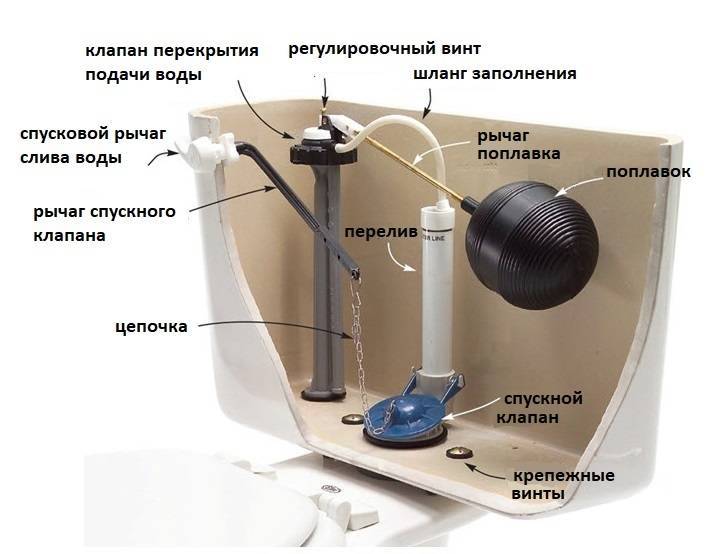
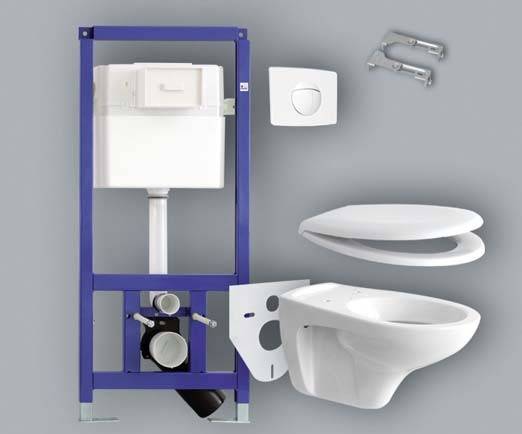
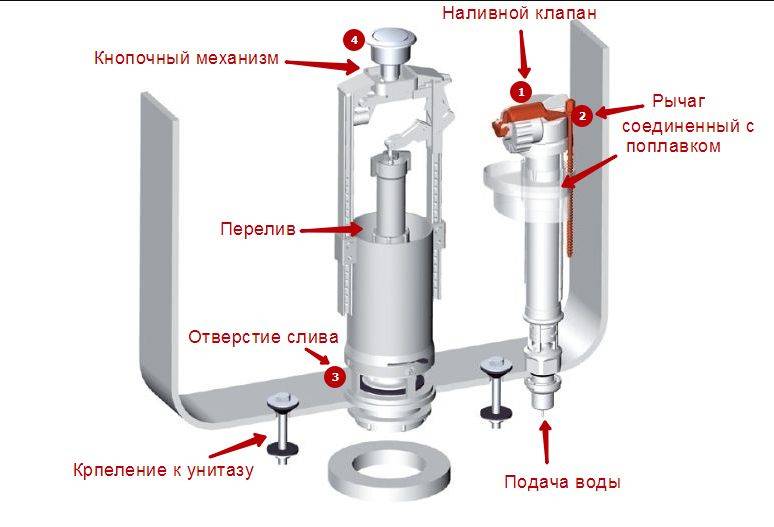
- Tank
- Frame
- Toilet
- How to disassemble the installation of the toilet
- The main malfunctions of the drain tank
- water leak
- Button not working
- Leak at the bottom of the tank
- The most common toilet cistern breakdowns and troubleshooting methods
- Abnormal tank operation
- Slow water flow
- Water continuously flows into the bowl
- Water flows continuously into the tank
- Button doesn't work
- Hull leak, piping
- Node repair
- Revision of the filler mechanism
- Drain Valve Prevention
- Conclusions and useful video on the topic
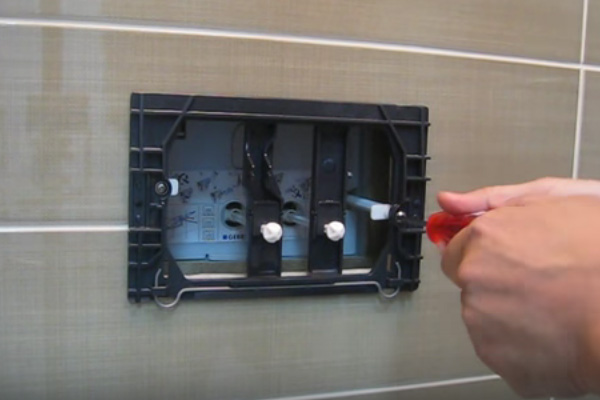
We dismantle the tank
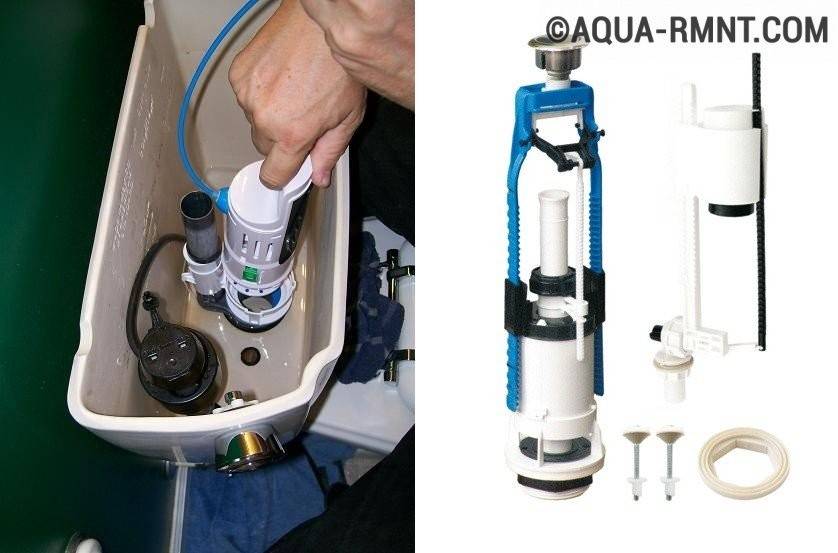
The old drain fittings of the tank cannot be replaced with a new one without completely dismantling the tank. Before starting work, it is necessary to shut off the water supply - if there is no shut-off valve on the supply to the tank, the cold water supply to the entire branch is shut off.
Next, water is drained from the tank. Using the keys, the side or bottom supply hose is removed, depending on the design of the tank.
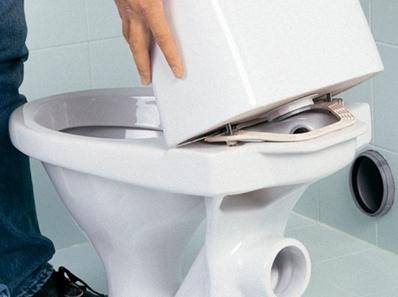
The tank needs to be disconnected from the toilet bowl.It is fixed with two bolts, the nuts are located on the underside of the back shelf of the bowl. To unscrew them, you will need an adjustable wrench or open-end wrench. It is first recommended to lay a rag on the floor or substitute a container - the water remaining at the bottom of the tank will certainly pour out when the fasteners are removed.
If the tank was installed many years ago and the nuts are tightly rusted, the bolts are simply cut through - the hacksaw blade moves freely in the gap between the tank and the shelf of the bowl.
Mounting nuts are located on the underside of the toilet shelf
After unscrewing the nuts and removing the bolts, the tank is carefully removed from the toilet. Discard the old deformed rubber or polymer seal. Even if it has retained its elasticity, there is no guarantee that it will be able to seal the joint when reused.
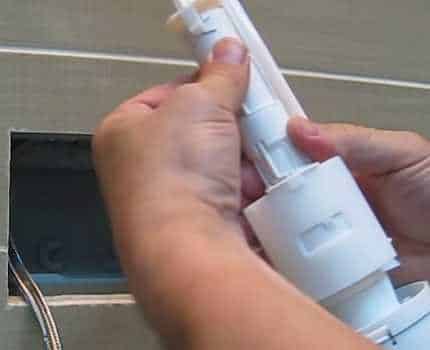
The tank is placed on a flat surface. Unscrew the large plastic nut located on the side of the drain hole - it fixes the flushing mechanism. Also dismantle the water supply device on the side or bottom of the tank.
The container is inspected from all sides for cracks and chips. The inner surface is cleaned of accumulated sediment, rust particles. It is recommended to thoroughly rinse the tank from the inside so that when installing new fittings, solid particles do not get under the seals - they can break the tightness of the joints and cause a leak.
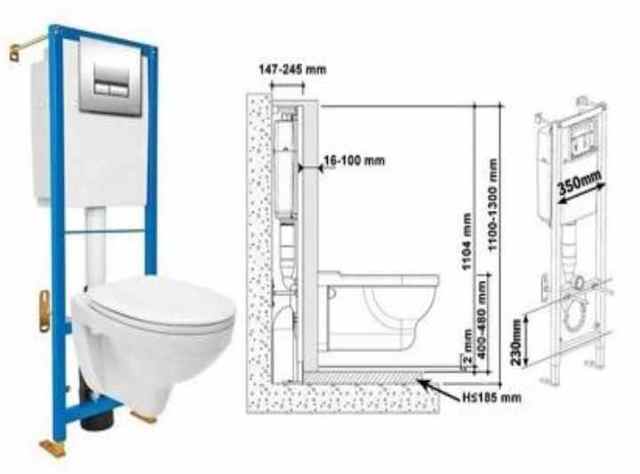
How to change installation
Manufacturers produce block and frame installations. The former are mounted in niches, the latter are mounted on walls or installed near thin partitions. In both types, drain tanks, inside of which fittings for draining and collecting water, are made of plastic.
Replacing the installation is necessary if:
- There is a crack in the tank. This is due to errors made during installation. Even with a slight distortion, the plastic begins to gradually crack. Repair with sealant is useless, you will have to change the container.
- During installation, an accidental blow was dealt to the tank. In this place, over time, a crack will appear.
- During operation, parts have worn out so much that repairs have to be done too often.
Before replacing, it is useful to study the instructions with the attached installation diagram. Installation is carried out in the following order:
- If the frame remains the same, check its position. If necessary, adjust with brackets and screws.
- The tank is installed in such a way that the distance from the button to the floor is one meter.
- The container is connected to the water supply with plastic pipes. Flexible hoses are not recommended, as they have a short service life.
- The drain hole of the tank is connected to the toilet.
- To check the tightness of the connections, open the water supply.
- The installation is closed with moisture-resistant drywall, the sheets of which are attached to the frame with self-tapping screws.
- Finishing is done in accordance with the design of the room.
Life without a toilet can hardly be called comfortable. Therefore, in order not to waste time searching for failed components during repairs, you need to acquire a spare set of spare parts in advance.
Watch related videos:
The main malfunctions of the toilet bowl
Do-it-yourself toilet repair can be done if:
- a small crack has formed on the bowl;
- the cuff connecting the device to the sewer has worn out;
- the toilet is clogged.
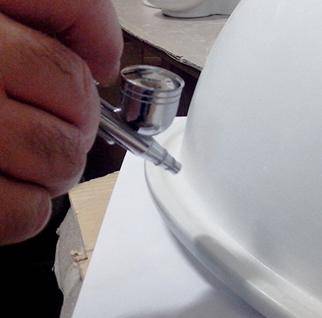
Crack repair
A crack in the toilet can be formed as a result of:
- mechanical impact on the toilet bowl;
- flushing hot liquid down the toilet.
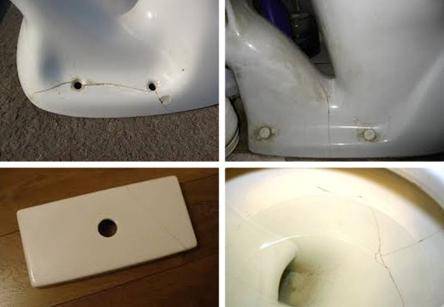
Minor damage to various parts of the toilet bowl
If a crack has formed in the upper part of the bowl or in the place of its attachment, then the malfunction can be eliminated. If there is a crack in the lower part, a complete replacement of the plumbing product will be required.
To fix the crack you will need:
- drill with a small drill;
- sandpaper;
- Sander;
- any solvent;
- epoxy resin or other similar adhesive.
Repair is carried out in the following order:
- the ends of the crack are carefully drilled to prevent further divergence. Drilling the bowl must be extremely careful to prevent damage. If the toilet cracked during the work, then it will need to be replaced;
- along the entire length, the crack is cleaned;
- the surface is degreased;
- the prepared surface is filled with resin and left to dry completely;
- the resulting seam is polished.
Cracked toilet bowl repair
Cracks formed on the drain tank are repaired in a similar way. Repair of the tank lid is most often not carried out, since the low cost of products allows a complete replacement of the cracked surface.
Cuff replacement
If a puddle forms under the toilet, then the reason lies in the wear of the rubber cuff, which is a seal between the toilet drain and the sewer pipe.

Toilet leak due to sewer cuff
The cuff is replaced as follows:
- dismantling of the old gasket. To do this, you can use an ordinary knife;
- the surfaces of the pipe and the sewer inlet are cleaned of contaminants;
- all surfaces are treated with sealant for a better fit of the new gasket;
- a new cuff is inserted into the sewer hole and then put on the toilet drain. For strength, the joints can be additionally treated with silicone sealant.

Replacing the sewer cuff on the toilet
The described method is suitable for toilet bowls with oblique and horizontal outlet. If the toilet is leaking with a release to the floor, then to replace the cuff, a preliminary dismantling of the plumbing is required.


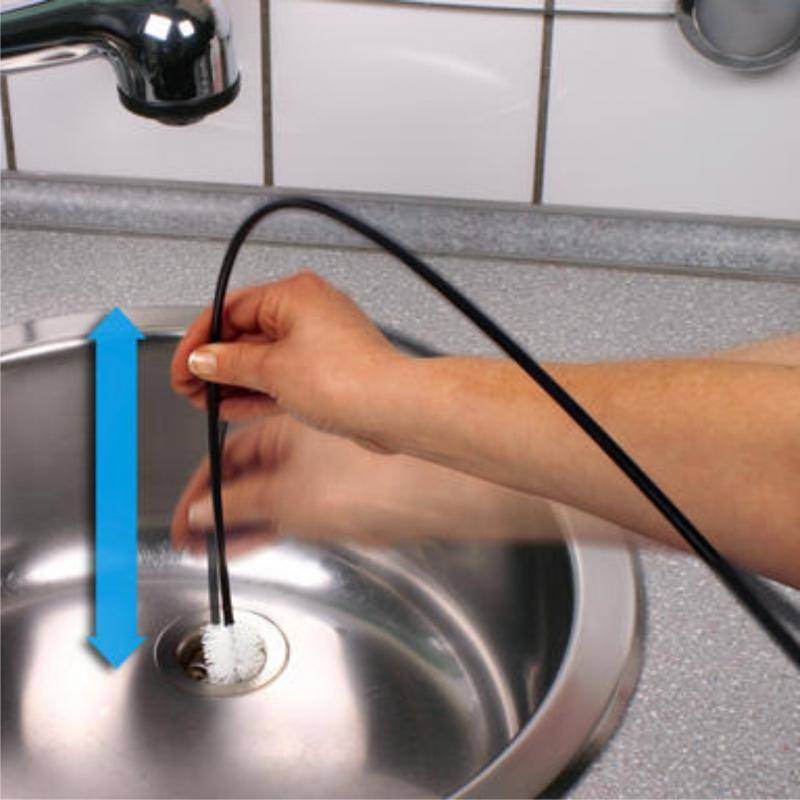
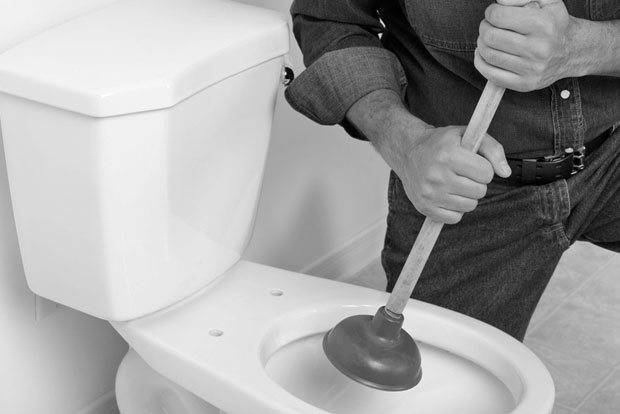
Removing blockages
The reason for the slow draining of water from the toilet bowl is a blockage.

Clogged toilet drain
To help you deal with the problem:
- various chemicals, for example, Tiret turbo;
- plunger;
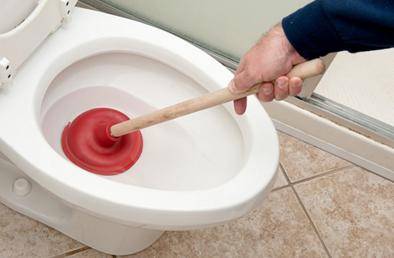
Removing clogs with a plunger
- plumbing cable.
Removing blockages with a plumbing cable
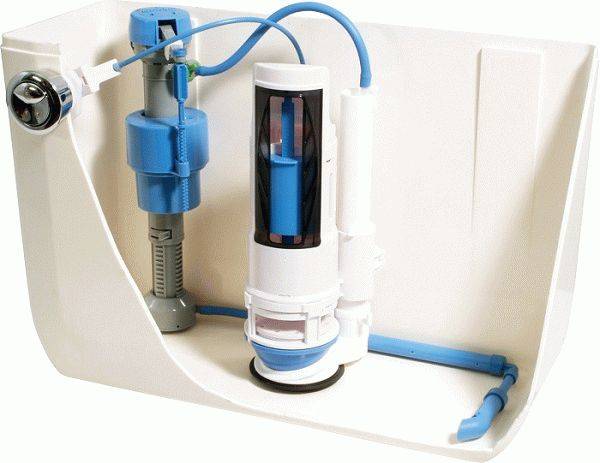
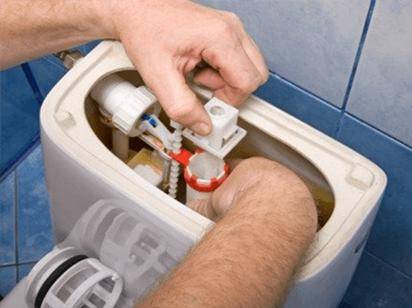
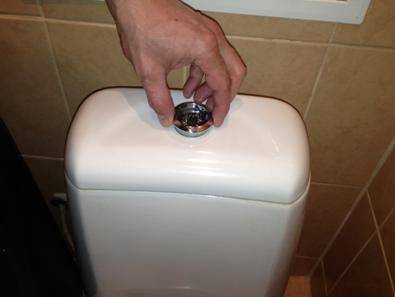
The tank fills up with water
The malfunction lies in the fact that the float lever has shifted or warped. The fix is quite simple: lower it below the incoming water pipe (not lower than 2.5 cm). And thoroughly fix all the fasteners.
If the float in the drain tank is on a plastic lever, then adjust it by tightening or loosening the screw. Or, in some models, the setting is done using a plastic ratchet.
The hole in the plastic valve that the pin enters is also subject to wear. In the process of work, for example, it can become oval. This damage is beyond repair. Plumbers are advised to remove the valve in order to present it in the store and buy an identical one.
Perhaps because of the float, the drain tank does not hold water. How to repair it? If it has become heavier due to the water accumulated in it, it must be drained, dried and the cracks or crevices that have appeared should be treated with a sealant.After repair, the part is put in place. This is a temporary fix. Ideally, the float should be replaced.
Troubleshooting the "two-button" tank
Currently, in order to save water, modern models of tanks are equipped with fittings that have two drain modes - economical, full. At the same time, each of the buttons is equipped with a separate drive to the drain valve.
Consider the most common problems with two-button drain fittings.
- Button drop. To fix this problem, you need to remove the cover of the device, set the button to its original position.
- Separation of the lever mechanism of the buttons. Namely, after pressing the device, there is no water drain. To eliminate the breakdown, it is necessary to install the reinforcement parts with hooks to their original position.
- Constant outflow of water. In this case, the membrane needs to be replaced.
- Leakage at the junction of the cistern, toilet bowl. The cause of the defect is the wear of the sealing gasket. To fix the problem, you need to replace it. First of all, you should disconnect the resource supply pipe from the drain system, and also remove the fixing screws. Next, the old gasket must be replaced with a new one. In this case, the dimensions of the connecting elements must completely match.
Remember, in order to avoid aggravating the breakdown of the toilet drain system, it is necessary to eliminate the problem as soon as possible.
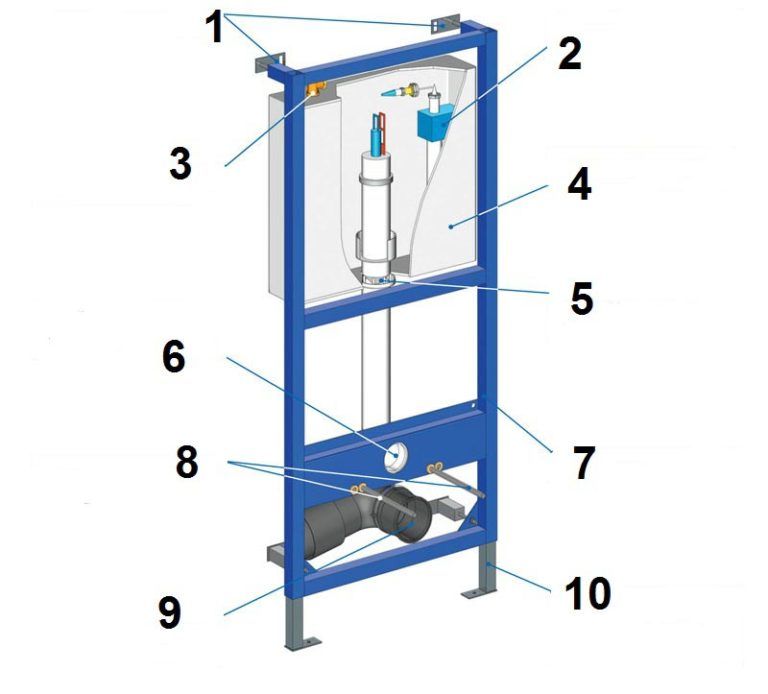
How to repair the installation with your own hands
Knowing the causes of the breakdown, you can successfully carry out repairs. As in the case of identifying problems, we will consider separately how to restore the health of each installation system.
Tank
one.A cracked tank requires replacement, for which it is necessary to disassemble the false wall. It is expensive and time-consuming - you have to pay for inattention.
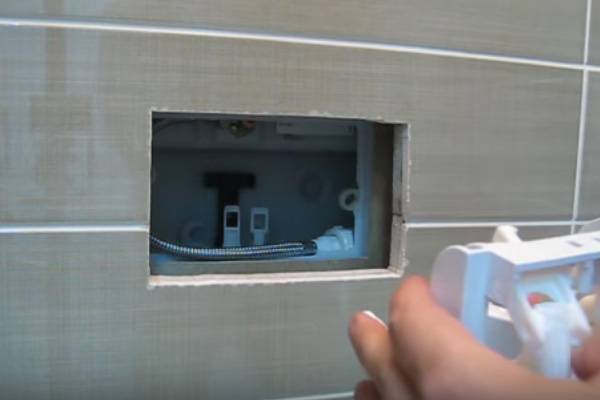
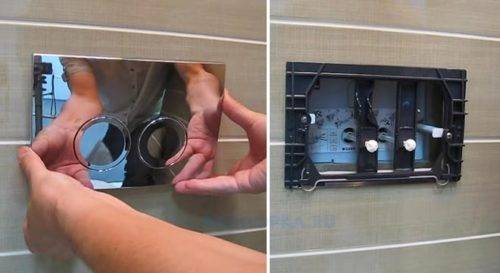
2. Reinforcement repair. Here, you first need to access the revision window. To do this, you need to know how to remove the installation button for the toilet. The work is carried out in several stages:
the panel with the key is removed. To do this, it is squeezed upwards from below, and then, by moving towards itself, it is released from the upper latches;
- pusher clamps are removed;
- pushers get out of the rocker;

the protective frame is removed - the hardware is unscrewed from the remote rods;

- remote rods are removed;
- the barrier is removed.
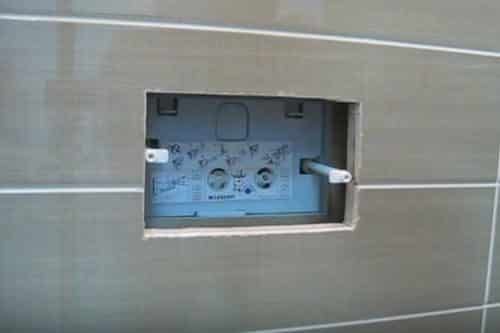
The window has become available, you can repair failed nodes. But do not rush to do it. It remains to perform a few mandatory operations. Dismantling continues by shutting off the water (a tap is twisted in the wall of the tank) and lowering its remains into the toilet. If you skip these operations, there will be a flood. Then the filling valve is removed from the latches, after which the rocker arm is removed. The next one gets the filling block.


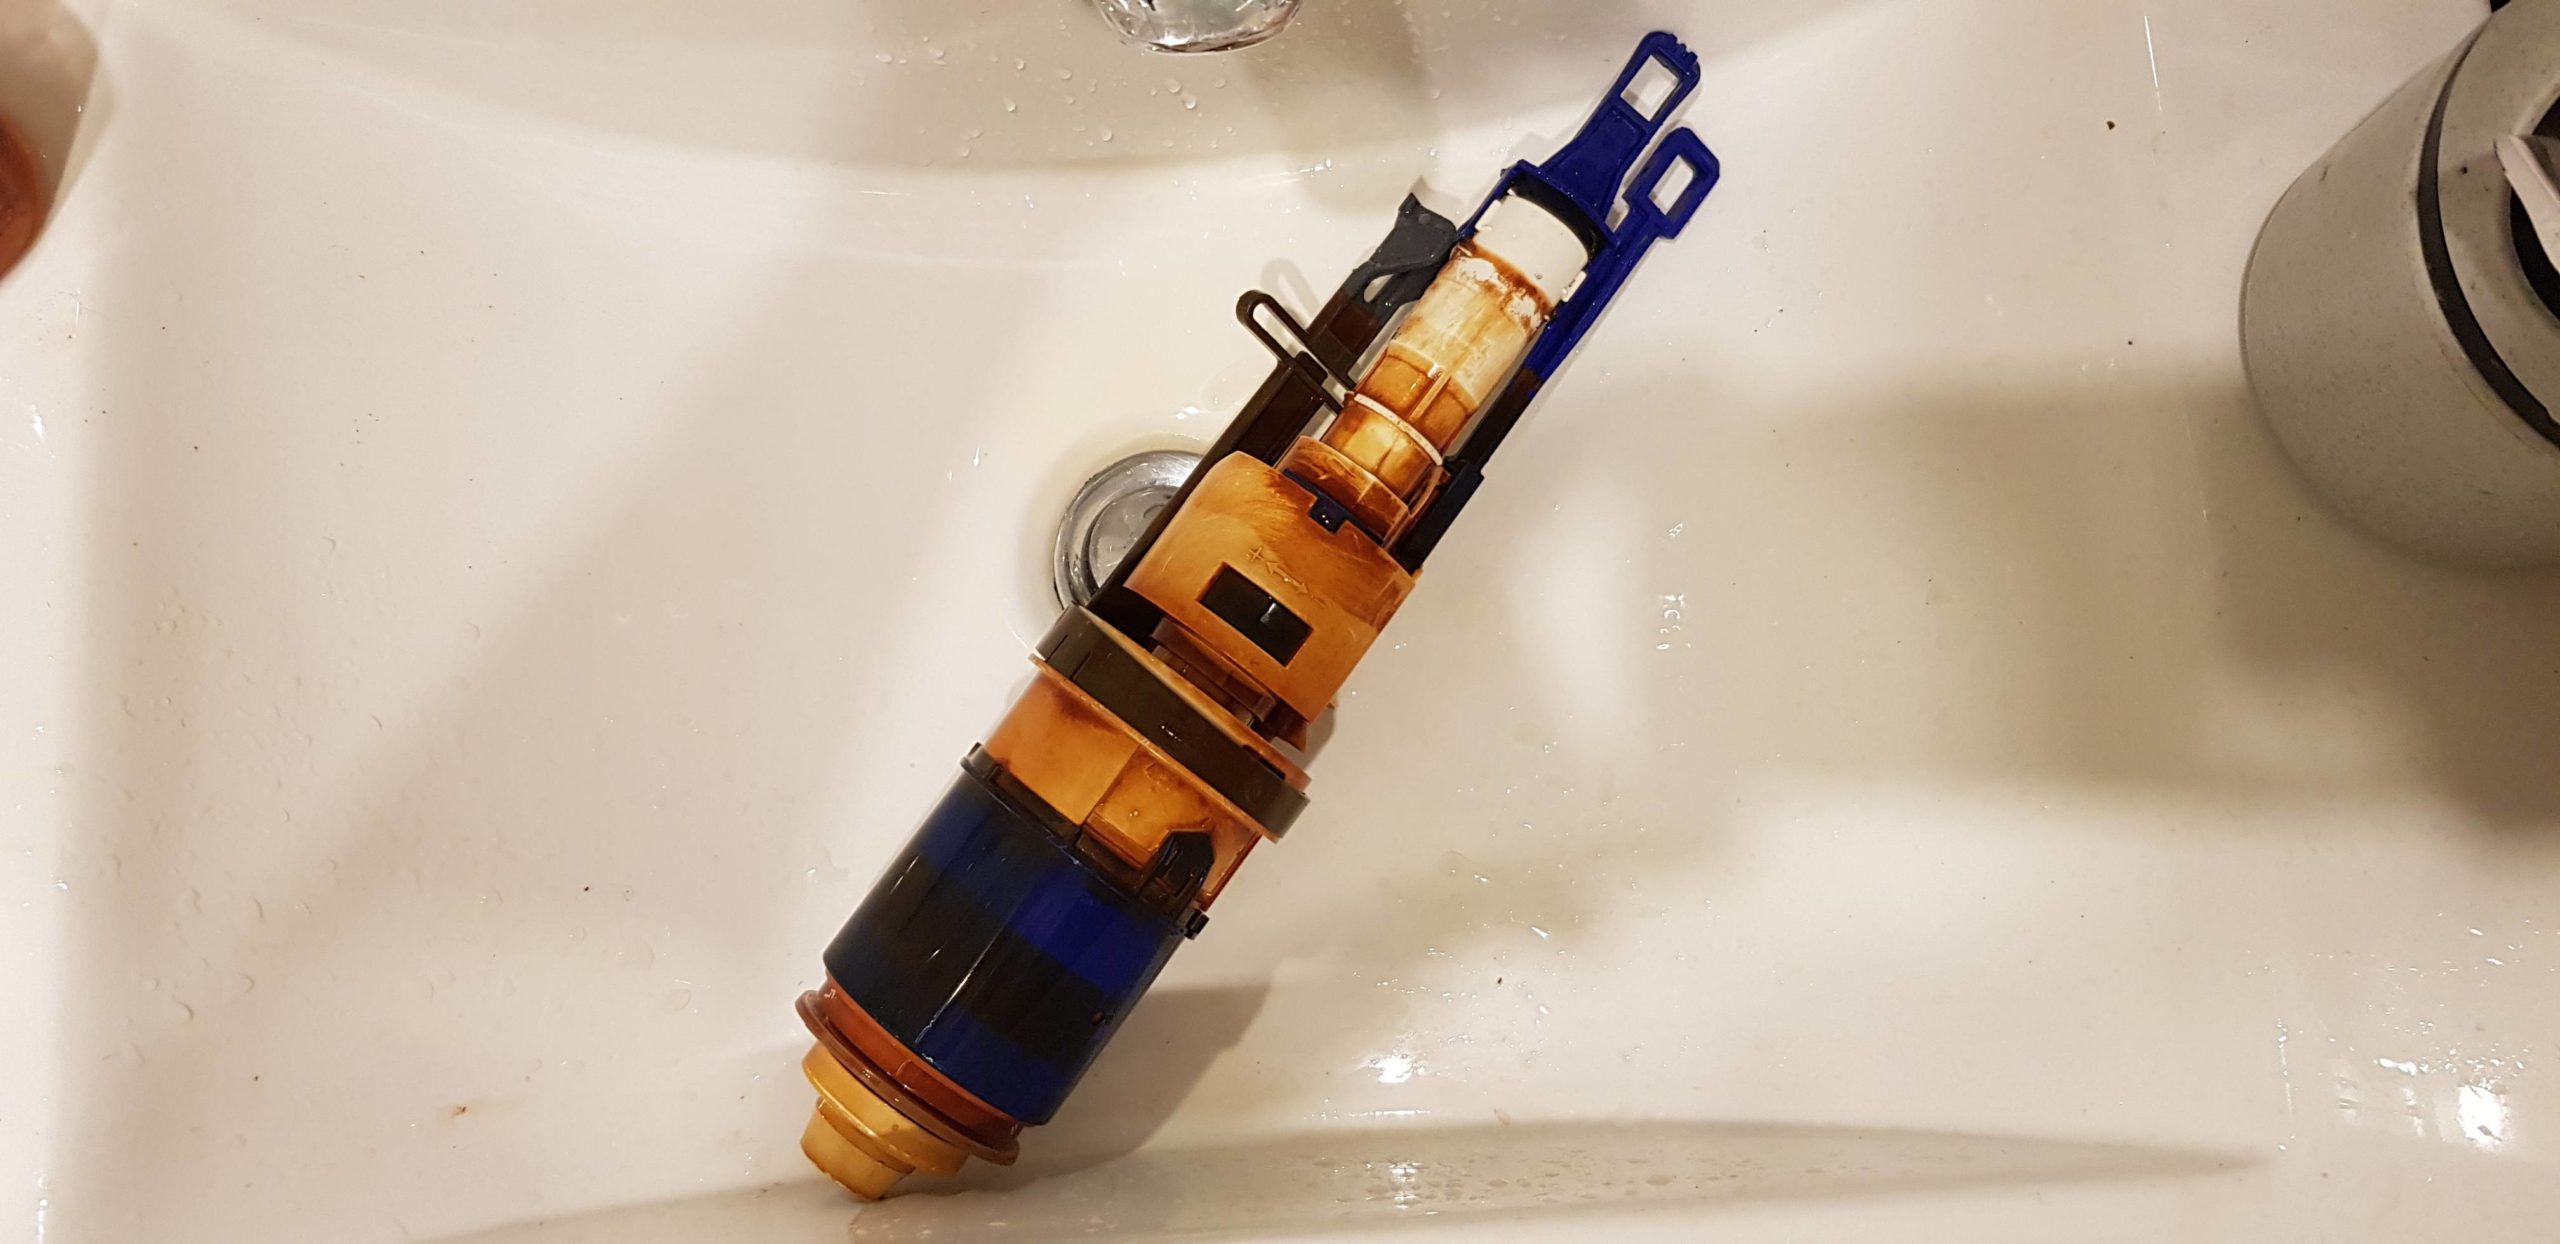
Next, you need to remove the drain assembly. Its length does not allow performing the operation in one step. Therefore, the retainer is first removed, then the upper part of the valve is separated by turning. At the same time, the second thrust remained in place and interferes. We drop it down. The valve is significantly shortened - you can pull it out.
There is nothing complicated in the instructions on how to disassemble the installation. As a result of simple manipulations, all fittings were dismantled and became available for any type of repair.
Elimination of permanent leakage. If water overflows through the siphon, the inlet valve is to blame. It needs to be washed or replaced.To get the valve, you need to snap off the top cover, or unscrew it (different manufacturers have different mounting systems).
After removing the valve, it is washed under running tap water. It is advisable to wash the cover at the same time. The fittings are assembled in the reverse order. If the leak does not stop, the filling unit must be replaced. You can only replace the gasket, but there is one caveat: if the valve repair kit was not purchased along with the installation, it is almost impossible to find spare parts later. Only ready knots.
If the valve does not fit snugly against the drain hole, it is changed if there is visible damage. With a working valve, you will have to change the entire assembly - it is impossible to repair the deformed elements of the drain block.
Water flows into the tank continuously. Repair is reduced to the replacement of the filling unit. You can replace the parts yourself, but it is almost impossible to find the necessary spare parts for sale - Western companies do not produce them. Only repair kits or assemblies in assembled form.
No water enters the tank. The coarse and fine filters are removed and washed with a toothbrush under cold water. If possible, it is better to replace them.
Drain button does not work. The drain button is disassembled and then reassembled. This is basically enough. In the event of a mechanical breakdown of the mechanism, which happens extremely rarely, you will have to buy a complete inspection window - it is impossible to find a part even theoretically.
Frame
The most unpleasant situation occurs when the frame breaks. You will have to disassemble the protective screen and dismantle the installation. You only need to buy a frame. All other design elements are interchangeable.
Toilet
Mechanical damage cannot be repaired. The toilet needs to be changed.A small consolation is that if there are no major leaks during the flush, the cracks can be sealed. And then the owners decide whether to use a disfigured plumbing fixture or buy a new one.
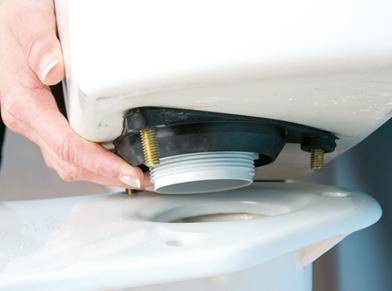
Leaks of water around the bowl must be removed. For this, there is no need to carefully study how to remove the toilet from the installation. It is enough to unscrew the nuts and remove the bowl from the studs. After that, replace the cuffs, clean the faience pipes from the old sealant, coat the joints with a new sealant, preferably silicone, and put the toilet in place.
How to disassemble the installation of the toilet
For repair or maintenance, you do not need to disassemble the wall. To get to the details of the toilet installation, disassembly is carried out in the following sequence:
- By pressing the bottom of the button, move it upwards to remove it from the mounts.
- To remove the frame from the sides, the bolts are unscrewed, after removing the clamps, plastic pushers are taken out.
- Disassemble the brackets to which the button is attached.
- The partition is removed after pressing the latches.
- Shut off the water.
- After dismantling the filling valve, the rocker arms are removed.
- When you press a pair of petals in the upper part, the drain valve is released from the latches.
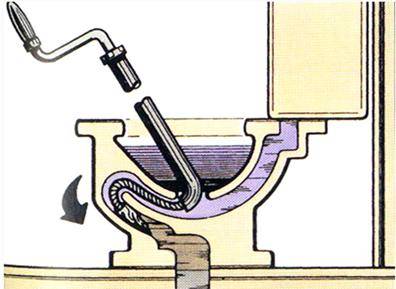
- Due to the large size, it will not be possible to get it through the revision window. Therefore, the drain assembly is disassembled on site. Unscrew the upper part, followed by bending the second rod.
After dismantling, the parts are washed with running water, the condition is assessed. Faulty and worn components are replaced. After completion of the repair, the assembly is carried out in the reverse order.
The main malfunctions of the drain tank
Now let's look at how to identify the problem and what to do if the toilet cistern is broken. Typical faults:
- water enters the tank constantly;
- water is continuously drained into the toilet bowl;
- the button responsible for flushing the water does not work;
- leaking at the bottom of the tank.
water leak
The reasons for the continuous flow of water into the tank and toilet can be:
- drain valve malfunction;
- check valve failure.
To fix these problems, you need to purchase a toilet repair kit or replace the cistern fittings. If a drain valve malfunction is detected, the following actions must be taken:
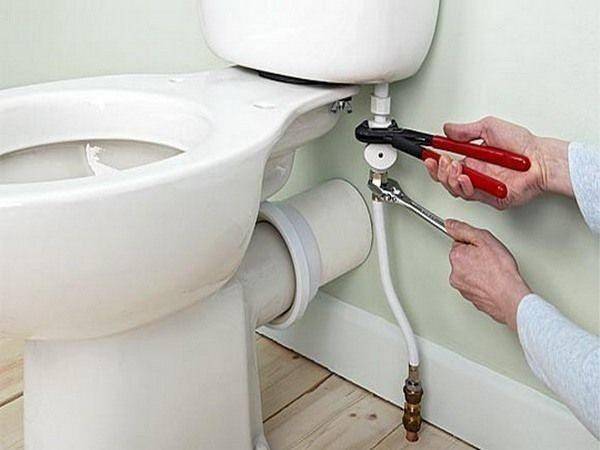
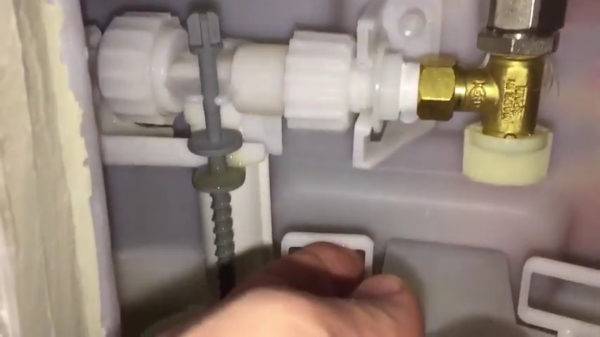
- First of all, you need to block the flow of water into the tank. Most often, a separate faucet is installed on the toilet, which allows you to turn off the water exclusively on the sanitary ware. If there is no such tap, then you will have to turn off the water throughout the apartment;
Water supply connected to an individual faucet
- remove water from the container. The bulk of the water is removed by pressing a button. The rest needs to be soaked with a rag;
- detach the tank from the toilet. To fix the tank, bolts located at the bottom of the tank are used;
Disconnecting the drain from the toilet
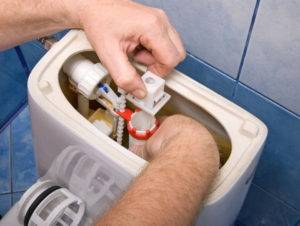
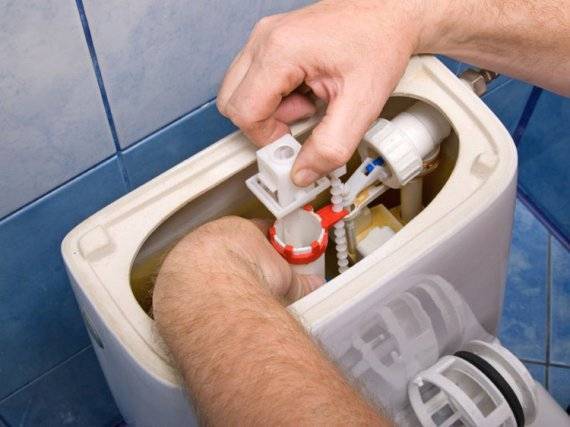
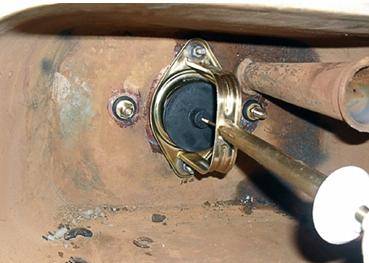
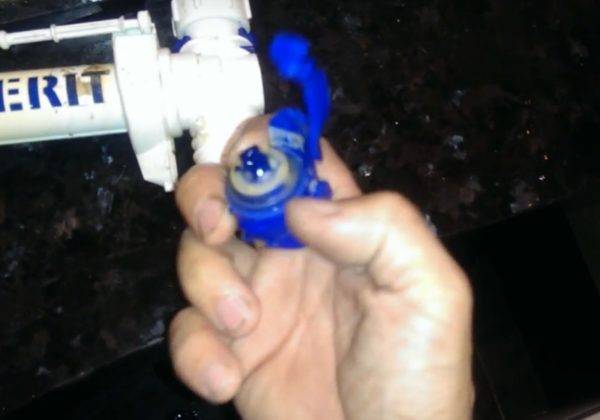
- disconnect the drain valve. To do this, unscrew the nut located under the gasket and loosen the clamp connecting the drain and fill valves;
Removing the old drain valve
- in some cases the valve can be repaired. To do this, it is necessary to replace all gaskets and clean the device from dirt. However, repair does not always help. With a low cost of the device, repairs are resorted to only in exceptional cases;
- clean the installation site of the device from dirt and rust.For this purpose, you can use any chemical means that can cope with the problem;
- install the new valve in the reverse order;
At the junction of the device and the container, the installation of an o-ring is required, both from the inside and outside of the tank.
- fix the tank and connect the water supply.
If during the inspection a problem is found with the shut-off valve, then it is replaced in the same way. You can watch the video for details on replacing the tank fittings.


Button not working
Repair of the toilet button consists in replacing the rod connecting the button with the flush mechanism. Traction can be:
in the form of a wire;
Fittings with wire pull of the drain button
in the form of a plastic tube.
Tubular push button
You can make a replacement as follows:
- removing the toilet lid. To carry out the procedure, you need to carefully unscrew the button;
Removing the lid from the toilet bowl
- button removal. To disconnect the button from the drain valve, it is necessary to remove the rod holding the device;
- disconnecting the rod from the button;
- installation of new traction;
- drain tank assembly.
In most cases, this procedure is not performed, since it is rather difficult to purchase button elements separately. Most often, the button is replaced entirely.
Leak at the bottom of the tank
A leak at the bottom of the tank can form due to the following problems:
shift or wear of the gasket installed between the tank and the toilet bowl. To fix the problem, you need to remove the tank and install a new rubber gasket;
Seal between cistern and toilet
wear of the gaskets installed on the connecting bolts.
To fix a leak at the location of the fixing bolts, you must:
- turn off the water supply to the plumbing device;
- drain water from the container;
- disconnect the tank from the toilet;
- replace the sealing rings located inside the tank;
- install the container in its original place;
- connect water supply.
Gaskets for cistern fixing bolts
Thus, based on the instructions presented, you can eliminate all the malfunctions of the toilet bowl yourself.
The most common toilet cistern breakdowns and troubleshooting methods
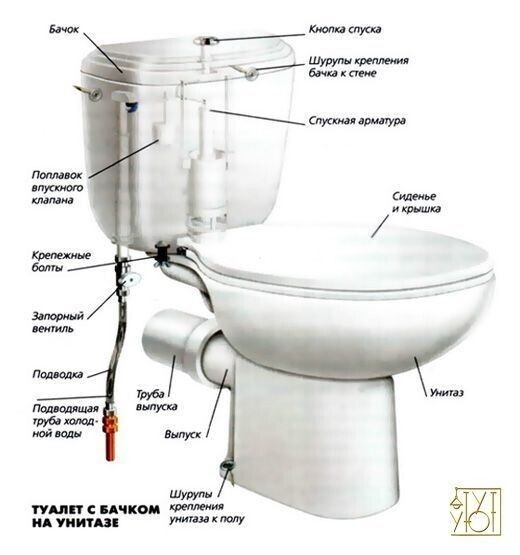
 The main malfunctions that occur during the long-term operation of the toilet, as a rule, are associated with the flush tank. Before proceeding with the restoration of the mechanism, it is necessary to study in detail its device, which implies the presence of drain and water collection systems.
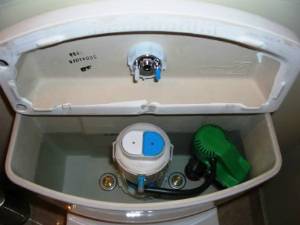
The principle of operation of the device is as follows: after pressing the button located on the toilet bowl, the drain hole closes and water is collected. The filling level of the mechanism is controlled by a float, which rises as the liquid in the system increases. After reaching the maximum allowable mark, the piston closes the inlet pipe, as a result, the filling of the structure with water stops.
Abnormal tank operation
European companies provide a guarantee of 3-5 years for valves and a tank, 10 years for bearing elements of wall-mounted plumbing. The almost non-failure operation of the system directly depends on the preparation of water.
Often, well-known brands produced by Chinese factories are of mediocre quality, failures occur after months of service. Here are some typical problems:
- The container does not fill or fills longer than usual.
- Constant leakage into the bowl.
- The tank filling does not stop.
- The key does not work.
- Leaks in the hull and/or inlet fittings.
Let us describe the probable causes of these situations.
Slow water flow
May be due to clogging of the inlet filter or the built-in safety net of the filling mechanism (if any). Salt deposits, rust, dirt prevent the filling valve from opening completely, up to blocking.


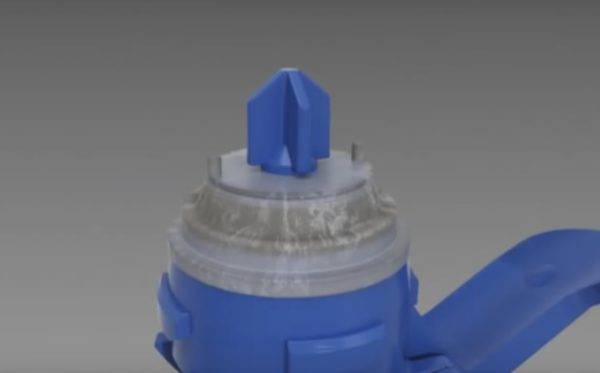
 Filler membrane yellowed from calcium deposits.
Turn off the cold water valve in the bathroom. Unscrew the cover of the brass filter, remove the mesh element, clean it with an unusable toothbrush. Rinse with a flowing jet, assemble back. If, after opening the tap, the filling time has not changed, you will have to remove the filling mechanism, we will analyze the procedure in detail below.
Sufficient protection for the filling, draining mechanism is a two-stage battery with polypropylene cartridges with a filtration rating of 40, 10 microns. Against scale, a softening module with a replaceable cassette or poured polyphosphate salt is suitable. Coarse filter with stainless mesh 100 - 500 microns - required.
Water continuously flows into the bowl
“Sick”, as a rule, the bottom valve, the cuff of which has lost its elasticity, has defects, does not fit tightly on the seat due to contamination. Try to lower the tank several times in a row, sometimes it is possible to wash off the particles that interfered with the closure, otherwise “surgical intervention” is necessary with the disassembly of the assembly.
It may leak due to a lowered emergency overflow tube, raising which eliminates the problem. If the tube is at the top, move the float lower, thereby slightly lowering the filling level.More often, the tank overflows due to the “fault” of the filler valve that did not close the supply, it needs to be dismantled and revised.
Water flows continuously into the tank
The flow is not blocked even at the extreme upper position of the float. The reason is the inlet valve is clogged. At a minimum, you will have to remove the control key, the mounting box, the partition in order to get close to the fittings. It is recommended to remove the entire filling mechanism for inspection, flushing, and possible replacement of the gasket.
Button doesn't work
Failure of the mechanical key occurs when the connection with the drain valve is broken, for example, one of the links is broken off or wedged: pusher, rocker, drain rods. Having restored the interaction of the parts, they check the work, the jamming parts will have to be replaced. How to remove the control button will be discussed below.
 Check the opening of the bottom valve by pulling up the rods.
At the pneumatic key, it happens that it jumps off, the impulse tube is loose or torn. If the corrected tube dangles, cut off the stretched end section, after making sure that the length is sufficient, otherwise the hose is replaced. A defective pneumatic unit is not subject to amateur repair.
Hull leak, piping
The most dangerous phenomenon, given the hidden nature, flooded neighbors can report trouble. Unfortunately, the crack permanently disables the tank. Craftsmen are trying to fix the container by gluing a strip of reinforced fiber with an epoxy overlay, but the reliability of the method is questionable.
The main guarantee of "long life" is the accurate installation of the frame with level control, fastening according to markings according to company drawings. The absence of distortions will protect the plastic from increased stresses.
Be careful with the puncher so as not to inadvertently hook the body
Fittings begin to leak over old gaskets, loose connections. Tightening by hand is generally accepted, the key is used only for metal hexagons. Hardened, crumpled O-rings are replaced with new ones. Joints with gaskets are assembled without the use of silicone!
Node repair
The fittings for automatic filling and emptying have a complex structure. Home prevention includes:
- Inspection to check the integrity of the connections, detect wear of the movable contact surfaces.
- Cleaning of debris, rust, limescale.
- Replacement of polymer cuffs, seals that have lost their elasticity, deformed, damaged.
- Replacement of worn, broken plastic elements.
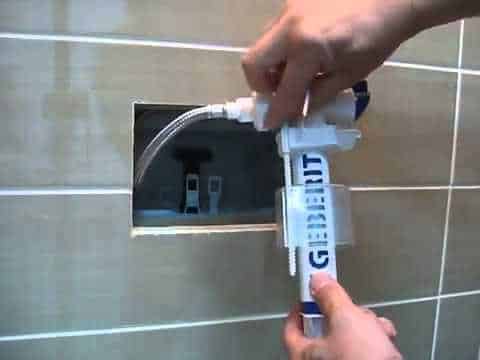
The last point is difficult to implement. The Geberit, Grohe, Cersanit documentation contains the article numbers for each spare part, but it is not always possible to find parts for sale. Some spare parts are supplied only in a set with others or in several pieces.
Revision of the filler mechanism
After removing the filling block, Geberit recommends disconnecting the valve head, flushing the seal under pressure. Additionally, use a toothbrush.
 Dirty stopper.
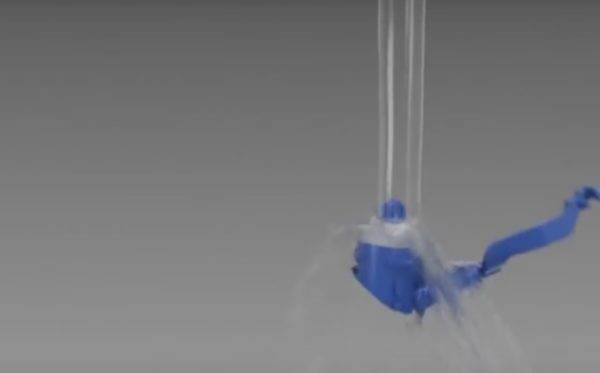 flushing
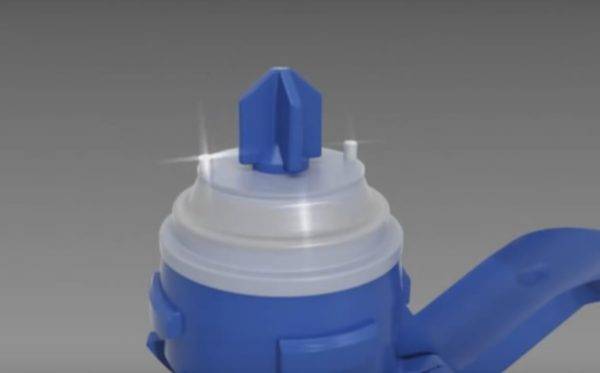 Cleared node.
The disassembly of the products of the Polish holding Cersanit is somewhat different:
- Using an adjustable wrench, loosen the union nut of the flexible hose.
- Unscrew by hand.
- We take out the mechanism.
- Break it down into parts and wash.
- Disconnect the lever head.
- We disassemble the head, clean the holes with a needle.
- We change the worn silicone cylindrical gasket or rearrange it with the reverse side.
Overturning the gasket from damaged material is a temporary way out. The wrong side is better preserved, so the knot stops leaking, but a change in the pressure of the water supply leads to a repetition of the situation. Do not put anything under silicone, the effect will be short-lived.
Attempts to expand the control channel with a small drill do not exclude the cause of overgrowth, but violate the design sections. Only filtration will save you from periodic clogging.
- We assemble in reverse order. We check the movement of the lever.
- We return the valve to its place, connect it.
- We open the valve, wait for filling, carry out a reset by pulling the rod up. We control the cessation of leakage into the toilet after automatic set, repeat the operation several times.
Masters experience:
Drain Valve Prevention
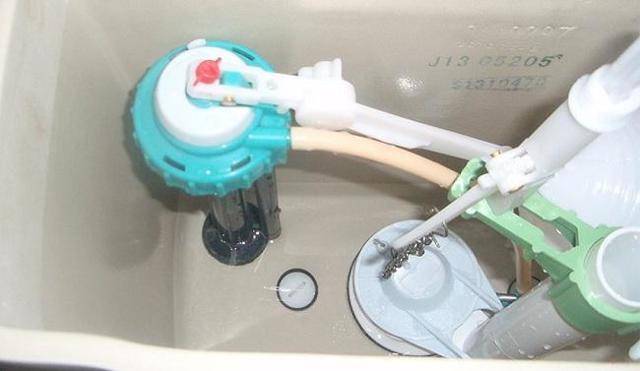
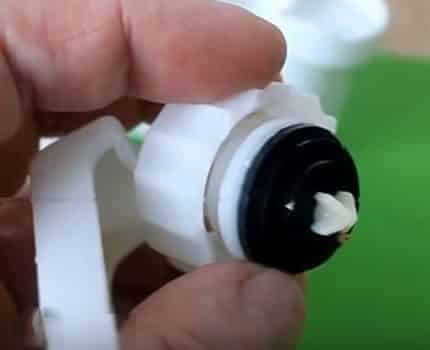
We take out the drain valve through the window, as described in paragraph 4. Sometimes the rubber fixed ring of the basket passes through the junction with the bottom neck of the container. The basket is disconnected from the valve cylinder by turning the bayonet mate.


Next, they clean the ring (black in the photo), the bottom hole. Replace defective seal. With a drain cuff (yellowish in the picture), do the same.
Engineer's comments:
Conclusions and useful video on the topic
Roller #1. It is real to disassemble the installation without destroying the wall of the bathroom. How to do it yourself:
Roller #2. The appearance of an unpleasant odor may be the result of an error when connecting the toilet bowl through the installation pipe to the sewer. You can fix this problem:
Roller #3. When water began to appear under the hanging toilet, you need to find a breakdown in the installation:
The resulting breakdowns of the toilet installation can be repaired with your own hands.This is more efficient than inviting a craftsman with crooked hands, and cheaper than the services of a professional plumber. Yes, and familiarity with the installation system can be useful in the future, when there is a need for prompt repairs.
You can tell about how you yourself repaired the support frame of the wall-mounted toilet bowl and share useful information in the block below. Please comment and ask questions.