- Replacing an old switch
- How to remove an old switch
- Installing a new switch
- Wire extension
- Preparatory work
- Connection options
- Connection with screw terminal blocks
- Stranding with welding
- Fixation with plastic caps
- Twisting with soldering
- Wago terminal blocks
- Why move the switch
- Helpful Hints
- Reasons for relocating an outlet
- Which wire is better to use
- Wiring diagrams
- Transfer methods
- Common Methods for Transferring Sockets
- Shortening the wire
- Outlet Offset - Wire Extension
- Daisy chain connection
- Laying a new line
- Socket device
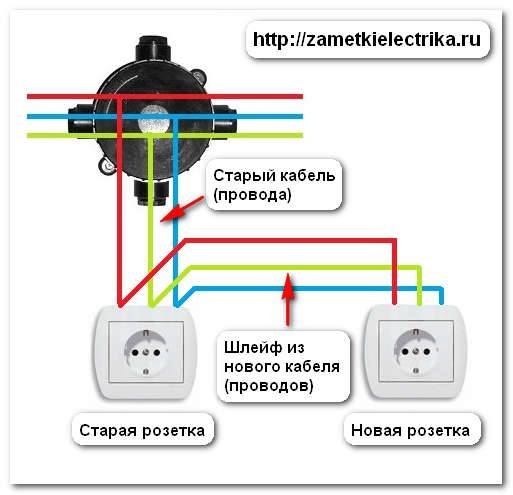
- Transferring an outlet using a loop method
- Method number 3 - Conclusion of a new line
- Introduction
- How to move the outlet?
- Launching a new branch
- Chasing the wall and installing the "glass"
- Cable laying and terminal connection
Replacing an old switch
The easiest job is to replace the old switch with a new one. It includes two operations - dismantling the old device and installing, connecting a new device. The order in which they are carried out depends on the type of device.
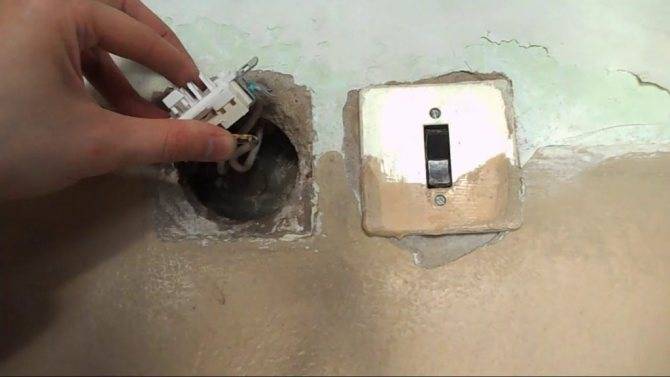
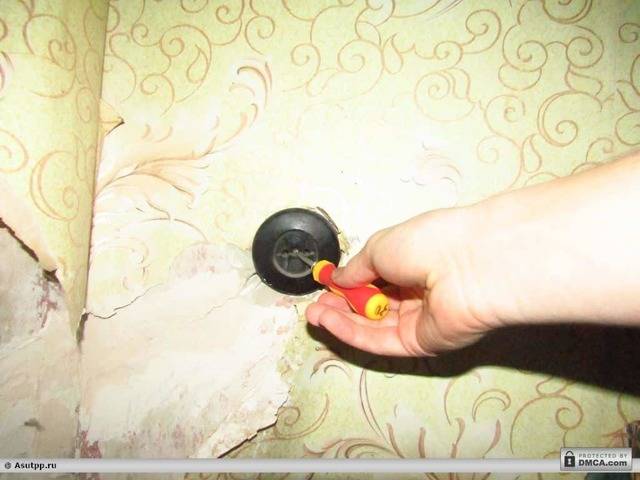
How to remove an old switch
The work is carried out in the following order:
- Using a flat screwdriver or a knife, the key is separated. Some models have an additional bar for pressing it, which must first be removed.
- The switch cover is removed, for which a screw is unscrewed (sometimes two screws).
- Loosen the screws of the mounting tabs that fix the switch in the socket.
- The entire switch is removed from the socket.
- Lead wires are removed from the terminal clamps.
The two-gang switch is dismantled in the same way as a one-gang device is removed.
In some apartments there are switches of the old type. They have an outdated design, and the dismantling procedure is somewhat different. In them, the key is not removed, because. the device cannot be disassembled.
Two screws are unscrewed (sometimes one, in the center), and the cover is removed. Next, loosen the screws of the mounting tabs and remove the switch. The ends of the wires are most often fixed with screws. They are unscrewed with a flat screwdriver, and the wires are released.
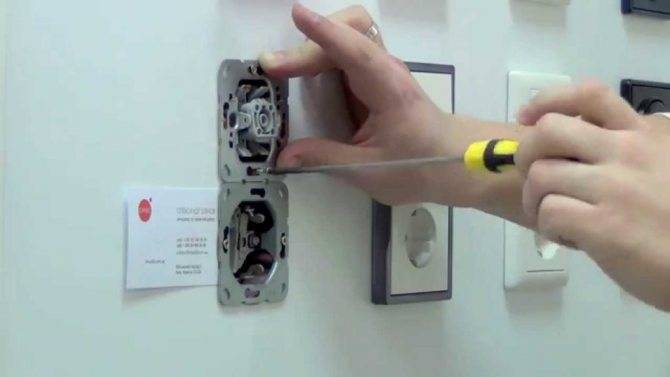
Installing a new switch
Work is carried out in reverse order:
The ends of the wires are inserted into the holes of the terminal clamps and securely fastened with screws.
In two-gang switches, the marking applied during dismantling is taken into account. In single-key designs, the order in which the wires are connected does not matter.
The switch is brought into the socket as much as possible and aligned
Excess wires are neatly laid out in the nest. Fixation is provided by two screws, with the help of which the body is wedged with side tabs.
Install the decorative cover with one or two screws.
Pressing lightly with your hand, set the keys until a characteristic click appears.
After checking the operation of the mechanism, you can connect electricity. In some modern switches, an original design may be provided. The installation procedure is described in the instructions for the device.
Wire extension
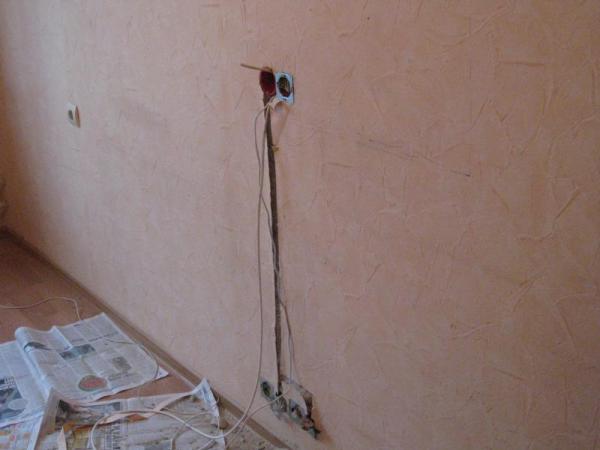
The essence of this method is that in order to move the outlet in the apartment on your own, you may need to extend it. Of course, in this case, wall chasing may be required, but this option is considered more attractive than the first.
The laying technology will look like this:
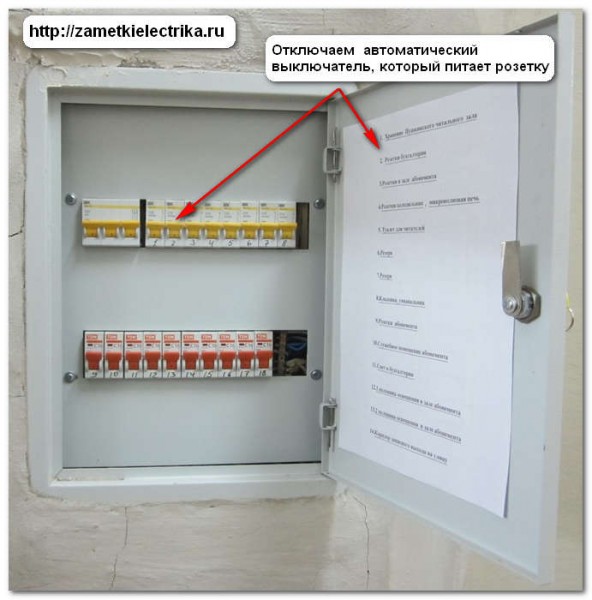
- Turn off the circuit breaker that will lead to the outlets.
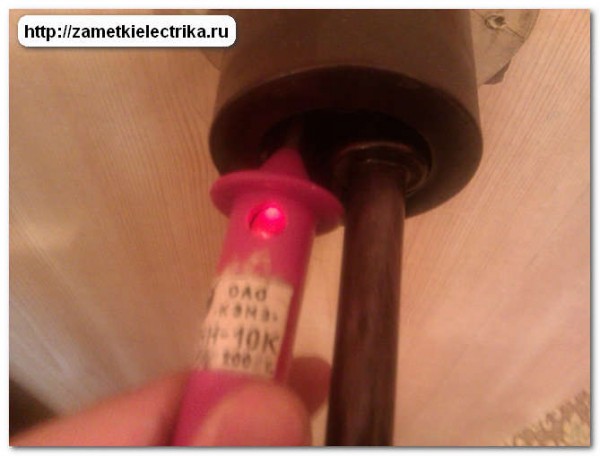
- Now check the device for current.
- Remove the decorative cover of the device and remove the socket.
- Now you need to extend the line. You can see how to connect wires in our article.
- In place of the old strobe, install the socket and lay the wires in it.
- Now install the outlet and connect the wires.
This is how you can perform a simple transfer of a power socket with a gating to another wall or to the floor. If you plan to extend your conductor, then remember that you should use a cable of the same gauge for this. If you do not know what section the cable has, then you should calculate the section.
You may also encounter a situation where the sockets need to be moved closer to the junction box and the wire will need to be shortened rather than extended. In this case, you will need to create a new gate, shorten the line and install a new product.
While using this method, many make a mistake. The main mistake is that they connect the elongated wire by laying it in the old strobe of the socket and cover it with alabaster. You should not do this, since in this case access to all connections will simply be closed.
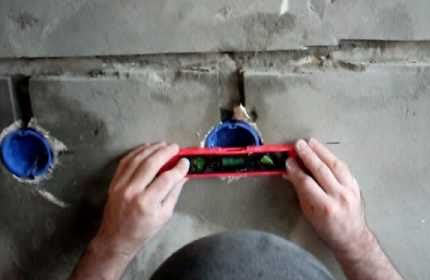
Preparatory work
In preparation, first of all, a diagram is drawn up, the location of sockets or switches is selected, and the location of the cable is also determined. To do this, you need to find out how hidden wiring is laid. If it was made according to standard projects, then you can find the wires using a special device. Then the amount of work is estimated, and the right tool is selected if the work is done by hand:
- perforator;
- screwdriver, pliers, hammer, chisel, probe.
The following materials are needed:
- mounting box;
- cable (recommended VVGng);
- socket;
- dowel-clamp, gypsum or alabaster, electrical tape.
When choosing an outlet, you must correctly determine which type is needed. Grounded outlets are currently in use. When transferring them, it is necessary to provide for the laying of a ground wire.
Connection options
If a wire needs to be extended, there are several ways to connect it to another wire. The choice of a particular option depends on the material from which the cores are made, as well as their cross section and the number of conductors.
Connection with screw terminal blocks
This method is one of the most reliable and has been used for many decades in the organization of lines, even at industrial facilities. Adapter terminal blocks can be used in two versions, one of which is provided with spring terminals, and the other with terminal blocks.
There are numerous models of terminal blocks on the market. Often comes across low-quality products
Therefore, when buying, you should pay attention to the quality of the product, its ability to firmly press the cable and withstand mechanical pressure when the screws are tightly tightened.
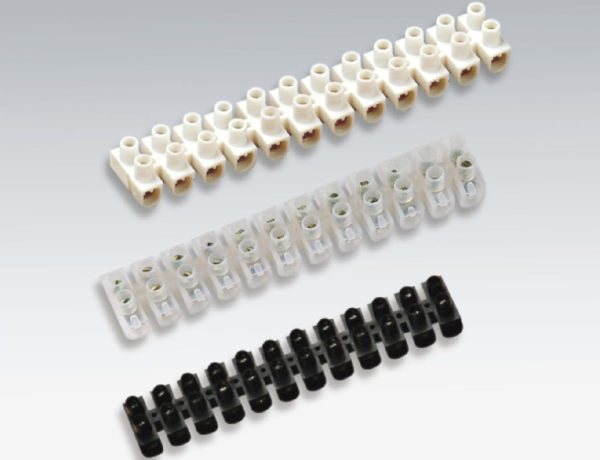
On sale there are disposable pads (they cannot be restored) and reusable spring wags (multiple separation of the contact is possible). It is recommended to choose blocks based on the fact that the diameter of the inlet is the same as the cross section of the cores. Unlike spring terminals, it is undesirable to use pads for connecting aluminum wires, since this metal is very fragile and can be deformed during tightening.


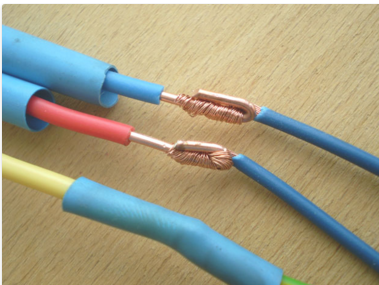
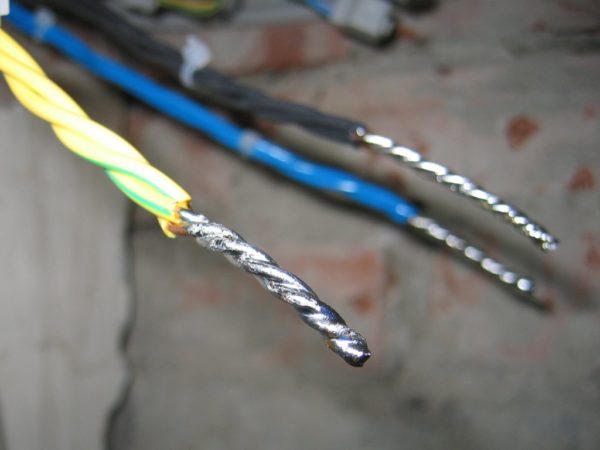
Stranding with welding
This method of connecting wires used to be used everywhere - including working with aluminum wiring. At the moment, twisting with welding is also used, but it is no longer so relevant, since simpler methods have appeared. The main disadvantage of this technique is the need for special equipment and an experienced welder.
Fixation with plastic caps
In this case, the wiring connection is carried out through the use of PPE (connecting insulating clamps). Plastic caps are made of fireproof material, which eliminates fire due to a short circuit in the area of the connection of the cores.
Caps are convenient to use. They are made in different colors for zero, phase and ground.
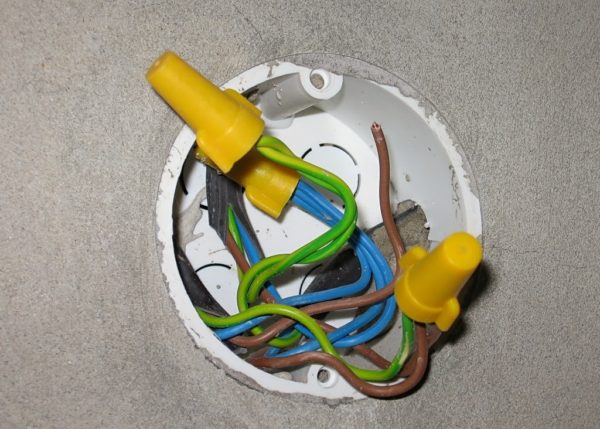
The only drawback of caps is a large number of fakes, when the product is equipped with a weak internal spring.
Twisting with soldering
Connecting electrical wiring by soldering is considered the highest quality option. However, to perform such work requires the ability to own a soldering iron. If you follow all the technological nuances, twisting will retain its performance characteristics for decades.
Instructions for creating a twist with soldering:
Strip the ends of the cable to provide the required contact area of the side surfaces. It is necessary to leave only pure metal from which the veins are made. The length of the cleaned area is 8-10 centimeters.
Grasp the wire with pliers on both sides and create a tight twist
It is important not to overdo it by tightening the strands, as the wire may break.
Solder the twisted wires with rosin solder. Important note: acidic fluxes are unacceptable, as they will cause metal corrosion in the future.
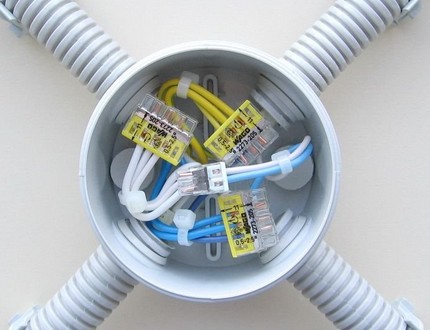
Wago terminal blocks
The design of these terminal blocks makes it possible to carry out electrical work efficiently and as quickly as possible. The contact quality is ensured by an internal spring system. Wago terminal blocks have received a European quality certificate and are the preferred way of connecting wires among foreign electricians.
Wago terminal blocks do their job well during network overloads. However, these devices also have a drawback: the contact area does not allow good heat transfer, removing energy through their design. As a result, if the loads are higher than permissible, heat is transferred to the wires, and this leads to the ignition of the insulation. Thus, the use of Wago terminal blocks is only permissible in combination with an automatic machine, which avoids overloads in the local network.

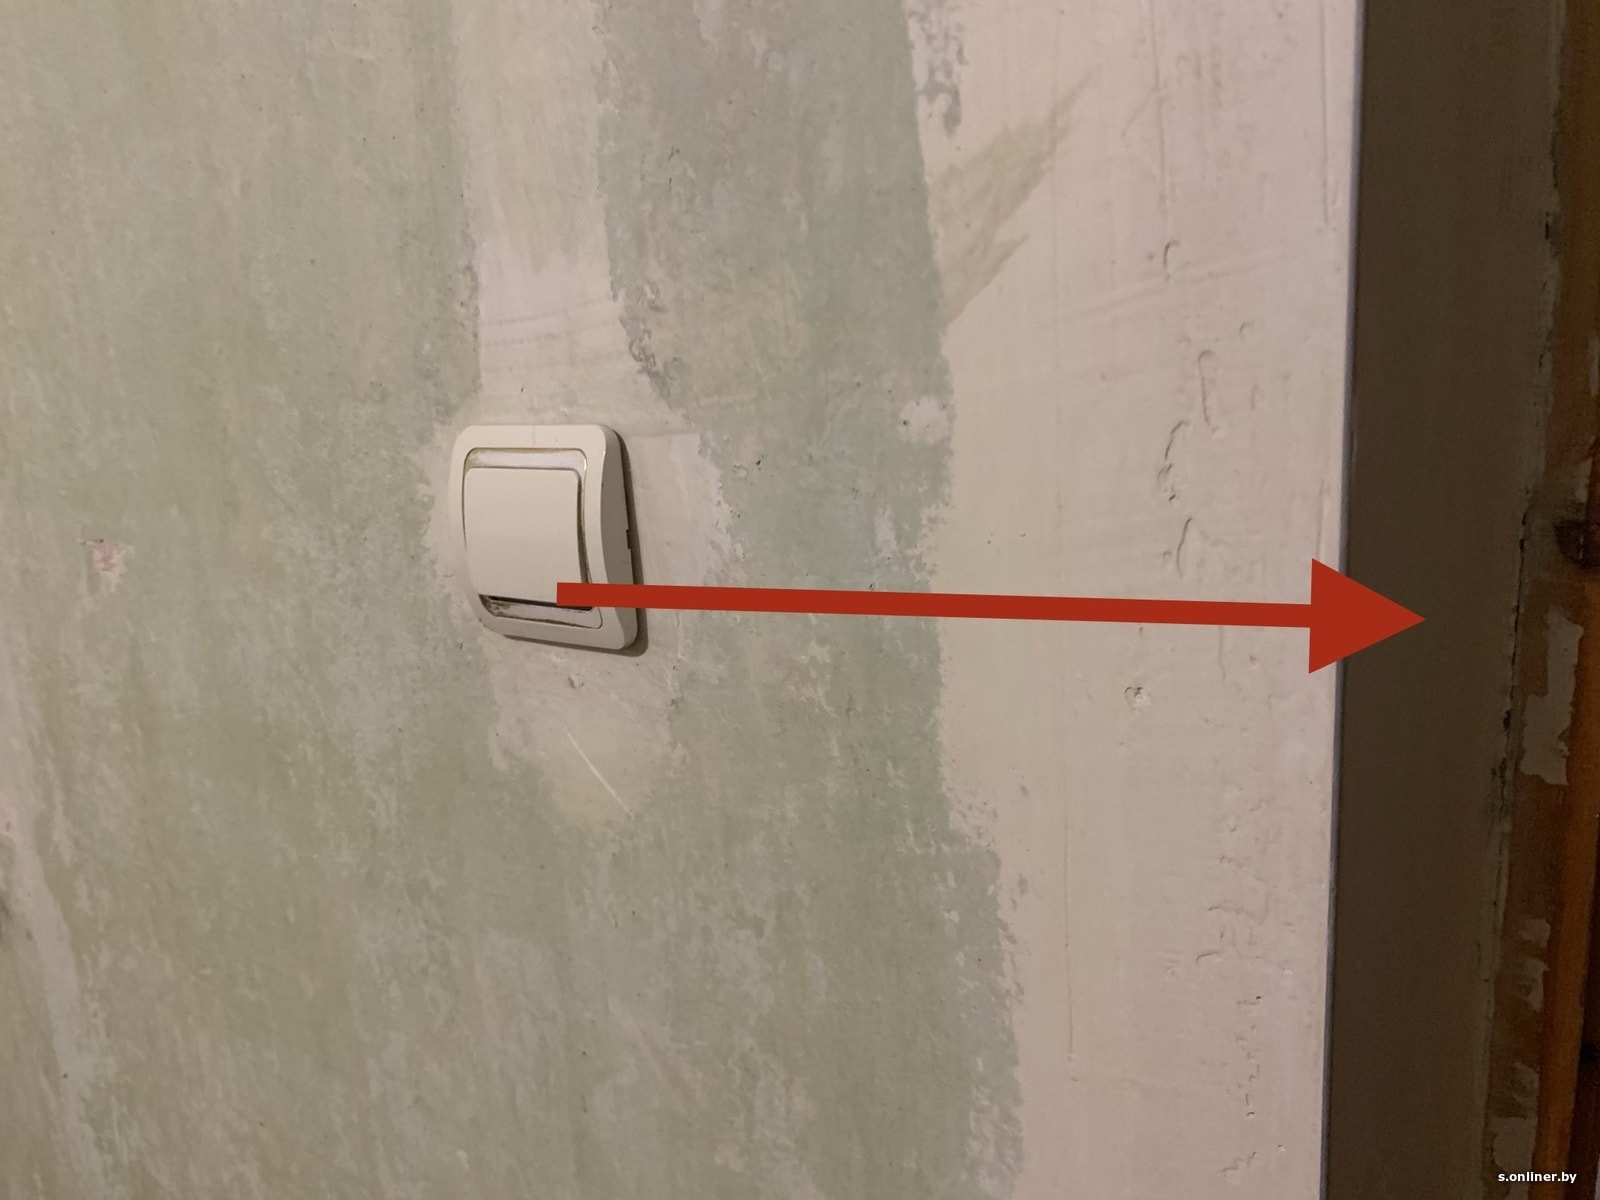
Why move the switch
In real conditions, the need to move the light switch in the room may arise for various reasons:
- Uncomfortable height. The switch is too high for small children to reach it.Or, on the contrary, the children have already grown up, and he is too low - you have to bend down.
- Access limitation. For example, he ended up behind a closet or bar counter.
- Desire to rearrange the furniture, and the switch is closed.
- Increasing convenience. Ensuring that the light is turned on from another room or from several places, bringing the switch closer to the bed or armchair, etc.
- consequences of the repair. Good reasons - combining several rooms. Transferring, for example, a kitchen to a living room, dividing a large room into several rooms, reinstalling the front door, etc.
Perhaps it became possible to install a new design, but it does not fit in its original place.
Helpful Hints
When carrying out electrical work, special attention should be paid to the following nuances:
All actions with wiring are performed only with a de-energized line. Since the use of electric tools is necessary, it is better to provide temporary input with a separate machine for them. To make sure there is no current, it is recommended to check the wiring with a probe.
Before moving the outlet to another location, the location of the old lines should be established so as not to damage the wires when chasing the channels.
In panel buildings, chasing of load-bearing structures is not allowed. In reality, this rule is often violated.
If such work is nevertheless carried out, it is very important to prevent damage to the reinforcement in the slabs. It is better to refuse gating altogether and give preference to laying wires under a screed, plaster or drywall sheets.
When the wires are brought into the junction box, you need to take into account the installation margin, which is 10-15 centimeters
If you ignore this issue, in the future (if changes in wiring are necessary), you will need to build up even a high-quality wire, and this will again force you to gut the wall.
Do not create direct contacts between copper and aluminum wires.
If you follow these simple rules, it is quite possible to move the outlet with your own hands.
It is important not to forget about security measures and try to do the work as efficiently as possible, because not only comfort, but also the safety of residents depends on it.
Reasons for relocating an outlet
The most common reasons why it becomes necessary to move the outlet are:
- Rearranging furniture or installing new equipment - in the first case, the movement of the connection node is due to the fact that access to the old ones is closed, in the second, the inability to make electrical contact at this point.
- Excessive heating due to the large number of consumers connected to one electrical outlet. Since this can lead to overheating and further ignition.
- Due to a lack of voltage or a malfunction of the old device, which does not allow them to be replaced with new ones.
Which wire is better to use
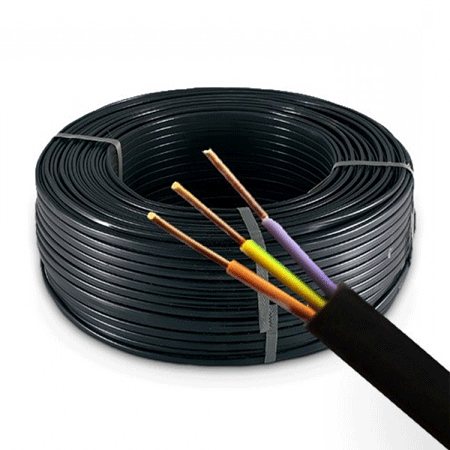
VVG wire or its flat modification VVG-Png, like no other fits for laying hidden electrical networks. True, working with a monolithic core is a little more difficult than with a multi-wire one, but this disadvantage, if it can be called a disadvantage, is compensated by the reliability and long service life of the walled wire. To choose the right parameters for an electrical wire for its use in an apartment, an article on this topic will help. Basically, there is a choice.If the strobe trajectory is replete with bends and plane differences, then only NYM. This wire is good for everyone, but expensive. It costs almost twice as much as VVG. It is for concealed wiring that VVG-Png is most often used. True, working with this wire is not easy, but if the cross section is chosen correctly, it will turn out to be guaranteed reliable. In extreme cases, for a slight lengthening of the line, PUNP can also be used.


The conclusions of the wires for connecting them to the outlet, on the one hand, must be long enough to make it convenient to work with them. On the other hand, too long leads simply will not fit behind the socket when the lid is closed. Therefore, their optimal size is 10–12 cm. The length of the wires for jumpers between sockets is slightly more than 15–20 cm. It is worth recalling that the cross section of the jumper wires should not be less than the cross section of the supply wire.
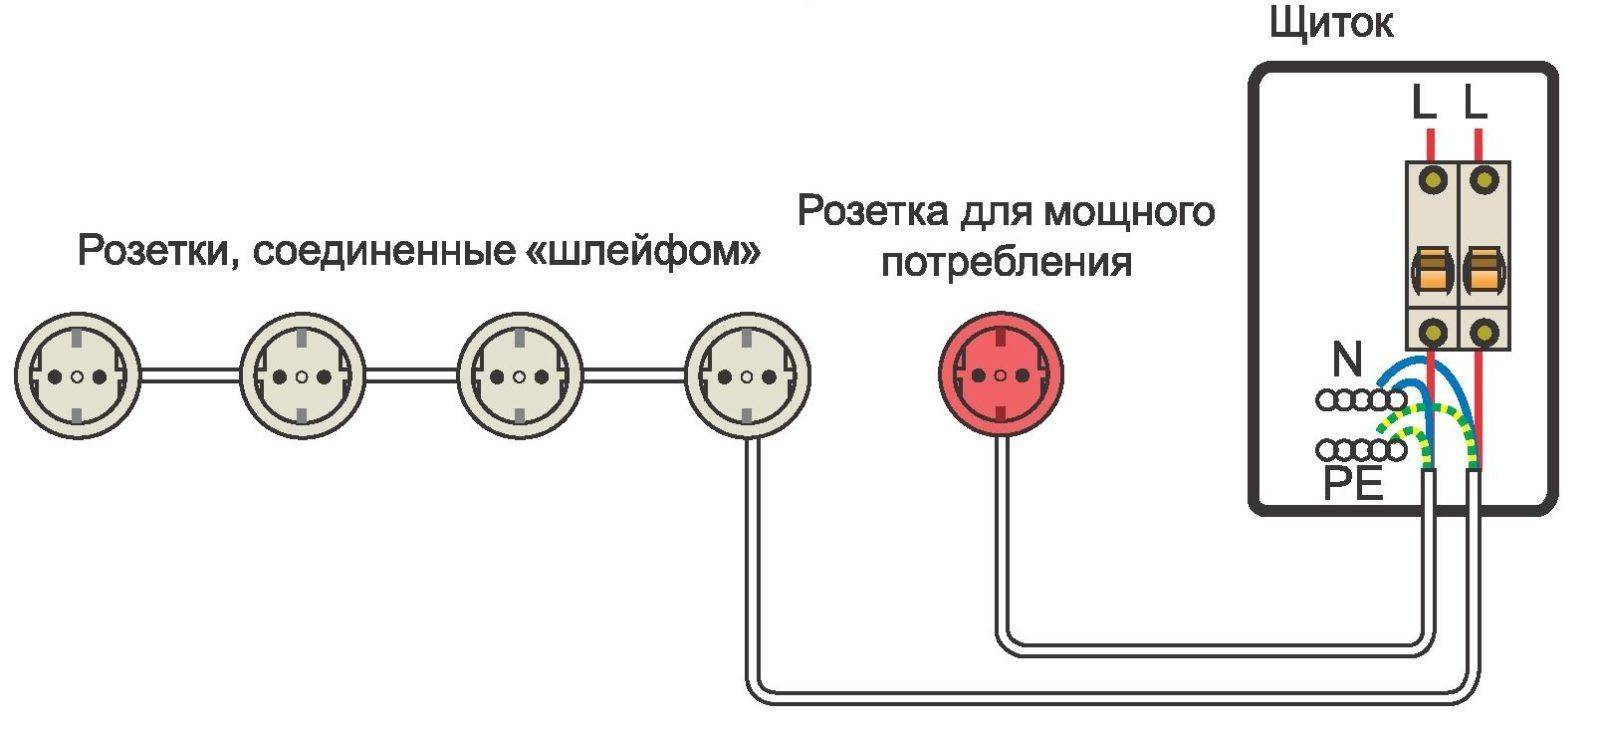
Wiring diagrams
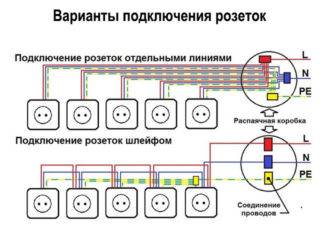 There are two schemes of different complexity that allow you to transfer the outlet to a new place without destroying the finishing material of the walls:
- By forming a kind of loop, in which wires are laid from the previous installation site to a new point by simply building up phase and earth tires.
- Laying a completely renewed line, starting from the linear machine and ending in the desired area of the wall in the kitchen, for example.
The first of these techniques is used for small distances of the new installation point from the old place, and the second - if the distance exceeds 5-7 meters.
The second laying option will require capital work related to the preparation of the scheme of the future route, as well as the selection of the type of wire and the method of its wiring.But in this case, it is possible to do without an undesirable intermediate connection that can degrade the performance of the entire power supply system. If, nevertheless, an extension scheme is chosen, the following important points must be considered:
- To implement this option, it is best to use wires from the same material and with the same core cross-section as the original cable brought to the old place. This will improve the quality of connections and dispense with special terminal blocks.
- The reliability of a loop of several parallel-connected sockets in comparison with the laying of a new line is very low.
- An accidental break at the very beginning will lead to a de-energization of the entire chain of sockets connected to it.
When choosing an extension cable connection scheme for a new outlet (sockets), one should proceed from the specific operating conditions of household equipment and the quality of wall surfaces. Taking into account these factors allows you to successfully cope with the task and eliminate the problems that often occur in electrical circuits.
Transfer methods
There are several ways to transfer, depending on the method of connection and installation, the following can be distinguished:
- Application of the loop. This method is the simplest: a jumper is laid from the old switching point to the new one. However, this method has disadvantages:
- the wire is laid horizontally, there is a risk of damage during further work in the wall;
- if the old one breaks, the new switch becomes inoperative.
Note! For the correct operation of the new switch with this method of transfer, it is necessary that the second, old switch be in ON mode all the time
- Wire extension. This method is more reliable, but it is more laborious.To move the switch in this way, you need:
- dismantle the old device;
- check the wires for voltage;
- make a gate to the installation site;
- connect wires;
- put a junction box in place of the old one;
- lay the cable, assemble a new switch.
Important! Aluminum wires are often found in old houses, in order to avoid incorrect operation and the occurrence of a short circuit, it is not necessary to attach a copper wire to them. You will either have to change all the wiring, or mount the same aluminum wire
- Launching a new line. This connection method is the most reliable. The process is similar to extending the wire, only the starting point will not be the old switch, but the junction box. You also need to make a strobe in the wall, run and connect the wire to the switch, connect the wires in the box.
- It happens that you need to move the switch without damaging the wall.
The transfer process will take place as described above, but instead of a strobe, the wire is placed in a cable channel or baseboard, where there are holes for wiring. You will also need to purchase an overhead switch (embedded will not work).
Any unfamiliar work at first seems difficult, but if you carefully study the sequence of actions, prepare theoretically, practically, study safety precautions, even a person without special skills can handle electrical installation work.
Common Methods for Transferring Sockets
To choose the right way to move the outlet correctly, you must have at least basic knowledge of electrical engineering - not always the method used in one room can show itself well in another. Everything rests on the power of the devices that will be switched on at a new point.
Shortening the wire
The easiest way - for example, a wire descends from the ceiling in the wall, while the socket is located 20 cm from the floor, and the new location will be 50 cm.
The procedure is as follows:
- Dismantling the socket and socket.
- Extract the wire from the strobe to the desired height.
- Drilling a hole for a new socket.
- Insertion of wires into the socket and its installation.
- Closing up the old hole for the outlet and strobe.
- Installing an outlet.
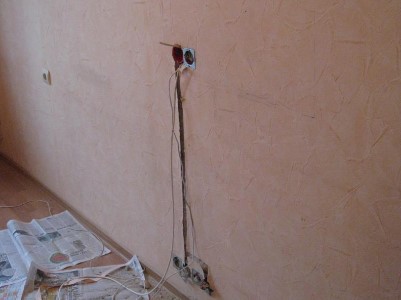
Outlet Offset - Wire Extension
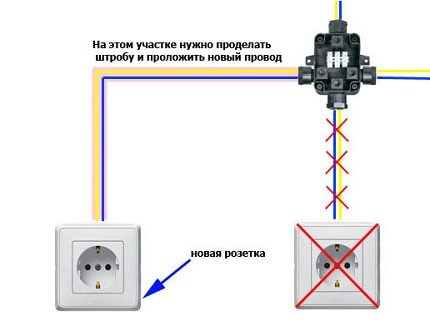
If a rearrangement is planned in the room and there is no outlet in the new place for the TV or iron, then the wire from the old one can simply be increased. If the wire is in the wall, then you will have to make a strobe from the old outlet to the new one.
Everything is done in this order:
- The old socket and socket are removed.
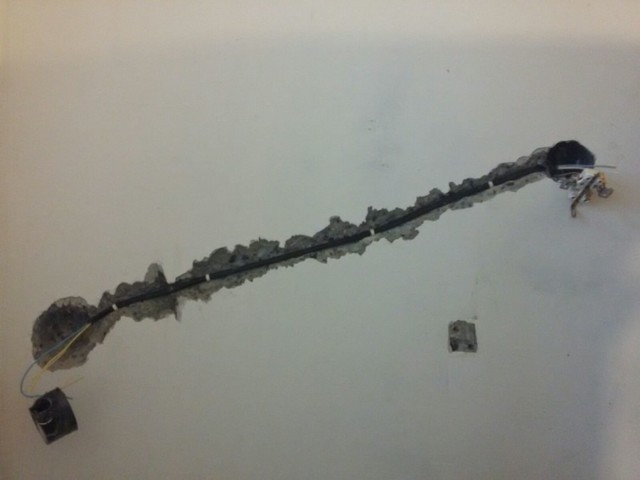
- A hole is drilled for a new socket and a strobe is cut to it.
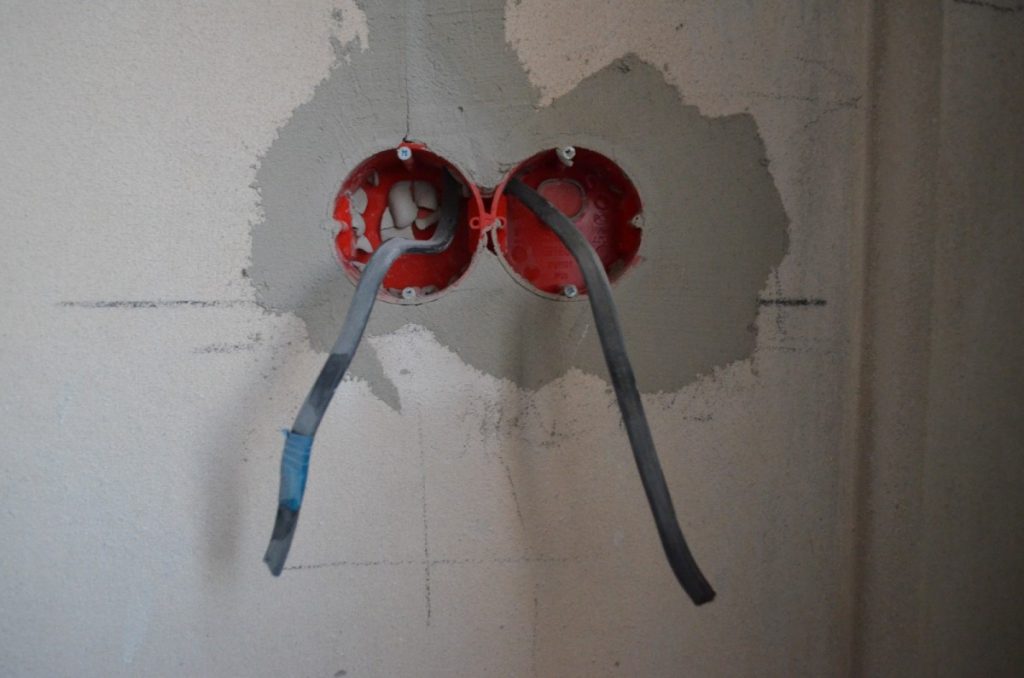
- A socket box is installed in place of the new outlet, and a twist box is installed on the old one.
- The wire is extended and laid to a new outlet.
- Strobes are closed and a socket is installed.
In some cases, the hole for the old outlet is completely covered with cement or gypsum. It is not recommended to do this, because most often it is the places where the wires are connected that deteriorate in the electrical circuit. It is better to make an additional box and open it if necessary than to break the wall.
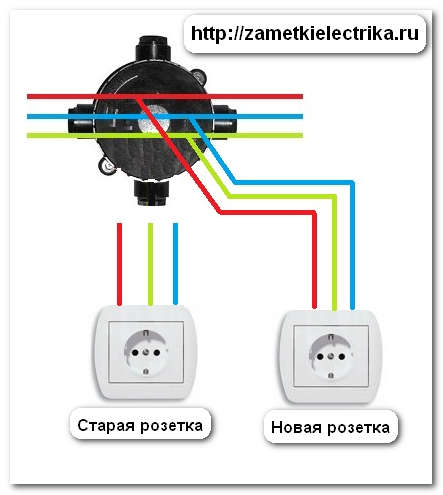
Daisy chain connection
If a rearrangement was made, this does not mean that after a while another one will not be made, and then a third, and so on ... If the previous method was supposed to transfer the old outlet with your own hands, then a logical thought should arise - leave the outlet in place, and install another one in a new place.
This method of increasing the number of outlets is used quite often, and new points are made open and closed wiring. At the same time, it must be remembered that it is not recommended to connect powerful devices to them - the more twists from the meter to the device, the higher the probability of damage to one of them.
There are few nuances here:
- Most often, the wires are clamped through the socket terminals. You can twist them separately, but it's just a waste of space and time.
- The wire for the new outlet must be selected with the same cross section as for the old one.
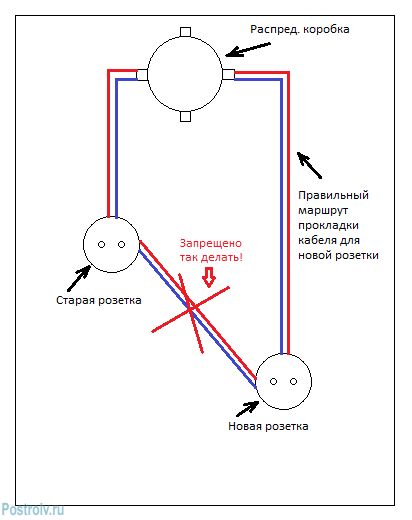
- Wires are always laid at right angles. Punching a diagonal strobe is prohibited by the rules of the PUE. In addition, if in the future you need to drill a hole in the wall, it is much easier to imagine where the wire can go.
Laying a new line
It is carried out in two ways - the outlet is laid from the junction box that is already in the room, or a completely new line is made directly from the meter. The first method is used when it is necessary to update the wire - for example, if the old one has been repeatedly overheated, as evidenced by hardened and crumbling insulation. A new line is laid under a powerful device - when a socket for an electric stove, boiler or air conditioner is being moved.
Everything is done in a few steps:
- The missing strobes are made from the junction box or electric meter shield to the new outlet.If possible, you can use the old furrows, but you will have to beat the putty out of them.
- An automatic switch is installed in the shield, in case of a short circuit.
- The wire is laid in a strobe and fixed - it is smeared with gypsum or cement.
- The socket is installed and the socket is connected. If a powerful device is connected, then it is recommended to tin the wires.
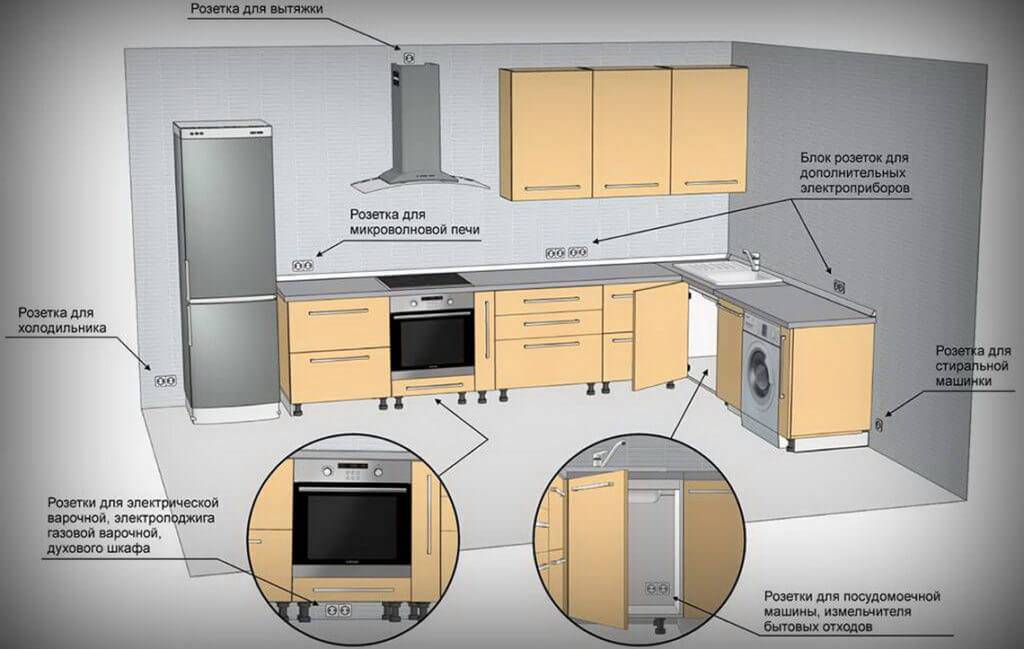
You can leave the old outlet in its place, or disconnect and cut the wires from the junction box, dismantle the sockets and cover everything with plaster. There is no particular difference between transferring powerful sockets in the kitchen, to which a three-phase line can be connected, and ordinary household outlets for 220 volts. All operations are performed in exactly the same way, only you have to connect more wires.


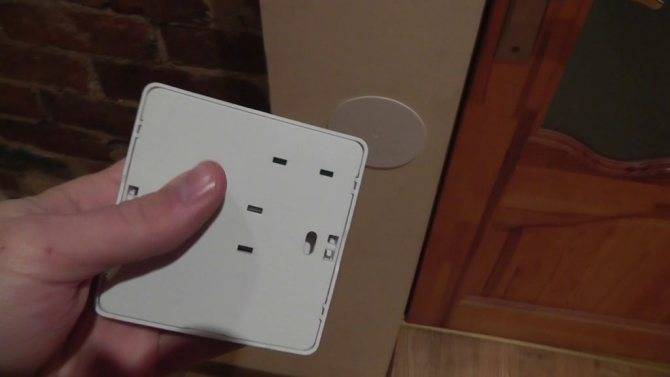
Socket device
The principle of the structure of sockets with and without grounding is relatively the same. With one slight difference, grounded internal or wall-mounted sockets have built-in metal grounding pins on the sides of the plug socket.

The complete socket device is as follows. Contacts for the plug with springs and terminals are attached to the ceramic or flame-retardant plastic base, and grounding elements and clamps for attaching to the socket box are also attached to the base (there are no such clamps in overhead devices). And all this is closed with a hardly flammable plastic case. Overhead sockets completely, and internal only the part that is not in the wall.

Transferring an outlet using a loop method
This method of transfer and connection presents a certain danger. This is due to the use of various kinds of jumpers, connecting the places of old connections with new ones.That is, the socket is essentially not transferred to some distance, but remains in its place. It just connects to a new point located nearby.
The main advantage of this method is the formation of a new place where electrical appliances can be connected. At the same time, the old socket remains in working condition and can be used in the same way as before.
However, when choosing a method for moving a point, the disadvantages of such a connection should also be taken into account:
- The loop connection is classified as unreliable and is not recommended for the use of PUE.
- Cables are laid from one point to another in a horizontal direction, which poses a certain danger. In the future, if there is no wiring diagram, you can get an electric shock while drilling holes in these places.
- After connecting an additional consumer to a new outlet, there will be a significant increase in the total load on the electrical network. In the case of simultaneous inclusion, the wiring simply cannot withstand the load and will burn out.
Despite the disadvantages, this method is widely used in electrical installations. Quite often, the wire does not fit into the walls, but is laid on the surface without gating in a special cable channel. The transfer is carried out with minimal losses, and the socket is used for outdoor wiring.
Method number 3 - Conclusion of a new line
Well, the safest and most reliable method of transferring an electrical outlet is to add wire from a junction box. In this case, you will have to spend more time and effort, but, as we have already said, it will be right! In addition, a new branch of the wire will allow you to transfer the product even to the opposite wall.

So, first you will need to turn off the electricity in the house, and then dismantle the old line along with the outlet. The strobe is smeared with mortar and a new one is created instead, leading from one wall to another or even to another room through the wall (at your discretion). Next, the cable is laid in the created recess, led to a new socket, where it is connected to the core.
As you can see, there is nothing complicated, the only problem is that you will have to destroy the wall decoration yourself, which is not very logical after a major overhaul. Here we have listed all the most popular methods. We hope that now you know how to move the outlet to another place with your own hands!
Similar material:
Hello, dear readers of the Electrician's Notes website.
I receive letters from you on personal mail with questions about how to transfer an electrical outlet.
Since this question is relevant and widespread, I will write about it in more detail.
To transfer the outlet, of course, you can turn to electricians, but I think that after studying the material in this article, you will be able to do it yourself, and most importantly, correctly.
Introduction
Many residents at least once had the question of how to move the outlet. There are many reasons for this. Someone transfers the socket in order to protect children from electric shock, someone transfers the socket according to European-style repair standards, someone because of the rearrangement of furniture. It makes no sense to list all the reasons, because. There are many of them and each person has their own.
It is also worth touching on the issue of places for transferring sockets.
There are several places:
- moving an outlet from one wall to another
- move the socket from one height to another
- move the outlet from one room to another (it even happens)
There is nothing difficult in this. All this can be done independently, while not forgetting about and.
I want to immediately point out to you the errors that may occur when moving an outlet or a switch.
1. First mistake (common)
This is the most common mistake when moving an outlet. This method of transferring the socket takes less time, and also saves materials of cables (wires) for electrical installation.
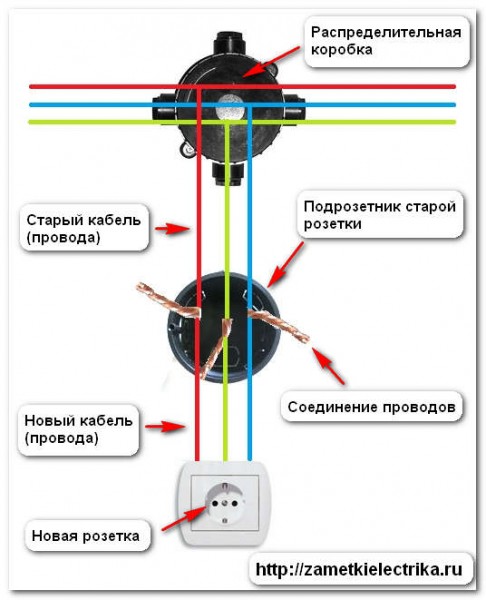
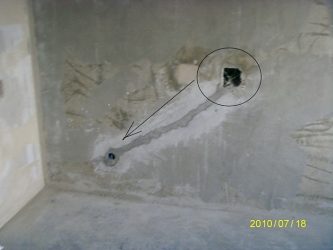
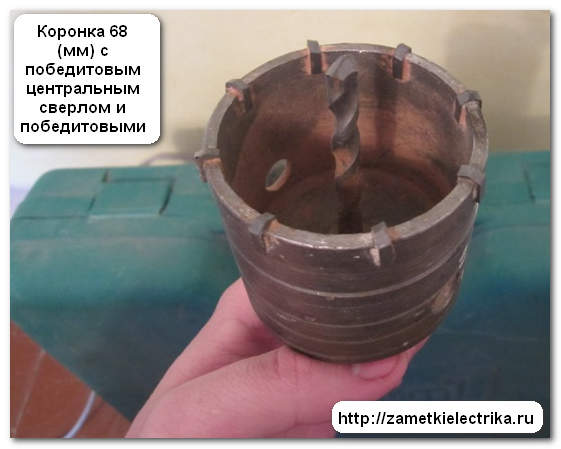
The old socket is removed. Using a special crown and a perforator, a hole is cut in a new place for the outlet.


A strobe is made between the holes obtained (read about all). A new cable or wire is laid in the resulting strobe. The wires are connected in place of the old outlet.
Among the disadvantages of this method of transferring the socket is the lack of access to the junction of the conductors of wires (cables).
If you still need to move the outlet in this way, then do it as follows. In place of the socket of the old outlet, install a junction box to have access to the wire connection.
2. Second mistake
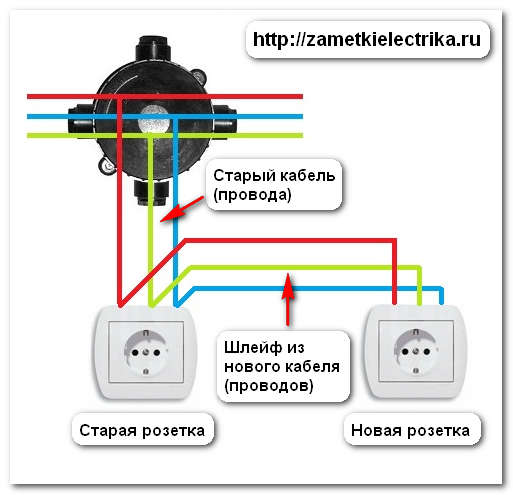
The disadvantage of this socket transfer is that the wires will be horizontal. After some time, you will forget exactly where the electrical wiring is located, and you can easily damage it when doing any work on the wall.
And I would also like to note here that in this case all additional load will pass through cable that was intended for the old outlet.And it may turn out to be old (with a bad one) or of an inappropriate section, which can lead to its overheating or failure.
How to move the outlet?
Before starting work, we need to purchase a tool.
1. Using a puncher and a special crown, we drill a hole for a new outlet.
2. Turn off the necessary circuit breaker, or remove the fuse, in, and check the absence of voltage in the outlet using.
3. Remove the old socket and socket box.
4. We dismantle the old wire coming from the junction box, i.e. we find our cable going to the old outlet and disconnect it.
5. We lay a new cable (wire) from the junction box to the place, in a pre-prepared strobe. And do not forget that the use of the wire is prohibited.
7. We connect a new cable in the junction box, of course following the rules.
8. We cover the strobe with a solution.
9. Turn on the necessary one, or insert the fuses.
10. Everything is ready. You can use a new outlet.
Launching a new branch
This method involves spending more time and effort, but allows you to get the safest transfer of an electrical outlet.
The method that involves launching a new line, are often used in panel houses, where the wires are literally walled up in a concrete wall, and therefore it is not possible to remove them. In this situation, they are simply de-energized and left in place, and a separate strobe is laid to power the new outlet.
 With the help of a new branch, you can move the connection point not only to the opposite wall, but even to the next room
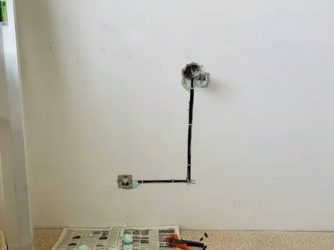
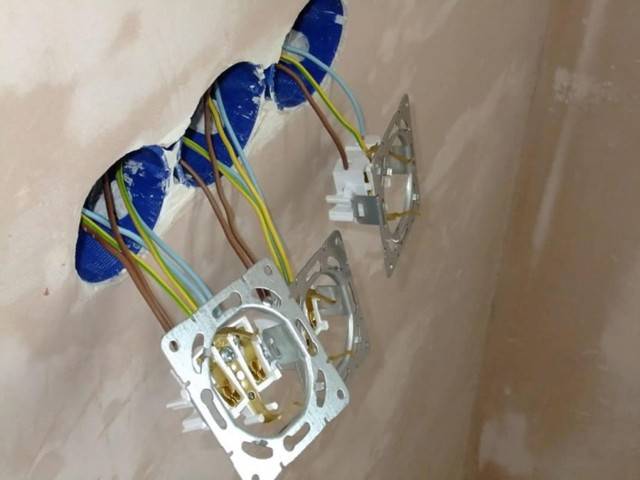
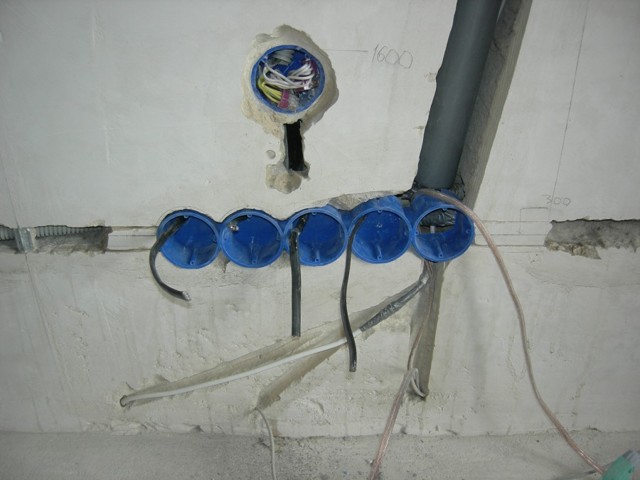
Chasing the wall and installing the "glass"
To bring out a new line, the first thing to do is turn off the electricity in the room where the work will be carried out. On the wall, with the help of a ruler and a pencil, they outline the route along which a new strobe will be laid.
According to the planned route, with the help of a puncher or a grinder, a strobe is cut out in the wall. The depth of the groove is made such that the wire laid in its cavity after installation is completed does not protrude above the surface.


For the installation of a new connection point in the intended place, using a puncher equipped with a crown, a “nest” with a depth of 50 mm is hollowed out. The walls of the niche are carefully cleaned from construction chips and dust.
To fix the plastic "glass", the inner walls of the completed niche are covered with a layer of gypsum mortar, the outer edges of the socket box are treated with the same composition.
The installed "glass" should not protrude above the surface. If the depth of the niche is not enough, you can carefully cut off the back wall of the socket.
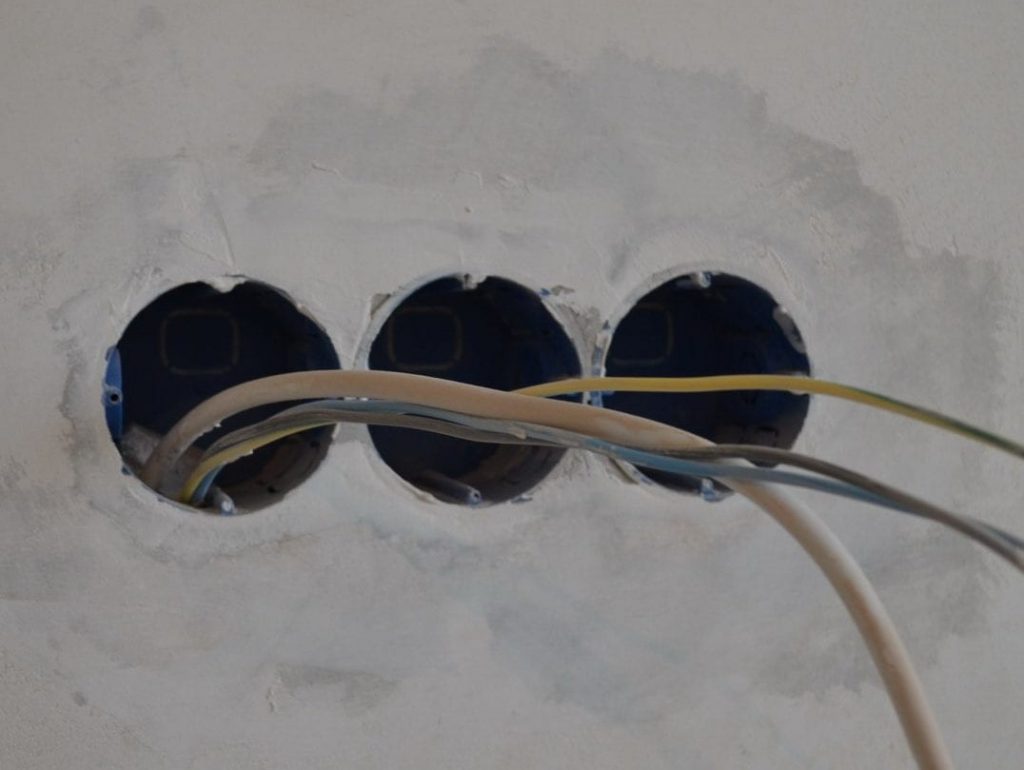
Cable laying and terminal connection
A cable is laid in the created recess, fixing it every 5-7 cm with plastic clamps or alabaster.
Having opened the junction box, from which the “old point” was powered, they find the junction of the output cable with the wire going to the former outlet, and disconnect the wires. After that, the old line is dismantled along with the outlet. If it was possible to open the old strobe, then after removing the wire, it is sealed with gypsum or alabaster mortar.
To power a new line, the end of the output cable is connected to a new wire using spring terminals or insulating clamps.
The connected unit is buried in the mounting box and fixed with bolts.
When installing the outlet, it is important to prevent even the slightest backlash.Otherwise, over time, it will fall out of the "nest" along with the plug. Since it is difficult to ensure a snug fit inside the box, it is advisable to connect the wires not by twisting, but by installing terminal blocks, spring terminals or plastic caps
Since it is difficult to ensure a snug fit inside the box, it is advisable to connect the wires not by twisting, but by installing terminal blocks, spring terminals or plastic caps.
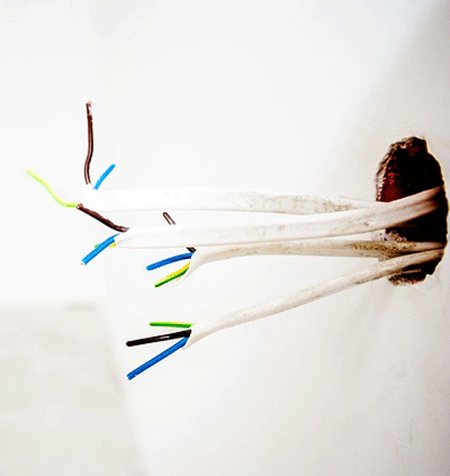
When laying a new conductor, you need to ensure that a small margin remains at both ends. It will be required in order to create a high-quality electrical connection.
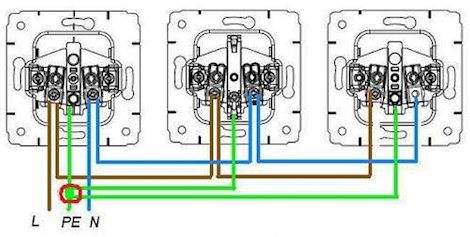
The free stripped ends of the cores are connected to the socket block of the new “point” through screw or spring terminals. When connecting through the terminals, they are guided by the rule that the phase wire is installed on the left terminal, and the zero wire on the right. The ground conductor is connected to the terminal equipped with "antennae", which is located on the device case.
The connected work unit is installed in the socket and fixed with spacer tabs and clamping screws. A decorative panel is mounted on top.


