- Malfunctions that may occur
- How to repair
- How to fix it if it's leaking
- Replacing the device mechanism
- Self-repair of a valve valve
- Replacing the rubber gasket
- Water oozing from under the stem
- Water does not shut off
- Difficulties in choosing a new cartridge
- Do-it-yourself faucet repair
- kitchen faucet
- Bath faucet
- Breakdowns of mixers with valve heads
- Repair and replacement of crane boxes
- Worm gear devices
- Crane boxes of disk type
- Varieties of mixers
- What other breakdowns are there and how to fix them
- Shower switch broken
- Single lever bath mixer with shower VIDIMA Fine
- pendulum
- Push-button (exhaust)
- Grohe Grohtherm thermostatic double lever bath mixer
- Leakage at the junction of the gander and the body
- Repair manual
- The junction of the watering can and the shower hose is leaking
- Repair manual
- Leaking water pipe joint
- Roca Victoria-N single lever bath mixer with shower
- Repair manual
- Conclusions and useful video on the topic
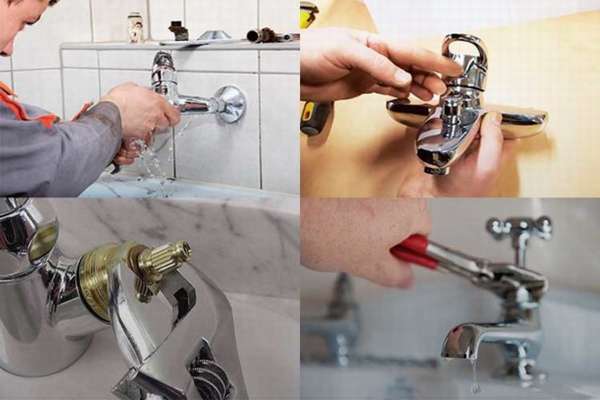
Malfunctions that may occur
The most common faults include:
- leak when the rotary handle is closed;
- weak jet pressure at normal pressure in water pipes;
- difficulties in setting the water temperature due to chaotic mixing.
Leaks can occur at the base of the mixer and this is usually due to wear of the sealing rings. In addition, water sometimes seeps out from under the rotary knob cap. Problems with continuous leakage cannot be avoided in the event of cracks in the housing or ball mechanism.
Attention! In case of mechanical damage (chips or cracks), the mixer must be replaced, and repair, alas, is useless. Low head problems most often occur due to blockages in the parts (for example, blockage of the aerator)
One small grain of sand is enough, unsuccessfully getting into the mechanism, to disable it. And also because of the polluted water, the gate is under threat, in which garbage is collected and accumulated.
Low flow problems most often occur due to blockages in the parts (for example, blockage of the aerator). One small grain of sand is enough, unsuccessfully getting into the mechanism, to disable it. And also because of the polluted water, the shutter, in which garbage collects and accumulates, is under threat.
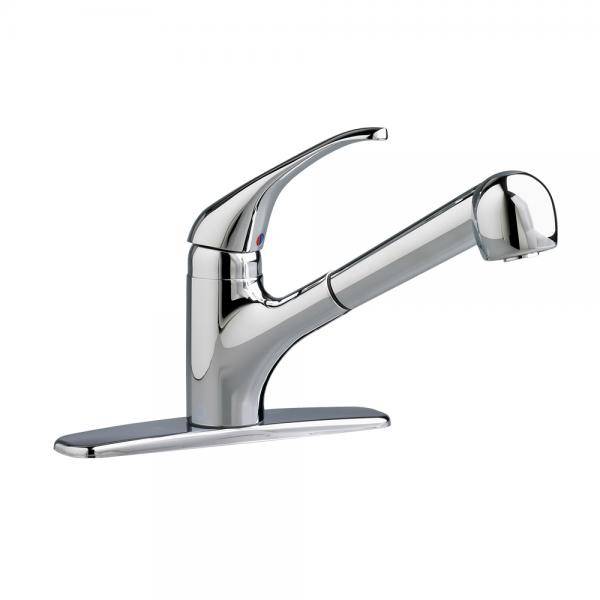
Photo 1. An example of one of the varieties of taps with a ball mixer without a shower hose and watering can.
How to repair
Having determined the cause of the breakdown, you can repair the ball valve yourself, provided that it is repairable
It is important to have at hand all the necessary tools and detailed instructions for repairing or replacing the ball mechanism.
How to fix it if it's leaking
Sometimes a leak does not require any complex repair work.
- For example, if water is leaking from under the cap of the rotary lever, you can try tightening the connection. As a rule, the problem then disappears.
-
Replacing the O-rings will stop the flow at the base of the mixer. It will need to be removed and disconnected from the water hoses.
With the correct selection of the diameter of the gasket, some effort will be required during installation.
- When you open the water leaks in the area of the lever - probably the case also lies in a worn gasket that needs to be updated.
Reference! In some cases, poorly processed mixer parts with sharp edges can spoil the seals, and their replacement will be required much more often.
A crack in the body is a sentence for a mixer. In this case, it cannot be repaired. You can cover the defect with sealant, but this is only a temporary solution to the problem.
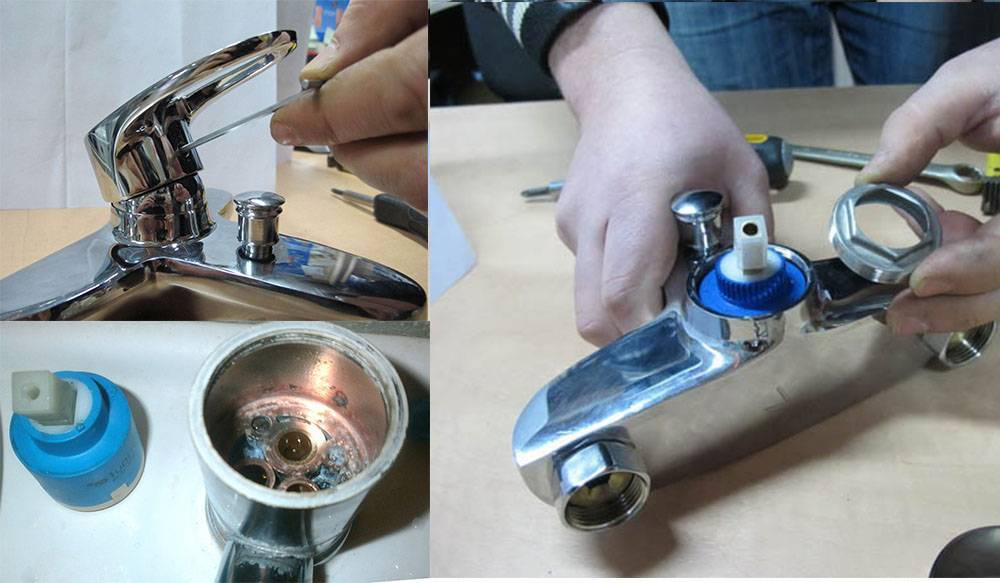
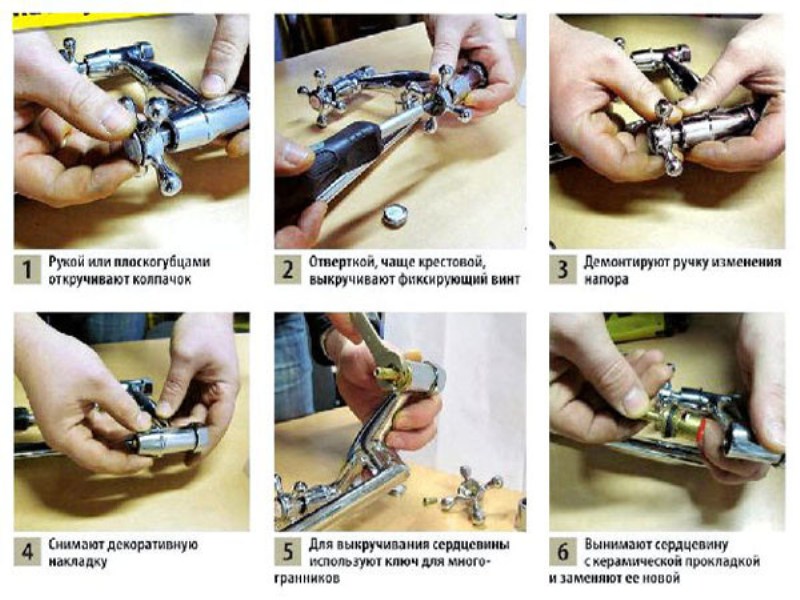
Replacing the device mechanism
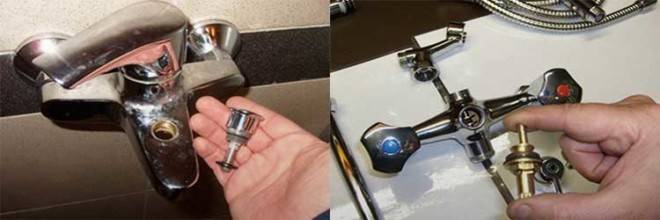
If the cause of the breakdown lies deeper, then the analysis of the entire product is inevitable. Before dismantling the equipment, you will need to shut off the water supply. To do this, turn the valves on the water pipes, and drain the residue by opening the tap. Having secured the apartment from the flood, you can proceed to remove the mixer.
The screw holding the lever is removed first.
As a rule, it is hidden under a decorative overlay.
The threaded part of the spout is unscrewed carefully, clockwise.
Next, the dome is removed and the gasket is removed
It is important to pay special attention to it, because if the gasket is worn out, then a mandatory replacement of the seal will be required.
After the seal, the locking ball is removed.
Rotary valve gaskets located under the shut-off ball require special care. In order not to damage them, in no case should you use a knife
They are carefully removed with a flat screwdriver.
Small springs are located under the gaskets of the rotary valve
They need to be taken out and checked for compression.Often their wear is the cause of a leak when opened at the handle.
The ball is drawn last. There should be no damage on it, and the water holes should not be dirty. If necessary, they are cleaned of accumulated debris.
When changing gaskets to new ones, it is important to cover them with a thin layer of a special plumbing paste that acts as a sealant, and apply a winding to the threads for a tighter connection. By replacing the failed parts, you can reassemble the mixer and check to fix the problem
By replacing the failed parts, you can reassemble the mixer and check to fix the problem.
Important! After collection, it is required to treat the valve valve with oil. This procedure will help to avoid metal corrosion.
Self-repair of a valve valve
Valve taps can be called classics of water supply. And, although they are gradually being replaced by new designs, there are still plenty of them. Their internal structure has not changed over the decades. Only the design has changed - it has become more diverse and refined. Today you can find both the most common models and very exotic ones.


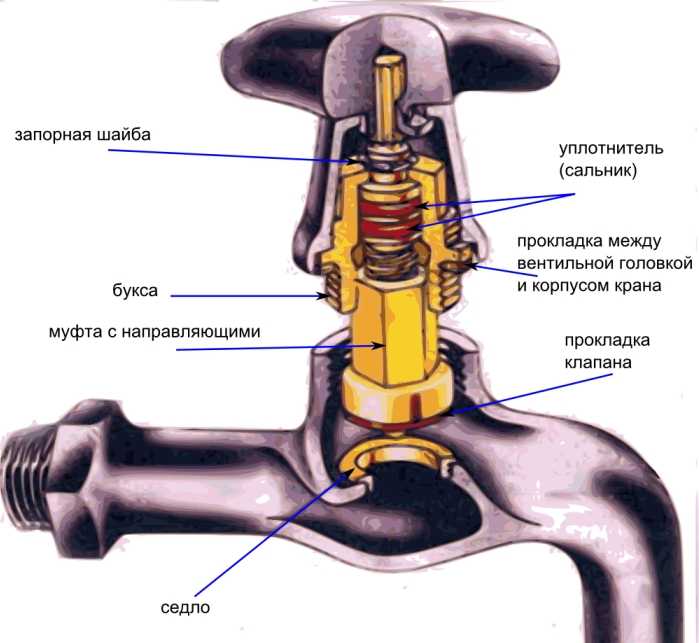
The structure of valve valves
Water taps of this type are still in use, as they are simple and reliable, they serve not for years, but for decades. If all the “stuffing” is of good quality, all that can fail during this time is gaskets. Replacing them is the main way to repair a valve valve.
Replacing the rubber gasket
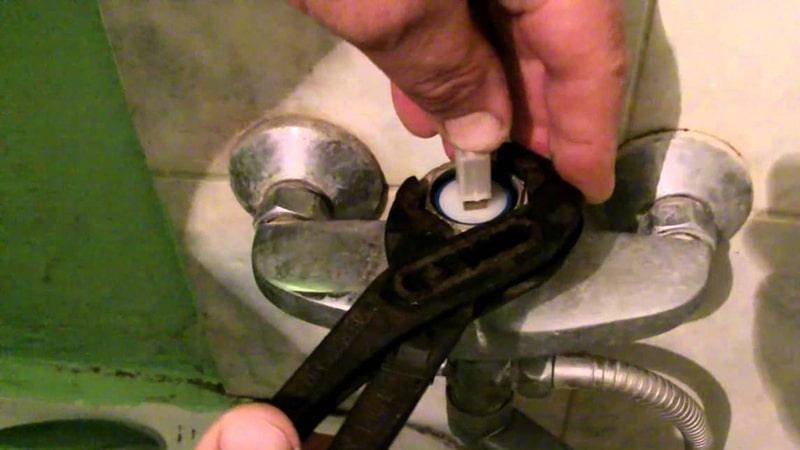
If, with the valve completely closed, the faucet in the kitchen or bathroom continues to drip, most likely the reason is the gasket on the valve that has lost its elasticity (see photo in the next paragraph).She no longer clings tightly to the saddle, which is why the water continues to flow and sometimes the tap does not just drip, but even flows. Repair the faucet in this case - replace the gasket. To do this, you need a wrench, or better - an adjustable wrench and a set of gaskets.
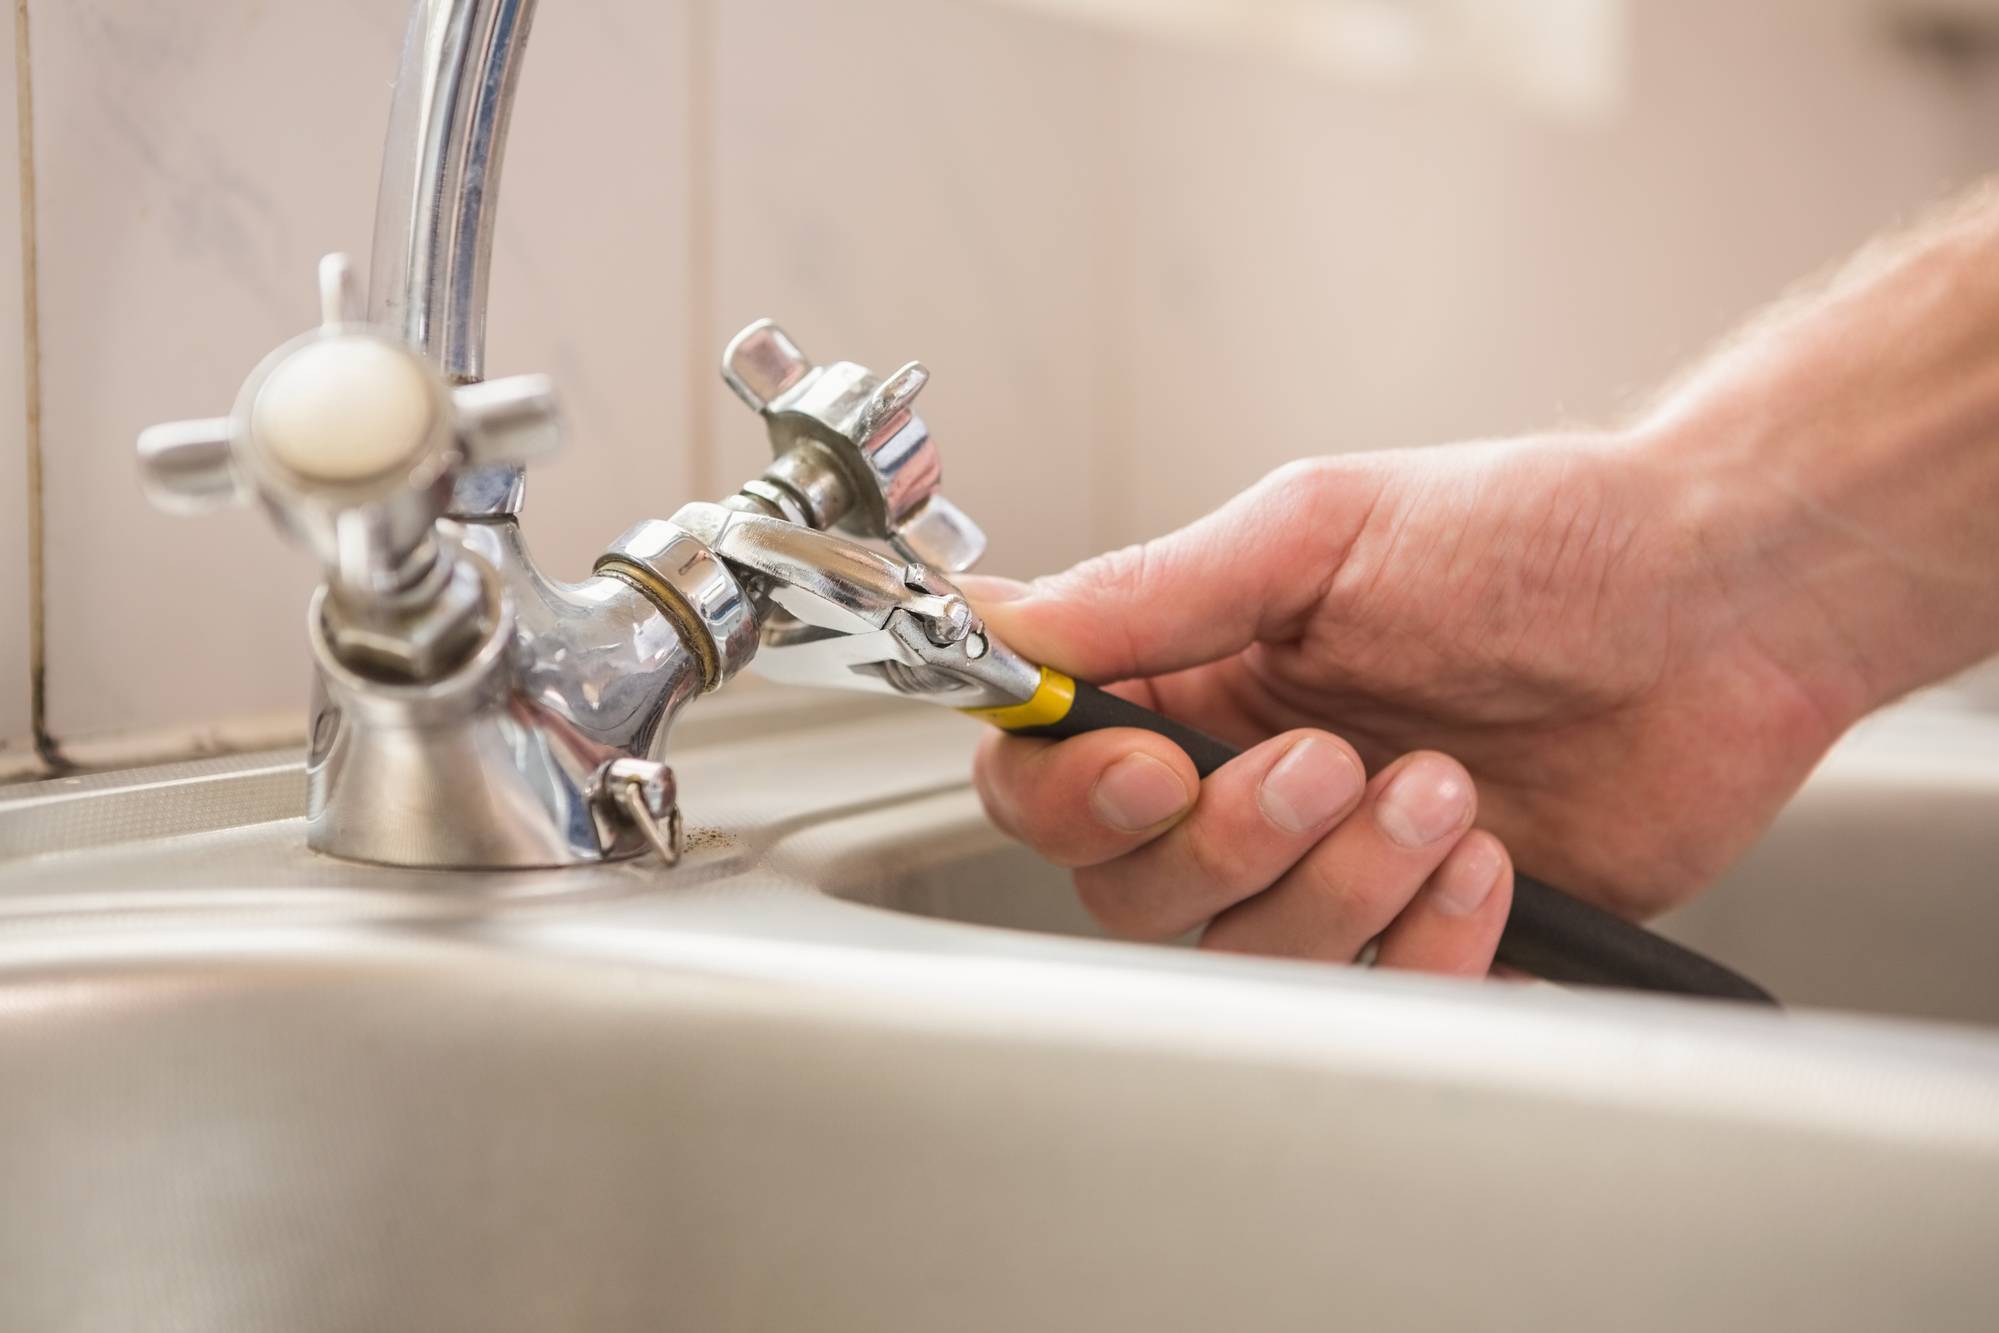
Before you fix a dripping faucet, turn off the water supply (you can completely, you can only in this branch, if possible). Next, it is useful to make sure that the water is still blocked. Water does not flow - we begin repairs. You will need a wrench or adjustable wrench. They will need to unscrew the head housing (the upper part of the housing).
It is better to work with a wrench. In order not to damage the surface during the operation, wrap it with a soft cloth, and then apply the key. Unscrew the head, remove the valve. Now you can replace the gasket or install a new valve. You pry the old one with something sharp - you can use a screwdriver with a flat blade, you can - with an awl, etc.
When choosing a gasket, please note that its edges must be beveled at about 45 °, otherwise the plumbing will make noise during operation. If this is not in your arsenal, you can trim the edge with something sharp - a knife or scissors. Replacing the gasket in the tap in pictures
Replacing the gasket in the tap in pictures
If there is no suitable gasket, it can be cut from a sheet of dense rubber (porous is not suitable). The thickness of the rubber sheet or gasket is 3.5 mm, the inner diameter is slightly less than the diameter of the rod, the outer one should not protrude. Don't forget the 45° beveled edges.
After installing the gasket, put the valve in place, twist the head. The new models do not require a winding on the thread.Moreover, winding is contraindicated - it can cause a crack in the body. If an old crane from the times of the USSR is being repaired, tow is placed on the thread, lubricated with packing paste, then twisted. After that, you can gradually turn on the water.
Sometimes the opposite story happens with this gasket on the valve - water does not flow or barely oozes. In this case, the gasket flew off the stem and blocked the flow of water. First, you can try to open / close the tap a couple of times, and if it doesn’t help, you need to repeat the operation described above, that is, repair the tap by replacing the gasket. Just remember to remove the old one stuck to the saddle.
Water oozing from under the stem
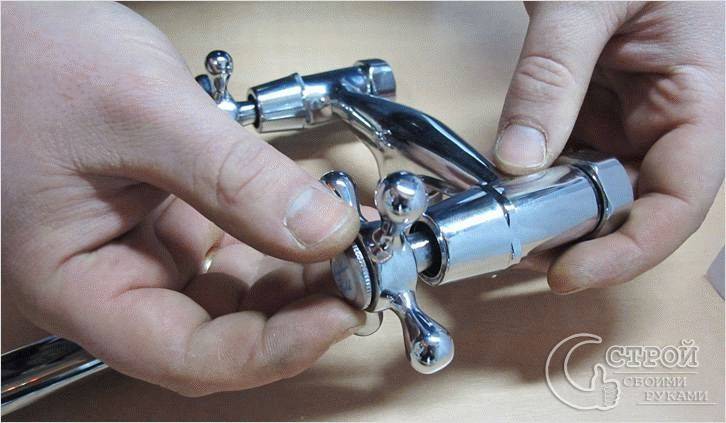
If water drips from under the valve, the seals are most likely worn out. Fix leaky faucet from under the stock in two ways. To begin with, you can try to twist the head housing more tightly. They do it again with a wrench. It is undesirable to use pliers, as traces remain after them. Tighten the head as far as possible (just don't overdo it).
The structure of the valve
If the thread is tightened to the maximum, and water continues to ooze, it is necessary to replace the gaskets on the stuffing box. To do this, first tighten the tap to the limit, then remove the tap head again, pry something sharp and remove both rubber rings, replacing them with new ones.
Water does not shut off
If the gasket is changed, and the water does not shut off, when the tap is rotated, the thread is torn off, it is necessary to change the stem - the thread on it has worn off. There are two options here - replace the stem itself or completely the entire valve head.
There may be a hole in the saddle

If the threads are not worn, the gasket is new, but the faucet is leaking, inspect the seat. It may have a hole in it.It is formed gradually - it is washed out by water supplied with high pressure. If the gasket is not pressed tightly in some place, a sink will form in this place. Sometimes water undermines the entire circumference, forming sharp edges, which quickly damage the gasket. The gully and sharp edge must be removed. Take a regular screwdriver and run it along the edge to dull the sharp edge. The same operation can be done with a nut file or a piece of fine-grained sandpaper. The main thing is to achieve a smooth (as far as possible) and non-sharp edge.
Difficulties in choosing a new cartridge
As mentioned earlier, when choosing plumbing, it is important to pay attention to its quality. Try to choose cartridges of well-known companies and avoid falling for clever fakes sold under the guise of products of well-known brands.
Unless you're building an entire plumbing system from scratch, you usually have little choice. The fact is that no matter which model of the mixer you choose, there are only two types of cartridges - ceramic and ball.
The advantage of using ball cartridges is the possibility of dismantling the bathroom faucet with a shower and repairing it if necessary.
A ceramic cartridge, unlike a ball cartridge, is non-separable. It only changes entirely.


 Ceramic cartridge
However, a significant advantage is the higher durability of ceramic plates and their resistance to the negative effects of hard water.
Now let's get back to the process of eliminating the leak detected from under the lever:
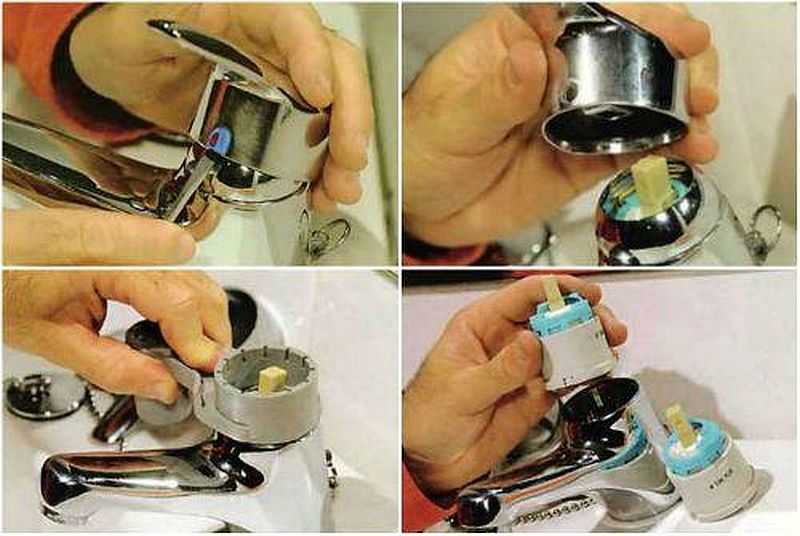
Using a flathead screwdriver, remove the plug that acts as an indicator for hot and cold water. Carefully unscrew the screw hidden under it.To do this, use either a hex wrench or a screwdriver of the required size, being careful not to spoil the thread. If you still cannot perform this operation accurately, then it is better to use a drill by installing a thin drill into it. Pull up to remove the lever from the faucet body. Remove the decorative trim with your hands or pliers. Loosen the nut that secures the cartridge to the faucet.
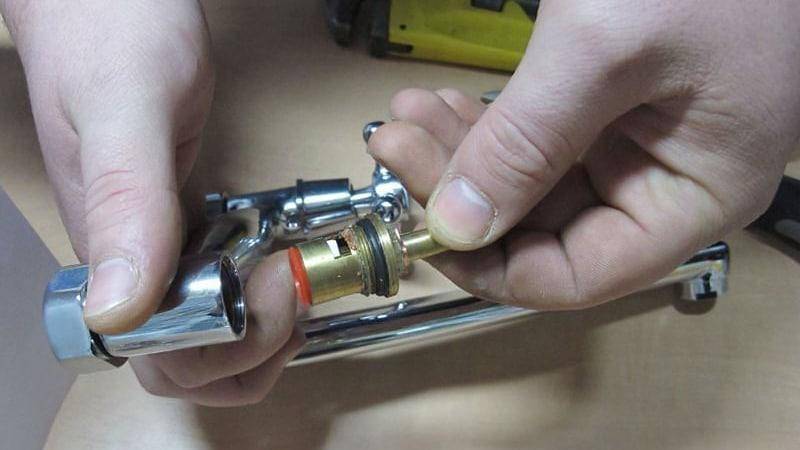
 Preparing the faucet for cartridge replacement
It is better to perform this operation with an adjustable wrench. Now carefully unscrew it by hand.
After that, pull out the old node and purchase a new one to replace it.
Having bought a cartridge, it should be installed, starting from the step-by-step instructions described above. Only the actions will be performed in reverse order.
Inside the mixer is another gasket. This additional piece is placed between the shift lever and the faucet body. Over time, it also wears out and is replaced.
In this case, all operations are performed in the same way as in the process of replacing the previous one:
- First you need to pull the lever. Sometimes you won't be able to do it right away. Then you need to unscrew the special fixing screw, and only then remove the lever.
- Remove what is left of the old gasket and put a new one in the vacant place.
- Then flax with paste or tape is wound on the thread.
- Install the lever again and, if necessary, screw in the fixing screw.
Do-it-yourself faucet repair
Probably, each person faced a situation when he found a puddle of unknown origin on the bathroom floor. An attentive person immediately found a small trickle of water flowing from the mixer.
All you need to do is call a plumber...
Or try to repair the faucet yourself.
kitchen faucet
With a mixer, which is in the kitchen, everything is more or less clear. This is the simplest kind of mixer.
You can replace it in the following way.
- Shut off the water with ball valves.
- Using a screwdriver, remove the “lambs” from the mixer taps.
- We unscrew the taps from the mixer with an open-end wrench.
- We change the gasket to a new one.
- We screw the tap into place, after wrapping the sealing tape on the thread.
The last action will avoid leaks in the kitchen faucet along the thread.
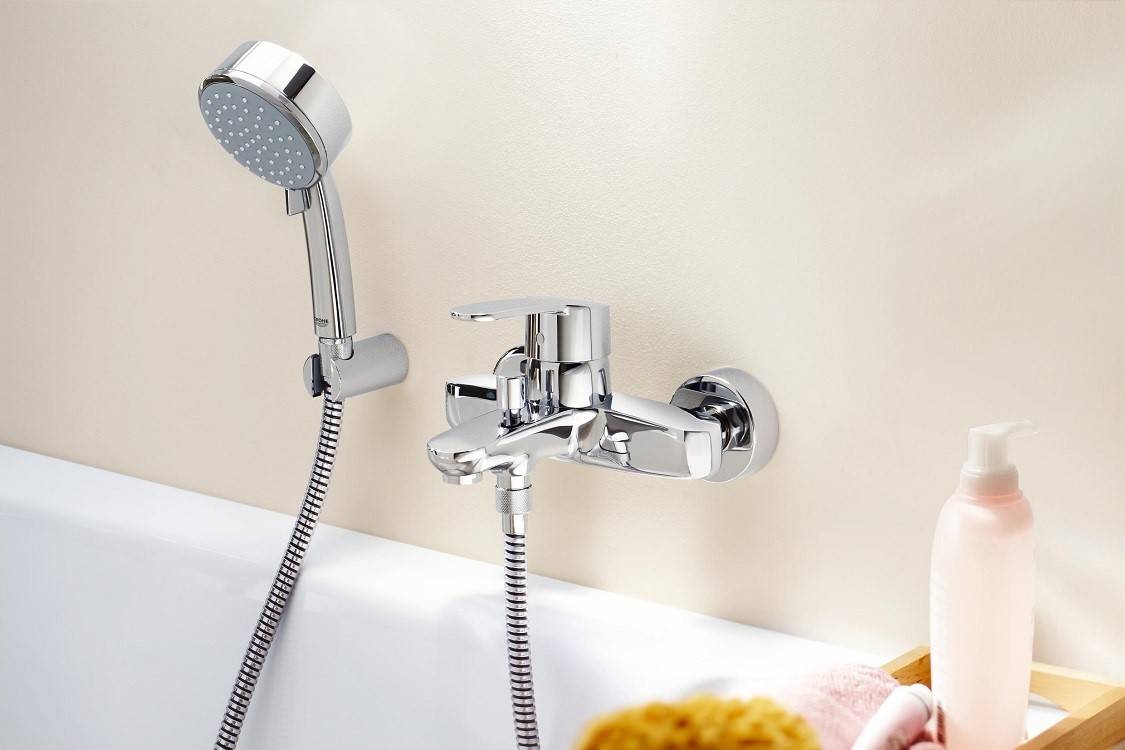
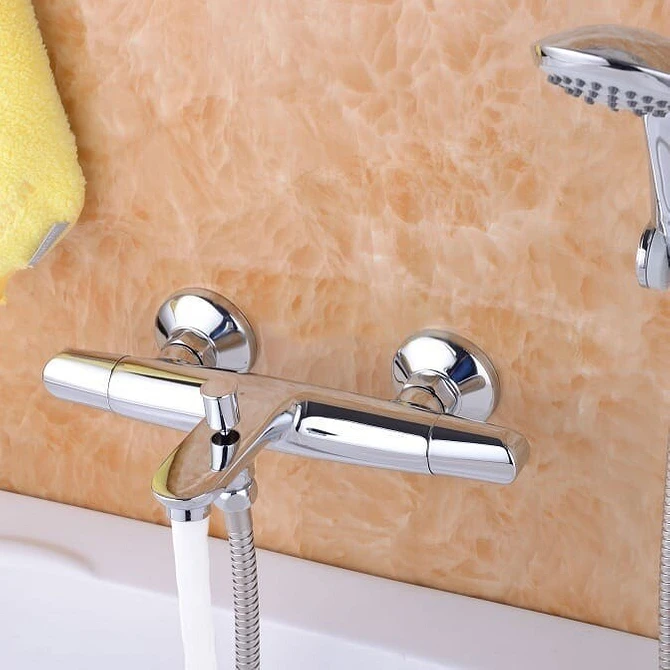
Bath faucet
It is more difficult to troubleshoot a bathroom faucet.
Let's try to understand this issue.
First of all, there are two types of faucets in the bathroom:
- Single lever mixers
- Mixers with two valve heads.
Each type of mixer has its own advantages, disadvantages, and, therefore, its own special defects.
Breakdowns of single-lever mixers
Let's start with breakdowns of single-lever mixers.
These include:
- Mixer leak.
- Weak water jet.
- Simultaneous flow of water into the drain and into the shower net.
- Button switch failure.
- Leak in the button area of the pushbutton switch.
Mixer leak
Most often, the cause of this malfunction is a small mote that ended up in the mixer mechanism. Mote can be between the ball and the ball sleeve or between the valve discs.
In this case, you need to replace the cartridge.
How to do it:
- It is necessary to remove the decorative cap of the water switch lever.
- Unscrew the fixing screw under the plug.
- Remove the switch lever from the mixer body.
- Replace cartridge.
- Assemble mixer.
Weak water jet
The cause of this malfunction may be a blockage of the aerator.
- The aerator needs to be unscrewed.
- The aerator mesh must be blown and rinsed on both sides.
- Restore original position.
Simultaneous water supply in the drain and in the shower screen
There may be several reasons for this malfunction, but the main one is most often the wear of the gaskets in the spool switch.
This malfunction can only be eliminated by replacing the gaskets and rings.
The only problem with such repairs - rubber rings for the spool - are rarely found on the open market. A spare kit is usually sold with the mixer. But, if it is not preserved, then as a temporary measure, you can cut out such rings yourself. For this purpose, any dense rubber will do. But such rings will not serve for a long time.


Pushbutton switch failure
The cause of this malfunction is a broken spring. So, in order to eliminate this malfunction, it is enough to replace the spring. The diameter of the new spring must be selected slightly smaller.
Leak around the pushbutton switch
The cause of the malfunction is a damaged oil seal. It just needs to be replaced. You can buy seals at any hardware store. The manual for the faucet usually describes the standard procedure for such a replacement.
As you can see, repairing a bathroom faucet is not such a difficult operation. Even if the mixer is single-lever.
Breakdowns of mixers with valve heads
This defect is eliminated by replacing the sealing gasket.
Breakage of the switch "shower - spout" The switching mechanism is simple. If such a breakdown occurs, then when disassembling the mixer, you can immediately identify the broken element and replace it.
Leaking water from a faucet
There can be two reasons for this:
- Gasket wear
- Defect in the processing of the conical plug.
Both causes can be eliminated by disassembling the mixer and replacing the damaged elements.
Faucet repair will not take a thinking person much time. You just need to turn on the logic, open the instructions and work a little with your hands. It's not as difficult as it seems.
Repair and replacement of crane boxes
This element is the main locking mechanism of the mixer. The internal core responsible for the performance of the crane needs to be replaced if any of the two “symptoms” appear:
- in the event of permanent leaks in the closed state;
- when uncharacteristic sounds appear in the form of a rattle when turning the mixer.
The sequence of actions when replacing a crane box depends on what type of device: with a worm gear or a disk version.
Worm gear devices
Worm-driven axle boxes are equipped with a retractable stem with a rubber cuff. Due to 2-4 turns of the rod, the water supply is completely blocked. Mechanisms of this type are famous for their low price and ease of use. But they have a short lifespan.
The limited service life is due to the loss of smooth running, which occurs due to the large number of closing / opening valve revolutions
Devices with a worm gear must be changed if cracks and chips are found on the saddle.
The replacement of the crane box is carried out in several stages:
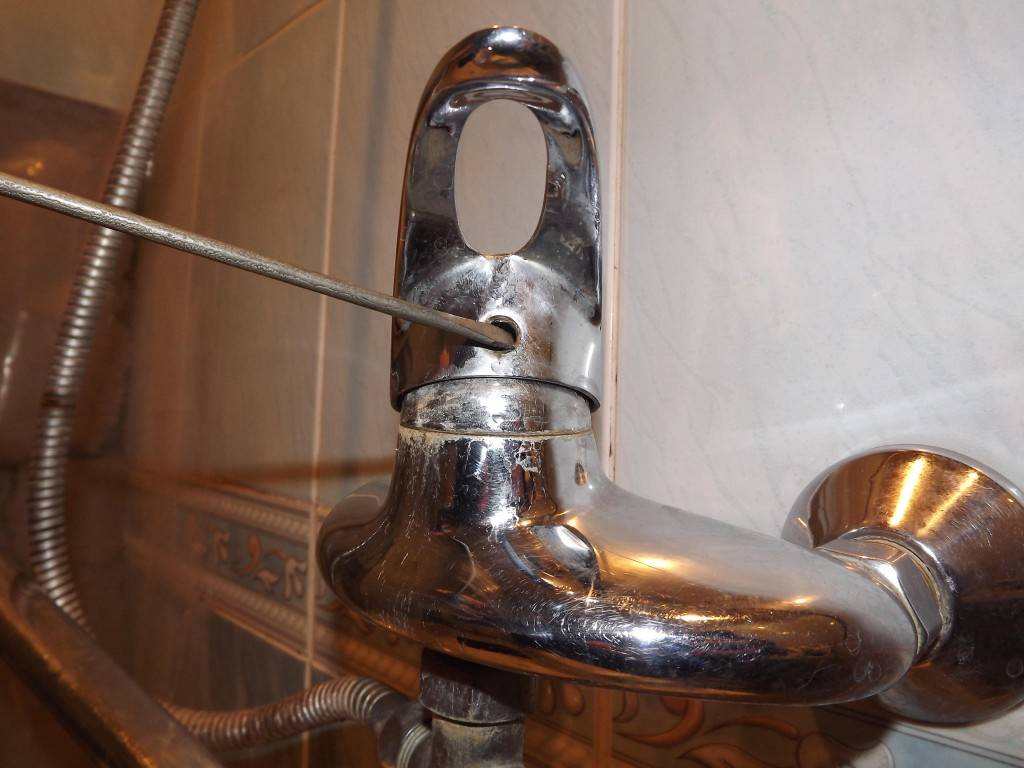
- Remove the top cap from the flywheel. To remove the tap valve, unscrew the bolt located under the flywheel cap. If this process is difficult, pliers are used.
- With a little effort, unscrew the valve.The thread and the inner surface of the flywheel are cleaned from operational debris accumulated in the cavity.
- With the help of sliding pliers, the “hardened” faucet fittings are unscrewed, opening access to the core installed in the mixer.
- Carefully remove the box. To ensure a tight entry of the new core, thereby preventing the flow of liquid, the mixing thread is cleaned before deepening the crane box. With the help of a card brush, the flywheel base and the nose of the gander are also cleaned.
- After making sure that the new axle box is compatible with the threaded connection, screw the new element into place of the removed one.
- Carry out the assembly of the crane in the reverse order.
To prevent damage to the glossy surface, before fixing the instrument, it is recommended to build a layer by placing a dense piece of fabric under it.
When screwing in a new box-box to seal the thread, it is necessary to wind it in several layers using FUM tape
When installing an inexpensive mixer model, it is advisable to check the presence of a sufficient amount of lubricant even at the installation stage. If necessary, oil seals should be lubricated with silicone or any other waterproof lubricant.
Crane boxes of disk type
The main working unit of the crane box, made of ceramics, are two tightly pressed plates with symmetrical holes. When shifted at the moment the handle is turned, they block the flow of water.
Crane boxes made of ceramics most often become unusable due to interaction with water, which contains various kinds of impurities.
Ceramic faucet boxes are famous for their long service life, but less resistance to polluted water.The main reason for their failure is the ingress of foreign objects into the interplate space.
If the integrity of the ceramic inserts responsible for controlling the flow of water is violated, they cannot be repaired. In this case, the defect can be eliminated only by completely replacing the old core with a new one.
The technology for disassembling a disk structure is not much different from that used for worm gears. It includes five main steps:
- Using a screwdriver, lift the top plastic cover of the valve.
- Loosen the fixing screw.
- Take off the flywheel.
- Remove the upper part of the box from the saddle.
- By separating the upper and lower parts, they gain access to ceramic discs.
When installing a new core made of ceramic, it is important to control the degree of tension. It is easiest to ensure tight screwing and pressing of the crane box into the mixer by installing a lock nut
In the future, in order to prevent damage to the core of the disk version, experts recommend installing coarse filters at the apartment entrance. They will protect ceramic elements from the harmful effects of water impurities.


Video advice: how to repair a disk crane box:
Varieties of mixers
Often, all types of water supply points (except showers) are called faucets. In fact, the term "faucet" means plumbing fittings with a place for issuing a jet of water and a movable element that opens or closes the flow of fluid. Cranes are installed on single-pipe supply systems. If water is supplied to the device from two pipes and hot and cold liquids are mixed, the device is called a mixer.
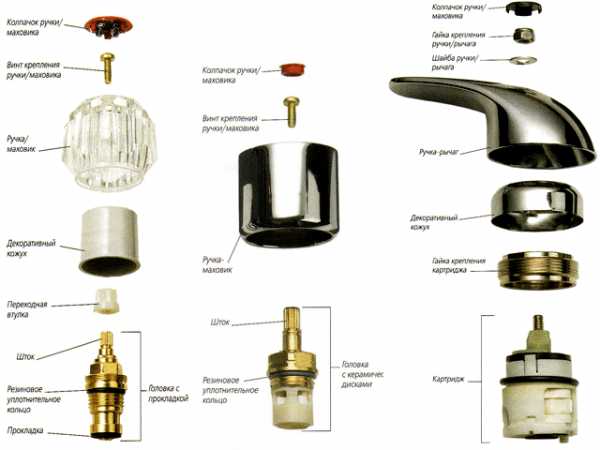
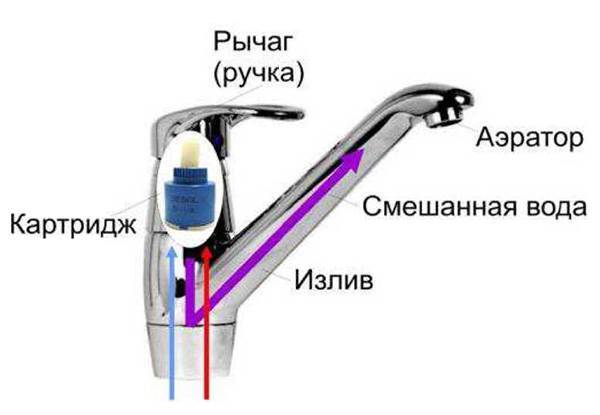
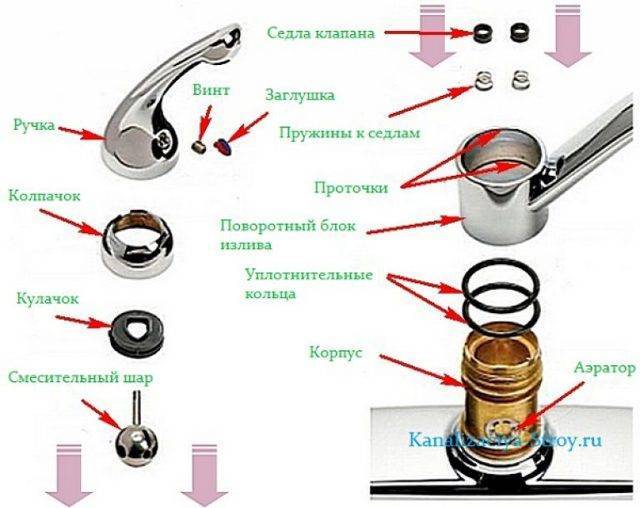
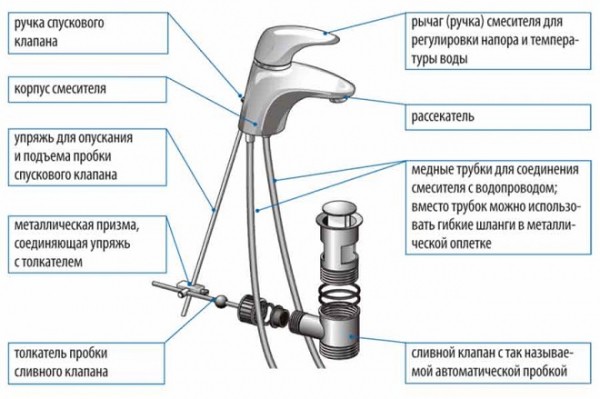
The main details of the mixer (faucet):
- housing - one-piece or composite, mounted on a support. It contains a mixing unit (nodes). For a single-lever faucet or mixer, the assembly is a cartridge, in the valve version - a faucet box;
- a spout with or without a built-in aerator, may have special nozzles for dispersing the jet, lighting and other functions;
- control element (elements) - levers or valves;
- additional equipment and parts. As additions are a shower head / heads, a holder for a watering can, a second spout for drinking water and more.
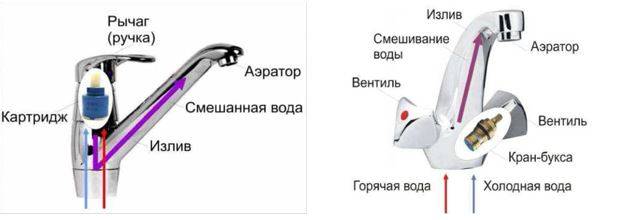
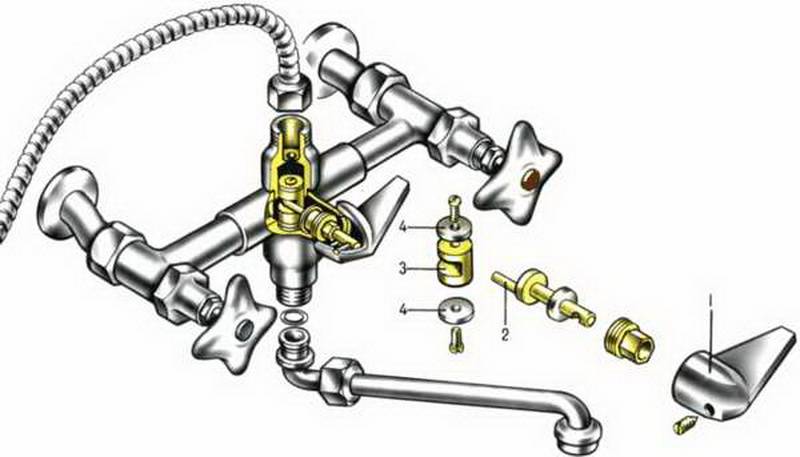
Below is a diagram of the design of a conventional water faucet. It is interesting that the locking device is similar to those used in valve mixers, but there is one in the tap, and two in the mixers, for each of the water supply pipes.

Device options are distinguished by:
- installation site - desktop, wall, floor;
- dimensions - compact, medium, enlarged;
- complete set - with a shower head, with a stationary shower, with an additional spout;
- spout type - made as a single unit with the body, swivel, retractable, on a tripod;
- control - one- or two-lever, valve, touch, automated (with a thermostat);
- degrees of automation - manual control, with elements of automation, automated.
What other breakdowns are there and how to fix them
It happens that the breakdown does not depend on the mechanism. How to fix such problems?
Shower switch broken
The most common failure of a faucet in the bathroom is to leak from both the spout and the shower at the same time. This means the switch that directs the water is broken.To fix the breakdown, you first need to figure out what type of switch you have. There are several.
Single lever bath mixer with shower VIDIMA Fine
pendulum
It is also called the flag type. Usually found on valve variants. Most often, when repairing the current pendulum model, you need to update the spool or cartridge. The work is done by analogy with the repair of a crane box.
- First of all, you need to get rid of the stub.
- The screw, which under it is also removed.
- The lever is unscrewed.
- The key removes the switch.
- The goldsmith is changing.
- All parts are returned to their place in reverse order.
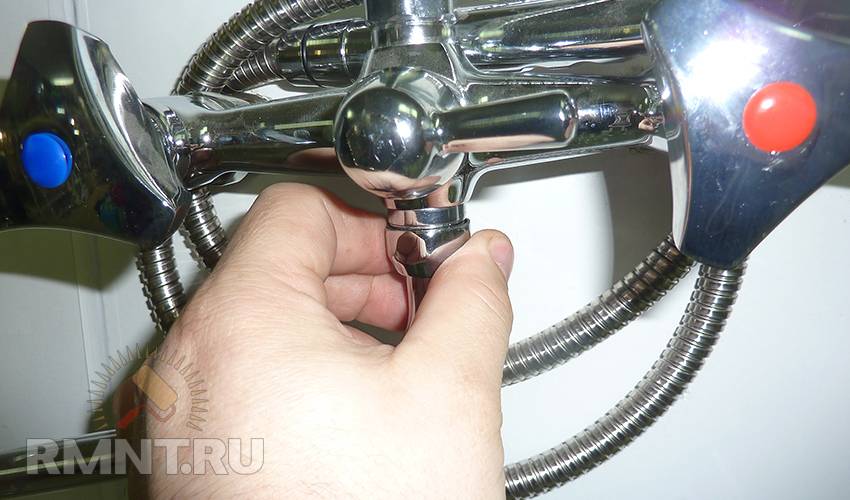
Push-button (exhaust)
More often it comes with cartridge models, but it is also found in valve models. Repairing a pushbutton switch most often comes down to replacing the gasket. It can wear off, harden or deform over time. After that, she will not be able to hold water. If the water does not switch or flows from everywhere at once, the gasket most likely needs to be updated. It's done like this.
Grohe Grohtherm thermostatic double lever bath mixer
- Take the wrench. Use this tool to unscrew and remove the button. Try to act carefully, without damaging the elements of the mechanism.
- Next you will see a stock. It will have several seals in the form of washers. Remove them and replace with new ones.
- Replace the button.
Instagram @berg.interior
Instagram @santehmega 1
Instagram @santehmega
Leakage at the junction of the gander and the body
The junction of the faucet spout and the body often leaks. Here, too, the most likely problem is a damaged gasket. It is put on the body of the spout, thus sealing the joint. If it has thinned and a leak has appeared, the gum must be updated as follows.
Repair manual
- Take an adjustable wrench and unscrew the nut that attaches the spout to the faucet body.
- Loosen the mounting nut.
- Remove the damaged part and install a new one. It is convenient to use tweezers for this.
- Install the parts in reverse order.
Instagram @magazin_sputnik
Instagram @luxform
The junction of the watering can and the shower hose is leaking
And again, the question is most likely in the gasket. Seals are installed at the joints, which deteriorate over time. The shower is dismantled along with the hose, and the part is replaced following the algorithm.
Repair manual
- Loosen the hex nut that holds the clan and hose together.
- Take the key. Remove the flare nut at the point where the hose and shower head are attached.
- The gasket will be located on the clamping hose.
- Replace it with a new one.
Instagram @elitesw_ukraine 2
Instagram @burlington_ru
Instagram @elitesw_ukraine
Leaking water pipe joint
If your case is the flow of joints with the water supply, first of all determine the location of the malfunction and the way the faucet is connected. There are three types of breakdowns.


Malfunction of the inlet pipes at the junction. If a faucet mounted in a wall leaked at the connection points to the branch pipes, most likely the gasket was deformed or worn off. She needs to be replaced. Just unscrew the faucet from the wall by removing the nuts and change the seals.
Roca Victoria-N single lever bath mixer with shower
The flexible hoses connecting the mixer and the pipe leaked. Bathroom faucets are connected to the plumbing using flexible tubes that can leak over time. If this happens, check the seal on the thin end of the tube. Most likely it's about him.If it is worn out or warped, update the consumable, and the leak will be eliminated. It's done like this.
Repair manual
- Remove the product from the sink or bathtub. Use a wrench for this. Troubleshooting from the bottom of the mixer while it is connected is very difficult.
- Unscrew all hoses connected to the product.
- Replace the rubber rings on each one.
- Install all elements in place.
- If the gaskets on the shower hose have deteriorated, the spout must also be dismantled.
Instagram @kobzevstudio
Instagram @indesland
Instagram @designplan.online
Instagram @berg.interior
Conclusions and useful video on the topic
The presented video shows how to repair the most common breakdowns of a shower faucet:
The causes of breakdowns of faucets with a shower can be very diverse. In some cases, they are easy to fix on your own using common tools. In other situations, you have to resort to the help of plumbers.
Unfortunately, sometimes the crane cannot be repaired and has to be replaced.
To prevent this from happening, it is important to take preventive measures, and when buying plumbing, choose modern models of well-known companies.
Tell us about how you repaired a faucet with a shower hose with your own hands. Share the technological nuances you know that will be useful to site visitors. Please leave comments in the block below, post photos and ask questions on the topic of the article.


