- Mounting types and connection methods
- Consignment note
- mortise
- Integrated
- How to remove a chip on an acrylic bath. Step-by-step instruction
- We fix the chip in the bathroom ourselves.
- "Sanoks", acetone, soda
- Auto putty
- Sandpaper
- Preparation for repair
- Types of baths and methods for repairing damage
- Types of possible damage
- Home restoration methods
- Tips for preventing chipping
- How to repair chips?
- Training
- Making a porcelain patch
- Pouring glue BF-2 with pigment
- Sealing with putty and enamel
- Enamel restoration
- Preparation for repair
- Necessary materials
- Chip removal
- How to hide chips on the surfaces of metal products
- Restoration work with two-component enamel
- Restoration of chips damaged by rust
- How to repair a crack in an acrylic surface
- How to remove minor damage?
- Surface preparation
Mounting types and connection methods
Overhead sink installation
Installation of a kitchen sink made of artificial stone is performed in various ways. The sink can be installed independently, without outside help.
There are four types of fasteners:
- waybill;
- mortise;
- integrated;
- undertable.
Each of them has its own installation features.
Consignment note
One of the simplest installation methods is to “impose” the sink on the cabinet, after removing the countertop.
The required size is ordered in a specialized store. If it is not there, the remains are cut off on their own. To do this, the material is placed on the countertop, the excess is isolated with a marker, cut off.
But it is better to order a sink and a cabinet ready for it - installation is easy and fast. There are two ways:
- adhesive;
- using brackets.
In the first case, the sink is placed on the pedestal, having previously processed the ends with hermetic silicone.
In the second case, from the inside of the cabinet, it is necessary to tighten the screws and install the brackets. The sink is exposed and the screws are tightened tightly.
mortise
Products are cut according to the prepared template. Inside the countertop, stepping back from the edge of 2-3 centimeters, draw a line. Holes are made in it and a contour is cut out, cleaned of sawdust. Attachments are put on the sink, and installed in a slot lubricated with silicone.
Integrated
The sink is mounted flush with the countertop, they are made from the same material. In most cases, they order ready-made samples at factories: the sink is installed immediately with the countertop.
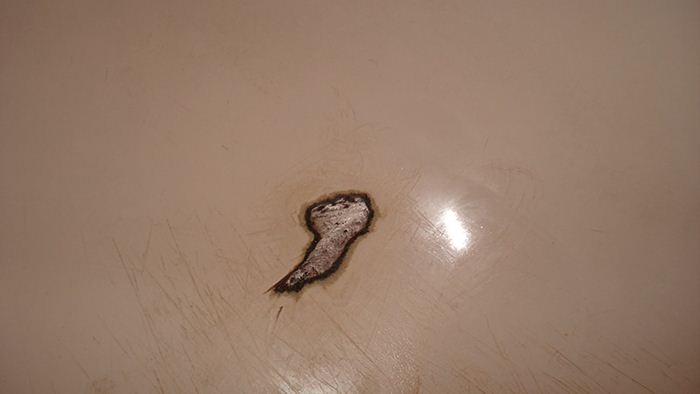
How to remove a chip on an acrylic bath. Step-by-step instruction
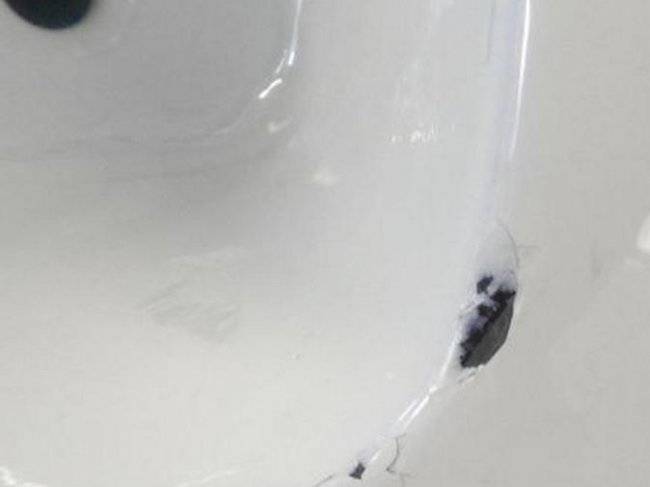
Acrylic baths are quite sensitive to mechanical stress. Therefore, chips usually appear as a result of careless handling. They can also appear if you accidentally drop a heavy object on the corner of the bath. But it is quite possible to cope with chips if you follow the instructions:
- Assess the extent of the damage. Some chips can damage not only the top acrylic coating, but also the base itself. In this case, you can not do without professional help, and sometimes you even need to replace the bath.
- If the chip is small, and you can fix it yourself, you need to use first coarse-grained, then fine-grained sandpaper. If you have a drill handy, you can make the appropriate nozzle to make the job go faster.
- Wash the damaged area with soapy water (preferably without foam) to degrease it, remove all debris and dust.
- Wait for the repair area to dry thoroughly. The fact is that solutions and formulations will not be well fixed if they are applied to wet surfaces. Even the presence of one small drop can spoil the whole work.
- Use acrylic compound to repair damage. It is necessary to apply several layers using a small spatula. You should not just clog the hole, because then the lower and inner part of the composition will dry for too long. And if it does not dry out and start using the bathroom, it will spoil the result of the work.
- If too much composition has been applied, the excess must be removed with a spatula.
- Wait for the acrylic mixture to dry completely.
- Polish the surface. If, after drying, tubercles form, you must first level them with sandpaper, and then polish them.


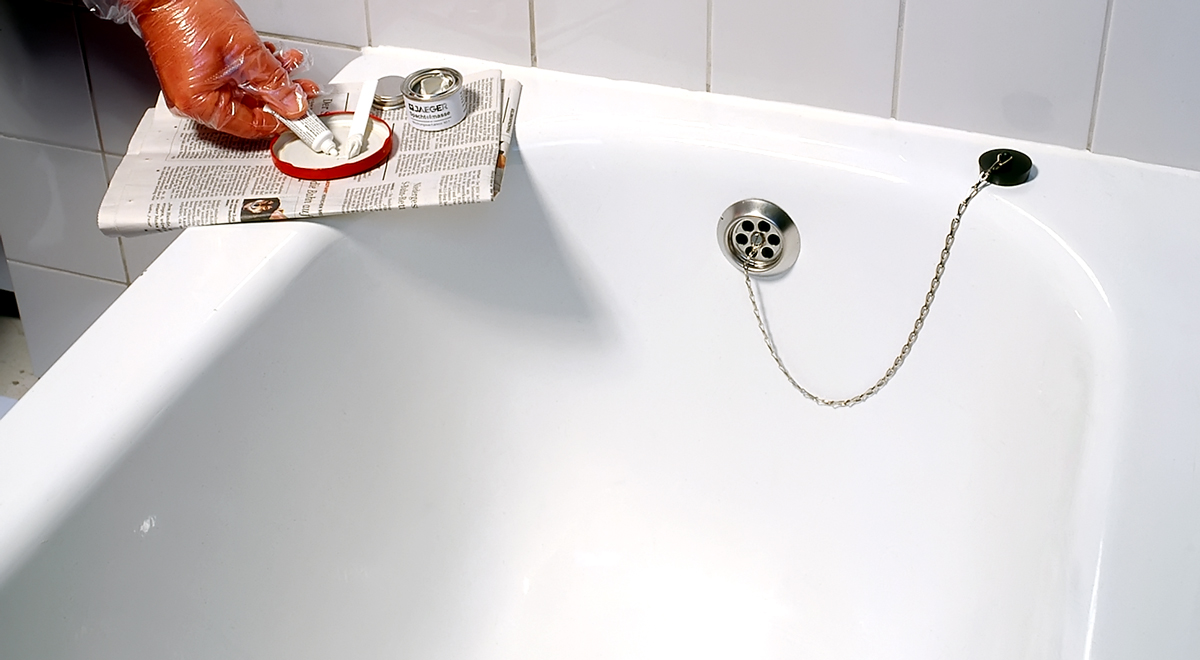
We fix the chip in the bathroom ourselves.
Sets by sets, but not all people have the opportunity to buy such sets. They are quite specific and are not present in all stores of the capital, but in the regions of Russia it happens and you can’t get it at all. What to do in this case? We will not despair. Let's accept the fact that any restoration is not perfect and let's get started. First you need to go to a simple auto shop and buy the following materials:
Preparing a bath
"Sanoks", acetone, soda
In order to clean the chip from dirt and the so-called "soaps" (a thin layer of fat from dried soap, shampoo), we need a detergent. We buy one of the most budgetary funds "Sanoks" its price for August 2016 is about 50 rubles. It contains oxalic acid, corrodes rust well. Plain, baking soda. Acetone.
Puttying chips
Auto putty
It is to her that you will close the chip in the bath. There are no fundamental requirements for it. If there are only a couple of chips on the bath, then it is better to choose a smaller tube and preferably the lightest color so that the dark color does not show through the new bath enamel. (cost 50-90r.). There is an opinion that fiberglass putty holds temperature better. Personally, when we close up chips in the bath, we use just this one, but such putty is also a little more expensive.
Cleaning the chip
Sandpaper
Sandpaper, take the cheapest. It does not require special quality, it is needed to grind the putty “flush” with the bathroom, and it is soft. To repair one chip in the bathtub, a couple of leaves will be enough. One is 80 grit, the other is a little smaller. It makes no sense to take moisture-proof paper, take a simple one. (18-20 p.)
Preparation for repair
If a crack, chip, abrasions appear on the enamel, and the bath itself turns yellow and becomes rough, there is no need to postpone repairs. In order for the restoration result to last longer and withstand mechanical stress, contact with water and temperature changes, it is necessary to carefully prepare the surface for work. The preparatory stage, as a rule, takes more than half of the time and effort spent on do-it-yourself enamel restoration. It consists of the following operations:
-
Purification from pollution.The surface of the bath is cleaned of dust and dirt with an ordinary alkaline detergent, and then rinsed abundantly with running water.
-
Rust cleaning. Yellow smudges around cracks and chips are removed with a rust converter.
-
Removal of the top layer of enamel. A crack or chip is polished with fine-grained sandpaper so that after the repair the coating comes out smooth and even. With extensive damage, you can use a grinder with a grinding disc.
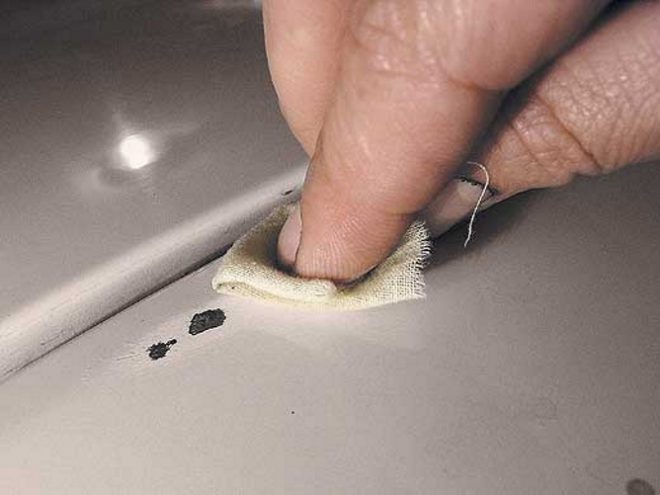
- Degreasing. Fat is removed from the surface of the bath using any solvent: alcohol, acetone, gasoline or acid.
- Drying. The bath is left to dry for 24-48 hours or forced to dry with a building hair dryer.
Types of baths and methods for repairing damage
- Acrylic.
- Cast iron.
- Wooden.
- Steel.
- Glass.
- From natural stone.
Wooden, glass and natural stone models are almost impossible to restore on your own. Too big a risk, permanently spoil the surface.

Another thing, bathrooms with an enamel surface. Their restoration will not require large costs and effort. The main thing is to start the recovery process immediately, without delay.
- Repair any chips on acrylic surfaces immediately. Any damage allows moisture to enter the material and can ruin the acrylic bowl.
- Rust. Regardless of what material the font is made of, rust on it can appear on almost any type of coating.
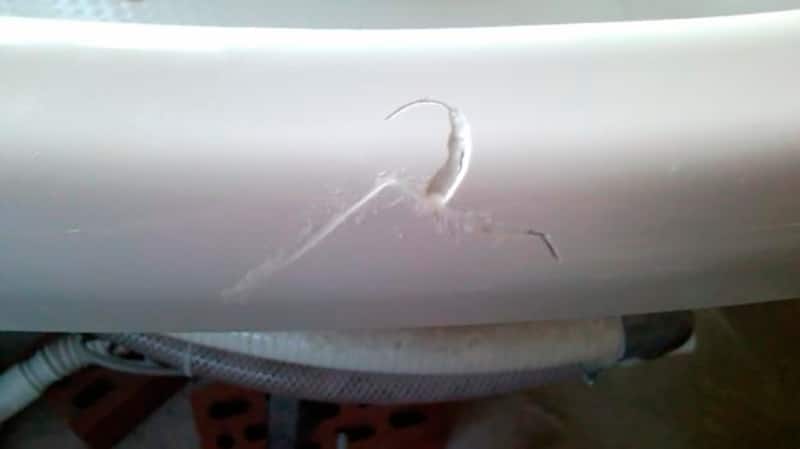
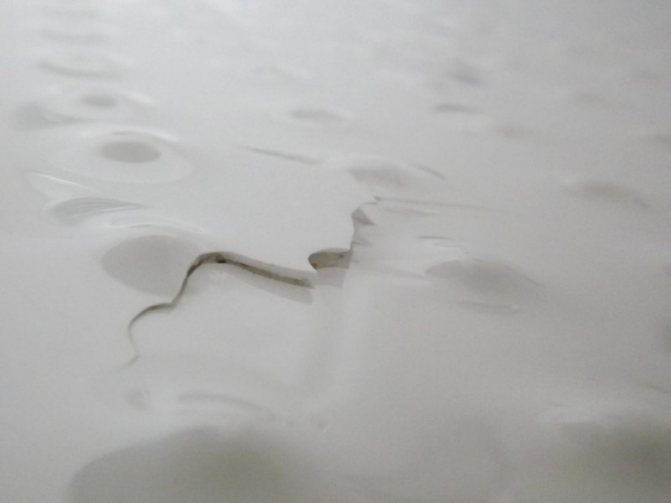
- Scratches. Most often, acrylic and cast iron products suffer from scratches. A scratch on an acrylic surface is much more dangerous than on a cast iron one.A deep scratch that is not repaired immediately can grow larger and lead to a split, breakage of the bottom or walls of the bowl.
- Split. The real problem with "acrylic" bathtubs is that the bottom or walls are too thin.
- Through hole. Can appear in a bowl of any material. If you can repair chips and scratches on your own, then with a through hole, you cannot do without the help of professionals in restoration. You can only try to put the insert on your own.

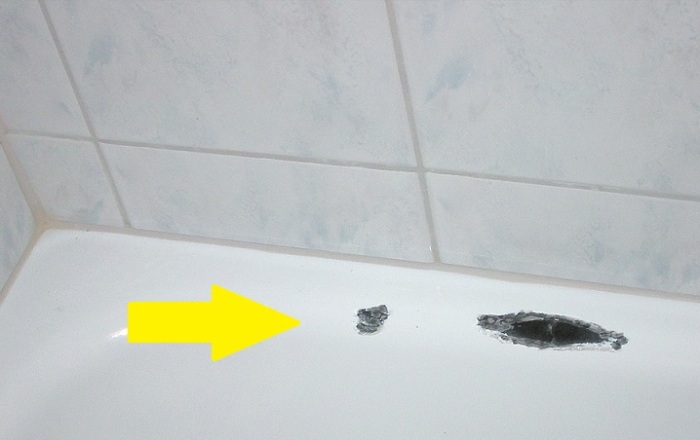
Types of possible damage
Depending on the type of bathroom and its material, damage can also be different. The most common are acrylic, cast iron and steel bathtubs. All of them can have similar damage that you can fix yourself. Glass, wooden and marble bathtubs cannot be repaired: such models are considered exclusive, and without the help of a specialist, everything can only get worse.
We close the chips in the bath with our own hands
The most common possible damage:
- chipping is a fairly common type of damage. It is better to close it immediately and not wait for it to increase;
- scratches - this problem is most serious for acrylic bathtubs, as deep scratches can cause the bathtub to split;
- split - applies only to acrylic baths and may be the result of a deep scratch or too thin a bath;
- rust - can be present in almost any bath;
- a hole is a defect that is the most time-consuming to repair. Only a specialist or a special insert can help here.
Home restoration methods
Previously, chips in the bathroom were covered with a mixture of BF-2 glue and filler (chalk, tooth powder, whitewash). Restoration with a mixture of epoxy resin and porcelain powder was considered more reliable.But both coatings are porous, brittle and short-lived. Now there are much more reliable means for restoring coatings. What to do if you do not have a ready-made bath repair kit?


- At the first stage, as in the case of a repair kit, you need to clean the chip from dirt, soap, shampoo, grease, etc. First, the cleavage site is wiped with Sanoks, which contains oxalic acid and corrodes rust, then with soda and acetone.
- The second stage is the sealing of the chip. Auto-filler will help you with this, fiberglass is best. Such products withstand high temperatures well, adhere well to the surface. For the restoration of plumbing, choose the putty of the lightest shade so that it does not show through from under the enamel.
- The third stage is grouting putty. It is performed when the filler is completely dry. It can be the cheapest paper with 80 grit or a little less. Sand the coating so that it does not show above the level of the enamel.
- The fourth stage is the application of enamel. To seal a small chip, you only need a small tube or aerosol. But if the paint turns out to be a little lighter or darker than the main tone of the bath, it can stand out against the background of the product. If you are unpretentious about the quality of work, this will be quite enough. But when a perfect result is required, it is best to enamel the entire bathtub. This ensures that the color is even across the entire surface. You may need more than one coat of paint.
If the bathtub enamel chip has an area of several square centimeters or there are many such damages, then it would be advisable to replace the entire bathtub or use other restoration methods.
An acrylic liner can be installed as an alternative, but the cost approaches that of a new steel or acrylic bathtub. Therefore, the method is only advisable if the rest of the finish is also quite expensive, and also if the work is performed by a reliable contractor with experience. Any defect can lead to the formation of voids between the liner and the tub, moisture ingress. And when microorganisms start up in the voids, a specific smell appears.
Instead of an acrylic liner, you can use a relatively new method of restoration - self-leveling acrylic or stakryl. The material is simply poured onto the sides of the baths and leveled with a spatula. Thus, a flat surface is formed, which repeats all the protrusions and dips of the bottom, adhering well to the main one, especially if the enamel is touched by corrosion.
Modern materials for bathroom renovation easy to use. They can be used even without special knowledge and skills. But if you want a perfectly even color over the entire surface bathtubs, as well as for the coating to last for decades, contact the professionals.
Tips for preventing chipping
Preventive measures will help extend the life of bathtubs, avoid situations in which there is a threat of breakage, damage to the product:
- for surface care, cleaning agents without abrasives are used;
- chlorine / other bleaches are not used;
- you can’t bounce in the bathroom (acrylic containers can be damaged even by jumping small children);
- the product is purchased with an acceptable threshold for the thickness of the decorative layer;
- for the period of repair, it is necessary to cover the bath with a dense cloth, plastic wrap.The best option is to put a protective wooden shield of suitable
- sizes. In addition, such a design will serve as an auxiliary surface for placing tools and materials.
The presence of several ways to restore the enamel of the bath allows you to choose the right option for different cases. If there is any doubt about the materials, it is advisable to contact the experts. Only a professional will tell you how best to fix a chip on an enamel / acrylic bath.
- Acrylic bath care
- How to choose a cast iron bath
- Bathroom in beige tones
- The use of wall paneling for finishing the bathroom
How to repair chips?
The broken off sections of the bath require the use of special methods of sealing. Suitable for this:
- making a porcelain patch;
- pouring BF-2 glue with pigment;
- sealing with putty and enamel;
- enamel restoration.
Training
The end result largely depends not only on compliance with the technology, but also on the thoroughness of the preparation. This stage of work includes the following steps:
- The damaged area is cleaned and degreased with soda powder, Pemolux or other cleaning agent.
- The chip is ground using a drill with abrasive nozzles. This will improve the adhesion of the mastic to the base.
- The bath is rinsed and the treated surface is dried with a hot hair dryer.
- The dry area is degreased with acetone, alcohol or thinner, and then primed.
The primer lays down in a more even layer and enhances the adhesion of the material if the treated area of the bath is heated before applying it.
Making a porcelain patch
To work, you will need any unnecessary or broken chinaware and epoxy. When choosing porcelain, you should carefully select the color: it should be as close as possible to the shade of the bath.
Repair is carried out sequentially:
- Porcelain is ground into a fine-grained powder.
- A layer of epoxy is applied to the chipped area.
- Sprinkle the resin with porcelain powder.
- Give the required time for freezing according to the instructions.
- After 2-3 hours, a deep chip is again covered with epoxy.
- Repeat sprinkling with crumbs and hold until hardened.
- Polish the area with fine sandpaper.
Epoxy resin, applied in several layers, completely hardens in about 9-10 hours.
Pouring glue BF-2 with pigment
The tool, known by this name, contains polymeric substances in its composition. They create a hard, strong, but transparent patch on the chip surface. So that it does not differ in color from the bath, pigment additives are used.


It can be:
- dry white;
- dentifrice;
- crushed chalk.
The repair process is as follows:
- A small amount of pigment is added to the glue, the mass is mixed.
- Apply white adhesive to the recess.
- Withstand a layer of glue on the bath for a day.
- If necessary, add a small amount of glue.
- The new layer is also allowed to dry completely.
- Polish the repaired area with the finest sandpaper.
A multi-layer coating of BF-2 adhesive must dry for at least 72 hours.
Sealing with putty and enamel
You can remove a chip on the font with the help of car putty and car enamel. These materials are resistant to water, temperature extremes, mechanical stress.
The job does not require special skills:
- putty is applied to the prepared chipped area;
- distribute the mass so that no bubbles remain;
- level the surface of the patch with a paint spatula;
- wait for the material to dry completely;
- polish the area with fine sandpaper;
- paint the hardened mastic with enamel.
Enamel restoration
This is the least labor intensive way. However, it does not guarantee a perfectly flat surface. To work, you must have enamel for restoration. It is made from synthetic resins. You can find such a tool in plumbing stores.
The cleaned and degreased surface of the chip is painted with a brush and dried for 4 hours. Then duplicate the layer and incubated for 24 hours. After that, the bathroom can be used.
This method is more suitable for fresh and small lesions. In this case, it provides a long-lasting and resistant coating on the bath.
How to repair chips on the surface of the bathroom, the video will tell:
Preparation for repair
Preparation is a very important step that should not be missed. The quality of the repair and its service life will depend on its implementation. As mentioned earlier, the chip must be repaired immediately. If this is not done, rust may form and must be removed. If the chip is fresh, then this stage of preparation can be missed.
- Rust removal. To do this, you will need such improvised tools as a knife, needles, a screwdriver. They can be used to remove rust. You can also use a special tool to remove it, which is sold in household chemical stores. If it is not available, then a regular cleaning agent will do. After all the manipulations, the chip cleaned of rust must be rinsed well with water.
- You can also remove dirt with the help of household chemicals.It must be remembered that such products should not contain abrasives.
- After complete cleaning, the repair site is well washed and thoroughly dried with a hair dryer. The surface must be perfectly clean and dry.
- Degreasing is a necessary procedure, without which the durability of the seal will significantly decrease. Degreasing is carried out with acetone, then dried again with a hairdryer.
On this preparation can be considered completed. All photos and videos of the preparation process can be seen in this article or in the gallery of our website. After that, you can start repairing the chipped bath enamel. This can be done in several ways and using various materials, which will be described below.
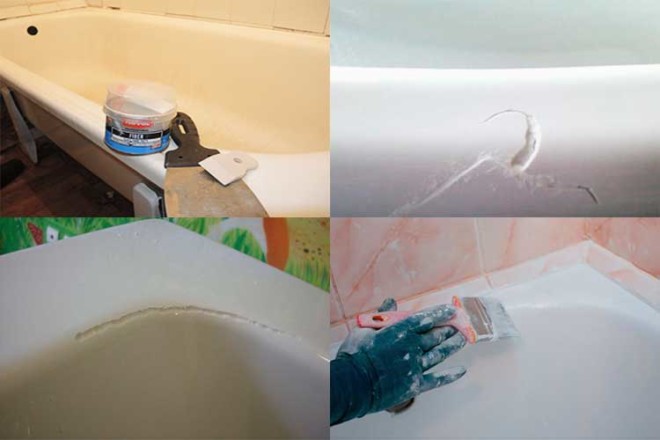
Bathtub restoration - step-by-step work on removing chips from a bathtub
Necessary materials
- The main and most necessary material is auto-putty. It takes a little, and its color should be as light as possible. There is a special putty for fiberglass that will work just as well. Its advantage is heat resistance, but its price is higher.
- Sandpaper. It also needs a little, a maximum of 1-2 sheets. It should be small, you can take the cheapest one.
- Special aerosol designed for the direct repair of chips. Its color should match the color of the bath itself. The price category does not matter, but if it is possible to choose a better model, then it is better to choose an aerosol with heat and water resistance.
- Instead of an aerosol, you can use bath enamel. It will already have all the necessary characteristics.
- Abrasive polishing paste. Necessary for the final stage to mask the traces of repair.
In order not to buy all the components for repair separately, you can immediately purchase a ready-made kit for repairing chips. Such kits usually include the following components: putty, spatula, sandpaper, aerosol and / or enamel.


Chip removal
Putty preparation. To do this, you need to mix the resin and hardener, while the resin should be thirty times more. The mass is mixed with a spatula and immediately applied to the chip. At the same time, it must be well tamped. You can put a little more than you need: all the excess can be removed first with the same spatula, and after hardening, smooth out with grinding. If the quantity is not enough, then, most likely, the repair will have to be carried out again.
We eliminate chips in the bath
How to hide chips on the surfaces of metal products
A variety of building materials, special kits allow you to repair coatings on destroyed areas of various areas. What to use in case of specific damage to the layer, experts can advise.
Restoration work with two-component enamel
Special tools - "enamel restorers" allow you to eliminate minor scratches on an enameled bath. For work you will need: two-component enamel, gray color, acetone, building hair dryer, sandpaper.
- The damaged area is sanded and degreased with acetone.
- Part of the enamel is poured into a measuring cup (the approximate volume required for the restoration of the chip).
- Color is added in small portions. The mixture is thoroughly stirred and applied in short strokes to the surface of the bath for color comparison.Having achieved the desired shade, all samples are erased with acetone.
- The hardener is added to the enamel (the proportion is taken strictly according to the instructions on the package). The mixture mixes well.
- With circular movements of the hair dryer along the border of the site, the damaged area warms up.
- The composition with enamel is poured / instilled in small portions into the damaged area. The repaired area is periodically heated with a hairdryer to evenly distribute the enamel and improve the process of gluing the mixture with the metal surface. It is necessary to enamel the zone until the cleavage and bath layers are leveled.
- The period of complete drying of the composition in the restored area is maintained.

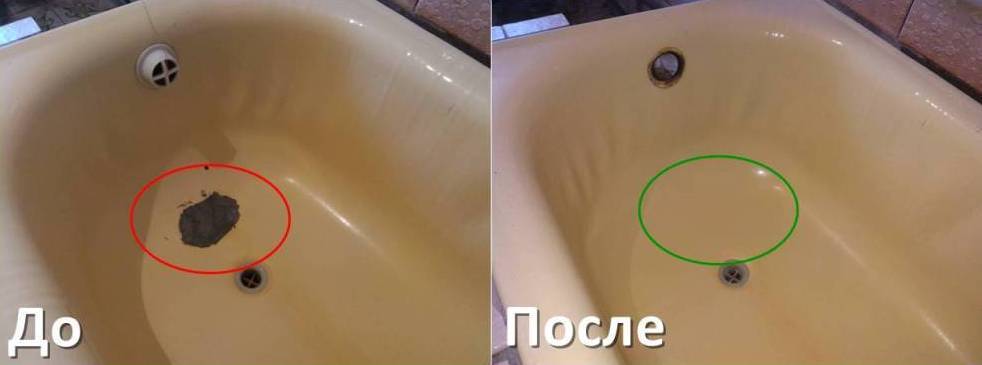
Restoration of chips damaged by rust
In the absence of special mixtures, it is possible to use other means to repair a significant chipped bathtub enamel.
The following materials and tools will be required: SHELL / Elkon-P rust removers, Fairy / Gala detergents, acetone, car putties / enamels (for leveling body surfaces), screwdrivers, brushes, a rubber spatula for grouting seams.
- The damaged area is cleaned of rust with improvised tools (knife, screwdriver). Then a special liquid is applied to remove corrosion.
- The cleavage site is preliminarily isolated - the sides of the plasticine are fixed along the border of the site, and then the instructions from the packaging of the product are followed.
- The area is washed with water, and rust residues are removed with a brush.
- Dried hygiene products (soaps, shampoos), grease is removed with the help of special washing liquids.
- The foam is washed off with water, and the area of damage to the surface is thoroughly dried with a hair dryer.
- The chip is degreased with acetone and re-dried and warmed up.
- The damaged area should be covered with putty using a spatula. Grouting is done carefully, with effort - the composition must completely cover all the corners of the chip. The fundamental point is that the levels of putty and enamel on the bath must match. The repaired area is allowed time to dry.
- To remove minor surface irregularities, the patched area is processed with fine-grained sanding paper.
- If slight depressions are found, the puttying process is repeated.
- The repaired area is painted over in the color of the bathtub with car enamel of a suitable shade.
Many manufacturers produce bathtubs with various shades of decorative coating (only white - about 10 tones). Sometimes, no matter how hard you try, it is very difficult to recreate an identical shade on the damaged area. Even if it is not possible to achieve a uniform surface tone, corrosion of the container will be prevented.

How to restore a well-groomed appearance of the container if there are a lot of chips? In this case, purchasing a new bathtub will be the best solution to the problem.
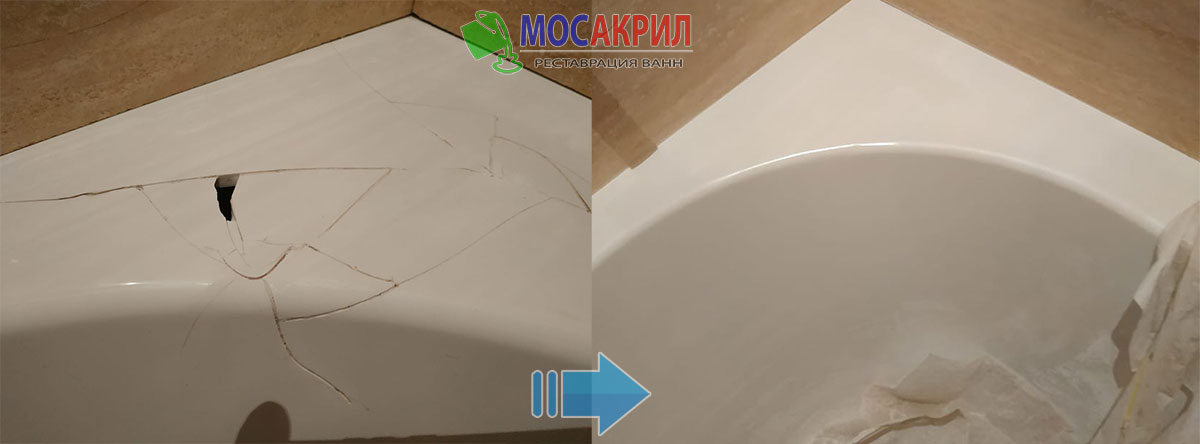
How to repair a crack in an acrylic surface
Bad things happen quite often in life. And what if your favorite bath cracked? The main thing is to eliminate it quickly, otherwise the damage may increase due to constant loads and temperature changes:
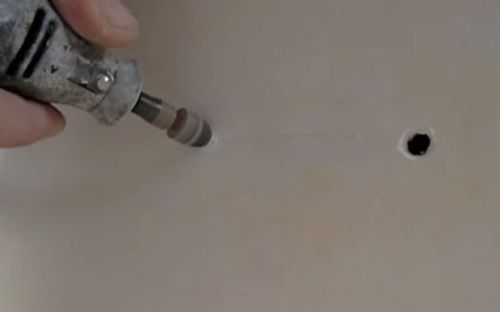
- Action 1. To begin with, the crack needs to be reamed. This will prevent its spread. Using a thin drill, switching the drill to high speed, we drill a couple of holes at the ends of the crack. You don't need to drill deep. A hole up to three millimeters deep is enough.
- Action 2. Now the crack needs to be expanded. This is necessary so that the composition fills all the damage.Using a drill, we will draw it along the entire crack.
- Action 3. Glue masking tape around the crack. It will not allow damage where there is no crack. Once the adhesive tape is pasted, use sandpaper to make a roughness on the surface of the crack. Remove the formed chips with soapy water.
- Step 4. Following the instructions, mix the acrylic with the hardener, apply the composition to the damaged surface. Smooth with a piece of plastic or a rubber spatula. We leave to dry for a day.
- Step 5 Now the surface should be polished. Glue adhesive tape around the former crack. Armed with sandpaper, we begin to sand. We start with large grains and gradually move to small ones. Next, remove the chips with soapy water. As soon as the surface is uniform, you need to take a polish and rub the surface with this paste. Continue to rub until a mirror shine appears.
How to remove minor damage?
Before proceeding with the removal small scratches on bathroom, it must be thoroughly washed and dried. It should be noted that acrylic is a porous material, so it takes at least 7 hours to fully dry it. Simply wiping the surface with a dry cloth is not enough. It is necessary to give moisture time for full evaporation.
Instructions for removing small scratches:
- The first stage of processing is grouting the surface with fine-grained sandpaper. The skin should be the thinnest, and the degree of graininess should be P2500 units.
Only under these conditions will it be possible to wipe, and not scratch the surface.
- If after grouting the surface is smooth and no roughness is felt on it, then the work was done with high quality.
- The second stage is the treatment of the damaged area with an abrasive polish. On sale you can find special repair kits, the average price of which is 600 rubles. The polish is applied to the surface of the bath and rubbed with a felt cloth.
- After 2-3 hours, the polish will be absorbed, after which you can proceed to the third stage of processing. It comes down to applying wax for acrylic baths (this component is also part of the repair kit).
- After an hour, the bath is washed using a liquid product.
If the size of the scratch does not exceed 0.5 mm, then it is enough just to intensively rub it with felt. As a rule, such treatment is enough to remove a shallow damage.


Surface preparation
In order for the result of applying a patch to an enamel chipped bathroom to be of high quality and last for a long time, it is necessary to carefully prepare the damaged area. The reliability and durability of the patch, its resistance to moisture, mechanical stress and changes in ambient temperature will depend on the correctness of the preparatory work.
Preparatory measures are carried out as follows:
- The damaged area is thoroughly washed with detergent from contamination.
- If there is rust around the edges, you need to go through the rust converter.
- The edges are treated with fine-grained emery cloth.
- At the end of the rough treatment, the damaged area must be degreased with alcohol or acetone. This is done so that the applied product adheres better to the metal surface of the bath.
- The last step is to wash the entire cavity of the bath and leave for 2 days for complete natural drying. You can use a hair dryer to speed up the drying process.


