- Recommendations for the repair of faucets
- What types of mixers are
- valve mixer
- Single lever models
- Thermostatic
- Sensory
- Choosing a new cartridge
- Most common bathroom faucet failures
- Troubleshooting a Cartridge Faucet
- How to disassemble a single-lever faucet in the bathroom and in the kitchen - step by step instructions
- Disassembly of Single Lever Ball Mixer
- How to disassemble a faucet with a cartridge
- Choosing the most reliable mixer: what we look at first
- Shape, economy, service life
- Bathroom faucet repair: valves, half-turn faucets and joysticks
- Do-it-yourself repair of a ball mixer in the kitchen
- Cartridge replacement - is it possible to repair a faucet with one handle
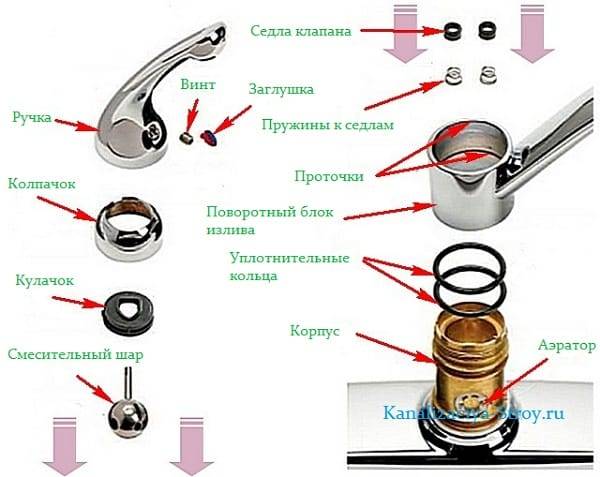
- Ball valve design
- Types and arrangement of mixers
- Step-by-step bathroom faucet switch repair
- Types of single-lever mixers and their device
- Cartridge mixer: structure
- Single Lever Ball Mixer
Recommendations for the repair of faucets
To increase the service life of the device, it is necessary to comply with certain requirements during its operation. The tap should not be tightly closed, because after the element is closed, the water still continues to flow out, and closing it all the way contributes to the rapid demolition of the valve and the thread of the product.In order to exclude the possibility of such a breakdown, it should be opened and closed in half a turn.
Given the above recommendations, the process of self-elimination the most popular breakdowns mixer, will not be an impossible task for you. On the contrary, it will allow you to use only proven materials of exceptionally high quality, quickly eliminate the cause of the malfunction, and also refuse the expensive help of plumbers.
What types of mixers are
Depending on the internal design of the device, there are several options for mixers.
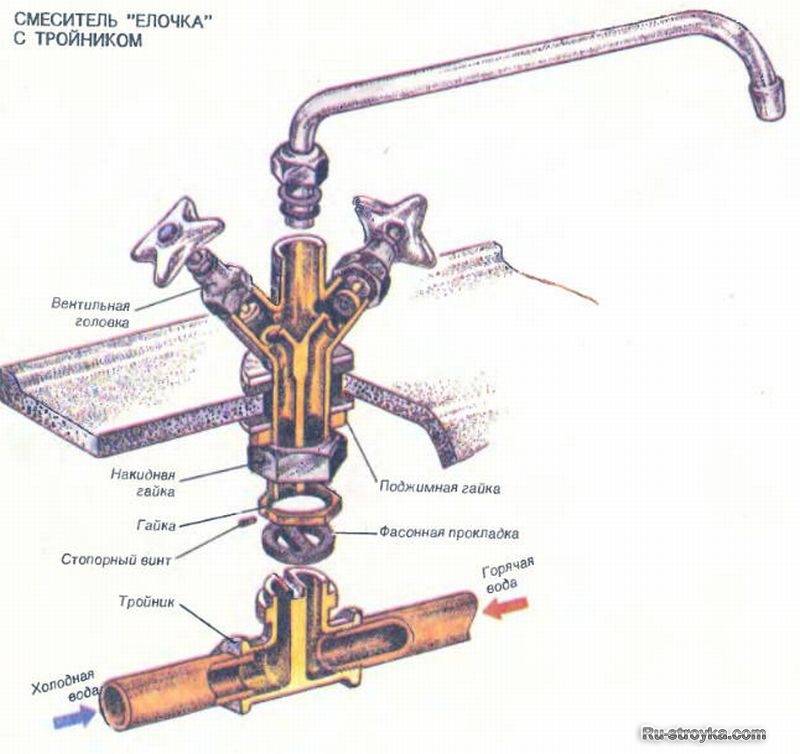
valve mixer
Valve models are equipped with a crane box, which can be:
- with plates of sanitary ceramics;
- with rubber seals.
Distinctive characteristics of the first variety:
- In one minute, the device is capable of passing up to 25 liters of water.
- The product is convenient to use. Ceramic faucet box quickly opens and closes the fluid supply.
- It is sensitive to various impurities contained in water. Small stones, rust deposits abrade the internal structural elements, so the product can quickly fail.
The features of the crane box with rubber gaskets include:
- The product completely opens the through hole. At the same time, it does this smoothly, which allows you to more accurately adjust the required temperature regime.
- A rubber gasket is responsible for locking the passage hole. Unlike ceramics, it is less sensitive to a variety of contaminants. But it can quickly become unusable due to constant exposure to hot water.
- Using the device is accompanied by a rather strong noise.
- As time goes by, the device becomes difficult to use. This is explained by the fact that the brass rod is gradually covered with a layer of brass oxide, due to which it increases in size.
Single lever models
This is the most modern version, which is in great demand among consumers. This is explained by the fact that the device is convenient to use. To set the desired temperature and intensity of pressure, you only need to turn the lever in the desired direction.
This takes much less time than with two-valve models. So, you save not only a few seconds, but also reduce the amount of consumed resources.
The disadvantages include - the complexity of maintenance and difficulty in finding the necessary cartridges. Cartridges vary in size: 20, 35 and 40 mm. The larger the diameter of the device, the faster you fill the tub or other container.
Thermostatic
The development of modern technologies has not bypassed sanitary ware. Models equipped with a thermostatic element are becoming more and more popular. A small device controls hot and cold water. You only need to set a comfortable temperature and pressure.
In such models, there are no familiar levers and valves, and control is carried out using knobs and buttons. On one side there is a handle for adjusting the flow rate, on the other there is a temperature scale. With it, you can set the required temperature. This option is especially convenient if you have small children - you can not worry about the safety of the baby.
But do not forget about the "fly in the ointment".Unfortunately, our plumbing system cannot boast of stable operation and the same water pressure. In the event of pressure surges and temperature fluctuations, thermostats may not be able to cope with the load. This leads to malfunctions of the mixer.
Sensory
The most innovative option. The operation of the device is based on electronic and infrared sensors. Such options are intended for public areas, as they can significantly reduce water consumption. The device works from various batteries: batteries, accumulators, mains using a 12 V power supply.
When choosing a mixer, consider not only the design of the product, but also the design. A convenient model will not only facilitate daily manipulations, but also save time.
The appearance of the device is also important, because the mixer should not stand out from the general style of the room. A properly selected model can complement the room, emphasizing its design.
Choosing a new cartridge
As we mentioned above, it is important to pay attention to the quality of the plumbing you buy. Give preference to cartridges from trusted European companies and try not to fall for the tricks of scammers who copy the performance of well-known brands
As a rule, if you do not install the entire water supply system in a house or apartment, you have no choice which type of cartridge to choose.
The fact is that, despite the variety of models, there are only two main types of cartridges - ball and ceramic.
As a rule, if you do not install the entire water supply system in a house or apartment, you have no choice which type of cartridge to choose.The fact is that, despite the variety of models, there are only two main types of cartridges - ball and ceramic.


The advantage of using ballpoint cartridges is the ability to disassemble the cartridge itself and repair it if necessary.
The ceramic cartridge cannot be disassembled, it must be replaced as a whole, but the ceramic plates in it are more durable and are not affected by hard water. If the faucet was originally installed with the expectation of using a ball cartridge, ceramic you put already you can't. And vice versa.
But back to the issue of repairing a single-lever mixer when a leak is detected from under the lever:
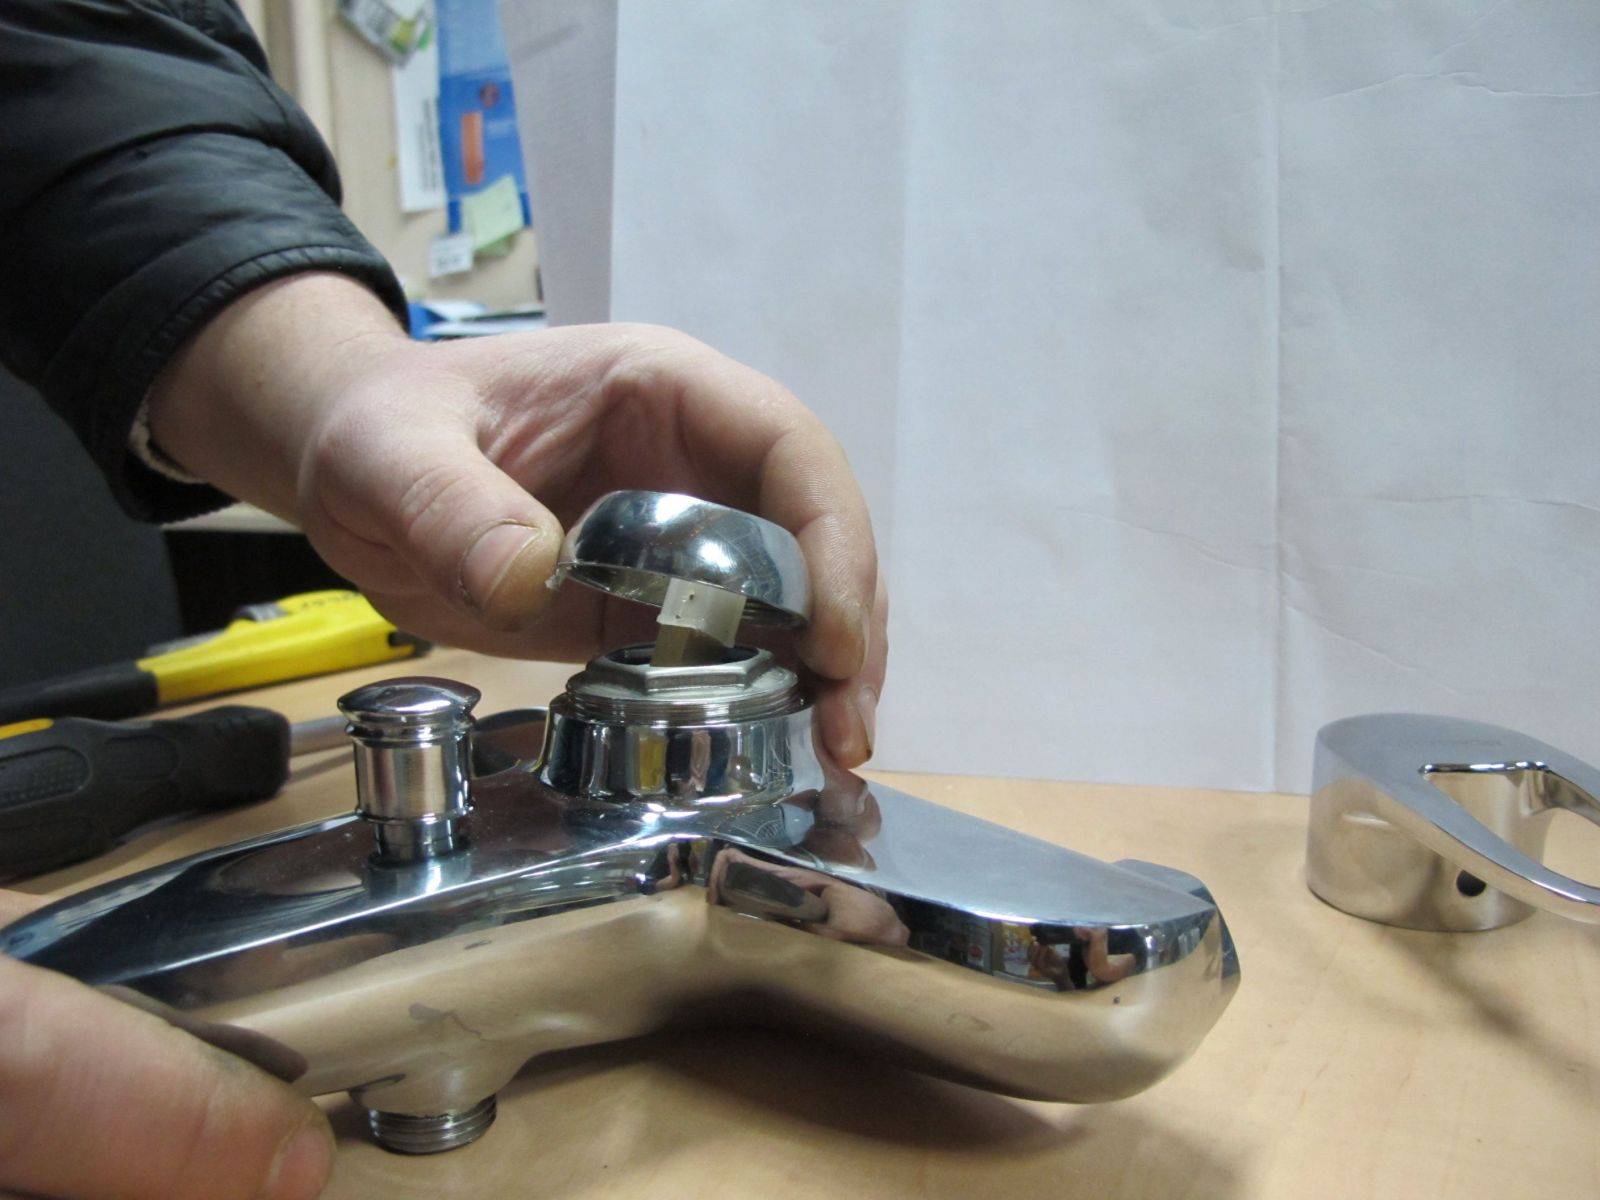
1. Use a screwdriver to remove the plug indicating the direction of cold and hot water.
2. Under it you will find a screw. Carefully unscrew it with a hex wrench or a suitable size screwdriver so as not to damage the threads. If you can't do it carefully, use a drill with a thin drill bit.
3. Remove the lever from the mixer body by pulling it up.
4. Remove the decorative element from the mixer with your hands or pliers.
5. Unscrew the nut that directly presses the cartridge itself to the faucet body. To do this, first use an adjustable wrench, and then carefully unscrew it with your hands.
6. Everything. Now you can pull out the old cartridge, feel free to go to the store with it and buy yourself a new one.
7. To install a new cartridge, follow all the above steps in reverse order.

Most common bathroom faucet failures
Description of standard mixer failures
First of all, we will consider the most common breakdowns that may occur during the operation of the device. The most common are:
- flow of liquid when the valve is completely closed. In lever mixers, this is due to damage to the cartridge by small mechanical particles. In valve devices, this occurs when the internal elements of the valve are worn or damaged;
- stripped valve thread or connecting thread. Such a failure occurs when excessive force is applied during closing of the valve, which leads to the disruption of the internal thread of the valve. A complete replacement of the faucet in the bathroom will be required if the connection of the faucet to the water main is broken. This usually happens with faucets that are mounted on the walls, if you lean on them while taking a shower.;
- corrosion on the inside of the case. All bathroom faucets that are not made of stainless material are subject to this.
Problems such as thread stripping and housing corrosion are inherent in poor quality products.
Troubleshooting a Cartridge Faucet
Cartridge models have a different design. Actions for their repair depend on the nature of the fault. If the tap does not close completely and constantly flows, you need to change the cartridge. In case of damage to the housing shell or low tide, the mixer is completely dismantled and replaced with a new one.
Most often, such models quickly wear out the spout or control unit. In the event of a breakdown of the latter, the cause is a factory defect, long-term operation or clogging with large solid particles. At the same time, plastic parts or the stem holding the faucet handle fail. The cause of the breakage of the ebb is a clogged filter nozzle. Because of this, the flow of water is blocked and the increased internal pressure breaks its shell.
To fix a leak, do the following:
- After shutting off the water supply, disassemble the mixer.
- The fixing nut is slightly tightened with an adjustable wrench.
- Remove the accumulated liquid with a rag.
- Open the water supply and check for leaks. To do this, turn the adjustment rod by hand. This method makes it possible to adjust the tension of the nut and avoid its breakage. When the mixer is assembled, the load on the rod will increase greatly. If the nut is overtightened, it may break.
- If the rod moves without effort, the mixer is assembled.
With a shower switch, two breakdowns are possible:
- wear of the spool gaskets causes the simultaneous flow of water into the shower and a regular faucet;
- if the rod spring wears out, it is impossible to return the switch to its original position.
The difficulty in replacing spool gaskets is that they are rarely commercially available. Usually you have to cut the desired shape from a piece of rubber. But such details do not last long. Another solution to the problem is to use the spare set that usually comes with the faucet.
One gasket in the switch is at the top of the spool and the other is at the bottom. To replace the top one, it is not necessary to dismantle the switch. It is necessary to remove the decorative cap and carefully replace the worn part with a new one. If the problem could not be fixed in this way, then the switch is disassembled to get to the bottom gum.
Switch disassembly procedure:
- close the mixer lever;
- disconnect the flexible shower hose;
- remove the cap and unscrew the screw fastening;
- pull out the switch;
- the spool is removed from the body of the main device;
- change the sealing gum, applying a sealant to them;
- assemble in reverse order.
To replace the stretched spring and eliminate the malfunction associated with the non-return of the button to its original position, perform the following steps:
- the adapter is removed in the same way as when replacing gaskets;
- take out from it a rod with a spring;
- remove the old part and install a new one with the help of pliers;
- the switch is assembled and installed in place.
How to disassemble a single-lever faucet in the bathroom and in the kitchen - step by step instructions
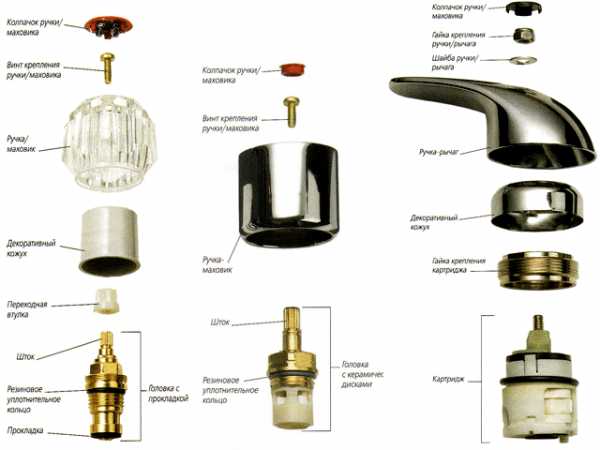
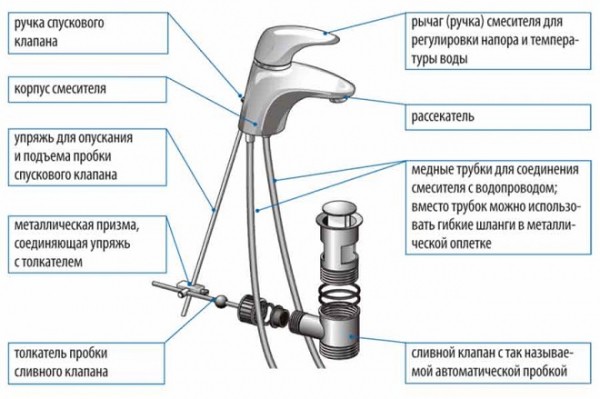
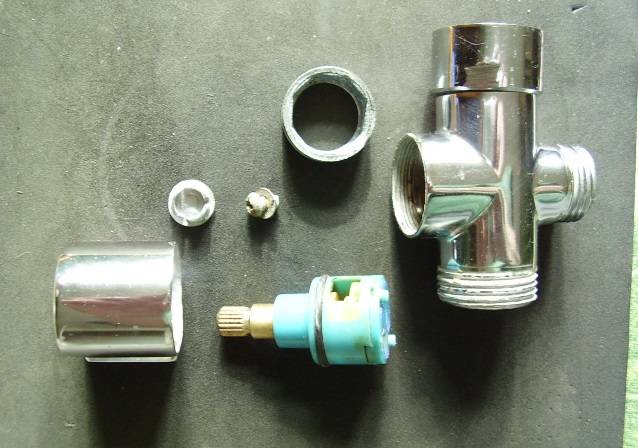
Single-lever (with one handle) are the simplest of all existing taps (Damixa Arc - Damiksa, Franke, Oras - Oras, Iddis). Their design is represented by a spout, a rotary lever, a fixing nut, a gasket, a replaceable ball or cartridge.


Disassembly of Single Lever Ball Mixer
The ball water tap (Gustavsberg, Haiba, Rubineta, Shruder, Varion, Flora) is one of the single-lever types. It is used to mix water, two pipelines are connected to it: hot and cold. Temperature and pressure control is carried out using a ball, which also acts as a locking element. The ball is a replaceable item.
 Single-lever ball mixer device
Step-by-step instructions with a video on how to disassemble a single-lever ball mixer in the kitchen or in the bathroom:
- Before starting work, you must completely turn off the water supply. Otherwise, during disassembly, boiling water may pour out of the water supply pipes;
-
Next, you need to remove the decorative plug, if you have one;
-
After that, unscrew the screw with a screwdriver, which presses the rotary control. This screw connects the handle to the valve stem;
-
Then the handle (control knob) should be removed from the housing.It is necessary for the supply of water and is a regulating part;
-
Next, using the key, unscrew the cap;
-
We take out the cam by hand;
-
After that, you can remove the ball mechanism. Care must be taken, often there are springs mounted under the balls that help control the flow and temperature of the water. Remove the locking mechanism carefully so as not to damage the fragile springs;
-
Using a screwdriver, carefully remove the valve seats and springs to them;
-
We remove the swivel block of the mixer spout;
-
Any faucet, in addition to the locking mechanism, is equipped with 2 gaskets (sealing rings), which are often located directly below it. They also need to be removed and cleaned. If the gasket is too much rubbed to the base, then it must be pry off with a thin flat screwdriver or knife and replaced;
- Of course, it is desirable to change both the ball and the gasket. But if you need to find out the exact location of the breakdown, then you should briefly turn on the water and see where the water will ooze from.
If the cause of the breakdown lies in the fact that the tap is simply clogged, for example, with lime salts or other rubbish, then the repair will progress much faster. It is necessary, according to the instructions above, to remove the case and clean it with a special gel. Depending on the material of the spout, you need to choose the right cleaning agent. For brass, copper and steel they are different
Please note that often an imported faucet (Italian, German, etc.) is equipped with a special mesh, which is located directly under the spout
It needs to be cleaned with an old toothbrush and blown out.
Video: how to disassemble a swivel single-lever faucet / faucet in the bathroom
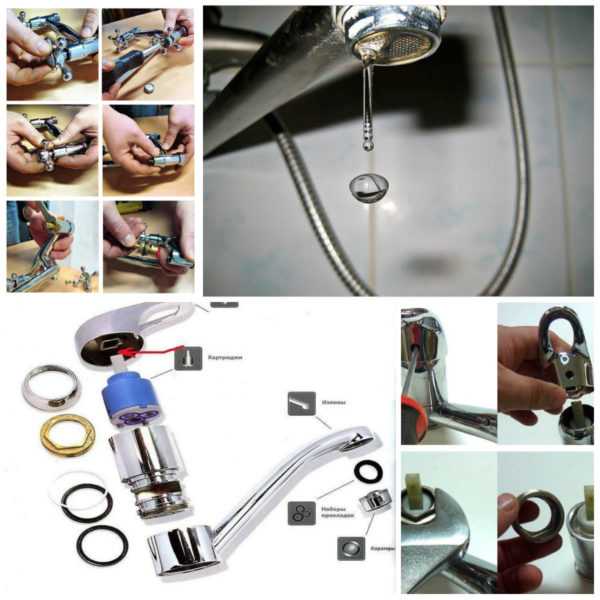
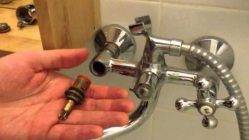
How to disassemble a faucet with a cartridge
It should be noted that now single-lever faucets with ceramic cartridges are often installed for a washbasin or as a kitchen faucet. They are not replaceable, so if they break, they need to be disassembled and thrown away. But in most cases, a ceramic cartridge faucet will last a long time, so it rarely needs to be replaced.
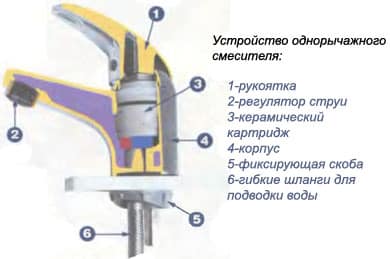 Photo - single-lever faucet device with ceramic cartridge
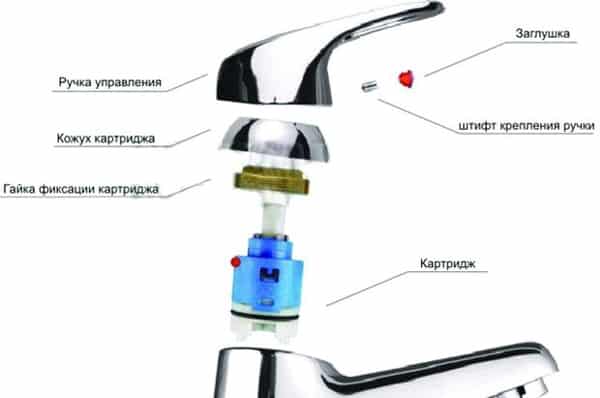 Photo - scheme for disassembling a mixer with a cartridge
and another video instruction on how to disassemble a kitchen faucet with a ceramic cartridge
Choosing the most reliable mixer: what we look at first
The mixer should be heavy (this is an indicator of the quality of steel), the coating should be uniform in color, without scratches or other defects. All moving elements should "walk" smoothly and silently, no extra effort. If there is a feeling that something is interfering or rubbing, this is a sign of poor quality mixer.
Check that the aerator is metal (not a mesh inside, but the element itself). For low-quality products, it is plastic, made of powdered metals or thin brass - in general, it is fragile, easily bends when screwed in. A conscientious manufacturer does not save on an aerator.
Take a close look at the flexible hose (a good faucet will have it included). The female thread at the end of the hoses must be metal, never plastic.
The conscientious manufacturer makes the hoses themselves from cross-linked PE, and not from rubber. This is easy to determine: rubber ones are very elastic, bend at any angles, while those made of cross-linked PE are rigid and unyielding.
The shower head should have soft silicone "pimples". If a stone is deposited on them, it can be easily removed by swiping your hand.Hard ones will clog over time.
The thread at the watering can should be even on all sides, the seam at the soldering point should be neat, barely visible, smooth.
The hose to the watering can have a silicone sheath. On the one hand, this significantly extends its service life, and on the other hand, it makes the hose less elastic (although it will still soften a little in hot water).
Shape, economy, service life
Mixers are lever, valve, on photocells, etc. However, the type of construction does not significantly affect the service life of the mixer.
“Many people ask which is more economical? To be honest, I don't see the point in chasing this. Bathroom and kitchen faucets have aerators, which, with a small pressure of water, create a volumetric jet, so that in principle little water is consumed.
And for the shower, lately, buyers are increasingly choosing watering cans of the “tropical rain” type, which allow a maximum of liters to pass per unit of time. What's the savings here? So take what you liked in terms of design and personally seems more convenient to you.
For a kitchen sink, it is better to choose a taller faucet. The specialist does not recommend different nozzles such as showers for kitchen faucets, except for a very large sink. After all, the more complex the design, the more different hoses, the higher the likelihood that parts will fail.
For a washbasin in a bathroom or toilet, you should choose a mixer that is low, without the possibility of rotation. It will last a long time.


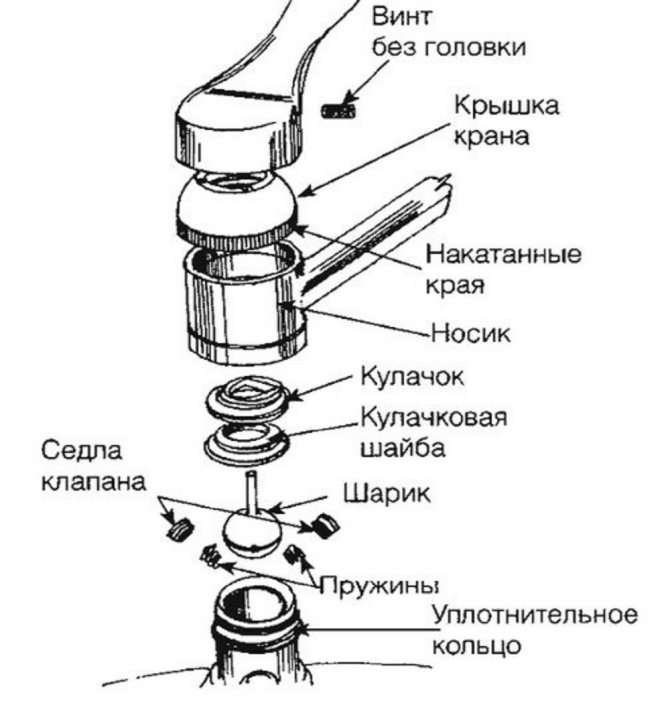
Bathroom faucet repair: valves, half-turn faucets and joysticks
All these three parts of the mixer are designed to control the flow of water - it is in them that you need to look for the reason for the flow of precious liquid through the mixer spout.Also, these mixer elements can be fully responsible for other malfunctions - for example, a valve failure can lead to pipe vibrations, any of the faucet boxes (half-turn or valve) can start to leak near the faucet itself. Repair of bathroom faucets with such breakdowns is carried out in almost the same way, with the exception of the individual characteristics of the control unit itself. Let's consider them each separately in more detail.
-
Valve. This is the most maintainable element for controlling the flow of water in the mixer, but at the same time the most frequently failing. You can throw it in a landfill only when the metal itself deteriorates, everything else - the rubber gasket and stuffing box - changes in a jiffy, after which the mixer returns to service. The easiest way to change is the gasket responsible for adjusting the flow of water - after the crane box is unscrewed, a small screw is unscrewed from below, the old gasket is removed and a new one is installed in its place, after which the screw is screwed back. With stuffing box packing, which causes leaks from the tap, things are a little more complicated. First you should try to tighten the gland - it is not necessary to unscrew the crane box for this. On the pin, on which the valve handle is put on, at the very base of the crane box, a small nut is screwed, which has a square section at the base. It also needs to be slowly twisted in a clockwise direction. If it does not help, then we unscrew the compression ring of the stuffing box, wrap the stuffing box packing on the valve stem and twist the ring back, tightening it well. After such manipulations, leaks from the tap should stop.
- Half turn valves.We can say this about its maintainability - on a half-turn valve it is possible to change only gaskets that keep water from flowing near the tap itself. Water flow control in such crane boxes is carried out using special ceramic inserts, which cannot be repaired in the event of a breakdown. On the one hand, this is good, since you don’t have to mess around with repairs for a long time - they unscrewed the old crane box, bought a similar one and put it in place. That's about all there is to say about bathroom faucet half-turn faucet repair.
-
Not much more can be said about the repair of a joystick faucet, in which water flows are controlled by a special ceramic cartridge - all its repair comes down to replacing this faucet assembly. Changing the cartridge is relatively simple - first, after unscrewing the screw under the handle, the joystick itself is removed, then the decorative cap is screwed, under which there is a nut holding the cartridge itself. We unscrew it, take out the cartridge, thoroughly clean the seat, install a new cartridge and restore the whole thing back in the reverse disassembly sequence. This is how the repair of a single-lever mixer is carried out.
In general, everything should be clear here, the repair of these mechanisms in most cases comes down to either replacing seals and gaskets, or installing a new water control mechanism.
How to repair a bathroom faucet with your own hands, see the video.
Do-it-yourself repair of a ball mixer in the kitchen
It should be understood that the repair of ball mixers for baths, as well as for kitchens, will practically not differ in any way, since the same device is assumed. The main thing is to correctly acquire consumables and components, otherwise it is not surprising to get into a mess. So, if you are going to fix the faucet, first disassemble it, remove the broken or damaged part and be sure to take it with you to the store. There you can present it to the seller, who will then immediately figure out what exactly you need and you won’t have to run back and forth ten times.
Remember
Before you disassemble the ball mixer in the kitchen or in the bathroom, you must first completely shut off the water supply in the apartment or house. To do this, it will be enough to turn on the common taps, and then release the remnants from the system. If there are none inside the apartment, then you will have to connect the housing office to turn off the entire riser, otherwise the hour is uneven, you can flood the neighbors, which is fraught with serious consequences.
Tools and equipment
- The screwdriver is flat and also curly. There is such goodness in the household of any home craftsman. It is worth choosing powerful screwdrivers with a strong handle, as screws, washers and nuts can “stick” from hot water.
- Wrenches and adjustable wrenches, suitable in size and shape.
- Plumbing fork puller, if available. You can get by with a punch and a hammer.
- Hexagons, as well as other nozzle heads, if required.
- Knife with a sharp tip.
- Pliers or pliers.
Sequencing
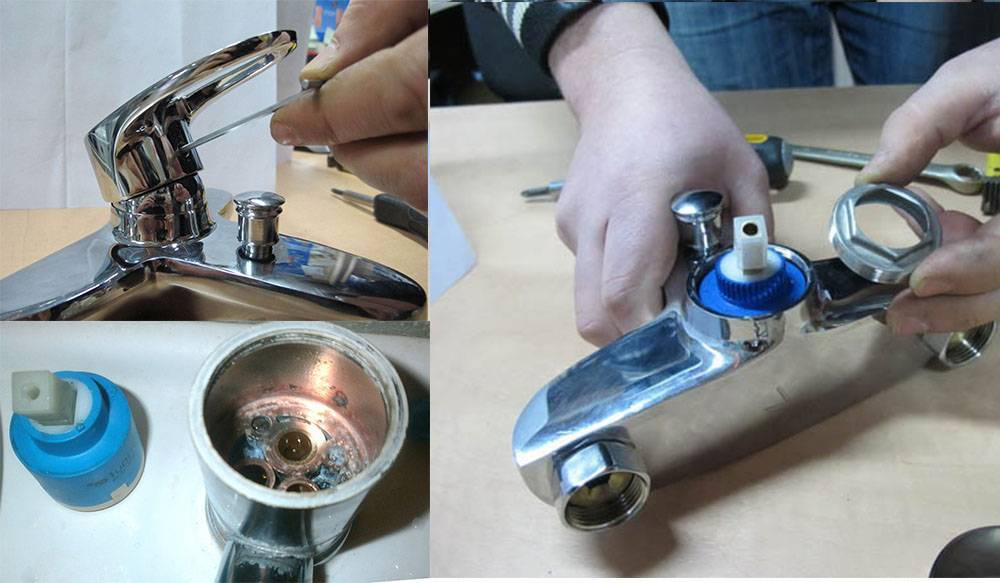
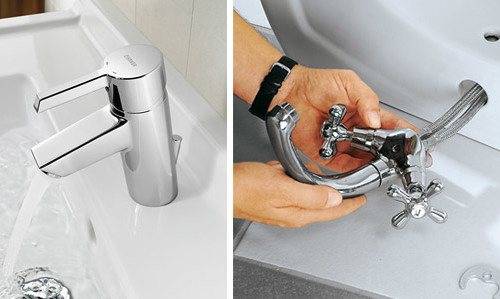
Having collected everything you need, and most importantly, having purchased the necessary spare parts and accessories, you can start repairing the ball mixer, regardless of whether it is installed in your kitchen or in the bathroom.It will not be difficult to cope, the main thing is to be careful, clearly monitor your actions and not make more effort than necessary. Professionals recommend filming every step of your repair on camera, so that you can easily restore the sequence of events and assemble the crane without problems.
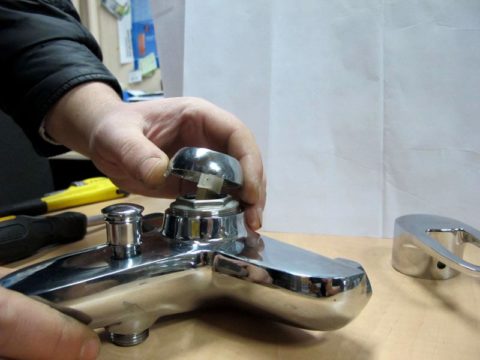
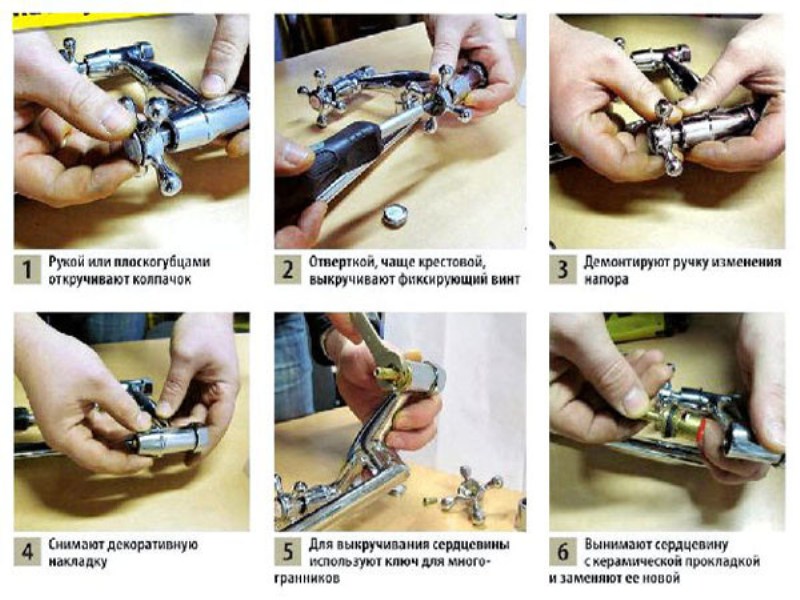
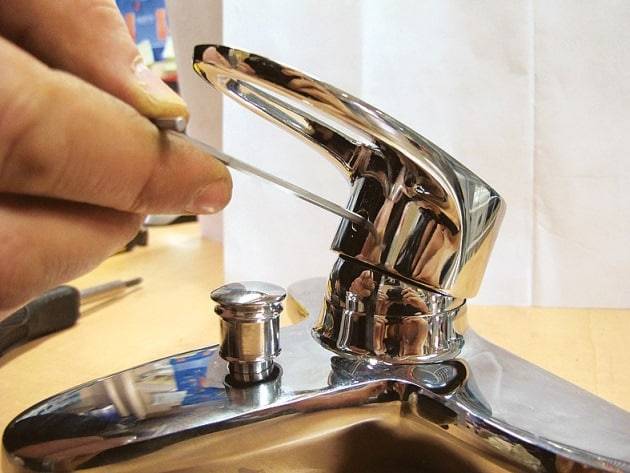
- Pry off the plug with the blue and red dot on it with a knife or flathead screwdriver and set it aside so you don't lose it.
- Unscrew the screw under the plug with a curly or flat screwdriver, depending on the design.
- Lifting with a screwdriver, remove the handle-lever from its place.
- Under the handle, the dome of the tap will immediately become visible, along which the lever for switching pressure and temperature conveniently slides. Remove the dome by prying it lightly with a screwdriver or knife.
- Unscrew the lock nut that holds the ball with the stem, adjustable wrench or gas wrench attached to it.
- Remove the ball from the faucet body and inspect it carefully. If it is not damaged anywhere, not frayed or burst, then it can be washed, cleaned, wiped and reinstalled. But if the ball has visible damage, then it must be replaced.
- Remove the rubber saddles-gaskets from the mixer body, on which the ball mechanism with grooves and slots rested. If they have their original appearance, are not deformed or damaged, then they can not be changed, but in other cases, replacement will not hurt.
- Unscrew the spout tube where leaks may occur. There are two sealing rings that will have to be replaced with new ones, good thing, today you can purchase such gaskets both individually and as a complete set.
- Unscrew the aerator mesh attached to the end of the spout and clean it with a stiff brush, rinsing with a strong stream of water.
- Thoroughly rinse all internal cavities of the body from lime, sand and other deposits, then assemble the mixer with new parts in reverse order. After such a repair, the mechanism should work like a clock.
Please note that it is not so difficult to repair a ball faucet in the kitchen or in the bathroom, but you should carefully ensure that it is not twisted too hard, but not loose. Either option will lead to a quick failure of the crane, so you should constantly keep this in mind. If there are factory defects, defects, cracks and chips on its body, from where water flows, then there will be nothing left but to buy new equipment
If there are factory defects, defects, cracks and chips on its body, from where water flows, then there will be nothing left but to buy new equipment.
Cartridge replacement - is it possible to repair a faucet with one handle
Single-lever faucets or faucets do not have a threaded locking device, but a non-separable cartridge at home. If the water mixing quality is impaired, the spout is leaking or the water is making excessive noise, this part must be completely replaced with a new one.
It is important here to know exactly what type of cartridge - disk or ball - is used in the device and choose the appropriate replacement. Manufacturers of quality sanitary ware usually offer separate cartridges for all models of their faucets.

To replace a cartridge, you need:
- remove the control lever;
- unscrew the protective ring;
- using an adjustable wrench, unscrew the clamping nut holding the locking mechanism in place;
- remove the cartridge;
- install a new one;
- repeat the operations in reverse order - fasten the clamping nut, protective ring, handle.
In more detail, the process of replacing the cartridge is discussed in the video.


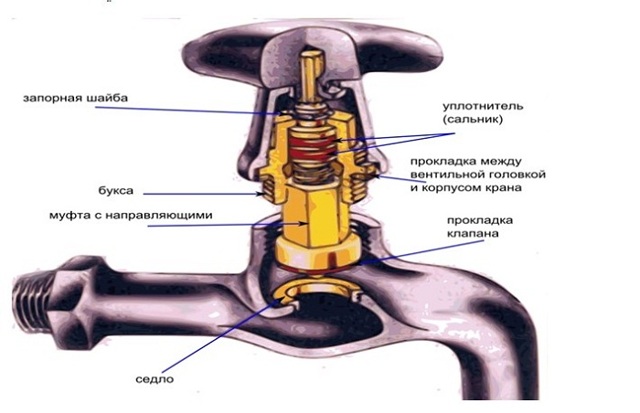

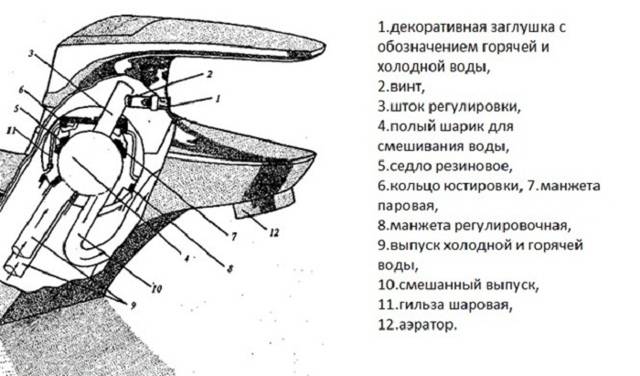
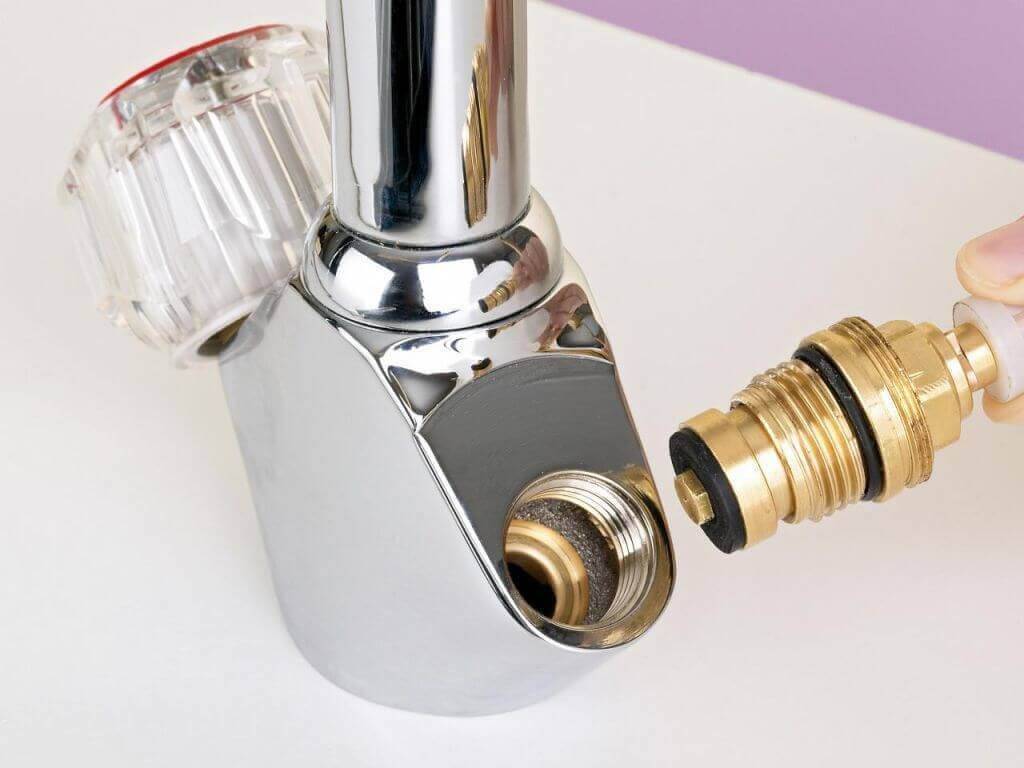
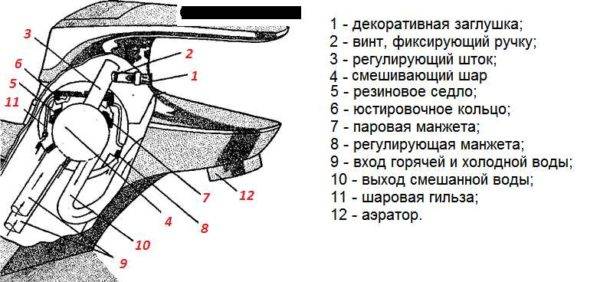
Ball valve design
Before you undertake the repair of a ball valve, be sure to familiarize yourself with the diagram of its design. It is advisable to study the instructions for a specific model, but if it is not at hand, then you can be guided by the general principles of the structure of a ball mixer.
Ball valve models are produced by many manufacturers, but the principle of their structure remains unchanged:
- in the core of the faucet is a hollow stainless steel ball. It is in its cavity that water is mixed: cold and hot water enters the inlets, and at the outlet - water of the required temperature;
- the ball is mounted in a cartridge, that is, a special sleeve. To fix it in the cartridge, there are special rubber seats that securely fix the ball, which is under water pressure.
Types and arrangement of mixers
There are various models of mixers. They differ in the type of fastening.
- Wall. They are fixed on communications coming out of the walls. More suitable for the bath.
- Preinstalled. They are connected to the outlet hoses through the holes made by the manufacturer.
- Mortise. Holes are pre-made where the model is mounted and fixed. Used for non-standard room layout.
There are types and according to the principle of action. This affects the functionality of the locking element.
- Single lever. At the heart of the swivel lever. Can be rotated horizontally or vertically.More suitable for the kitchen due to ease of use;
- Two-valve. The basis is two valves, separately for cold and hot water. This type is considered the most reliable. The classic version, in demand;
- Touch. It is based on a photocell that reacts to the hand that is brought to the spout. The option is more expensive and uses high technology.
Mixers are different, so each has its own instructions
Step-by-step bathroom faucet switch repair
Once you figure out what's what and what type of mechanism is available in your particular case, you can start repairing the shower faucet switch. A step-by-step guide to the most common types will be discussed below. In order to cope with the task, no special education is required, all the designs are quite simple and understandable, so no one should have any problems.
Please note
If you're going to fix the bathtub faucet switch we're discussing, make sure you turn off the water supply completely. This can be done by turning off the common taps in the apartment or by contacting a locksmith to completely shut off the riser.
Repair of the shower switch in the spool type mixer
After making sure that water does not enter the mixer, as well as releasing its remnants from the pipe system, you can proceed to the repair itself, which will not take much time
It should be understood that if any part breaks down, you will most likely have to purchase a new element or mixer completely, so you need to act carefully and carefully
- Unscrew the entire lower part from the body, that is, the faucet (gander) on the nut, as well as the hose from the shower and the switch itself.An adjustable wrench or the so-called "gas" wrench is optimal for this.
- Unscrew the shower hose from the switch, as in such designs it is most often fixed with an additional nut.
- Gently unscrew the mixer shower switch from the body of the device.
After disassembly, a new one is inserted in place of the damaged spool, since it cannot be repaired, which led to the fact that it was decided to slowly abandon the design. That is why the repair of the spool shower switch in the mixer consists in replacing broken parts, nothing more. Some designs of spool switches do not require complete disassembly, it is enough just to remove the special cap, and then you can turn the spool out.
Repair of the push-button shower switch in the faucet
The easiest way is to repair the shower button switch in the mixer, as evidenced by the video, which can be found at the end of the article.
- Having previously removed the decorative plate, as well as the screw, unscrew the button with your fingers or a key.
- From the hole, remove the rod, which has opened to the eye, with the spring holding on it.
- Remove the old spring, and in its place put on a pre-purchased, new one. Make sure that it has an anti-corrosion coating and is smaller in diameter than the previous one.
- Assemble everything in reverse order.
For those who perform such work for the first time, professionals recommend taking pictures of their every step, the good thing is that almost every person already has modern smartphones. So it will be easier to return everything to its place without errors and finally not break the plumbing.
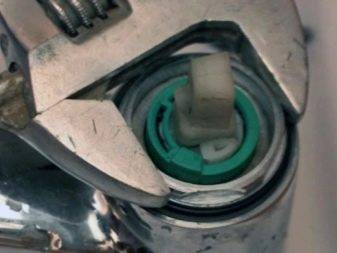
Cartridge shower switch repair
You can find several types of cartridges in plumbing stores, so buying without knowing which one you need will not be very reasonable. First you have to disassemble the mixer and only after that acquire the desired part.
- Using a knife or screwdriver, pry off the plug on the faucet switch and set it aside.
- The screw that has opened to the eye, most often requires a screwdriver figure, it must be kept at the ready. Open it up and set it aside too.
- Remove the lever and unscrew the decorative washer with your fingers.
- Unscrew the nut holding the cartridge itself and gently sway it from side to side, remove it for inspection.
- Replace the old cartridge with a new one and assemble the device in reverse order.
Do not forget that if you go lime, sand or scale inside the system, then all this must be thoroughly cleaned, otherwise the replacement may be ineffective and after a short time the switch will start to junk again.
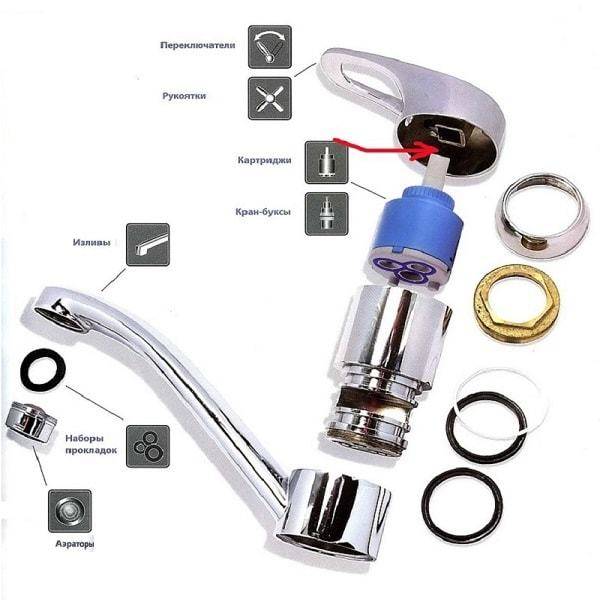
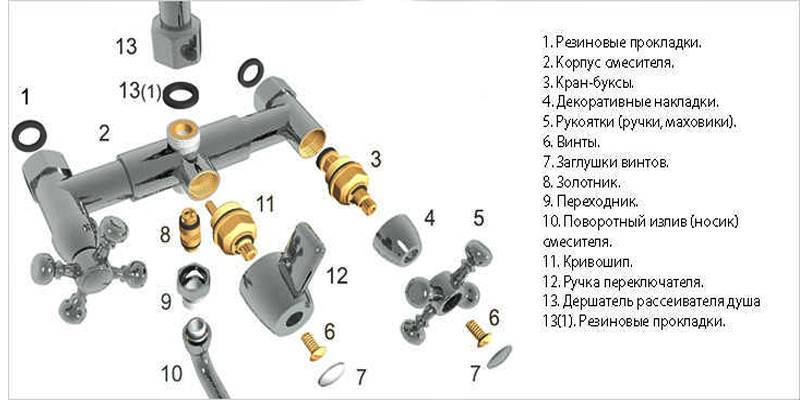
Types of single-lever mixers and their device
Despite the external similarity, rotary or single-lever mixers are of two types - with a cartridge (cartridge) and ball - with a ball inside. You can repair any of them, but for this you need to disassemble them first. And so that you can not only disassemble, but also assemble, it is advisable to familiarize yourself with the internal structure of each.


The design may be different, the structure remains the same
Cartridge mixer: structure
Cartridge mixers are so named because their locking and regulating mechanism is hidden in a special cartridge flask. In more expensive models of faucets, the cartridge body is made of ceramics, in cheaper models it is made of plastic.What these models are good for is ease of repair, but it is not always easy to achieve the required pressure with them - you need tighter control of the handle. But changing the temperature of the water is very easy - with a slight movement of the hand.
The structure of a single-lever faucet with a cartridge is simple. If you go from top to bottom:
- Switch with fixing screw.
- Locking (clamping) nut.
- Cartridge. It mixes water flows, the same device shuts off the water.
- The body of the mixer, in which there is a "seat" place for the cartridge.
- Fasteners, studs and gaskets to ensure tightness.
- Outflow (gander). It can be a separate part - in rotary models for the kitchen or part of the body - for sinks in the bathroom.
- If the spout is separate, gaskets are still installed from below and there is another part of the body.
What is a single lever cartridge faucet made of?
The cartridge itself contains several (usually 4) specially shaped ceramic or metal discs. A rod is welded to the upper disk. By changing the position of the rod, we change the position of the plates relative to each other, changing the amount of water passing through the holes in the plates.
In order for the faucet / mixer to work normally, the plates are lapped very tightly. For this reason, cartridge single-lever mixers are very demanding on water quality. The ingress of foreign fragments between the plates leads to the fact that the valve flows or stops working altogether. To avoid this, some manufacturers put filters on the inlet pipes. But, it is better to put filters on the water supply and get clean water that can be safely supplied to household appliances.
Single Lever Ball Mixer
It got its name because of the element in which water is mixed - a ball with cavities.The ball is usually metal, hollow inside. Its outer part is polished to a shine. There are three holes in the ball - two for the entry of cold and hot water, one for the exit of already mixed water. A rod is attached to the ball, which enters the cavity on the handle. This rod with a rigidly attached ball changes the temperature of the water, its pressure.
The structure of a single-lever mixer with a ball mechanism for mixing water
It is easier to adjust the parameters with such a device - the parts are well ground in, the handle moves easily. Mixers with a ball mechanism are less critical to the presence of mechanical impurities, but do not respond very well to the presence of hardness salts and excess iron. So for normal operation, pre-filtering is also required here.


