- Detailed instructions for unscrewing the tap
- Replacing the faucet box in the mixer.
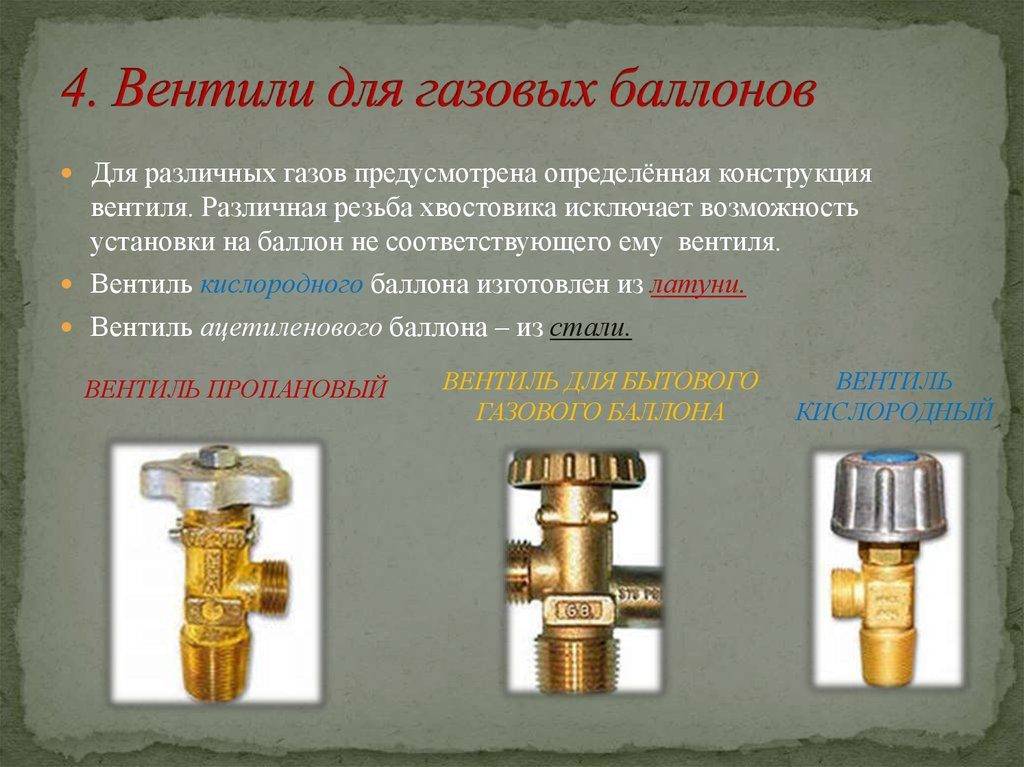
- VALVE DESIGN
- How to bleed gas and get rid of it
- Valve problems
- Crane boxes
- Differences
- Repair work
- How to check tightness?
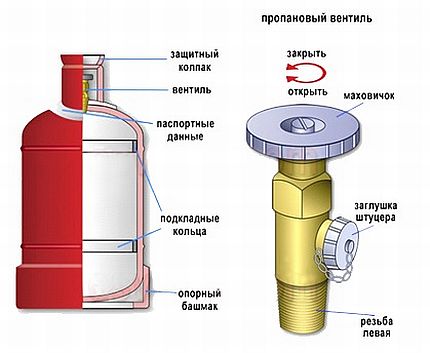
- Components of a gas cylinder
- How to identify a defective or defective product
- How to prevent possible damage in the future
- How many cubic meters of gas are in a standard household propane tank?
- What is the thread on the propane tank?
- How many m3 of propane in 1 cylinder for 5, 12, 27, 50 liters?
- Recommendations of the masters and possible difficulties
- How to identify a defective or defective product
- Faults
- VALVE DESIGN
- Best Answers
- Fire safety rules when using cylinders
- Oxygen regulator and its threads?
- Conclusions and useful video on the topic
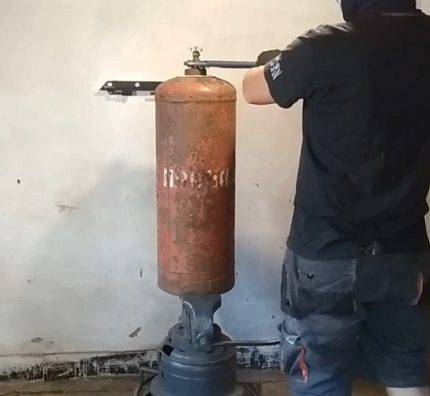
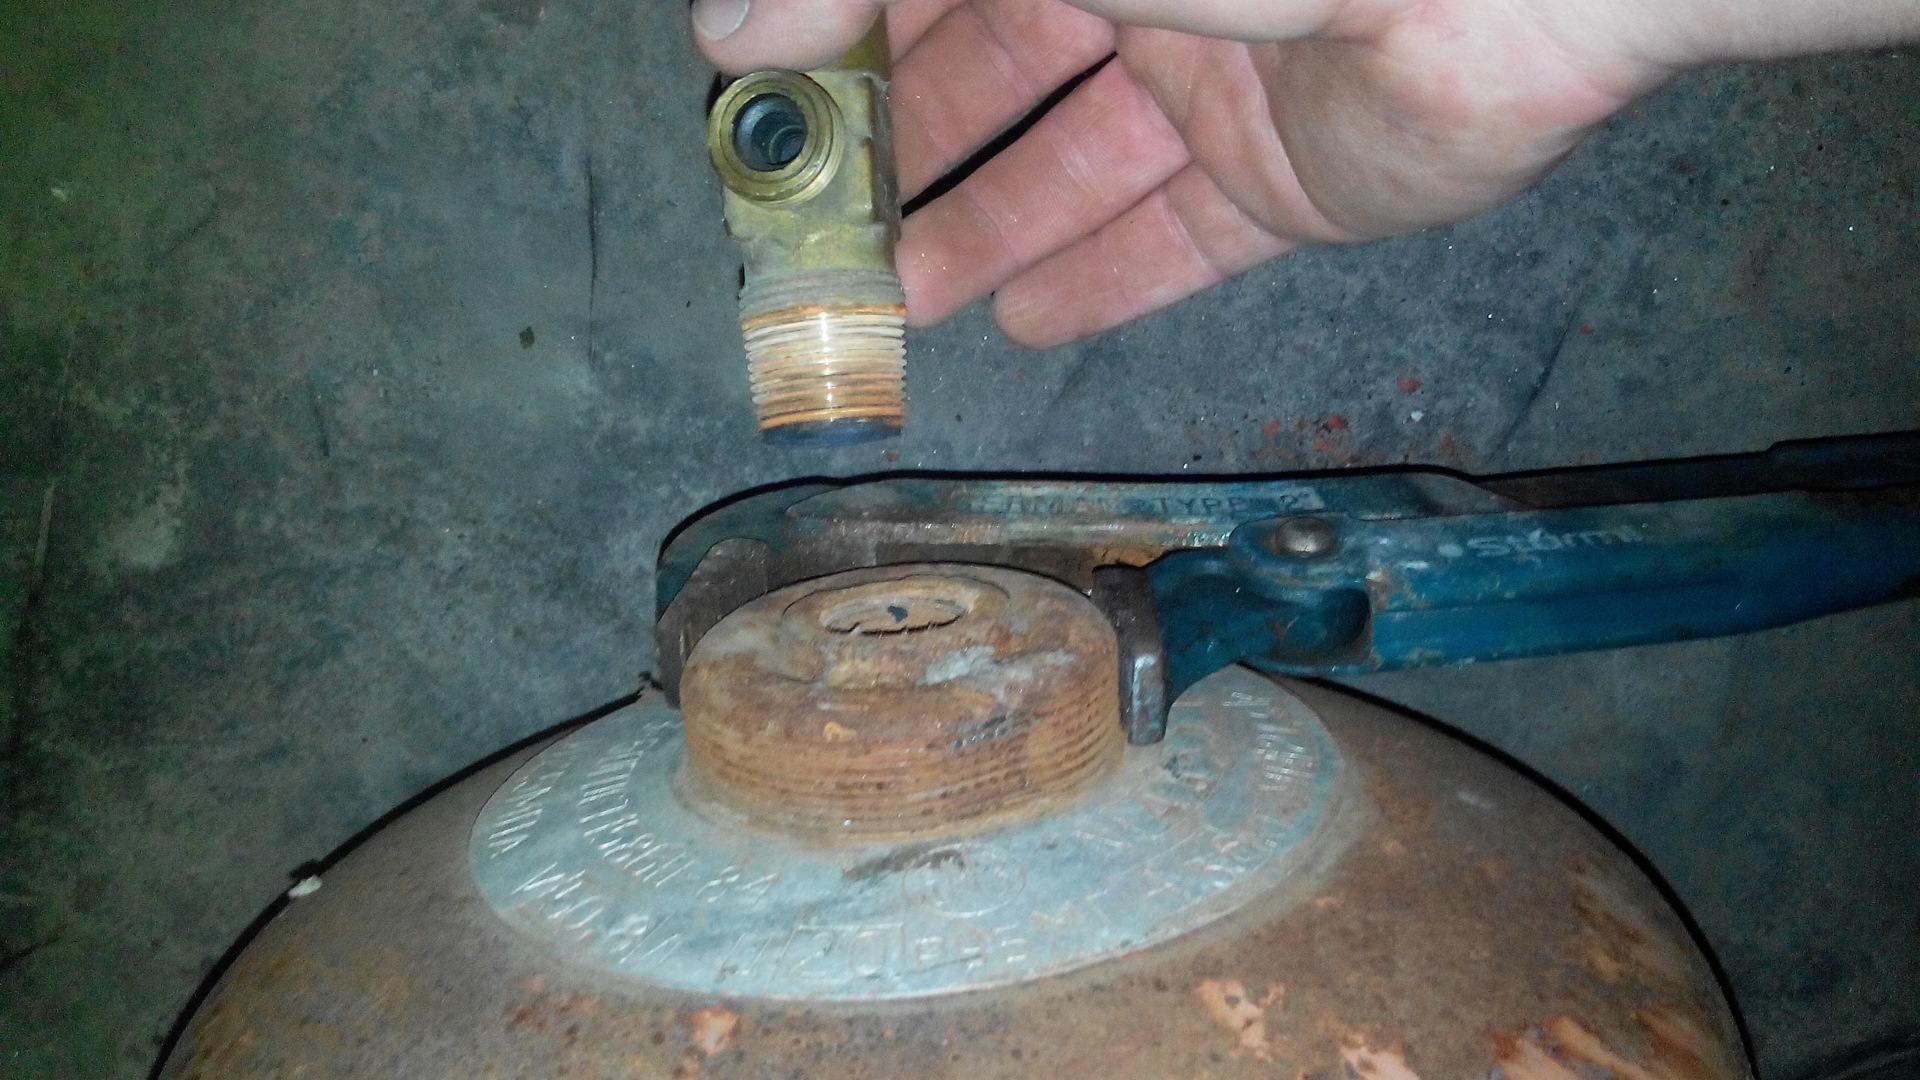
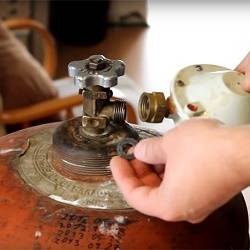
Detailed instructions for unscrewing the tap
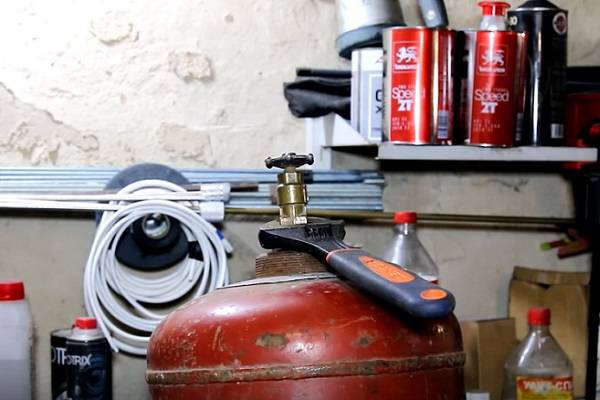
Looking for information on how to quickly and safely turn off the valve on a propane-butane gas cylinder? Then read our instructions and see step-by-step photos below.
In order to cope with the valve without any difficulties, which can “tightly sit” in the neck of the cylinder, you will need to apply force. And, depending on the tools at hand, an assistant may be needed.
If you have only one tank and this is your first time to twist the valve, you will have to tinker while you get used to it. If you are going to disassemble the cylinder and put the manufacture of various homemade products from cylinders into stream, then you simply cannot do without good tools at hand.
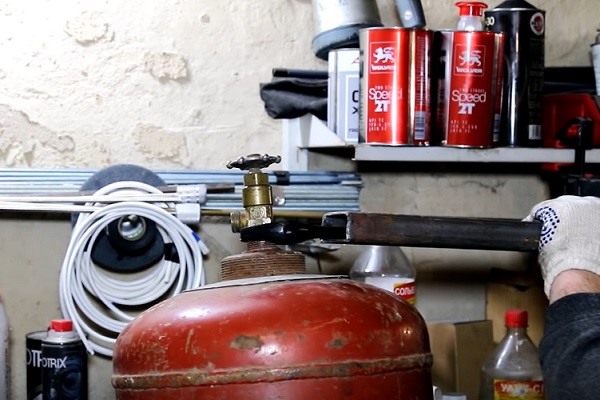
First you need to release the remaining gas, if any, in this cylinder. For what it is enough to turn the valve flywheel in the direction indicated on it. If there is still gas inside, then you will hear a characteristic hiss - this is the remnants of liquefied gas coming out.
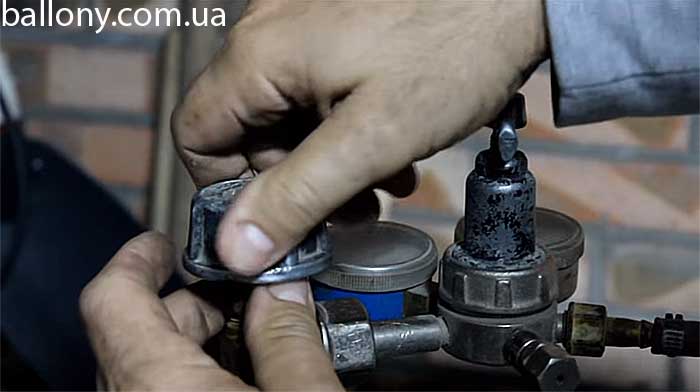
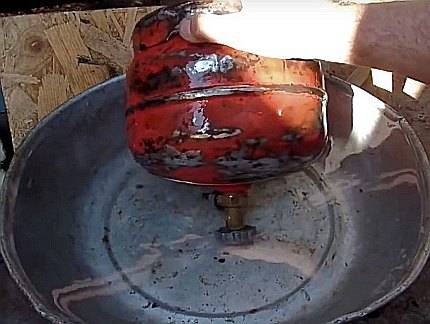
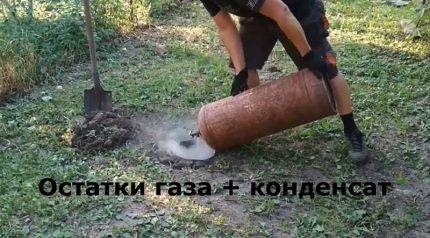 Having unscrewed the valve flywheel, you need to turn the cylinder over and drain the remaining gas and condensate accumulated at the bottom of the vessel into a previously dug hole. It is advisable to protect hands and face with gloves and a mask, respectively.
 So that the remaining gas does not harm in any way, they must be disposed of immediately. The best option is to burn it. It can burn for a long time. When the fire goes out, this place can be sprinkled with bleach or whitewash, which will get rid of the unpleasant smell.
Then you need to fix the cylinder body. How to do this is completely dependent on your imagination and the tools at hand. For these purposes, they use welding, metal pins, a vice, a board, clamp the balloon with the wheel of a large car, fasten it with a belt to a tree, and many more options. Therefore, choose for yourself the method of fixation that will be convenient for you.
In most cases, there are no problems with turning off the valve - such a simple method allows you to safely unscrew it.
Replacing the faucet box in the mixer.
Step 1. We stop the water supply directly to the mixer by closing the valves. They may be somewhere on the water pipes that lead to the mixer.How to make plumbing in the country, read this article.
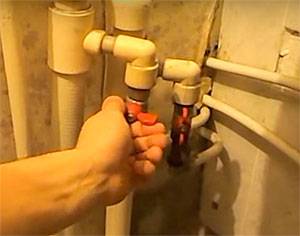
fig.1 Turn off the water
Step 2. With a screwdriver, carefully, so as not to damage the flywheel, remove the plug from it, which indicates the temperature of the water from this tap.
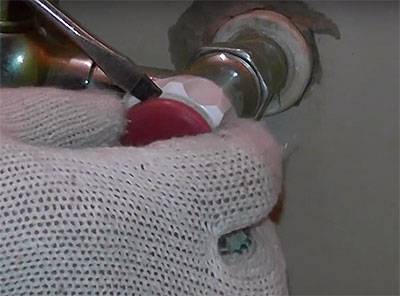
fig.2 Remove the cap
Step 3. Under it you will see a bolt that needs to be unscrewed.
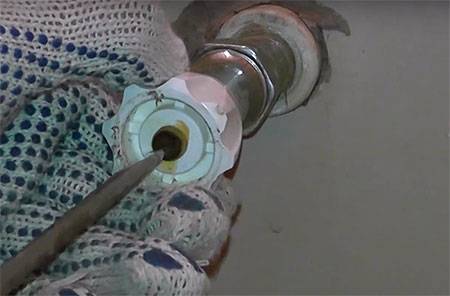
Fig. 3 Unscrew the bolt
Step 4. Having turned it out, we remove the flywheel itself.
Step 5. Now we take either an open-end wrench or sliding pliers, or an adjustable or gas wrench and unscrew the retaining ring.
Step 6. After that, using the same tool, carefully unscrew the crane box itself.

fig.4 We unscrew the faucet-box Of course, you can fix the mixer by replacing the gasket or ceramic plates, depending on the device of the mechanism. But it is better to make a complete replacement of the crane box. Moreover, the cost of this part is very low.
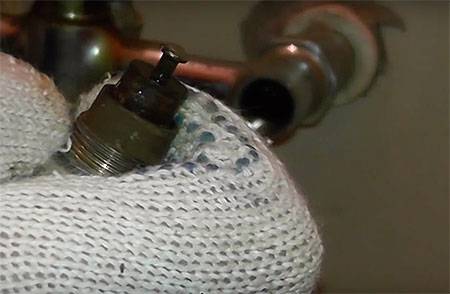
Fig. 5 We take out the crane box
Step 7. Regardless of which path you decide to take, the next step is your trip to the store to purchase the required part. Be sure to take it with you bush crane. as a sample, as there are a huge number of options.
Step 8. After acquiring everything you need, we screw in a new one bush crane on its seat, after cleaning the thread from rust and various deposits. If you still decide to get by with the method of replacing the gaskets, then before screwing, respectively, we first replace them.
Screw the bushing carefully. Do not overdo it, as you can ruin the rubber bands if you overtighten it.
Step 9. We wind the retaining ring.


Step 10. We put on the valve and fix it with a bolt.
Step 11. Install the cap.
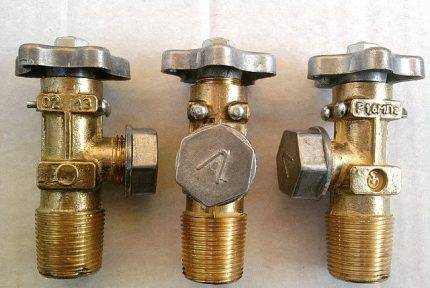
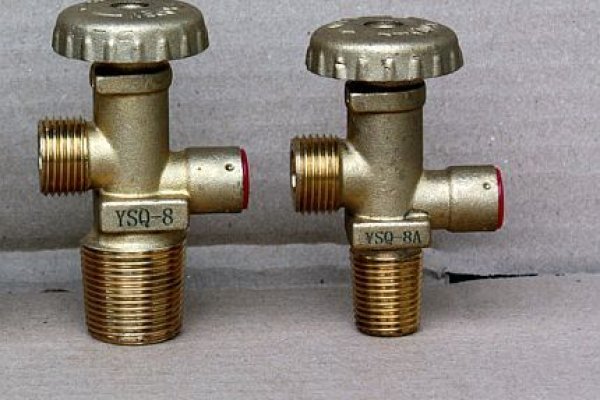
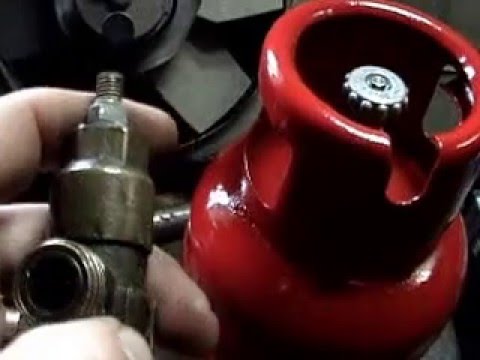
VALVE DESIGN
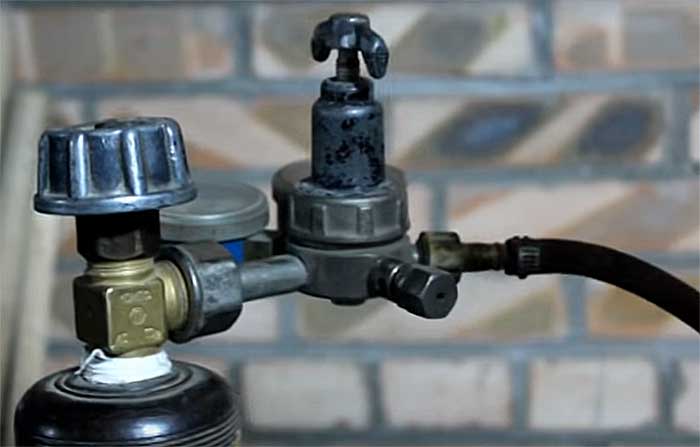
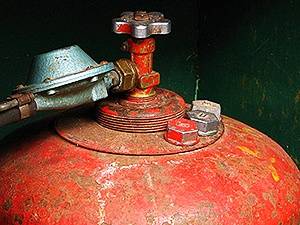
As a standard, propane gas cylinders up to 27 liters are equipped with KB-2 valves or VB-2 valves. The second option is considered more reliable. The reducer is connected to the valve by means of a fitting thread and a cap nut. The degree of tightness of the connection is regulated by an open-end wrench.
Valve connections are not always tight and often result in gas leakage.
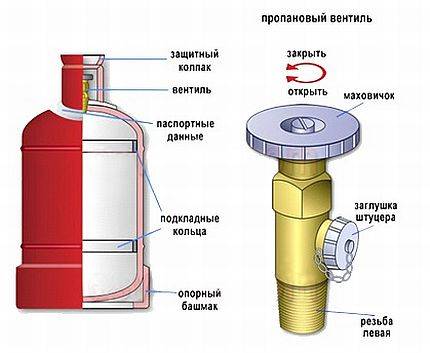
Structurally, the valve consists of the following elements:
- steel body in the form of a threaded tee;
- locking part;
- flywheel;
- seals.
The color of the cylinder indicates what kind of gas is there:
- red color - propane-butane;
- black - nitrogen;
- blue color - oxygen;
- green - hydrogen;
- white color - acetylene.
How to bleed gas and get rid of it
Most importantly, never start working on a cylinder before the gas and condensate has been completely removed from it. Otherwise, it may happen that there will simply be no one to make a brazier or a compressor.
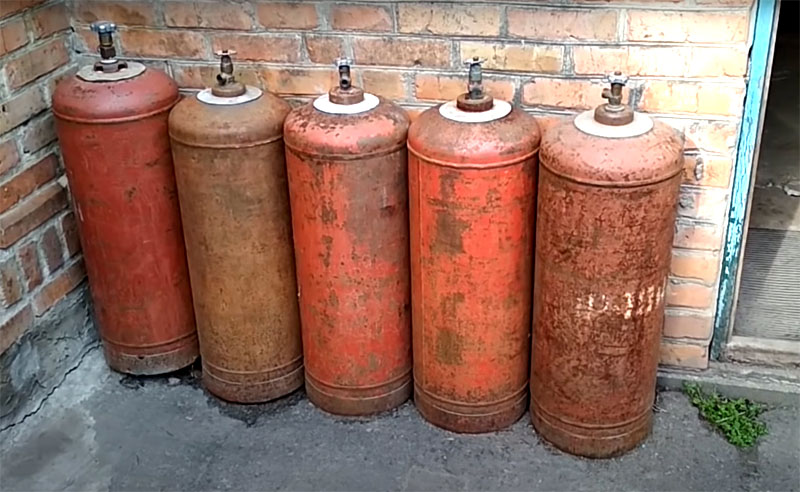 Old cylinders can be bought from the hands or at a gas station
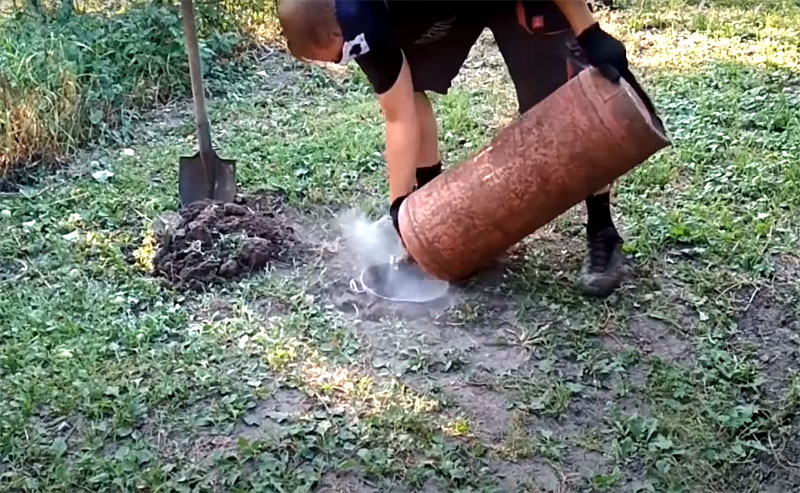 Dig a hole about 50 cm deep in the area and bleed the gas into it
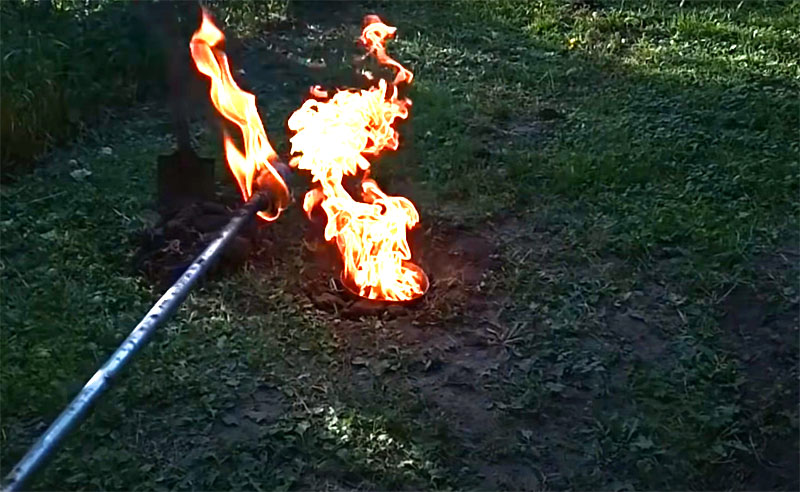 Then make a torch on a long stick and set fire to the gas in the pit from a distance. It will burn out for a long time, and when the flame goes out, an unpleasant smell may remain. It is easy to get rid of it by simply filling the hole
Valve problems
If the gas cylinder valve is leaking, it will need to be sealed or replaced altogether. One way or another, you have to unscrew and twist it.
The security measures here are:
- Remaining gas in the open air is eliminated. Exceptions: nitrogen and argon.
- Work is best done outdoors.
- The flywheel spins smoothly.
- You can start working with the valve as soon as the pressure indicators are completely equalized: external and external.
To screw in the valve, you need a fum tape, or special lubricants to improve the hermetic properties. When a faucet changes, such seals cause a lot of trouble. Need a hair dryer. They heat up the valve.
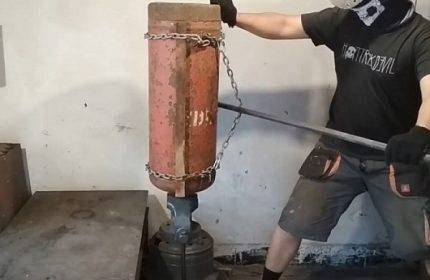
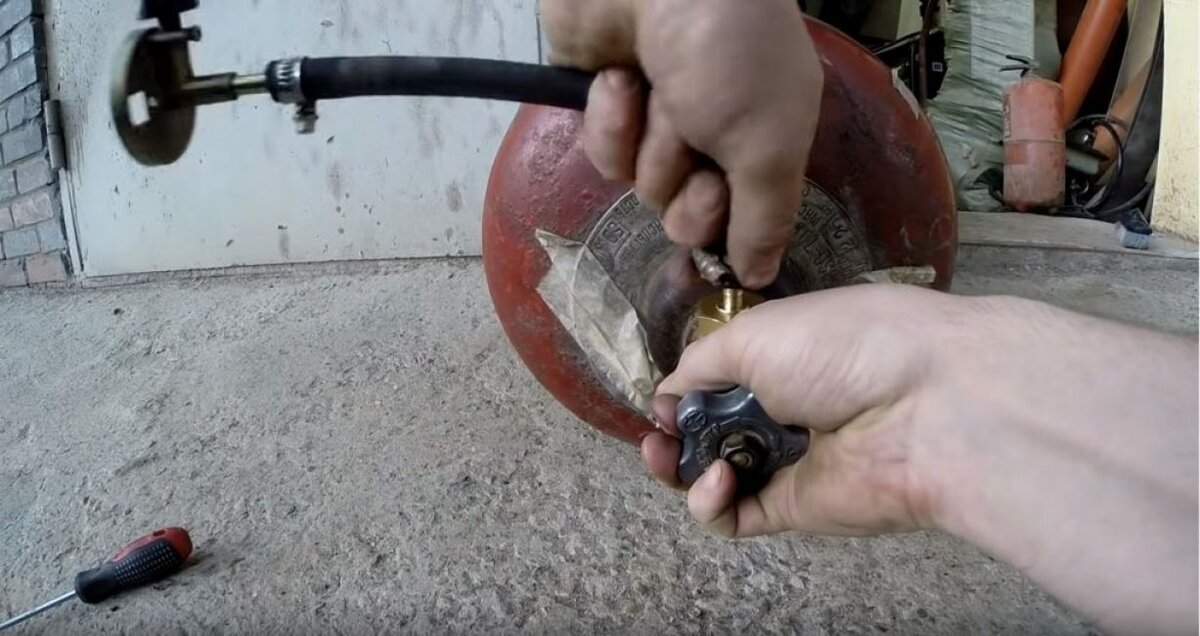
How to unscrew the valve? For work you will need:
- a pair of bolts at least 2 cm long and a pair of nuts to them,
- metal corner profile. Its length is at least 1 m.
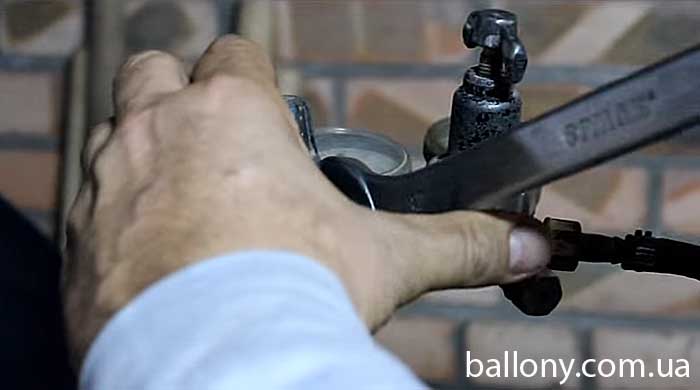
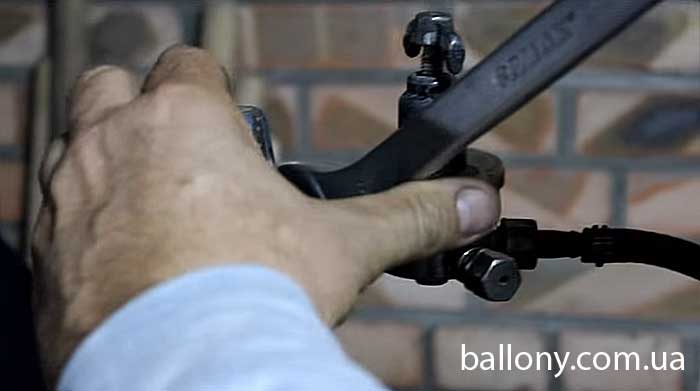
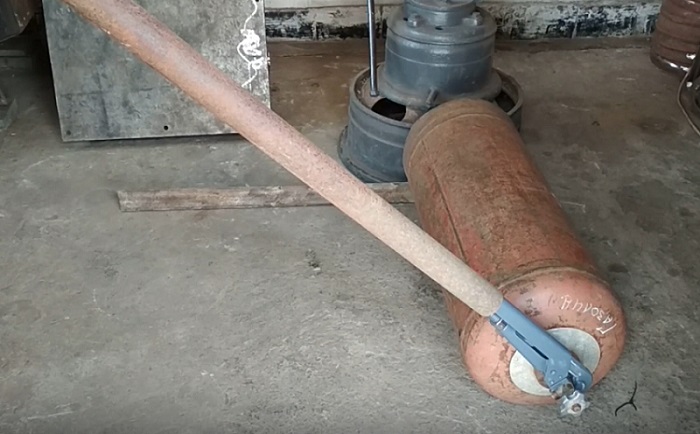
- pipe wrench.
On the shoe of the container, the distance between a pair of adjacent holes is measured. The same holes are drilled in the profile, on one extreme side. Then a metal bar is screwed to the balloon body. He lies on his side.
A foot is placed on this profile. A hand with a key unscrews the valve.
How to screw on the valve on the gas cylinder? All parts are first degreased. Fum tape is used. The use of sealing grease is acceptable. The lower fitting is covered with a sealant. The faucet is spinning.
A suitable fum tape has a thickness of more than 0.1-0.25 mm and a yellow bobbin. Tape tension - 3-4 layers.
A torque wrench is used to clamp the valve. If the crane is steel, then the maximum force of its fastening is 480 Nm. If it is brass - 250 Nm.
After clamping, the tightness is tested.
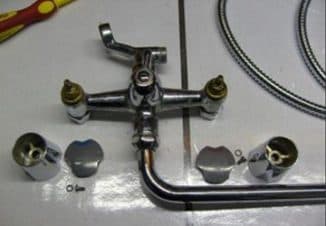
Crane boxes
Differences
To understand how to change the faucet box in the mixer, or even better, repair it, you need to understand what it consists of and how it works, that is, how the water flow is regulated with its help.
The entire repair kit is divided into movable and fixed parts, where the first includes a retaining ring or bracket, a rod with a fork, a silencer and an upper ceramic plate with a hole.The fixed parts include the case itself, the bottom ceramic plate with a hole and the rubber ring for sealing. (See also the article Flexible faucet hoses: features.)
You have probably already noticed that the holes in the ceramics are not located in the center and it is this factor that allows you to regulate the flow of water. That is, when the holes match, a full passage opens, but when the top plate rotates around its axis, the holes gradually shift relative to each other, which reduces the passage until it is completely closed. The rubber seal does not allow water to break through to the sides, but it flattens over time and then the question arises of how to change the bushing tap in the mixer
The rubber seal does not allow water to break through to the sides, but it flattens over time and then the question arises of how to change the axle box faucet in the mixer.
In the case when, when closing and opening the valve, you need to make many turns (from 5 to 10), then this indicates that there is a shut-off valve with a worm gear. Despite the fact that the replacement of the crane box in this type of mixer is almost the same as the ceramic version, however, its device is somewhat different.


In this case, the rod serves as a piston that is raised and lowered using a worm gear, but in order to prevent water from flowing through this assembly, there is a fat chamber.
Occasionally, the reason for the failure of such a mechanism is the wear of the “worm” thread, but in most cases, this is the wear of the rubber gasket on the piston, so replacing the faucet box in the mixer is not needed here - just change the gasket (valve).
Repair work
We first need to remove the valve, how to unscrew the crane box on the mixer is possible only after its dismantling (it interferes). To do this, pry off a decorative plug in the center of the lamb with a knife or screwdriver and remove it, under the bottom there is a bolt that needs to be unscrewed and then we will remove the valve
If you have handles, then such a bolt is usually located under the lever on the handle body (it is also closed with a plug).
Now we need to remove the locknut by turning it counterclockwise, but this must be done carefully so as not to scratch the body. Often, there may be another, decorative nut above the locknut, which in most cases can be unscrewed by hand. Now you can simply pull out the stop valves, but sometimes there is still a retaining ring for additional fastening - dismantle it, since it will be possible to remove the bushing valve from the mixer only after that.
Now you can simply pull out the stop valves, but sometimes there is still a retaining ring for additional fastening - dismantle it, since it will be possible to remove the bushing valve from the mixer only after that.
Now you can just go to the store with the locking mechanism removed and buy the same one, fortunately, its price is low, but you can save yourself from buying if you disassemble and repair it. To do this, remove the retaining ring from the stem and squeeze the ceramic pair with the gasket out of the body with its rod.If there is plaque on the body, then you will need to hit the end of the rod with a screwdriver or pliers.
- In order to eliminate the leak, we need to increase the thickness of the flattened ring, but since this is not possible, we will simply increase the length of the inner box set. To do this, look at the photo above - there you can see where to stick two or three layers of electrical tape to increase the thickness of the upper ceramic plate. In addition, a home-made washer made of copper wire can be substituted under the rubber sealing ring, as if increasing the thickness of the gasket. (See also the article How to choose a sink: features.)
- Replacing the rubber valve in a crane box with a worm gear will not cause any problems at all. To do this, unscrew the bolt with a washer and change the valve (you can even make it homemade, made of thick rubber).
How to check tightness?
When checking the tightness of the valve connection, it will be necessary to pump gas under pressure into the gas cylinder.
This can be done in two ways:
- Inject gas using compressor equipment or a car pump.
- Connect two cylinders with a hose, the first of which is empty (tested), and the second is filled with gas.
If soap bubbles do not inflate anywhere, then the connection is tight. But if at least slight swelling of the foam appears, then you will have to twist the valve again.
When the valve is immersed in water, it is advisable to close the side fitting with a plug so that water and suspended particles contained in it do not enter the locking mechanism.
If the balloon is small, then you can immerse its valve in a small bowl of water and look for bubbles.
After replacing the shut-off valves in the passport of gas cylinders, a corresponding mark must be put down.
It should be remembered that the methods described above for replacing a used valve are applicable only to metal tanks. If you have a composite cylinder for storing gas, this cannot be done because of the possibility of damaging the flask and breaking its tightness.
The tightness of the connections and the absence of gas leaks after connecting the reducer is checked using soapy foam, which is applied with a sponge to all connections (valve, union nut, reducer housing, to the connection between the reducer and the outgoing hose).
Fire safety scheme when working with gas cylinders: (1-Do not open the valve abruptly! The gas jet electrifies the neck of the cylinder and the gearbox, it can cause ignition and explosion; 2- Do not allow more than 1 cylinder with propane butane to be at the workplace; 3-At least once a quarter, check the safety valve by forced opening; 4- check for gas leakage)
The height of negligence is to check the tightness of connections using matches or an electric discharge. Usually, owners of gas cylinders do not care about replacing a valve on a propane cylinder and then checking the valve thread for leaks, since such operations are performed by gas filling station specialists using special equipment
First, under the control of a manometer, fill the test cylinder with gas with a pressure of 1.5-2 atmospheres. After that, soap suds are applied to the connection and the tap opens slightly. If soap bubbles do not inflate anywhere, then the connection is tight. But if at least slight swelling of the foam appears, then you will have to twist the valve again.
Components of a gas cylinder
Requirements for production processes and technical characteristics of gas cylinders are regulated by rather old GOSTs 949-73 and 15860-84.
The maximum working pressure in the devices ranges from 1.6 MPa to 19.6 MPa, and the wall thickness can vary from 1.5 to 8.9 mm.
The protective cap on gas cylinders can be screwed onto a special neck thread, completely closing the valve, or be welded to the body and only protect the valve from accidental external shocks
A standard gas cylinder assembly consists of the following items:
- The body of the balloon.
- Valve with stop valves.
- Closing valve cap.
- Backing rings for fixing and transportation.
- Base shoe.
An important element of the cylinder is also the technical information stamped on it.
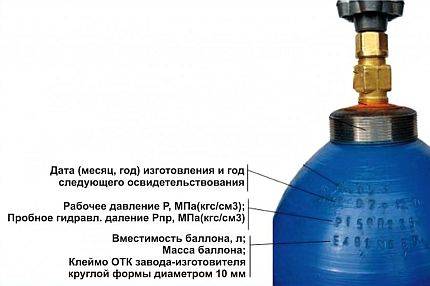
The information stamped on the cylinder is used by service centers when refueling and re-examining the equipment, so it should not be heavily painted over with paint
The bottom of the cylinders has the shape of a hemisphere for uniform distribution of internal pressure. For better stability of the body, a shoe is welded on the outside, on the lower edges of which there are often holes for attaching the cylinder to horizontal surfaces.


How to identify a defective or defective product
Modern certified cylinder manufacturers produce efficient designs that meet the requirements of GOST. If you have a counterfeit product in front of you, then it is very easy to identify. You just need to know the basic standards.
The main text on the label should occupy 2/3 of its area. Moreover, all letters must be the same height, equal to 6 cm.The inscription must contain information about the mass of an empty and capacity of a full cylinder, the date of issue and technical inspection, the manufacturer's trademark, as well as other information.
The following facts indicate a malfunction of the cylinder:
- flywheel does not turn on the valve itself
- mechanical deformations are visible on the surface of the container or valve with the naked eye: scratches, abrasions, cracks, dents, traces of corrosion.
- the inscription on the label states that the technical inspection date was overdue;
- there is a smell of gas in the air;
- the cylinder shoe is incorrectly installed or damaged;
- the fitting does not have a plug.
Important information for consumers. The pressure in the cylinder must always remain! The container must not be completely emptied!
How to prevent possible damage in the future
No matter how expensive a two-valve mixer is, without proper care and careful handling, breakdowns cannot be avoided.
Basic rules that can extend the life of your crane:
- You need to open and close the valves calmly, without sudden movements, so as not to disrupt the tap.
- It is better to install a silicone gasket, since it is characterized by increased wear resistance compared to rubber.
- Check connections regularly for leaks.
- At the first sign of leaks, it is necessary to immediately replace the gasket, so that later you do not have to change the entire plumbing fixture, which will cost much more.
- When disassembling the structure, it is necessary to clean the parts from contamination.
By following these simple rules, you can extend the performance of your crane for several years.
In the event of a malfunction of the faucet in the bathroom, it is recommended to repair it in a timely manner so that in the future you do not have to buy a new device. The repair process is shown in the video:
It is better to replace it yourself, since this option is much cheaper than calling a plumber. And let you have to spend a little time and effort, but you will be sure of the reliability of the design.
How many cubic meters of gas are in a standard household propane tank?
Here you can also find how much a propane tank weighs for 5, 12, 27, 50 liters.
| Volume | 5 liters | 12 liters | 27 liters | 50 liters |
| Empty cylinder weight, kg | 4 | 5,5 | 14,5 | 22,0 |
| Propane tank weight, kg | 6 | 11 | 25,9 | 43,2 |
| Mass of stored gas, kg | 2 | 5,5 | 11,4 | 21,2 |
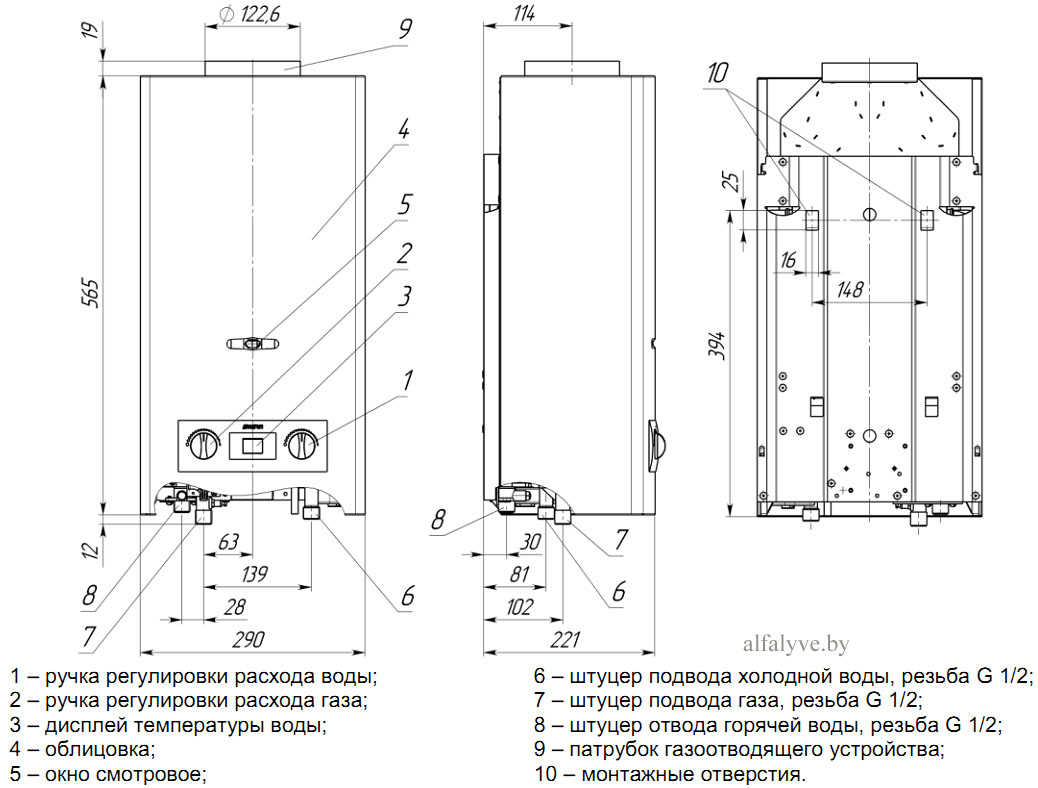
| Cylinder height, mm | 290 | 500 | 600 | 930 |
| Cylinder diameter, mm | 200 | 230 | 299 | 299 |
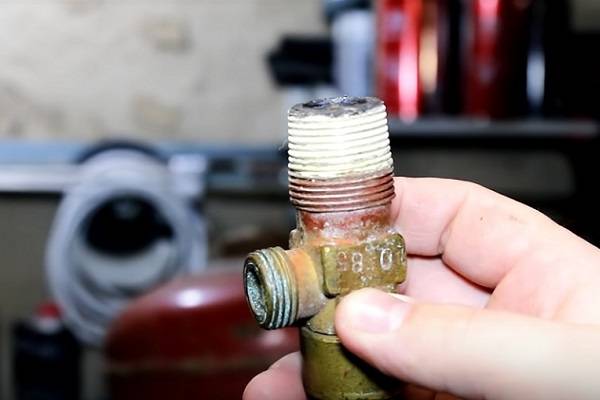
What is the thread on the propane tank?
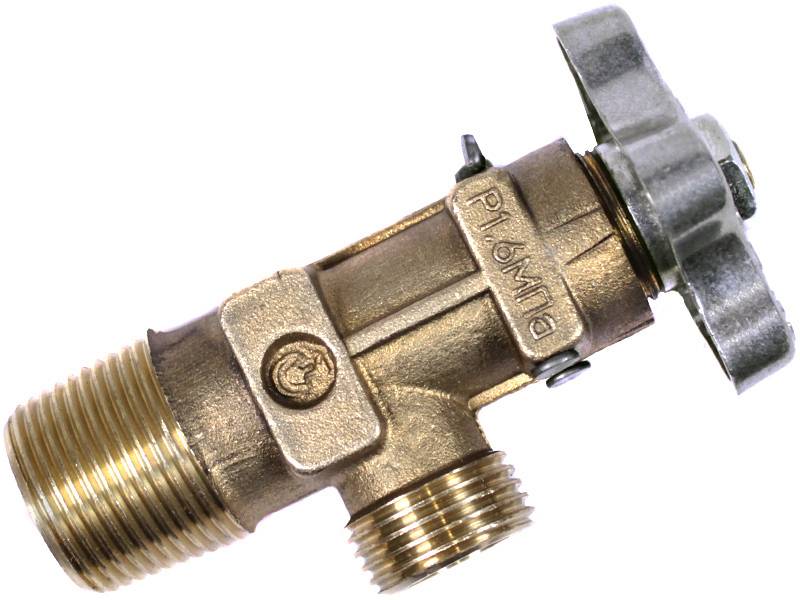
Valves of the VB-2 type are installed on most household cylinders for propane-butane mixture. These locking devices are manufactured in accordance with GOST 21804-94 and are designed for pressures up to 1.6 MPa. The valve has a left-hand thread SP21.8-1 (6 turns), which allows you to connect any gearboxes with a union nut and a similar thread.
The valve provides a strong connection with the neck, full tightness, has a clear marking and a modern design. Threaded surfaces are lubricated with a special lubricant that reduces friction during operation. The screw plug with rubber seal prevents gas leakage during transport or storage. The device provides protection against unqualified repairs by persons who have not received appropriate training. The reliability of the locking device contributes to the long and safe operation of the gas cylinder structure.
How many m3 of propane in 1 cylinder for 5, 12, 27, 50 liters?
We made special calculations that conditionally convert propane-butane into a gaseous state. Under standard conditions (100 kPa, 288 K), 0.526 m³ of propane or 0.392 m³ of butane is formed from 1 kg of liquefied gas. Given the percentage of the mixture (60% prop.), the volume of combustible gas is calculated by the formula M * (0.526 * 0.6 + 0.392 * 0.4). How many cubes are in a propane tank, you can see in the table below. The last line contains the number of liters of propane-butane mixture (in the liquid phase).
| Tank capacity (l) | 5 | 12 | 27 | 50 |
| Capacity (cubic meters of combustible gas) | 0,95 | 2,59 | 5,38 | 10,01 |
| Volume of liquid propane (liters) | 4,3 | 10,2 | 22,9 | 42,5 |
It should be borne in mind that the calorific value of the propane-butane mixture is three times higher than that of natural gas (methane).
Recommendations of the masters and possible difficulties
- Chemical. Implementation is simple as the world. The part is generously lubricated with an acid solution (WD-40, Cilit plumbing or vinegar), and after a few hours it will be possible to try to dismantle it. In difficult situations, you should try to pour the chemical into the problematic compound (for example, with a syringe). In addition, experts recommend trying to boil a completely removed device for 20 minutes in a soda solution - this often helps to turn a stuck valve.
Thermal. It is necessary to apply in the case when the above method did not bring the desired result. It is based on the fact that the crane box itself and the parts of the mixer with which it comes into contact are usually different. Accordingly, they have a different degree of expansion. Processing is carried out with a building hair dryer, with which the thread is thoroughly heated until the bolt moves.
Tapping.Usually helps with the dismantling of an alloy crane box that is leaking. It is carried out with light repeated blows of a hammer or mallet on the body along the threaded connection. Limescale and rust should be removed, and the jammed part should be easy to dismantle.
Jumper swinging. It is used in those situations when the edges of the jumper "sticked together". It is necessary to tightly grasp the bolt with a pipe wrench and try to break it by swinging
In this case, it is important not to apply excessive force - this is fraught with thread breakage and breakage of the part. Drilling a sticky crane box
Drilling
It is considered the most radical way; used when others have failed. The protruding part of the jumper is cut off with a hacksaw, after which the parts remaining inside are drilled with a suitable drill. Instead of a drill, you can use a cutter. Then the thread will have to be cut again.
Leaky fit occurs as a result of increased hardness of water, leaving abrasive deposits on the planes. And to eliminate them, it is enough to rinse and clean the plates. Therefore, experts recommend installing coarse filters in front of bathroom and kitchen faucets when using ceramic cores. In addition, the masters advise:
- before starting work, lay a rug, cardboard or newspapers so as not to lose small parts in the process and protect surfaces from damage if heavy tools fall;
- when the tap fails, when water floods the room, first turn off the water supply, and only then find out the nature of the damage;
- check the new faucet box with a partner: one opens the water to the mixer, and the second monitors whether the leak has been eliminated so that at any time you can immediately close the valve again;
- when buying a new mixer, you should always check which mechanism is being purchased, for which it is enough to unwind the flywheel to the limit; for a design with rubber gaskets, 3-4 turns must be done, for a ceramic one half is enough.
We suggest that you familiarize yourself with How to remove the filter on a Kandy washing machine
How to identify a defective or defective product
Look at the label first. Its main inscription should occupy two thirds of the total area of the label and the height of the letters should be exactly 6 centimeters. Those are the standards. The following is mandatory: container number, manufacturer's trademark, empty weight, cylinder capacity, date of issue and inspection (past and next), test hydraulic pressure, etc.
Modern certified cylinder manufacturers produce efficient designs that meet the requirements of GOST. If you have a counterfeit product in front of you, then it is very easy to identify. You just need to know the basic standards.
The main text on the label should occupy 2/3 of its area. Moreover, all letters must be of the same height, equal to 6 cm. The inscription must contain information on the mass of an empty and capacity of a full cylinder, the date of issue and technical inspection, the manufacturer's trademark, and other information must be indicated.
The following facts indicate a malfunction of the cylinder:
- flywheel does not turn on the valve itself
- mechanical deformations are visible on the surface of the container or valve with the naked eye: scratches, abrasions, cracks, dents, traces of corrosion.
- the inscription on the label states that the technical inspection date was overdue;
- there is a smell of gas in the air;
- the cylinder shoe is incorrectly installed or damaged;
- the fitting does not have a plug.
Important information for consumers. The pressure in the cylinder must always remain! The container must not be completely emptied!
Faults
- The most common failure is the “sticking” of the arrow on the multivalve. This happens, most often, due to the hanging of the float, which is located in the middle of the cylinder and should display the fuel level in it. Most often, with such a breakdown, the arrow can sometimes “stick off” (usually with a sharp collision with a tubercle or hole).
- Poison gas can be due to a malfunction of the emergency relief valve. In this case, there will be a distinct smell of gas closer to the location of the cylinder.
- In the event of a failure of the high-speed gas valve, fuel simply will not flow into the gearbox, and in the case of 4th generation LPG, it will switch to gasoline, and in the second generation, the car will simply stall.
- In the event of a shut-off valve failure, the symptoms will be similar to those described in the previous paragraph.
- The solenoid shut-off valve should shut off the gas supply to the reducer in the event of a break in the electromagnetic coil, and in the event of a coil failure or break, the symptoms will be similar to the previous two points.
These are the most common malfunctions of the HBO multivalve.
VALVE DESIGN
As a standard, propane gas cylinders up to 27 liters are equipped with KB-2 valves or VB-2 valves. The second option is considered more reliable. The reducer is connected to the valve by means of a fitting thread and a cap nut. The degree of tightness of the connection is regulated by an open-end wrench.
Valve connections are not always tight and often result in gas leakage.


Structurally, the valve consists of the following elements:
- steel body in the form of a threaded tee;
- locking part;
- flywheel;
- seals.
The color of the cylinder indicates what kind of gas is there:
- red color - propane-butane;
- black - nitrogen;
- blue color - oxygen;
- green - hydrogen;
- white color - acetylene.
Best Answers
Evil:
Either break the “lamb”, or grab it with an adjustable wrench and unscrew (counterclockwise) the entire crane box, buy another one along with the “lamb”. Well, if I understand you correctly.
Nikolai Mogilko:
drill out the bolt or at least its head
K-GOLEM:
only experienced managers or merchandisers can handle this problem... :)))
dZen:
A household drill can cut a new slot. Or she just drill out.
Alexey from Russia:
if the valve is no longer needed, cut it off with a grinder. there is an option to unscrew the valve itself from the mixer. but first turn off the water completely - both cold and hot.
Grandfather Au:
I would have posted a photo, but from where we know. white while spray on the bolt for half an hour. If copper plated - should turn away
researcher:
It's easier to find a man than to master the technology of repair. Just don't say that it was the husband who wrote it, because it's not a husband, but a boy!!!!
Alexander:
You cannot even imagine what a nightmarish mixer the imagination draws on your question. The valve is unscrewed from the mixer with an adjustable wrench and is not attached to it with any bolts. The head of the bolt is for a wrench and does not have a slot for a screwdriver. If you can’t remove the valve because of the flywheel, break it, drill a screw, etc., whatever you like. If anything, a set of new flywheels for the mixer is not so expensive.
uncle Ivan:
Throw a photo in a personal, then you can tell something. Valves and mixers are different now, and it’s so easy not to tell. I understand that you need to first remove the lamb, and then unscrew the axle box.
Fire safety rules when using cylinders
- it is forbidden to use faulty gas cylinders;
- it is forbidden to store cylinders in places of permanent residence of people;
- the valve must not be opened very quickly: the head electrified by the gas jet can cause an explosion;
- periodically check the serviceability and tightness of the valve;
- it is forbidden to use or stay at the same workplace two propane-butane cylinders at the same time.
If you have never unscrewed a crane, then it will not be superfluous to familiarize yourself with the safety rules before starting such work.
The operation of the valve is regulated by such documents as PB 12-368-00 "Safety Rules in the Gas Industry", Resolution No. 91 of June 11, 2003 "Rules for the Design and Safe Operation of Pressure Vessels" and GOST 12.2.008-75.
Dismantling, repair and replacement of the valve must be carried out only by persons who have a permit for the repair of gas equipment. And repair of a pressurized device is strictly prohibited.Therefore, if you notice that the valve is poisoning or is faulty, then the right decision would be to contact a gas service representative, and not repair at your own peril and risk.
If you want to disassemble an old cylinder in order to make a useful homemade product from it like a potbelly stove, smokehouse or gas grill, then you should remember that these actions cannot be called safe. And you will be responsible for the consequences.
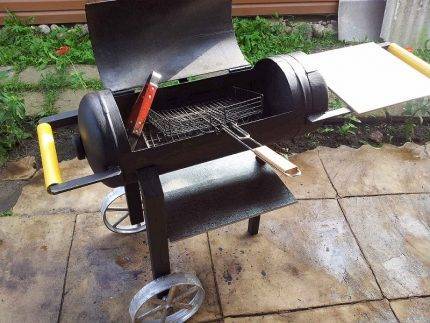
Home craftsmen are rich in ideas for constructing interesting and functional homemade products from old gas cylinders. So, a home brazier will become not only a useful device, but also a very stylish addition to the interior of the gazebo.
Here are some basic safety rules to follow:
- To release the remaining gas, slowly and slowly unscrew the valve handwheel.
- Under no circumstances should the pressure cylinder be disassembled or sawn.
- There should be no other cylinders near the dismantled vessel.
If you are just about to unscrew the valve and have not had time to do anything yet, and in the garage where the cylinder was standing, you can clearly hear the smell of gas, you should ensure maximum ventilation of this room. Why open the gates, windows, doors (if any), and leave immediately.


Oxygen regulator and its threads?
Yes-ah-ah-ah, Anton Man asked the right question. The new DIN valve standard for Natrox and O2 is out and running. Information is available on every site. I took the first one that came along. Mistral is available with all standard YOKE 232 bar, DIN 300 bar or Nitrox/O2 M26x2 connections. “I.e. a regular regulator will not screw into a new nitrox-o2 cylinder. Conversely, a new nitrox regulator into the air tank. It looks like Igor Kiselev is right: someone really is.he doesn’t know shit about technology.”
There are currently three types of valves:
A-clamp (or English Yoke - clamp) - ensures the tightness of the connection by pressing the regulator to the cylinder valve with a clamp. This type of connection is simple, cheap and very widely used throughout the world. It is designed for a maximum pressure of 232 bar and the weakest part of the connection, the O-ring, is not well protected against overpressure. 232 bar DIN (5 turns, metric thread M 25×2) - the regulator is screwed into the valve, which ensures a secure fixation of the O-ring. They are more reliable than A-clamps because the O-ring is well protected, but in many countries DIN standard equipment is not commonly used on compressors, so the diver will need to carry an adapter when traveling.
Valve standard 232 bar DIN300 bar DIN : (7 turns, metric thread M 25×2) - similar to the previous type of valve (for 232 bar), but designed for working pressure up to 300 bar. It is possible to use 300 bar regulators in 232 bar cylinders, but not vice versa. The new European standard EN 144-3:2003 describes a new type of connection that is similar in appearance to DIN 232 or 300, but uses a metric thread M 26×2. This type of compound is intended for use with mixtures in which the oxygen content is higher than in the atmosphere, that is, with nitroxes. From August 2008, all equipment used for diving with nitrox or pure oxygen will have to comply with the new standard.
Conclusions and useful video on the topic
The presented video materials allow you to see with your own eyes all the details and difficulties when replacing a valve on gas cylinders.
Even with all the precautions, the described manipulations with gas equipment are quite dangerous for a beginner. It is best to entrust these works to professionals who will perform them at a specialized stand.
When performing work on replacing a gas valve, you need to take your time and consider each subsequent action and its consequences.
Even with all the precautions, the described manipulations with gas equipment are quite dangerous for a beginner. It is best to entrust these works to professionals who will perform them at a specialized stand.