- What to look for when choosing a shower drain
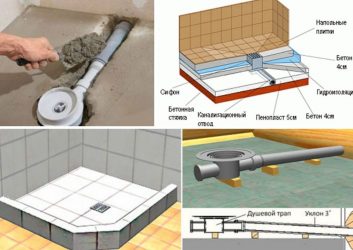
- Stages of work
- Fixing the siphon
- How to fix panels
- How to put doors
- Location
- Features of a shower cabin with a ladder
- Pro Tips
- Drain siphon
- Peculiarities
- Why is it needed
- Varieties of cabins and installations
- How to raise the floor in the bathroom for the installation of a drain
- Screed of different types
- On the logs
- Functional characteristics
- Safety shutter: types
- What else to consider
- Summer shower lighting question
- Humidity in the shower
- Is a shower suitable as a replacement for a bath
- Types and types
- Benefits of a shower cabin
What to look for when choosing a shower drain
If a siphon is not included with or a pallet, then measure the diameter of the drain hole before purchasing it. European standards provide for only three standard diameters: 52, 62 and 90 mm. Accordingly, siphons for pallets are mainly produced for them. It should be borne in mind that for siphons for drain holes of 52 and 62 mm, openings should be arranged with the possibility of unhindered access to this plumbing equipment for cleaning. On the contrary, 90 mm siphons can be installed in the floor, since, if necessary, they can be cleaned through the drain hole.
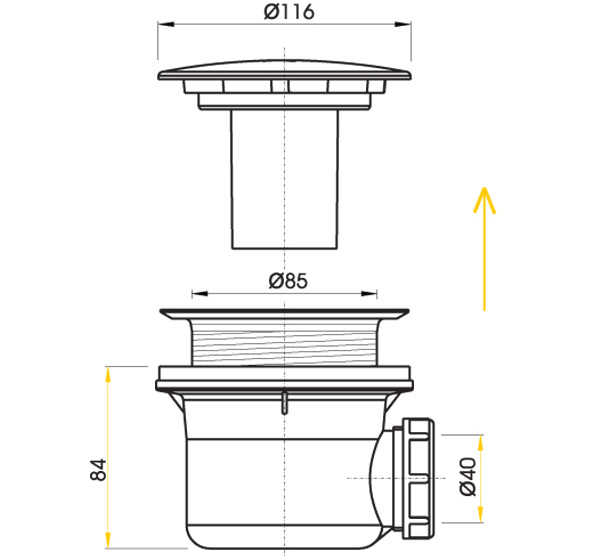
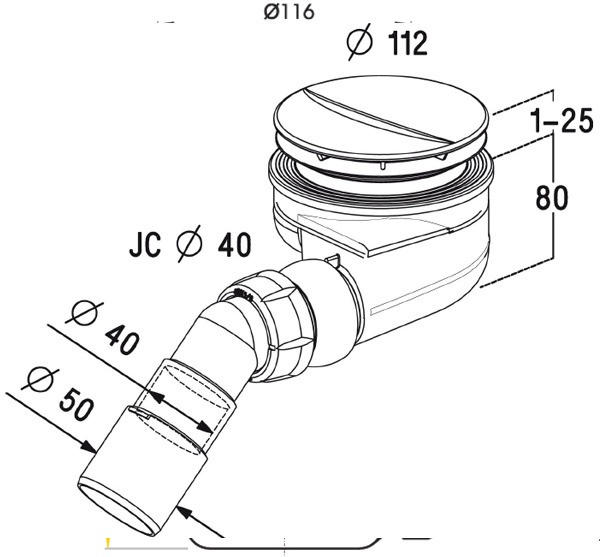
Also, attention should be paid to the design features of the siphons, or rather, to the number of butt joints that will need to be made during installation. The fewer of them, the better - there is less chance that one of the connections for some reason will leak over time
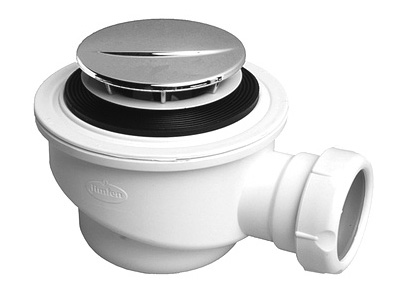
Another important design element of the shower tray drain is drain valve. He is necessary for deep pallets, which usually collect water during use. In fact, the valve may not be provided for in the design - the drain in this case is blocked by an ordinary plug, but this, to put it mildly, is out of date.
Modern shower cabins often provide for the installation of semi-automatic siphons, the drain valves of which can be opened and closed with a simple turn of the handle. It is clear that no stubs are required in this case.
However, the most advanced models of semi-automatic siphons are equipped with click-clakc valves, which open and close by simply pressing the valve with your foot. Accordingly, in order to collect or drain water in the pan, you do not even need to bend down.
Stages of work
Pallet assembly:
- We turn the pallet over, fasten 4 stud legs into the seats.
- We fix the pallet only after we put nuts and washers on the legs.
- We find a pre-soldered nut on a short support, fasten the central leg into it.
- To secure the legs, we tighten the nut more strongly, string the washer, locknut on top and twist it to the limit.
- To avoid distortion, do not tighten the bolts to the limit.
- We level the legs with a lock nut.
- Now, install the brackets for the pallet screen.
- We fix the pallet according to the level.
- The pallet is ready.
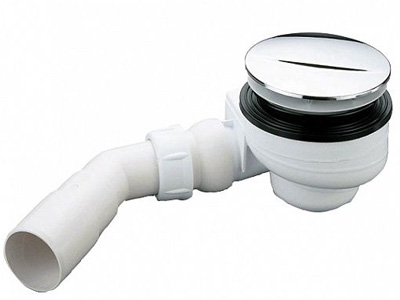
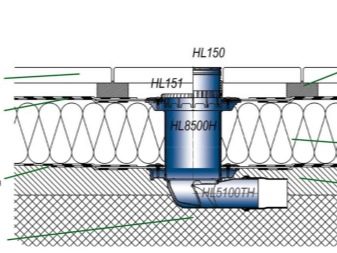
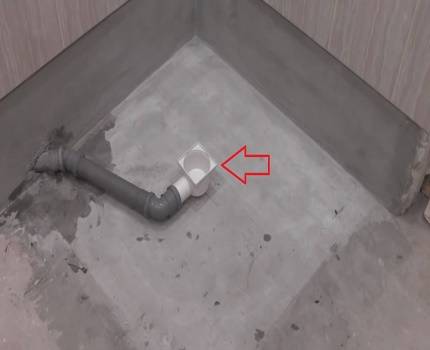
Fixing the siphon
The next important part is the fastening of the siphon
Its design and material may vary significantly, so read the instructions carefully at this stage! By the way, if you do not pay due attention to this point, install the air valve incorrectly, then you will enjoy the ambrosia of sewer pipes.
We mount the siphon to the bottom of the cabin. It is better to tighten the outlet with a water and gas wrench.
How to fix panels
Fixing is carried out in steps:
- We check the compliance of the panels in advance by placing them side by side. Where there are more holes for self-tapping screws - there is a top. Bottom edges are rounded. We set the glass in the guides;
- Raising the panel, we smear the bottom of the frame with sealant, wipe off excess glue;
- After installing the glass, tighten the screws on the clamping feet;
- We use self-tapping screws, attach the arch from above and below;
- We put the silicone sealant on the glass panels with the “petal inward”;
- We smear silicone under the lower parts of the guides and the rim of the pallet. We fasten. Do not touch the screws!
- We coat the joints of the side panels with silicone sealant for complete insulation;
- We apply a little silicone around the rim of the pallet. Be careful not to touch the water outlet! Then, we attach the side panels to small self-tapping screws with washers;
- We attach one of the side panels to the pallet, in the latter there are special holes for the screws;
- In the same way we fix the second panel;
- The place where the back skin is connected to the side skins is smeared with glue;
- We check the coincidence of the holes for fixing the back panel with screws, after that, insert the back panel and screw in the screws;
If you are not sure of the correct location of the screws and bolts, then do not tighten them to the limit. You can always go back and correct.The main thing - do not forget.


Many cabin models require a separate complete panel assembly. You don’t have to alternately glue arches, etc. with sealant.
How to put doors
Now most often they use sliding doors on rollers, so we will consider the option of fixing them:
- screw the rollers into the upper and lower parts. First to failure. The second - we delay during installation;
- we pull the seal with the “petal” outward onto the door;
- we check whether the door leaves are tightly closed, tighten the bolts if necessary;
- we attach plastic plugs to the screws for the door rollers.
How to mount the top:
- We connect the roof with a watering can, a fan, a backlight and a speaker. The assembly of the upper part in almost every model is peculiar, so read the instructions carefully. for convenience, we fix the speaker with hermetic glue;
- We fix the hose from the shower head from the outside;
- We install additional parts: mirrors, glass shelves, etc.
When the external finishing is finished, we check the correct operation of the cabin, and close the pallet with a screen.
Location
 When choosing the location of the ladder, the following fact must be taken into account: the pipe coming from it must have a slope of at least 3 cm / m, so that the farther the device is from the tie-in to the sewer riser, the higher it will have to be raised.
The least visible are the ladders located in the corner.
The floor in this case will be divided by a diagonal passing through this corner into two planes having a corresponding slope.
Slotted drains are often installed on one side, while the entire floor forms a single plane with a slope in the direction of the drain device.
In some cases, it is advisable to install the ladder in the center or slightly away from it. Then, during planning, the floor is divided diagonally into four triangles, each of which is given the necessary slope (triangles, as it were, form the faces of an inverted 4-angled pyramid).
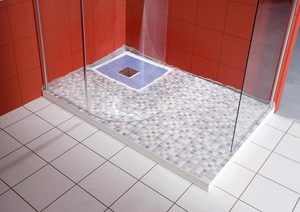
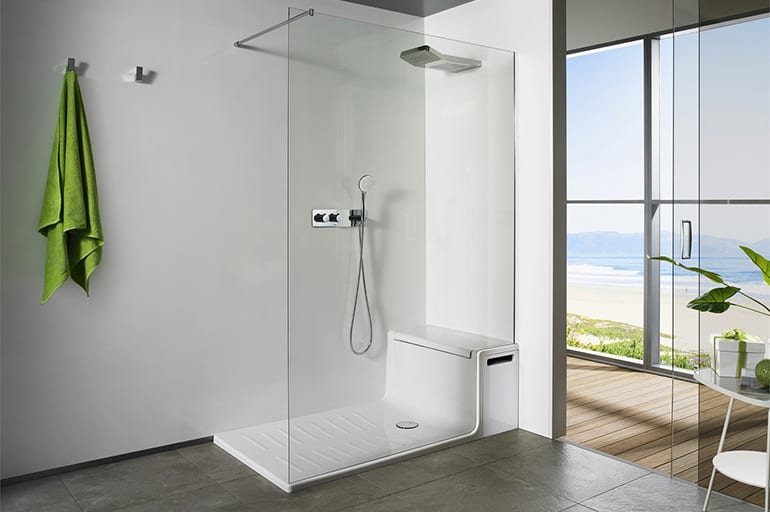
Features of a shower cabin with a ladder
This variant of the shower area is gaining more and more popularity. It can be placed anywhere in the bathroom - built into a corner or separated from the end of a narrow room. The design has undeniable advantages over traditional devices, since it:
- does not clutter up the bathroom, in which there is already little space - glass sheets perfectly transmit light, look light, airy and do not visually eat up the space;
- supports the concept of a "barrier-free environment", is convenient for use by the elderly, the disabled - the lack of a side eliminates the problem of getting into the shower;
- looks stylish and modern;
- has a tile floor, which is much easier to clean and disinfect;
- does not allow the space under the pallet to be littered, due to the lack thereof;
- provides unlimited options for choosing the design, location, dimensions and configuration of the shower area;
- allows you to refuse to purchase an expensive device;
- easily dismantled if necessary.

The installation of such a cabin will require specific preparatory work at the stage of arranging the floor. The main issue that needs to be addressed is the effective disposal of waste water. This requires a sewer slope of 0.03%. Therefore, a rise of 3 cm must be provided per meter of pipe.If you want to completely abandon pallets, you will either have to raise the level of the entire floor, or equip the drain system with a drainage pump.
Pro Tips
When designing a pallet, remember that the ceiling height will decrease by 15-20 cm.
For effective drainage, the minimum slope of the floor should be 1.5-2 cm. An angle of more than 2 cm is not recommended for reasons of comfort and safety.
It is possible to ensure trouble-free operation of the drain system only by placing it above the level of sewer connections. In an apartment building, the problem is solved by bringing communications to the basement.
If the connected bathroom and drain are built into the bathroom floor, then you can install an inclined horizontal descent using corrugations. This will allow the sewer tee to be flush with the surface.

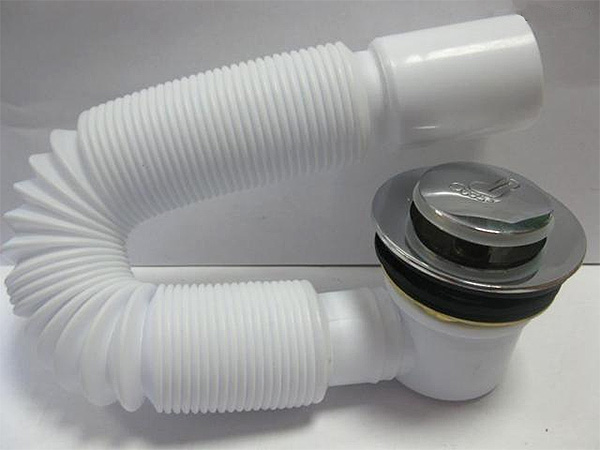
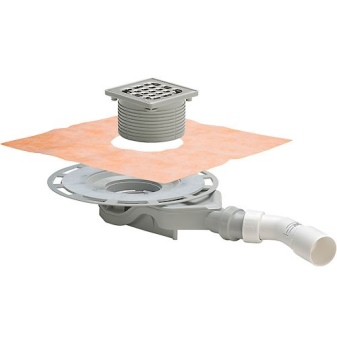
Drain siphon
 When constructing a drain for the bathroom, do not forget about the shower siphon. For its manufacture, the following materials can be used:
- brass;
- plastic;
- stainless steel.
The choice of material in this case depends on your financial capabilities. But whatever you choose, two prerequisites for installing a shower siphon must be taken into account:
- choose a collapsible design that can be easily disassembled, cleaned, and then reassembled. The siphon needs to be cleaned regularly, otherwise the water will not exit through the drain in the floor, and silt deposits will accumulate in the siphon and emit an unpleasant odor that will be difficult to get rid of;
- the drain structure must be equipped with a water seal to prevent the appearance of rotten odors. But most of the finished models are already equipped with them.
Peculiarities
Modern shower enclosures have firmly taken a leading position in the renovation of the bathroom. Today, designers prefer not to use bulky pallets and other structures. Transparent doors, non-slip tiles on the floor, a hose with a shower and no complicated electronic stuffing - this is how many imagine their future bathroom.


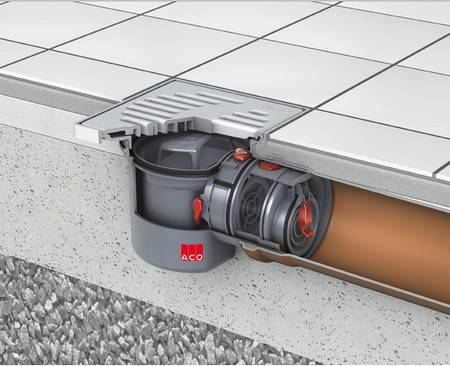


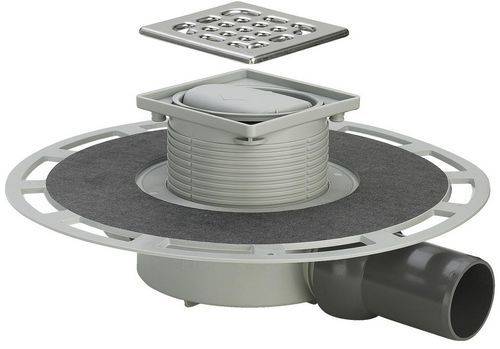


The design resembles a funnel that collects water and diverts it into a sewer pipe. On the one hand, the sanitary ladder has a fixing adapter, and on the other, a coupling for connecting to the pipeline. Inside the housing there is a filter grill, which acts as a shutter. But the installation of such a plumbing device requires a waterproof coating on the floor.

What is the ladder for?
- discharges waste water into the main drain channel;
- does not let contaminants into the drain riser and thereby prevents blockages;
- hermetically connected to the docking area;
- protects against unpleasant sewer odors;
- leaves access to the drain system for cleaning pipes from blockage;
- is an additional emergency drain, which can be especially important when the bathroom is flooded by neighbors from above.
Why is it needed
What is the drain in the bathroom floor for?
There are two typical reasons.
- A shower stall floor drain is a great alternative to a bathtub or shower tray for people with limited mobility. It is difficult for a young and physically healthy person to imagine this, but even a barrier of only thirty centimeters high may well become an insurmountable obstacle.
- In addition, a floor drain can be an excellent insurance against flooding of neighbors due to plumbing failures, an open faucet, careless use of the bathroom, and so on. No matter how effective floor waterproofing is, it will not help when water flows over the threshold; here, all the surplus safely drains into the sewer.
Varieties of cabins and installations
The main types of showers:
- Open. They do not have a ceiling, the walls of the bathroom play the role of 2 sidewalls, and the other 2 are made of plastic or glass. They can be with or without a pallet. In the latter case, it is necessary to properly organize the drain, otherwise the water will flow into the room.
- Closed. Such models have a base, walls and ceiling. Available in square, rectangular, semi-circular and even round shapes. They are installed in a convenient place where you can organize the supply / drainage of water. In such cabins they create the necessary microclimate, bathe children and even wash them.
- Combined. In this case, the cabin is enclosed by side walls and combined with the bathroom. It is equipped with a large number of additional functions (rain shower, hydromassage, etc.). To install this design requires a lot of space, and its cost is high.
Enclosed cabins have a base, walls and ceiling.
Modern shower installations help drain water at floor level, while all communications are hidden in the wall. This innovative solution ensures the functionality of the equipment, effectively removes liquid and guarantees a beautiful design of the bathroom interior.
Shower concealed installation is a multifunctional self-supporting element. It is designed for installation in hollow partitions and for floor coverings with a thickness of 90-200 mm.The installation can be placed both inside the wall and in front of it.
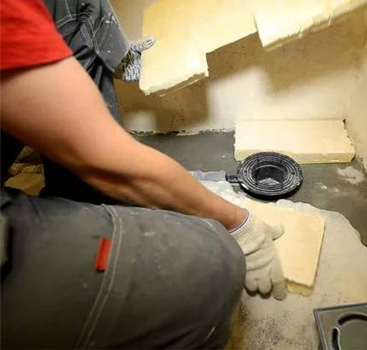
How to raise the floor in the bathroom for the installation of a drain
The smallest floor drain, mounted on the floor, has a height of 6-7 cm. At the same time, in order for water to drain normally into it, it is necessary to ensure a slope towards the drain hole of at least 1 cm per meter. This means that by making the floor with a drain, the height of the floor is increased towards the walls. The zero point in this case is the upper part of the installed ladder. How accurately the floor rises depends on the size of the shower or bathtub completely, if you plan to collect water from the entire area of the bathroom.
The layout of the ladder for draining water in the floor
Raising the floor in the bathroom or in the shower can be done in several ways. When choosing a method, it is necessary to take into account the bearing capacity of the floor, otherwise you can harm the entire structure.
Screed of different types
The most obvious way to slope the floor drain in the floor is to pour the screed. But the option is not always the best. Firstly, the usual cement-sand mixture has a lot of weight, and secondly, it “ripens” for a long time. But there are some good options.
- CPS. Ordinary cement-sand screed. The option is understandable, but very heavy - 15-16 kg per 1 sq. meter with a layer thickness of 1 cm. Not every floor can withstand such a load. You need to be especially careful in old houses.
-
First pour a layer of expanded clay, pour cement-sand mixture on top (thickness not less than 3 cm). Not a bad option, but it must be considered according to the bearing capacity of the floor - will it withstand or not.
-
- Make an insulated floating screed.Plates of extruded polystyrene foam are laid down (not polystyrene, it will collapse under the weight of the screed), pour DSP on top (the minimum thickness is also at least 3 cm). A good option is that the floor will not be so cold, and the total mass is relatively small. An underfloor heating system is easily integrated into this option. More rational - electric, with water a lot of trouble during installation.
- Polystyrene concrete or other types of lightweight concrete. The option is very good, at the same time the problem of the “cold floor” is also solved - since these materials have good thermal insulation properties. Here it will be necessary to look for a compromise solution - between the mass of the screed and the strength characteristics.


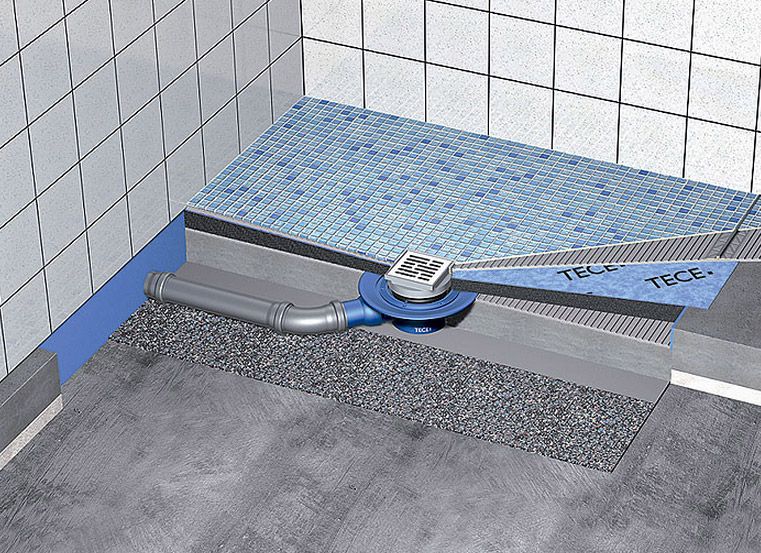


The most common way to make a floor with a drain is using a screed. It’s just that the screed can be different, especially since the thickness of the “pie” is usually significant - rarely less than 12 cm - which makes it possible to make it combined. This allows you to provide the required reliability, but reduce weight. Most often, the floor with a drain is made insulated. But the maximum thickness of the insulation and screed is 10 cm, which is clearly not enough to install most ladders. The remaining centimeters are “gained” by laying a rough screed, but it makes sense to make it from lightweight concrete in order to reduce the load on the ceiling.
On the logs
In order not to overload the floors, you can make a podium in the shower or bathroom on the logs. The option is controversial, since high humidity and wood do not mix well, but sometimes this is the only way out. When choosing such a floor drain device, you need to use well-dried wood. Before use, it is treated with protective compounds (according to the instructions, but at least twice).It is desirable to choose from those impregnations that are intended for outdoor use or for direct contact with the ground - their degree of protection is higher. After the composition has dried, you can start working.
-
Make it full of wooden joists. Logs are installed in an "envelope" with a center at the location of the drain. In general terms, the technology is as follows: holes are drilled in the floor screed for the installation of studs (M14-M16), the installation step is about 30 cm. Logs are attached to the studs (40 * 60 mm or 45 * 90 cm - from the size of the podium being built). The logs are laid (can be hung up) taking into account the creation of the required slope. On them - moisture-resistant plywood 12 mm or thicker, then GVL, waterproofing, on it - tiles.
-
Make a flat wooden floor on the logs, and lay the tiles with a slope due to different thicknesses of glue. This option is good in small areas - if you drain only in a small shower stall.
The advantages of these methods are the minimum weight, the disadvantages are the complexity of execution, since attention to detail is required, high quality waterproofing. As you can see, the floor with a drain in the bathroom or in the shower can be done in different ways. Choose the option that best suits your conditions
Choose the option that best suits your conditions
As you can see, the floor with a drain in the bathroom or in the shower can be done in different ways. Choose the option that best suits your conditions.
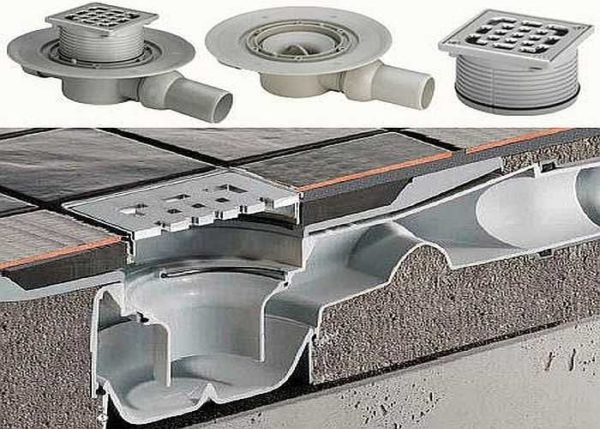
Functional characteristics
The ladder has a simple design - it is designed to collect and divert water from the floor surface into the sewer system. The device is made of stainless steel, reinforced or metal-plastic.
In addition to the main function, the ladder solves the following tasks:
- Keeps debris out and thus prevents clogging of sewer pipes.
- Does not allow unpleasant odors from the sewer into the room.
- Allows you to quickly clean the drain hole, providing free access to it.
Drainage devices with a dry seal do not allow unpleasant odors from the sewer to pass through
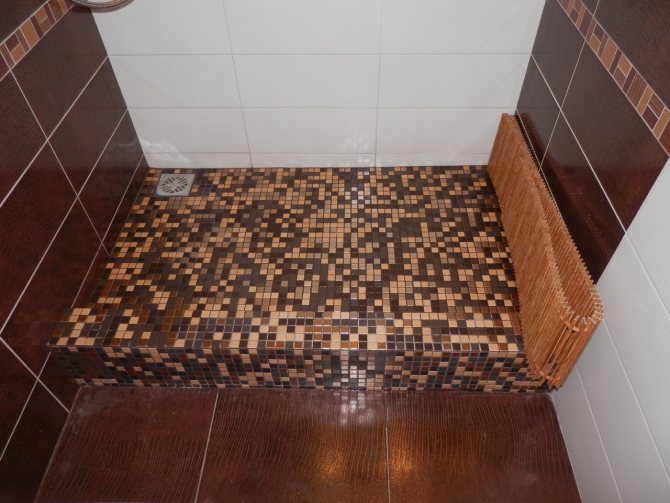
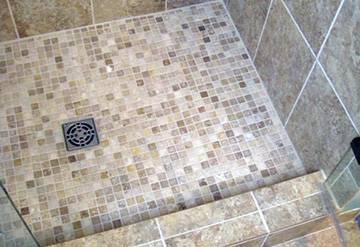
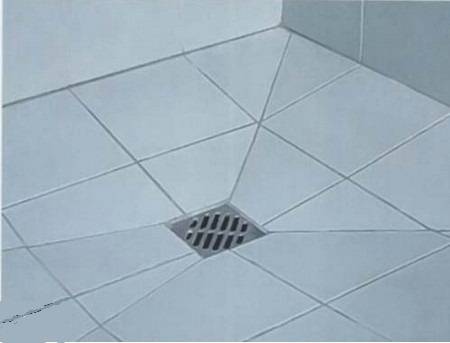
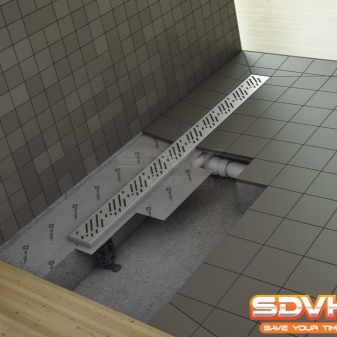
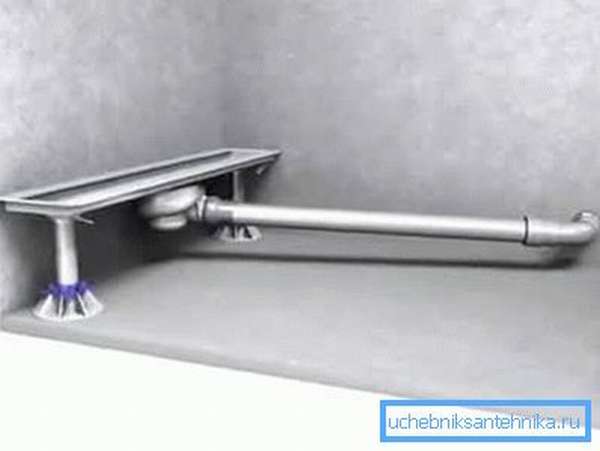
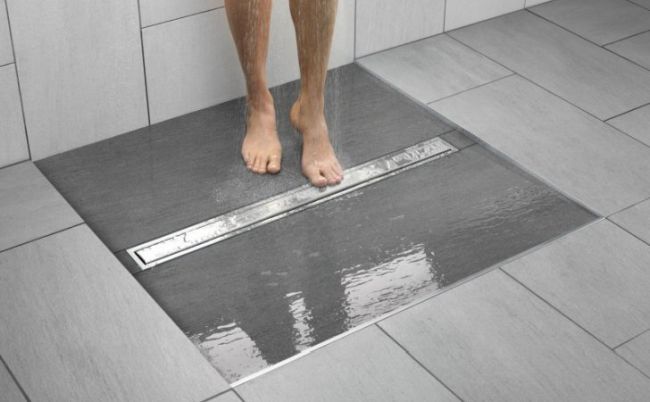
There are two types of ladders. A linear drain collects water in a tray, and a point drain is made in the form of a funnel. The second variety is more common, as it allows you to mount the ladder anywhere in the shower. It will only be necessary to tilt the floor towards the drain so that the water flows by gravity.
Since the working area of the linear ladder is increased due to the presence of the tray, its throughput is much greater than that of a point device. Such a ladder can be located along the wall or in the center of the shower room. You will also need a slope towards the ladder on one side. Outside, a linear stainless steel strip in the form of a narrow long rectangle is mounted on the floor surface. The lattice can be traditional or patterned. It is located on the same level with the plane of the tiled floor.
Construction of a linear ladderlinear shower drain
When choosing a ladder model, consider the following:
- The technical capabilities of the device, its bandwidth and size.
- Where is the sewer pipe located?
- Where is the shower located in the room?
- The style of the room, as well as the finishing material of the walls and floor.
Some manufacturers offer the installation of a ladder that imitates floor tiles - water flows through slots along its perimeter
It is not difficult today to choose a device of the required height, size and shape.Plums differ in the shape of the lid (round, square, rectangular) and the material of manufacture.


Most of the drains are equipped with a water seal inside the siphon. A conventional device with infrequent use of the shower, when water evaporates, will not protect against odors. But a device with a dry water seal works more efficiently. It reliably protects the room from "sewer" aromas, as not only with a water lock, but also with several dampers. They automatically block the drain channel if no water flows through it.
Elements of a drain with a dry shutter
There are several options for the location of the drain hole:
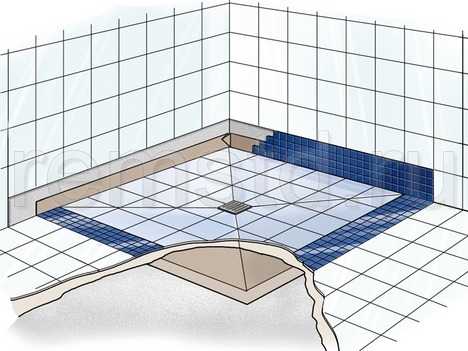
- In the center - this is a common way to locate the drain. The slope of the floor in this case is performed on four sides.
- Linear ladders are placed at the junction of the wall and the floor, and the slope of the floor is performed from the opposite wall.
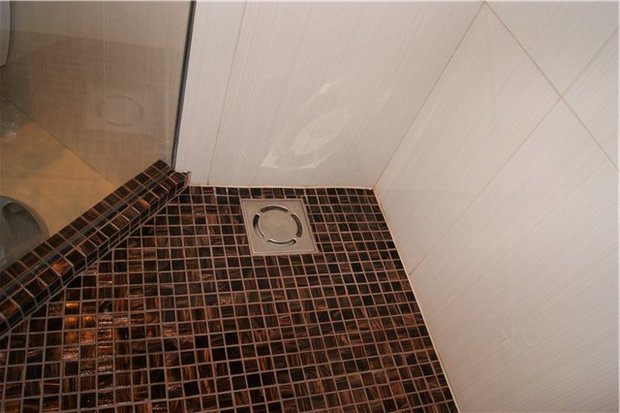
- The most inconspicuous is the spot drain located in the corner of the shower. The slope is made on both sides so that the water flows into the corner.
Safety shutter: types
The design of the safety shutter depends on how often the shower is used. The siphon water seal works great in showers that are used daily. The water barrier reliably protects the room from the penetration of odors from the sewer. The disadvantage of this design lies in its massiveness. In addition, the shutter ceases to cope with its function when it dries up. This happens for various reasons: when a shower is rarely used, the slope of the structure was initially chosen incorrectly or a “warm floor” was installed.
siphon valve
Therefore, modern models with a “dry” locking device have gained popularity.There are three varieties:
- The diaphragm type dry seal is equipped with a movable spring-loaded diaphragm. The diaphragm lets water through, lowering under its pressure.
- In a float valve, the locking element rises when the water is drained, and then lowers and “plugs” the hole.
- In pendulum constipation, a special device closes the drain under the action of gravity.
The elements of the dry drain, which are located inside the floor structure, are made of plastic, and the outer cover is made of stainless steel.
What else to consider
Summer shower lighting question
Considering that in summer the daylight hours are quite long, shower lighting can be neglected.
The difficulty lies in the fact that the room is small and it is almost always damp
When organizing electric lighting, you must follow all the rules and precautions for laying electrical wires. This will allow you not to be afraid of electric shock during washing.
It is better to organize a small window in the shower wall. The transmitted light is quite enough for comfortable washing.
Humidity in the shower
In order for the shower from the sanitary room not to turn into a hotbed of dampness and mold, it is necessary to provide for good ventilation of the room.
If the shower is light, with gaps, then it will dry out well anyway. If the premises are capital with solid walls, then it is necessary to provide an opening in the upper part of the wall. It will allow heated, moist air to quickly leave the volume of the shower and speed up drying.
Is a shower suitable as a replacement for a bath
Many people, when planning a bathroom renovation, think about whether the shower can fully replace the bath. There is a large selection of shower cabins on sale, they have different functions and many sellers indicate that such equipment should be in every home.
Some people need several times a week take a hot bath with foam and relaxing oils. For others, taking a shower twice a day is enough, which helps keep the body clean and at the same time spend a minimum of time.
People's tastes change, and not every person can afford to make repairs in the bathroom every year. If the area of \u200b\u200bthe room is large, then it is better to install a bathtub and a shower cabin at the same time. The health status of residents is also taken into account. Some need to constantly take therapeutic baths, while others are contraindicated in hot water.
Water procedures help not only to keep the body clean. In the morning, a cool shower will help you wake up faster and tune in to the working day. In the evening, a hot bath relaxes, helps to get rid of the tension accumulated during the day.


The shower can fully replace the bathroom.
Having compared all the pros and cons, each person independently decides which option is more acceptable for him, but if possible, it is better to choose both.
Types and types
First of all, shower cabins differ in shape: angular and straight. In our country, corners are more common, because they are easier to fit into small rooms.
But corners can also be of different shapes. More common with a rounded front part - in the form of a sector of a circle, but there are also with a beveled and rectangular base.
Now actually about the configuration. On this basis, shower cabins are divided into closed and open. The open ones do not have a top panel, as well as side walls. They are closed. Open showers are most commonly referred to as "shower corners" or nooks and crannies. Its equipment can also be different - with or without a pallet.
Some closed showers have many additional functions - various types of jet massage, showers - regular, tropical, etc., a built-in sauna or a steam generator for a hammam. Such multifunctional devices are correctly called "hydromassage cabins", and simply - hydrobox.
It is clear that the more complex the “stuffing”, the more time-consuming the assembly will be. But hydromassage cabins are assembled at the very beginning in the same way as a shower enclosure with a tray. If you understand how to assemble the main one, it will be easier to install the walls and the roof. The main thing, as usual, is the foundation, and the assembly of a shower cabin of any complexity begins with the installation of a pallet and guides for the doors.
Benefits of a shower cabin
Separate cabin for soul without a pallet is very convenient for people aged or with limited mobility. It is distinguished by a drain, the hole of which is located under the shower head. To ensure that water does not stagnate on the bathroom floor, the floor surface is made with a slight slope towards the drain hole.
A properly installed shower drain in the bathroom floor not only allows you to use the shower stall at any time, but also protects the bathroom from accidental flooding in the event of a plumbing failure. In addition, during the installation of the drain pipe of the shower cabin, it is possible to arrange a warm floor in the shower due to the use of modern waterproof heat-insulating materials in the manufacture of the drain.


