- General information about welding inverters
- Preparation for work
- Weld defects
- Lack of fusion
- undercut
- burn
- Pores and bulges
- Cold and hot cracks
- Vertical seam semi-automatic
- How to cook?
- Fundamentals of manual welding
- How to cut metal with an electrode
- How to weld a vertical seam
- Polarity when welding
- Tips for dummies
- Creating a seam with an electrode
- top down technique
- Basics of welding for beginners
- Electric welding technology
- Polarity explanation
- Influence of electrode feed rate
- Current strength
- Features of thin metal
- top down technique
- Advantages of inverter welding machines
General information about welding inverters
Inverter welding devices convert mains alternating current with standard indicators into high-frequency currents and then into direct current. The efficiency of such devices is quite high and averages 85-90%. At the same time, it is possible to weld metal with an inverter with little power consumption, even under high loads. During operation, any physical influence on this network is excluded; during this period, there are no voltage surges and drops.
Another positive quality is the possibility of relatively normal operation under low voltage conditions.For example, at 170 V, many inverters are capable of welding with 3 mm electrodes. The relatively easy production and retention of an electric arc contributes to the rapid development of equipment.
This is especially important when welding aluminum at home with an inverter.
At the initial stage of training, beginners should not focus on the internal structure of the unit. First of all, you should carefully examine all terminals, connectors, switches and other elements located outside
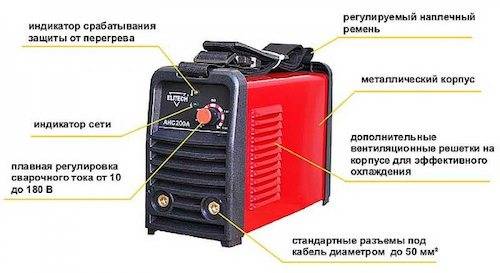
The device itself, recommended for beginners, is made in the form of a compact metal box, with a total weight of 3 to 7 kg. The case has multiple ventilation holes to help cool the transformer and other internal parts more efficiently. For the convenience of carrying the inverter from place to place, a belt is provided, and some models are additionally equipped with handles.
Power is turned on using a toggle switch or a special key. The front face is designed to accommodate power and overheating control indicators. Welding current and voltage are set with the adjusting knob. Work cables are connected to two outputs - plus and minus, located here on the front panel. An electrode holder is attached to one of the cables, and a clip in the form of a clothespin attached to the workpiece is attached to the other. The connector for connecting the power cable is located at the rear.
When buying, pay special attention to the length of the cables and their flexibility. With rigid and short cables, inverter welding for beginners will be inconvenient and a special extension cord may be required
Preparation for work
The connection of profile pipes without welding is mainly carried out using specialized clamps and bolts. Over time, the fasteners loosen, so when caring for the product, it is necessary to constantly check the strength of the structure. To reduce problems during operation, welding is used to assemble the structure.
To obtain a strong weld, it is necessary to prepare the surface of the pipe. For this:
pipe sections are cut to the required length;
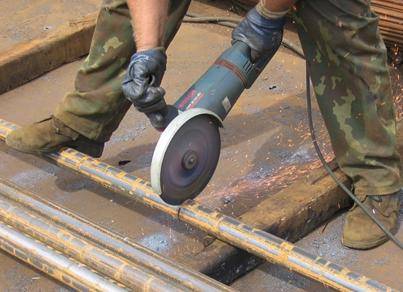
Using a grinder for cutting pipes
It is recommended to cut pipes with special tools, for example, a hacksaw, which allows you to make the cut as even as possible.
- if it is necessary to connect the elements at an angle, then the pipes are carefully adjusted to each other so that the gaps are as small as possible. This will increase the quality of the weld and, as a result, the reliability of the finished product;
- the places where the weld is supposed to be located are cleaned of rust, burrs and other foreign deposits. Any inclusion negatively affects the strength of the seam. Cleaning can be done with a simple metal brush or specialized equipment, such as a grinder.
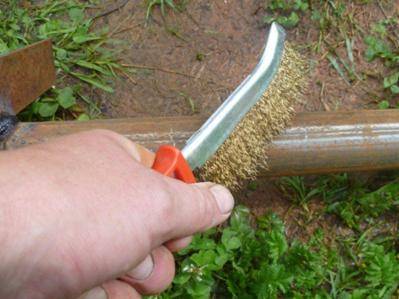
Surface preparation before welding
Weld defects
Beginning welders often make mistakes when making seams that lead to defects. Some are critical, some are not.
In any case, it is important to be able to identify the error in order to correct it later. The most common defects among beginners are the unequal width of the seam and its uneven filling.
This happens due to uneven movements of the electrode tip, changes in the speed and amplitude of movements.With the accumulation of experience, these shortcomings become less and less noticeable, after a while they disappear altogether.


Other errors - when choosing the current strength and the size of the arc - can be determined by the shape of the seam. It is difficult to describe them in words, it is easier to depict them. The photo below shows the main shape defects - undercuts and uneven filling, the reasons that caused them are spelled out.
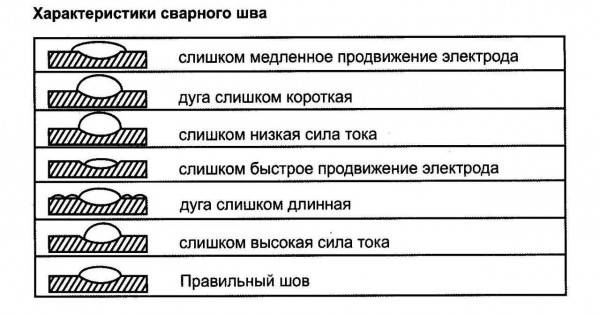
Errors that can occur when welding
Lack of fusion
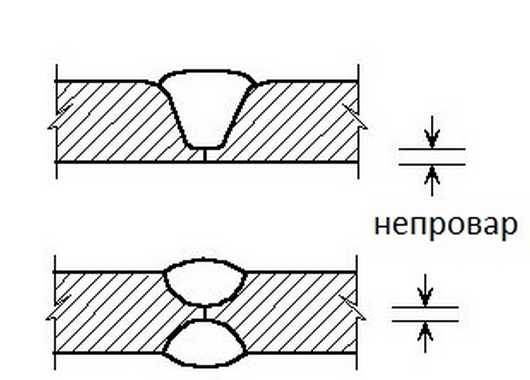
One of the mistakes that novice welders make: lack of fusion
This defect consists in incomplete filling of the joint of parts. This disadvantage must be corrected, as it affects the strength of the connection. Main reasons:
- insufficient welding current;
- high speed of movement;
- insufficient edge preparation (when welding thick metals).
It is eliminated by correcting the current and reducing the length of the arc. Having chosen correctly all the parameters, they get rid of such a phenomenon.
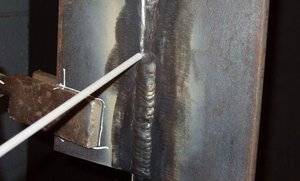
undercut
This defect is a groove along the seam in the metal. Usually occurs when the arc is too long. The seam becomes wide, the temperature of the arc for heating is not enough. The metal around the edges quickly solidifies, forming these grooves. "Treated" by a shorter arc or by adjusting the current strength upwards.
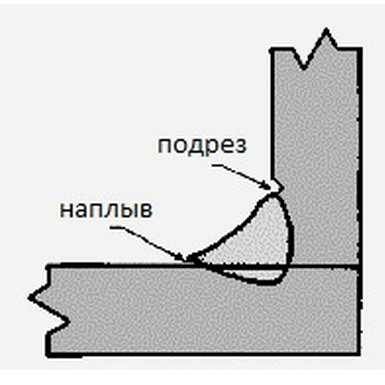
Undercut in gusset
With a corner or tee connection, an undercut is formed due to the fact that the electrode is more directed towards the vertical plane. Then the metal flows down, a groove forms again, but for a different reason: too much heating of the vertical part of the seam. Eliminated by reducing the current and / or shortening the arc.
burn
This is a through hole in the weld. Main reasons:
- too high welding current;
- insufficient speed of movement;
- too much gap between the edges.
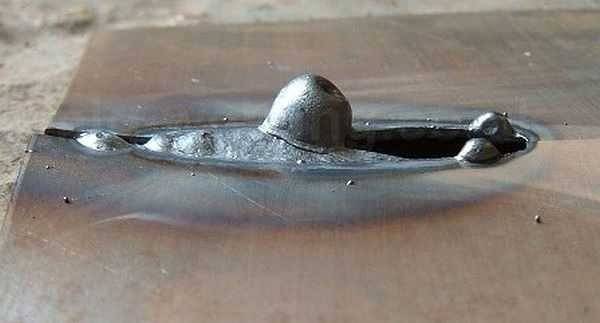
This is how a burnt seam looks like when welding
The correction methods are clear - we are trying to choose the optimal welding mode and the speed of the electrode.
Pores and bulges
The pores look like small holes that can be grouped in a chain or scattered over the entire surface of the seam. They are an unacceptable defect, as they significantly reduce the strength of the connection.
Pores appear:
- in case of insufficient protection of the weld pool, an excessive amount of protective gases (poor quality electrodes);
- draft in the welding zone, which deflects protective gases and oxygen enters the molten metal;
- in the presence of dirt and rust on the metal;
- inadequate edge preparation.
The sags appear when welding with filler wires with incorrectly selected welding modes and parameters. Represent a numb metal that has not connected to the main part.
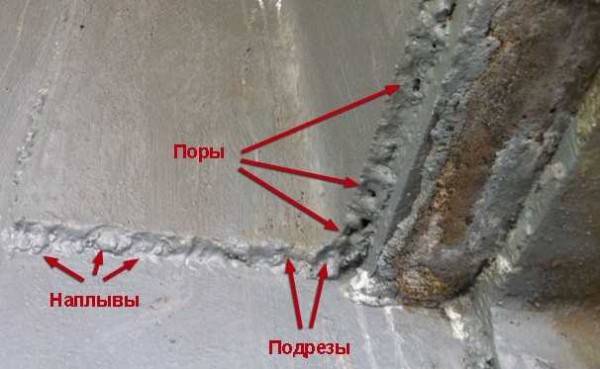
Main defects in welds
Cold and hot cracks
Hot cracks appear as the metal cools. Can be directed along or across the seam. Cold ones appear already on a cold seam in cases where the loads for this type of seam are too high. Cold cracks lead to the destruction of the welded joint. These shortcomings are treated only by repeated welding. If there are too many flaws, the seam is cut off and re-applied.


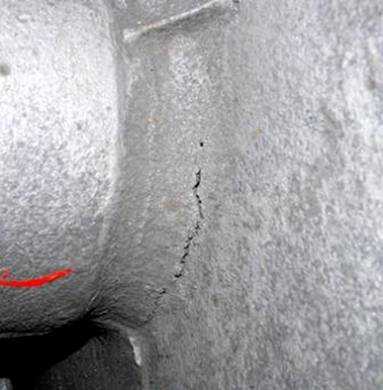
Cold cracks lead to product failure
Vertical seam semi-automatic
The quality of the weld depends on how strong the resulting structure will be and what load it will be designed for.
In addition, in some cases it is important to maintain an attractive aesthetic appearance.Most of the problems arise with the creation of a vertical weld, as the metal flows out of the pool
A fairly common question is, how to cook vertical the seam. Among the features, we note the following points:
- The preparation of the material is carried out depending on what kind of work will be carried out. The thickness of the material and the degree of machinability are taken into account.
- A short arc with an average operating current is selected.
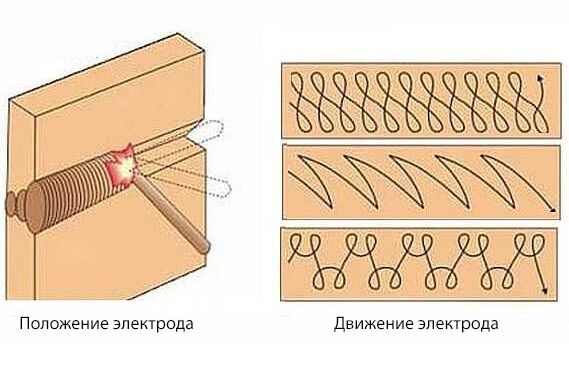
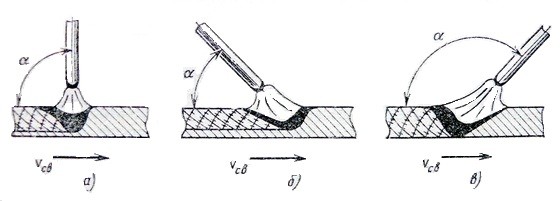
- The rod with a special coating is located at an angle of 80 degrees relative to the surface to be treated.
- When creating a vertical seam, it is recommended to manipulate the rod over the entire width of the formed bead.
Semiautomatic welding
A high-quality vertical seam can be obtained by welding with the arc separated from the surface. For beginner welders, this method is more suitable, as it is easier to perform. This is due to the fact that at the moment of arc separation, the metal can cool down. However, there is also a significant drawback - the performance indicator is reduced. Among the features of the application of this method, associated with the separation of the rod from the surface, we name the following points:
- When welding, the tip can be supported on the shelf of the welded crater.
- The scheme of movement of the working part from side to side, due to which the entire vertical seam is covered. In addition, it is possible to apply the scheme of loops or a short roller when the working part moves from top to bottom.
- The set current strength largely determines the shape of the seam and its main parameters. In general, it is recommended to reduce the rating by 5 A from the usual value for a particular alloy thickness.
It should be taken into account that the main parameters of the work being carried out are chosen experimentally in almost all cases. That is why the skills of the welder largely determine the quality of the connection and its reliability.
How to cook?
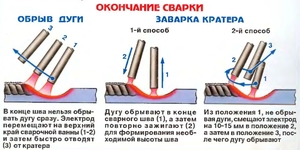
Welding begins with the ignition of the arc. There are two ways to start an arc:
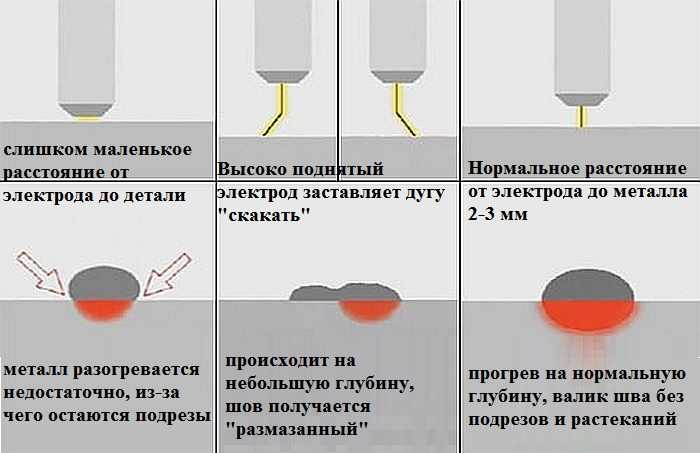
- Touch. The electrode is held at an angle of 60°, then the end of the electrode touches the metal and immediately raises the electrode to a distance of 3-5 mm. An arc is formed.
- Striking. The tip of the electrode is quickly drawn over the surface of the metal and immediately quickly lifted by 2 mm.
It is optimal to maintain an arc length of 5 mm. If you get too close, sticking of the electrode will occur, while a long arc does not boil through the metal, it forms a lot of spatter. If sticking occurs too often, then the current strength is not enough and it should be added. The length of the arc can be controlled by sound: if the sound is even, monotonous, then the length is constant, but if sharp sounds with pops are formed, then the length is too long.
As soon as the welder catches the arc, he starts welding. The electrode is slowly and smoothly moved horizontally, performing light oscillatory movements. If suddenly the arc breaks or the electrode burns out before the seam ends, then you need to continue working correctly. A recess (crater) is formed at the end of the seam. You need to retreat from it by about 12 mm and light the arc. Slowly moving forward, carefully weld the crater and continue welding the seam.
As a rule, they are welded in several layers:
- parts up to 6 mm thick in two layers;
- workpiece 6-12 mm - in three layers;
- parts with a thickness of more than 12 mm - 4 layers.
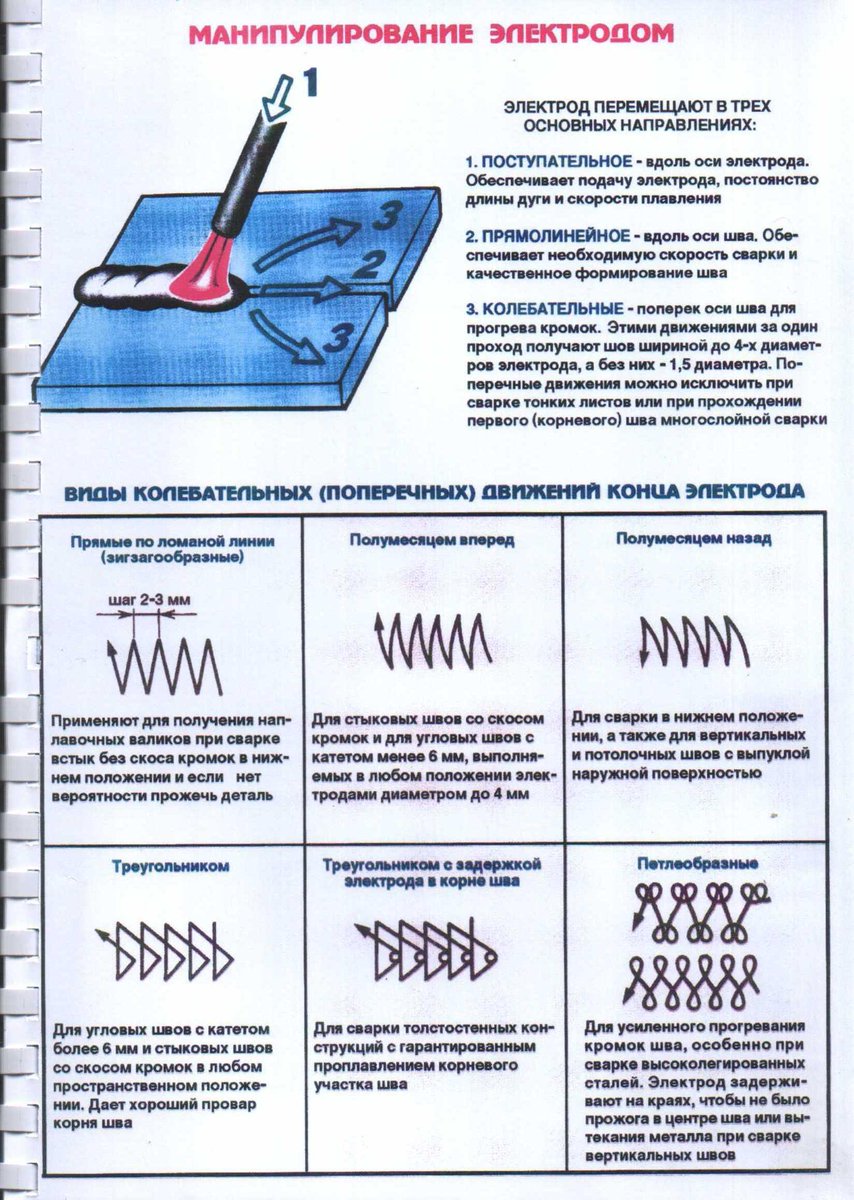
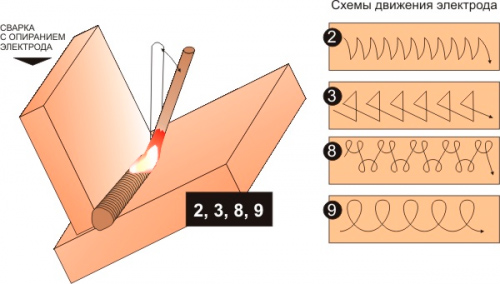
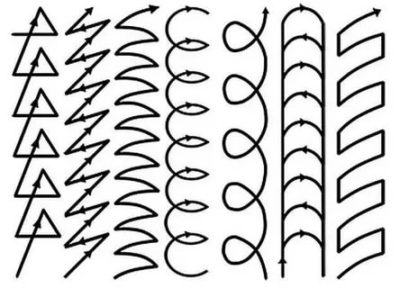
The trajectory of the arc is divided into types:
- Translational - the electrode simply moves along the axis of the electrode;
- Longitudinal - for the formation of a thin thread seam;
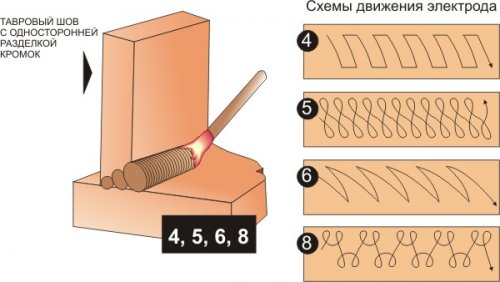
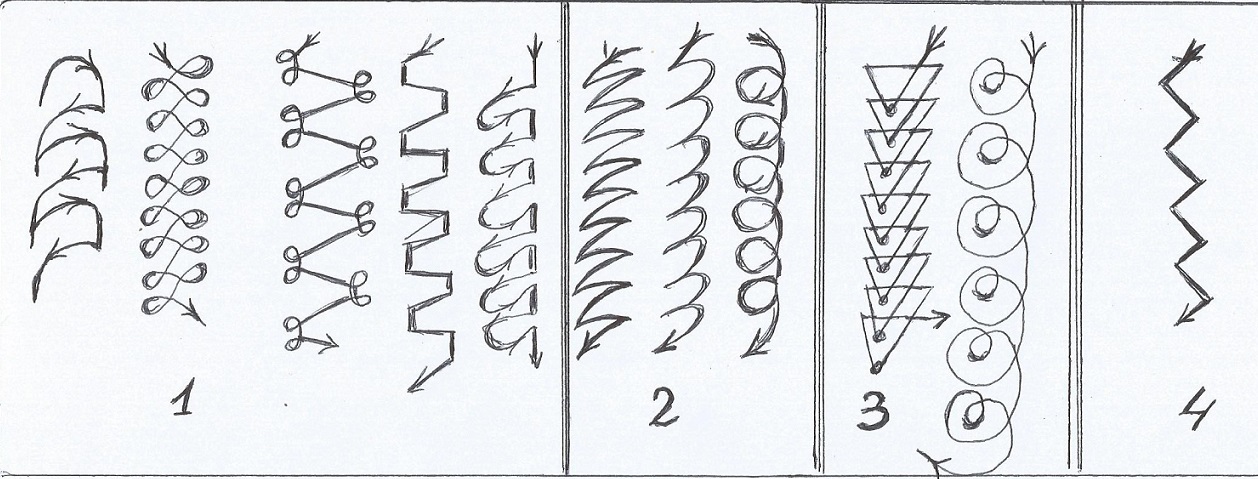
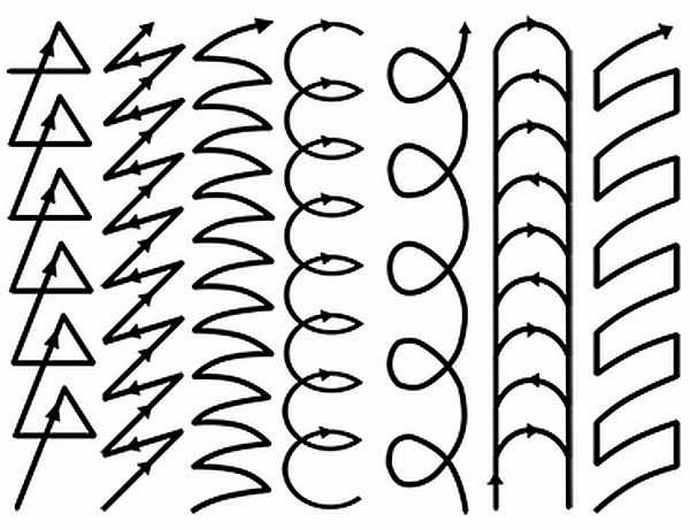
- Transverse - oscillatory movement of an electrode of a certain width (Fig. 2)
fig.2
Usually the master combines all three trajectories. At the same time, it is necessary to control the distance between the electrode and the surface, since the electrode burns out and decreases in length. You also need to monitor the condition of the bath, its size, in order to increase or decrease the speed of movement in time.
It must be remembered that it is impossible to weld parts immediately with a continuous seam, this will lead to distortion of the metal. Two workpieces are connected with clamps or in another way, then spot seams are made at a distance of 8-25 cm from each other, depending on the length of the seam. It is recommended to carry out spot seams on both sides so that metal stress does not occur. And only then proceed to the implementation of the main seam.
Fundamentals of manual welding
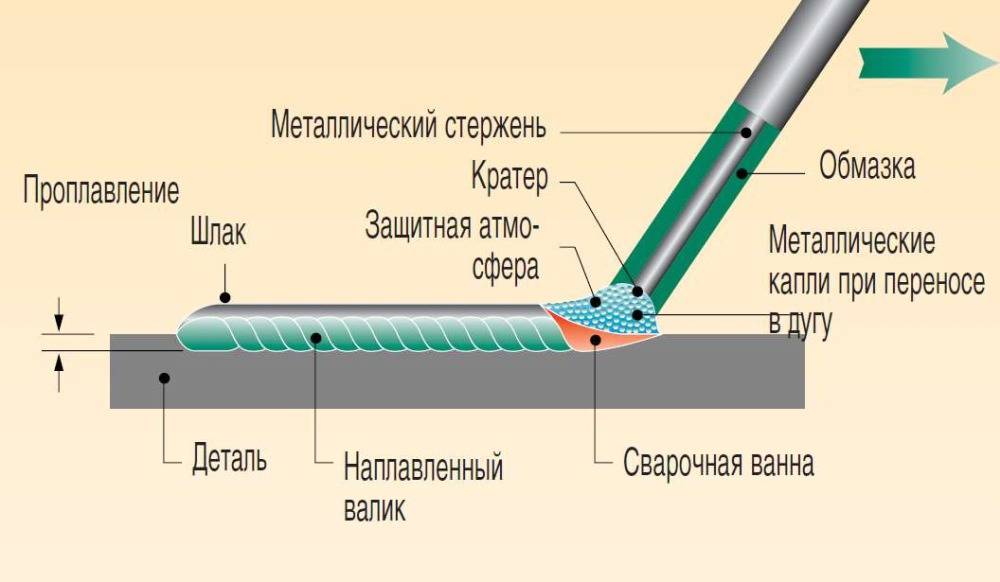
When welding with a consumable electrode, it is the source of both the metal-melting arc and the metal introduced into the weld. To protect the zone of molten metal (weld pool), a special flux coating is used to cover the electrode. Depending on the purpose of the electrode, the composition of the coating varies. Also, the nature of the burning of the electrode, the ease of maintaining the arc and the quality of the seam very much depend on it.
- The acidic coating contains iron and silicon oxides as a base component. When using it, the metal in the weld pool actively boils, which allows you to remove gas pores from the seam. Welding with acid-coated electrodes can be carried out on alternating and direct current of any polarity. The seam goes well even on contaminated metal, as foreign inclusions are oxidized and removed from the slag bath.The main disadvantage of this type of coating is the tendency of the seam to crack, which is why electrodes of this type are used only on non-critical joints of parts made of ductile low-carbon steels.
- Mainly fluoride and calcium carbonate are used for coating electrodes with a basic coating. When an electrode with a basic coating burns, carbon dioxide is actively formed, which protects the weld pool from atmospheric oxidation. A non-deoxidizing seam is durable, without a tendency to crystallize and crack. The reverse side of this plus is the high requirements for surface cleanliness, since slag is poorly separated when welding with basic-coated electrodes. Welding is carried out with direct current with reverse polarity.
- Electrodes with rutile and rutile-cellulose coatings are the most versatile, they can be used on all types of current (some coating compositions require a certain polarity when operating on direct current). The weld pool deoxidizes moderately, which makes it possible to separate slags and gas inclusions, but at the same time, sufficient strength of the weld is also maintained.
The thickness of the electrode determines the current required for stable arcing, and, consequently, the thermal power of the arc. Therefore, welding of thin metal (sheet iron, thin-walled pipes) is carried out with thin (1.6-2 mm) electrodes at low current. The exact value of the current depends on many parameters: the type of electrode, the direction of the seam and is indicated in the form of a table on the packaging with the electrodes. There is the following classification of seams:
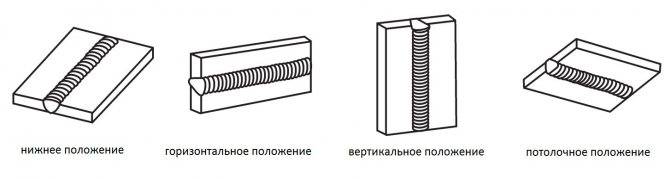
- The bottom seam is the easiest.The parts to be welded lie horizontally, the weld pool is stable because gravity is directed downwards. This is the simplest type of seam, which begins the training of any welder.
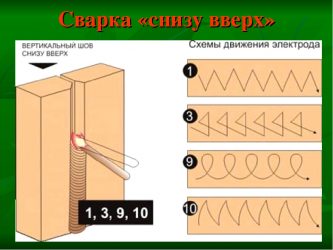
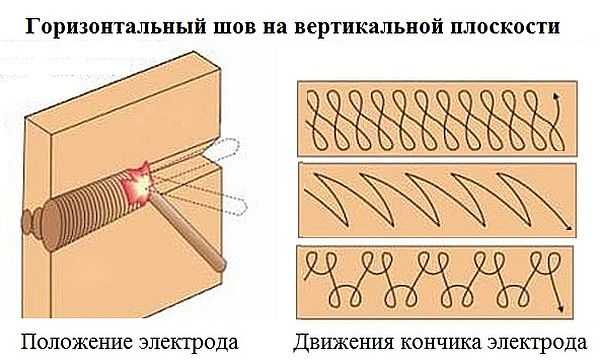
- The horizontal seam is carried out in the same direction, but it requires much more skill of the welder to keep the metal in the bath.
- The vertical seam is even more difficult. In this case, the electrode is led from the bottom up to prevent the molten metal from flowing out of the weld pool. Otherwise, the seam is uneven, with sagging and shallow penetration.
- The most difficult seam is the ceiling one, since during welding the weld pool is above the electrode. A well-established ceiling seam welding technique is a sign of high qualification of an electric welder.
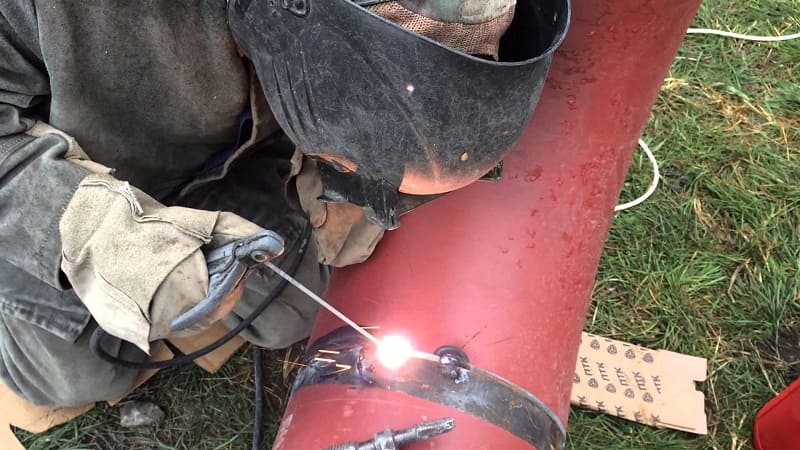
For many welders, pipe welding becomes a serious test - after all, in this case, the lower seam smoothly turns into a vertical one, and then into a ceiling section. Therefore, one must have good practice in all these types of seams.


The text already mentioned such a definition as “current polarity”. It greatly affects the DC welding process, and when using a number of electrodes, it must be strictly defined.
How to cut metal with an electrode
Electric arc machines (including inverters) are used not only for welding, but also for cutting metal. For these purposes, it is preferable to use specialized electrodes of the brand OZR-1, although, in principle, ordinary ones are also suitable for welding with reverse polarity. As well as during welding, during cutting, the movement of the electrode is carried out at an angle forward, while the welding current is selected by 20 ÷ 50% more than the nominal one.Therefore, if the inverter is planned not only for welding, but also for cutting metal, it is necessary to purchase a device designed for high welding currents. For example, when cutting low-carbon structural steel up to 20 mm thick with an Ø3 mm electrode, the operating current will be in the range from 150 to 200 A.
How to weld a vertical seam
 Welding such seams (inclined and ceiling) is a rather complicated process. This is due to the fact that even molten metal is subject to the law of universal gravitation. He is pulled down all the time, which causes difficulties. Novice welders will need to spend a lot of time learning how to do this.
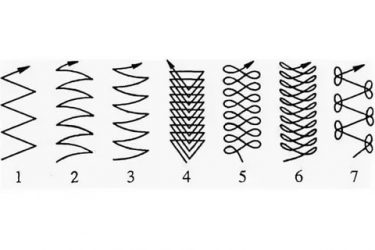
There are 3 vertical seam welding technologies:
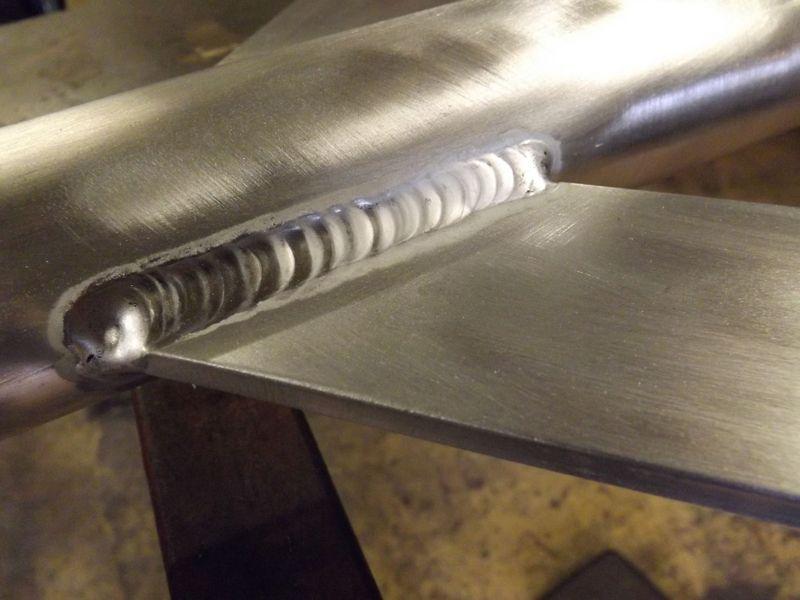
Triangle. Apply when connecting parts with a thickness of not more than 2 mm. Welding takes place from the bottom up. The liquid metal is on top of the solidifying metal. It flows down, thereby closing the seam bead. The flowing slag does not interfere, because it moves along the hardened bath, which exits at a certain angle. Externally, the welded bath looks like a triangle
In this method, it is important to accurately move the electrode to completely fill the joint.
Herringbone. This type of welding is suitable for gaps between workpieces equal to 2-3 mm.
Along the edge from the depth towards itself, it is necessary to melt the metal with the electrode to the entire thickness of the workpiece and, without stopping, lower the electrode to the gap. After melting occurs, do it all along the other edge. You need to continue from the bottom to the top of the weld. This results in a uniform arrangement of the molten metal in the space of the gap. It is important to prevent the formation of undercut edges and metal smudges.
Stairs.This method is used with a large gap between the workpieces to be joined and little or no edge blunting. Welding is carried out in a zigzag manner from one edge to the other from the bottom up. The electrode stops at the edges for a long time, and the transition is made quickly. The roller will have a small section.
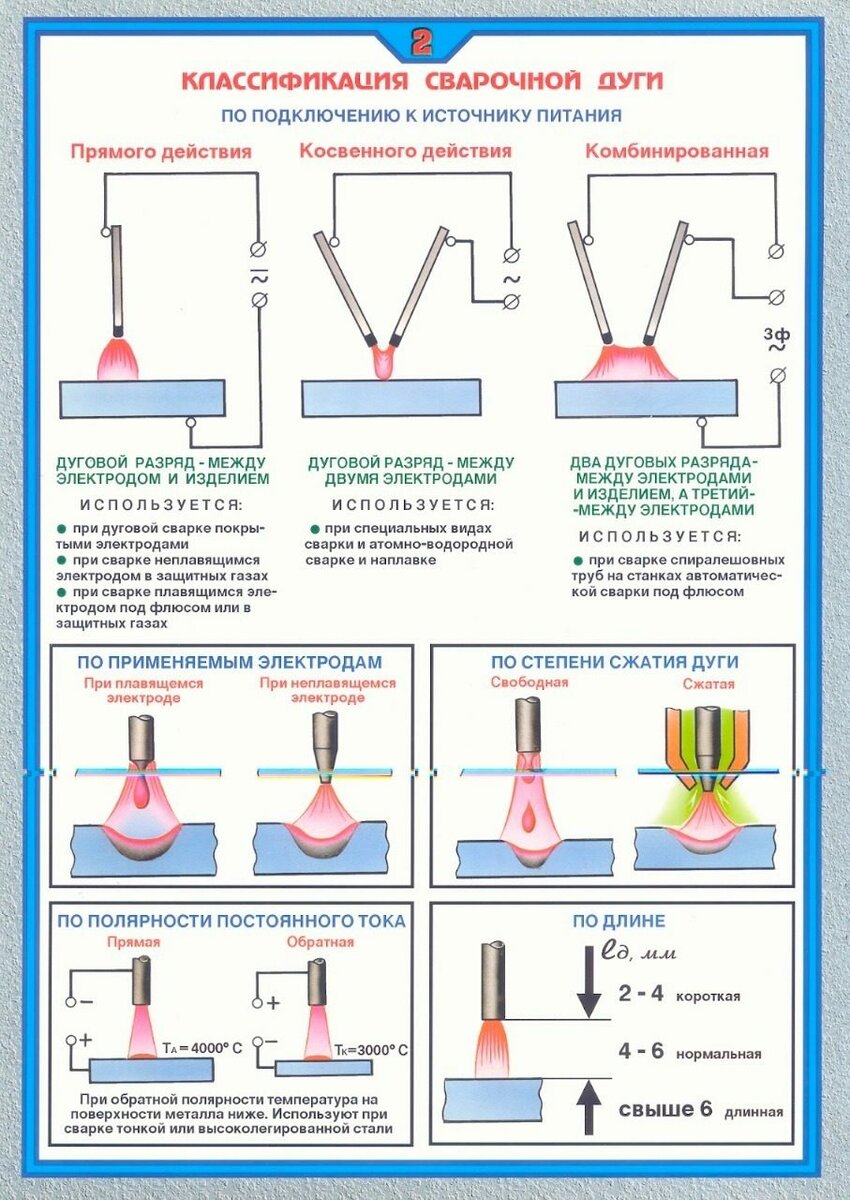
Polarity when welding
 The melting of the metal during the welding process is carried out under the action of the heat of the arc. It is formed between the metal and the electrode when they are connected to opposite terminals of the welding device.
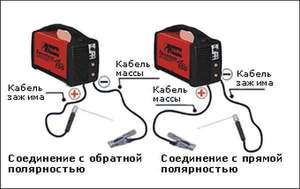
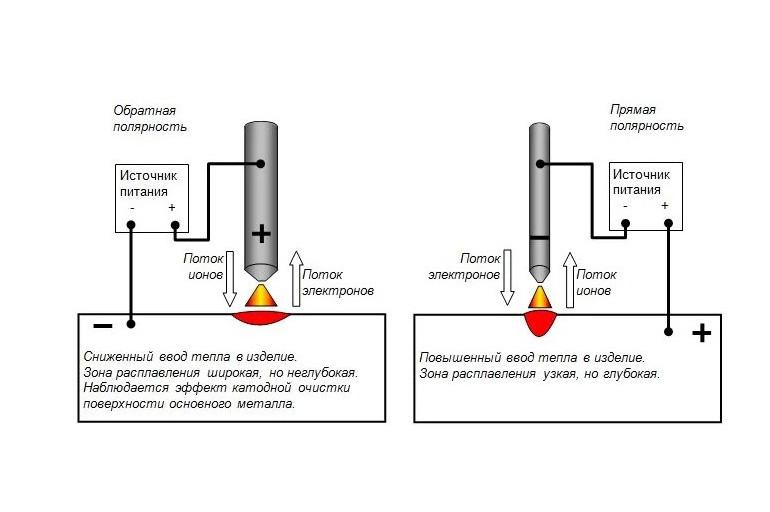
There are 2 options for welding: direct and reverse polarity.
- In the first case, the electrode is connected to the minus, and the metal to the plus. The introduction of heat into the metal is reduced. The place of melting is narrow and deep.
- In the second case, the electrode is connected to the plus, and the metal to the minus, there is a reduced introduction of heat into the product. The place of melting is wide, but not deep.
When choosing welding, it must be taken into account that the network element connected to the plus heats up more. Thick metal is welded on direct polarity, and thin metal is welded on reverse polarity.
Tips for dummies
- do not neglect the means of protection;
- before doing work, it is worth practicing to prevent errors;
- welding must be performed with the minimum recommended current;
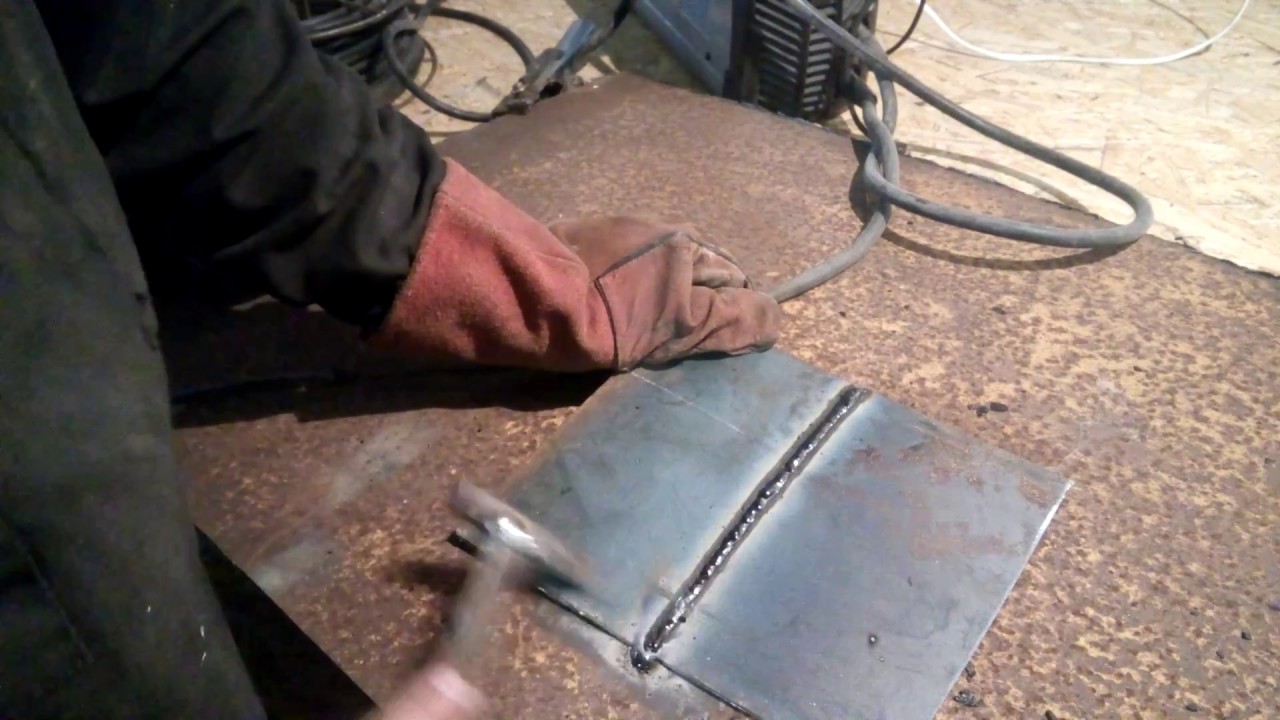
- do not forget to beat off the slag;
- to reduce the deformation of the product, it is necessary to fix the parts during the welding process;
- follow instructions and recommendations.
In addition to the fact that welding can connect parts, it can also cut them. To do this, increase the current strength and cut off the part or corners. It just won't do it right.
By following this guide, you can gradually improve your skills and continue to use inverter welding without any problems. The key to this is practice.
Creating a seam with an electrode
The seams created by the electric inverter have a fairly extensive classification. When determining the main parameters, the type of parts to be connected is taken into account. When considering how to weld a vertical seam electric welding, you need to take into account their features. The following types of compounds are most widely used:
- Butt.
- Tavrovoe.
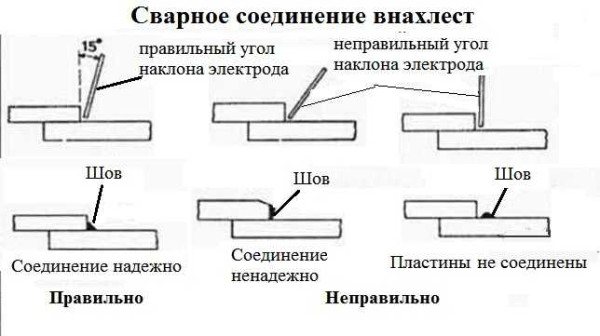
- Overlap.
- Angular.
Creating a seam with an electrode
That is why welding of a vertical seam is carried out with careful surface preparation. The technologies used make it possible to obtain a high-quality seam only with the right choice of electrode thickness. It should be slightly less than the width of the seam, since it is recommended to drive the rod from side to side to eliminate the possibility of alloy dripping.
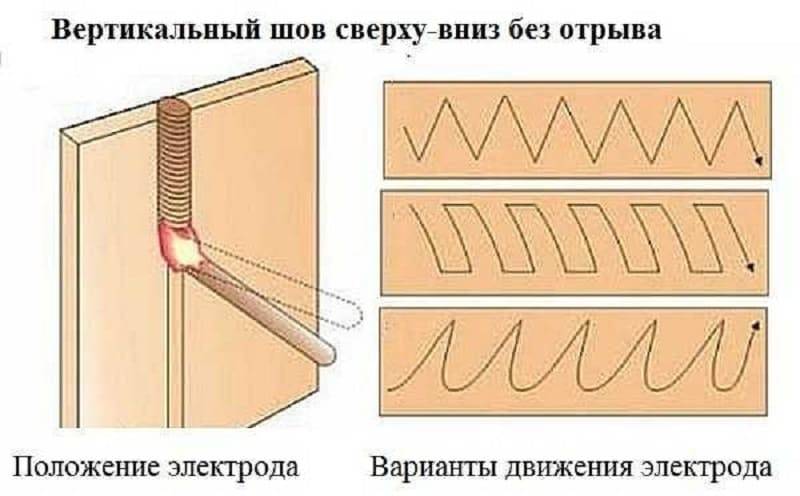
top down technique
The movement of the electrode from top to bottom can only be boiled when using an electrode that produces a thin layer of slag. Among the features of this process, we note the following points:
- Due to the use of such a rod in the weld pool, the material hardens faster. In this case, the runoff of the molten material does not occur.
- The use of plastic and cellulose coated electrodes is recommended. An example is the LNO-9 and VCC-2 brands.
- This technology is characterized by high performance. That is why if there is a need to increase labor productivity, then the technology under consideration is selected.

Vertical seam from top to bottom
This technique is not suitable for beginner welders, as it is difficult to prevent the alloy from running off.
Basics of welding for beginners
First you need to understand the device of the inverter and the controls. Also, the master must know the features of the metal.


For a complete "teapot" the cheapest device is enough. With the accumulation of experience, you can purchase a professional or semi-professional unit.
The nuances of work for beginners:
- The arc should be as short as possible, at least at the beginning of the process. It can be ignited in two ways: by striking or tapping the electrode. It is best to use the first option - it is easier to warm up the surface.
- When an arc appears, you can start welding with an inverter. To do this, the tool is led along the edge of the product. There are several patterns: spiral, herringbone, triangles.
- The thinner the metal sheet, the higher the speed of work must be, otherwise holes will appear.
Electric welding technology
The equipment is a rectangular box with ventilation holes on one side and a control panel on the other. The main element on it is the current regulator. There are also positive and negative outputs for connecting the electrode holder and terminals.

The electrode rod consists of a metal core coated with a protective compound. It protects the arc from oxygen exposure. There are carbon and graphite rods, but they are not suitable for beginners.
The principle of operation is to create a short circuit between the electrode and the base. This allows you to quickly heat up the surface and melt it. As a result, 2 elements are fused together.To form a weld, you need to set fire to the system. The master strikes or taps the electrode rod on the metal structure.
Polarity explanation
An arc is formed between the metal and the electrode because they are connected to different poles. Since only direct current is used, plus and minus can be arbitrarily changed. This will affect the end result. If you turn on the electrode cord to minus, and the ground to plus, this will be called a direct connection. It is used for metal with a thickness of more than 5 mm.
For thin iron, the reverse inclusion is applied. It allows you to protect the weld from burning through without heating the metal sheet.
Influence of electrode feed rate
To get an even result, the electrode rod must be fed evenly. The welder needs to keep the same distance between the tool and the surface. Then the device will not go out, and the molten metal will lie neatly.
If the arc advances too slowly, it may not heat the metal parts enough. Then welding will be superficial and short-lived. Feeding too fast also has a negative effect on the result: it leads to overheating and deformation.
Current strength
This is the main value that affects the quality of the seam. If set too large, holes may form in the structure. For calculation, you can use the formula L=KD. D is the diameter of the electrode. The K coefficient is 25-60, the exact figure depends on the method of work, for example, for manual electric welding in the lower position, you can take 30-35.
Features of thin metal
The complexity of arc welding of such structures is that the slightest miscalculation can give a burn, which is difficult to fix for a non-professional.Therefore, it is better for beginners to train on a thick iron.
Job highlights:
- first you need to make tacks, and then the main seam;
- if the electrode is pulled up too quickly, a hot arc will occur that will burn through the metal;
- it is better to cook in short segments so that the structure has time to cool.
top down technique
The movement of the electrode from top to bottom can only be boiled when using an electrode that produces a thin layer of slag. Among the features of this process, we note the following points:
- Due to the use of such a rod in the weld pool, the material hardens faster. In this case, the runoff of the molten material does not occur.
- The use of plastic and cellulose coated electrodes is recommended. An example is the LNO-9 and VCC-2 brands.
- This technology is characterized by high performance. That is why if there is a need to increase labor productivity, then the technology under consideration is selected.

Vertical seam from top to bottom
This technique is not suitable for beginner welders, as it is difficult to prevent the alloy from running off.
Advantages of inverter welding machines
To connect metal structures, experience and the welding machine itself are required. The best option is to use inverter equipment, which is great for work at home. Such a device is inexpensive, differs in small dimensions and weight. Small dimensions do not affect the quality of welding work. All connections are neat and reliable. Even a master of low qualification will cope with such welding.


The design of the inverter welding machine consists of such elements as:
- Power supply with filter and special rectifier unit.
- The inverter unit is responsible for converting direct voltage into high-frequency alternating current.
- A transformer is used to reduce the high frequency current. It is he who is responsible for safety and prevents equipment from overheating.
- The power rectifier serves as a means of supplying direct current to the output of the device.
- The device is controlled by an electronic unit.
 Inverter welding uses various innovative technologies that have helped to significantly reduce the size and weight of the installation. Due to its small size, it is easy to store at home or install in any convenient place during work. The weight of such equipment ranges from 5-15 kg. That is, it will not be difficult to transfer the welding machine.
This device helps to weld any metal structures, if you work correctly on an inverter welding machine. The instruction manual is available with the equipment, in which there is a lot of various useful information indicating how to cook with inverter welding, choose electrodes depending on the type of metal, etc. Such a brochure will be useful even for experienced professionals.
When buying, it is important to pay attention to the presence of instructions in Russian, because it is difficult to use blind welding, not to mention the danger. There are cases when the equipment is bought "from hand", and the old owners have lost the instructions. Then it is best to find a specialist who will clearly show the main points of welding control
It is impossible to start testing it on your own without even having a banal instruction.
Then it is best to find a specialist who will clearly show the main points of welding control. It is impossible to start testing it on your own without even having a banal instruction.


