- Causes of system damage
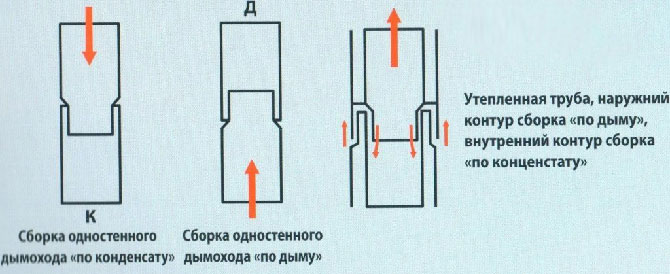
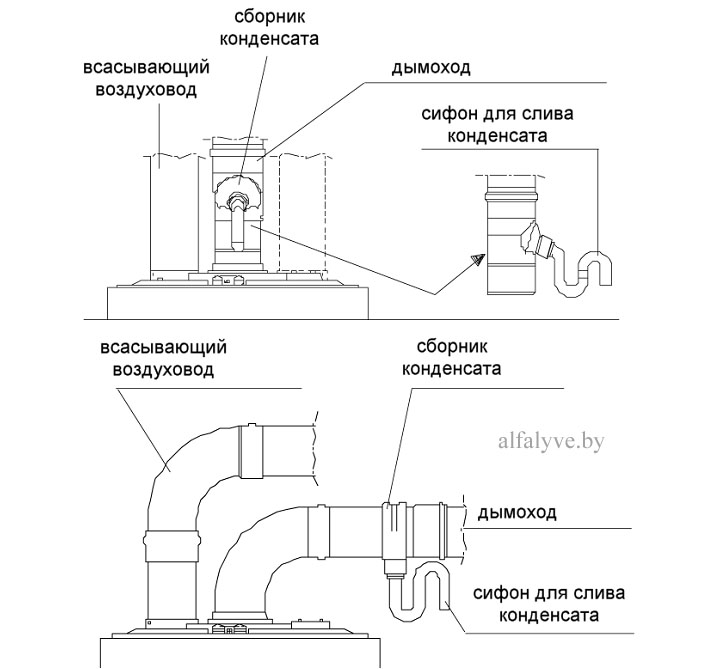
- Efficient method with condensate removal
- Pipe insulation: work procedure
- Basic Troubleshooting
- Insufficient traction
- Noise
- Filter system
- Carrying out a test
- The appearance of moisture in double-circuit boilers
- How it all works
- How is condensate removed from ventilation?
- How and where to properly insulate ventilation ducts
- We solve the problem with smells in the kitchen with the help of a hood
- Extraction power calculation
- Hood installation
- Causes of condensation in the ventilation system
- Why does condensation form?
- Requirements for the design of the chimney
- How and where to properly insulate ventilation ducts
- The order of installation of thermal insulation from the outside
- How to block the smell from the neighbors?
- No. 1 - installation of a supply valve
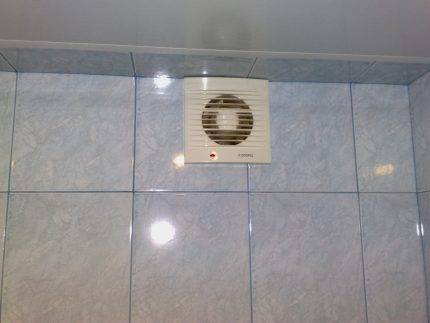
- No. 2 - installation of a fan in the bathroom
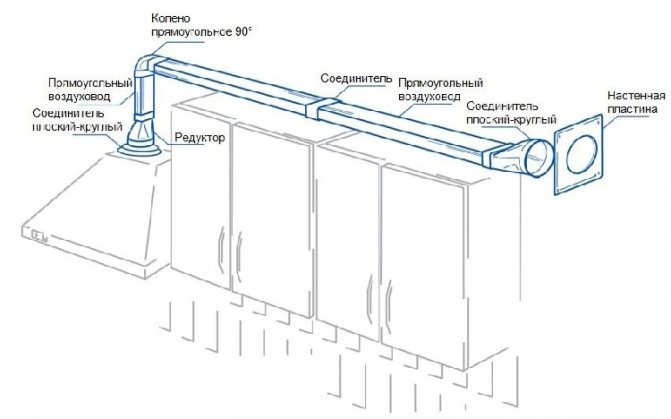
- No. 3 - installing a hood in the kitchen
Causes of system damage
Most people, even after moving to a new place of residence and living there for years, often do not think about some kind of pipes laid inside the walls. Often they find out that there is a ventilation duct in their home only when some kind of trouble happens with the hood. And then for a long time they wonder why this very misfortune happened. And it could happen for several reasons:
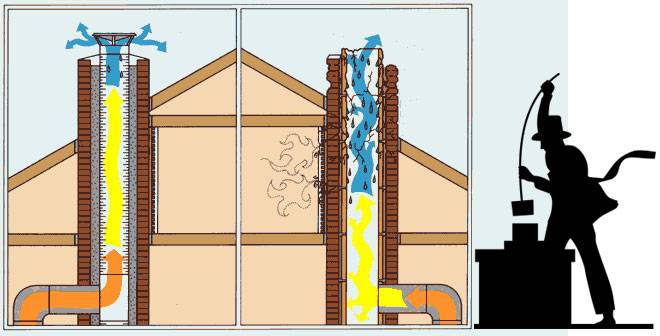
- The main reason for the appearance of condensate is a sharp temperature difference, the collision of cold air streams from the street and warm, humid domestic ones. The greater the difference in temperature, the more the pipes "cry". No wonder people usually begin to complain about condensate when the hood is turned on in the off-season.
- The system from the very beginning was arranged incorrectly and malfunctioned from which condensation began to form. Usually moisture appears due to weak exhaust or insufficient air flow, due to which water vapor lingers in the pipe and settles there as droplets.
- The reasons may lie deeper in an oversight in the construction of a house. The foundation is damp or the walls and floor are poorly insulated.
- Another version is excessive humidity in the room.
- Condensation forms in response to house flooding or a water supply interruption.
- Condensation appears if the thermal insulation of the pipe is poor. The situation described in the first paragraph occurs - a collision of temperatures, a conflict between the cold of the pipe and the heat of the air passing through it.
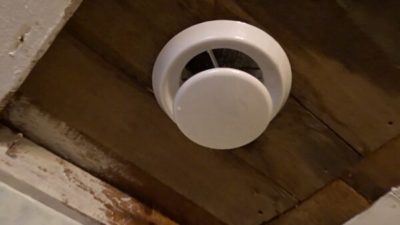
- The problem with the hood is its clogging. Over time, dust and other debris get inside the channel, its amount increases until it becomes an obstacle to air exchange. Attach a piece of paper to the ventilation grate - if the channel is not clogged, the paper will adhere firmly to the grate due to the air flow. Worst of all, if a piece of paper flies sharply from the grate, it means that exhaust air from neighbors enters the house.
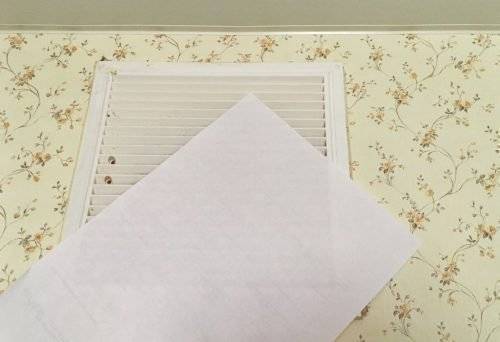
By applying paper to the ventilation grill, you can check the operation of the exhaust system
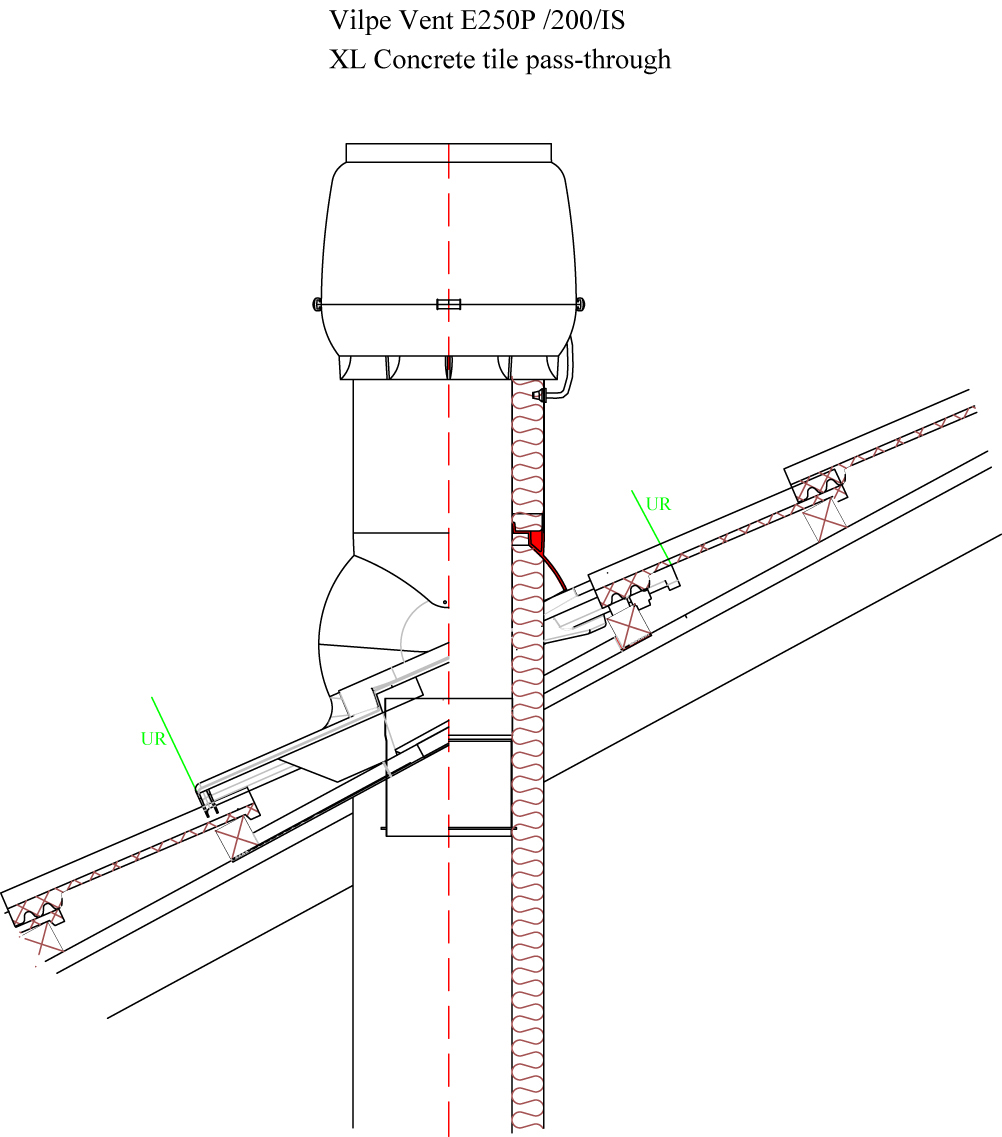
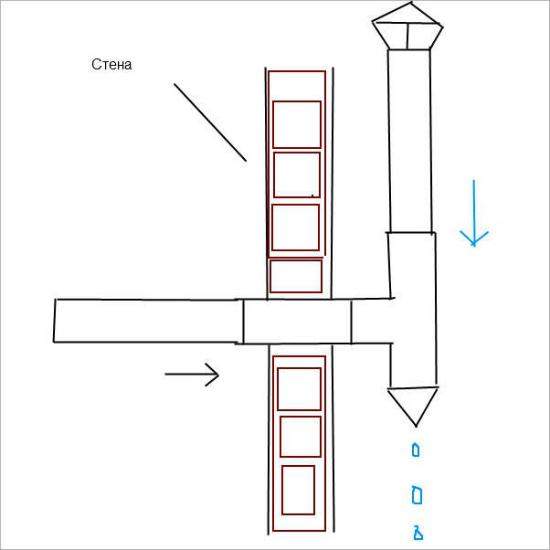
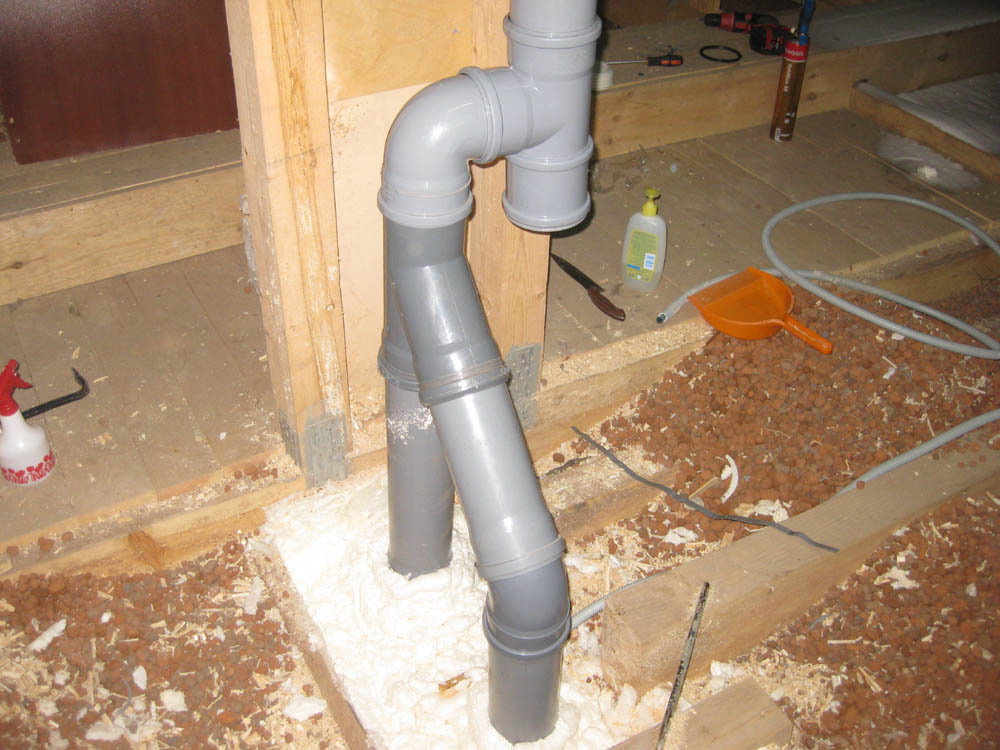
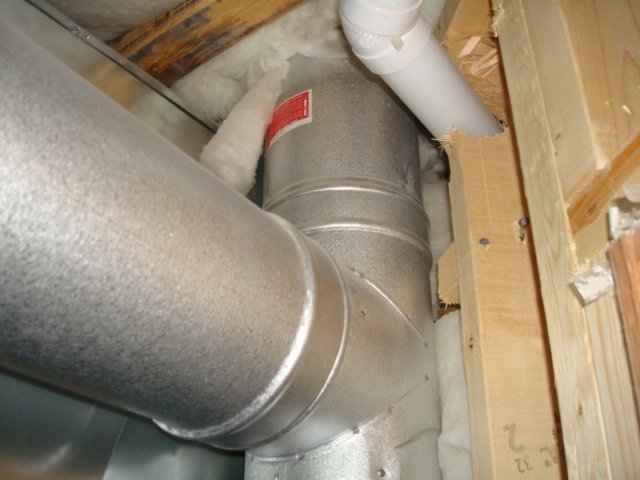
Efficient method with condensate removal
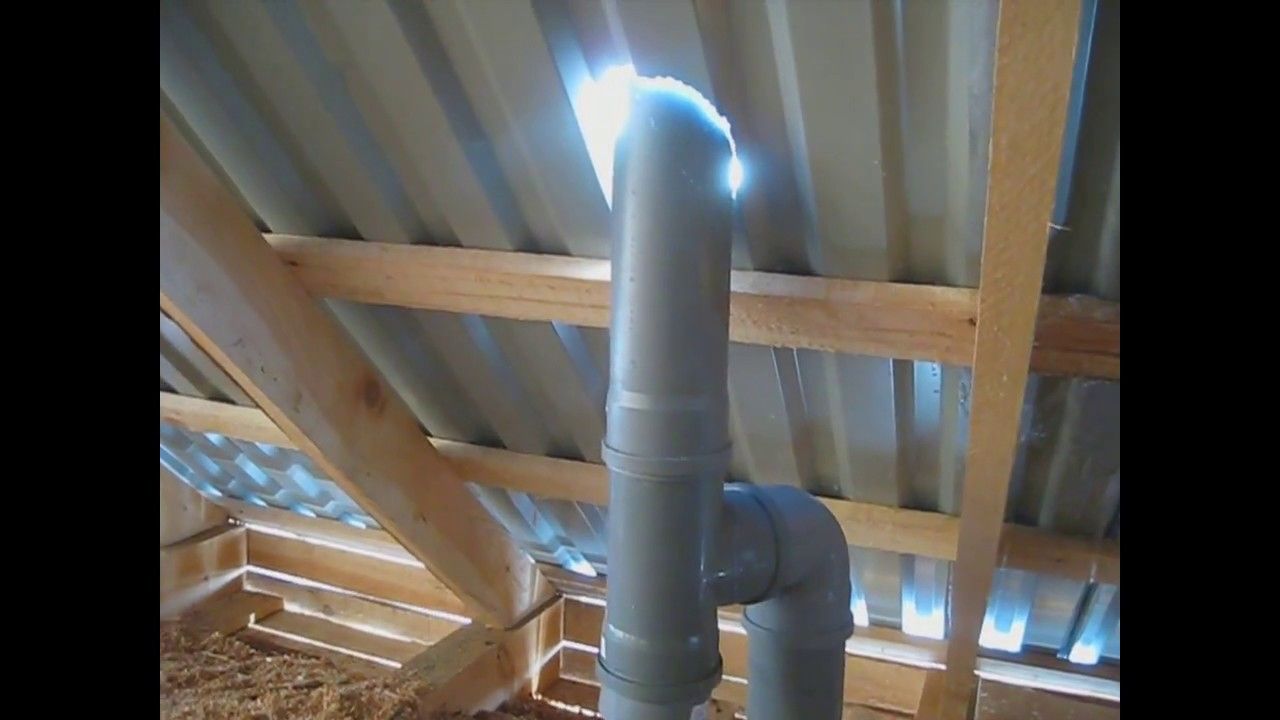
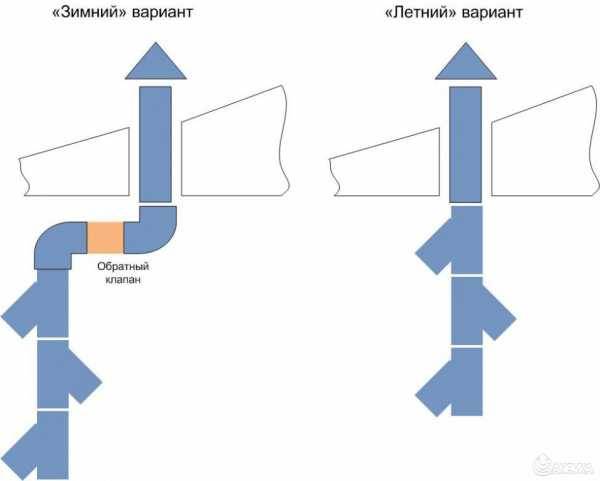
In the event that the insulation of air ducts for ventilation is currently impossible or there is simply not enough time for this, and condensate continues to drip from the pipe, you can resort to the diversion method. To implement this method, you do not have to spend a lot of free time and it does not involve large cash costs. The owners of private houses can turn ninety degrees the pipe, which is located in the attic, after disconnecting it. Having performed a turn, having brought the pipe to a vertical position before that, you can join the pipe, which carries out the output to the street outside the premises.
Efficient method with condensate removal
For an apartment building, you first need to locate the duct, and then rotate it ninety degrees to get a section of duct that runs horizontally. Using the simple algorithm of actions described above, you can insulate all the pipes in the system by removing the tube from the plug, which will perform the function of draining condensate directly from the ventilation system.
Do not forget that condensate drainage is a temporary measure, since during prolonged frosts such a system can easily fail due to freezing.
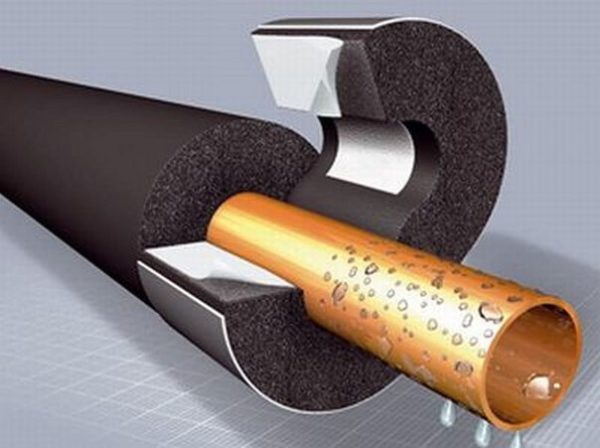
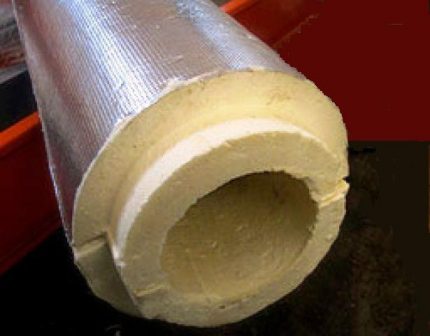
Pipe insulation: work procedure
When isolating ventilation with a polystyrene shell, the following is carried out:
- clarification of the dimensions of the ventilation pipe, in particular, the inner diameter;
- making cuts with a knife (you can use a saw);
- coverage by fragments of the cylinder (shell) of the pipe, their displacement between themselves by a couple of centimeters;
- closing with force of the lock interface "comb-groove" of the parts on the sides.
The structure (shell) is easily installed and dismantled in case of work with the pipe.
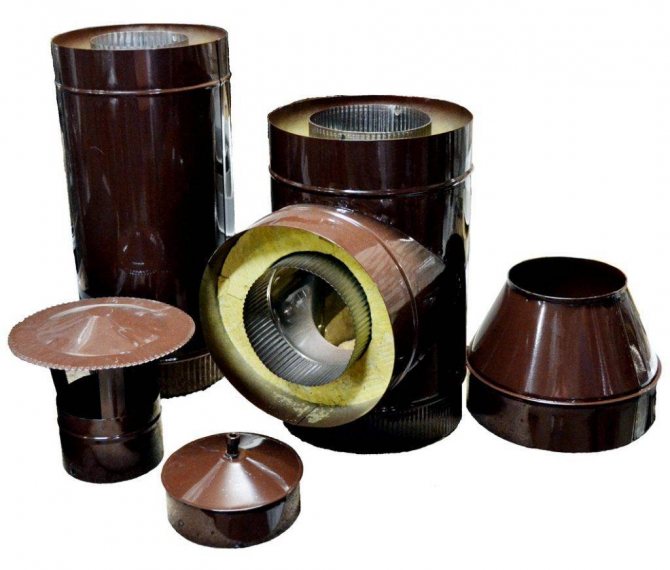
As an option, structural elements with factory insulation can be used when installing ventilation
Works on insulation with foamed polyethylene in the form of a finished shell of a ventilation pipe are as follows:
- taking the necessary measurements of the pipe: so that the insulation tightly fits the surface of the duct;
- finding a special seam on the capsule and separating it along this seam;
- fixing the shell on the insulated pipe;
- insulation of joints and seams with glue or adhesive tape.
Protection from fire-resistant polypropylene or polyurethane foam is performed as follows:
- dimensions are determined;
- semi-cylindrical segments are cut from a solid workpiece with a margin for the cover layer;
- a capsule is formed from the cut fragments around the pipe;
- the resulting joints are hermetically fastened with bandages.
If the ventilation opening in the house is in the shape of a rectangle:
- a rolled or slab insulation of the required thickness is selected (for example, basalt fiber);
- it is cut and cut to size into fragments that are convenient to assemble when facing;
- with the help of steel wire, previously calcined, the pieces are fastened together;
- seams are hermetically sealed with strips of foil with an adhesive layer applied to it.
Thermal insulation for ventilation by any of these methods, with all the positive aspects, has one weak point - "cold bridges"
It is important to prevent violations of the work technology and the prerequisites for their formation during the installation process. To do this, the joints between the ventilation ducts and the structures of the house are especially carefully isolated, otherwise the effect expected from the insulation will decrease.
Basic Troubleshooting
Insufficient traction
 The following signs (one or more) may indicate a malfunction of air exchange:
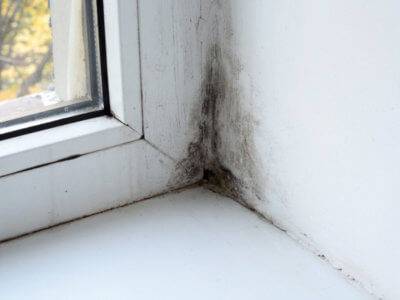
- the room smells of dampness, rot or diaper rash;
- on the windowsill, walls, in the crevices, mold begins to actively multiply, a fungus is visible, which is concentrated both in open areas and in hard-to-reach places (under the plinth, behind cabinets, carpets and peeled off wallpaper);
- condensation is visible on the surface of the walls, wallpaper and even on furniture;
- the rooms are constantly cool, dampness, mustiness are felt;
- the supply of oxygen ceases to be replenished, which is expressed in the rapid breathing of the residents, the desire to go outside;
- extraneous sounds are heard in the ventilation system in the form of hum, noise, creaking;
- a burning smell comes from the air duct.
Rooms are usually made as airtight as possible. The natural ventilation system works through cracks in doors and windows. Decorative gratings are used to cover large gaps. With a difficult hood, which is forcibly installed in the bathroom, kitchen, toilet, the reasons may be corrosion in the system and impaired integrity of the parts.
To eliminate the problem, it is necessary to replace the damaged soft inserts, wafer seals. In this case, it may be necessary to replace duct elements with visible defects. To achieve tightness of the joints, they need to be adjusted.


Attention
The problem may be the increased resistance of the veterinary channels. Contaminants can accumulate in the air duct, resulting in low filter efficiency.
The maximum cleaning of the ventilation duct from debris will be required. It must be well dried, washed from dirt. Sometimes it's better to change to a new one.
Noise
A loud noise from the ventilation duct is evidence of clogged valves. There may be other reasons for increased noise:
- Small insects, rodents and even birds can enter the pipeline. The problem is solved by installing a protective mesh on the sockets of the outlet channels. It is fixed with screws.
- Noise can occur due to insufficient lubrication of moving parts of the equipment and, finally, due to strong wind. At least 4 times a month, you need to remove the grate and lubricate the moving parts with special grease.
- To get rid of wind noise, you can wrap the pipe with soundproofing material. You should choose a reliable one that is not affected by temperature and moisture. In addition, you can put several silencers that will absorb extraneous sounds.
 Noise can be mechanical or aerodynamic. The first appears due to poor depreciation, unsatisfactory condition of the nodes, friction and violation of the balancing parameters. The second - as a result of the operation of electric motors, fans (read how to repair a kitchen hood engine with your own hands). The following steps will help reduce noise:
- install the fan on special vibration-isolating bases;
- balance rotating elements, parts;
- firmly fix the movable valves, gate valves and clamps;
- install a removable soundproof casing;
- between the channel and the fan, you can insert canvas pads or rubber ties;
- Facing the internal surfaces of the air ducts with durable materials that absorb sounds (mineral felt, fiberglass) will also help;
- you can lubricate the moving parts of the compressor.
Advice
An effective way to dampen vibrations is to build a concrete frame around the duct on the roof. If technical reasons do not allow such an operation, the channel is wrapped with insulation.
Filter system
Filters can be constantly clogged with dust, fine debris and kitchen grease
It is important to carry out a scheduled cleaning every 4-6 months. If the filter system is finally clogged, does not allow the air duct system to function normally, then the following steps must be performed:
- prepare a stable ladder, table or chair and put on protective gloves on your hands;
- after removing all the ventilation grilles, they must be thoroughly cleaned and washed with detergent;
- when parts are worn out, which will be visible at first glance, they are replaced with new, better ones;
- with a spatula, they clean the inner walls of various types of settled dirt;
- You need to be very careful not to damage the surface of the protective mesh.
The deep channel needs to be cleaned well. To do this, use a long stick with a solid base wound around its end, preferably a damp terry cloth. You need to move inward gradually, with rotational movements. At the end of the work, a final check of thrust is made with a sheet of paper or an anemometer.
here
Carrying out a test
How do you know that the exhaust pipe is working properly? Is it possible to hope that she will save the household from trouble? It's simple, do the following test. Close windows and doors tightly. “Arm” with toilet paper, you will need a small piece. Bring the paper close to the hood. Watch what happens to the leaf. He fell? So the system is out of order.
In apartment buildings, with the help of such a test, you can also check ventilation communications. It happens that the paper during the test flies off the grate with force. This means the following: it is not fresh air that enters your apartment, but exhaust air from neighbors.
The appearance of moisture in double-circuit boilers
In addition to the chimney, condensate can occur in the water pipes of 2-circuit gas boilers. It's all about the temperature difference, due to which the pipe can rust and fail.
The problem may appear for one of the following reasons:
- Ventilation does not work properly (hood power is not enough).
- The indoor climate is unfavorable - the level of humidity is consistently exceeded.
- The equipment is operating in an incorrect (erroneously calculated) mode.
Unfortunately, the features of the boiler do not allow to completely get rid of condensate, but pipe insulation and chimney insulation can reduce the rate of moisture accumulation.
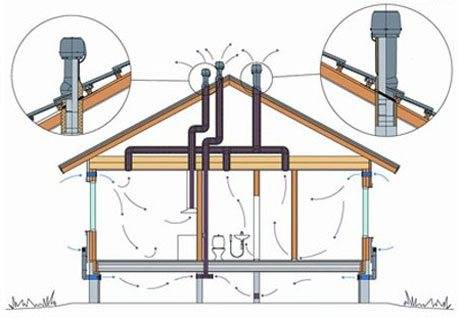
How it all works
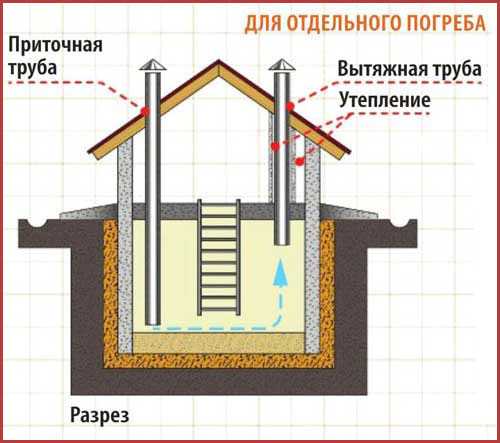
As a rule, the installation of an exhaust pipe in a private house, as well as a ventilation system, is planned at the design stage of the building. Meanwhile, if you find that not everything is in order with such communications in the purchased house, you should not panic - everything can be fixed. To complete the picture in your head, let's get acquainted with all types of air exchange present in the house.
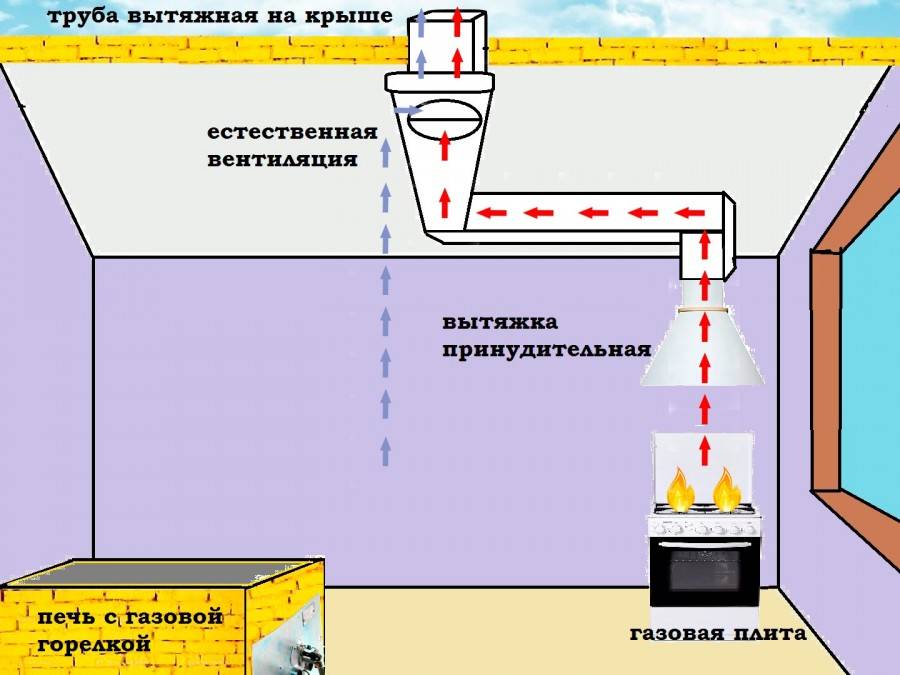
So, systems of this type are:
- natural;
- supply;
- supply and exhaust.
In the current buildings, replete with plastic windows, doors and artificial materials, alas, natural ventilation does not work well. Plastic blocks air circulation.In addition, the lack of temperature fluctuations also reduces the effectiveness of natural ventilation, especially in the summer. Meanwhile, in apartment buildings, natural ventilation works better, but we are talking about mansions, and we will return to them.


In houses with an area not exceeding 300 m², it is enough to install a supply system; for owners of large mansions, there is only one way out - to install a supply and exhaust system. Communications should not only remove air, but also pump it.

The exhaust pipe on the roof becomes visible, while its lower part can be hidden from view, although it is always present in the kitchen, in the boiler room, and, possibly, in other rooms. By the way, you can easily learn to distinguish between these designs, because the height of the chimney chimney above the roof is always less than its ventilation "sister". There is such a rule: the shorter the chimney ventilation pipe, the less condensate accumulates in the structure. Although, of course, this reason for the appearance of "poisonous" drops is not the only one.
How is condensate removed from ventilation?
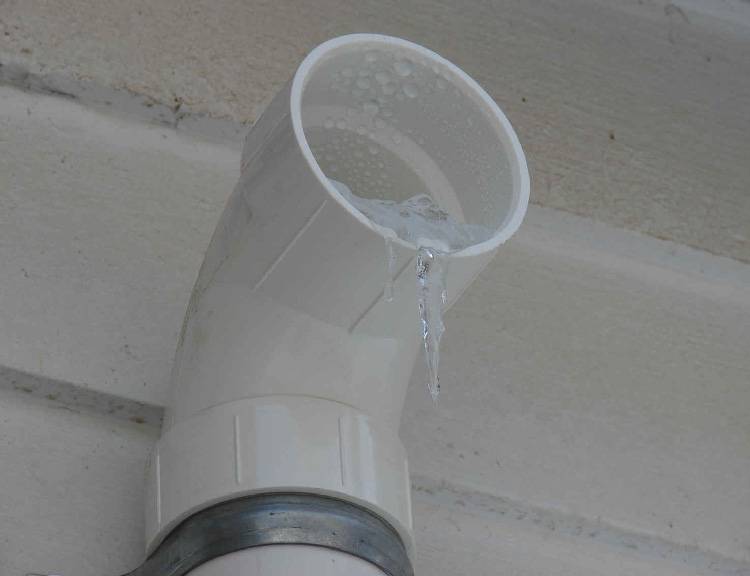
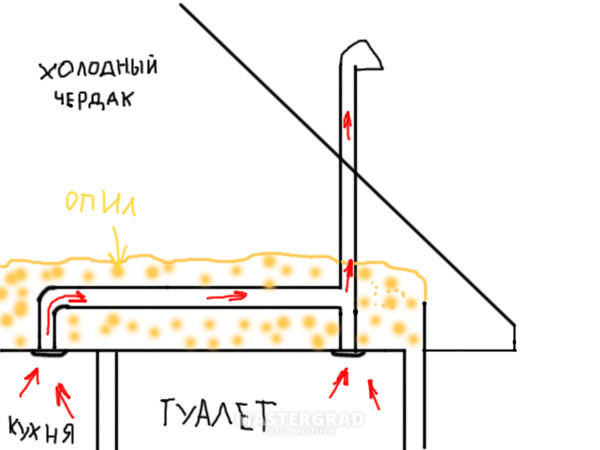
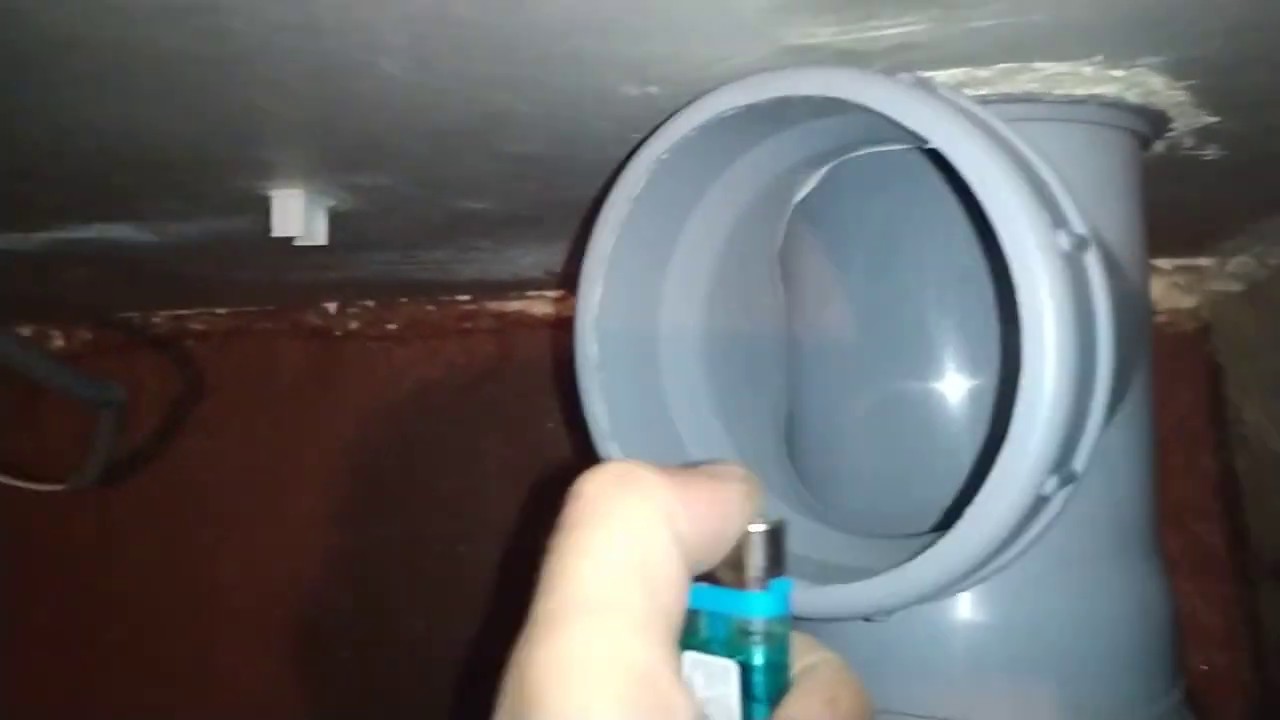
People remove condensate from the ventilation of a private house in a simple, low-cost way in every sense - they disconnect the ventilation pipe that runs through the attic and drain it at an angle of 90 °. A cone-shaped plug is inserted into the condensate outlet, the tee, through which the condensate is discharged.
In the people, such a tee with a plug is called a valve for condensate in ventilation.
Condensation in the ventilation in the apartment is a little more complicated in this way: First you need to find the duct in which condensate forms. Then grow it by turning it 90 ° and repeat all the above steps.A prerequisite for this method is high-quality insulation of all sections of the condensate pipes.
The second more expensive method of removing condensate from the ventilation system of a private house is the installation of a new forced ventilation system. In the kitchen, or another room where there is the most evaporation, a fan is mounted in the wall or window, which will draw air from all rooms, preventing the formation of condensate. For proper air exchange with this scheme, it is also necessary to install a supply valve. The calculation of such a system should be carried out by a design organization, which, by the frequency of air exchange, will calculate the size of the holes in the wall, their number, fan power, and more. This method is more expensive, and you should not do it yourself. Indeed, with an incorrectly selected section or fan, you simply simply spend money without getting any result.
There is also an absorption method. In this case, special cassettes, made of a material capable of absorbing moisture, are placed in the ventilation duct. After some time has elapsed, it is necessary to remove the cassettes and dry them, and then reuse them.
How and where to properly insulate ventilation ducts
It is necessary to isolate that segment of the ventilation duct where there is active contact between warm and cold air. When removing the ventilation pipe through the wall, the section leading to the deflector is subject to insulation. If the air duct passes through a cold attic space, then this area should be insulated.
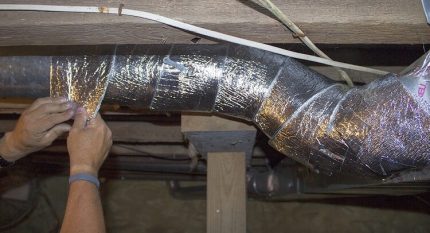
The warming procedure itself is carried out as follows:
- the surface of the ventilation pipe is wiped dry. Then the galvanized channels are treated from the outside with an anti-corrosion compound.Plastic air ducts are not subject to corrosion, it is enough just to dry them;
- rolled or slab heat-insulating material is tightly wound around the problematic section of the duct and fastened with a bandage. The insulation in the form of a shell or a split pipe is put on the air duct so that the joints of the individual elements fit snugly against each other. All longitudinal and transverse joints are glued with reinforcing adhesive tape or foil tape;
- a metal casing is installed on top or a paint mesh is attached, followed by plastering the surface of the heat insulator.
Installation of thermal insulation with a frame device can be viewed on the video:
We solve the problem with smells in the kitchen with the help of a hood
Stink strange smells that appear out of nowhere? Not a problem with the hood. They have several types and have their own competitive functional features. To equip high-quality ventilation in the kitchen, you first need to decide which hood is right for you?
Kinds:
- Suspended - one of the most popular models, installed between a wall cabinet and a gas stove;
- Island - ideal for a kitchen with an island. Suspended from the ceiling. Can be installed in any room;
- Corner - mounted in the corner of the room;
- Wall - mounted on the wall above the stove. Models have a variety of colors and designs. You can choose an option for any interior design;
- Built-in - placed in a table or cabinet. Visually does not spoil the full design of the room. Easily fits into any interior design and does not stand out.
Job types:
- The flow hood removes polluted air masses into the ventilation shaft. This is the choice of most buyers, as it is, according to experts, the safest and most effective;
- The circulation hood takes air into its own design and cleans it with the help of filters. The clean air is then released back into the room space. An air duct is not required for installation.
Extraction power calculation
Having decided to make proper ventilation in the kitchen, each person resorts to the question choice of power and installation technology designs. For proper operation, the required power for the hood should be calculated. It depends on the area of the room and has a simple formula:
Power = area * room height.
Using this formula, you can easily get the desired data and choose the right device for ventilation.
Hood installation
For quality work, it is recommended to go a long way, but in this case, the operation of the device will be correct and efficient:
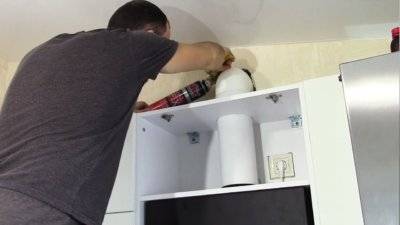
- The case is mounted on a cabinet for comfort. It is good to fix it in the cabinet, and fill the remaining openings with mounting foam;
- Install a cabinet for making holes;
- Remove the cabinet from the wall to cut the hole;
- For high-quality work, it is recommended to take a modern foreign-made tool. With it, you can accurately make holes.
Next, you need to connect the equipment and start working:
- Install corrugation and holes. At the top of the cabinet, its shape should be square;
- Cut the corrugation without leaving large stocks;
- Hang the cabinet in its place on the wall;
- Treat the docking points with a sealed agent;
- Connect the corrugation with the ventilation shaft;
- Fix the hood;
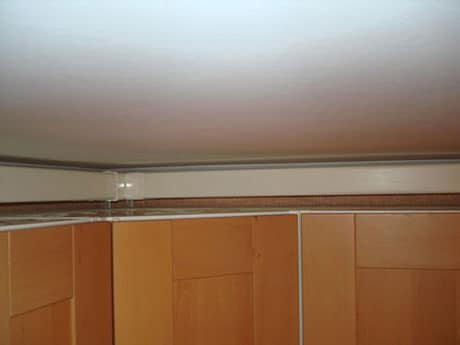
- Connect the ventilation shaft to the air duct.
It is important to complete each step in accordance with safety regulations. If you have never encountered such issues, we recommend that you contact professionals in their field who will be able to correctly calculate and install ventilation in any room of your apartment.
Remember, the slightest inaccuracy can lead to incorrect operation of the hood.
It is important to ensure a normal level of electrical safety. During cooking, splashes of grease may enter the hood, and this may cause a short circuit and a fire.
Safety is in your hands and should never be neglected! Otherwise, you risk harming the health of not only yourself, but also all residents of the apartment building.


Causes of condensation in the ventilation system
Moisture that forms on the inner surface of the ventilation pipe is called condensate. Old private houses are not equipped with well-thought-out ventilation that could effectively remove carbon dioxide, unpleasant odors and regulate the level of humidity in the rooms. Often, condensate in the exhaust system forms after replacing wooden windows with plastic ones: the fresh air flow that penetrated through the window cracks stops flowing. The natural regulation of the air mass stops, and moisture begins to accumulate inside the room.
Often, owners of new private houses also face the problem of condensate formation. Condensation in ventilation occurs due to a number of factors:
- no thermal insulation of air ducts;
- thermal insulation of air ducts is made using low-quality material;
- the sealing of the ventilation ducts is broken;
- assembly of the ventilation system was carried out with non-compliance with the rules;
- increased humidity in the room;
- clogged ventilation pipes;
- there are damages and defects in the building structure of the house (damp basement, cold floor, ventilated foundation);
- faulty plumbing;
- climatic features of the region of residence;
- there is a regular source of evaporation (wet clothes are dried, food is cooked).
Why does condensation form?
This phenomenon is a normal, natural process that occurs when warm air collides with a cold surface. At the same time, due to the large temperature difference, the moisture in the air condenses and appears as drops on the glass surface.
- Skylights are in fact part of the roof and are operated in rather extreme conditions. Cold rain water flows down them, snow lies on them, which leads to a significant cooling of the surface of the outer glass. If the double-glazed window is single-chamber at the same time, it cannot interfere with the cooling of the inner glass;
- Add to this the fact that warm indoor air tends to rise up, where it is sure to meet cold glass, and you will inevitably get condensation.
You also need to take into account that warm air from all over the house rises to the top floor.
contributes to the formation of condensate:
- high humidity in the room;
- lack of natural and forced ventilation.
There is the concept of "dew point", which clearly demonstrates the dependence of temperature and humidity inside the room on the temperature outside the window. Take a look at the table, in which there is a temperature scale on the left, and an indicator of air humidity on the top.Normal parameters for a comfortable stay of a person in a room are a temperature in the range of 18-25 ° C and humidity in the range of 40-60%. To determine at what temperature condensation appears on the window, you need to find a mark on the left, for example, 20 ° C, and on top, the humidity value, for example, 50%. The figure at the intersection of the two indicators corresponds to the dew point value. That is, when the double-glazed window "cools down" to 9.3 ° C and below, condensate forms. In addition, the cause of fogging windows can be:
- Incorrect design of window slopes. The lower slope of the roof window must be strictly perpendicular to the floor surface. While the side slopes should be deployed with respect to the double-glazed window in the direction of increasing the angle of 90 degrees, and the top one should be parallel to the floor plane. This ensures the correct circulation of warm air, which does not block the path from below, but delays it a little from above, thereby contributing to the heating and drying of the glass surface;
- Violation of the integrity of the vapor and waterproofing or the absence of one layer can lead to the fact that moisture from the outside settles on the heaters and penetrates into the room. The following sequence will be correct - waterproofing under the roof, a layer of heat-insulating material, a layer of vapor barrier;
- Insufficient insulation of slopes can lead to the fact that cold air penetrates into the gaps between the frame and a thin layer of insulation;
- Violation of the installation technology as a result of which cold bridges were formed. This will be evidenced by the formation of frost on the window;
- And the last - the marriage of the double-glazed window itself. In this case, condensate forms and accumulates between the panes.Such a double-glazed window should be replaced free of charge, which should be mentioned in the warranty card for the product.
Requirements for the design of the chimney
Compliance with the requirements of the rules and regulations during the construction and operation of the smoke exhaust system will extend its service life, including by minimizing the formation of condensate:
With a vertical arrangement of the pipe, horizontal sections with a length of not more than a meter or inclined, but without sharp corners, are allowed.
The inner surface of the chimney must be smooth, without protrusions, slots and other irregularities.
It is not allowed to reduce the diameter of the channel in comparison with the outlet pipe of the heating unit.
The ability to clean the chimney is an important requirement when constructing a chimney.
To ensure good draft and free removal of combustion products, the height of the pipe must take into account the height of the roof of the heated building.
How and where to properly insulate ventilation ducts
It is necessary to isolate that segment of the ventilation duct where there is active contact between warm and cold air. When removing the ventilation pipe through the wall, the section leading to the deflector is subject to insulation. If the air duct passes through a cold attic space, then this area should be insulated.
The warming procedure itself is carried out as follows:
- the surface of the ventilation pipe is wiped dry. Then the galvanized channels are treated from the outside with an anti-corrosion compound. Plastic air ducts are not subject to corrosion, it is enough just to dry them,
- rolled or slab heat-insulating material is tightly wound around the problematic section of the duct and fastened with a bandage. The insulation in the form of a shell or a split pipe is put on the air duct so that the joints of the individual elements fit snugly against each other. All longitudinal and transverse joints are glued with reinforcing adhesive tape or foil tape,
- a metal casing is installed on top or a paint mesh is attached, followed by plastering the surface of the heat insulator.
Installation of thermal insulation with a frame device can be viewed on the video:
The order of installation of thermal insulation from the outside
The most economical heat-insulating material for a private house is time-tested mineral wool. It comes in rolls of various widths and can have one or two outer foil layers.
The heat-insulating material is installed on the ventilation pipe with an overlap so that there are no unprotected areas left, the joints on top are glued with adhesive tape
When determining the thickness of the heat-insulating layer, they are guided by SNiP 2.04.14–88. Thermal engineers perform complex calculations, taking into account the diameters of the pipes, the thermal conductivity coefficient of the heat-insulating material used.
They take into account the average annual air temperature and even possible heat losses through joints and fasteners, as well as other parameters, most of which can be found in reference books and the above SNiP.
If we talk specifically about mineral wool, then when insulating ventilation systems in private houses located in central Russia, roll material 100 mm thick is usually used. You can buy mineral wool 50 mm thick and wrap the pipe twice.
To determine the desired width of the insulation, measure the diameter of the pipe, add the thickness of the mineral wool multiplied by two to the obtained value. Multiply the resulting amount by 3.14 (Pi).


Getting started, prepare in advance a rubber spatula, a construction knife, a stapler, aluminum tape 7-8 cm wide, a marker and measuring tools - a square, a ruler and a tape measure (preferably metal). Be sure to wear protective clothing.
To work outdoors choose a day without precipitation. Otherwise, the mineral wool may get wet. The roll is unrolled, marked and cut to obtain a segment of the required size. The foil is separated along the edge so that the pipe can be wrapped with overlapping mineral wool and cover the connecting seam with a foil layer.
In hard-to-reach places, a modern type of heat insulator is used - the so-called shell, which must be selected taking into account the outer diameter of the pipe
Then the connecting seam with a step of 10 cm is fixed with a stapler and glued along the entire length with adhesive tape. To fix the insulation to the pipe, both special fasteners and ordinary wire are used.
To protect the joints of the air ducts, the insulation is cut into fragments of the appropriate shape and size. Do not forget to clean the pipe from contaminants before warming.
Insulation can also be performed using segment heaters. The monolithic casing has the form of a pipe and is strung on the air duct. It is mainly used during the installation of the ventilation system from scratch.
Having measured the geometric parameters of the duct, select a casing that is suitable in size and pull it along the entire length of the pipe. Foil is wound on top and fixed with stainless steel or copper clamps.
The collapsible shell consists of two half-cylinders, which are applied to the pipe from both sides and fixed. On sections passing through the wall, it is difficult to wrap the pipe in a roll insulation, and putting on the shell is much easier. collapsible the shell may be put on an existing air duct.
How to block the smell from the neighbors?
The appearance of an unpleasant odor from the air exchange system can be due to various reasons. Professionals recommend finding them and eliminating them, rather than dealing with the consequences. For example, when an extractor hood is installed near the entrance to a room, damp air is blocked. As a result, unpleasant odors and mold may appear.
When figuring out how to quickly block the smell from the ventilation system, it is important to understand that the measures must be comprehensive, otherwise the problem will soon have to be dealt with again.
No. 1 - installation of a supply valve
After installing plastic windows, the natural flow of air into the apartment is practically excluded. As a result, the rate of gas exchange decreases sharply, waste products are not removed, and the microclimate in the apartment worsens. Installing an inlet valve on a window or wall will help partially solve the problem.
The user can choose the simplest fixture or purchase an automatic system. It not only provides air supply to the room, but also warms it up. If there is a supply valve, it will not be necessary to open the windows daily. At the same time, the amount of air entering the room will be quite sufficient.
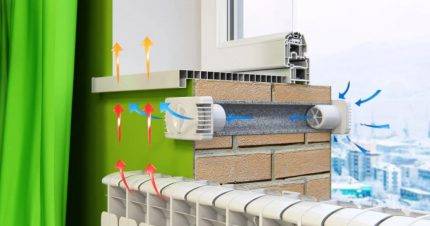 Installing an inlet valve will be a simple solution that will provide a sufficient flow of fresh air into the apartment, help solve the problem associated with a decrease in the rate of gas exchange
A wide variety of models, flexible pricing policy will help you choose a supply valve that meets the needs of the customer, his budget.
No. 2 - installation of a fan in the bathroom
The smell from the ventilation of the bathroom is easily eliminated after installing an exhaust fan.
Manufacturers offer three device options:
- centrifugal;
- axial;
- centrifugal-axial.
Fans have design features, differ in power. Their installation is relevant when the dimensions of the ventilation pipe exceed 3 meters.
 Installing a fan will speed up air exchange, solve the problem of high humidity after swimming, and eliminate unpleasant odors.
Choosing the right model, do not dwell on too powerful options. With a high intensity of air intake, a rarefaction effect may appear, which negatively affects health.
No. 3 - installing a hood in the kitchen
An extractor hood will help cut off odors from neighbors, remove unpleasant odors that occur during cooking. Modern models not only differ in a set of functions, they have an excellent appearance.


To equip the kitchen, you first need to decide on the type of device:
- suspended - the most common option, fixed above the gas stove in the space between kitchen cabinets;
- island - mounted to the ceiling, can be located anywhere in the kitchen;
- corner - located in the corner, occupies a minimum of space;
- wall-mounted - installed on the wall next to the stove, can become a highlight of the interior;
- built-in - mounted in a cabinet, does not spoil the interior, almost invisible.
We recommend that you familiarize yourself with the detailed recommendations for choosing and installing a hood in the kitchen.
Most of the hoods take the exhaust air and throw it into the ventilation. Experts consider this solution the most effective, safe.


