- Cable connection
- Scheme of connecting switches to the network
- Open and closed wiring
- Selection of the cable section and its connection
- Selection of circuit breakers and RCDs
- Ways to connect sockets
- How sockets and switches are connected
- Video - Connecting an outlet and a switch
- Preparing to connect
- Connection materials
- Types of double sockets
- Marking for electrical
- Installation process
- Preparatory work
- Cable connection
- Cable connection
- Drilling socket boxes
- How to choose a good double socket
- Electrical outlet device
- Conclusions and useful video on the topic
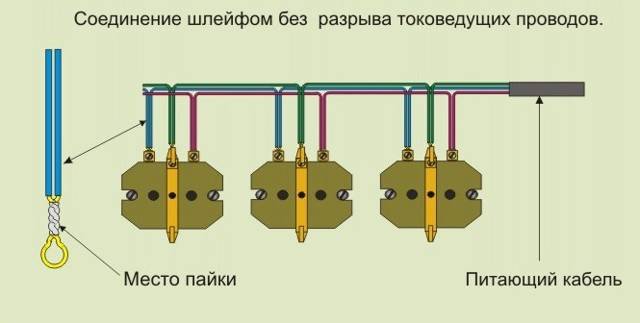
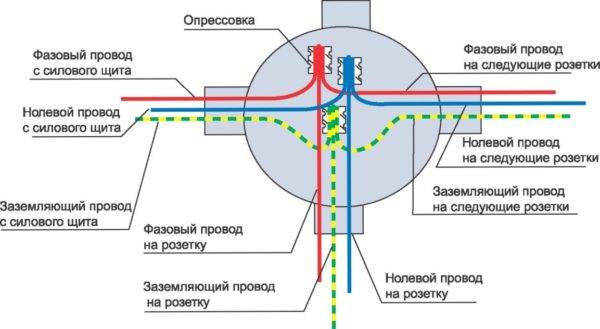
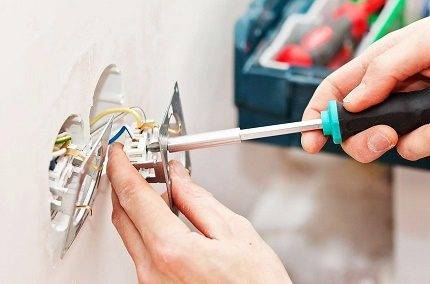
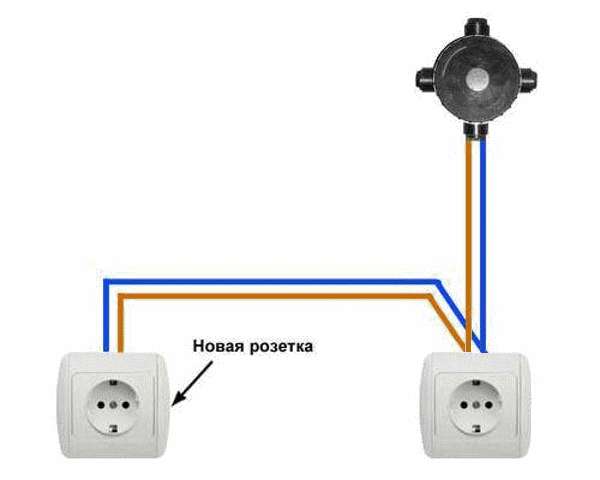
Cable connection
Connect to an existing outlet like this:
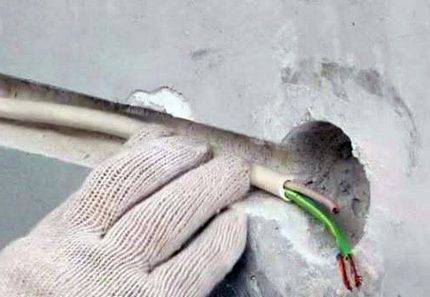
- the end of the new cable is cut to a convenient length;
- they release the ends of the cores from insulation to a length of 1 cm. There is a special tool for this operation - a stripper (aka a crimper), which excludes the possibility of damaging the core. In his absence, the insulation is carefully cut off with an ordinary knife, trying not to damage the core;
- the bare ends of the cores are bent into loops and slightly squeezed with pliers;
- having pressed the spacer antennae, remove the inside of the socket and loosen the screws on the phase and zero terminals. The grounding conductor is unscrewed completely;
- the power conductors of the new cable are inserted into the terminals and the screws are tightened.Now in each terminal there are two cores - from the supply cable and from the jumper for the new outlet. The colors of the insulation on the cores in each terminal match.
Grounding is connected differently. For him, a loop connection is unacceptable due to low reliability: if the contact in one of the sockets burns out, all subsequent ones will remain without grounding. According to the PUE, it is necessary to observe the continuity of the conductor by making a branch for each outlet.
 They do it like this:
- a crimp sleeve is put on the unscrewed grounding conductor of the supply cable and two more conductors are inserted into it: from the jumper cable and a short segment - a branch for the existing outlet;
- pressurize the sleeve with press tongs;
- put a heat shrink tube on it and heat the latter with a hot air gun or a lighter (insulation);
- screw the branch to the ground contact of the existing outlet.
Do the same when connecting each subsequent outlet of the loop. The existing socket is assembled
It is important to make sure that the limiter on its inside (rectangular metal plate) does not squeeze the jumper wire. If this is found, a cutout is made for the wire in the socket, and if necessary, deepen the hole in the wall
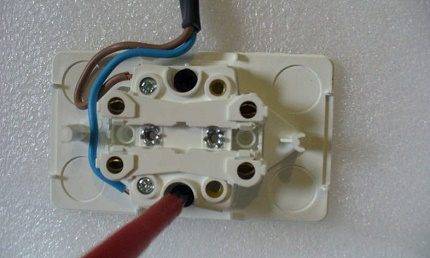
Scheme of connecting switches to the network
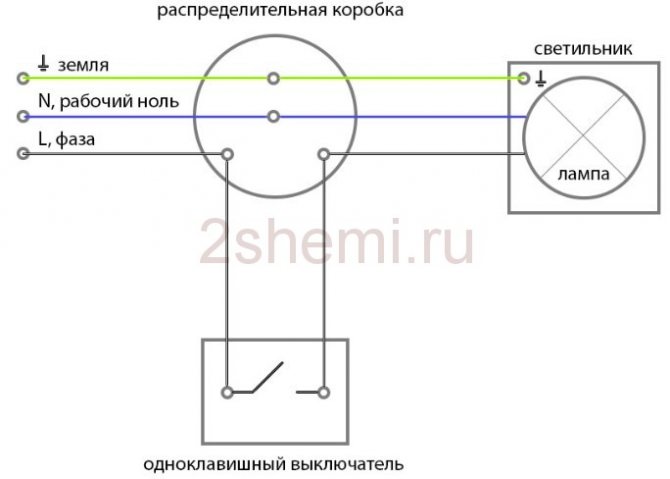
Wiring diagram for a single-key light switch
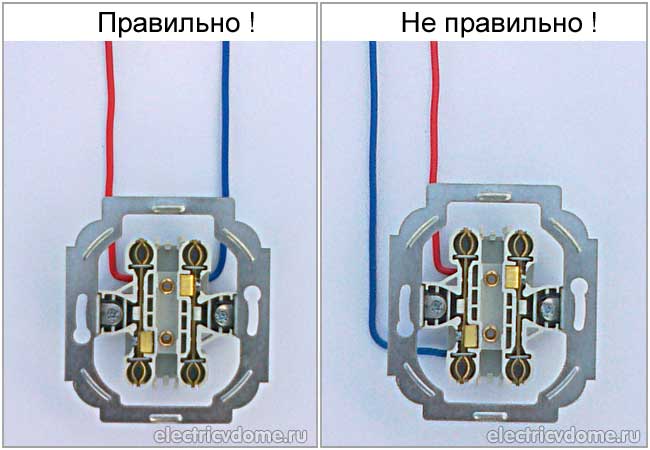
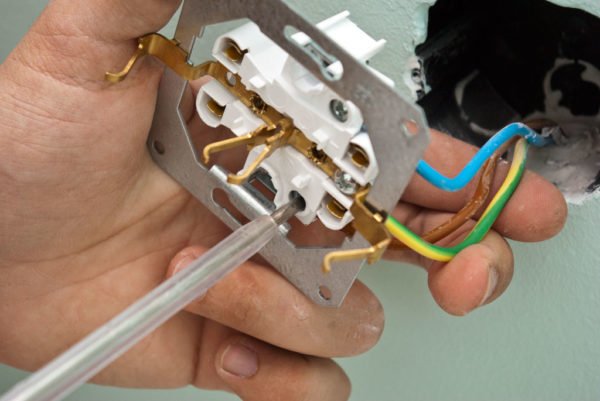
Wiring diagram for a two-button light switch Black phase wiring is connected with a screw to the block terminal marked with the letter L (phase). The blue neutral wire is connected to the terminal marked N. The cable must be screwed on tightly, but not too tight, so as not to break it.
Useful: Microwave motion sensor: circuit and connection to Arduino
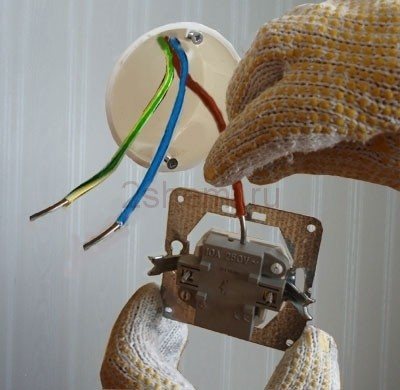
Connecting the phase conductor to the switch
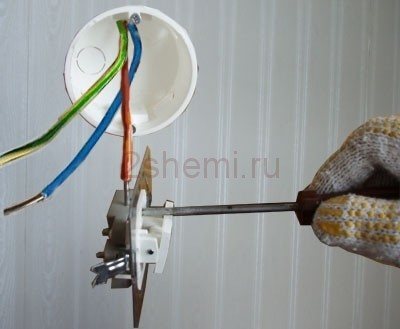
Screwing in a phase conductor
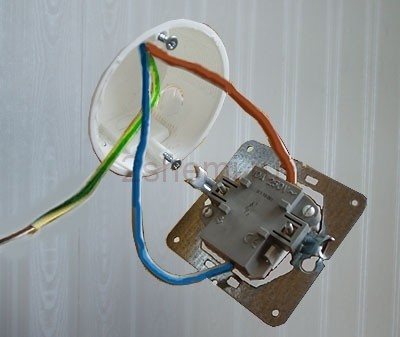
Connecting the neutral conductor to the button
Normally, a ground conductor is not required for mounting the switch, so its tip is insulated and inserted into a small clamp (or wrapped tightly with electrical tape using this technique).
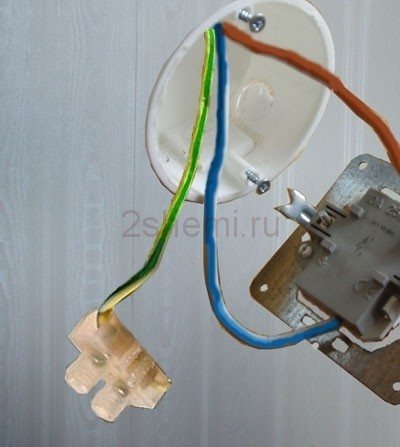
Insulated end of earth conductor
Open and closed wiring
The difference between the methods and noticeable to the naked eye. Closed wiring is located inside the wall, for which grooves (strobes) are punched or cut in it, in which the connecting wire is hidden under a layer of putty. Open wiring is laid along the surface of the wall, on which it is held in special fasteners or laid in plastic guides - cable channels.
Accordingly, if you can see the wires that fit the outlet, then the wiring is open. Otherwise, closed wiring is used, for which walls were cut.
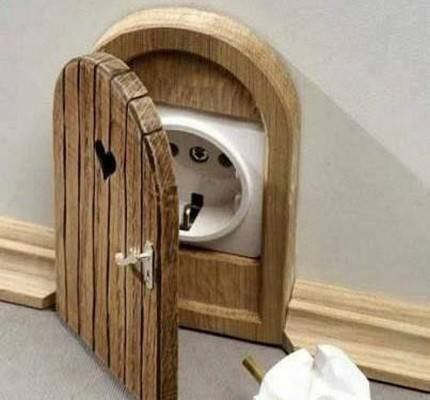
These two ways in which the outlet is connected can be combined with each other - if the old points are connected in a closed way, then nothing prevents connecting a new one in an open way. There is no choice in only one case - in wooden houses, the socket can be connected exclusively in an open way, as well as the rest of the wiring.
Advantages:
- To install a new outlet, you do not have to cut the wall. This is especially true for those premises that have already been renovated.
- For installation, no tools such as a wall chaser or puncher are needed.
- In the event of a breakdown, you do not have to open the wall - all the wiring is in front of your eyes.
- Mounting speed. Even after all the work has been completed, adding another point to the existing wiring is a matter of a few minutes.
- If desired, you can quickly completely change the wiring - ideal for temporary connection schemes.
Flaws:
- High probability of external influence on the wiring - children, pets, you can just accidentally catch it. This disadvantage is leveled by laying wires in cable channels.
- Open wires spoil the entire interior of the room. True, it all depends on the design abilities of the owner of the room - cable channels will fit perfectly into modern design solutions, and if the room is made in retro style, then special wires and other accessories are produced for this.
- The need to purchase special fasteners, even if cable channels are not used - in wooden houses, open wiring should be laid at a distance of 0.5-1 cm from the wall surface. Often wires are laid inside iron pipes - all these requirements are aimed at increasing the safety of using open electrical wiring.
Despite some significant drawbacks, it is used almost everywhere - the advantages of its use still outweigh.
Advantages:
- The wires to the outlet fit in the wall, so wallpaper is freely glued on the outside or other finishes are made.
- Complies with all fire safety requirements (in concrete buildings) - even if a short circuit occurs, you can not be afraid of a fire from the wires in the wall.
- Very low probability of damage to the wiring - it can only be damaged while drilling the walls.
Read next: How many amps in the outlet
Flaws:
- For installation, you need to cut the walls.
- Difficult to do repairs.
- If the walls are finished, then after laying an additional outlet, you will have to redo it.


Selection of the cable section and its connection
The cross section of the cable conductors is selected depending on the planned load (in kW) and the material of the conductor. It is not necessary to do all the wiring with a cable with the same core. You can save money without sacrificing safety. To do this, a section is selected for each section, depending on the power of the devices that will be connected here. Their power consumption is summed up, about 20% of the reserve is added, and the section is selected in the table according to this value.
Table for selecting the section of the electric cable depending on the load
To connect the power supply in a wooden house, fire safety requirements are added. The main thing is that the wire sheath must be non-combustible. In such wires, the name contains the letters "ng". To ensure the required degree of protection, double (VVG) or triple (NYM) cable insulation is also required.
To electrical wiring in a wooden house with your own hands was done correctly, it is best to use cables with multi-colored cores. Then you definitely will not confuse zero with phase or ground. Usually the colors are distributed in this way:
- "earth" - yellow-green;
- "zero" - blue;
-
"phase" - brown.
If you buy a European-made cable, there are different colors:
- "earth" - yellow-green;
- "zero" - white;
- phase is red.
Selection of circuit breakers and RCDs
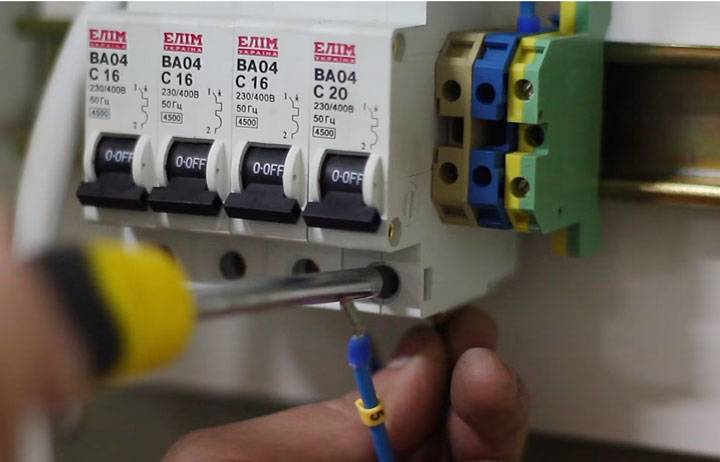 What rating of automatic machines should be installed in the electrical panel? The amperage will depend on the section of the connected cables. Remember that it is the cable, not the equipment, that primarily protects the switch:
cable 3*1.5mm2 - 10A
cable 3*2.5mm2 - 16A
cable 3*4mm2 - 20A or 25A
cable 3*6mm2 - 32A
In addition, each shield must be equipped with:
voltage relay
load break switch
SPDs have been actively used in private houses to protect against lightning surges. What is it, are they needed in apartments and how to connect them, read below.
Plus, try to always allocate a separate, so-called non-switchable load in the circuit:
fridge
burglar alarm etc. .
All lines are protected by both circuit breakers and group RCDs. At the same time, the machines protect the cable and equipment, the RCD protects people from ultra-low metering currents.
Most electricians install one introductory RCD into the shield, without any outgoing group protections. This is fundamentally not the right approach, because if at least one line is damaged, the input protection device will automatically turn off.
The whole apartment remains without electricity. Moreover, it is not always possible to correctly select such an introductory device for leakage current.
Either it will work falsely for you (at minimum values), or it will only perform a fire-fighting role, without protecting a person in any way.
It is recommended to connect no more than 5 lines to group RCDs. On the lines that are connected with water - a dishwasher, a washing machine, a boiler, sockets for bathrooms, it is better to install differential machines.
After assembling and switching the shield, each wire and machine must be marked and signed. Any electrician who comes up to him after you should easily understand the circuit and outgoing lines.
For ease of use, stickers are glued to the outer cover (plastron) at the very end of the repair. On this, the entire electrical installation can be considered complete.


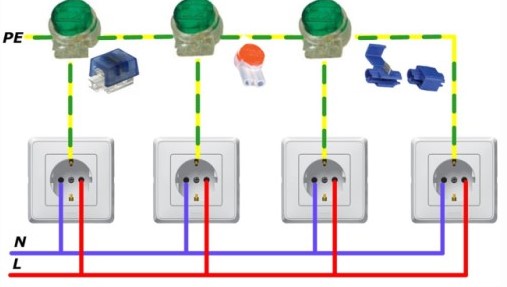
Ways to connect sockets
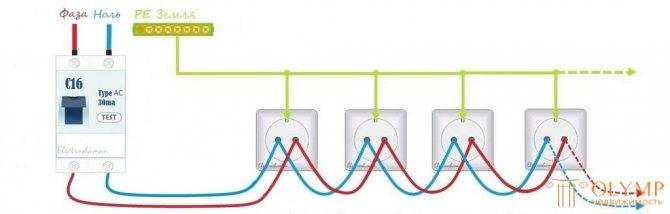
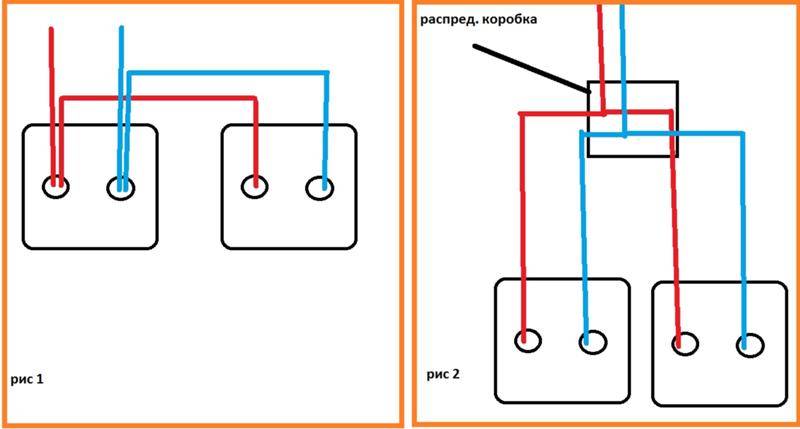
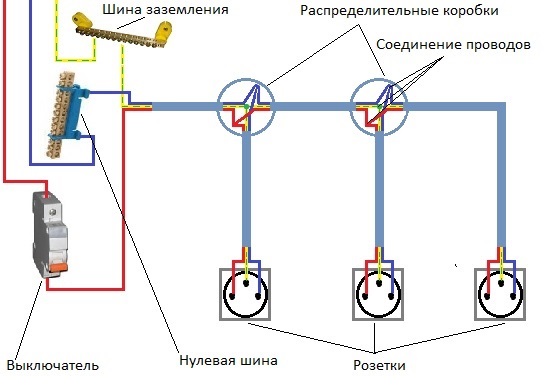
Today, sockets are connected in two ways: in the first, a separate electrical wiring line is equipped for each point, in the second, several points are connected to one branch at once.
The type of sockets to be installed is closely related to the type of wiring: whether single-phase sockets are used, equipped with grounding or without it, or three-phase devices are installed to power devices that operate on a 380-volt network.
The vast majority of technical devices that need to be connected to the power supply are located or confined to the kitchen and bathroom:
Sockets for powerful consumers, such as electric ovens or boilers, are connected with a separate line. If possible, use whole pieces of cable, devoid of any connections, during installation. Power lines are laid separately from the shield to each point, which somewhat resembles the rays emanating from the star according to the scheme.
If it is necessary to connect each such consumer, the powered point must withstand a rated current of 16 - 32A. The circuit breaker at the input is also designed for a current with the same indicator.
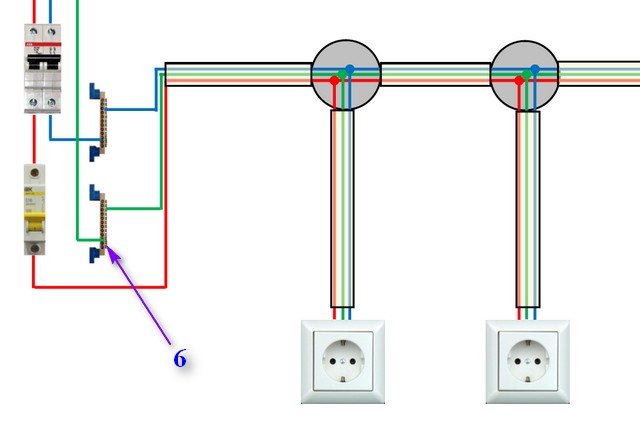
Daisy-chaining is chosen if it is necessary to power electrical outlets of the same group. These groups are formed in accordance with the location of appliances around the house.
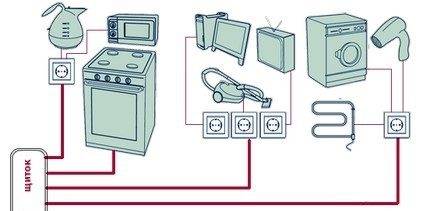
Sockets with separate lines are the only right option for servicing powerful household appliances such as a washing machine or electric stove
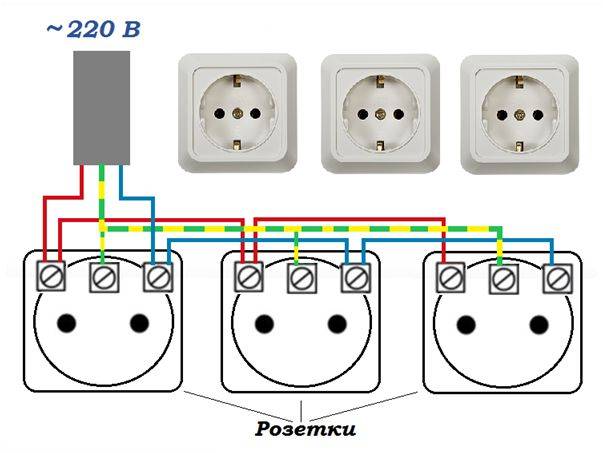
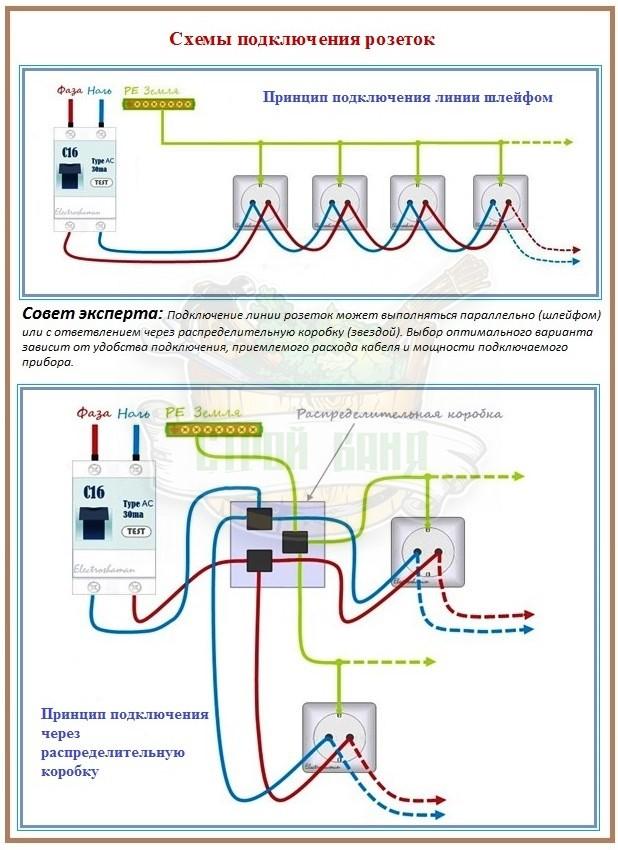
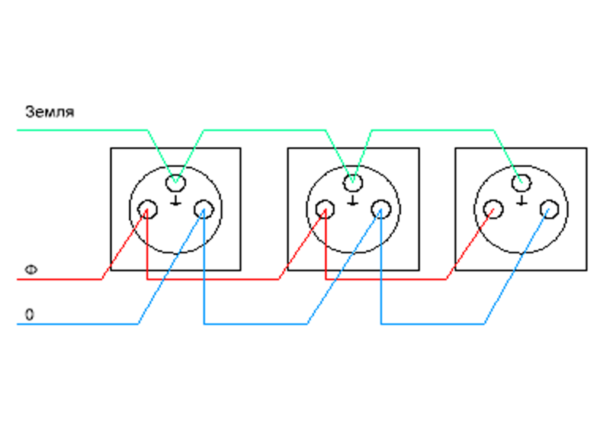
The method involves the connection of all elements to a common power line of electrical wiring.
In order to nullify the risk of disabling several points at once, the masters recommend including no more than two or three outlets in one system.This moment is clearly spelled out in SP 31-110-2003: it is allowed to connect up to three additional electrical receivers with a loop.
A significant "minus" of such a scheme is that if one of the wires is accidentally damaged at the point of contact, all the elements following it stop working.
The only condition is that the total current load should not exceed twice the value of the operating rated current of the first (head) power receiver.
But, in any case, the circuit created in this way is designed for a load whose total indicator does not exceed 16A. If the operating conditions are not observed, there is a high probability of creating emergency situations.
When connecting sockets, it is not at all necessary to use a clean type of wiring. With the right approach, they can be combined, for example, to bring the power cable to the junction box. And after it, send one cable in the form of a loop, and bring the other separately to the power point of powerful equipment in the house.
The number of power lines laid from the shield depends on how many wiring routes are supposed to be laid.
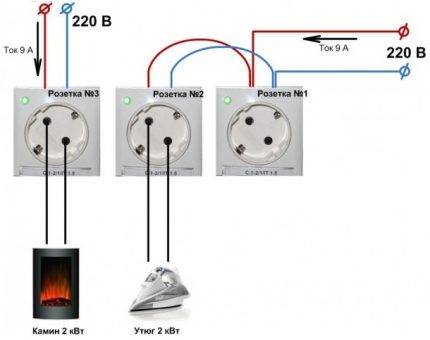 To connect an electric fireplace with a power of 2 kW, it is worth providing a separate independent outlet, while the iron can be safely powered from points connected by a daisy chain
Regardless of the type of method chosen, wiring can be done in one of two ways:
- open - involves laying wires on the surface of the wall;
- closed - involves gouging channels for laying power lines in concrete and brick walls, sampling a channel in wood for laying a cable pulled into a corrugated pipe.
The open version is more convenient and easier with respect to not only installation, but also maintenance and control.But regarding the aesthetic aspect, an open wire is not always appropriate. And besides, the open installation method “eats up” part of the usable area: it is impossible to hang a shelf on top of the cable or move furniture close to the wall.
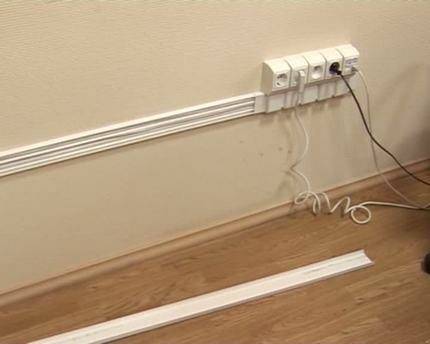
With an open mounting method, cable channels or plastic skirting boards are used to protect the PE conductor from mechanical damage and make it more presentable.
The inner space of most cable channels has partitions between which it is convenient to place wires. Control over the state of the track is carried out through the upper removable part.
The closed wiring option is convenient in that it eliminates the possibility of accidental damage to the cable, while making it invisible to others.
In order to minimize the need to "unravel" the walls to create a strobe, closed wiring is performed at the stage of construction or repair work until the finish is completed.
But the “invisibility” of closed wiring can also play a cruel joke when trying to “hammer in a nail”. Therefore, there is an unspoken rule: lay the wires relative to the sockets strictly vertically or horizontally.
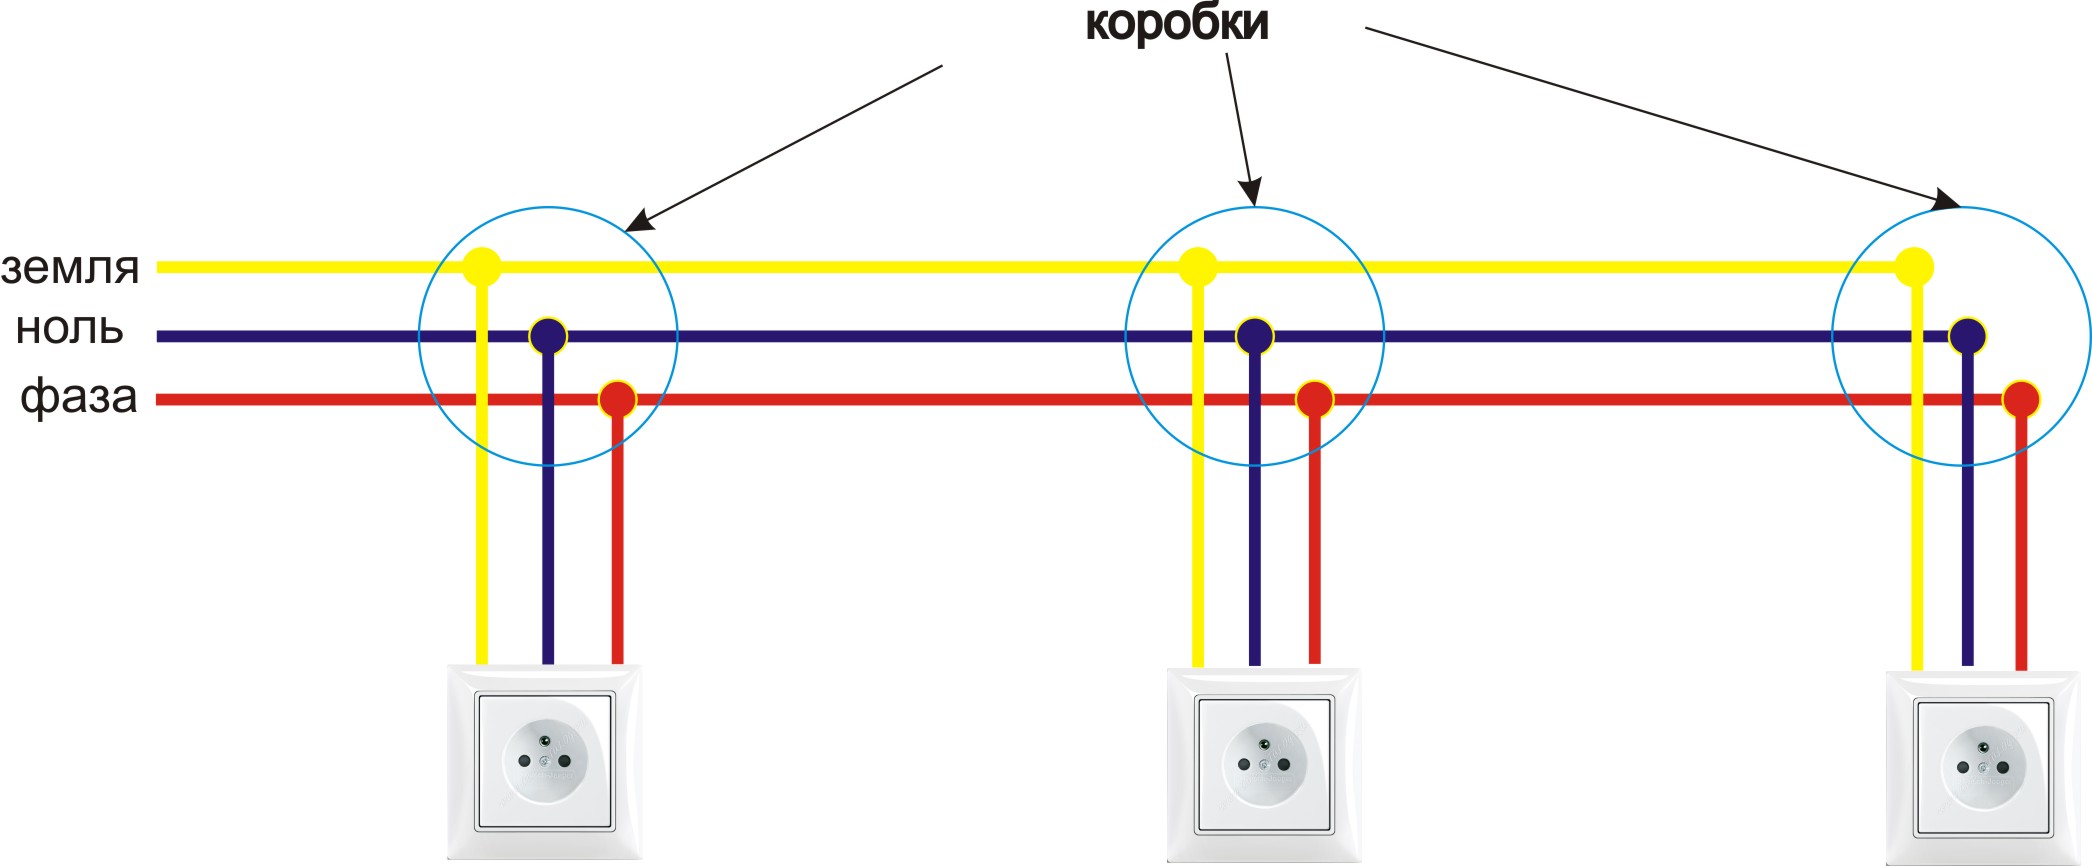
How sockets and switches are connected
The general part of the chain structure, we hope, is clear to everyone. Now let's see how electric points are connected to it.
Scheme of connecting fixtures through a two-gang switch
So, we have a group power wire that comes to the junction box. This wire can have two or three cores. According to modern standards, three-core wires are used for these purposes. It is worth saying that the connection scheme does not change much from the number of wires available.


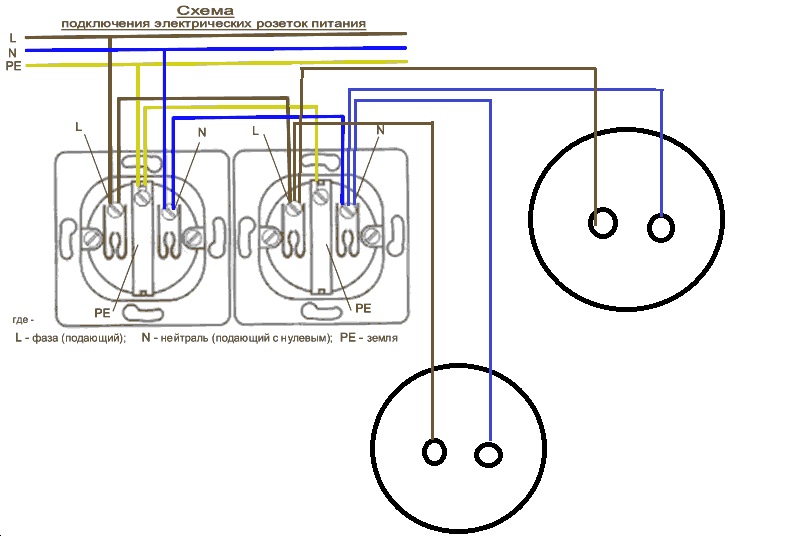


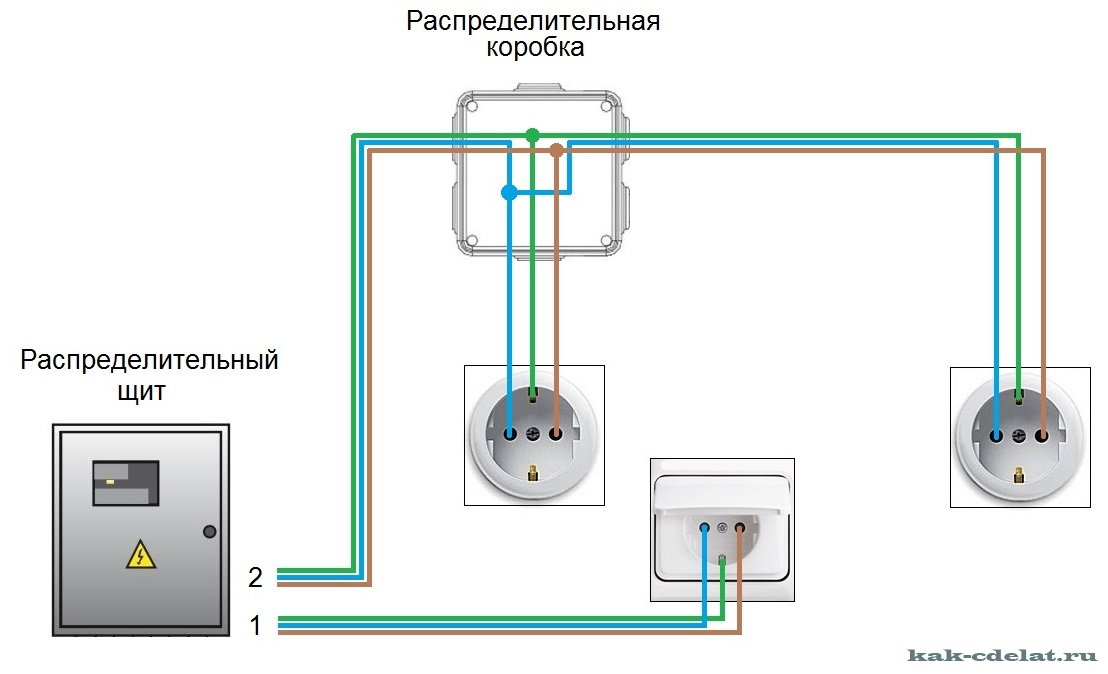
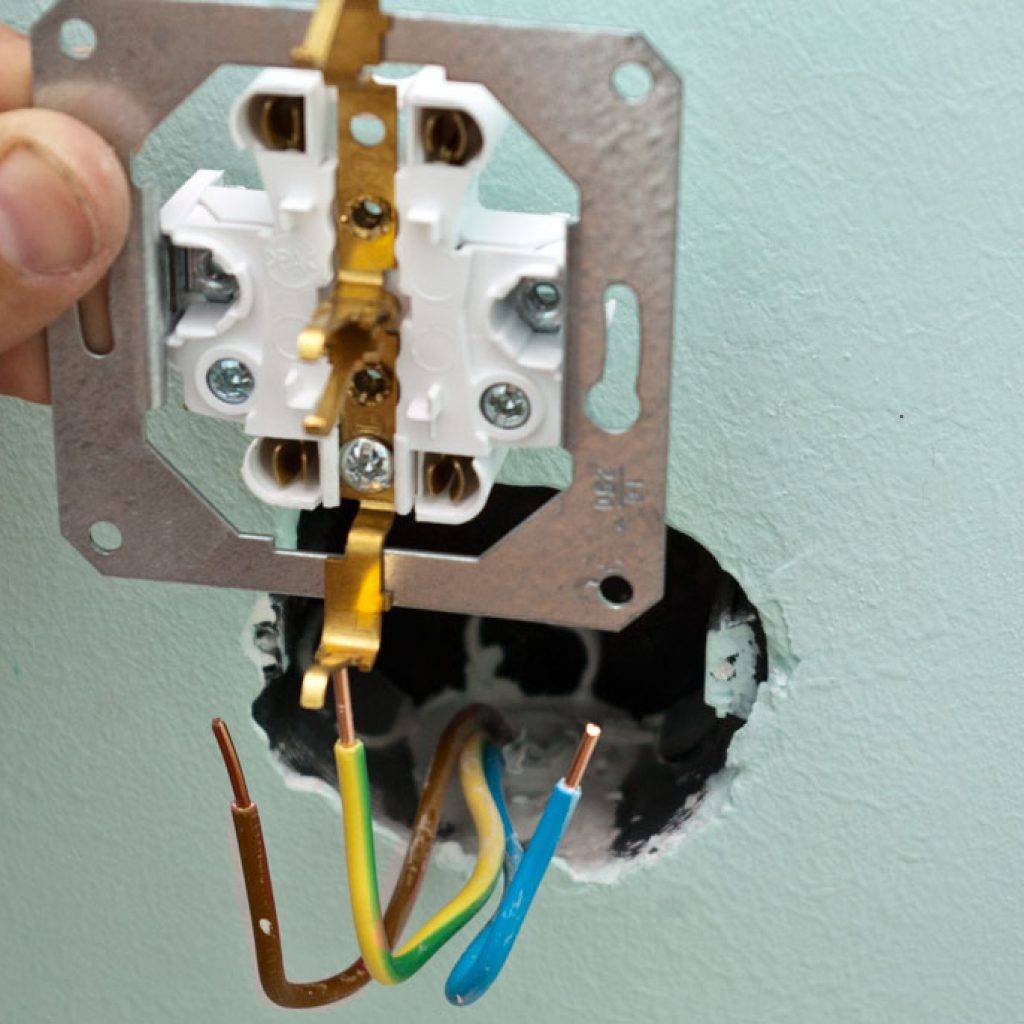
- All three wires will have different color markings.White or pink is phase, blue is zero, and yellow-green is ground. Be careful and careful when making the connections, as there is always the possibility that the electrician has incorrectly connected the wires to the machine. Pre-check the wires for voltage with a tester.
- Let's start the analysis by connecting the outlet. Phase and zero are connected to its power contacts, while the "ground" is connected to the ground. That is, all three wires are used to connect it to the network.
 Grounding is required to transfer the charge from the device case to the ground loop, thus avoiding electric shock.
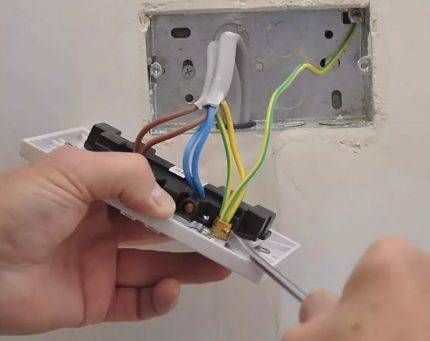
- With the switch, everything is a little more complicated, since a lighting fixture is still included in this part of the circuit.
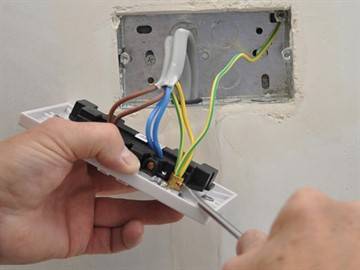
- So, we have three wires in the box - they are separated from each other and we can clearly see the color marking, which corresponds to the actual parameters of the circuit. A two-wire or three-wire wire is laid from the junction box to the switch box - the first is taken for a single-key switch, and the second for a two-key switch. If there are even more keys, then the number of conductors grows proportionally.
- We fasten the stripped ends of the wire to the switch terminals. We must say right away that only phase wires will be suitable for this device, regardless of their number. The fact is that the task of the switch is to break the circuit and stop the supply of electricity to the lighting fixture. That is, the ends of the wire are input and output.
- Already in the junction box, one core connects to the phase conductor of the group wire. The second core is connected to another wire, which is extended to the lamp as a phase.This wire also has two or three cores - the second is connected to zero by color marking, and the third to ground. We do the same if the switch is two-gang, but according to a slightly more complicated scheme. Here the task is to break the lighting fixtures into groups and turn them on individually.
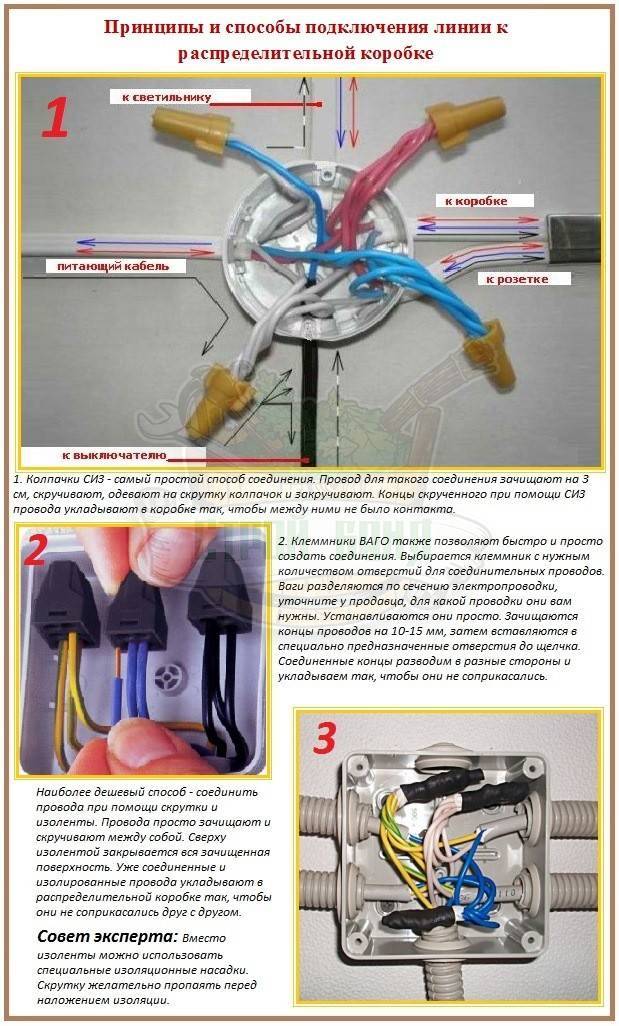
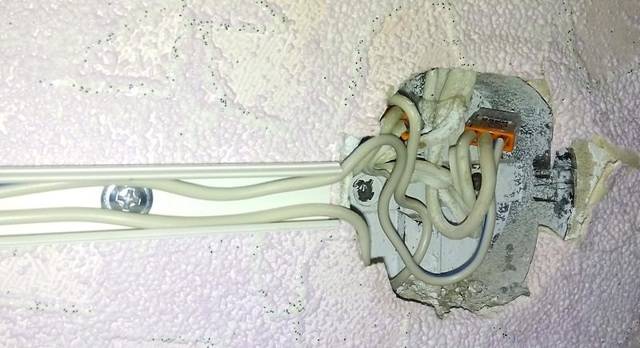
 Connection of wires in the junction box
Video - Connecting an outlet and a switch
If you read the above carefully, you already understand that the point connection schemes are completely different and there is simply no zero and ground in the switch box so that you can connect the outlet. So how is this possible? Let's name all possible methods.
Preparing to connect
The first step is to de-energize this section of the wiring and make sure that there is no voltage with a screwdriver-indicator.
Determined with the method of laying the wire, there are two options:
- open: on the surface of the wall in the cable channel. The method is fast and low-cost, but unaesthetic;
- hidden: in a furrow (strobe), subsequently filled with a solution. A more attractive way: only sockets will be visible on the wall.
With a significant distance between sockets, you can reduce the length of the gate or cable channels by laying the cable along the following path: from the source socket down in the gate or cable channel to the baseboard, then under the baseboard to the place under the new outlet and then again in the gate or cable channel directly to the outlet.
Further:
- drill a hole in the wall with a crown for a new outlet;
- fasten the cable channel with dowels or cut out the strobe - depending on the accepted method of laying.It is convenient to cut the furrow with a professional wall chaser with a built-in vacuum cleaner. For a home craftsman, this expensive tool should be rented. In the absence of such an opportunity, a series of holes are drilled along the route with a perforator, and then the gaps between them are knocked out with a chisel. And it is possible to make two slots along the borders of the future strobe with a grinder and remove the body of the wall enclosed between them in any way convenient for the performer;
- a corrugated pipe is laid in the strobe, a piece of wire is placed in it and then the groove is sealed with gypsum or cement mortar. The corrugated tube will provide the ability to replace a damaged wire without opening the strobe.
 If the thickness of the plaster on the wall is at least 4 mm, you can do it easier:
- cut the wallpaper along the cable laying line, wet the edges and then spread them apart;
- scratch a groove in the plaster so that only the cable fits in it;
- lay the cable and putty the groove, then glue the wallpaper back.
With open laying, in the front panel of the existing outlet, a cutout is made for the release of the wire: it will allow it to fit snugly against the wall.
The length of the cable for connecting a new outlet is selected so that there is a margin of 20 cm on each side. This is necessary for a quality connection.
Connection materials
The wire for connecting the electric point must be made of the same metal as the main cable. For example, when using an aluminum cable, the jumper must also be made of aluminum.
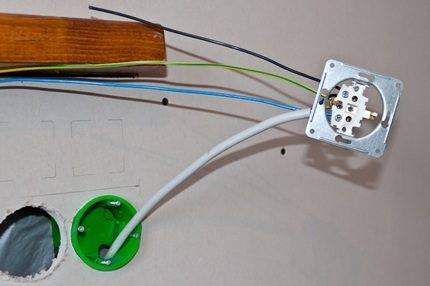
To ensure an even distribution of the incoming electricity, the cable used for connection must have the same cross section as the main wiring in the room
To install a double socket, you also need:
- flat and Phillips screwdrivers;
- braid stripping tool;
- pliers;
- insulating tape.
For safety reasons, in case of fire, any electrical wires are recommended to be laid in a corrugation. This solution is also convenient because it does not require wall punching, and also simplifies the replacement of damaged wire during subsequent operation.
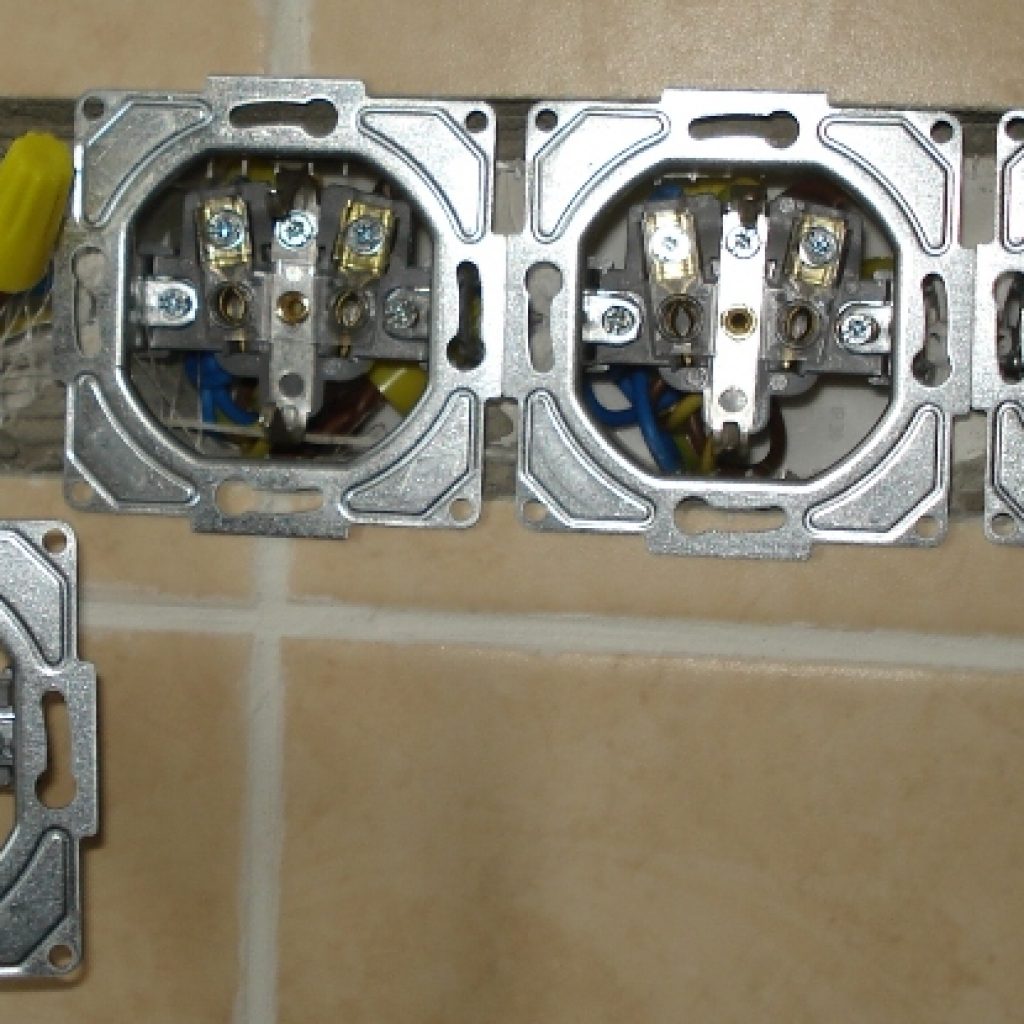
Types of double sockets
The main elements of the electrical outlet are the outer protective case and the working part, including the base and contacts.
They are interconnected by screw terminals - clamps necessary for connecting the electrical equipment cable.
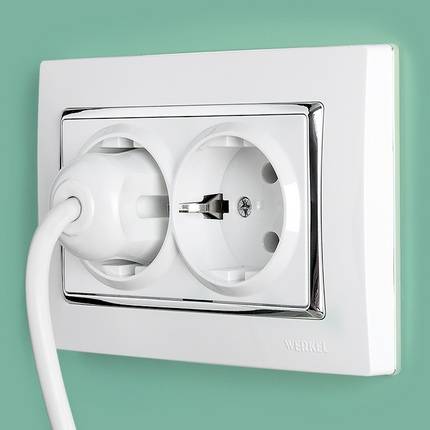
The only drawback of double sockets is that it is problematic to connect two high-power consumers of electricity through them at the same time.
There is an erroneous opinion that double sockets are identical to assembled or double models and are several independent devices located close to each other, interconnected by loops.
 If a double socket is connected to one supply circuit, then electrical work is carried out according to a scheme similar to connecting a single socket. The only difference is the serial connection of two contact pairs within the wiring product
Technological progress does not stand still. Modern models are more advanced designs. In terms of nominal voltage and current strength, they are strikingly different from the sockets that were found everywhere in the days of the USSR.
For example, if in old-style models the permissible current strength did not exceed 10A, then for modern electrical installation equipment this figure is 16A.
Each part of the double socket can be connected to a separate power circuit, if you first remove the brass jumper connecting them on the terminal
In fact, a double socket has one clamp and several distribution strips. Due to this, the electric current is supplied to both outlets in the same way, but its level will be divided depending on the power of the devices powered by the network.
Therefore, when replacing a failed old device with a new one, it is worth knowing its design features, which involve certain nuances during installation.
The distance between the output contacts, as well as the diameter of the plug pins in modern models is greater than in traditional counterparts, and is 4.8 mm instead of 4 mm
By modification, double sockets are classified into the following main types:
- Open and closed execution. In closed models, the holes are hidden behind curtains that move to the side when the device is turned on. Devices of this type are indispensable for homes with small children. The shutters only work when pressed simultaneously. Thanks to this, even if a foreign object is deliberately pushed through, nothing dangerous happens.
- Without grounding and with grounding contacts. In models of the second type, grounding contacts are displayed on the socket housing, which protect electrical appliances and the user from breaking currents that accidentally "leave" the plastic housing.
- For installation in rooms with high humidity and outdoor installation. Models of the first option are marked IP-44. They are equipped with a housing that protects the device from moisture penetration. Devices for outdoor installation are marked IP-55. Their high-strength housings are protected from dust contamination and moisture ingress.
Each type has a corresponding letter marking. For example: "A" indicates that this is an American double socket, "B" indicates the presence of a grounding contact.


Depending on the type of execution and material of manufacture, the devices are also divided into standard and polar, overhead and custom-made
Among the latest developments, programmed sockets are especially popular. Devices equipped with a timer turn on and off independently from power after a set time interval has elapsed.
The protective case of modern sockets is made of heat-resistant unbreakable plastic. To enhance the decorative qualities, it is decorated with various inserts.
Due to the variety of design options, you can choose devices that will be invisible in the interior or, on the contrary, act as its worthy decoration.
When planning to install a double outlet on your own, experts recommend choosing simple models without any modifications. Or give preference to double sockets with a spring-loaded plug ejector. Such models are convenient in that they are equipped with springs that work when the plug is removed from the device.
To protect yourself by minimizing the risk of accidents, you should choose products from trusted manufacturers: Schneider electric, ABB, Legrand.
Marking for electrical
Any quality work starts with accurate markup. Most often, professionals use laser levels and scale builders for this.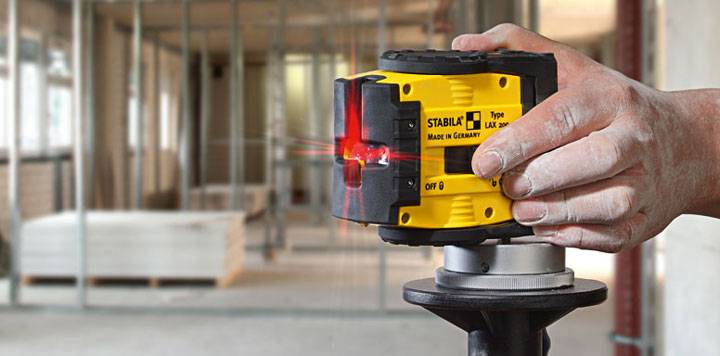
With their help, you can quickly and accurately mark the center for all the sockets in the room. It would seem that a couple of millimeters will not play a decisive role here.What's wrong if one block at the beginning of the room is slightly higher than the other at its end.
However, very often in apartments there are wallpapers with horizontal or vertical stripes. And along these strips it will be clearly visible when the socket box is not installed evenly.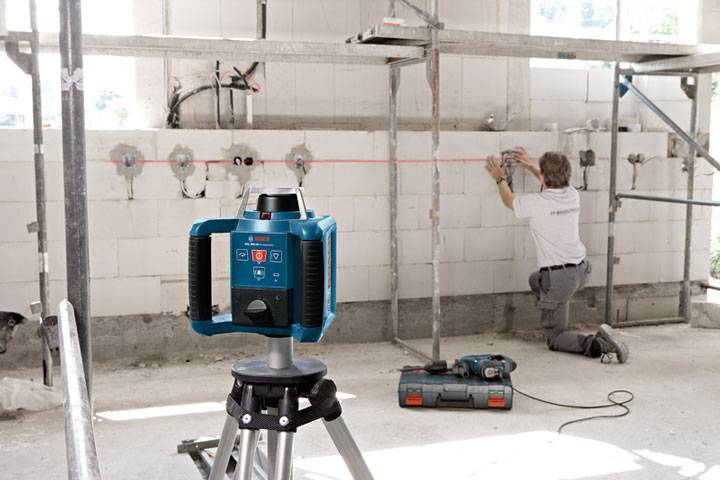
The same can be said about the seams on the tiles.
Therefore, set all the sockets in the room in the same plane. The recommended distances are as follows:
for sockets - 30 cm from the floor
for light switches - 60-90cm
everything above the countertop, in the bathroom or in the kitchen - 110cm
 After all the centers of the socket boxes are marked, then proceed to marking the mounting points of the fixtures, both on the walls and on the ceiling.
At the same time, it is possible to mark the places for hanging plasterboard structures. Since in the future, when all the loops and corrugations are on the ceiling, it will not be very convenient to mark the fasteners for drywall.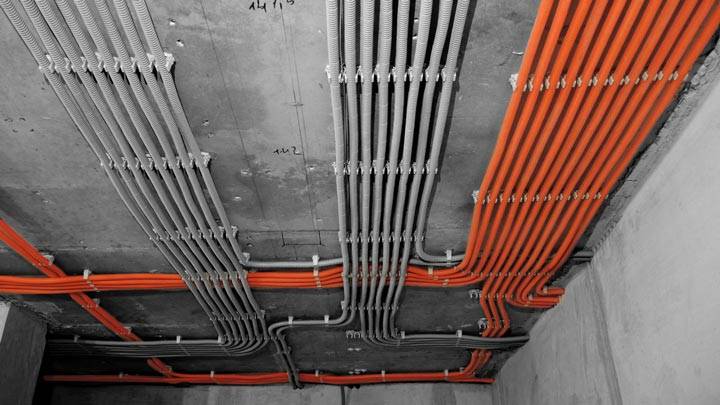
But with all this it is worth bothering if you will also mount the structures.
After all this, proceed to putting marks under the corrugation fasteners. The most important thing is that they do not interfere with each other.
Usually, it takes a full working day to make a competent markup, even with the use of modern measuring instruments. Set yourself up for just such a period in advance. You will be in a hurry and it will definitely come out sideways to you during further installation.
Installation process
Turn off power before electrical work
Preparatory work

- Disassemble the socket by unscrewing the cover.
- The socket box is also removed, they get access to the terminals to which the wires are attached.
- With an external installation method on a concrete wall, it is necessary to pre-drill holes for the socket box at the locations of the fasteners in order to be able to use plastic dowels. Self-tapping screws are suitable for a wooden base.
- The hidden method is complicated by drilling a hole for the socket box. To do this, use a chisel with a hammer, an impact drill, a hammer drill with a core drill for concrete.
- A round hole is cut with a drill, a groove is brought to the desired size with other tools.
- A groove is made with a puncher or drill, a wire is laid, which is hidden under the plaster.
Cable connection
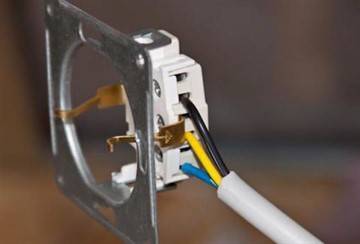
- The cover is removed from the device, exposing the inside where the terminals are located. They remove the flexible insulation that hides the three parts of the wire: phase, ground and zero. Diluted to the sides for ease of installation. When working with hidden wiring, a 20-centimeter margin is left.
- All three wires are stripped of insulation by about one centimeter carefully, without damaging the core.
- Loops are formed, flattened with pliers to ensure optimal contact.
- Then, stretching under the screws, they are pressed against the terminals with force for better fixation of the bare contacts.
- They adhere to color marking: the yellow wire corresponds to grounding, the other two are phase and zero.
- The device is assembled by screwing the inner part to the working part.
Cable connection
- The cable is stripped, two loops are formed, flattened, securely fixed with terminals.
- Wires start according to color marking.
- Then screw the body into place.
On our website you can also learn about the features of installing sockets with USB and Wi-Fi.
Drilling socket boxes
Then the most noisy and dusty part of electrical work begins - drilling and chasing.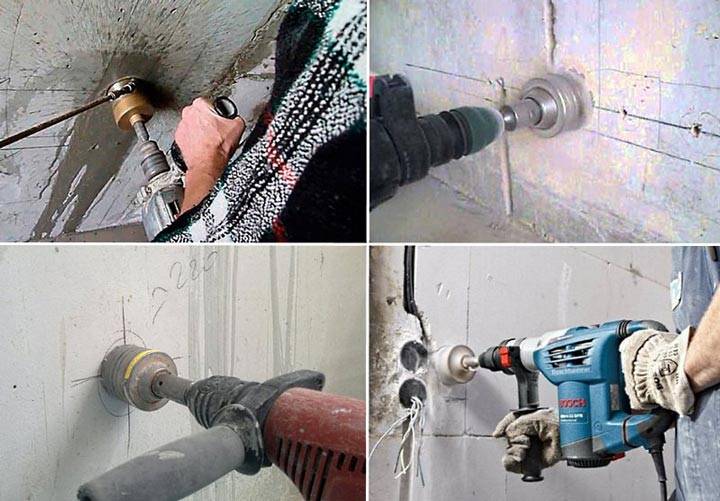
In order to minimize the amount of dust, construction vacuum cleaners are used.
In addition, each tool in this case must have an outlet with a nozzle or a dust extraction device.
A small puncher, a medium one, a large one, a wall chaser, all these tools must have dust removal, otherwise there will be no sense from your vacuum cleaner.
First, the centers of the socket boxes are drilled using a d-6mm drill. Then, based on the material of the walls, it is selected niche tool socket boxes.


It could be:
medium drill with diamond crown
large hammer drill with impact bit
wall chaser with 60mm deep cut
How to choose a good double socket
 Table of degrees of protection
When choosing a product, you should pay attention to the following criteria:
- Mounting box size matches standard wall openings. It is advisable to put a double socket in one socket without additional drilling to expand or deepen it.
- Degree of protection. For a family with no children, ordinary models with an IP22 rating are sufficient. Products with degrees of protection IP33 and IP43 are equipped with shutters that protect the contacts from splashes and penetration of solid objects. For the bathroom and kitchen, it is better to take IP44 sockets, which are not afraid of splashes and jets of water flowing along the wall.
-
contact standard. You should stop at F or C. Products of this type are adapted for all types of plugs, equipped with a contact for connecting ground.
- Power. Sockets for 10A (2.5 kW) and 16A (4 kW) are on sale.It is advisable to purchase a more powerful model in order to be able to connect consumers such as a welding machine or a washing vacuum cleaner.
- Internal organization. Preference should be given to models that are equipped with a protective overlay for the contact group. The terminal tightening screws must be on the outside. This will help to carry out maintenance of the device without dismantling it. You should choose products with terminals equipped with spring clips.
- Mounting feet. They must be made of thick steel that will not bend when the mechanism is installed in the socket.
- Restriction of access to terminals. It is necessary that each wire has its own hole, which will eliminate errors during installation.
Electrical outlet device
Almost any master had to deal with connecting the outlet. At first glance, this procedure is very simple, but there are many nuances hidden under it. So that a self-connected outlet does not become a source of problems, you need to understand the principle of its operation. It consists of the following components:
- Decorative cap with fixed screw.
- Socket box. To fasten the element inside the mounting hole, it has paws, with the help of which the insert is attached to the hole, the pads in which the contacts are movable are more difficult to install, but thanks to their design it is possible to adjust the position in terms of inclination and height. It is advisable to choose models with two-pronged paws. Compared to single teeth, they are much more reliable.
- Complete contact box. The terminals can be connected in various ways, as with contact screws directly, or as a single unit. Two contacts, zero and phase, as well as grounding which is located separately.
Conclusions and useful video on the topic
To get two out of one outlet, you can use the simplest way - put a double model instead of a single one. Step by step this option is shown in the video:
The video clip summarizes the basic principles of connecting sockets in series:
Before starting work on the socket, you should clearly determine which wire is responsible for what. How to do this correctly, without practical experience, the video tutorial will tell you:
Video review of popular connectors used to connect wires to each other:
> Having considered the question of the feasibility of installing a new outlet from an existing one and having decided on its installation, you will have to carefully consider all stages of the work. In the future, it will be necessary to strictly adhere to the rules for operating the new electric point in order to exclude overloading of the line - it is impossible to simultaneously turn on 2 rather powerful devices in such sockets.


