- Chasing tips
- Gating methods
- Step-by-step instructions for embedding a strobe with your own hands
- Wiring rules
- Termination instructions
- Video
- Questions and answers
- Useful tips from the masters
- Choosing a tool for work
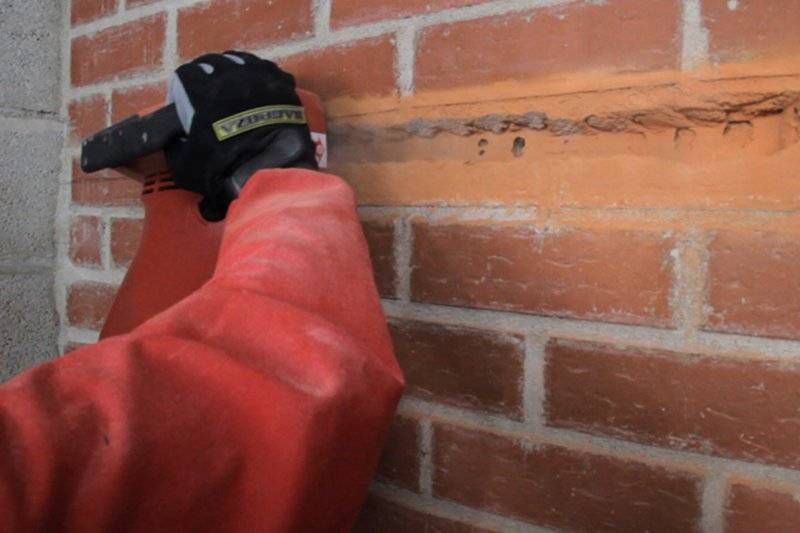
- chisel with hammer
- Chisel with drill
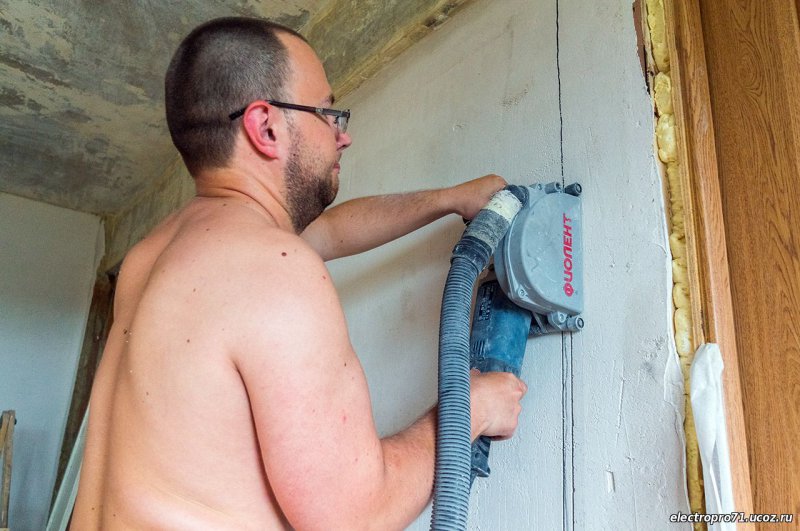
- Bulgarian
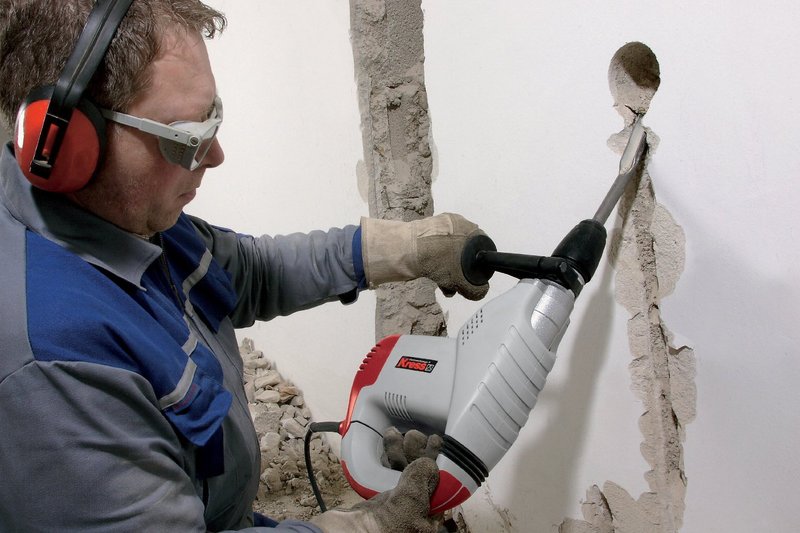
- Perforator
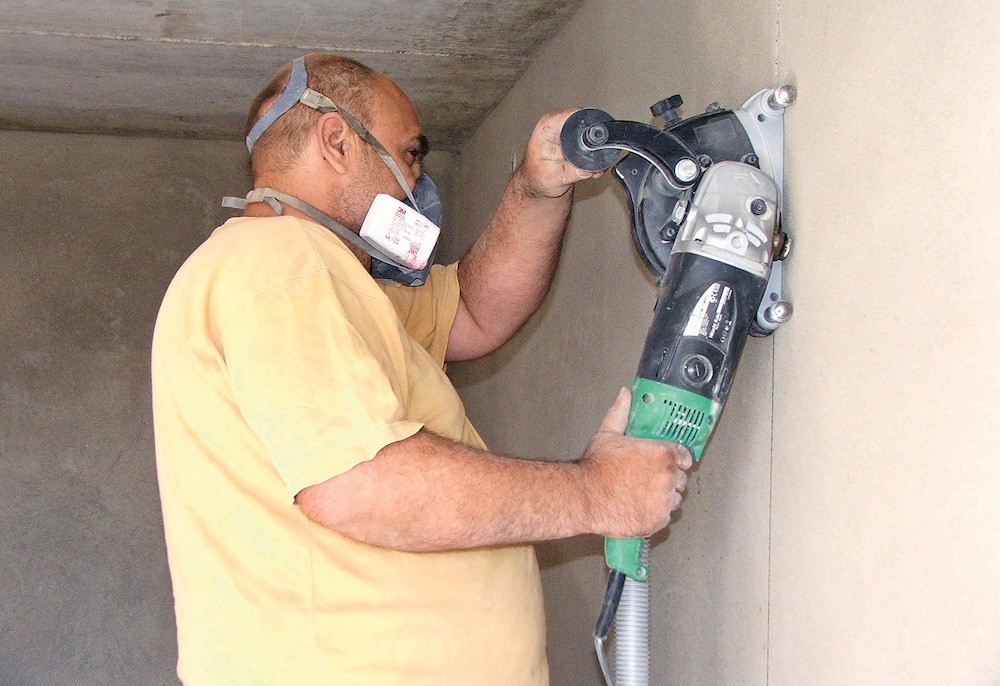
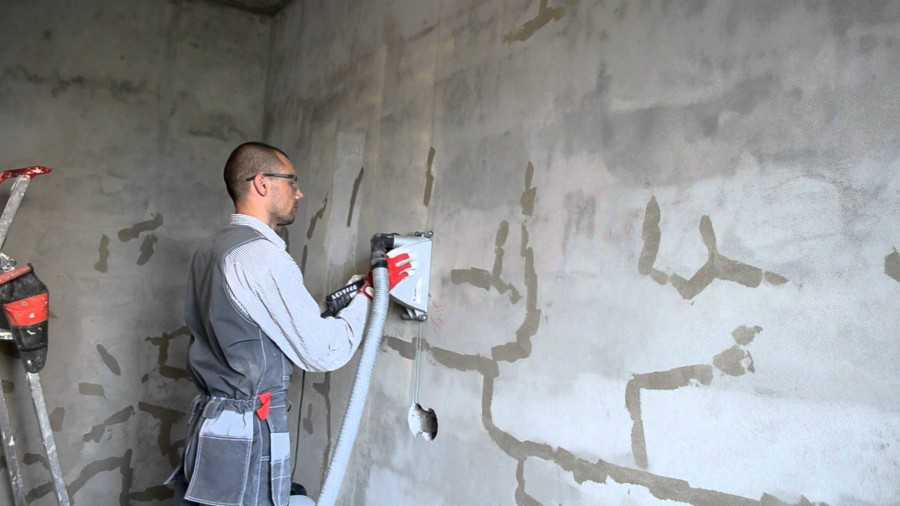
- wall chaser
- Bulgarian with a perforator
- Choosing a tool for chasing walls
- What is suitable from the arsenal of a home master
- A simple power tool to help manual labor
- Professional equipment for quick installation
- What tool do you need
- Hammer and chisel
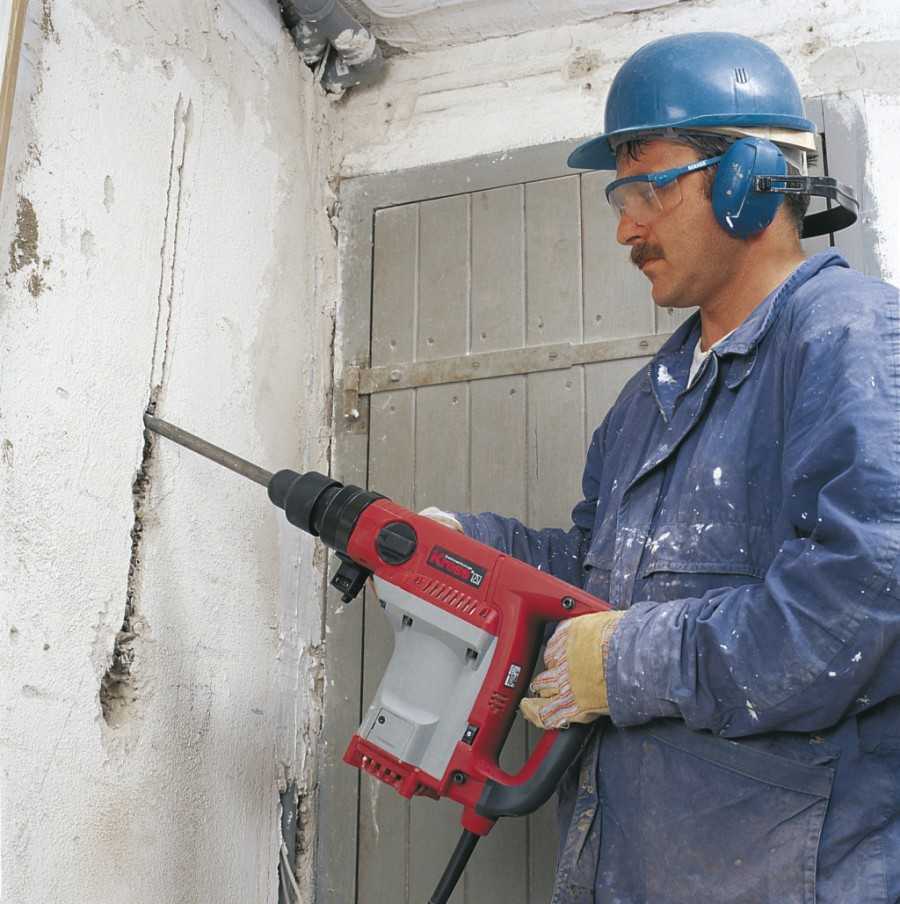
- Perforator
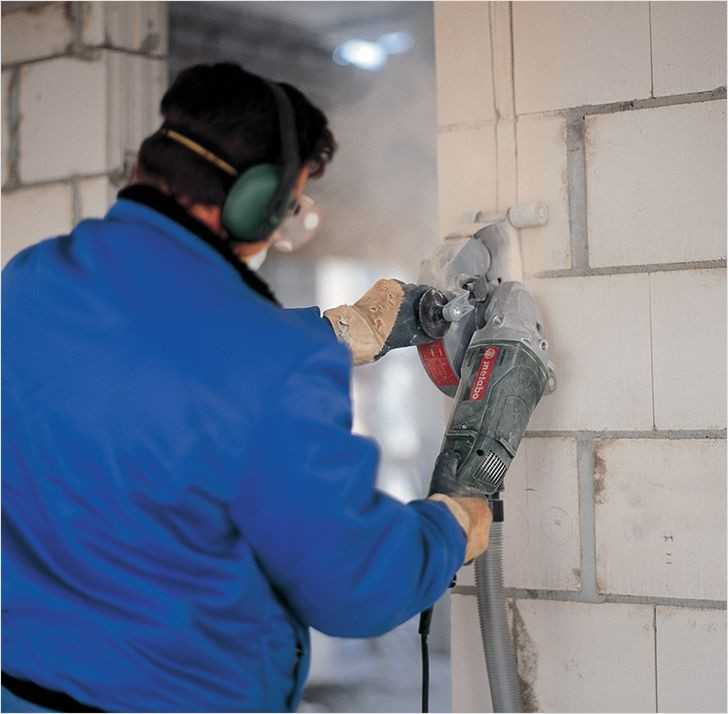
- Bulgarian
- wall chaser
- The main methods, their pros and cons
- Is it possible to shred walls in a panel house
- SNiP for wall chasing - Rezalmaz
- SNiP for wall chasing for electrical wiring
- SNiP for chasing load-bearing walls
- Additional Information
- Conclusions and useful video on the topic
Chasing tips
Although you are not a master, but still listen to smart advice. Do not try to do everything quickly and in a couple of hours. It is better to measure seven times and cut once than vice versa - this is what folk wisdom says.
- With a hidden form of laying (when the wires pass under a layer of plaster or in partitions up to 80 mm), the wires are laid parallel to the architectural and construction lines.
- The distance of wires (horizontally laid) from floor slabs cannot be more than 150 mm.
- In walls whose thickness is more than 8 cm, furrows for wiring can be drawn along the shortest path, and when working with a thin-walled interior partition, it is allowed to ditch, as we have already indicated, parallel to the construction lines, having a distance between horizontal routes and floor slabs of no more than 15 cm .
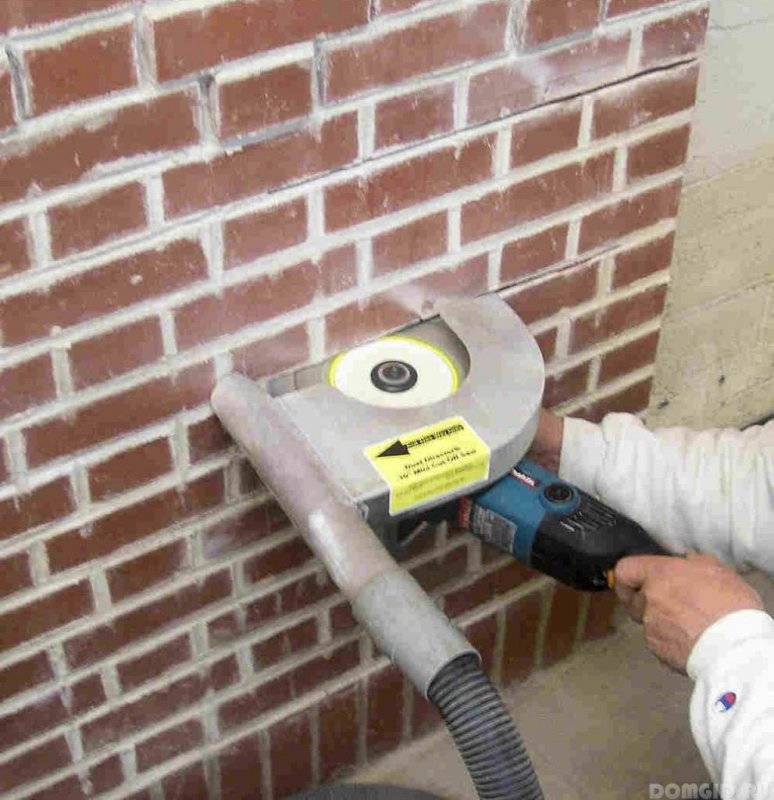
- The wall chaser can make lines on the walls with two diamond discs at once (located one next to the other). It's fast and reliable.
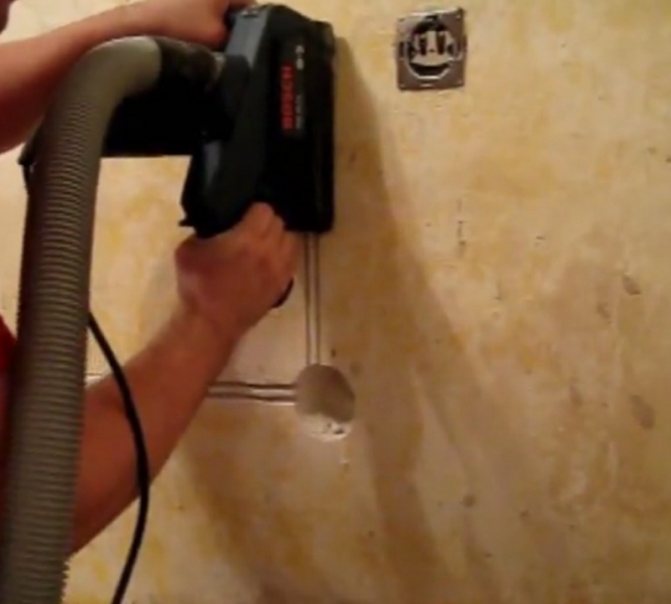
- Using a special technique (wall chaser), do not forget about the vacuum cleaner, which is necessary to collect dust. It is better if it is an industrial and powerful household appliance (such a vacuum cleaner does not overheat quickly and endure heavy loads).
- To work with walls, it is necessary to choose a tool based on the density of the material that will have to be ditched.
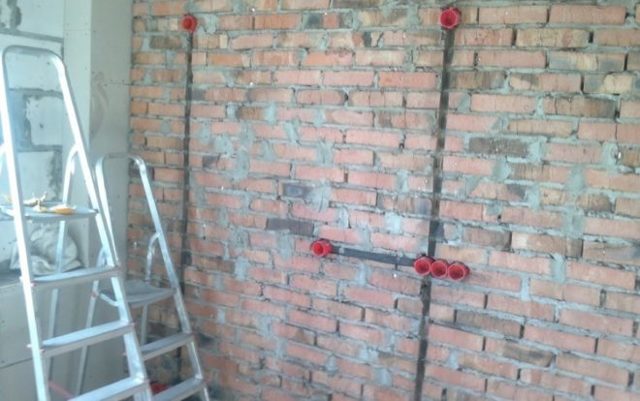
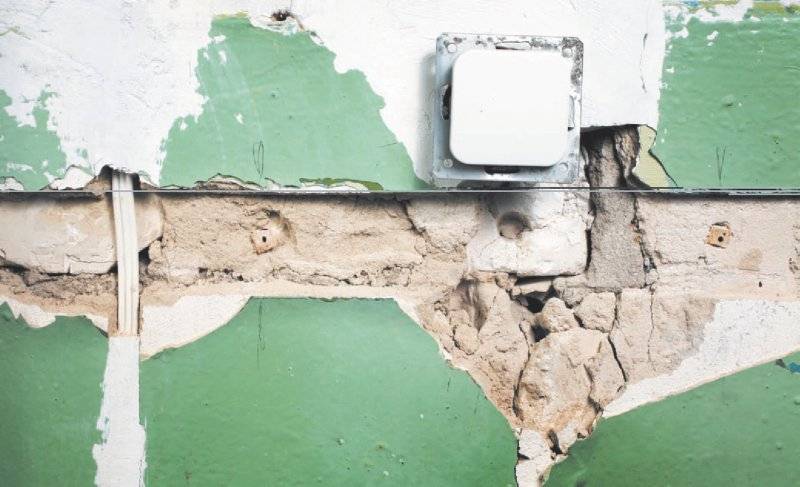
- Recesses in the wall are used not only for laying electrical wiring, but also for piping systems (the width can reach 5-10 cm).
- Before starting gating (if this is an old apartment), take appropriate measures (surface sounding) to make sure that hidden obsolete wiring is not already available at this place of work.
- Do not carry out the work yourself if you have a long-standing allergy to dust - neither a mask nor medications will help you save your respiratory tract from it.
- When running channels under pipes (to further hide pipes under a layer of plaster), it is better to check the walls by ringing. This will help to make sure that there are or are not hidden electrical wiring in your walls.
- Keep in mind that the entire wiring replacement procedure is quite a serious undertaking and you will need experience, and even better the appropriate qualifications (so consider how much it will cost you to have the complex work done by professionals in exchange for quality assurance and reliability).
Now you know how to drill a wall for wiring. So - good luck!
Gating methods
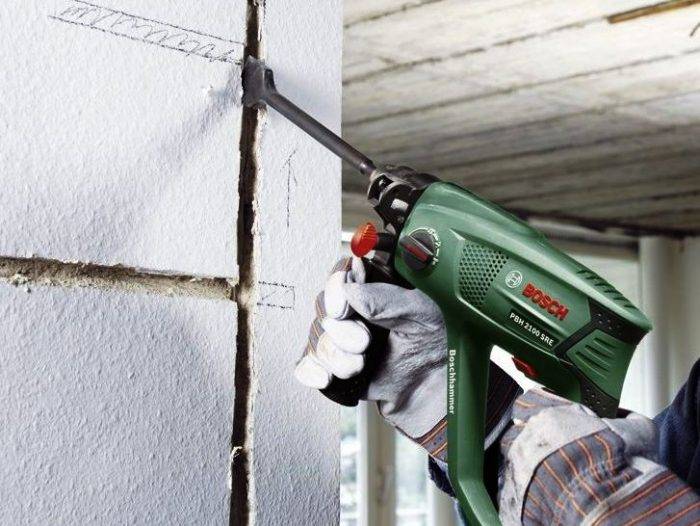
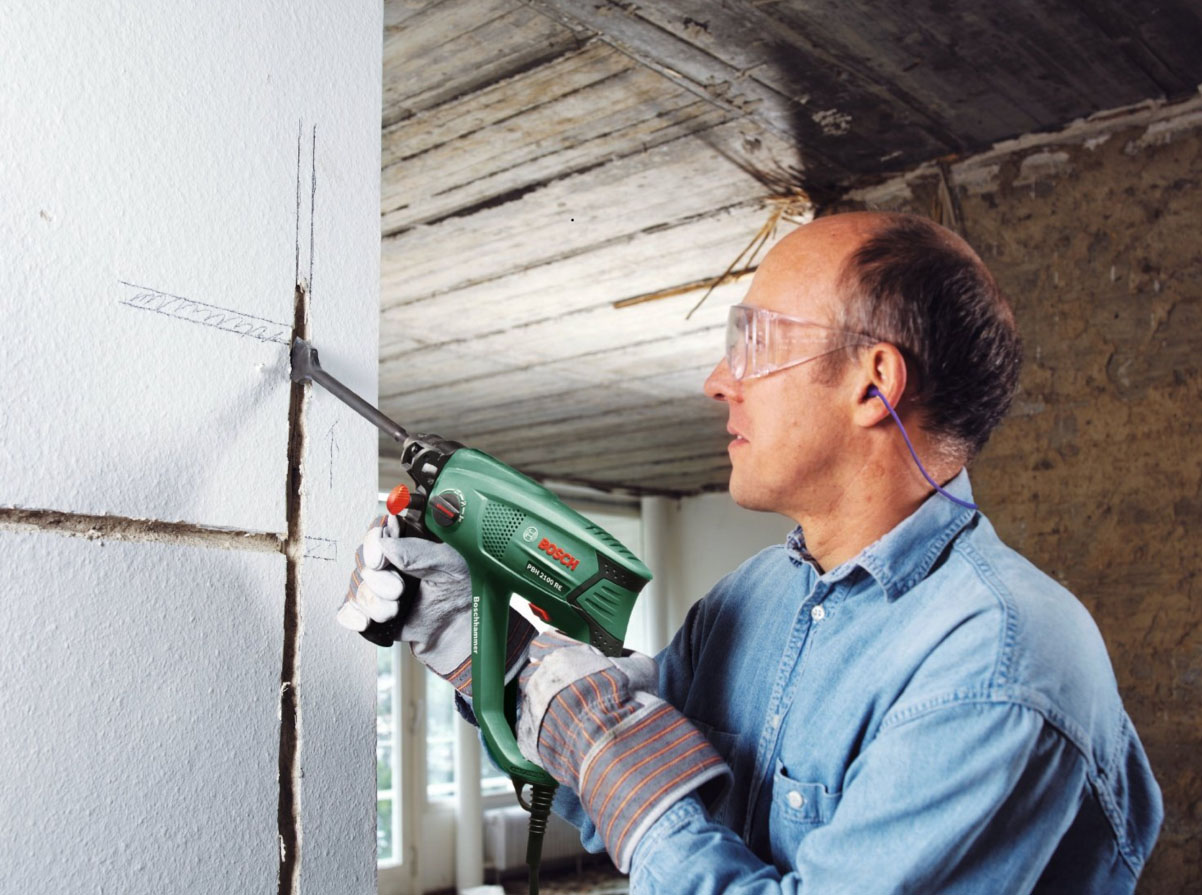
In brickwork, the strobe is done quite simply. It is necessary to form a horizontal recess with a hammer and chisel, laying the wire there. With a vertical direction, you will have to use turns or punch. In general, such a wall is easily amenable to manual chasing, which means that the use of power tools can be abandoned. If concrete walls are available, then they are highly durable. A special power tool will be simply necessary here.
When choosing the main algorithm for carrying out work, you must figure out what you have available, as well as what skills you have. The easiest solution is to use a hammer and chisel. A drill can be added to the last tool. Separately from all this, a grinder is used. If you have a puncher, the work will go much faster, but if you have a wall chaser, then you can do it in a matter of minutes. Another issue is that not everyone has such specialized equipment.
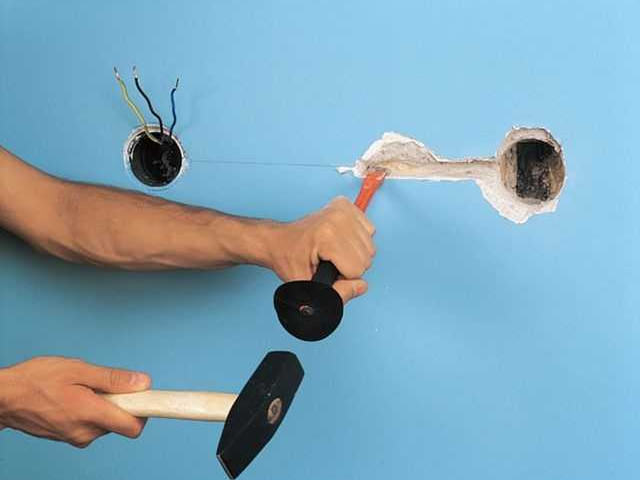
Step-by-step instructions for embedding a strobe with your own hands
It's time to close up the strobe in the wall. Following this instruction, even a beginner will cope with the task:
Using a narrow brush, you need to sweep away dirt and dust from the recesses. A lot of dust is generated during the processing of bricks.It will interfere with the putty to qualitatively adhere to the surface. Even a primer won't help.
When the gutter is cleaned, it is primed. The primer will improve adhesion (adhesion) to the surface and prevent cracking. The entire surface must be treated with high quality, even in the most inaccessible places. For work, a paint brush is used. The packaging indicates how long the composition needs to dry.
While the primer dries, check the location of the wiring. Before sealing the wall after chasing, make sure that the wiring does not stick out. If the electrician is conscientious, then he will not spare the fixing elements and will fix the cable well inside. However, there are masters who do not do it well. Putty will not hold the wire, so you need to part the alabaster and fix it in that place
The plaster will dry quickly.
It is important to wait until the alabaster and the primer coat dry. Then you can start preparing the solution
Its consistency should resemble thick sour cream or paste. For embedding, the composition should be slightly thicker than the usual putty mortar, so as not to spread over the strobe. The method of preparation is indicated on the package. You already know the best way to close the strobes after laying the wiring. It can also be a cement mortar, when the tile is the finish. But most often they use the Knauf Rotband gypsum mixture.
Now it's time to close the strobe. It is filled with mortar using a small spatula. It is important to apply the solution perpendicular to the wires. After that, excess putty or cement is removed with a wide spatula. It should be carried along, and remove the excess.
In the case when the wall is painted, you can reinforce the seam with reinforcing tape.It is enough to put a sickle on a freshly filled strobe and fix it with a small layer of plaster.
When the mixture dries, a primer is applied.
Thus, you can close the strobes in the bathroom, kitchen or other room. After such manipulations, the wall surface is ready for any finish. The wiring is hidden, the grooves are sealed.
In the end, I would like to note a few nuances that beginners miss. Experienced craftsmen advise not to ignore these points:
priming is done in any case
It doesn't matter if we are talking about wiring or pipes. If the brush does not reach some areas, then the composition can be applied by spraying
All manipulations are performed with gloves, since after drying the primer will be problematic to wash;
the pipe or wiring must be securely fixed in the strobe so that cracks do not form on site during operation;
the plaster mixture should be applied herringbone. Due to this, the adhesion of the mixture to the wall will improve;
it is recommended to remove excess mortar from the wall with a wide spatula. At the same time, it is better to wield them at a right angle.
By adhering to all the rules, you can be sure that the work on sealing the strobe will be successful. And even after several years of operation, the plaster will not crack or fly off. Only a purposeful action, for example, to repair wiring, can destroy it.
Wiring rules
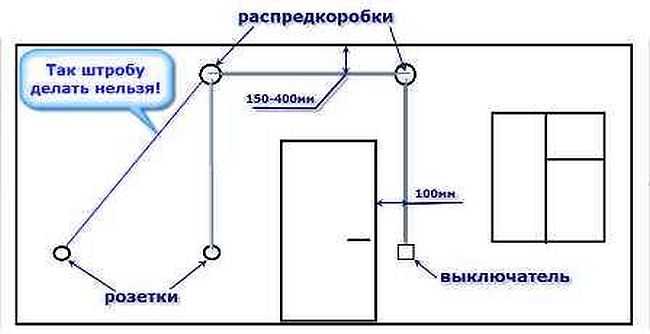
 Rules governing electrical installations should be taken very seriously. The reliability of the wiring and the safety in the room will depend on their observance. As for the strobes, they must be located strictly horizontally and vertically; oblique furrows and uneven corners are not allowed.
When installed horizontally, the distance from the floor or ceiling should not exceed 150 mm. Vertical grooves should be used next to gas pipes with a distance of at least 400 mm from the latter. The optimal length of a continuous strobe is 3 meters with a width and depth of 25 mm. The transition is carried out at a strict angle of 90 degrees without deviations in any direction. It is not recommended to carry out horizontal strobes on load-bearing floors.


In addition, it is important to correctly draw up a wiring plan, determine the location of all sockets and switches in the apartment. This will help not to load the power grid with the use of tees and extension cords.
It is necessary to take into account the presence in the apartment of serious energy consumers, such as modern electric stoves and hobs. For such powerful devices, a separate line with a machine should be allocated, since the household outlet cannot withstand the load, which is fraught with fire or the operation of automatic fuses.
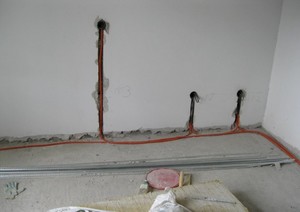
Before chasing the walls in an old apartment, you should find out the location of the old electrical wiring and then dismantle it in order to avoid many unpleasant moments. If you only need to replace the wiring, and not install a new one, you can use the old strobes. This will save a lot of time and effort that will be required for chasing.
Having decided on the layout of the room and having learned all the rules of electrical installation in a hidden way, you should decide on the tool that will be used for chasing walls for sockets and wiring.
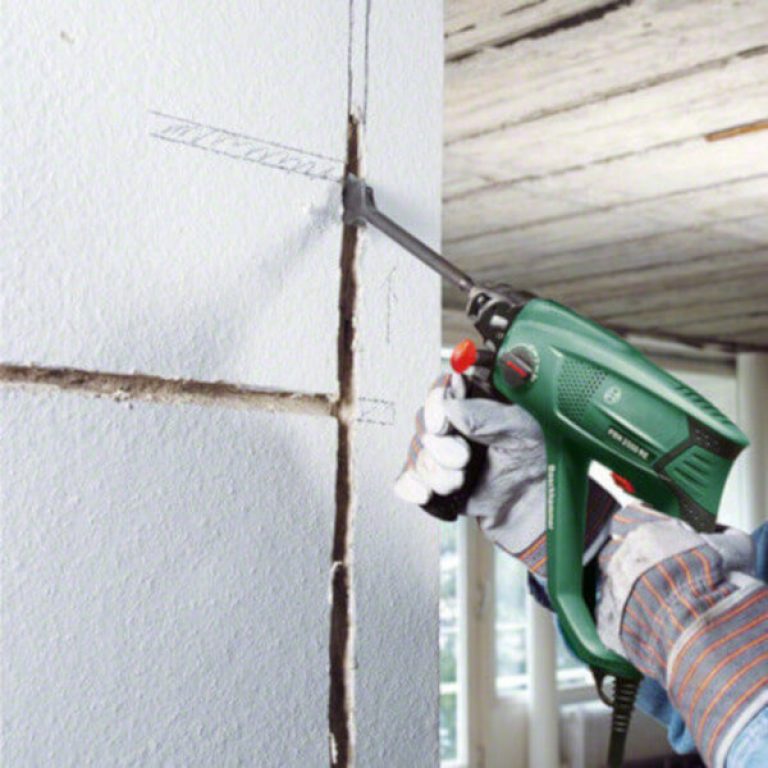
Termination instructions
First of all, after the completion of the installation work on the chasing, it is necessary to prime the technological channels for the reliability of the further coupling of the mixture and the inner walls of the strobes. The soil creates a thin film on the walls in the channel and this greatly facilitates the work in the future. If the primer for interior work is concentrated, then it must be diluted in the proportion recommended by the manufacturer with water and applied liberally to the inner walls of the punched channel with a brush.
After the completion of the primer, you can not pause, as before puttying, but immediately proceed to seal the strobe channel with gypsum plaster. First, the cable is fixed, for which ordinary building gypsum is used, which is kneaded in a minimal amount, since you can only work with it normally for a few minutes. In this process, you should try to fasten the cable as tightly as possible at intervals of no more than 1 meter, and in places of internal and external corners of the walls you should retreat from the corner 3-5 cm at both sides.
After that, a plaster piece comes into operation, which incorporates special polymeric fillers, which makes it possible to avoid cracks on the walls in the future and increases the period of work with the material up to 1-2 hours. The technological channel is completely filled with a thick mixture in a section of 1-2 meters, after which the excess plaster is removed with a metal spatula by moving along (!) The channel.
You can start painting a wall or ceiling with in-depth wiring immediately after setting the gypsum composition, as a rule, it is 12-24 hours.
Video
If you perceive the information better on the video, then we offer a short video, which presents the simplest technology for closing the strobe -
Questions and answers
How long after coating the strobes with a primer can they be plastered?
Immediately, since in this case the primer is needed not so much to reduce absorption and strengthen the strobe bed, but to dedust the channel. If you want to wait - wait, but you can not waste time.
At what distance from the floor (ceiling) is it better to conduct a strobe?
The question is off topic - this is for electricians. Okay, 10-20 cm and write this indent on a piece of paper, which must be saved. In this case, there is minimal risk that you will forget the wiring and damage the cable when trying to hang a picture or wall lamp.
Useful tips from the masters
If you need to connect two nearest points, then the strobe can have only one turn, because in this case the wire will bend, which will cause overheating. When there are more than 2 such points, overheating can provoke a dangerous situation. The strobe can be cut with a maximum width of 30 mm and a maximum depth of 25 mm. It will be necessary to retreat 400 mm from heating radiators, although experts recommend indenting 500 mm or more. From the highest and lowest points of the room, you should start chasing with a retreat of 10 mm.
In rooms, load-bearing walls should not be subjected to chasing under any circumstances. But outside the load-bearing wall can be ditched, even if the depth of the furrow is maximum, this will not adversely affect the structure. But to manipulate partitions, you need to obtain special permission. This rule must be strictly observed when gating is carried out in a panel house.
On the first floors, chasing should be carried out with extreme caution, since in addition to the roof, the walls hold the entire structure.


Choosing a tool for work
All masters are aware that a good tool is synonymous with quality work. Chasing walls for wiring is no exception. Therefore, determining the most suitable, convenient and effective tool is half the battle. The candidates are presented in a certain order: the most labor-intensive options come first, the last “monsters” are the easiest.
chisel with hammer
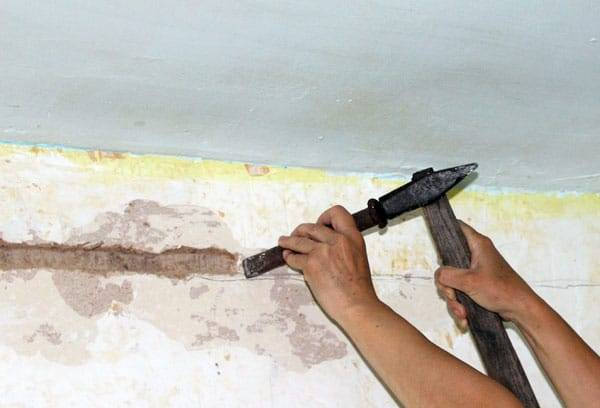
This old-fashioned way - there is no reception against scrap - has been known for a long time. The grooves are knocked out with a chisel, helping him with a hammer. The method has a plus - no costs and no need for power tools. But in this case, it is covered by huge shortcomings - a real unmotivated “killing” of time and an irrational loss of strength.
In the 21st century, does it make sense to use almost primitive tools? This question is more rhetorical. The second minus is the inability to make strobes in brick, so this better option for masters do not even consider, because there are applicants more worthy.
Chisel with drill
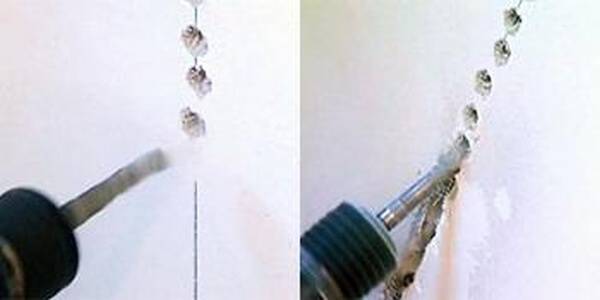
This method is considered more efficient. Such wall chasing for wiring includes two stages. First, holes are drilled every 10-15 mm - a dotted route of a planned, but permissible width. Then the craftsmen are armed with the "sculptor's tool": they cut off "everything unnecessary" - the remaining jumpers - with a chisel.
The end result is a groove. True, it turns out not quite even, but it can be called a real strobe. The disadvantage of this method is the same as that of the previous duet - wasting time, as well as low productivity. Plus - a good physical exercise.
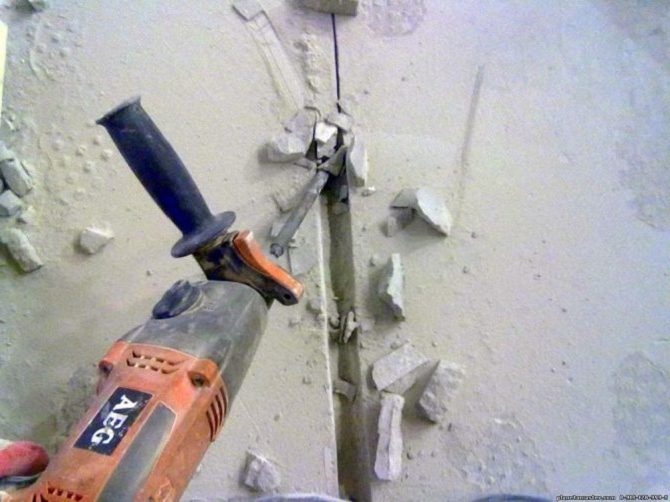
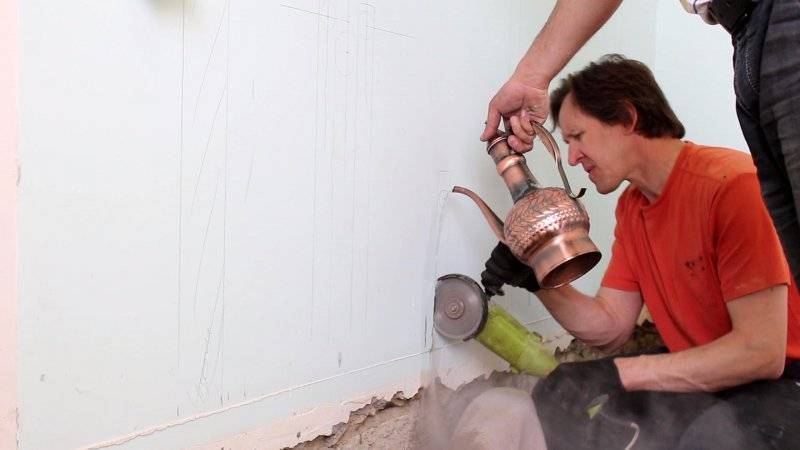
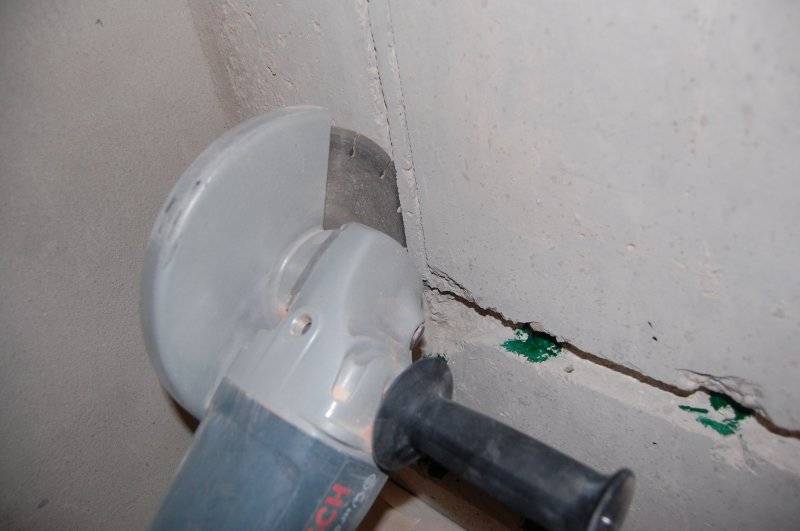
Bulgarian
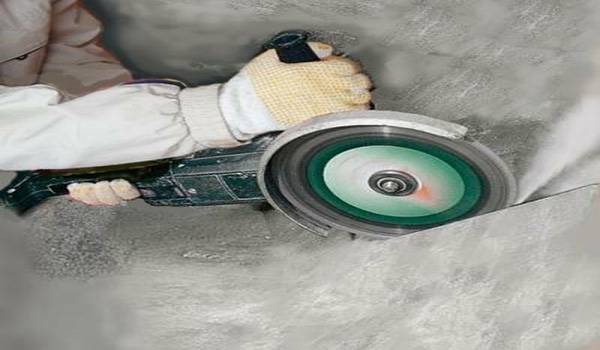
Without an angle grinder, it is generally difficult to imagine any major overhaul, so it can already be considered the “golden mean” in wall chasing.This process is simplified when a diamond disc is placed on the grinder. With such “armament”, the operation is quite fast, and the contours of the grooves are almost perfect.
However, even here it does not do without fly in the ointment. The dust in the room will stand in a column, for the strobes you have to make two passes - on both sides of the route. The disadvantages include the inability to make it in the corner, noise, different depth of the groove along the entire length, potential breakdown of the angle grinder.
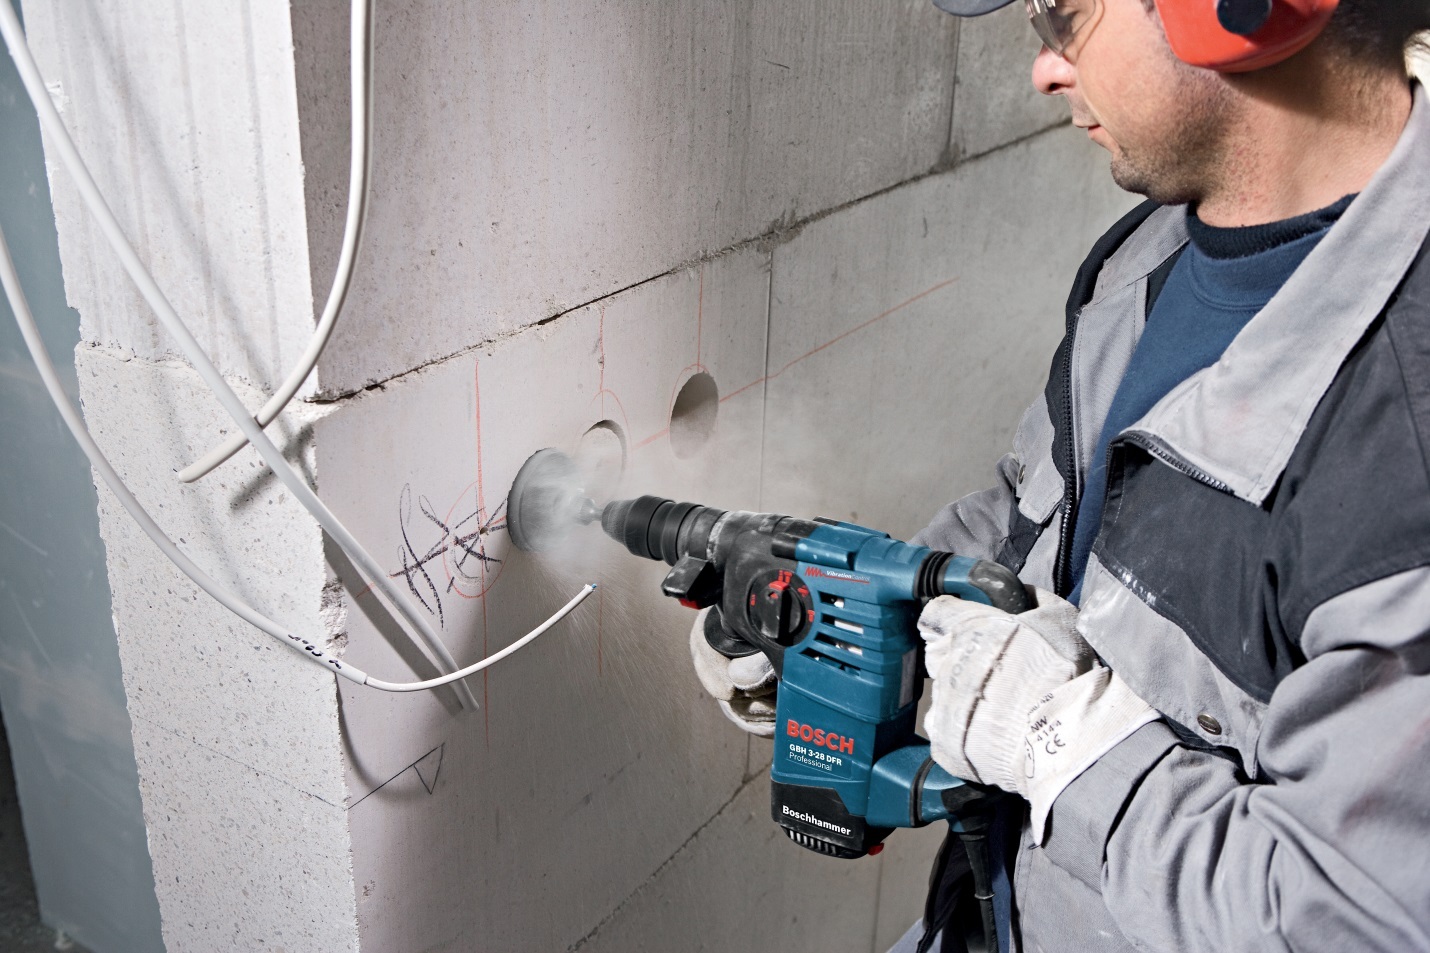
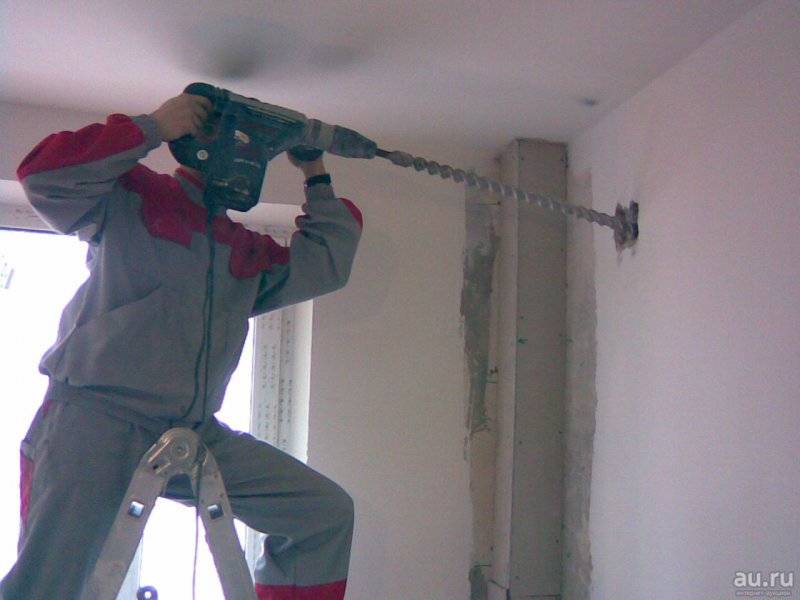
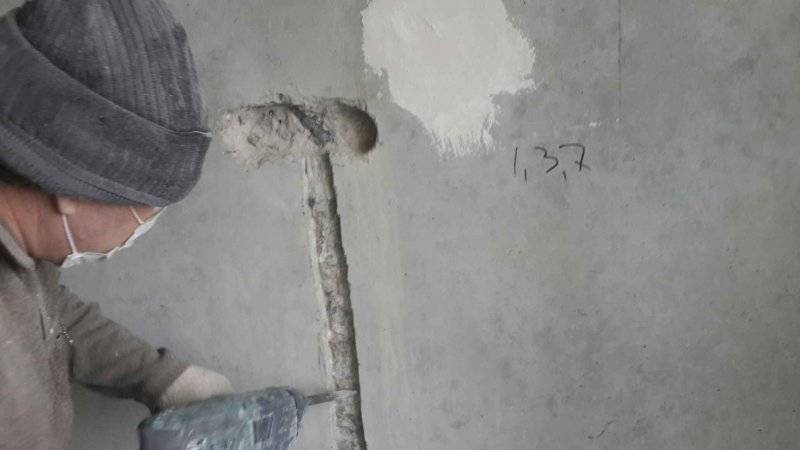
Perforator
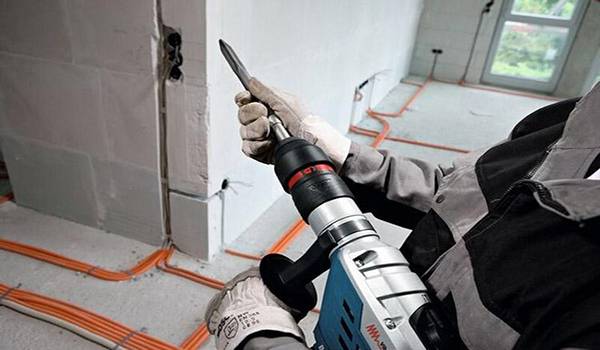
It cannot be called a generalist, but this tool brilliantly copes with its main profession - drilling holes. For chasing walls for wiring, suitable nozzles are used - a special strobe, a drill and a spatula. They pass along the marked lines by turning on the shock mode. A puncher is most often used for this purpose.
He also has a weak point. This is the curvature of the grooves. If you first use the tool as an impact drill - drill a series of holes, and then knock out the partitions with a spatula, then the strobes will look better. Such work on concrete is more convenient and faster.
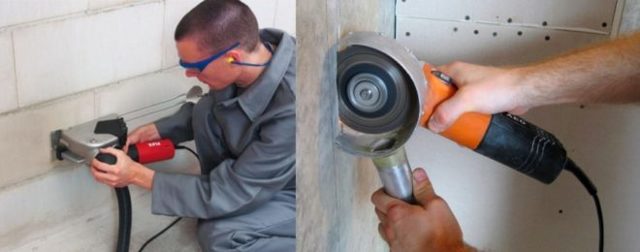
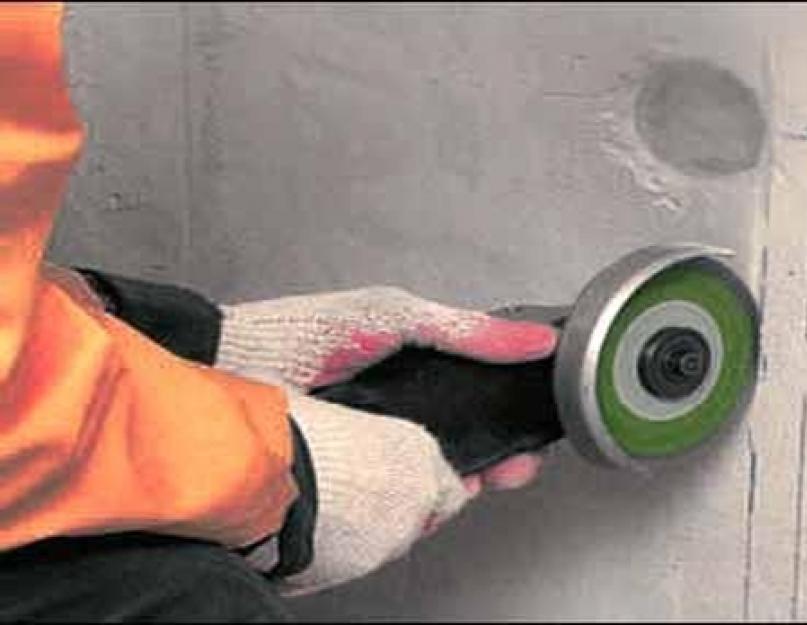
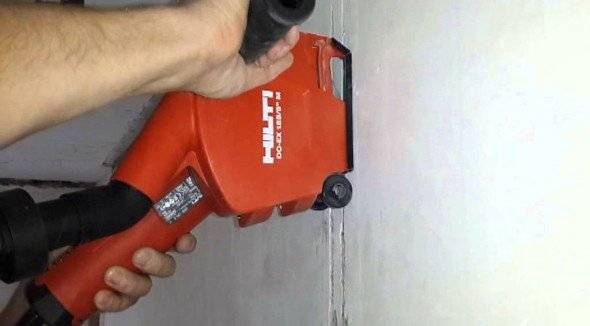
wall chaser
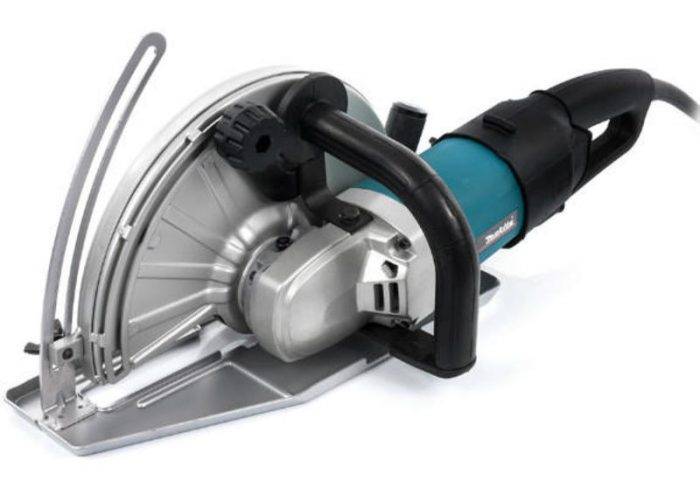
Everyone understands that this tool is a specialist when it comes to gating. The grooves are perfectly smooth, the work goes “without noise and dust”, since the wall chaser works relatively quietly, besides, it is connected to a construction vacuum cleaner, so all debris is absorbed quickly. It's fast, efficient, safe. A perforator is used to remove material between the grooves.
Even ideals have flaws.The wall chaser has only one - an almost exorbitant price, so it makes no sense to purchase such a tool for a one-time operation. However, you can rent a wall chaser, it will be inexpensive. The second way is the operation “do-it-yourself wall chaser from a grinder”.
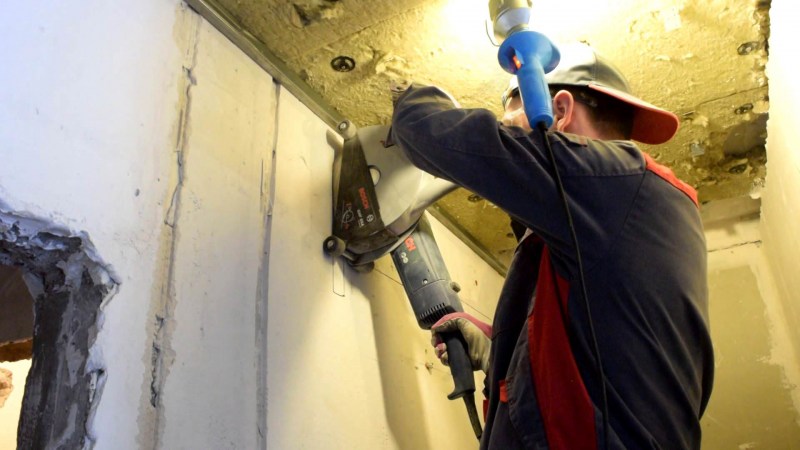
Bulgarian with a perforator
This duet cannot compete with a professional wall chaser, however, during a major overhaul, it is he who becomes the favorite when it comes to wall chasing - concrete or brick structures. First, the boundaries of the grooves are cut with a grinder, then the middle is knocked out with a puncher. This method is fast, efficient, and therefore popular.


Choosing a tool for chasing walls
The oldest approach is the one where the hammer and chisel are used.
This option, however, has one important advantage, which is no cost. You can ditch the wall without power tools, because such devices can be found in every home
But in the end, you will pay with a loss of strength, as well as the formation of a large amount of garbage.
Chasing concrete walls for wiring can be done with a chisel and a drill. Although this approach is more effective, it cannot be called the most convenient. Through each meter you will have to drill holes, and then connect them into a single line with a chisel. Initially, you will need to carry out the markup on which you will act. The time and effort costs here will be much less, but it will take a lot of time to work, and there will be much more dust than if you used, for example, a grinder.
What is suitable from the arsenal of a home master
More recently, an angle grinder was a rarity for an amateur master.Today, an angle grinder can be found in almost every home. If you have it available, then it is perfect for wall chasing. The equipment will need to be supplemented with a diamond blade, and this will be all the costs, except, of course, time and power. The process will go faster, and the contours of the groove will be even.
A strobe disc, although it will allow you to work efficiently, will only allow you to make a groove with it in two passes. This lengthens the markup process. Another disadvantage is that you will not be able to work in the corner with the help of a grinder, and the whole process will be accompanied by a high level of noise, which means that you will have to work quickly, excluding weekends. It is these disadvantages that quite often force craftsmen to abandon the use of this power tool. It is rarely used for cutting.
In order to lay one small wire into a new wall, you can use a puncher. You will have to purchase or use the available suitable nozzle. The tool will need to be used in shock mode. They need to walk along the marked lines. The disadvantage of this approach is the strobe curve, but at home, a puncher is used quite often.
When repairing premises, home craftsmen often also use a wall chaser. This option is the most efficient and allows you to cut through the wall evenly without generating dust. Not much noise will be generated, and a vacuum cleaner can be additionally connected to the tool, which means that the room will not be so dusty after the process is completed. In general, this wiring tool is the most efficient and safe.
A simple power tool to help manual labor
If you want to achieve a good result, saving time, it is better to use an electric drill. But if you work with a concrete surface, this tool will manifest itself as burning drills, so you need to familiarize yourself with some of the nuances before starting the process.
First, you need to make markings on the surface, and then use a tool with an 8 mm drill. Several holes of a certain depth are made along the line, a step of up to 1 cm must be observed between them. The drill must be located perpendicular to the surface, otherwise it may bend and break. If the groove is to be large enough in width, the holes should be staggered. If it is necessary to carry out the same work in masonry, you need to use the tool at low speeds. Stop periodically to allow the drill to cool in the water.
It is important to exclude the penetration of liquid into the structure. Using a hammer and chisel, the next step is to knock out the gaps
Professional equipment for quick installation
The first thing that comes to mind is a shredder. It is he who allows you to do the task with a minimum of effort and time. If desired, two discs can be placed on the tool at once, thanks to which the strobe will turn out to be perfectly even, and the second approach will not be needed.
Circles are closed with a casing, where there is a branch for a vacuum cleaner. It is good if the design provides for the ability to change the distance between the disks and provide the required depth of the future groove. This method has one main disadvantage, which is the cost of the equipment.If you do not have it, then it will not be advisable to purchase for a single repair. An alternative solution would be to rent a device.
What tool do you need
 One of the key points is choosing the right tool in order to ditch the walls as conveniently as possible.

Hammer and chisel
- cheap;
- available;
- very uncomfortable;
- tedious duration of the operation.
 Option for
 perverts the most enduring and patient. Everything would be fine, but in the end the strobe turns out to be far from even. However, if there is nothing more suitable at hand, then you can push your aesthetic criteria to hell and choose this method. Especially if you are not dealing with a concrete base, but with a brick wall. 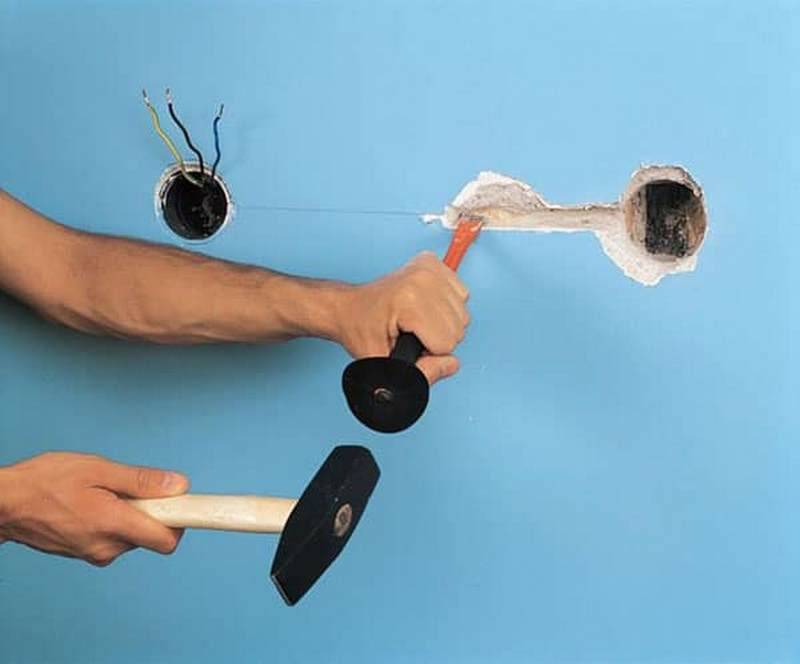


Perforator
- fast;
- purely;
- noisy;
- comfortable.
 As if in contrast to a hammer and a chisel, a puncher will quickly allow you to gouge the walls, but the quality of the resulting goblet is unlikely to satisfy you: if you want to see an even and beautiful result, then consider other tools.
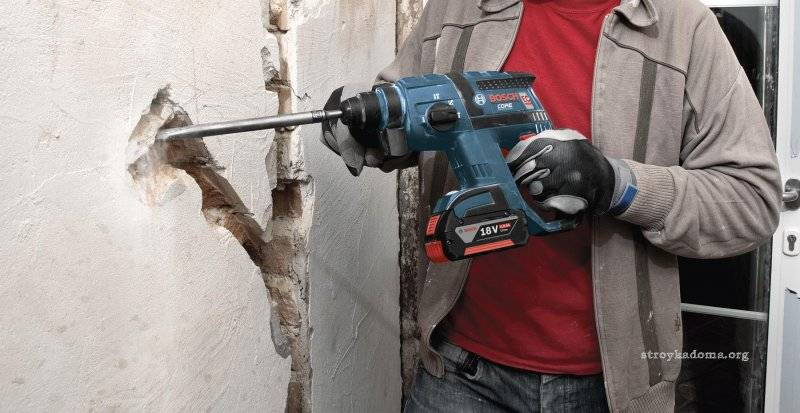
Bulgarian
- fast;
- dusty;
- comfortable;
- smooth.
 At the output, we get an ideal strobe for wiring, which you can admire for a long time. As well as mountains of dust and debris, which are then hardly removed even by the most powerful vacuum cleaner. Perhaps the dirt that remains is the only disadvantage of this method.
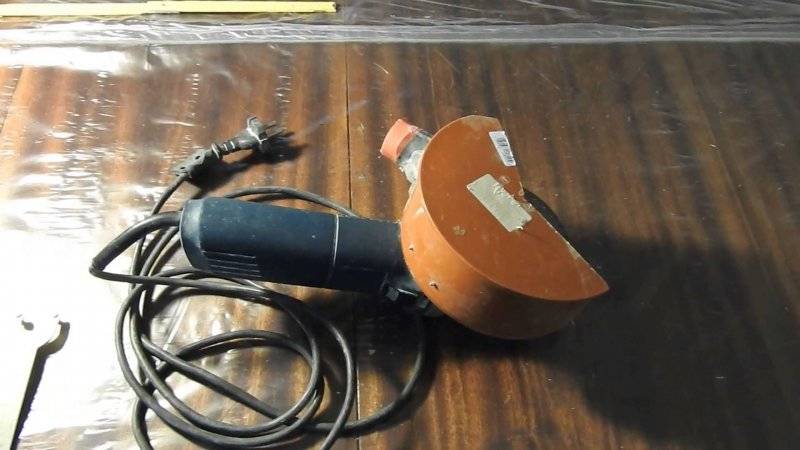
wall chaser
- perfect evenness;
- fast and convenient;
- high price for the tool.
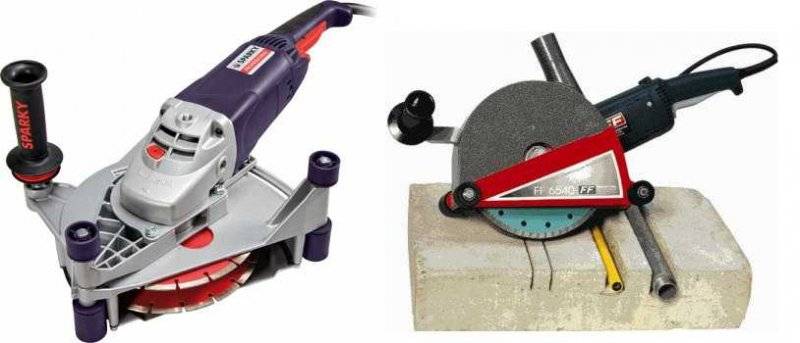 Yes, it is best to hammer nails with a hammer, screw screws with a puncher, and with a wall chaser, respectively, make beautiful and even strobes with a clearly measured hole depth and a given width. That's just the price of this useful tool scares many.
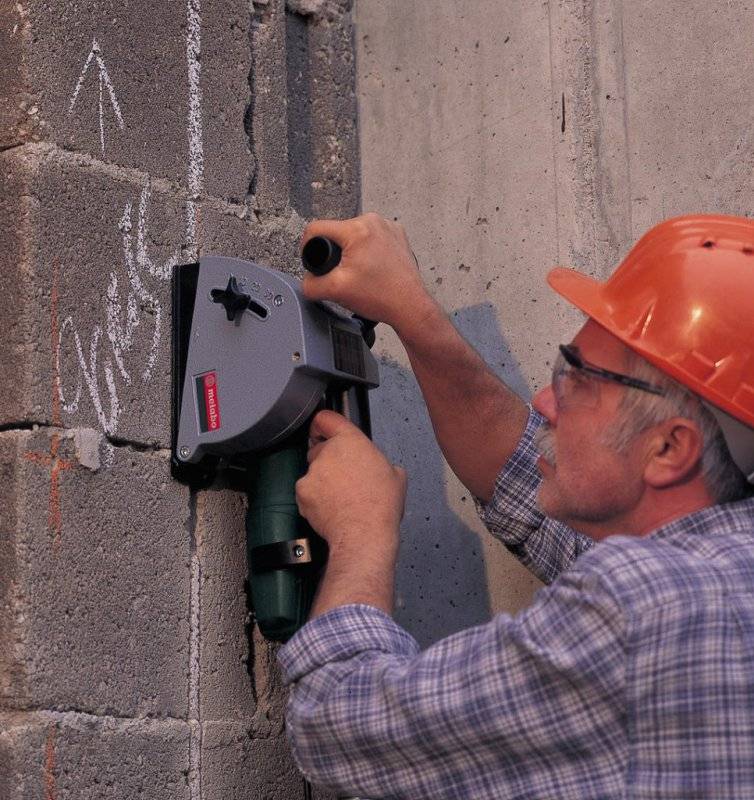
The main methods, their pros and cons
Wall chaser - a tool designed specifically for wall chasing
The method of wall chasing directly depends on the tool that will be used in the work. Let us consider in more detail what devices can be used to make furrows in the thickness of the walls:
- The puncher is used for chasing walls quite often. It allows you to do the job quickly, but the furrows when using such a tool are uneven. The perforator also beats off excess parts of concrete or brick, so you will have to spend more mortar and time to seal the strobe. In addition, the tool is noisy and needs to be connected to the power supply. However, when using such a device, relatively little dust is generated, and the process itself does not take much time.
- You can also make furrows in the walls with the help of a grinder. It is good because it allows you to cut even grooves exactly in those places that were previously marked on the surface. Between these edge lines, it will be necessary to make a groove for the wires, which means that other tools will have to be used along with the grinder, for example, a chisel or the same puncher. The minus of the grinder is also that diamond saws are needed for gating, which cost a lot of money. But the final result will be quite accurate.
- A wall chaser is a device designed specifically for making strobes in walls. The tool is equipped with two saws, which, during use, make two even parallel grooves in the wall. The wall chaser works quickly and accurately, but it is quite expensive. However, if you need such a device for a short time, you can rent it and save money.
- Chisel with a hammer - tools for laying strobes manually. There are many downsides to this method. Firstly, working with a chisel and hammer is long, difficult and physically difficult. Secondly, the quality of the result does not always live up to expectations, since it is not easy to make an even strobe manually. Among the advantages of this method are the availability and low cost. It is advisable to use manual chasing with a hammer and a chisel when you need to make a small furrow in the wall.
- In some cases, wall chasing is carried out using an impact drill. This method is not very simple and labor-intensive, therefore it is rarely used. To make a groove with an impact drill, holes are first drilled in the wall, equidistant from each other, after which they work with a drill like a hammer, knocking out a strobe in the concrete along the intended recesses.
Is it possible to shred walls in a panel house
If the grooved channel did not expose the reinforcement of the reinforced concrete slab, then there is no need to worry. So that the interior of the room does not disfigure wall communications, they are made hidden. To do this, in the enclosing structures, wall chasing is done for wiring and pipes. Is it possible to ditch the wall in a panel house for wiring? Of course, this is possible, but under certain conditions.
The arrangement of channels in the body of partitions in a monolithic house does not cause problems. This also applies to panel houses. A partition is a structure that bears the load only from its own weight and does not affect the bearing capacity of the entire structure.
Another thing is the gating of load-bearing walls.A significant violation of the integrity of concrete walls will lead to the loss of their bearing capacity, and this, in turn, can cause irreparable consequences.
On the Internet, on this topic, you can find many articles that assert in a categorical tone about the impossibility of chasing walls in a panel house. You should try to refute such statements.
To understand the essence of the problem, you need to know the design features of reinforced concrete walls. The main bearing load is taken by a metal reinforcing cage, “permeated” with a mass of concrete. The top surface layer of concrete plays a protective role. Therefore, if the chasing of the walls for wiring does not expose the reinforcement, then monolithic fences will not suffer from this.
The protective layer of concrete, as a rule, is from 30 to 50 mm. For a two-core wire, a channel depth of 10 - 15 mm will be enough. For laying several cores, a strobe should be punched in the load-bearing wall with a depth of 20 - 25 mm. The wider the channel, the more wires can be laid.
SNiP for wall chasing - Rezalmaz
Chasing is a type of construction work that is performed when it is necessary to install electrical wiring and other communications. It involves making special recesses (strobes) in the walls with the help of special equipment. Gating is a complex labor-intensive process that requires the involvement of highly qualified specialists. Poor performance of these works can lead to deformation of the supporting structures, damage to communications and the creation of an emergency, up to the collapse of the house.
SNiP for wall chasing for electrical wiring
Chasing walls according to SNiP requires some preparatory work.Before proceeding with the laying of recesses, it is necessary to familiarize yourself with the layout of existing communications and check their location using special equipment. This is necessary in order to prevent damage to pipes, cables and wires, as well as to exclude the possibility of injury to workers.
SNiP for chasing load-bearing walls
Chasing load-bearing walls according to SNiP requires compliance with the following rules:
- recesses (strobes) must be laid either vertically or horizontally, diagonal chasing is strictly prohibited;
- horizontal recesses can be made no closer than 150 mm from the ceiling;
- vertical recesses - no closer than 100 mm from windows, doors and corners;
- if the gate is planned to be placed parallel to the gas pipeline, the distance between them should be at least 400 mm;
- the dimensions of the gate should not exceed the following restrictions: length - 3000 mm; width and depth - 250 mm;
- on walls with a thickness of more than 800 mm, recesses must be laid along the shortest path;
- on walls less than 800 mm thick - parallel to the construction lines.
These are far from all the SNiP standards for wall chasing, there are other rules that must be observed when performing this work.
The RezAlmaz company will perform wall chasing for electrical wiring according to SNiP and provide you with complete safety. Our specialists have extensive experience and high qualifications. We use modern reliable equipment, so you can be sure of the high quality of the services provided.


Additional Information
| Name of works | Brick (cost of 1 linear meter) in rubles | Concrete (cost of 1 linear meter) in rubles |
|---|---|---|
| Strobe 2x2 cm.wall chaserwith vacuum cleaner on the wall | 200 | 300 |
| Shtroba 2x2 cm. Shtroborezom with vacuum cleaner on the ceiling | 400 | |
| Socket socket | 200 | 300 |
| Shtrobe under the air conditioner | 1000 | 1500 |
Conclusions and useful video on the topic
For a better idea of wall chasing, we offer you to look at the work of craftsmen with various tools and learn practical tips about the many nuances that may arise during the wiring process.
If you are in doubt which tool to choose for chasing, we suggest studying a master class with a comparison of the work of a puncher, grinder and chasing cutter:
Despite the noise, the hammer drill remains one of the most popular construction tools for making strobes. Learn more about the principles of working with this tool in the following video:
Bulgarian is an excellent device for creating smooth channels. And to minimize the amount of dust, installing a protective cover with a dust outlet will help:
How to make a manual wall chaser for working with gas and foam blocks:
If the examples provided did not inspire you to gouge the walls yourself, you can always call a master with professional equipment to make a network of channels and run wires through them.
Do you have experience with wall chasing? Share with our readers practical skills and tips. Please leave comments and ask your questions. The block for feedback is located below.


