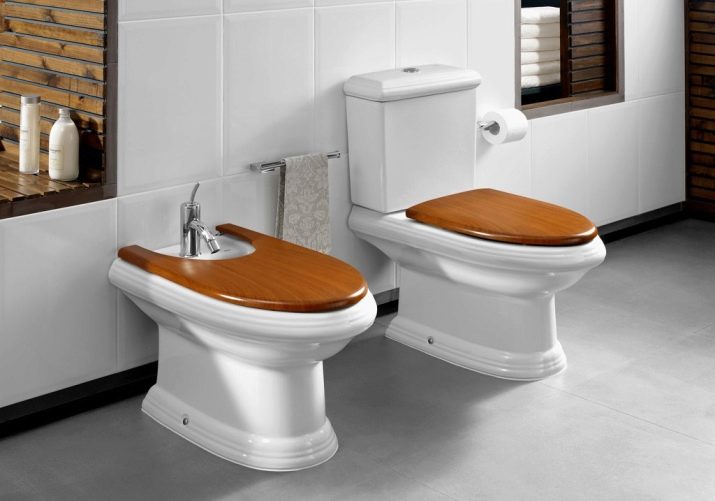
- Toilet material
- How to choose?
- Helpful Tips
- Varieties
- Types of releases and their features
- Preparing for installation
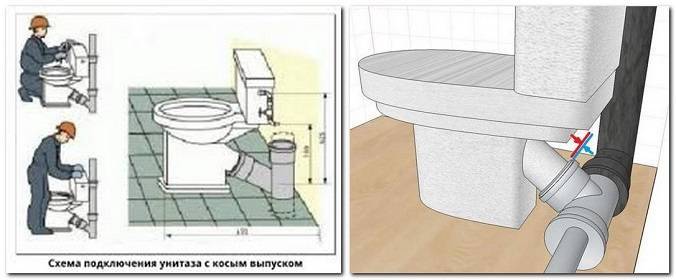
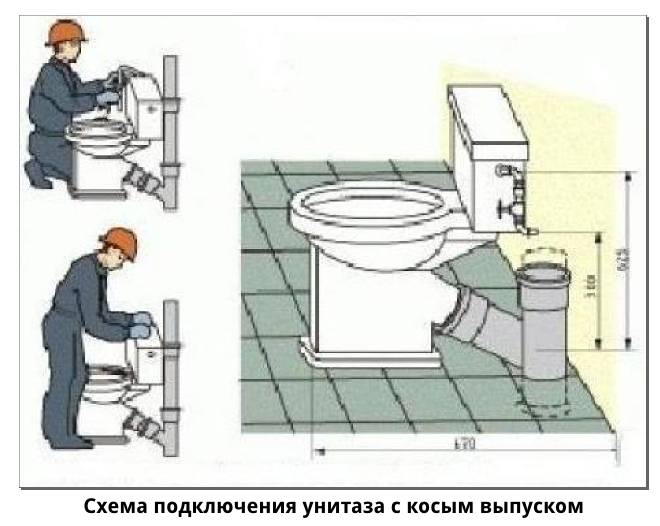
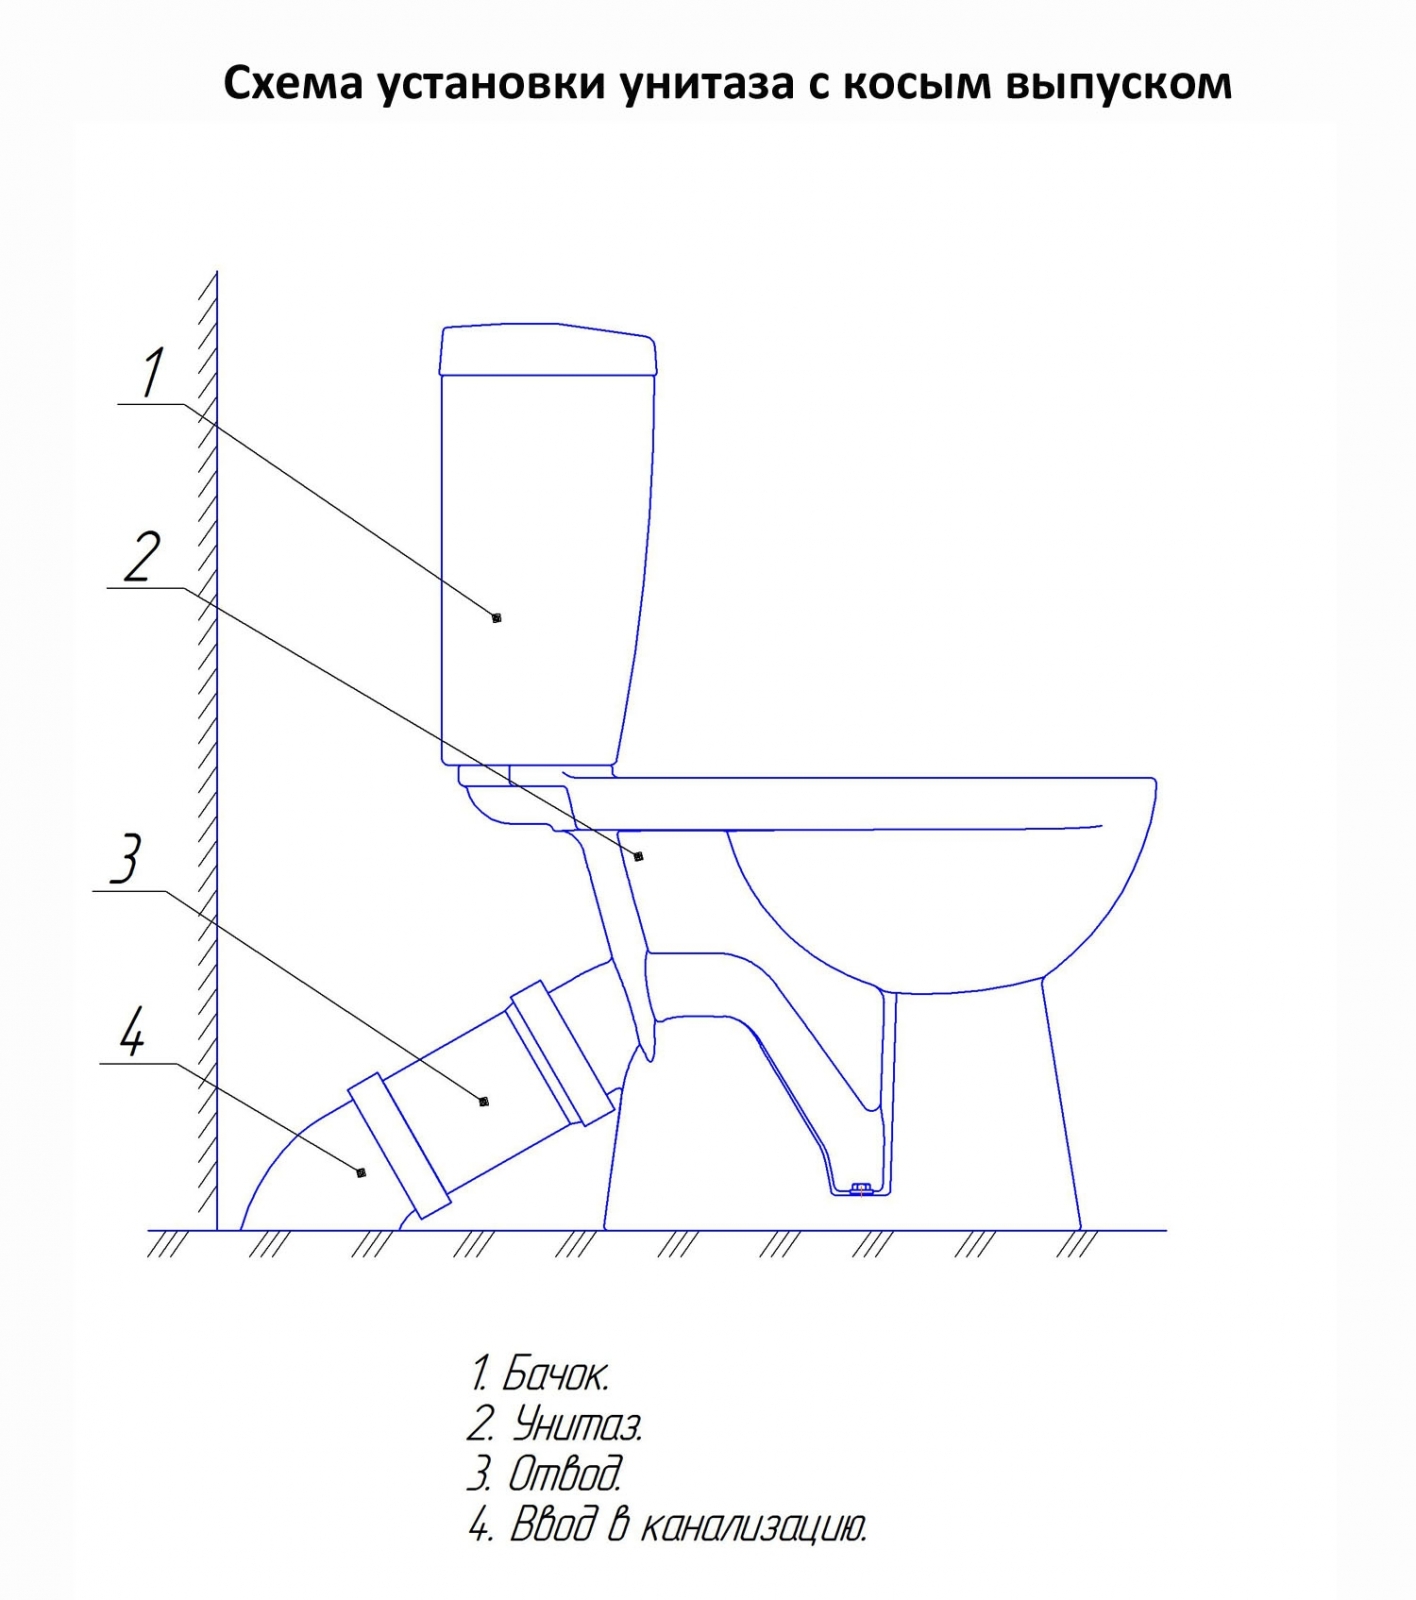
- Installation of a toilet bowl with an oblique outlet
- Installation of a toilet bowl with a vertical outlet
- Installation of a toilet with a horizontal outlet
- Installation of a toilet bowl to the sewerage system with corrugation
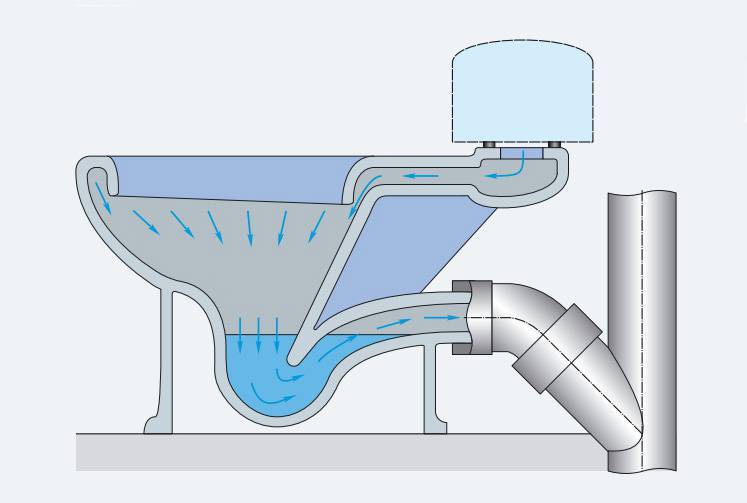
- What is horizontal release
- Right choice
- Toilet bowl material
- bowl shape
- Design
- Plum variety
- Drain mechanism
- Installing a floor standing toilet
- Installation on a tile
- Epoxy resin mounting
- Mounting on taffeta
- What you need to know about installation work
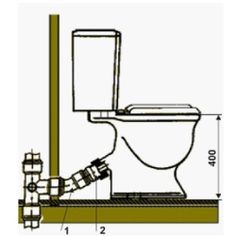
- The toilet is as close to the wall as possible.
- Types of connecting elements
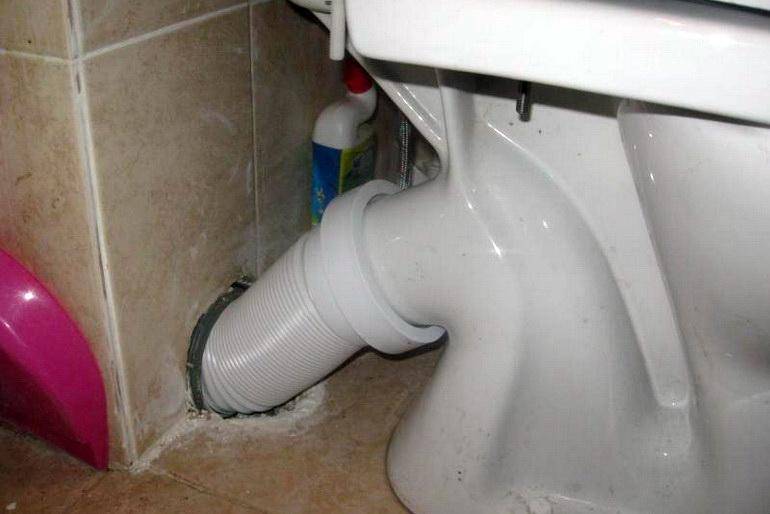
- Corrugated connection
- Connecting the toilet to the sewer with a release to the floor
Toilet material
An important role in the choice of plumbing is played by the material from which it is made. Now, basically, the following toilets are produced:
- Faience.
- Porcelain.
- From an artificial stone.
Faience models are quite cheap, resistant to household chemicals. One drawback can be noted: the porous structure of the material contributes to rapid contamination.
Porcelain toilet bowls are more expensive, but more hygienic, as they attract dirt to a lesser extent.
Recently, they began to produce models from polymer concrete, in addition to a beautiful texture - there are solid minuses here.The material is not highly resistant to acids, alkalis and abrasive materials, so the process of cleaning such a toilet bowl is difficult.
How to choose?
Of course, the choice of a toilet bowl is a personal matter, depending on the taste and preferences of the owners themselves. Some like compact models, others - with a tank hanging on the wall, and still others - corner options. As for manufacturers, some buyers have a craving for German plumbing, others for Czech, and still others have nothing against domestic toilets, as long as they work well.
But still, it can be recommended to adhere to some criteria in the process of choosing toilet bowls, so as not to be mistaken.
If you choose high-quality and expensive plumbing, first of all pay attention to the models of European and American manufacturers. There are very interesting specimens made of stone and even glass (of course, not transparent).
Consult with professional plumbers about choosing the best toilet model.
Before buying, measure the diameter of the sewer pipe to which you will need to connect the toilet.
Decide for yourself what external shape and color the new plumbing fixture should be.
If you want to purchase a siphon type of toilet bowl, then you should know that we still have few such toilet bowls for sale.
Repairs can cost a lot of money, and there is a risk of not finding some parts at all.
Try sitting on your chosen bowl to find out the comfort.
Pay attention to the cleanliness and noise of the flush.
The following video will help you with choosing a toilet bowl.
Helpful Tips
Before installing and before purchasing a toilet, you should familiarize yourself with the recommendations of experienced plumbers.
By following some rules, many problems can be avoided.
The first thing experts advise to pay attention to is the type of drain
This is especially important if the sewer supply will not change.
With the help of adapters, it is especially difficult to make a high-quality connection of a toilet bowl with an inappropriate type of sewer outlet.
Do not postpone the purchase of plumbing at the last moment, as well as purchase it after repair. It is better if the place in the toilet room is prepared for a specific toilet model in advance.
This will simplify the installation of plumbing.
- You should refuse to save on bolts and anchors. It is better to choose nickel-plated fasteners. They don't rust. This will save the product in the future from ugly streaks, as well as sticking of bolts.
- An eccentric cuff, which is called a corrugation, will help compensate for the difference in floor height before and after repair. To supply water to the tank, it is better to use a flexible hose.
- In the case when the sewer pipe leaves through the floor, it is worth using a rectangular elbow or a flexible corrugated cuff.
Plumbers recommend using small wedges made of wood or plastic. However, with them it is also necessary to use a sealant to evenly distribute the weight of the toilet bowl. When installing a toilet bowl on old cast iron, it is better to use a sealant.
If the water supply is old, it should definitely be replaced. When choosing an eyeliner, you need to know the distance from the junctions on the pipe with water to the attachment to the toilet bowl. Then you need to replace the old flexible water supply. And 15 - 20 cm should also be added to it. Adapters for threads at the joints or FUM tape should be purchased in advance.
To do this, make marks in the right places. A self-tapping screw is attached to them and hit with a hammer several times. After that, you can drill a tile with a puncher or drill, but only without shock mode.
If the sewer riser is made of cast iron, it must be cleaned to metal, then thoroughly washed and dried. After that, a sealant is applied to a dry and clean metal surface. And you need to put it down a little more. After that, it must be connected to the corrugation.
You can also apply sealant to the outer part of the joint.
- In order to easily and without damage remove the corrugation connecting the toilet bowl and the sewer, its exit and the outlet of the toilet bowl are lubricated with wet soap. And only after this procedure is put on a sewer socket.
- Before you make marks with a marker through the holes in the sole of the bowl, you need to sit on it and check how comfortable it is. If necessary, you need to immediately correct the position.
- Do not use plastic dowels that come with toilet bowls. They break quickly, so it is better to give preference to other fasteners.
An additional insert in an old cast-iron sewer pipe can be removed with a perforator or burned out. Under no circumstances should a hammer be used. It is possible to burn out if the cavity was filled with sulfur or clogged with a cable. Before burning it is necessary to take care of sufficient ventilation of the room, remove all flammable means and materials.
When installing a toilet bowl on glue, you can make it yourself. To do this, take 100 parts of epoxy resin ED-6. Then it should be heated to 50 degrees and add 20 parts of a plasticizer or solvent, mix well.Pour 35 parts of the hardener into the resulting solution and mix again. It remains to add 200 parts of cement there and mix until a plastic homogeneous mixture is obtained.
How to install a toilet, see the following video.
Varieties
Toilets with horizontal outlet are produced in a wide variety of modifications. Let's name the main models at the place of installation.
- Floor. Ordinary (everyone knows them) toilet bowls both today and in the last century. Attached to the floor. Basically, compact toilets are now being installed.
- Suspended. These models are hung on the wall, have a high release and are divided into frame and block systems according to the method of fastening. All communications (and in some cases a tank) are hidden behind a false panel or in a wall niche. It is convenient to clean under such toilet bowls, as they hang over the floor.
- Attached (wall). They are popular lately. They are tightly mounted to the wall, while all communications, just like with suspended models, are hidden, and only the bowl remains outside. The difference from the suspended ones is that the bowl is not suspended, but is installed on the floor, like the floor-standing versions of the toilet bowls.
According to the design of drain tanks, toilet bowls are divided into several varieties.
- With a high drain. The tank is mounted on the wall and has a drain pipe. The model itself is archaic, found in old houses, however, such models, but slightly improved, can be found on sale. Sometimes they are also used in modern houses, where the decoration is designed in the so-called historical style. Pretty noisy build.
- With a low drain. A standard flush system in which a plastic or ceramic cistern is mounted low above the toilet and has a short flush pipe.
- Hidden bins. They are built into the wall and closed with an easily dismantled finish. Only the flush lever remains outside.
- Compact bathroom. The bowl is attached to the bowl. The most common type of toilet today.
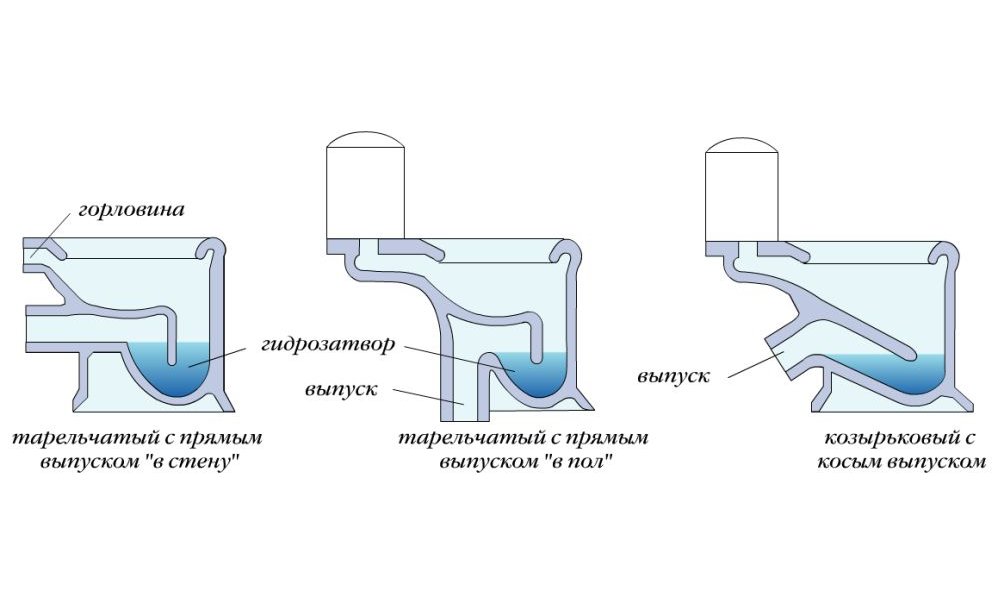
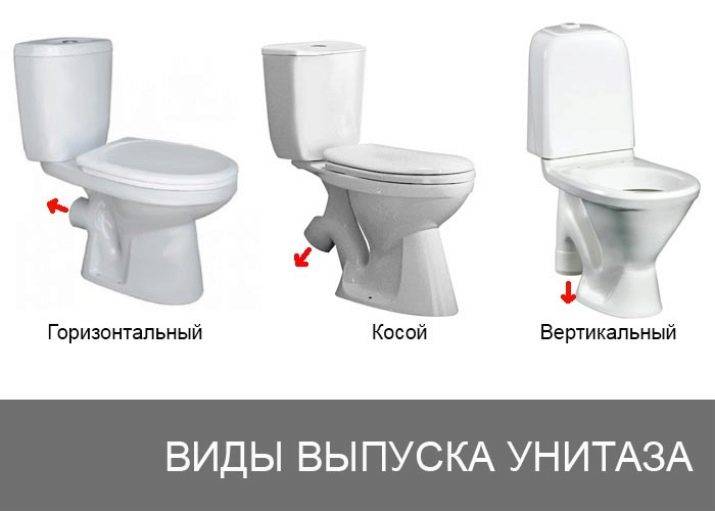
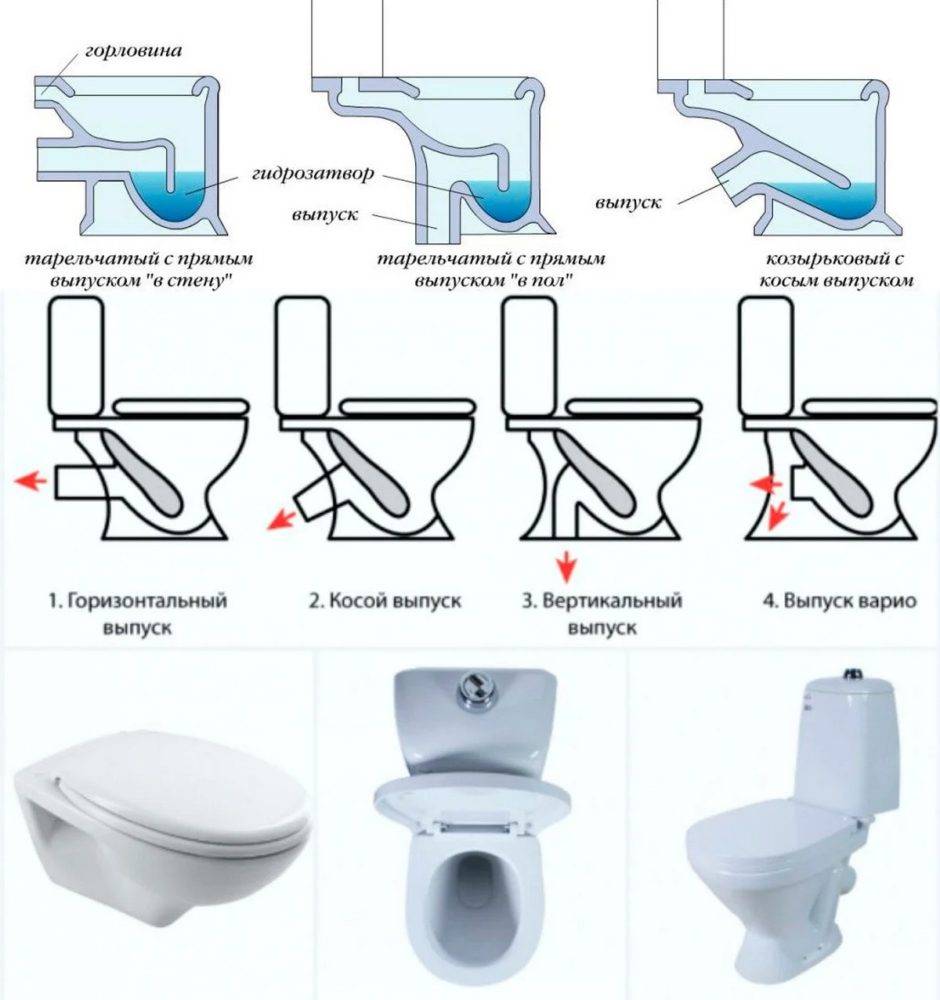
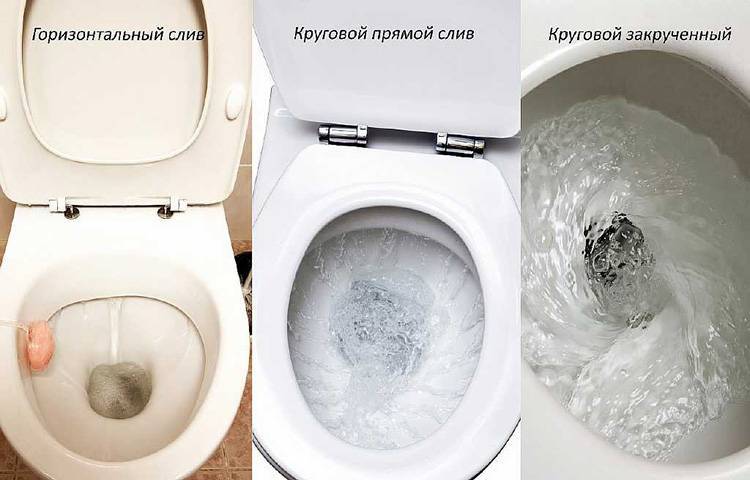
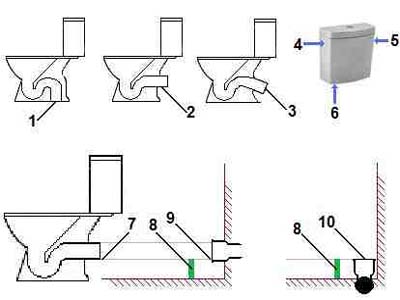
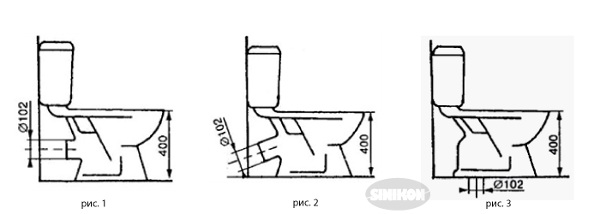
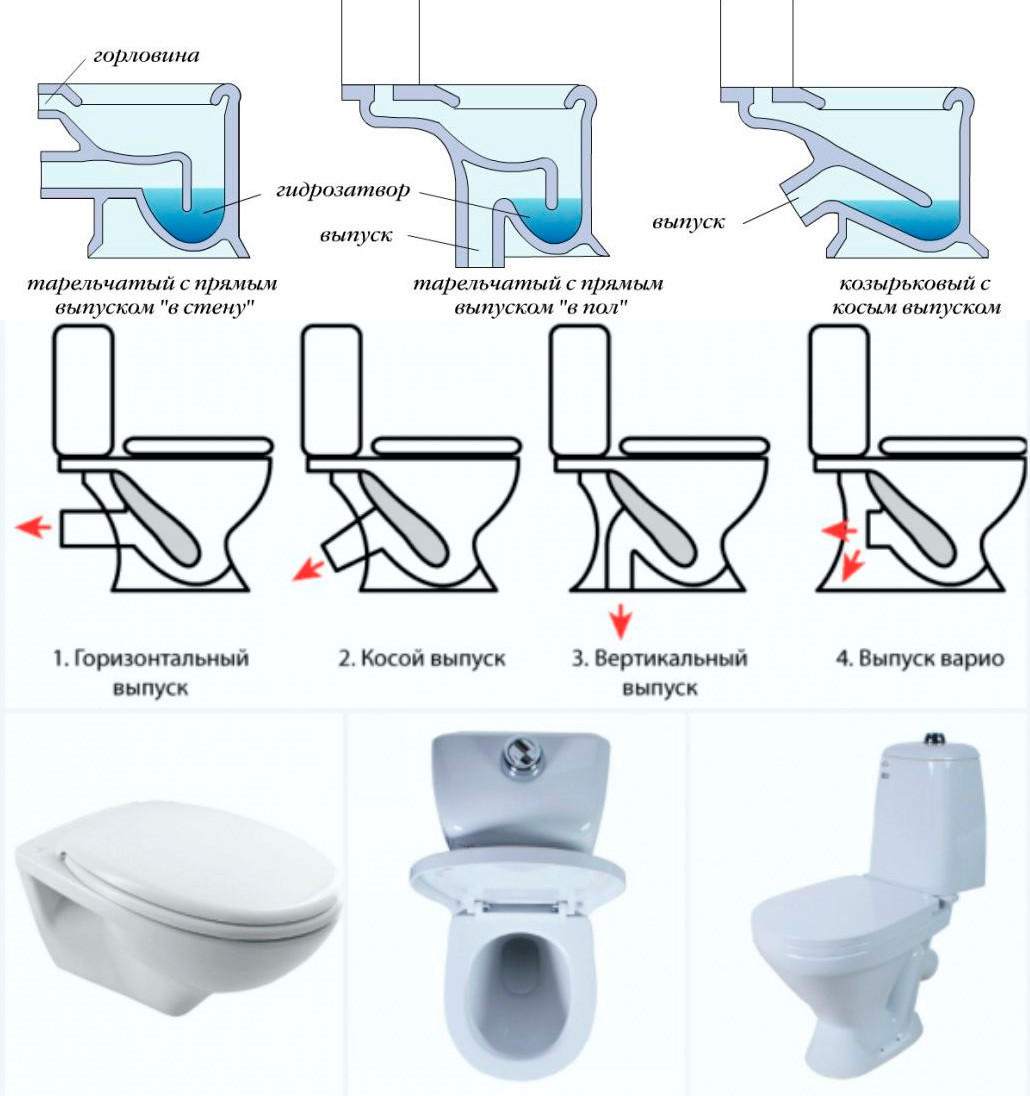
Types of releases and their features
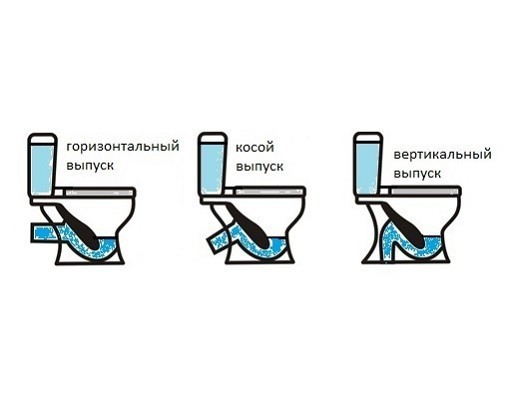
Initially, it is important to know which editions are available, as well as how exactly they differ. These include:
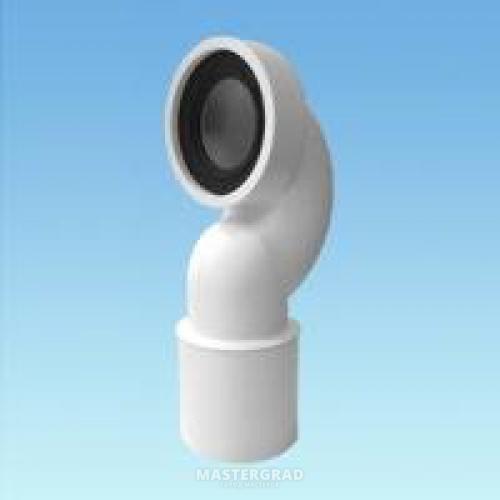
Vertical or direct outlet - usually rarely used in Russian conditions, since for its proper installation it is necessary that the elements of the sewer system pass through the floor slabs, and such a device is most often found in Western countries. In Russia, the technology of laying a pipeline system in the walls of a room is usually used.
However, today many developers are beginning to realize that laying sewers in floors has many advantages, so it is important to first make sure exactly where the pipes are in order to find the right toilet. Installing a direct outlet toilet is said to be the easiest job to do, while providing a truly efficient and effective flush.
The horizontal drain is designed for such a sewage system, the elements of which pass through the wall, and at the same time the outlet itself is parallel to the floor of the room
Such a device of this plumbing fixture is considered the most popular for Russian conditions, and at the same time, all work on do-it-yourself connection.
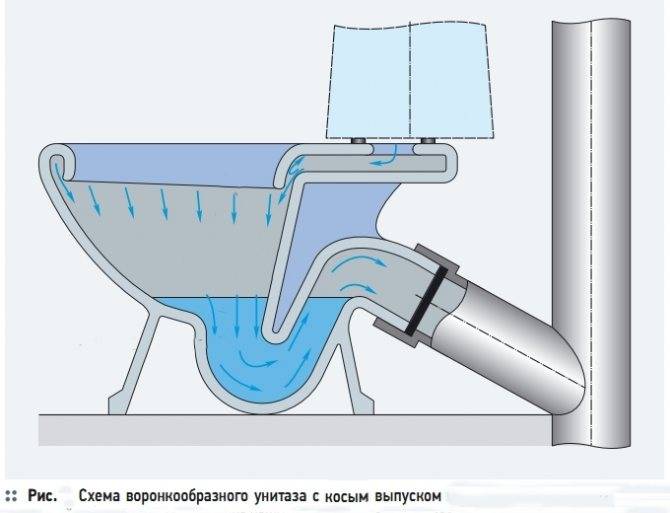
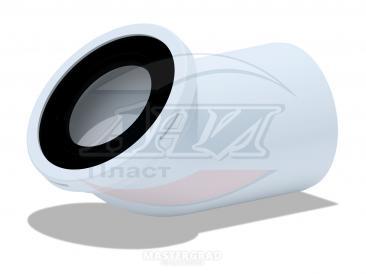
An oblique or side drain is considered quite specific, since the outlet is mounted in such a way that it is located at an angle of 45 degrees to the floor.This design is used when the sewer pipes are located in the walls of the room, and at the same time it is impossible to use the usual horizontal drain due to the different levels of outlet and pipes. The installation of such an element can only be performed in certain rooms, however, if there is an urgent need to install it, then in this case it may be necessary to reconstruct the entire drain system.


Preparing for installation
If you plan to change the old toilet to a new one, then you need to carefully dismantle the old product. When the fasteners are removed, you need to tilt the toilet back. This is necessary in order to drain the remaining water. This applies to the replacement of an old plumbing product with a new one.
If this is a new building, there were no previously installed plumbing products, then it’s enough to put things in order, buy a toilet bowl, prepare all the necessary tools and start installation work.
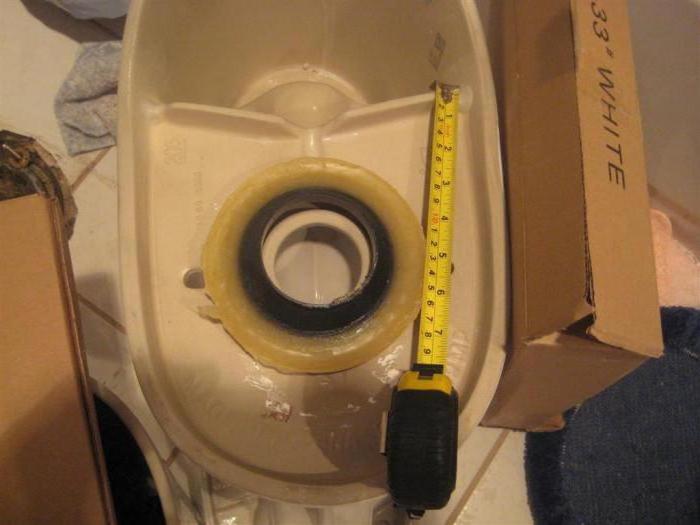
Installation of a toilet bowl with an oblique outlet
A toilet with an oblique outlet is connected to the sewer as follows:
- First you need to lubricate the outlet of the toilet bowl with red lead mixed with drying oil.
- Next, a resin strand is wound on top, but you need to leave its tip free.
- Then the wrapped strand should be smeared with red lead.
- Next, you can install the toilet, fixing the outlet in the opening of the sewer pipeline
This is how the toilet is connected to the sewer riser with an oblique outlet.
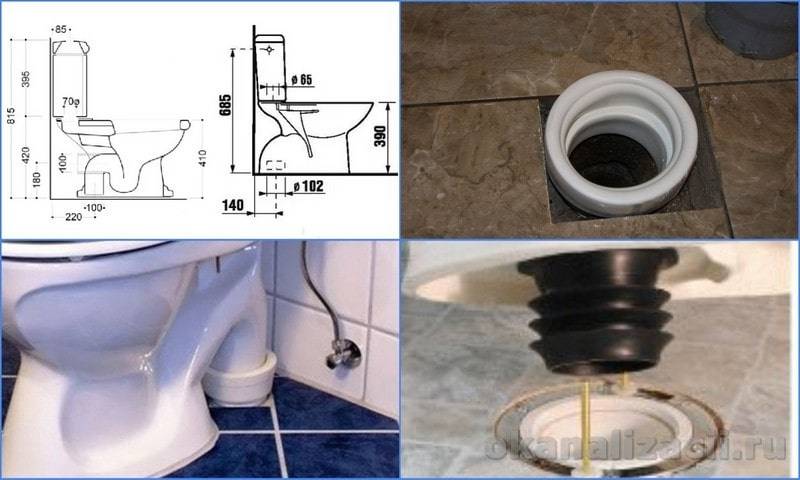
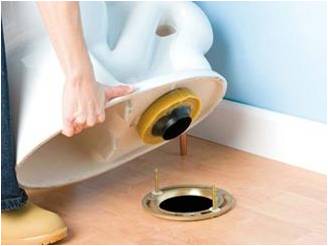
Installation of a toilet bowl with a vertical outlet
As stated earlier, toilet with vertical outlet has a siphon with an outlet pipe that points upwards. The toilet is very easy to install. The installation process looks like this:
- It is necessary to mark the location of the toilet bowl, a screw flange is installed, which is equipped with a lock.
- A sewer pipe is installed in the center of this screw flange.
- Then the toilet is installed on the flange, it must be rotated until it is fully fixed.
It is noteworthy that the pipe will be automatically fixed at the end of the sewer pipe. The toilet can be placed tightly against the wall, which will definitely be an advantage.
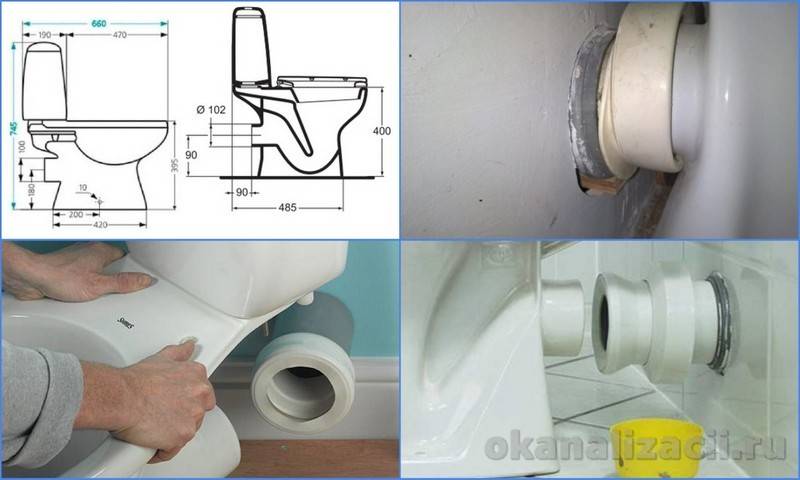
Installation of a toilet with a horizontal outlet
Installation of a toilet bowl with a horizontal outlet is carried out using a sealing cuff. First you need to fix the toilet to the floor with dowels. Then a connection to the sewer is made. The connection must be made very carefully so as not to damage the surface of the toilet bowl.
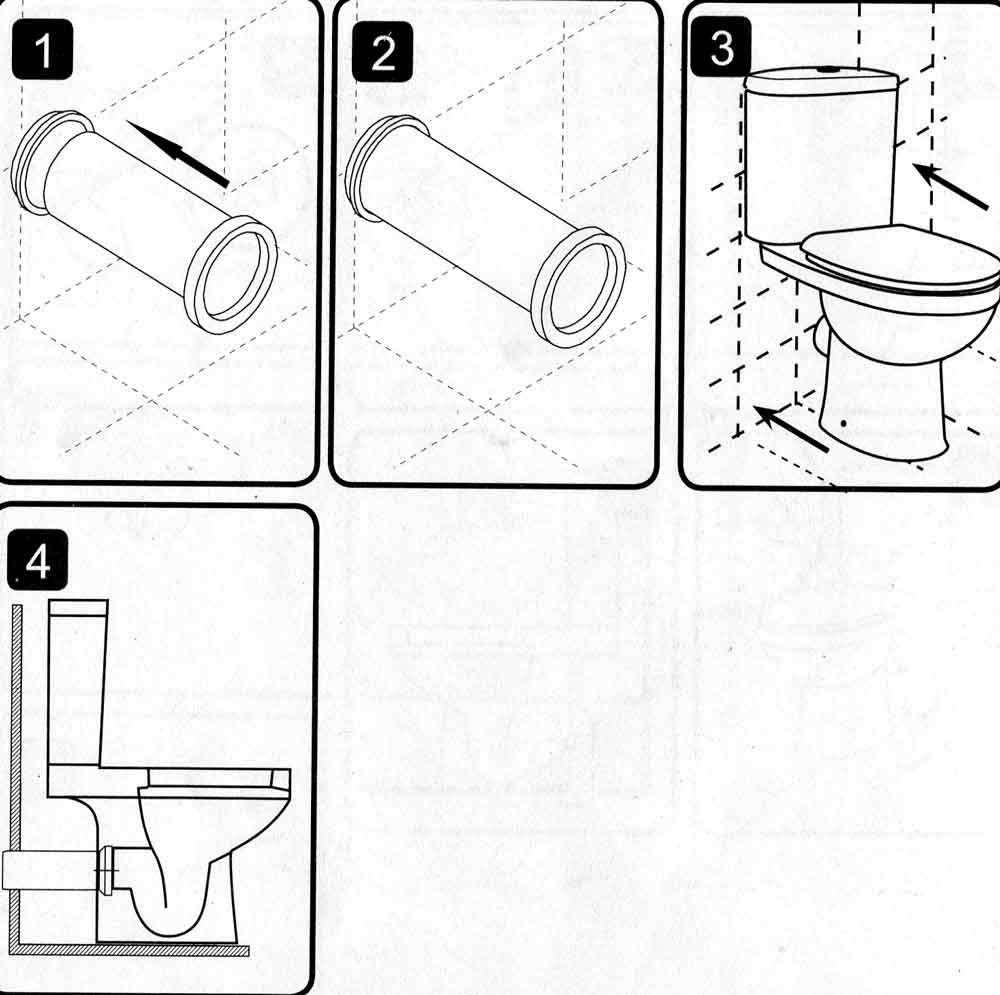
Installation of a toilet bowl to the sewerage system with corrugation
You can also connect the toilet bowl to the sewer with corrugation yourself. In general, this is a standard installation procedure, there is nothing super complicated in it.
The connection is done like this:
- Outside, a small amount of sealant should be applied to the outlet.
- Then it is necessary to put on the outlet that edge of the corrugation on which the inner membrane is located.
- It must be carefully considered so that there are no distortions and the corrugation is put on evenly.
- When the sealant dries, you can install the toilet in place.
- Next, the toilet is connected to the sewer.
There is nothing complicated in the process of installing a toilet bowl to a sewer with a corrugation.
What is horizontal release
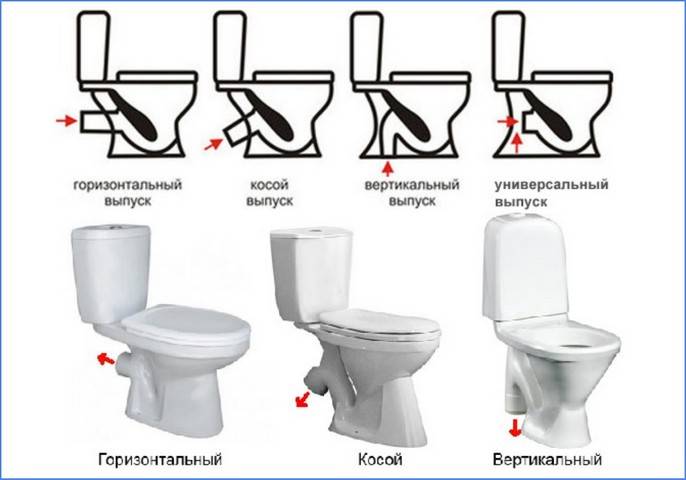
 Types of toilet outlet
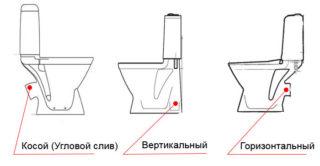
According to the type of drain pipe device, there are three types of toilet bowl designs:
- with vertical outlet;
- with oblique release;
- with horizontal outlet.
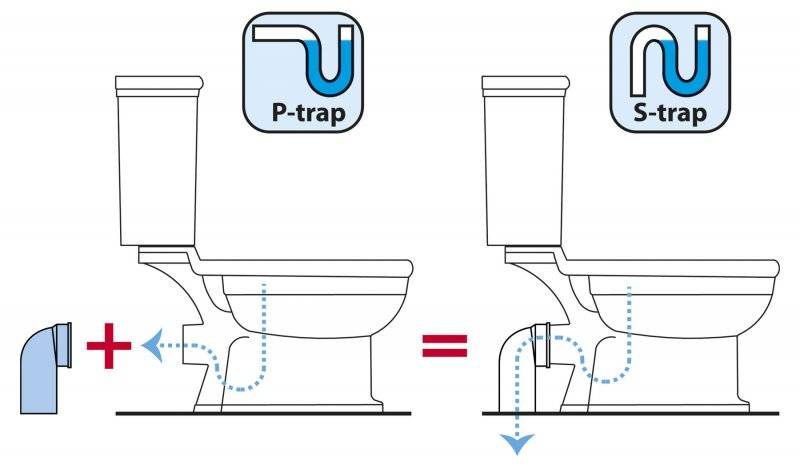
The first option involves a vertical drain into the sewer system - this is the so-called direct outlet. Often found in Soviet-era homes, the slant drain allows the outlet to be hermetically connected to a sewer located along the wall.
The design has both advantages and disadvantages. The advantages include:
- saving space in the toilet due to the possibility of mounting close to the wall;
- combination of functionality and aesthetics;
- low price;
- connection with a vertically located sewer pipe by means of adapters;
- transformation of a horizontal drain into an oblique one if the heights do not match.
Cons of toilets with a horizontal outlet:
- a complex installation process, which is best entrusted to the master;
- the likelihood of blockages due to a knee located at a right angle at the junction with a sewer drain;
- the need for careful sealing of the joints.
The peculiarity of toilets with a horizontal drain is in the parallel semi-position of the bowl outlet pipe. Fastening to the sewer pipe takes place closely, and the levels of one and the other holes must be at the same height.
Right choice
Having decided on the form of release, you need to consider a few more important points:
Toilet bowl material
Traditionally, ceramic appliances are installed in houses and apartments. However, you should be aware that ceramics are different. The most popular are two varieties:
- Faience: attracts with an affordable cost, but it has a porous structure. When the glaze coating is abraded, the material begins to absorb water (the product becomes less durable), dirt and unpleasant odors.
- Porcelain: this material is somewhat more expensive than faience, but it is not characterized by porosity.
Note that the difference in price is not significant, so it is better to stop the choice on the porcelain model.
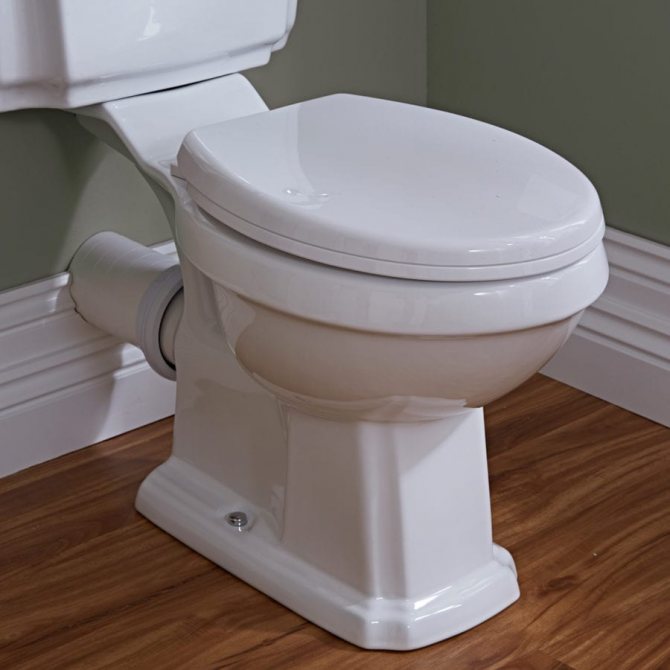
Porcelain floor standing toilet
If you are interested in a very budget option - pay attention to acrylic toilets. Just be prepared for the fact that they lose their attractive appearance quickly and are short-lived. Those who want to bring some zest to the interior will surely like a toilet made of copper
And if you need a device in an anti-vandal design (usually installed in public toilets), then a stainless steel toilet will be the best
Those who want to bring some zest to the interior will surely like a copper toilet bowl. And if you need a device in an anti-vandal design (usually installed in public toilets), then a stainless steel toilet will be the best.
bowl shape
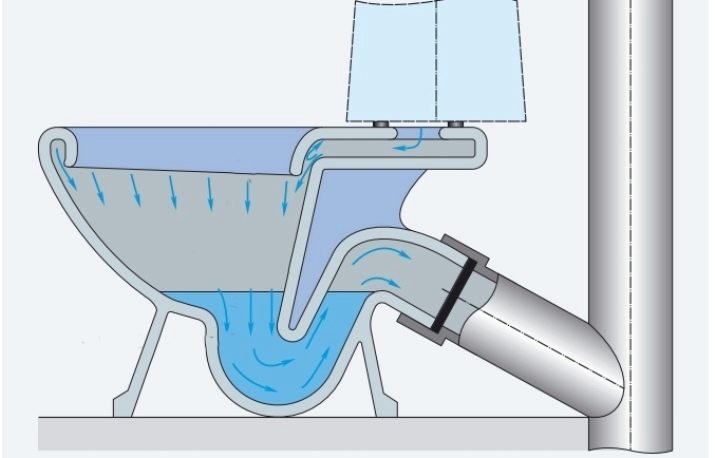
For a long time, toilet bowls with a sloping back wall and a drain hole made forward were the most common. But this form has a drawback: after each session, the bowl has to be cleaned with a brush.
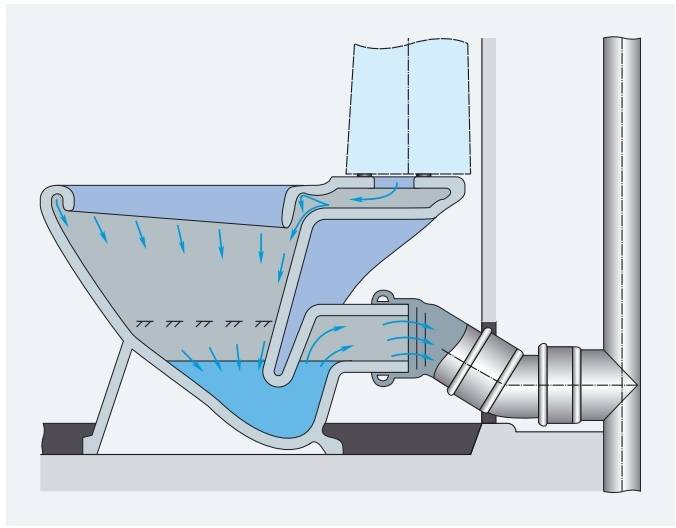
Today, a new type of toilet is in vogue - funnel-shaped, in which the drain is located almost in the center. Feces fall directly into the water, so the bowl does not get dirty. But at the same time, they can splash the user with splashes, which, of course, no one likes. This problem is less noticeable for owners of toilets with an anti-splash system.
First of all, such toilet bowls are higher than their ordinary counterparts, that is, the distance from the rim to the mirror of water in the siphon is increased. In addition, they have a special shoulder around the drain hole, which is designed to extinguish the "bulks".
Scheme of a funnel-shaped toilet with a horizontal outlet
Toilet bowls are produced, in which instead of a sloping wall there is a platform. Most users consider this form to be outdated and impractical, mainly because at the time of draining the water, the device can spray its owner. But if you take a closer look at such toilets, you can find a significant advantage: the waste falls into a small puddle of water (the platform has a concave shape).


Therefore, porcelain remains clean; at the same time, no bursts or “gurgles” annoy the user.
Design
For most users, the design of the toilet bowl is familiar, in which the bowl and tank are made in the form of two autonomous elements. This design has its advantages: if chips or cracks appear, only the damaged part will need to be replaced.
Toilet bowl and cistern in stand-alone version
But there is also a drawback: due to wear of the seals or fasteners, water may leak from under the tank. If you do not want to deal with such troubles, purchase monoblocks in which the tank and bowl are made in the form of a single piece.
Plum variety
There are two options. Classic - direct drain, when the water simply runs along the shortest path from the inlet of the bowl into the siphon.
A circular drain is considered more advanced, in which streams of water first rush into the channels under the rim, and then flow down, washing the entire surface of the bowl.
Types of toilet flush
When choosing a toilet with a circular drain, one should take into account its important feature: if the water contains a large amount of dirt, hardness salts and other impurities, the narrow channels under the rim will quickly become clogged.
Drain mechanism
The usual drain is no longer quoted. Toilets with two buttons have become the most popular: with one, the entire tank is emptied, with the other, only half. If you have a water meter, such a system will help save a lot of money. Economical toilets may have one button, but it has a design feature: when pressed again, the drain valve closes.
Thus, the user has the opportunity to pour as much water into the toilet bowl as he sees fit.
Installing a floor standing toilet
Do-it-yourself toilet installation on the floor can be done using:
- fastening screws. This method is advantageously used when installing plumbing on tiles previously laid in the toilet room;
- epoxy resin;
- taffeta.
Installation on a tile
How to properly install a toilet on a tile? For work you will need:
- marking tools: pencil, chalk or marker;
- drill with a diamond drill for making holes in floor tiles;
- set of wrenches;
- silicone sealant;
- fixing screws, washers and decorative caps (included with the toilet);
- plastic dowels;
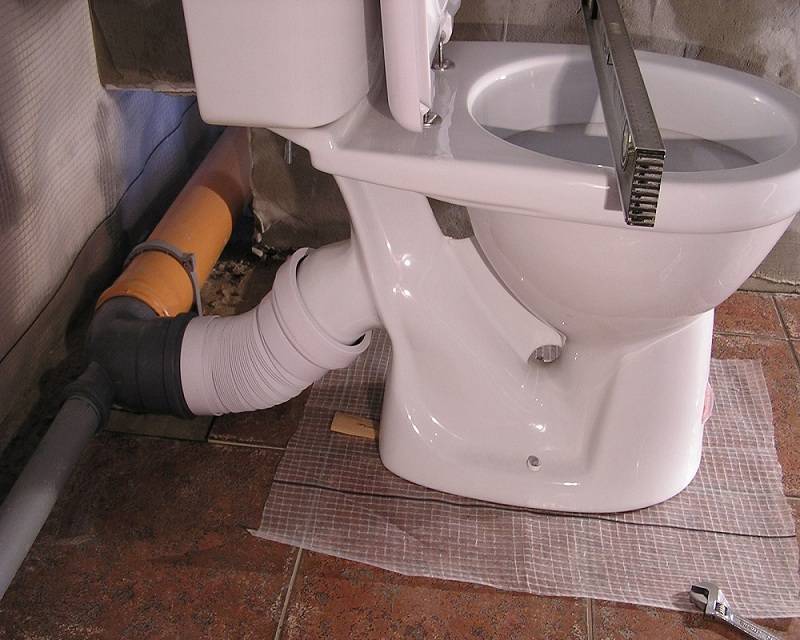
- cuff for connecting a sanitary ware to the sewer network;
- water supply.
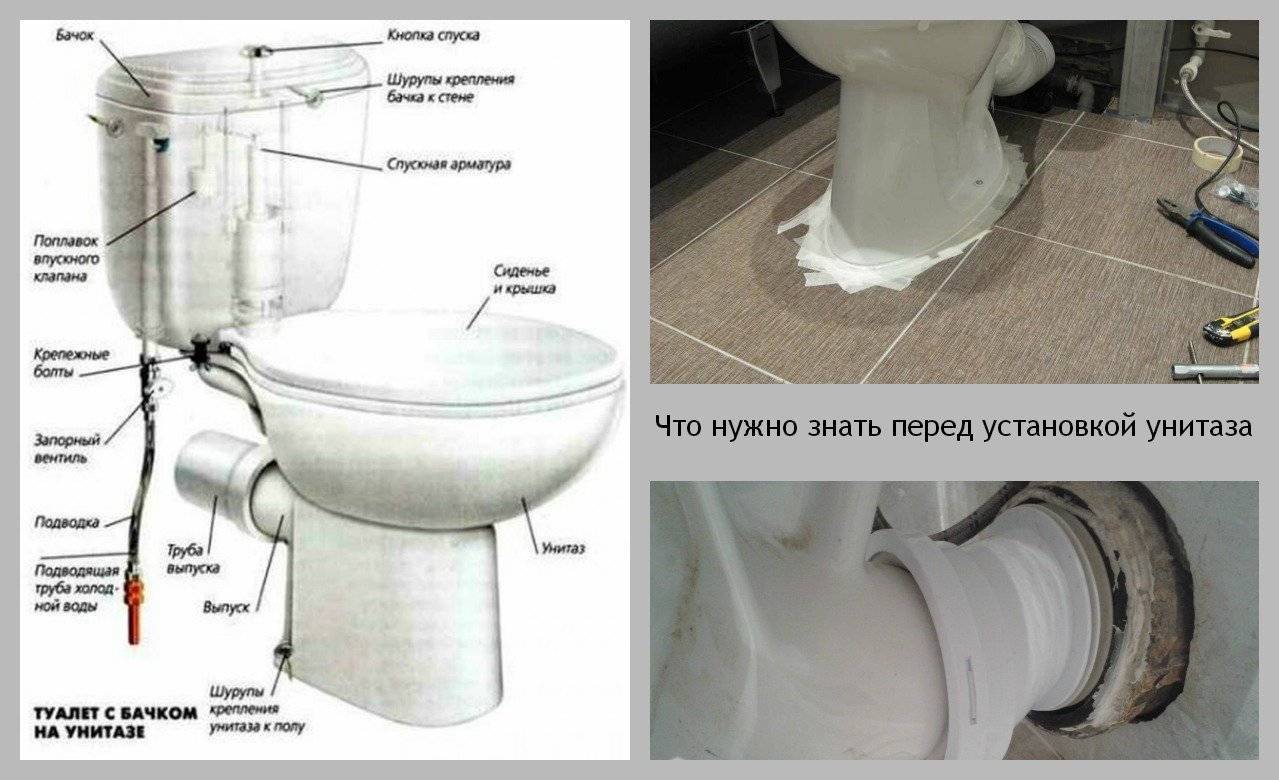
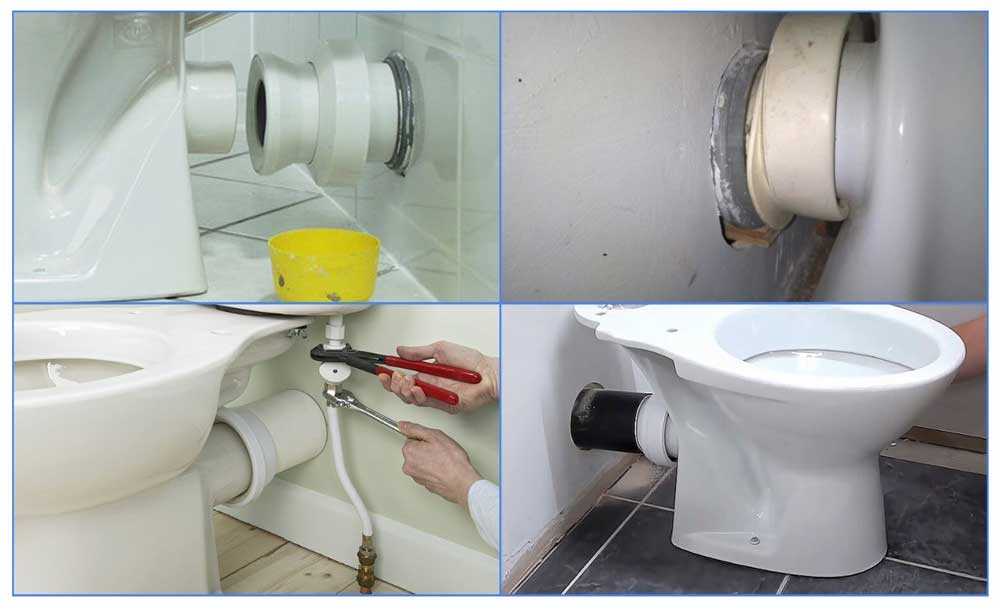
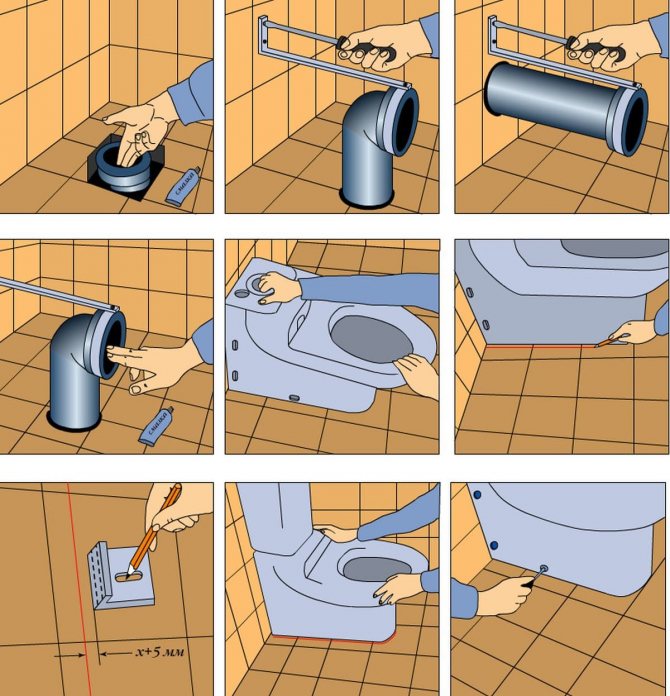
Toilet installation instructions:
- if plumbing is being replaced, then at the first stage it is necessary to clean the sewer inlet and tiles from the remaining particles. When installing the toilet for the first time, this step is skipped;
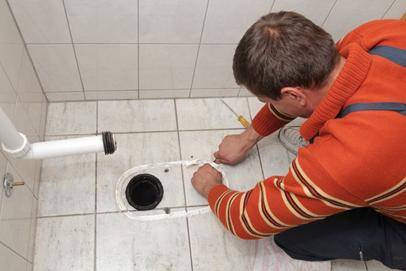
Preparation for the installation of the toilet
- a cistern is attached to the toilet. For this, fixing bolts, a special gasket and sealant are used;
- a cuff is mounted on the outlet of the toilet, selected for connection to the sewer pipe. For the tightness of the connection, the joint is sealed with a rubber ring and treated with a sealant;
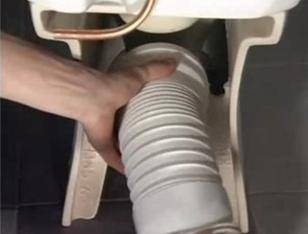
Preparing the toilet for further installation
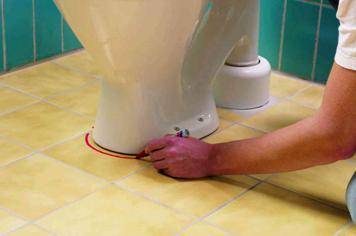
- the toilet is attached to the sewer pipe and the optimal location of the sanitary ware is selected. It is required to adjust the toilet in such a way that there is complete alignment between the sewer inlet and the outlet of the plumbing;
If the plumbing product deviates at least a few degrees, you must either align the toilet bowl or purchase an additional adapter.
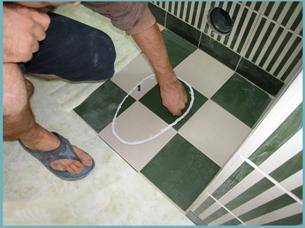
- places for fixing screws are marked on the floor. In this case, it is recommended to circle the contour of the outlet of the toilet in order to fix the chosen location of its location;
Preliminary marking for installation
- drilling holes for fasteners;
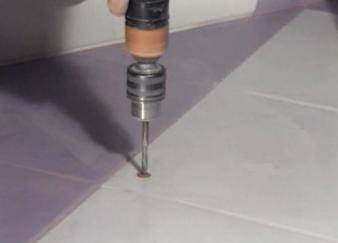
Preparing holes for mounting bolts
Tiles are very fragile, so drilling must be done with extreme care. You can use the impact ability of the drill only after passing through the decorative layer.
- dowels are inserted into the prepared holes;
Preparing to fix the toilet
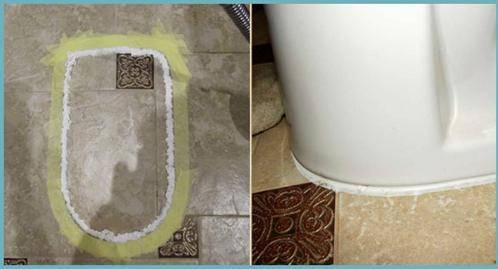
- a rubber gasket is placed under the heel of the toilet bowl, protecting both the toilet bowl and the tiles from damage;
- the toilet is fixed with bolts. Decorative caps are put on the ends of the fasteners;
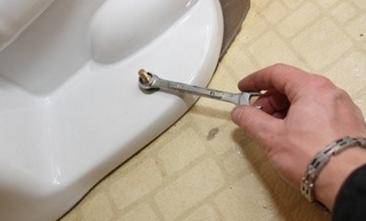
Tightening the fixing bolts with a wrench
- for greater reliability, the space between the floor and the toilet is filled with sealant;
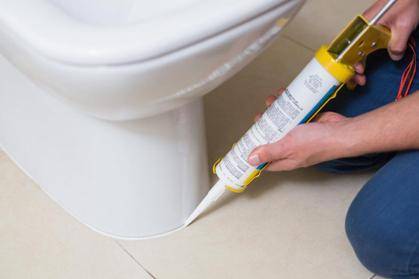
Joint treatment with sealant
- connection to sewerage and water supply.
In the described way, an oblique toilet bowl or a straight toilet bowl with a horizontal or vertical outlet is installed. At the last stage, it is necessary to check all the connections obtained for tightness.


The toilet can be used 2-3 hours after the installation is completed. This time is necessary for the complete curing of the sealant.
The process of installing plumbing equipment is presented in the video.
Epoxy resin mounting
When choosing an installation method using epoxy resin, the installation and installation of the toilet bowl is carried out in almost the same way. The main difference lies in the preparatory process:
- the floor surface needs to be roughened. To do this, notches are applied to the floor or matting is done with sandpaper;
- then you need to remove all debris and treat the floor with a solvent;
- epoxy resin is applied to the installation site of the sanitary ware. The layer size should not be less than 0.5 cm;
- the toilet is installed on the resin and secured with various fixtures.
Installing an epoxy toilet
The toilet can be connected only 10-12 hours after its installation.
Mounting on taffeta
Installing a toilet bowl on taffeta (wooden board) was predominantly used earlier. Currently, this method is practically not used. The main difference is the need for pre-installation of taffeta, which is done as follows:
- at the installation site of the toilet bowl, a wooden board is laid on the floor, the dimensions of which are slightly larger than the heel of the toilet bowl;
- the remaining space of the toilet room is poured with concrete. The concrete level must not exceed the height of the taffeta.
After the concrete screed has completely dried, you can proceed with the installation of the toilet bowl. Plumbing is fastened with ordinary screws to a wooden board.
Mounting a toilet on a wooden lining
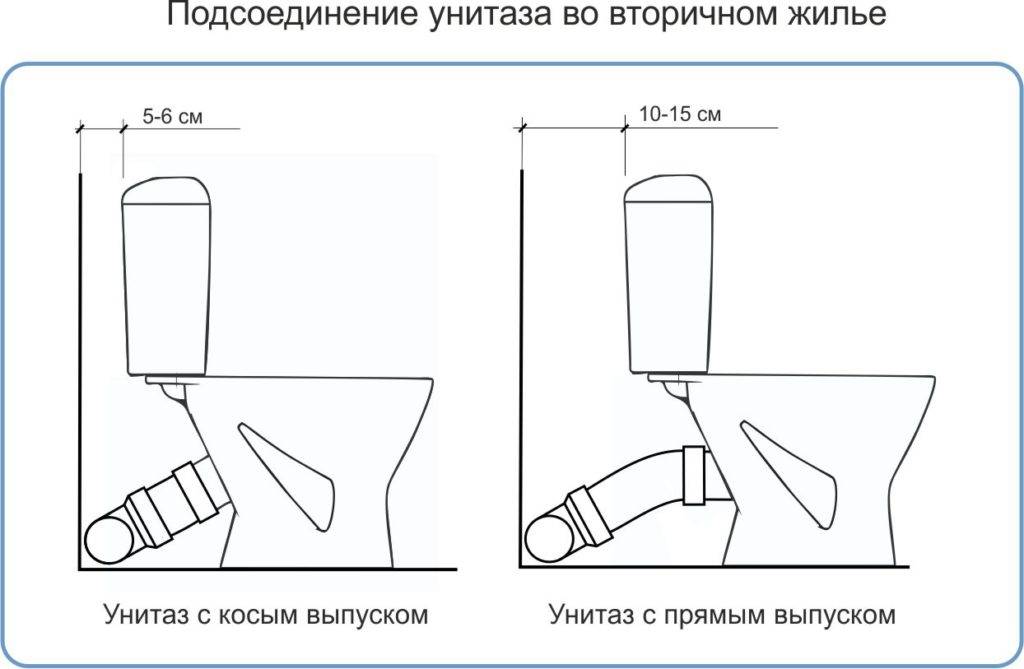
What you need to know about installation work
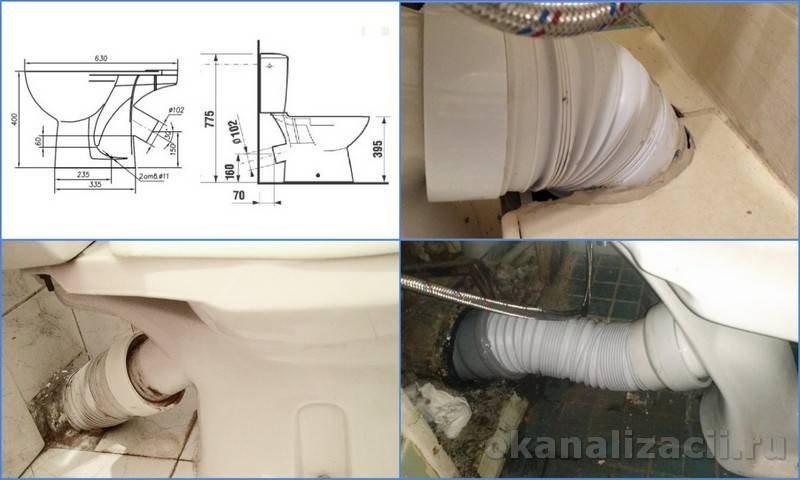
Which toilet outlet is better - straight or oblique - you can decide for yourself if you know if your bathroom is limited in free space. Despite the fact that toilets with a horizontal drain are increasingly being installed in new buildings, devices with a vertical outlet do not lose their relevance. To connect the toilet to the sewer system, prepare:
- fan pipes;
- corrugated pipes;
- cuffs;
- eccentrics.
When using a fan pipe, you can achieve the unity of the device with the connecting material, because both are made of porcelain, faience and ceramics. The only difficulty during installation in this case may be the need to match the installation site. It will not work to fit the trimming method.
The cuff-eccentric is made on the basis of polymers and is a design of a pair of bends, in which the axes are shifted. The cuffs can have different lengths, so it is easy to choose them to connect the device to the sewerage system with other socket and outlet parameters. Installing a direct outlet toilet may require the use of corrugated pipe, which is ductile and can bend as well as stretch. If you use this element, the master will get freedom of movement and facilitate installation work. But in this case, one should not forget about the slope of the sewer pipe. In this case, care should be taken about the rigidity of the material so that the walls are reliable and durable during further operation.
A cast iron sewer pipe can be connected to a plumbing fixture using a rubber cuff. It is located at one end of the pipe. The toilet should be put on the outlet, the cuff is turned out so that it is possible to achieve complete sealing. You can increase the density of the connection by using a sealant.
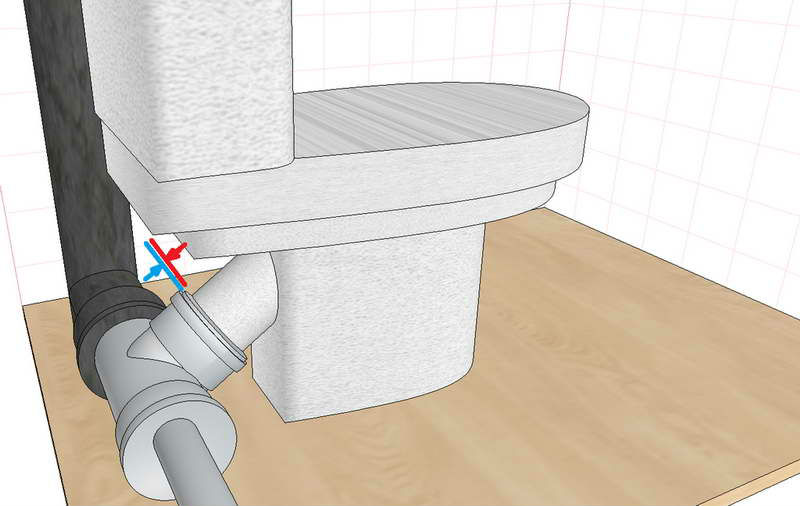
The toilet is as close to the wall as possible.
I want to change the toilet to something more decent. Mostly direct issue. Can you tell me the models that can be installed in my case as close to the wall as possible? I sew the pipes into the box then.


Little depends on the toilet model, they are standard for the most part. Any straight outlet toilet in your case will require more space than a slanted one.
Zerg, and if you use this?
There are no decent toilet bowls with an oblique outlet at all. I wanted an installation - but, on the contrary, it will increase the distance (22 frame + 55 toilet bowl - this is a lot)
sserge, Depart even further. Try a 45 degree tee with another 45 degree angle. And into it through the cuff 110 the transition to the throat of the toilet. If the height fits. With a direct outlet, the neck is deeper.
Although, this transition in my opinion is the same.
Hitgher, try trimming if the corners. Good. I'll try to figure it out.
sserge, This one that you brought to cut only in length. Will it be shorter in depth, if it is not enough in depth, put it on the neck of the toilet bowl? It's a 45 degree angle 110.
So compact - only Soviet with a shelf. The tank will hit the wall. Still releasing. The installation was wrong. 110 (pipe) + 40 (frame) + 20 (GVL) + 10 (tile). Can be shortened. 110->90, remove the tiles from the wall, then another 10-20mm will be released. Instead of 20 GVL, 10 GVL is possible, although they are not recommended. And the pot can be shorter.
So compact - only Soviet with a shelf. The tank will hit the wall. Still releasing.
But no! Twice I was able to install a compact with an oblique release of Gustavsberg Nordic under the same conditions as the TC almost right up.
In this photo, the toilet is missing, but it stood close:

Another thing is that the manufacturer recommends leaving a gap of 50 mm between the wall and the tank.
Yes, and the installation can be moved closer to the wall if you hollow out a window for a pipe like this in the lower part of the wall:
closer to the wall you can even specifically depicted in the photo of the toilet. we take out the cuff, cut off the socket on the toilet, leaving only the ribbed part. then we stick this part into hot water, it becomes softer, and we pull it over the outlet of the toilet bowl. and insert directly into the 110 pipe, turning it a little higher.


When the question arose of replacing the Soviet toilet bowl, not a single model fit into the dimensions, including the Nordic. But the TS installation will still be more compact.
It makes no sense, the size is determined by the sunbed + frame thickness.
It makes no sense, the size is determined by the sunbed + frame thickness.
Tonal, the thickness of the installation frame is by no means 20 mm. The lounger can protrude more than the installation (although if you use a 90 mm pipe, you can keep within 10-12 cm).

You can bypass the frame racks with four or even three bends, hollowing out a recess under them:

When the question arose of replacing the Soviet toilet bowl, not a single model fit into the dimensions, including the Nordic.
Nevertheless, I, a specialist by no means in plumbing, succeeded.


You just need a creative approach, which Zhek plumbers are unlikely to be able to provide.
Vadim M, from the wall to the edge of the pipe - 103 mm. This is plus installation racks 50 - 153, drywall 2 layers, tiles (20 mm + 10 mm) - 183mm + 550 the toilet itself (on average) - we have 74 cm (from the wall). Basically okay. But I have 123 cm to the heated towel rail. And the top of the tee, turned vertically upwards, will be somewhere 22 cm from the floor + a tap put on it - from the floor to the axis of the toilet drain hole it will turn out 27 cm, instead of the prescribed 23. I'm afraid I'll have to raise the frame above and rests on a towel.
Your option with a bypass, as an option, is possible, but I would like to do without such heavy gating and, I think, it will simply clog over time - since the slope of the pipe 50, which goes further to the bathroom, is already minimal (2 cm per meter) .. Yes, and draining the installation is possible only at 90 degrees to the tee.
sserge, for whom did I write, draw, look for models? The sewer pipe on a very short section in the places of the racks of the installation frame is recessed into the wall with the help of bends. Installation thickness -8 cm, plus GVL 10-12 mm, plus tiles 10 mm total (subject to replacement of the lounger by 90 mm) the thickness of both the sewn lined installation and the lounger is 10-11 cm!
The sunbed will need to be sorted out, the tee will be changed to, into it - In no case should the installation be raised!
Your option with a bypass, as an option, is possible, but I would like to do without such heavy gating.
sserge, is chasing a niche 300x90x50 mm "heavy"?
. and, I think, it will simply clog up over time - since the slope of the pipe 50, which goes further to the bathroom, is already minimal (2 cm per meter).
The bias should not suffer. If you use bends at 45 degrees, then nothing will clog.
Types of connecting elements
If it is impossible to directly connect the toilet bowl to the sewer due to the design features, auxiliary materials are used - connecting pipes. In most cases, the following types are used:
- corrugation;
- eccentric cuffs;
- corners and bends made of plastic;
- pipes of various materials, but preferably plastic.
The disadvantages of using corrugations to connect the toilet to the sewer include a large minimum length. If the distance between the nozzles is about 12 cm, it is better to opt for other connecting components.
These data will allow you to choose the most suitable cuff model in the store. The disadvantage of the eccentric part is its small length, which implies the possibility of installation only with a small distance between the nozzles (up to 12 cm).
Elbows and corners are installed in cases where the corrugation cannot be used for any reason. Their advantage compared to corrugations is that they have a smooth wall from the inside, which significantly reduces the risk of blockages.
The main disadvantage is rigidity, which leads to leakage even with a small skew. Plastic products can be cut to fit the required size, unlike cast iron.
In most cases, steel pipes are used when there is a risk of the hydraulic seal mechanism breaking down (find out what a sewer seal is, its principles of operation, what types there are, etc.). If the throughput of the riser is insufficient, liquid from the siphon will be drawn into it.
As a result, the water seal does not work, and the stench from the sewer enters the room.In such a situation, a tubular product with an automatic valve is connected to a riser or pipe connected to the toilet. When draining, a special valve opens and air enters, which prevents the disruption of the water seal.
However, to implement such a function, it is not necessary to use steel pipes. There are also eccentrics and adapters that give the pipeline similar properties. To ensure the reliability of the connection, it is recommended to use a sealant when using any type of connecting elements.


For these purposes, it is advisable to purchase a special waterproof product designed for plumbing fixtures. By loosening the rubber sealing collar, the sealant will prevent leakage.
Corrugated connection
Brief algorithm of actions:
- Lubricate the joint with silicone and insert the corrugation with a sealant into the opening of the pipeline. It is advisable not to move it until the silicone-based product has completely dried.
- Put the toilet, check its stability. If the product wobbles, level the floor or install special stands.
- Insert the corrugation into the toilet pipe, nothing is required to lubricate the connection.
- Pour a few liters of liquid, wait 1 minute, then check for leaks. If the connection is leaking, you need to disconnect the corrugation, check the correct position of the seals and carefully reinstall it.
- If there are no leaks, you can mark the attachment points of the plumbing fixture with a pencil or marker.
- Fix the product so that it does not swing.
- Connect to sewer.
- After 2 hours, test by making several drains.Wait 5 minutes, if the pipe does not leak, you can proceed with the installation of the tank and other elements.
- Lubricate the joint with sealant from the outside to prevent leaks in the future.
If a small leak (a few drops) was detected during the last test, it is necessary to completely remove all liquid and remove the corrugation. Then again apply silicone to the elastic of the product and install it on the toilet pipe.
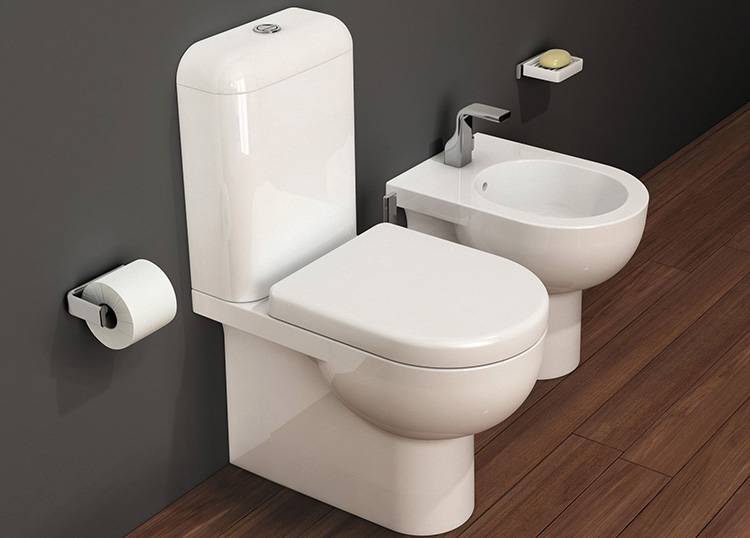
Connecting the toilet to the sewer with a release to the floor
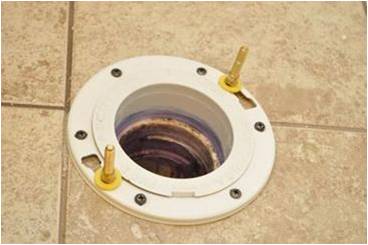
The position of the structure is fixed to the floor with a special flange for connection.
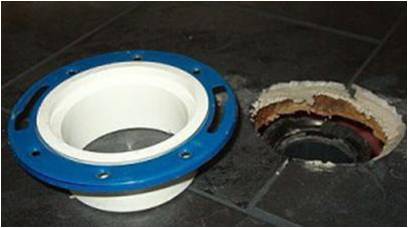
Silicone sealant is used to seal joints.
The connection is carried out carefully and slowly in strict sequence:
- The place of the model is chosen at the discretion of the owners, but achieving the coincidence of the sewer hole and the outlet of the toilet bowl.
- A felt-tip pen on the floor marks the place of fixing the fasteners of the legs of the structure. This will prevent it from shifting during installation work.
- Bolts are inserted into the holes of the flange, which will fix the position of the model.
- A flange is installed in the sewer outlet. Previously, the place of its docking with the pipe is smeared with sealant to enhance fixation.
The next step is very important. With special care, the input of the model is combined with the connector of the flange mounted in the floor. To enhance the seal, a rubber gasket or silicone sealant is used.
- The position of the release of the structure is fixed on the flange with special fasteners.
- The position of plumbing on the floor surface is fixed. For this, its leg is strengthened with bolts.
- By lowering the water into the bowl, it is checked that there are no leaks at the junctions.
Connecting work can be done independently by everyone.